
Insert a watermark

-
On the Design tab, select Watermark.
-
Choose a pre-configured watermark, like DRAFT, CONFIDENTIAL, or DO NOT COPY.
-
For placing a logo or image, Select Watermark > Custom Watermark > Picture watermark > Select Picture. On the same menu you can create a custom text watermark.
Want more?
Insert a picture watermark
Use a custom text watermark
See all our content about watermarks
On the Design tab, select Watermark.

-
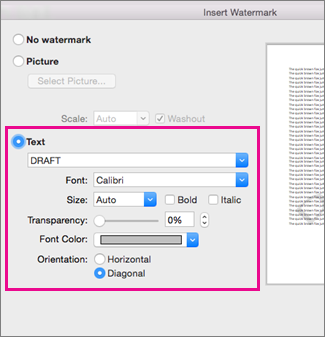
In the Insert Watermark dialog, select Text and either type your own watermark text or select one, like DRAFT, from the list. Then, customize the watermark by setting the font, layout, size, colors, and orientation.

If you don’t see the watermark, click View > Print Layout. This also shows how the printed watermark will look.
-
Select OK.
Important:
Office 2010 is no longer supported. Upgrade to Microsoft 365 to work anywhere from any device and continue to receive support.
Upgrade now
-
On the Page Layout tab, select Watermark.
-
Choose a pre-configured watermark, like DRAFT or CONFIDENTIAL.
Important:
Office for Mac 2011 is no longer supported. Upgrade to Microsoft 365 to work anywhere from any device and continue to receive support.
Upgrade now
-
On the Layout tab, under Page Background, select Watermark.
-
Choose Text.
-
Type or edit your text for the watermark, or select a text watermark from the drop down menu, and then select the text formatting that you want.
Tips:
-
If the text watermark makes it difficult to read the text on the page, increase the transparency of the watermark text, or select a lighter color for the watermark text.
-
You can use the Size drop down menu to change the size of the watermark text.
-

In Word for the web, you can see watermarks that are already in a document, but you can’t change them or insert new ones.
If you have the Word desktop application, use the Open in Word command to open the document and insert or change a watermark there. When you’re done and you save the document, it will continue to be stored where you opened it in Word for the web. When you reopen it, you’ll see the watermarks in the doc.
Need more help?
Want more options?
Explore subscription benefits, browse training courses, learn how to secure your device, and more.
Communities help you ask and answer questions, give feedback, and hear from experts with rich knowledge.
-
On the Design tab, select Watermark.
-
Select Custom Watermark, and then choose Picture Watermark.
-
Click Select Picture.
-
Find a picture of your own, or search Bing images.
-
Choose the picture you want, and select Insert.
-
On the Design tab, select Watermark.
-
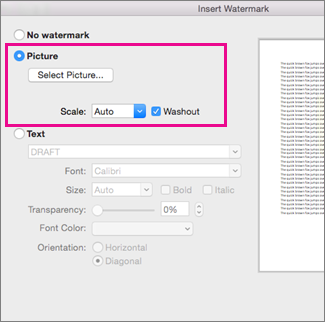
In the Insert Watermark box, select Picture > Select Picture, and then browse to the picture you want to use.
-
Next to Scale, make sure Auto is selected and Washout is checked, and then choose OK.
.
 .
.-
On the Page Layout tab, select Watermark.
-
Select Custom Watermark, and then choose Picture Watermark.
-
Click Select Picture.
-
Find a picture of your own, or search Bing images.
-
Choose the picture you want, and select Insert.
-
On the Layout tab, under Page Background, select Watermark.
-
Select Picture.
-
Choose Select Picture, and then locate the picture that you want to use as a watermark.
-
Choose Insert,
Notes:
-
If the picture watermark makes it difficult to read the text, select Washout to lighten the picture.
-
You can use the Scale pop-up menu to change the size of the picture watermark.
-

Today, we’re going to insert and modify image watermarks in Microsoft Word.
This is the second in a three-part series about watermarks in Microsoft Word. In the first part, we inserted and modified text watermarks. In the third part, we will insert text and image watermarks on specific pages in Word.
Image watermarks can be anything from logos to background pictures or graphics used for security, branding, or design.
Quick Links:
- How to Insert Image Watermarks
- How to Modify Image Watermarks
This tutorial is available as a YouTube video showing all the steps in real time.
Watch more than 150 other writing-related software tutorials on my YouTube channel.
The images below are from Word for Microsoft 365. These steps will also work in Word 2021, Word 2019, Word 2016, and Word 2013. However, your interface may look slightly different in those older versions of the software.
These steps show how to insert image watermarks on every page of your document.
- Select the Design tab in the ribbon.

- Select Watermark in the Page Background group.

- Select Custom Watermark from the drop-down menu.

- Select the Picture watermark button in the Printed Watermark dialog box.

- Select the Select Picture button.

- Select From a file in the Insert Picture dialog box to locate an image stored on your computer.
Alternatively, you can choose Bing Image Search to search for an image online or OneDrive to locate an image stored in the cloud.

The Insert Picture dialog box will close automatically after you make your selection.
- Find and select your image in the second Insert Picture dialog box, and then select the Insert button.

- (Optional) Select a scale (sizing) option.

- (Optional) Select Washout to lower your image’s color intensity. (The brightness and contrast can be customized, as shown in step 7 in the modification section below.)

- Select the OK button to close the Printed Watermark dialog box.

Your image watermark should appear in your document.
How to Modify Image Watermarks in Microsoft Word
These steps show how to modify the size, position, and color options for an existing image watermark.
Important Note: Each time you add a watermark, it replaces the existing watermark. So, if you want to replace your watermark, repeat all the steps in the section above.
- Double-click the top of any page to open the Header & Footer tab. (In Word, watermarks are part of the header even though they typically appear in the middle of the page.)

- Hover your cursor over the watermark until your cursor becomes two crossed arrows. Then, double-click to select the watermark.
![]()
Small, gray adjustment handles (squares and circles) will appear when the watermark is selected.

Important Note: The selection process can be a bit temperamental, so you may have to try more than once to reveal the adjustment handles.
Resizing and Repositioning
- Select, hold, and drag the adjustment handles to change the size of your watermark. (The top, center handle tilts the watermark to the left and right.)
- To reposition your watermark, hover your cursor over the watermark until the cursor becomes two crossed arrows (see figure 12). Then, click, hold, and drag your watermark to a new position.
Color Options
- Right-click the watermark with the crossed-arrow cursor, and then select Format AutoShape/Picture from the shortcut menu.

- (Optional) Select an option from the Color menu in the Format Picture dialog box:
-
- Automatic (This option is usually a washout.)
- Washout (This option reduces color intensity.)
- Grayscale
- Black & White

- (Optional) Adjust the Brightness and Contrast, as necessary.

Pro Tips:
- Select the Reset button to return the watermark to the default settings.
- Select the Compress button to reduce the image’s resolution or delete cropped areas in order to minimize the file size for printing or web display.
- Select the OK button to close the Format Picture dialog box.

Additional Picture Format Options
- (Optional) Explore the Picture Format tab for additional options such as Shadow Effects. (Note that this tab only appears when an image watermark or other image is selected.)

Finalize Your Modifications
- Select the Header & Footer tab (see figure 11).
- Select the Close Header and Footer button.

Your watermark modifications should take effect immediately.
If you need to delete your watermark, see “How to Delete Watermarks in Microsoft Word” in the first tutorial in this series.
Related Resources
How to Create Newspaper-Style Columns in Microsoft Word
How to Insert Headers and Footers in Microsoft Word
How to Insert Placeholder Text in Microsoft Word
Updated March 06, 2022
Insert a picture watermark
- On the Design tab, select Watermark.
- Select Custom Watermark, and then choose Picture Watermark.
- Click Select Picture.
- Find a picture of your own, or search Bing images.
- Choose the picture you want, and select Insert.
Contents
- 1 How do you make a picture watermark transparent in Word?
- 2 How do you watermark a picture?
- 3 How do I put a watermark on every page in Word?
- 4 Why is watermark not visible?
- 5 How do I put a watermark in front of text in Word?
- 6 How do I add a watermark to a photo in Microsoft?
- 7 How do I apply a picture watermark to only one page in Word?
- 8 How do I insert a watermark in Word 2019?
- 9 How do I insert watermark in Word 2013?
- 10 How do I unhide a watermark in Word?
- 11 How do you create a hidden watermark word that shows when a document is copied?
- 12 Which one can be used as watermark in a Word document text image both A and B None?
- 13 How do I insert a watermark in Word 2016?
- 14 How do I watermark my photos in Windows 10?
- 15 How do I insert watermark in Word 2010?
- 16 How do you put a watermark on multiple pictures in Word?
- 17 How do you put a watermark on only one page?
- 18 Why can’t I insert a watermark in Word?
- 19 How do you watermark a picture in Word 2013?
- 20 How do I insert watermark in Word 2007?
How do you make a picture watermark transparent in Word?
Double-click near the top of the page to open the header. Double-click the watermark to open Format Picture, and then select the Picture tab. Try selecting Picture Transparency or Picture Corrections.
Tap on Photos to choose the image you want to add the watermark to. If you don’t immediately see the picture you need, just tap on the Browse Folders option to see all your files. To add a particular text as a watermark, tap on the “T” at the top right.
How do I put a watermark on every page in Word?
Put a watermark on all pages
- Go to Design > Watermark > Custom Watermark.
- Choose Picture Watermark and select a picture, or choose Text watermark and type your watermark text in the Text box.
- Select OK.
Why is watermark not visible?
However, sometimes a watermark may not be displayed. The most common reason for this is that by default watermarks are displayed in the background, behind the document’s content.The solution is to change the z-order of the watermark to a positive value to make sure it is displayed in front of the content.
How do I put a watermark in front of text in Word?
You’ll need to open the header to select the watermark.
- Double-click near the top of the page to open the header.
- Click the watermark to select it. (Try moving the cursor over the watermark until the cursor displays a four-headed arrow.)
- Drag the watermark where you want it on the page.
How do I add a watermark to a photo in Microsoft?
Open Windows Live Writer.
- Click on picture and select a picture from your computer that you want to watermark.
- Select the picture and then go to “watermark”; highlighted in yellow in the screenshot below.
- Enter text that you want to use as the watermark for your photo.
- That’s it – you’re finished in less than 5 steps!
How do I apply a picture watermark to only one page in Word?
Insert a watermark on just one page
- Select where you want the watermark to be on the page.
- Select Design > Watermark > right-click the watermark you want, and select Insert at Current Document Position. The watermark appears as a text box.
How do I insert a watermark in Word 2019?
Inserting Watermark in Word (Office 365 and Word 2019)
- Open Word.
- Click on the ‘Design’ tab.
- Click on ‘Watermark’ at the far-right. Depending on the version of the word, you will see a few templates that you can choose from.
- Click on one.
- The watermark should appear on the page.
How do I insert watermark in Word 2013?
How to Add a Watermark to Documents in Word 2013
- Click the Design tab.
- In the Page Background group, click the Watermark button. A menu plops down with a host of predefined watermarks that you can safely duck behind the text on your document’s pages.
- Choose a watermark from the long, long list.
How do I unhide a watermark in Word?
To remove a watermark,
- Open your Word document.
- Click the Design tab.
- In the Page Background group, double-click the Watermark button.
- Underneath the examples, click the entry Remove Watermark.
How do you create a hidden watermark word that shows when a document is copied?
On the Design tab — Page Layout in Word 2007 and 2010 — click on the “Watermark” button in the Page Background section to choose your watermark. There are pre-set watermarks that will be visible when the document is viewed or printed, however you can choose the Custom Watermark option to design an unobtrusive one.
Which one can be used as watermark in a Word document text image both A and B None?
While viewing a document in Print Layout, from the Page Layout tab, choose Watermark (found in the “Page Background” section) and then Custom Watermark. This opens a window where you can choose a picture or text and format it as you wish for use as a watermark.
How do I insert a watermark in Word 2016?
How to Add a Watermark in Word 2016
- Click the Design tab.
- In the Page Background group, click the Watermark button. A menu plops down with a host of predefined watermarks that you can safely duck behind the text on your document’s pages.
- Choose a watermark from the menu.
How do I watermark my photos in Windows 10?
Just follow the steps below:
- Launch Microsoft Paint.
- Open a Digital Picture.
- Start Watermarking.
- Click the Place Where to Watermark.
- Choose Your Watermark Style.
- Type Your Watermark Text.
- Add Watermark Settings.
- Add a Text Annotation Watermark.
How do I insert watermark in Word 2010?
How to create watermarks in Microsoft Word 2010
- Click on the Page Layout tab.
- In the ribbon, click on Watermark. A vertical scroll list of six watermarks will appear (Confidential, Do Not Copy, Draft, Sample, ASAP and Urgent)
- Select the watermark that you wish to use.
How do you put a watermark on multiple pictures in Word?
The basics
- Click the Design tab. In Word 2007, click the Page Layout tab.
- Click Watermark in the Page Background group (Figure B).
- Choose one of the watermark thumbnails from the gallery and click OK. The watermark appears on every page in your document (unless you specify differently using sections).
How do you put a watermark on only one page?
For example I have a Word document with 7 pages, and want to apply watermark to the second page only. Here, I will describe the detailed steps to add watermark to the specified one page only. 1.
Why can’t I insert a watermark in Word?
Open an existing Word document and make sure the view is set to “Print Layout” or “Full-Screen Reading.” You won’t be able to set a watermark if the view is set to “Web Layout” or “Outline View.” 2. Click the “Page Layout” tab, then navigate to the “Page Background Group” section and click the “Watermark” button.
How do you watermark a picture in Word 2013?
Insert a picture watermark
- On the Design tab, select Watermark.
- Select Custom Watermark, and then choose Picture Watermark.
- Click Select Picture.
- Find a picture of your own, or search Bing images.
- Choose the picture you want, and select Insert.
How do I insert watermark in Word 2007?
Workaround
- Open the Word 2007 document to which you want to add a watermark.
- On the Page Layout tab, click Watermark, and then click Printed Watermark.
- In the Printed Watermark dialog box, click either Picture watermark or Text watermark.
- Select the picture or the text that you want to use, and then click OK.
Making a picture Watermarking in Word is the easiest process. Inserting one is the same as inserting a text watermark, with a slight difference.
In other words, in Microsoft Word, A picture watermark is a type of visual feature that is added to a document to signify ownership or to prevent unlawful use or distribution.
It is a faint image or text that appears in the background of the document and is typically repeated throughout the page.
Picture watermarks can be logos, autographs, or any other image or text that represents the creator of the document.
Table of Contents
Go to the “Design” tab (2016 and later versions of MS Office) or the “Page Layout” tab (2013 and earlier versions of MS Office), then click on “Watermark” in the “Page Background” group.
After clicking on the Watermark to expand its options, click the “Custom Watermark” to open a pop-up window

Click here to learn 2 Ways to Remove Watermark in Word (Including DRAFT)In the printed watermark pop-up dialogue box, select the “Picture Watermark“, and then click the “Select Picture“

After clicking on the select picture, another pop-up window will open, In the insert pictures pop-up window, select one of the options to insert a picture

If you have selected “From a file“, a computer search dialogue box will open. In this, select location of the picture, then select the picture you want, and then click “Insert“.

After clicking “Insert” an existing dialogue box closes and the previous dialogue box will appear.
You can scale and/or wash out the image if you want to do so.
Lastly, click “Apply” or “OK“.

Now your watermark will be inserted as in the screenshot below.

Resizing and Rotating an Image Watermark:
Resizing:
Double-click on the header area of any page
Then select an image watermark of any page.
Now click any outer dot of the watermark and hold down the left mouse button, then drag it up or down to resize it.

Rotating:
Double-click on the header area on any page
Then select an image Watermark of any page.
Now click the outer rounded green dot (rotate icon) of the picture Watermark and hold down the left mouse button, then rotate the mouse pointer around an image to rotate it.

Formatting Picture Watermark:
To Format the Watermark, do the following:
Double-click on the header area on any page
Then select the watermark to open the “Picture tools format” tab
Now click the “Picture tools format” tab, then choose any format you like to format the watermark.

How can the Picture Watermark be adjusted?
Picture watermarks in Word can be adjusted by adjusting the size, position, transparency, and orientation of the image or text.
What is the benefit of using a Picture the Watermark?
It is often used to safeguard intellectual property and to provide a professional touch to documents in legal, business, and artistic situations.
What is a Picture Watermark?
A picture watermark is a transparent image used to protect or claim something described in a document.