
Excel import function — component encapsulation
The target
Migrate excel import functionality provided in vue-element-admin to the current project
Train of thought
- The installation package
- Copy component
Install the necessary plug-ins
This plug-in is called XLSX
npm install xlsx -S
Copy the code
Import the UploadExcel component and register as global
- Copy the vue-element-admin supplied components into our own project **
src/components/UploadExcelUnder the * * - Register it as a global component in index.js
Import PageTools from './PageTools' import UploadExcel from './UploadExcel' export default {import PageTools from './UploadExcel' export default { Vue.component('PageTools', PageTools) vue.component ('UploadExcel', UploadExcel) // Import excel component}Copy the codeStaff management — Excel import function — Preparation page
The target
Based on business requirements, configure a separate route, and then implement employee import in this separate page
Train of thought
- Configure the routing
- Create the corresponding page, and then import UploadExcel component in this page to implement the import function
Establish a common imported page route
To create a new public import page, that is, the import routing component SRC/views/import/index. Vue
Use the Previously encapsulated Excel upload component in the page, supplemented with the successful import callback function
template
upload-excel :on-success="handleSuccess" /
/template
script
export default {
name: 'Import',
methods: {
handleSuccess({ header, results }) {
console.log(header, results)
}
}
}
/script
Copy the codeConfigure the routing
This route can be defined as a static route without permission control. Add a route to the static route under ** SRC /router/index.js**
{path: '/import', Component: Layout, hidden: true, // Children: [{path: '', Component: () = import('@/views/import') }] }Copy the codeTest the import effect
Click Upload to analyze the results of handleSuccess
HandleSuccess ({header, results}) {// Header title // [' name ',' phone '] // results '13712345678'}, {.....} ] console.log(header, results) }Copy the codeExcel import plug-in essence: Excel after analysis into regular data that JS can recognize, we can get the data for any operation
Staff management — Implementation of Excel import — data processing
The target
Data format conversion: Data parsed by Excel is processed and converted into data that can be passed to the interface

Train of thought
The key point of invoking the interface to upload Excel is data processing. We need to process the data processed by the plug-in in excel table into the format required by the back-end interface according to the requirements of the interface
The following is an example format for back-end interface requirements

Process data imported by Excel according to interface requirements
Processing contents include:
- Field From Chinese to English. So what I read in Excel is
The nameWhat the back end needs isusername - Date processing. The time read in from Excel is a number value, and the back end needs the standard date.
To facilitate maintenance of the code, a separate method is encapsulated to implement the transformation’s functionality.
/ * * * results the content of the excel spreadsheet / / [{' name ':' zhang ', 'phone number', '13712345678'}, {...}] / / target / / [{' username ':' zhang ', 'mobile' : '13712345678'}, {.....}] */ / change the attribute name of each object in an array from Chinese to English TransExcel (results) {const mapInfo = {' start date ': 'timeOfEntry', 'mobile number ': 'mobile', 'name' : 'username',' date ': 'correctionTime', 'workNumber' : 'department ': 'departmentName', 'Employment Form ': } return results.map(zhObj = {const enObj = {} const zhKeys = object.keys (zhObj) // [' name ', ForEach (zhKey = {const enKey = mapInfo[zhKey] enObj[enKey] = zhObj[zhKey]}) return enObj})}Copy the codeImplement Excel import — encapsulate interface and call
The target
After the button jump is complete and the import is complete (interface call), jump back to the original page
Analysis of the
On the page, click import, jump to upload page;
Get the interfaces ready,
Interface API
src/api/employee
/** * @description: Excel * @param {*} data * @return {*} */ export function importEmployee(data) {return request({url: '/sys/user/batch', method: 'post', data }) }Copy the codeUse in pages
Import {importEmployee} from ‘@/ API /employees’
Encapsulation doImport
async doImport(data) { try { const res = await importEmployee(data) console.log('importEmployee', This.$router.back()} catch (err) {console.log('importEmployee', 'importEmployee') Err) this.$message.error(' import failed ')}}, // 1. HandleSuccess ({header, results}) {console.log(header, results) // 2. Const data = this.transexcel (results) console.log(' transExcel ', data) // 3. Call interface to upload this.doimport (data)},Copy the codeExcel export function
background
We have queried the data we need in the element-table. We hope to use them to generate Excel files and save them locally.
Train of thought
Front-end dominance (lots of work on the front end)

- Fetch the data, save the Excel file
Back-end dominance (lots of work on the back-end)

- Front-end call interface
Analyze the export scheme in vue-element-admin
The target
Go to Vue-admin to learn how to use the export function, and summarize the steps to use it in this project
Pre-work: This feature is already available in vue-element-admin at the beginning of the course, and we have also provided a ready-made plugin package in project resources. Please copy it into your project’s SRC directory
Learn to use off-the-shelf Excel export components
Locate the source through the routing path
 Familiarize yourself with case codes
Examples online address: gitee.com/panjiachen/…
onclick: function (){
  import('@/vendor/Export2Excel').then(excel = {
    const tHeader = ['Id', 'Title', 'Author', 'Readings', 'Date']
    const filterVal = ['id', 'title', 'author', 'pageviews', 'display_time']
    const list = this.list
    const data = this.formatJson(filterVal, list)
    excel.export_json_to_excel({
      header: tHeader,
      data,
      filename: this.filename,
      autoWidth: this.autoWidth,
      bookType: this.bookType
    })
    this.downloadLoading = false
 })
}
Copy the code
specify
-
The plug-in package is located in SRC /vendor/export2Excel and is imported on demand
When does an export function need to be used before a plug-in is officially introduced into an application
import('@/vendor/Export2Excel').then(excel = {}) Copy the code -
Export2Excel relies on packages such as js-xlsx, file-Saver, and script-loader
That is, install dependencies before the project runs
npm install file-saver script-loader --save
Copy the code
Employee export — basic export function implementation
The target
Migrate the project with vue-element-admin export functionality
Basic export functionality using static data (not using data retrieved from the interface)
Train of thought
- Copy SRC /vendor/export2Excel from vue-element-admin into this project and use it directly
- Install dependencies in your project
npm install file-saver script-loader xlsx --save
Copy the code
Add a click event to the export button
The contents of the callback function are as follows
Import ('@/vendor/Export2Excel').then(excel = {// excel indicates the imported module object console.log(excel) excel. Header: [' name ', 'wages'], / / header required data: [[' liu bei, 100], [' guan yu, 500]], / / specific data required filename: 'excel-list', // file name autoWidth: true, // whether the width is adaptive bookType: 'XLSX' // generated file type})})Copy the codeThe above code represents:
- When we officially click
exportBefore loading the Export2Excel module in the Vendor folder - The import method returns a promise object after execution, and in the then method we get the module object to use
- Focusing on the configuration part of Data, we see that it requires a strictly two-dimensional array
Excel export parameter description
| parameter | instructions | type | An optional value | The default value |
|---|---|---|---|---|
| header | The header of the exported data | Array | / | [] |
| data | Specific data to be exported | Array | / | [[]] |
| filename | Export file name | String | / | excel-list |
| autoWidth | Whether the cell should be width adaptive | Boolean | true / false | true |
| bookType | Export file type | String | xlsx, csv, txt, more | xlsx |
Introduction:
Excel is frequently used for data organization and financial analysis. It is utilized by businesses of all sizes and in all business operations.
This post demonstrates how to read an excel file in VueJS. In order to read the excel file, we start over completely by installing VueJS.
Get Started:
Step 1:
Install Vue CLI in your system. You can use the following commands to install the new package. Unless npm was installed on your system using Node.js version management, you need administrator rights to run them (e.g. n or nvm).
npm install -g @vue/cli
After installation, your command line will have access to the Vue binary. Run Vue to see if it was correctly installed; you should then get a help message outlining all the commands that are available.
With this command, you may verify that you are using the correct version:
vue --version
Step 2:
Create a new project by running this command.
vue create read-excel
Step 3:
Install XLSX package using this command.
npm i xlsx
Step 4:
Import XLSX into your HelloWorld.vue file.
import * as XLSX from "xlsx";

Step 5:
Add this code in your <template> section.
<template>
  <div class="hello">
    <div>
      <input
        type="file"
        v-on:change="addfile($event)"
        placeholder="Upload file"
        accept=".csv,application/vnd.openxmlformats-officedocument.spreadsheetml.sheet, application/vnd.ms-excel"
      />
    </div>
  </div>
</template>

Step 6:
Declare the variables in the data function.
data: function(){
    return {
      file: File,
      arrayBuffer: null,
      filelist: null
    };
  },

Step 7:
Add the addfile() function in the methods section.
addfile(event) {
  this.file = event.target.files[0];
  let fileReader = new FileReader();
  fileReader.readAsArrayBuffer(this.file);
  fileReader.onload = (e) => {
    this.arrayBuffer = fileReader.result;
    var data = new Uint8Array(this.arrayBuffer);
    var arr = new Array();
    for (var i = 0; i != data.length; ++i)
      arr[i] = String.fromCharCode(data[i]);
    var bstr = arr.join("");
    var workbook = XLSX.read(bstr, { type: "binary" });
    var first_sheet_name = workbook.SheetNames[0];
    var worksheet = workbook.Sheets[first_sheet_name];
    console.log(XLSX.utils.sheet_to_json(worksheet, { raw: true }));
    var arraylist = XLSX.utils.sheet_to_json(worksheet, { raw: true });
    this.filelist = [];
    console.log(this.filelist);
  };
}

Finally, run the project by
npm run serve
You can see the output on the http://localhost:8080. Then open the console and see the output in it.
Output:

Содержание
- How to implement excel import and export in VUE project
- Excel import function — component encapsulation
- The target
- Train of thought
- Install the necessary plug-ins
- Import the UploadExcel component and register as global
- Staff management — Excel import function — Preparation page
- The target
- Train of thought
- Establish a common imported page route
- Configure the routing
- Test the import effect
- Staff management — Implementation of Excel import — data processing
- The target
- Train of thought
- Process data imported by Excel according to interface requirements
- Implement Excel import — encapsulate interface and call
- The target
- Analysis of the
- Interface API
- Use in pages
- Excel export function
- background
- Train of thought
- Front-end dominance (lots of work on the front end)
- Back-end dominance (lots of work on the back-end)
- Analyze the export scheme in vue-element-admin
- The target
- Learn to use off-the-shelf Excel export components
- specify
- Employee export — basic export function implementation
- The target
- Train of thought
- Add a click event to the export button
- How to use excel import and export in vue project
- Import
- Installation dependency
- Introduction component
- Prepare to import page
- Configure routing
- Test routing results
- Test import effect
- Process data as required
- Programmer Help
- How to import and read Excel data in Vue
- First, there are two ways to import and read Excel functions as a whole. One is to parse the file in the front-end and return the data to the back-end. The other is to return the Excel document directly to the back-end and process it in the back-end. Which method to use needs to be based on specific business needs, the following is a brief introduction to the first method: parsing data from the front end
- 2. Because of the variety of backstage frameworks you use, there is no illustration of the second method here, and there will be time to gradually improve this method.
- How to Add Excel Import and Export to your Vue App
- The Vue App
- Vue Application Structure
- Adding SpreadJS to your Vue App
- Adding Excel Export
- Adding Excel Import
- Testing Your Vue App
- Conclusion
- What’s Next
How to implement excel import and export in VUE project
Excel import function — component encapsulation
The target
Migrate excel import functionality provided in vue-element-admin to the current project
Train of thought
- The installation package
- Copy component
Install the necessary plug-ins
This plug-in is called XLSX
Import the UploadExcel component and register as global
- Copy the vue-element-admin supplied components into our own project ** src/components/UploadExcel Under the * *
- Register it as a global component in index.js
Staff management — Excel import function — Preparation page
The target
Based on business requirements, configure a separate route, and then implement employee import in this separate page
Train of thought
- Configure the routing
- Create the corresponding page, and then import UploadExcel component in this page to implement the import function
Establish a common imported page route
To create a new public import page, that is, the import routing component SRC/views/import/index. Vue
Use the Previously encapsulated Excel upload component in the page, supplemented with the successful import callback function
Configure the routing
This route can be defined as a static route without permission control. Add a route to the static route under ** SRC /router/index.js**
Test the import effect
Click Upload to analyze the results of handleSuccess
Excel import plug-in essence: Excel after analysis into regular data that JS can recognize, we can get the data for any operation
Staff management — Implementation of Excel import — data processing
The target
Data format conversion: Data parsed by Excel is processed and converted into data that can be passed to the interface
Train of thought
The key point of invoking the interface to upload Excel is data processing. We need to process the data processed by the plug-in in excel table into the format required by the back-end interface according to the requirements of the interface
The following is an example format for back-end interface requirements

Process data imported by Excel according to interface requirements
Processing contents include:
- Field From Chinese to English. So what I read in Excel is The name What the back end needs is username
- Date processing. The time read in from Excel is a number value, and the back end needs the standard date.
To facilitate maintenance of the code, a separate method is encapsulated to implement the transformation’s functionality.
Implement Excel import — encapsulate interface and call
The target
After the button jump is complete and the import is complete (interface call), jump back to the original page
Analysis of the
On the page, click import, jump to upload page;
Get the interfaces ready,
Interface API
Use in pages
Import from ‘@/ API /employees’
Excel export function
background
We have queried the data we need in the element-table. We hope to use them to generate Excel files and save them locally.
Train of thought
Front-end dominance (lots of work on the front end)
- Fetch the data, save the Excel file
Back-end dominance (lots of work on the back-end)
Analyze the export scheme in vue-element-admin
The target
Go to Vue-admin to learn how to use the export function, and summarize the steps to use it in this project
Pre-work: This feature is already available in vue-element-admin at the beginning of the course, and we have also provided a ready-made plugin package in project resources. Please copy it into your project’s SRC directory
Learn to use off-the-shelf Excel export components
Locate the source through the routing path
Familiarize yourself with case codes
Examples online address: gitee.com/panjiachen/.
specify
The plug-in package is located in SRC /vendor/export2Excel and is imported on demand
When does an export function need to be used before a plug-in is officially introduced into an application
Export2Excel relies on packages such as js-xlsx, file-Saver, and script-loader
That is, install dependencies before the project runs
Employee export — basic export function implementation
The target
Migrate the project with vue-element-admin export functionality
Basic export functionality using static data (not using data retrieved from the interface)
Train of thought
- Copy SRC /vendor/export2Excel from vue-element-admin into this project and use it directly
- Install dependencies in your project
Add a click event to the export button
The contents of the callback function are as follows
The above code represents:
- When we officially click export Before loading the Export2Excel module in the Vendor folder
- The import method returns a promise object after execution, and in the then method we get the module object to use
- Focusing on the configuration part of Data, we see that it requires a strictly two-dimensional array
Excel export parameter description
Источник
How to use excel import and export in vue project
Migrate from the excel import function provided in Vue element admin to the current project
Import
Installation dependency
Introduction component
Copy the components provided by Vue element admin to our own project * * src/components/UploadExcel * *
Register as global component
Prepare to import page
Create a new public import page and import the routing component src/views/import/index.vue
Use the previously encapsulated excel upload component in the page, and supplement the callback function after successful import
Configure routing
This route does not need to be controlled according to permissions or displayed in the left menu. It can be directly defined as a static route. Add a route to the static route under * * src/router/index.js * *
Test routing results
[the external chain image transfer fails. The source station may have an anti-theft chain mechanism. It is recommended to save the image and upload it directly (img-gelsua7b-1629724067018) (several methods to solve cross domain problems. assets/image-20210823205507375.png)]
Test import effect
Process data as required
The processing contents include:
- Field Chinese to English. The name is read in excel, and the back-end needs username
- Date processing. The time read from excel is a number value, and the back end needs a standard date.
In order to facilitate code maintenance, a separate method is encapsulated to realize the function of this transformation.
Источник
Programmer Help
Where programmers get help
How to import and read Excel data in Vue
In the last article, we completed the export of excel (link: https://blog.csdn.net/a736755244/article/details/99426520 So how do you import excel and read its data?
First, there are two ways to import and read Excel functions as a whole. One is to parse the file in the front-end and return the data to the back-end. The other is to return the Excel document directly to the back-end and process it in the back-end. Which method to use needs to be based on specific business needs, the following is a brief introduction to the first method: parsing data from the front end
1. Introducing Dependence
2. Introducing XLSX into main.js
3. After the previous environment and dependencies have been completed, we started to create the Import.vue page and put a button upload button. This time we used the element-ui encapsulated upload button, or arbitrarily placed a dom element.
The parameters can be described in official documents: https://www.jianshu.com/p/84b727a4b58a No explanation here.
4. Define the method you need. The code is as follows
Some prompt statements and prompt boxes in element-ui are added to make it beautiful.
The most important way to read excel files is:
5. The data obtained and displayed as follows:

6. The relevant code has been uploaded to Github at the following address:
2. Because of the variety of backstage frameworks you use, there is no illustration of the second method here, and there will be time to gradually improve this method.
Personal QQ: 736755244, welcome to exchange learning, if you have any questions, please leave a message to discuss.
Posted on Wed, 14 Aug 2019 03:41:56 -0400 by bhola
Источник
How to Add Excel Import and Export to your Vue App
“It looks great, but could you just add Excel import?”
If you’ve developed software for a long time, you’ve probably heard that question from a manager more than once. To a non-technical crowd, asking for Excel import/export doesn’t sound like a big deal. How hard could it be, right?
But all too often, this question strikes fear into the hearts of developers. On most platforms, working with Excel files requires lots of work. Historically, this has been doubly true on the web. Working with Excel data in a web app has felt a bit like this xkcd comic: “It can be hard to explain the difference between the easy, and the virtually impossible.” Building your own in-browser spreadsheet with Excel import and Excel export feels like a problem that will take five years and a research team to solve.
That’s changing. We now have turnkey libraries that let you drop a fully-functioning spreadsheet into your web app. SpreadJS is one of them. We’re going to look at how to take an existing Vue app – a real world app using a Vuex store – and enhance it using SpreadJS.
The rest of the article assumes that you already understand HTML, CSS, and JavaScript. It also assumes you have a working knowledge of the Vue.js progressive JavaScript framework for creating web UI. It will help if you’ve used Vuex for state management, but don’t worry if you haven’t. It’s intuitive and easy to understand, and you’ll be able to figure out what’s going on just by reading the code if you’ve used Vue.
The Vue App
The Vue app we’ll be working on is a straightforward sales dashboard with a few summary panels and a table of data. It’s the kind of app that falls into the “not bad” category:
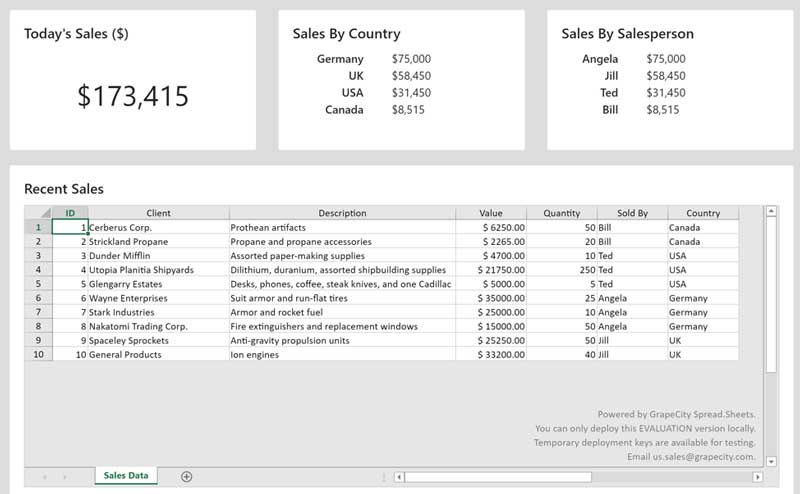
Although it’s just a demo, it’s exactly the kind of app that enterprise web developers have to create. It’s also exactly the kind of app that we’re typically asked to add Excel functionality to, so it will be a perfect example for the rest of this article.
To set the stage: the dashboard is a single page application made with Vue. It’s using the latest and greatest Vue best practices: single-file components and a Vuex data store. It’s also using Bootstrap for its CSS components and grid system.
Bootstrap isn’t as popular as it used to be. But in reality, Bootstrap is still everywhere – especially in the kinds of enterprise web apps where Excel support is usually needed. I’d wager that plenty of new enterprise web apps will still use Bootstrap in 2030.
If you’d rather use Bulma or Tachyons in your own spreadsheet-enabled apps, go right ahead! SpreadJS will work happily with either of them.
Vue Application Structure
Let’s take a look at how the code is structured. Our Vuex store and Vue application are both defined in index.js. We have several single-file Vue components, all located in the components folder.
If you look at our Vuex store, you’ll see the following:
Our store’s initial state is just set to the value of recentSales, which is a set of dummy data we imported.
Wait a minute – if we’ve only got one set of data, how are we generating three charts and a table? To see what’s happening, open up the Dashboard.vue component. In it, you’ll see several computed properties are being generated based on the data in the Vuex store:
Now it makes more sense! The single data set contains everything we need to generate all of the numbers and tables for our dashboard. Since the data is in a reactive Vuex store, if the data updates then all of the dashboard panels will update automatically.
This reactivity will come in very handy in the next section, when we replace our boring old static table with an editable spreadsheet.
Adding SpreadJS to your Vue App
Here’s where the fun starts! We have our dashboard, but we want to get rid of that clunky old HTML table. So we’ll have to change things up a little bit. CodeSandbox was great for seeing our starting point, but we must run our app locally to use SpreadJS in development mode without a license.
You can clone a copy of the code from the following GitHub repository: https://github.com/rpeden/vue-spreadjs. Once you’ve done that, open a terminal, navigate to the directory where you cloned the repository and run ‘npm install’. This installs the dependencies needed to run the application. When dependency installation finishes, run ‘npm serve’ to see the updated app in action.
Let’s walk through the changes we’ll have to make to upgrade our old app to its new and improved version. Since we’re going to replace our sales table with a spreadsheet, we’re going to put the sheet into our existing SalesTable component. But first, we’ll have to get rid of our old table. Once it is gone, our SalesTable template will look like this:
After eliminating the table, we’ve got our table panel ready and waiting for a spreadsheet, so let’s add one! After adding a SpreadJS sheet, our template will look like this:
That’s a lot to take in, so let’s walk through it to understand what is happening.
First, we create a spreadsheet by using the gc-spread-sheets element and binding it to two of our component’s properties: hostClass and workbookInit .
Inside the spreadsheet, we create a new worksheet with the gc-worksheet element and binding it to our component’s tableData and autoGenerateColumns properties . Note that tableData is exactly the same tableData we used to generate our plain HTML table. We can put our data into SpreadJS as-is with no changes required!
Finally, inside the worksheet we define columns that tell SpreadJS how to display our data. The dataField property tells us which property of the underlying dataset this column should display, and headerText gives SpreadJS a nicely-formatted column name to use. The rest of the bindings for each column are straightforward; the SpreadJS documentation has a complete list of everything you can pass to a gc-column.
So with our template in place, exactly how much code is going to be needed to make this all work? Fortunately, not much at all! Here’s our SalesTable component’s new script code:
Due to Vue’s simplicity, it takes very little code to make this work. If there’s anything here you’re unfamiliar with, the ‘Components In-depth’ section of the Vue documentation explains Vue components in detail. The only things that have changed from before are a few imports, some data properties, and a couple of methods. The data properties should look familiar; we saw them a moment ago in the template. They’re configuration options we are binding to the components in our SpreadJS spreadsheet.
The workbookInit method is a callback that SpreadJS calls when the sheet is initialized. In this method, we save our SheetJS spreadsheet object as an instance variable on our component so we can interact with it directly if necessary.
One final change: we give our component a scoped style to help the spreadsheet style itself. We saw this earlier when we passed the hostClass to the gc-spread-sheets element. Since hostClass is set to ‘spreadsheet’, we’re going to create a CSS class named spreadsheet:
And at this point, if we make no other changes and load our Dashboard, it will look like this:
But wait, there’s more!
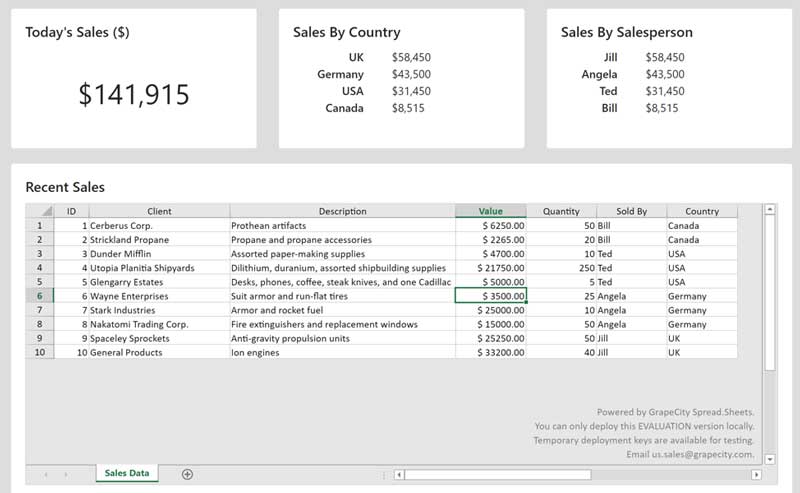
Remember how we passed our table data to the spreadsheet without making any changes to the data set? Now that our data is in a spreadsheet, we can edit it.
What will happen if we change the value of sale #6 from $35,000 to $3500? If we go into the sheet and edit the value, we get a dashboard that looks like this:
Wow! What happened.
We updated the SpreadJS sheet, and it automatically updated our Vuex store. We didn’t have to add any code to make this happen. It just worked! The SpreadJS Vue wrapper is reactive out of the box.
It also looks like Angela went from having a spectacular sales month to having a mediocre one. Sorry about that, Angela!
I’m a veteran developer who isn’t easily impressed, but I admit that this brought a smile to my face. I was expecting to manually wire up change handlers to bind spreadsheet changes back to my Vuex store, but SpreadJS handled it for me.
We now have an enhanced dashboard that a manager would be happy with. They can modify the data and watch the dashboard update before their eyes. But we can do even better by adding the ability to import and export Excel files. Next, we’ll learn how to do that.
Adding Excel Export
Adding Excel export to our sheet is easy. First, let’s add an export button to our dashboard. We’re going to place it at the bottom of our table panel, right after the gc-spread-sheets closing tag:
As you can see, our button is expecting a click handler named exportSheet. We’ll add it in a moment, but first we’re we will import a function from an NPM package named file-saver:
Next, let’s add exportSheet to our component’s methods object:
Here’s what the code is doing: first, we get a reference to our Sales Data sheet. Since it’s the only sheet in our spreadsheet, it lives at index 0 and we access it by calling getSheet.
When then instantiate SpreadJS’ ExcelIO library, convert our sheet to JSON, and ask SpreadJS to save it. And voila! We’ve exported an Excel file from our spreadsheet-enabled Vue app!
Note that we’re passing two serialization options to the sheet’s toJSON call: includeBindingSource and columnHeadersAsFrozenRows. Together, these options ensure that the data we bound to the sheet is exported correctly, and that the sheet contains our column headers so anyway looking at the exported Excel file will understand what each column contains.
Adding Excel Import
Next, it’s time to add the ability to import Excel files.
Right below our export button, we’re going to add the following bit of markup:
As you can see, we’re going to be using a standard HTML file picker, and triggering a component method named fileChange when a file is selected.
Now that we’ve added the template, let’s add the change handler to our component’s methods object:
In our extractSheetData function – which you’ll find in the src/util.util.js file – you’ll see that we pull data out of the JavaScript object returned by ExcelIO and restructure it to match the shape of the data in our Vuex store.
Our import function assumes that the data in the imported sheet will have the same columns as our original data set. If someone uploads a spreadsheet that doesn’t meet this requirement, our app won’t be able to handle it. This is an acceptable limitation in most line-of-business apps. Since our dashboard is designed to display a specific type of data, it’s reasonable to ask users to supply data in the format the app is expecting.
When data extraction is complete, we call commit on the Vuex store and send the updated sales transaction data. The SpreadJS sheet and all of the dashboard panels then update themselves to reflect the new data.
Testing Your Vue App
Now that seen the code, let’s test out Excel import and export in our Vue app.
Start by clicking the ‘Export to Excel’ button. Your web browser will then download an Excel spreadsheet containing all of the data we saw in our dashboard’s spreadsheet.
Open the sheet in Excel and add a couple of lines of data. It’s okay if you use new countries or new salespeople; all our dashboard components can handle it. Just be careful not to change the column order or names. When you’re finished, click the ‘Choose File’ button at the bottom of the Recent Sales panel. Select the Excel file you just edited.
When you select the file, you’ll see all of the dashboard components update.
Conclusion
We’re done! We took an ordinary Vue dashboard app and added a live spreadsheet to it. We can now edit the data in the sheet and watch our entire dashboard update itself. Our enhanced dashboard is also able to import and export Excel files.
Vue, Vuex, and SpreadJS complement each other well. With Vue’s easy templating and data binding, Vuex’s reactive data store, and SpreadJS’ interactive spreadsheets, complex enterprise JavaScript apps can be created in hours.
As great as this might seem, we’ve barely scratched the surface of what SpreadJS can do. To better understand what SpreadJS can do for you, refer to SpreadJS tutorial site. If you’re looking to dive deeper into using SpreadJS in your own apps, the SpreadJS Developer’s Guide has the information you need.
What’s Next
Our dashboard with a spreadsheet is great. It’s missing something, though. What’s one thing managers love to see on dashboards?
Charts!
Fortunately, SpreadJS has built-in charting support. In a future article, we’re going to learn how to enhance our dashboard with SpreadJS charts. In another article we discuss how to slice your JavaScript charts with SpreadJS slicers.
If you’re interested in developing expert technical content that performs, let’s have a conversation today.
Источник
In the last article, we completed the export of excel (link: https://blog.csdn.net/a736755244/article/details/99426520 So how do you import excel and read its data?
First, there are two ways to import and read Excel functions as a whole. One is to parse the file in the front-end and return the data to the back-end. The other is to return the Excel document directly to the back-end and process it in the back-end. Which method to use needs to be based on specific business needs, the following is a brief introduction to the first method: parsing data from the front end
1. Introducing Dependence
 npm install -S file-saver xlsx

 npm install -D script-loader

 npm install xlsx
2. Introducing XLSX into main.js
import XLSX from 'xlsx'
Vue.use(XLSX)
3. After the previous environment and dependencies have been completed, we started to create the Import.vue page and put a button upload button. This time we used the element-ui encapsulated upload button, or arbitrarily placed a dom element.
The parameters can be described in official documents: https://www.jianshu.com/p/84b727a4b58a No explanation here.
  <!--limit:Maximum upload number, on-exceed: Operation when the maximum number of uploads is exceeded  -->
    <el-upload
        class="upload-demo"
        action=""
        :on-change="handleChange"
        :on-remove="handleRemove"
        :on-exceed="handleExceed"
        :limit="limitUpload"
        accept="application/vnd.openxmlformats-
        officedocument.spreadsheetml.sheet,application/vnd.ms-excel"
        :auto-upload="false">
    <el-button size="small" type="primary">Click Upload</el-button>
    </el-upload>
4. Define the method you need. The code is as follows
Some prompt statements and prompt boxes in element-ui are added to make it beautiful.
        //Processing Method for Uploading Files
        handleChange(file, fileList){
            this.fileTemp = file.raw;
            if(this.fileTemp){
                if((this.fileTemp.type == 'application/vnd.openxmlformats-officedocument.spreadsheetml.sheet')
                    || (this.fileTemp.type == 'application/vnd.ms-excel')){
                    this.importfxx(this.fileTemp);
                } else {
                    this.$message({
                        type:'warning',
                        message:'Attachment format error, please delete and upload again!'
                    })
                }
            } else {
                this.$message({
                    type:'warning',
                    message:'Please upload the attachment!'
                })
            }
        },
        //Processing method when exceeding the maximum number of uploaded files
        handleExceed(){
            this.$message({
                type:'warning',
                message:'Exceed the maximum number of uploaded files limit!'
            })
            return;
        },
        //How to remove files
        handleRemove(file,fileList){
            this.fileTemp = null
        },
The most important way to read excel files is:
         importfxx(obj) {
            let _this = this;
            let inputDOM = this.$refs.inputer;
            // Retrieving file data through DOM

            this.file = event.currentTarget.files[0];

            var rABS = false; //Read the file as a binary string
            var f = this.file;

            var reader = new FileReader();
            //if (!FileReader.prototype.readAsBinaryString) {
            FileReader.prototype.readAsBinaryString = function(f) {
                var binary = "";
                var rABS = false; //Read the file as a binary string
                var pt = this;
                var wb; //Read completed data
                var outdata;
                var reader = new FileReader();
                reader.onload = function(e) {
                    var bytes = new Uint8Array(reader.result);
                    var length = bytes.byteLength;
                    for (var i = 0; i < length; i++) {
                        binary += String.fromCharCode(bytes[i]);
                    }
                    //If not introduced in main.js, you need to introduce it here to parse excel
                    // var XLSX = require("xlsx");
                    if (rABS) {
                        wb = XLSX.read(btoa(fixdata(binary)), {
                        //Manual conversion
                        type: "base64"
                        });
                    } else {
                        wb = XLSX.read(binary, {
                        type: "binary"
                        });
                    }
                    outdata = XLSX.utils.sheet_to_json(wb.Sheets[wb.SheetNames[0]]);
                    //outdata is read data (without header rows or headers, the header will be the subscript of the object)
                    //Data can be processed here.
                    // let arr = [];
                    // outdata.map(v => {
                    //     let obj = {}
                    //     obj.code = v['Code']
                    //     obj.name = v['Name']
                    //     obj.pro = v['province']
                    //     obj.cit = v['city']
                    //     obj.dis = v['district']
                    //     arr.push(obj)
                    // });
                    // _this.da=arr;
                    // _this.dalen=arr.length;
                    return arr;
                };
                reader.readAsArrayBuffer(f);
            };
            if (rABS) {
                reader.readAsArrayBuffer(f);
            } else {
                reader.readAsBinaryString(f);
            }
        }
5. The data obtained and displayed as follows:
6. The relevant code has been uploaded to Github at the following address:
https://github.com/736755244/Import/upload
2. Because of the variety of backstage frameworks you use, there is no illustration of the second method here, and there will be time to gradually improve this method.
Personal QQ: 736755244, welcome to exchange learning, if you have any questions, please leave a message to discuss.
How to use excel import and export in vue project
Migrate from the excel import function provided in Vue element admin to the current project
Import
Installation dependency
Install plug-ins
npm install xlsx
Introduction component
Copy the components provided by Vue element admin to our own project * * src/components/UploadExcel * *
Register as global component
Prepare to import page
Create a new public import page and import the routing component src/views/import/index.vue
Use the previously encapsulated excel upload component in the page, and supplement the callback function after successful import
<template>
  <upload-excel :on-success="handleSuccess" />
</template>

<script>
export default {
  name: 'Import',
  methods: {
    handleSuccess({ header, results }) {
      console.log(header, results)
    }
  }
}
</script>
Configure routing
This route does not need to be controlled according to permissions or displayed in the left menu. It can be directly defined as a static route. Add a route to the static route under * * src/router/index.js * *
{
    path: '/import',
    component: Layout,
    hidden: true, // Do not display to left menu
    children: [{
      path: '',
      component: () => import('@/views/import')
    }]
}
Test routing results
[the external chain image transfer fails. The source station may have an anti-theft chain mechanism. It is recommended to save the image and upload it directly (img-gelsua7b-1629724067018) (several methods to solve cross domain problems. assets/image-20210823205507375.png)]
Test import effect
handleSuccess({ header, results }) {
      // Header header
      //        ['name', 'mobile number']
      // results excel table contents
      //        [{'name': 'Xiao Zhang', 'mobile phone number': '13712345678'}, {.....}]
      console.log(header, results)
    }
Process data as required
The processing contents include:
- Field Chinese to English. The name is read in excel, and the back-end needs username
- Date processing. The time read from excel is a number value, and the back end needs a standard date.
In order to facilitate code maintenance, a separate method is encapsulated to realize the function of this transformation.
/**
     * results excel Table contents
      // [
          {'Name: 'Xiao Zhang', 'mobile number:' 13712345678 '}
        , {.....}
        ]

      // target
      // [ {'username': 'Xiao Zhang ','mobile':'13712345678 '}, {...}]
     */
    // Change the attribute name of each object in an object array from Chinese to English
    // Idea: for each object of the original array
    //    (1) Find all Chinese key s
    //     (2) Get the corresponding English key
    //     (3) Splice a new object: English key: value
    transExcel(results) {
      const mapInfo = {
        'Entry date': 'timeOfEntry',
        'cell-phone number': 'mobile',
        'full name': 'username',
        'Confirmation date': 'correctionTime',
        'Job number': 'workNumber',
        'department': 'departmentName',
        'Employment form': 'formOfEmployment'
      }
      return results.map(zhObj => {
        const enObj = {}
        const zhKeys = Object.keys(zhObj) // ['name', 'mobile number']

        zhKeys.forEach(zhKey => {
          const enKey = mapInfo[zhKey]

          enObj[enKey] = zhObj[zhKey]
        })

        return enObj
      })
    }
Processing of inaccurate date of excel data
// Convert the contents of date format in excel file back to standard time
// https://blog.csdn.net/qq_15054679/article/details/107712966
export function formatExcelDate(numb, format = '/') {
  const time = new Date((numb - 25567) * 24 * 3600000 - 5 * 60 * 1000 - 43 * 1000 - 24 * 3600000 - 8 * 3600000)
  time.setYear(time.getFullYear())
  const year = time.getFullYear() + ''
  const month = time.getMonth() + 1 + ''
  const date = time.getDate() + ''
  if (format && format.length === 1) {
    return year + format + month + format + date
  }
  return year + (month < 10 ? '0' + month : month) + (date < 10 ? '0' + date : date)
}
Update format conversion function
import { formatExcelDate } from '@/utils/index.js'

// Update format conversion function
transExcel(results) {
      const mapInfo = {
        'Entry date': 'timeOfEntry',
        'cell-phone number': 'mobile',
        'full name': 'username',
        'Confirmation date': 'correctionTime',
        'Job number': 'workNumber',
        'department': 'departmentName',
        'Employment form': 'formOfEmployment'
      }
      return results.map(zhObj => {
        const enObj = {}
        const zhKeys = Object.keys(zhObj) // ['name', 'mobile number']

        zhKeys.forEach(zhKey => {
          const enKey = mapInfo[zhKey]
+          if (enKey === 'timeOfEntry' || enKey === 'correctionTime') {
            // The date format required by the backend is standard time
+            enObj[enKey] = new Date(formatExcelDate(zhObj[zhKey]))
          } else {
            enObj[enKey] = zhObj[zhKey]
          }
        })

        return enObj
      })
    }
Call the interface to read in the file
Define interface api
/**
 * @description: Import excel
 * @param {*} data
 * @return {*}
 */
export function importEmployee(data) {
  return request({
    url: '/sys/user/batch',
    method: 'post',
    data
  })
}
Use in page
Import API
Encapsulate doImport
import { importEmployee } from ‘@/api/employees’
async doImport(data) {
  try {
    const res = await importEmployee(data)
    console.log('importEmployee', res)
    this.$message.success('Import succeeded')

    // Page back
    this.$router.back()
  } catch (err) {
    console.log('importEmployee', err)
    this.$message.error('Import failed')
  }
},
  //  1. Read the data from excel file into browser memory
  handleSuccess({ header, results }) {
    console.log(header, results)

    // 2. Assemble data according to interface requirements
    const data = this.transExcel(results)
    console.log('Assemble data according to interface requirements', data)
    // 3. Call the interface to upload
    this.doImport(data)
  }
export
-
The plug-in package is located in src/vendor/export2Excel and is imported on demand
When will the export function be officially used before the plug-in will be formally introduced into the application
import('@/vendor/Export2Excel').then(excel => {}) -
Export2Excel depends on JS xlsx, file saver and script loader
That is, install dependencies before the project runs
npm install file-saver script-loader --save
Copy src/vendor/export2Excel in Vue element admin to the project and use it directly
Register click event for export
import('@/vendor/Export2Excel').then(excel => {
  // excel represents the imported module object
  console.log(excel)
  excel.export_json_to_excel({
    header: ['full name', 'wages'], // Header is required
    data: [
      ['Liu Bei', 100],
      ['Guan Yu', 500]
    ], // Specific data is required
    filename: 'excel-list', // File name
    autoWidth: true, // Is the width adaptive
    bookType: 'xlsx' // Generated file type
  })
})
Excel export parameter description
| parameter | explain | type | Optional value | Default value |
|---|---|---|---|---|
| header | Header of exported data | Array | / | [] |
| data | Specific data exported | Array | / | [[]] |
| filename | Export file name | String | / | excel-list |
| autoWidth | Do you want to adapt the width of the cell | Boolean | true / false | true |
| bookType | Export file type | String | xlsx, csv, txt, more | xlsx |
Processing data
formatData(list) {
      const map = {
        'id': 'number',
        'password': 'password',
        'mobile': 'cell-phone number',
        'username': 'full name',
        'timeOfEntry': 'Entry date',
        'formOfEmployment': 'Employment form',
        'correctionTime': 'Confirmation date',
        'workNumber': 'Job number',
        'departmentName': 'department',
        'staffPhoto': 'Avatar address'
      }
      console.log(list)
      let header = []
      // header = ['id', 'mobile', 'username', .....]
      // data = [
      //     ['65c2', '1380000002', 'administrator',...],
      //     ['65c3', '1380000003', 'sun CAI',...],
      // ]
      let data = []
      // Start code
      // Found an element
      const one = list[0]
      if (!one) {
        return { header, data }
      }
      header = Object.keys(one).map(key => {
        return map[key]
      })

      // data converts each object in the list into a corresponding value array
      data = list.map(obj => {
        // Obj ['formofemployment ']: 1, 2 -- >' formal ',' informal '
        const key = obj['formOfEmployment'] // 1, 2
        obj['formOfEmployment'] = hireTypEnmu[key] // hireTypEnmu:{1: 'formal', '2': 'informal'}

        return Object.values(obj)
      })

      return { header, data }
    },
hExport() {
      import('@/vendor/Export2Excel').then(async excel => {
        // Send ajax request to get data
        const res = await getEmployee(this.page, this.size)
        const list = res.data.rows
        console.log('Data obtained from the backend', list)

        const { header, data } = this.formatData(list)
        // excel represents the imported module object
        console.log(header, data)
        excel.export_json_to_excel({
          // Header: ['name', 'salary'], / / header is required
          header: header, // Header is required
          data: data,
          // data: [
          //   ['Liu Bei 11111', 100],
          //   ['Guan Yu', 500]
          // ], / / specific data is required
          filename: 'excel-list', // File name
          autoWidth: true, // Is the width adaptive
          bookType: 'xlsx' // Generated file type
        })
      })
    },
Posted by xuhao_harvey
at Aug 23, 2021 — 8:45 PM
Tag:
Vue
Javascript
element