- Forum
- Technical Support
- Computer Help
- Office Help
- MS Office Support
- How do I insert a check box (voting box) in word

-
How do I insert a check box (voting box) in word
How to add a voting box in Microsoft Word. I am not able to find any option to do the same. I want to add some graphics also. I had upgraded to Office 2007. There are many new options that has made job more complicated. I was quiet happy with Office 2003.
-
Re: How do I insert a check box (voting box) in word
It is easy. You can find all the settings on Ribbon. There you can find a option to insert object. Office 2003 has very basic interface which is easy to use but somehow to some extent directly switching to the new version. You can try out using the help and support section to find out the detail about the same.
-
Re: How do I insert a check box (voting box) in word
Go the insert tab and then check out second column on the same. You can find a section called as illustration. In that you can find a set of options to find out different objects to insert. You can insert the same from there. To add a voting box you have to find out the set of shape in that place. You must try out the same and then check out.
-
Re: How do I insert a check box (voting box) in word
The checkbox is also located on the same place. If you are not able to find the same then it is possible that Developer tab is disabled. To enable the same you have to go to Word options and then click on Popular. In that click on Show developer and then click on the enable developer. You can then find out the check box in that section.
-
Re: How do I insert a check box (voting box) in word
Originally Posted by Check Box
I need help on how to insert a voting (check) box in a checklist form
Is there a different way to use ballot boxes in WORD 2010 other than how we used them in documents within 2007?
-
Re: How do I insert a check box (voting box) in word
Look in symbol or just look for how to add radio button in microsoft word. Microsoft Word 2007 offer you many new features related to symbols. The radio or check box is available word. You just need to drag that and also you can insert a drop down list. I was looking for a better symbol which can offer you more customization in checkboxes. There are very less options provided in that graphics. So the more you can do is insert it via image by looking no web.
-
Re: How do I insert a check box (voting box) in word
There are templates in Word which are categories in different categories. Here you can download a ready to use template which can be either a voting box or form. This comes with pre-configured graphics that can be modified as per your need. I found some site on web which offer you to add customize graphics in word where you can add more interactive checkbox or radio button.

Similar Threads
-
Replies: 5
Last Post: 27-10-2010, 06:24 AM
-
Replies: 3
Last Post: 21-10-2009, 07:04 PM
-
Replies: 4
Last Post: 24-06-2009, 09:09 PM
-
Replies: 2
Last Post: 16-05-2009, 11:51 AM
-
Replies: 3
Last Post: 04-03-2009, 02:27 PM
Tags for this Thread
Bookmarks
Bookmarks
Posting Permissions

- You may not post new threads
- You may not post replies
- You may not post attachments
- You may not edit your posts
- BB code is On
- Smilies are Off
- [IMG] code is Off
- [VIDEO] code is Off
- HTML code is Off
Forum Rules
На чтение 3 мин Опубликовано 24.07.2015
Когда Вы создаёте опросы или формы в Microsoft Word, то для удобства можно добавить флажки (чек-боксы), чтобы было проще выбрать и отметить один из вариантов ответа. Для этого есть два основных способа. Первый отлично подходит для документов, которые нужно заполнять в электронном виде, второй удобен для печатных документов (таких как списки дел).
- Способ 1 – Элементы управления для электронных документов
- Способ 2 – Флажки для печатных документов
Способ 1 – Элементы управления для электронных документов
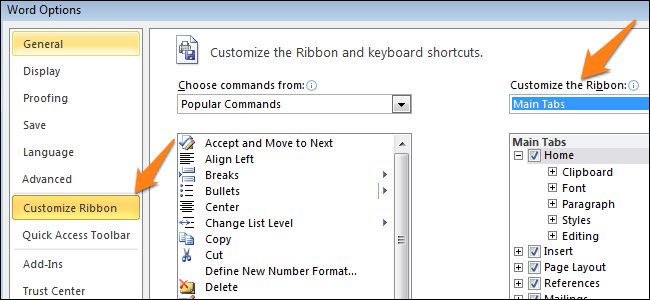
Чтобы создавать заполняемые формы с флажками (чек-боксами), сперва нужно активировать вкладку Developer (Разработчик). Для этого откройте меню File (Файл) и нажмите кнопку Options (Параметры). Перейдите на вкладку Customize Ribbon (Настроить ленту) и выберите из выпадающего списка Customize the Ribbon (Настроить ленту) вариант Main Tabs (Основные вкладки).
Поставьте галочку в строке Developer (Разработчик) и нажмите ОК.
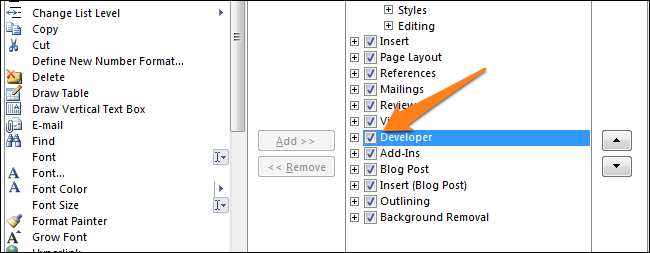
На Ленте появилась новая вкладка с инструментами для разработчиков.

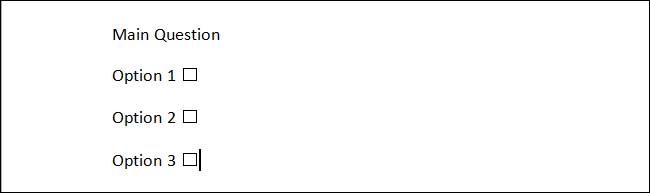
Теперь Вы можете добавить в документ элемент управления — Check Box (Флажок). Это просто: запишите вопрос и варианты ответа на него, откройте вкладку Developer (Разработчик) и кликните значок Check Box Content Control (Элемент управления содержимым «флажок”) .

Теперь повторите тот же приём для всех вариантов ответа. Как видно на рисунке ниже, рядом с каждым ответом появится чек-бокс.
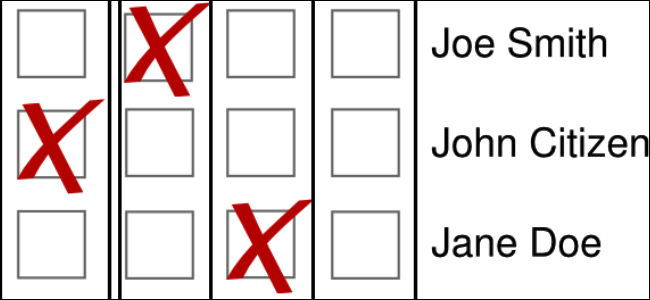
Способ 2 – Флажки для печатных документов
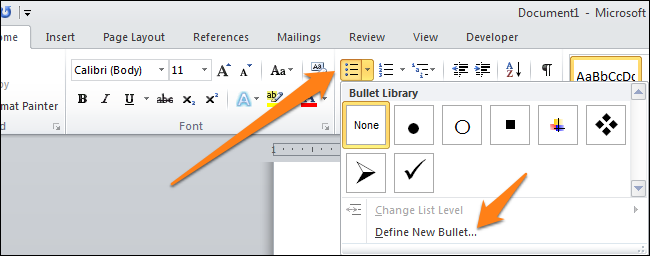
Второй способ подходит для создания документов, которые нужно распечатать на бумаге. Он потребует вставки маркеров. Откройте вкладку Home (Главная), и Вы увидите кнопку для вставки маркеров в разделе Paragraph (Абзац).
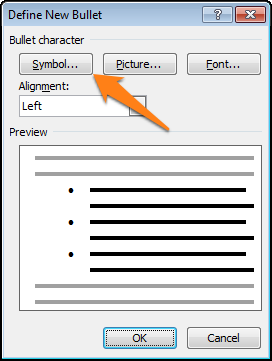
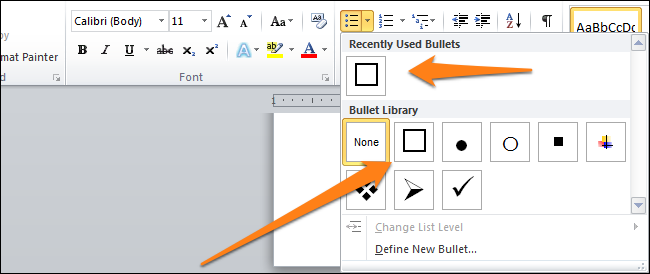
Просто нажмите маленькую стрелку рядом с этой кнопкой и выберите команду Define New Bullet (Определить новый маркер). Обратите внимание, что там уже есть несколько вариантов на выбор, но среди них нет нужного значка.
Чтобы определить новый маркер, в открывшемся диалоговом окне выберите вариант Symbol (Символ).
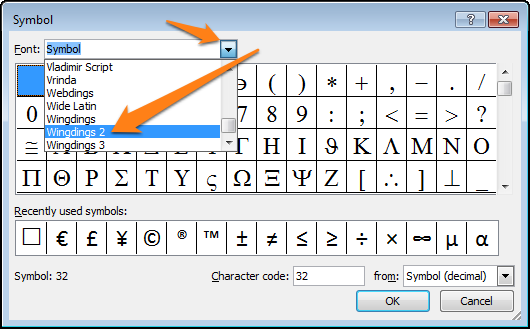
Когда откроется окно выбора символов, Вы увидите множество различных вариантов. В верхней части окна находится выпадающий список. Кликните по нему и выберите Wingdings 2.
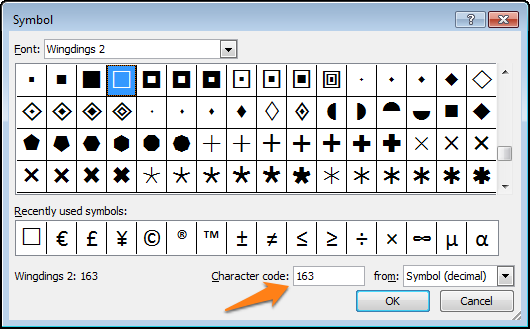
Теперь введите в поле Character Code (Код знака) код 163, чтобы автоматически перейти к лучшему варианту чек-бокса в Word.
Запишите варианты ответов маркированным списком:
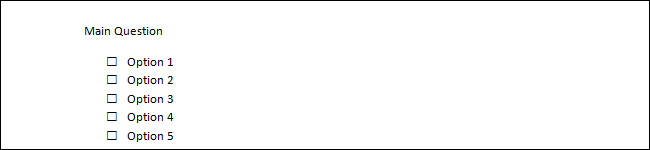
В следующий раз, когда Вам понадобится вставить такой символ, просто кликните по маленькой стрелке рядом с кнопкой выбора маркеров, и Вы увидите его в одном ряду с символами по умолчанию.
Попробуйте сами поэкспериментировать с настройкой маркеров, используя символы. Возможно Вы найдёте варианты лучше, чем привычный чек-бокс. Наслаждайтесь, создавая опросы и документы с использованием флажков.
Оцените качество статьи. Нам важно ваше мнение:

When you type text in Microsoft Word, you have options to make it look different on the page (for example, changing the margins), but these options are limited. Text boxes expand your formatting repertoire by giving you additional control and flexibility over how your text is displayed. You can place a text box anywhere in a document and format it with different colors and fonts. This feature is especially useful for creating a quote or sidebar. Here’s everything you need to know about creating and customizing text boxes in Word.
The instructions in this article apply to Word for Microsoft 365, Word 2019, Word 2016, and Word 2013.
Insert a text box in Word
First, open the document you want to add a text box to. Then follow the steps below.
Select on the ribbon insertion.
In which text group, select text zoneThen select a text box template.
The new text box appears in the middle of the text and the shape size is automatically selected.
Click on the field and drag it to the desired position. To resize the text box, click and drag the circles around the border. To rotate the text box, click and drag the circular arrow at the top of the box.
Place your cursor in the text box and enter the information you want displayed there.
Customize a text box
After you create a text box, you can customize it in a number of ways.
To bring up the options, place the cursor in the text box and right-click. Choose an option and follow the onscreen instructions to add a border, change the style, or customize how the text box interacts with other text on the page.
Alternatively, you can use the controls on the shape size Tab.
To go straight layout options Select the text box and then select the menu layout options (it looks like a horseshoe and is to the right of the text box).
You can always change the text, make other adjustments, or move the field to a different location. To delete a text box, select its border, and then press Extinguish on the keyboard.
Check Box
-
#1
I need help on how to insert a voting (check) box in a checklist form
Advertisements
Susan Ramlet
Kutty
-
#3
Dear Susan,
If Word 2007 how to insert a voting (check) box in a checklist form.
Advertisements
Susan Ramlet
-
#4
This information can be found in Word 2007 Help (the little question mark in
the upper-right corner. Search for «checkbox».
Basically, you probably need to turn on the Developer tab, which can be done
in Word Options (Office button | Word Options | Popular | Show Developer Tab
in the Ribbon).
Refer to the detailed information in the Help file for more assistance,
depending on your end goal.
Want to reply to this thread or ask your own question?
You’ll need to choose a username for the site, which only take a couple of moments. After that, you can post your question and our members will help you out.
Ask a Question
Use voting buttons in messages
Outlook for Microsoft 365 Outlook 2021 Outlook 2019 Outlook 2016 Outlook 2013 Outlook 2010 Outlook 2007 More…Less
It’s easy to create a message in Microsoft Outlook that uses voting buttons to ask your recipients questions with a specific and limited set of answers. When recipients respond using the voting buttons, you can either automatically tabulate the results of the vote in Outlook or export the responses to an Excel worksheet.
Add voting buttons
Notes:
-
A Microsoft Exchange Server account is required.
-
If you encrypt an Outlook message that contains voting buttons, message recipients won’t be able to see them. That feature isn’t supported at this time.
-
Create an email message or reply to or forward a message that you received.
-
On the Options tab, in the Tracking group, click Use Voting Buttons.
-
Choose one of the following:
-
Approve;Reject
Use when you need an authorization for an action. For example, you can send an email request to several recipients seeking their approval of a project proposal. -
Yes;No
Use when you need either a yes or a no. This is a good way to take a quick poll. -
Yes;No;Maybe
Use when you don’t want to limit the choices to yes and no. This voting option offers an alternative response. -
Custom
Use to create your own custom voting button names. For example, you can ask your colleagues to choose among three days of the week for a recurring weekly staff meeting.
-
Custom voting button
If you chose a Custom voting button, do the following:
-
In the Properties dialog box, under Voting and Tracking options, select the Use voting buttons check box.
-
Use the default button options, or delete the default options and then type the text that you want, and use semicolons to separate the button names.
-
Click Close.
Important: If you apply Information Rights Management (IRM) permissions (Options tab > Permission command) to a message, the recipient won’t see the voting options.
-
Recipients can vote in the Reading Pane or in an open message. In the Reading Pane, click the Click here to vote line in the message header and then click the option that you want. In an open message, on the Message tab, in the Respond group, click Vote, and then click the option that you want.
-
The sender can see all responses in a table. On one of the response messages, click the The sender responded line in the message header, then click View voting responses.
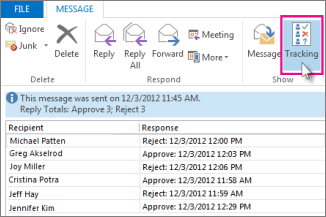
Review the voting responses
-
Open the original message with voting buttons that you sent. This message is usually located in the Sent Items folder.
-
On the Message tab, in the Show group, click Tracking.
Note:
Tracking doesn’t appear until at least one recipient of the email message has replied with his or her vote.
Track and print results
When you create and send an email with voting buttons to others, you may want to track and print the results. You can either quickly copy the voting results into a blank Word document or a new email, or copy them into Excel so you can work with the data later.
-
In Outlook, in the Sent Items folder, open the email message you sent that contains the voting poll.
-
Click Message > Tracking.
Tip: The Tracking button doesn’t appear until at least one vote has been cast.
-
To print the results, do one of the following:
-
For a quick print, press Alt + Print Screen (PrtScrn) on the keyboard, and then do one of the following;
-
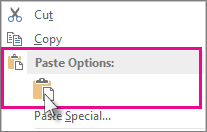
In Word, click Blank document, and then click Paste.
-
In Outlook, click Home >New Email, and then click Paste.
Click File > Print, specify a printer, and then click Print.
-
-
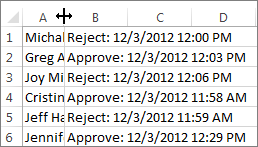
To sort and work with the data results in Excel, first do this:
-
Click Message > Tracking.
-
On the keyboard, press and hold Ctrl, and then click and drag the mouse to select all names and responses in the list.
-
On the keyboard, press Ctrl + C.
-
Open Excel and choose Blank workbook.
-
Right-click the top-left cell, and then click Paste.
-
-
To adjust the columns to fit the text, place the cursor between the column headers and double-click.
Click File > Print, specify a printer, and then click Print.
-