
Office 2013 SharePoint in Microsoft 365 Office for business Lync Web App for Lync Online Lync Web App Office 2010 Lync Web App operated by 21Vianet More…Less
Because the Lync Web App and Microsoft 365 are cloud-based technologies, they require interactive browser functionality. This functionality is provided, in part, by JavaScript. You might have to enable JavaScript within your browser in order to ensure that your features work as expected.
Instructions for enabling JavaScript vary by browser. Select your browser from the list to learn how.
-
Click Tools > Internet Options.
-
Click the Security tab > Custom Level.
-
In the Scripting section, click Enable for Active Scripting.
-
In the dialog box that displays, click Yes.
JavaScript is supported in the Microsoft Edge web browser. However, it might have been disabled in your browser by an administrative setting. If you encounter a JavaScript error in Edge:
-
On the More menu (…), select Open with Internet Explorer.
-
Then, follow the procedures for Internet Explorer.
-
If you’re running Windows OS, in the Firefox window, click Tools > Options.
Tip: If you’re running Mac OS, click the Firefox drop-down list > Preferences.
-
On the Content tab, click the Enable JavaScript check box.
-
If you’re running Windows OS, click Tools > Preferences.
Tip: If you’re running Mac OS, from the Safari menu, click >Preferences.
-
Click Preferences > Security tab.
-
Click the Enable JavaScript check box.
-
Click Close and refresh the browser.
If you received an error that says, This site requires use of scripts, which your browser does not currently allow, clear the web browser cache to delete history cookies, and any other website data.
-
Select Preferences > Privacy > Remove all web site data > Remove now.
-
Click the wrench icon on the toolbar.
-
Click Options > Under the Hood.
-
In the Privacy section, click Content settings.
-
Scroll to the JavaScript section and click Allow all sites to run JavaScript (recommended).
-
Close the Options tab and refresh the browser.
Need more help?
Want more options?
Explore subscription benefits, browse training courses, learn how to secure your device, and more.
Communities help you ask and answer questions, give feedback, and hear from experts with rich knowledge.
-
08-17-2006, 01:00 PM
#1
How to enable javascript in Excel?
-
08-17-2006, 04:50 PM
#2
Re: How to enable javascript in Excel?
You can automate Excel from javascript, but AFAIK you cannot run js direcly in excel (except maybe in a HTML page loaded into a
browser control on a form)Maybe you’d care to expand on your requirements.
—
Tim Williams
Palo Alto, CA«CC» <CC@discussions.microsoft.com> wrote in message news:514AB407-A436-4440-A1C8-F111517CEACC@microsoft.com…
>
-
08-18-2006, 04:55 AM
#3
Re: How to enable javascript in Excel?
There’s the ScriptControl, msscript.ocx .
I guess you could SHELL it or pass it to WScript on the command line.NickHK
«CC» <CC@discussions.microsoft.com> wrote in message
news:514AB407-A436-4440-A1C8-F111517CEACC@microsoft.com…
>
-
06-22-2016, 11:10 AM
#4

Registered User
Re: How to enable javascript in Excel?
When I try to import data from the web, I get the message:
Please enable JavaScript to view the page content.Any ideas,,,
-
11-17-2020, 11:56 PM
#5
Registered User
Re: How to enable javascript in Excel?
Neither of your alternatives worked for me�and I’m getting tired of reinventing the wheel once for VBA and once for HTA


Содержание
- Обзор API JavaScript для Excel
- Сведения о концепциях объектной модели
- Сведения о возможностях API
- Опробуйте примеры кода в Script Lab
- Объектная модель JavaScript для Excel в надстройках Office
- Интерфейсы API Office.js для Excel
- Объектная модель для Excel
- Диапазоны
- Образец диапазона
- Диаграммы, таблицы и другие объекты данных
- Создание таблицы
- Создание диаграммы
- Work with worksheets using the Excel JavaScript API
- Get worksheets
- Get the active worksheet
- Set the active worksheet
- Reference worksheets by relative position
- Get the first worksheet
- Get the last worksheet
- Get the next worksheet
- Get the previous worksheet
- Add a worksheet
- Copy an existing worksheet
- Delete a worksheet
- Rename a worksheet
- Move a worksheet
- Set worksheet visibility
- Hide a worksheet
- Unhide a worksheet
- Get a single cell within a worksheet
- Detect data changes
- Detect formula changes
- Handle sorting events
- Find all cells with matching text
- Filter data
- Data protection
- Detect changes to the worksheet protection state
- Page layout and print settings
Обзор API JavaScript для Excel
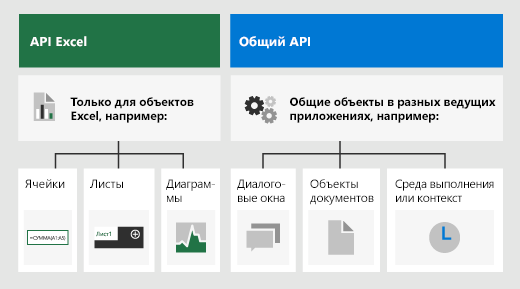
Надстройка Excel взаимодействует с объектами в Excel с помощью API JavaScript для Office, включающего две объектных модели JavaScript:
API JavaScript для Excel. Это API-интерфейсы для определенных приложений в Excel. Появившийся в Office 2016 API JavaScript для Excel предоставляет строго типизированные объекты, с помощью которых можно получать доступ к листам, диапазонам, таблицам, диаграммам и другим объектам.
Общие API. Появившиеся в Office 2013 общие API можно использовать для доступа к таким компонентам, как пользовательский интерфейс, диалоговые окна и параметры клиентов, общие для нескольких типов приложений Office.
В этом разделе рассматривается API JavaScript для Excel, используемый для разработки большинства функций в надстройках и предназначенный для Excel в Интернете, Excel 2016 или более поздних версий. Сведения об общем API см. в статье Общая объектная модель API JavaScript.
Сведения о концепциях объектной модели
Сведения о важных понятиях объектной модели см. в статье Объектная модель JavaScript для Excel в надстройках Office.
Чтобы получить практический опыт доступа к объектам в Excel с помощью API JavaScript для Excel, выполните инструкции из руководства по надстройкам Excel.
Сведения о возможностях API
Каждой основной функции API Excel посвящена статья или набор статей с описанием ее возможностей и соответствующей объектной модели.
Дополнительные сведения об объектной модели API JavaScript для Excel см. в справочной документации по API JavaScript для Excel.
Опробуйте примеры кода в Script Lab
Используйте Script Lab, чтобы быстро начать работу с коллекцией встроенных примеров, демонстрирующих выполнение задач с помощью API. Вы можете выполнять примеры в Script Lab, чтобы сразу увидеть результат в области задач или листе, изучать примеры, чтобы понять принципы действия API, и даже использовать примеры для создания собственных надстроек.
Источник
Объектная модель JavaScript для Excel в надстройках Office
В этой статье описано, как создавать надстройки для Excel 2016 или более поздней версии с помощью API JavaScript для Excel. В статье изложены основные принципы, которые являются фундаментальными при использовании этого API, а также имеются рекомендации по выполнению определенных задач, например чтению данных из большого диапазона или записи данных в него, изменения всех ячеек в диапазоне и много другого.
Сведения об асинхронном типе интерфейсов API Excel и принципах их работы с книгой см. в статье Использование модели API, зависящей от приложения.
Интерфейсы API Office.js для Excel
Надстройка Excel взаимодействует с объектами в Excel с помощью API JavaScript для Office, включающего две объектных модели JavaScript:
API JavaScript для Excel. Появившийся в Office 2016 API JavaScript для Excel предоставляет строго типизированные объекты, с помощью которых можно получать доступ к листам, диапазонам, таблицам, диаграммам и другим объектам.
Общие API. Появившиеся в Office 2013 общие API можно использовать для доступа к таким компонентам, как пользовательский интерфейс, диалоговые окна и параметры клиентов, общие для нескольких типов приложений Office.
Скорее всего, вы будете разрабатывать большую часть функций надстроек для Excel 2016 или более поздней версии с помощью API JavaScript для Excel, но вам также потребуются объекты из общего API. Например:
- Context. объект Context представляет среду выполнения надстройки и предоставляет доступ к ключевым объектам API. Он состоит из данных конфигурации книги, например contentLanguage и officeTheme , а также предоставляет сведения о среде выполнения надстройки, например host и platform . Кроме того, он предоставляет метод requirements.isSetSupported() , с помощью которого можно проверить, поддерживается ли указанный набор обязательных элементов приложением Excel, в котором работает надстройка.
- Document. Объект Document предоставляет метод getFileAsync() , позволяющий скачать файл Excel, в котором работает надстройка.
На рисунке ниже показано, когда можно использовать API JavaScript для Excel или общие API.
Объектная модель для Excel
Чтобы понять API-интерфейсы Excel, вы должны понимать, как компоненты рабочей книги связаны друг с другом.
- Рабочая книга содержит одну или несколько рабочих листов.
- Рабочий лист содержит коллекции тех объектов данных, которые присутствуют на отдельном листе, и предоставляет доступ к ячейкам с помощью объектов Range.
- Range представляет группу смежных клеток.
- Диапазоны используются для создания и размещения таблиц, диаграмм, фигур и других объектов визуализации данных или организации.
- Рабочие книги содержат коллекции некоторых из этих объектов данных (таких как таблицы) для всей рабочей книги.
В API JavaScript для Excel нет объекта или класса Cell. Вместо этого API JavaScript для Excel определяет все ячейки Excel как объекты Range . Отдельные ячейки в пользовательском интерфейсе Excel преобразуются в объект Range с одной ячейкой в API JavaScript для Excel. Один объект Range также может содержать несколько смежных ячеек. Дополнительные сведения см. в статье Работа с ячейками с использованием API JavaScript для Excel.
Диапазоны
Диапазон — это группа непрерывных ячеек в рабочей книге. В надстройках обычно используется нотация в стиле A1 (например, B3 для отдельной ячейки в столбце B и строке 3 или C2:F4 для ячеек из столбцов с C по F и строк с 2 по 4) для определения диапазонов.
Диапазоны имеют три основных свойства: values , formulas , и format . Эти свойства получают или устанавливают значения ячеек, формулы для оценки и визуальное форматирование ячеек.
Образец диапазона
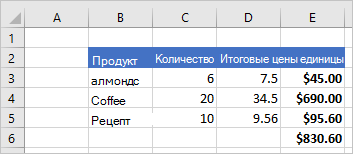
В следующем примере показано, как создавать записи продаж. Эта функция использует объекты Range для установки значений, формул и форматов.
В этом примере создаются следующие данные в текущем листе.
Диаграммы, таблицы и другие объекты данных
API JavaScript для Excel могут создавать и управлять структурами данных и визуализациями в Excel. Таблицы и диаграммы являются двумя наиболее часто используемыми объектами, но API поддерживают сводные таблицы, фигуры, изображения и многое другое.
Создание таблицы
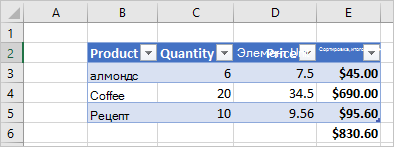
Создавайте таблицы, используя заполненные данными диапазоны. Элементы управления форматированием и таблицами (например, фильтры) автоматически применяются к диапазону.
В следующем примере создается таблица с использованием диапазонов из предыдущего примера.
Использование этого примера кода на листе с предыдущими данными создает следующую таблицу.
Создание диаграммы
Создайте диаграммы для визуализации данных в диапазоне. API поддерживают десятки разновидностей диаграмм, каждая из которых может быть настроена в соответствии с вашими потребностями.
В следующем примере создается простая гистограмма для трех элементов, которая размещается на 100 пикселей ниже верхней части листа.
Выполнение этого примера на листе с предыдущей таблицей создает следующую диаграмму.
Источник
Work with worksheets using the Excel JavaScript API
This article provides code samples that show how to perform common tasks with worksheets using the Excel JavaScript API. For the complete list of properties and methods that the Worksheet and WorksheetCollection objects support, see Worksheet Object (JavaScript API for Excel) and WorksheetCollection Object (JavaScript API for Excel).
The information in this article applies only to regular worksheets; it does not apply to «chart» sheets or «macro» sheets.
Get worksheets
The following code sample gets the collection of worksheets, loads the name property of each worksheet, and writes a message to the console.
The id property of a worksheet uniquely identifies the worksheet in a given workbook and its value will remain the same even when the worksheet is renamed or moved. When a worksheet is deleted from a workbook in Excel on Mac, the id of the deleted worksheet may be reassigned to a new worksheet that is subsequently created.
Get the active worksheet
The following code sample gets the active worksheet, loads its name property, and writes a message to the console.
Set the active worksheet
The following code sample sets the active worksheet to the worksheet named Sample, loads its name property, and writes a message to the console. If there is no worksheet with that name, the activate() method throws an ItemNotFound error.
Reference worksheets by relative position
These examples show how to reference a worksheet by its relative position.
Get the first worksheet
The following code sample gets the first worksheet in the workbook, loads its name property, and writes a message to the console.
Get the last worksheet
The following code sample gets the last worksheet in the workbook, loads its name property, and writes a message to the console.
Get the next worksheet
The following code sample gets the worksheet that follows the active worksheet in the workbook, loads its name property, and writes a message to the console. If there is no worksheet after the active worksheet, the getNext() method throws an ItemNotFound error.
Get the previous worksheet
The following code sample gets the worksheet that precedes the active worksheet in the workbook, loads its name property, and writes a message to the console. If there is no worksheet before the active worksheet, the getPrevious() method throws an ItemNotFound error.
Add a worksheet
The following code sample adds a new worksheet named Sample to the workbook, loads its name and position properties, and writes a message to the console. The new worksheet is added after all existing worksheets.
Copy an existing worksheet
Worksheet.copy adds a new worksheet that is a copy of an existing worksheet. The new worksheet’s name will have a number appended to the end, in a manner consistent with copying a worksheet through the Excel UI (for example, MySheet (2)). Worksheet.copy can take two parameters, both of which are optional:
- positionType — A WorksheetPositionType enum specifying where in the workbook the new worksheet is to be added.
- relativeTo — If the positionType is Before or After , you need to specify a worksheet relative to which the new sheet is to be added (this parameter answers the question «Before or after what?»).
The following code sample copies the current worksheet and inserts the new sheet directly after the current worksheet.
Delete a worksheet
The following code sample deletes the final worksheet in the workbook (as long as it’s not the only sheet in the workbook) and writes a message to the console.
A worksheet with a visibility of «Very Hidden» cannot be deleted with the delete method. If you wish to delete the worksheet anyway, you must first change the visibility.
Rename a worksheet
The following code sample changes the name of the active worksheet to New Name.
Move a worksheet
The following code sample moves a worksheet from the last position in the workbook to the first position in the workbook.
Set worksheet visibility
These examples show how to set the visibility of a worksheet.
Hide a worksheet
The following code sample sets the visibility of worksheet named Sample to hidden, loads its name property, and writes a message to the console.
Unhide a worksheet
The following code sample sets the visibility of worksheet named Sample to visible, loads its name property, and writes a message to the console.
Get a single cell within a worksheet
The following code sample gets the cell that is located in row 2, column 5 of the worksheet named Sample, loads its address and values properties, and writes a message to the console. The values that are passed into the getCell(row: number, column:number) method are the zero-indexed row number and column number for the cell that is being retrieved.
Detect data changes
Your add-in may need to react to users changing the data in a worksheet. To detect these changes, you can register an event handler for the onChanged event of a worksheet. Event handlers for the onChanged event receive a WorksheetChangedEventArgs object when the event fires.
The WorksheetChangedEventArgs object provides information about the changes and the source. Since onChanged fires when either the format or value of the data changes, it can be useful to have your add-in check if the values have actually changed. The details property encapsulates this information as a ChangedEventDetail. The following code sample shows how to display the before and after values and types of a cell that has been changed.
Detect formula changes
Your add-in can track changes to formulas in a worksheet. This is useful when a worksheet is connected to an external database. When the formula changes in the worksheet, the event in this scenario triggers corresponding updates in the external database.
To detect changes to formulas, register an event handler for the onFormulaChanged event of a worksheet. Event handlers for the onFormulaChanged event receive a WorksheetFormulaChangedEventArgs object when the event fires.
The onFormulaChanged event detects when a formula itself changes, not the data value resulting from the formula’s calculation.
The following code sample shows how to register the onFormulaChanged event handler, use the WorksheetFormulaChangedEventArgs object to retrieve the formulaDetails array of the changed formula, and then print out details about the changed formula with the FormulaChangedEventDetail properties.
This code sample only works when a single formula is changed.
Handle sorting events
The onColumnSorted and onRowSorted events indicate when any worksheet data is sorted. These events are connected to individual Worksheet objects and to the workbook’s WorkbookCollection . They fire whether the sorting is done programmatically or manually through the Excel user interface.
onColumnSorted fires when columns are sorted as the result of a left-to-right sort operation. onRowSorted fires when rows are sorted as the result of a top-to-bottom sort operation. Sorting a table using the drop-down menu on a column header results in an onRowSorted event. The event corresponds with what is moving, not what is being considered as the sorting criteria.
The onColumnSorted and onRowSorted events provide their callbacks with WorksheetColumnSortedEventArgs or WorksheetRowSortedEventArgs, respectively. These give more details about the event. In particular, both EventArgs have an address property that represents the rows or columns moved as a result of the sort operation. Any cell with sorted content is included, even if that cell’s value was not part of the sorting criteria.
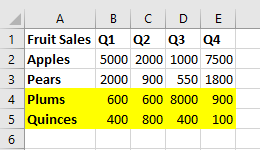
The following images show the ranges returned by the address property for sort events. First, here is the sample data before sorting:
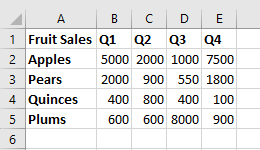
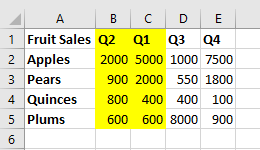
If a top-to-bottom sort is performed on «Q1» (the values in «B«), the following highlighted rows are returned by WorksheetRowSortedEventArgs.address .
If a left-to-right sort is performed on «Quinces» (the values in «4«) on the original data, the following highlighted columns are returned by WorksheetColumnsSortedEventArgs.address .
The following code sample shows how to register an event handler for the Worksheet.onRowSorted event. The handler’s callback clears the fill color for the range, then fills the cells of the moved rows.
Find all cells with matching text
The Worksheet object has a findAll method to search for a specified string within the worksheet. It returns a RangeAreas object, which is a collection of Range objects that can be edited all at once.
The following code sample finds all cells with values equal to the string Complete and colors them green. Note that findAll throws an ItemNotFound error if the specified string doesn’t exist in the worksheet. If you’re uncertain whether the specified string exists in the worksheet, use the findAllOrNullObject method to gracefully handle that scenario.
This section describes how to find cells and ranges using the Worksheet object’s methods. More range retrieval information can be found in object-specific articles.
- For examples that show how to get a range within a worksheet using the Range object, see Get a range using the Excel JavaScript API.
- For examples that show how to get ranges from a Table object, see Work with tables using the Excel JavaScript API.
- For examples that show how to search a large range for multiple sub-ranges based on cell characteristics, see Work with multiple ranges simultaneously in Excel add-ins.
Filter data
An AutoFilter applies data filters across a range within the worksheet. This is created with Worksheet.autoFilter.apply , which has the following parameters.
- range : The range to which the filter is applied, specified as either a Range object or a string.
- columnIndex : The zero-based column index against which the filter criteria is evaluated.
- criteria : A FilterCriteria object determining which rows should be filtered based on the column’s cell.
The first code sample shows how to add a filter to the worksheet’s used range. This filter will hide entries that are not in the top 25%, based on the values in column 3.
The next code sample shows how to refresh the auto-filter using the reapply method. This should be done when the data in the range changes.
The following code sample shows how to use the clearColumnCriteria method to clear the auto-filter from only one column, while leaving the filter active on other columns.
The final auto-filter code sample shows how to remove the auto-filter from the worksheet with the remove method.
An AutoFilter can also be applied to individual tables. See Work with tables using the Excel JavaScript API for more information.
Data protection
Your add-in can control a user’s ability to edit data in a worksheet. The worksheet’s protection property is a WorksheetProtection object with a protect() method. The following example shows a basic scenario toggling the complete protection of the active worksheet.
The protect method has two optional parameters:
- options : A WorksheetProtectionOptions object defining specific editing restrictions.
- password : A string representing the password needed for a user to bypass protection and edit the worksheet.
The article Protect a worksheet has more information about worksheet protection and how to change it through the Excel UI.
Detect changes to the worksheet protection state
The protection state of a worksheet can be changed by an add-in or through the Excel UI. To detect changes to the protection state, register an event handler for the onProtectionChanged event of a worksheet. Event handlers for the onProtectionChanged event receive a WorksheetProtectionChangedEventArgs object when the event fires.
The following code sample shows how to register the onProtectionChanged event handler and use the WorksheetProtectionChangedEventArgs object to retrieve the isProtected , worksheetId , and source properties of the event.
Page layout and print settings
Add-ins have access to page layout settings at a worksheet level. These control how the sheet is printed. A Worksheet object has three layout-related properties: horizontalPageBreaks , verticalPageBreaks , pageLayout .
Worksheet.horizontalPageBreaks and Worksheet.verticalPageBreaks are PageBreakCollections. These are collections of PageBreaks, which specify ranges where manual page breaks are inserted. The following code sample adds a horizontal page break above row 21.
Worksheet.pageLayout is a PageLayout object. This object contains layout and print settings that are not dependent any printer-specific implementation. These settings include margins, orientation, page numbering, title rows, and print area.
The following code sample centers the page (both vertically and horizontally), sets a title row that will be printed at the top of every page, and sets the printed area to a subsection of the worksheet.
Источник
-
#3
Greetings Adison
Welcome to the forum.
Please See: Help Us Help You
In your OP, the url is suppressed, so we can’t see what the page you are querying is publishing.
I can only say the CommandType = 0 is not valid; it must be one the the values specified below for XlCmdType.
Code:
Enum XlCmdType
    Const xlCmdCube = 1
    Const xlCmdSql = 2
    Const xlCmdTable = 3
    Const xlCmdDefault = 4
    Const xlCmdList = 5
End Enum


Enum XlWebSelectionType
    Const xlEntirePage = 1
    Const xlAllTables = 2
    Const xlSpecifiedTables = 3
End Enum
On that,
assuming there are HTML Tables
, instead of collecting the entire page, which would include the JavaScript, could try:
.CmdType = xlCmdTable ‘3
.WebSelectionType = xlSpecifiedTables ‘3
.WebTable = «»»tablename«»» ‘
Note: the HTML will identify the table like:
HTML:
< table id="table3" class="graybox" >js-xlsx введение
кSheetJSПроизведеноjs-xlsxЭто очень удобная библиотека инструментов, которой для чтения и экспорта в Excel нужен только чистый JS. Она имеет мощные функции, поддерживает множество форматов и поддерживаетxls、xlsx、ods(Собственный формат файлов таблицы OpenOffice) и более десятка форматов. Вся эта статья основана наxlsxВозьмем, к примеру, формат.
- Официальный гитхаб:https://github.com/SheetJS/js-xlsx
- Онлайн-демонстрационный адрес поддерживающей демонстрации для этой статьи:http://demo.haoji.me/2017/02/08-js-xlsx/
- Эта статья впервые была опубликована у меня синхронноличный блогсБлог сад。
1.1. Совместимость
Совместимость следующая:

1.2. Как пользоваться
distВ каталоге много JS-файлов, обычно используйтеxlsx.core.min.jsдовольно,xlsx.full.min.jsОн содержит все функциональные модули.

непосредственныйscriptЭтикетка может быть введена:
<script type="text/javascript" src="./js/xlsx.core.min.js"></script>Читать в Excel
Чтение в Excel происходит в основном черезXLSX.read(data, {type: type});Способ достижения, ответьте на звонокWorkBookОсновные значения типа следующие:
base64: Читать в режиме base64;binary: Формат BinaryString (n-й байт — это data.charCodeAt (n))string: Строка в кодировке UTF8;buffer: nodejs Buffer;array: Uint8Array, 8-битный беззнаковый массив;file: Путь к файлу (поддерживается только в nodejs);
2.1. Получить объект книги
2.1.1. Чтение локальных файлов
Непосредственно по коду:
// читаем локальный файл Excel
function readWorkbookFromLocalFile(file, callback) {
    var reader = new FileReader();
    reader.onload = function(e) {
        var data = e.target.result;
        var workbook = XLSX.read(data, {type: 'binary'});
        if(callback) callback(workbook);
    };
    reader.readAsBinaryString(file);
}
2.1.2. Чтение сетевых файлов
// Чтобы прочитать файл Excel из Интернета, URL-адрес должен находиться в том же домене, иначе будет сообщено об ошибке
function readWorkbookFromRemoteFile(url, callback) {
    var xhr = new XMLHttpRequest();
    xhr.open('get', url, true);
    xhr.responseType = 'arraybuffer';
    xhr.onload = function(e) {
        if(xhr.status == 200) {
            var data = new Uint8Array(xhr.response)
            var workbook = XLSX.read(data, {type: 'array'});
            if(callback) callback(workbook);
        }
    };
    xhr.send();
}
2.2. Подробная рабочая тетрадь
2.2.1. Workbook Object
workbookЧто в нем, распечатаем и посмотрим:

можно увидеть,SheetNamesВ нем сохраняются все названия листов, а затемSheetsКонкретное содержимое каждого листа сохраняется (мы называем этоSheet Object). КаждыйsheetЧерез что-то вродеA1Такое значение ключа сохраняет содержимое каждой ячейки, и мы называем его объектом ячейки (Cell Object):

2.2.2. Sheet Object
КаждыйSheet ObjectПредставляет форму, если она не!Те, что в начале, указывают на обычныеcell, В противном случае это означает какое-то особое значение, а именно:
sheet['!ref']: Указывает диапазон всех ячеек, например, от A1 до F8, он записывается какA1:F8;sheet[!merges]: Хранить некоторую информацию о слиянии ячеек, это массив, каждый массив состоит изsсeСоставьте композицию объекта,sЗначит старт,eОзначает конец,rПредставляет строку,cПредставляет столбец;- и многое другое;
Что касается слияния ячеек, в принципе не проблема понять следующую картину:

Результаты приведены ниже:

2.2.3. Объект Cell
Каждая ячейка — это объект (Cell Object),Естьt、v、r、h、wИ другие поля (см.Здесь):
- t: указывает тип содержимого,
sПредставляет тип строки,nПредставляет числовой тип,bПредставляет логический тип,dПредставляет тип даты и т. Д. - v: представляет исходное значение;
- f: представляет формулу, например
B2+B3; - h: HTML-контент
- w: форматированный контент
- r: богатый текстовый контент
rich text - и многое другое
2.2.4. Читать книгу
Обычный метод:
// читаем файл Excel
function outputWorkbook(workbook) {
         var sheetNames = workbook.SheetNames; // набор имен рабочих листов
    sheetNames.forEach(name => {
                 var worksheet = workbook.Sheets [name]; // Указанный рабочий лист можно получить только по имени рабочего листа
        for(var key in worksheet) {
                         // v - исходное значение прочитанной ячейки
            console.log(key, key[0] === '!' ? worksheet[key] : worksheet[key].v);
        }
    });
}
в соответствии с!refОпределите сферу применения Excel, а затем в соответствии с!mergesУбедитесь, что ячейки объединены (если есть), и, наконец, выведите всю таблицу, что вызывает затруднения. К счастью, сам плагин уже написал инструментXLSX.utilsДля непосредственного использования, без нашего собственного обхода, выходные данные инструмента в основном включают следующее:

Некоторые из них обычно не используются, наиболее часто используются:
XLSX.utils.sheet_to_csv: Создать формат CSVXLSX.utils.sheet_to_txt: Создать текстовый форматXLSX.utils.sheet_to_html: Создать формат HTMLXLSX.utils.sheet_to_json: Выходной формат JSON
Чаще всего используютсяsheet_to_csvили жеsheet_to_html, Формат, объединение ячеек и другая информация будут игнорироваться при преобразовании в CSV, поэтому сложные таблицы могут быть неприменимы. Если вы конвертируете в html, ячейки будут объединены, но результат будет<html></html>Код вместо<table></table>, Это неудобно, когда вам нужно внести некоторые изменения в форму, поэтому вам все равно придется использовать соответствующие инструменты в зависимости от ситуации.
Вот простой пример вывода результатов путем преобразования в CSV, вы можете щелкнуть здесь, чтобы просмотретьДЕМО онлайн:
function readWorkbook(workbook)
{
         var sheetNames = workbook.SheetNames; // набор имен рабочих листов
         var worksheet = workbook.Sheets [sheetNames [0]]; // здесь мы читаем только первый лист
    var csv = XLSX.utils.sheet_to_csv(worksheet);
    document.getElementById('result').innerHTML = csv2table(csv);
}

 // Преобразование csv в простую таблицу, игнорирование слияния ячеек, добавление индекса, аналогичного excel, в первой строке и первом столбце
function csv2table(csv)
{
    var html = '<table>';
    var rows = csv.split('n');
         rows.pop (); // последняя строка бесполезна
    rows.forEach(function(row, idx) {
        var columns = row.split(',');
                 columns.unshift (idx + 1); // добавляем индекс строки
                 if (idx == 0) {// добавляем индекс столбца
            html += '<tr>';
            for(var i=0; i<columns.length; i++) {
                html += '<th>' + (i==0?'':String.fromCharCode(65+i-1)) + '</th>';
            }
            html += '</tr>';
        }
        html += '<tr>';
        columns.forEach(function(column) {
            html += '<td>'+column+'</td>';
        });
        html += '</tr>';
    });
    html += '</table>';
    return html;
}
Экспорт в Excel
Существует два типа экспорта: один основан на существующей модификации Excel, другой — нового поколения, первый относительно прост, здесь мы сосредоточимся на втором.
3.1. Создайте собственный рукописный код
Экспорт файла Excel, в основном, как его создатьsheet, Здесь мы пишем простой пример csv для Excel:
// csv в объект листа
function csv2sheet(csv) {
         var sheet = {}; // лист, который будет сгенерирован
    csv = csv.split('n');
    csv.forEach(function(row, i) {
        row = row.split(',');
        if(i == 0) sheet['!ref'] = 'A1:'+String.fromCharCode(65+row.length-1)+(csv.length-1);
        row.forEach(function(col, j) {
            sheet[String.fromCharCode(65+j)+(i+1)] = {v: col};
        });
    });
    return sheet;
}

 // Преобразование листа в объект blob окончательного файла Excel, а затем использование URL.createObjectURL для загрузки
function sheet2blob(sheet, sheetName) {
    sheetName = sheetName || 'sheet1';
    var workbook = {
        SheetNames: [sheetName],
        Sheets: {}
    };
    workbook.Sheets[sheetName] = sheet;
         // Создание элементов конфигурации для Excel
    var wopts = {
                 bookType: 'xlsx', // тип создаваемого файла
                 bookSST: false, // Следует ли генерировать общую таблицу строк, официальное объяснение состоит в том, что если она включена, скорость генерации уменьшится, но есть лучшая совместимость с устройствами IOS более низкой версии
        type: 'binary'
    };
    var wbout = XLSX.write(workbook, wopts);
    var blob = new Blob([s2ab(wbout)], {type:"application/octet-stream"});
         // Строка в ArrayBuffer
    function s2ab(s) {
        var buf = new ArrayBuffer(s.length);
        var view = new Uint8Array(buf);
        for (var i=0; i!=s.length; ++i) view[i] = s.charCodeAt(i) & 0xFF;
        return buf;
    }
    return blob;
}
Получите объект blob выше, и вы можете загрузить его напрямую, см. Мой предыдущийJS всплывает диалоговое окно загрузкиИнкапсулирован внутриopenDownloadDialogметод:
/**
   * Общий метод открытия диалогового окна загрузки не тестировался на совместимость
   * @param url-адрес загрузки, это также может быть объект blob, обязательно
   * @param saveName имя файла сохранения, необязательно
 */
function openDownloadDialog(url, saveName)
{
    if(typeof url == 'object' && url instanceof Blob)
    {
                 url = URL.createObjectURL (url); // Создание адреса большого двоичного объекта
    }
    var aLink = document.createElement('a');
    aLink.href = url;
         aLink.download = saveName || ''; // новый атрибут HTML5, укажите имя файла сохранения, суффикс не требуется, обратите внимание, что он не вступит в силу в режиме file: ///
    var event;
    if(window.MouseEvent) event = new MouseEvent('click');
    else
    {
        event = document.createEvent('MouseEvents');
        event.initMouseEvent('click', true, false, window, 0, 0, 0, 0, 0, false, false, false, false, 0, null);
    }
    aLink.dispatchEvent(event);
}
Таким образом, окончательная загрузка выглядит следующим образом:
// Передаем csv, и после выполнения появится окно загрузки
function exportExcel(csv) {
    var sheet = csv2sheet(csv);
    var blob = sheet2blob(sheet);
         openDownloadDialog (blob, 'Export.xlsx');
}
3.2. Используйте официальные инструменты для создания
На самом деле, нам не нужно писать ни один из вышеперечисленных кодов. Чиновник предоставил нам готовые инструменты, в основном в том числе:
aoa_to_sheet: Этот класс инструментов является наиболее мощным и практичным.Преобразование двумерного массива в лист автоматически обработает числовые, строковые, логические, даты и другие типы данных;table_to_sheet: Поставить одинtable domНепосредственно преобразованный в лист, он будет автоматически распознанcolspanсrowspanИ преобразовать его в соответствующую ячейку и объединить;json_to_sheet: Преобразовать массив объектов в лист;
aoa_to_sheetПример:
var aoa = [
         ["Имя", "Пол", "Возраст", "Время регистрации"],
         ['Zhang San', 'Male', 18 лет, новое свидание ()],
         [' ', ' ', 22, новая дата ()]
];
var sheet = XLSX.utils.aoa_to_sheet(aoa);
openDownloadDialog (sheet2blob (лист), 'Export.xlsx');table_to_sheetЕще проще, прямоXLSX.utils.table_to_sheet($('table')[0])Может
3.3. Решение проблемы слияния ячеек
Вообще говоря, интерфейсное поколениеexcelВместоcsvОсновная цель — решить проблему, заключающуюся в том, что csv не может выполнить слияние ячеек. В противном случае было бы неплохо напрямую экспортировать файл csv. Зачем вводить несколько сотен килобайт плагинов.
Предположим, мы хотим сгенерировать файл Excel в следующем формате, гдеA1-C1Чтобы объединить ячейки:

код показан ниже:
var aoa = [
         ['Основная информация', null, null, 'Другая информация'], // Особое внимание следует уделить резервированию 2 нулевых значений за объединенным местом
         ["Имя", "Пол", "Возраст", "Время регистрации"],
         ['Zhang San', 'Male', 18 лет, новое свидание ()],
         [' ', ' ', 22, новая дата ()]
];
var sheet = XLSX.utils.aoa_to_sheet(aoa);
sheet['!merges'] = [
         // Устанавливаем слияние ячеек A1-C1
    {s: {r: 0, c: 0}, e: {r: 0, c: 2}}
];
 openDownloadDialog (sheet2blob (sheet), 'Слияние ячеек example.xlsx');
Стоит обратить внимание на использование объединенных ячеек.nullЗарезервируйте место, иначе следующий контент (в этом примере четвертый столбецДополнительная информация) Будет перезаписан.
3.4. Пользовательский стиль
Обычная версия не поддерживает определение шрифтов, цветов, цветов фона и т. Д., Вы можете использовать ее, если вам нужна эта функция.профессиональная версия, Вроде заряжено, потому что официальный сайт не видел адреса загрузки.
Персональный сайт:https://haoji.me
github:https://github.com/sxei
Сад блогов:http://www.cnblogs.com/liuxianan
авторское право © 2012-2018 одноклассник Xiaominggrapecity.com.cn/spreadjs/excel-online/content/index.html