
Excel для Microsoft 365 Outlook для Microsoft 365 PowerPoint для Microsoft 365 Visio, план 2 Excel 2021 Outlook 2021 PowerPoint 2021 Visio профессиональный 2021 Visio стандартный 2021 Excel 2019 Outlook 2019 PowerPoint 2019 Visio профессиональный 2019 Visio стандартный 2019 Excel 2016 Outlook 2016 PowerPoint 2016 Visio профессиональный 2016 Visio стандартный 2016 Excel 2013 Outlook 2013 PowerPoint 2013 Visio профессиональный 2013 Visio 2013 Excel 2010 Outlook 2010 PowerPoint 2010 Visio 2010 Visio стандартный 2010 Еще…Меньше
Вкладка Разработчик по умолчанию не отображается, но ее можно добавить на ленту.
-
На вкладке Файл перейдите в раздел Параметры > настройка ленты.
-
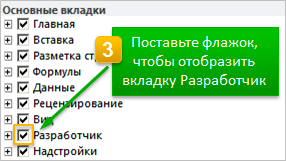
В разделе Настройка ленты в списке Основные вкладки установите флажок Разработчик.
После отображения вкладки вкладка Разработчик остается видимой, если вы не снимите флажок или не переустановите программу Microsoft 365.
Вкладка Разработчик — это место, куда можно перейти, если вы хотите выполнить или использовать следующие действия:
-
написания макросов;
-
запуска ранее записанных макросов;
-
использования XML-команд;
-
использования элементов ActiveX;
-
Создание приложений для использования с программами Microsoft 365.
-
использования элементов управления формы в Microsoft Excel;
-
работы с таблицей свойств фигуры в Microsoft Visio;
-
создания фигур и наборов элементов в Microsoft Visio.
Нужна дополнительная помощь?
Каждый, кто сталкивался с написанием макросов в Excel версий 2007 и позже, слышал, что существует вкладка Разработчик. А ведь в ней можно работать не только с возможностями макросов, но и создавать элементы управления (кнопки запуска макросов), настраивать импорт через XML и так далее. Мощное и удобное дополнение к имеющимся вкладкам.
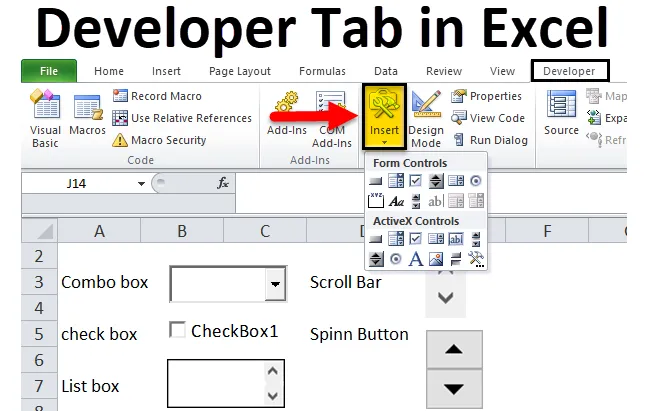
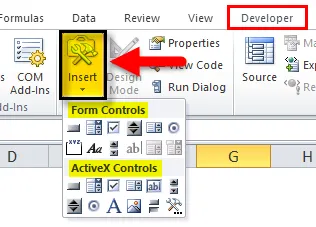
Поскольку в Excel 2007 в отличие от версии 2003 добавили Ленту команд, появились связанные с ней новые возможности. Одна из них — очень удобная вкладка Разработчик. Как видно на рисунке, на ней есть довольно большое количество функций, которые удобно сразу вызывать и не лезть вглубь программы.

Она не доступна изначально, но легко включается через Настройки Excel:
Содержание
- Вкладка Разработчик. Как включить?
- Вкладка Разработчик. Основные возможности
- Раздел Код
- Раздел Элементы управления
- Раздел XML
- Раздел Изменить
- Похожие статьи
Вкладка Разработчик. Как включить?
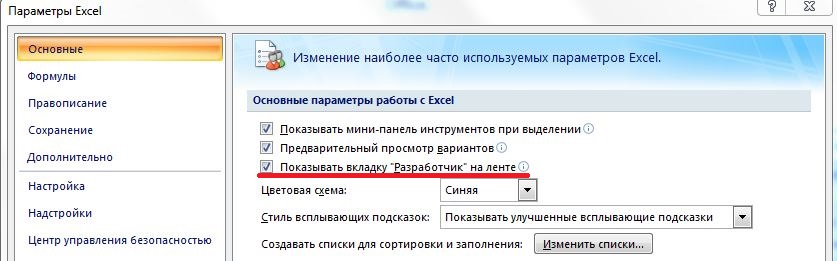
Заходим в Настройки Excel (круглая кнопка в левом верхнем углу) — нажимаем кнопку Параметры Excel — первая вкладка Основные — ставим галочку Показывать вкладку «Разработчик» на ленте.

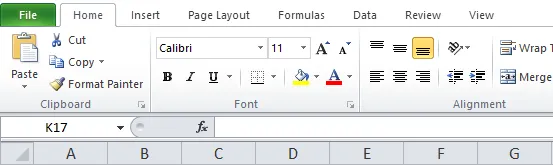
Вкладка должна появиться рядом со вкладкой Вид.
Для Excel 2016 зайдите в Параметры — Настройка ленты — в разделе Основные вкладки справа поставьте галочку в пункте Разработчик, и нажмите кнопку ОК.
Вкладка Разработчик. Основные возможности
Теперь, когда у нас доступен нужный раздел ленты, пробежимся по ее возможностям.
Раздел Код

Опишем каждую из доступных кнопок
Visual Basic — с ее помощью заходим в окно VBA, где можно написать макрос, горячая клавиша Alt + F11
Макросы — откроется панель выбора макросов, горячая клавиша Alt + F8. Подробно о том как запустить макрос можно читать здесь.
Запись макроса — повторяет кнопку внизу панели, для записи макроса макрорекордером.
![]()
Относительные ссылки — интересная функция, подробней о которой можно прочитать, если навести на нее мышкой:

Вроде бы довольно понятно. Удобно. Если нужны пояснения, пишите в комментарии
Безопасность макросов — вызывает меню настроек, где нужно включить макросы, прежде чем начать с ними работу. Довольно распространенный вопрос, что делать если макросы не работают.
Раздел Элементы управления
Элементы управления — это дополнительные виджеты, которые можно добавить на лист для быстрого выполнения написанных на VBA команд. Возможностей здесь довольно много.

Вставить — выпадает менюха с различными элементами, которые можно добавить на лист. Чекбоксы, полосы прокрутки и так далее.

Самый популярный элемент для вставки — это, конечно же, кнопка. При ее помощи можно, например, запустить написанный макрос.
Режим конструктора — если вы вставили кнопку, то вам нужно управлять ее свойствами и размерами, это возможно в режиме конструктора.
Свойства — так же нам нужно управлять свойствами кнопок или другого объекта, в том числе листа Excel. Чтобы открыть меню свойств кнопки, запустите режим конструктора, а затем нажмите Свойства. А здесь уже выбор неплохой — цвет, шрифт, границы, печатать объект или нет и т.д. и т.п.

Просмотр кода — во многом дублирует кнопку Visual Basic из раздела Код, но при нажатии этой кнопки, вы сразу попадаете на код привязанный к объекту. А когда объектов много, это очень удобно!
Отобразить окно — если вам не хватило имеющихся элементов управления, вы можете создать свой. Это тема для отдельной большой статьи. Если вы молодец, и уже создали такое окно, то вы сможете его отобразить через эту кнопку.
Раздел XML

XML (Extensible Markup Language) — расширяемый язык разметки, разработанный специально для размещения информации в World Wide Web. Довольно часто применяется для разного рода обменов данными, как универсальный язык. Например, между сайтом и Excel, 1C и Access и так далее.
Кнопка Источник — при помощи Excel мы можем перевести данные в XML и после использовать их в веб, например, на сайте.
Если вы создали таблицу, то для нее нужно прописать карту XML. Об этом, думаю, тоже стоит написать отдельную статью. В ближайшее время.
Пакеты расширений — по умолчанию подключен пакет Actions Pane 3.
Импорт/Экспорт — если вы настроили импорт или экспорт данных из XML, вы можете передавать или получать данные этими кнопками.
Раздел Изменить

Здесь единственная кнопка — Область документа. Как говорится, «век живи — век учись», раньше не встречался с этой возможностью. Почитал в интернете скудную информацию. Оказывается:
При ее нажатии открывается окно настройки Область сведений о документе.

Область сведений — это те сведения/примечания, которые записываются о самом файле в свойствах документа: автор, тема, категория и т.д.
Если нажать кнопку Всегда показывать область сведений, то при повторном открытии в самом документе вы сможете записать комментарии к документу или изменить автора, не заходя в свойства.
Если остались вопросы, пишите смело в комментарии.
Allows users to create VBA applications, design forms, create macros, import and export XML data, etc.
What is the Developer Tab?
The Developer tab, which is a built-in tab in Excel, provides the features needed to use Visual Basic for Applications (VBA) and perform a macro operation. The tab is disabled by default. It must be enabled first in the Options section on the File menu to make it visible on the toolbar at the top of the Excel window.
Summary
- The Developer tab is a feature included in Microsoft Excel, and it is usually hidden by default.
- The tab allows users to create VBA applications, design forms, create macros, import and export XML data, etc.
- The Developer tab must be enabled from the Options section in the File menu in order to appear on the toolbar of the Excel window.
Importance of Developer Tab in Excel
Microsoft Excel is one of the most important Microsoft Office applications that are available to finance professionals. It helps in creating reports, analyzing large volumes of data, generating reports, etc. The spreadsheet application makes it easy for financial analysts, investment bankers, and portfolio managers to make decisions with ease.
Finance professionals can evaluate the financial performance of companies, simulate expected outcomes, and even compare investment scenarios. When the Developer tab is activated in Excel, they carry out more advanced functions such as designing forms, writing code, creating macros, as well as importing and exporting XML file formats.
How to Add the Developer Tab to the Excel Ribbon?
The Developer tab is usually hidden by default, and the user needs to activate it from the Options section. Follow the following steps to make the Developer tab visible:
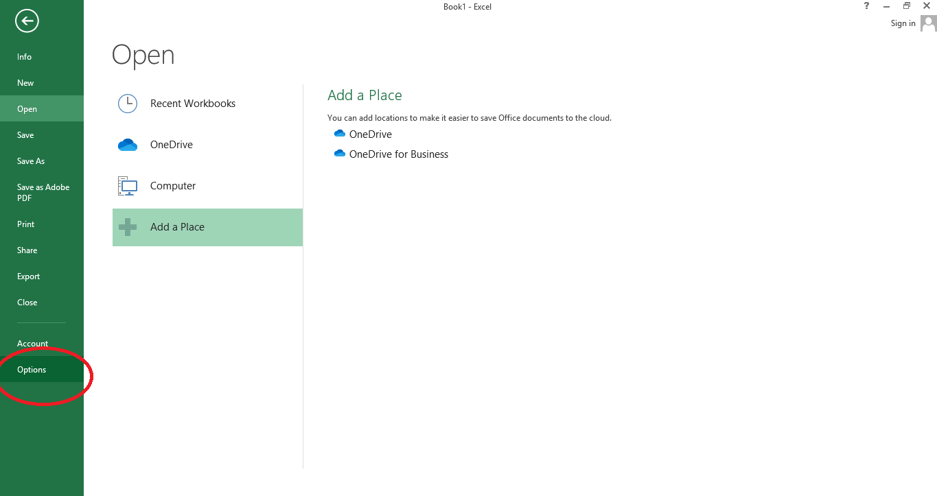
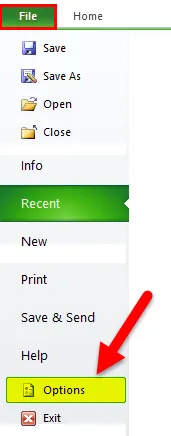
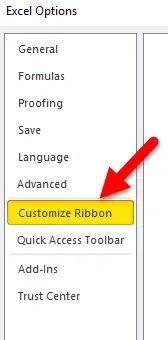
1. Click on the File menu, and scroll to the Options menu. Click Options from the drop-down menu to open the Excel Options window as follows.
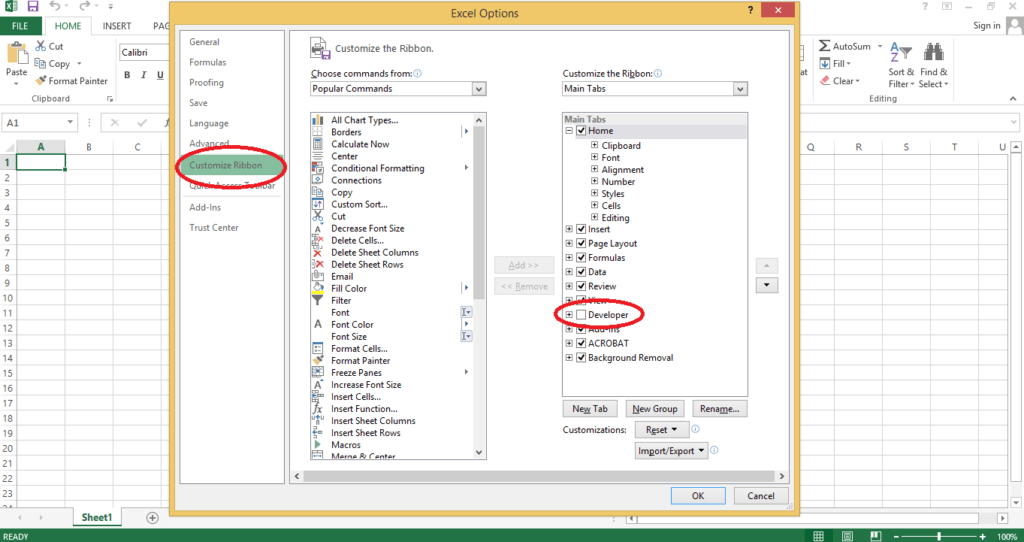
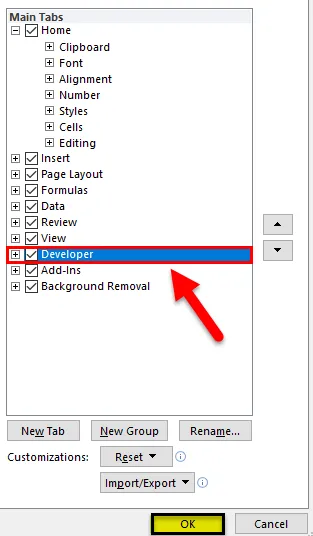
2. Click the Customize Ribbon option in the Excel Options window. Then, on the right side under the list of main tabs, click on the Developer checkbox to tick the box. Click the OK button.
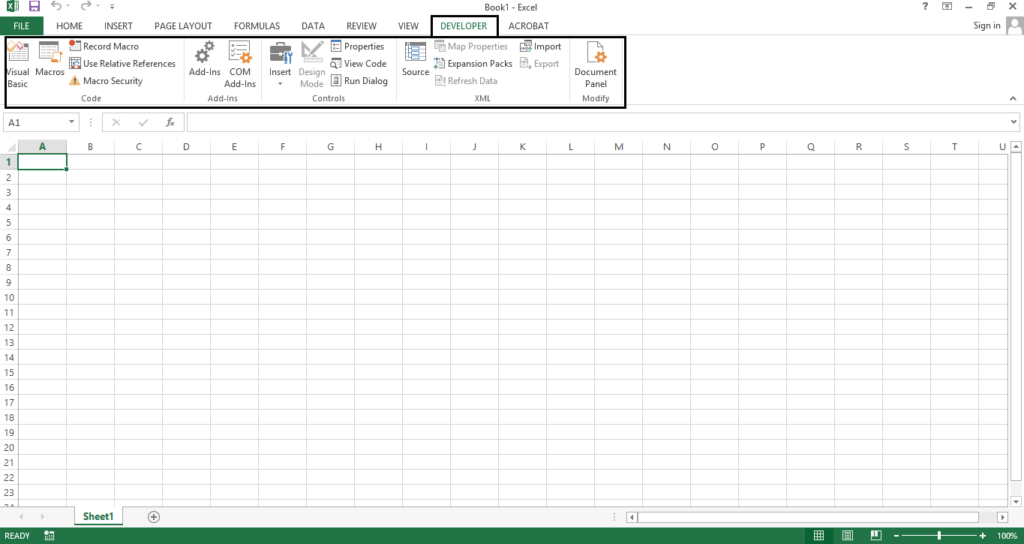
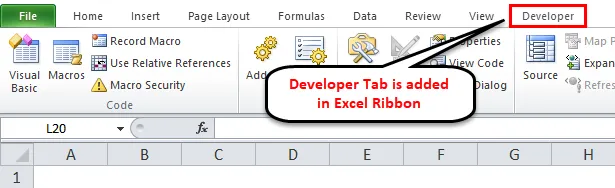
3. The Developer tab will appear on the default tabs at the top of the Excel window. The tab contains a list of all features that you will need for advanced functions. It will remain visible unless you uncheck the Developer option or uninstall the Microsoft Office suite.
Options in the Developer Tab
The following are some of the useful options available in the Excel Developer Tab:
1. Macros
The Macros option is the code group in the Developer tab, and it gives users access to a list of macros that they can work with. Users can record new macros, run macros, and even manage already recorded macros. A macro is a set of instructions that a user can record and get them repeated automatically once a specific action is carried out.
Once you click on the “Record Macro” option under the Developer tab, Excel will automatically start recording the user’s actions in the program. Clicking the “Record Macro” again will stop recording the macro, and save it for later use.
Under the Macro options, users can also open the Visual Basic for Application (VBA) Editor to create, edit, and record macros that can perform frequent or repetitive tasks in MS Office applications. While users can still create macros in the traditional manner, writing a macro from the VBA Editor provides more flexibility, and users can complete more complicated tasks using VBA. The Windows shortcut for launching the VBA Editor is Alt+F11.
2. Add-ins
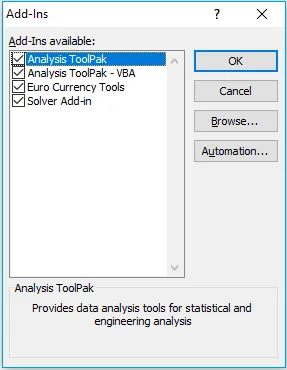
Add-ins are additional programs that users can install to get additional features, functionalities, and commands in Excel. When a user installs Excel for the first time, add-ins are not immediately available, and users need to install and activate them first.
Some of the Excel add-ins are built within the application, such as Analysis Toolpak and Solver, while others are developed by solution providers to perform specific functions. Users can also create an add-in by writing or recording the code in a module, saving it as an Excel add-in, and then putting the add-in to the Quick Access toolbar.
3. Interactive controls
There are two types of controls in Excel worksheets that are used on worksheet forms. They include Form Controls and ActiveX Controls. Form Controls are simple to use. On the other hand, ActiveX is more advanced, and it provides a flexible design that users can use in VBA.
Users can insert the controls in a worksheet, edit the VBA code for control, and switch the design mode to on or off. Users can also use the controls to insert interactive tools such as radio buttons, checkboxes, and combo boxes.
4. XML commands
The Developer tab also includes the XML Source task panel that allows users to import and export XML data that is created from other applications or databases. The section also helps manage expansion packs that may be included in an active worksheet. Users can also exchange XML data between different applications.
Additional Resources
In order to help you become a world-class financial analyst and advance your career to your fullest potential, these additional resources will be very helpful:
- Excel VBA
- How to Add a VBA Button in Excel?
- How to Debug Code?
- VBA Glossary
- See all Excel resources
1 звезда
2 звезды
3 звезды
4 звезды
5 звезд

В офисной программе Excel можно открыть панель с инструментами разработчика, которые помогут в создании таблиц и макросов. Мы расскажем, как активировать дополнительные функции в документе Excel.


Откройте инструменты разработчика и начните создавать макросы и приложения для программ Microsoft Office. Мы покажем, как сделать это в Excel 2007 и более поздних версиях программы.
Microsoft Office Excel 2007
- Откройте меню «Файл» — кнопка в виде значка Windows в левом верхнем углу.
- Выберите раздел «Параметры Excel» и подраздел «Основные».
- Поставьте галочку напротив пункта «Показывать вкладку «Разработчик» на ленте».
Microsoft Office Excel 2010, 2013, 2016
- Откройте меню «Файл» — «Параметры» — «Настройка ленты».
- В списке «Основные вкладки» установите флажок напротив пункта «Разработчик».
- Нажмите «ОК», чтобы подтвердить свое решение. Инструменты разрабочика появятся в ленте основных вкладок Excel.
Читайте также:
- Как изменить цвет ссылки в PowerPoint?
- Не активируется Microsoft Office — что делать?
- Excel: 10 формул для работы в офисе
Фото:Microsoft Office Excel 2007

Редактор направлений «Мобильные устройства» и «Техника для дома»
Была ли статья интересна?
- Вкладка разработчика в Excel
Вкладка Excel Developer (Оглавление)
- Вкладка разработчика в Excel
- Как добавить вкладку разработчика в ленту Excel?
- Разделы вкладок разработчика и их использование
Вкладка разработчика в Excel
Вкладка разработчика в Excel является одним из наиболее значимых и очень полезных и используемых параметров в Excel. Есть несколько приложений с вкладкой Разработчик в Excel.
- С помощью редактора Visual Basic на вкладке разработчика вы можете создавать, записывать и редактировать макросы, которые могут автоматизировать ваши повторяющиеся или ручные задачи в приложениях Office.
- Запустить макросы, которые были записаны ранее.
- Использование относительной ссылки для записи макроса (применение этой ссылки к другому диапазону ячеек или рабочему листу или рабочей книге для запуска макроса)
- Использование команд XML (для импорта и экспорта данных расширяемого языка разметки (XML), созданных из других баз данных и приложений, а также позволяющих обмениваться данными между различными приложениями.
- Применение форм и элементов управления ActiveX в Microsoft Excel, например. Кнопки, полоса прокрутки и флажки.
Как добавить вкладку разработчика в ленту Excel?
Вкладка разработчика в Excel помогает создать макрос, импортировать и экспортировать файлы XML или вставить форму или активные элементы управления.
В некоторых версиях по умолчанию вкладка «Разработчик» в Excel не отображается, поэтому ее необходимо добавить.
Вкладка разработчика в Excel не будет видна, если вы не активируете ее из меню настроек. Чтобы активировать вкладку «Разработчик» в Excel, выполните следующие действия.
Шаг 1. Сначала нажмите кнопку «Файл» в верхнем левом углу экрана, а затем нажмите кнопку «Параметры» в нижнем левом углу экрана.
Или
Вы можете щелкнуть правой кнопкой мыши в любом месте ленты Excel, а затем нажать Настроить ленту

Шаг 2: Появится окно «Параметры Excel», нажмите кнопку «Настроить ленту», расположенную в списке параметров в левой части окна Параметры Excel.
Шаг 3: Теперь вы можете найти опцию «Разработчик» в «Главных вкладках», и вы можете поставить галочку или флажок рядом с ней. Как только это будет сделано, нажмите кнопку «ОК» в правом нижнем углу окна параметров Excel.
Шаг 4. Теперь вы можете видеть, что вкладка «Разработчик» добавлена в ленту Excel,
Разделы вкладок разработчика и их использование
Вкладка для разработчиков в Excel состоит из четырех разделов (ниже отмечены чёрным цветом отмеченные поля)

Давайте рассмотрим различные разделы вкладки разработчика в Excel.
- Код
Excel поддерживает базовое программирование для создания мощных сценариев и действий в Excel с параметрами макросов Visual Basic и Excel, где вы можете создавать, записывать и редактировать макросы, которые могут автоматизировать ваши повторяющиеся или ручные задачи в приложениях Office
- Надстройки
Надстройки в Excel добавляются для получения дополнительных или дополнительных функций, функций и команд в ваших книгах.
По умолчанию надстройки не доступны сразу в Excel, когда это требуется, его нужно сначала установить и активировать, чтобы использовать.
Немногие из них являются встроенными, которые доступны в Excel, а именно Solver и Analysis Toolpak, которые можно добавлять или удалять с помощью надстроек в параметрах Excel.

Существуют различные типы надстроек, например надстройки Visual Basic для приложений (VBA) Надстройки компонентной объектной модели (COM) и надстройки DLL
Надстройки Visual Basic для приложений (VBA) Надстройки компонентной объектной модели (COM) обычно разрабатываются или разрабатываются разработчиками и поставщиками решений.
- Элементы управления: элементы управления формы и элементы управления ActiveX.
В электронной таблице Excel есть два разных типа элементов управления, которые в основном похожи, но их внешний вид различается, например, элементы управления формы и элементы управления ActiveX.
Оба они используются в формах рабочего листа.
Параметры управления формой просты и просты в использовании в самом Excel для создания, тогда как элемент управления ActiveX немного продвинут, обеспечивает более гибкий дизайн, который чаще всего используется в Excel VBA, где он появляется или отображается как объекты, которые вы можете использовать в своем код.
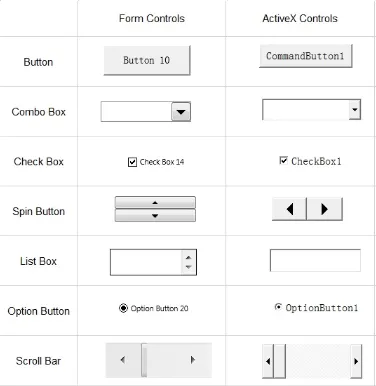
На вкладке разработчика в Excel есть 11 типов элементов управления.
- Флажок:
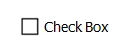
Он также называется блоком галочек или блоком галочек или блоком выбора, где он управляет отображением галочки, когда он выбран. это маленькая квадратная форма, где вы можете выбрать или отменить выбор данного параметра
например, правда / ложь или да / нет в опросах общественного мнения.
- Командная кнопка:
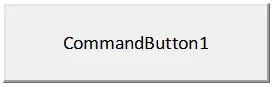
Кнопки команд или кнопки используются для запуска или запуска макроса, он выполняет задачу, когда вы нажимаете на него.
- Поле со списком :

Интерактивный инструмент для расширенного взаимодействия с пользователем. Это выпадающий список, из которого вы можете выбрать или добавить элементы по вашему выбору в список. Вы можете выбрать элемент по вашему выбору, введя текст в поле со списком или выбрав его из списка.
- Контроль изображения:
Он встраивает изображение или изображение, такое как JPG.webp, JPEG.webp, растровое изображение, файлы GIF и форматы PNG.
- Метка:
Он используется для отображения информации или описательного текста или инструкций. Это может быть заголовок или заголовок.
- Окно списка:
Он используется для отображения списка элементов в списке, из которого вы можете выбрать один или несколько. По умолчанию параметры или варианты отображаются вертикально.
- Кнопка выбора:

Он используется для выбора только одного варианта из нескольких вариантов в группе. визуально вы можете указать, выбрана ли кнопка управления опциями или нет. Он связан с ячейкой рабочего листа. Когда вы выбираете кнопку выбора, значение будет «ИСТИНА» или, если вы отмените выбор, значение будет «ЛОЖЬ».
Полоса прокрутки:
Это поможет вам легко перемещаться по большому списку предметов, прокручивая их по вертикали или по горизонтали. Стрелки прокрутки в полосе прокрутки могут быть вверх / вниз или в стороны.
- Кнопка Spin:
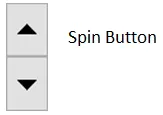
Используется для уменьшения или увеличения числа или значения ячейки. Кнопка Spin полезна для отображения максимального и минимального значения заданного диапазона.
- Текстовое окно:

Используется для размещения текста в них. Это может быть только для чтения или в заблокированном формате. В текстовое поле можно ввести несколько строк.
- Кнопка-переключатель:
В основном он используется для скрытия или отображения диапазона строк или столбцов, а также для скрытия или отображения диаграммы.
- Использование XML- команд.
Для импорта и экспорта данных расширяемого языка разметки (XML), созданных из других баз данных и приложений, а также позволяющих обмениваться данными между различными приложениями.
То, что нужно запомнить
Помимо вышеупомянутого использования, вкладка разработчика в Excel также помогает для следующего:
- Создавать или разрабатывать приложения, которые можно использовать в программах Microsoft Office.
- Работа с Shape Sheet в приложении для создания диаграмм и векторной графики (Microsoft Visio)
- Создавайте новые формы и трафареты в Microsoft Visio.
- Вкладка «Разработчик» в Excel также предоставляет вам быстрый доступ к некоторым более продвинутым функциям и функциям.
Рекомендуемые статьи
Это было руководство к вкладке разработчика в Excel. Здесь мы обсудим, как добавить вкладку «Разработчик» в ленте Excel, а также разделы вкладки «Разработчик» и ее различные варианты использования. Вы также можете посмотреть другие статьи по теме:
- Как обернуть текст в Excel?
- Конвертировать строки в столбцы
- Как объединить таблицы в Excel?
- Функция квадратного корня в Excel
Отображение вкладки «Разработчик»
- На вкладке файл выберите Параметры> Настройка ленты.
- В разделе Настройка ленты в списке Основные вкладки установите флажок Разработчик.
Как добавить режим разработчика в Excel?
Вкладка Разработчик в Excel
- Щелкните правой кнопкой мыши в любом месте на Ленте и нажмите Customize the Ribbon (Настроить ленту).
- С правой стороны открывшегося диалогового окна под надписью Customize the Ribbon (Настроить ленту) при необходимости выберите Main Tabs (Основные вкладки) .
- Поставьте галочку в ячейке Developer (Разработчик).
Как включить панель разработчика в Excel 2007?
Отображение вкладки «Разработчик» на ленте Microsoft Office Excel 2007/2010: – нажмите кнопку Office –> Параметры Excel; – в открывшемся диалоговом окне Параметры Excel в меню (слева) выберите Основные; – в разделе Основные параметры работы с Excel установите флажок Показывать вкладку «Разработчик» на ленте –> OK.
Как открыть VBA в Excel?
Вставляем код VBA в книгу Excel
- Открываем рабочую книгу в Excel.
- Нажатием Alt+F11 вызываем окно редактора Visual Basic.
- На панели Project-VBAProject кликаем правой кнопкой мыши по имени рабочей книги (в левой верхней части окна редактора) и в контекстном меню выбираем Insert > Module.
Как включить режим конструктора в Excel 2016?
На вкладке Разработчик в группе элементы управления включите Режим конструктора.
…
Если вкладка Разработчик недоступна, отобразите ее:
- Откройте вкладку Файл и выберите пункт Параметры.
- В раскрывающемся списке настроить ленту выберите Основные вкладки.
- Установите флажок Разработчик.
Как добавить кнопку в Excel?
Добавление кнопки (элемент управления формы)
- На вкладке разработчик в группе элементы управления нажмите кнопку Вставить, а затем в разделе элементы управления формынажмите кнопку .
- Щелкните на листе место, где должен быть расположен левый верхний угол кнопки. …
- Назначьте кнопку макроса, а затем нажмите кнопку ОК.
Где находится разработчик в Excel 2010?
Microsoft Office Excel 2010, 2013, 2016
- Откройте меню «Файл» — «Параметры» — «Настройка ленты».
- В списке «Основные вкладки» установите флажок напротив пункта «Разработчик».
- Нажмите «ОК», чтобы подтвердить свое решение. Инструменты разрабочика появятся в ленте основных вкладок Excel.
Почему нет вкладки Разработчик в Excel?
Вкладка » разработчик » не отображается по умолчанию, но ее можно добавить на ленту. В меню Word выберите пункт Параметры. Выберите элемент Лента и панель инструментов , > настроить ленту > Основные вкладки. Установите флажок разработчик и нажмите кнопку сохранить.
Как включить VBA в Excel 2007?
Excel
- Нажмите кнопку Microsoft Office. , а затем — Параметры Excel.
- Выберите Центр управления безопасностью > Параметры центра управления безопасностью > Параметры макросов.
- Выберите нужные параметры. Отключить все макросы без уведомления. Выберите этот параметр, если не доверяете макросам.
Как писать макросы в Excel?
Чтобы записать макрос, следуйте инструкциям ниже.
- На вкладке Разработчик в группе Код нажмите кнопку Запись макроса. …
- В поле Имя макроса укажите имя макроса. …
- Чтобы назначить сочетание клавиш для запуска макроса, в поле Сочетание клавиш введите любую строчную или прописную букву.
Где находятся элементы управления в Excel?
Чтобы добавить список в Excel 2007 и более поздних версий, откройте вкладку разработчик , нажмите кнопку Вставить в группе элементы управления , а затем в разделе элементы управления формывыберите пункт форма списка (элемент управления) .
Где сохраняются файлы Excel?
Как и в предыдущих версиях программы, файлы Microsoft Excel можно сохранять на локальном компьютере. При желании документ можно сохранить в облачном хранилище OneDrive, а также экспортировать или открыть доступ напрямую из Excel. Служба OneDrive прежде называлась SkyDrive.
Где Автосохраненные файлы Эксель?
— Зайдите в Файл — Параметры программы, вкладка Сохранение и посмотрите, куда сохраняются файлы — на скриншоте виден путь к нужной папке. Как правило, это папка на диске С.

В программах Microsoft Office есть дополнительная вкладка Разработчик. По умолчанию она скрыта.
Что же это за загадочная вкладка и как её отобразить?
На вкладке Разработчик (Developer) представлены инструменты для работы с макросами, добавления элементов формы. Отобразить её можно в диалоговом окне Настройка ленты Excel.
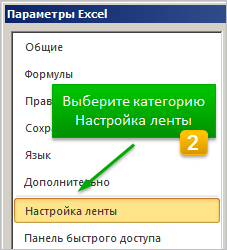
- В меню Файл (File) выберите команду Параметры (Options).
- В открывшемся диалоговом окне выберите категорию Настройка Ленты (Customize Ribbon).
- Установите флажок напротив вкладки Разработчик (Developer).
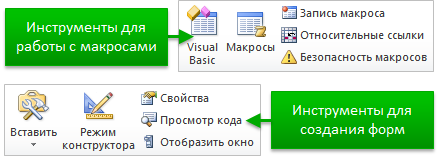
Что полезного можно найти на вкладке Разработчик?
Набор инструментов для работы с макросами: переход в редактор Visual Basic, кнопка вызова диалогового окна Макросы, настройки безопасности при работе с макросами.
Набор инструментов для создания форм: кнопки, флажки, поля для ввода, раскрывающиеся списки, а также инструменты для настройки свойств этих элементов.
…ещЁ
Может быть интересно:
Настройка ленты Excel 2007-2016

Introduction
This is a tutorial about writing code in Excel spreadsheets using Visual Basic for Applications (VBA).
Excel is one of Microsoft’s most popular products. In 2016, the CEO of Microsoft said «Think about a world without Excel. That’s just impossible for me.” Well, maybe the world can’t think without Excel.
- In 1996, there were over 30 million users of Microsoft Excel (source).
- Today, there are an estimated 750 million users of Microsoft Excel. That’s a little more than the population of Europe and 25x more users than there were in 1996.
We’re one big happy family!
In this tutorial, you’ll learn about VBA and how to write code in an Excel spreadsheet using Visual Basic.
Prerequisites
You don’t need any prior programming experience to understand this tutorial. However, you will need:
- Basic to intermediate familiarity with Microsoft Excel
- If you want to follow along with the VBA examples in this article, you will need access to Microsoft Excel, preferably the latest version (2019) but Excel 2016 and Excel 2013 will work just fine.
- A willingness to try new things
Learning Objectives
Over the course of this article, you will learn:
- What VBA is
- Why you would use VBA
- How to get set up in Excel to write VBA
- How to solve some real-world problems with VBA
Important Concepts
Here are some important concepts that you should be familiar with to fully understand this tutorial.
Objects: Excel is object-oriented, which means everything is an object — the Excel window, the workbook, a sheet, a chart, a cell. VBA allows users to manipulate and perform actions with objects in Excel.
If you don’t have any experience with object-oriented programming and this is a brand new concept, take a second to let that sink in!
Procedures: a procedure is a chunk of VBA code, written in the Visual Basic Editor, that accomplishes a task. Sometimes, this is also referred to as a macro (more on macros below). There are two types of procedures:
- Subroutines: a group of VBA statements that performs one or more actions
- Functions: a group of VBA statements that performs one or more actions and returns one or more values
Note: you can have functions operating inside of subroutines. You’ll see later.
Macros: If you’ve spent any time learning more advanced Excel functionality, you’ve probably encountered the concept of a “macro.” Excel users can record macros, consisting of user commands/keystrokes/clicks, and play them back at lightning speed to accomplish repetitive tasks. Recorded macros generate VBA code, which you can then examine. It’s actually quite fun to record a simple macro and then look at the VBA code.
Please keep in mind that sometimes it may be easier and faster to record a macro rather than hand-code a VBA procedure.
For example, maybe you work in project management. Once a week, you have to turn a raw exported report from your project management system into a beautifully formatted, clean report for leadership. You need to format the names of the over-budget projects in bold red text. You could record the formatting changes as a macro and run that whenever you need to make the change.
What is VBA?
Visual Basic for Applications is a programming language developed by Microsoft. Each software program in the Microsoft Office suite is bundled with the VBA language at no extra cost. VBA allows Microsoft Office users to create small programs that operate within Microsoft Office software programs.
Think of VBA like a pizza oven within a restaurant. Excel is the restaurant. The kitchen comes with standard commercial appliances, like large refrigerators, stoves, and regular ole’ ovens — those are all of Excel’s standard features.
But what if you want to make wood-fired pizza? Can’t do that in a standard commercial baking oven. VBA is the pizza oven.

Yum.
Why use VBA in Excel?
Because wood-fired pizza is the best!
But seriously.
A lot of people spend a lot of time in Excel as a part of their jobs. Time in Excel moves differently, too. Depending on the circumstances, 10 minutes in Excel can feel like eternity if you’re not able to do what you need, or 10 hours can go by very quickly if everything is going great. Which is when you should ask yourself, why on earth am I spending 10 hours in Excel?
Sometimes, those days are inevitable. But if you’re spending 8-10 hours everyday in Excel doing repetitive tasks, repeating a lot of the same processes, trying to clean up after other users of the file, or even updating other files after changes are made to the Excel file, a VBA procedure just might be the solution for you.
You should consider using VBA if you need to:
- Automate repetitive tasks
- Create easy ways for users to interact with your spreadsheets
- Manipulate large amounts of data
Getting Set Up to Write VBA in Excel
Developer Tab
To write VBA, you’ll need to add the Developer tab to the ribbon, so you’ll see the ribbon like this.

To add the Developer tab to the ribbon:
- On the File tab, go to Options > Customize Ribbon.
- Under Customize the Ribbon and under Main Tabs, select the Developer check box.
After you show the tab, the Developer tab stays visible, unless you clear the check box or have to reinstall Excel. For more information, see Microsoft help documentation.
VBA Editor
Navigate to the Developer Tab, and click the Visual Basic button. A new window will pop up — this is the Visual Basic Editor. For the purposes of this tutorial, you just need to be familiar with the Project Explorer pane and the Property Properties pane.

Excel VBA Examples
First, let’s create a file for us to play around in.
- Open a new Excel file
- Save it as a macro-enabled workbook (. xlsm)
- Select the Developer tab
- Open the VBA Editor
Let’s rock and roll with some easy examples to get you writing code in a spreadsheet using Visual Basic.
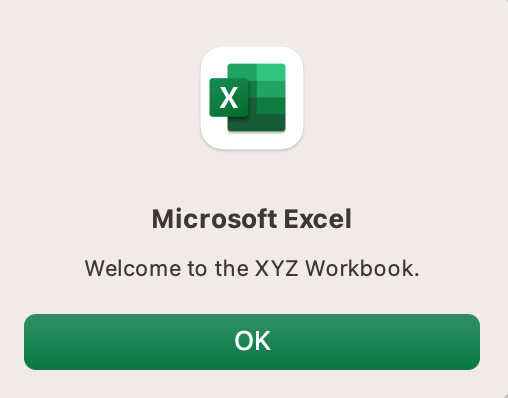
Example #1: Display a Message when Users Open the Excel Workbook
In the VBA Editor, select Insert -> New Module
Write this code in the Module window (don’t paste!):
Sub Auto_Open()
MsgBox («Welcome to the XYZ Workbook.»)
End Sub
Save, close the workbook, and reopen the workbook. This dialog should display.
Ta da!
How is it doing that?
Depending on your familiarity with programming, you may have some guesses. It’s not particularly complex, but there’s quite a lot going on:
- Sub (short for “Subroutine): remember from the beginning, “a group of VBA statements that performs one or more actions.”
- Auto_Open: this is the specific subroutine. It automatically runs your code when the Excel file opens — this is the event that triggers the procedure. Auto_Open will only run when the workbook is opened manually; it will not run if the workbook is opened via code from another workbook (Workbook_Open will do that, learn more about the difference between the two).
- By default, a subroutine’s access is public. This means any other module can use this subroutine. All examples in this tutorial will be public subroutines. If needed, you can declare subroutines as private. This may be needed in some situations. Learn more about subroutine access modifiers.
- msgBox: this is a function — a group of VBA statements that performs one or more actions and returns a value. The returned value is the message “Welcome to the XYZ Workbook.”
In short, this is a simple subroutine that contains a function.
When could I use this?
Maybe you have a very important file that is accessed infrequently (say, once a quarter), but automatically updated daily by another VBA procedure. When it is accessed, it’s by many people in multiple departments, all across the company.
- Problem: Most of the time when users access the file, they are confused about the purpose of this file (why it exists), how it is updated so often, who maintains it, and how they should interact with it. New hires always have tons of questions, and you have to field these questions over and over and over again.
- Solution: create a user message that contains a concise answer to each of these frequently answered questions.
Real World Examples
- Use the MsgBox function to display a message when there is any event: user closes an Excel workbook, user prints, a new sheet is added to the workbook, etc.
- Use the MsgBox function to display a message when a user needs to fulfill a condition before closing an Excel workbook
- Use the InputBox function to get information from the user
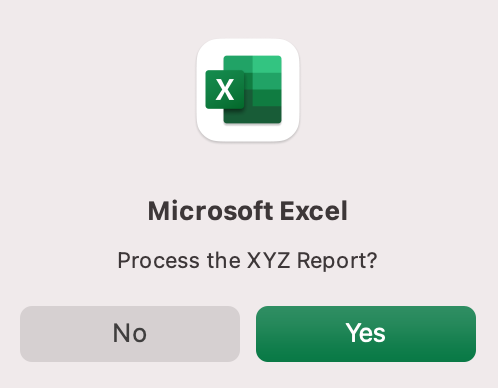
Example #2: Allow User to Execute another Procedure
In the VBA Editor, select Insert -> New Module
Write this code in the Module window (don’t paste!):
Sub UserReportQuery()
Dim UserInput As Long
Dim Answer As Integer
UserInput = vbYesNo
Answer = MsgBox(«Process the XYZ Report?», UserInput)
If Answer = vbYes Then ProcessReport
End Sub
Sub ProcessReport()
MsgBox («Thanks for processing the XYZ Report.»)
End Sub
Save and navigate back to the Developer tab of Excel and select the “Button” option. Click on a cell and assign the UserReportQuery macro to the button.
Now click the button. This message should display:
Click “yes” or hit Enter.
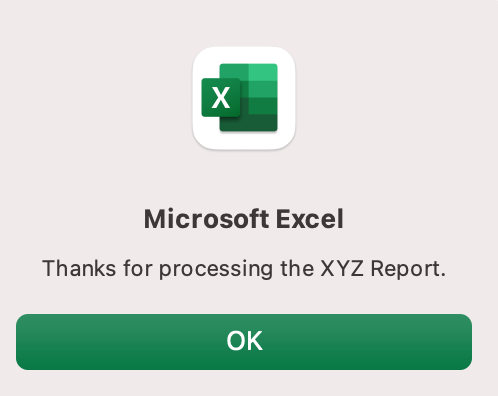
Once again, tada!
Please note that the secondary subroutine, ProcessReport, could be anything. I’ll demonstrate more possibilities in example #3. But first…
How is it doing that?
This example builds on the previous example and has quite a few new elements. Let’s go over the new stuff:
- Dim UserInput As Long: Dim is short for “dimension” and allows you to declare variable names. In this case, UserInput is the variable name and Long is the data type. In plain English, this line means “Here’s a variable called “UserInput”, and it’s a Long variable type.”
- Dim Answer As Integer: declares another variable called “Answer,” with a data type of Integer. Learn more about data types here.
- UserInput = vbYesNo: assigns a value to the variable. In this case, vbYesNo, which displays Yes and No buttons. There are many button types, learn more here.
- Answer = MsgBox(“Process the XYZ Report?”, UserInput): assigns the value of the variable Answer to be a MsgBox function and the UserInput variable. Yes, a variable within a variable.
- If Answer = vbYes Then ProcessReport: this is an “If statement,” a conditional statement, which allows us to say if x is true, then do y. In this case, if the user has selected “Yes,” then execute the ProcessReport subroutine.
When could I use this?
This could be used in many, many ways. The value and versatility of this functionality is more so defined by what the secondary subroutine does.
For example, maybe you have a file that is used to generate 3 different weekly reports. These reports are formatted in dramatically different ways.
- Problem: Each time one of these reports needs to be generated, a user opens the file and changes formatting and charts; so on and so forth. This file is being edited extensively at least 3 times per week, and it takes at least 30 minutes each time it’s edited.
- Solution: create 1 button per report type, which automatically reformats the necessary components of the reports and generates the necessary charts.
Real World Examples
- Create a dialog box for user to automatically populate certain information across multiple sheets
- Use the InputBox function to get information from the user, which is then populated across multiple sheets
Example #3: Add Numbers to a Range with a For-Next Loop
For loops are very useful if you need to perform repetitive tasks on a specific range of values — arrays or cell ranges. In plain English, a loop says “for each x, do y.”
In the VBA Editor, select Insert -> New Module
Write this code in the Module window (don’t paste!):
Sub LoopExample()
Dim X As Integer
For X = 1 To 100
Range(«A» & X).Value = X
Next X
End Sub
Save and navigate back to the Developer tab of Excel and select the Macros button. Run the LoopExample macro.
This should happen:
Etc, until the 100th row.
How is it doing that?
- Dim X As Integer: declares the variable X as a data type of Integer.
- For X = 1 To 100: this is the start of the For loop. Simply put, it tells the loop to keep repeating until X = 100. X is the counter. The loop will keep executing until X = 100, execute one last time, and then stop.
- Range(«A» & X).Value = X: this declares the range of the loop and what to put in that range. Since X = 1 initially, the first cell will be A1, at which point the loop will put X into that cell.
- Next X: this tells the loop to run again
When could I use this?
The For-Next loop is one of the most powerful functionalities of VBA; there are numerous potential use cases. This is a more complex example that would require multiple layers of logic, but it communicates the world of possibilities in For-Next loops.
Maybe you have a list of all products sold at your bakery in Column A, the type of product in Column B (cakes, donuts, or muffins), the cost of ingredients in Column C, and the market average cost of each product type in another sheet.
You need to figure out what should be the retail price of each product. You’re thinking it should be the cost of ingredients plus 20%, but also 1.2% under market average if possible. A For-Next loop would allow you to do this type of calculation.
Real World Examples
- Use a loop with a nested if statement to add specific values to a separate array only if they meet certain conditions
- Perform mathematical calculations on each value in a range, e.g. calculate additional charges and add them to the value
- Loop through each character in a string and extract all numbers
- Randomly select a number of values from an array
Conclusion
Now that we’ve talked about pizza and muffins and oh-yeah, how to write VBA code in Excel spreadsheets, let’s do a learning check. See if you can answer these questions.
- What is VBA?
- How do I get set up to start using VBA in Excel?
- Why and when would you use VBA?
- What are some problems I could solve with VBA?
If you have a fair idea of how to you could answer these questions, then this was successful.
Whether you’re an occasional user or a power user, I hope this tutorial provided useful information about what can be accomplished with just a bit of code in your Excel spreadsheets.
Happy coding!
Learning Resources
- Excel VBA Programming for Dummies, John Walkenbach
- Get Started with VBA, Microsoft Documentation
- Learning VBA in Excel, Lynda
A bit about me
I’m Chloe Tucker, an artist and developer in Portland, Oregon. As a former educator, I’m continuously searching for the intersection of learning and teaching, or technology and art. Reach out to me on Twitter @_chloetucker and check out my website at chloe.dev.
Learn to code for free. freeCodeCamp’s open source curriculum has helped more than 40,000 people get jobs as developers. Get started