
Introduction
Generally, in development projects there is most common requirement is reading/ editing/ generating an excel file. There are lots of paid/free software components available nowadays to fulfill this requirement.
In recants projects, I also worked with the same kind of requirement. I have used the Microsoft Interop excel component to read excel file but the main problem appears when it is hosted in a shared hosting platform.
When the developer hosts that project in shared hosting (in the case of low-budget projects where a dedicated server is not necessary), then the developer will have limited access to server settings and he/she can’t install excel components (that are required for Microsoft Interop excel) on the server, here you need a component that will solve your problem.
After some research, I found a software component IronXL which solved my problem. We don’t need to install MS office or any Excel component on the hosting server (even on shared hosting) to make code the work. This is the biggest advantage of IronXL. I decided to share this component via this article with others. But this component is not free it has dedicated pricing.
Code playground
Let’s start with code. We will make a new Windows application using C#.
- Open Visual Studio. Select New Project, then Windows Form Application. I am using Visual Studio 2022 community version.
- Name it as you want. My application name is ReadExcelFileApp.
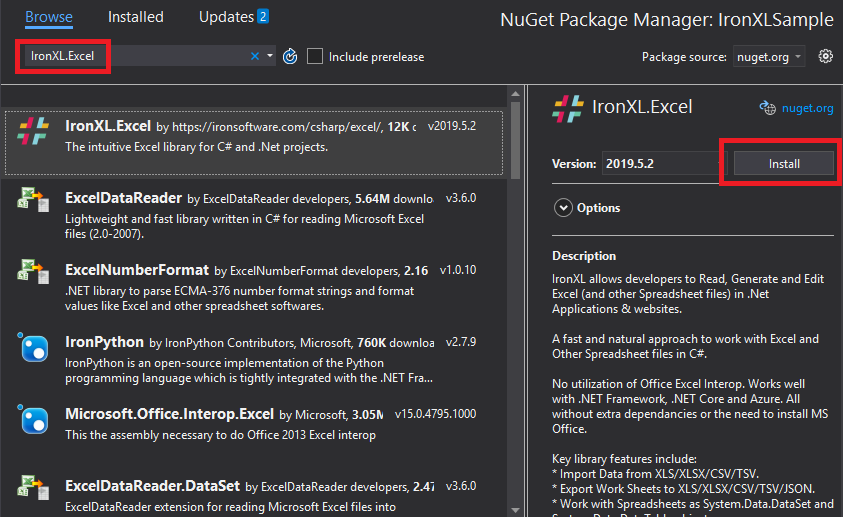
- First of all, add Reference of the Excel library — IronXL. Right click on the Solution in the solution explorer and click “Manage NuGet packages” option.
- Browse tab type “IronXL.Excel” keyword, following screen will appear. Click the install button. Visual Studio will prompt you that VS is installing following components and it related libraries (dependencies) in this project. Click on OK. NuGet package will be installed.


5. Now add two buttons Choose and Read File and Close on form by dragging the button control from Toolbox window.
6. Also add a DataGridView to see the result (excel data).

7. Right click on Windows Form and click “View code” option. This will open the code behind file of form.
8. You can also open the code behind file by double click on buttons. It will create the click event method of button.

9. You can also manage the click event of button in its Properties.

10. Now create a method ReadExcel who returns a datatable using the following logic.
/// <summary>
/// this method will read the excel file and copy its data into a datatable
/// </summary>
/// <param name="fileName">name of the file</param>
/// <returns>DataTable</returns>
private DataTable ReadExcel(string fileName) {
    WorkBook workbook = WorkBook.Load(fileName);
    //// Work with a single WorkSheet.
    ////you can pass static sheet name like Sheet1 to get that sheet
    ////WorkSheet sheet = workbook.GetWorkSheet("Sheet1");
    //You can also use workbook.DefaultWorkSheet to get default in case you want to get first sheet only
    WorkSheet sheet = workbook.DefaultWorkSheet;
    //Convert the worksheet to System.Data.DataTable
    //Boolean parameter sets the first row as column names of your table.
    return sheet.ToDataTable(true);
}
Let’s discuss something about ReadExcel() method.
This method will read the file data in Workbook class object. Here you can perform lot of operation on Workbook class object.
You can get the Workbook data in data set or data table directly by using 1 line of code.
Similarly, you can do lot of operations with this component.
11. Add the following logic in button click events.
 /// <summary>
 /// this method will choose and read the excel file
 /// </summary>
 /// <param name="sender"></param>
 /// <param name="e"></param>
 private void btnChoose_Click(object sender, EventArgs e) {
     OpenFileDialog file = new OpenFileDialog(); //open dialog to choose file
     if (file.ShowDialog() == DialogResult.OK) //if there is a file chosen by the user
     {
         string fileExt = Path.GetExtension(file.FileName); //get the file extension
         if (fileExt.CompareTo(".xls") == 0 || fileExt.CompareTo(".xlsx") == 0) {
             try {
                 DataTable dtExcel = ReadExcel(file.FileName); //read excel file
                 dataGrdView.Visible = true;
                 dataGrdView.DataSource = dtExcel;
             } catch (Exception ex) {
                 MessageBox.Show(ex.Message.ToString());
             }
         } else {
             MessageBox.Show("Please choose .xls or .xlsx file only.", "Warning", MessageBoxButtons.OK, MessageBoxIcon.Error); //custom messageBox to show error
         }
     }
 }
 /// <summary>
 /// this method will close the windows form
 /// </summary>
 /// <param name="sender"></param>
 /// <param name="e"></param>
 private void btnCancel_Click(object sender, EventArgs e) {
     this.Close(); //to close the window(Form1)
 }
After choosing the file Result will be like the following whether you upload .xls or .xlsx file.

Conclusion
The IronXL is also helpful in other excel operations like editing/styling/generating excel files. The code of this tutorial is attached. You can download the code, play with code and modify according to your requirement. I tried to make this tutorial development friendly as simple I can make. Thank you and enjoy coding!!!
Whether you are working on Windows or on Web or on Console application, at one stage we need to process data and excel file is widely used for it, so in previous article, we have explained about creating excel in C# without interop but in this article, I am going to provide you code to open and read excel file (.xls or .xlsx) in C# line by line in Console application using OLEDB or EPPlus or Interop (all 3 methods), you can use the same code C# code to fill ASP.NET GridView or MVC application table.
So, let’s get started with it.
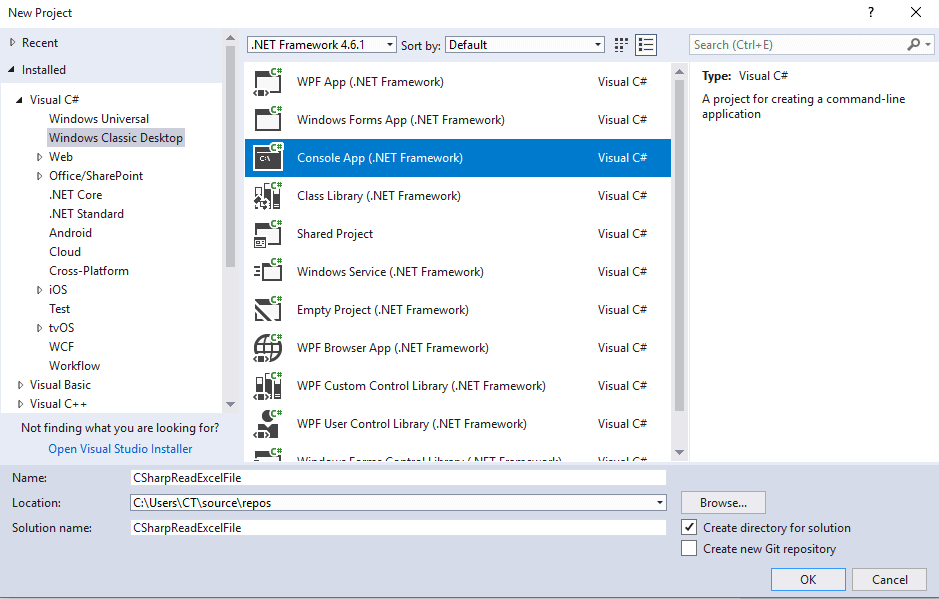
Step 1: Create a new Console applicaiton in your Visual Studio, by navigating to File->New->Project-> Select «Windows Classic dekstop» from left-pane & «Console-App» from right-pane -> Provide a name to your application «CSharpReadExcelFile» -> Click «OK»
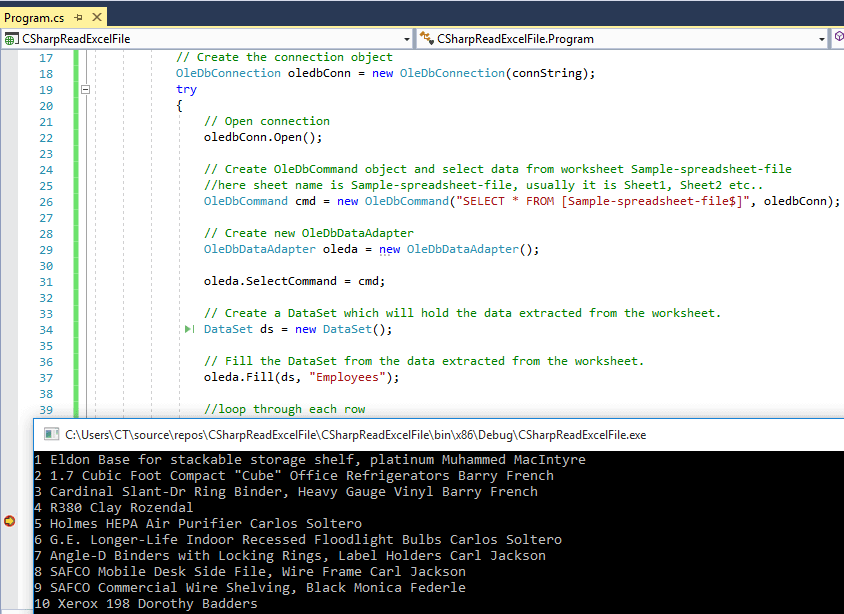
Step 2: Now we have our Console application and we need to add C# code using OLEDB to read excel file, for that we would need connection string with the source URL of excel file.
In the given example as I am using .XLS excel file, here is my connection string
string connString = "Provider=Microsoft.Jet.OLEDB.4.0;Data Source=D:\Sample1.xls; Extended Properties='Excel 8.0;HDR=NO;IMEX=1;'";For Excel 97-2003 Format we can use “Microsoft Jet OLEDB Driver 4.0”, while for the Connection String for Excel 2007 Format (.XLSX), we can use “Microsoft Ace OLEDB Driver 12.0” and it’s connection string would be as below
string connString = "Provider= Microsoft.ACE.OLEDB.12.0;" + "Data Source=Sample1.xlsx" + ";Extended Properties='Excel 8.0;HDR=Yes'";In the above Connection string’s you may see extended properties HDR=Yes & HDR =No
Use HDR=YES if first excel row contains headers, alternatively,use HDR=NO when your excel’s first row is not headers and it’s data.
Now, we have connection string , we need to create connection using OLEDB and open it
             // Create the connection object
            OleDbConnection oledbConn = new OleDbConnection(connString);

            // Open connection
            oledbConn.Open();
Read the excel file using OLEDB connection and fill it in dataset
  //here sheet name is Sample-spreadsheet-file, usually it is Sheet1, Sheet2 etc..
                OleDbCommand cmd = new OleDbCommand("SELECT * FROM [Sample-spreadsheet-file$]", oledbConn);

                // Create new OleDbDataAdapter
                OleDbDataAdapter oleda = new OleDbDataAdapter();

                oleda.SelectCommand = cmd;

                // Create a DataSet which will hold the data extracted from the worksheet.
                DataSet ds = new DataSet();

                // Fill the DataSet from the data extracted from the worksheet.
                oleda.Fill(ds, "Employees");
in the above code Sample-spreadsheet-file is the name of Sheet.
Note: With the help of sheet name, you can refer to Excel data, you need to use ‘$’ with sheet name, e.g. Select * from [Sheet1$]
Now loop through each row of excel sheet and print it in Console app
 //loop through each row
                foreach(var m in ds.Tables[0].DefaultView)
                {
                    Console.WriteLine(((System.Data.DataRowView)m).Row.ItemArray[0] +" "+((System.Data.DataRowView)m).Row.ItemArray[1] +" "+((System.Data.DataRowView)m).Row.ItemArray[2]);

                }
If you are using ASP.NET, you can bind it with Grid View using below code instead of printing it
// Bind the data to the GridView
GridView1.DataSource = ds.Tables[0].DefaultView;
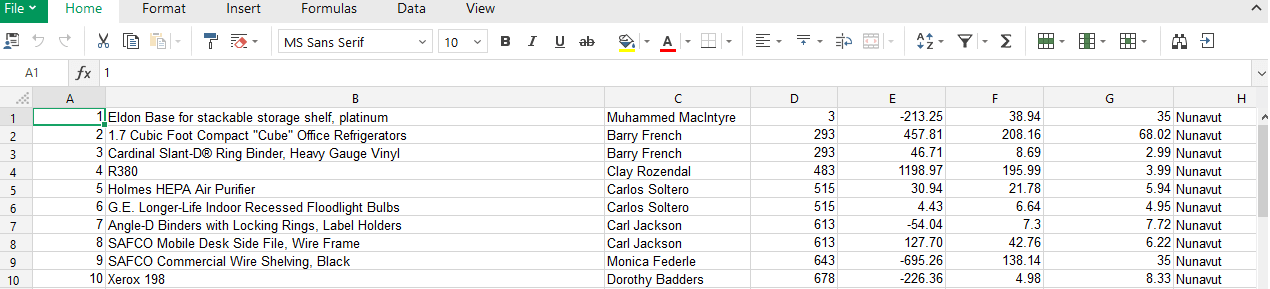
GridView1.DataBind();Now, we have discussed each step, suppose this is out Excel file
and ese the code below in your Console application, build and execute it.
using System;
using System.Data;
using System.Data.OleDb;


namespace CSharpReadExcelFile
{
    class Program
    {
        static void Main(string[] args)
        {
            //this is the connection string which has OLDB 4.0 Connection and Source URL of file
            //use HDR=YES if first excel row contains headers, HDR=NO means your excel's first row is not headers and it's data.
            string connString = "Provider=Microsoft.Jet.OLEDB.4.0;Data Source=D:\Sample1.xls; Extended Properties='Excel 8.0;HDR=NO;IMEX=1;'";


            // Create the connection object
            OleDbConnection oledbConn = new OleDbConnection(connString);
            try
            {
                // Open connection
                oledbConn.Open();

                // Create OleDbCommand object and select data from worksheet Sample-spreadsheet-file
                //here sheet name is Sample-spreadsheet-file, usually it is Sheet1, Sheet2 etc..
                OleDbCommand cmd = new OleDbCommand("SELECT * FROM [Sample-spreadsheet-file$]", oledbConn);

                // Create new OleDbDataAdapter
                OleDbDataAdapter oleda = new OleDbDataAdapter();

                oleda.SelectCommand = cmd;

                // Create a DataSet which will hold the data extracted from the worksheet.
                DataSet ds = new DataSet();

                // Fill the DataSet from the data extracted from the worksheet.
                oleda.Fill(ds, "Employees");

                //loop through each row
                foreach(var m in ds.Tables[0].DefaultView)
                {
                    Console.WriteLine(((System.Data.DataRowView)m).Row.ItemArray[0] +" "+((System.Data.DataRowView)m).Row.ItemArray[1] +" "+((System.Data.DataRowView)m).Row.ItemArray[2]);

                }

            }
            catch (Exception e)
            {
                Console.WriteLine("Error :" + e.Message);
            }
            finally
            {
                // Close connection
                oledbConn.Close();
            }
        }
    }
}
Output of the above code will be as below
Now, if you are working on 64 bit operating system, you may get this error «The ‘Microsoft.Jet.OLEDB.4.0’ provider is not registered on the local machine.«.
Resolving this error: If your application is Desktop based, compile your EXE with x86 CPU (Menu Tools, Options, select Projects And Solutions, check the show advanced build configurations. Now in the Build Menu you will be able to go to the Config Manager and set output to x86.)
If your application is web based, then Enable ’32-Bit Applications’ in application pool.
On IIS, change the «Enable 32-bit Applications» setting to True, in the Advanced Settings for the Application Pool.
Disadvantage of using OLEDB for Excel
With OLEDB, you cannot format data that you inserted/updated in EXCEL sheet but Interop can do it efficiently. You cannot perform any mathematical operation or working on graphs using OLEDB, but it is really a good way to insert/update data in EXCEL where no Excel application is installed.
Reading Excel file using EPPlus
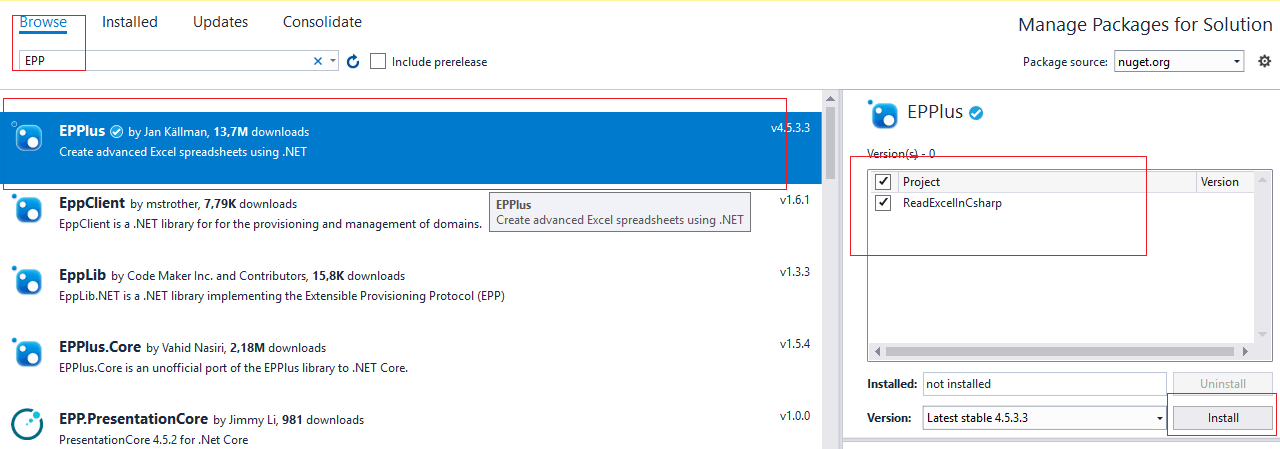
If you don’t want to use OleDb, you can try using EPPlus Nuget package based solution.
For this, you would have to install EPPlus, so navigate to «Tools»-> «Nuget package manager»-> «Manage Nuget for this solution» -> Select «Browse» tab and search for «EPPlus», then install the nuget package.
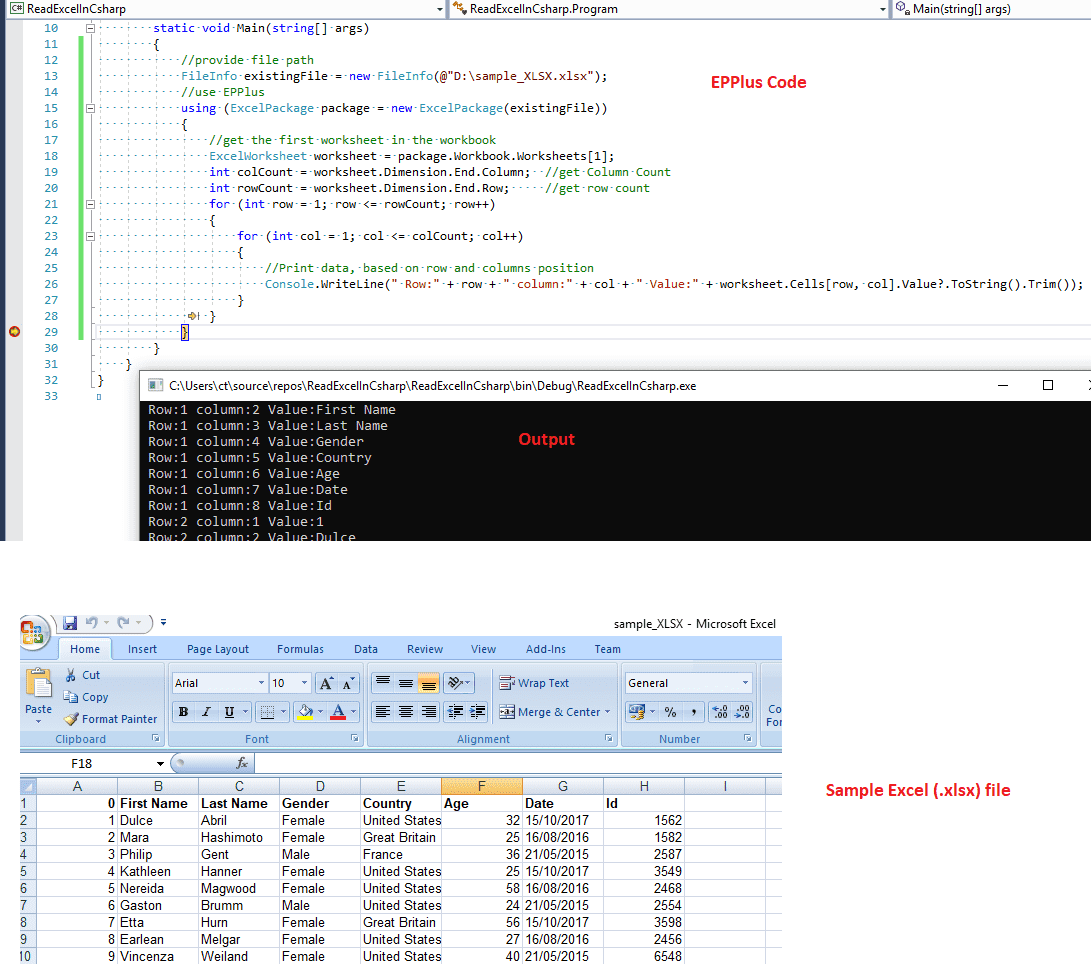
Once you have installed the package, in your Console application «Program.cs», you can use the code below
using OfficeOpenXml;
using System;
using System.IO;


namespace ReadExcelInCsharp
{
    class Program
    {
        static void Main(string[] args)
        {
            //provide file path
            FileInfo existingFile = new FileInfo(@"D:sample_XLSX.xlsx");
            //use EPPlus
            using (ExcelPackage package = new ExcelPackage(existingFile))
            {
                //get the first worksheet in the workbook
                ExcelWorksheet worksheet = package.Workbook.Worksheets[1];
                int colCount = worksheet.Dimension.End.Column;  //get Column Count
                int rowCount = worksheet.Dimension.End.Row;     //get row count
                for (int row = 1; row <= rowCount; row++)
                {
                    for (int col = 1; col <= colCount; col++)
                    {
                        //Print data, based on row and columns position
                        Console.WriteLine(" Row:" + row + " column:" + col + " Value:" + worksheet.Cells[row, col].Value?.ToString().Trim());
                    }
                }
            }
        }
    }
}
Here is the image, which shows console application output with sample excel file (.xlsx), we are using .xlsx file here for reading in C# using EPPlus
You can use above EPPlus example to work in .NET Core C# also, to read excel file in .NET Core.
Read Excel using MS Office Interop
You can also read Excel file in C# using MS Office Interop easily.
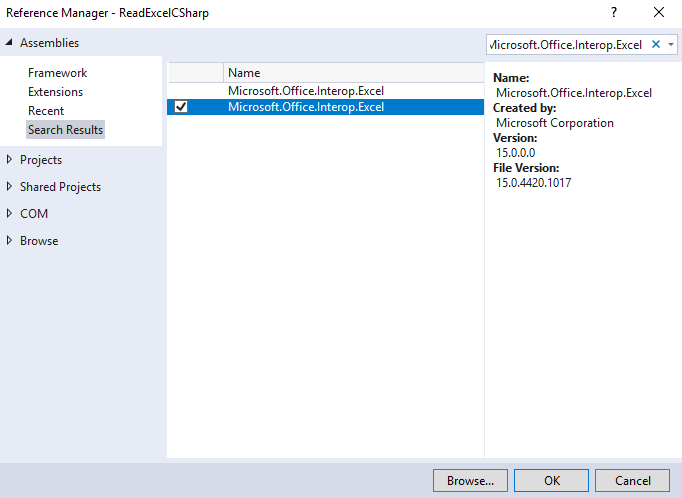
First you will have to add reference for «Microsoft.Office.Interop.Excel«, so in your Console, Windows or Web-Application, right-click on «Reference» and then in «Assemblies» search for «Microsoft.Office.Interop.Excel»
So, here is the C# Code for it, considering we have sample XLSX file as above
using Microsoft.Office.Interop.Excel;
using System;

namespace ReadExcelCSharp
{
    class Program
    {
        static void Main(string[] args)
        {
            Application excelApp = new Application();
            if (excelApp != null)
            {
                Workbook excelWorkbook = excelApp.Workbooks.Open(@"D:sample_XLSX.xlsx", 0, true, 5, "", "", true, XlPlatform.xlWindows, "t", false, false, 0, true, 1, 0);
                Worksheet excelWorksheet = (Worksheet)excelWorkbook.Sheets[1];

                Range excelRange = excelWorksheet.UsedRange;
                int rowCount = excelRange.Rows.Count;
                int colCount = excelRange.Columns.Count;
                //get an object array of all of the cells in the worksheet (their values)
                object[,] valueArray = (object[,])excelRange.get_Value(
                            XlRangeValueDataType.xlRangeValueDefault);

                for (int i = 1; i <= rowCount; i++)
                {
                    for (int j = 1; j <= colCount; j++)
                    {


                        Console.WriteLine(valueArray[i, j].ToString());
                    }
                }

                excelWorkbook.Close();
                excelApp.Quit();
            }
        }
    }
}
Output:
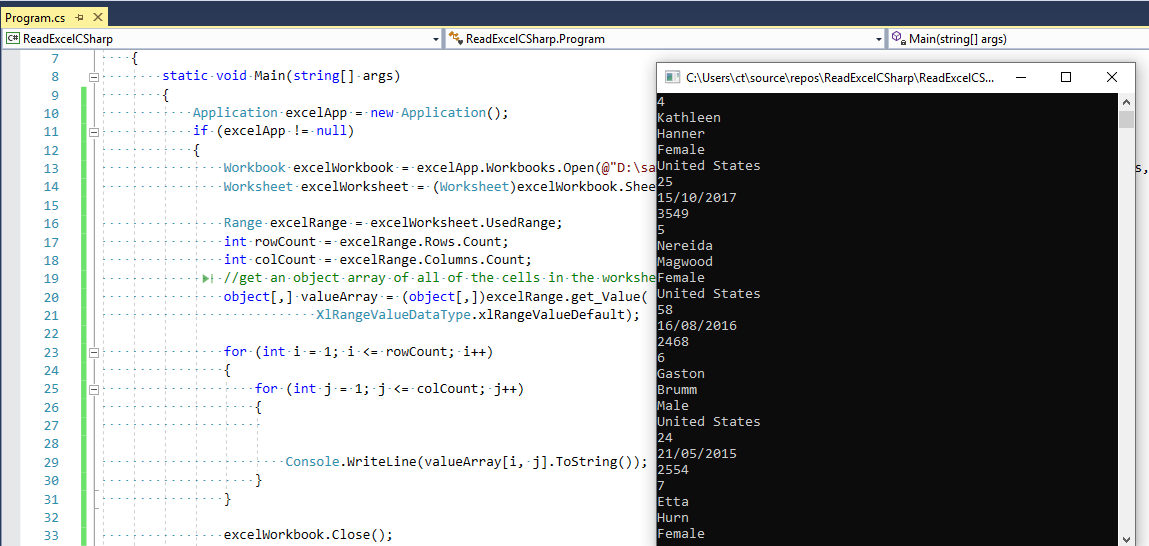
As you can see we have used Interop to open and read excel rows/columns, one of the drawbacks of using MS office Interop is that you need it installed on Server also.
You may also like to read:
Read Excel file and import data into GridView using Datatable in ASP.NET
Read file in C# ( Text file example using Console Application )
That’s it, feel free to provide your feedback in the below comment’s section.
C# Read Excel File with Examples
This tutorial explains how to read an Excel file in C#, as well as perform everyday tasks like data validation, database conversion, Web API intergrations, and formula modification. This article references code examples that utilize the IronXL .NET Excel library.
IronXL facilitates reading and editing Microsoft Excel documents with C#. IronXL neither requires Microsoft Excel nor does it require Interop. In fact, IronXL provides a faster and more intuitive API than Microsoft.Office.Interop.Excel.
IronXL Includes:
- Dedicated product support from our .NET engineers
- Easy installation via Microsoft Visual Studio
- 30 day free trial test for development. Licenses from $749.
Reading and creating Excel files in C# and VB.NET is easy using the IronXL software library.
Overview
How to Read Excel File in C#
- Download the C# Library to read Excel files
- Load and read an Excel file (workbook)
- Create an Excel workbook in CSV or XLSX
- Edit cell values in a range of cells
- Validate spreadsheet data
- Export data using Entity Framework
Reading .XLS and .XLSX Excel Files Using IronXL
Below is a summary of the overal workflow for reading Excel files using IronXL:
- Install the IronXL Excel Library. We can do this using our NuGet package or by downloading the .Net Excel DLL.
- Use the
WorkBook.Loadmethod to read any XLS, XLSX or CSV document. - Get Cell values using intuitive syntax:
sheet["A11"].DecimalValue
:path=/static-assets/excel/content-code-examples/tutorials/how-to-read-excel-file-csharp-1.csusing IronXL;
using System.Linq;
using System;
// Supported spreadsheet formats for reading include: XLSX, XLS, CSV and TSV
WorkBook workBook = WorkBook.Load("test.xlsx");
WorkSheet workSheet = workBook.WorkSheets.First();
// Select cells easily in Excel notation and return the calculated value
int cellValue = workSheet["A2"].IntValue;
// Read from Ranges of cells elegantly.
foreach (var cell in workSheet["A2:A10"])
{
Console.WriteLine("Cell {0} has value '{1}'", cell.AddressString, cell.Text);
}
// Advanced Operations
// Calculate aggregate values such as Min, Max and Sum
decimal sum = workSheet["A2:A10"].Sum();
// Linq compatible
decimal max = workSheet["A2:A10"].Max(c => c.DecimalValue);Imports IronXL
Imports System.Linq
Imports System
' Supported spreadsheet formats for reading include: XLSX, XLS, CSV and TSV
Private workBook As WorkBook = WorkBook.Load("test.xlsx")
Private workSheet As WorkSheet = workBook.WorkSheets.First()
' Select cells easily in Excel notation and return the calculated value
Private cellValue As Integer = workSheet("A2").IntValue
' Read from Ranges of cells elegantly.
For Each cell In workSheet("A2:A10")
Console.WriteLine("Cell {0} has value '{1}'", cell.AddressString, cell.Text)
Next cell
' Advanced Operations
' Calculate aggregate values such as Min, Max and Sum
Dim sum As Decimal = workSheet("A2:A10").Sum()
' Linq compatible
Dim max As Decimal = workSheet("A2:A10").Max(Function(c) c.DecimalValue)VB C#
The code examples used in the next sections of this tutorial (along with the sample project code) will work on three sample Excel spreadsheets (see below for a visual):
Tutorial
1. Download the IronXL C# Library for FREE
![]()
Install with NuGet
Install-Package IronXL.Excel
nuget.org/packages/IronXL.Excel/
or

Download DLL
The first thing we need to do is install the IronXL.Excel library, adding Excel functionality to the .NET framework.
Installing IronXL.Excel, is most easily achieved using our NuGet package, although you may also choose to manually install the DLL to your project or to your global assembly cache.
Installing the IronXL NuGet Package
- In Visual Studio, right-click on the project select «Manage NuGet Packages …»
-
Search for the IronXL.Excel package and click on the Install button to add it to the project


Another way to install the IronXL library is using the NuGet Package Manager Console:
- Enter the Package Manager Console
-
Type > Install-Package IronXL.Excel
PM > Install-Package IronXL.Excel
Additionally, you can view the package on the NuGet website
Manual Installation
Alternatively, we can start by downloading the IronXL .NET Excel DLL and manually installing into Visual Studio.
2. Load an Excel Workbook
The WorkBook class represents an Excel sheet. To open an Excel File using C#, we use WorkBook.Load method, specifying the path of the Excel fil.
:path=/static-assets/excel/content-code-examples/tutorials/how-to-read-excel-file-csharp-2.csWorkBook workBook = WorkBook.Load(@"Spreadsheets\GDP.xlsx");Dim workBook As WorkBook = WorkBook.Load("Spreadsheets\GDP.xlsx")VB C#
Sample: ExcelToDBProcessor
Each WorkBook can have multiple WorkSheet objects. Each one represents a single Excel worksheet in the Excel document. Use the WorkBook.GetWorkSheet method to retrieve a reference to a specific Excel worksheet.
:path=/static-assets/excel/content-code-examples/tutorials/how-to-read-excel-file-csharp-3.csSample: ExcelToDB
Creating new Excel Documents
To create a new Excel document, construct a new WorkBook object with a valid file type.
:path=/static-assets/excel/content-code-examples/tutorials/how-to-read-excel-file-csharp-4.csWorkBook workBook = new WorkBook(ExcelFileFormat.XLSX);Dim workBook As New WorkBook(ExcelFileFormat.XLSX)VB C#
Sample: ApiToExcelProcessor
Note: Use ExcelFileFormat.XLS toi support legacy versions of Microsoft Excel (95 and earlier).
Add a Worksheet to an Excel Document
As explained previously, an IronXL WorkBook contains a collection of one or more WorkSheets.

This is how one workbook with two worksheets looks in Excel.
To create a new WorkSheet call WorkBook.CreateWorkSheet with the name of the worksheet.
:path=/static-assets/excel/content-code-examples/tutorials/how-to-read-excel-file-csharp-5.csWorkSheet workSheet = workBook.GetWorkSheet("GDPByCountry");Dim workSheet As WorkSheet = workBook.GetWorkSheet("GDPByCountry")VB C#
3. Access Cell Values
Read and Edit a Single Cell
Access to the values of individual spreadsheet cells is carried out by retrieving the desired cell from its WorkSheet. as shown below:
:path=/static-assets/excel/content-code-examples/tutorials/how-to-read-excel-file-csharp-16.csWorkBook workBook = WorkBook.Load("test.xlsx");
WorkSheet workSheet = workBook.DefaultWorksheet();
IronXL.Cell cell = workSheet["B1"];Dim workBook As WorkBook = WorkBook.Load("test.xlsx")
Dim workSheet As WorkSheet = workBook.DefaultWorksheet()
Dim cell As IronXL.Cell = workSheet("B1")VB C#
IronXL’s Cell class represents an invidual cell in an Excel spreadsheet. It contains properties and methods that enable users to access and modify the cell’s value directly.
Each WorkSheet object manages an index of Cell objects corresponding to every cell value in an Excel worksheet. In the source code above, we reference the desired cell by its row and column index (cell B1 in this case) using standard array indexing syntax.
With a reference to Cell object, we can read and write data to and from a spreadsheet cell:
:path=/static-assets/excel/content-code-examples/tutorials/how-to-read-excel-file-csharp-17.csIronXL.Cell cell = workSheet["B1"];
string value = cell.StringValue; // Read the value of the cell as a string
Console.WriteLine(value);
cell.Value = "10.3289"; // Write a new value to the cell
console.WriteLine(cell.StringValue); Dim cell As IronXL.Cell = workSheet("B1")
Dim value As String = cell.StringValue ' Read the value of the cell as a string
Console.WriteLine(value)
cell.Value = "10.3289" ' Write a new value to the cell
console.WriteLine(cell.StringValue)VB C#
Read and Write a Range of Cell Values
The Range class represents a two-dimensional collection of Cell objects. This collection refers to a literal range of Excel cells. Obtain ranges by using the string indexer on a WorkSheet object.
The argument text is either the coordinate of a cell (e.g. «A1», as shown previously) or a span of cells from left to right top to bottom (e.g. «B2:E5»). It is also possible to call GetRange on a WorkSheet.
:path=/static-assets/excel/content-code-examples/tutorials/how-to-read-excel-file-csharp-6.csRange range = workSheet["D2:D101"];Dim range As Range = workSheet("D2:D101")VB C#
Sample: DataValidation
There are several ways to read or edit the values of cells within a Range. If the count is known, use a For loop.
:path=/static-assets/excel/content-code-examples/tutorials/how-to-read-excel-file-csharp-7.cs// Iterate through the rows
for (var y = 2; y <= 101; y++)
{
var result = new PersonValidationResult { Row = y };
results.Add(result);
// Get all cells for the person
var cells = workSheet[$"A{y}:E{y}"].ToList();
// Validate the phone number (1 = B)
var phoneNumber = cells[1].Value;
result.PhoneNumberErrorMessage = ValidatePhoneNumber(phoneNumberUtil, (string)phoneNumber);
// Validate the email address (3 = D)
result.EmailErrorMessage = ValidateEmailAddress((string)cells[3].Value);
// Get the raw date in the format of Month Day[suffix], Year (4 = E)
var rawDate = (string)cells[4].Value;
result.DateErrorMessage = ValidateDate(rawDate);
}' Iterate through the rows
For y = 2 To 101
Dim result = New PersonValidationResult With {.Row = y}
results.Add(result)
' Get all cells for the person
Dim cells = workSheet($"A{y}:E{y}").ToList()
' Validate the phone number (1 = B)
Dim phoneNumber = cells(1).Value
result.PhoneNumberErrorMessage = ValidatePhoneNumber(phoneNumberUtil, CStr(phoneNumber))
' Validate the email address (3 = D)
result.EmailErrorMessage = ValidateEmailAddress(CStr(cells(3).Value))
' Get the raw date in the format of Month Day[suffix], Year (4 = E)
Dim rawDate = CStr(cells(4).Value)
result.DateErrorMessage = ValidateDate(rawDate)
Next yVB C#
Sample: DataValidation
Add Formula to a Spreadsheet
Set formula of Cells with the Formula property.
The code below iterates through each state and puts a percentage total in column C.
:path=/static-assets/excel/content-code-examples/tutorials/how-to-read-excel-file-csharp-13.cs// Iterate through all rows with a value
for (var y = 2; y < i; y++)
{
// Get the C cell
Cell cell = workSheet[$"C{y}"].First();
// Set the formula for the Percentage of Total column
cell.Formula = $"=B{y}/B{i}";
}' Iterate through all rows with a value
Dim y = 2
Do While y < i
' Get the C cell
Dim cell As Cell = workSheet($"C{y}").First()
' Set the formula for the Percentage of Total column
cell.Formula = $"=B{y}/B{i}"
y += 1
LoopVB C#
Sample: AddFormulaeProcessor
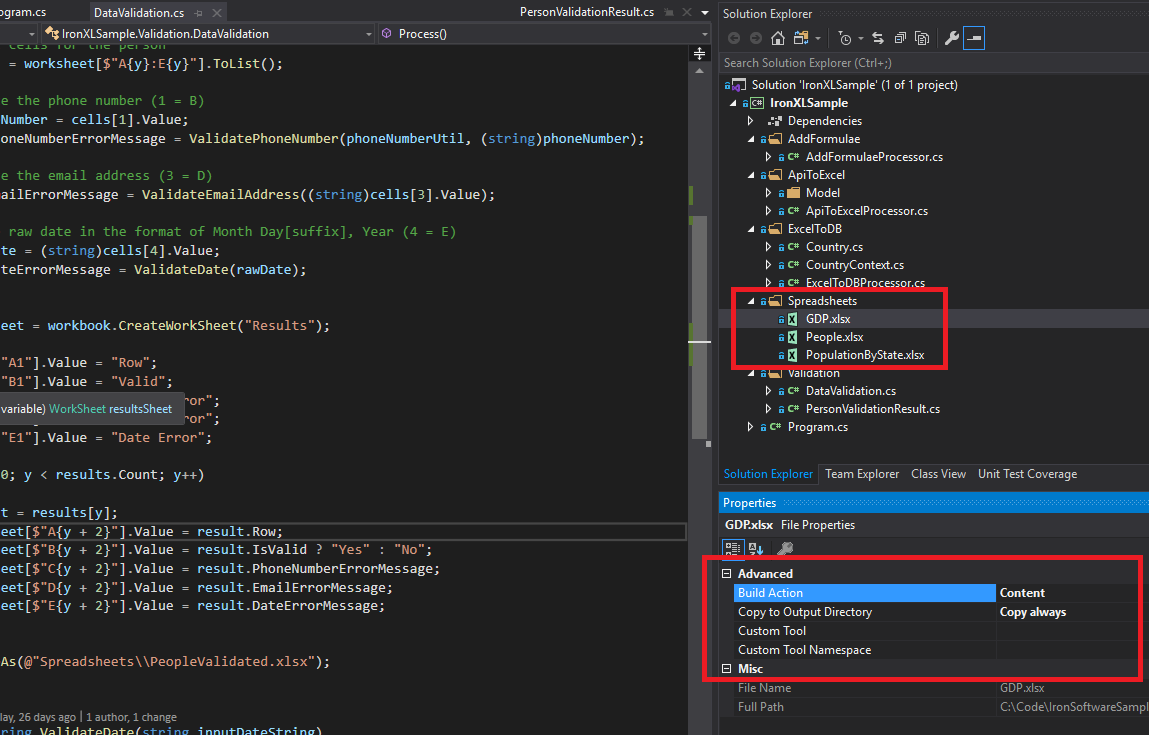
Validate Spreadsheet Data
Use IronXL to validate a sheet of data. The DataValidation sample uses libphonenumber-csharp to validate phone numbers and uses standard C# APIs to validate email addresses and dates.
:path=/static-assets/excel/content-code-examples/tutorials/how-to-read-excel-file-csharp-8.cs// Iterate through the rows
for (var i = 2; i <= 101; i++)
{
var result = new PersonValidationResult { Row = i };
results.Add(result);
// Get all cells for the person
var cells = worksheet[$"A{i}:E{i}"].ToList();
// Validate the phone number (1 = B)
var phoneNumber = cells[1].Value;
result.PhoneNumberErrorMessage = ValidatePhoneNumber(phoneNumberUtil, (string)phoneNumber);
// Validate the email address (3 = D)
result.EmailErrorMessage = ValidateEmailAddress((string)cells[3].Value);
// Get the raw date in the format of Month Day[suffix], Year (4 = E)
var rawDate = (string)cells[4].Value;
result.DateErrorMessage = ValidateDate(rawDate);
}' Iterate through the rows
For i = 2 To 101
Dim result = New PersonValidationResult With {.Row = i}
results.Add(result)
' Get all cells for the person
Dim cells = worksheet($"A{i}:E{i}").ToList()
' Validate the phone number (1 = B)
Dim phoneNumber = cells(1).Value
result.PhoneNumberErrorMessage = ValidatePhoneNumber(phoneNumberUtil, CStr(phoneNumber))
' Validate the email address (3 = D)
result.EmailErrorMessage = ValidateEmailAddress(CStr(cells(3).Value))
' Get the raw date in the format of Month Day[suffix], Year (4 = E)
Dim rawDate = CStr(cells(4).Value)
result.DateErrorMessage = ValidateDate(rawDate)
Next iVB C#
The above code loops through each row in the spreadsheet and grabs the cells as a list. Each validates method checks the value of a cell and returns an error message if the value is invalid.
This code creates a new sheet, specifies headers, and outputs the error message results so that there is a log of invalid data.
:path=/static-assets/excel/content-code-examples/tutorials/how-to-read-excel-file-csharp-9.csvar resultsSheet = workBook.CreateWorkSheet("Results");
resultsSheet["A1"].Value = "Row";
resultsSheet["B1"].Value = "Valid";
resultsSheet["C1"].Value = "Phone Error";
resultsSheet["D1"].Value = "Email Error";
resultsSheet["E1"].Value = "Date Error";
for (var i = 0; i < results.Count; i++)
{
var result = results[i];
resultsSheet[$"A{i + 2}"].Value = result.Row;
resultsSheet[$"B{i + 2}"].Value = result.IsValid ? "Yes" : "No";
resultsSheet[$"C{i + 2}"].Value = result.PhoneNumberErrorMessage;
resultsSheet[$"D{i + 2}"].Value = result.EmailErrorMessage;
resultsSheet[$"E{i + 2}"].Value = result.DateErrorMessage;
}
workBook.SaveAs(@"Spreadsheets\PeopleValidated.xlsx");Dim resultsSheet = workBook.CreateWorkSheet("Results")
resultsSheet("A1").Value = "Row"
resultsSheet("B1").Value = "Valid"
resultsSheet("C1").Value = "Phone Error"
resultsSheet("D1").Value = "Email Error"
resultsSheet("E1").Value = "Date Error"
For i = 0 To results.Count - 1
Dim result = results(i)
resultsSheet($"A{i + 2}").Value = result.Row
resultsSheet($"B{i + 2}").Value = If(result.IsValid, "Yes", "No")
resultsSheet($"C{i + 2}").Value = result.PhoneNumberErrorMessage
resultsSheet($"D{i + 2}").Value = result.EmailErrorMessage
resultsSheet($"E{i + 2}").Value = result.DateErrorMessage
Next i
workBook.SaveAs("Spreadsheets\PeopleValidated.xlsx")VB C#
4. Export Data using Entity Framework
Use IronXL to export data to a database or convert an Excel spreadsheet to a database. The ExcelToDB sample reads a spreadsheet with GDP by country and then exports that data to an SQLite.
It uses EntityFramework to build the database and then export the data line by line.
Add the SQLite Entity Framework NuGet packages.
EntityFramework allows you to create a model object that can export data to the database.
:path=/static-assets/excel/content-code-examples/tutorials/how-to-read-excel-file-csharp-10.cspublic class Country
{
[Key]
public Guid Key { get; set; }
public string Name { get; set; }
public decimal GDP { get; set; }
}
Public Class Country
		<Key>
		Public Property Key() As Guid
		Public Property Name() As String
		Public Property GDP() As Decimal
End Class
VB C#
To use a different database, install the corresponding NuGet package and find the equivalent of UseSqLite()
:path=/static-assets/excel/content-code-examples/tutorials/how-to-read-excel-file-csharp-11.cspublic class CountryContext : DbContext
{
public DbSet<Country> Countries { get; set; }
public CountryContext()
{
//TODO: Make async
Database.EnsureCreated();
}
/// <summary>
/// Configure context to use Sqlite
/// </summary>
/// <param name="optionsBuilder"></param>
protected override void OnConfiguring(DbContextOptionsBuilder optionsBuilder)
{
var connection = new SqliteConnection($"Data Source=Country.db");
connection.Open();
var command = connection.CreateCommand();
//Create the database if it doesn't already exist
command.CommandText = $"PRAGMA foreign_keys = ON;";
command.ExecuteNonQuery();
optionsBuilder.UseSqlite(connection);
base.OnConfiguring(optionsBuilder);
}
}
Public Class CountryContext
	Inherits DbContext

		Public Property Countries() As DbSet(Of Country)
		Public Sub New()
			'TODO: Make async
			Database.EnsureCreated()
		End Sub
		''' <summary>
		''' Configure context to use Sqlite
		''' </summary>
		''' <param name="optionsBuilder"></param>
		Protected Overrides Sub OnConfiguring(ByVal optionsBuilder As DbContextOptionsBuilder)
			Dim connection = New SqliteConnection($"Data Source=Country.db")
			connection.Open()
			Dim command = connection.CreateCommand()
			'Create the database if it doesn't already exist
			command.CommandText = $"PRAGMA foreign_keys = ON;"
			command.ExecuteNonQuery()
			optionsBuilder.UseSqlite(connection)
			MyBase.OnConfiguring(optionsBuilder)
		End Sub
End Class
VB C#
Create a CountryContext, iterate through the range to create each record, and then SaveAsync to commit data to the database
:path=/static-assets/excel/content-code-examples/tutorials/how-to-read-excel-file-csharp-12.cspublic async Task ProcessAsync()
{
//Get the first worksheet
var workbook = WorkBook.Load(@"Spreadsheets\GDP.xlsx");
var worksheet = workbook.GetWorkSheet("GDPByCountry");
//Create the database connection
using (var countryContext = new CountryContext())
{
//Iterate through all the cells
for (var i = 2; i <= 213; i++)
{
//Get the range from A-B
var range = worksheet[$"A{i}:B{i}"].ToList();
//Create a Country entity to be saved to the database
var country = new Country
{
Name = (string)range[0].Value,
GDP = (decimal)(double)range[1].Value
};
//Add the entity
await countryContext.Countries.AddAsync(country);
}
//Commit changes to the database
await countryContext.SaveChangesAsync();
}
}Public Async Function ProcessAsync() As Task
'Get the first worksheet
Dim workbook = WorkBook.Load("Spreadsheets\GDP.xlsx")
Dim worksheet = workbook.GetWorkSheet("GDPByCountry")
'Create the database connection
Using countryContext As New CountryContext()
'Iterate through all the cells
For i = 2 To 213
'Get the range from A-B
Dim range = worksheet($"A{i}:B{i}").ToList()
'Create a Country entity to be saved to the database
Dim country As New Country With {
.Name = CStr(range(0).Value),
.GDP = CDec(CDbl(range(1).Value))
}
'Add the entity
Await countryContext.Countries.AddAsync(country)
Next i
'Commit changes to the database
Await countryContext.SaveChangesAsync()
End Using
End FunctionVB C#
Sample: ExcelToDB
5. Download Data from an API to Spreadsheet
The following call makes a REST call with RestClient.Net. It downloads JSON and converts it into a «List» of the type RestCountry. It is then easy to iterate through each country and save the data from the REST API to an Excel spreadsheet.
:path=/static-assets/excel/content-code-examples/tutorials/how-to-read-excel-file-csharp-14.csvar client = new Client(new Uri("https://restcountries.eu/rest/v2/"));
List<RestCountry> countries = await client.GetAsync<List<RestCountry>>();Dim client As New Client(New Uri("https://restcountries.eu/rest/v2/"))
Dim countries As List(Of RestCountry) = Await client.GetAsync(Of List(Of RestCountry))()VB C#
Sample: ApiToExcel
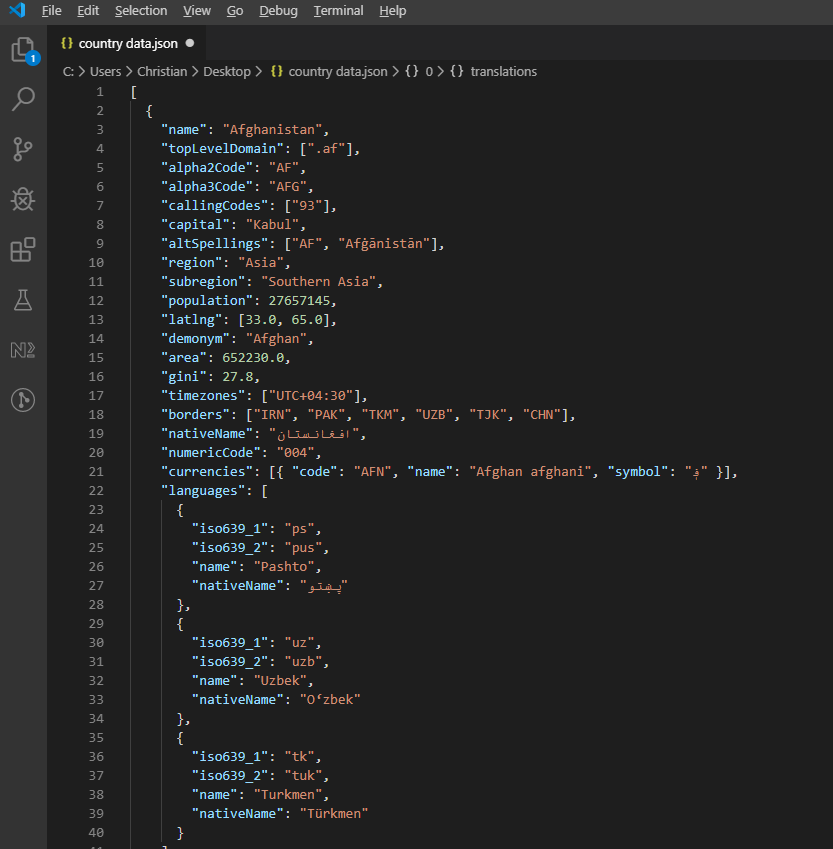
This is what the API JSON data looks like.
The following code iterates through the countries and sets the Name, Population, Region, NumericCode, and Top 3 Languages in the spreadsheet.
:path=/static-assets/excel/content-code-examples/tutorials/how-to-read-excel-file-csharp-15.csfor (var i = 2; i < countries.Count; i++)
{
var country = countries[i];
//Set the basic values
workSheet[$"A{i}"].Value = country.name;
workSheet[$"B{i}"].Value = country.population;
workSheet[$"G{i}"].Value = country.region;
workSheet[$"H{i}"].Value = country.numericCode;
//Iterate through languages
for (var x = 0; x < 3; x++)
{
if (x > (country.languages.Count - 1)) break;
var language = country.languages[x];
//Get the letter for the column
var columnLetter = GetColumnLetter(4 + x);
//Set the language name
workSheet[$"{columnLetter}{i}"].Value = language.name;
}
}For i = 2 To countries.Count - 1
Dim country = countries(i)
'Set the basic values
workSheet($"A{i}").Value = country.name
workSheet($"B{i}").Value = country.population
workSheet($"G{i}").Value = country.region
workSheet($"H{i}").Value = country.numericCode
'Iterate through languages
For x = 0 To 2
If x > (country.languages.Count - 1) Then
Exit For
End If
Dim language = country.languages(x)
'Get the letter for the column
Dim columnLetter = GetColumnLetter(4 + x)
'Set the language name
workSheet($"{columnLetter}{i}").Value = language.name
Next x
Next iVB C#
Object Reference and Resources
You may also find the IronXL class documentation within the Object Reference of great value.
In addition, there are other tutorials which may shed light in other aspects of IronXL.Excel including Creating, Opening, Writing, Editing, Saving and Exporting XLS, XLSX and CSV files without using Excel Interop.
Summary
IronXL.Excel is alone .NET software library for reading a wide variety of spreadsheet formats. It does not require Microsoft Excel to be installed, and is not dependant on Interop.
Tutorial Quick Access
Download this Tutorial as C# Source Code
The full free C# for Excel Source Code for this tutorial is available to download as a zipped Visual Studio 2017 project file.
Download
Explore this Tutorial on GitHub
The source code for this project is available in C# and VB.NET on GitHub.
Use this code as an easy way to get up and running in just a few minutes. The project is saved as a Microsoft Visual Studio 2017 project, but is compatible with any .NET IDE.
How to Read Excel File in C# on GitHub
View the API Reference
Explore the API Reference for IronXL, outlining the details of all of IronXL’s features, namespaces, classes, methods fields and enums.
View the API Reference

Christian Findlay
Software Development Team Lead
Christian builds software for the health industry and leads up a team. Christian has years of experience integrating with systems of all kinds. IronXL allows Christian to import and manipulate data from different sources to automate repetitive tasks and validate input data from 3rd party sources.
Время на прочтение
7 мин
Количество просмотров 69K
В современном мире разработки приложений нередко встает необходимость работы с Excel документами. Чаще всего это разного рода отчеты, но иногда xls/x файлы используются в качестве хранилища данных. Например, если пользователь должен иметь возможность загрузить данные в приложение или выгрузить, в человеко-читаемом виде, Excel де-факто является стандартом. Относительно дружелюбный интерфейс, прозрачная структура, в купе с его распространенностью… трудно навскидку назвать решение лучше.

Однако, у многих Excel до сих пор ассоциируется с чем-то тяжелым, неповоротливым и сложным. Давайте посмотрим, как мы — обычные C# разработчики, можем легко сформировать простой Excel документ, на примере табличного отчета.
Историческая справка
Времена, когда доминировал проприетарный формат .xls(Excel Binary File Format) давно прошли и сейчас мы имеем только .xlsx(Excel Workbook), в рамках Office Open XML. Последний представляет собой обычный .zip архив с XML файлами. Не будем углубляться в его структуру, я искренне надеюсь что вам это никогда не понадобится.
На github, и не только, можно найти ряд библиотек, бесплатных и не только. Пожалуй самой популярной является EPPlus. До определенной степени, она довольно хорошо отражает концепцию Excel, именно по этому я всегда использую EPPlus. Версия 4 полностью бесплатна, начиная с 5‐й версии вам потребуется приобрести лицензию для коммерческого использования.
Задача
Итак, предположим, продукт-мэнеджеру ударила в голову идея того, что возможность выгружать некий отчет в формате Excel увеличит кол-во пользователей на 100500%. Проджет-менеджер решает выкатить эту киллер-фичу как хотфикс прямо сегодня — ведь работы всего на пару часов.

Сам по себе, отчет содержит краткое описание компании и историю изменения некоторых экономических показателей. Для простоты все свойства компании — строки. Экономические показатели — большие целые числа и числа с плавающей точкой, а также даты. Предположим, что где-то в недрах микросервисного backend-да есть сервис-генератор подобных отчетов, например по id компании. Однако, поскольку id нет смысла выводить пользователю, идентификатор отсутствует в самой модели отчета.
Аналитик, в свою очередь, выдает задачу с феноменально точным описанием — «Сгенерировать excel отчет на базе данных MarketReport». Что ж, для нашего примера, создадим заглушку — генератор фейковых данных:

Первый запуск
Подключим EPPlus версии 4.5.3.3 и создадим базовую обвязку для будущего генератора.

Сердцем генератора будет метод Generate. ExcelPackage это модель документа, через которую мы и будем осуществлять все взаимодействия с ним. Также имеется конструктор для передачи пути к файлу или потока.

В методе main создается генератор отчетов, а также генератор Excel файлов. Далее полученный файл просто записывается на диск.
При попытке запустить приложение, получаем exception:InvalidOperationException: The workbook must contain at least one worksheet
Все правильно, Excel документ не может существовать без страниц, должна быть хотя бы одна. Добавляем ее, все интуитивно понятно:
var sheet = package.Workbook.Worksheets
		.Add("Market Report");
Запускаем снова и… вот оно! Теперь наше приложение генерирует документ и, хотя там еще ничего нет, он уже весит 2,5KB — значит мы работаем с Excel правильно и все идет как надо.
Вывод данных
Давайте выведем основную информацию по компании в шапку. Для доступа к конкретной ячейки объект Cells на странице пакета снабжен удобным индексатором. При этом, до конкретной ячейки можно достучаться как через номер строки и столбца, так и по привычному всем буквенно-числовому коду:
sheet.Cells["B2"].Value = "Company:";
sheet.Cells[2, 3].Value = report.Company.Name;
Полный код вывода шапки.
sheet.Cells["B2"].Value = "Company:";
sheet.Cells[2, 3].Value = report.Company.Name;
sheet.Cells["B3"].Value = "Location:";
sheet.Cells["C3"].Value = $"{report.Company.Address}, " +
  												$"{report.Company.City}, " +
  												$"{report.Company.Country}";
sheet.Cells["B4"].Value = "Sector:";
sheet.Cells["C4"].Value = report.Company.Sector;
sheet.Cells["B5"].Value = report.Company.Description;
Для вывода исторических данных понадобится как минимум шапка таблицы и цикл по массиву History:
sheet.Cells[8, 2, 8, 4].LoadFromArrays(new object[][]{ new []{"Capitalization", "SharePrice", "Date"} });
var row = 9;
var column = 2;
foreach (var item in report.History)
{
  sheet.Cells[row, column].Value = item.Capitalization;
  sheet.Cells[row, column + 1].Value = item.SharePrice;
  sheet.Cells[row, column + 2].Value = item.Date;
  row++;
}
Предлагаю обратить внимание на метод LoadFromArrays, который заполняет диапазон ячеек рваным(зубчатым) массивом. Здесь мы можем видеть, что типизация теряется и передавая массив object мы ожидаем что EPPlus в конечном итоге использует ToString, чтобы записать переданное в ячейки.
Стилизация
Если вы прямо сейчас откроете документ, то вы возможно увидите не то, что хотелось бы отдать в продакшн в пятницу вечером.
Как это выглядит

Во-первых, шапка никак не выделяется, во-вторых таблица не имеет границ… выравнивание пляшет, даты отображаются магическими числами, а капитализация «уходит в какую-то математику» — как это прокомментировал аналитик.
Да, на все эти красивости у нас уйдет больше года кода, чем на сам вывод данных, и, в конечном тоге, получившаяся каша из логики вывода данных и разметки заставит некоторых усомниться в их компетентности… но, мы же backend разработчики, так давайте сверстаем Excel Sheet!
Размер ячеек
Из коробки у нас есть возможность сделать автофит а так же вручную выставить ширину в соответствии с нашей ситуацией. А ситуация у нас не самая хорошая — по задумке аналитика в шапке у ячеек должен быть автофит, а у ячеек таблицы — тоже автофит. Так в чем же подвох?
Если вы когда-нибудь до этого открывали Excel, то возможно знаете, что ширина ячеек не может отличаться в рамках столбца и автофит будет по самому широкому контенту ячейки. Однако, простые вещи бывает нетак то просто объяснить… Но если вы справитесь, то вот как это будет выглядеть в коде:
sheet.Cells[1, 1, row, column + 2].AutoFitColumns();
sheet.Column(2).Width = 14;
sheet.Column(3).Width = 12;
Формат данных
Как и большая часть стиля ячейки, он задается через одноименное свойство Style. Обратите внимание на вычисление 3-го аргумента индексатора. Это звоночек некачественного кода, но к этому мы вернемся в позже…
sheet.Cells[9, 4, 9 + report.History.Length, 4].Style.Numberformat.Format = "yyyy";
sheet.Cells[9, 2, 9 + report.History.Length, 2].Style.Numberformat.Format =  "### ### ### ##0";
Выравнивание
Его можно задать как на ячейке, так и на диапазоне. На самом деле, для EPPlus, это одна и та же сущность — некий ExcelRange, описывающий диапазон ячеек, в том числе и со всего 1 ячейкой.
sheet.Column(2).Style.HorizontalAlignment = ExcelHorizontalAlignment.Left;
sheet.Cells[8, 3, 8 + report.History.Length, 3].Style.HorizontalAlignment = ExcelHorizontalAlignment.Center;
Стиль текста
Также легко задается, используя Style.Font, кстати, здесь, на 2-й строчке, мы впервые указываем диапазон так, как привыкли его видеть пользователи Excel:
sheet.Cells[8, 2, 8, 4].Style.Font.Bold = true;
sheet.Cells["B2:C4"].Style.Font.Bold = true;
Границы
Задаем стиль линии, а также ее толщину. К этому моменту от кол-ва магических чисел-параметров индексатора уже рябит в глазах, но мы уже на финишной прямой… не так ли?
sheet.Cells[8, 2, 8 + report.History.Length, 4].Style.Border.BorderAround(ExcelBorderStyle.Double);
sheet.Cells[8, 2, 8, 4].Style.Border.Bottom.Style = ExcelBorderStyle.Thin;
График
«Ну что за отчет без графиков, верно, Карл?» — ловко подметит специалист по тестированию, и не важно, что этого не было в ТЗ а на часах уже половина 9-го…
Хотя график как сущность сам по себе сложнее таблиц и с графиками мы не работаем каждый день, EPPlus предоставляет довольно понятный API. Давайте добавим простейший график, отражающий рост капитализации:
var capitalizationChart = sheet.Drawings.AddChart("FindingsChart", OfficeOpenXml.Drawing.Chart.eChartType.Line);
capitalizationChart.Title.Text = "Capitalization";
capitalizationChart.SetPosition(7, 0, 5, 0);
capitalizationChart.SetSize(800, 400);
var capitalizationData = (ExcelChartSerie)(capitalizationChart.Series.Add(sheet.Cells["B9:B28"], sheet.Cells["D9:D28"]));
capitalizationData.Header = report.Company.Currency;
Еще, может понадобиться защитить страницу от редактирования:
sheet.Protection.IsProtected = true;На этом все, репозиторий с рабочим приложением находится здесь.
Заключение
О чем говорит финальная версия метода Generate?
public byte[] Generate(MarketReport report)
{
  var package = new ExcelPackage();

  var sheet = package.Workbook.Worksheets
    	.Add("Market Report");

  sheet.Cells["B2"].Value = "Company:";
  sheet.Cells[2, 3].Value = report.Company.Name;
  sheet.Cells["B3"].Value = "Location:";
  sheet.Cells["C3"].Value = $"{report.Company.Address}, " +
    												$"{report.Company.City}, " +
    												$"{report.Company.Country}";
  sheet.Cells["B4"].Value = "Sector:";
  sheet.Cells["C4"].Value = report.Company.Sector;
  sheet.Cells["B5"].Value = report.Company.Description;

  sheet.Cells[8, 2, 8, 4].LoadFromArrays(new object[][]{ new []{"Capitalization", "SharePrice", "Date"} });
  var row = 9;
  var column = 2;
  foreach (var item in report.History)
  {
    	sheet.Cells[row, column].Value = item.Capitalization;
   		sheet.Cells[row, column + 1].Value = item.SharePrice;
   		sheet.Cells[row, column + 2].Value = item.Date;
    	row++;
  }

  sheet.Cells[1, 1, row, column + 2].AutoFitColumns();
  sheet.Column(2).Width = 14;
  sheet.Column(3).Width = 12;

  sheet.Cells[9, 4, 9+ report.History.Length, 4].Style.Numberformat.Format = "yyyy";
  sheet.Cells[9, 2, 9+ report.History.Length, 2].Style.Numberformat.Format =  "### ### ### ##0";

  sheet.Column(2).Style.HorizontalAlignment = ExcelHorizontalAlignment.Left;
  sheet.Cells[8, 3, 8 + report.History.Length, 3].Style.HorizontalAlignment = ExcelHorizontalAlignment.Center;
  sheet.Column(4).Style.HorizontalAlignment = ExcelHorizontalAlignment.Right;

  sheet.Cells[8, 2, 8, 4].Style.Font.Bold = true;
  sheet.Cells["B2:C4"].Style.Font.Bold = true;

  sheet.Cells[8, 2, 8 + report.History.Length, 4].Style.Border.BorderAround(ExcelBorderStyle.Double);
  sheet.Cells[8, 2, 8, 4].Style.Border.Bottom.Style = ExcelBorderStyle.Thin;

  var capitalizationChart = sheet.Drawings.AddChart("FindingsChart", OfficeOpenXml.Drawing.Chart.eChartType.Line);
  capitalizationChart.Title.Text = "Capitalization";
  capitalizationChart.SetPosition(7, 0, 5, 0);
  capitalizationChart.SetSize(800, 400);
  var capitalizationData = (ExcelChartSerie)(capitalizationChart.Series.Add(sheet.Cells["B9:B28"], sheet.Cells["D9:D28"]));
  capitalizationData.Header = report.Company.Currency;

  sheet.Protection.IsProtected = true;

  return package.GetAsByteArray();
}
Во-первых, прежде всего, о том, что мы успешно справились с задачей, а именно, сгенерировали свой первый Excel отчет, поработали со стилями и даже решили пару попутных проблем.
Во-вторых, возможно имеет смысл искать новою работу, но, забегая вперед, я бы с этим не спешил… Если данная публикация наберет 1+ просмотров, то во второй части мы поговорим о том, как можно отделить стилизацию от логики заполнения данными, упростить манипуляции над ячейками и в целом сделаем код боле поддерживаемым.
- Remove From My Forums
-
Question
-
Hi
Can anyone help me how to read values in Excel in C# . So that Once I read I can send them to DataBase. My excel file Test.xls in («C:»)
Thanks
Doss
Answers
-
His Doss, Create a reference in your project to Excel Objects Library. The excel object library can be added in the COM tab of adding reference dialog. I hope the following code in your menu click event method will help you a lot to achieve your need. this.openFileDialog1.FileName = «*.xls»;
if (this.openFileDialog1.ShowDialog() == DialogResult.OK)
{
Excel.Workbook theWorkbook = ExcelObj.Workbooks.Open(
openFileDialog1.FileName, 0, true, 5,
«», «», true, Excel.XlPlatform.xlWindows, «t», false, false,
0, true);
Excel.Sheets sheets = theWorkbook.Worksheets;
Excel.Worksheet worksheet = (Excel.Worksheet)sheets.get_Item(1);
for (int i = 1; i <= 10; i++)
{
Excel.Range range = worksheet.get_Range(«A»+i.ToString(), «J» + i.ToString());
System.Array myvalues = (System.Array)range.Cells.Value;
string[] strArray = ConvertToStringArray(myvalues);
}
}Cheers,
Daya Anand, PSPIndia -
If you don’t want to use the Excel COM objects, you can use OleDb. It takes a little setup in your Excel document. Basically, you need to define «named objects» in Excel that are synonymous to tables in a database. The first row of the named object are the column headers. To set up a named object, first select the range of cells (your «table,» with the first row being the column headers), then go to menu Insert->Names->Define. Name your object and press «Add.» Now you have an object which can be read by ADO.NET.
Now for the C# (this example assumes I have an Excel file at C:Book1.xls and a named object in this workbook called «MyObject»):
using System.Data;
using System.Data.OleDb;
…
OleDbConnection con = new OleDbConnection(@»Provider=Microsoft.Jet.OLEDB.4.0;Data Source=C:Book1.xls;Extended Properties=Excel 8.0″);
OleDbDataAdapter da = new OleDbDataAdapter(«select * from MyObject», con);
DataTable dt = new DataTable();
da.Fill(dt);
You can use SQL to query the data in your named object.
-
You can read data from Excel using the JET OLEDB provider. See the URL below for the necessary connection string, and a link to a KB article with further information ... http://www.carlprothman.net/Default.aspx?tabid=87#OLEDBProviderForMicrosoftJetExcel -- Brendan Reynolds wrote in message news:9226766e-a1d5-400c-8d3c-8ffc566bec50@discussions.microsoft.com... > Hi > > Can anyone help me how to read values in Excel in C# . So that Once I > read I can send them to DataBase. My excel file Test.xls in ("C:") > > Thanks > Doss > -
If you are using a dynamically generated excel file then you can use the following:
Excel.Sheets sheets = m_Excel.Worksheets;
Excel.Worksheet worksheet = (Excel.Worksheet)sheets.get_Item(1);
System.Array myvalues;
Excel.Range range = worksheet.get_Range(«A1», «E1».ToString());
myvalues = (System.Array)range.Cells.Value;
Thanks