
| title | description | ms.date | ms.topic | dev_langs | helpviewer_keywords | author | ms.author | manager | ms.technology | ms.workload | ||||||||||
|---|---|---|---|---|---|---|---|---|---|---|---|---|---|---|---|---|---|---|---|---|
|
Excel Object model overview |
Learn that you can interact with the objects provided by the Excel object model to develop solutions that use Microsoft Office Excel. |
08/14/2019 |
conceptual |
|
|
John-Hart |
johnhart |
jmartens |
office-development |
office |
Excel object model overview
[!INCLUDE Visual Studio]
To develop solutions that use Microsoft Office Excel, you can interact with the objects provided by the Excel object model. This topic introduces the most important objects:
-
xref:Microsoft.Office.Interop.Excel.Application
-
xref:Microsoft.Office.Interop.Excel.Workbook
-
xref:Microsoft.Office.Interop.Excel.Worksheet
-
xref:Microsoft.Office.Interop.Excel.Range
[!INCLUDEappliesto_xlalldocapp]
[!includeAdd-ins note]
The object model closely follows the user interface. The xref:Microsoft.Office.Interop.Excel.Application object represents the entire application, and each xref:Microsoft.Office.Interop.Excel.Workbook object contains a collection of Worksheet objects. From there, the major abstraction that represents cells is the xref:Microsoft.Office.Interop.Excel.Range object, which enables you to work with individual cells or groups of cells.
In addition to the Excel object model, Office projects in Visual Studio provide host items and host controls that extend some objects in the Excel object model. Host items and host controls behave like the Excel objects they extend, but they also have additional functionality such as data-binding capabilities and extra events. For more information, see Automate Excel by using extended objects and Host items and host controls overview.
This topic provides a brief overview of the Excel object model. For resources where you can learn more about the entire Excel object model, see Use the Excel object model documentation.
Access objects in an Excel project
When you create a new VSTO Add-in project for Excel, Visual Studio automatically creates a ThisAddIn.vb or ThisAddIn.cs code file. You can access the Application object by using Me.Application or this.Application.
When you create a new document-level project for Excel, you have the option of creating a new Excel Workbook or Excel Template project. Visual Studio automatically creates the following code files in your new Excel project for both workbook and template projects.
| Visual Basic | C# |
|---|---|
| ThisWorkbook.vb | ThisWorkbook.cs |
| Sheet1.vb | Sheet1.cs |
| Sheet2.vb | Sheet2.cs |
| Sheet3.vb | Sheet3.cs |
You can use the Globals class in your project to access ThisWorkbook, Sheet1, Sheet2, or Sheet3 from outside of the respective class. For more information, see Global access to objects in Office projects. The following example calls the xref:Microsoft.Office.Interop.Excel._Worksheet.PrintPreview%2A method of Sheet1 regardless of whether the code is placed in one of the Sheetn classes or the ThisWorkbook class.
C#
:::code language=»csharp» source=»../vsto/codesnippet/CSharp/Trin_VstcoreExcelAutomationCS/Sheet1.cs» id=»Snippet82″:::
VB
:::code language=»vb» source=»../vsto/codesnippet/VisualBasic/Trin_VstcoreExcelAutomation/Sheet1.vb» id=»Snippet82″:::
Because the data in an Excel document is highly structured, the object model is hierarchical and straightforward. Excel provides hundreds of objects with which you might want to interact, but you can get a good start on the object model by focusing on a small subset of the available objects. These objects include the following four:
-
Application
-
Workbook
-
Worksheet
-
Range
Much of the work done with Excel centers around these four objects and their members.
Application object
The Excel xref:Microsoft.Office.Interop.Excel.Application object represents the Excel application itself. The xref:Microsoft.Office.Interop.Excel.Application object exposes a great deal of information about the running application, the options applied to that instance, and the current user objects open within the instance.
[!NOTE]
You should not set the xref:Microsoft.Office.Interop.Excel.ApplicationClass.EnableEvents%2A property of the xref:Microsoft.Office.Interop.Excel.Application object in Excel to false. Setting this property to false prevents Excel from raising any events, including the events of host controls.
Workbook object
The xref:Microsoft.Office.Interop.Excel.Workbook object represents a single workbook within the Excel application.
The Office development tools in Visual Studio extend the xref:Microsoft.Office.Interop.Excel.Workbook object by providing the xref:Microsoft.Office.Tools.Excel.Workbook type. This type gives you access to all features of a xref:Microsoft.Office.Interop.Excel.Workbook object. For more information, see Workbook host item.
Worksheet object
The xref:Microsoft.Office.Interop.Excel.Worksheet object is a member of the xref:Microsoft.Office.Interop.Excel.Worksheets collection. Many of the properties, methods, and events of the xref:Microsoft.Office.Interop.Excel.Worksheet are identical or similar to members provided by the xref:Microsoft.Office.Interop.Excel.Application or xref:Microsoft.Office.Interop.Excel.Workbook objects.
Excel provides a xref:Microsoft.Office.Interop.Excel.Sheets collection as a property of a xref:Microsoft.Office.Interop.Excel.Workbook object. Each member of the xref:Microsoft.Office.Interop.Excel.Sheets collection is either a xref:Microsoft.Office.Interop.Excel.Worksheet or a xref:Microsoft.Office.Interop.Excel.Chart object.
The Office development tools in Visual Studio extend the xref:Microsoft.Office.Interop.Excel.Worksheet object by providing the xref:Microsoft.Office.Tools.Excel.Worksheet type. This type gives you access to all features of a xref:Microsoft.Office.Interop.Excel.Worksheet object, as well as new features such as the ability to host managed controls and handle new events. For more information, see Worksheet host item.
Range object
The xref:Microsoft.Office.Interop.Excel.Range object is the object you will use most within your Excel applications. Before you can manipulate any region within Excel, you must express it as a xref:Microsoft.Office.Interop.Excel.Range object and work with methods and properties of that range. A xref:Microsoft.Office.Interop.Excel.Range object represents a cell, a row, a column, a selection of cells that contains one or more blocks of cells, which might or might not be contiguous, or even a group of cells on multiple sheets.
Visual Studio extends the xref:Microsoft.Office.Interop.Excel.Range object by providing the xref:Microsoft.Office.Tools.Excel.NamedRange and xref:Microsoft.Office.Tools.Excel.XmlMappedRange types. These types have most of the same features as a xref:Microsoft.Office.Interop.Excel.Range object, as well as new features such as the data binding capability and new events. For more information, see NamedRange control and XmlMappedRange control.
Use the Excel object model documentation
For complete information about the Excel object model, you can refer to the Excel primary interop assembly (PIA) reference and the VBA object model reference.
Primary interop assembly reference
The Excel PIA reference documentation describes the types in the primary interop assembly for Excel. This documentation is available from the following location: Excel 2010 primary interop assembly reference.
For more information about the design of the Excel PIA, such as the differences between classes and interfaces in the PIA and how events in the PIA are implemented, see Overview of classes and interfaces in the Office primary interop assemblies.
VBA object model reference
The VBA object model reference documents the Excel object model as it is exposed to Visual Basic for Applications (VBA) code. For more information, see Excel 2010 object model reference.
All of the objects and members in the VBA object model reference correspond to types and members in the Excel PIA. For example, the Worksheet object in the VBA object model reference corresponds to the xref:Microsoft.Office.Interop.Excel.Worksheet object in the Excel PIA. Although the VBA object model reference provides code examples for most properties, methods, and events, you must translate the VBA code in this reference to Visual Basic or Visual C# if you want to use them in an Excel project that you create by using Visual Studio.
Related topics
| Title | Description |
|---|---|
| Excel solutions | Explains how you can create document-level customizations and VSTO Add-ins for Microsoft Office Excel. |
| Work with ranges | Provides examples that show how to perform common tasks with ranges. |
| Work with worksheets | Provides examples that show how to perform common tasks with worksheets. |
| Work with workbooks | Provides examples that show how to perform common tasks with workbooks. |
Давайте научимся быстро и просто создавать и записывать файлы Excel с помощью visual studio c#. Наше самое простое приложение Windows Forms будет брать из текстбокса текст и заносить его в первую ячейку. Статья написана специально для Сергея =).
Начать необходимо с подключения библиотеки Microsoft.Office.Interop.Excel. Выглядеть это должно так:

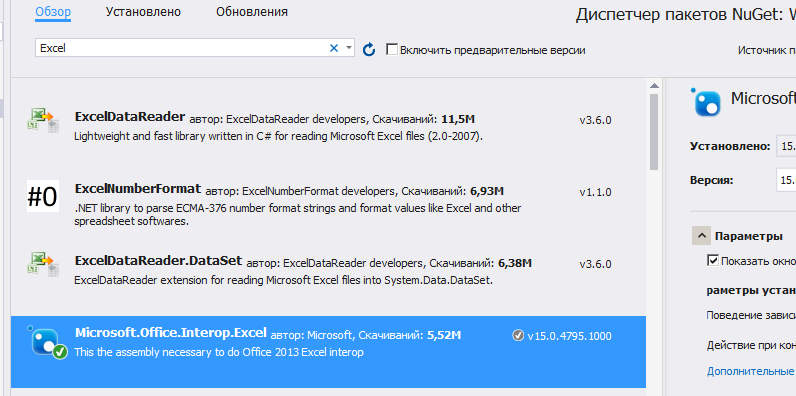
Если у вас при открытии обозревателя решений – Ссылки – правая кнопка – Добавить ссылку – Сборки – в списке нет Microsoft.Office.Interop.Excel, то добавьте её через Nuget. Проект – управление пакетами NuGet – в строке поиска Excel:
Теперь создайте новый проект Windows Forms и на форму закиньте текстбокс и кнопку. На кнопки кликните два раза, откроется исходный код. В самом верху допишите следующее:
using Excel = Microsoft.Office.Interop.Excel;
А в методе button1_Click замените так:
private void button1_Click(object sender, EventArgs e)
        {
            string fileName = "D:\temp\test.xls";

            try
            {
                var excel = new Excel.Application();

                var workBooks = excel.Workbooks;
                var workBook = workBooks.Add();
                var workSheet = (Excel.Worksheet)excel.ActiveSheet;

                workSheet.Cells[1, "A"] = textBox1.Text;

                workBook.SaveAs(fileName);
                workBook.Close();
            }
            catch (Exception ex) {
                MessageBox.Show("Ошибка: "+ ex.ToString());
            }

            MessageBox.Show("Файл "+ Path.GetFileName (fileName) + " записан успешно!");

        }
Вот, собственно говоря и все. Текст из текстбокса запишется в ячейку A1. Обратите внимание, что папка temp на диске уже должна существовать.
Дополнение. Прочитать первую ячейку
Это тоже просто:
 string fileName = "D:\temp\test.xls";

Excel.Application xlApp = new Excel.Application();
Excel.Workbook xlWorkbook = xlApp.Workbooks.Open(fileName, 0, true, 5, "", "", true, Excel.XlPlatform.xlWindows, "t", false, false, 0, true, 1, 0);
Excel._Worksheet xlWorksheet = (Excel._Worksheet)xlWorkbook.Sheets[1];
Excel.Range xlRange = xlWorksheet.UsedRange;

string temp = (string)(xlRange.Cells[1, 1] as Excel.Range).Value2;// 1 1 - адрес 1-й ячейки
MessageBox.Show(temp);

Автор этого материала — я — Пахолков Юрий. Я оказываю услуги по написанию программ на языках Java, C++, C# (а также консультирую по ним) и созданию сайтов. Работаю с сайтами на CMS OpenCart, WordPress, ModX и самописными. Кроме этого, работаю напрямую с JavaScript, PHP, CSS, HTML — то есть могу доработать ваш сайт или помочь с веб-программированием. Пишите сюда.
![]() заметки, си шарп, excel
заметки, си шарп, excel
Оставляю заметку по работе с Excel с помощью C#.
Привожу фрагменты кода, которые искал когда-то сам для работы с Excel документами.
Наработки очень пригодились в работе для формирования отчетности.
Прежде всего нужно подключить библиотеку Microsoft.Office.Interop.Excel.

Далее создаем псевдоним для работы с Excel:
using Excel = Microsoft.Office.Interop.Excel;
//Объявляем приложение
Excel.Application ex = new Microsoft.Office.Interop.Excel.Application();

//Отобразить Excel
ex.Visible = true;

//Количество листов в рабочей книге
ex.SheetsInNewWorkbook = 2;

//Добавить рабочую книгу
Excel.Workbook workBook = ex.Workbooks.Add(Type.Missing);

//Отключить отображение окон с сообщениями
ex.DisplayAlerts = false;

//Получаем первый лист документа (счет начинается с 1)
Excel.Worksheet sheet = (Excel.Worksheet)ex.Worksheets.get_Item(1);

//Название листа (вкладки снизу)
sheet.Name = "Отчет за 13.12.2017";

//Пример заполнения ячеек
for (int i = 1; i <= 9; i++)
{
  for (int j = 1; j < 9; j++)
  sheet.Cells[i, j] = String.Format("Boom {0} {1}", i, j);
}

//Захватываем диапазон ячеек
Excel.Range range1 = sheet.get_Range(sheet.Cells[1, 1], sheet.Cells[9, 9]);

//Шрифт для диапазона
range1.Cells.Font.Name = "Tahoma";
//Размер шрифта для диапазона
range1.Cells.Font.Size = 10;

//Захватываем другой диапазон ячеек
Excel.Range range2 = sheet.get_Range(sheet.Cells[1, 1], sheet.Cells[9, 2]);
range2.Cells.Font.Name = "Times New Roman";

//Задаем цвет этого диапазона. Необходимо подключить System.Drawing
range2.Cells.Font.Color = ColorTranslator.ToOle(Color.Green);
//Фоновый цвет
range2.Interior.Color = ColorTranslator.ToOle(Color.FromArgb(0xFF, 0xFF, 0xCC));
Расстановка рамок.
Расставляем рамки со всех сторон:
range2.Borders.get_Item(Excel.XlBordersIndex.xlEdgeBottom).LineStyle = Excel.XlLineStyle.xlContinuous;
range2.Borders.get_Item(Excel.XlBordersIndex.xlEdgeRight).LineStyle = Excel.XlLineStyle.xlContinuous;
range2.Borders.get_Item(Excel.XlBordersIndex.xlInsideHorizontal).LineStyle = Excel.XlLineStyle.xlContinuous;
range2.Borders.get_Item(Excel.XlBordersIndex.xlInsideVertical).LineStyle = Excel.XlLineStyle.xlContinuous;
range2.Borders.get_Item(Excel.XlBordersIndex.xlEdgeTop).LineStyle = Excel.XlLineStyle.xlContinuous;
Цвет рамки можно установить так:
range2.Borders.Color = ColorTranslator.ToOle(Color.Red);
Выравнивания в диапазоне задаются так:
rangeDate.VerticalAlignment = Excel.XlVAlign.xlVAlignCenter;
rangeDate.HorizontalAlignment = Excel.XlHAlign.xlHAlignLeft;
Формулы
Определим задачу: получить сумму диапазона ячеек A4:A10.
Для начала снова получим диапазон ячеек:
Excel.Range formulaRange = sheet.get_Range(sheet.Cells[4, 1], sheet.Cells[9, 1]);
Далее получим диапазон вида A4:A10 по адресу ячейки ( [4,1]; [9;1] ) описанному выше:
string adder = formulaRange.get_Address(1, 1, Excel.XlReferenceStyle.xlA1, Type.Missing, Type.Missing);
Теперь в переменной adder у нас хранится строковое значение диапазона ( [4,1]; [9;1] ), то есть A4:A10.
Вычисляем формулу:
//Одна ячейка как диапазон
Excel.Range r = sheet.Cells[10, 1] as Excel.Range;
//Оформления
r.Font.Name = "Times New Roman";
r.Font.Bold = true;
r.Font.Color = ColorTranslator.ToOle(Color.Blue);
//Задаем формулу суммы
r.Formula = String.Format("=СУММ({0}", adder);
Выделение ячейки или диапазона ячеек
Так же можно выделить ячейку или диапазон, как если бы мы выделили их мышкой:
sheet.get_Range("J3", "J8").Activate();
//или
sheet.get_Range("J3", "J8").Select();
//Можно вписать одну и ту же ячейку, тогда будет выделена одна ячейка.
sheet.get_Range("J3", "J3").Activate();
sheet.get_Range("J3", "J3").Select();
Авто ширина и авто высота
Чтобы настроить авто ширину и высоту для диапазона, используем такие команды:
range.EntireColumn.AutoFit();
range.EntireRow.AutoFit();
Получаем значения из ячеек
Чтобы получить значение из ячейки, используем такой код:
//Получение одной ячейки как ранга
Excel.Range forYach = sheet.Cells[ob + 1, 1] as Excel.Range;
//Получаем значение из ячейки и преобразуем в строку
string yach = forYach.Value2.ToString();
Добавляем лист в рабочую книгу
Чтобы добавить лист и дать ему заголовок, используем следующее:
var sh = workBook.Sheets;
Excel.Worksheet sheetPivot = (Excel.Worksheet)sh.Add(Type.Missing, sh[1], Type.Missing, Type.Missing);
sheetPivot.Name = "Сводная таблица";
Добавление разрыва страницы
//Ячейка, с которой будет разрыв
Excel.Range razr = sheet.Cells[n, m] as Excel.Range;
//Добавить горизонтальный разрыв (sheet - текущий лист)
sheet.HPageBreaks.Add(razr);
//VPageBreaks - Добавить вертикальный разрыв
Сохраняем документ
ex.Application.ActiveWorkbook.SaveAs("doc.xlsx", Type.Missing,
  Type.Missing, Type.Missing, Type.Missing, Type.Missing, Excel.XlSaveAsAccessMode.xlNoChange,
  Type.Missing, Type.Missing, Type.Missing, Type.Missing, Type.Missing);
Как открыть существующий документ Excel
ex.Workbooks.Open(@"C:UsersMyuserDocumentsExcel.xlsx",
  Type.Missing, Type.Missing, Type.Missing, Type.Missing,
  Type.Missing, Type.Missing, Type.Missing, Type.Missing,
  Type.Missing, Type.Missing, Type.Missing, Type.Missing,
  Type.Missing, Type.Missing);
Комментарии
При работе с Excel с помощью C# большую помощь может оказать редактор Visual Basic, встроенный в Excel.
Для этого в настройках ленты надо добавить пункт «Разработчик». Далее начинаем запись макроса, производим действия и останавливаем запись.
Далее заходим в редактор Visual Basic и смотрим код, который туда записался:

Например:
Sub Макрос1()
'
' Макрос1 Макрос
'

'
    Range("E88").Select
    ActiveSheet.ListObjects.Add(xlSrcRange, Range("$A$1:$F$118"), , xlYes).Name = _
        "Таблица1"
    Range("A1:F118").Select
    ActiveSheet.ListObjects("Таблица1").TableStyle = "TableStyleLight9"
    Range("E18").Select
    ActiveWindow.SmallScroll Down:=84
End Sub
В данном макросе записаны все действия, которые мы выполнили во время его записи. Эти методы и свойства можно использовать в C# коде.
Данный метод так же может оказать помощь в формировании относительных формул, например, выполнить сложение чисел, находящиеся слева от текущей ячейки на 4 столбца, и т.п. Пример:
//Складываем значения предыдущих 12 ячеек слева
rang.Formula = "=СУММ(RC[-12]:RC[-1])";
Так же во время работы может возникнуть ошибка: метод завершен неверно. Это может означать, что не выбран лист, с которым идет работа.
Чтобы выбрать лист, выполните sheetData.Select(Type.Missing); где sheetData это нужный лист.
Просмотрено:
81 944
Table of Contents
- Introduction
- Building the Sample
You can download the source code from this link Source
Code Link
Introduction

The main purpose of this article is to explain how to create simple Excel and Microsoft Word Add-Ins using Visual
Studio Tools for Office (VSTO).
VSTO is available as an add-in tool with Microsoft Visual Studio. Using Visual Studio we can develop our own custom controls for Office tools like Excel, Word and and so on.In
our demo program We have used Visual Studio 2010 and Office 2007.
Building the Sample
This article explains a few basic things to create our own Custom Add-Ins for Excel and Word as follows.
1. Excel Add-Ins
- Add text to any Excel selected active Excel cell.
- Add an image to Excel from our Custom Control.
- Load data from a database and display the search result data in Excel.
2. Word Add-Ins

- Export Word to PDF.
- Add Image to Word Document.
- Add Table to Word document.
Description
Creating Excel Add-Ins
To create our own Custom Control Add-Ins for Excel.
Step 1
Create a new project and select Office 2007 Excel Add-In as in the following Image. Select your Project Folder and enter your Project Name.

Step 2
Now we can see that the Excel ThisAddIn.Cs file has been created in our project folder and we can find two default methods in this class as in the following image. “ThisAddIn_Startup”
In this event we can display our own custom Control Add-Ins to Excel. We can see the details in the code part.

Step 3
Add a new UserControl to your project to create your own Custom Excel Control Add-In.
Right-click your project->Click Add New Item->Add User Control and Name the control as you wish. Add all your Controls and design your user control depending on your requirement.

In our example,We are performing 3 types of actions in User Controls.
- Add Text: In this button click event I will insert the text from the Text box to the Active Selected Excel Cell. Using “Globals.ThisAddIn.Application.ActiveCell”
we can get the current active Excel cell. We store the result in an Excel range and now using the range, value and color we can set our own text and colors to the active Excel Cell.
private void btnAddText_Click(object sender, EventArgs e)
{
Excel.Range objRange = Globals.ThisAddIn.Application.ActiveCell;
objRange.Interior.Color = Color.Pink; //Active Cell back Color
objRange.Borders.Color = Color.Red;// Active Cell border Color
objRange.Borders.LineStyle = Excel.XlLineStyle.xlContinuous;
objRange.Value = txtActiveCellText.Text; //Active Cell Text Add
objRange.Columns.AutoFit();
}
2. Add Image: using
the Open File Dialog we can select our own image that needs to be added to the Excel file. Using the Excel.Shape we can add our selected image to the Excel file.
private void btnAddImage_Click(object sender, EventArgs e)
{
OpenFileDialog dlg = new OpenFileDialog();
dlg.FileName = "*";
dlg.DefaultExt = "bmp";
dlg.ValidateNames = true;
dlg.Filter = "Bitmap Image (.bmp)|*.bmp|Gif Image (.gif)|*.gif|JPEG Image (.jpeg)|*.jpeg|Png Image (.png)|*.png";
if (dlg.ShowDialog() == System.Windows.Forms.DialogResult.OK)
{
Bitmap dImg = new Bitmap(dlg.FileName);
Excel.Shape IamgeAdd = Globals.ThisAddIn.Application.ActiveSheet.Shapes.AddPicture(dlg.FileName,
Microsoft.Office.Core.MsoTriState.msoFalse, Microsoft.Office.Core.MsoTriState.msoCTrue,
20, 30, dImg.Width, dImg.Height);
}
System.Windows.Forms.Clipboard.Clear();
}
Search and bind Db Data to Excel: Now
we can create our own Custom Search control to be used in Excel to search our data from the database and bind the result to the Excel file.
Creating the table
-- Create Table ItemMaster in your SQL Server - This table will be used for search and bind result to excel.
CREATE
TABLE
[dbo].[ItemMasters](
[Item_Code] [varchar](20)
NOT NULL,
[Item_Name] [varchar](100)
NOT NULL)
-- insert sample data to Item Master table
INSERT
INTO
[ItemMasters] ([Item_Code],[Item_Name])
VALUES
('Item001','Coke')
INSERT
INTO
[ItemMasters] ([Item_Code],[Item_Name])
VALUES
('Item002','Coffee')
INSERT
INTO
[ItemMasters] ([Item_Code],[Item_Name])
VALUES
('Item003','Chiken Burger')
INSERT
INTO
[ItemMasters] ([Item_Code],[Item_Name])
VALUES
('Item004','Potato Fry')
In the button search click event we search for the data from the database and bind the result to an Excel cell using “Globals.ThisAddIn.Application.ActiveSheet.Cells”.
This will add the result to the active Excel sheet.
private
void
btnSearch_Click(object
sender, EventArgs e)
{
try
{
System.Data.DataTable dt =
new
System.Data.DataTable();
String ConnectionString =
"Data Source=YOURDATASOURCE;Initial Catalog=YOURDATABASENAME;User id = UID;password=password";
SqlConnection con =
new
SqlConnection(ConnectionString);
String Query =
" Select Item_Code,Item_Name FROM ItemMasters Where Item_Name LIKE '"
+ txtItemName.Text.Trim() + "%'";
SqlCommand cmd =
new
SqlCommand(Query, con);
cmd.CommandType = System.Data.CommandType.Text;
System.Data.SqlClient.SqlDataAdapter sda =
new
System.Data.SqlClient.SqlDataAdapter(cmd);
sda.Fill(dt);
if
(dt.Rows.Count <= 0)
{
return;
}
Globals.ThisAddIn.Application.ActiveSheet.Cells.ClearContents();
Globals.ThisAddIn.Application.ActiveSheet.Cells[1, 1].Value2 =
"Item Code";
Globals.ThisAddIn.Application.ActiveSheet.Cells[1, 2].Value2 =
"Item Name";
for
(int
i = 0; i <= dt.Rows.Count - 1; i++)
{
Globals.ThisAddIn.Application.ActiveSheet.Cells[i + 2, 1].Value2 = dt.Rows[i][0].ToString();
Globals.ThisAddIn.Application.ActiveSheet.Cells[i + 2, 2].Value2 = dt.Rows[i][1].ToString();
}
}
catch
(Exception ex)
{
}
}
Step 4
Now we have created our own User Control to be added to our Excel Add-Ins. To add this user control to our Excel Add-In as we have already seen that the Excel Addin class “ThisAddIn.Cs” has start and stop events. Using
the Office “CustomTaskpane” we can add our user control to Excel as an Add-In as in the following.
private
Microsoft.Office.Tools.CustomTaskPane customPane;
private
void
ThisAddIn_Startup(object
sender, System.EventArgs e)
{
ShowShanuControl();
}
public
void
ShowShanuControl()
{
var txtObject =
new
ShanuExcelADDIn();
customPane =
this.CustomTaskPanes.Add(txtObject,
"Enter Text");
customPane.Width = txtObject.Width;
customPane.Visible =
true;
}
Step 5
Run your program and now we can see our user control has been added in the Excel File as an Add-In.
Next we will see how to create Add-Ins for Word Documents using a Ribbon Control.
Creating Word Add-Ins:
In my example I have used Visual Studio 2010 and Office 2007.
The following describes how to create our own Custom Control Add-Ins for Word.
Step 1
Create a new project and select Office 2007 Word AddIn as in the following Image. Select your Project Folder and enter your Project Name.

Step 2
Add a new Ribbon Control to your project to create your own Word Control Add-In.
Right-click your project then click Add New Item -> Add Ribbon Control and name the control as you wish.

Add all your controls and design your user control depending on your requirements. By default in our Ribbon Control we can see a “RibbonGroup”. We can add all our controls to the Ribbon Group. Here
in my example I have changed the Group Label Text to “SHANU Add-In”. I have added three Ribbon Button Controls to the group. We can add an image to the Ribbon Button Controls and set the properties of the Button Control Size as “RibbobControlSizeLarge”.

Here I have added three Button Controls for export the Word as a PDF, add an image to Word and add a table to the Word file.
Step 3
Export to PDF File Button Click.
Using the “Globals.ThisAddIn.Application.ActiveDocument.ExportAsFixedFormat” we can save the Word document to the PDF file. I have used the Save file dialog to save the PDF file into our selected path.
private
void
btnPDF_Click(object
sender, RibbonControlEventArgs e)
{
SaveFileDialog dlg =
new
SaveFileDialog();
dlg.FileName =
"*";
dlg.DefaultExt =
"pdf";
dlg.ValidateNames =
true;
if
(dlg.ShowDialog() == System.Windows.Forms.DialogResult.OK)
{
Globals.ThisAddIn.Application.ActiveDocument.ExportAsFixedFormat(dlg.FileName, word.WdExportFormat.wdExportFormatPDF, OpenAfterExport:
true);
}
}
Step 4
Here we will add an image to Word. Using the Open File Dialog we can select our own image to be added to the Word file. Using the “Globals.ThisAddIn.Application.ActiveDocument.Shapes.AddPicture” method we can add our
selected image to the Word file.
private
void
btnImage_Click(object
sender, RibbonControlEventArgs e)
{
OpenFileDialog dlg =
new
OpenFileDialog();
dlg.FileName =
"*";
dlg.DefaultExt =
"bmp";
dlg.ValidateNames =
true;
dlg.Filter =
"Bitmap Image (.bmp)|*.bmp|Gif Image (.gif)|*.gif|JPEG Image (.jpeg)|*.jpeg|Png Image (.png)|*.png";
if
(dlg.ShowDialog() == System.Windows.Forms.DialogResult.OK)
{
Globals.ThisAddIn.Application.ActiveDocument.Shapes.AddPicture(dlg.FileName);
}
}
Step 5
Here we will add a table to Word. Using the “Globals.ThisAddIn.Application.ActiveDocument.Tables” method we can add a table to the Word file. In my example I have created a table with 4 columns and 3 rows.
private
void
button1_Click(object
sender, RibbonControlEventArgs e)
{
Globals.ThisAddIn.Application.ActiveDocument.Tables.Add(Globals.ThisAddIn.Application.ActiveDocument.Range(0, 0), 3, 4);
.ThisAddIn.Application.ActiveDocument.Tables[1].Range.Shading.BackgroundPatternColor = Microsoft.Office.Interop.Word.WdColor.wdColorSeaGreen;
Globals.ThisAddIn.Application.ActiveDocument.Tables[1].Range.Font.Size = 12;
Globals.ThisAddIn.Application.ActiveDocument.Tables[1].Rows.Borders.Enable = 1;
}
Step 6
Run your program and now you will see your own Ribbon Control has been added to the Word file as an Add-In.

You can download the source code from this link Source
Code Link
In this tutorial I will show you how to create an Excel file using the C# programming language. This tutorial consists of a step-by-step guide specially designed for beginners and intermediate developers. Experts can skip the “project creation” section and jump directly to the “code” section. I will use the IronXL Library to create Excel files.
We will cover the following topics:
- What is an Excel File?
- What is IronXL?
- A Step-by-Step Guide to Creating Excel Files
- Step 1: Create a Visual Studio Project
- Step 2: Install the NuGet Package
- Step 3: Create an Excel Workbook
- Step 4: Set a Default Worksheet
- Step 5: Save the Workbook
- Step 6: Set Cell Values
- Set Cell Values Manually
- Set Cell Values Dynamically
- Set Cell Values from the Database
- Summary
What is an Excel File?
Excel is a spreadsheet application developed and published by Microsoft. It is part of the Microsoft Office suite of productivity software.
Excel is a tool for both organizing data and making calculations with it. The software can analyze data, calculate statistics, generate pivot tables, and represent data as charts or graphs.
For example, you could create an Excel spreadsheet that calculates a monthly budget, tracks associated expenses, and interactively sorts the data by various criteria.
Unlike a word processor, such as Microsoft Word, Excel organizes data in columns and rows. Rows and columns intersect at a space called a cell. Each cell contains data, such as text, numerical values, or formulas.
What is IronXL?
IronXL is an intuitive C# & VB Excel API that allows you to read, edit and create Excel spreadsheet files in .NET with lightning-fast performance. There is no need to install MS Office or even Excel Interop. This library can also be used for manipulating Excel documents.
IronXL fully supports .NET Core, .NET Framework, Xamarin, Mobile, Linux, MacOS and Azure.

A Step-by-Step Guide to Creating Excel Files
Firstly, we have to create a new Visual Studio Project. I will use the Console Application template for the demonstration. You can use any template that best suits your requirements.
You may also use a current project that would benefit from the capacity to create Excel files.
Step1: Create a Visual Studio Project
Open Microsoft Visual Studio 2019 or any other version. However, the latest version is recommended. Click on “Create New Project”. Select the C# Console Application for the application template. Click on the “Next” button.
Assign a name to your project. I have named mine «Excel Tutorial». You can select any name you wish. Click the “Next” button, and set the target framework. I have set my target framework to «.Net 5.0», the latest and most stable version. Click the “Create” button, and a new project will be created for you.
(adsbygoogle = window.adsbygoogle || []).push({});
Step 2: Install the NuGet Package in Visual Studio
Our next step is to install the IronXL NuGet Package for our project. Click on “Tools” on the menu bar. A new drop-down menu will appear. Click on «NuGet Package Manager» and then «Manage Nuget Packages for Solution», as shown below.

Click on “Browse” and search for IronXL in the search bar.

Click on “IronXL.Excel” and press the “Installed” button. This will install IronXL in your project. Now you are free to use any of its functions in your project.
Now that the IronXL Library has been installed, let’s go to the next step.
Step 3: Create an Excel Workbook
Firstly, add the namespace of IronXL into your project.
using IronXL;
Enter fullscreen mode
Exit fullscreen mode
It could not be easier to create a new Excel Workbook using IronXL! We need just one line of code. Yes, really!
WorkBook workbook = WorkBook.Create(ExcelFileFormat.XLSX);
Enter fullscreen mode
Exit fullscreen mode
Both the XLS (older Excel file versions) and XLSX (current and newer file versions) file formats can be created with IronXL.
Step 4: Set a Default Worksheet
Let’s create an Excel spreadsheet. I have just created one. You can create as many Excel spreadsheets as you need.
var sheet = workbook.CreateWorkSheet("Result Sheet");
Enter fullscreen mode
Exit fullscreen mode
«Sheet» in the above code snippet represents the worksheet, and you can use it to set cell values and almost everything else Excel can do.
If you are confused about the difference between a Workbook and a Worksheet, let me explain: a Workbook contains Worksheets. This means that you can add as many Worksheets as you like into one Workbook. I will explain how to do this in a later article. A Worksheet contains rows and columns. The intersection of a row and a column is called a cell, and these cells are what we manipulate whilst working with Excel.
Step 5: Save the Workbook
To save the xlsx format Workbook, use the following code:
workbook.SaveAs("Budget.xlsx");
Enter fullscreen mode
Exit fullscreen mode
Run the program to see the output.
Output File
This program will create a new workbook. You can find it in your project bin folder. You can also specify the path with the “Save As” function. Open your Excel document with Microsoft Excel. Below is the Excel worksheet we have just created.

Step 6: Setting Cell Values
Now that our workbook is created and saved, let’s add some data to the cell.
Setting Cell Values Manually:
To set cell values manually, you simply indicate which cell you are working with and set its value, as in the following example:
WorkBook workbook = WorkBook.Create(ExcelFileFormat.XLSX);
            var sheet = workbook.CreateWorkSheet("Result Sheet");
// Set Cell Values Manually
            sheet["A1"].Value = "Object Oriented Programming";
            sheet["B1"].Value = "Data Structure";
            sheet["C1"].Value = "Database Management System";
            sheet["D1"].Value = "Agile Development";
            sheet["E1"].Value = "Software Design and Architecture";
            sheet["F1"].Value = "Software Requirement Engineering";
            sheet["G1"].Value = "Computer Programming";
            sheet["H1"].Value = "Software Project Management";
            sheet["I1"].Value = "Software Construction";
            sheet["J1"].Value = "Software Quality Engineering";
            sheet["K1"].Value = "Software ReEngineering";
            sheet["L1"].Value = "Advance Database Management System";
// Save Workbook
            workbook.SaveAs("Result Sheet.xlsx");
Enter fullscreen mode
Exit fullscreen mode
Here, I have populated Columns A to L, and the first row of each to the names of various courses related to software engineering.
Run the program to see the output:
Output File

Setting Cell Values Dynamically
To set values dynamically we employ instructions that are very similar to those under the previous heading. The advantage here is that you do not have to hard-code the cell location. In the next code example, you will create a new random object to create random numbers, and then make use of a loop to iterate through the range of cells you’d like to populate with values.
WorkBook workbook = WorkBook.Create(ExcelFileFormat.XLSX);
            var sheet = workbook.CreateWorkSheet("Result Sheet");
            /**
            Set Cell Value Dynamically
            **/
            Random r = new Random();
            for (int i = 2; i <= 11; i++)
            {
                sheet["A" + i].Value = r.Next(1, 100);
                sheet["B" + i].Value = r.Next(1, 100);
                sheet["C" + i].Value = r.Next(1, 100);
                sheet["D" + i].Value = r.Next(1, 100);
                sheet["E" + i].Value = r.Next(1, 100);
                sheet["F" + i].Value = r.Next(1, 100);
                sheet["G" + i].Value = r.Next(1, 100);
                sheet["H" + i].Value = r.Next(1, 100);
                sheet["I" + i].Value = r.Next(1, 100);
                sheet["J" + i].Value = r.Next(1, 100);
                sheet["K" + i].Value = r.Next(1, 100);
                sheet["L" + i].Value = r.Next(1, 100);
            }
            // Save Workbook
            workbook.SaveAs("Result Sheet.xlsx");
        }
Enter fullscreen mode
Exit fullscreen mode
Every cell from A2 to L11 contains a unique value that was randomly generated.
Let’s run the program. It will create an excel file for us. Open this with Microsoft Excel to see the output.
Output

Talking about dynamic values, how about learning how to dynamically add data into cells directly from a database? The next code snippet quickly shows how this is done, assuming you have set up your database connections correctly.
Adding Data Directly from a Database
I will get the data from the table and assign those values to the cells of my spreadsheet. Here is a snapshot of my “Marks” table:
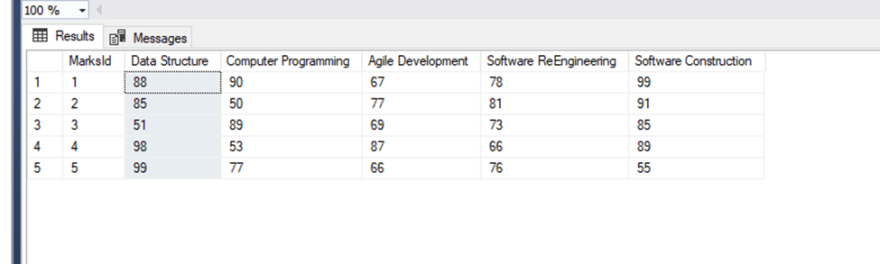
I will get the data from that tables and assign those values to the cells of my spreadsheet. Here is the snapshot of my Marks Table.
WorkBook workbook = WorkBook.Create(ExcelFileFormat.XLSX);
            var sheet = workbook.CreateWorkSheet("Result Sheet");
            //Create database objects to populate data from database
            string contring;
            string sql;
            DataSet ds = new DataSet("ResultSet");
            SqlConnection con;
            SqlDataAdapter da;
            //Set Database Connection string
            contring = @"data source = DESKTOP-FEP5MVSSQLEXPRESS; Initial Catalog = Result; Integrated Security = True; ";
            //SQL Query to obtain data
            sql = "SELECT [Data Structure],[Computer Programming] , [Agile Development] , [Software ReEngineering] , [Software Construction]  FROM Marks";
            //Open Connection & Fill DataSet
            con = new SqlConnection(contring);
            da = new SqlDataAdapter(sql, con);
            con.Open();
            da.Fill(ds);
            //Loop through Column
            foreach (DataTable table in ds.Tables)
            {
                for (int j = 0; j < table.Columns.Count; j++)
                {
                    sheet["A1"].Value = table.Columns[j].ToString();
                    sheet["B1"].Value = table.Columns[j].ToString();
                    sheet["C1"].Value = table.Columns[j].ToString();
                    sheet["D1"].Value = table.Columns[j].ToString();
                    sheet["E1"].Value = table.Columns[j].ToString();
                }
            }

            //Loop through contents of dataset
            foreach (DataTable table in ds.Tables)
            {
                for (int j = 0; j < table.Rows.Count; j++)
                {
                    sheet["A" + (j + 2)].Value = table.Rows[j]["Data Structure"].ToString();
                    sheet["B" + (j + 2)].Value = table.Rows[j]["Computer Programming"].ToString();
                    sheet["C" + (j + 2)].Value = table.Rows[j]["Agile Development"].ToString();
                    sheet["D" + (j + 2)].Value = table.Rows[j]["Software ReEngineering"].ToString();
                    sheet["E" + (j + 2)].Value = table.Rows[j]["Software Construction"].ToString();
                }
            }
            // Save Workbook
            workbook.SaveAs("Result Sheet.xlsx");
        }
Enter fullscreen mode
Exit fullscreen mode
In the above code, I first set the connection string of my database, and then I read the data from the table. Next, I assigned the column name to the Excel spreadsheet in the first loop, and values of the table in the second loop.
You simply have to set the value property of the particular cell to the field name, so that it can be entered into the cell.
Output File
Let’s run the program. It will create an Excel file for us. Open this with Microsoft Excel to see the output.

Summary
IronXL allow us to generate new Excel files in C#, create new worksheets inside them, set font sizes, use formulas and much more. There are too many functions and details to describe here. For more detailed information, please click here.
Iron software provides other libraries such as IronPdf for creating Pdf documents, Iron Barcode for generating, reading and manipulating barcode, and so forth. If you purchase the complete Iron suite, you will be eligible to receive all 5 products for the price of just two. For more details, please click here.
I hope this article was helpful and easy to read. Feel free to comment with your queries and feedback.
You can download a file project from this link.