
Содержание
- Пошаговое руководство. Вставка данных в книгу на сервере
- Предварительные требования
- Создание проекта библиотеки классов, определяющего набор данных
- Создание проекта библиотеки классов
- Определение набора данных в проекте библиотеки классов
- Определение типизированного набора данных в проекте библиотеки классов
- Создание проекта книги Excel
- Создание проекта книги Excel
- Добавление набора данных в источники данных в проекте книги Excel
- Добавление набора данных в источники данных в проекте книги Excel
- Создание объекта ListObject, привязанного к экземпляру набора данных
- Создание объекта ListObject, привязанного к экземпляру набора данных
- Добавление набора данных в кэш данных
- Добавление набора данных в кэш данных
- Контрольная точка
- Построение и запуск проекта
- Создание проекта консольного приложения
- Создание проекта консольного приложения
- Добавление данных в кэшированный набор данных с помощью консольного приложения
- Добавление данных в кэшированный набор данных
- Тестирование книги
- Тестирование книги
- Дальнейшие действия
Пошаговое руководство. Вставка данных в книгу на сервере
Область применения: Visual Studio Visual Studio для Mac Visual Studio Code
В этом пошаговом руководстве показано, как вставить данные в набор данных, кэшированный в книге Microsoft Office Excel без запуска Excel с помощью ServerDocument класса.
Применимо к: Сведения в этом разделе относятся к проектам уровня документа для Excel. Дополнительные сведения см. в разделе «Функции», доступные по Office приложению и типу проекта.
В этом пошаговом руководстве описаны следующие задачи:
Определение набора данных, содержащего данные из базы данных AdventureWorksLT.
Создание экземпляров набора данных в проекте книги Excel и консольном проекте приложения.
Создание привязанного ListObject к набору данных в книге.
Добавление набора данных в книгу в кэш данных.
Вставка данных в кэшированный набор данных путем выполнения кода в консольном приложении без запуска Excel.
Хотя в этом пошаговом руководстве предполагается, что код выполняется на компьютере разработки, код, показанный в этом пошаговом руководстве, можно использовать на сервере, на котором не установлено Excel.
Отображаемые на компьютере имена или расположения некоторых элементов пользовательского интерфейса Visual Studio могут отличаться от указанных в следующих инструкциях. Это зависит от имеющегося выпуска Visual Studio и используемых параметров. Дополнительные сведения см. в разделе Персонализация интегрированной среды разработки Visual Studio.
Предварительные требования
Для выполнения этого пошагового руководства требуются следующие компоненты:
Выпуск Visual Studio, включающий инструменты разработчика Microsoft Office. Дополнительные сведения см. в статье «Настройка компьютера для разработки Office решений».
Excel 2013 или Excel 2010 г.
Доступ к запущенному экземпляру Microsoft SQL Server или Microsoft SQL Server Express с присоединенной к ней образцом базы данных AdventureWorksLT. Базу данных AdventureWorksLT можно скачать на веб-сайте CodePlex. Дополнительные сведения о подключении базы данных см. в следующих разделах:
Чтобы подключить базу данных с помощью SQL Server Management Studio или SQL Server Management Studio Express, см. статью «Практическое руководство. Присоединение базы данных (SQL Server Management Studio)».
Создание проекта библиотеки классов, определяющего набор данных
Чтобы использовать один и тот же набор данных в проекте книги Excel и консольном приложении, необходимо определить набор данных в отдельной сборке, на которую ссылается оба этих проекта. В этом пошаговом руководстве определите набор данных в проекте библиотеки классов.
Создание проекта библиотеки классов
Запустите Visual Studio.
В меню Файл выберите пункт Создать, а затем команду Проект.
В области шаблонов разверните визуальные C# или Visual Basic, а затем щелкните Windows.
В списке шаблонов проектов выберите библиотеку классов.
В поле «Имя » введите AdventureWorksDataSet.
Нажмите кнопку «Обзор«, перейдите в папку %UserProfile%My Documents (для Windows XP и более ранних версий) или %UserProfile%Documents (для Windows Vista) и нажмите кнопку «Выбрать папку«.
В диалоговом окне «Создать Project» убедитесь, что флажок «Создать каталог для решения» не установлен.
Нажмите кнопку ОК.
Visual Studio добавляет проект AdventureWorksDataSet в Обозреватель решений и открывает файл кода Class1.cs или Class1.vb.
В Обозреватель решений щелкните правой кнопкой мыши файл Class1.cs или Class1.vb и выберите команду «Удалить«. Этот файл не нужен для этого пошагового руководства.
Определение набора данных в проекте библиотеки классов
Определите типизированный набор данных, содержащий данные из базы данных AdventureWorksLT для SQL Server 2005. Далее в этом пошаговом руководстве вы будете ссылаться на этот набор данных из проекта книги Excel и проекта консольного приложения.
Набор данных — это типизированный набор данных , представляющий данные в таблице Product базы данных AdventureWorksLT. Дополнительные сведения о типизированных наборах данных см. в разделе «Средства набора данных» в Visual Studio.
Определение типизированного набора данных в проекте библиотеки классов
В Обозреватель решений щелкните проект AdventureWorksDataSet.
Если окно «Источники данных» не отображается, отобразите его в строке меню, выбрав пункт «Просмотр>других источников Windows>Data».
Выберите команду Добавить новый источник данных , чтобы запустить Мастер настройки источника данных.
Щелкните База данныхи нажмите кнопку Далее.
Если у вас есть подключение к базе данных AdventureWorksLT, выберите это подключение и нажмите кнопку «Далее«.
В противном случае нажмите Создать подключениеи в диалоговом окне Добавление подключения создайте новое подключение. Дополнительные сведения см. в статье «Практическое руководство. Подключение к данным в базе данных».
На странице Сохранение подключения в файле конфигурации приложения нажмите кнопку Далее.
На странице «Выбор объектов базы данных » разверните «Таблицы» и выберите «Продукт » (SalesLT)«.
Нажмите кнопку Готово.
Файл AdventureWorksLTDataSet.xsd добавляется в проект AdventureWorksDataSet . В этом файле определены следующие элементы:
Типизированный набор данных с именем AdventureWorksLTDataSet . Этот набор данных представляет содержимое таблицы Product в базе данных AdventureWorksLT.
TableAdapter с именем ProductTableAdapter . Этот tableAdapter можно использовать для чтения и записи данных в . AdventureWorksLTDataSet Дополнительные сведения см. в обзоре TableAdapter.
Далее в пошаговом руководстве используются оба эти объекта.
В Обозреватель решений щелкните правой кнопкой мыши AdventureWorksDataSet и выберите команду «Сборка«.
Убедитесь, что сборка проекта выполняется без ошибок.
Создание проекта книги Excel
Создайте проект книги Excel для интерфейса с данными. Далее в этом пошаговом руководстве вы создадите объект ListObject , отображающий данные, и вы добавите экземпляр набора данных в кэш данных в книге.
Создание проекта книги Excel
В Обозреватель решений щелкните правой кнопкой мыши решение AdventureWorksDataSet, наведите указатель мыши на «Добавить» и выберите команду «Создать Project«.
В области шаблонов разверните узел Visual C# или Visual Basic, а затем узел Office/SharePoint.
В развернутом узле Office/SharePoint выберите узел Надстройки Office .
В списке шаблонов проектов выберите проект Книга Excel 2010 или Книга Excel 2013 .
В поле «Имя » введите AdventureWorksReport. Не изменяйте расположение.
Нажмите кнопку ОК.
Откроется Мастер проектов набора средств Visual Studio для Office .
Убедитесь, что выбран пункт «Создать новый документ » и нажмите кнопку «ОК«.
Visual Studio открывает книгу AdventureWorksReport в конструкторе и добавляет проект AdventureWorksReport в Обозреватель решений.
Добавление набора данных в источники данных в проекте книги Excel
Перед отображением набора данных в книге Excel необходимо сначала добавить набор данных в источники данных в проекте книги Excel.
Добавление набора данных в источники данных в проекте книги Excel
В Обозреватель решений дважды щелкните файл Sheet1.cs или Sheet1.vb в проекте AdventureWorksReport.
Книга откроется в конструкторе.
В меню Данные выберите команду Добавить новый источник данных.
Откроется мастер настройки источника данных .
Нажмите кнопку «Объект» и нажмите кнопку «Далее«.
На странице «Выбор объекта, к которым требуется выполнить привязку «, нажмите кнопку «Добавить ссылку«.
На вкладке «Проекты» нажмите кнопку AdventureWorksDataSet и нажмите кнопку «ОК«.
В пространстве имен AdventureWorksDataSet сборки AdventureWorksDataSet нажмите кнопку AdventureWorksLTDataSet и нажмите кнопку «Готово«.
Откроется окно источников данных , и AdventureWorksLTDataSet добавляется в список источников данных.
Создание объекта ListObject, привязанного к экземпляру набора данных
Чтобы отобразить набор данных в книге, создайте объект ListObject , привязанный к экземпляру набора данных. Дополнительные сведения о привязке элементов управления к данным см. в разделе «Привязка данных к элементам управления» в Office решениях.
Создание объекта ListObject, привязанного к экземпляру набора данных
В окне «Источники данных » разверните узел AdventureWorksLTDataSet в разделе AdventureWorksDataSet.
Выберите узел Product , щелкните появиющуюся стрелку раскрывающегося списка и выберите ListObject в раскрывающемся списке.
Если стрелка раскрывающегося списка не отображается, убедитесь, что книга открыта в конструкторе.
Перетащите таблицу Product в ячейку A1.
На ListObject листе создается элемент productListObject управления, начиная с ячейки A1. Одновременно в проект добавляется объект набора данных adventureWorksLTDataSet и объект BindingSource с именем productBindingSource . Объект ListObject привязан к объекту BindingSource, который в свою очередь привязан к объекту набора данных.
Добавление набора данных в кэш данных
Чтобы включить код за пределами проекта книги Excel для доступа к набору данных в книге, необходимо добавить набор данных в кэш данных. Дополнительные сведения о кэше данных см. в разделе «Кэшированные данные» в настройках на уровне документа и данных кэша.
Добавление набора данных в кэш данных
В конструкторе щелкните adventureWorksLTDataSet.
В окне «Свойства » задайте для свойства Modifiersзначение Public.
Задайте для свойства CacheInDocumentзначение True.
Контрольная точка
Выполните сборку и запуск проекта книги Excel, чтобы убедиться, что он компилируется и выполняется без ошибок.
Построение и запуск проекта
В Обозреватель решений щелкните правой кнопкой мыши проект AdventureWorksReport, выберите «Отладка» и выберите «Запустить новый экземпляр«.
Проект создан, и книга откроется в Excel. Лист ListObject1 пуст, так как adventureWorksLTDataSet объект в кэше данных еще не имеет данных. В следующем разделе вы будете использовать консольное приложение для заполнения объекта данными adventureWorksLTDataSet .
Закройте Excel. Не сохраняйте изменения.
Создание проекта консольного приложения
Создайте проект консольного приложения для вставки данных в кэшированный набор данных в книге.
Создание проекта консольного приложения
В Обозреватель решений щелкните правой кнопкой мыши решение AdventureWorksDataSet, наведите указатель мыши на «Добавить» и выберите команду «Создать Project«.
В области «Типы Project» разверните visual C# или Visual Basic и щелкните Windows.
Выберите панель Консольное приложение в области Шаблоны.
В поле «Имя» введите DataWriter. Не изменяйте расположение.
Нажмите кнопку ОК.
Visual Studio добавляет проект DataWriter в Обозреватель решений и открывает файл кода Program.cs или Module1.vb.
Добавление данных в кэшированный набор данных с помощью консольного приложения
ServerDocument Используйте класс в консольном приложении для заполнения кэшированного набора данных в книге данными.
Добавление данных в кэшированный набор данных
В Обозреватель решений щелкните правой кнопкой мыши проект DataWriter и выберите команду «Добавить ссылку«.
На вкладке .NET выберите Microsoft.VisualStudio.Tools.Applications.ServerDocument.
Нажмите кнопку ОК.
В Обозреватель решений щелкните правой кнопкой мыши проект DataWriter и выберите команду «Добавить ссылку«.
На вкладке «Проекты» выберите AdventureWorksDataSet и нажмите кнопку «ОК«.
Откройте файл Program.cs или Module1.vb в редакторе кода.
Добавьте следующую инструкцию using (для C#) или Imports (для Visual Basic) в начало файла кода.
Добавьте в метод Main следующий код. Этот код объявляет следующие объекты:
Экземпляры AdventureWorksLTDataSet и ProductTableAdapter типы, определенные в проекте AdventureWorksDataSet .
Путь к книге AdventureWorksReport в папке сборки проекта AdventureWorksReport .
ServerDocument Объект, используемый для доступа к кэшу данных в книге.
В следующем коде предполагается, что вы используете книгу с расширением.xlsx файла. Если книга в проекте имеет другое расширение файла, измените путь при необходимости.
Добавьте следующий код в Main метод после того, как код, добавленный на предыдущем шаге. Этот код выполняет следующие задачи:
Он заполняет типизированный объект набора данных с помощью адаптера таблицы.
Он использует CachedData свойство ServerDocument класса для доступа к кэшированному набору данных в книге.
Он использует SerializeDataInstance метод для заполнения кэшированного набора данных данными из локального типизированного набора данных.
В Обозреватель решений щелкните правой кнопкой мыши проект DataWriter, наведите указатель мыши на «Отладка» и выберите команду «Запустить новый экземпляр«.
Проект создается, и консольное приложение отображает несколько сообщений о состоянии при заполнении локального набора данных и при сохранении данных в кэшированном наборе данных в книге. Нажмите клавишу Enter , чтобы закрыть это приложение.
Тестирование книги
При открытии книги теперь отображаются данные, ListObject добавленные в кэшированный набор данных с помощью консольного приложения.
Тестирование книги
Закройте книгу AdventureWorksReport в конструкторе Visual Studio, если она по-прежнему открыта.
В проводник откройте книгу AdventureWorksReport, расположенную в папке сборки проекта AdventureWorksReport. По умолчанию папка сборки находится в одном из следующих расположений:
%UserProfile%My DocumentsAdventureWorksReportbinDebug (для Windows XP и более ранних версий)
%UserProfile%DocumentsAdventureWorksReportbinDebug (для Windows Vista)
Убедитесь, что данные ListObject заполняются после открытия книги.
Дальнейшие действия
Дополнительные сведения о работе с кэшируемыми данными см. в следующих разделах:
- Изменение данных в кэшированном наборе данных без запуска Excel. Дополнительные сведения см. в пошаговом руководстве. Изменение кэшированных данных в книге на сервере.
Источник
Blog / Import Excel to Datagridview using C#
In this tutorial, I will show you how to import an excel file to a DataGridview using C#. We are going to be using Microsoft.Office.interop.Excel namespace in this project. There are many ways to read an excel file in C#, but this is the easy way I found for beginners like me. Just follow the steps below.
Before we start, make sure that you have Visual Studio installed on your machine. If not, you can visit this download link. You can download the community version for free.
Let’s Start:
- First, Create a new Windows forma project. Navigate to File. Choose New option. Select Project.
2. From the New Project window. Name your project in any way you want. In my case, I name my project Upload_Data_From_Excel. Proceed on clicking the “Ok” button. See the image below.
3. Add controls from the toolbox. What we need is a Form, buttons, and OpenFileDialog.
- Form
- Button -> for the upload click event.
- OpenFileDialog -> for browsing files.
- DataGridview ->for viewing of data
Below image is the UI I created. This will help you visualize and understand the next step.
- For clarity and easy navigating, we will rename our button. Click the button you added to your form and go to its property from the solution explorer and change the value. In my case, I name it as btn_Upload.
5. Now navigate to your solution explorer and right-click on Reference, choose Add Reference, and then add Microsoft.Office.Interop.Excel.
6. From the reference manager window, expand Assemblies, and click Extensions from the left pane and search for Microsoft.Office.Interop.Excel from the middle pane.
7. Verify if the reference is added. Go to your project solution explorer. Expand Reference, then look for Microsoft.Office.Interop.Excel.
8. After we verify and successfully added Microsoft.Office.Interop.Excel. Open your form design and double click on the btn_Upload button to add button click event.
9. Copy and paste the code below to your btn_Upload Click Event.
string file = ""; //variable for the Excel File Location
DataTable dt = new DataTable(); //container for our excel data
DataRow row;
DialogResult result = openFileDialog1.ShowDialog(); // Show the dialog.
if (result == DialogResult.OK) // Check if Result == "OK".
{
  file = openFileDialog1.FileName; //get the filename with the location of the file
  try {
    //Create Object for Microsoft.Office.Interop.Excel that will be use to read excel file

    Microsoft.Office.Interop.Excel.Application excelApp = new Microsoft.Office.Interop.Excel.Application();

    Microsoft.Office.Interop.Excel.Workbook excelWorkbook = excelApp.Workbooks.Open(file);

    Microsoft.Office.Interop.Excel._Worksheet excelWorksheet = excelWorkbook.Sheets[1];

    Microsoft.Office.Interop.Excel.Range excelRange = excelWorksheet.UsedRange;

    int rowCount = excelRange.Rows.Count; //get row count of excel data

    int colCount = excelRange.Columns.Count; // get column count of excel data

    //Get the first Column of excel file which is the Column Name

    for (int i = 1; i <= rowCount; i++) {
      for (int j = 1; j <= colCount; j++) {
        dt.Columns.Add(excelRange.Cells[i, j].Value2.ToString());
      }
      break;
    }

    //Get Row Data of Excel

    int rowCounter; //This variable is used for row index number
    for (int i = 2; i <= rowCount; i++) //Loop for available row of excel data
    {
      row = dt.NewRow(); //assign new row to DataTable
      rowCounter = 0;
      for (int j = 1; j <= colCount; j++) //Loop for available column of excel data
      {
        //check if cell is empty
        if (excelRange.Cells[i, j] != null && excelRange.Cells[i, j].Value2 != null) {
          row[rowCounter] = excelRange.Cells[i, j].Value2.ToString();
        }
        else {
          row[i] = "";
        }
        rowCounter++;
      }
      dt.Rows.Add(row); //add row to DataTable
    }

    dataGridView1.DataSource = dt; //assign DataTable as Datasource for DataGridview

    //close and clean excel process
    GC.Collect();
    GC.WaitForPendingFinalizers();
    Marshal.ReleaseComObject(excelRange);
    Marshal.ReleaseComObject(excelWorksheet);
    //quit apps
    excelWorkbook.Close();
    Marshal.ReleaseComObject(excelWorkbook);
    excelApp.Quit();
    Marshal.ReleaseComObject(excelApp);
  }
  catch(Exception ex) {
    MessageBox.Show(ex.Message);
}- Now you are ready to run your project and test if no error occurs. Run your application by pressing ctrl + f5 without debugging or f5 for debugging mode.
- Click Upload button to upload.
- Then select your excel file. See the image below.
This is how to Import Excel to Datagridview using C# code. Hopes this helps.
Final output:
Excel File:
Project Output:
Full Code:
using System;
using System.Collections.Generic;
using System.ComponentModel;
using System.Data;
using System.Drawing;
using System.IO;
using System.Linq;
using System.Runtime.InteropServices;
using System.Text;
using System.Threading.Tasks;
using System.Windows.Forms;

namespace Upload_Data_From_Excel
{
    public partial class Upload_Data_Frm_EXCEL : Form
    {
        public Upload_Data_Frm_EXCEL()
        {
            InitializeComponent();
        }

        private void btn_upload_Click(object sender, EventArgs e)
        {
         string file = "";   //variable for the Excel File Location
            DataTable dt = new DataTable();   //container for our excel data
            DataRow row;
            DialogResult result = openFileDialog1.ShowDialog();  // Show the dialog.
            if (result == DialogResult.OK)   // Check if Result == "OK".
            {
                file = openFileDialog1.FileName; //get the filename with the location of the file
                try

                {
                 //Create Object for Microsoft.Office.Interop.Excel that will be use to read excel file

                    Microsoft.Office.Interop.Excel.Application excelApp = new Microsoft.Office.Interop.Excel.Application();

                    Microsoft.Office.Interop.Excel.Workbook excelWorkbook = excelApp.Workbooks.Open(file);

                    Microsoft.Office.Interop.Excel._Worksheet excelWorksheet = excelWorkbook.Sheets[1];

                    Microsoft.Office.Interop.Excel.Range excelRange = excelWorksheet.UsedRange;


                    int rowCount = excelRange.Rows.Count;  //get row count of excel data

                    int colCount = excelRange.Columns.Count; // get column count of excel data

                        //Get the first Column of excel file which is the Column Name

                    for (int i = 1; i <= rowCount; i++)
                    {
                        for (int j = 1; j <= colCount; j++)
                        {
                            dt.Columns.Add(excelRange.Cells[i, j].Value2.ToString());
                        }
                            break;
                    }
                        //Get Row Data of Excel
                    int rowCounter;  //This variable is used for row index number
                    for (int i = 2; i <= rowCount; i++) //Loop for available row of excel data
                    {
                        row = dt.NewRow();  //assign new row to DataTable
                        rowCounter = 0;
                        for (int j = 1; j <= colCount; j++) //Loop for available column of excel data
                        {
                             //check if cell is empty
                            if (excelRange.Cells[i, j] != null && excelRange.Cells[i, j].Value2 != null)
                            {
                                row[rowCounter] = excelRange.Cells[i, j].Value2.ToString();
                            }
                            else
                            {
                                row[i] = "";
                            }

                            rowCounter++;
                        }
                        dt.Rows.Add(row); //add row to DataTable
                    }

            dataGridView1.DataSource = dt; //assign DataTable as Datasource for DataGridview

                   //Close and Clean excel process
                    GC.Collect();
                    GC.WaitForPendingFinalizers();
                    Marshal.ReleaseComObject(excelRange);
                    Marshal.ReleaseComObject(excelWorksheet);
                    excelWorkbook.Close();
                    Marshal.ReleaseComObject(excelWorkbook);

                    //quit
                    excelApp.Quit();
                    Marshal.ReleaseComObject(excelApp);
                }
                catch (Exception ex)
                {
                    MessageBox.Show(ex.Message);
                }
        }

        }

    }

}
Thank you for reading! Happy Coding!!
If you are interested in ASP.NET Core you may visit my Blog page for my latest post.
Also Read: Ethernut telecommunications
We use cookies on our website to give you the most relevant experience by remembering your preferences and repeat visits. By clicking “Accept”, you consent to the use of ALL the cookies.
Microsoft Office is heavily used in most organizations, and Microsoft has provided several ways to extend and customize Office applications. In this article, Darko Martinovic demonstrates how to use C# to create several automation solutions, including custom add-ins.
Office components such as Excel or Word, have a powerful GUI, with many options to automate everyday tasks. In addition, there are a lot of excellent Add-Ins such as Power BI. With such functionality and the ability to use VBA, you may ask yourself why we need Office extensions.
Of course, there are many situations in which you might like to extend Office functionality. For example, to create a routine that:
- exports data from SQL Server into Excel with custom formatting
- imports data from Excel into the dataset
- automatizes Pivot Table creation in Excel
- customizes writing documents in Word
- customizes writing e-mail messages in Outlook
- more…
Microsoft provides a mechanism to accomplish all of these tasks. Office developer tools in Visual Studio let you create .NET Framework applications that extend Office. These applications are also named Office solutions. This article talks about how to develop and distribute such solutions.
In order to start developing you have to set up the environment.
Configure a Computer for Developing Office Solutions
The Office Developer Tools are installed by default as part of Visual Studio.
NOTE: In order to follow examples in the article, you can use any edition, including Visual Studio 2017 Community Edition.
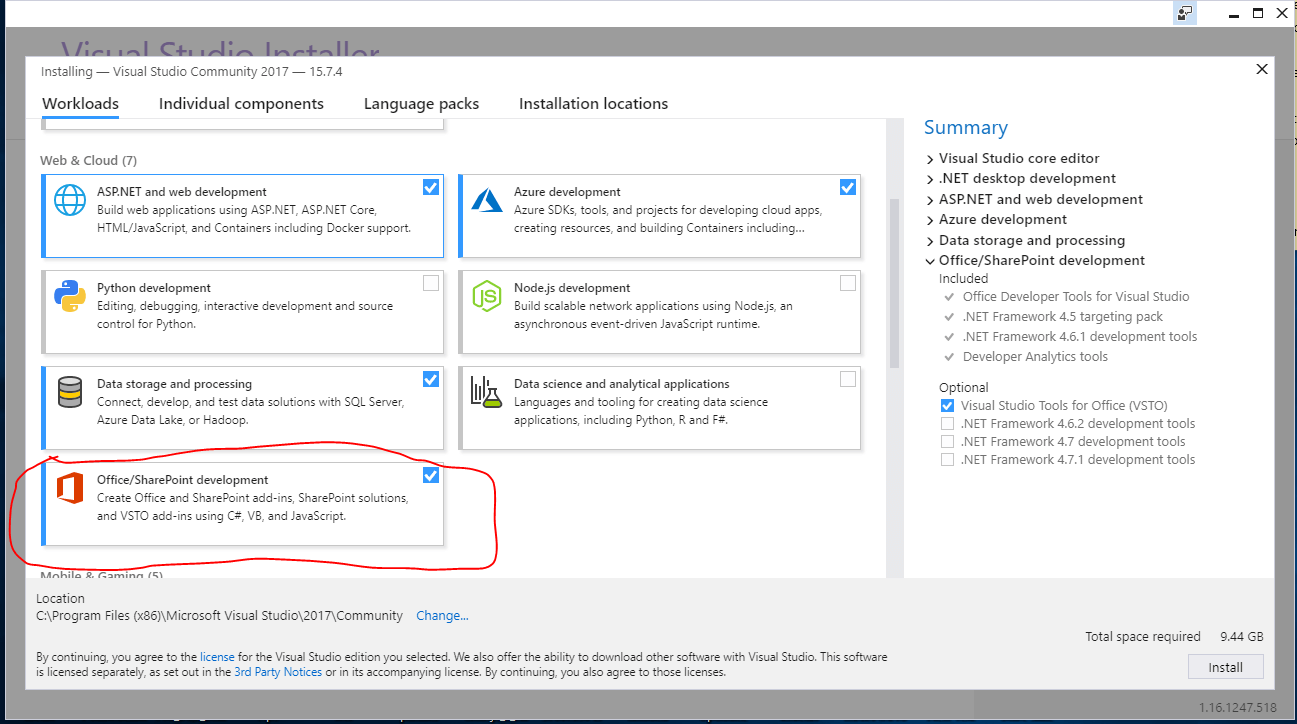
If you customize the Visual Studio installation by selecting which features to install, make sure that Microsoft Office Developer Tools is selected during setup. Alternatively, you can start Visual Studio Installer and select the Office/SharePoint development workload, as shown in the image below.
In addition, you have to Install a version of Office that is supported by the Office developer tools in Visual Studio. Examples in the article are tested with Office 2013/2016. Make sure that you also install the PIAs (Primary Interop Assemblies) for the version of Office that you install. The PIAs are installed with Office by default. If you modify the Office setup, make sure that the .NET Programmability Support feature is selected for the applications you want to target.
To check the installation, start Visual Studio, create a new project and be sure that Office templates are present as shown in the image below.
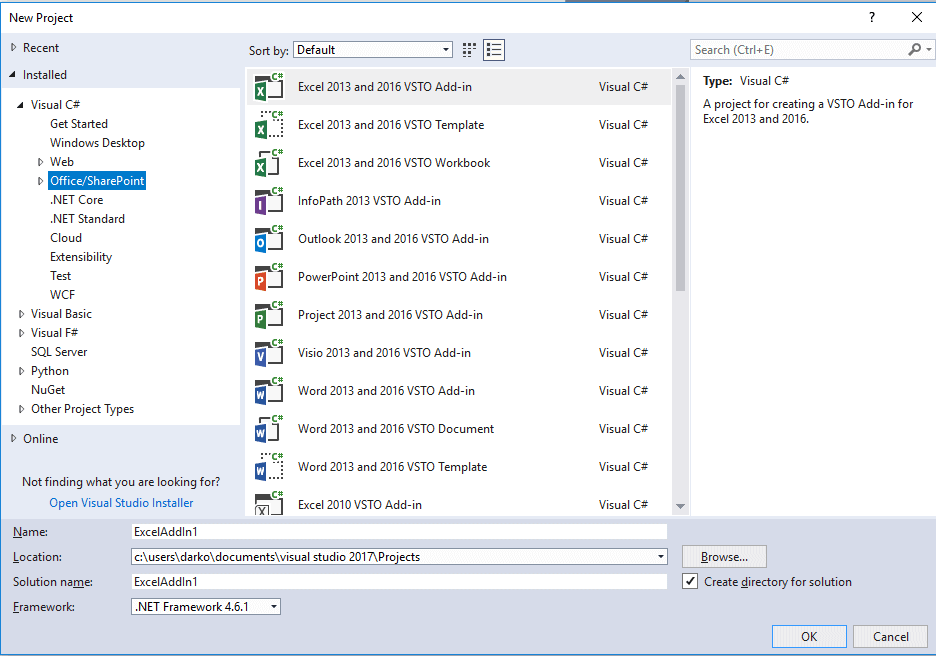
Choose an Office project type
Office projects are divided into Office and COM Add-ins. The first one usually is marked as ‘new development’, uses WEB templates and JavaScript, requires Office 2016, and targets mainly Office 365. In my opinion, both are worth exploring. This article covers the second one, which is usually divided based on the template you choose. There are Document-level customizations and VSTO Add-ins. VSTO Add-ins are associated with the application itself and Document-level customizations, as the name implies, are associated with a particular document.
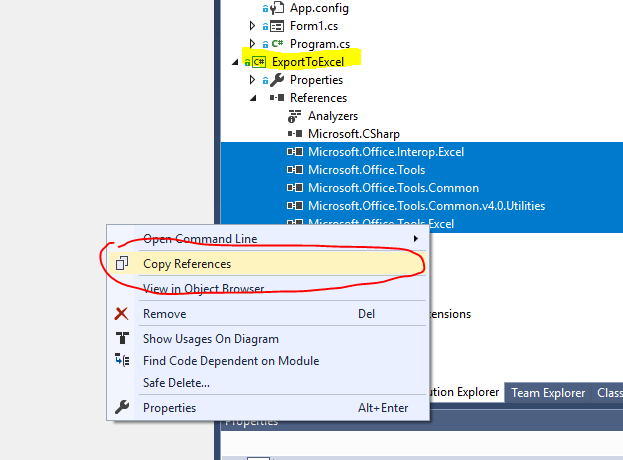
Besides that, there is the possibility to include the Office object model in your application by referencing PIA assemblies. The PIA enables the managed code in your solution to interact with the Office application’s COM-based object model. That would be the first example in which we will browsing source code in a Console application. If you would like to create your own startup project, choose C# console application from the list of available templates. After that you can use Visual Studio productivity tool Power Commands to copy references as shown in the image below and paste them in your project.
NOTE: You can add references by choosing Add Reference command from References context menu.
Exporting Data into Excel
Download this solution and then open it in Visual Studio. Make sure that ExportToExcel is selected as the startup project. The purpose of the first demo is to introduce the Excel object model by accomplishing one common task, exporting data from SQL Server tables into Excel. In order to follow the demo, you have to change the application configuration file app.config. In the file enter your instance name where you have restored the AdventureWorks2016 database.
The most important objects in Excel are:
- Application
- Workbook
- Worksheet
- Range
Microsoft documentation states: “The Application object represents the Excel application. The Application object exposes a great deal of information about the running application, the options applied to that instance, and the current user objects open within the instance.”
NOTE: The source code is located in the ExportToExcel.cs file inside the ExportToExcel project. There is no need to copy the code from the article.
In order to instantiate an application object, you have to include the Microsoft.Office.Interop.Excel namespace. An application object is created by using the following code snippet.
|
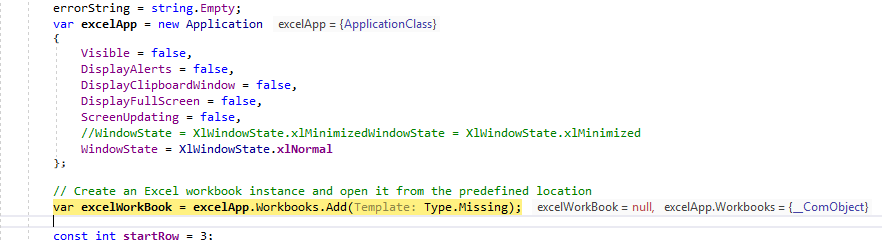
var excelApp = new Application { Visible = false, DisplayAlerts = false, DisplayClipboardWindow = false, DisplayFullScreen = false, ScreenUpdating = false, WindowState = XlWindowState.xlNormal }; |
If you add a breakpoint on a line after an application object is created (see the image below) and press F5 to start debugging the project, you will notice that nothing changes. The application is started as hidden because the Visible property is set to false.
In order to prove that the Excel application has started, start Task Manager, and find the Excel application on the list, as shown in the image below.

The Workbook object represents a single workbook within the Excel application. The following snippet is used to create the object:
|
// Create an Excel workbook instance var workbooks = excelApp.Workbooks; var excelWorkBook = workbooks.Add(Template: Type.Missing); |
The Worksheet object is a member of the Worksheets collection. Many of the properties, methods, and events of the Worksheet are identical or similar to members provided by the Application or Workbook objects. Excel provides a Sheets collection as a property of a Workbook object. Each member of the Sheets collection is either a Worksheet or a Chart object. The following snippet is used to create the Worksheet.
|
var wst = excelWorkBook.Worksheets; Worksheet excelWorkSheet = null; // Add a new worksheet to workbook with the Data table name excelWorkSheet = (Worksheet)wst.Add(); |
A range object represents a cell, a row, a column, or any kind of selection that contains at least one cell. In order to create Range object, you have to use a snippet like this one
|
var newRng = excelWorkSheet.Range[excelWorkSheet.Cells[startRow + 1, i], excelWorkSheet.Cells[endIndex, i]]; |
The purpose of the first example is to take T-SQL query results as an object of type DataSet and transform that object into an Excel workbook. The T-SQL query, as well as the connection string, are found in the application configuration file app.config. The example uses two tables of the AdventureWorks2016 database, both located in the schema Sales: The SalesOrderHeader table which contains 31K rows and SalesOrderDetail which contains 121K rows. On my machine, the Excel file is created in 25 sec. In order to shorten the example, I reduced number of records in both tables to 1000 by applying SELECT TOP in the app.config file.
Generating an object of the DataSet type is quite a common thing, and I will skip describing this part. In the project, the source code to accomplish that task is located in DataAccess.cs.
After getting an object of the DataSet type, Excel Workbook creation is invoked. This is accomplished in the Export method that is part of static class ExportToExcel. The workbook Is exported to C:TMPFirstTest.xlsx. The workbook looks similar to that shown in the image below.
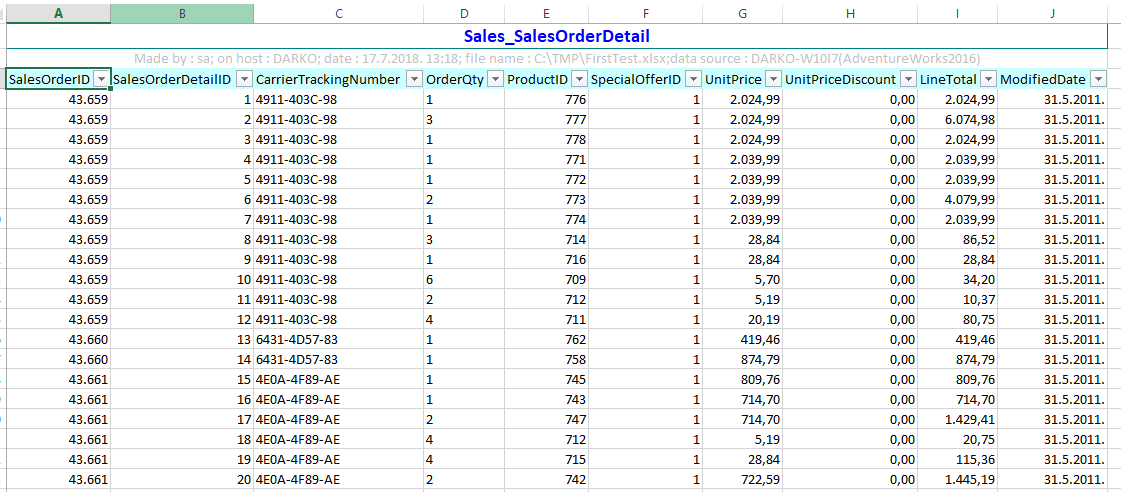
Every table that is part of the DataSet collection becomes an Excel sheet. The first and the second rows contain some information about the data. The third row contains the column names as well as something called ‘auto-filter’ which I will explain in detail later in the article.
When working with the object of type Range, you may find yourself confused by the Range property names that sound very similar, like Value, Value2, and Text.
Besides that, there is a big difference in performance. Text and Value are much slower than Value2. Value2 represents the cells underlying value, unlike Text which gives you the string representation of the cell. Value differs from Value2 when the cell is formatted as date or currency.
In the Export method, there is a parameter named pasteRange used to test performance. Its default value is true which means that the two-dimensional object based on a DataTable is set as the value of the Excel sheet range.
|
1 2 3 4 5 6 7 8 9 10 11 12 13 14 15 16 17 |
if (pasteRange == false) { // slow! do not use like this for (var j = 0; j <= table.Rows.Count — 1; j++) { for (var k = 0; k <= table.Columns.Count — 1; k++) { excelWorkSheet.Cells[j + startRow + 1, k + 1] = table.Rows[j][k]; } } } else { // using Value2 excelWorkSheet.Range[excelWorkSheet.Cells[startRow + 1, 1], excelWorkSheet.Cells[endIndex, table.Columns.Count]].Value2 = General.Convert(table); } |
You can change the method call by setting pasteRange to false as shown in the snippet below.
|
Excel.ExportToExcel.Export(pasteRange: false, ds: dataSet, mFileName: fileName, title: name, errorString: out var error2); |
When the value false is passed, it iterates through all columns and rows, setting the values by each cell. It’s is slow and should not be used.
Before setting the range’s property Value2, some formatting is made. This is accomplished by processing the Columns collection of the DataTable object and setting the property to NumberFormat.
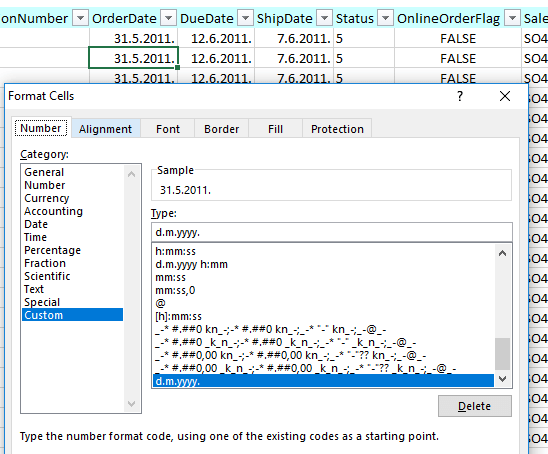
DateTime columns are formatted as shown in the snippet below
|
newRng.NumberFormat = Thread.CurrentThread.CurrentCulture.DateTimeFormat.ShortDatePattern; |
So, it depends on the CurrentCulture, and on my machine looks similar to the image below:
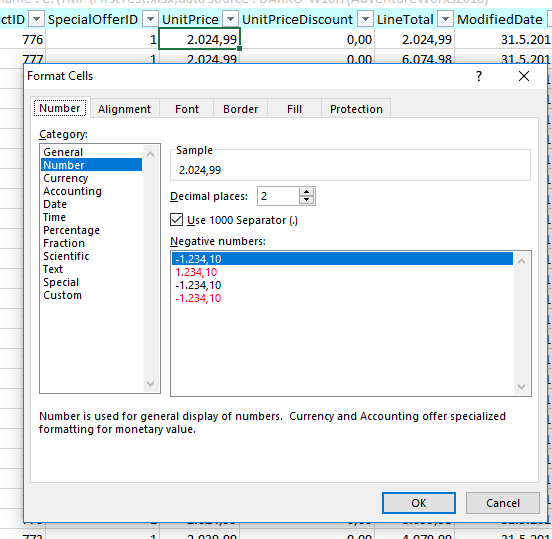
You can also format numbers. For columns that are System.Decimal type, formatting is accomplished like the snippet below.
|
newRng.NumberFormat = «#» + Thread.CurrentThread.CurrentCulture.NumberFormat.NumberGroupSeparator + «##0» + Thread.CurrentThread.CurrentCulture.NumberFormat.NumberDecimalSeparator + «00»; |
On my machine, it looks similar to the image shown below:
One feature that I love when working with Excel is to put columns into the auto-filter mode. That means that all discrete values for one particular column are bound to the combo box that represents the column name.
This is accomplished by referencing the row in which the column names are and by calling the AutoFilter method as shown in the snippet below.
|
// apply auto filter var firstRow = (Range)excelWorkSheet.Rows[<strong>startRow</strong>]; firstRow.AutoFilter(fRow, Criteria1: Type.Missing, Operator: XlAutoFilterOperator.<strong>xlAnd</strong>, Criteria2: Type.Missing, VisibleDropDown: true); |
Finally, to conclude the first example, a sentence about disposing of objects. The proper way to dispose objects is to call Marchal.RelaseComObject. This method is used to explicitly control the lifetime of a COM object used from managed code. You should use this method to free the underlying COM object that holds references to resources in a timely manner or when objects must be freed in a specific order.
COM disposing is a very huge and painful topic and one article is not enough to cover it. Talking about COM disposal is out of scope of the article.
Close the console application if still running and remove the first two rows in the Excel workbook created in the example. This is preparation for the second example.
Importing Data from Excel
The source code for this example is located in the ImportFromExcel project. Set up this project as the Startup Project. This example opens the Excel file generated in the first example, but it can be a different Excel file as well. After opening the file, the code tries to determine how many sheets are in the workbook and the name of every sheet.
This example needs a driver installed, microsoft.ace.oledb.12.0. The driver could be downloaded from the link.
After that, by using the OLEDB provider, every sheet is queried and, as a result, an object of type DataSet is formed. When you have a DataSet object, it is easy to update the database or do whatever else you need to do.
The source code that creates an object of type DataSet is displayed in the snippet below.
|
1 2 3 4 5 6 7 8 9 10 11 12 13 14 15 16 17 |
using (var myConnection = new OleDbConnection($@»Provider=Microsoft.Ace.OLEDB.12.0;Data Source={fileToRead};Extended Properties=’Excel 12.0 Xml;HDR = YES;'»)) { using (var dtSet = new DataSet()) { foreach (var s in dic) { Console.WriteLine($» Processing {s} table»); var myCommand = new OleDbDataAdapter($@»select * from {s};», myConnection); myCommand.TableMappings.Add(«Table», s); myCommand.Fill(dtSet); } foreach (DataTable t in dtSet.Tables) { Console.WriteLine($» Table {t.TableName} has {t.Rows.Count} records»); } } } |
It is important that the sheet name is put in parenthesis and that dollar sign is appended at the end. For example, you could query the first sheet by issuing select * from [Sales_SalesOrderDetail$];. As a result, the console window displays the number of records for each table.
Now, is time to make a real Add-in for Excel and that is the third example.
Creating an Excel VSTO Add-In
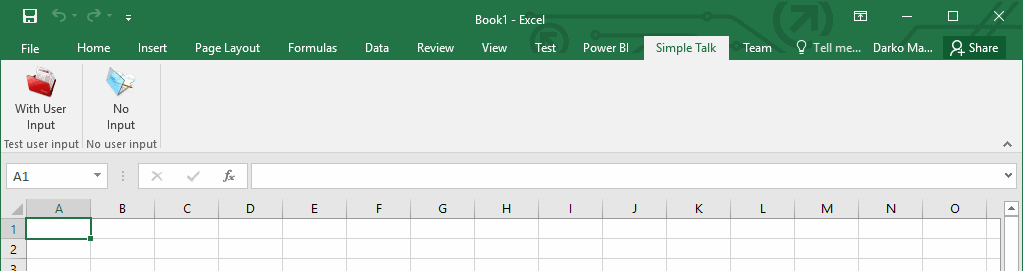
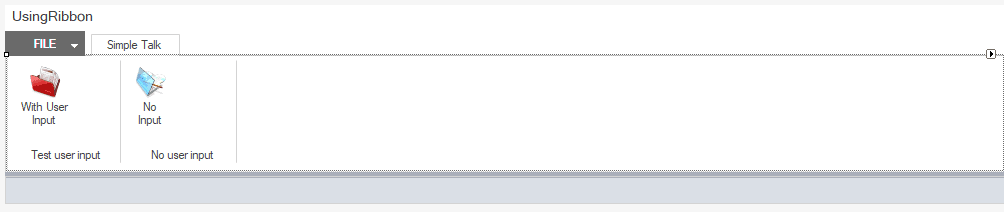
The third example extends Excel functionality by adding a custom tab with two buttons on the Excel Ribbon, as shown in the image below.
Set SimpleTalkExcelAddIn as the Startup project in the solution. This project has the type of Excel VSTO Add-In. When you create such a project for the first time, a class named ThisAddIn is created and two events are raised. Usually, the generated code looks similar to what is shown in the image below.
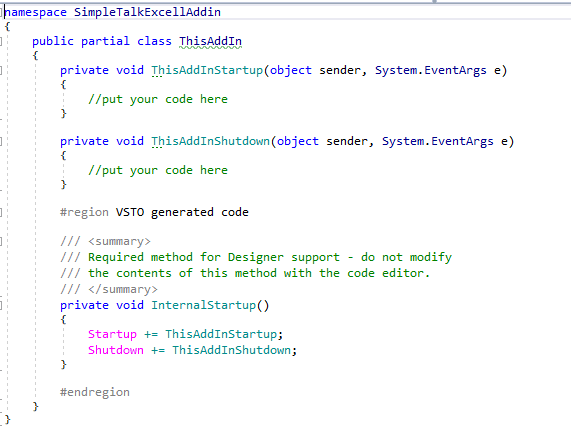
The Startup event is raised after the VSTO Add-in is loaded and all the initialization code in the assembly has been run. The event is handled by the ThisAddInStartup method in the generated code file named ThisAddin.cs. The code in the ThisAddInStartup event handler is the first user code to run unless your VSTO Add-in overrides the RequestComAddInAutomationService method. In this case, the ThisAddInStartup event handler is called after RequestComAddInAutomationService.
Similar to the Startup event, there is a ShutDown event. The event is raised when the application domain that your code is loaded in is about to be unloaded. Usually, it means when you close the Excel application.
Accessing the application, workbook and worksheet objects is accomplished slightly different from earlier examples, as shown in the code below.
|
Excel.Worksheet oSheet; Excel.Workbook oBook; Excel.Application oApp; oApp = Globals.ThisAddIn.Application; oBook = Globals.ThisAddIn.Application.ActiveWorkbook; oSheet = Globals.ThisAddIn.Application.ActiveSheet; |
You can interact with the Excel application by adding two types of Ribbon as shown in the image below.

In the example, the Ribbon of type Visual Designer is already added and named UsingRibbon. In design mode, the Ribbon looks similar to the image below.
The ribbon control has its own set of properties and events. The control looks similar to any tabbed control and exposes a tabs collection.
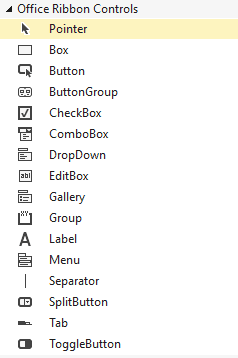
When working with Excel VSTO Add-in’s, on the Visual Studio Toolbar there is a special tab in Visual Studio Toolbox. You can access the toolbox, called Office Ribbon Controls, through the View->Toolbox menu. It’s shown in the image below.
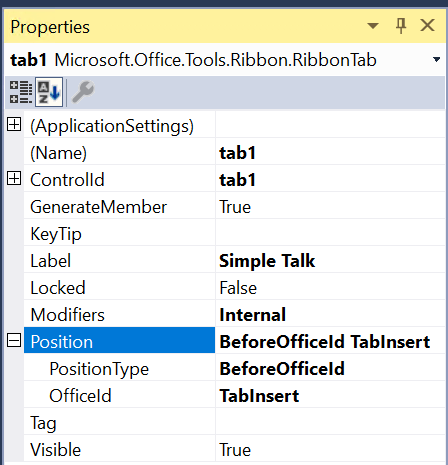
In the example, a few controls are already added. Ribbon Tab is a part of Ribbon Control collection. In this example it’s labeled as Simple Talk. After the Label property, the most commonly used property is Position. The property is the type of RibbonPosition which is an interface that holds a string called OfficeId and an enumerator with three possible values:
- Default
- BeforeOfficeId
- AfterOfficeId
If you choose something other than Default, you have to specify the OfficeId as a string value. Usually, this ID is formed from the word ‘Tab’ plus the ‘Label’ shown on Excel main ribbon. For example, if you would like to position the tab before the ‘Insert’ tab, put ‘TabInsert’ as the OfficeId property. Here is an example from this ribbon.
The Group control is a classic container that could hold another control. It also exposes the Position property. In this example, every group control has a button on it. The Button control responds to only one event – the click event. The most important code in this example is in buttons event handlers.
However, before writing anything about what the handler does, I have to make a digression. If you create a brand new Excel VSTO Add-In using Visual Studio template, your first build will fail. Visual Studio will report to you that you have to sign the ClickOnce manifest.
In the example, signing is already accomplished and in the next few sentences, I will explain how.
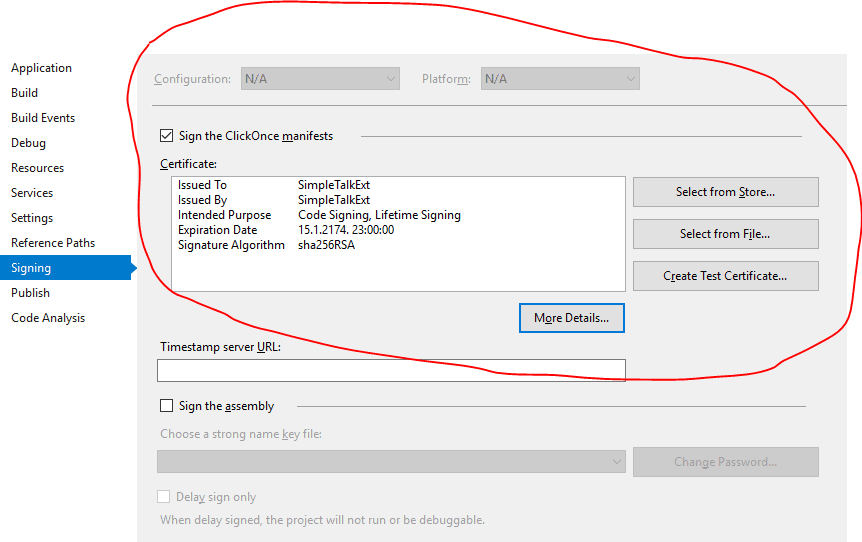
The project is signed by using the Personal Information Exchange (.pfx) file, although it’s possible to select a certificate from the Store. In order to create a .pfx file, first, you have to create a certificate. This is accomplished by using the Windows SDK utility MakeCert.exe as shown in the snippet below.
|
MakeCert /n «CN=SimpleTalkExt» /r /h 0 /eku «1.3.6.1.5.5.7.3.3,1.3.6.1.4.1.311.10.3.13» /e «01/16/2174» /sv SimpleTalkExt.pvk SimpleTalkExt.cer /a sha256 |
After that, another Windows SDK tool named Pvk2Pfx is used. Pvk2Pfx (Pvk2Pfx.exe) is a command-line tool that copies public key and private key information contained in .spc, .cer, and .pvk files to a Personal Information Exchange file. The file is created by issuing following command
|
pvk2pfx —pvk SimpleTalkExt.pvk —spc SimpleTalkExt.cer —pfx SimpleTalkExt.pfx –f |
After the file is created, on the project property Signing tab, choose Select from File and select the newly created pfx file. Your build will work correctly. So, time to go back to the main topic.
NOTE: Just like the previous examples, you can see this add-in in action by running the project. Be sure to modify the App.Config file first.
The event handlers for both buttons in the example produce the same result. The result is an Excel workbook. The workbook contains three sheets. The first one a contains data that represents the result of the T-SQL query, the second one is a Pivot table based on data in the first sheet. And the last sheet contains a chart that represents Pivot on the second sheet.
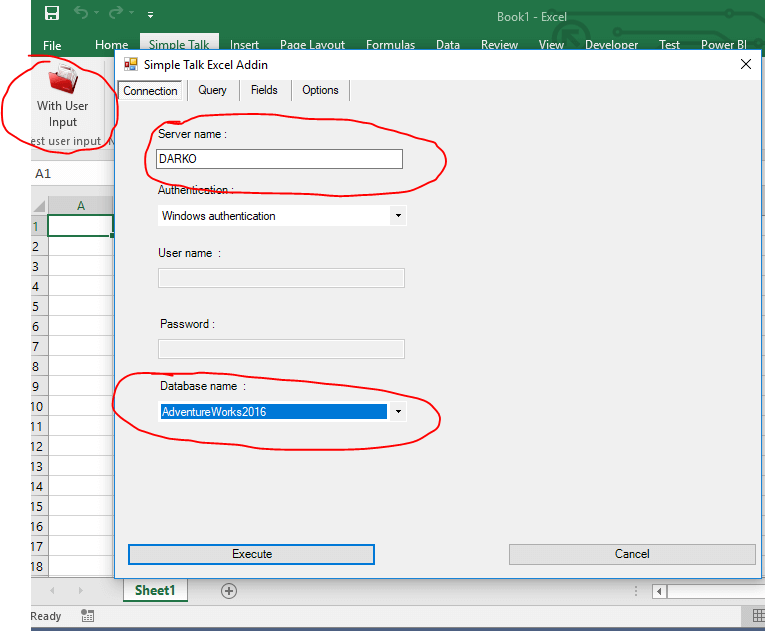
The difference between these two handlers is that the first one shows a form in which the user can specify a connection to SQL Server, T-SQL query, some Pivot options. The form looks similar to that shown in the image below. On the first tab named Connection, you have to specify the instance name and select a database from the list box. This example uses the AdventureWorks2016 database.
On the second tab named Query, you have to specify a T-SQL statement. This example, queries the Sales.SalesHeader table. On the third tab named Fields, you have to specify some Pivot options, like Columns, Rows, Values and so on, as shown in the image below.
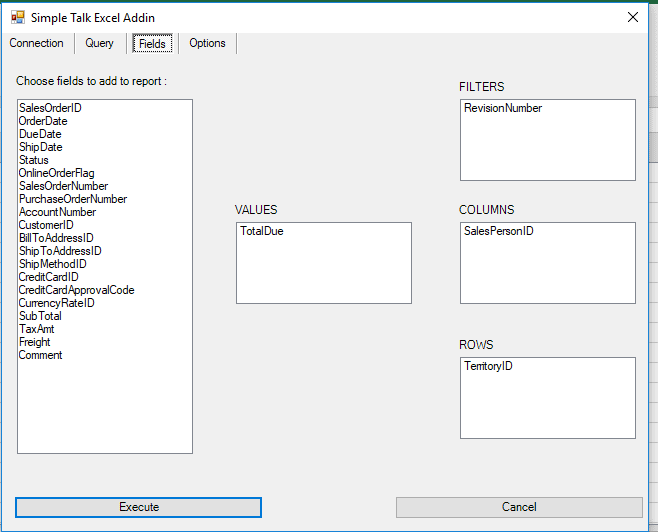
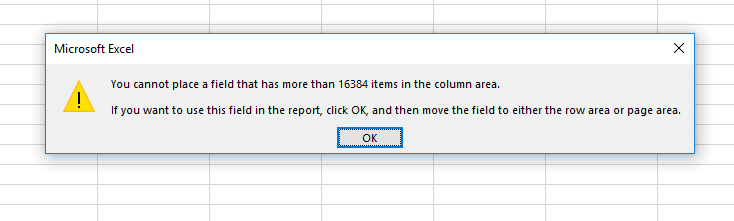
Several values are already added to the list boxes, as you see in the image above. Using drag & drop, it is possible to move fields between list boxes similar to Excel. Every table or every query result is not suitable to be pivoted. Furthermore, there is a restriction on the Columns list box. For example, when you try to put SalesOrderID in the Columns list box in Excel, you will receive an Excel message like the one shown in the image below.
Finally, on the Options tab, there are possibilities to define Chart Types, Table Styles and Pivot styles as shown in the image below.
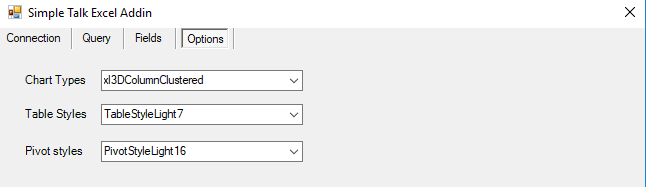
The chart type is an enumerator named xlChartType defined in Microsoft.Office.Core. During loading of the custom user form, the enumerator is set as a data source of the form’s combo box labeled Chart Types, so the user can initially set up the type of chart to see.
NOTE:In Excel it’s possible to change the chart type as well, but the purpose of this example is to show the Excel object model.
Excel exposes 21 ‘Light’ styles, 28 ‘Medium’ styles, and 11 ‘Dark’ styles by default, and you can define your own styles for the table and pivot. When the user has filled everything on the form, and clicks Execute in the current Excel workbook, three sheets are added.
In the first one, the result of the T-SQL query, is displayed very similarly to in the first example, as shown in the image below.
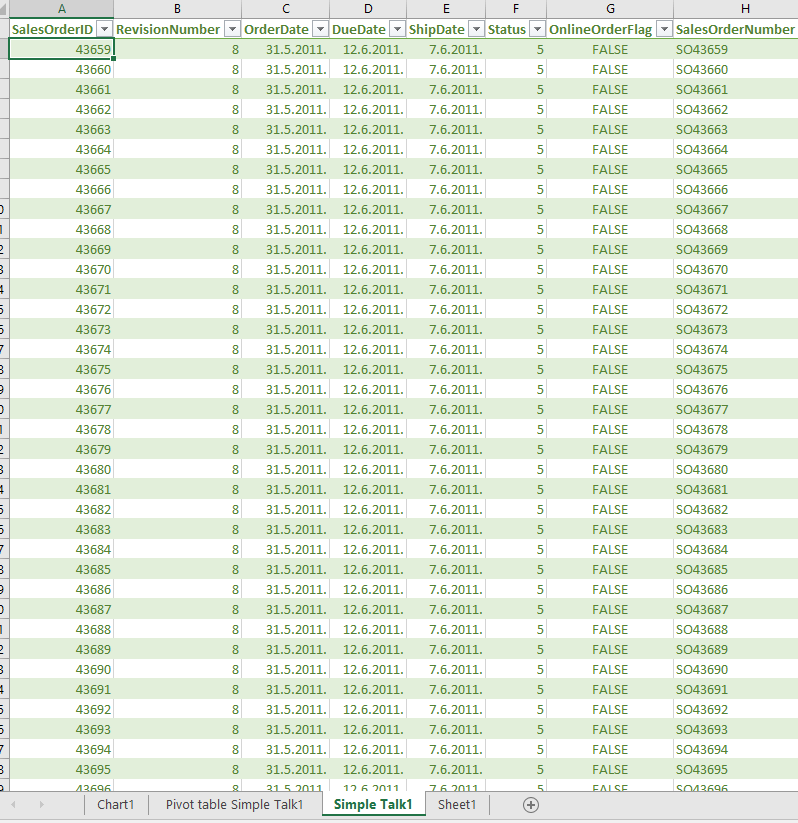
The only difference is that the result is formatted as a table rather than range. This is accomplished by calling function FormatAsTable that is implemented in the project’s General.cs class. The function is implemented as shown in the snippet below.
|
public static void FormatAsTable( Excel.Range sourceRange, string tableName, string tableStyleName, bool isSelected ) { sourceRange.Worksheet.ListObjects.Add(SourceType: Excel.XlListObjectSourceType.xlSrcRange,Source: sourceRange, LinkSource: Type.Missing, XlListObjectHasHeaders: Excel.XlYesNoGuess.xlYes,Destination: Type.Missing).Name = tableName; if (isSelected) sourceRange.Select(); sourceRange.Worksheet.ListObjects[tableName].TableStyle = tableStyleName; } |
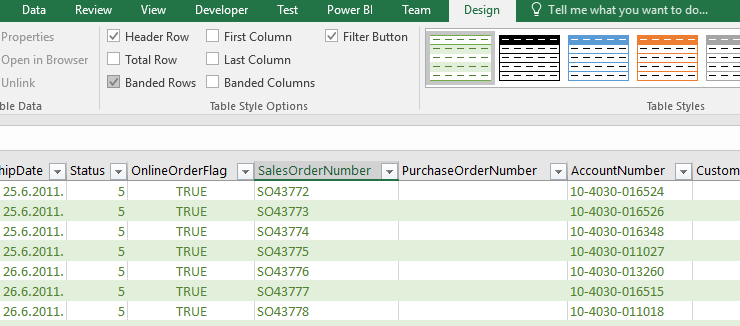
The benefits of formatting ‘as table’ are that column names are frozen in the first row with applied auto-filtering, and there are extra functionalities such as adding Total row by clicking on checkbox, as shown in the image below.
The second sheet contains a pivot table with a slicer object.
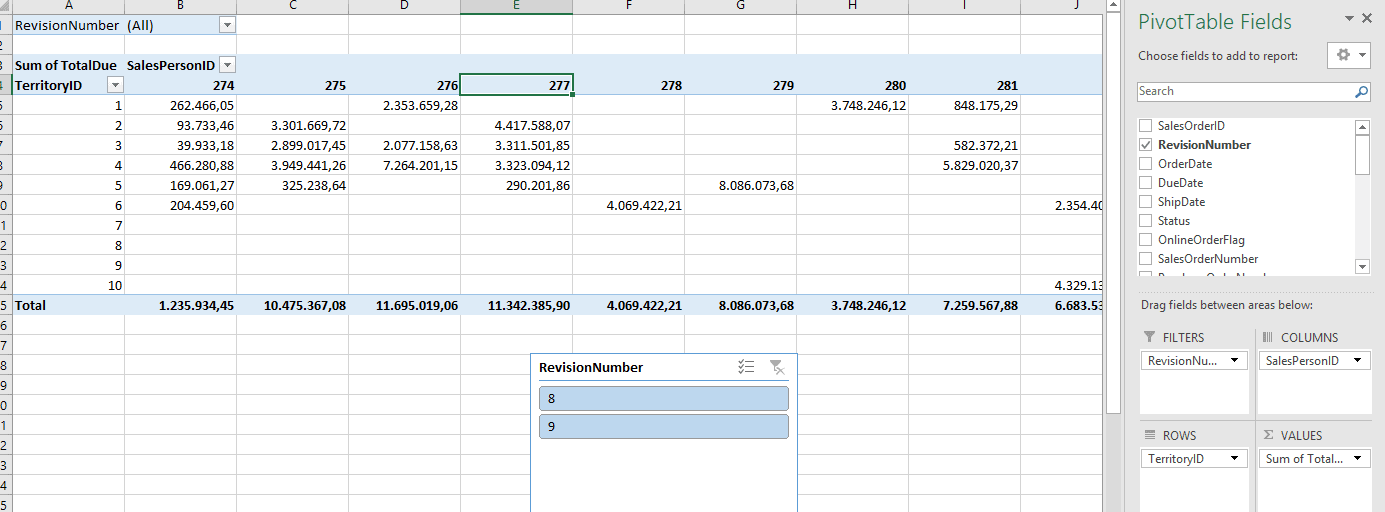
You can manipulate fields, applied a filter, and so on. One cool thing is a slicer object, introduced with Excel 2010, which makes it easy to apply a filter.
The pivot table is added by calling the AddPivot function defined in the General.cs static class. The signature of the function looks similar to that shown in the image below.
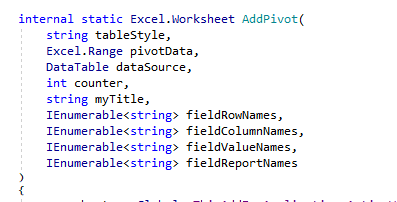
The AddPivot function uses the PivotTableWizard function which is part of the _Worksheet interface defined in the Microsoft.Office.Interop.Excel namespace. The function call is accomplished as in the snippet below.
|
//Add a PivotTable to the worksheet. pivotWorkSheet.PivotTableWizard( SourceType: Excel.XlPivotTableSourceType.xlDatabase, SourceData: pivotData, TableDestination: pivotWorkSheet.Cells[1, 1], // first cell of the pivot table TableName: pivotTableName ); |
Finally, on the third tab, there is a pivot-chart, which is basically the pivot table represented as a chart.
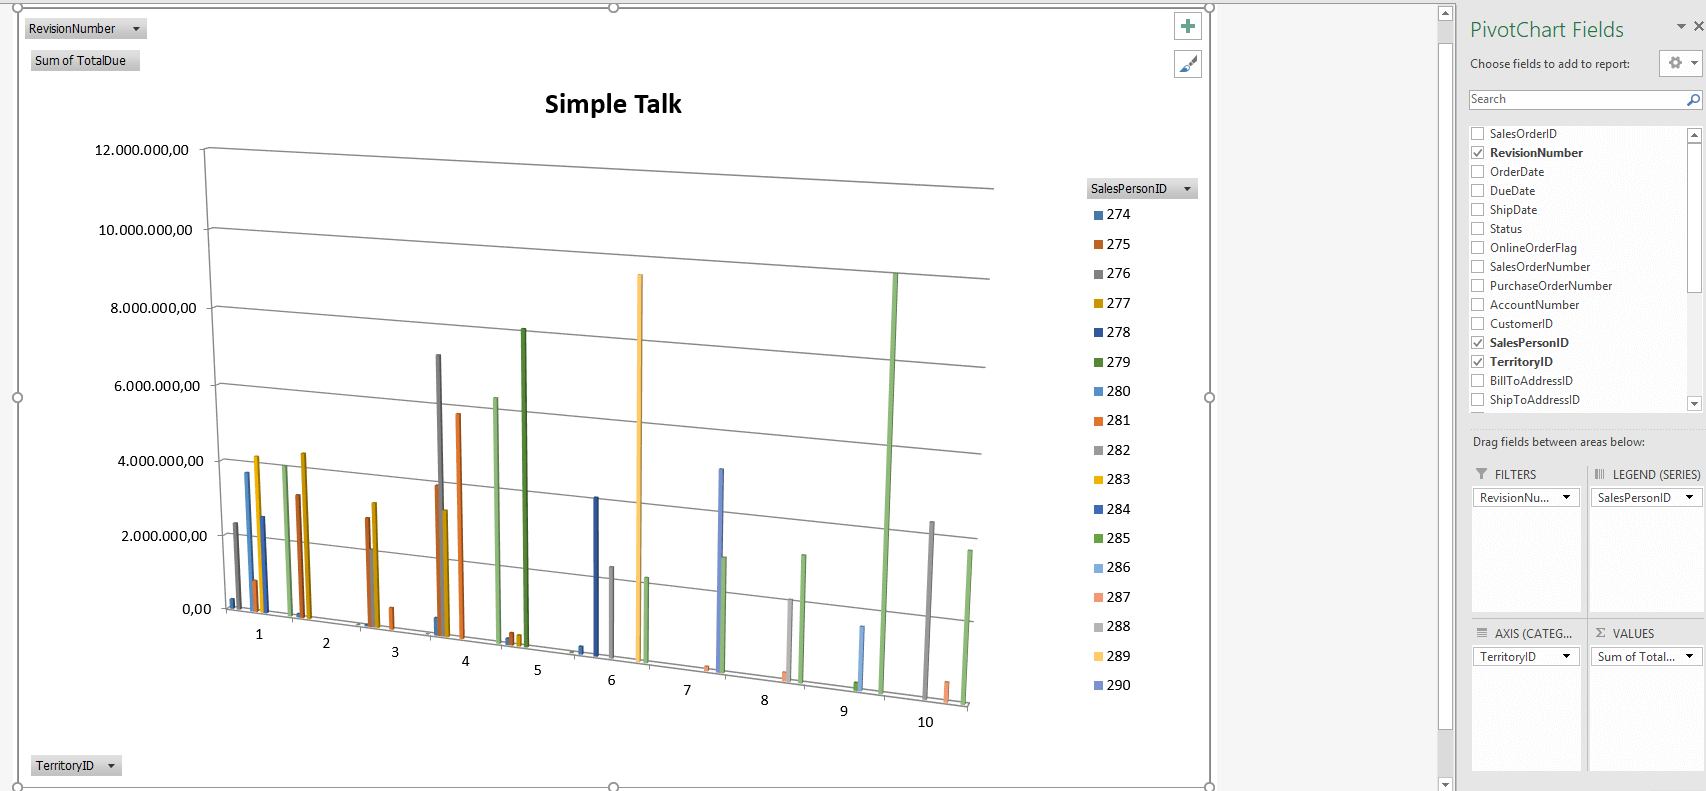
The pivot-chart is added to the workbook by using a wrapper method AddChart defined in the static class General. The most important part of this method is calling the ChartWizard method, which is part of the Chart interface defined in Microsoft.Office.Interop.Excel namespace.
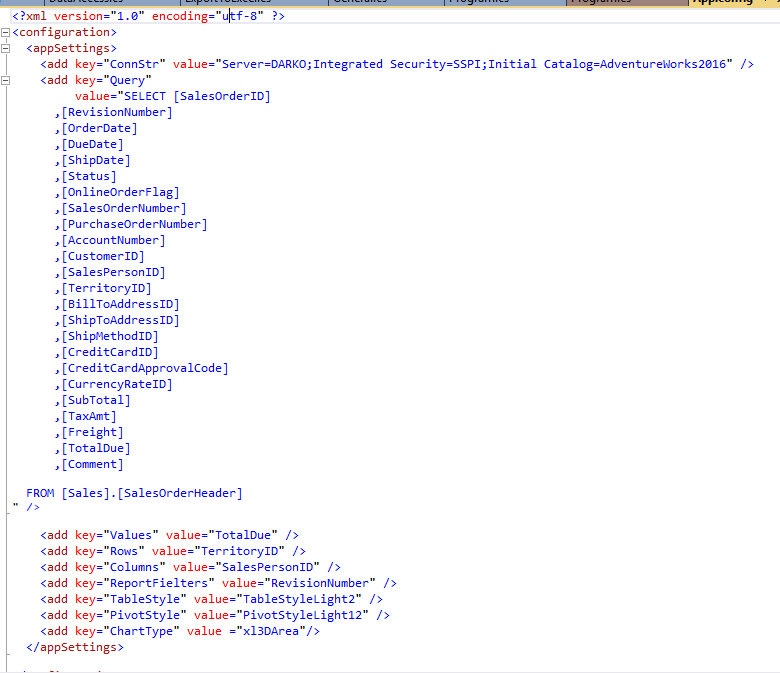
In the introduction of the section I mentioned that there are two buttons on the ribbon form. Both do the same thing. The difference is that information needed to accomplish the task in the second event handler is read from the application configuration file app.config shown in the image below.
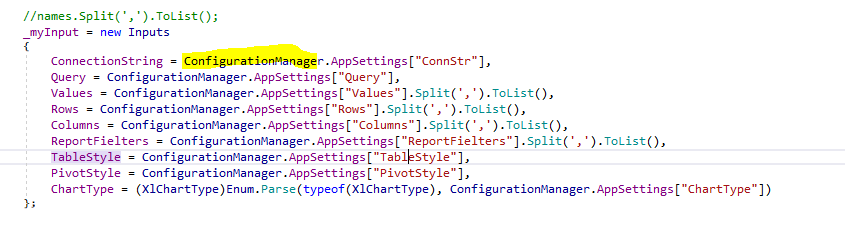
Reading from app.config is quite common, and it is accomplished by using ConfigurationManager defined in System.Configuration as shown in the image below.
Changing the values in app.config before and after publishing the result is a little bit different. In order to explain how to achieve this, I have to explain how to publish the result of the project VSTO.
Publishing the project result could be accomplished by using ClickOnce or by creating a Setup project. On the project properties, there is a tab named Publish as shown in the image below.
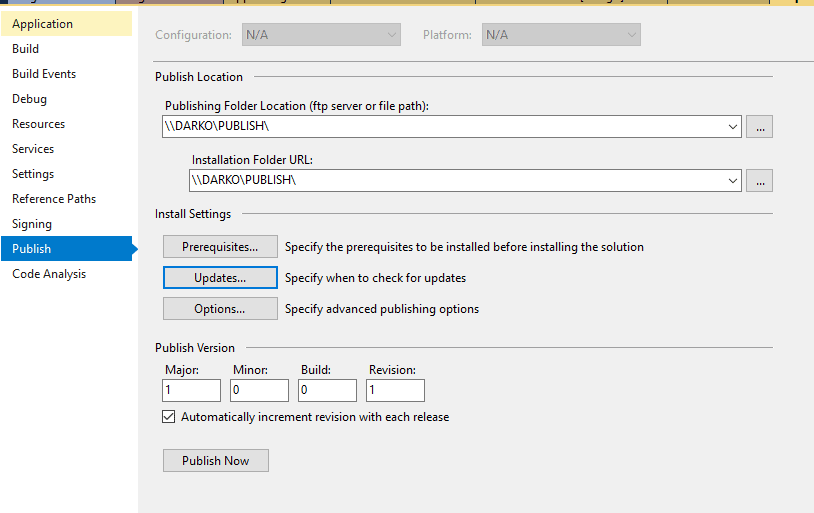
In addition to specifying the publish and installation folders, you can also specify Prerequisites, Updates, and Options.
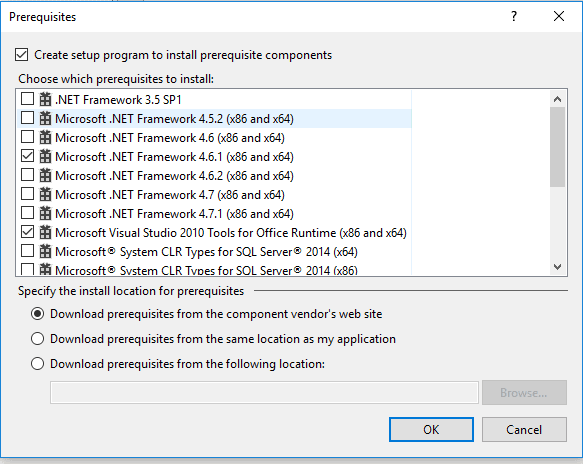
When you click on the Prerequisites button, you see a set of options similar to the image below.
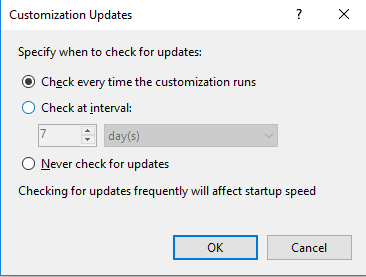
When you click on the Update button, you can see a set of options for updates as shown in the image below.
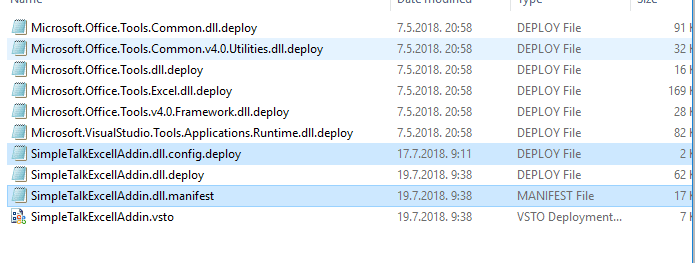
Depending on the options you choose, and after choosing the Publish command from the project context menu, your publishing/installation folder will look to that shown in the image below.
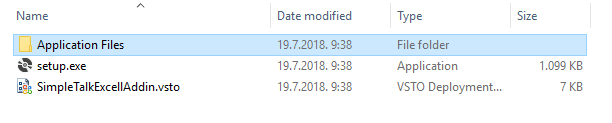
When you browse Application Files, you will notice that the files are separated by the version number. One common thing that you will need to do is to change configuration values, e.g. to change the connection string. This could be done, but after that, you should update the manifest file. On the image below configuration file and manifest file are highlighted.
When you explore the manifest file by using Visual Studio, you will notice that the file is basically an XML file. Part of that file is a description of the configuration file, as shown in the image below.
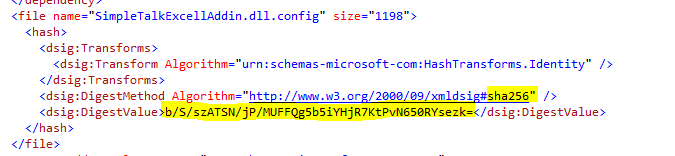
The result files are protected by hashing. In order to change some values in the configuration file, you have to determine a new hash value. This might be accomplished by using ComputeHashGUI that is part of the article solution. If you set the project as a startup, you will see a simple GUI as shown in the image below.
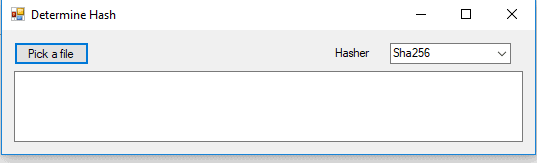
Usage is easy, first, you have to pick a file and that will be the configuration file. After that, the hash value is calculated by using the hash algorithm selected in the combo box. That hash value is then pasted in the manifest file. And there are a just a few more steps.
First, you have to copy the pfx file to the installation folder as well as the Windows SDK utility called mage.exe. Then you have to sign the manifest file located in the last installation folder by executing
|
d:publishmage —sign d:publishApplication FilesSimpleTalkExcellAddin_1_0_0_0SimpleTalkExcellAddin.dll.manifest —certfile «d:publishSimpleTalkExt.pfx» |
After that, you have to update the application VSTO file by executing the following command
|
mage —update SimpleTalkExcellAddin.vsto —appmanifest «d:publishApplication FilesSimpleTalkExcellAddin_1_0_0_0SimpleTalkExcellAddin.dll.manifest» —certfile «D:PUBLISHSimpleTalkExt.pfx» |
As a final step, you have to copy the VSTO file to the last installation folder, in this example SimpleTalExcelAddin_1_0_0_0. Of course, all these steps could be automated, but it is out of the scope of the article.
In the solution, there are two other projects. One to define a Word add-in by using the XML Ribbon control, and the other by using Outlook Add-in.
Set TestWordAddIn as the Startup project in Visual Studio. That is the next example.
Working with Word Add-ins
Unlike the previous example in which a Ribbon Designer Control is used, in this section, I will take another approach by utilizing Ribbon XML. So, what is the difference? The Ribbon Designer does not incorporate all facets provided by the OfficeFluentUI model. For example, the Ribbon Designer provides no way to re-purpose built-in commands or work with the BackStage. These things can only be done using Ribbon XML.
When you add a Ribbon (XML) item to a VSTO project from the Add New Item dialog box, Visual Studio automatically adds
- A Ribbon XML file. This file is used to defined UI elements
- A Ribbon code file. This file contains the Ribbon class.
In the solution, these two files are named as MyRibbon.xml and MyRibbon.cs.
If you open the MyRibbon.cs file, you will notice that, unlike the previous example in which a Ribbon Designer Control is used, here the class implements an interface called IRibbonExtensibility. The interface is defined as shown in the image below. The interface contains only one method named GetCustomUI. (NOTE : The image is NOT from the project code, it is generated(displayed) with a help of R#-Resharper).
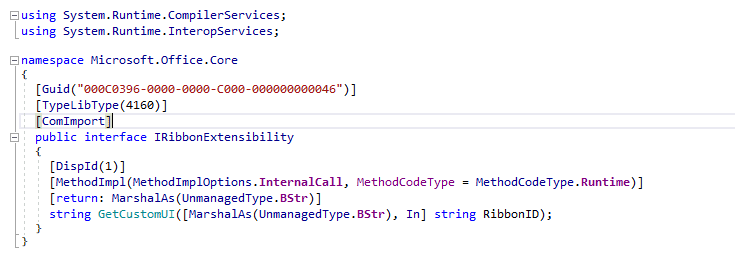
The interface implementation is in the code file and looks similar shown in the following snippet
|
#region IRibbonExtensibility Members public string GetCustomUI(string ribbonId) { return GetResourceText(«TestWordAddIn.MyRibbon.xml»); #endregion |
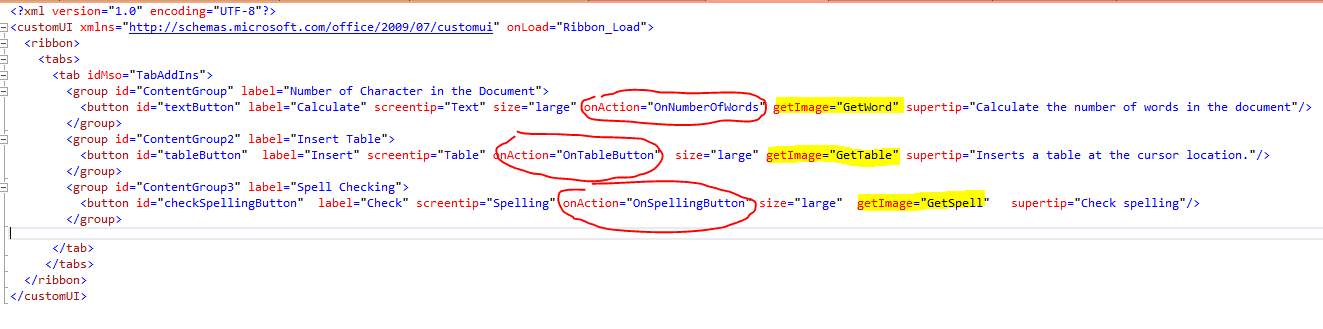
The content of the XML file, returned by GetCustomUI, is used to construct a GUI representation of the ribbon control. You can respond to user actions, such as clicking a button on the ribbon, by creating callback methods. Callback methods resemble events in Windows Forms controls, but they are identified by an attribute in the XML of the UI element and displayed surrounded with red in the image below. You might define an image for a button, as shown highlighted in yellow.
Before exploring the Word Add-in’s functionality, take a look at the Word object model. Similar to Excel, at the top of the object hierarchy, is the Application object. It represents a current instance of Word.
Next in the hierarchy is the Document object, which is basically the most frequently used object. Application objects have a collection named Documents of currently open or created documents.
The Selection object represents the area that is currently selected. When you perform an operation in the Word user interface, such as bolding text, you select, or highlight the text and then apply the formatting.
The Range object represents a contiguous area in a document and is defined by a starting character position and an ending character position. It is not visible, unlike Selection, which is always visible.
Now it is time to start exploring the Add-in functionality. By pressing F5, Word will launch. On the Add-ins tab, there are three buttons, as shown in the image below.
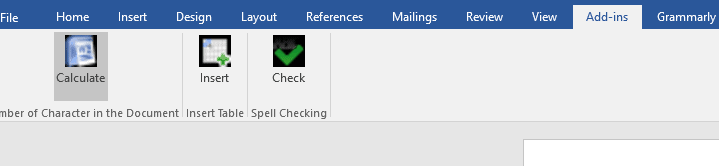
The first button, labeled with Calculate, calculates the number of characters (including hidden) in the current document.
The second button, with the Insert label, inserts a table at the current cursor position. This is accomplished by adding a new table in the ActivDocument.Tables collection, as shown in the snippet below.
|
var <strong>missing</strong> = Type.Missing; var currentRange = Globals.ThisAddIn.Application.Selection.Range; var newTable = Globals.ThisAddIn.Application.ActiveDocument.Tables.Add(Range: currentRange, NumRows: 3, NumColumns: 4, DefaultTableBehavior: ref <strong>missing</strong>, AutoFitBehavior: ref <strong>missing</strong>); |
The third button performs spell checking and reports the result by showing a MessageBox dialog. Most of the things that I write about Excel VSTO could be applied to Word VSTO or Outlook VSTO as well.
Now it is time to review the last example. In order to do that set OutLookAddIn as the startup project.
Working with Outlook Add-ins
Most things we are talking about Office VSTO could be applied to Outlook VSTO’s as well. It means that signing the project, then working with ThisAddIn class is almost the same as with Excel or Word VSTO’s.
However, unlike Word or Excel VSTO’s, Outlook VSTO does not raise a ShutDown event. When you create a new Outlook VSTO project, the generated code tells you exactly that.

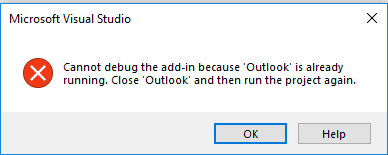
There is another difference, unlike Excel or Word VSTO’s which allows you to have running instances when you try to debug an OutLook VSTO by running the Outlook client, you receive a message like shown in the image below
At the top of Outlook’s object model hierarchy is the Application object. It represents the Outlook application. The application object has two collection properties, Explorers, and Inspectors. Part of the Explorers collection is the object of type Explorer.
The Explorer object represents a window that displays the contents of a folder that contains items such as e-mail messages, tasks, or appointments. The Inspector object represents a window that displays a single item such as an e-mail message, task, or appointment.
In this example, the Inspector object is used. In the VSTO StartUp event-handler, the following snippet is added in order to respond to the creation of the new e-mail message.
|
private void ThisAddInStartup(object sender, System.EventArgs e) { _inspectors = Application.Inspectors; _inspectors.NewInspector += InspectorsNewInspector; } |
When you create a new task, meeting, contact or e-mail or view existing once, the event is fired. In the event, handler following code is added.
|
Private void InspectorsNewInspector(Outlook.Inspector inspector) { If (!(inspector.CurrentItem is Outlook.MailItem mailItem)) return; if (mailItem.EntryID != null) return; mailItem.Subject = @»Mail subject added by using Outlook add-in»; mailItem.Body = @»Mail body added by using Outlook add-in»; } |
If the item is a newly created e-mail, then a text is added to e-mail subject and e-mail body.
Finally few words about cleaning up the environment. By choosing File->Options from the main menu, and choosing Add-ins from tabbed menu, you can get the form like shown in the image below.
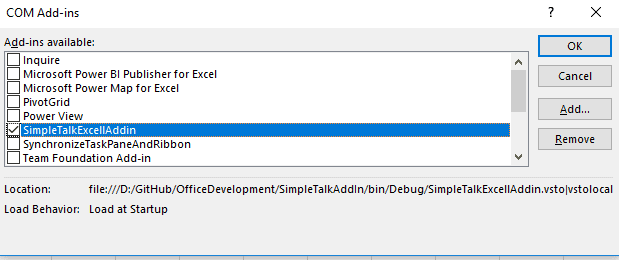
If you would like to disable an Add-in, just uncheck checkbox that is with Add-ins name. If you would like to remove the Add-in, choose Remove button.
Summary
Browsing Microsoft documentation about Office solutions is a tedious task. There are no pictures and a lot of mistakes. My aim was in writing this article is to provide a set of practical examples that could be easy to follow. The Office solution is a huge topic. In the article, I cover a small part, but I hope quite enough to encourage readers to start exploring the topic.
The solution source code can be found on GitHub here.


How To Import Excel To Datagridview In C# .Net Windows Application
This Tutorial Shows How To Import Excel To Datagridview In C# .Net Windows Application Using Visual Studio 2010 And Microsoft Excel 2010.
This application imports excel file to datagridview when you click import button. For the code to work you need to import/Add microsoft.office.interop.excel library to your project.
Form1.cs SOURCE CODE
using System;
using System.Collections.Generic;
using System.ComponentModel;
using System.Data;
using System.Drawing;
using System.Linq;
using System.Text;
using System.Windows.Forms;
using Microsoft.Office.Interop.Excel;

namespace HowToImportExcelToDataGridViewInCSharp
{
    public partial class Form1 : Form
    {
        public Form1()
        {
            InitializeComponent();
        }

        private void btnImportExcelToDataGridView_Click(object sender, EventArgs e)
        {
            _Application importExcelToDataGridViewApp;
            _Workbook importExcelToDataGridViewWorkbook;
            _Worksheet importExcelToDataGridViewWorksheet;
            Range importExcelToDataGridViewRange;

            try
            {
                importExcelToDataGridViewApp = new Microsoft.Office.Interop.Excel.Application();

                OpenFileDialog importExcelToDataGridViewOpenFileDialog = new OpenFileDialog();
                //importExcelToDataGridViewOpenFileDialog.InitialDirectory = @"C:/Users/Authentic/Desktop";
                //importExcelToDataGridViewOpenFileDialog.RestoreDirectory = true;
                //Dialog Box Title
                importExcelToDataGridViewOpenFileDialog.Title = "Import Excel File To DataGridView";
                //filter Excel Files Only
                importExcelToDataGridViewOpenFileDialog.Filter = "Choose Excel File | *.xlsx;*.xls;*.xlm";
                //If Open Button Is Clicked
                if (importExcelToDataGridViewOpenFileDialog.ShowDialog() == DialogResult.OK)
                {
                    importExcelToDataGridViewWorkbook = importExcelToDataGridViewApp.Workbooks.Open(importExcelToDataGridViewOpenFileDialog.FileName);
                    importExcelToDataGridViewWorksheet = importExcelToDataGridViewWorkbook.ActiveSheet;
                    importExcelToDataGridViewRange = importExcelToDataGridViewWorksheet.UsedRange;

                    //Start Importing from the second row. Since the first row is column header
                    for (int excelWorkSheetRowIndex = 2; excelWorkSheetRowIndex < importExcelToDataGridViewRange.Rows.Count + 1; excelWorkSheetRowIndex++)
                    {
                        //Convert The Path to image and display it in datagridviewimagecolumn
                        Image excelWorkSheetImage = Image.FromFile(importExcelToDataGridViewWorksheet.Cells[excelWorkSheetRowIndex, 7].Value);
                        dgvImportExcelToDatagridGridView1.Rows.Add(importExcelToDataGridViewWorksheet.Cells[excelWorkSheetRowIndex, 1].Value, importExcelToDataGridViewWorksheet.Cells[excelWorkSheetRowIndex, 2].Value, importExcelToDataGridViewWorksheet.Cells[excelWorkSheetRowIndex, 3].Value, importExcelToDataGridViewWorksheet.Cells[excelWorkSheetRowIndex, 4].Value, importExcelToDataGridViewWorksheet.Cells[excelWorkSheetRowIndex, 5].Value, importExcelToDataGridViewWorksheet.Cells[excelWorkSheetRowIndex, 6].Value, importExcelToDataGridViewWorksheet.Cells[excelWorkSheetRowIndex, 7].Value, excelWorkSheetImage);
                    }
                }

            }
            catch (Exception importExcelToDataGridViewException)
            {
                MessageBox.Show("Error" + importExcelToDataGridViewException);
            }
        }

        private void Form1_Load(object sender, EventArgs e)
        {
            //change DataGridView Height On Form Load
            dgvImportExcelToDatagridGridView1.RowTemplate.Height = 50;
        }
    }
}
Form1.Designer.cs SOURCE CODE
namespace HowToImportExcelToDataGridViewInCSharp
{
    partial class Form1
    {
        /// <summary>
        /// Required designer variable.
        /// </summary>
        private System.ComponentModel.IContainer components = null;

        /// <summary>
        /// Clean up any resources being used.
        /// </summary>
        /// <param name="disposing">true if managed resources should be disposed; otherwise, false.</param>
        protected override void Dispose(bool disposing)
        {
            if (disposing && (components != null))
            {
                components.Dispose();
            }
            base.Dispose(disposing);
        }

        #region Windows Form Designer generated code

        /// <summary>
        /// Required method for Designer support - do not modify
        /// the contents of this method with the code editor.
        /// </summary>
        private void InitializeComponent()
        {
            this.dgvImportExcelToDatagridGridView1 = new System.Windows.Forms.DataGridView();
            this.btnImportExcelToDataGridView = new System.Windows.Forms.Button();
            this.Column1 = new System.Windows.Forms.DataGridViewTextBoxColumn();
            this.Column2 = new System.Windows.Forms.DataGridViewTextBoxColumn();
            this.Column3 = new System.Windows.Forms.DataGridViewTextBoxColumn();
            this.Column6 = new System.Windows.Forms.DataGridViewTextBoxColumn();
            this.Column4 = new System.Windows.Forms.DataGridViewTextBoxColumn();
            this.Column5 = new System.Windows.Forms.DataGridViewTextBoxColumn();
            this.Column7 = new System.Windows.Forms.DataGridViewTextBoxColumn();
            this.Column8 = new System.Windows.Forms.DataGridViewImageColumn();
            ((System.ComponentModel.ISupportInitialize)(this.dgvImportExcelToDatagridGridView1)).BeginInit();
            this.SuspendLayout();
            //
            // dgvImportExcelToDatagridGridView1
            //
            this.dgvImportExcelToDatagridGridView1.AllowUserToAddRows = false;
            this.dgvImportExcelToDatagridGridView1.ColumnHeadersHeightSizeMode = System.Windows.Forms.DataGridViewColumnHeadersHeightSizeMode.AutoSize;
            this.dgvImportExcelToDatagridGridView1.Columns.AddRange(new System.Windows.Forms.DataGridViewColumn[] {
            this.Column1,
            this.Column2,
            this.Column3,
            this.Column6,
            this.Column4,
            this.Column5,
            this.Column7,
            this.Column8});
            this.dgvImportExcelToDatagridGridView1.Location = new System.Drawing.Point(3, 4);
            this.dgvImportExcelToDatagridGridView1.Name = "dgvImportExcelToDatagridGridView1";
            this.dgvImportExcelToDatagridGridView1.Size = new System.Drawing.Size(829, 336);
            this.dgvImportExcelToDatagridGridView1.TabIndex = 0;
            //
            // btnImportExcelToDataGridView
            //
            this.btnImportExcelToDataGridView.Font = new System.Drawing.Font("Microsoft Sans Serif", 12F, System.Drawing.FontStyle.Bold, System.Drawing.GraphicsUnit.Point, ((byte)(0)));
            this.btnImportExcelToDataGridView.Location = new System.Drawing.Point(426, 346);
            this.btnImportExcelToDataGridView.Name = "btnImportExcelToDataGridView";
            this.btnImportExcelToDataGridView.Size = new System.Drawing.Size(406, 42);
            this.btnImportExcelToDataGridView.TabIndex = 1;
            this.btnImportExcelToDataGridView.Text = "Import Excel To DataGridView";
            this.btnImportExcelToDataGridView.UseVisualStyleBackColor = true;
            this.btnImportExcelToDataGridView.Click += new System.EventHandler(this.btnImportExcelToDataGridView_Click);
            //
            // Column1
            //
            this.Column1.HeaderText = "Full Name";
            this.Column1.Name = "Column1";
            //
            // Column2
            //
            this.Column2.HeaderText = "Email";
            this.Column2.Name = "Column2";
            //
            // Column3
            //
            this.Column3.HeaderText = "Phone Number";
            this.Column3.Name = "Column3";
            //
            // Column6
            //
            this.Column6.HeaderText = "Language";
            this.Column6.Name = "Column6";
            //
            // Column4
            //
            this.Column4.HeaderText = "Country";
            this.Column4.Name = "Column4";
            //
            // Column5
            //
            this.Column5.HeaderText = "Gender";
            this.Column5.Name = "Column5";
            //
            // Column7
            //
            this.Column7.HeaderText = "Image Path";
            this.Column7.Name = "Column7";
            //
            // Column8
            //
            this.Column8.HeaderText = "Image";
            this.Column8.ImageLayout = System.Windows.Forms.DataGridViewImageCellLayout.Stretch;
            this.Column8.Name = "Column8";
            this.Column8.Resizable = System.Windows.Forms.DataGridViewTriState.True;
            this.Column8.SortMode = System.Windows.Forms.DataGridViewColumnSortMode.Automatic;
            //
            // Form1
            //
            this.AutoScaleDimensions = new System.Drawing.SizeF(6F, 13F);
            this.AutoScaleMode = System.Windows.Forms.AutoScaleMode.Font;
            this.ClientSize = new System.Drawing.Size(836, 394);
            this.Controls.Add(this.btnImportExcelToDataGridView);
            this.Controls.Add(this.dgvImportExcelToDatagridGridView1);
            this.Name = "Form1";
            this.StartPosition = System.Windows.Forms.FormStartPosition.CenterScreen;
            this.Text = "Form1";
            this.Load += new System.EventHandler(this.Form1_Load);
            ((System.ComponentModel.ISupportInitialize)(this.dgvImportExcelToDatagridGridView1)).EndInit();
            this.ResumeLayout(false);

        }

        #endregion

        private System.Windows.Forms.DataGridView dgvImportExcelToDatagridGridView1;
        private System.Windows.Forms.Button btnImportExcelToDataGridView;
        private System.Windows.Forms.DataGridViewTextBoxColumn Column1;
        private System.Windows.Forms.DataGridViewTextBoxColumn Column2;
        private System.Windows.Forms.DataGridViewTextBoxColumn Column3;
        private System.Windows.Forms.DataGridViewTextBoxColumn Column6;
        private System.Windows.Forms.DataGridViewTextBoxColumn Column4;
        private System.Windows.Forms.DataGridViewTextBoxColumn Column5;
        private System.Windows.Forms.DataGridViewTextBoxColumn Column7;
        private System.Windows.Forms.DataGridViewImageColumn Column8;
    }
}
Program.cs SOURCE CODE
using System;
using System.Collections.Generic;
using System.Linq;
using System.Windows.Forms;

namespace HowToImportExcelToDataGridViewInCSharp
{
    static class Program
    {
        /// <summary>
        /// The main entry point for the application.
        /// </summary>
        [STAThread]
        static void Main()
        {
            Application.EnableVisualStyles();
            Application.SetCompatibleTextRenderingDefault(false);
            Application.Run(new Form1());
        }
    }
}
When working in a business setting, more specifically in the finance field, it is common to monitor stocks. When making big decisions for yourself, or your clients/end users, it is essential to know where the market was, where it is now, and where it will be heading. You’ll need the ability to import data concerning these stocks, effectively evaluate the data, and then make educated clear decisions. Not to mention, it is common practice to then export the data for your clients or end users, so they can visualize and understand all of the data easily.
In this article, we’ll demonstrate using Spread.NET to build an application with C# and Windows Presentation Foundation (WPF). The application is responsible for importing and retrieving three months’ worth of closing price history for various stock symbols via an Excel spreadsheet import process. The application will also be able to export an Excel spreadsheet containing the new data.
Application Goals
The goal of this application is to allow the user to provide a series of stock symbols via the import of an external Excel document. These symbols will then be processed by the application.
- It will retrieve the three-month closing price history of each of the stocks via a REST API.
- The historical data retrieved from the API will be displayed alongside the symbol in the spreadsheet component.
- We’ll add a visualization of the stock price history using an inline Sparkline chart.
- After processing, the user will also have the ability to export the resulting data into a new Excel document.
Let’s get started building the app.
Building a WPF Application
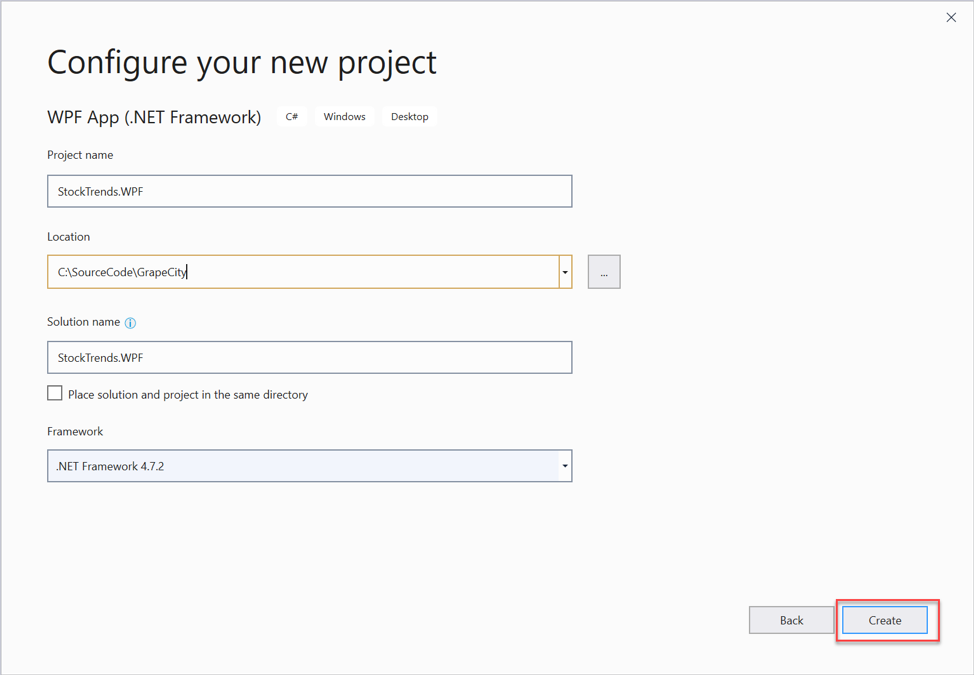
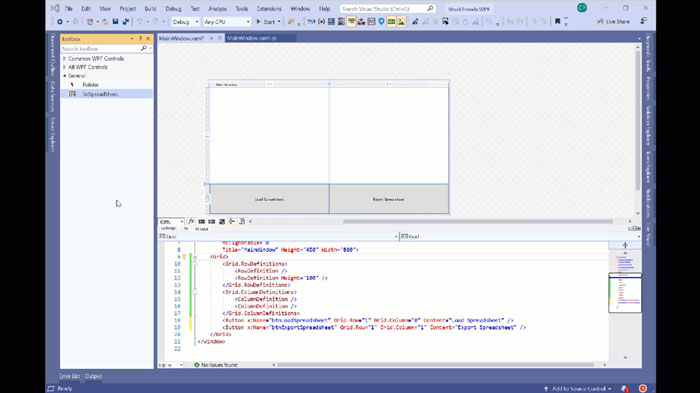
First, you’ll need to download and install the trial version of Spread.NET. After the installation process has completed, open Visual Studio 2019 and create a new WPF (.NET Framework) desktop application project. I named my project StockTrends.WPF.
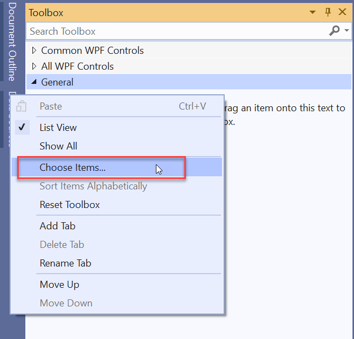
Once the solution has completed loading in Visual Studio, open MainPage.xaml in the editor, then open the Visual Studio Toolbox (CTRL + ALT + X). If you don’t see a Toolbox section named ComponentOne Spread, you will need to add the spreadsheet component to the toolbox manually – luckily, you’ll only ever have to do this once.
Add the component by right-clicking in the Toolbox panel, and from the menu select Choose Items.
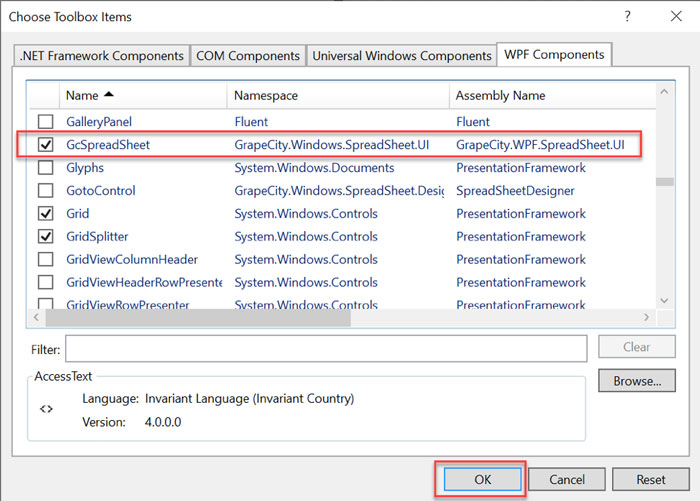
Next, in the Choose Toolbox Items dialog, ensure the WPF Components tab is selected and wait for it to populate (this can take several minutes). Scroll through the list, find and place a checkmark next to the GcSpreadSheet component located in the GrapeCity.WPF.SpreadSheet.UI namespace and press the OK button.
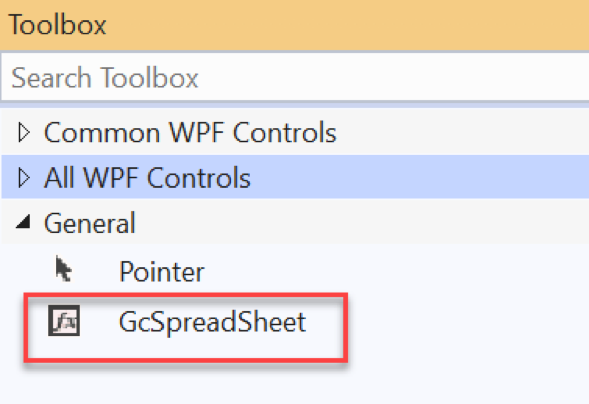
Now you will have the GcSpreadSheet control available to drag and drop from the toolbox onto your XAML documents.
Defining the User Interface
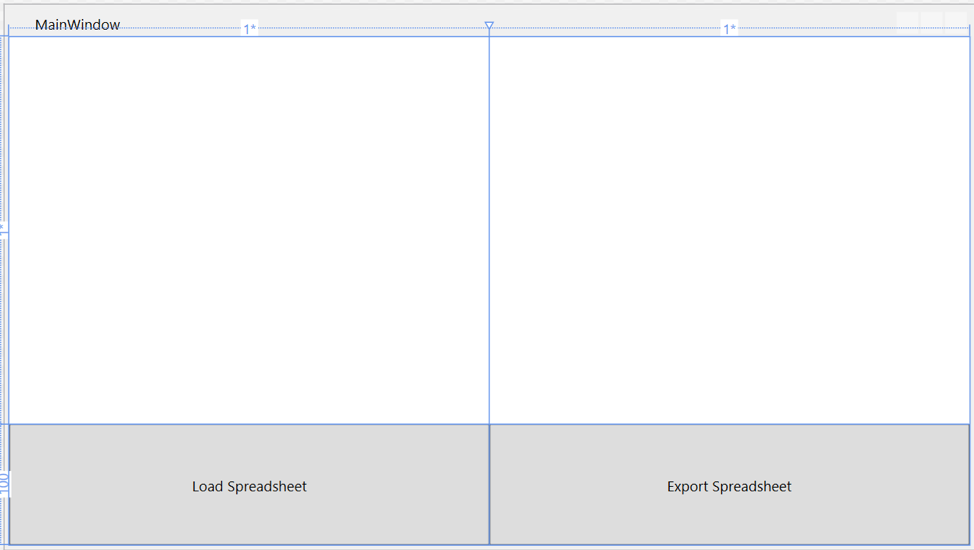
We will create a simple window that consists of two rows to satisfy the requirements of our WPF application. The first row consists of a large area that will house the Spread.NET spreadsheet component. Below it will be two buttons: one to import the symbols spreadsheet and one to export the results after processing.
With MainPage.xaml open in the Visual Studio editor, replace the existing Grid element with the following markup:
The designer of the window should now look similar to the following:
Next, drag the GcSpreadSheet component and drop it into the first cell of the grid.
Edit the XAML element representing the spreadsheet component so that it matches the following:
The designer should now look similar to the following:

Importing an Excel File into the Spreadsheet Component
The first piece of functionality that we will implement is importing an external Excel file into the Spread.NET spreadsheet component. This Excel spreadsheet contains a list of stock symbols the user would like to process in the application.
We will implement this functionality using the OpenFileDialog class from the Microsoft.Win32 namespace. This class allows you to add filters to the dialog so that the user can quickly select from existing Excel (*.xlsx) documents. Once a file is selected, the spreadsheet is then loaded into the spreadsheet component using a single line of code!
In the MainPage.xaml designer, double-click on the Load Spreadsheet button to implement the click handler. Implement the code as follows:
					private void BtnLoadSpreadsheet_Click(object sender, RoutedEventArgs e)
       {
            Microsoft.Win32.OpenFileDialog ofd = new Microsoft.Win32.OpenFileDialog();
            ofd.DefaultExt = ".xlsx";
            ofd.Filter = "Excel Documents (*.xlsx)|*.xlsx";
            var sel = ofd.ShowDialog();
            if (sel==true)
            {
                //one line of code to import the Excel file into Spread.NET
                spreadControl.OpenExcel(ofd.FileName);
            }
        }
Next, we will create a simple spreadsheet in Excel that contains a list of stock symbols. This document consists of a single worksheet with one column. In this column, enter a stock symbol for processing. (For this example we’re not doing any data cleaning or error processing so that we can focus on the application code itself, so there are some rules about how the spreadsheet should be formatted: just one ticker symbol per row, and make sure you enter only valid ticker symbols.)
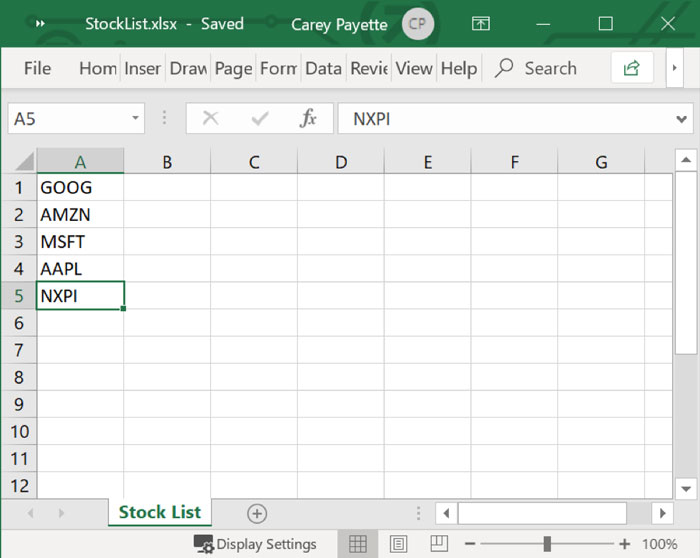
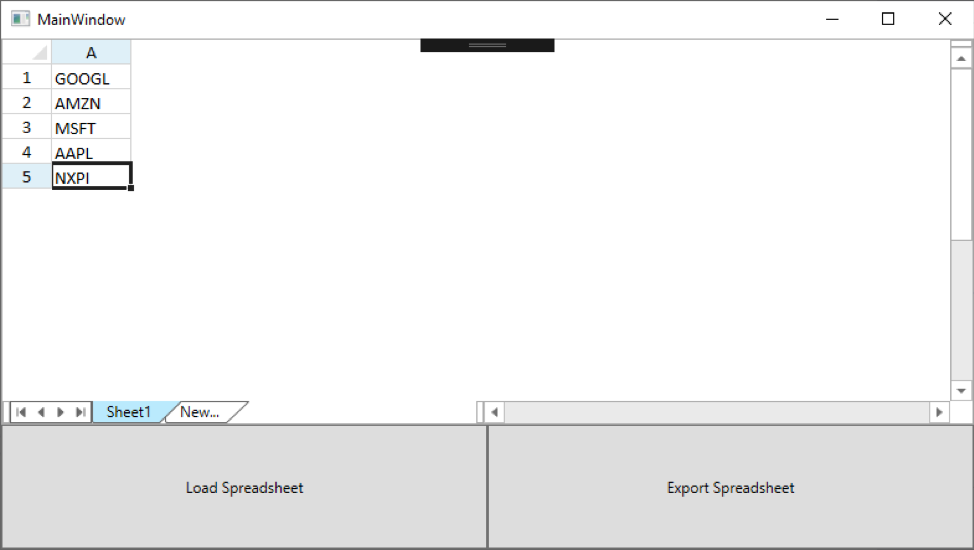
Run the application and select the Excel file that you just created. The file is then imported and displayed in the spreadsheet control of the application.
Exporting an Excel File from Spread.NET
Now that we have the import process functioning, we can move onto implementing the export functionality. We will be using the SaveFileDialog class located in the Microsoft.Win32 namespace because it can set extension filters in the dialog. The ability to export an Excel document from the Spread.NET component is also a simple process, accomplished with – (you got it) – a single line of code!
In the MainPage.xaml designer, double-click on the Export Spreadsheet button to implement the click event handler code. Implement the handler code as follows:
					        private void BtnExportSpreadsheet_Click(object sender, RoutedEventArgs e)
        {
            Microsoft.Win32.SaveFileDialog sfd = new Microsoft.Win32.SaveFileDialog();
            sfd.FileName = "SpreadNET.xlsx";
            sfd.Filter = "Excel Documents (*.xlsx)|*.xlsx";
            sfd.DefaultExt = ".xlsx";
            var sel = sfd.ShowDialog();
            if (sel == true)
            {
                spreadControl.SaveExcel(sfd.FileName,
                    GrapeCity.Windows.SpreadSheet.Data.ExcelFileFormat.XLSX);
            }
        }
Run the application once more, load the Stock Price spreadsheet once again, then press the Export Spreadsheet button to save a copy of the displayed spreadsheet onto your computer.
Retrieving Historical Stock Data
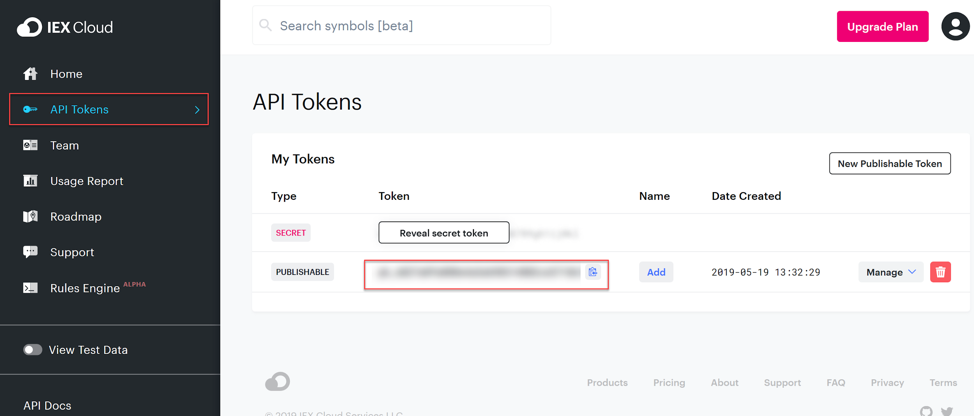
For this application, I’ve created a free account on the IEX Cloud to retrieve the three-month closing price history for the stocks in the spreadsheet. Once registered for an account, you will log into a dashboard console where you can obtain the API token to use with the IEX Cloud APIs.
We already know the full list of stock symbols when calling our API. It makes sense to use the batch request endpoint so that all data is obtained via a single call.
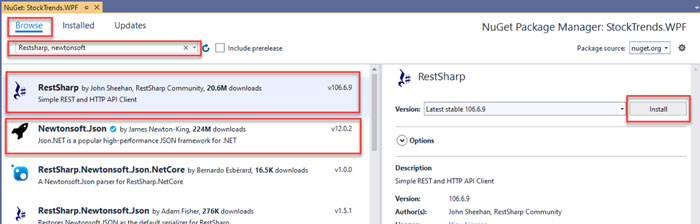
To implement the integration with the API, we will use two NuGet packages. Right-click on the project and select the Manage NuGet Packages option. Select the Browse tab, then search for and install the Newtonsoft.JSON and RestSharp packages.
Next, right-click on your project, and add a new class named StockHistoryRetriever. This file encapsulates all code relevant to the API integration. It also contains the definition of two additional classes that reflect the structure of the data from the IEX Cloud API.
In addition to the data encapsulation classes, this file also contains the method responsible for making the call out to the financial API. The code listing of StockHistoryRetriever is as follows (replace the API_TOKEN value with your own from the IEX Cloud dashboard).
					using Newtonsoft.Json.Linq;
using RestSharp;
using System;
using System.Collections.Generic;

namespace StockTrends.WPF
{
    public class StockHistoryRetriever
    {
        private const string API_TOKEN = "";
        private const string BASE_URL = "https://cloud.iexapis.com";
        private const string API_VERSION = "beta";

        public List Get3MonthHistory(List symbols)
        {
            var client = new RestClient(BASE_URL);
            var endpoint = $"{API_VERSION}/stock/market/batch";
            var request = new RestRequest(endpoint, Method.GET);
            request.AddQueryParameter("symbols", string.Join(",", symbols));
            request.AddQueryParameter("types", "chart");
            request.AddQueryParameter("range", "3m");
            request.AddQueryParameter("chartCloseOnly", "true");
            request.AddQueryParameter("token", API_TOKEN);

            IRestResponse resp = client.Execute(request);
            var stockHistory = JObject.Parse(resp.Content);

            var history = new List();
            foreach (var symbol in symbols)
            {
                var closingStockHistory = new ClosingStockHistory();
                closingStockHistory.Symbol = symbol;
                closingStockHistory.Prices = new List();
                var stock = stockHistory[symbol];
                var chartData = (JArray)stock["chart"];
                foreach (var itm in chartData)
                {
                    closingStockHistory.Prices.Add(new ClosingPrice() {
                        Date = Convert.ToDateTime(itm["date"]),
                        Price = Convert.ToDouble(itm["close"]) });
                }
                history.Add(closingStockHistory);
            }

            return history;
        }
    }

    public class ClosingStockHistory
    {
        public string Symbol { get; set; }
        public List Prices { get; set; }
    }

    public class ClosingPrice
    {
        public DateTime Date { get; set; }
        public double Price { get; set; }
    }
}
Adding Stock Data to the Spreadsheet
Upon successful loading of the symbols spreadsheet into the Spread.NET component, we have all the information necessary to issue the call to the API and write the retrieved closing price history back into the same worksheet.
To begin this implementation, open MainPage.xaml.cs and add the following using statement:
using GrapeCity.Windows.SpreadSheet.Data;
Add the following method to the MainPage class. The ProcessSpreadsheet method is responsible for reading the list of symbols from the uploaded document, issue the API calls and write the pricing history data back to the appropriate row in the current worksheet.
					private void ProcessSpreadsheet()
{
    List stocks = new List();
    var worksheet = spreadControl.Sheets[0];
    for (var i = 0; i < worksheet.RowCount; i++)
    {
        var stockSymbol = worksheet.Cells[i, 0].Text;
        stocks.Add(stockSymbol);
    }
    StockHistoryRetriever retriever = new StockHistoryRetriever();
    var data = retriever.Get3MonthHistory(stocks);
    //calculate max columns required,
    //increase the number of columns available in the worksheet
    int maxCount = data.Max(x => x.Prices.Count());
    worksheet.ColumnCount = maxCount + 1; //1 column for the symbol
    //Similar to a CSS class, define header column style
    var headerStyleName = "HeaderStyle";
    var headerStyle = new StyleInfo()
    {
        Background = new SolidColorBrush(Colors.LightSeaGreen),
        Name = headerStyleName,
        BorderBottom = new BorderLine(Colors.SeaGreen),
        BorderRight = new BorderLine(Colors.SeaGreen)
    };
    worksheet.NamedStyles.Add(headerStyle);
    //set column header for the symbol assign header style
    worksheet.ColumnHeader.Cells[0, 0].Text = "Symbol";
    worksheet.ColumnHeader.Cells[0, 0].StyleName = headerStyleName;
    bool setHeader = true;
    foreach (var stock in data)
    {
        //find stock index
        int rowIdx = 0;
        int colIdx = 0;
        spreadControl.Search(0, stock.Symbol, out rowIdx, out colIdx);
        int columnCounter = 1;
        foreach (var price in stock.Prices)
        {
            if (setHeader)
            {
                //set header text to date of the price,
                //expand column width, set column header style
                worksheet.ColumnHeader.Cells[0, columnCounter].Text =
                    price.Date.ToString("MM/dd/yyyy");
                worksheet.ColumnHeader.Cells[0, columnCounter].StyleName =
                    headerStyleName;
                worksheet.Columns[columnCounter].Width = 85;
            }
            //set cell to format to currency
            worksheet.Cells[rowIdx, columnCounter].Formatter =
                new GeneralFormatter(FormatMode.StandardNumericMode, "c");
            worksheet.Cells[rowIdx, columnCounter].Value = price.Price;
            columnCounter++;
        }
        setHeader = false;

        spreadControl.Invalidate();
    }
}
One of the main things to keep in mind is that we will be changing the dimensions of the spreadsheet. When it was first uploaded, the symbols sheet consisted of a single column with stock symbols defined one per row. Attempting to write to a column that didn’t previously exist will cause errors. Adjust the number of columns in a worksheet by setting the ColumnCount property to the total number of columns desired.
Immediately following the OpenExcel statement in the BtnLoadSpreadsheet_Click method, add a call to the new ProcessSpreadsheet function.ProcessSpreadsheet();
Rerun the application, and you will now see the three-month closing price history shown on the same row as the corresponding stock symbol. Export the spreadsheet to take this data offline.
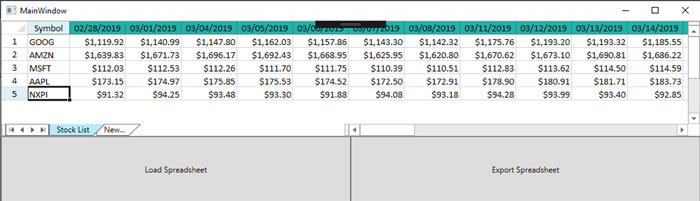
Creating Sparkline Charts
Even though looking at all of this data collected is impressive, it would be better if paired with a visual. Sparkline graphs provide a compelling way to interpret this data at a glance. Spread.NET allows for the creation of a Sparkline graph through its powerful API. These Sparklines are fully customizable and can be built using the data already in the spreadsheet.
Alter the ProcessSpreadsheet with the following code:
					private void ProcessSpreadsheet()
{
    List stocks = new List();
    var worksheet = spreadControl.Sheets[0];
    for (var i = 0; i < worksheet.RowCount; i++)
    {
        var stockSymbol = worksheet.Cells[i, 0].Text;
        stocks.Add(stockSymbol);
    }
    StockHistoryRetriever retriever = new StockHistoryRetriever();
    var data = retriever.Get3MonthHistory(stocks);
    //calculate max columns required,
    //increase the number of columns available in the worksheet
    int maxCount = data.Max(x => x.Prices.Count());
    //1 column for the symbol, 1 column for the sparkline
    worksheet.ColumnCount = maxCount + 2;
    //set sparkline column width
    worksheet.Columns[1].Width = 500;

    //define header column style
    var headerStyleName = "HeaderStyle";
    var headerStyle = new StyleInfo() {
        Background = new SolidColorBrush(Colors.LightSeaGreen),
        Name = headerStyleName,
        BorderBottom = new BorderLine(Colors.SeaGreen),
        BorderRight = new BorderLine(Colors.SeaGreen)};
    worksheet.NamedStyles.Add(headerStyle);
    //set column header for the symbol and sparkline column - assign header style
    worksheet.ColumnHeader.Cells[0, 0].Text = "Symbol";
    worksheet.ColumnHeader.Cells[0, 0].StyleName = headerStyleName;
    worksheet.ColumnHeader.Cells[0, 1].Text = "Trend";
    worksheet.ColumnHeader.Cells[0, 1].StyleName = headerStyleName;
    bool setHeader = true;
    foreach (var stock in data)
    {
        //find stock index
        int rowIdx = 0;
        int colIdx = 0;
        spreadControl.Search(0, stock.Symbol, out rowIdx, out colIdx);
        int columnCounter = 2;
        foreach (var price in stock.Prices)
        {
            //set header to date, expand column width, set column header style
            if (setHeader)
            {
                worksheet.ColumnHeader.Cells[0, columnCounter].Text =
                    price.Date.ToString("MM/dd/yyyy");
                worksheet.ColumnHeader.Cells[0, columnCounter].StyleName =
                    headerStyleName;
                worksheet.Columns[columnCounter].Width = 85;
            }

            //set cell to format to currency
            worksheet.Cells[rowIdx, columnCounter].Formatter =
                new GeneralFormatter(FormatMode.StandardNumericMode, "c");
            worksheet.Cells[rowIdx, columnCounter].Value = price.Price;
            columnCounter++;
        }
        setHeader = false;

        //create sparkline
        var range = new CellRange(rowIdx, 2, 1, stock.Prices.Count);
        var settings = new SparklineSetting();
        settings.AxisColor = SystemColors.ActiveBorderColor;
        settings.LineWeight = 1;
        settings.ShowMarkers = true;
        settings.MarkersColor = Color.FromRgb(255, 0, 128);
        settings.ShowFirst = true;
        settings.ShowHigh = true;
        settings.ShowLast = true;
        settings.ShowNegative = true;
        settings.FirstMarkerColor = Color.FromRgb(163, 73, 164);
        settings.HighMarkerColor = Color.FromRgb(49, 78, 111);
        settings.LastMarkerColor = Color.FromRgb(0, 255, 255);
        settings.NegativeColor = Color.FromRgb(255, 255, 0);
        //set row height
        worksheet.Rows[rowIdx].Height = 250;
        worksheet.SetSparkline(rowIdx, 1, range, DataOrientation.Horizontal,
            SparklineType.Line, settings);
        spreadControl.Invalidate();
    }
}
The ProcessSpreadsheet code now sets a row height and column width on the Sparkline column. Setting these values gives the Sparkline graph more room so that it is easier to read and interpret. You will also notice the code now Sparkline customization settings such as colors, as well as designate the cell range used to generate the graph in each row.
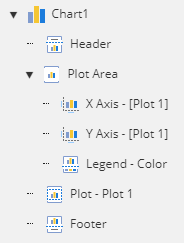
Excel Spreadsheet Components
This article only scratches the surface of the full capabilities of the Spread.NET spreadsheet component. Review the documentation to see some of the many available features. Integrating a spreadsheet component into your applications allows you to customize the experience of your users and provide them with familiar spreadsheet functionality without having to refer them to an external program.
In another article series, we demonstrate how to import and export Excel Spreadsheets in your WinForms app using C#, import/export Excel spreadsheets using JavaScript and how to import and export Excel spreadsheets in Angular.
This article appeared first on GrapeCity.
If you’re interested in developing expert technical content that performs, let’s have a conversation today.
You may also like
ContentLab
ContentLab provides high-quality written articles, tutorials, courses, and other technical marketing materials to industry leaders. We create no-nonsense tech content that’s purpose-built to attract, educate, and engage your technical audience.
All Posts »