
Code Focused
Automate Microsoft Excel with Visual Studio 2010
Enhancements in the .NET Framework 4 and Visual Studio 2010 make Office automation solutions easier than ever to write and deploy. Here’s an Excel automation scenario that reflects solutions that I’ve seen requested by multiple clients.
Many computer users live in the Microsoft Office suite, using Word, Excel and Outlook as the core tools to perform the majority of their daily computer tasks. I am amazed at the number of serious .NET business software developers that fail to exploit this familiar and comfortable environment to deliver easy-to-use solutions. Enhancements in the .NET Framework 4 and Visual Studio 2010 make Office automation solutions easier than ever to write and deploy, in either C# or Visual Basic.
In this article I present an Excel automation scenario that is closely representative of solutions requested by multiple clients. My experience is that there is a strong demand for Excel automation solutions in the finance departments across a wide variety of industries.
Chinook and Northwind Have Merged
Our scenario is that the Chinook company has purchased the Northwind company and the Chinook CFO has hired you to provide automation to create consolidated financial statements. You must provide a solution that allows the Controller to simply pick a financial reporting period and click a button to produce a consolidated financial statement for that period. The statement must list invoices by date, show the Sales to Date for the customer alongside the order total, and highlight the largest sale order for the period in bold font. The Chinook invoice detail must be filled on a new worksheet tab for verification. A sample completed consolidated spreadsheet is shown in Figure 1.
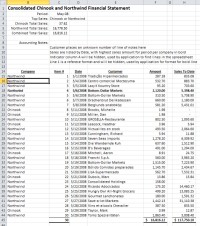 [Click on image for larger view.] |
| Figure 1. Sample Consolidated Financial Sheet |
Your research has shown that adding a custom ribbon tab to Excel will meet the client’s requirements. The custom tab will be named «Accounting» and will contain a drop-down list of available financial periods (months) for the selected company or companies as shown in Figure 2. The Period drop-down lists the financial periods available based on which company is checked, as an example of dynamic data interaction based on Ribbon controls status. Once the desired period is selected, the user clicks the Load Data button and the result is a completed consolidated spreadsheet as shown in Figure 1 above.
Database Note: Both sample databases are implemented as SQL Compact 3.5 databases to permit the databases to install with the demo application. The Chinook database is a sample database available for SQL Server and other databases at http://chinookdatabase.codeplex.com/. The Northwind database is taken from the SQL Server Compact 3.5 installation at C:Program Files (x86)Microsoft SQL Server Compact Editionv3.5Samples. The Northwind Order dates were adjusted to correspond to the same years as Chinook Invoice dates to provide accounting periods with activity from both companies. LINQ to SQL is used to access both databases.
Creating the Excel Solution
Visual Studio 2010 offers a number of Office templates as shown in Figure 3. Choosing the Excel 2010 Workbook template opens a blank Excel workbook template that is the spreadsheet shown when the solution is run. This is a document level customization; the Accounting tab will appear only in this particular template when opened in Excel. Selecting this template offers the choice to create a new document or add to an existing document as shown in Figure 4. Select the option to create a new document.
To provide a spreadsheet with proper formatting that can be filled in by our customization, the blank template is modified as shown in Figure 5. The yellow column A contains keyword markers that identify which rows receive particular data. Column A is hidden after the data is filled on the template. This provides a positive visual cue to the user that the process has completed.
Adding a new item to a Workbook project offers the templates shown in Figure 6. Choosing the Ribbon Designer produces a blank Ribbon tab. Figure 7 shows the blank Ribbon and controls available to be used on the Ribbon. The customized Ribbon is shown in Figure 2 above.
The solution shown in Figure 8 consists of the Data.Chinook project to provide needed methods to query the Chinook sample database, the Data.Northwind project provides the needed methods to query the Northwind database, the Data.Shared provides a few common functions. The Data projects contain some interesting LINQ-to-SQL queries but are otherwise outside the discussion of this article.
Almost all of our custom Ribbon code is contained in Ribbon.vb and Utility.vb of the Excel2010_Workbook_VB project. This logic performed when the «Load Data» button is clicked is:
- Write the Accounting period to column C of row that contains «Period» in column A.
- Write the company name with the top sales for the period to column C of row that contains «TopSales» in Column A.
- Write the total sales for the period for Chinook to column C of row that contains «ChinookSales» in column A.
- Write the total sales for the period for Northwind to column C of row that contains «NorthwindSales» in column A.
- Write the combined sales for the period to column C of row that contains «CombinedSales» in column A.
- For each Chinook invoice or Northwind order for the period.
- If the first row then write values into the row that contains «FormatRow» in column A.
- If the last row then write values into the row that contains «DataRow» in column A.
- Otherwise insert a new row at «DataRow» and copy the formatting from the row below and then write the values into the newly inserted row.
- Change the formatting to bold for all columns for the row that contained the highest invoice or order amount. This must be done AFTER the rows are written otherwise the newly inserted rows will carry this bold formatting.
- Hide Column A.
- Create a new worksheet and place the detail Chinook transactions for the period in the new worksheet. A new worksheet tab could also be created for Northwind order detail if desired.
The conditional processing in the loop above is required because Excel copies the formatting of the prior row when a row in inserted. In order for the detail line formatting to be maintained and for the Totals line ranges to be maintained as rows are inserted, there must be two rows between the heading and the Total line.
Listing 1 contains the user-interface code described above. Listing 2 contains almost all the code that interacts with the Excel object model.
- AddChinookInvoicesForPeriod — Adds the Chinook invoice detail to a blank worksheet.
- AddWorksheet — Adds a new worksheet with specified name either before or after the current worksheet.
- CopyRowActiveSheet — Copies a row in the active worksheet to the specified row.
- FindFirstOccuranceRow — Find the row that contains the specified text in the specified column.
- GetActiveWorksheetDimensions — Returns the row and column dimensions of the active worksheet based on data present in the worksheet.
- HideColumn — Hides the specified column. Do this only after all data has been written to it.
- InsertRowActiveSheet — Insert a blank row in the active spreadsheet at the specified row.
- SetRowBold — Formats all columns of the specified row with the Bold font attribute.
- WorkSheetIndex — Returns the numeric worksheet index for the specified name starting at 1.
- WriteValueToSheet — Writes a string value to the active worksheet at the specified row, column.
Testing the Ribbon
I created a second tab on the ribbon as shown in Figure 9. This Testing tab is used to verify methods as they are being written. It is useful to keep this tab in the template, just change its Visible property to false before deploying the solution.
Conclusion
Visual Studio 2010 and .NET Framework 4 makes it much easier to develop Microsoft Office extensions as shown here by the automated spreadsheet to prepare a consolidated financial statement across two different databases. The user simply needs to open the template, select the desired financial period, and click the Load Data button to get a fully prepared financial spreadsheet with information that would otherwise take significant manual effort to prepare.
Developing Office Automation solutions provides useful functionality in an environment in which the user is comfortable and familiar to the end user. Business solution developers will do well to consider taking full advantage of these capabilities in future applications.
- Get Code Download
About the Author
Joe Kunk is a Microsoft MVP in Visual Basic, three-time president of the Greater Lansing User Group for .NET, and developer for Dart Container Corporation of Mason, Michigan. He’s been developing software for over 30 years and has worked in the education, government, financial and manufacturing industries. Kunk’s co-authored the book «Professional DevExpress ASP.NET Controls» (Wrox Programmer to Programmer, 2009). He can be reached via email at [email protected].
- Remove From My Forums
-
Question
-
We are using Visual Studio 2010 Ultimate edition, with Team support. I would like to know how does VS 2010 and Team Explorer generates Excel spreadsheet when selected in Team Explorer.

Benjamin Fallar III
-
Moved by
Tuesday, October 18, 2011 4:54 AM
move for better support (From:.NET Base Class Library)
-
Moved by
Answers
-
Hello Benjamin,
Thanks for your post.
When we install VS2010 Team Explorer, the Team Foundation Add-in also installed in the Excel (you will get the Team menu in the Excel).
And with that add-in, the Excel just is one client side of TFS server. You can use it to connect to TFS server, and then get the appropriate work items for you.Once you click the
Open Query in Microsoft Excel option in the Visual Studio, Excel opens and displays these work items. And I personally think that it seems that the work item query runs in the Excel.Thanks.
Vicky Song [MSFT]
MSDN Community Support | Feedback to us
Get or Request Code Sample from Microsoft
Please remember to mark the replies as answers if they help and unmark them if they provide no help.-
Marked as answer by
Vicky SongMicrosoft employee, Moderator
Wednesday, October 26, 2011 1:52 AM
-
Marked as answer by

I’m running Visual Studio 2010 Express, and in C# I’m trying to display Excel workbook.
I’m trying to use
Microsoft.Office.Interop.Excel
I have office 2007. Why doesn’t this show up when I go to add> reference and navigate to the .NET or COM tabs?
Why doesn’t this show up?
How can I add this as a reference or is there a better to show a workbook to the user in Excel?
asked Aug 19, 2011 at 3:38
![]()
For whatever reason VS 2010 doesn’t like to show it in the .NET tab of the Add Reference window, you have to manually browse for it. The path to the assembly is C:WindowsassemblyMicrosoft.Office.Interop.Excel.
- Go to Add Reference
- Click on the Browse tab
- Browse to
C:windowsassembly - Choose
Microsoft.Office.Interop.Excel
answered Aug 19, 2011 at 3:47
![]()
squillmansquillman
13.2k3 gold badges42 silver badges59 bronze badges
3
I’ve had decent luck using EPPlus. It was awhile ago but I chose it since at the time the interop library was specific to a single version of Office whereas epplus was compatible with any version supporting the Open Office Xml format
answered Aug 19, 2011 at 3:53
![]()
scottscott
9747 silver badges10 bronze badges
4
Using Visual Studio 2010 Professional, creating Excel Add-in is pretty simple. Following are the steps I followed for writing an Add-In for exporting Xml:
Step # 1
Create new project of type ‘Excel 2010 Add-in’. The project will have a class file called ThisAddin.cs.
Step # 2
For creating a button on the Excel ribbon, right click on the project and select Add – > New Item.
Step # 3
Select ‘Ribbon (XML)’ from the list of new items and name the ribbon class, say Ribbon1. This will add two files to the project which are Ribbon1.cs and Ribbon1.xml.
Step # 4
Add the following code in ThisAddin class
protected override Microsoft.Office.Core.IRibbonExtensibility CreateRibbonExtensibilityObject()
{
    return new Ribbon1();
}
Step # 5
In Ribbon1.xml define the properties of the button that will be displayed on the Excel ribbon. The onAction attribute specifies the method which will be called from Ribbon1.cs on clicking the button (onAction="OnTextButton").
 <?xml version="1.0" encoding="UTF-8"?>
	<customUI xmlns="http://schemas.microsoft.com/office/2009/07/customui" onLoad="Ribbon_Load">
	  <ribbon>
	    <tabs>
	      <tab idMso="TabAddIns">
	        <group id="MyGroup"
	               label="Export XML">
	          <button id="textButton" label="Generate XML"
	             screentip="Export to XML" onAction="OnTextButton"
	             supertip="Export excel sheet to XML file."/>
	        </group>
	      </tab>
	    </tabs>
	  </ribbon>
	</customUI>
Step # 6
Add following method declaration to Ribbon1.cs and implement your functionality here.
public void OnTextButton(Office.IRibbonControl control)
{
    //TODO:Add your implementation here
}
Links:
- Writing a simple Excel Add-In for exporting data to Xml
- Working with Excel Workbooks (MSDN)
- How to: Store and Retrieve Date Values in Excel Ranges (MSDN)
- Walkthrough: Creating a Custom Tab by Using Ribbon XML (MSDN)

Creating Excel 2010, 2007 addin. Customizing Excel Ribbon: C#, VB.NET
Posted on Tuesday, May 29th, 2012 at 8:37 am by .
In my previous article, we’ve taken a look at how Add-in Express makes your life easier when it comes to developing COM add-ins for Microsoft Excel 2003.
In today’s article we’ll concentrate on the components and tools Add-in Express for Office and .net gives us when creating COM add-ins for Excel 2007, Excel 2010 and Excel 2013. As most of you are probably aware, Excel 2007 took a radical new UI direction with the introduction of the Ribbon UI as well as another mayor UI enhancement in Excel 2010 and 2013, in the form of the Backstage View.
Our Excel plug-in is created using C# in VS 2010, but you can also write your Excel COM add-ins in VB.NET and C++ in Visual Studio 2012, 2010, 2008 and 2005.
Adding Excel 2013, 2010, 2007 UI elements
We’ll re-use the same add-in from my last article. As we’ve chosen the minimum supported version to be Office 2003, all the UI elements we are going to add will work if our user has Excel 2007 or Excel 2010 or 2013 installed.
Creating a custom Ribbon tab for Excel 2007, 2010, 2013
To add your own Ribbon tab, click on the ADXRibbonTab button on the AddinModule designer.

When you select the ribbon tab component, Add-in Express will display the built-in visual Ribbon designer giving you a visual way to build your Excel ribbon. I’ve designed a simple ribbon tab with a combo box, two checkboxes and a large button.

When you register, build and run your project, you should see the new tab in Excel.

Adding custom controls to the built-in Excel ribbon tabs
It is possible to add your own Ribbon groups to the existing Excel ribbon tabs and Add-in Express makes it even easier. Let’s say, for example, we would like to add our own ribbon group to the built-in Page Layout tab of Excel 2010.
First, add a new ADXRibbonTab control to the AddinModule designer surface and add a Ribbon group to the Ribbon Tab design. For this example, I’ve added two buttons to the Ribbon group.

Next, we need to know what the internal name of the tab control is, and to do this you need to consult the list of Office Control IDs. You can find the list for Office 2007 here and the Office 2010 control ID’s here.
After checking the list, we know that the name for the built-in Page Layout tab is TabPageLayoutExcel. Armed with this ID, we can add a new Ribbon Tab control to the AddinModule designer surface and change its IdMso property value to TabPageLayoutExcel.

If you want your on the Page Layout tab, you need to specify either the InsertAfterIdMso or InsertBeforeIdMso properties of your ribbon group control. In this scenario, we want to insert our custom group after the Themes ribbon group, so we set the InsertAfterIdMso property value to GroupThemesExcel.

The resulting custom Excel ribon should look similar to the image below.

Hiding built-in Excel ribbon controls
If you need to hide a built-in Ribbon tab or control, you follow a similar approach as adding your own group to a built-in tab. For example, if we would like to hide the entire Excel Illustrations group on the Excel Insert tab, we add a new ribbon tab control and set its IdMso property to TabInsert. Next, add a ribbon group control to the Ribbon tab control and change its IdMso property value to GroupInsertIllustrations, and finally, since we would like to hide the group, set its Visible property to False.

Intercepting events of built-in Excel controls
Unfortunately, the Office object model does not allow you to add you own controls to the built-in ribbon groups, however, you are able to intercept events of some of the Office built-in controls. To illustrate, if we would like to intercept the event when the user clicks on the Paste button, we need to add a new ADXRibbonCommand component and set its ActionTarget property to Button and its IdMso property value to Paste.
Next, generate an event handler for the OnAction event by double-clicking next to the event name in the property grid.

This will generate an empty event handler, to which you can add you own logic when the user clicks the button.
private void adxRibbonCommand1_OnAction(object sender,
	IRibbonControl control, bool pressed, ADXCancelEventArgs e)
{
    e.Cancel = true;
    MessageBox.Show("Clicked");
}
By setting the e.Cancel property to true, we will cancel the default Excel action and only show our message box.
Responding to Microsoft Excel events
The Microsoft Excel object model exposes a number of events and Add-in Express provides you with an easy way to respond to these events. You first need to add a new ADXExcelAppEvents to your AddinModule designer surface.

Select the ADXExcelAppEvents and double-click next to the event you would like to use in order to generate an empty event handler for it.
Using Excel events
We’ll now take a closer look at how to use some of the Excel events, starting with:
SheetSelectionChange
Use this event when you need to know when the selection changed on any Excel worksheet. It passes a reference to the worksheet in which the selection occurred as well as the actual range that was selected.
private void adxExcelEvents_SheetSelectionChange(object sender,
	object sheet, object range)
{
    Excel.Worksheet worksheet = null;
    Excel.Range rng = null;
    Excel.Range cells = null;
    Excel.Range feedbackRange = null;
    try
    {
        worksheet = (Excel.Worksheet)sheet;
        rng = (Excel.Range)range;
        feedbackRange = worksheet.get_Range("A1", "A1");
        cells = rng.Cells;
        feedbackRange.Value = cells.Count + " cells selected.";
    }
    finally
    {
        if (feedbackRange != null)
            Marshal.ReleaseComObject(feedbackRange);
        if (cells != null)
            Marshal.ReleaseComObject(cells);
    }
}
SheetActivate
This event occurs when any sheet is activated and passes a reference to the worksheet.
private void adxExcelEvents_SheetActivate(object sender, object hostObj)
{
    Excel.Worksheet sheet = null;
    Excel.Range feedbackRange = null;
    try
    {
        sheet = (Excel.Worksheet)hostObj;
        feedbackRange = sheet.get_Range("A1", "A1");
        feedbackRange.Value = "You've activated sheet : " + sheet.Name;
    }
    finally
    {
        if (feedbackRange != null)
            Marshal.ReleaseComObject(feedbackRange);
    }
}
SheetChange
Occurs when cells in any workbook were changed. You will receive a reference to the worksheet as well as the cell ranges that were changed.
private void adxExcelEvents_SheetChange(object sender,
	object sheet, object range)
{
    Excel.Worksheet worksheet = null;
    Excel.Range rng = null;
    Excel.Range cells = null;
    try
    {
        worksheet = (Excel.Worksheet)sheet;
        rng = (Excel.Range)range;

        cells = rng.Cells;
        Console.WriteLine(String.Format(
			"{0} cells changed. In worksheet {1}", cells.Count, worksheet.Name));
    }
    finally
    {
        if (cells != null)
            Marshal.ReleaseComObject(cells);
    }
}
WorkbookActivate
Occurs when a workbook, worksheet or chart sheet is activated.
private void adxExcelEvents_WorkbookActivate(object sender, object hostObj)
{
    Excel.Workbook workbook = null;
    Excel.Sheets sheets = null;
    try
    {
        if (hostObj is Excel.Workbook)
        {
            workbook = (Excel.Workbook)hostObj;
            sheets = workbook.Sheets;
            Console.WriteLine(sheets.Count.ToString());
        }
    }
    finally
    {
        if (sheets != null)
            Marshal.ReleaseComObject(sheets);
    }
}
Thank you for reading. Until next time, keep coding!
Available downloads:
This sample Excel COM Add-in was developed using Add-in Express for Office and .net:
C# add-in for Excel 2010/2007
You may also be interested in:
- Writing Excel COM add-in in C# (for Excel 2003)
- Video: Creating Excel COM add-in using C#, VB.NET
- Special features for Excel plug-in developers