
Hightlight yanked text
First of all I would like to recommend highlight yanked text:
https://github.com/machakann/vim-highlightedyank (vim and neovim)
This is useful because it will give you a visual hint of what you have just copied.
For neovim:
augroup highlight_yank
    autocmd!
    au TextYankPost * silent! lua vim.highlight.on_yank({higroup="IncSearch", timeout=700})
augroup END
The vim philosophy goes way beond selecting, copying etc.
Start spending more time reading about vim/neovim and you will not going back to any other editor.
Nice to meet you dear «text-objects»
- Read more about them here
Copy a whole paragraph to the clipboard:
"+yip

"+ .................... clipboard register
y ..................... copy
ip .................... inner paragraph
Copy the whole file to the clipboard
:%y+
Test some vim commands from the clipboard
:@+
The above command allows you to run functions and vim commands even if did not pasted them into your vimrc, there are some exceptions but in general it will work.
You can define your own text-objects
" vim line text-objects
xnoremap al :<C-u>norm! 0v$<cr>
xnoremap il :<C-u>norm! _vg_<cr>
onoremap al :norm! val<cr>
onoremap il :norm! vil<cr>
So you can use vil or dil
Sometimes you don’t need to select to copy
If you wan to copy the second line to the end of the file you can do:
:2t$
If you want to move lines 4-7 to the beggining of the file you can do:
:4,7m0
copy from mark a to mark b:
ma .................. mark current line as mark a

Jump to a second place in your file and then

mb .................. mark current line as mark b

finally:

:'a,'by+

from mark a to mark b copy to the clipboard
Diving into advanced vim:
- What is your most productive shortcut with Vim?
This is a follow up post to this amazing post on vscode shortcuts. I thought it would be fun to try and make the same or similar shortcuts on vim for comparison. Now mind you I am a relative new vimmer, more like a casual vimmer lol. Staying within the home row does provide faster work flow, like a painter bonding with the canvas. For my everyday use I mostly use Intellij/Android Studio, and vscode. I have vim mode turned on and I do turn it off when I feel is getting in the way.
I’ll be using this repo for the examples
coreutils just clone it to your git directory.
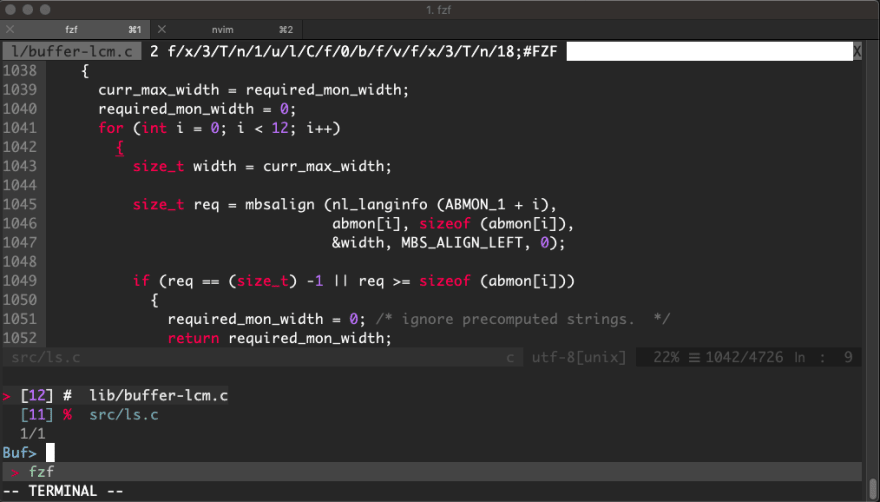
1 Search Text Through All Files At Once
Probably one of the best utilities for terminal is fzf, if you’ve ever used everything on windows then you know what I am talking about. fzf as the name implies is a fuzzy finder. fzf is supercharged with a bunch of nice commands. To use it on vim you need to have it installed first.
brew install fzf
Enter fullscreen mode
Exit fullscreen mode
Then you add it to your Plug vimrc, I use vim-plug by the same author.
Plug '/usr/local/opt/fzf'
Plug 'junegunn/fzf.vim'
Enter fullscreen mode
Exit fullscreen mode
For this next example, simply do :Lines then type whatever you’re looking for. Fzf will look in the opened buffers, if you are looking just in the current buffer then do :BLines. A cool thing about fzf is well that it finds anything even if missing a few letters here and there. Also if you don’t want fuzzy finding you can start the fzf commands with a single quote '.

Fzf is amazingly fast, no kidding try it on a big project.
2 Select lines inside brackets
There are quite a few ways to select text in vim, in fact you don’t even need visual mode to do it.
Place cursor in a bracket or inside the brackets.
ya(
ya{
Enter fullscreen mode
Exit fullscreen mode
If you’d like to do it visually, place cursor in a bracket, then you can do yank(y), or cut(d).
v%
Enter fullscreen mode
Exit fullscreen mode
3 Open a file in the buffer with fzf
If you ever need help on fzf utility you can do :help fzf within vim. You can see the help file, and all the commands it does. Buffers command show you all the buffers opened at the moment. Then if you start typing you can do fzf finding if you have lots of buffers opened.
:Buffers
Enter fullscreen mode
Exit fullscreen mode
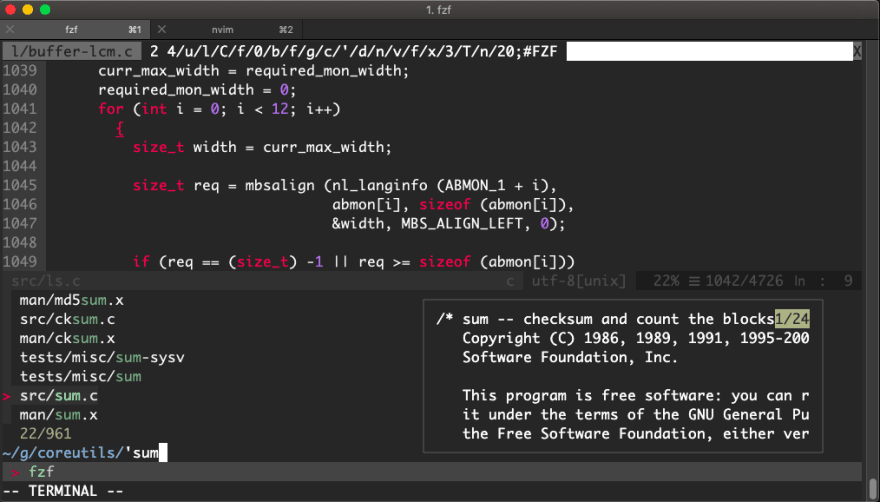
4 Find a file in the project with fzf
Same as with the buffers command, but with all files within the directory you are working with.
:Files
Enter fullscreen mode
Exit fullscreen mode

Note how fzf picks up strnumcmp.c when searching for sum. If you start the search with ' it will look for whole words.
5 Launch terminal
This is just personal preference, because when you are in vim you are in the terminal, if you use iTerm2 then you can switch between tabs relatively easy.
If you want to have a terminal tab within vim I use split-term plugin. Keep in mind I use neovim, let me know if you also use this or some other plugin in vim.
There are far too many configurations to talk about to make sure to visit the repo.
- :Term Opens a new terminal buffer using :new (splits horizontally)
- :VTerm Opens a new terminal buffer using :vnew (splits vertically)
- :TTerm Opens a new terminal buffer using :tabnew (new tab)
6 Delete Everything to the Left/Right
This is far too easy with vim. Move your cursor to where you want it with motions or hjkl, if you want to delete everything to the left d0, if you want to do to the right d$.

Another good one is the t (until). So if you want to delete until a bracket you would do dt).

7 Delete Previous Word
If you are writing some text and you make a mistake, exit insert mode, and do daw (delete a word).
For more tips on this do :help diw in vim.
8 Select Words
Visual mode in vim is just another world in itself, it has line, block, and columns modes. To select words make sure you are in visual mode by hitting lower v. Then press w to select next word. Let’s say you selected a word you don’t want, hit b for back, most vim commands have some sort of pnemonic. There is also e for end of word.
9 Selecting Lines
Visual Lines mode, let’s you select lines easily.
Enter lines mode with upper case V.

10 Duplicate a Line
Simply yank the line with yy, the paste with p.

11 Move to Beginning/End of File
Moving in vim is such of breeze. Top of the file with gg, and G to the end of the file.
12 Move Up/Down a File
You can move up and down a file with CTRL+U and CTRL+D, also you can use SHIFT+ { and SHIFT+}.
13 Search Words in a File
Searching for words in a file with vim is pretty cool, but not as cool as fzf. To search for a word you do / then type the word to find. To go to next word you hit n, and to go to previous word N. In addition you can search backwards with ?.
14 Replace Words in a File
Search and replace can take various forms.
:%s/search/replace/gc
Enter fullscreen mode
Exit fullscreen mode
- % indicates search in the whole file
- g for global, meaning all occurrences
- c is for confirmation
When you run this command you’ll get a confirmation where you can hit yes or no for each instance or simply hit a to replace all instances.
15 Move Line Up/Down
Vim provides a move command for moving lines around.
:move+1
:move-2
Enter fullscreen mode
Exit fullscreen mode
16 Delete a Line
If you want to delete the whole line, you can do dd.
17 Add Cursor Multiple Lines
- Move the cursor to the position on first line.
- Enter visual block mode (ctrlv).
- Press j three times (or 3j).
- Press I (Uppercase i).
- Type in whatever.
Press esc.
Seems like a lot but once you get used it is quick.

18 EasyMotion in Vim
EasyMotion is a cool plugin that helps with traversing through text really quick, it also works within vscode if you are interested in trying vim in vscode, though the shortcomings of using vim in vscode is that you can’t bring in any plugins other than the ones provided by the vscodevim plugin.
Make sure to check out easymotion for full description of the plugin.
VSCodeVim
19 NerdTree
Another cool plugin for looking in directories is NerdTree.
For more plugins visit https://vimawesome.com/
20 Bookmarking aka Marks
I am not sure if vscode has this feature, but nevertheless is pretty cool in vim. You just put your cursor in a line, and hit m and a letter or number.
If you do ma then your mark will be a
To see your current marks, you can do (Marks to use with fzf plugin):
:marks
:Marks
Enter fullscreen mode
Exit fullscreen mode

You can also delete marks:
:delmarks a
Enter fullscreen mode
Exit fullscreen mode
Delete all lowercase marks:
:delmarks!
Enter fullscreen mode
Exit fullscreen mode
If you ever got too many marks you can delete ~/.viminfo which contains history and marks.
Conclusion
Lots of cool stuff you can do with Vim, I particularly wish I could do vim with all the plugins but in a vscode environment, and I think that’s what Oni is trying to accomplish. Let me know what you think or what cool tricks or plugins you use in vim. Hasta la vimsta baby!
If you’re interested in checking out my vimrc file check here
-
First install Vim.
-
To install the packages, first install ‘vundle’ using following command. Use ‘git-shell’ to run this command in Windows.
git clone https://github.com/VundleVim/Vundle.vim.git ~/.vim/bundle/Vundle.vim

(in Windows : use 'git-shell' to run below command)
git clone https://github.com/VundleVim/Vundle.vim.git C:/Users/<Username>/.vim/bundle/Vundle.vim
-
Copy and paste the .vimrc file in the home directory.
-
In Windows, paste in the .vimrc file at C:/Users/<Username>/; and change the line “set rtp+= …” in .vimrc with correct location of “Vundle.vim” i.e. “set rtp+=C:/Users/<Username>/.vim/bundle/Vundle.vim”.
-
Use double quote to comment/uncomment the packages in .vimrc file e.g. ” Plugin ‘mattn/emmet-vim’ will not install the package “emmet-vim”. Or add some more packages in .vimrc file as required.
-
After selecting the packages, open vim and run the command -> :PluginInstall and it will install the all the plugins.
-
Use :help <plugin name> to see the list of operations.
1.1. Starting Vim
| Commands | Descriptions |
|---|---|
| :w | save file |
| :w <filename> | save file as <filename> and keep the current file open |
| :sav <filename> | save file as <filename> and open <filename> |
| :q | quit (if already saved) |
| :q! | quit without saving |
| :e <filename> | open new/existing <filename> in new buffer |
| :wq | save and quit |
| :bn | go to next buffer i.e. file |
| :b <filename> | go to buffer with <filename> |
| :bd | close current file without exiting vim |
| :bd! | close current file without exiting vim and ‘no modification’ |
| :vim * | open all files in the directory (all in same buffer) |
| :vim file1 file2 file3 | open file1, file2 and file3 in vim |
| :n | go to next file |
| :n <filename> | go to file name |
| :prev | go to previous file |
| ctrl-Z | suspend vim |
| fg | bring forground vim |
1.2. Undo/Redo
| Commands | Descriptions |
|---|---|
| u | undo |
| crtl-r | redo |
1.3. Insert
| Commands | Descriptions |
|---|---|
| i | insert mode at cursor |
| I | insert mode at beginning of the line (i.e. first character of line) |
| s | delete character under the cursor and enter into insert mode |
| S | delete the line and go to insert mode from the beginning of same line |
| a | insert mode after the cursor |
| A | insert mode at the end of line |
| o | insert mode on below line |
| O | insert mode at bottom line |
| C | delete from cursor to end of line and go to insert mode |
| r | replace current character |
| R | replace characters until Esc is pressed (i.e. same as insert button in keyboard) |
1.4. Copy/Paste/Delete
| Commands | Descriptions |
|---|---|
| y | yank (copy) |
| yiw | copy the word |
| yw | copy the word after the cursor |
| yy or Y | copy the line |
| y$ | copy till end of the line from current location of cursor |
| “+y | copy to clipboard e.g. “+yiw will copy the word in clipboard |
| <F3>y | same as above (use <F3> for clipboard, remapped in .vimrc) |
| <F3>p | paste from clipboard (see above line as well) |
| p | paste after cursor (remapped as ]p in .vimrc ) |
| ]p | paste with indentation |
| P | paste before cursor |
| ctrl-P | paste from clipboard (remapped in .vimrc) |
| shift insert | paste from clipboard (remapped in .vimrc) |
| d<command> | delete<command> |
| diw | delete word (and stay at normal mode) |
| ciw | delete word (and go to insert mode) |
| dw or cw | delete word after the cursor |
| dd or cc | delete line |
| D or C | delete till end of line |
| x | delete character (delete) |
| X | delete character (backspace) |
| . | repeat previous operation |
1.5. Paste in search or colon commands
- Following commands can be used at command mode during search or color commands e.g. :w ctrl r ctrl w etc.
| Commands | Descriptions |
|---|---|
| ctrl r “ | paste the last copied data |
| ctrl r ctrl w | paste the word under cursor |
| ctrl r % | print the naem of current file |
| shift insert | paste the data from clipboard |
1.6. Search
| Commands | Descriptions |
|---|---|
| / | forward then use n/N for next/previous match |
| ? | backward |
| * (asterisk) | word under cursor forward (exact match) |
| g* | word under the cursor (partial match) |
| # | word under cursor backward (exact match) |
| g# | word under cursor backward (partial match) |
| /<word1> | search for exact match for “word1” |
| :set ignorecase | use this option for avoiding case-matches |
| :set noignorecase | use this option for case-matches |
1.7. Replace
- Use ‘c’, ‘g’, ‘gc’ and other combination to perform the desired replacement.
| Commands | Descriptions |
|---|---|
| :s /word1/word2 | substitute word1 with word2 in current line (only first occurrence) |
| :s /word1/word2/c | substitute word1 with word2 in current line after confirmation (only first occurrence) |
| :s /word1/word2/g | substitute word1 with word2 in current line (all occurrence) |
| :s /word1/word2/gc | substitute word1 with word2 in current line ater confirmation (all occurrence) |
| :1,4 s /word1/word2 | substitute word1 with word2 in lines 1 to 4 (only first occurrence in each line) |
| :%s /word1/word2/g | replace all occurrences |
| :%s /word1/word2/gc | replace all occurrence after confirmation |
| :%s /ctrl-r ctrl-w/word2/gc | replace all occurance of the word under cursor after confirmation (exact match) |
| :s /<word1>/word2 | substitute exactly matched “word1” with word2 in current line |
1.8. Indentation
| Commands | Descriptions |
|---|---|
| >> | Right indent the current line |
| 5>> | Right indent 5 lines |
| << | De-indent line |
| 5== | Re-indent 5 lines |
| >% | Increase indent of a braced or bracketed block (place cursor on brace first) |
| =% | Reindent a braced or bracketed block (cursor on brace) |
| <% | Decrease indent of a braced or bracketed block (cursor on brace) |
| ]p | Paste text, aligning indentation with surroundings |
| =i{ | Re-indent the ‘inner block’, i.e. the contents of the block |
| =a{ | Re-indent ‘a block’, i.e. block and containing braces |
| >i{ | Increase inner block indent |
| <i{ | Decrease inner block indent |
| Commands | Descriptions |
|---|---|
| :retab | convert existing tabs to spaces |
1.9. Mouse settings
| Commands | Descriptions |
|---|---|
| :behave mswin | mouse functionality will work as windows |
| :behave xterm | mouse functionality will word as x-windows |
1.10. Command/Visual Mode
| Commands | Descriptions |
|---|---|
| Esc or crtl-[ | command mode |
| v | visual mode |
| crtl-v | visual block mode |
1.11. Cursor movement
Note
To run the ‘ctrl-]’ and ‘ctrl-T’ command, we need to create the tags first. In the below command, the ‘tags’ will be created for all the python files in the directory, which will be stored in a file ‘tags’,
(run the following command in shell)
ctags -R *.py
| Commands | Descriptions |
|---|---|
| h | left |
| j | down |
| k | up |
| l | down |
| w | forward to the beginning of next word |
| 3w | forward 3 words |
| W | forward to the beginning of next word (only spaces are the end of word) |
| b | backward to the beginning of next word |
| B | backward to the beginning of next word (only spaces are the end of word) |
| e | forward to end of next word |
| E | forward to end of next word (only spaces are the end of the word) |
| gg | go to first line of page |
| G | go to end line of page |
| 10G | go to 10th line |
| 10gg | go to 10th line |
| 0 | go to first character of line |
| $ | go to end character of line |
| ^ | go to first non-black character of line |
| M | go to middle of the screen |
| fa | go to next a in current line |
| Fa | go to previous a in current line |
| ta | go to end of next a in current line |
| Ta | to to end of previous a in current line |
| ctrl-o | go to previous location e.g. we went to line 10 from line 18, ctrl-o will go to line 18 again |
| ctrl-i or Tab | go to next location i.e. go to line 10 again from line 18. |
| gd | go to the local declaration of the word under cursor |
| gD | go to the global declaration of the word under cursor |
| g* | search for the word under the cursor |
| g# | same as g* but in backward direction. |
| gf | go to the filename under the cursor, use ctrl-o to go back |
| ctrl-] | go to tag definition (a tag can be a function or variable name etc.); use ctrl-o to go back |
| ctrl-T | go back to previous loation from where ctrl-] was exectued |
1.12. Screen movements
| Commands | Descriptions |
|---|---|
| ctrl-d | move half screen down |
| ctrl-f | page down |
| ctrl-e | move one line down |
| ctrl-u | move half screen up |
| ctrl-b | page up |
| ctrl-y | move one line up |
| z<Enter> | move current line to the top of screen (with cursor at the beginning) |
| zt | move current line to the top with without changing the location of cursor |
|
|
move current line to the center of screen (with cursor at the beginning) |
| zz | move current line to the center of screen (without moving cursor) |
| z- | move current line to the center of screen (with cursor at the beginning) |
| zb | move current line to the center of screen (without moving cursor) |
1.13. Unix Shell
| Commands | Descriptions |
|---|---|
| :shell | go to unix shell |
| exit | type exit in unix shell to come back in Vim |
1.14. Registers
| Commands | Descriptions |
|---|---|
| “ayy | copy line in register ‘a’ |
| “ap | paste content of register ‘a’ |
| Capital letters append the new value to previously stored values | |
| “Ayy | copy line and append to previous value in register “a” Then use “a to paste the value in register ‘a’ |
| “=3*2<Enter>p | paste the result i.e. 6 at the current cursor location |
| :registers | display the values in all the registers |
| :registers abc | display the values of registers a, b and c |
1.15. Multiple Files
| Commands | Descriptions |
|---|---|
| :arg grep -l ‘import’ *.py | open all files in current folder which contains word ‘import’ |
1.16. Mark
| Commands | Descriptions |
|---|---|
| ma | mark the line with name ‘a’ (use a-z or 0-9) |
| Next go to some other line and excute following command | |
| d’a | delete till line which is marked as ‘a’ |
| :marks | show the list of marks |
| ‘a | go to mark a |
1.17. Sorting
| Commands | Descriptions |
|---|---|
| !10G (press enter) sort (press enter) | it will sort first ten lines according to name |
| !G (press enter) sort (press enter) | it will sort all the lines according to names |
| !!ls | go to terminal, run ls command and print the output on the file (i.e. print list of file in current directory) |
| !!dates | go to terminal, run date command and print the output on the file |
1.18. Printing the code
| Commands | Descriptions |
|---|---|
| :hardcopy <filename.pdf> | open the printing-instructions-window |
| :TOhtml and then save the file | Save in html format, use :colorscheme default for white background |
1.19. Mapping
- Please read the comments in .vimrc file for more commands and details
- comment/uncomment the command using double quote as per requirement.
| Commands | Descriptions |
|---|---|
| :map | display the key-mappings, |
1.19.1. Copy/paste from clip board
Use <F3> and then normal copy/paste command from clipboard.
| Copy/paste to clip board | |
|---|---|
| <F3> is remapped | nnoremap <F3> “+ |
| <ctrl-P> is remapped | nnoremap <C-P> “+]p (paste with indentation) |
| <F3>yiw or <F3>yy etc. | copy the word or line etc. in clipboard |
| <F3>p | paste the data from clipboard |
1.19.2. Disable arraow keys
Below code can be used in .vimrc file
| “Key mappings : disable arrow keys |
|---|
| no <left> <Nop> |
| no <down> <Nop> |
| no <up> <Nop> |
| no <right> <Nop> |
| ino <down> <Nop> |
| ino <left> <Nop> |
| ino <right> <Nop> |
| ino <up> <Nop> |
1.19.3. Code execution
| “python commands |
|---|
| ” Execute : F9 (Below code is used in .vimrc file) |
| :autocmd FileType python :nmap <F9> :! clear <CR> :! python % <Enter> |
| “C/C++ commands |
|---|
| “Compile : F9 (Below code is used in .vimrc file) |
| :autocmd FileType c,cpp :nmap <F9> :! rm -r out <CR> :! clear <CR> :! g++ % -o out <Enter> |
| “Run : Ctrl+F9 (Below code is used in .vimrc file) |
| :autocmd FileType c,cpp :nmap <C-F9> :! clear <CR> :! ./out <CR> |
1.20. Buffer
| Commands | Descriptions |
|---|---|
| :bn | go to next buffer i.e. file |
| :b <filename> | go to buffer with <filename> |
| :bd | close current file without exiting vim |
| :bd! | close current file without exiting vim and ‘no modification’ |
1.21. Split windows
| Commands | Descriptions |
|---|---|
| :split | split window in two part and display current file in both window |
| :split <filename> | open <filename> in split window |
| :5 split <filename> | open <filename> in new split window with width of 5 line |
| :new | split window in two part with second window as blank |
| crtl-w j | go to below split window |
| crtl-w k | go to above split window |
| crtl-ww, crtl-w w | go to next split window |
| crtl-w + | increase the width of split window by one line |
| 5 crtl-w — | decrease the width of split window by 5 line |
| crtl-w = | make all split window of equal size |
| crtl-w _ | maximize the current split window |
1.22. Auto completion
| Commands | Descriptions |
|---|---|
| ctrl-p,ctrl-n | auto complete by looking previous/next words (use ctrl-p or ctrl-n to change the words from list) |
1.23. Text files
| Commands | Descriptions |
|---|---|
| :set textwidth=50 | change the line after 50 character |
| :1,5 center 50 | textwidth = 50 and center the lines 1 to 5 |
| :1,5 right 50 | textwidth = 50 and right justify the text on lines 1 to 5 |
| :1,5 left 4 | left margin = 4 for lines 1 to 5 |
| Use $ for end of the line as shown below, | |
| :1,$ center 50 | textwidth=50 and cneter all the line |
| or use % sign for the file (results is same as above, | |
| :% center 50 | |
| :set wrap | turn the wrap words on |
| :set nowrap | turn off the wrap words |
1.24. Macros
| Commands | Descriptions |
|---|---|
| qa | start recording and store in reg ‘a’. Then perform certain operations. press ‘q’ again to stop recording. |
| @a | execute macro |
| 3@a | repeat macro 3 times |
1.25. More commands
| Commands | Descriptions |
|---|---|
| ctrl + g | name of current file |
| ctrl + u | move half screen up |
| ctrl + d | move half screen down |
| J | join line below with current line |
| 3J | join below two line with this line (not 3) |
| z= | spell suggestion |
| ~ | change case of letter |
| :digraphs | to see the list of symbols e.g. copyright etc. |
1.26. Block Visual Mode
Add same items in the beginning/end/middle of all the lines
| Commands | Descriptions |
|---|---|
| crtl-v | select the block with cursor movement |
| press I (insert before) or A (insert after) or c (replace) |
type the text -> press Esc -> block will be replaces by text |
1.27. Zoom Screen
| Commands | Descriptions |
|---|---|
| Zoom in | crtl-+ |
| Zoom out | ctrl– |
1.28. Save session
| Commands | Descriptions |
|---|---|
| :mksession name.vim | save session |
| :mksession! name.vim | override session |
| :source name.vim | load session |
1.29. Folding
Use space (remapped in .vimrc) at the line below the function definition for folding/unfolding the code.
1.30. Plugins
First install ‘vundle’ using following command. Use ‘git-shell’ to run this command in Windows.
- git clone https://github.com/VundleVim/Vundle.vim.git ~/.vim/bundle/Vundle.vim
- After that copy and paste the .vimrc file in the home directory (in Windows paste in the director C:/Users/<Username>/)
- Use double quote to comment/uncomment” the packages in .vimrc file e.g. ” Plugin ‘mattn/emmet-vim’ will not install the package “emmet-vim”. Or add some more packages in .vimrc file as required.
- After selecting the packages, open vim and run the command -> :PluginInstall and it will install the all the plugins.
- Use :help <plugin name> to see the list of operations.
1.30.1. NERDTree
| Commands | Descriptions |
|---|---|
| NERDTree | turn on the directory structure |
| NERDTree! | disable the directory structure |
| m | then use various operations for delete, and create files. |
| e.g | |
| m-a meher | create a file with name meher |
| m-a meher/ | create a folder with name meher |
1.30.2. Surround
| Commands | Descriptions | Results |
|---|---|---|
| ysiw” | add “” to the word | Meher -> “Meher” |
| ds” | delete surround quotes | “Meher” -> Meher |
| cs[( or cs]) | change surround [] by () | [2+3]/2 -> (2+3)/2 |
| cst<h1> | change <p> tag to <h1> | <p>Meher Krishna</p> -> <h1>Meher Krishna</h1> |
1.30.4. vim-table-mode
Follow the below steps to create the ‘rst-table’ in Vim,
- Enable/Disable table mode using ‘:TableModeEnable/TableModeDisable’ or using ‘:TableModeToggle’,
- Type column-names e.g. |Col1 | Col2| and press enter
- Then press | twice to create the table. Do the same to add more lines in the table.
- Also, go above the |Col1 | Col2| and press | twice (required for correct rst-table-format)
1.30.5. vim-extline
This is used to underline the text, which is required for making Headings in .rst document.
- Type the symbols (in insert mode) e.g. = and then press ctrl-l ctrl-l to complete it.
- Or press ctrl-l and then press the symbol,
- Or press ctrl-l and then press a number e.g. 1, 2 etc. This is autocomplete the underline base on heading levels.
- Some more commands are listed below,
| Commands | Descriptions |
|---|---|
| ctrl-l ctrl-l | Auto-line update |
| ctrl-l ctrl-h | Horizontal line update |
| ctrl-l ctrl-u | Change to underlined title |
| ctrl-l ctrl-o | Change to overlined title |
| ctrl-l ctrl-i | Change to underlined and overlined title |
| ctrl-l = or = ctrl-l | Force Section heading (with = as underline) |
| ctrl-l 2 | Force Section heading (level 2) |
1.30.6. ConqureShell
Use :ConqueTermSplit to start the terminal in the Vim.
1.30.7. Airline
Airline theme plugin for better view e.g. display name of file, line number, column number etc.
I know that * selects the word under the cursor, but what if I want to actually select a WORD ?
Just to be clear, I would then like to use the selection for a replace, something like :%s//foo/g
asked Jun 18, 2020 at 8:36
![]()
I would then like to use the selection for a replace, something like :%s//foo/g
:%s/^R^A/foo/g
See :h c_CTRL-R_CTRL-A
answered Jun 18, 2020 at 9:19
![]()
MattMatt
19.3k1 gold badge9 silver badges24 bronze badges
1
You are looking for the help topic :h <cWORD>. When you combine it with :h expand() it allows you to get the WORD under your cursor. You can try this command to understand how it works:
:echo expand('<cWORD>')
Now if you want to have for example <leader>* to work as * but with WORDs you could use the following mapping which will use expand('<cWORD>') as the current search pattern:
nnoremap <leader>* :execute '/' . expand('<cWORD>')<CR>
If you want to use that directly in a substitution you could do something like this:
execute 's/' . expand('<cWORD>') . '/foo/g'
See :h execute() if you are not familiar with this way of building commands.
answered Jun 18, 2020 at 8:45
![]()
statoxstatox
48.2k19 gold badges134 silver badges215 bronze badges
Another approach is to map your * key in visual mode to make it search for the selection:
" search visual selection
vnoremap * y/V<C-R>=escape(@",'/')<CR><CR>
Then, you can do viW* to effectively search the WORD under the cursor.
Also, you could use a map to quickly start replacing the current selection:
nnoremap gr :s/<c-r>///g<left><left>
answered Jun 18, 2020 at 11:37
![]()
BiggybiBiggybi
2,6498 silver badges27 bronze badges
In this guide, we have presented all basic commands that you will need to use VIM editor for doing all tasks efficiently. You will learn how to search for a word, how to replace the word, select, copy, paste, using various special features of VIM and much more. Vim is an editor to create or edit a text file. There are two modes in vim:
- Command mode
- Insert mode
- In the command mode, user can move around the file, delete text, etc.
- In the insert mode, user can insert text.
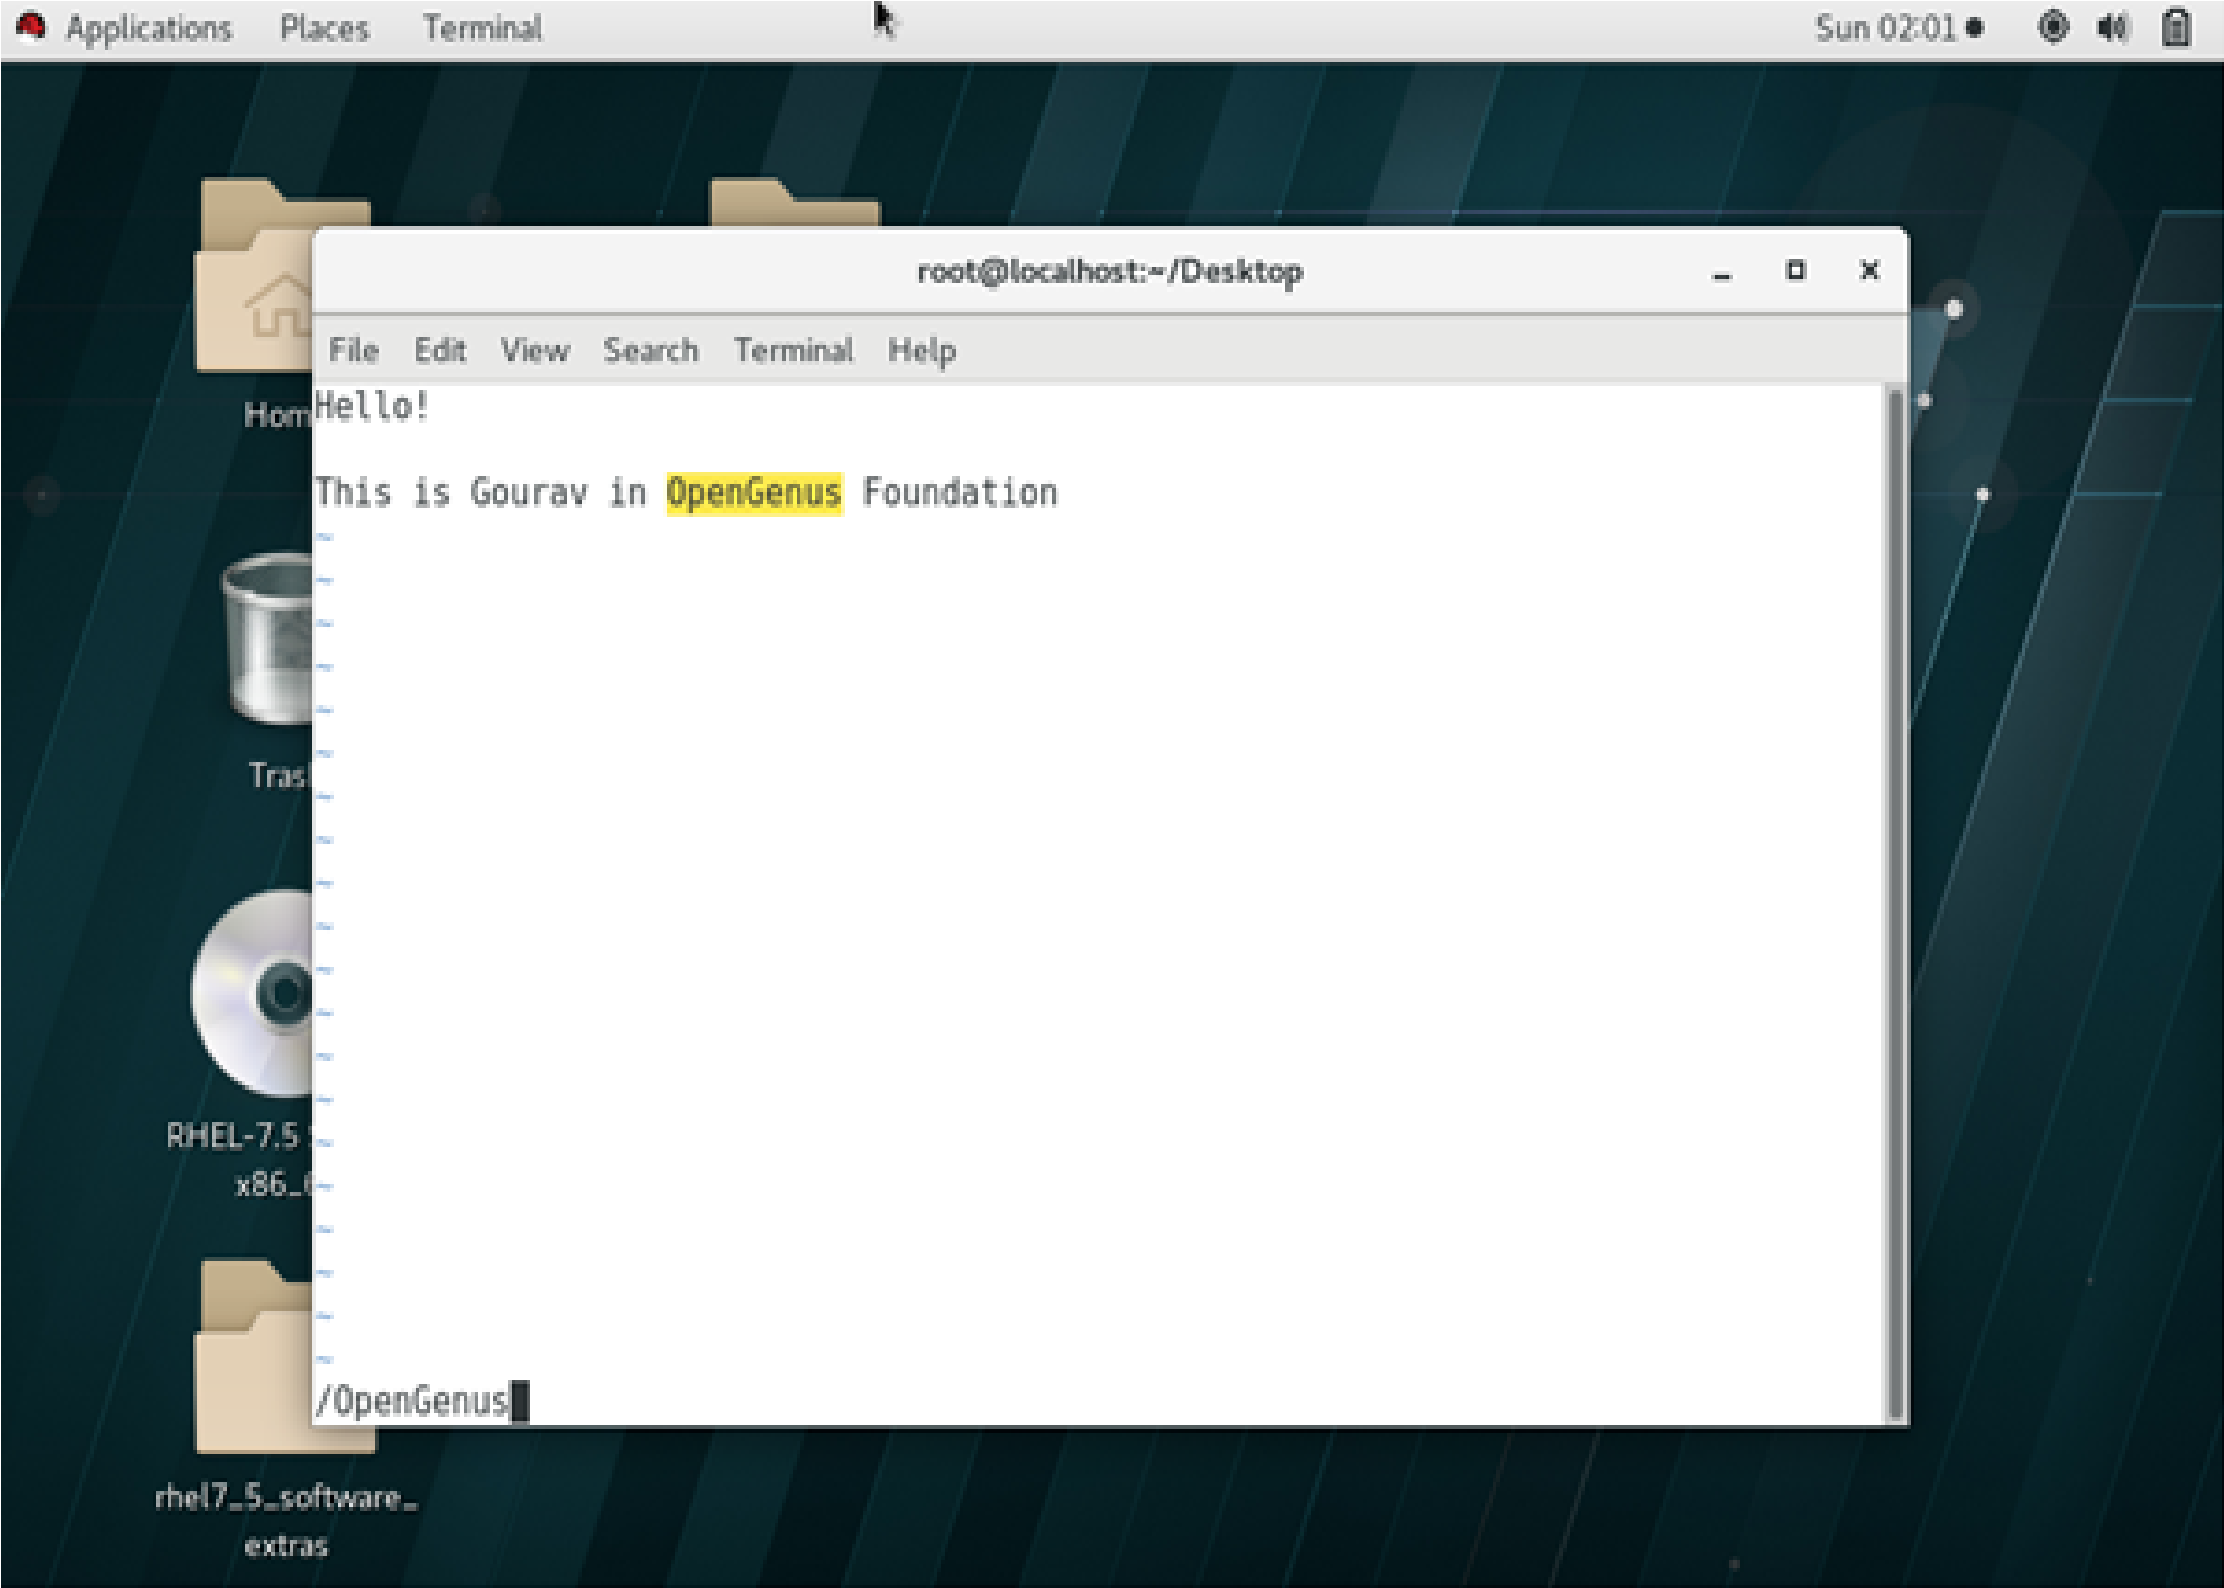
To create a new file named «opengenus.txt», use the following command:
vim opengenus.txt
This will create the file and open the file in VIM editor where you can add text.
If there is an existing file with the same name, the existing file will be opened in the VIM editor.
Changing mode from one to another
From command mode to insert mode, press anyone of the following keys: a/A/i/I/o/O ( see details below)
From insert mode to command mode, press Esc (escape key)
Some useful commands for VIM
a Append text following current cursor position
A Append text to the end of current line
i Insert text before the current cursor position
I Insert text at the beginning of the cursor line
o Open up a new line following the current line and add text there
O Open up a new line in front of the current line and add text there
The following commands are used only in the commands mode.
h Moves the cursor one character to the left
l Moves the cursor one character to the right
k Moves the cursor up one line
j Moves the cursor down one line
^F (CTRl F) Forward screenful
^B Backward screenful
^f One page forward
^b One page backward
^U Up half screenful
^D Down half screenful
$ Move cursor to the end of current line
0 (zero) Move cursor to the beginning of current line
w Forward one word
b Backward one word
Exit Commands
To exit from VIM editor, use the following commands after entering the ESCAPE mode:
:wq Write file to disk and quit the editor
:q! Quit (no warning)
:q Quit (a warning is printed if a modified file has not been saved)
ZZ Save workspace and quit the editor (same as :wq)
Text Deletion Commands
Use these commands in ESCAPE mode:
To use these commands, you need to press the keys (for example for command dw, first press d key, then press w key):
x Delete character
dw Delete word from cursor on
db Delete word backward
dd Delete line
d$ Delete to end of line
d^ (d caret, not CTRL d) Delete to beginning of line
File Manipulation Commands
:w Write workspace to original file
:e file Start editing a new file
:r file Read contents of a file to the workspace
Go to end of the file
Esc + Ctrl + End – Jump end of file
Esc + Ctrl + Home : Jump start of file
Press Esc + gg : Go to top the file
Esc + G : Go to bottom of the file
Esc + G + A : Go to bottom of the file and in append text mode.
Searching Methods
To search forward, use the command:
/word
- Press Esc to make sure Vim/Vi is in normal mode.
- Type the command:
/OpenGenus
Searching Backward For a Word
?word
-
Press Esc to make sure Vim/Vi is in normal mode.
-
Type the command:
/Foundation
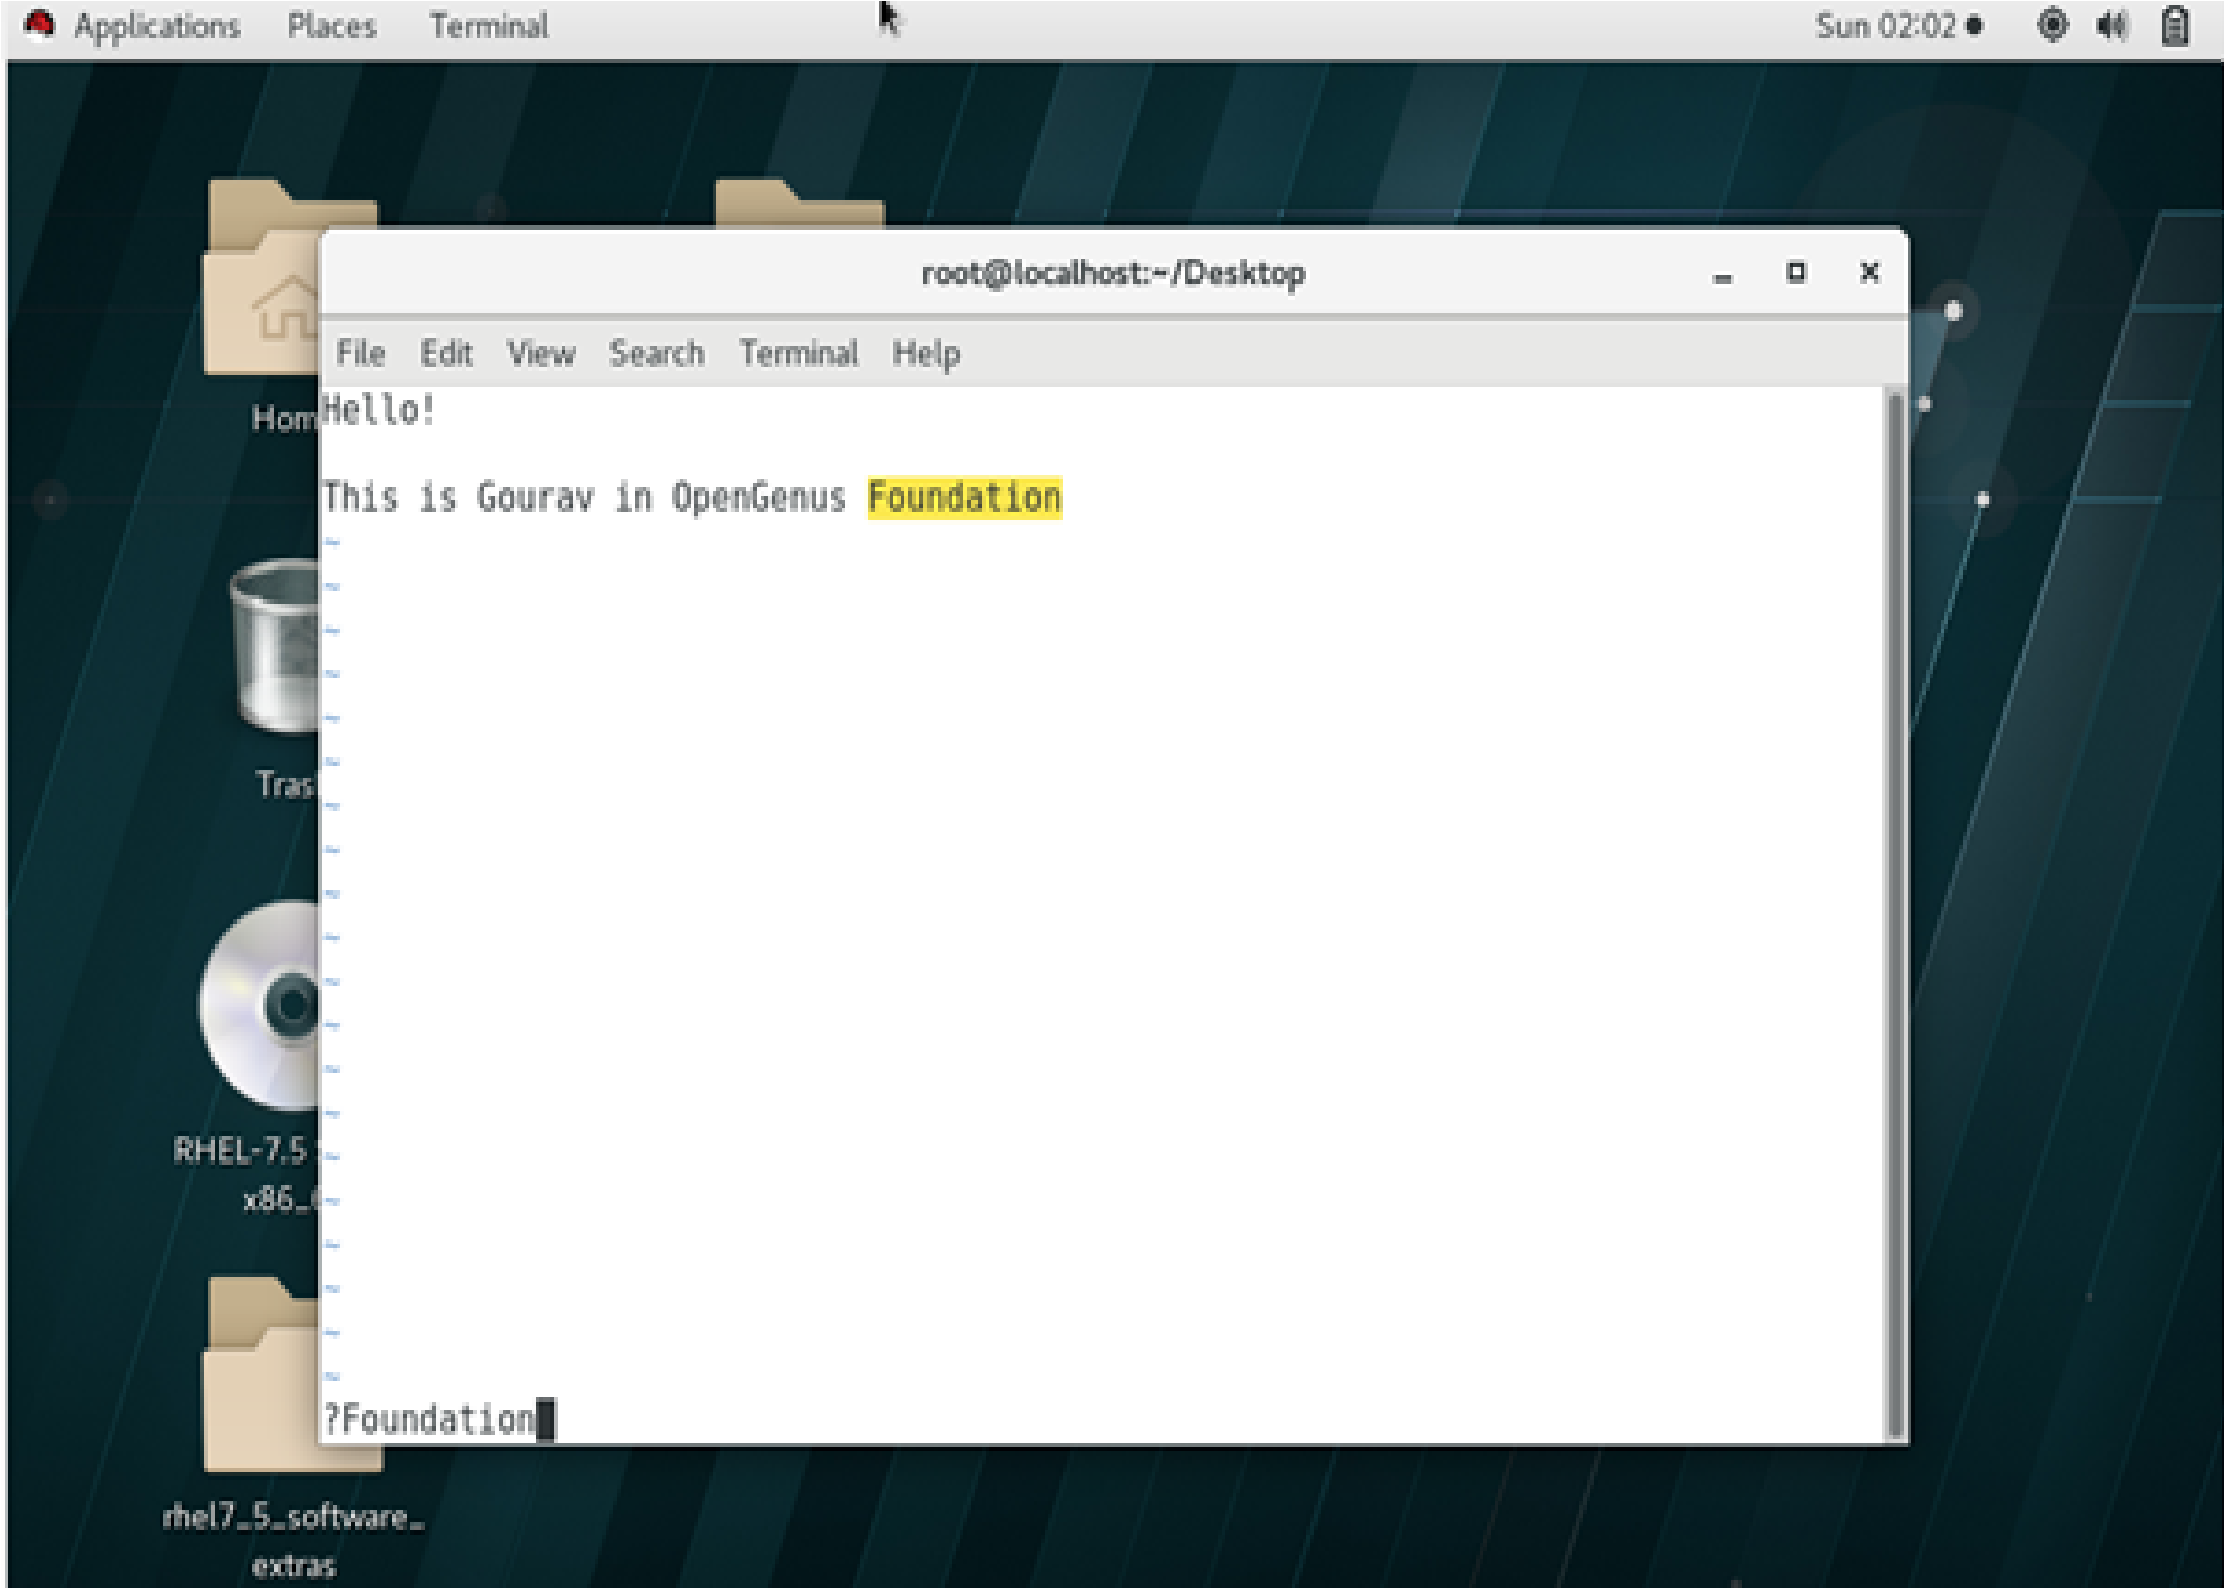
search and replace
:s/Search_Word/Replace_Word/g
Find each occurrence of ‘Search_Word’ (in the current line only), and replace it with ‘Replace_Word’.
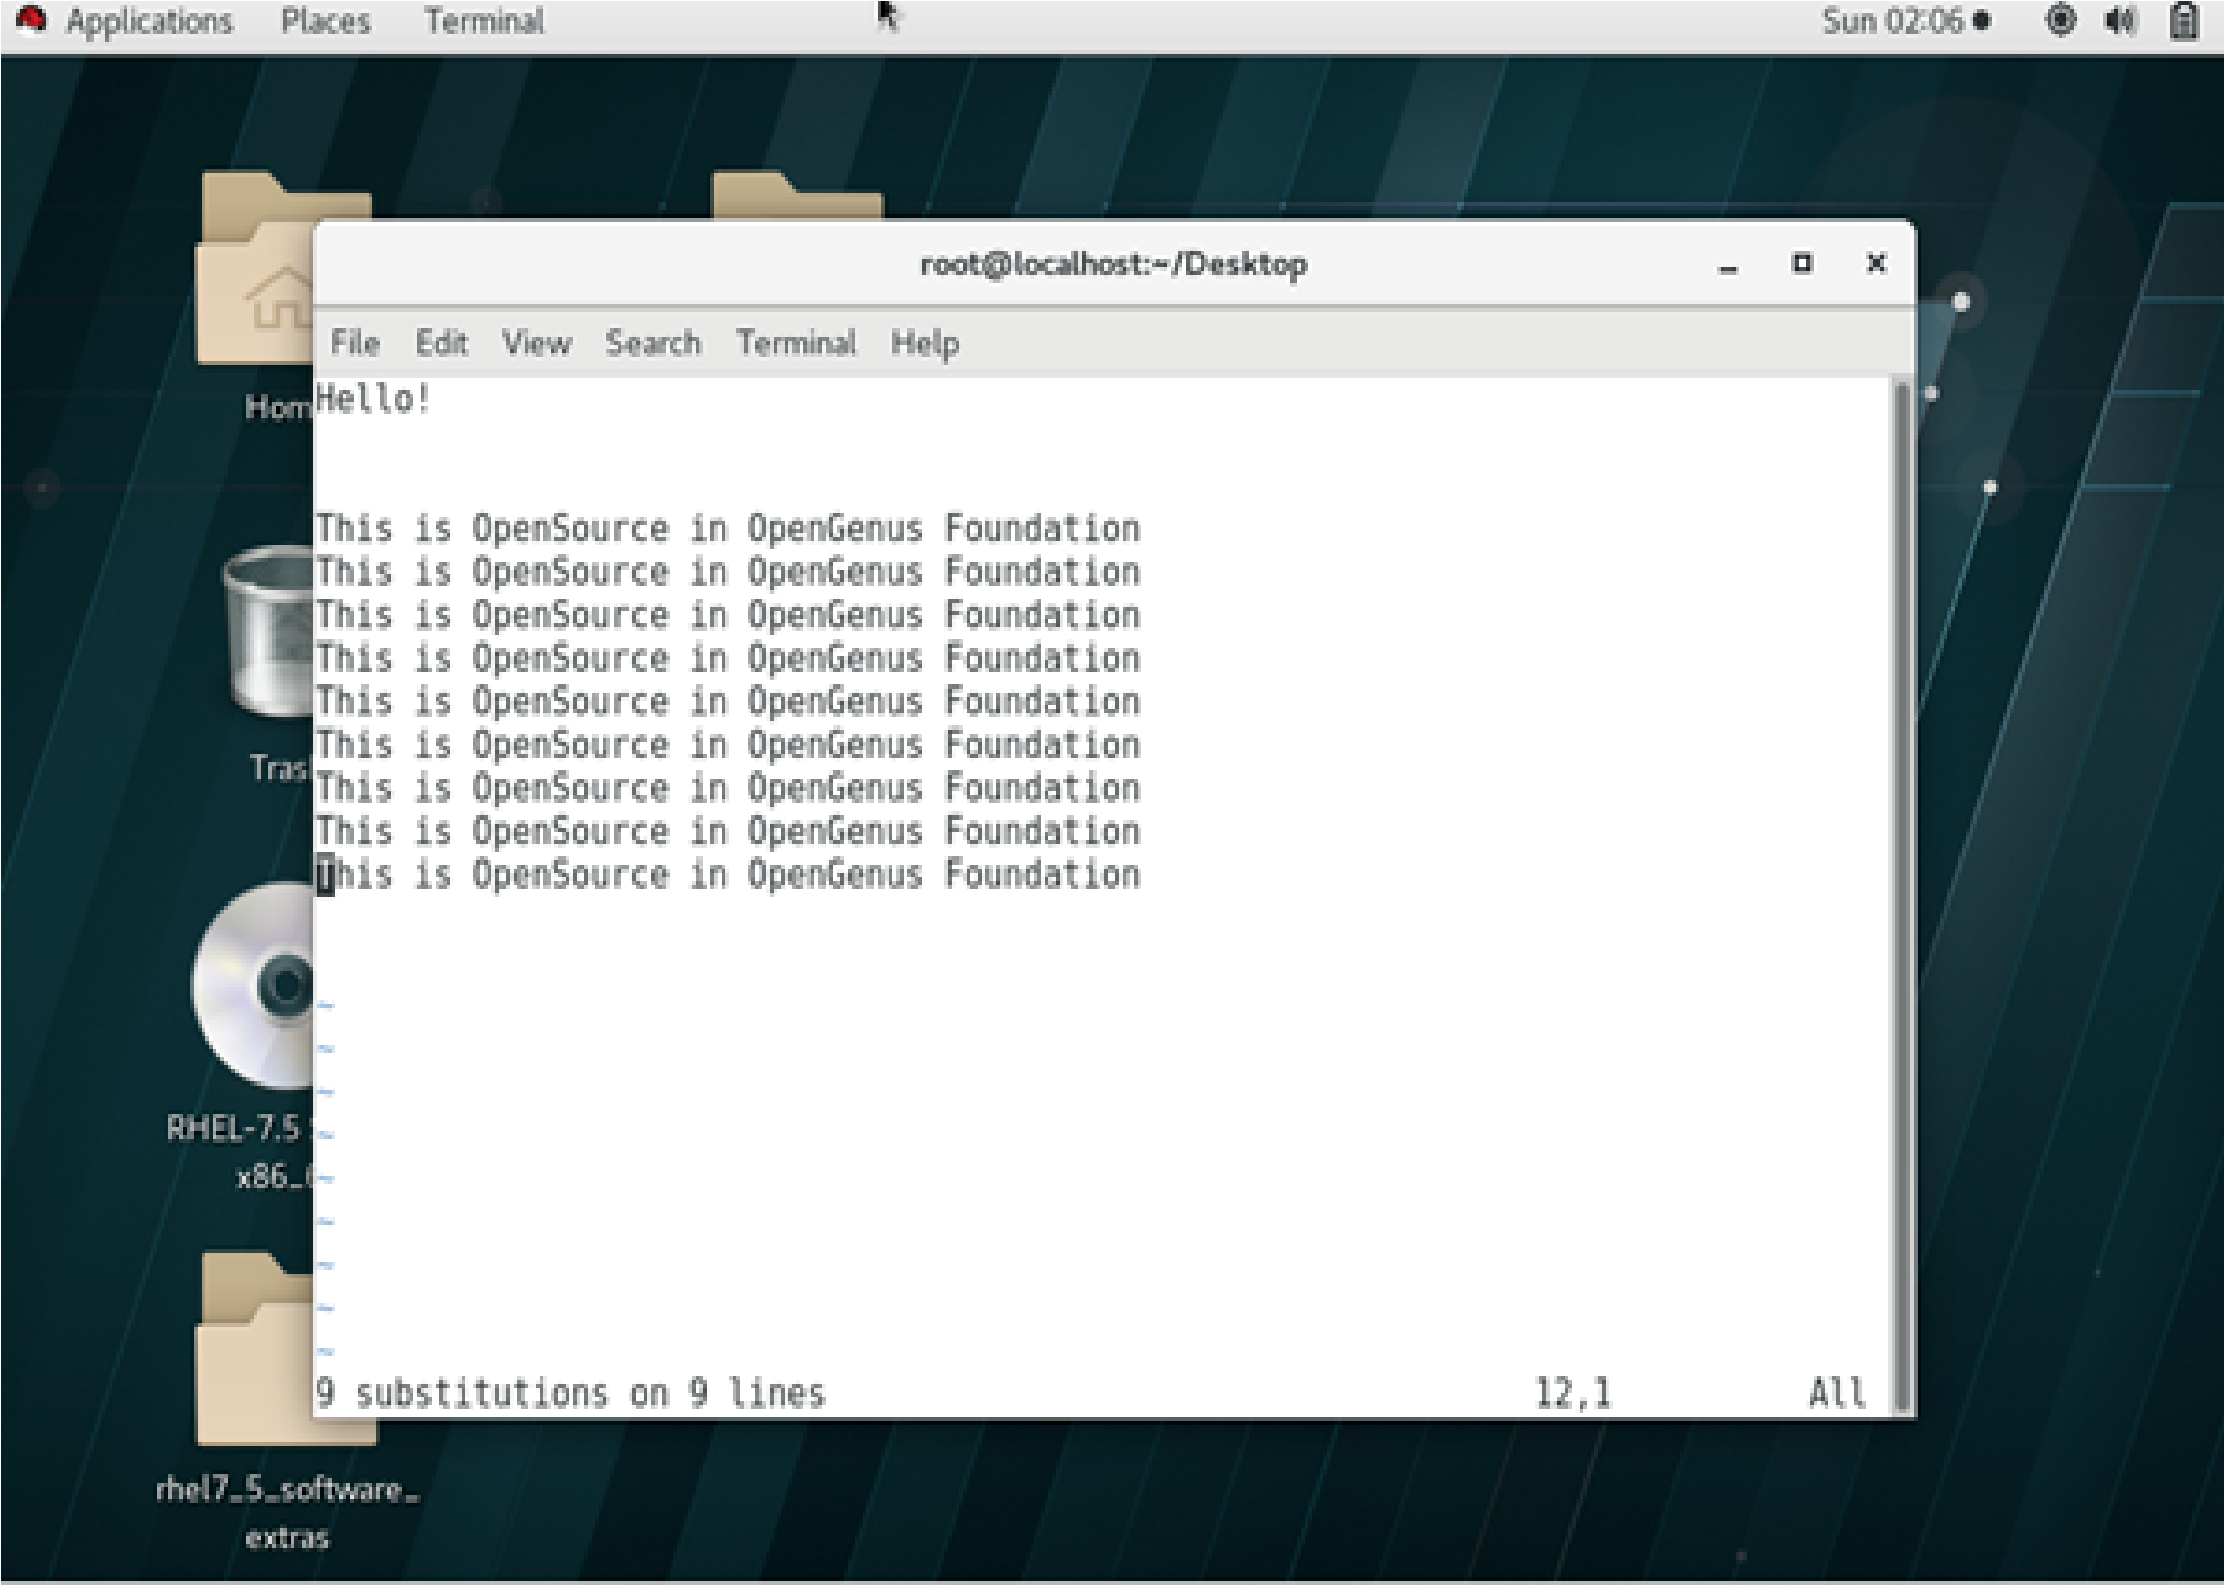
:%s/Search_Word/Replace_Word/g
Find each occurrence of ‘Search_Word’ (in all lines), and replace it with ‘Replace_Word’.
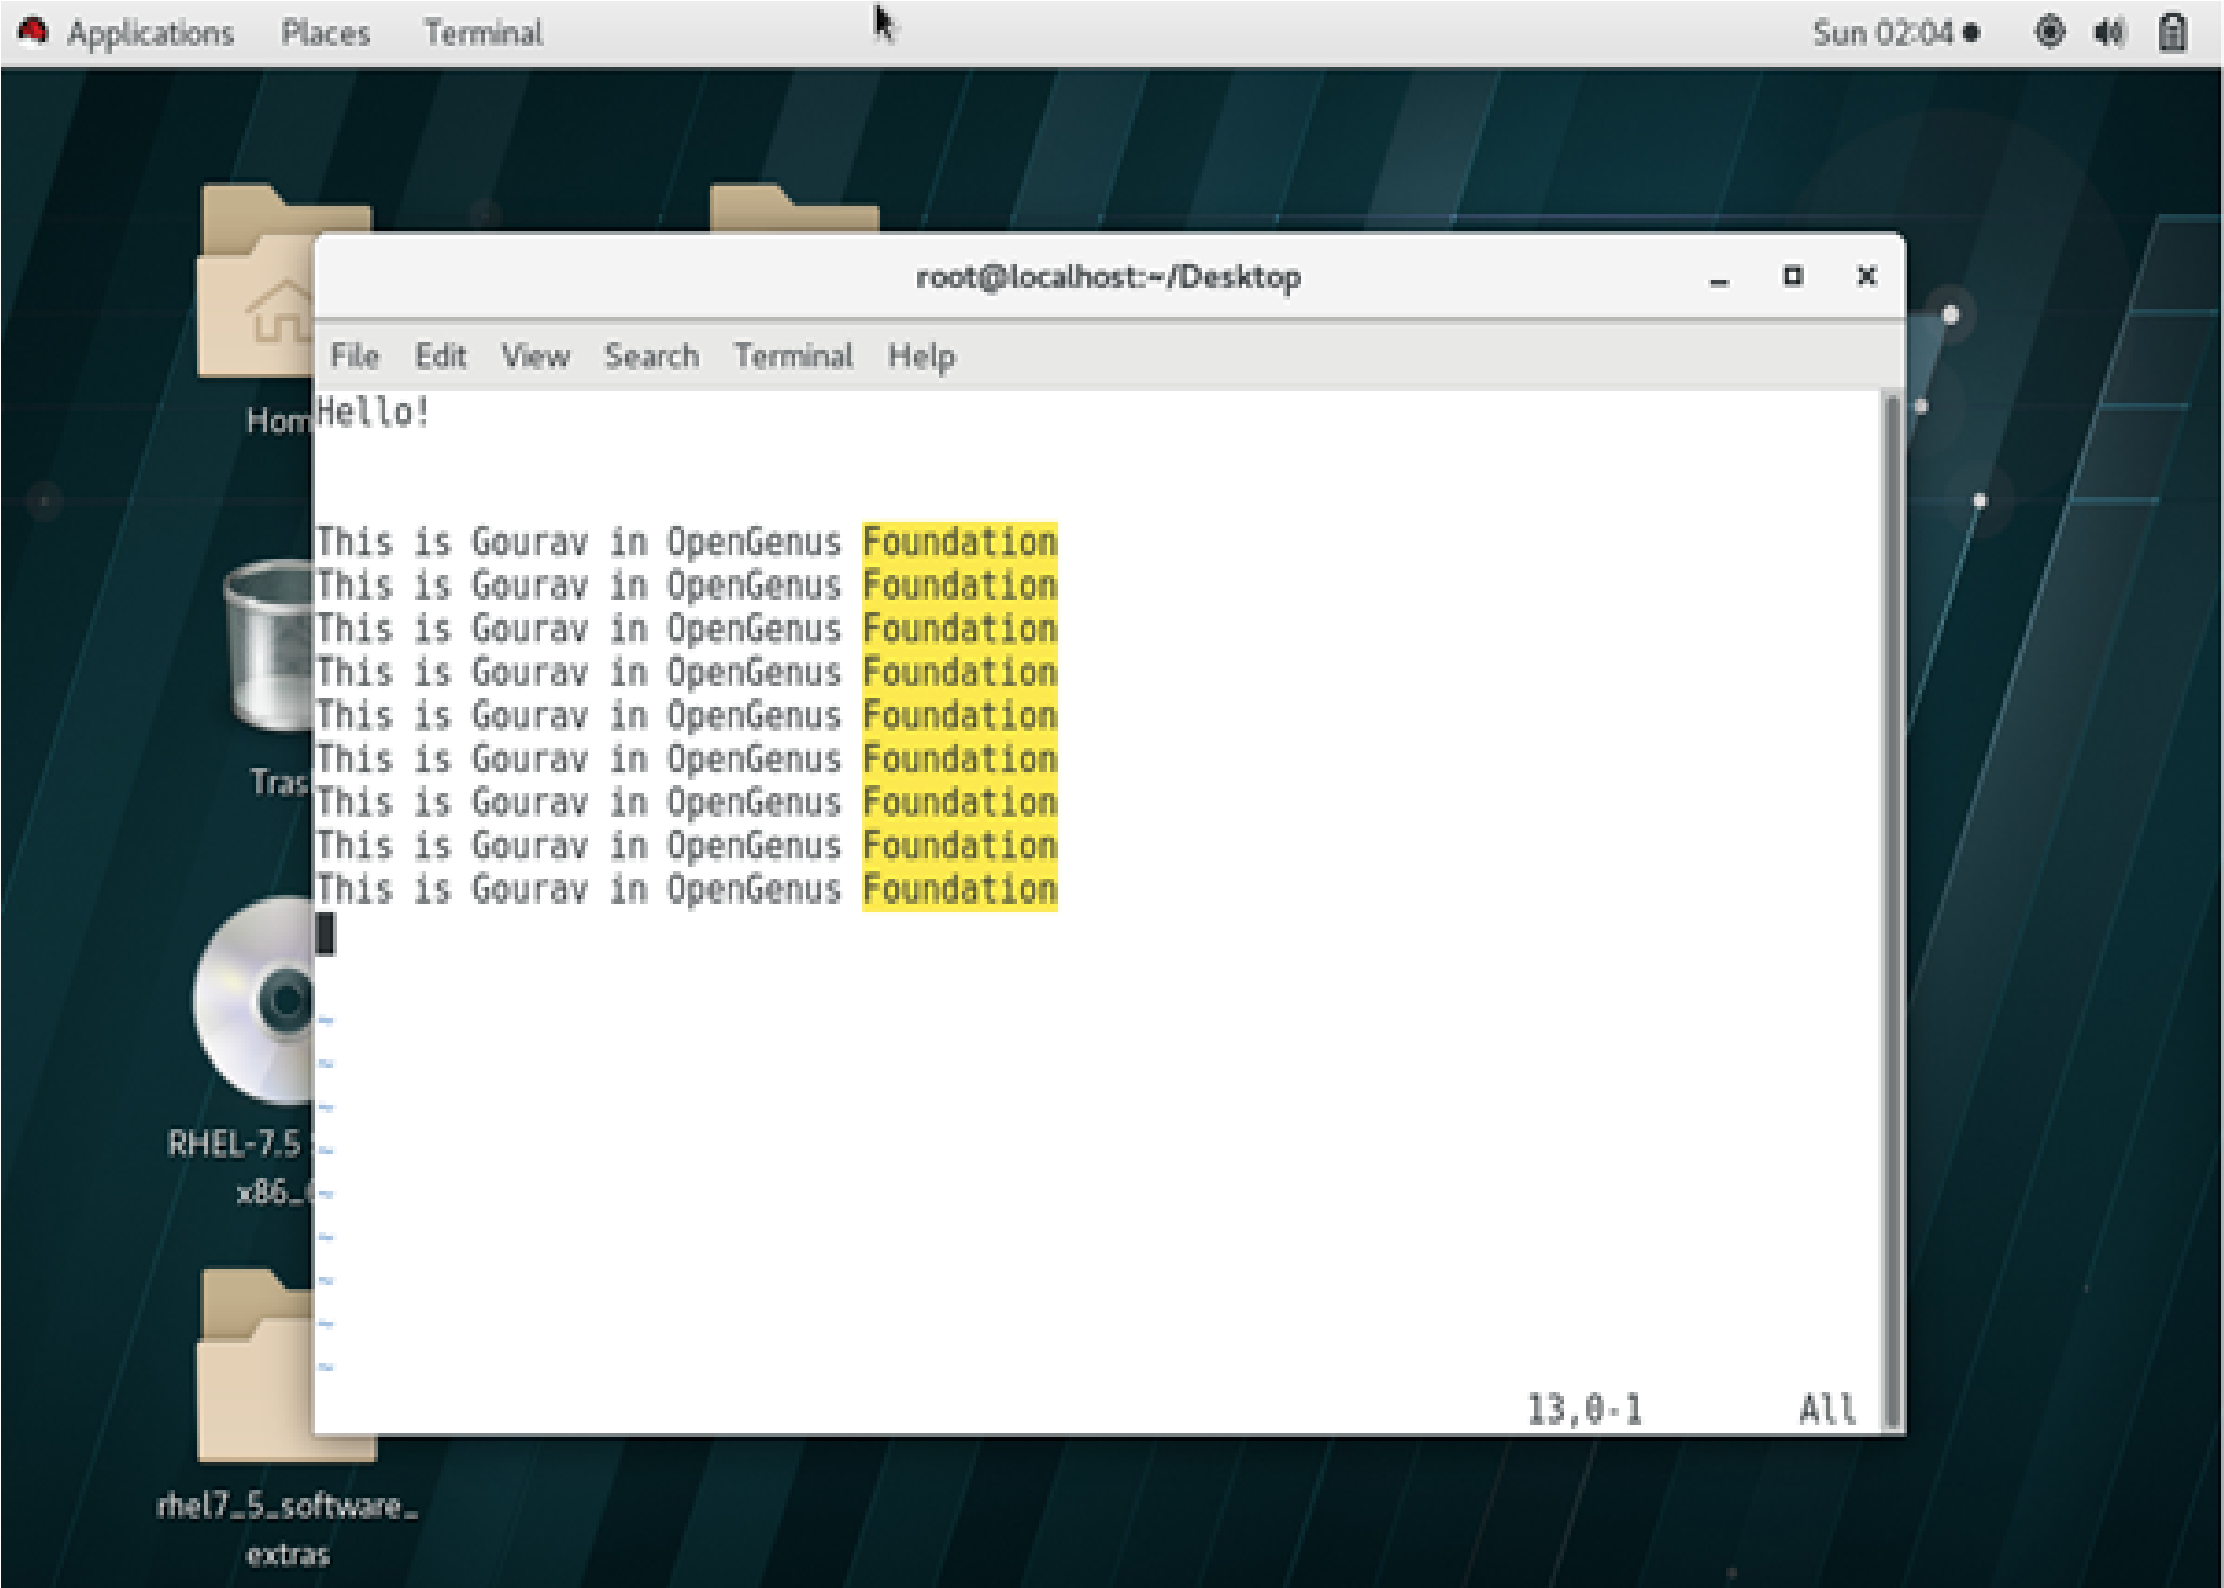
:%s/Search_Word/Replace_Word/gc
Change each ‘Search_Word’ to ‘Replace_Word’, but ask for confirmation first.
select text, copy and paste
—> Position the cursor at the beginning of the text you want to cut/copy.
—> Press v to begin character-based visual selection, or V to select whole lines, or Ctrl-v or Ctrl-q to select a block.
—> Move the cursor to the end of the text to be cut/copied. While selecting text, you can perform searches and other advanced movement.
—> Press d (delete) to cut, or y (yank) to copy.
—> Move the cursor to the desired paste location.
—> Press p to paste after the cursor, or P to paste before.
Difference b/w Vi and Vim
——> Editor Interface VIM vs VI
Both the editors are similar in their appearance.
——> Modes in VIM vs VI
Both the editors are mode based, that is you need to enter INSERT mode to edit and COMMAND mode to perform actions like saving and undo.
The three modes are as follows:
Normal (Default): For navigation
Insert: For inserting and modifying text
Command: For Operations like saving, exiting, etc.
Insert mode allows you to make changes to your content.
The command mode is for specifying commands to exit, save your work, and perform other operations.
To enter command-line mode hit the “Escape” key and then type in the colon ‘:’. To enter insert mode, hit the “Escape” key and type in ‘i’. To enter Normal mode press Escape.
Navigating within the editor interfaces
Searching for text
Both the editors provide the option to search for text in the file.
To search in the file you must be in command line mode. So start by pressing colon (:).
To search for a word use forward slash followed by the word to search followed by enter.
/{word-to-be-searched} [enter]
Improvements in Vim – The differences between VIM vs VI
Vim editor differs from Vi editor since it provides a lot of improvements over the latter. The command to display the points of difference within the Vim editor is:
:help vi_diff
Difference
You can scroll through the list to go over the differences.
Multiple Undo in VIm
Vi editor only offers the option to perform one undo. This can be very limiting in the case of a large text file.
Vim editor on the other hand offers the ability to perform multiple undo.
With this, you must have the complete idea of using VIM editor. Enjoy.