Written by Allen Wyatt (last updated June 1, 2020)
This tip applies to Word 2007, 2010, 2013, and 2016
Have you ever worked on a document that included multiple fonts and the printout didn’t quite match what you wanted? Sometimes there was more space between words or sentences than what seemed right, and you didn’t quite know what the problem was?
I have found that the culprit is often my own fault. I may have placed extra spaces between words or sentences in such a manner that the text looks fine on screen, but doesn’t quite fit the bill when finally printed. The solution, of course, is to remove the extra spaces and make sure there are a consistent number of them between both words and sentences. The problem with the solution is that it is often difficult to see how many spaces there really are.
Fortunately, Word allows you to easily see where spaces occur in your documents. All you need to do is follow these steps:
- Display the Word Options dialog box. (In Word 2007 click the Office button and then click Word Options. In Word 2010 and later versions display the File tab of the ribbon and then click Options.)
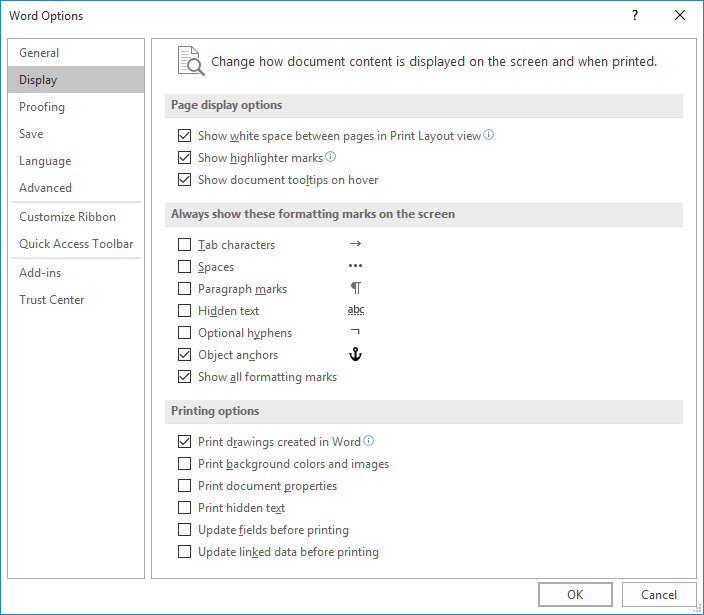
- Click Display at the left side of the dialog box. (See Figure 1.)
- Make sure the Spaces check box is selected.
- Click on OK.
Figure 1. The Display options of the Word Options dialog box.
Now, all your spaces appear as small visible dots. It is very easy to tell where two visible dots appear, as opposed to two invisible spaces. Delete any extra spaces you want, as you would delete any other characters, and you will have your document cleaned up in no time.
WordTips is your source for cost-effective Microsoft Word training.
(Microsoft Word is the most popular word processing software in the world.)
This tip (6827) applies to Microsoft Word 2007, 2010, 2013, and 2016.
Author Bio
With more than 50 non-fiction books and numerous magazine articles to his credit, Allen Wyatt is an internationally recognized author. He is president of Sharon Parq Associates, a computer and publishing services company. Learn more about Allen…
MORE FROM ALLEN
Using GEOMEAN with a Large List
When performing a statistical analysis on a large dataset, you may want to use GEOMEAN to figure out the geometric mean …
Discover More
Calculating an Age On a Given Date
Start putting dates in a worksheet (especially birthdates), and sooner or later you will need to calculate an age based …
Discover More
Merging Many Workbooks
If you need to combine the contents of a bunch of workbooks into a single workbook, the process can get tedious. Here’s a …
Discover More
More WordTips (ribbon)
Selecting a Word
Selecting text is a critical skill to possess when you want to work with a Word document. This tip explains how you can …
Discover More
Preventing the Insertion of Non-Breaking Spaces
When you copy and paste information from the Internet, you may end up with a lot of non-breaking spaces in the pasted …
Discover More
Making Highlighting Disappear when Typing
Select a highlighted word or phrase and start typing, and Word maintains the highlighting on what you enter. If this …
Discover More
Show or Hide White Space in Microsoft Word Documents
by Avantix Learning Team | Updated February 9, 2022
Applies to: Microsoft® Word® 2010, 2013, 2016, 2019 or 365 (Windows)
You can show or hide white space at the top and bottom of pages in Microsoft Word documents. If you hide white space, you won’t be able to see headers, footers or top and bottom margins in Print Layout View. The gray space that typically appears at the top and bottom of pages as you scroll through your document will also disappear. If you want to show or hide spaces between words, you’ll need to click Show/Hide ¶ on the Home tab in the Ribbon.
Print Layout View is the default view in Word. You can click the View tab in the Ribbon and select Print Layout in the Views group to go to this view if necessary.
In Word documents, margins are set for the top and bottom of pages by default and can be changed on the Layout tab in the Ribbon. Headers and footers appear in the top and bottom margin areas (with the exception of floating objects) so if white space is hidden, headers and footers may seem to be missing.
Recommended article: How to Hide Comments in Word (or Display Them)
Do you want to learn more about Microsoft Word? Check out our virtual classroom or live classroom Word courses >
Showing or hiding white space using a shortcut
To show or hide white space in Word using a shortcut:
- Position the cursor at the top of the document (you can press Ctrl + Home to move the cursor to the top of the document).
- Move the pointer into the gray area just above the first page (below the Ruler) until the pointer turns into an up and down arrow. A message appears to Double-click to show white space or Double-click to hide white space.
- Double-click. If you are hiding white space, you can also position the pointer in the gray area between pages and then double-click.
If you show or hide white space, this setting will continue in any new documents you create. When white space is hidden, the setting affects not just the white space between pages but anything that is part of the header or footer (including watermarks and other graphics anchored to the header or footer). When you save and close a document, the setting is retained in the document.
If you hide white space, page breaks are still visible in the document. If you print the document, the headers and footers will print even if white space is hidden.
Showing or hiding white space using the Options dialog box
To show or hide white space using the Word Options dialog box:
- Open a Word document where you want to show or hide white space.
- Click the File tab in the Ribbon.
- Select Options. A dialog box appears.
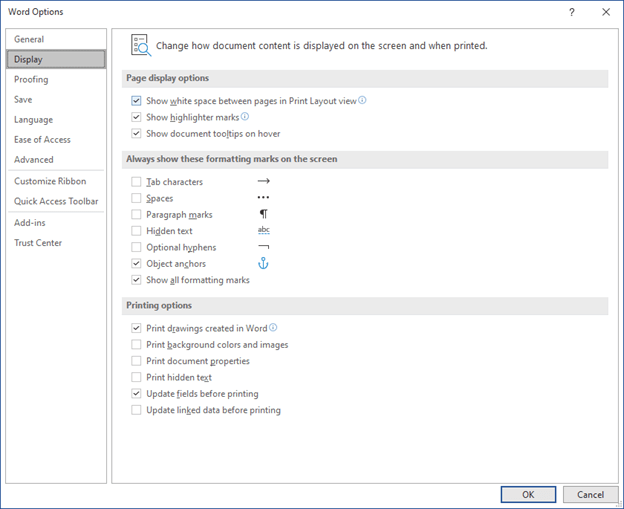
- In the categories on the left, select Display.
- In the pane on the right, check or uncheck Show whitespace between pages in Print Layout view.
- Click OK.
The Options dialog box, with the Display category selected, appears as follows:
Because this feature isn’t obvious, it can cause problems for users if areas in their document seem to be missing (such as headers or footers).
Subscribe to get more articles like this one
Did you find this article helpful? If you would like to receive new articles, join our email list.
More resources
14+ Word Selection Shortcuts to Quickly Select Text
How to Remove Hard Returns in Word Documents
How to Superscipt or Subscript in Word (with Shortcuts)
How to Insert the Not Equal Sign in Word (5 Ways to Type or Insert ≠)
How to Insert or Type the Degree Symbol in Word (5 Ways to Insert °)
Related courses
Microsoft Word: Intermediate / Advanced
Microsoft Excel: Intermediate / Advanced
Microsoft PowerPoint: Intermediate / Advanced
Microsoft Word: Long Documents Master Class
Microsoft Word: Styles, Templates and Tables of Contents
Microsoft Word: Designing Dynamic Word Documents Using Fields
VIEW MORE COURSES >
To request this page in an alternate format, contact us.
Our instructor-led courses are delivered in virtual classroom format or at our downtown Toronto location at 18 King Street East, Suite 1400, Toronto, Ontario, Canada (some in-person classroom courses may also be delivered at an alternate downtown Toronto location). Contact us at info@avantixlearning.ca if you’d like to arrange custom instructor-led virtual classroom or onsite training on a date that’s convenient for you.
Copyright 2023 Avantix® Learning
Microsoft, the Microsoft logo, Microsoft Office and related Microsoft applications and logos are registered trademarks of Microsoft Corporation in Canada, US and other countries. All other trademarks are the property of the registered owners.
Avantix Learning |18 King Street East, Suite 1400, Toronto, Ontario, Canada M5C 1C4 | Contact us at info@avantixlearning.ca
You can use Microsoft Word’s Find and Replace tool to delete extra spaces all at once. Or, you can find extra spaces in Word by customizing your proofing options and then deleting them individually as you type or during a Spelling & Grammar check. These three tasks are explained in this tutorial:
Customize Word’s Proofing Options to Find Extra Spaces
Delete Extra Spaces as You Type
Delete Extra Spaces during a Spelling & Grammar Check
This tutorial is also available as a YouTube video, which you can watch on my YouTube channel or in the video player at the bottom of this page.
The images below are from Word for Microsoft 365. The steps are the same for Word 2021, Word 2019, Word 2016, Word 2013, and Word 2010. However, your interface may look slightly different in those older versions of the software.
1. Select the File tab.
2. Select Options in the Backstage view.
3. Select Proofing in the Word Options dialog box.
4. Ensure that Mark grammar errors as you type and Check grammar with spelling are selected in the spelling and grammar section. (Note that Word for Office 365 no longer includes the “Check grammar with spelling” option and instead includes grammar by default.)
5. Select the Settings button in the spelling and grammar section.
6. Select Spacing in the Grammar section of the Options menu in the Grammar Settings dialog box. (This option flags extra spaces between words, not between sentences.)
7. Select one space in the Space Between Sentences drop-down menu in the Punctuation Conventions section.
8. Select the OK button to close the Grammar Settings dialog box.
9. Select the OK button to close the Word Options dialog box.
Once you have customized your proofing options, Word will flag extra spaces as you type.
Extra spaces between sentences will be marked with a red dotted line. Extra spaces between words will be marked with blue double lines.
1. Right-click on the extra space mark (the red dotted line or blue double lines).
2. Select the correction from the pop-up menu.
Pro Tip: Select See More to open the Editor pane. Or, select Options for “Grammar” or Options for “Punctuation Conventions” to reopen the Grammar Settings dialog box.
Note that the Spelling & Grammar check won’t find extra spaces until you customize your proofing options.
1. Select the Review tab.
2. Select Spelling & Grammar in the Proofing group.
3. Select each spacing correction in the Suggestions section of the Editor pane.
Pro Tip: If Word finds an extra space that you want to keep, select Ignore Once at the bottom of the Editor pane.
Further Reading: How to Find and Replace Formatting in Microsoft Word
Updated November 09, 2021

To fit more content on the screen, you can hide the white space on and between pages, such as top and bottom margins with all information on them. Thus, the pages will not display in the usual way. After a page break or between objects, any white space, headers, and footers will be hidden.
Note: Be careful! Any object in the header or footer, including watermarks, text boxes, and other graphics anchored to the header or footer, will also be hidden with the margins. Therefore, some important information in your document may disappear!
To display or hide the white space between pages, do one of the following:
- On the File tab, click the Options button:
In the Word Options dialog box, on the Display tab, select or deselect the Show white space between pages in Print Layout view check box:
- Move the mouse pointer to the top or bottom edge of the page to the location where the mouse pointer changes into a double arrow:
- If you see the Hide White Space pointer, double-click to show white space:
- If you see the Show White Space pointer, double-click to hide white space:
- If you see the Hide White Space pointer, double-click to show white space:
Please, disable AdBlock and reload the page to continue
Today, 30% of our visitors use Ad-Block to block ads.We understand your pain with ads, but without ads, we won’t be able to provide you with free content soon. If you need our content for work or study, please support our efforts and disable AdBlock for our site. As you will see, we have a lot of helpful information to share.
This content has been archived, and is no longer maintained by Indiana University. Information here may no longer be accurate, and links may no longer be available or reliable.
To display or hide formatting marks (e.g., spaces, tabs, and paragraph
breaks) in a Microsoft Word document:
Word for Windows
- In Word 2010, on the tab, click . In
Word 2007, from the Office Button menu, select near the bottom right corner of the menu. - Select from the listing at the left.
- In the section titled «Always show these formatting marks on the
screen», check or uncheck the appropriate boxes to view the marks of
your choice. To show or hide them all, select . - To save your changes, click .
Word for Mac OS X
- From the menu, select .
- Select .
- In the section titled «Nonprinting characters», check or uncheck
the appropriate boxes to view the marks of your choice. Check
to see all formatting marks. - To save your changes, click .
You can also toggle between displaying and hiding formatting
marks. To do so:
- In Word for Windows, on the tab, in the
group, click the paragraph icon. - In Word for Mac OS X, click the paragraph icon in the Standard
toolbar. If you don’t see the icon, from the menu,
choose , and then check .
This is document ajfe in the Knowledge Base.
Last modified on 2018-01-18 13:09:34.
Is there one space or two between sentences? Word lets you check the sentence spacing or ignore it completely.
It’s a useful option for those of us who learnt on manual typewriters where double sentence spacing was standard. Switching to single spacing is hard for your fingers to remember.
One Space or Two
People can get very exercised about sentence spacing. Maybe it depends on what you were taught at school?
The trend has been towards single spacing but many of us were double spacing when we were taught to type.
Most style guides including the Chicago Manual of Style and Oxford Style Manual recommend single spacing.
Whichever you choose, Word can check for you.
Global Setting
The setting for sentence spacing is a Word global setting. It applies to all documents opened in Word.
There’s no way to change the sentence spacing check at the document, style or paragraph level.
For most people that’s not a problem. However, some might have clients or specifications for different documents. Anyone in that situation has to change the Word setting manually each time.
Microsoft 365 / Office 365
In Word 365 if the spacing setting isn’t correct, there’s a brown dotted line.

Right-click on the dotted line to see the options under ‘Punctuation Conventions’.

Click on the fullstop/period, question mark or exclamation to change the spacing.
Ignore Once – will leave this spacing unchanged.
Don’t check for this issue – changes the sentence spacing for ALL documents, not just the current document. The global Word setting is returned to ‘Don’t Check’. This isn’t made clear at all.
Options for ‘Punctuation Conventions’ – takes you to the Grammar & more settings.
Settings
Go to Options | Proofing | Writing Styles. Select ‘Grammar & more’ then Settings.
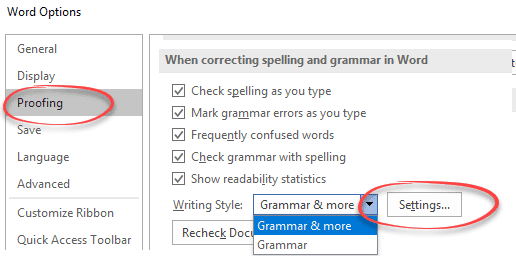
Word for Mac: Preferences | Spelling & Grammar | Writing Style | Grammar and More | Setting.
Scroll down to the bottom of the settings to see ‘Space between sentences’.
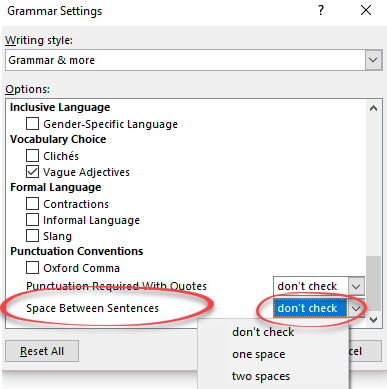
Don’t Check – the default.
One space – a single space between sentences.
Two spaces – two spaces
Before you ask … we don’t know why the most commonly changed grammar settings (Oxford Comma, Punctuation Required with Quotes and Space Between Sentences) are at the very bottom of the list. They were at the top of the list in past versions of Word, so this must be a deliberate, though mysterious decision.
Word 2019, 2016, 2013, Word 2010 and before …
In earlier versions of Word the look is a little different but the result is the same.
The blue squiggly line marks an incorrect sentence spacing.

Right-click on the blue line to see the options which aren’t very clear.

You’re forgiven for wondering what caused the blue squiggly line.
Click on the period/fullstop, question mark, exclamation to change the sentence spacing.
Ignore Once – will leave this spacing unchanged.
Grammar … – opens the Grammar settings
The settings are the same but a little more accessible.
Go to Options | Proofing | Writing Styles. Select ‘Grammar & Style’ then Settings.

1 – a single space between sentences.
2 – two spaces
don’t check – the default.
Change single space after sentence to double space in Word
Change sentence space after fullstop/period in Word
Now Word wants to Rewrite your sentences
While you might have experience changing the formatting for your Word documents to meet the requirements for your school or job, you might encounter a situation where you need to use different settings.
Microsoft Word is full of different tools and menus that let you customize your document, and line spacing is something that you can adjust.
Our tutorial below will show you how to single space in Word, even if you have already written and edited the entire document.
How to Make a Word Single Space Document
- Open the document.
- Click inside the document and press Ctrl + A to select everything.
- Select the Home tab at the top of the window.
- Click the Line and Paragraph Spacing button.
- Choose the 1.0 option.
Our guide continues below with additional information on how to make a document single space instead of double space in Microsoft Word, including pictures of these steps.
Last update on 2023-04-13 / Affiliate links / Images from Amazon Product Advertising API
| As an Amazon Associate, I earn from qualifying purchases.
Document spacing can impact several things, including the number of pages in the document. Microsoft Word includes several different options from which you can select to control the amount of space between the lines in your document.
Many schools and organizations have their own rules and preferences when it comes to the amount of line spacing that you have in your documents. Often they want you to use double spacing, but it’s entirely possible that they might want single spacing to reduce the number of pages in documents.
A document in Microsoft Word can have a lot of different formatting options, including the amount of space between lines.
If your current document is double spaced, or if it appears to have more or less spacing than the single spacing you need, you may be looking for a way to adjust that.
You can make a Microsoft Word single space document by opening the document, selecting all of the text, choosing the Home tab, clicking the Line and Paragraph Spacing button, then choosing the 1.0 option from the drop down menu.
Our guide below will show you how to single space in Word by selecting all of the text in the document and adjusting the line spacing setting.
You can also check out our tutorial on how to select all in Word if you would like to know more about using that option.
How to Use Single Spacing in Word for Office 365 (Guide with Pictures)
The steps in this article were performed in the Microsoft Word for Office 365 version of the application but will work in most other versions as well.
Step 1: Open your document in Microsoft Word.
Step 2: Click inside the document, then press Ctrl + A on your keyboard to select everything.
If this is a new, blank document, you can skip this step.
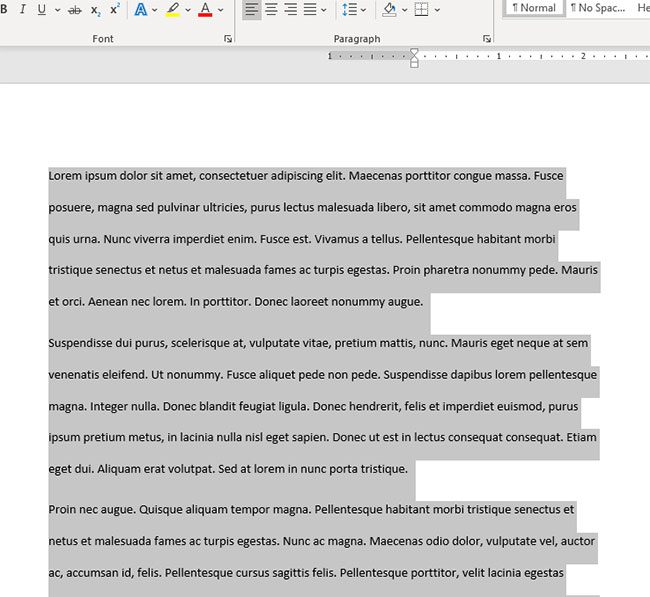
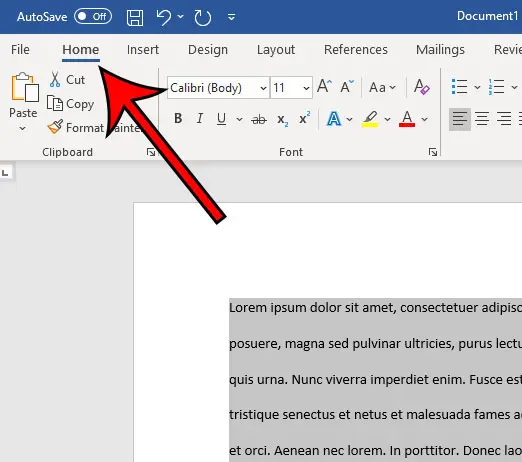
Step 3: Select the Home tab at the top of the window.
Step 4: Click the Line & Paragraph Spacing button in the Paragraph section of the ribbon.
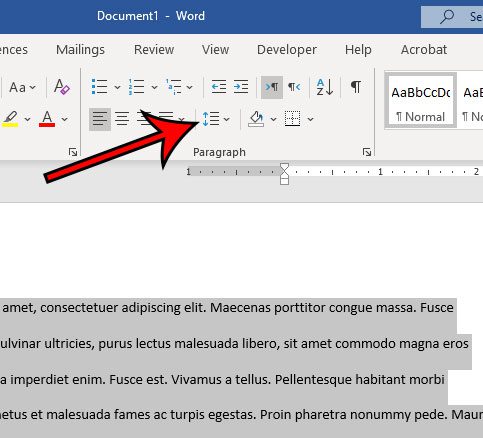
Step 5: Choose the 1.0 option from the dropdown menu to switch the document to single spacing.
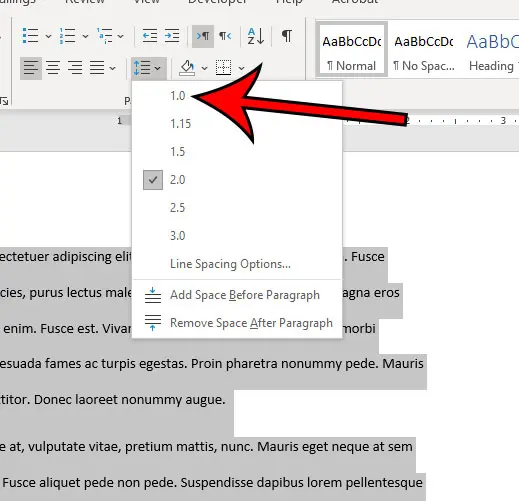
Note that there is a Line Spacing Options button at the bottom of that dropdown menu.
If you select that option, you will be able to customize your document spacing further and set a new default spacing option if you would like.
Our tutorial continues below with additional discussion about how to make a document single spaced in Word.
You can also read our article on how to double space in Word for additional information about Microsoft Word line spacing.
How to Change Default Line Spacing in Microsoft Word
While you can change line spacing in every document that you create or edit in Microsoft Word, you might not want to adjust spacing every time.
But if your Word Normal template is defaulting to double spacing and you need to have single spacing more often, then constantly switching the line spaces can not only be tedious, it can be something that you forget to do.
Fortunately, among all of the different formatting adjustments that you can make for your document, there is a way to set the default line spacing.
- Open Microsoft Word.
- Select the Home tab.
- Click Line and Paragraph Spacing.
- Choose Line Spacing Options.
- Click the Line spacing drop down.
- Select your default line spacing preference.
- Click Set as Default.
- Choose All documents based on the Normal template.
- Click OK.
Now any new documents that you create in Microsoft Word that use the Normal template will have the line spacing that you just chose.
this will not affect the line spacing in any of your existing documents.
More Information on How to Apply Single Line Spacing in Word
While we have focused on changing the line spacing setting in an MS Word document, for the entire document, you can also format a document so that only some of it is single spaced.
Rather than selecting the whole document, simply use your mouse to select the part of the document for which you want to change the spacing, then follow the steps above to apply a new line spacing setting to that selection.
Another thing that you can adjust that relates to line spacing is the paragraph space setting. This affects the amount of line spacing that appears before and after your paragraphs.
You can find the paragraph spacing settings by clicking the Home tab, then clicking the small Paragraph Settings button at the bottom-right corner of the Paragraph group in the ribbon. This will open the Paragraph dialog box.
There you can select line spacing options in the “Spacing” section so that you can choose the amount of space before and after a paragraph, as well as determine the line spacing type.
Frequently Asked Questions About How to Make a Document Single Spaced in Word
How do I get to the paragraph spacing menu in Word?
While this document has focused on using the Line and Paragraph Spacing drop down menu to change document spacing, you might want to adjust some other spacing options, too.
if you select the Home tab, then click the Paragraph Spacing button at the bottom-right of the Paragraph group, it will open a Paragraph dialog box.
At the top of the Paragraph dialog box, you will see Indents and Spacing, as well as Line and Page Breaks tabs.
Here you can customize the spacing before and after your paragraphs, as well as select line spacing options.
What is the Set as Default button at the bottom of the Paragraph dialog box?
If you have made a lot of changes in this dialog box and want them to apply to new documents that you create in the future, you have the option of using these settings as the default for future documents.
Simply click the Set as Default button at the bottom of the Paragraph menu, then confirm that you want to make this change.
Can I have single spaced text in just part of my Microsoft Word document?
Yes, you can have a mixture of different types of spacing in a single document.
Simply follow the steps above, but rather than selecting the entire document, select only the part of the document that you want to single space.
Then when you click the Line and Paragraph Spacing button in the Paragraph group and choose the 1.0 option, it will only affect the part of the document that’s currently highlighted.
Matthew Burleigh has been writing tech tutorials since 2008. His writing has appeared on dozens of different websites and been read over 50 million times.
After receiving his Bachelor’s and Master’s degrees in Computer Science he spent several years working in IT management for small businesses. However, he now works full time writing content online and creating websites.
His main writing topics include iPhones, Microsoft Office, Google Apps, Android, and Photoshop, but he has also written about many other tech topics as well.
Read his full bio here.
We ran into a strange problem today, and thought we’d share the solution.
The Problem
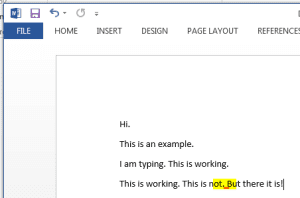
When you enter a space, a line return, or other paragraph mark, nothing happens until you enter the next character. For instance, you type «This is not working.», then <space>, but the cursor is still right next to your period.
However, as soon as you type «B» for «But», the space you had already typed appears.
At first this may not seem like a big deal, but it can get very frustrating, very quickly.
The Cause
It turns out there is a fairly simple cause for this: You have a Section Break at the point in your document where you’re seeing this behaviour. You can verify this by hitting ctrl+* (ctrl+shift+8) to show Formatting Marks.
We’re not sure why this is the behaviour that Word exhibits under this circumstance, but there it is.
The Solution
Once you know the cause, the solution is pretty easy. Just put a few additional blank lines in front of your Section Break to make sure you’re not typing right up against it. Voilà! Problem solved.

