
Remember the good old days when MS Word defaulted to single page view when you’d open a document? I do. I prefer that, because I want to focus on what I’m working on, not what’s 30 lines away from that.
I’m using MS Word 365, and whenever I open a document it defaults to 2-page view. I then have to sigh, squeeze a stress ball, and adjust the View setting to 1-page view to get the view I want. I’d like to set 1-page view as default. Is there a way to do that in MS Word 365?
asked Aug 5, 2020 at 12:45
![]()
Unfortunately, Word has no setting to specify a default «open» view for
all documents.
This means that documents open at the view mode that was used when the
document was originally saved.
To force the issue, a VBA macro is required. The macro, named AutoOpen,
needs to be saved in the Normal.dotm template.
Here is the macro:
Public Sub AutoOpen()
    ThisDocument.Application.ActiveWindow.View.Zoom.PageColumns = 1
End Sub
To always open at 100% zoom, add this line inside the macro:
ThisDocument.Application.ActiveWindow.View.Zoom.Percentage = 100
For more information see the article Writing a Macro from Scratch.
answered Aug 5, 2020 at 14:00
![]()
harrymcharrymc
439k30 gold badges506 silver badges885 bronze badges
Very late answer but I find it annoying when the question is either not answered correctly or stated that it can’t be done. No code needed here.
- Open Word and go to File > Open
- Navigate to
%appdata%MicrosoftTemplatesor%localappdata%MicrosoftTemplates(whichever exists) - Open Normal.dot or Normal.dotm, whichever exists
- Go to View and select «One Page» in the ribbon under the «Zoom» section
- This might change your zoom so make sure it is at 100% or whatever you wish
- Save
- Close
- Problem gone
![]()
answered Oct 13, 2021 at 12:07
![]()
GrantGrant
911 silver badge2 bronze badges
1
In Word 2016 (365), in the View Ribbon, select Print View.
Then Words opens to just one page. I have this set and always see just one page when opening Word.

I also disable the Start Screen for all Office 365 Apps, but I do not think this affects how Word opens the view. It does simplify things to uncheck Start Screen. Word, Options, General, near the bottom.
answered Aug 5, 2020 at 12:54
![]()
JohnJohn
43.6k3 gold badges31 silver badges53 bronze badges
These steps worked for me too, with the exception that I’m also using office 365 on one drive.
I had to navigate to a slightly differt folder;
C:Users(User name)AppDataRoamingMicrosoftTemplates
There I found Normal.dotm
I made a back up copy of it. Then I tinkered with it. It wouldn’t let me save over it. So I saved it with the name «Normal.dotm.docx» I then deleted the original file and deleted the Docx off the end of the new one I made.
It seems to be working now.
—original —
- Open word and go to file>open
- Navigate to c:/users/name/appdata/local/microsoft/templates
- Open the normal.dot or normal.dots depending on your version
- go to view and select «one page» in the ribbon under «zoom»
This might change your zoom so make sure it is a 100% or whatever you wish - Save
- close
Problem gone
![]()
Toto
16.5k50 gold badges29 silver badges41 bronze badges
answered Nov 30, 2022 at 18:16
![]()
I added the «one page» and «100% zoom» buttons to the quick access bar, this seems to be the best way of dealing with it besides using macros.
answered Mar 23, 2021 at 14:54
![]()
 Please Note:
This article is written for users of the following Microsoft Word versions: 97, 2000, 2002, and 2003. If you are using a later version (Word 2007 or later), this tip may not work for you. For a version of this tip written specifically for later versions of Word, click here: Displaying a Single Page.
![]()
Written by Allen Wyatt (last updated January 28, 2023)
This tip applies to Word 97, 2000, 2002, and 2003
Walter’s screen shows two pages of his document, side by side. He only wants one page the full width of the screen, but he’s not sure how to change that.
As you adjust the zoom settings used by Word, you may notice that Word automatically displays multiple pages of your document at the same time. This is especially true if you are using a widescreen monitor at a high resolution. In that case, as you get your zoom factor down to near 50%, Word automatically switches to display two pages.
There are a few ways that you can get back to a single page. The first thing you’ll want to do, however, is to make sure you are not using one of Word’s non-standard views. For instance, if you are in Reading Layout view, it can affect what is on your screen. Try pressing the Esc key, using the view icons on the Status bar, or using the choices from the View menu to return to a regular view, such as Normal or Page Layout.
One easy way to display just a single page is to simply «zoom out» a bit by holding down the Ctrl key as you move the scroll wheel on your mouse. As you zoom in and Word discovers that it can no longer display two pages on the screen, it should switch automatically to show only a single page.
Another approach is to choose Zoom from the View menu in order to display the Zoom dialog box. (See Figure 1.)
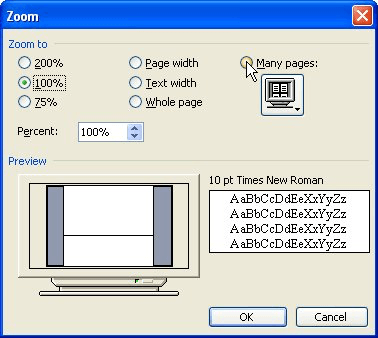
Figure 1. The Zoom dialog box.
Select the Page Width radio button and click OK. Word calculates the proper zoom percentage to show a single page at the width available on your screen. If you prefer, you can click one of the other single-page options—Whole Page or Text Width. (Pick the one that gives you the appearance you desire.)
If, for some reason, your zoom setting still doesn’t look right, you may be interested in the information provided at this page on the Word MVP site:
http://wordmvp.com/FAQs/General/SaveViewAndZoom.htm
WordTips is your source for cost-effective Microsoft Word training.
(Microsoft Word is the most popular word processing software in the world.)
This tip (966) applies to Microsoft Word 97, 2000, 2002, and 2003. You can find a version of this tip for the ribbon interface of Word (Word 2007 and later) here: Displaying a Single Page.
Author Bio
With more than 50 non-fiction books and numerous magazine articles to his credit, Allen Wyatt is an internationally recognized author. He is president of Sharon Parq Associates, a computer and publishing services company. Learn more about Allen…
MORE FROM ALLEN
Changing Font Size Using a Shortcut Key
When you need to change the font size of a text selection, using the shortcut described in this tip is a great technique. …
Discover More
Pixels in a Text String
Determining the length of a text string is easy, but figuring out how many pixels are represented by those characters is …
Discover More
Including Footnotes and Endnotes in Word Counts
When you have Word calculate how many words there are in a document, it normally doesn’t pay attention to text in …
Discover More
There was a point in the not-too-distant past where monitors were not nearly as high-resolution as they are now. While higher resolutions have enhanced the computing experience for the majority of people, not everything is for the better.
With more displayed at once, programs like Microsoft Word often attempt to make things “better.” Depending on who you ask, these changes aren’t always an improvement. Just like changing to the Ribbon UI, displaying two pages at once on high-resolution displays has been controversial. Many people want to display one page at a time in Microsoft Word instead.
Luckily, it is possible to change things to suit your own preferences.
1. Change the View Layout
1. Move across the Ribbon UI to the “View” options.

2. The first three buttons on the left include “Read Layout,” “Print Layout” and “Web Layout,” with Print showing the document across virtual A4 pages. Select Web Layout.

3. The change should be apparent, as the document is no longer parsed into virtual pages, and it will run for the entire width of the window.

4. Change back to “Print Layout.” For whatever reason, this will display the document one page at a time. It’s a simple, yet effective way to display one page at a time in Microsoft Word.
2. Change the Zoom Level
1. Observe the zoom level in the lower-right corner of the Word window. Click the zoom percentage, and another window will appear providing a few more options.
2. You can choose a variety of zoom options, but “Many Pages” on the right and the button below it should attract the most attention.

3. Click to expand the button below it and select an option; 1×1 and 1×2 show one page or two pages at a time respectively.

4. Once you’ve done this, you’ll see that Word’s zoom level is going to change. Go back to the left and change it to 100%. Confirm this change.
5. If the document is not already two or more pages long, such as what happens when you open Word to try this, add another page with Ctrl + Enter. It should either appear alongside the existing page or below it, depending on what you chose.
If you’re using the online version of Microsoft Word, this is the best way to display one page at a time in Microsoft Word. The web version doesn’t have the same view options as the desktop version. The good news is Word usually defaults to the Web View anyway since you’re using it online, which typically gets rid of this issue automatically.
If you’re just looking through a document, you can also set “Read Mode” or “Reading View” to set pages to scroll versus being side by side.
Conclusion
The ability to control Word’s display of pages is invaluable; a Google search results in numerous complaints about its default handling of high-resolution monitors. While we’ve covered a few ways to improve Word, such as reintroducing the 2003-era UI and tabs, this one requires no extensions or add-ons.
Should you wish to revert your changes, it’s as simple as following Solution 2 and adjusting the “Many Pages” section to suit. The simplicity of this tweak, coupled with the polarizing nature of Word’s default approach, makes it highly valuable.
Do you also know that you can merge documents in Microsoft Word and add offline videos? If not, check it out.
Image credit: Microsoft Word Under Magnifying Glass

Crystal Crowder
Crystal Crowder has spent over 15 years working in the tech industry, first as an IT technician and then as a writer. She works to help teach others how to get the most from their devices, systems, and apps. She stays on top of the latest trends and is always finding solutions to common tech problems.
Subscribe to our newsletter!
Our latest tutorials delivered straight to your inbox
|
03-24-2010, 04:58 AM |
|||
|
|||
|
How do you view a single page I don’t like the two page view and want to change it to single. When I change it to single page from the ribbon menu I then find the zoom is set to 70% which is much too small for me. If I change the zoom to 100% it goes back to the 2 page view. So how do view single page and keep the zoom to 100% ?
|


|
03-24-2010, 03:33 PM |
|
Word puts as many pages side by side as it can fit depending on the zoom you have chosen.
|
|
03-28-2010, 04:11 AM |
|||
|
|||
|
It is true I can make the window smaller which is hardly convinient and means having to resize the window every time I opened word. The situation has got worse now that I find 3 pages crammed onto one page and yet can hardly read the text. This surely must be a bug? Surely the developers are not intending to force the number of pages we view on a page? As it is I have already had to pay extra for software that will allow me to customise the ribbon bar, am I now expected to look for software so I can see what I am typing ?
|
|
03-28-2010, 02:44 PM |
|
Delboy I don’t understand what is going wrong with your version of Word 2007 but you are not explaining the problem particularly well. «3 pages crammed into one page» is not helping us visualise what is on your screen. Your initial description sounded a little like you were changing the document view rather than the zoom but again it isn’t fully clear. Each document view can have a different zoom associated with it so that is the only case I can think of where you could «increase the zoom» and actually see more pages. The One Page/Two Pages buttons on the View tab don’t actually specify a particular zoom value — the zoom you get depends on the size of your window. I don’t find these buttons useful and would suggest you don’t use them as they artificially constrain the pages you would see on screen if you then modify the zoom. Instead, first hit the 100% button in the View>Zoom area THEN use the zoom slider in the bottom right of the window. In Print Layout when you use the slider — if you reduce the zoom percentage then the number of pages that fit the screen will increase. Moving the slider to the right will increase the zoom and reduce the number of pages you see. FWIW, the next version of Word has the ribbon customisation built-in but I haven’t used it yet so don’t know how it goes. In any case, I find that editing the ribbon directly with the free Office 2007 Custom UI Editor is workable but can be slow to learn.
|
|
03-30-2010, 02:37 AM |
|||
|
|||
|
Office 2007 have this facility. You go to file menu and click on print and check the print preview. Check what you want.
|
|
03-30-2010, 04:47 AM |
|||
|
|||
|
Sorry I should have said 3 pages crammed into one window. What I want is simple. I just want to view one page at a time and I want the zoom to he 100%. As far as I can see I am no longer given that choice.
|
|
04-02-2010, 02:56 PM |
|||
|
|||
|
I also don’t like the multi-page view when editing. But I don’t know what’s going on with your Word 2007. On my version, if I press 100% view, I automatically get a single page view. I can make a multi-page view, but I can’t make it stay in multi-page view at 100% even when I try. Have you tried selecting View from the ribbon menu, and One-Page from the zoom tab?
|
|
04-02-2010, 03:27 PM |
|||
|
|||
|
believe me I have tried everything but like I say, if I view 100% it always goes to two pages. Maybe it is due to my monitor size so as it is 21 inch I have by luck found a workaround though and that is on the slider to set it to anything above 101 % and then I regain control and have one page. Definately seems like a bug to me
|
|
04-08-2010, 01:17 PM |
|||
|
|||
|
Has this issue been sorted Del Boy I’ve got exactly the same problem but only in 1 document sent from a user of Word 2003. Problem is its a 58K word book, I need to view at ‘One Page’ at ‘100%’ like i can with all my other documents. Any advice you can give would be much appreciated. Thanks
|
|
04-08-2010, 01:24 PM |
|||
|
|||
|
Yes as I mentioned in my last post you can get around it by using the slide zoomer on the bottom left of the screen and pushing that up. I find that anything from 101% and up leaves the view at one page.
|
|
04-08-2010, 01:48 PM |
|||
|
|||
|
As I have a widescreen it only works from 130% and up. I’ll change my screen resolution and that should do it for me based on your findings. Thanks for the fast response db.
|
|
04-14-2011, 06:47 AM |
|||
|
|||
|
Delboy, I know EXACTLY what you are talking about. I.T. put a new computer in my office with a new monitor. I want to be able to SEE one page that looks like an 8 1/2 x 11 sheet of paper both when I am composing messages as well as reading messages that are sent to me. I just want it to look like ONE sheet of paper on a blue background. Instead, if I zoom to 100%, it opens 2 pages. I have tried to zoom first, then set one page view, as well as the reverse. It is so annoying I do not know what to do. There has to be a way of using Word to view and compose as if it were simply one page!
|
|
04-14-2011, 02:29 PM |
|
Go to Zoom, click on the ‘Many Pages’ icon, choose a one-page display, then set the zoom level to whatever you want.
__________________
Last edited by macropod; 04-16-2011 at 09:08 PM. Reason: spelling fix
|
|
04-15-2011, 05:40 AM |
|||
|
|||
|
Microsoft one page view and zoom Macropod — thank you. That worked for composing a document, so I have high hopes that it will also work when somebody e-mails a Word document to me. I think the «many pages» icon may have been the missing piece of the puzzle. Is there any way to make a one-page view «stick» as a default view in Word preferences? Thanks again for your assistance.
|
|
04-15-2011, 06:13 AM |
|
Hi tpacheco, Quote: Is there any way to make a one-page view «stick» as a default view in Word preferences? You can go close — the following macro sets a number of display options for any document as it is opened. You can change the various parameters, including addig/deleting where appropriate. To use it, simply add it to Word’s ‘Normal’ template. Code: Sub AutoOpen()
With ActiveWindow
'Force Print Preview mode
If .View.SplitSpecial = wdPaneNone Then
.ActivePane.View.Type = wdPrintView
Else
.View.Type = wdPrintView
End If
'Resizes to 125% and 1 page viewed
With .ActivePane.View.Zoom
.PageColumns = 1
.Percentage = 125
End With
'Displays the Document Path in the Title Bar
.Caption = ActiveDocument.FullName
End With
End Sub
__________________
|
Change How Word Looks on Screen to Be More Productive
How do you change views in Word documents?
Updated on December 4, 2019
Microsoft Word provides several ways to view a document you’re working on. Each is suitable for different aspects of working with a document, and some are better suited for multi-page documents than single pages. If you’ve always worked in the default view, you may find other views that make you more productive.
Instructions in this article apply to Word for Microsoft 365, Word 2019, Word 2016, Word 2013, and Word 2010.
Change Layouts
Word documents open in the Print Layout by default. You can select an alternative layout at any time.
-
Go to the Ribbon and select the View tab.
-
In the Views group, select one of the other available layouts available to change the layout.
Change Layouts With the Icons Under the Document
Another way to change layouts on the fly is to use the buttons at the bottom of the Word document window. The current layout icon is highlighted. To switch to a different layout, select the corresponding icon.
Word Layout Options
Current versions of Word provide the following layout options:
- Print Layout is the default layout and the one you see most often.
- Web Layout is suitable if you are designing a web page in Word. Web Layout view shows how the document will look as a web page.
- Outline generates an outline version of the contents of the document. You can control the number of levels that are shown and whether the text is formatted. Use Outline view to organize and navigate through a lengthy document.
- Draft view displays only basic text without any formatting or graphics. It is Word’s equivalent of a plain text editor.
- Read Mode hides the writing tools and menus, leaving leave more room for the document pages.
- Focus Mode is a simplified view of the document without any distractions and is available in Microsoft 365. If you need the ribbon, move the mouse to the top of the screen and the ribbon will drop down.
Other Ways to Change How Word Displays
Also in the View tab are other ways to control how a Word document looks on screen.
- Zoom opens a dialog box you can use to specify the percentage of zoom you want. Choose from Word-supplied choices or enter any percentage you like.
- Zoom to 100% instantly returns the document to 100% size.
- One Page or Multiple Pages toggles the view so that either one page of the document displays on the screen or thumbnails of several pages display on the screen.
- Page Width expands the width of the working document to the screen size, usually displaying only the top part of the document.
- Ruler and Gridlines make it easier to measure distance and objects in a document and line up objects on the page.
- Navigation Pane adds a column to the left of the document that holds thumbnails for every page. It is useful for navigating through documents that have more than one page.
- Split displays parts of two pages at the same time, which is useful when you want to copy text or graphics from one page and paste to another.
Thanks for letting us know!
Get the Latest Tech News Delivered Every Day
Subscribe
Как уменьшить текст в ворде чтобы уместить в одну страницу
Предположим что документ получается чуть больше чем одна страница или у многостраничного документа есть небольшой хвостик, и мы хотим уместить текст так чтобы из-за этого хвостика не печатать почти пустую страницу. Для этого нужно уменьшить или подогнать текст на одну страницу.

В предыдущих версиях Word была очень удобная функция которая позволяла уменьшить текст. Для этого Предварительном просмотре была кнопка “Подгонка страниц”. В Word 2010 этой кнопки там уже нет и найти её очень не просто, потому что она теперь называется Сократить на страницу (Shrink One Page).
Так же изменился характер работы этой кнопки. По моему мнению раньше (в предварительном просмотре) было гораздо удобнее, т.к. уменьшаешь и сразу видишь как это будет при печати выглядеть. А сейчас очень не удобно, уменьшил и нужно идти в печать чтобы увидеть результат 🙁
Итак, нужно создать свою вкладку на ленте (или добавить свою группу в любую существующую вкладку) и добавил туда кнопку Сократить на страницу (Shrink One Page).
— Закладка Файл (File) — пункт Параметры (Options). Пункт Настройка ленты (Customize Ribbon).


— Кнопка Создать вкладку (New Tab). Затем с помощью кнопки Переименовать (Rename), можно переименовать вкладку и группы.

C помощью клавиш стрелочек можно изменить порядок вкладок и групп.
Теперь добавляем кнопку Сократить на страницу (Shrink One Page) в созданную вкладку.
Выбрать необходимую группу. В списке Выбрать команды (Choose commands from) выбрать Все команды (All Commands), выбрать Сократить на страницу (Shrink One Page). Нажать кнопку Добавить (Add). Нажать ОК.

В результате на панели инструментов выглядеть это будет так
Сокращение текста
Если у вас короткий документ, в который на последней странице всего лишь небольшое количество текста, можно уменьшить его, чтобы напечатать только на одной странице, и не печатать лишние страницы.

Для этого воспользуйтесь командой Сократить на страницу. Приложение Word сократит документ на одну страницу, уменьшив размер шрифта и значения интервалов в тексте. Например, документ из примера выше будет сокращен до 1 страницы, а документ, состоящий из 3 страниц, можно сократить до 2.
Совет: Перед использованием этой команды создайте копию документа. Для сокращения Word уменьшит размер каждого использованного в документе шрифта. Отменить команду можно нажатием сочетания клавиш CONTROL + Z. Обратите внимание, что после сохранения и закрытия документа быстро восстановить исходный размер шрифта невозможно.
Команда Сократить на страницу не является часто используемой командой, поэтому кнопка по умолчанию не отображается. Однако вы можете быстро добавить его. Самый быстрый способ добавить кнопку — добавить ее на панель быстрого доступа.
На панели быстрого доступа в верхней части окна Word нажмите Настроить панель быстрого доступа (маленькая стрелка вниз) и выберите пункт Другие команды.

В списке Выбрать команды из: выберите пункт Все команды.

Найдите в списке команд Сократить на страницу.
Щелкните команду Сократить на страницу, чтобы выбрать ее, а затем нажмите кнопку Добавить.

Когда кнопка станет доступной, нажмите на нее для сокращения текста.
Щелкните Редактировать > в Word в Интернете, если вы еще этого не сделали.
Чтобы выбрать весь текст в документе, нажмите CTRL+A.
Щелкните Главная > уменьшить шрифт один или несколько раз.

При нажатиикнопки Уменьшить шрифт Word уменьшает размер всех шрифтов в документе.
Нажмите кнопку > в этом >, чтобы узнать, достаточно ли сжатие текста.
Совет: Если это не сработает и у вас есть классические приложения Word, нажмите кнопку Открыть в Word, чтобы открыть документ в Word и сжать текст.
Как сделать текст в word на одном листе?
Microsoft Office 2007 , можно столкнуться с ситуацией, когда
пару строк не умещаются
на странице и переходят на следующую. документ с лишней страницей, на которой будет всего несколько строк не рационально с точки зрения экономии бумаги, да и просто удобства восприятия текста как целого.
Для решения этой задачи откройте нужный
текст , который следует
уместить , и нажмите на кнопку эмблемы. Затем нажмите кнопку «Печать» и «Предварительный просмотр».

В открывшемся окошке нажмите пункт «Сократить на страницу».

Размер шрифта уменьшится так, что бы
текст поместился на страницу . После этого можно печатать документ, не полная страница будет сэкономлена.
Для удобства, если вы часто сталкиваетесь с такой ситуацией, можно
перенести эту
на панель быстрого доступа .
И все хорошо, понятно и работает, но все это писалось для другого. Дело в том, что в
Microsoft Office 2010 такой функции нет. Вернее она
отключена , и что бы активировать, надо соответственно
настроить меню ленты . Нажмите «Файл» и выберете
параметры , там нажмите «Настройка ленты».

В открывшемся окне разверните меню в пункте «Выбрать команды» и выберете «Все команды».

Прокрутите ползунок вниз до пункта «Сократить на страницу», выделите его. В колонке справа отметьте вкладку, на которой должен находиться данный пункт меню и внизу нажмите «Создать группу» и затем нажмите кнопку «Добавить» и ОК.

Теперь, когда вам нужно сократить текст, перейдите на ленте на вкладку «Разметка страницы», где справа увидите нужный пункт.

Предположим что документ получается чуть больше чем одна страница или у многостраничного документа есть небольшой хвостик, и мы хотим уместить текст так чтобы из-за этого хвостика не печатать почти пустую страницу. Для этого нужно уменьшить или подогнать текст на одну страницу.
В предыдущих версиях Word была очень удобная функция которая позволяла уменьшить текст. Для этого Предварительном просмотре была кнопка “Подгонка страниц”. В Word 2010 этой кнопки там уже нет и найти её очень не просто, потому что она теперь называется Сократить на страницу (Shrink One Page).
Так же изменился характер работы этой кнопки. По моему мнению раньше (в предварительном просмотре) было гораздо удобнее, т.к. уменьшаешь и сразу видишь как это будет при печати выглядеть. А сейчас очень не удобно, уменьшил и нужно идти в печать чтобы увидеть результат 🙁
Итак, нужно создать свою вкладку на ленте (или добавить свою группу в любую существующую вкладку) и добавил туда кнопку Сократить на страницу (Shrink One Page).
— Закладка Файл (File) — пункт Параметры (Options). Пункт Настройка ленты (Customize Ribbon).
— Кнопка Создать вкладку (New Tab). Затем с помощью кнопки Переименовать (Rename), можно переименовать вкладку и группы.

C помощью клавиш стрелочек можно изменить порядок вкладок и групп.
Теперь добавляем кнопку Сократить на страницу (Shrink One Page) в созданную вкладку.
Выбрать необходимую группу. В списке Выбрать команды (Choose commands from) выбрать Все команды (All Commands), выбрать Сократить на страницу (Shrink One Page). Нажать кнопку Добавить (Add). Нажать ОК.

В результате на панели инструментов выглядеть это будет так

Программа для работы с текстовыми документами MS Word позволяет быстро и удобно создавать нумерованные и маркированные списки. Для этого достаточно нажать всего одну из двух кнопок, расположенных на панели управления. Однако, в некоторых случаях возникает необходимость отсортировать список в Ворде по алфавиту. Именно о том, как это сделать, и пойдет речь в этой небольшой статье.
Урок: Как сделать содержание в Word
1. Выделите нумерованный или маркированный список, который необходимо отсортировать в алфавитном порядке.

2. В группе “Абзац”, которая расположена во вкладке “Главная”, найдите и нажмите кнопку “Сортировка”.

3. Перед вами появится диалоговое окно “Сортировка текста”, где в разделе “Сначала по” необходимо выбрать подходящий пункт: “по возрастанию” или “по убыванию”.

4. После того, как вы нажмете “ОК”, выделенный вами список будет отсортирован в алфавитном порядке, если вы выбрали параметр сортировки “по возрастанию”, либо же в обратном направление алфавита, если вы выбрали “по убыванию”.

Собственно, это и есть все, что требуется для того, чтобы упорядочить список по алфавиту в MS Word. К слову, точно таким же образом можно отсортировать и любой другой текст, даже если он не является списком. Теперь вы знаете больше, желаем вам успехов в дальнейшем освоение этой многофункциональной программы.
Мы рады, что смогли помочь Вам в решении проблемы.
Задайте свой вопрос в комментариях, подробно расписав суть проблемы. Наши специалисты постараются ответить максимально быстро.
Помогла ли вам эта статья?
В документах Microsoft Word можно часто встретить различные списки, например, перечень товаров, литературы, учащихся и прочее. Они могут быть написаны или просто с новой строки на листе, или добавлены в таблицу. Заполняя их, новые данные просто печатаются в конце. Но что делать, если необходимо расставить данные по алфавиту, чтобы можно было легче найти нужную информацию?
Расставлять все пункты в алфавитном порядке вручную не придется, для этого можно использовать встроенную функцию текстового редактора. Вот в данной статье мы и затронем данную тему и разберемся, как в Ворде расставить по алфавиту список.
Для примера возьмем вот такой список людей.
Выделите те строки, с которыми нужно работать. Затем на вкладке «Главная» в группе «Абзац» нажмите на кнопку «Сортировка» – на ней нарисованы буквы «А-Я» и стрелка, указывающая вниз.

Появится окно, как на нижнем скриншоте. В нем укажите, как нужно отсортировать, по возрастанию, или убыванию, и нажмите «ОК».

Нужный список будет расставлен в алфавитном порядке.
Если у Вас в одной строке есть различные слова или цифры и отсортировать хотите не по первому значению, а любому другому, тогда делаем так. В примере, в строке кроме имени и фамилии человека, указан еще и его рост. Давайте его и используем.
Выделите список и нажмите на кнопку с буквами А/Я.

В открывшемся окне в поле «Тип» выберите «Число», дальше укажите, в каком порядке сортировать, и нажмите «ОК».

После этого, список будет изменен, и числа расставлены в порядке возрастания.
Для того чтобы в Ворде выполнить сортировку списка, вставленного в таблицу, нужно сделать все точно так, как было описано. Сначала выделите нужные строки таблицы, потом нажмите на упомянутую кнопку.

Дальше нужно указать столбец, и по какому типу данных сортировать (это пригодится, если в одном столбце есть и текст и числа, или даты). Потом выберите по возрастанию или убыванию и нажмите «ОК».

Вот так выглядят отсортированные данные в таблице.

Если у Вас не первый столбец, тогда в окне «Сортировка» выберите нужный, затем тип данных, по которому нужно сортировать. Дальше выбираем по возрастанию или убыванию и жмем «ОК».

В примере я сделала второй столбец с числами по возрастанию.
На этом буду заканчивать, ведь теперь Вы знаете, как сортировать список по алфавиту в Ворде. Причем он может быть или обычный, или представленный в виде таблицы.
Поделитесь статьёй с друзьями:
Спасибо . На работе уверяли что такого нет.
Метод 1 В программе Word 2007/2010/2013
Откройте файл, с которым будете работать. Можно просто скопировать и вставить список слов, с которыми вы будете работать. Чтобы расположить их в алфавитном порядке, нужно ввести все слова в форме списка – каждое с новой строки.
Выберите текст, который необходимо упорядочить. Если список – единственная часть документа, тогда ничего выделять не нужно. Если вы хотите расположить в алфавитном порядке список, который является частью большего документа, выделите ту часть, которую нужно отсортировать.
Перейдите во вкладку Главная.
В колонке Абзац нажмите кнопку Сортировка (А,Я и стрелочка). Откроется окно сортировки текста.
Выберите порядок в поле Сначала по.
По умолчанию установлена сортировка по абзацам. Выберите опцию По возрастанию или По убыванию, чтобы установить порядок.
- Если вы хотите сортировать каждое второе слово, например, в формате ПЕРВЫЙ, ПОСЛЕДНИЙ, нажмите кнопку Параметры… В поле Разделитель полей выберите Другой. Введите пустой пробел. Нажмите ОК. В главном меню выберите сортировку по Словам 2. Нажмите ОК для сортировки списка.
Метод 2 В Word 2003 и предыдущих версиях
Откройте файл, текст в котором вы хотите отсортировать. Можно просто скопировать и вставить список слов для сортировки в документ. Для сортировки слов по алфавиту нужно ввести все слова в форме списка, каждое слово с новой строки.
Выберите текст, который необходимо упорядочить. Если список – единственная часть документа, тогда ничего выделять не нужно. Если вы хотите расположить в алфавитном порядке список, который является частью большего документа, выделите его.
Перейдите во вкладку Таблица. Выберите Сортировка. Откроется окно сортировки текста.
По умолчанию сортировка проводится по абзацу. Выберите сортировку По возрастанию или По убыванию.
- Если вы хотите сортировать по второму слову (например, по имени и фамилии, сначала имя, потом фамилия), откройте Параметры в окне Сортировка. В разделителе полей выберите Другой. Поставьте здесь пробел. Нажмите OK. Выберите Словам 2 в главном окне меню. Нажмите OK для сортировки.
Советы
- Можно использовать MS Word для сортировки любых текстов из других программ. Просто скопируйте и вставьте нужный текст.
- Возможно, вам придется нажать кнопку со стрелочкой вниз, чтобы развернуть полное меню опций.
Информация о статье
Категории: Microsoft Word
На других языках:
English: Alphabetize in Microsoft Word, Español: ordenar alfabéticamente en Microsoft Word, 中文: 在Microsoft Word中按字母顺序排列, Français: classer par ordre alphabétique dans Word, Italiano: Ordinare Alfabeticamente con Microsoft Word, Deutsch: In Microsoft Word alphabetisch ordnen, Português: Organizar uma Lista em Ordem Alfabética Utilizando o Microsoft Word, Nederlands: Sorteren op alfabetische volgorde in Word, Bahasa Indonesia: Menyusun Berdasarkan Abjad di Microsoft Word, ไทย: เรียงข้อมูลตามตัวอักษรใน Microsoft Word, Tiếng Việt: Sắp xếp theo thứ tự bảng chữ cái trong Microsoft Word, العربية: ترتيب الكلمات أبجديا في برنامج الكتابة مايكروسوفت وورد
- Печать
- Править
- Написать благодарственное письмо авторам

If you’re creating a Word document with multiple page layouts, you may wish to make a single page landscape. Here’s how.
Photo Credit — iStockPhoto
When you’re creating Word documents, you have two-page layout options available—landscape or portrait. Portrait mode is the default option, but you can switch to landscape mode instead if you want your text sideways.
If you want to use both types of layouts in Word, you’ll need to use a few workarounds using section breaks and Word’s own page formatting options to do so. Here’s how.
If you want to quickly make one page landscape in Word, here’s what you’ll need to do:
- Open your Word document and place the blinking cursor at the start of the page you wish to change to landscape mode.
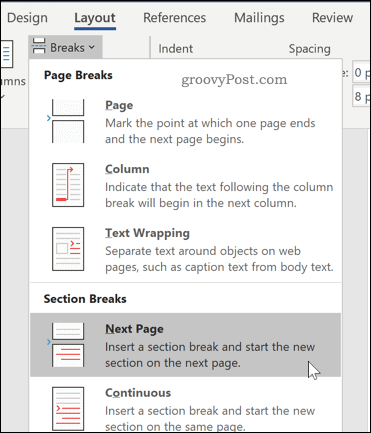
- Click on the Layout menu in the ribbon bar.
- Select Breaks > Next Page in the Section Breaks section. This will insert a section break and push your text onto a new page.

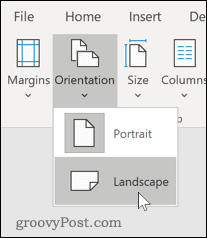
- In the Layout menu, press Orientation > Landscape. This will switch the current page and all the following pages to landscape mode.

- You’ll now need to turn the remaining pages back to portrait mode. Scroll down to the next page, then place the blinking cursor at the start of the page.
- Press Layout > Breaks > Next Page to insert a new section break.
- Click on Orientation > Portrait to switch the pages to portrait mode.


If you followed the steps correctly, you should now have one single landscape page, with all other pages remaining in portrait mode.
How to Make Specific Text Landscape in Word
If you don’t want all of the text on your page to appear on the landscape page, you can choose to make a landscape page that only contains specific text.
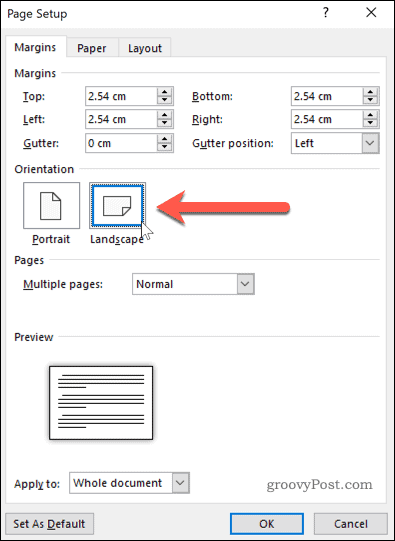
- To do this, start by highlighting the text that you want to appear on the landscape page.

- In the Layout menu, click on Margins, then select the Custom Margins… option at the bottom of the drop-down menu.

- In the Page Setup window, click on the Landscape option in the Margins tab, under the Orientation section.

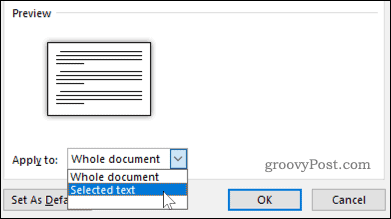
- In the Apply to box, choose Selected Text.

- Click OK to confirm the settings you’ve selected.


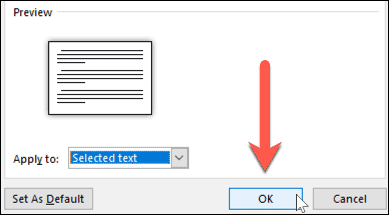
You should now have a landscape page that contains the text you previously highlighted, creating a section break that uses a different page layout to the rest of your Word document.
You can use this method to turn an entire page landscape—to do this, select all of the text on the page before you start and repeat the steps above to complete the change.
Formatting Microsoft Word Documents
Now that you know how to make a single page landscape in Word, you can start creating documents with as many combinations of landscape and portrait pages as you want. This is where learning how to rearrange pages in Word might just come in handy.
If you’re looking for other ways to take your Word documents further, why not learn how to insert an Excel table into Word. For academic documents, you may wish to create a table of contents in Word to keep your document organized.
![]()

When laying out your document in Word, it’s sometimes helpful to view multiple pages on the screen at one time, especially if you have a large monitor. Seeing multiple pages at a time allows you to get a sense of how your overall layout looks.
NOTE: We used Word 2013 to illustrate this feature.
You must be in “Print Layout” view to view multiple pages at one time. If you are not in “Print Layout” view, or if you’re not sure which layout is currently active, click the “View” tab.

In the “Views” section of the “View” tab, click “Print Layout.”
To view multiple pages at one time, keep the “View” tab active. Place your cursor in the text of the first page you want to view in the multiple-page view. In the “Zoom” section, click “Multiple Pages.”
By default, two pages are shown side-by-side. The pages are shrunk so the full pages can be viewed. This is why viewing multiple pages at once is good for reviewing your layout, but not necessarily for reading your document.
To return to viewing one page at a time, click “One Page” in the “Zoom” section of the “View” tab.
The page in which you had placed the cursor displays, but smaller than 100 percent. To zoom back to regular size, click “100%” in the “Zoom” section.
You can view more than two pages at a time. To do so, click the “Zoom” button in the “Zoom” section of the “View” tab.
The “Zoom” dialog box displays. You can zoom to various percentages (including a custom percent), widths, or the whole page. To view multiple pages, select the “Many pages” radio button. Then, click the monitor button below the radio button and select the number of pages you want to view at a time from the drop-down menu.
The “Preview” shows how the pages will be displayed. Click “OK” to accept the change and close the “Zoom” dialog box.
The view changes to show the number of pages at once that you specified.
Remember to go back to viewing one page at a time, click the “One Page” button. To go back to viewing your text at 100 percent, click the “100%” button.
READ NEXT
- › This 64 GB Flash Drive From Samsung Is Just $8 Right Now
- › How to Get a Refund on the PlayStation Store
- › Spotify Is Shutting Down Its Free Online Game
- › Five Types of Phone Damage That Aren’t Covered by Your Free Warranty
- › Save Hundreds on Elegoo’s New PHECDA Laser Engraver Through Kickstarter
- › Android’s Nearby Share Has (Unofficially) Arrived on Mac
How-To Geek is where you turn when you want experts to explain technology. Since we launched in 2006, our articles have been read billions of times. Want to know more?