
Word for Microsoft 365 Outlook for Microsoft 365 Word 2021 Outlook 2021 Word 2019 Outlook 2019 Word 2016 Outlook 2016 Word 2013 Outlook 2013 Word 2010 Word 2007 More…Less
You can use styles to quickly apply a set of formatting choices consistently throughout your document. If you want formatting choices that are not available from the built-in styles and themes available in Word, you can modify an existing style and customize it to suit your needs. You can change the formatting (such as font size, color, and text indentation) in styles applied to titles, headings, paragraphs, lists, and so on. You can also select formatted text in your document to create a new style in the Styles gallery.
The styles covered in this article are located in the Styles gallery, a visual menu located on the Home tab. To apply a style, simply select the text you want to format, and then click the style you want in the Styles gallery. To learn more, see Apply a style to text in Word.

Modify an existing style
You can modify an existing style in the Styles gallery in two ways:
-
Modify a style by updating it to match formatting in your document
-
Modify a style manually in the Modify Style dialog box
Modify a style by updating it to match formatting in your document
If you have text in your document that already has a style applied, you can change the formatting of that text and apply it to the style in the Styles gallery.
-
Select text in your document that has the style applied, such as Heading 1.
When you select text that has a style applied, that style is highlighted in the Styles gallery.

-
Format the selected text with the new attributes that you want.
For example, you might want to change the point size for the Heading 1 style from 16 points to 14 points.
-
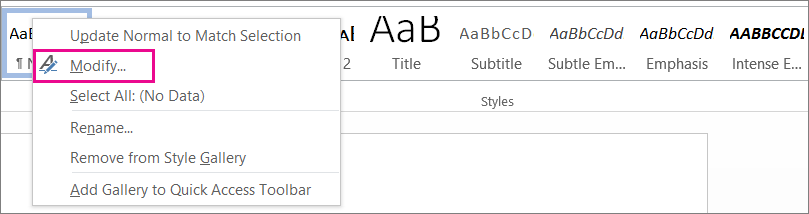
On the Home tab, in the Styles group, right-click the style that you want to change, and then click Update [Style Name] to Match Selection.
Note: All text with the style that you changed will automatically change to match the new style that you defined.
Modify a style manually in the Modify Style dialog box
You can modify a style directly in the Styles gallery, without using the text in your document.
-
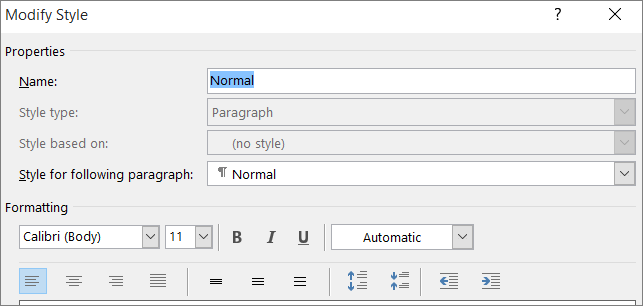
On the Home tab, right-click any style in the Styles gallery and click Modify.
-
In the Formatting section, make any formatting changes you want, such as font style, size, or color, alignment, line spacing, or indentation.
-
Choose whether the style change applies to the current document or to all future documents.

Create a new style based on document formatting
You can select formatted text in your document to create a new style that you add to the Styles gallery.
-
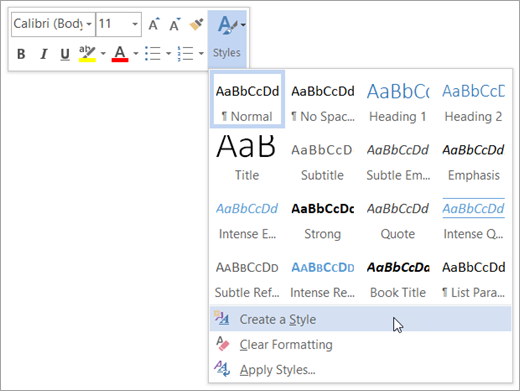
Right-click the text on which you want to base a new style.
-
In the mini toolbar that appears, click Styles, and then click Create a Style.
-
In the Create New Style from Formatting dialog box, give your style a name and click OK.
Your new style will now appear in the Styles gallery.
Note: If you want your new style to appear in all new Word documents, right-click it in the Styles gallery, click Modify, and then select New documents based on this template at the bottom of the dialog box.
-
Right-click the text on which you want to base a new style, point to Styles, and then click Save Selection as a New Quick Style.
-
In the Create New Style from Formatting dialog box, give your style a name and click OK.
Your new style will now appear in the Styles gallery.
Note: If you want your new style to appear in all new Word documents, right-click it in the Styles gallery, click Modify, and then select New documents based on this template at the bottom of the dialog box.
See also
Apply a style to text in Word
Need more help?
Want more options?
Explore subscription benefits, browse training courses, learn how to secure your device, and more.
Communities help you ask and answer questions, give feedback, and hear from experts with rich knowledge.
Apply styles

Try it!
Styles give your document a consistent, professional look.
-
Select the text you want to format.
Tip: If you place your cursor in a paragraph, the style is applied to the whole paragraph. If you select specific text, only the selected text is formatted.
-
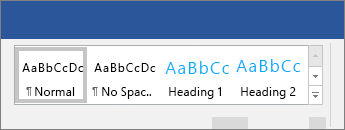
On the Home tab, point to a style to preview it.
If you don’t see a style you want, click the More button
to expand the gallery. -
Select a style.
 to expand the gallery.
Using Headings allows you to move parts of the document around by using View > Navigation Pane and then moving the listed headings up or down in the doc. Headings also can be used in creation of a table of contents.
Note: If you need a different look, go to Design > Themes and select a new one. Each Theme has its own set of Styles.
Want more?
Use the Navigation pane in Word
Apply themes
Customize or create new styles in Word
Insert a table of contents
Need more help?
![]()
Download Article
![]()
Download Article
Instead of wading through every Microsoft Word paragraph style just to find the one you need, try viewing only the styles used in the current document. You’ll need a version of Word installed on a Windows or macOS device, as this option is not yet available for Android, iOS, and Office Online.
-
1
Open your document in Word.
-
2
Click the Home tab. This is the first tab in the toolbar at the top of the screen.
Advertisement
-
3
Click the Styles Pane icon on the right side of the toolbar. The Styles pane will appear on the ride side of the screen, displaying a list of every style in Word.[1]
-
4
Place a checkmark next to “Show Styles Guides.” Now the Styles toolbox lists only the styles used in the current document. To view a style’s details (such as font size, color, etc.), hover your mouse over its name.
- Each style name is preceded by a colored box containing a number.
- Colored boxes now also appear along the left side of your document.
-
5
Compare the colored boxes in the Styles toolbox to those in your document.
- For example, if the style “Normal” shows a blue box with a 1, each paragraph using that style will also show a blue box with a 1.
- To assign a different style to a paragraph, highlight that paragraph and then click a style in the Styles toolbox.


Advertisement
-
1
Open your document in Word.
-
2
Click the View menu at the top of the screen.[2]
-
3
Click Print Layout.
-
4
Click Show or hide the toolbox on the toolbar. The button may appear as an icon of a square containing three horizontal lines with a smaller red square at its top. Once clicked, the “Styles” toolbox will appear.[3]
-
5
Click the ¶ at the top left corner of the toolbox. The Styles toolbox will now show a list of all available styles in Word.
-
6
Place a checkmark next to “Show Styles Guides.” Now the Styles toolbox lists only the styles used in the current document. To view a style’s details (such as font size, color, etc.), hover your mouse over its name.
- Each style name is preceded by a colored box containing a number.
- Colored boxes now also appear along the left side of your document.
-
7
Compare the colored boxes in the Styles toolbox to those in your document.
- For example, if the style “Normal” shows a blue box with a 1, each paragraph using that style will also show a blue box with a 1.
- To assign a different style to a paragraph, highlight that paragraph and then click a style in the Styles toolbox.


Advertisement
-
1
Open your document in Word.
-
2
Click the Home tab.
-
3
Press Alt+⇧ Shift+Ctrl+S. The Styles pane will open on the right side of the screen, displaying the list of all styles in Word.[4]
- You can also open the Styles pane by clicking the tiny arrow at the bottom right corner of the “Styles” toolbar at the top of the screen.
-
4
Click the Options link at the bottom of the Styles pane.
-
5
Click the dropdown menu beneath “Select Styles to Show.”
-
6
Select In Current Document from the dropdown menu.
-
7
Place a check next to “Paragraph Level Formatting.” The other check boxes should remain blank.
-
8
Click OK. Now the Styles pane will only show the paragraph styles used in the current document.
-
9
Click anywhere in your document to see which style is used. The style used in the paragraph you clicked will now appear highlighted in the Styles pane.
- Hover your mouse over the name of the style in the Styles pane to see its details, such as font size, face, and color.
- To modify a Style, hover the mouse over its name and click the small arrow.
- To change the style of part of your document, highlight the part you want to change, then click a style in the Styles pane.


Advertisement
Ask a Question
200 characters left
Include your email address to get a message when this question is answered.
Submit
Advertisement
-
To find out which style is being used in a paragraph in Word for Windows, click the document and press Ctrl+⇧ Shift+S. This opens the “Apply Styles” box, which displays the currently-selected style.
Thanks for submitting a tip for review!
Advertisement
References
About This Article
Thanks to all authors for creating a page that has been read 17,144 times.
Is this article up to date?
Microsoft Word, since 2007, has developed a confusing mish-mash of lists, galleries and dialog boxes to view, select and manage styles. We’ve received a few questions about finding style options so this Office-Watch.com article will try to make sense of all fourteen places.
It’s a guided tour to the various Style setup, configuration and management options spread around Word.
For an introduction to the subject see Word Styles from the beginning
Gallery
The first and most obvious place for selecting styles is the Style Galley on the Home tab.

Click on a style to apply it to the selection or paragraph.
Right-click on a style to see some style management options.
The Style Gallery is definitely an improvement over the old style list but has various limitations that Microsoft is reluctant to admit, let alone fix.
The Gallery shows some styles, but not all. Not even all the styles in use. Styles have to be manually added or removed from the Style Gallery, usually a right-click will show the ‘Add’ or ‘Remove’ option.
Styles can have shortcut keys to apply it. Headings have default shortcuts Ctrl + Alt + number for Heading 1, Heading 2 etc. But those shortcuts don’t appear on the Gallery tooltips unlike other buttons. See Shortcuts for Word heading styles.

There’s no simple way to control the Style Gallery order. Dragging and dropping would seem obvious but not in an Office Gallery. To change the Gallery order you must dig down to Manage Styles | Recommended tab that we’ll discuss below.
The Style Gallery gives no visual hint about the style of the current selection except if the style is currently visible row. It’s out biggest gripe about Word and the ribbon.
Here’s what you’ll see if you’re working on a para with Normal style and the Normal style is visible in the Gallery. A gray box appears around that style.

But that only works if the style is showing in the Gallery. For example, here’s what I’m seeing as I type this; no mention of the current style:

Because the document is focused on a style other than one of the five in view, the Gallery shows nothing. Even though the current style is in the Gallery in another row, Word doesn’t change the gallery to make it visible.
Add a proper list
To get around some of the Style Gallery limitations, add the older Styles pull down list to the Quick Access Toolbar.
Now there’s an easily visible label of the current style. You can also select any style from this list.
Here’s how to add the pull-down list in Customize Quick Access Toolbar.

Style Pane
The next step from the Style Gallery is the Style Pane. Open it from the little arrow on bottom right of the Gallery.

There are two main viewing options – with or without Preview of the style. The latter shows more styles in the space available.

The pane can be fixed to one side of the document or floating.
Right-click on a style to see some options. Most important is the Modify Style link.

Options
The choices at the bottom of the Styles pane are:
Show Preview
Disable Linked Styles – somewhat confusingly named, ‘Linked Styles’ are paragraph styles that can also be used as a character style to format text within a paragraph.
The buttons at the bottom are:
New Style – opens the Modify Style dialog to make a new style.
Style Inspector – see below.
Manage Styles – also covered later in this article
Styles next to Paragraphs
The Style Area Pane appears only in Draft and Outline view on the left-side.

Dig into Word for the Style Area Pane. File | Options | Advanced | Display then add a measurement to ‘Style Area pane width in Draft and Outline views’.
See Word Styles alongside document paragraphs
Modify Styles
This is the main place to configure a style.

Under the Format button are all the different formatting options available to a style.

Style Inspector
Style Inspector is a floating window to show you what styles and direct formatting apply to the current selection.

In the above example. Heading 3 style is used with no variations. But there’s some italics added to part of the selected text.
Each of the style boxes has a pull-down menu of choices, similar to the same menu on the Style Pane.

You can remove either the style or the additional formatting with the eraser buttons on right. Erasing a style really means switching to ‘Normal’ style and erasing Text level formatting is actually reverting to ‘Default Paragraph Font.
At the bottom are buttons for:
Reveal Formatting – see below
New Style – same as the Style Pane button.
Clear All – removes all formatting
Reveal Formatting
Why does Word have a ‘Reveal Formatting’ option and why is buried deep in Word’s menu’s?
Back in the ‘olden days’ WordPerfect had a much loved feature called ‘Reveal Codes’ which showed where formatting was applied in a document.

Microsoft resisted doing a similar thing in Word, insisting that their superior WYSIWYG display didn’t need such an ‘under the hood’ display. But they eventually relented because many WordPerfect users would not switch to Word without something similar to ‘Reveal Codes’.
That’s why the Style Inspector has a little ‘Reveal Formatting’ button. It shows the detailed formatting settings for the current document selection.
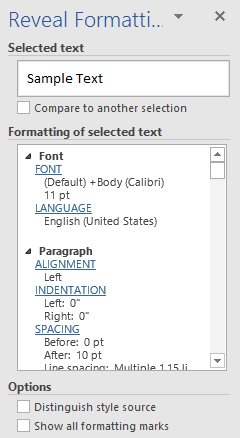
Click on the blue underlined links to open the appropriate dialog box with that setting selected. Click ‘Font’ to open the Fonts dialog. ‘Alignment’ opens Paragraph and Spacing.
Distinguish style source – changes the display to group formatting by style, direct formatting or section.

Show all formatting marks – is the same as the Show All button on the Home tab.
Compare
The Compare option can be very useful. It lets you see the differences in formatting between two selections. Choose one as the Reveal Formatting base, then click ‘Compare to another selection’ and choose another part of the document.

In this extreme case, there are a lot of differences because we’re comparing Normal text with a Heading style.
Manage Styles
The Manage Styles dialog has been largely replaced by the Styles Gallery and Pane. But it’s still there. The old dialog looked like this (thanks for David G for the screen shot).

It changed significantly but the essentials of the one you’re used to are still there. It’s called Manage Styles. There’s a button for it at the bottom of the Styles pane.
In modern Word, it’s expanded a lot with four tabs and many choices.
There’s no in-built shortcut for it but you can add one. It’s on the Command Lists as Manage Styles.
Edit
Change the overall sort order or choose a style to edit. The latter is more easily available from the Style Pane but here all the styles are listed including hidden and un-used styles.

Recommend / Sort
This is an important tab for anyone frustrated by the standard style ordering in the Gallery or Pane.
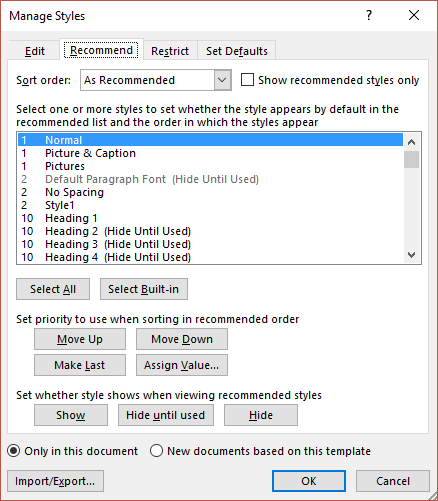
You can select a style then move it up/down the listing. Also mark a style as visible in the Recommended list – all the time, only when used or never.
Restrict
This tab works with documents that are protected from changes to set which styles can be used.

Set Defaults

Organizer – Import/Export
On each of the four Manage Styles tabs there’s a button in the bottom left corner called ‘Import/Export’. That’s the old style ‘Organizer’.

It’s the way to copy or move styles between templates or documents.
This is another Word dialog that hasn’t changed much for many versions.
Word: get a list of styles in a document
See Word Styles alongside document paragraphs
Fix your Word Style Gallery

Styles in Word allow you to easily apply a consistent look throughout your entire document, rather than formatting everything manually. If you want to review your formatting, you can display the styles applied to the paragraphs in the left margin for quick reference.
Normally, to see which styles are applied to which paragraphs, you have to put the cursor in the paragraph and look at the Styles section of the Home tab. However, there’s an option in Word that allows you to see all your styles at a glance as you scroll through the document. We’ll show you how to turn on and adjust that setting.
To display the paragraph styles in the left margin, your document must be in Draft mode. To change to Draft mode, click the “View” tab.

In the Views section, click “Draft”.
Now, we’ll change the setting that will show the styles in the left margin. Click the “File” tab.
On the backstage screen, click “Options” in the list of items on the left.
Click “Advanced” in the list of items on the left side of the Word Options.
In the “Style area pane width in Draft and Outline views” box, enter a number for the width of the pane. To start, enter .5 and we’ll see if that width is big enough.
Click “OK” to accept the change and close the Word Options dialog box.
You’ll see paragraph style names in the left margin. For us, the .5 size for the left pane is not wide enough to show the full paragraph style names.
So, we changed the width to a bigger number and now we can see the full names of the paragraph styles.
If you don’t want to see the styles pane on the left anymore, change the “Style area pane width in Draft and Outline views” to 0 (zero).
READ NEXT
- › How to Add, Edit, and Remove Tab Stops in Microsoft Word
- › What’s the Difference Between Microsoft Office’s Desktop, Web, and Mobile Apps?
- › Spotify Is Shutting Down Its Free Online Game
- › Save Hundreds on Elegoo’s New PHECDA Laser Engraver Through Kickstarter
- › Five Types of Phone Damage That Aren’t Covered by Your Free Warranty
- › Android’s Nearby Share Has (Unofficially) Arrived on Mac
- › How to Get a Refund on the PlayStation Store
- › This 64 GB Flash Drive From Samsung Is Just $8 Right Now
How-To Geek is where you turn when you want experts to explain technology. Since we launched in 2006, our articles have been read billions of times. Want to know more?
Стили в ворде
Просмотров 9.5к. Обновлено 4 сентября 2020
Стиль Word является предопределенным сочетанием шрифтов стиля, цвета и размера , которые могут быть применены к любому тексту в документе. Стили могут помочь вашим документам получить более профессиональный вид. Вы также можете использовать стили, чтобы быстро изменить несколько вещей в документе одновременно.
Содержание
- Как применяются стили в ворде
- Применить набор стилей
- Как создать стиль в ворд
- Изменить существующий стиль
Как применяются стили в ворде
Существующие стили в Word доступны в меню «Стили» на вкладке «Главная». Чтобы применить стиль, просто выделите текст и нажмите на выбранный шаблон. Используемая модель вставляется в рамку с выделенными краями.
Чтобы увидеть больше стилей Word, используйте стрелку в правой части меню «Стили» или откройте меню, нажав на стрелку меню.
Применить набор стилей
Наборы стилей включают комбинацию стилей заголовка и абзаца. Наборы стилей позволяют форматировать все элементы в документе одновременно, а не изменять каждый элемент отдельно.
На вкладке «Дизайн» щелкните стрелку раскрывающегося списка в группе «Форматирование документа».
Выберите нужный набор стилей из выпадающего меню.
Выбранный набор стилей будет применен ко всему документу.
Как создать стиль в ворд
Если вы хотите, применить параметры форматирования, которые недоступны в стилях Word, вы можете без проблем создать их и вставить в галерею стилей:
- Нажмите на меню «Главная» в разделе «Стили» на стрелке в правом нижнем углу.
- Выберите значок «Создать стиль» в «Стилях».
Дайте стилю имя и нажмите изменить.
Определите тип стиля. Вы можете выбрать между «Абзац», «Знак», «Связанный» (абзац и символ), «Таблица» и «Список».
- Если стиль основан на существующем, вы можете установить его в разделе «Стиль на основе».
- Вы также можете выбрать стиль для следующего абзаца в разделе «Стиль для следующего абзаца».
- Определитесь с типом шрифта, размером и другими типами форматирования.
- После подтверждения нажатием «OK» найдите свой новый стиль в меню «Стили».
Изменить существующий стиль
В Word вы также можете изменить уже существующие стили в коллекции стилей.
В группе «Стили» на вкладке «Главная» щелкните правой кнопкой мыши стиль, который хотите изменить, и выберите «Изменить» в раскрывающемся меню.
Появится диалоговое окно. Сделайте необходимые изменения форматирования, такие как стиль шрифта, размер и цвет. Если вы хотите, вы также можете изменить название стиля. Нажмите кнопку ОК, чтобы сохранить изменения.
Когда вы изменяете стиль, вы изменяете каждый экземпляр этого стиля в документе. Если в вашем документе где-то использовался этот стиль и вы поменяли, например, размер шрифта, то он автоматически обновится.
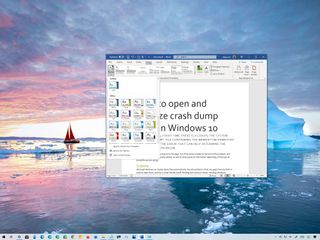
(Image credit: Windows Central )
Although you can style every part of a Microsoft Word document individually with unique fonts and colors, it is not a convenient approach since you have to repeat the steps many times, consuming more time and increasing the chances of mistakes, and this is when styles and themes can come in handy.
In the Office apps, styles are collections of fonts, text sizes, and colors that you can apply to different parts of the document (titles, subheadings, quotation, etc.). On the other hand, themes are collections of styles that you can use to format the entire document quickly.
When you use styles and themes, you will still be using a few steps, but it is a more organized way to format a document on Windows 10, and you will really see the benefit when you need to make changes since updating the format can be as easy as selecting a new theme or style.
In this Windows 10 guide, we will walk you through the steps to change the look and feel of Word documents using the style and themes settings whether you use Office from Microsoft 365 or Office 2019.
- How to use styles in Word
- How to use themes in Word
How to use styles in Word
To change the overall look of a Word document, use these steps:
- Open the Word app.
- Under the «New» section, click the Blank document option (or open an existing document).
- Create the document’s content.
- Select with the mouse the text you want to apply a different format – for example, the title.
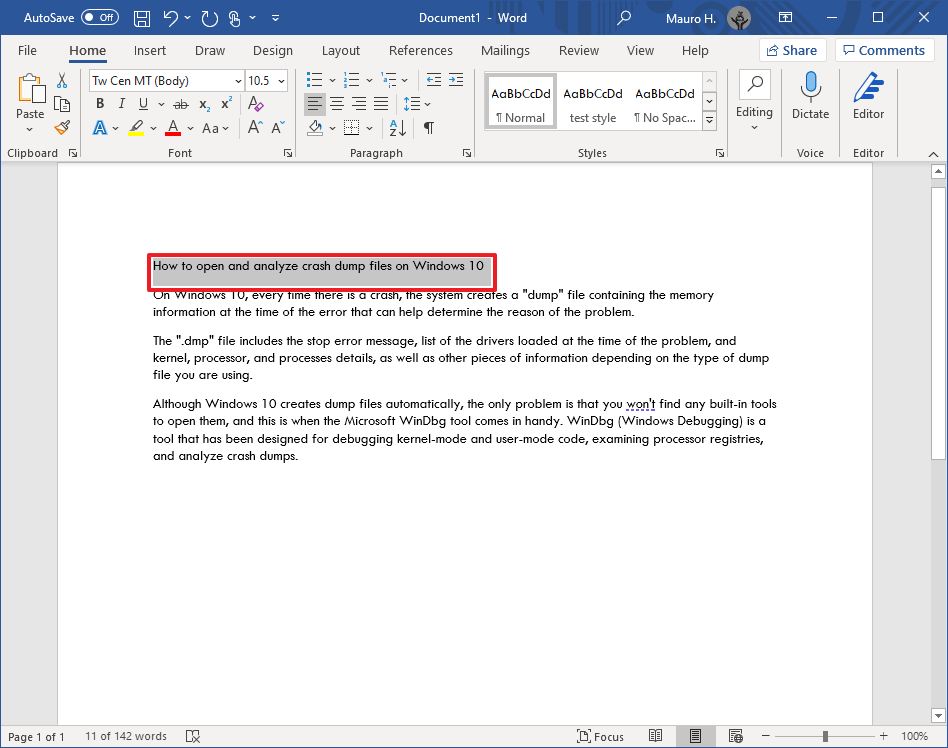
- In the «Home» tab, under the «Styles» section, select the content type to style.Quick note: When selecting a style, make sure to apply it to the correct formating. For example, if you choose the title, then the style should be «Title.» For the subtitle, select the «Subtitle» style and the rest of the headings using «Heading» 1 through 9 accordingly. And don’t worry about the colors. You will customize these when applying a theme. Also, to view all the available elements, click the More button in Styles’s bottom-right corner.

- Continue applying the styling for subtitles, headings, quotes, and anything else you want to format.Quick tip: You can always click and hold the Ctrl key and use the mouse pointer to select the same parts of the document, including the same stying, for instance, all the subtitles (headings).
Once you complete the steps, the document will be formatted with the styling you selected, and when you make changes to the style, the formatting will change automatically for all the same parts of the document.
In addition to selecting from the predefined settings, you can also create new or modify existing elements to style documents with custom settings.
Create new style element
To create a custom style element in Microsoft Word, use these steps:
- Open the Word app.
- Click the Open option.
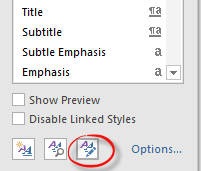
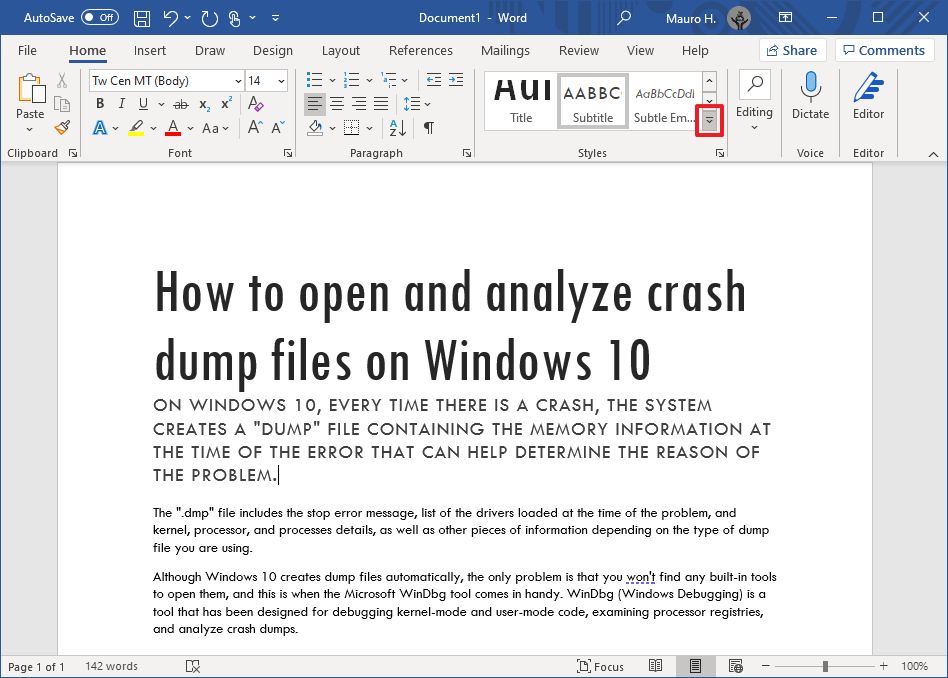
- In the «Home» tab, under the «Styles» section, click the More (down-arrow button) menu.
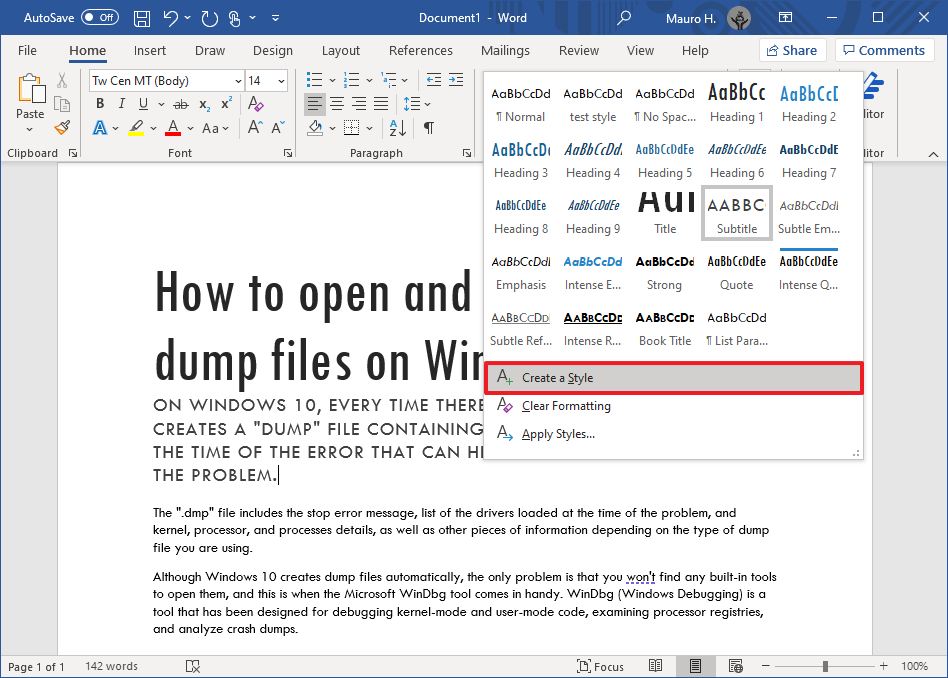
- Click the Create a style option.
- Specify a name for the style.
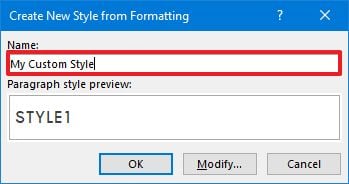
- Click OK button.
After you complete the steps, the new element will appear in the Styles menu.
Modify style elements
To modify a new or existing style element, use these steps:
- Open the Word app.
- Click the Open option.
- In the «Home» tab, under the «Styles» section, right-click the style and select the Modify Option.
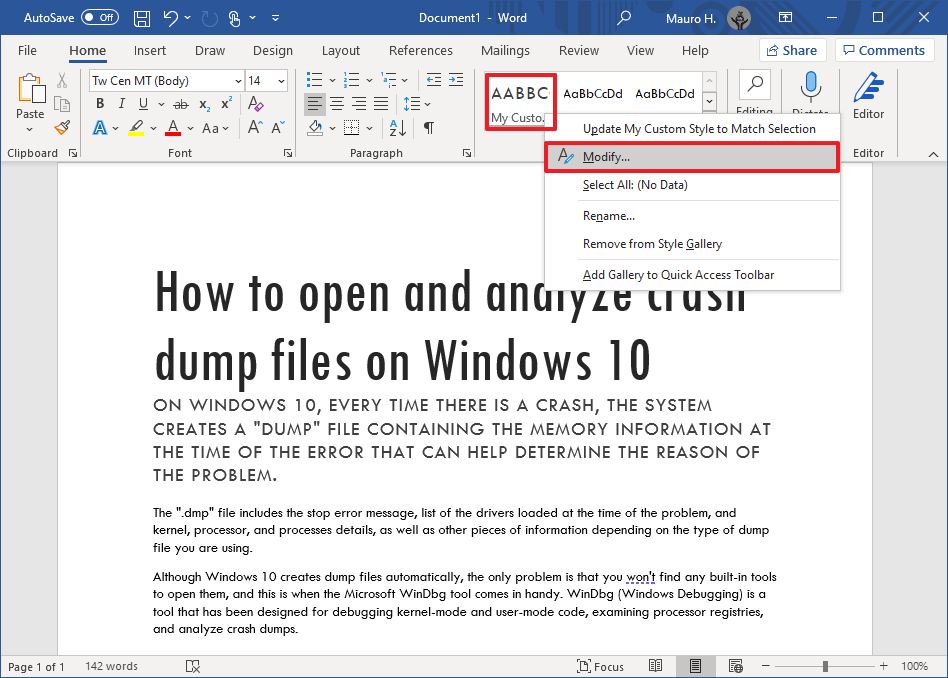
- Customize the style name and formatting settings (for example, font, size, color, aligment, etc.) as necessary.
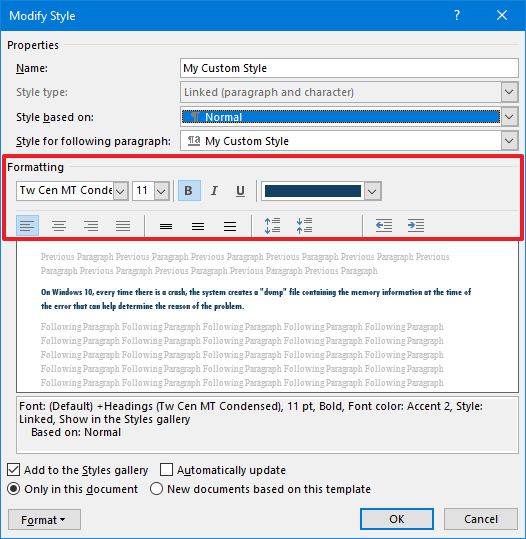
- Click the OK button.
Once you complete the steps, the new styling changes will apply to the element.
 Get subscribed
Microsoft 365 gives you full access to all the Office apps and perks, such as 1TB OneDrive storage and Skype minutes. You can also install Word, Excel, PowerPoint, Outlook, and other apps on up to five devices, and depending on the subscription, you can share the account with up to five people.
How to use themes in Word
After applying the style, you can use themes to give the document a different look and feel with colors and a combination of fonts.
To apply a theme to a Microsoft Word document, use these steps:
- Open the Word app.
- Click the Open option.
- Select the document you already styled to open it.
- Click the Design tab.
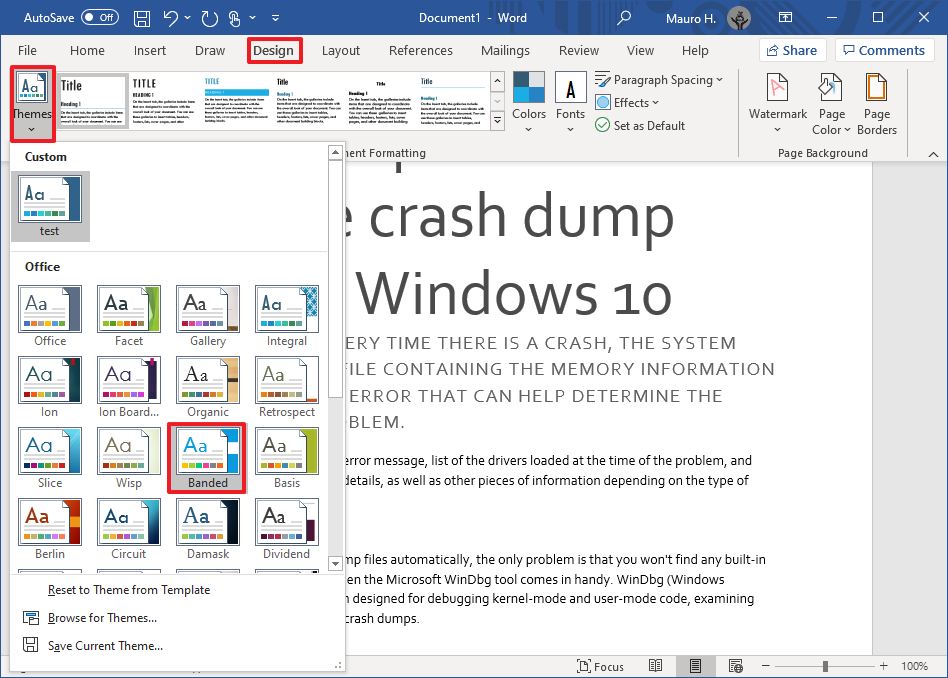
- Click the Themes button.
- Roll the mouse pointer over the themes to see a live preview of each available theme.
- Click the theme you want for the document.
- (Optional) Use the «Document Formatting» section to select another version of the theme with different combinations of fonts and colors.
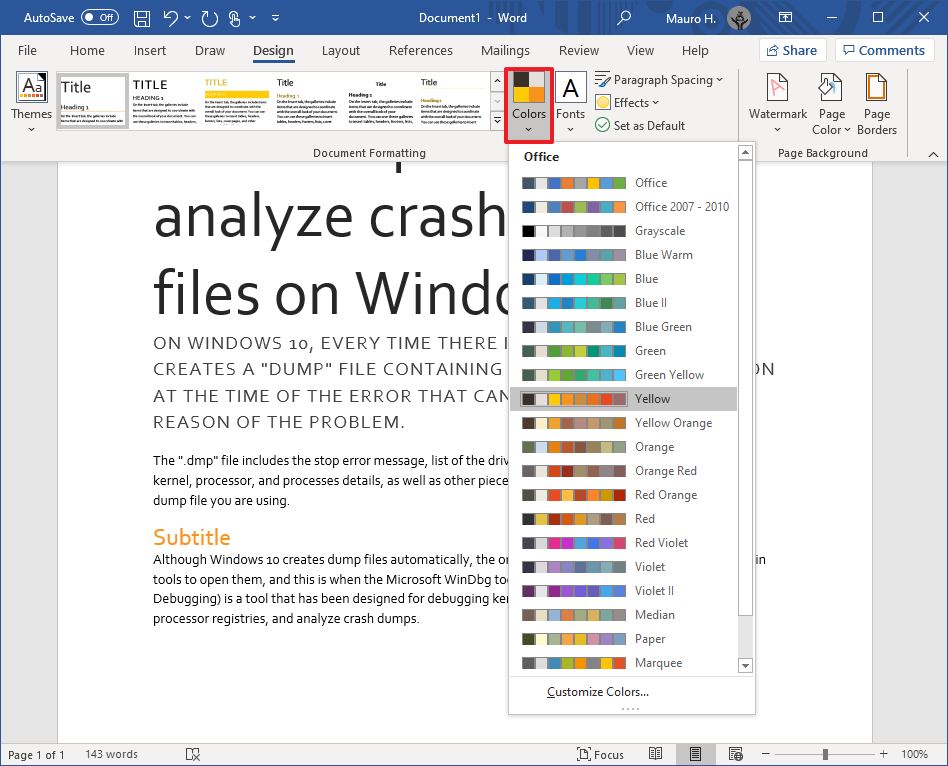
- (Optional) Click the «Colors» menu to select a different color scheme.
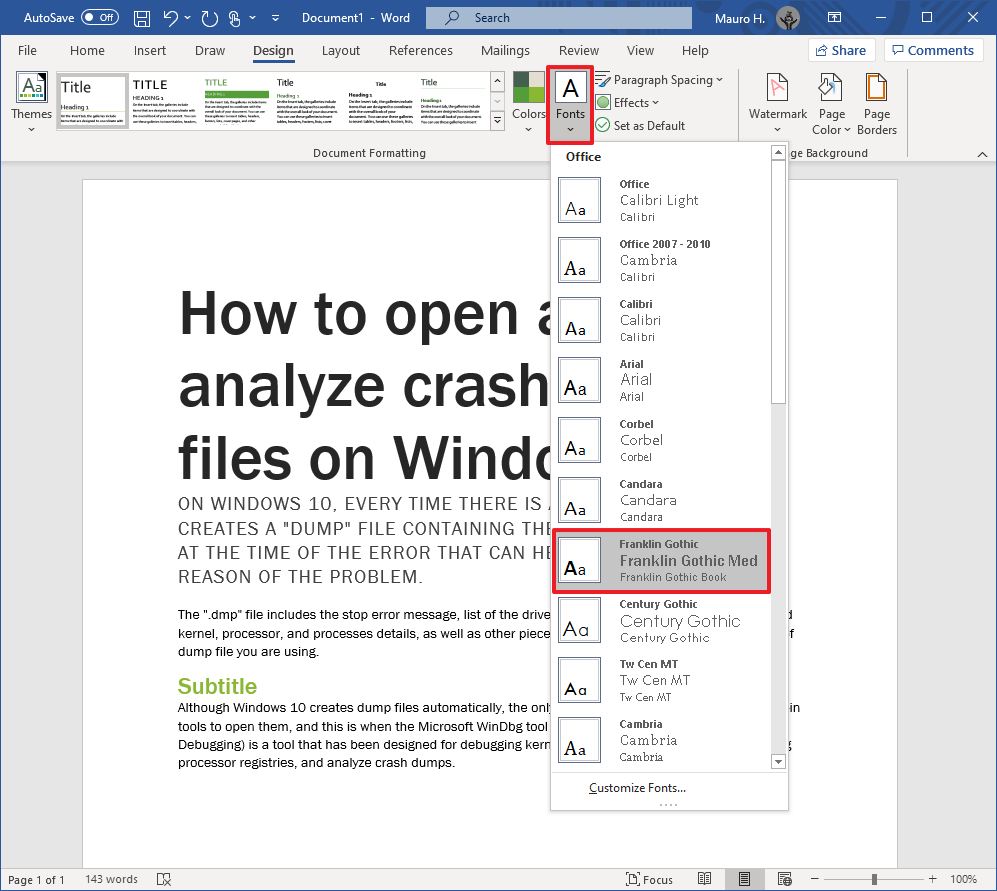
- (Optional) Click the «Fonts» menu to select a different combination of fonts.Quick note: As you open the menu, the top font is one for the title, the one in the middle is for the subheadings, and the one at the bottom is for the content.
After you complete the steps, the content will incorporate the new colors and fonts available through the theme you selected.
Set theme as the default
To set a theme as the default for Word, use these steps:
- Open the Word app.
- Click the Open option.
- Select the document you already styled to open it.
- Click the Design tab.
- Customize the formatting of the document with colors, fonts, spacing, and effects.
- Click the Set as Default button.
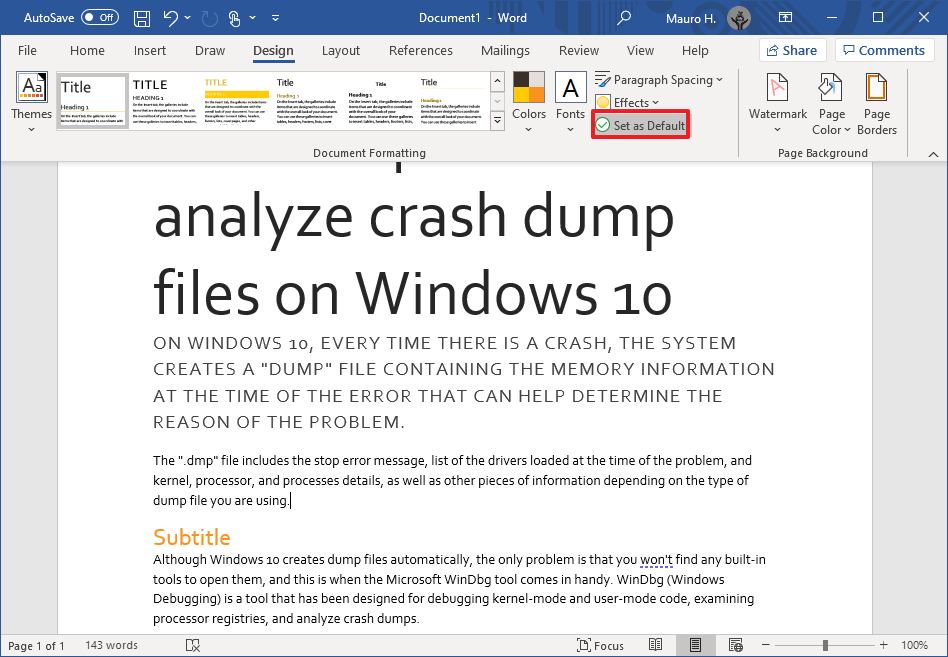
- Click the OK button.
Once you complete the steps, the theme will be available as the default for every new document. However, it won’t apply to the document automatically. Instead, it will be the default theme in the «Style» section, in the «Home» tab.
Create a new theme template
To create a new theme for Microsoft Word documents, use these steps:
- Open the Word app.
- Click the Open option.
- Select the document you already styled to open it.
- Click the Design tab.
- Use the «Document Formatting» section to select a format.
- Click the «Colors» menu to select a color scheme.
- Click the «Fonts» menu to select a combination of fonts.
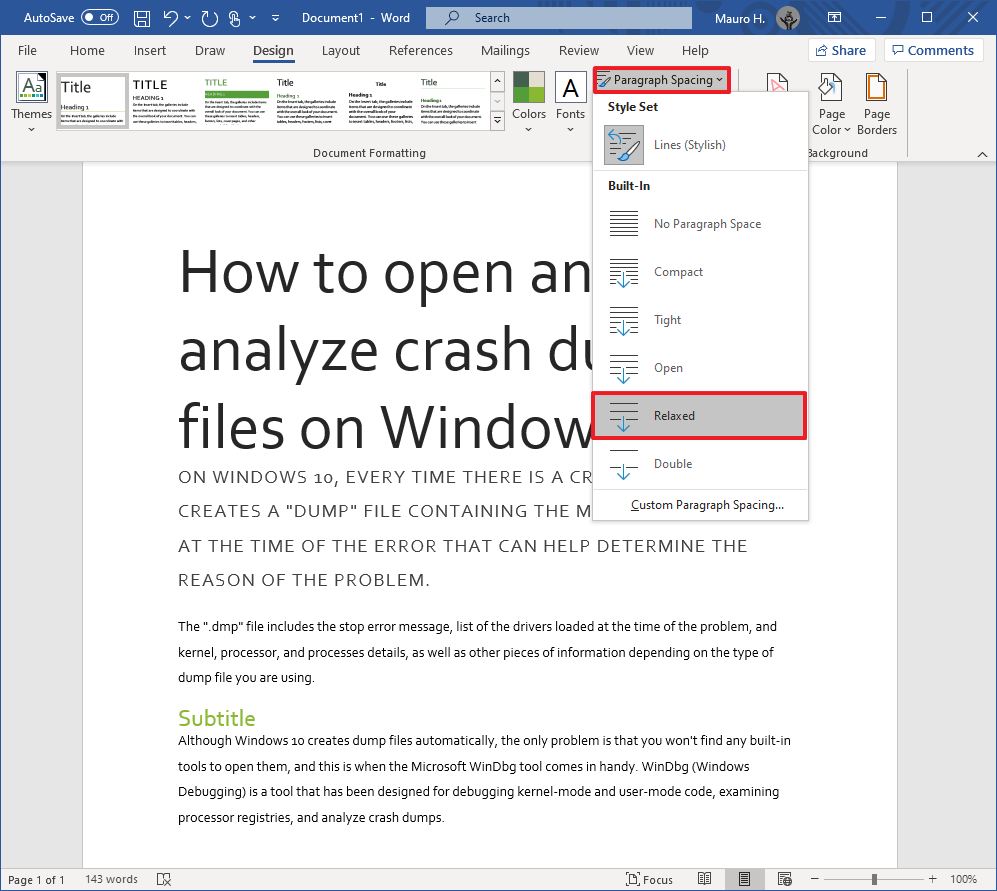
- Click the «Paragraph Spacing» menu and select one of the predefined options.Quick tip: You can also click the Custom Paragraph Spacing option to create a new style.
- (Optional) Click the «Effects» menu and select the effect you want to use when inserting objects.
- Click the «Themes» menu and choose the Save Current Theme option.
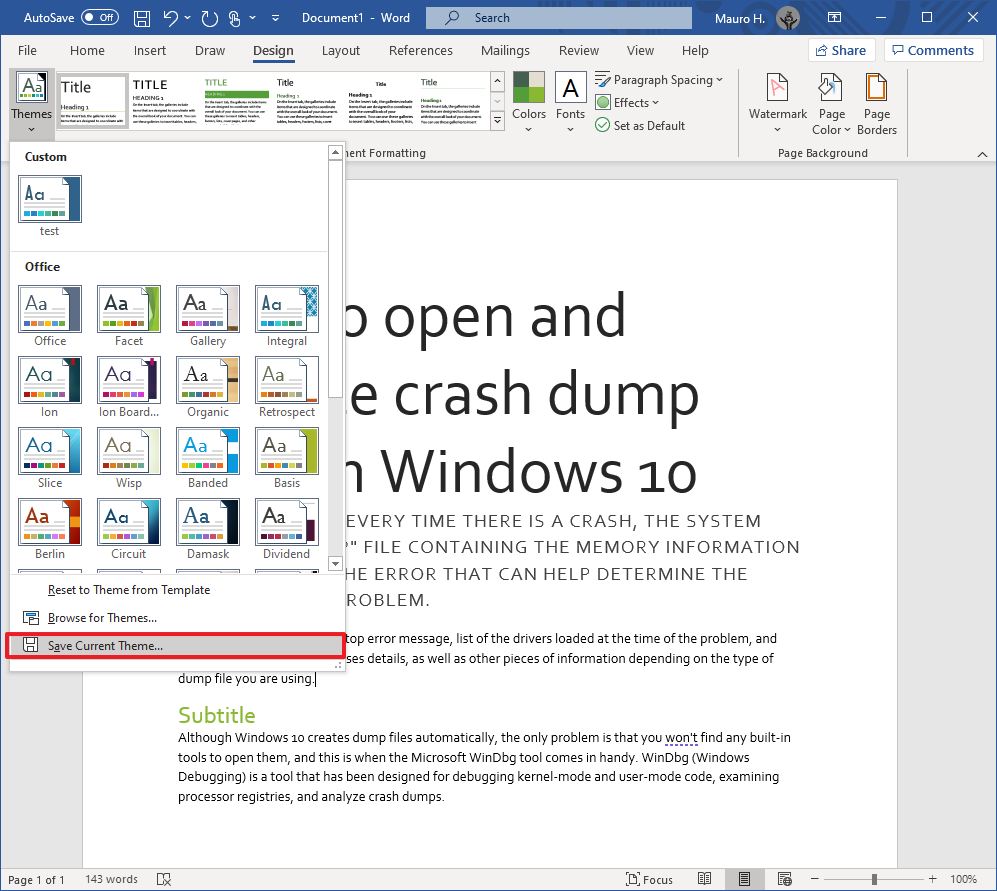
- Confirm a name for the theme.
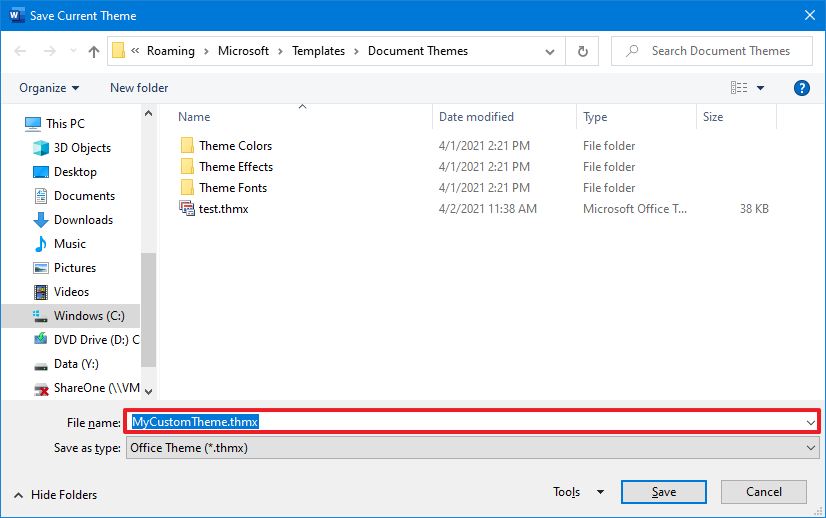
- Click the Save button.
After you complete the steps, the new theme will be available from the «Themes» menu in the «Custom» section.
More Windows 10 resources
For more helpful articles, coverage, and answers to common questions about Windows 10, visit the following resources:
- Windows 10 on Windows Central – All you need to know
- Windows 10 help, tips, and tricks
- Windows 10 forums on Windows Central
All the latest news, reviews, and guides for Windows and Xbox diehards.
Mauro Huculak is technical writer for WindowsCentral.com. His primary focus is to write comprehensive how-tos to help users get the most out of Windows 10 and its many related technologies. He has an IT background with professional certifications from Microsoft, Cisco, and CompTIA, and he’s a recognized member of the Microsoft MVP community.