
See all How-To Articles
This tutorial will demonstrate how to turn off Protected View and Enable Editing in Excel.
![]()
Files opened from potentially unsafe locations are opened in Protected View. Protected View is a read-only view where most editing functions are disabled until the user enables editing.
Why Does My File Open in Protected View?
Files that are downloaded from the Internet are usually opened in Protected View, because these files can contain malware or viruses. If you’re confident that the file is safe to edit, click Enable Editing in the message bar that appears.
Files that are sent as Outlook attachments are also usually opened in Protected View.

Files that are opened from an unsafe location will also display a Protected View message. An unsafe location can be the Temporary Internet Files folder, for example.
Files that you choose to open in Protected View will also show a message.

You can open a file in Protected View by selecting File > Open > Open in Protected View.

Enabling Edit Mode
Once you’re confident that the file will not damage your computer, you can enable editing in one of two ways.
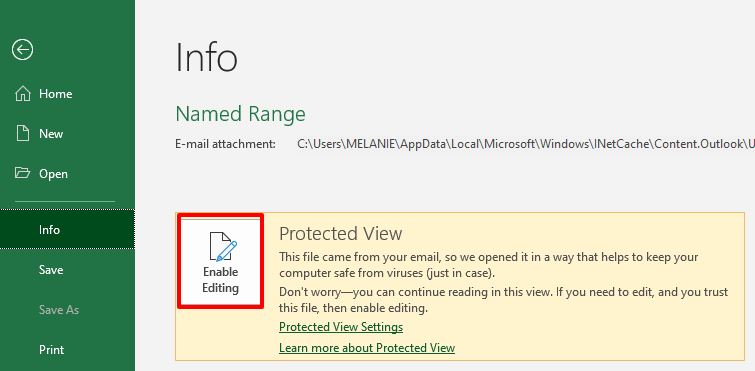
1. Click on Enable Editing in the message box that pops up.
OR
2. In the Ribbon, click File > Info > Enable Editing.
Changing Protected View Settings
To switch off Protected View, change the settings in the Excel Trust Center.
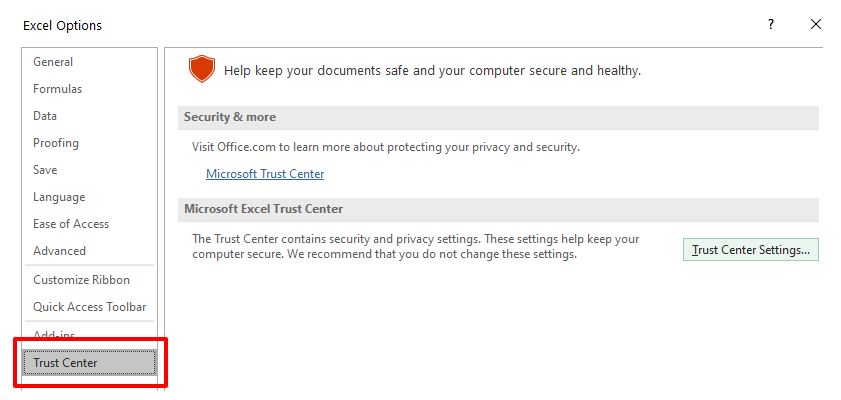
1. In the Ribbon, select File > Options > Trust Center.
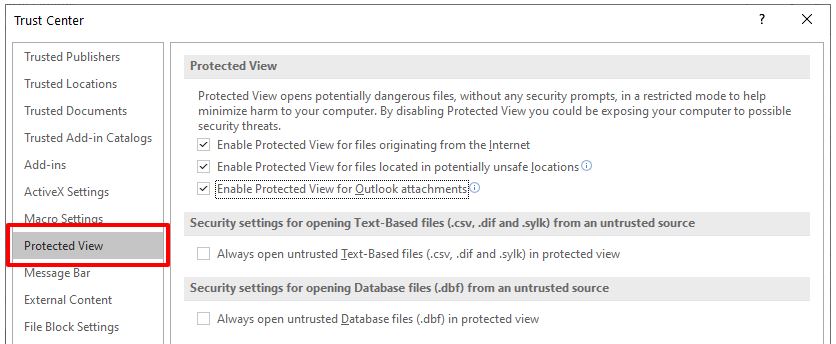
2. Select Trust Center Settings, and then select Protected View.
3. Remove the check marks from the three check boxes in Protected View.
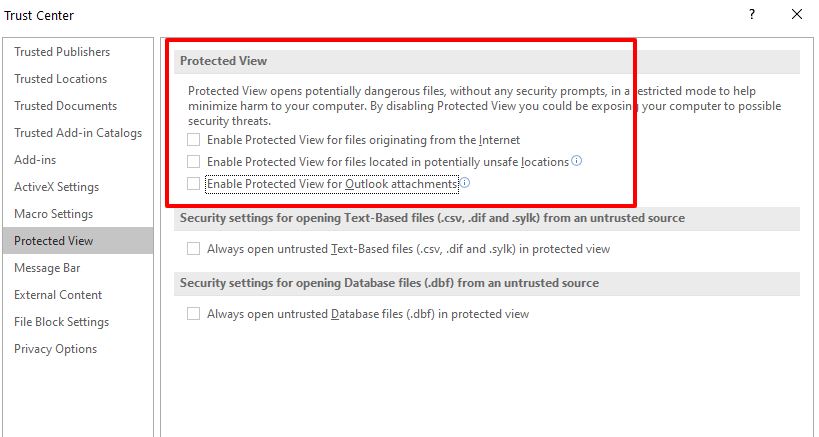
4. Click OK to save the changes.
Protected View messages will now no longer be displayed in Excel.
Files from the Internet and from other potentially unsafe locations can contain viruses, worms, or other kinds of malware that can harm your computer. To help protect your computer, files from these potentially unsafe locations are opened as read only or in Protected View. By using Protected View, you can read a file, see its contents and enable editing while reducing the risks.
Note: If your machine has Application Guard for Microsoft 365 enabled, documents that previously opened in Protected View will now open in Application Guard for Microsoft 365.
Included in this article
Why is my file opening in Protected View?
How do I exit Protected View so that I can edit, save, or print?
Why can’t I exit Protected View?
A problem was detected with my file
I want to change my Protected View settings
I want to revoke trust from a document/documents that I’ve previously trusted to not open in Protected View
Protected View Trust Center settings explained
What happens to add-ins in Protected View?
What happens to cloud fonts in Protected View?
How do I use Protected View with a screen reader?
Why is my file opening in Protected View?
Protected View is a read-only mode where most editing functions are disabled. There are several reasons why a file opens in Protected View:
-
The file was opened from an Internet location — When you see the message in Protected View that says «Be careful — files from the Internet can contain viruses. Unless you need to edit, it’s safer to stay in Protected View.», the file is being opened from the Internet. Files from the Internet can have viruses and other harmful content embedded in them. We recommend you only edit the document if you trust its contents.

-
The file was received as an Outlook attachment and your computer policy has defined the sender as unsafe — When you see the message in Protected View that says «Be careful — email attachments can contain viruses. Unless you need to edit, it’s safer to stay in Protected View.», the file was received from a potentially unsafe sender. We recommend you only edit the document if you trust its contents.
-
The file was opened from an unsafe location — When you see the message in Protected View that says «This file was opened from a potentially unsafe location. Click for more details.», the file was opened from a folder that is unsafe. An example of an unsafe location is your Temporary Internet Files folder. We recommend you only edit the document if you trust its contents.
-
The file is blocked by File Block — The following images are examples. Learn more about File Block
Editing isn’t allowed.
Editing is allowed, but not recommended unless you completely trust its contents.
-
File validation failure — When you see a message in Protected View that says «Microsoft 365 has detected a problem with this file. Editing it may harm your computer. Click for more details.», the file didn’t pass file validation. File validation scans file for security problems that can result from changes in the file structure.
-
The file was opened in Protected View by using the Open in Protected View option — When you see the message in Protected View that says «This file was opened in Protected View. Click for more details.«, you chose to open the file in Protected View. This can be done by using the Open in Protected View option:
1. Click File > Open.
2. On the Open dialog box, click the arrow next to the Open button.
3. From the list, click Open in Protected View.
-
The file was opened from someone else’s OneDrive storage— When you see the message in Protected View that says «Be careful — This file is from someone else’s OneDrive. Unless you trust this person and want to continue collaborating with them, it is safer to stay in Protected View.», you opened a document from a OneDrive folder other than your own, for example, when someone has shared a file in OneDrive with you. Such files may be untrusted and could beused to cause harm to your computer. We recommend you trust documents only if you trust the person to whom this OneDrive location belongs.
Notes:
-
This functionality is currently only available in Microsoft 365 clients.
-
Once you click «Trust Documents From This Person» all subsequent documents shared from this OneDrive location will no longer open in Protected View.
-


Important: Administrators can customize the list of potentially unsafe locations to include additional folders they also consider unsafe.
How do I exit Protected View so that I can edit, save, or print?
If you must read the file, and don’t have to edit it, you can remain in Protected View. If you know the file is from a trustworthy source, and you want to edit, save, or print the file, you can exit Protected View. After you leave Protected View, you’ve effectively remove read only, and the file becomes a trusted document.
Exit Protected View and edit when the yellow Message Bar appears
-
On the Message Bar, click Enable Editing.
Exit Protected View and edit when the red Message Bar appears
-
Click File > Edit Anyway.
Caution: We recommend you only do this if the file’s source and content are trusted by you.
Why can’t I exit Protected View?
If you can’t exit Protected View, it’s possible that your systems administrator has rules established that prevent leaving Protected View. Speak to your administrator to determine whether such rules have been made.
A problem was detected with my file
Microsoft 365 found a problem with your file and it might be a security risk. Opening the file in Protected View helps protect your computer and we recommend that you edit the file only if you trust the person who sent it to you, and if the file doesn’t look suspicious.
Why do I see this message?
This message can appear for a malicious file, which was created by a hacker to infect your computer with a virus or steal important information. This message means that editing the file could be dangerous. Sometimes the message appears for files that are damaged, for example:
-
The disk where the file is stored could be worn out or broken.
-
The file was created or edited with a program that has a problem.
-
An unexpected error occurred while copying the file to your computer, which can be caused by a problem with your Internet connection.
-
There could be a problem with how Microsoft 365 looks for problems in files. We work to make it better, but it’s not perfect.
Can I edit the file?
If the file is from someone you know and trust, you can choose to edit it. But we recommend that you avoid editing a file that seems suspicious. For example:
-
The file came from someone you don’t know or trust.
-
You weren’t expecting to receive the file or it doesn’t seem like the kind of file that person would send you.
-
The content of the file seems unusual, for example, it appears to be a bill for something you never bought, or it’s causing your computer to display errors.
If the file seems suspicious, close the file and delete it from your computer. We recommend you don’t edit it. To ease suspicion, you can call or email the person who sent you the file to confirm.
The following image is an example of the Edit Anyway button in the Microsoft 365 Backstage view.

What type of files cause file-validation errors?
-
Word 97-2003 files (.doc, .dot)
-
Excel 97-2003 files (.xls, .xla, .xlt, .xlm, .xlb, .xlt)
-
PowerPoint 97-2003 files (.ppt, .pot., pps, .ppa)
I want to change my Protected View settings
We advise speaking with your administrator before you make changes to your Protected View settings.
-
Click File > Options.
-
Click Trust Center > Trust Center Settings > Protected View.
-
Make selections that you want.
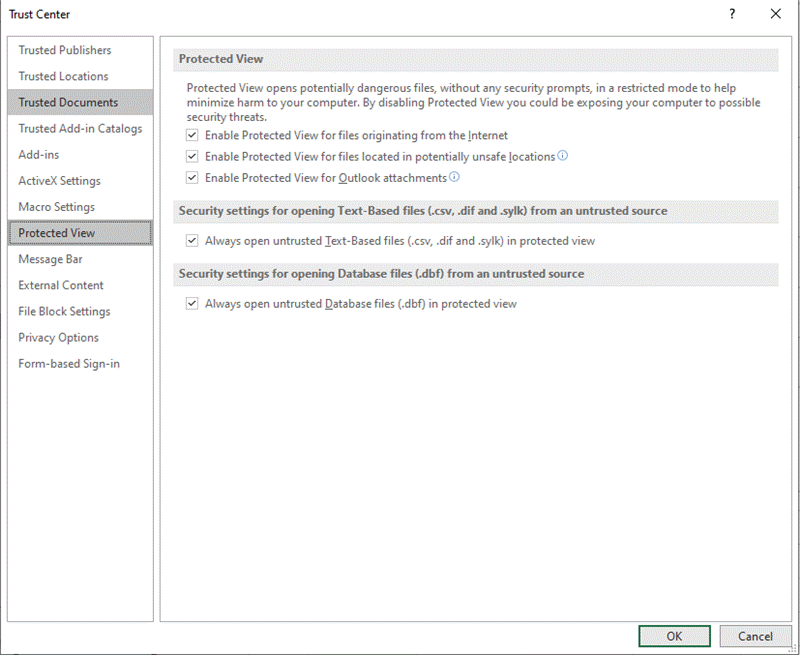
Protected View Trust Center settings explained
-
Enable Protected View for files originating from the Internet The Internet is considered an unsafe location because of its many opportunities for malicious intent.
-
Enable Protected View for files that are located in potentially unsafe locations This refers to folders on your computer or network that are considered unsafe, such as the Temporary Internet folder or other folders assigned by your administrator.
-
Enable Protected View for Outlook attachments Attachments in emails can come from unreliable or unknown sources.
-
Always open untrusted Text-Based files
(.csv, .dif and .sylk)
in protected view If this Excel-specific setting is enabled, text-based files opened from an untrusted location are always opened in Protected View. If you disable or don’t configure this setting, text-based files opened from an untrusted location are not opened in Protected View.This setting can also be configured by an administrator as a policy via Group Policy or the Microsoft 365 cloud policy service.
Note: This policy setting only applies to Microsoft 365 products.
-
Always open untrusted Database files (.dbf) in protected view If this Excel-specific setting is enabled, database files opened from an untrusted location are always opened in Protected View. If you disable or don’t configure this setting, database files opened from an untrusted location are not opened in Protected View.
This setting can also be configured by an administrator as a policy via Group Policy or the Microsoft 365 cloud policy service.
Note: This policy setting only applies to Microsoft 365 products.
I want to revoke trust from a document/documents that I’ve previously trusted to not open in Protected View
If you previously trusted a document or documents to open outside of Protected View by either (1) clicking «Enable Editing» or «Trust Documents From This Person» in the message bar or (2) clicking on «Edit Anyway» when the file fails validation, please refer to guidance under Trusted documents for removing this trust decision and making such documents re-open in Protected View.
What happens to add-ins in Protected View?
Add-ins may run when a file opens in Protected View, but may not function as expected. If your add-ins aren’t running correctly, contact the add-in’s author. An updated version, which is compatible with Protected View, may be needed.
What happens to cloud fonts in Protected View?
It’s possible the person who sent you the document used a cloud font, which is a font that doesn’t ship with Windows or Microsoft 365 but which must be downloaded from the Internet the first time it’s used. If so, and it’s a font you don’t already have installed, that font won’t download while you’re in Protected View. Word will try to substitute another font that will hopefully look okay. If you’re confident that the document is safe, and want to see it the way the author intended, you’ll need to enable editing so that Word can download and install the correct font.
Note: If Word is unable to find any compatible fonts to substitute you might see black boxes where the text should be. Enabling editing so the correct font can download should fix the problem.
How do I use Protected View with a screen reader?
When you are in protected view, editing is locked, so you can’t cursor around the document as expected. However, if you need to navigate through a document in Protected View with a screen reader, you can press F7 to turn on caret browsing. This action should allow you to navigate through the text without being in edit mode.
See Also
Open a document after a file corruption error
Check file compatibility with earlier versions
Add or remove protection in your document, workbook, or presentation
 При открытии файлов документов или таблиц в Microsoft Word и Excel вы можете увидеть уведомление: «Защищенный просмотр» с пояснением, например: «Будьте осторожны: файлы из Интернета могут содержать вирусы. Если вам не нужно изменять этот документ, лучше работать с ним в режиме защищенного просмотра» или «Изменение файлов этого типа запрещено параметрами политики». Иногда редактировать документ всё-таки требуется, в этом случае может потребоваться выйти из режима защищенного просмотра.
В этой инструкции подробно о том, почему включается этот режим и о том, как убрать защищенный просмотр в Word и Excel.
Назначение защищенного просмотра
Защищенный просмотр для документов Word и Excel по умолчанию включается для:
- Файлов, скачанных из Интернета или полученных через Outlook
- Файлов из небезопасных расположений (например, папок с временными файлами)
- Файлов старых версий Word и Excel
Также, в зависимости от настроек безопасности, защищенный просмотр может включаться для определенных типов документов или документов из сетевых расположений.
Назначение защищенного просмотра — заблокировать действия, которые может выполнить документ на вашем компьютере (а документы могут содержать в себе не только текст, но и исполняемые макросы), что может повысить безопасность в случаях, когда источник документа неизвестен.
Как убрать защищенный просмотр
В зависимости от конкретного сценария открытия документа Word и Excel в режиме защищенного просмотра, возможны следующие действия, чтобы его отключить.
Простое отключение защищенного просмотра
Два простых варианта (при условии, что вам действительно требуется редактирование документа и простой просмотр не подходит), которые сработают для файлов из Интернета при сообщении «Будьте осторожны: файлы из Интернета могут содержать вирусы»:
- Нажать кнопку «Разрешить редактирование» в уведомлении о защищенном просмотре.

- Для файлов, скачанных из Интернета — нажать правой кнопкой мыши по файлу, выбрать пункт «Свойства», отметить пункт «Разблокировать» в свойствах файла, применить настройки и уже после этого открывать его в соответствующем приложении Microsoft Office.


Параметры защищенного просмотра и безопасности в Word и Excel
Если требуется настроить включение защищенного просмотра в определенных условиях, сделать это можно в настройках Word и Excel. Настройки почти одинаковы в обеих программах, привожу пример для Excel:
- Откройте меню Файл — Параметры. Если вы не видите пункт «Параметры», нажмите «Другие…», а затем — этот пункт.
- Откройте пункт «Центр управления безопасностью».
- Нажмите кнопку «Параметры центра управления безопасностью». Параметры защищенного просмотра настраиваются в далее приведенных разделах.

- Защищенный просмотр — здесь задаются параметры, при которых защищенный просмотр будет включен автоматически: для файлов из Интернета и других ненадежных файлов. Отметки можно снять и применить настройки. Список параметров отличается для Word и Excel.
- Параметры блокировки файлов — в этом разделе вы увидите список типов файлов. Те из них, для которых установлена отметка в столбце «Открыть» по умолчанию открываются в режиме защищенного просмотра (что указано ниже списка). Вы можете снять отметки и применить настройки, чтобы файлы открывались в обычном режиме. Этот раздел настроек поможет отключить защищенный просмотр в случае, если «Изменение файлов этого типа запрещено параметрами политики».
- Надежные расположения — список папок (можно добавить свои, в том числе расположения в сети), документы из которых считаются надежными и не открываются в режиме защищенного просмотра.
- Надежные документы — позволяет включить «надежность» для документов из локальной сети или отключить её. Также, если ранее какие-либо документы были отмечены как надежные (вы разрешили их редактирование), здесь можно очистить список таких документов и при последующем открытии они снова откроются в режиме защищенного просмотра.


Видео
Если у вас остаются вопросы, касающиеся режима защищенного просмотра в Microsoft Office, задавайте их в комментариях — решение должно найтись.
![]()
Download Article
![]()
Download Article
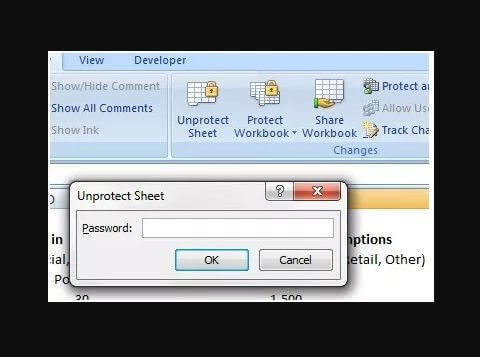
- Removing Password Protection from a Sheet
- Cracking a Workbook Password
- Q&A
- Tips
|
|
|
This wikiHow teaches you how to remove the password from a protected Excel worksheet, as well as how to crack the password for an encrypted Excel file. In most cases, removing a password from an editing-locked worksheet inside of an Excel file is fast and easy! But if you need a password to even open the file, things get a bit tricky. There’s no legitimate way to decrypt an Excel workbook without using a password cracker, which can be a very resource-intensive process, depending on the complexity of the password. Still, it’s worth a try!
-
1
Understand the conditions under which you can do this. If only a sheet in the Excel workbook is protected—that is, if you can open the Excel file and view its contents but not edit it—then you can use this method to remove the password protection on both Windows and Mac computers.
- If the Excel file itself is encrypted and requires a password to even view the contents, this method will definitely not work. You can try using a password cracker, but there are no guarantees.
- There’s a chance this method won’t work if the file was protected using the Microsoft 365 version of Excel.[1]
-
2
Check to see if the Excel file is encrypted. The easiest way to do this is by double-clicking the Excel file. If the file opens and you can click Read Only to view the file, or if the file opens like usual when you double-click it, the file is not encrypted.
- If you’re immediately prompted for a password upon double-clicking the file and not given the option to open it read-only, the file is encrypted and you cannot use this method to open it.
Advertisement
-
3
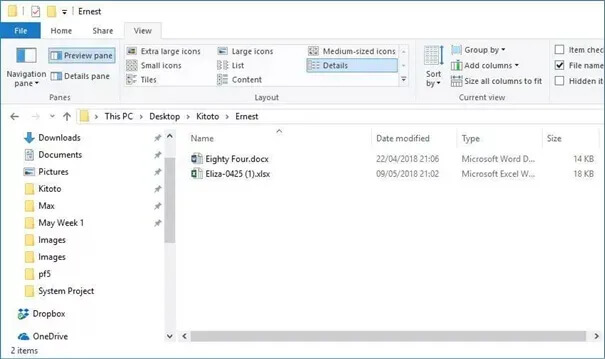
Make a copy of the workbook. In Finder or the Windows File Explorer, click the Excel file that contains the sheet you want to unprotect, then press Ctrl + C (Windows) or Command + C (Mac) and paste it into another folder by pressing Ctrl + V (Windows) or Command + V (Mac).
- This is necessary in case you accidentally corrupt the original version of the file in the process.
-
4
Enable file extensions. Skip this step on a Mac. If you’re using a Windows computer, you’ll need to make sure you can view and change file extension names by doing the following:
- Open File Explorer by pressing Windows key + E.
- Click View.
- Check the «File name extensions» box.
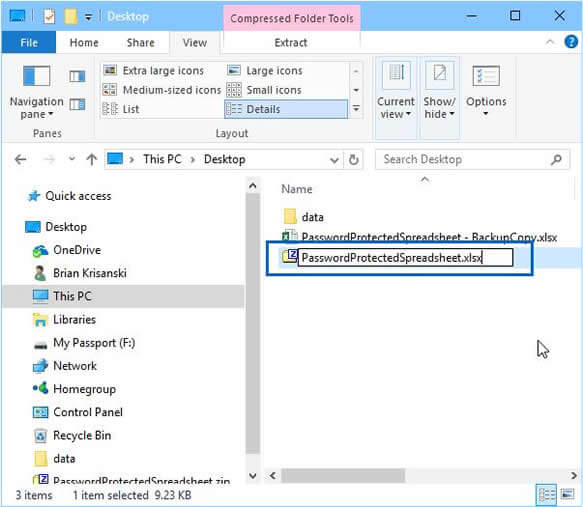
-
5
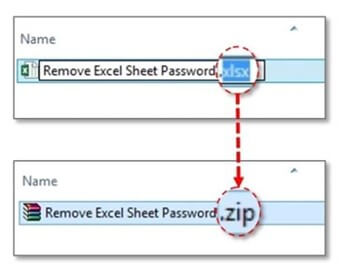
Change the Excel file into a ZIP folder. To do so:
- Windows — Right-click the Excel file, click Rename, delete the «xlsx» text at the end of the file’s name, and type in zip. Make sure that you keep the period between the file’s name and «zip». Press Enter and click Yes when prompted.
- Mac — Select the Excel file, click File, select Get Info, delete the «xlsx» text at the end of the file’s name, and type in zip. Make sure that you keep the period between the file’s name and «zip». Press Return and click Use .zip when prompted.
-
6
Extract the ZIP folder. This process will vary depending on your computer’s operating system:
- Windows — Right-click the ZIP folder, click Extract All… in the drop-down menu, and click Extract when prompted. The extracted folder should open.
- Mac — Double-click the ZIP folder, then wait for the extracted folder to open.
-
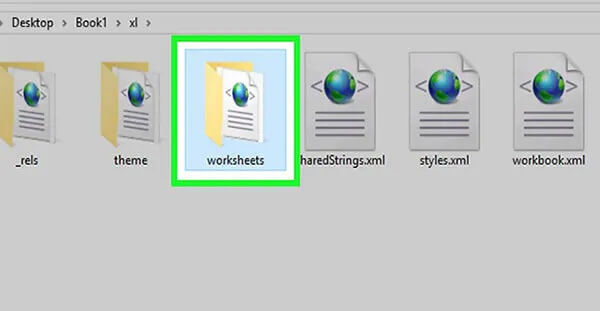
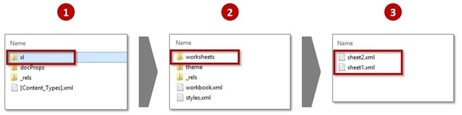
7
Double-click the xl folder. This opens the folder.[2]
- If the extracted folder didn’t open for some reason, first double-click the regular folder with the same name as your ZIP folder.
-
8
Double-click the worksheets folder. It’s near the top of the «xl» folder.
-
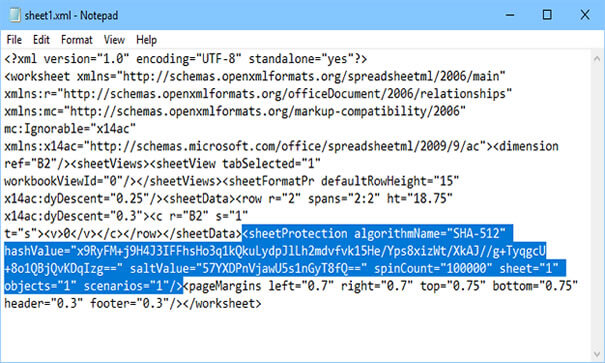
9
Open the sheet in a text editor. Depending on your computer’s operating system, do one of the following:
- Windows — Right-click the sheet you want to unlock (e.g., «Sheet1»), select Open with in the drop-down menu, and click Notepad in the resulting pop-out menu.
- Mac — Click the sheet you want to unlock (e.g., «Sheet1»), click File, select Open With, and click TextEdit.
-
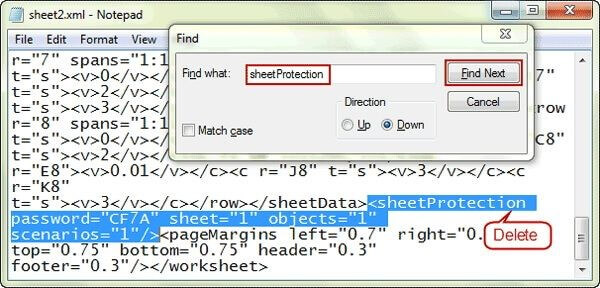
10
Remove the password protection code. Find the «sheetProtection» section that’s inside the «< >» brackets, then delete everything from «<sheetProtection» to the closed bracket («/>») on the other side of the sheet protection algorithm.
-
11
Save your changes and close the text editor. Press either Ctrl + S (Windows) or Command + S (Mac), then click the X (or red circle on a Mac) in the corner of the text editor.
- If multiple sheets in the workbook are protected, you’ll need to remove protection from each of them separately. Open any other protected sheet in your text editor and remove the same line, saving each as you go.
-
12
Copy the «worksheets» folder. Click the «Back» button to go back to the «xl» folder, then select the «worksheets» folder and press either Ctrl + C (Windows) or Command + C (Mac) to copy it.
-
13
Open the ZIP file (Windows) or the new folder (Mac). This is the file you renamed and then extracted earlier (the one ending in .zip, if you’re using Windows). If you’re using a Mac, just double-click the new folder that has the same name as the ZIP file.
-
14
Replace the «worksheets» folder with your copied one. Navigate to the «worksheets» folder by double-clicking the «xl» folder, and then delete the «worksheets» folder inside. Next, right-click a blank place in the window and select Paste to paste the copied version.
- If you’re using Windows, you’ve now added the copied folder back into the existing ZIP file.
- If you’re using a Mac, you’ve added the copied folder to the extracted folder.
-
15
(Mac only) Turn the folder back into a ZIP file. If you’re using a Mac, press Control as you click the folder that you previously extracted—it’s the folder with the same name as your spreadsheet. Then, select Compress from the menu. The folder is now a ZIP file again.[3]
-
16
Change the ZIP folder back into an Excel file. Close the ZIP file, then do one of the following:
- Windows — Right-click the ZIP folder, click Rename, replace the «zip» text with «xlsx», and press Enter. Click Yes when prompted.
- Mac — Click the ZIP folder, click File, click Get Info, replace the «zip» text in the title with «xlsx», and press Return. Click Use .xlsx when prompted.
-
17
Double-click the Excel file to open it. Now that you’ve removed password protection from the sheet, you’ll be able to edit it as needed.
- If you receive an error that the Excel sheet is damaged, you probably removed extra code when you were attempting to remove the password protection algorithm. Repeat the above steps, making sure to only remove the text between the brackets (</>) and the brackets themselves.


Advertisement
-
1
Understand that it may be impossible to crack the password. Modern versions of Excel, such as Excel 2019 and Microsoft 365, use advanced encryption techniques that make the methods used by password crackers virtually useless due to how long the password can take to crack. You’ll have an easier time cracking a shorter password without special characters, although it may still be possible to crack more complex passwords using the right app.
- It is impossible to crack an Excel file without purchasing a password cracker, as free versions of reputable password crackers usually only cover up to Excel 2010.
- If your Excel file truly is encrypted, double-clicking the Excel file will prompt you for a password before you can view the file’s contents. If this is the case (and you don’t know the password), you’ll need a password cracker to view its contents.
-
2
Download and install PassFab for Excel. You can get it from https://www.passfab.com/products/excel-password-recovery.html. While many applications may claim to remove password encryption from password-protected Excel workbooks, PassFab is known for being safe and easy to use.[4]
It can also decrypt Excel files made in all versions of Excel, including 2019 and Microsoft 365. There are two drawbacks, though:- One is that the app only works on Windows, so Mac users will need access to a PC.[5]
There may be a Mac alternative, but none have proven to be as reliable. If you don’t have access to Windows, try searching for another Excel password-cracking app. Just be sure to research the app thoroughly before downloading and installing, as there are many rogue apps out there. - The other is that the software is not totally free—there are some basic features in the trial version that may help crack your password, but you’ll need to pay for a license if the password is at all complex. If you just need to crack one workbook, you can go for the one-month option that’s only $15.95.[6]
Just remember to cancel the subscription before the month ends so you aren’t billed in the future.
- One is that the app only works on Windows, so Mac users will need access to a PC.[5]
-
3
Open PassFab. After installing the app, you’ll find it in your Windows Start menu.
-
4
Click Recover Excel Open Password. It’s the first of two options. This is the option you should choose if you are required to enter a password upon opening the workbook.
- If you just need to remove the password from a protected sheet inside a workbook and couldn’t do so by editing the XML file, you can select Remove Excel Restriction Password instead and follow the on-screen instructions.
-
5
Click the + and select your Excel file. This tells PassFab which file to crack.[7]
-
6
Select a password recovery mode. Keep in mind that no matter which option you choose, cracking a password takes time. The app has to try all different combinations of letters, numbers, and symbols. This can take anywhere from a few minutes to a few months! There are three options you can choose from:
-
Dictionary Attack is a good option if you think the password is a simple word from the dictionary. You can also provide your own list of words to add in addition to the dictionary, such as common passwords used by your organization. Just add those potential passwords to a text file, save it, click Settings next to «Dictionary Attack,» and select that file.
- This is the only free option, and it only includes a limited dictionary.[8]
If you want to gain access to more options, click Upgrade Now to purchase a license.
- This is the only free option, and it only includes a limited dictionary.[8]
- Brute Force with Mask Attack is a great option if you know any parts of the password, or want to include certain letters, numbers, or symbols in your cracking attempt. If you choose this option, click Settings beside it to customize the length of passwords to try, which characters to use, and prefixes and/or suffixes. Depending on the length and complexity of the password, this option can take a long time—hours, days, even weeks!
- Brute Force Attack is just like the previous option, except it’s best for when you really have no idea what the password could be. It basically tries all possible combinations until it can figure out the password, which can definitely take a long time depending on its length.
-
Dictionary Attack is a good option if you think the password is a simple word from the dictionary. You can also provide your own list of words to add in addition to the dictionary, such as common passwords used by your organization. Just add those potential passwords to a text file, save it, click Settings next to «Dictionary Attack,» and select that file.
-
7
Click the blue Recover button. Let the password cracking begin! PassFab will attempt all possible combinations consistent with the cracking option you selected. The app will continue trying combinations until it guesses the password or runs out of options to try.
- This can take a while, and can consume a lot of resource on your computer. If you need to pause the cracking, click the stop button (the square) until you’re ready to resume, and then click the play button to start again.[9]
- When PassFab finds the password, it will display it to you in plain text—you can then copy or type the password into Excel when opening the file to view its contents.
- Depending on the contents of the Excel file, it might be necessary to abandon your efforts if you haven’t found the password within a reasonable period of time.
- This can take a while, and can consume a lot of resource on your computer. If you need to pause the cracking, click the stop button (the square) until you’re ready to resume, and then click the play button to start again.[9]


Advertisement
Add New Question
-
Question
Can I save the excel sheet in .CSV format then open in Excel?

Marry.M.Chen
Community Answer
Yes, you can do that, save the excel sheet in .CSV format and open in Excel.
-
Question
What do I do if I get an error extracting a ZIP file?
-
Question
What do I do if I can’t open my password protected Excel file?
Password crackers are the fastest and easiest option if you need to remove an Excel password. There are free password recovery tools, such as FreeWordExcel and Straxx. Unfortunately they have limited functionality, so if they won’t help in you that case, then you can try commercial software such as Excel password recovery master, Excel password recovery online services like Password-Find, there are a lot of options.

Ask a Question
200 characters left
Include your email address to get a message when this question is answered.
Submit
Advertisement
-
Microsoft cannot recover lost Excel passwords for you.[10]
-
Only use these methods if you are the file’s owner or an authorized user. Cracking a password for a file that isn’t yours is not only unethical, but also may be illegal, depending on the file’s contents and your location.
-
In most cases, you won’t be able to crack the password on an encrypted Excel file.
Thanks for submitting a tip for review!
Advertisement
References
About This Article
Article SummaryX
To open a password protected Excel file, start by double-clicking the file to see if you can read it. If it opens, copy and paste the file to create a backup in case you make a mistake. Then, open File Explorer, click “View” and check the “File name extensions” box. Once you’ve done that, right click the Excel file and rename the file extension to “.zip.” Next, right-click the file and select “Extract files.” After you’ve extracted the files, open the “xl” folder and then “worksheets.” Open the sheet inside with Notepad, search for the “sheetProtection” section inside the diamond brackets, then delete the text until the closed bracket. When you’ve deleted the sheet protection, save the file. Then, copy the “Worksheets” folder from the “xl” folder. Open the zip file you renamed earlier, and replace the “worksheets” folder inside with the one you just copied. To finish off, change the zip folder back to an Excel file by changing the extension back to “.xlsx.” For more tips, including how to crack an encrypted Excel file, read on!
Did this summary help you?
Thanks to all authors for creating a page that has been read 817,088 times.
Is this article up to date?
A password protected Excel file means that only authorized users can view, open, change or edit the contents of the file. It also means that the file is locked, and users must know the password to open it.
So this tutorial will explain how you can open password protected Excel files without the password. If you don’t have the password, you will have to face different limitations, like you won’t be able to change the formatting too. Here are some tested methods to unlock protected Excel file without password.
Part 1: How to Open Password Protected Excel File If Password Forgotten
Due to security reasons, there is no official way offered by Microsoft to open password protected Excel file without a password. Although there is no official way yet, you can try some other methods that work perfectly fine. Let’s get started with some working tricks.
- 1. Open Excel File & Office 365 without Password
- 2. Open Excel File in Google Sheets
- 3. Open Excel File Using VBA Code
- 4. Open Excel File Online
- 5. Open Excel File by Modifying File Extension
- 6. Open Excel File on Mac
Solution 1: Open Excel File & Office 365 without Password
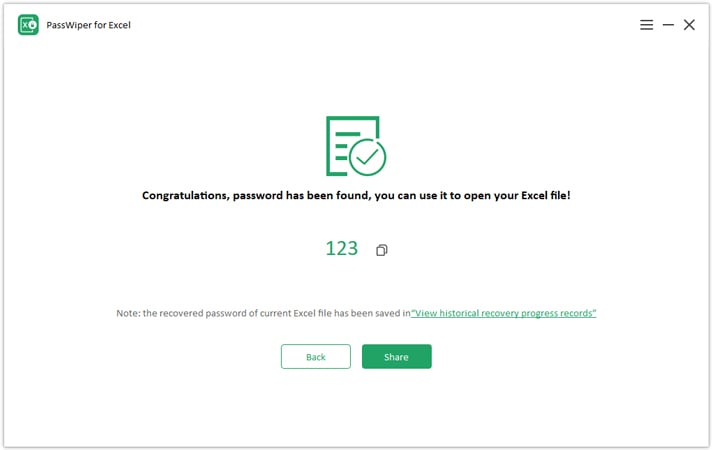
The best option to open an Excel file without a password is to use a premium tool. Here, you can use PassWiper for Excel. This tool allows you to open Excel file for any version of Excel or Office 365 without a password.
The use of this tool is quite easy, and here are the simple steps that will help you to unlock any Excel file without a password.
This method is best for users who have a rough idea of the previous password. If you know some of the numbers, characters, and length of the password, it can help to speed up the password recovery process. Here are the steps you need to follow:
- Install PassWiper on your computer and open the program and click on “Recover Excel Password.”
- On the next step, drop your locked file and choose dictionary attack, combination attack or brute force attack as per your requirement and then click on recover.
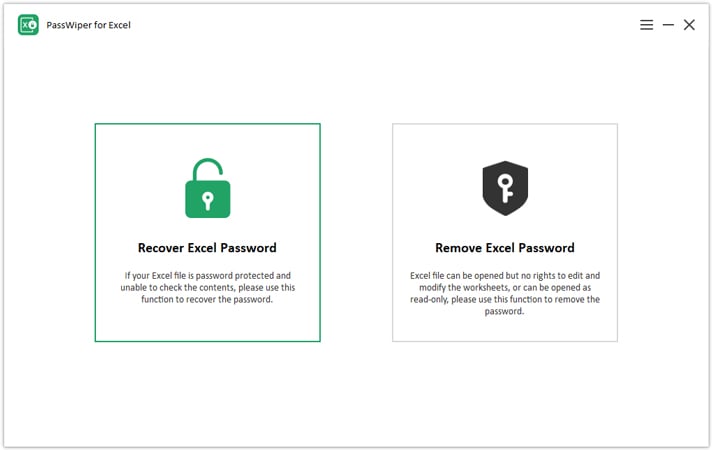
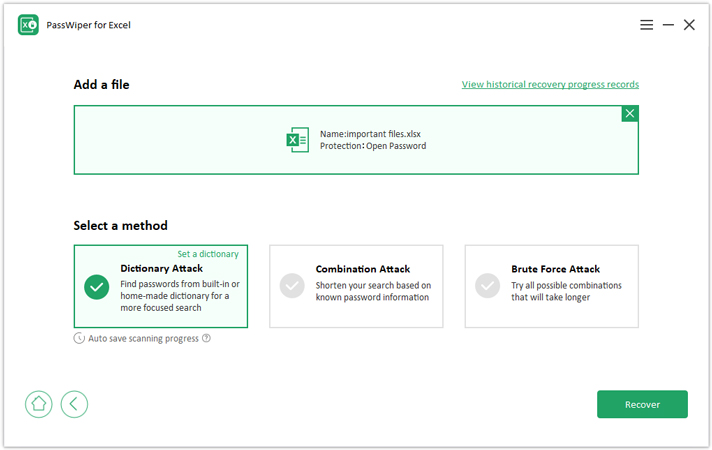
Note: Dictionary attack needs a dictionary file where stores all your possible password, and on combination attack, you need to follow the on-screen instructions to complete some information about the password, as for brute force attack, just click “Recover”.
Solution 2: Open Excel File in Google Sheets
There is another smart way to open an Excel file without a password by using Google Sheets. The process is simple, but it does not always work. You can try it for your file:
- Open your Google account and create Spreadsheet.
- Choose File from the menu and click on Open.
- You can upload or drag your protected Excel file in Google sheets.
- Google Sheets will open the file without a password.
- You can download the file and save as .XLSX format and open the file in Excel without a password.
Solution 3: Open Excel File Using VBA Code
You can open Excel files using VBA code, and this method does not require the use of any other software or tool. The process is a little bit technical so pay attention to these steps:
- Open the protected Excel file and open the VBA code by pressing ALT+F11.
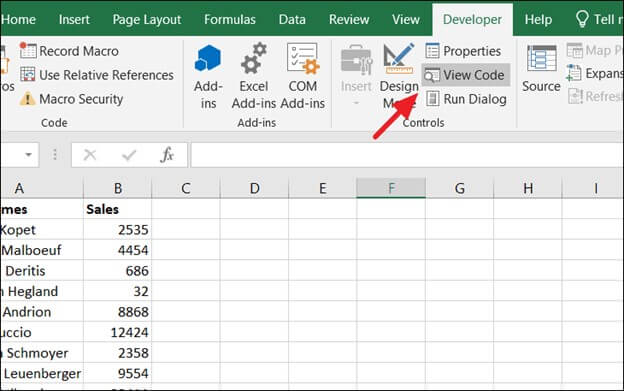
- Go to Developers >> View Code, and a new code window will appear.
- Enter the following code in the code window.
- Now, save the code, and you will be able to open the password without a password.
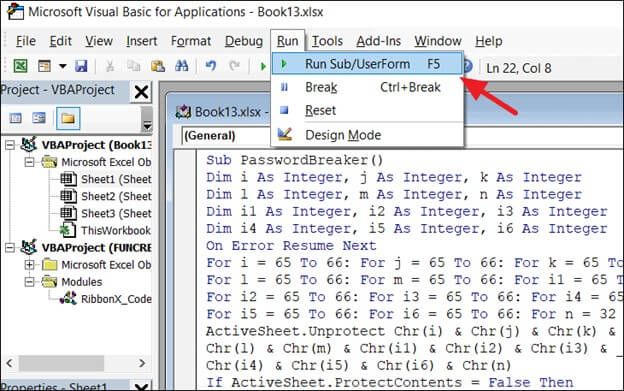
>Sub UnProtectWorkbook()
On Error GoTo ErrorOccured
Dim pwd1 As String, ShtName As String
pwd1 = InputBox(“Please Enter the password”)
If pwd1 = “” Then Exit Sub
ShtName = “Workbook as a whole”
ActiveWorkbook.Unprotect Password:=pwd1
MsgBox, “The workbook’s structure has been Unprotected.”
Exit Sub
error occurred:
MsgBox “Workbook could not be UnProtected – Password Incorrect.”
Exit Sub
End Sub

Solution 4: Open Excel File Online
There are different tools that can help you to open Excel files online without a password. Every tool has its own benefits and disadvantages, so be careful with the selection of the tool. Some popular online tools include:
1. Password-Find: You don’t need to install or download any program as you can recover Excel password or remove limitations with this online tool.
2. LostMyPass: The paid version of this online tool is quite powerful but it is only suitable for password recovery and does not offer many features.
3. Password-online: This tool provider has done good job with the informational content but the performance and application of the tool could be lot better. You can try it for free too.
Solution 5: Open Excel File by Modifying File Extension
This method does not always work as the flaw has been resolved in the later versions, but you can still give it a try. You need to:
- Create a backup for the protection of your data.
- Rename the file and change the extension to .Zip.
- Unzip the file by using any 3rd party software.
- Find the file that has the .XML extension and open it with XML Editor.
- Find “sheetProtection” by using the CTRL+F command and remove that word.
- Save the file and now change the extension back to .XLS and enjoy the unprotected Excel file.
Solution 6: Open Excel File on Mac
If you need to only view the contents of the file, you can open the Excel file on Mac. Mac OS X can preview documents via Quick View, and it will require no additional software or tool. You can download Microsoft Office for Excel files.
Part 2: How to Password Protect Excel File from Opening
If you want to ensure the safety of the Excel file, you can go through the detailed guide about password protect Excel full ways and understand the different levels of password protection for Excel files. Here are the simple steps to restricting Excel files from the opening:
- Select File > Info.
- Select the Protect Workbook box and choose Encrypt with Password.
- Enter a password in the Password box, and then select OK.
- Confirm the password in the Reenter Password box, and then select OK.
Conclusion
Opening an Excel file without a password without using any software or tool is not always easy. Most of the time, you will have to try different methods, and it may take quite a while until you are able to successfully get it done. But don’t worry! PassWiper for Excel can solve your problems and recover Excel files without a password in a few moments. Download this tool now and enjoy the most amazing features.
Summary:
In this blog, I am going to discuss each and every aspect about password protected Excel file and how to unlock xlsx file. Find out the fixes covered in this post below if you are unable to open password protected Excel file.
After reading the complete post you will get answer of queries like how to open a password protected Excel file if forgot password or how to fix password protected Excel file not opening issue on your own.
About Excel Password:
In Microsoft Excel users stores various types of valuable, confidential, official, projects and important data as per their convenience. Thus, with respect to the importance of Excel files, users protect their workbook data with a password.
While creating password protection in the Excel worksheet, Microsoft warns you to keep the password in a secure and safe place or note it down. So, it will be easier for you only to remember the password if you forget or lost the password due to any reason.
To recover lost Excel data, we recommend this tool:
This software will prevent Excel workbook data such as BI data, financial reports & other analytical information from corruption and data loss. With this software you can rebuild corrupt Excel files and restore every single visual representation & dataset to its original, intact state in 3 easy steps:
- Download Excel File Repair Tool rated Excellent by Softpedia, Softonic & CNET.
- Select the corrupt Excel file (XLS, XLSX) & click Repair to initiate the repair process.
- Preview the repaired files and click Save File to save the files at desired location.
Hence, due to this people are unable unlock password protected Excel file and wants to know the best solutions for how to unlock password protected Excel file?
Don’t worry, here I am with my new blog post discussing each and everything in detail about how to unlock Excel file protected by password. As well as you will also get to know about how to unlock password protected Excel file online for free?
So, just go through this blog carefully to get rid of password protected Excel file not opening issue or to learn how to unlock Excel password.
Practical Scenario:
Problem with password protected excel file not opening
I am trying to use the Write Range activity to write a data table into a password protected Excel file.
If I use the Application Integration Activity (with Excel App scope) to write into a password protected cell range, I get the “Range does not exist” error message.
I have already tried inputting the “Password” and the “Edit Password” options here. That does not help.If I use the System Integration Activity, it disturbs the formatting of the Excel Template – especially cell borders.
Is this a bug or a known issue? How do we get around this?
EDIT: Certain ranges within a particular sheet in my Excel are password protected – not the entire file itself. I want the robot to be able to make edits in these protected ranges.
Source: https://forum.uipath.com/t/problem-with-password-protected-excel-file/103784
Types of MS Excel Password
Before we get into the solutions of how to unlock password protected Excel file, let’s go through the types of MS Excel passwords and they are as follows:
1) Read-Only-Password: Read-Only password documents can be viewed and ready but you cannot change the password.
2) Workbook Structure Password: Workbook Structure Password can only protect the structure of the Excel worksheet but cannot protect the content.
3) Sheet Password: Sheet Password will allow the users only to modify, delete or change in the editable part of the existing worksheet, not all the parts of the workbook.
4) Open Password: Open Password is one the most basic type for the users to set the password for opening any document.
5) Modify Password: Modify Password is basically used in the corporate world where you can easily examine your workbook data but in order to make any kind of changes you have to enter your password first.

Here are some of the basic and important methods about how to unlock password protect Excel file. Go through the fixes to resolve unable to open password protected Excel file issue.
Method #1: How To Unlock Password Protected Excel File 2016/2013/2010/2007
This is one of the simplest methods for how to unlock a Excel file protected by password as well as you can also Lock and Unlock Cells, Formulas in Microsoft Excel as per the need. Just follow the steps given below:
- Open the MS Excel file by double click on it
- If you have protected the file with a password, then a pop up will appear on the screen
- The pop up will indicate you that your Excel file is password protected and you will need a password to open it
- Just enter the password to unlock the password-protected Excel file

- After that, click on the OK button and your file will open
Method #2: How To Open Password Protected Excel File 2007

This method is only useful for MS Excel 2007 or older versions. With the help of modifying the File Extension, users can get rid of password protected Excel file not opening in Office 2007 easily. So, to know the full process about how to unlock password protected Excel file 2007, just go through the steps given below:
- At first, make a backup of the Excel document which is password protected
- Press Ctrl + C to make a new copy for the protected Excel document
- Then, right-click on the password-protected Excel file and choose the Rename menu
- A dialog box will appear to rename

- Here, change the file extension name from .csv or .xls or .xlsx to .zip extension

- After that unzip the document from the zip file
- Search for the file that ends with the .xml format
- Then, double click on the XML file and open it with the XML editor
- Select the Enter key and click on the Yes button to proceed
- Now, with the help of archiving software like WinZIP or 7ZIP tool or ZIP, you can extract the ZIP files
- After that, double click on the folder named as xl
- A spreadsheet file will appear and open that file with Notepad
- Now, press Ctrl + F to find the word SheetProtection and look for the line that starts with “<sheetProtection algorithmName=”SHA-512″ hashValue=“

- Delete that word and save the file
- Here, change the .zip file to .csv or .xls or .xlsx format and press the Enter key
- Press Ctrl + S to save the Excel file and close it
- Thus, this will definitely help you in solving the issue of unable to open password protected Excel file in 2007.
Here is the video for illustrating this method more clearly to you:
Method #3: How To Unlock Password Protected Excel File Online Free
To unlock password protected Excel sheet online free, just read the steps carefully that how it works.
- At first, you should have a good and stable Internet connection
- Then open the online website to unlock password protected Excel file
- Here you will find the Drop file to upload or click here option
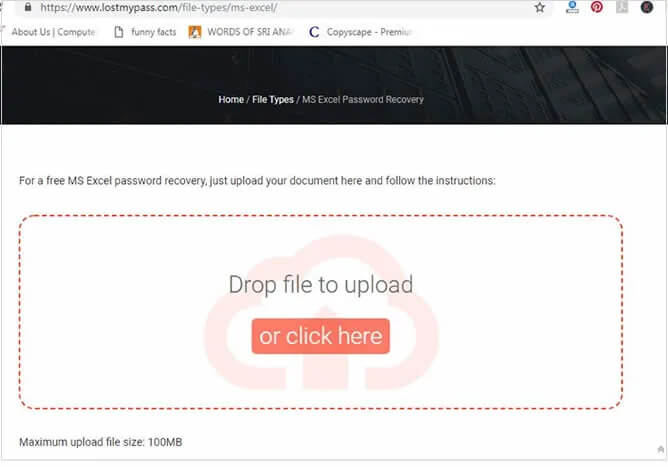
- Drag the targeted locked Excel workbook data to the web screen or you can browse the particular Excel file from the system also to upload
- After the uploading gets over, the process for password protected Excel file not opening issue will start to solve it
- You will able to view the recovery process with the help of a progress bar as shown on your computer screen
- Let the process gets completed, then you will be able to crack the unlock password as it will show on your screen
- This will help you to get rid of how to unlock password protected Excel file online problem
Recommended Solution: MS Excel Repair & Recovery Tool

While you are saving your important Excel document with a password for the protection of your files but sometimes accidentally or by mistake, some of the files get corrupted or deleted.
So in that case, we have a professional recommended tool i.e. MS Excel Repair & Recovery Tool to get back your all important files.
With the help of this advanced tool, you can easily recover all sorts of corrupted, damaged lost or deleted Excel files also.
This is a very helpful and useful software to restore all types of MS Excel files with ease which includes all the versions of Excel, i.e. Excel 2000, 2003, 2007, 2010, 2016 & 2019.
* Free version of the product only previews recoverable data.
Steps to Utilize MS Excel Repair & Recovery Tool:
Conclusion
So, this is all about how to unlock a Excel file protected by password. Well, I tried my level best to put together the best possible ways to solve the password protected Excel file not opening issue.
Hope you followed the above methods carefully about how to unlock password protected Excel file and it helped you to unlock xlsx file.
Now you don’t need any expert to unlock Excel password as you can do this on your own.


Priyanka is an entrepreneur & content marketing expert. She writes tech blogs and has expertise in MS Office, Excel, and other tech subjects. Her distinctive art of presenting tech information in the easy-to-understand language is very impressive. When not writing, she loves unplanned travels.
Microsoft Word, Excel, and PowerPoint open the file in the Protected View mode when you open a file from an online location, such as a cloud storage location, email message, or another insecure location. In the Protected View mode, most editing functions are disabled. Microsoft apps do this to prevent malicious code from accessing your computer.
When the file is opened in Protected View, Word, Excel, or PowerPoint displays:
- Protected View label in the title bar to the right of the file name,
- a yellow banner at the top of the content pane explains why the file was opened in Protected View.
For example:


Read-only the file opened in Protected View
If you are not going to change the file content, you can hide the banner by clicking the Close button (the X) at its right end.
Open a file in Protected View
To open a file in the Protected View mode, in the Open dialog box (see how to open this dialog box in Word, in Excel), in the Open list, click the arrow on the right side of the Open button, then select Open in Protected View from the drop-down list.
For example, in Word:

Note: You may face a situation when some types of files, regardless of the location, don’t open, and a warning message is displayed. For example:

See File Block settings below to configure which files can be opened and saved or denied opening or saving.
Modify, edit the file opened in Protected View
If you are sure that the file was received/uploaded from a safe location or the trusted sender and want to edit the file content, click the Enable Editing or Edit Anyway button.
Note: Microsoft Word, Excel, and PowerPoint remember files you have edited even in suspicious locations. The next time you open this file, it may open without the Protected View mode warning. See how to stop remembering such files below (in the Trusted Documents).
Open files from a location without a Protected View
To open a file from a specific online storage folder without switching into the Protected view mode, you need to add it (and its subfolders if needed) to the Trusted Locations list. Do the following:
1. On the File tab, click the Options button:

2. In the *** Options dialog box, on the Trust Center tab, click the Trust Center Settings… button.
For example, in Word:

3. In the Trust Center dialog box, on the Trusted Locations tab, the User Locations list shows the folders from which you can open files without Protected View.
For example, in Word:

You can add a new location to this list, remove and modify the existing locations.
Change settings to open files without Protected View
In Microsoft Word, PowerPoint, and Excel, there are three core settings selected by default:

- Enable Protected View for files originating from the Internet controls files opened from a website. To open any file from the Internet without the Protected View mode, unselect this check box.
- Enable Protected View for files located in potentially unsafe locations controls files opened from certain folders considered unsafe, such as Temporary internet files. Unselect this check box if you want to open all files without Protected View.
- Enable Protected View for Outlook attachments controls attachments that you try to open from an email message in Microsoft Outlook. To open any files from the Outlook attachments, unselect this check box.
Excel adds two more settings, both of which are unselected by default:

- Always open untrusted Text-Based files (.csv, .dif and .sylk) in Protected View
- Always open untrusted Database files (.dbf) in Protected View
These two additional options control how to open specified files in Excel. If you prefer to open these files in the Protected View mode, select the appropriate check box.
File Block settings
The Block Files list in Word, Excel, and PowerPoint contains file types prohibited from opening or saving in Word, Excel, and PowerPoint, respectively. You can change the list of Block Files by selecting or deselecting the file types that the app opens in Protected View. To make changes, do the following:
1. On the File tab, click the Options button.
2. In the *** Options dialog box, on the Trust Center tab, click the Trust Center Settings… button.
3. In the Trust Center dialog box, on the File Block Settings tab, in the File Type list, select or deselect the Open check box and the Save check box to prohibit the file type from opening and saving.
For example, in Word:

Note: Unfortunately, when writing this tip, options of the Open behavior for selecting file types group work incorrectly. The selected Open check box prohibits from opening the file type even if the Open selected file types in Protected View and allow editing check box is selected. The same problem occurs for the selected Save check box.
Trusted documents
By default, Word, Excel, and PowerPoint remember which files were marked as safe by the user (saved without Protected View). The next time you open such a file, Word, Excel, and PowerPoint will not open it in Protected View, even if the file has been modified.
To stop remembering such files, do the following:
1. On the File tab, click the Options button.
2. In the *** Options dialog box, on the Trust Center tab, click the Trust Center Settings… button.
3. In the Trust Center dialog box, on the Trusted Documents tab, unselect the Allow documents on a network to be trusted check box:

To clear the files already remembered in Word, Excel, or PowerPoint, click the Clear button. In the Microsoft message, click Yes:

Excel Is Password Protected, How to Open?
In recent years, protecting your essential files with a password has been the only way to secure them. Whenever it comes to work-related data and statistics, one must constantly be on their toes because of the ever-increasing number of cyber theft incidences that occur. Everyone’s computer, laptop, and electronic device at work should be password protected at all times to spare oneself the difficulty later on.
Do you know it is still possible to open an Excel file that has been password protected? And this article will provide you with everything you need to get your spreadsheet open if you forgot the password.
Three Ways to Open/ Unlock Password Protected Excel File
Microsoft has implemented various security measures to keep the content of these Excel files safe from prying eyes. However, this might turn into a significant problem. That’s when you lose track of your password. Nevertheless, we have come up with three ways to open password-protected Excel files.
| Workable Solutions | Step-by-step Troubleshooting |
|---|---|
| 1. Use Known Password | The first step is to go to the destination of your to-be-opened document and double-click it…Full steps |
| 2. Unlock Excel by VBA Code | The quickest method to launch VBA Editor is to hit the Alt and F11 keys simultaneously…Full steps |
| 3. Modify the File Extension | One of the most crucial things you must do before the operation starts is establish…Full steps |
Method 1. Open Password Protected Excel File with Known Password
All you should do here is input the password, and the file will be displayed next to you in a matter of seconds. These are the methods to access a password-protected Excel file using a known password.
Step 1. The first step is to go to the destination of your to-be-opened document and double-click it. You can also right-click on the selected file and choose ‘open.’
Step 2. Because the sheet you are attempting to view is password-protected, you will be prompted to enter the password with a pop-up, which will unprotect the document. You would be able to view the information of the sheet after it has been exposed.
Step 3. Once you’ve entered your password, click the «OK» button at the bottom right of the pop-up. You will now be taken to the file, ready to view and work on.
Another reason why this section has been dubbed the simplest and quickest of all is that it works with any Excel versions, including Excel 2007, Excel 2010, Excel 2016, and above.
Method 2. Unlock Excel Spreadsheet without Software by VBA Code
VBA is a programming language created by Microsoft that is included with Microsoft Office. VBA is an abbreviation for Visual Basic for Applications. It is used to do hundreds of different activities such as keeping a list of various objects, predicting and budgeting, evaluating scientific data, and producing charts.
One of its benefits is its capacity to assist you in unprotecting Excel spreadsheets without the need for any third-party software. And it is simple to do by following these four steps.
Step 1. The first step is to open the Microsoft Excel file in question.
Step 2. The quickest method to launch VBA Editor is to hit the Alt and F11 keys simultaneously.
Step 3. The next stage is to include an Insert Menu module.
Step 4. After you’ve opened the code window, you’ll need to enter the following lines of code.
>Sub UnProtectWorkbook()
On Error GoTo ErrorOccured
Dim pwd1 As String, ShtName As String
pwd1 = InputBox(«Please Enter the password»)
If pwd1 = «» Then Exit Sub
ShtName = «Workbook as a whole»
ActiveWorkbook.Unprotect Password:=pwd1
MsgBox, «The workbook’s structure has been Unprotected.»
Exit Sub
error occurred:
MsgBox «Workbook could not be UnProtected — Password Incorrect.»
Exit Sub
End Sub
Step 5. After entering the code lines into the code box, click the «Save» button. Your file will be saved in a worksheet that supports macros.
Step 6. Press F5 to carry out the preceding actions.
If you carefully follow the procedures, you will be able to unprotect Excel files without software using VBA code.
Method 3. Open Protected Excel by Modifying the File Extension
While these techniques cannot be ideal for newer Microsoft Office versions, they work very well for Microsoft Office 2010 or any prior versions. By altering the file extension, you will be able to read or open protected Excel files by following these ten easy steps:
Step 1. One of the most crucial things you must do before the operation starts is establish a password-protected backup of the Excel file.
Step 2. After creating a backup, you must rename the file by right-clicking on the excel sheet and selecting the «rename« option.
Step 3. Whether your file is a .csv or a .xls extension, it is time to convert it to an a.zip extension.
Step 4. After renaming the file and changing the extension to.zip, it’s time to unzip the zip file’s contents.
Step 5. You must now look for a file that ends in.xml format.
Step 6. After you’ve located the file with the.xml extension, double-click it and open it in an XML editor.
Step 7. You can locate your target term by holding down the Ctrl and F keys simultaneously. In this situation, you’re looking for the term «SheetProtection». You must look for it.
Step 8. Remove the term from the file after you’ve discovered it.
Step 9. Save the file after eliminating the word.
Step 10. After you’ve saved the file, change the file extension from.zip to.xls or.csv, whichever you want.
When you have completed all of the ten procedures outlined above, all of your worksheets will be made unprotected. It implies you’ll be able to access any of your files without needing to enter the password.
Also read: Lost Bitlocker Recovery Key? Here’s How to Get It Back
How Open/Repair a Corrupted Excel File (2 Ways)
We’ve all experienced having a file that won’t open because it’s corrupted. If you do not have a backup of your data, the situation might get worse. However, the best and easiest method is to use the Microsoft Office repair software, which allows you to access faulty/corrupted files.
There are two primary techniques for opening a corrupt Excel file:
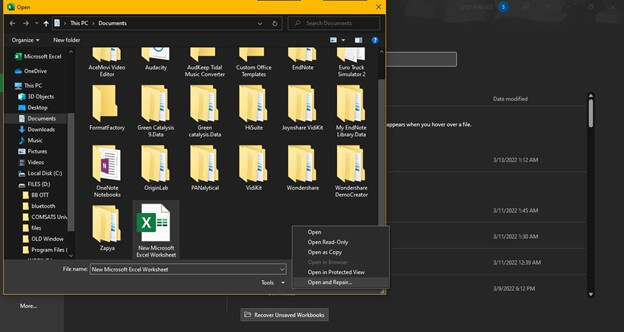
1. Repair Damaged Excel Files with the Open and Repair Method
The Open and Restore method can repair corrupted Excel files manually and does not need a backup. Here are the actions that must be taken.
Step 1. Select the «Microsoft Office» tab.
Step 2. Click the «Open» button.
Step 3. Choose the corrupt files when the ‘Open’ dialog box appears.
Step 4. Click the arrow, then choose «Open and Repair».
Step 5. Select the «Repair» option.
2. Repair and Open Excel with a File Repair Tool
Many software can be used to open corrupt files. However, one must approach with extreme caution when selecting a third-party tool to open a corrupt file to protect data. Ensure that this third-party product is dependable and capable of doing the job without compromising privacy.
EaseUS Data Recovery Wizard is the most commonly recommended product on the market to carry out these types of tasks. The program can fix XLSX files quickly and efficiently. Additionally, the Repair Toolkit is available for Windows and Mac operating systems.
- Possible to fix all corrupt Excel files.
- You can remove viruses in Excel files.
- The possibility to repair any damaged files at the same time.
- Formulas, cell comments, photos, tables, chart sheets, and charts, among other things, are repaired.
- Excel worksheet characteristics are preserved while using this function.
The following are the steps to repair an Excel file using EaseUS Data Recovery Wizard:
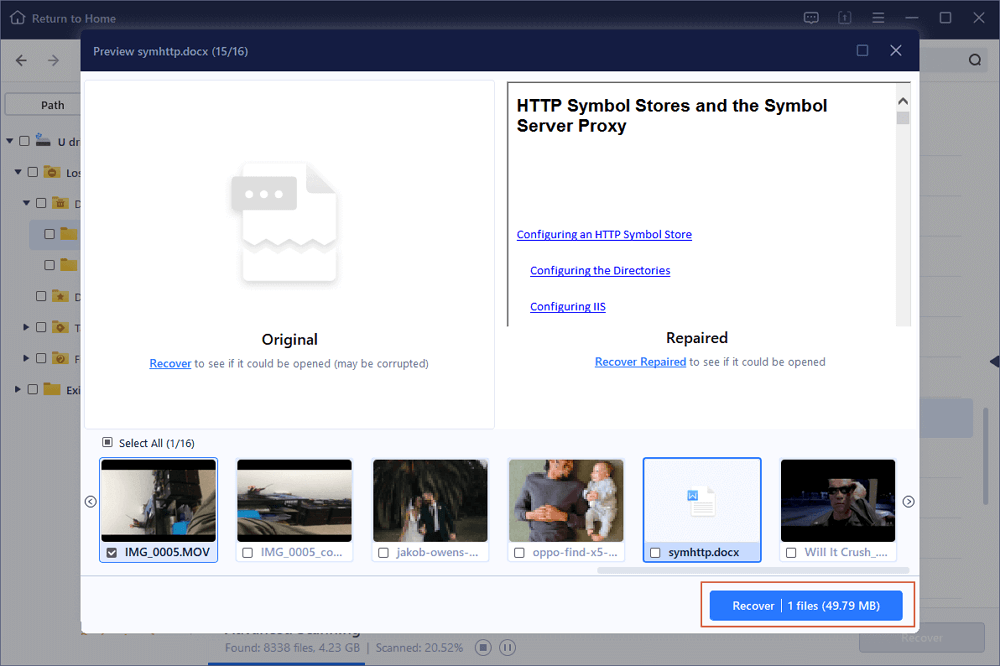
Step 1. Launch EaseUS Data Recovery Wizard, and then scan disk with corrupted documents. This software enables you to fix damaged Word, Excel, PPT, and PDF files in same steps.
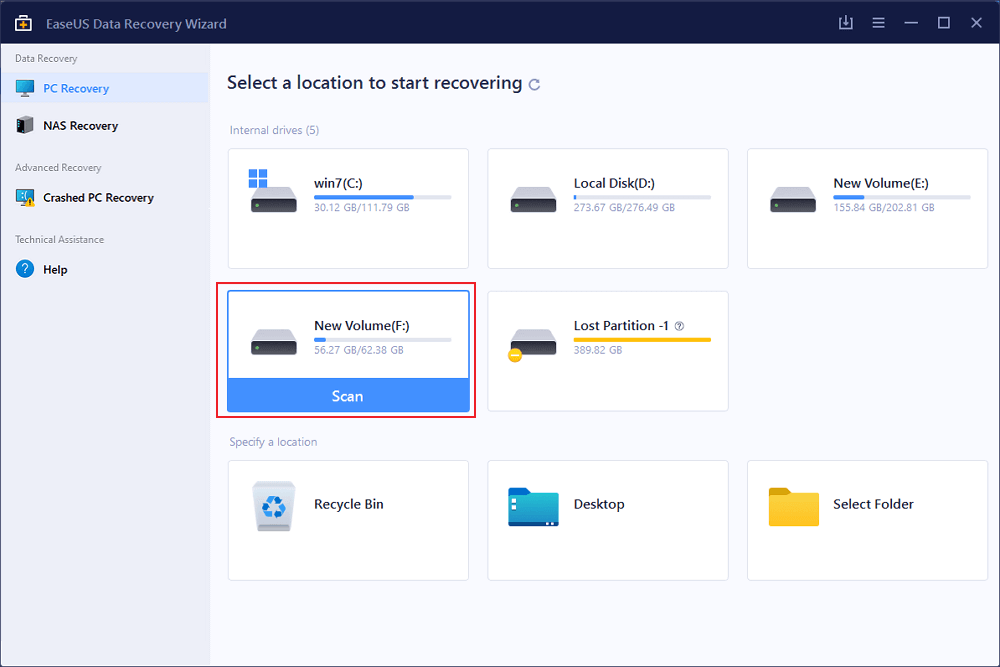
Step 2. EaseUS data recovery and repair tool will scan for all lost and corrupted files. You can find the target files by file type or type the file name in the search box.
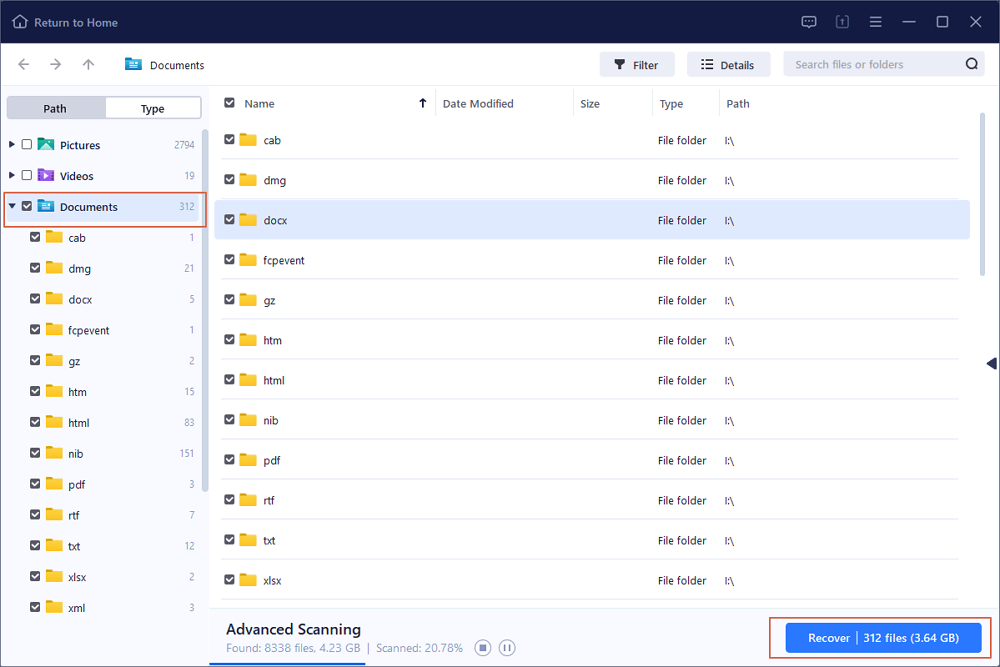
Step 3. EaseUS Data Recovery Wizard can repair your damaged documents automatically. After file preview, you can click «Recover» to save the repaired Word, Excel, and PDF document files to a safe location.
Final Words
Managing passwords for so many professional and personal files is becoming a challenge. With this article, we want to alleviate any frustration you might be experiencing with an Excel spreadsheet due to an inability to recall the password you used. With the EaseUS Data Recovery Wizard, you have an excellent opportunity to open password-protected Excel Files. Make it count!