
This article is for people with visual or cognitive impairments who use a screen reader program such as Microsoft’s Narrator, JAWS, or NVDA with the Microsoft 365 products. This article is part of the Microsoft 365 screen reader support content set where you can find more accessibility information on our apps. For general help, visit Microsoft Support home or Fixes or workarounds for recent office issues.
Use Word with your keyboard and a screen reader to insert a picture or image from your computer or an online source. We’ve tested it with Narrator, JAWS, and NVDA, but it might work with other screen readers as long as they follow common accessibility standards and techniques. You’ll also learn how to add alt texts to the pictures to make them more accessible.
 Need instructions on how to insert pictures to a Word document, but not using a screen reader? See Insert pictures.
Notes:
-
New Microsoft 365 features are released gradually to Microsoft 365 subscribers, so your app might not have these features yet. To learn how you can get new features faster, join the Office Insider program.
-
To learn more about screen readers, go to How screen readers work with Microsoft 365.
In this topic
-
Insert an image or picture from your computer
-
Insert an image from an online source
-
Place a picture in line with text
-
Add alt text to an image
Insert an image or picture from your computer
-
In your Word document, place the insertion point where you want to insert an image.
-
Press Alt+N, P, D. The Insert Picture dialog box opens. The focus is on the File name text field.
-
Use the Tab key and the arrow keys to navigate to the location of the picture on your computer. When you hear the name of the picture, followed by «Selected,» press Enter. The original picture is embedded into your document.
Tip: If your picture has a large file size, it can make your document too large. To reduce the size of your document, you can link to the picture instead of embedding it. In the Insert Picture dialog box, press the Tab key until you hear with Narrator and NVDA: «Insert, split button.» With JAWS, you hear: «Leaving menus, Insert button.» Press the Down arrow key until you hear «Link to file,» and then press Enter.
Insert an image from an online source
If you don’t have the perfect picture on your computer, you can search for and insert a picture from a web location straight from Word.
-
In your Word document, place the insertion point where you want to insert an image.
-
Press Alt+N, P, O. The Bing image search dialog box opens. The focus is on the search text field.
-
Type your search words to describe the picture you’re looking for, and then press Enter. The search results are listed, and the focus is on the first matching image.
Tip: To browse for more images from your OneDrive, press the Tab key until you hear «OneDrive,» and press Enter.
-
Use the arrow keys to browse the search results. Your screen reader describes each image as you move through the search results.
-
To select an image, press Spacebar.
-
To insert the selected image, press the Tab key until you hear «Insert,» and press Enter. Word downloads and inserts the image into your document.
Place a picture in line with text
To be read correctly by a screen reader, the picture has to be in line with the text. By default, Word inserts a picture in line with text, but you can check it to make sure that the screen readers can read the pictures.
-
In your Word document, move the focus to the picture you want. When the focus is on the picture, you hear the file name or number of the picture, followed by «Image.»
-
Press Shift+Right arrow key once to select the picture. Then press Shift+F10. The context menu opens.
-
Press the Up arrow key until you hear «Wrap text,» and then press the Right arrow key once. You hear: «In line with text.» Press Enter. If you don’t hear «In line with text,» press the Up arrow key until you reach the In line with text button, and press Enter.
Add alt text to an image
Add alt text to the images to make your document accessible to all audiences. For more information on alt text, refer to Everything you need to know to write effective alt text.
-
In your Word document, move the focus to the picture that you want to add alt text to. When the focus is on the image, you hear the page you’re on, the file name or the number of the image, followed by «Image.» Press Shift+Right arrow key once to select the image.
-
Press Shift+F10 to open the context menu.
-
Press the Up arrow key until you hear «Edit alt text,» and press Enter.
-
The Alt Text pane opens, and the focus is on the alt text field. Type alt text for the image.
-
When you’re ready, press Esc to return to the body of the document.
See also
Use a screen reader to insert a hyperlink in Word
Use a screen reader to align text and paragraphs in Word
Keyboard shortcuts in Word
Basic tasks using a screen reader with Word
Set up your device to work with accessibility in Microsoft 365
Use a screen reader to explore and navigate Word
What’s new in Microsoft 365: Release notes for Current Channel
Use Word for Mac with your keyboard and VoiceOver, the built-in MacOS screen reader, to insert a picture or image into a document. You’ll also learn how to add alt texts to the pictures to make them more accessible.
Need instructions on how to insert pictures to a Word document, but not using a screen reader? See Insert pictures.
Notes:
-
New Microsoft 365 features are released gradually to Microsoft 365 subscribers, so your app might not have these features yet. To learn how you can get new features faster, join the Office Insider program.
-
This topic assumes that you are using the built-in macOS screen reader, VoiceOver. To learn more about using VoiceOver, go to VoiceOver Getting Started Guide.
In this topic
-
Insert an image or picture from your computer
-
Insert an image from an online source
-
Place a picture in line with text
-
Add alt text to an image
Insert an image or picture from your computer
-
In your Word document, place the insertion point where you want to insert an image.
-
Press F6 until you hear the currently selected tab on the ribbon, for example, «Home, selected, tab.» Press Control+Option+Right or Left arrow key until you hear «Insert tab,» and press Control+Option+Spacebar.
-
Press the Tab key until you hear «Pictures, menu button,» and press Control+Option+Spacebar.
-
Press Control+Option+Right arrow key until you hear «Picture from file,» and then press Control+Option+Spacebar.
-
A dialog box opens with the focus on a recent images folder. To access the images in this folder, press Control+Option+Right arrow key. To browse to another location, use the Tab key, Shift+Tab, and the arrow keys.
-
When on the correct location, use the Up or Down arrow key to browse the files or subfolders. To open a subfolder, press the Right arrow key.
-
When you’ve located the correct image file, press Return. The picture is inserted into the document.
Insert an image from an online source
If you don’t have the perfect picture on your computer, you can search for and insert a picture from a web location straight from Word for Mac.
-
In your Word document, place the insertion point where you want to insert an image.
-
Press F6 until you hear the currently selected tab on the ribbon, for example, «Home, selected, tab.» Press Control+Option+Right or Left arrow key until you hear «Insert tab,» and press Control+Option+Spacebar.
-
Press the Tab key until you hear «Pictures, menu button,» and press Control+Option+Spacebar.
-
Press Control+Option+Right arrow key until you hear «Online pictures,» and then press Control+Option+Spacebar.
-
The Bing image search pane opens. The focus is on the search text field. Type your search words to describe the picture you’re looking for, and then press Return. The search results are listed, and the focus is on the first matching image.
-
Press Control+Option+Right or Left arrow key to browse the search results. VoiceOver describes each image as you move through the search results.
-
To select an image, press Control+Option+Spacebar.
-
To insert the selected image, press the Tab key until you hear «Insert,» and press Control+Option+Spacebar. Word downloads and inserts the image into your document.
Place a picture in line with text
To be read correctly by a screen reader, the picture has to be in line with the text.
-
In your Word document, move the cursor before the picture you want, press and hold Shift, and then press the Right arrow key once to select the picture. You hear: «Grouped object, you’re currently on a grouped object.»
-
Press F6 until you hear: «Picture format.»
-
Press the Tab key until you hear «Position button,» and then press Control+Option+Spacebar.
-
Press Control+Option+Left arrow key until you hear «In line with text,» and press Control+Option+Spacebar.
Add alt text to an image
Add alt text to the images to make your document accessible to all audiences. For more information on alt text, refer to Everything you need to know to write effective alt text.
-
In your Word document, select the picture that you want to add alt text to. To select a picture in Word, place the cursor before the image, hold down Shift, and then press the Right arrow key. You hear: «Grouped object, you’re currently on a grouped object.»
-
Press Control+Option+Shift+M. The context menu opens. Press Control+Option+Right arrow key until you hear «Edit alt text,» and press Control+Option+Spacebar.
-
The Alt Text pane opens, and the focus in on the alt text field. Type alt text for the image.
-
When you’re ready, press Shift+Tab until you hear «Close alt text button,» and press Control+Option+Spacebar. The Alt Text pane closes, and the focus moves back to your document.
See also
Use a screen reader to insert a hyperlink in Word
Use a screen reader to align text and paragraphs in Word
Keyboard shortcuts in Word
Basic tasks using a screen reader with Word
Set up your device to work with accessibility in Microsoft 365
Use a screen reader to explore and navigate Word
What’s new in Microsoft 365: Release notes for Current Channel
Use Word for iOS with VoiceOver, the built-in iOS screen reader, to insert a picture or image into a document. You’ll also learn how to add alt texts to the pictures to make them more accessible.
Notes:
-
New Microsoft 365 features are released gradually to Microsoft 365 subscribers, so your app might not have these features yet. To learn how you can get new features faster, join the Office Insider program.
-
This topic assumes that you are using the built-in iOS screen reader, VoiceOver. To learn more about using VoiceOver, visit Apple accessibility.
-
We recommend you read and edit documents in Print Layout View. VoiceOver might not work reliably in other view modes.
In this topic
-
Insert an image or picture from your phone
-
Insert a picture from the camera
-
Place a picture in line with text
-
Add alt text to an image
Insert an image or picture from your phone
-
While editing your Word document, place the insertion point where you want to insert an image.
-
Tap near the top of the screen with four fingers, swipe right until you hear «Show ribbon,» and double-tap the screen. You hear the currently selected tab, for example, «Home tab.»
-
Double-tap the screen, swipe right or left until you hear “Insert tab,” and double-tap the screen. You hear: “Insert tab.”
-
Swipe right until you hear “Insert pictures button,” and double-tap the screen. The Photos app opens.
-
Swipe right until you hear the image location you want, and then double-tap the screen to select.
-
To browse the images, swipe right or left. As you move, VoiceOver announces the images by the image types and dates.
-
When on the picture you want to insert into the document, double-tap the screen. The picture is inserted and the focus returns to your document with the image selected.
Insert a picture from the camera
You can open the device camera straight from Word for iOS, take a photo, and then insert the photo into the document.
-
While editing your Word document, place the insertion point where you want to insert a picture.
-
Tap near the top of the screen with four fingers, swipe right until you hear «Show ribbon,» and double-tap the screen. You hear the currently selected tab, for example, «Home tab.»
-
Double-tap the screen, swipe right or left until you hear “Insert tab,” and double-tap the screen. You hear: “Insert tab.”
-
Swipe right until you hear “Insert pictures button,” and double-tap the screen. The Photos app opens.
-
Swipe right until you hear “Insert picture from camera, button,” and then double-tap the screen. The Camera app opens.
Note: If you hear «Word would like to access the camera,» swipe right until you hear «OK, button,» and double-tap the screen.
-
Swipe right until you hear «Take picture, button,» point the camera in the right direction, and double-tap the screen.
-
Swipe right or left until you hear «Use photo, button,» and then double-tap the screen to insert the photo. The focus returns to your document.
Place a picture in line with text
To be read correctly by a screen reader, the picture has to be in line with the text.
-
While editing your Word document, slide one finger around the document body until you hear the image you want. When the image is in focus, VoiceOver announces the image file name, followed by «Image,» and the image layout. Double-tap the screen. You hear: «Selected.»
-
Tap near the bottom of the screen with four fingers, swipe left until you hear «Show ribbon,» and double-tap the screen. You hear: «Picture tab.»
-
Swipe right until you hear «Wrap text button,» and double-tap the screen. Swipe left until you hear «In line with text,» and double-tap the screen.
Add alt text to an image
Add alt text to the images to make your document accessible to all audiences. For more information on alt text, refer to Everything you need to know to write effective alt text.
-
While editing your Word document, to select a picture, slide one finger around the document body until you hear the image you want to add alt text to. When the image is in focus, VoiceOver announces the image file name, followed by «Image,» and the image layout. Double-tap the screen. You hear: «Selected.»
-
Tap near the bottom of the screen with four fingers, swipe left until you hear «Show ribbon,» and double-tap the screen. You hear: «Picture tab.»
-
Swipe right until you hear «Alt text button,» and double-tap the screen.
-
To add alt text, swipe right until you hear «Description, text field,» double-tap the screen, and then use the on-screen keyboard to type alt text for the image.
-
When you’re ready, tap near the top of the screen with four fingers, swipe right until you hear «Done button,» and double-tap the screen. The focus moves back to the document body.
See also
Use a screen reader to insert and change text in Word
Use a screen reader to set line spacing and indenting in Word
Basic tasks using a screen reader with Word
Set up your device to work with accessibility in Microsoft 365
Use a screen reader to explore and navigate Word
What’s new in Microsoft 365: Release notes for Current Channel
Use Word for Android with TalkBack, the built-in Android screen reader, to insert a picture or image into a document. You’ll also learn how to add alt texts to the pictures to make them more accessible.
Notes:
-
New Microsoft 365 features are released gradually to Microsoft 365 subscribers, so your app might not have these features yet. To learn how you can get new features faster, join the Office Insider program.
-
This topic assumes that you are using the built-in Android screen reader, TalkBack. To learn more about using TalkBack, go to Android accessibility.
In this topic
-
Insert an image or picture from your phone
-
Insert a picture from the camera
-
Place a picture in line with text
-
Add alt text to an image
Insert an image or picture from your phone
-
While editing your Word document, place the insertion point where you want to insert an image.
-
Swipe left until you hear «More options button,» and double-tap the screen. You hear the currently selected tab, for example, «Home tab.» Double-tap the screen, swipe right or left until you hear “Insert tab,” and double-tap the screen.
-
Swipe right until you hear “Pictures menu,” and double-tap the screen. The Pictures menu opens.
-
Swipe right until you hear “Photos button,” and double-tap the screen. The default gallery app opens.
Note: If you’re signed in and using your organization’s phone and account, you might have to switch to your personal account or select a gallery app before you can insert an image into a document.
-
Do one of the following:
-
To navigate through the pictures in the currently selected image storage location, swipe right until you hear the image you want.
-
To navigate to another storage location, for example, Downloads or Images, swipe left until you hear «Show roots button,» and then double-tap the screen. Swipe right until you hear the location you want, and then double-tap the screen. Swipe left or right until you hear the image you want.
TalkBack announces the images by their filenames, sizes, and dates.
-
-
When on the image you want to insert, double-tap the screen. The image preview opens.
-
Swipe right until you hear «Done,» and then double-tap the screen. The image is inserted and the focus returns to your document with the image selected.
Insert a picture from the camera
You can open the device camera straight from Word for Android, take a photo, and then insert the photo into the document.
-
While editing your Word document, place the insertion point where you want to insert a picture.
-
Swipe left until you hear «More options button,» and double-tap the screen. You hear the currently selected tab, for example, «Home tab.» Double-tap the screen, swipe right or left until you hear “Insert tab,” and double-tap the screen.
-
Swipe right until you hear “Pictures menu,” and then double-tap the screen. The Pictures menu opens.
-
Swipe right until you hear “Camera button,” and then double-tap the screen. The Camera app opens.
Note: If you hear «Allow Word to take pictures and record video, Allow button,» double-tap the screen.
-
To take a picture, swipe right until you hear «Capture,» point the camera to the right direction, and then double-tap the screen.
-
The image is captured, and the editing view opens. Swipe right until you hear «Confirm,» and double-tap the screen.
-
The image preview opens. Swipe right until you hear «Done,» and then double-tap the screen. The image is inserted and the focus returns to your document with the image selected.
Place a picture in line with text
To be read correctly by a screen reader, the picture has to be in line with the text.
-
While editing your Word document, slide one finger around the document body until you hear the image you want. When the focus is on the image, you hear the file name or number of the image, followed by «Image.» Double-tap and hold the screen with one finger. You hear: «Cut button.»
-
Swipe down-then-left. Then slide one finger near the lower-right corner of the screen until you hear «Not checked, More options switch,» and double-tap the screen. The focus moves to the Picture tab on the ribbon.
-
Swipe right until you hear «Wrap text menu,» and double-tap the screen.
-
Swipe right until you hear «In line with text,» and double-tap the screen.
Add alt text to an image
Add alt text to the images to make your document accessible to all audiences. For more information on alt text, refer to Everything you need to know to write effective alt text.
-
While editing your Word document, slide one finger around the document body until you hear the image you want to add alt text to. When the focus is on the image, you hear: «Selected, Image.» Double-tap the screen.
-
Slide one finger near the lower-right corner of the screen until you hear «Not checked, More options switch,» and double-tap the screen.
-
The focus moves to the Picture tab on the ribbon. Swipe right until you hear «Alt text menu,» and double-tap the screen.
-
Swipe right until you hear «Edit box, for, describe this object for someone who is blind,» and double-tap the screen. Use the on-screen keyboard to type alt text for the image. To close the on-screen keyboard, swipe down-then-left.
-
To move the focus back to the document body, swipe down-then-left.
See also
Use a screen reader to insert and change text in Word
Use a screen reader to set line spacing and indenting in Word
Basic tasks using a screen reader with Word
Set up your device to work with accessibility in Microsoft 365
Use a screen reader to explore and navigate Word
What’s new in Microsoft 365: Release notes for Current Channel
Use Word for the web with your keyboard and a screen reader to insert a picture or image into a document. We have tested it with Narrator in Microsoft Edge and JAWS and NVDA in Chrome, but it might work with other screen readers and web browsers as long as they follow common accessibility standards and techniques. You’ll also learn how to add alt texts to the pictures to make them more accessible.
Need instructions on how to insert pictures to a Word document, but not using a screen reader? See Insert pictures.
Notes:
-
If you use Narrator with the Windows 10 Fall Creators Update, you have to turn off scan mode in order to edit documents, spreadsheets, or presentations with Microsoft 365 for the web. For more information, refer to Turn off virtual or browse mode in screen readers in Windows 10 Fall Creators Update.
-
New Microsoft 365 features are released gradually to Microsoft 365 subscribers, so your app might not have these features yet. To learn how you can get new features faster, join the Office Insider program.
-
To learn more about screen readers, go to How screen readers work with Microsoft 365.
-
When you use Word for the web with a screen reader, switch to the full screen mode. Press F11 to toggle the full screen mode on and off.
-
When you use Word for the web, we recommend that you use Microsoft Edge as your web browser. Because Word for the web runs in your web browser, the keyboard shortcuts are different from those in the desktop program. For example, you’ll use Ctrl+F6 instead of F6 for jumping in and out of the commands. Also, common shortcuts like F1 (Help) and Ctrl+O (Open) apply to the web browser – not Word for the web.
In this topic
-
Insert a picture from your computer
-
Insert a picture from the web
-
Place a picture in line with text
-
Add alt text to an image
Insert a picture from your computer
-
In your Word document, place the insertion point where you want to insert the picture.
-
Press Alt+Windows logo key+N, P, P. The Windows Open dialog box opens. The focus is on the File name text field.
-
Use the Tab key and the arrow keys to navigate to the location of the picture on your computer. When you hear the name of the picture, followed by «Selected,» press Enter. The original picture is embedded into your document.
Insert a picture from the web
If you don’t have the perfect picture on your computer, you can search for and insert a picture from a web location straight from Word for the web.
Note: When using photos, images, or clip art, you’re responsible for respecting copyright. For images, the license filter in Bing can help.
-
In your Word document, place the insertion point where you want to insert the image.
-
Press Alt+Windows logo key+N, P, F.
-
The Bing image search dialog box opens. The focus is on the search text field. Type your search words to describe the picture you’re looking for, and then press Enter. The search results are listed, and the focus is on the first matching image.
-
Use the arrow keys to browse the search results. Your screen reader describes each image as you move through the search results.
-
To select an image, press Spacebar.
-
To insert the selected image, press the Tab key until you hear «Insert,» and press Enter. Word downloads and inserts the image into your document.
Place a picture in line with text
To be read correctly by a screen reader, the picture has to be in line with the text.
-
In your Word document, move the focus to the picture you want. When the picture is in focus and selected, you hear: «Image.»
-
Press Shift+F10. The context menu opens.
-
Press the Up arrow key until you hear «Wrap text,» and then press the Right arrow key once. You hear: «In line with text.» Press Enter. If you don’t hear «In line with text,» press the Up arrow key until you reach the In line with text button, and press Enter.
Add alt text to an image
Add alt text to the images to make your document accessible to all audiences. For more information on alt text, refer to Everything you need to know to write effective alt text.
-
In your Word document, move the focus to the image that you want to add alt text to. When the image is in focus and selected, you hear: «Image.»
-
Press Alt+Windows logo key+J, P, E. The Format Picture pane opens, and the focus moves to the Alternative Text section.
-
Press the Tab key until you hear «Description,» and then type alt text for the image.
-
To return the focus to document body, press Esc.
See also
Use a screen reader to insert and change text in Word
Use a screen reader to check spelling and grammar in Word
Keyboard shortcuts in Word
Basic tasks using a screen reader with Word
Use a screen reader to explore and navigate Word
What’s new in Microsoft 365: Release notes for Current Channel
Technical support for customers with disabilities
Microsoft wants to provide the best possible experience for all our customers. If you have a disability or questions related to accessibility, please contact the Microsoft Disability Answer Desk for technical assistance. The Disability Answer Desk support team is trained in using many popular assistive technologies and can offer assistance in English, Spanish, French, and American Sign Language. Please go to the Microsoft Disability Answer Desk site to find out the contact details for your region.
If you are a government, commercial, or enterprise user, please contact the enterprise Disability Answer Desk.
Some documents have digital photographs and images created and saved in other programs that make documents entertaining or convey information better than words. These types of images are referred to as pictures.
Insert an image
To insert a picture in a Word document, on the Insert tab, in the Illustrations group, click the Pictures button, then choose the option you prefer:

- Select This Device to choose an image stored on the local computer, laptop, shared locations, or network server:

Select an image in the Insert Picture dialog box and click the Insert button.
- Select Stock Images to choose Stock Images, Icons, Cutout People, Stickers, and Illustrations from the stock image library:

Select one or several objects (see the number near the Insert label) and click the Insert button.
- Select Online Pictures to find and insert images from Bing, Microsoft’s search engine, or OneDrive:
Select one or a few objects (see the number near the Insert label) and click the Insert button.


Note: Another option is to insert the image as a linked object that creates a link between the document and the external image but does not embed the image in the Word document. Using linked objects can help minimize the file size of the final document while preserving images, photographs, and other objects that can take up storage space. However, if image files are not available when you open a Word document, the images are not displayed. This option is not recommended to create documents distributed to other users, as they may not access the images.
When you click on a picture, Word shows the Picture Format tab:

Using features from that tab, you can:
- Adjust picture characteristics:
- Remove the background by designating either the areas you want to keep or those you want to remove
- Sharpen, soften, and adjust the brightness of images for better printing or on-screen presentation
- Apply different color masks to achieve antiquing, sepia tone, grayscale, and a variety of other color effects
- Choose one of 23 special effects, such as pencil sketch, blurring, charcoal sketch, paint strokes, and others
- Apply effects such as shadows, reflections, and borders; or apply combinations of these effects
- Choose a picture transparency
- Compress the pictures in the document
- Format picture by using predefined picture styles or choosing some of the proposed features such as shape and orientation, borders, and other effects
- Arrange the picture to specify its relationship to the page and other elements on the page
- Crop the parts of the picture or crop the picture to a shape
- Resize, scale, and rotate the picture by using its sizing handles or appropriate fields in the Layout dialog box (see below)
- Position the object in any of several predefined locations on the page
- Specify how other text should wrap around the object.
Resize an image
To resize a picture, select it and do one of the following:
- On the Picture Format tab, in the Size group, change the Height and Width for the picture in the appropriate fields:

- Click and drag the side sizing handles to stretch it horizontally or vertically:


Scale an image
To scale a picture, select it and do one of the following:
- On the Picture Format tab, in the Size group, click the dialog box launcher:
- Click and drag one of the corner sizing handles to maintain the image’s current shape. The image will change size while keeping the same proportions:
- Open the Layout dialog box by one of the methods:
- On the Picture Format tab, in the Size group, click the dialog box launcher.
- Right-click the selected picture and choose Size and Position… in the popup menu:


In the Layout dialog box, on the Size tab, in the Scale section:

- Rescale the picture by changing the height and width percentages.
- Select the Lock aspect ratio check box (selected by default) to scale the picture by height and width using the same percentage.
Deselect the Lock aspect ratio check box to scale height and width separately.
- Select the Relative to original picture size check box (selected by default) to scale the picture height and width as percentages of the original size.
Note: See the picture’s original size in the Original size section.
Rotate an image
To rotate a picture, do one of the following:
- Click and drag the rotation handle at the top of the border:

- Open the Layout dialog box by one of the methods:
- On the Picture Format tab, in the Size group, click the dialog box launcher.
- Right-click the selected picture and choose Size and Position… in the popup menu.
In the Layout dialog box, on the Size tab, select or type a rotation in the Rotation field.

Hide and display images on the page
The picture can be hidden using the Selection pane (see how to open it). For example, Picture 6:

To hide the picture, click the Showing icon ![]() to the right of the object name. After clicking that icon, it will change to a simple icon indicating that the object is Hidden
to the right of the object name. After clicking that icon, it will change to a simple icon indicating that the object is Hidden ![]() from view. To show the object once again, click the Hidden icon
from view. To show the object once again, click the Hidden icon ![]() , and it will reappear.
, and it will reappear.
Note: You can hide all images in the document by changing global Word options:

See Hiding pictures for more details.
Copy the formatting
To copy the formatting of one picture to another picture, do the following:
1. Select the formatted picture, which formatting you need to copy.
2. On the Home tab, in the Clipboard group, click the Format Painter button:

3. Click another picture to apply the color adjustments, color corrections, or picture style from the first picture.
Add an Alternative text for images
The Alternative text (Alt text) for pictures is a common requirement. By default, Word generates Alt text for all inserted pictures (see how to turn off that feature).
Alt text is:
- Read aloud when a screen reader will encounter such an image.
- Shown if there are some problems with displaying an image.
You can see the generated Alt text at the bottom of the object immediately after inserting it in a document:

or

To change or add Alt text to a picture, do the following:
1. Select the picture.
2. Open the Alt text pane by doing one of the following:
- On the Picture Format tab, in the Accessibility group, click the Alt Text button:

- Right-click and choose Edit Alt Text… in the popup menu:
- On the Review tab, in the Accessibility group, click the Check Accessibility button, then choose Alt Text:


3. On the Alt Text pane:

- Modify or enter an Alt text you need.
Alt text should briefly describe the purpose or content of the image, photo, icon, table, or equation. It is recommended to use no more than 15 words.
- Select the Mark as decorative check box if the picture is purely decorative and does not provide helpful information for the document content.
Note: If the option for automatic generation of Alt text for pictures is turned on (see how to turn on and turn off that feature), after modifying a generated Alt text, you can regenerate it by clicking the Generate a description for me:

See also how to create picture captions.
«I am running Microsoft 365 on my Windows 10 computer. I need to insert PNG images into my document, but after I try to insert the pictures it is showing a box with a red x mark and the message «This image cannot currently be displayed.»
Many users experience an odd issue with their Word document regarding a picture or an object is not showing up in Word. Whenever you open the Microsoft Word file, you can see white spaces or rectangles instead of the images that you have inserted earlier. This is a common issue in MS Word 2007 and 2010. Though the problem can also occur in the later versions of Microsoft Word.
Many MS Office users complained that they can’t insert pictures in a Word document. In a Word document, when I select insert, then picture, and select picture from my folder, it fails to insert. It only shows me a blank outline of the image but can’t insert the picture in Word.
Moreover, it can also happen with a Word file that contains an object or graphic image. If this is the case, let us understand why such an error is caused and how to fix the Word Document not showing pictures issue with a few easy methods.
Table of Contents
Why does Word say “This image cannot currently be displayed”?
How do I Fix this “Image Cannot Currently be Displayed” Error?
- Use the «In line with text» wrapping style option
- Change the view of the MS Word Application
- Enable the Show drawings and text boxes on-screen option
- Enable Print drawings created in Word option
- Disable Use of draft quality
- Disable Picture Placeholders
- Change the problematic Video driver settings
Why does Word say “This image cannot currently be displayed”?
“The images that cannot be displayed currently”
The main reason behind the issue “This image cannot currently be displayed” in Word is using the “wrapping style” option instead of the «In Line with text» Option with the pictures in the Word document.
a) Word Wrapping Style
Generally, Text Wrapping is used to manage well the text surrounding the image. However, in some cases using the “Wrapping style” option with your image might make Microsoft Word not show the images. Using the inline option might fix the error. Along with the Word Wrapping style, the following are a few other reasons that can also cause Word not to show images.
b) Picture Placeholder is Enabled
In some cases even after selecting the inline with text option, your image might not show up in the Word document. It might be because the Picture Placeholder option is enabled. Generally, the Picture placeholder is used when the Word document has numerous images or items.
In conditions where word files have a lot of images can be hard to process for a low-spec computer. If you enable the Picture Placeholder option, it will cease all the images to display. Yet images will be in the same position, they just won’t be displayed. This is the best way to reduce the load on the computer. Disabling the picture placeholder might fix your error. In the following sections, you find the instructions on how to change the settings.
c) Other Settings
Following are a few other settings that can be a reason behind the missing photos in the Word file:
- Word document view is set to Draft view or Outline View.
- If you Show drawings and text boxes on-screen preference in the Options menu is disabled.
- When Print drawings are created in Word choice is deactivated.
- If you have enabled the Use draft quality option.
d) Glitches in Windows Video Driver
Finally, your images on the Word document might not show up content or pictures due to any glitches Windows video driver. However, this is highly rare and there is no possibility of this happening.
In the following section, you will find every little detail on how to fix the error.
How do I Fix this “Image Cannot Currently be Displayed” Error?
Try the below-explained troubleshoots to solve your Word document not showing pictures problem. The following steps are according to Word in Office 365. The steps will be slightly different for Word 2007 and 2010 but the results will be the same. The difference in Word 2007 is that there is no File option, instead, you have to use the Microsoft Office button.
1. Use the «In line with text» wrapping style option
- Click on the inserted image
- Switch to the Right-click on the image
- Click on Wrap Text
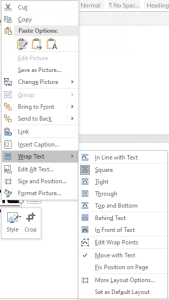
- Select In line with Text option
2. Change the view of the MS Word Application
If you are using Draft or Outline view, then select one of the following views:
- Print Layout
- Full-Screen Reading
- Web Layout
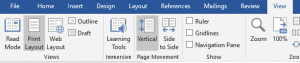
In MS Word 2016 or Office 365 just go to View and select on Print Layout.
For Word 2010: Click File, and then click Print.
3. Enable the Show drawings and text boxes on-screen option
- Go to File and select Options
- Click on the Advanced tab
- Scroll down to see Show document content
- Enable Show drawings and text boxes on-screen option
- Hit OK
- If you are using Word 2007, click on the Microsoft Office Button and click Word Options. As in Word 2007, instead of File, there is a Microsoft Office button.
4. Enable Print drawings created in Word option
- Hit the File tab and go to Options
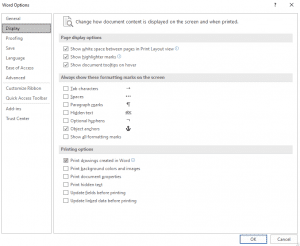
- Jump to Display
- In Printing options, enable Print drawings created in Word option
- Apply changes
5. Disable Use draft quality
- Hit the File tab and go to Options
- Jump to Display
- In Printing options
- Uncheck Use the draft quality option
- Opt OK
6. Disable Picture Placeholders
- Go to File and select Options
- Click on the Advanced tab
- Scroll down to see Show document content
- Uncheck Show Picture Placeholders Preference

- Hit OK
7. Change the problematic Video driver settings
For Windows 10:
- Go to Desktop and right-click
- Select Graphics Properties and then in the next window select Video
- Change your Windows video driver color quality settings and screen resolution.
- Try updating the video driver as well if a new update is available
If none of the above fixations help you, then there might be a possibility that your word file is damaged and as a result of that, it is not showing some content. In such situations, you have to adapt to a Word repair tool to fix the error. To do so, try to repair your DOC file / DOCX file using the Remo Word Repair utility. The Remo Repair Word is capable of solving any issues related to the Word document, regardless of the reason behind the corruption.
The best possible way to avoid any kind of error on Word doc is by creating multiple copies as a backup. However, you should know for a fact that even those copies are exposed to issues. Hence, it is strongly suggested to have Remo Repair on your Hands to fix any word-related issues.
Asked by: Bernadine Simonis
Score: 5/5
(52 votes)
Click the Microsoft Office Button, and then click Word Options. Click Advanced. Under Display document content, click to clear the Picture Placeholders check box. Click OK.
How do you fix images not showing up when you paste it in Microsoft Word?
Let’s try the following suggestions, please:
- Open Office Word.
- Click on File > Options.
- Under Display tab, check the box for Print drawings created in Word.
- Under Advanced tab, look for Show document content. Uncheck the Show picture placeholders box and check the Show drawings and text boxes on screen box.
Why are my pictures not showing up on Microsoft Word 365?
1. Go to File > Options > Advanced > Show document content, check the box of Show background colors and images in Print Layout view, and uncheck the box of Show picture placeholders. 2. Run Word in the safe mode to have a check.
Which view in MS Word can’t display graphics?
On the View tab of the Ribbon or on the status bar, choose Print Layout view. Wrapped graphics don’t display in Draft view. Go to Office Button | Word Options | Advanced: Show document content and make sure that “Show drawings and text boxes on screen” is checked and that “Show picture placeholders” is not checked.
Why is word not letting me insert a picture?
If you can’t select Pictures from the Insert tab on the ribbon, your message is probably in plain text format. In Word, click on But it wont let me move pictures. Navigate to the location of the image file, select it, then select “Insert.” The image will now be inserted.
31 related questions found
Why are images not displaying in Word?
Microsoft Word – Pictures Not Showing. If you are using Word and you see white rectangles instead of images in your documents, you might have “Show picture placeholders” set. Scroll down, and then under “Show document content” uncheck “Show picture placeholders”. Click OK.
How do I unhide a picture in Word?
Open Microsoft Word. Go to File > Options > Advanced Tab. In the Advanced tab, enable the Show picture placeholders check box under the Show document content group. Click OK on the dialog to save the setting and come back to your document.
How do I fix a picture in Word?
Select a picture. Select the Layout Options icon. To bring your picture in front of the text and set it so it stays at a certain spot on the page, select In Front of Text (under With Text Wrapping), and then select Fix position on page.
Why is my text not showing in Word?
If all your text appeas/disappears when you click on the «Show/Hide» button, the suggests you have applied the hidden text attribute to all of your document. Either you did this by selecting the whole document, <CTL><A>, and applying the hidden text attribut, <CTL><H>.
How do I reset Microsoft Word to default settings?
Unfortunately, there is no button in Word to reset the program to its default settings. However, you can rename Word’s global template to see if that fixes its problems. If Word continues to have issues or it runs very slow, another option is to delete Word’s registry key.
Where is show picture placeholders in Word?
To turn on picture placeholders, follow these steps:
- Display the Word Options dialog box. …
- Click Advanced at the left side of the dialog box.
- Scroll down to the Show Document Content section. …
- Click to turn on the Show Picture Placeholders check box.
- Click on OK.
How do I add a tooltip in Word?
Adding a ScreenTip
- Press Ctrl+K. Word displays the Insert Hyperlink dialog box. …
- Click on the ScreenTip button. …
- In the ScreenTip Text box, enter the text you want to use for your ScreenTip.
- Click on OK to close the dialog box.
- Set any other hyperlink values, as desired.
- When completed, click on OK.
How do I fix pictures not displaying?
How do I fix a broken image icon in Chrome?
- Check if the Show all images option is selected. …
- Try a different browser. …
- Switch on JavaScript. …
- Switch off your extensions. …
- Check your antivirus. …
- Clear Google Chrome’s Cache. …
- Reset the Browser. …
- Use Google’s DNS.
How do I enable shapes in Word?
(Word for the web doesn’t support shapes.) To add a shape, select Insert on the ribbon, select Shapes, and then choose a shape. After you add a shape, you can move it and resize it; add text, bullets, or numbering; and you can change the fill color or outline.
Where is the Protect option in Microsoft Word 2010?
1From the File tab menu, choose Info.
Click the Protect Document button to open the Protect Document menu. You have several choices, including Mark As Final, Encrypt with Password, and Restrict Editing.
How do you make a picture transparent in Word 2016?
Make part of a picture transparent
- Select the picture, and go to Picture Format > Color or Picture Tools > Format > Color.
- Select Set Transparent Color.
- When the pointer changes, select the color you want to make transparent.
Where is layout options in Word?
The layout options and compatibility options in Word 2007 and later versions are found near the bottom of the Word Options dialog box > Advanced category. This illustration shows the options found in Word 2013, 2016, 2019, and Word for Microsoft 365.
How can I freely move a picture in Word?
Double-click the picture to add it to your Word document. Back on Word’s editing screen, right-click the image that you just added and select Wrap Text > In Front of Text from the menu. Your picture is now freely movable. Drag and drop it anywhere you want in your document.
How do I view hidden pictures?
Go to the folder you want to search by tapping the folder’s location (e.g., Internal storage) and then tapping the folder, then search for images that have been hidden. Hidden files, including pictures, will appear transparent when compared to other non-hidden files.
How do I find hidden shapes in Word?
Follow these steps:
- Display the Word Options dialog box. …
- Click Advanced at the left side of the dialog box.
- Scroll through the options until you can see the Show Document Content section. …
- Make sure the Show Picture Placeholders check box is cleared.
How do I find hidden links in Word?
Office 365 — Word — how to find and highlight all hyperlinks in documents
- Press Alt + F9 to display the fields.
- Ctrl + F to open the search box.
- Search: ^d hyperlink.
- In main doc – find all.
- Check «Highlight all items found …»
- Click on the Find All button.
- Close the dialog.
Where is the Office button in Word?
The Office button is found in the top-left corner of Excel, Word, and other Office 2007 program windows and looks like the picture. When the Office button is clicked, many of the same options you’d see in the file menu, such as New, Open, Save, Print, etc., can be found.
Why are my images not showing up in my PowerPoint?
Make sure you have the latest Office Updates installed. Try going to File > Save As and save your file to a different location. Close PowerPoint and reopen the file to see if your pictures display properly. … For example, you may be prompted to install a graphics filter to view the picture or clip.
What is gutter margin?
A gutter margin adds extra space to the side margin, top margin, or inside margins of a document that you plan to bind. A gutter margin helps ensure that text isn’t obscured by the binding. … In the Gutter box, enter a width for the gutter margin. In the Gutter position box, click Left or Top.
 Please Note:
This article is written for users of the following Microsoft Word versions: 2007, 2010, 2013, and 2016. If you are using an earlier version (Word 2003 or earlier), this tip may not work for you. For a version of this tip written specifically for earlier versions of Word, click here: Making Pictures Show in Word.
![]()
Written by Allen Wyatt (last updated April 29, 2020)
This tip applies to Word 2007, 2010, 2013, and 2016
Have you ever placed a picture in your Word document, only to have the picture not be visible when you are later working in the document? This seems to be a common occurrence, and there are several reasons for this.
Word uses a «layered» approach to documents. Each document has several different layers. You are probably most familiar with the text layer, in which your text actually resides. There are two other layers, as well. First is the header/footer layer, which contains both the header and footer information that appears on every page in your final document. The other layer is the drawing layer, which contains graphic objects.
In reality, text can appear in all three layers of your document. For instance, headers and footers are composed primarily of text—text obviously appears in the text layer, and text boxes can appear in the graphics layer.
Similarly, graphics can appear on all three layers. People don’t normally place graphics on the header/footer layer, but they can. Graphics are much more common on both the text layer and the graphics layer. If you place an inline graphic in your document, it is on the text layer; if you place a floating graphic in your document, then it is on the graphics layer.
What does this discussion about layers have to do with whether pictures show up in Word? There are a number of ways to view your document, each accessible from the ribbon tools or by clicking on one of the View buttons that may be visible on the status bar, just below your document. Most people do their writing and editing in Draft or Print Layout views. If you are using Draft view, Word displays only the contents of the text layer of your document. Thus, any pictures residing in the header/footer layer or, more commonly, on the drawing layer are not visible. In order to see the pictures on these other layers, you need to switch to Print Layout view. Of course, some pictures are visible when working on your document in Draft view. Why? Because some pictures—inline pictures—are stored on the text layer, and this is the layer being displayed.
You can switch a drawing from the drawing layer to the text layer (or vice versa) by changing whether it is floating or inline. The easiest way to do this is to right-click on the picture to display a Context menu. The Text Wrapping option (Word 2007) or the Wrap Text option (Word 2010, 2013, and 2016) provide different options, including In Line with Text.
Note that you can switch a drawing to the text layer (make it In Line with Text) only if it is a picture that you placed in your document. If it is a graphic object that you created with the Shapes tool on the Insert tab of the ribbon, you cannot do this; the In Line with Text option is not available. Graphic objects such as these can only reside on the drawing layer. This is why Word switches to Print Layout view whenever you choose to insert drawing objects in your document—it knows that these are only visible in Print Layout view.
Despite the foregoing explanation, there are other settings in Word that can affect the visibility of graphics in a document. If you cannot see a drawing that you believe should be visible, you may want to check these:
- Display the Word Options dialog box. (In Word 2007 click the Office button and then click Word Options. In Word 2010 and later versions display the File tab of the ribbon and then click Options.)
- Click Advanced at the left side of the screen.
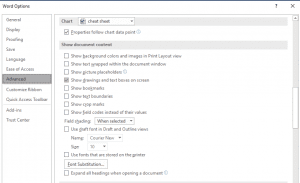
- Scroll through the advanced options until you see the Show Document Content section. (See Figure 1.)
- Note the Show Picture Placeholders check box. This check box controls whether Word displays any drawings, regardless of the layer on which they reside. If selected, then Word shows a «placeholder» for the graphic, but not the graphic itself. Set this check box according to your desires.
- Note the Show Drawings and Text Boxes On Screen check box. This check box controls whether drawings are displayed or not when using Print Layout and Web Layout views; set it according to your desires.
- When done, click OK to close the dialog box.
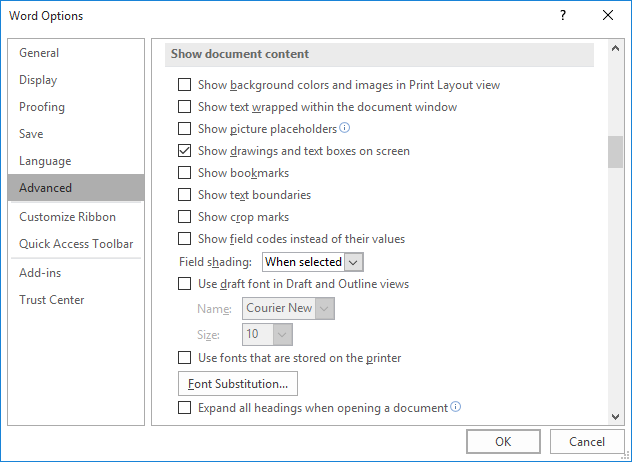
Figure 1. The advanced options of the Word Options dialog box.
Another thing to remember is that Word treats different types of graphics differently when displaying them. For instance, if you are placing an EPS graphic in your document, and the graphic was not saved with a «preview,» then Word won’t display it, but will instead display a gray box that shows where the graphic will print. This type of behavior illustrates that graphic filters can affect what you see in a document.
WordTips is your source for cost-effective Microsoft Word training.
(Microsoft Word is the most popular word processing software in the world.)
This tip (5964) applies to Microsoft Word 2007, 2010, 2013, and 2016. You can find a version of this tip for the older menu interface of Word here: Making Pictures Show in Word.
Author Bio
With more than 50 non-fiction books and numerous magazine articles to his credit, Allen Wyatt is an internationally recognized author. He is president of Sharon Parq Associates, a computer and publishing services company. Learn more about Allen…
MORE FROM ALLEN
How Excel Treats Disk Files
Workbooks are loaded from disk files, but workbooks aren’t the only type of files that Excel can load. This tip provides …
Discover More
Determining the Number of Paragraphs in a Document
When using a macro to process a document in some way, you often need to know the number of paragraphs in the document. …
Discover More
Debugging a Macro
Part of writing macros is to make sure they work as you expect. This involves a process known as debugging. Here’s how …
Discover More