
Word for Microsoft 365 Word for Microsoft 365 for Mac More…Less

We’ve rolled out a new, more modern comments experience in Word with an improved @mention experience and keyboard shortcuts. These improvements set the stage for richer collaboration by your team, unify how comments work across Word endpoints—as well as Excel and PowerPoint—for a consistent, coherent experience.
Let’s look at what’s new.
A consistent experience
With modern comments in Word, we’re aligning how comments work across Office on different endpoints, so that you and your team can rely on a consistent experience regardless of whether you’re using Word, Excel, or PowerPoint on Windows, MacOS, or the web.
Stay in control
With this update, you no longer have to worry about your comments being seen by others before you’re finished editing them. After you draft a new comment or reply, click the Post comment or Post reply button or use the keyboard shortcut Ctrl+Enter (Windows) or Cmd + Enter (MacOS) to share your thoughts with others.
Choose how you view comments
In Word you’ll find comments to the right of your page, by default. In this view, contextual comments are side-by-side with the page content, to help you focus on the feedback that’s most relevant to the part of the document you’re working on. To help you focus on what’s active, when you resolve comments they’ll be moved out of your way to the Comments pane.
In the Comments pane, you can see a single list of all comments in your document, including resolved comments.
To switch between the contextual view and the Comments pane, simply click the Comments button in the upper right corner of your Word window.
Resolve comment threads
Comments in documents generally represent questions, ideas, or concerns about the content. When those have been addressed, comments allow you to mark that thread as resolved. Resolved comment threads won’t appear in the margin (though you can still find them in the Comments pane) to help you stay focused on what’s active.
Improved @mentions in comments
This feature is only available to enterprise customers for files that are in the cloud.
After you’ve started your new comment or reply, you can use the @mention feature to call out to one or more of your colleagues in your organization or school. Simply type the @ symbol followed by their name or email alias.
Tip: The email alias is that part of the email address before the @ sign. For example: «alexw» is the email alias for alexw@contoso.com.
When you post your comment, anybody that you’ve @mentioned in it will get an email notification. Whoever started the comment thread will also be notified. Notification emails let your collaborators know there’s been new activity in the comment thread, gives them a preview of the document content where the comment was made, as well as the comment you left. They can reply to your comment from the email, or they can click a link in the notification email to open the document and go straight to the comment you left, if they want to see more context.
Assign tasks with @mentions
This feature is only available to enterprise customers in Word for the web.
An @mention is also important for assigning tasks to your collaborators. When you @mention someone, you have the option to assign the comment to them as a task. As with a normal @mention, the person you assign the task to will get an email notification. When the person assigned a task has completed the task, they can resolve it.
Increased confidence by design
A comment or reply can only be edited by the person who created it.
Improved accessibility
With this update we’ve also improved the accessibility of comments by adding more ways to navigate and read comments using your keyboard and screen reader.
And more!
We’re just getting started with improving your comments experience. Stay tuned for more new and exciting comments and collaboration features to help you and your team be more productive in Word and Office.
Why don’t I see it?
Modern Comments are available only if you’re using Word for Microsoft 365. If you’re using an older version of Office, you’ll still see comments from other users, but in the classic Comments experience.
See also
Using Modern Comments in Word
Need more help?
You’re working on a Microsoft Word Document and can’t figure out how to see all of the comments at the same time.
This article will show you how to view all of the comments in your Word doc at the click of a button.
How to show all comment lines in your Word Document
Follow these 4 easy steps to view all comments:
- Open the Word document.
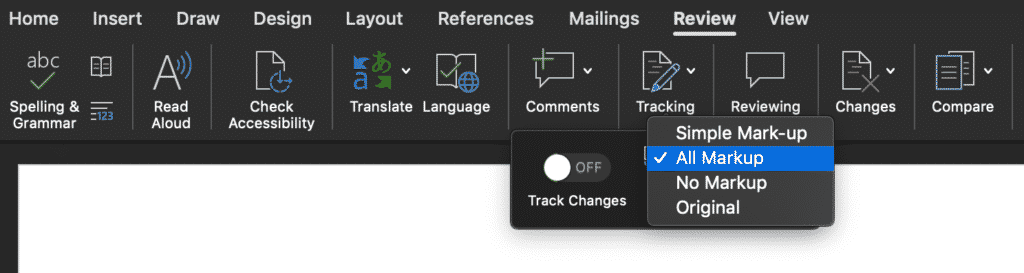
- In the toolbar, click Review.
- Find and click Tracking.
- Tick All Markups.
Only want to see the comments not all changes?
If your Microsoft Word Document is full of tracked changes, comments and formatting updates and you want to clear the air for comments only here’s how you do it:
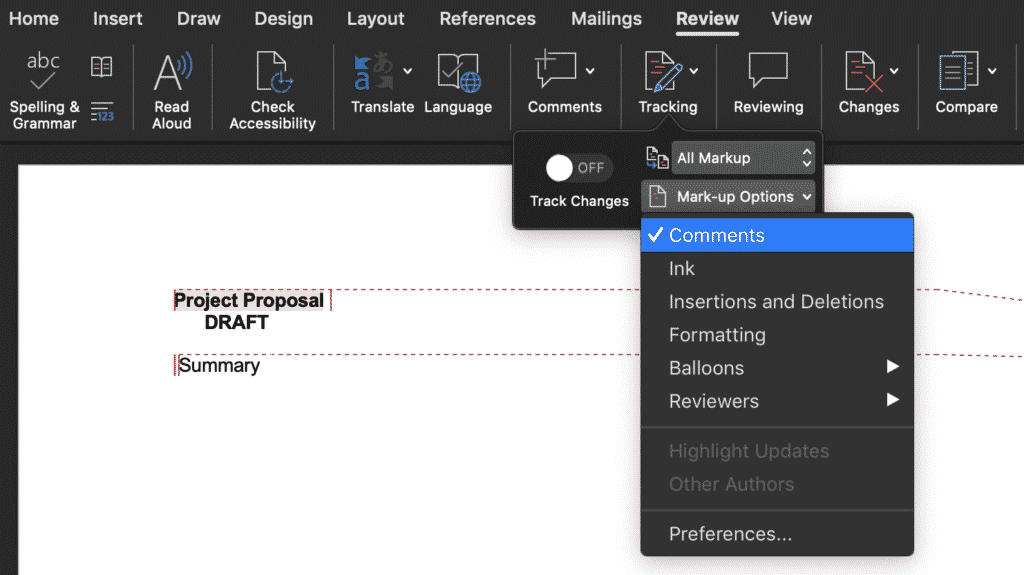
- Open the Word document.
- In the toolbar, click Review.
- Find and click Tracking.
- Click Mark-up Options.
- Clear everything except Comments.
Need a better way to collaborate on Microsoft Word Documents?
You’re working on a word document with your team, each of you adding comments and tracking changes along the way. Then you realise two people have been working on the same document at once and you no longer have all of the changes in the one file.
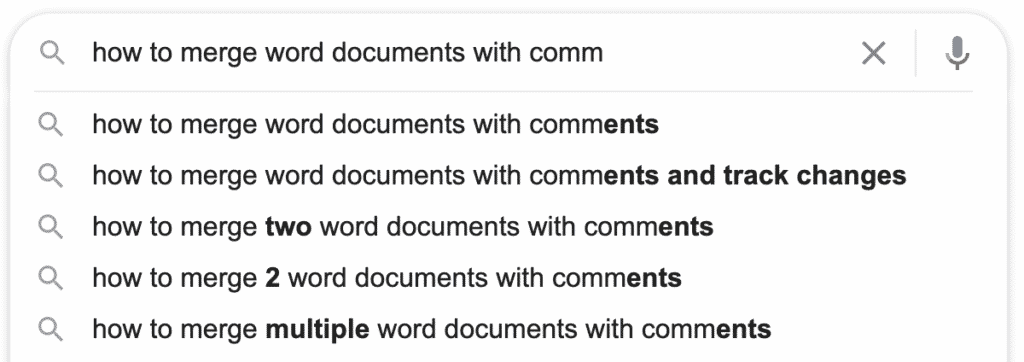
You start googling ‘How to merge Word documents with comments?’ and think there has to be a better way!
Enter purpose-built tools, such as Simul Docs, designed to help you seamlessly collaborate on Microsoft Word documents with your team.
Simul Docs is an easy to use tool that works to keep track of a Word document as your team make edits. Automatically saving new versions each time the document is opened and edited, tracking all changes (even if you forget to turn track changes on).
Simul also recognises when two people are editing a document at the same time, saving each person’s changes in a separate ‘branch’ so no one’s work is overridden.

You can then ‘merge’ these two branches with the click of a button. Bringing both author’s changes back into the same document, allowing you to easily identify the differences. It’s that easy!

Show or Hide Comments in Microsoft Word Documents
by Avantix Learning Team | Updated January 10, 2021
Applies to: Microsoft® Word® 2010, 2013, 2016, 2019 or 365 (Windows)
You can show and hide comments using the Review tab in the Ribbon in Microsoft Word. If you add comments in a Word document, they will appear in a markup area on the right side of pages by default. If you want to show or hide comments, you’ll need to control the display of markup. Keep in mind that comments that are hidden could be displayed by a colleague or client.
The markup area appears in Print Layout View (the default view in Word) whenever a document includes comments and its appearance can be controlled using settings on the Review tab in the Ribbon. The default markup is set to Simple Markup with comments displayed. If the markup area is not appearing on the right, click Show Comments in the Comments group. Tracked changes also appear in the markup area.
In this article, we’re assuming that the default markup options are being used (although you can change the display of markup using Track Changes Options).
Recommended article: How to Remove Comments in Word (3+ Ways to Delete Comments)
Do you want to learn more about Microsoft Word? Check out our virtual classroom or live classroom Word courses >
Hide comments using Display for Review
To hide comments in the markup area using Display for Review:
- Click the Review tab in the Ribbon.
- In the Tracking group, click Display for Review. A drop-down menu appears.
- Select No Markup or Original to hide the markup area, including comments.
The following drop-down menu appears when you click Display for Review:

When you click Display for Review, you have the following options:
- Simple Markup which displays the markup area with comments and revisions. If you select Simple Markup and then click Show Comments in the Comments group, the markup area appears or disappears (if there are no tracked changes). If no markup area appears on the right, comments appear as speech bubbles that you can click to display the comment.
- All Markup which displays the markup area with all comments or revisions as well as lines to their locations in the text.
- No Markup which hides the markup area so that comments and revisions are hidden.
- Original which hides the markup area as well as any revisions made to the document. In regard to comments, this option is the same as No Markup.
In the following example, Simple Markup is selected as well as Show Comments in the Comments group (Print Layout View in Word 365):

In the next example, Simple Markup is selected and Show Comments is not selected in the Comments group (Print Layout View in Word 365):

Comments appear in different ways depending on the selected view. Typically, you would change views using the View tab in the Ribbon. If you select Draft View, comments appear as the initials of the reviewer with square brackets and are highlighted with a background color. You can position the mouse pointer on the text to view the comment in a pop-up bubble. In Read Mode View, comments appear as speech bubbles to the right of the text. Simply click a bubble to view a comment.
Hide comments using Show Markup
To hide comments using Show Markup:
- Click the Review tab in the Ribbon.
- In the Tracking group, click Show Markup. A drop-down menu appears.
- Select Comments to deselect comments.
The Show Markup drop-down menu includes the following options:

Show comments in the markup area
To show comments in the markup area:
- Click the Review tab in the Ribbon.
- In the Tracking group, click Display for Review. A drop-down menu appears.
- Select Simple Markup or All Markup to show the markup area, including comments.
- Click Show Markup. A drop-down menu appears.
- Ensure Comments is selected.
- If you selected Simple Markup, in the Comments group, select Show Comments in the Comments group.
View all comments using the Reviewing Pane
To view all comments regardless of view:
- Click the Review tab in the Ribbon.
- In the Tracking group, click Reviewing Pane. A drop-down menu appears.
- Select either the horizontal or vertical display. The Reviewing Pane appears and will displays comments and revisions.
You can click the Reviewing Pane button again in the Ribbon to hide the Reviewing Pane.
Hiding markup is not the same as accepting changes or deleting comments. You should accept or reject changes and delete comments in your Word document before you send out the final version.
Subscribe to get more articles like this one
Did you find this article helpful? If you would like to receive new articles, JOIN our email list.
More resources
How to Find and Replace in Word (and Use Wildcards)
How to Superscipt or Subscript in Word (with Shortcuts)
How to Insert or Type the Sigma Symbol in Word (Σ or σ)
How to Insert Excel Data into a Word File (Linked or Unlinked)
How to Insert a Check Mark or Tick Mark in Word (5 Ways with Shortcuts)
Related courses
Microsoft Word: Intermediate / Advanced
Microsoft Excel: Intermediate / Advanced
Microsoft PowerPoint: Intermediate / Advanced
Microsoft Word: Long Documents Master Class
Microsoft Word: Styles, Templates and Tables of Contents
Microsoft Word: Designing Dynamic Word Documents Using Fields
VIEW MORE COURSES >
Our instructor-led courses are delivered in virtual classroom format or at our downtown Toronto location at 18 King Street East, Suite 1400, Toronto, Ontario, Canada (some in-person classroom courses may also be delivered at an alternate downtown Toronto location). Contact us at info@avantixlearning.ca if you’d like to arrange custom instructor-led virtual classroom or onsite training on a date that’s convenient for you.
Copyright 2023 Avantix® Learning
Microsoft, the Microsoft logo, Microsoft Office and related Microsoft applications and logos are registered trademarks of Microsoft Corporation in Canada, US and other countries. All other trademarks are the property of the registered owners.
Avantix Learning |18 King Street East, Suite 1400, Toronto, Ontario, Canada M5C 1C4 | Contact us at info@avantixlearning.ca
![]()
Written by Allen Wyatt (last updated August 21, 2021)
This tip applies to Word 2007, 2010, 2013, 2016, 2019, and Word in Microsoft 365
When you are adding a comment, Word allows you to enter the comment in the balloon area at the right side of the document. Most users, when they are through entering the comment text, hide the comments balloons so they will be able to see more of their document at once. (You hide the comment balloons by clicking the Show Comments tool on the Review tab of the ribbon.)
If you later want to view your comments, Word provides two ways that they can be displayed: either in the Reviewing Pane or in balloons to the right side of your document. The latter method (using balloons) is the default comment-viewing method; there’s nothing you need to do to turn it on. If the balloons aren’t displayed, however, you can display them by clicking the Show Comments tool on the Review tab of the ribbon. (Note that the Show Comments tool will be greyed out if All Markup is selected in the Tracking group.) You can change any of the comments by clicking within a balloon and making your changes. Then, click some other area of your document outside the balloon.
If you prefer to display the Reviewing Pane, follow these steps:
- Make sure the Review tab of the ribbon is displayed.
- In the Tracking group you see the Reviewing Pane tool. Click the down-arrow at the right of the tool. You should see two options displayed.
- Choose either Reviewing Pane Vertical or Reviewing Pane Horizontal, according to your desires. The Reviewing Pane should appear as indicated by your choice.
Make any changes to your comments in the Reviewing Pane, as desired. When you are done making changes, you can close the Reviewing Pane by again clicking on the Reviewing Pane tool.
WordTips is your source for cost-effective Microsoft Word training.
(Microsoft Word is the most popular word processing software in the world.)
This tip (6018) applies to Microsoft Word 2007, 2010, 2013, 2016, 2019, and Word in Microsoft 365.
Author Bio
With more than 50 non-fiction books and numerous magazine articles to his credit, Allen Wyatt is an internationally recognized author. He is president of Sharon Parq Associates, a computer and publishing services company. Learn more about Allen…
MORE FROM ALLEN
Upside-Down Printing
Putting words on the printed page is easy in Word. Rotating those words in different manners can be a bit trickier. This …
Discover More
Changing the Type of Page Numbers Used in Headers or Footers
Like to have your page numbers displayed using different types of numbers? Here’s how you can choose from the several …
Discover More
Hiding Individual Comments
When developing a document, a common practice is to use comments to discuss changes with other people or to make notes …
Discover More
More WordTips (ribbon)
Struggling with New Changes to Track Changes
In the latest versions of Microsoft 365, the company has introduced an entirely new way to deal with markup comments. …
Discover More
Pasting a Comment into Your Document
When developing a document, you may end up with all sorts of comments that you need to deal with. One common task is to …
Discover More
Searching for Comment Marks
Got a bunch of comments in your document? You can easily jump from one comment to the other by using the Object Browser, …
Discover More
Long documents can have hundreds or even thousands of markups, which can make finding individual feedback quite time-consuming. Today’s tutorial shows how to quickly view specific reviewers’ comments and edits in Microsoft Word.
First, we’ll use Track Changes to view comments and edits from specific reviewers. Then, we’ll use the Navigation pane to view comments (but not edits) from specific reviewers.
This tutorial is also available as a YouTube video showing all the steps in real time.
Watch more than 150 other videos about Microsoft Word and Adobe Acrobat on my YouTube channel.
Please note that these steps are for Word for Microsoft 365, Word 2021, Word 2019, and Word 2016. The steps are similar for Word 2013 and Word 2010.
Use Track Changes to View Comments and Edits from Specific Reviewers
The Tracking tools offer the most control over the comments and edits you see from specific reviewers.
1. Select the View tab and then ensure the document is set to Print Layout for best viewing.

2. Select the Review Tab.

3. Select the Display for Review drop-down menu and then select All Markup.

4. Select the Show Markup drop-down menu and then check the options you want to view: Comments, Insertions and Deletions, and/or Formatting.

5. Select Balloons and then select the viewing option you prefer: Show Revisions in Balloons, Show All Revisions Inline, or Show Only Comments and Formatting in Balloons. (My personal preference is Show Only Comments and Formatting in Balloons.)

6. Select the Specific People drop-down menu. Deselect the reviewers’ names whose comments and edits you don’t want to see. (Alternately, you may have to select the reviewers’ names whose comments and edits you do want to see if none are selected.)

The comments and edits from the reviewer or reviewers you selected will now show in the document.
When you’re finished…
7. Return to Specific People in the Show Markup drop-down menu and select All Reviewers to show everyone’s comments and edits.
Use Navigation to View Comments from Specific Reviewers
If you only need to view specific reviewers’ comments (not edits), use the Navigation pane to quickly move through the document.
1. Select the View tab and then ensure the document is set to Print Layout for best viewing.
2. Select the Home Tab.

3. Select Find in the Editing group to open the Navigation pane.

Pro Tip: Windows users can select Ctrl + F to open the Navigation pane directly.
4. Select the magnifying glass.

5. Select Comments and then check the reviewers’ names whose comments you want to view.

6. Use the navigation arrows to move up and down through the comments in the documents. (The comments won’t appear in the Navigation pane itself.)

When you’re finished…
7. Select the X in the text box to return the comment view to All Reviewers.

In my next Microsoft Word tutorial, we’ll look at how to search within comments without having to run the search through the entire document.
Further Reading: How to Remove User Names from Existing Track Changes in Microsoft Word
Updated June 04, 2022