Когда вы создаете или редактируете документ, вы привыкаете к тому, что все выглядит определенным образом.
Так что, если вы открываете документ Microsoft Word, а страница либо намного меньше, либо больше, или вы не видите разрывов страниц, к которым вы привыкли, это может вас немного оттолкнуть.
К счастью, вы можете вернуть документ Word к обычному виду, изменив параметр на вкладке «Вид».
- Откройте документ.
- Выберите вкладку «Вид».
- Нажмите кнопку Макет печати.
Наше руководство продолжается ниже с дополнительной информацией, чтобы ответить на вопрос о том, как мне вернуть документ Word к обычному виду, включая изображения этих шагов.
Word 2010 имеет множество различных настроек и панелей просмотра, которые вы можете выбрать.
Они полезны, когда вам нужно просмотреть нетипичные элементы, такие как метки форматирования и различные разрывы.
Однако, если вы забудете выйти из представления, на которое вы переключились, или если кто-то другой использовал ваш компьютер и изменил представление, вы можете запутаться в том, как вернуться к обычному представлению в Word 2010.
К счастью, в Word 2010 есть отдельное меню, в котором можно указать большинство желаемых параметров просмотра, а также вернуться к обычному виду, к которому вы привыкли.
Выход из режима черновика в Word 2010 (руководство с иллюстрациями)
Если в окне просмотра Word 2010 просто отображается гигантский белый холст без разрывов страниц в любом направлении, то, вероятно, вы находитесь в режиме черновика.
Это представление имеет свое применение в определенных ситуациях, но для обычного пользователя, который просто пытается создать обычный документ, отсутствие отдельных страниц может немного раздражать.
К счастью, вы можете переключиться с этого вида и вернуться к нужному виду по умолчанию.
Шаг 1: Откройте окно Word 2010, в котором ваш документ в данный момент отображается неправильно.
Шаг 2: Щелкните вкладку «Вид» в верхней части окна.
Шаг 3. Щелкните представление «Макет печати» в разделе «Представления документов» на ленте в верхней части окна.
Теперь, когда вы ответили на вопрос, как вернуть документ Word к обычному виду, вы сможете переключаться между различными представлениями документа, чтобы всегда использовать то, которое наиболее полезно для вашей текущей ситуации.
Представление «Макет печати» используется по умолчанию для большинства ситуаций в Word 2010, но вы также можете выбрать один из других параметров в разделе «Представления документа», чтобы увидеть, предпочитаете ли вы один из этих вариантов.
Отказ от ответственности: Большинство страниц в Интернете содержат партнерские ссылки, в том числе некоторые на этом сайте.
23318

Режимы отображения документа Word 2010
Возможно, вы уже обратили внимание на то, что Microsoft Word 2010 иногда называется не текстовым редактором, а текстовым процессором. Отличия между этими терминами очевидны — текстовый редактор позволяет лишь редактировать текстовые документы, а текстовый процессор в дополнение предлагает пользователю мощнейшие инструменты и для других видов работ с ними. Такой богатый багаж функций позволяет использовать приложения для очень широкого спектра прикладных задач.
В этой статье рассказывается о том, каким образом можно эффективно использовать рабочее пространство текстового процессора Microsoft Word для того, чтобы перемещаться по тексту, выделять текст, копировать, заменять, искать нужные символы и слова в открытом документе. Вы узнаете о различных режимах отображения документа, чем они отличаются друг от друга и для каких целей предназначен каждый из них. Эффективное перемещение по открытому документу поможет вам сэкономить массу времени и нервов. Поиск по документу позволит найти и заменить нужные выражения за считанные секунды. Итак, давайте начнем двигаться по порядку. Первое, что мы рассмотрим, — различные режимы отображения документов в Microsoft Word.
Как уже говорилось выше, текстовый процессор позволяет пользователю решать огромное количество различных задач. Именно для удобства работы с дифференцированными типами задач в Microsoft Word 2010 существует несколько режимов отображения документа: Разметка страницы (Print Layout), Режим чтения (Full Screen Reading), Веб-документ (Web Layout), Структура (Outline) и Черновик (Draft).
Каждый режим имеет специфические особенности отображения открытого документа и предназначен для отдельного вида работы с текстом. Прежде чем узнать поподробнее про каждый из этих режимов, давайте научимся переключаться между режимами отображения документа. По умолчанию все документы открываются в режиме Разметка страницы (Print Layout). Для смены режима пользователю предлагаются два различных пути.
Во-первых, можно изменить режим отображения документа с помощью ленты управления. Для этого необходимо щелкнуть мышью по вкладке Вид (View) (рис. 4.1) и выбрать нужный режим из списка. Во-вторых, можно с помощью строки состояния выбрать нужный режим отображения. Для этого в правой нижней части главного окна программы Microsoft Word необходимо щелкнуть мышью по иконке, соответствующей нужному режиму просмотра документа.
Рис. 4.1. Главное окно программы с выбранным стилем отображения Разметка страницы
Теперь давайте разберемся, чем же отличаются режимы отображения друг от друга и для чего они используются при работе с текстовым процессором Microsoft Word.
- Режим Разметка страницы (Print layout). Этот режим установлен в текстовом процессоре Microsoft Word по умолчанию и отображает все особенности верстки открытого документа. Документ отображается разбитым на печатные страницы. Просматривая и редактируя документ в данном режиме отображения, вы можете быть уверены в том, что то, как вы видите документ в Microsoft Word, будет отображаться при печати данного документа.
- Режим чтения (Full Screen Reading) предназначен для комфортного чтения документа: он отображается разбитым на две страницы, подобно обычной книге. Для удобства чтения и вычитки документов в этом режиме не видна большая часть элементов управления главного окна программы Microsoft Word, а также существуют функции увеличения и уменьшения размера шрифта, вставки примечаний и исправлений, выделения текста.
- Режим Веб-документ (Web Layout). Этот режим предназначен для создания и редактирования веб-документов и отображает документы в таком виде, в каком они будут смотреться при просмотре их через веб-браузер. Для данного вида просмотра характерно отсутствие разбивки документа на страницы и отображение заднего фона, если таковой установлен.
- Режим Структура (Outline) (рис. 4.2) предназначен для просмотра структуры открытого документа. Это незаслуженно редко используемый режим отображения документов. С помощью него можно увидеть документ в виде структурированного многоуровневого списка. В этом режиме можно отключить просмотр определенных уровней вложенности, например не отображать содержание элементов, расположенных под заголовками третьего уровня.
- Режим Черновик (Draft). Внешне похож на режим Веб-документ (Web layout), однако предназначен для удобной работы с текстовым содержимым документа. В этом режиме отображения игнорируется часть верстки и разметки документа. Применяйте данный режим в случае, если необходимо вводить много текста и мало работать с версткой документа.
[box color=sovet]Если вы хотите скрыть пробелы между страницами документа в режиме просмотра Разметка страницы (Print Layout), установите указатель мыши в интервале между страницами так, чтобы указатель изменился с обычного на и появилась надпись Дважды щелкните здесь, чтобы скрыть пробелы (Double-click to hide white space). После этого документ будет отображаться без пробела между страницами. Также не будет отображаться содержание верхнего и нижнего колонтитула.[/box]
[box color=primechanie]Выйти из режима чтения можно, нажав клавишу Esc.[/box]
Рис. 4.2. Документ, открытый в режиме Структура
Очень часто даже давние пользователи текстового процессора Microsoft Word не подозревают о том, что различные режимы отображения текста способны значительно упростить работу с документами. Грамотно выбирайте режим для каждой задачи, которая стоит перед вами. Кажущаяся сложность нескольких режимов отображения документов через некоторое время поможет вам намного быстрее и проще работать с открытыми документами.
Microsoft Word: вкладка Главная
Приветствую всех посетителей Компьютерной планеты! Пользователи Microsoft Office не всегда могут представить всего многообразия функций, которые предоставляет им данный текстовый редактор. В данной статье я расскажу обо всех функциях, расположенных на вкладке «Главная».
Группа – это набор функций на кладке, которые объединены более конкретным предназначением.
Внешний вид вкладки Главная
Мы рассмотрим вкладку «Главная» и разберем каждую из групп. На данной вкладке располагаются наиболее востребованные функции при работе с текстом в Word. Именно поэтому они располагаются на самой первой вкладке.
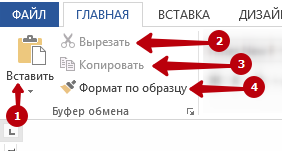
Группа «Буфер обмена»
В данной группе собраны функции для работы с буфером обменом.
- Вставить – используется для вставки текста или объекта из буфера обмена.
- Вырезать – служит для перемещения текста или объекта из одного места в документе в другое.
- Копировать – предназначена для копирования выделенного фрагмента текста и вставки его в другом месте документа.
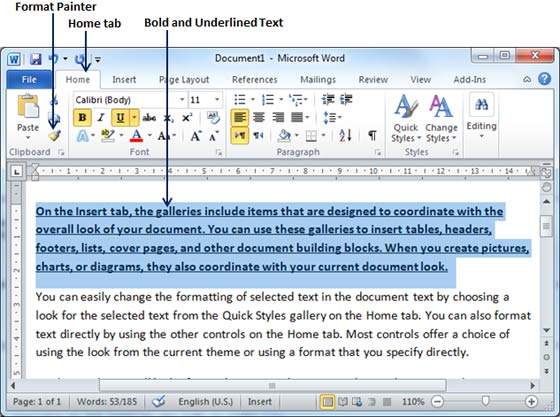
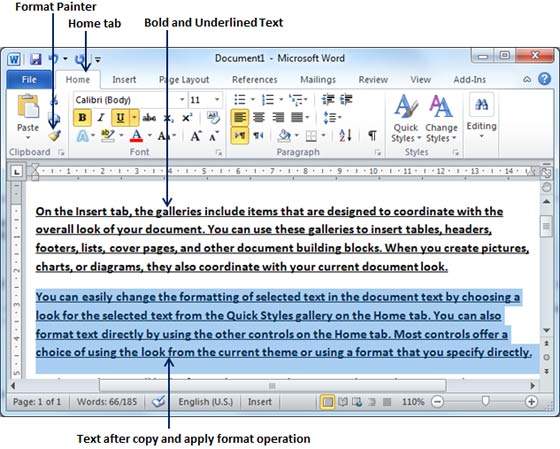
- Формат по образцу – если вам нужно оформить текст по подобию другого, то с помощью этой кнопки вы сможете сделать это очень быстро. Просто выделите образец текста, нажмите на кнопку «Формат по образцу», затем выделите другой фрагмент текста и к нему тут же применятся все стили, которые использовались для оформления образца.
Группа Буфер обмена
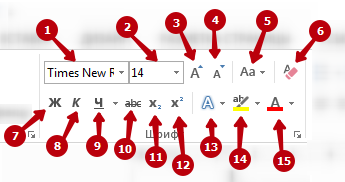
Группа «Шрифт»
Данная группа объединяет в себе все функции по работе с оформлением текста.
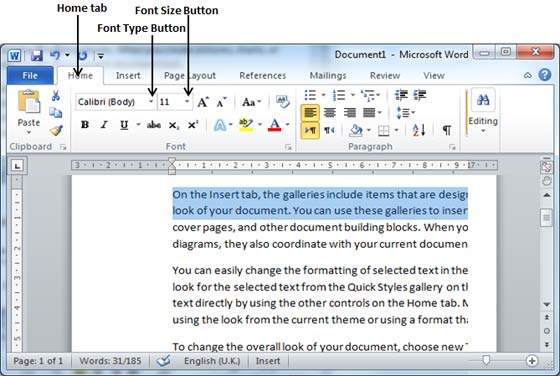
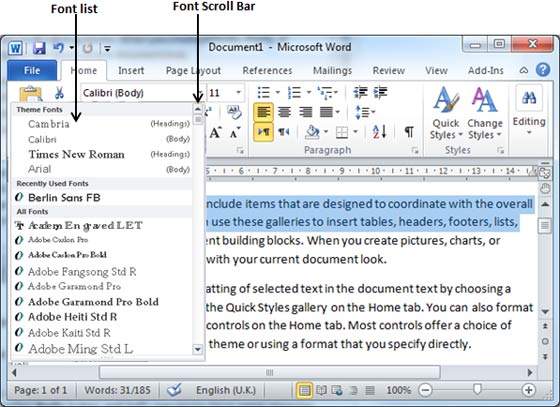
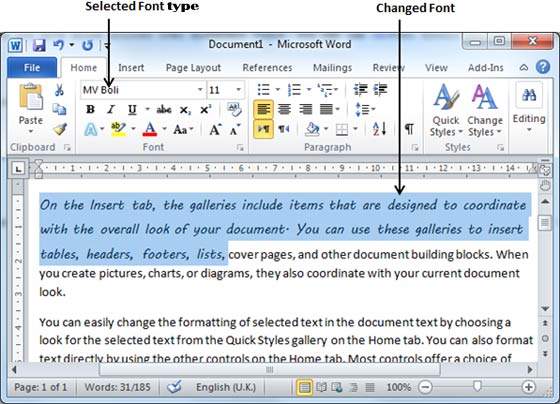
- Шрифт – выбор начертания текста из большого списка предустановленных шрифтов.
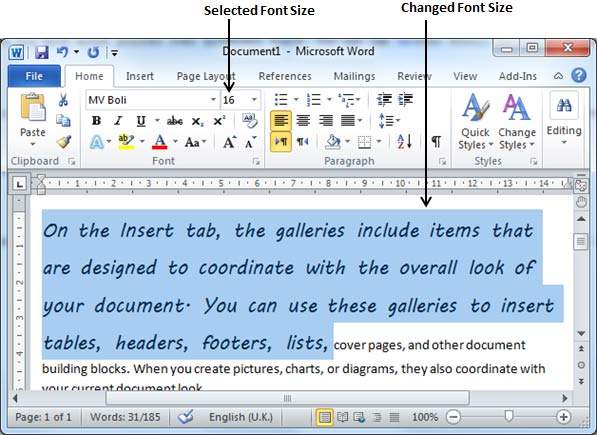
- Размер шрифта – размер текста на странице.
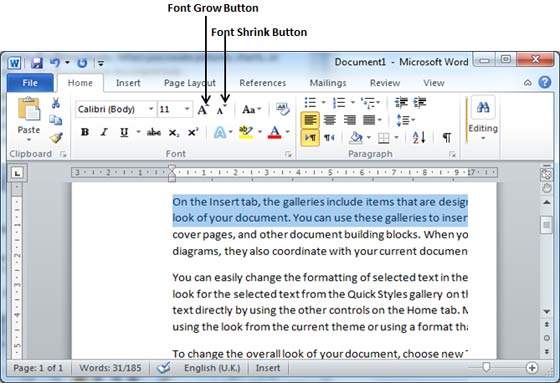
- Увеличение размера шрифта – при нажатии на данную кнопку каждый раз происходит увеличение размера текста.
- Уменьшение размера шрифта – при нажатии на данную кнопку каждый раз происходит уменьшение размера текста.
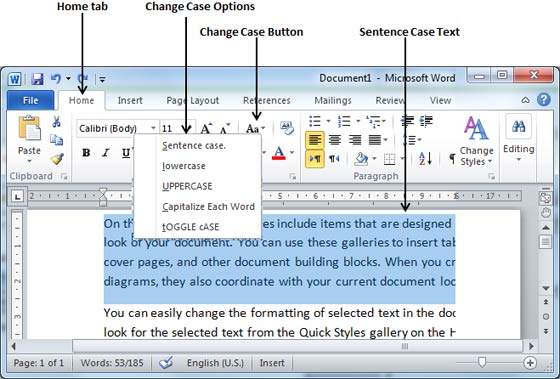
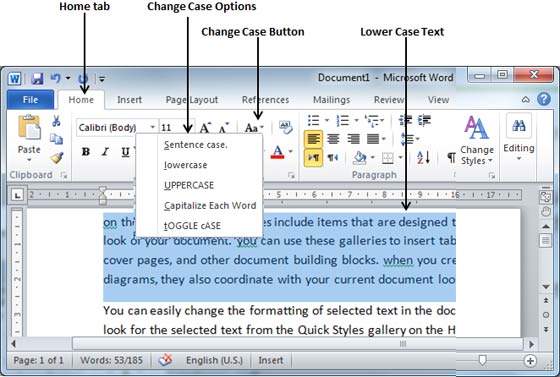
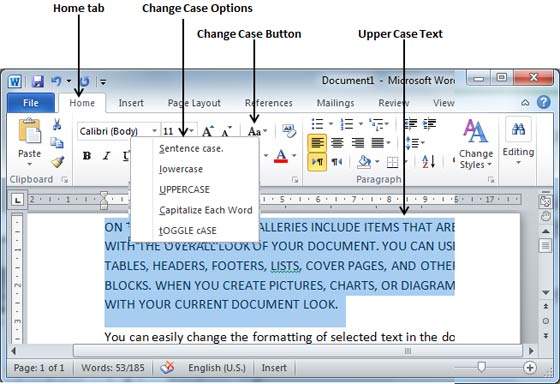
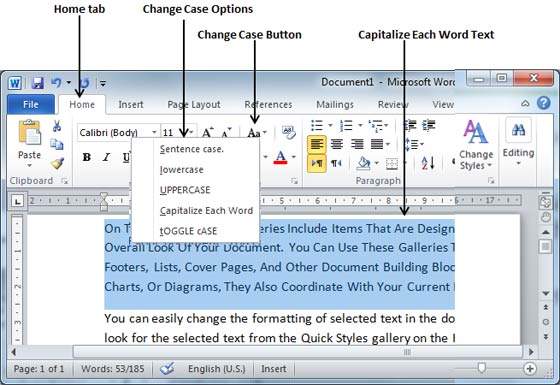
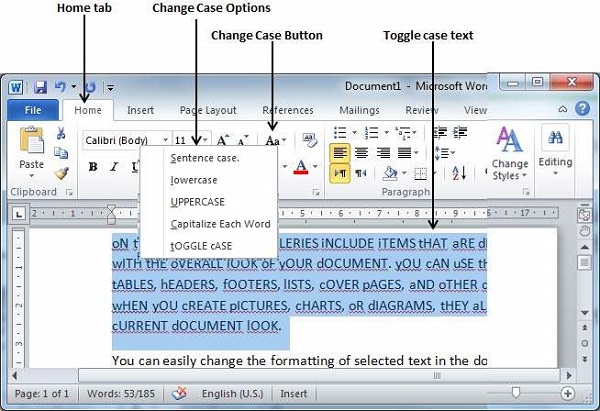
- Регистр – позволяет привести регистр букв в тесте к одному виду. Это может быть оформление как в предложениях – Первая буква после точки с заглавная, все строчные, ВСЕ ПРОПИСНЫЕ, Каждое Слово Начинается С Прописных и инвертирование регистра – зАГЛАВНЫЕ СТАНУТ СТРОЧНЫМИ, А СТРОЧНЫЕ зАГЛАВНЫМИ.
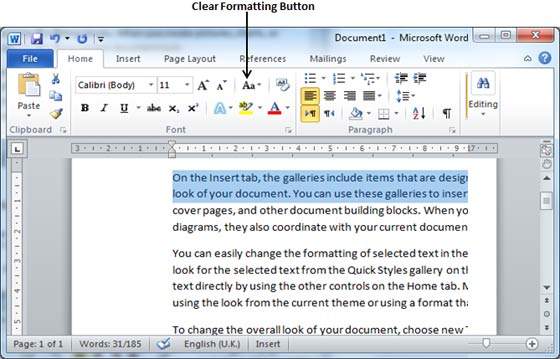
- Удалить форматирование – убирается все форматирование текста. Остается лишь текст со стандартным оформлением.
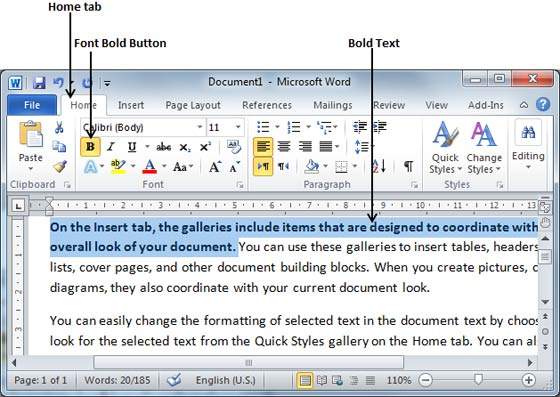
- Полужирный – выделение фрагмента текста полужирным начертанием.
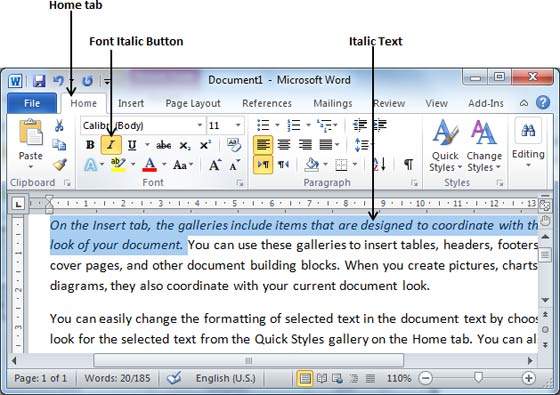
- Курсив – выделение фрагмента текста курсивным начертанием.
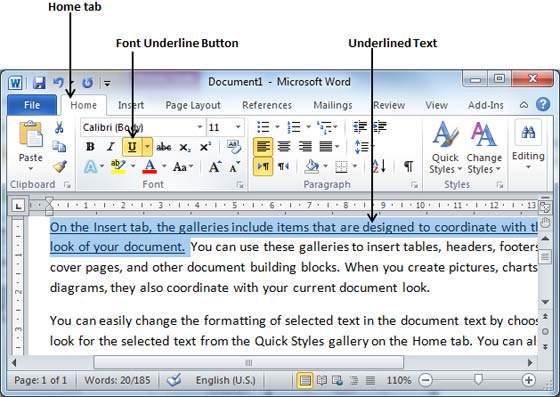
- Подчеркнутый – подчеркивание выделенного фрагмента текста.
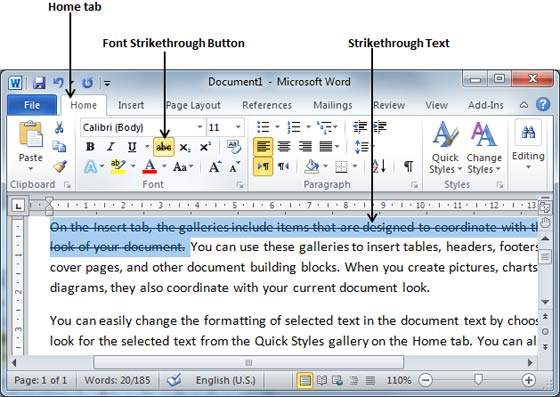
- Зачеркнутый – зачеркивание выделенного текста.
- Подстрочный текст – написание текста под основным текстом: тексттекст
- Надстрочный текст – написание текста над основным текстом: текст текст
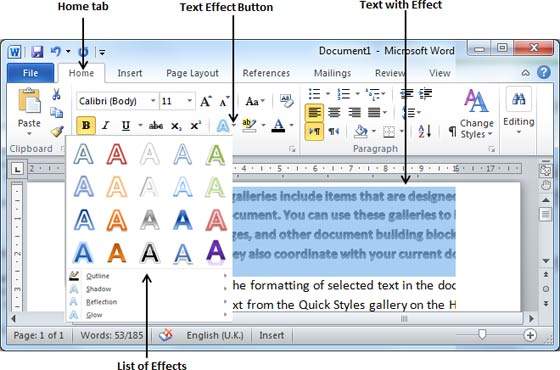
- Текстовые эффекты и оформление – здесь вы сможете оформить текст: добавить к нему цвет, тень, отражение, подсветку и т.д.
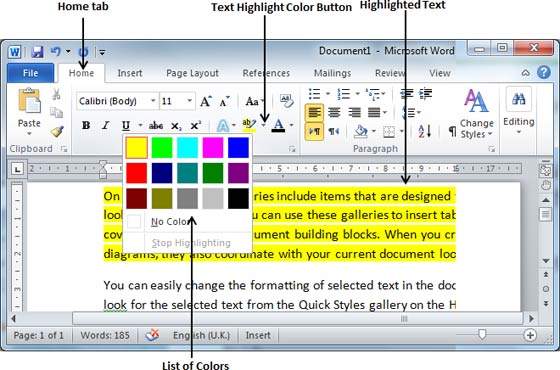
- Цвет выделения текста – это своеобразный текстовыделитель – меняется цвет фона. Вы сможете выделить текст любым цветом.
- Цвет текста – здесь задается цвет текста. Можно подобрать любой цвет текста, а также закрасить текст градиентом.
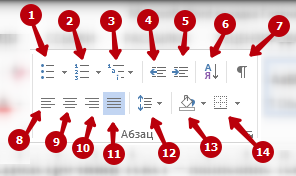
Группа «Абзац»
Здесь располагаются все функции, которые предполагают работу со списками, выравниванием текста и отступами.
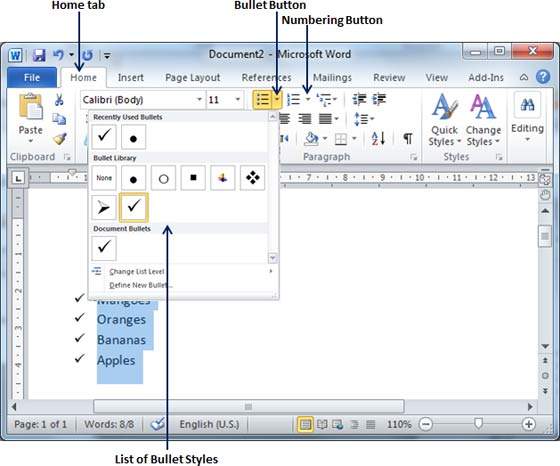
- Маркированный список – список, значения которого разделяются знаками: точкой, кружком, галкой и т.д.
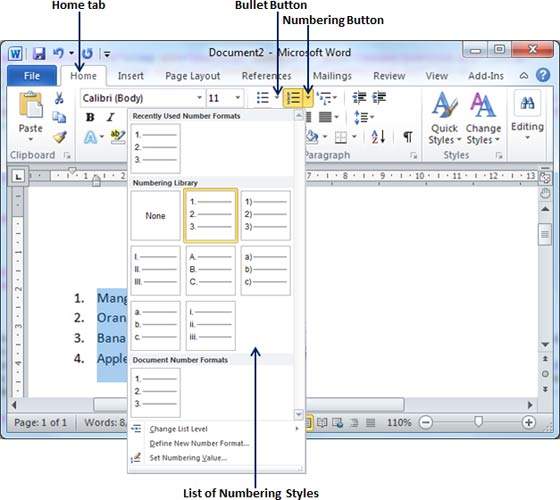
- Нумерованный список – список, значения которого автоматически нумеруются. Нумерованный список может быть арабскими, римскими цифрами, буквами латинского алфавита.
- Многоуровневый список – такой список подразумевает наличие подуровней на каждом уровне списка. То есть у номер 1, могут быть подуровни 1.1, 1.2, 1.1.1 и т.д.
- Уменьшить отступ – позволяет уменьшить отступ от края листа.
- Увеличить отступ – позволяет увеличить отступ от края листа.
- Сортировка – упорядочивает список по алфавиту или по числовым значениям. Чаще всего используется для упорядочивания списка в таблицах.
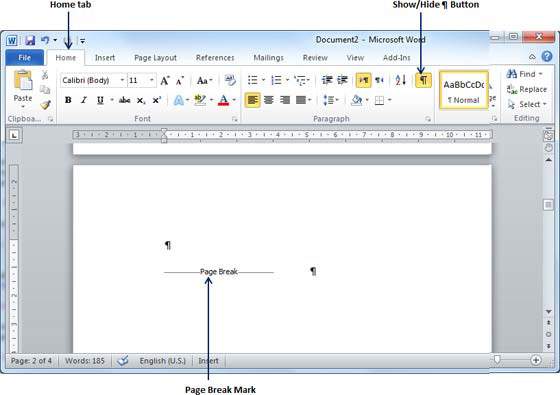
- Отобразить все знаки – кнопка, которая отображает все скрытые знаки форматирования. Особенно полезна при выполнении сложного форматирования.
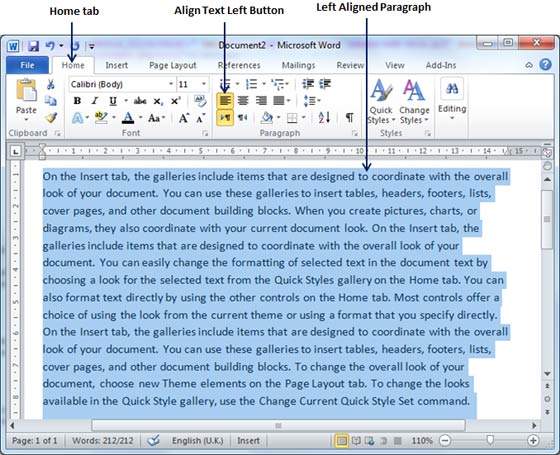
- Выравнивание по левому краю – выравнивает текст по левому краю, правый край при этом получается «рваным».
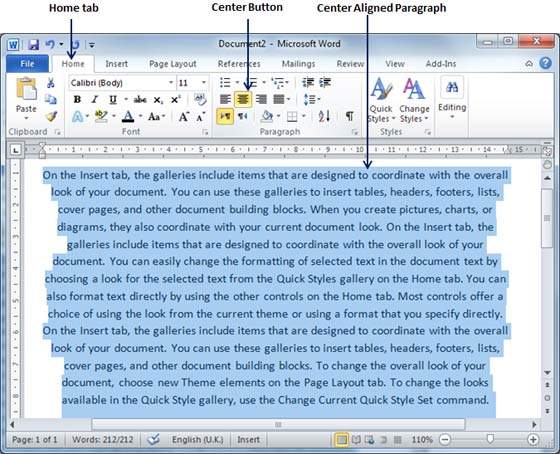
- Выравнивание по центру – текст располагается посередине листа, с правой и с левой стороны отступ от края листа одинаковый.
- Выравнивание по правому краю – текст выравнивается по правому краю, при этом левый край текста будет неровным.
- Выравнивание по ширине – как правая, так и левая сторона текста будет ровная. Текст автоматически распределяется по листу.
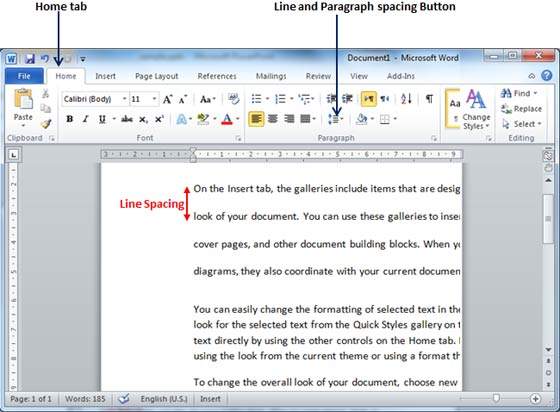
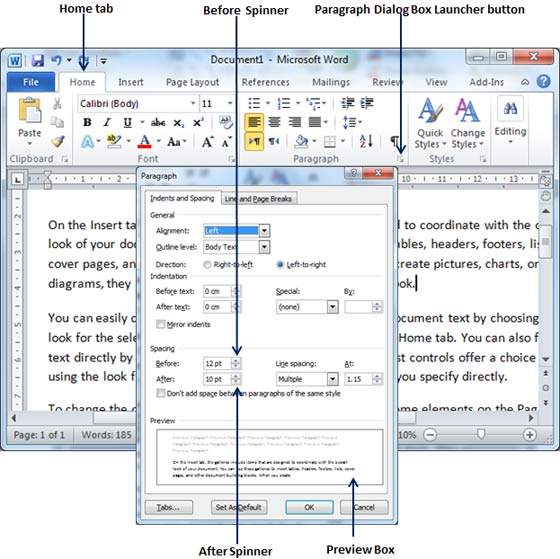
- Интервал – позволяет увеличить отступ между строками текста. По умолчанию устанавливается интервал, равный 1,15. Для оформления рефератов и различных работ обычно используется полуторный или двойной интервал.
- Заливка – с помощью данной кнопки вы сможете поменять цвет фона у выделенного текста или ячейки таблицы.
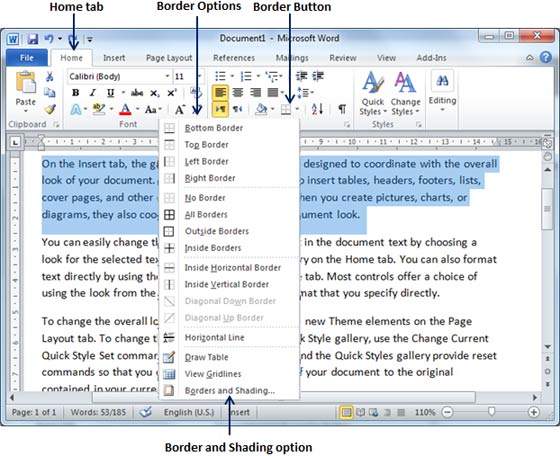
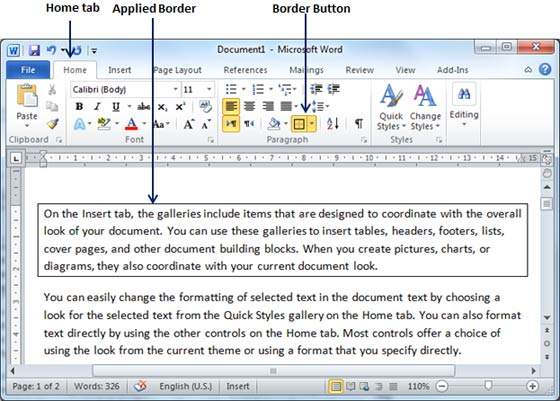
- Границы – данная кнопка предназначена для работы с границами таблиц. Позволяет добавлять или убирать видимые границы ячеек.
Группа «Стили»
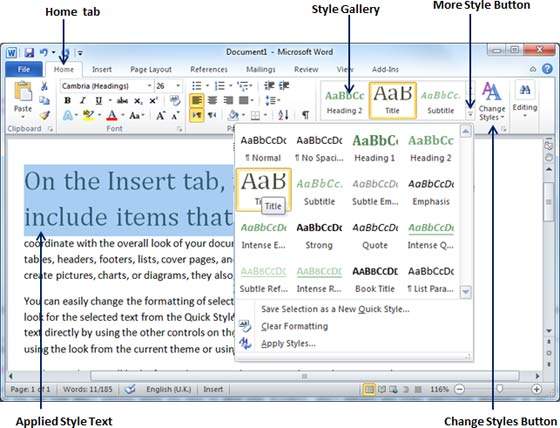
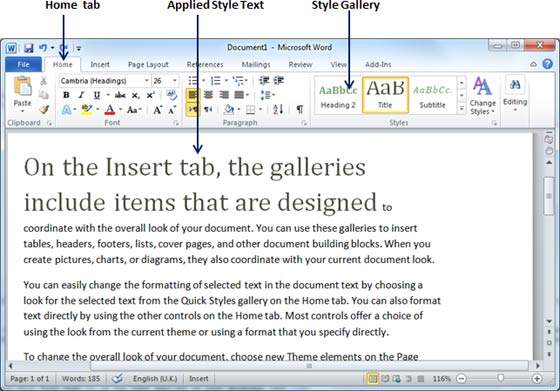
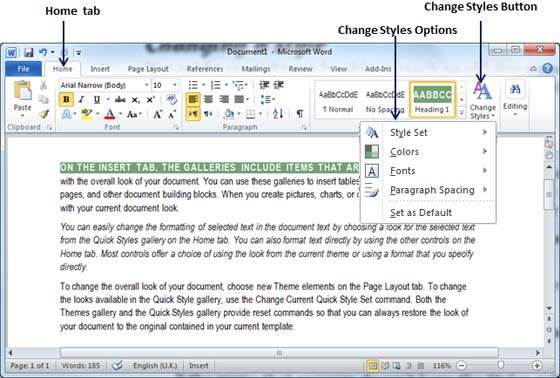
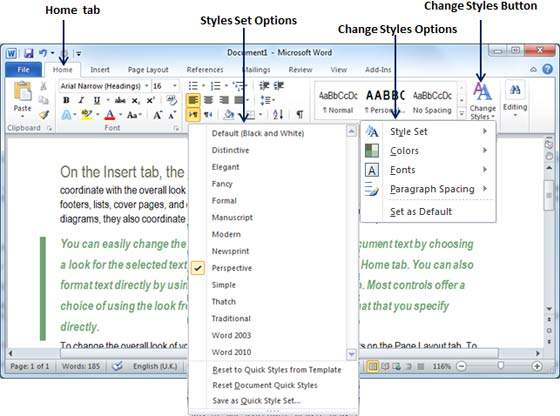
Здесь располагаются кнопки выбора предустановленных стилей. Чтобы воспользоваться одним из стилей, выделите текст и нажмите на кнопку устанавливаемого стиля текста левой клавишей мыши, чтобы применить его.
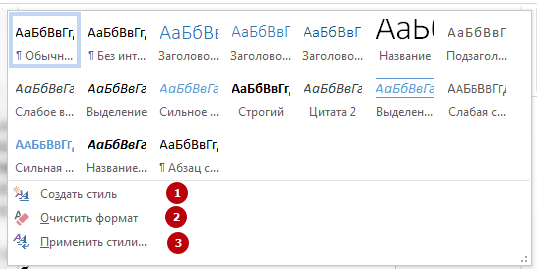
С помощью кнопок 1 и 2 вы можете перемещаться по списку. Кнопку 3 позволяет открыть весь список стилей, а также открывает дополнительные кнопки.
Дополнительный кнопки позволяют создать свой собственный стиль (1) для оформления текста, очистить все оформление и форматирование текста (2) и применить требуемый стиль к документу (3)
Развернутый список группы Стили
Группа «Редактирование»
Это самая маленькая группа на вкладке «Главная». Здесь расположено всего 3 кнопки:
- Найти – открывает окно поиска по документу. С помощью данной функции вы сможете найти слово или фрагмент в документе.
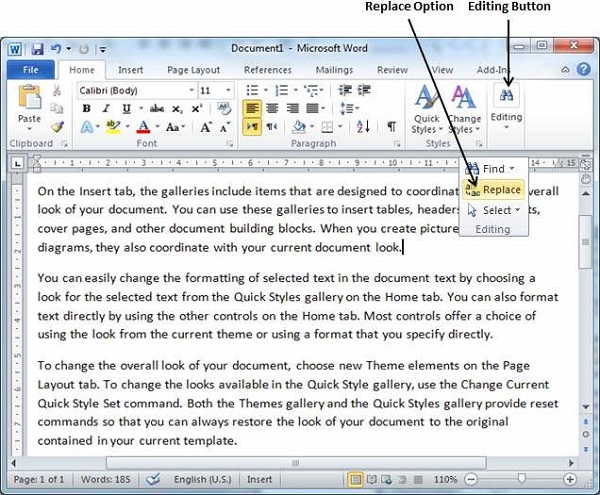
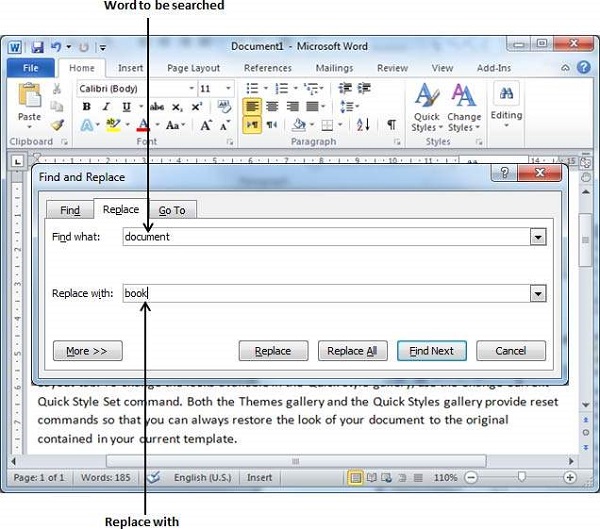
- Заменить – данная кнопка открывает окно, с помощью которого можно один фрагмент текста заменить другим в автоматическом режиме.
- Выделить – здесь расположены функции выделения текста и объектов. Вы сможете выделить все содержимое документа, только объекты или фрагменты с одинаковым оформлением.
Мы рассмотрели с вами первую вкладку Microsoft Word – «Главная». В следующих статьях я расскажу об остальных вкладках и о функциях, которые выполняют кнопки на этих вкладках. Если у вас остались вопросы, задавайте их в комментариях ниже.
НАСТРОЙКА ВИДА ДОКУМЕНТА WORD
F Выполнение задания
— Щелкните по кнопке Развернуть в зоне заголовка окна, если после вызова программы ее окно не занимает всего экрана. Также сделайте полноэкранным окно документа 
— Убедитесь, что ваш документ имеет установку Разметка страниц.
— Если этого нет, то можете щелкнуть на левую кнопку Режимов представления документа 
— Через вкладку Вид / группа Режимы просмотра документа / Разметка страниц (рис. 2.7) также можно настроить вид документа.
Рис. 2. 7. Настройка вида представления документа через вкладку Вид
— Если линейка отсутствует, выделите команду Вид / Показать или скрыть / Линейка (слева должна стоять галочка – рис. 2.8).
Рис. 2. 8. Установка/скрытие линейки
— Боле быстрым способом является щелчок на кнопке Линейка 
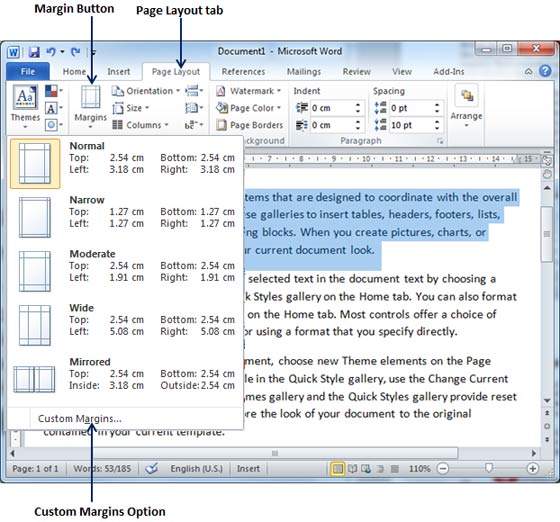
— Установите параметры страницы. Выделите команду Разметка страницы / Параметры страницы / Поля (рис. 2.9). Если требуемого параметра нет, то щелкните на стрелочке в правом нижнем углу вкладки Параметры страницы. Вы перейдете на установку параметров страницы, известную вам по предыдущим версиям Word (рис. 2.10).
Рис. 2. 9. Установка параметров страницы Word 2007
— Задайте параметры страницы с помощью стрелок выбора (рис. 2.10), в области Поля диалогового окна Параметры страницы рис. 2.11. Проверьте, чтобы ориентация листа была установлена как книжная. Нажмите кнопку ОК.
—
Рис. 2. 10. Задание размеров полей с помощью стрелок
Рис. 2. 11. Установка параметров страницы в прежних версиях Word
Примечание. Для установки параметров страницы также можно дважды щелкнуть в области вертикальной линейки (при режиме экрана Разметка страницы). Вы попадете в окно 2.10.
— Установите требуемые параметры страницы. Для этого в группе команд Параметры страницы выберите команду Размер. В появившемся окне выберите формат А4 (рис. 2.12).
Рис. 2. 12. Задание размеров страницы
— Если вам требуется другой формат бумаги, то щелкните на стрелке под текстом Другие размеры страниц и выберите необходимый, как это делается в прежней версии Word (рис. 2.13).
Рис. 2. 13. Задание размеров страницыв прежней версии Word
— Включите кнопку Непечатаемые символы, размещенную на вкладке Главная, группа команд Абзац. Они помогут вам в дальнейшем редактировать текст 
— Установите шрифт Times New Roman размером 14 пунктов с выравниванием по ширине с помощью команды вкладка Главная / группа Шрифт / кнопка Шрифт (рис. 2.14).
Рис. 2. 14. Задание параметров текстав прежней версии Word
— Эти же установки можно провести с помощью кнопок групп команд Шрифт и Абзац (рис. 2.15 и 2.16).
Рис. 2. 15. Задание параметров текстас помощью кнопок групп команд Шрифт и Абзац
Рис. 2. 16. Задание типа шрифта, его размеров и выравнивания с помощью кнопок групп команд Шрифт и Абзац
— Пока не трогайте кнопки Полужирный, Курсив, Подчеркнутый.
— Размер шрифта в выделенном тексте можно увеличить или уменьшить с помощью кнопок Увеличения/Уменьшения размера 
— Щелкните на кнопке открытия окна в группе команд Абзац и установите параметры, показанные на рис. 2.17.
— Несколько раз нажмите на клавишу клавиатуры Enter. Этим самым вы установите для себя несколько строк с заданным форматированием.
Рис. 2. 17. Задание параметров абзаца с помощью команды Абзац
— Установите масштаб экрана. В правом нижнем углу приложения установлен маркер, перемещая который можно задать масштаб страницы (рис. 2.18).
Рис. 2. 18. Задание масштаба экрана.
— Другим способом изменения размер видимой части документа является использование группы команд Вид из вкладки Вид (рис. 2.19). Щелкнете в окне Масштаб и экспериментально определите необходимый масштаб экрана, завершая ввод чисел нажатием на клавишу Enter (рис. 2.19 и 2.20).
Рис. 2. 19. Задание масштаба экрана с помощью команды Масштаб
Рис. 2. 20. Задание масштаба экрана с помощью команды Масштаб в прежней версии Word
Рис. 2. 21. Задание темы Обычная
— Чтобы в следующий раз больше не настраивать параметры страницы вы можете сохранить измененный вид всего документа, включая палитру цветов, шрифты и эффекты. Тогда, на этом же или на новом компьютере откроются все установки, которые вы задали. Можно поменять Цвета темы, Шрифты темы, Эффекты темы (рис. 2.21).
— Для этого выберите команду Сохранить текущую тему…. По умолчанию установки сохранятся в папке Document Themes, но вы можете это сделать в своей папке (рис. 2.22).
Режимы отображения документа Word 2010
В данной статье рассказывается о том, как работать с документом в различных режимах отображения документа. Освещены вопросы работы в каждом из них, а также вопрос использования области навигации.
Режимы отображения документа
В центре окна Microsoft Office Word 2010 размещается страница документа, в рабочей области которой происходит набор текста и размещение различных объектов (рисунков, таблиц, диаграмм). Страница может отображаться несколькими способами:
- Разметка страницы;
- Режим чтения;
- Веб-документ;
- Структура;
- Черновик.
Рассмотрим их по порядку.
Разметка страницы
Разметка страницы — это способ отображения рабочей области документа, при котором представлены измерительные линейки, а сам документ разбит на страницы разделенные полями. Это наиболее универсальный режим для работы — доступны все инструменты форматирования, и можно добавлять в документ таблицы и различные графические объекты.
Выбор режима «Разметка страницы»
- Используйте комбинацию клавиш ;
- Вкладка «Вид» — группа «Режимы просмотра документа»;
- Строка состояния — щелкните по значку «Разметка страницы» (первый справа).
Рисунок 1. Режим «Разметка страницы».
Режим чтения
Этот режим предназначен для максимального удобства чтения документа. Присутствие кнопок команд минимизировано, а рабочая область занимает максимум пространства. Чтобы включить этот режим:
- «Вид» — группа «Режимы просмотра документа» — «Режим чтения»;
- В строке состояния щелкните по значку «Режим чтения».
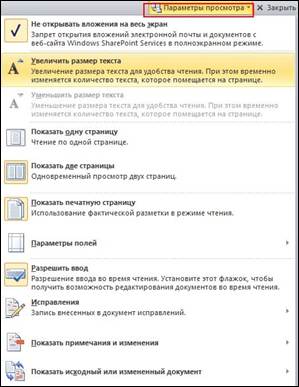
В режиме чтения доступен ряд настроек, которые можно изменять. Для этого щелкните на панели быстрого доступа (в режиме чтения) по области «Параметры просмотра».
- «Не открывать вложения на весь экран» — если включена эта опция, то вложения электронной почты будут раскрываться в окнах ограниченного размера. Рекомендуется для удобства работы оставлять этот пункт включенным;
- «Увеличить размер текста» — позволяет увеличивать размер шрифта всего текста документа. Применяйте эту опцию, если для вас текст документа слишком мелкий. Если наоборот, используйте «Уменьшить размер текста». Один щелчок на данных областях изменяет размер шрифта на 2пт. То есть если шрифт был равен 12пт, то после щелчка (увеличение) он будет равен 14пт и наоборот;
- «Показать одну страницу» — отображает одну страницу на экране. «Показать две страницы» — соответственно две;
- «Показать печатную страницу» — позволяет увидеть страницу в виде, идентичном печатному. Используйте перед выводом документа на печать;
- «Параметры полей» — позволяет задать параметры полей, что вполне оправданно, поскольку в режиме чтения зачастую обнаруживается ряд ошибок в их расположении, незаметных в стандартном режиме;
- «Разрешить ввод» — позволяет править документ в режиме чтения (правда с весьма ограниченными возможностями);
- «Исправления» — позволяет вести учет внесенных исправлений;
- «Показать примечания и исправления» — если вам сначала надо прочитать весь текст перед правкой, а примечания вас отвлекают — отключите их. Затем, когда вы повторно будете читать документ, и вам надо будет ориентироваться на внесенные примечания, включите их;
- «Показать исходный или измененный документ» — позволяет увидеть документ «до» и «после» внесения изменений.
Рисунок 2. Параметры просмотра режима чтения.
Также в режиме чтения вы можете сохранить документ и распечатать его, используя кнопки «Сохранить» и «Печать».
Используя кнопку «Цвет выделения текста», можно выделять участки текста, представляющие для вас особый интерес. Причем вы можете добавить/убрать выделение цветом двумя способами:
- Выделите участок текста, затем щелкните на кнопке;
- Щелкните на кнопке, предварительно выбрав цвет в раскрывающемся окошке, и протяните курсор в форме стикера по искомому участку текста.
Используйте «Мини-переводчик, если вы работаете с документами, содержащими фрагменты текста на иностранном языке, либо для перевода небольших объемов текста (наиболее точный перевод).
Рисунок 3 . Использование мини-переводчика в режиме чтения.
При щелчке на кнопке «Сервис» открывается окно, с помощью которого можно:
- «Справочники» — использовать справочники для поиска отдельных слов, их синонимов или антонимов;
- «Цвет выделения текста» — выбрать цвет выделения текста, не задействуя соответствующую кнопку;
- «Создать примечание» — создать примечание. Оно будет вынесено в правое поле, напротив редактируемого участка текста;
- «Найти» — открывает окно «Найти и заменить на вкладке «Найти», в которой набирается искомый текст.
Рисунок 4 . Создание примечания в режиме чтения.
Выход из режима чтения
Для выхода из этого режима, в панели быстрого доступа щелкните на кнопке «Закрыть» или нажмите .
Веб-документ
Данный режим используется для работы с документами, предназначенными для публикации во всемирной сети интернет.
Выбор режима «Веб-документ»
- Вкладка «Вид» — «Режимы просмотра документа» — «Веб-документ»;
- «Строка состояния» — «Веб документ».
Черновик
Данный режим отображения документа предназначен для набора текста без форматирования и вставки различных объектов (рисунков, таблиц). Здесь отсутствует вертикальная линейка, границы и поля документа. Разрыв страницы показан точечной горизонтальной линией. Минимализм данного режима позволяет лучше сосредоточиться на наборе текста, и к тому же является наиболее экономным для ресурсов компьютера, что особенно актуально для бюджетных ПК (см. также КВ918793).
Выбор режима «Черновик»
- «Вид» — группа «Режимы просмотра документа» — «Черновик»;
- «Строка состояния» — «Черновик»;
- Комбинация клавиш .
Настройка режима «Черновик»
Для экономии ресурсов компьютера включите использование шрифтов черновика.
- «Файл» — «Параметры» — «Дополнительно»;
- В области «Показывать содержимое документа» — включите пункт «Использовать шрифты черновика в режиме черновика и структуры», предварительно выбрав размер и тип шрифта.
Если вам необходимо видеть стили, используемые в документе:
- «Файл» — «Параметры» — «Дополнительно»;
- В области «Экран», в поле «Ширина полосы стилей в режиме черновика и структуры» введите число больше нуля, и в поле «Единицы измерения» выберите нужный пункт (всего пять).
Для того чтобы скрыть полосу стилей, введите ноль (единица измерения не имеет значения).
Рисунок 5. Настройка режима «Черновик».
Структура документа
Если вы работаете со структурированным документом, рекомендуется использовать данный режим, поскольку он позволяет перемещать заголовки с абзацами по всей структуре документа. Работа происходит с абзацами, которым можно задать расположение и место в иерархии заголовков. При переходе в этот режим включается вкладка структура, а общий вид, становится чем-то схож на режим «Черновик».
Текст документа состоит из заголовков различных уровней и основного текста, их параметры можно регулировать. Рекомендуется заголовки предварительно отформатировать при помощи стилей.
Знаки «+» и «-«, располагаются слева от текста заголовка и являются символами структуры. Плюс говорит о том, что в данном заголовке присутствует подзаголовок более низкого уровня, либо основной текст. Минус, напротив, сообщает о том, что внутри абзаца нет подзаголовков и основного текста. Напротив абзацев основного текста располагается кружок.
Рисунок 6. Документ в режиме «Структура».
Выбор «Режима структура»
- Вкладка «Вид» — в группе «Режимы просмотра документа» щелкните «Структура»;
- ;
- «Строка состояния» — «Структура».
Чтобы показать или спрятать содержимое заголовка, дважды щелкните по знаку «+» или «-«.
Уровень абзаца
Уровень абзаца можно повысить или понизить, для этого используйте один из вариантов:
- Выделите заголовок абзаца — Вкладка «Структура»- в группе «Работа со структурой» выберите необходимый уровень (от 1-го до 9-ти) из раскрывающегося списка, щелкнув на поле «Уровень». Заголовки с пониженным уровнем сместятся вправо;
- Выделите заголовок абзаца и перейдите на вкладку «Структура». В группе «Работа со структурой» напротив поля «Уровень» щелкайте кнопки со стрелками, пока не выставите необходимый уровень;
- Используйте комбинацию клавиш — для понижения уровня, — для повышения.
Отображение уровней в структуре документа
Для отображения только нужных уровней заголовков:
Перемещение абзаца по структуре
- «Структура» — в группе «Работа со структурой» щелкайте по кнопкам «Вверх» или «Вниз»;
- Щелкните и удерживайте лкм при наведенном на знаке структуры курсоре. Перетащите заголовок с абзацем на новое место, при этом курсор примет крестообразную форму;
- .
Отображение первых строк
Если документ достаточно большой, рекомендуется оставить видимыми только первые строки абзацев. Тем более это оправданно, если вы хорошо знаете содержимое документа, и сможете ориентироваться таким образом.
Выход из режима «Структура»
- «Вид» — в группе «Режимы просмотра документа» выберите другой режим;
- Вкладка «Структура» — в группе «Закрыть» щелкните «Закрыть режим структуры».
Область навигации
При работе с объемными документами, в которых много глав и пунктов, для оперативного и точного перемещения к необходимым абзацам, рекомендуется использовать область навигации. Она показывает схему документа, в которой показан список всех заголовков документа и не только.
- Вкладка «Вид» — в группе «Показать» поставьте флажок в пункте «Область навигации».
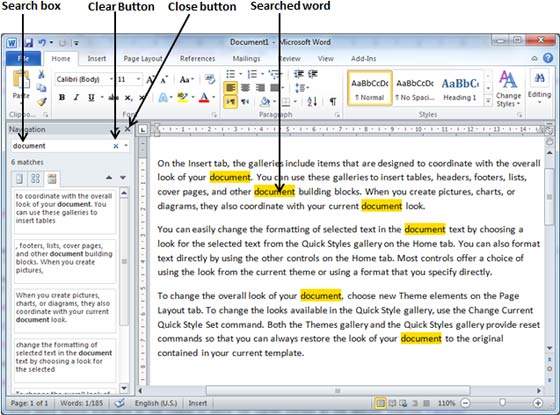
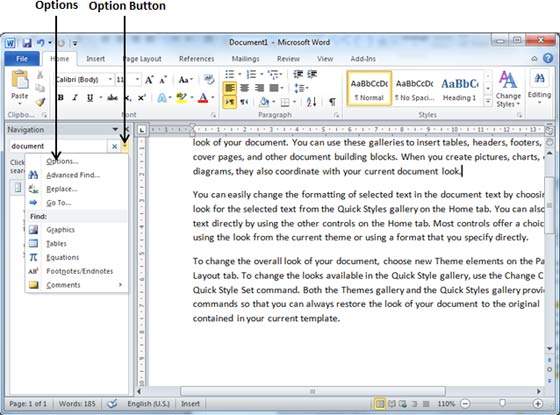
Область навигации позволяет осуществлять поиск слов (выражений) в документе, для этого наберите искомое слово в поле поиска и нажмите «Enter» или щелкните по значку поиска. Обратите внимание, что раскрывающийся список кнопки «Параметры поиска и дополнительные команды поиска» позволяет конкретизировать поиск и задать ему особые параметры. Поиск будет осуществляться по заданному критерию — например, только примечания или только слово целиком.
Рисунок 7. Вкладки панели навигации.
- Вкладка «Просмотр заголовков документа» — инструмент, который позволяет быстро перемещаться по документу, используя структуру документа (1);
- Вкладка «Просмотр страниц документа» — показывает эскизы страниц, которые тесно связаны с понятием схемы документа, и позволяют увидеть уменьшенные изображения всех страниц документа (2);
- Вкладка «Просмотр результатов текущего поиска» позволяет увидеть результаты поиска, которые представлены в виде ячеек с отрывками текста, в котором содержится искомое слово или фраза (3).
Для закрытия области навигации снимите флажок с пункта «Область навигации» в группе «Показать» вкладки «Вид», либо щелкните по крестику в верхнем правом углу в поле «Навигация».
Заключение
Большинство пользователей работают в режиме «Разметка страницы», практически не используя другие режимы. Часто бывает, что так поступают даже опытные пользователи со стажем более 2-х лет работы в Word. И делают так напрасно, поскольку каждый режим работы имеет свои преимущества, и со временем позволяет делать работу более комфортной и эффективной. Ознакомившись с материалом статьи, вы узнали о существующих режимах отображения документа. О том, какие они имеют преимущества и недостатки, где и в каких случая наиболее эффективно их использовать.
Вкладка «Вид»
Примечание: Мы стараемся как можно оперативнее обеспечивать вас актуальными справочными материалами на вашем языке. Эта страница переведена автоматически, поэтому ее текст может содержать неточности и грамматические ошибки. Для нас важно, чтобы эта статья была вам полезна. Просим вас уделить пару секунд и сообщить, помогла ли она вам, с помощью кнопок внизу страницы. Для удобства также приводим ссылку на оригинал (на английском языке).
Вкладка вид позволяет переключаться между обычной или эталонной страницей, а также одной страницей или двумя режимами разворота. На этой вкладке также можно настроить отображение границ, направляющих, линеек и других инструментов макета, увеличить размер представления публикации и управлять открытыми окнами Publisher.
Представления
Группа » представления » позволяет быстро переключаться между обычными и эталонными представлениями в публикации.
По умолчанию выбран обычный режим. В этом представлении отображаются страницы публикации, где вы работаете над созданием публикации. В представлении эталонНой страницы отображаются страницы или страницы, содержащие элементы, которые нужно повторять на нескольких страницах публикации. Используя главные страницы для этих распространенных элементов, вы можете придать публикации более единообразное представление. В публикациях с несколькими страницами можно создать несколько эталонных страниц для более гибкого дизайна публикации. Несколько эталонных страниц содержат различные макеты, которые можно применить к любой из страниц публикации.
Совет: Кроме того, вы можете переместить и выйти из представления эталонной страницы, нажав клавиши CTRL + M.
Макет
В группе Макет можно переключаться между одной или двумя страницами публикации.
Единственная страница является представлением по умолчанию и отображает каждую страницу по отдельности в рабочей области и области навигации по страницам. Двухстраничный разворот — это типографское соглашение о том, как представлять последовательность страниц в сложенной или переплетенной публикации, например в книге, брошюре, информационном бюллетене или открытке. Часто макет страниц на двух страницах зеркального разворота. На двух страницах одновременно отображаются две параллельные страницы в рабочей области и в области навигации по страницам, если в публикации есть три или более страниц.
Показать
Группа Показать позволяет выбрать, какие элементы управления макетами отображаются в рабочей области публикации, например линейка, направляющие разметки и Навигация по страницам. Каждый из элементов управления помощника по разметке отображается или скрывается путем выбора и снятия флажка.
Разграничени
Выделенный фрагмент отображает или скрывает границы объектов, таких как фигуры, рисунки и текстовые поля. Эти границы не отображаются при печати публикации, но вы помогаете разметку страницы, отображая пространство, занимаемое объектом на странице.
Руководства
Этот флажок позволяет отобразить или скрыть направляющие разметки в публикации. Направляющие помогают выравнивать объекты на странице. Дополнительные сведения см. в разделе Структурирование страницы с помощью направляющих разметки.
Этот параметр показывает, какие объекты на странице будут вставлены, например бизнес-данные или поля объединения в каталог. Если флажок установлен, объекты полей будут подчеркнуты незаметной серой пунктирной линией:
Линейки
Определяет, нужно ли отображать горизонтальную и вертикальную линейку по левому и верхнему краю рабочей области.
Примечание: При использовании языка с письмом справа наЛево горизонтальная линейка будет находиться на правой стороне рабочей области.
Навигация по страницам
Этот параметр скрывает или отображает область навигации по страницам слева от рабочей области.
Примечание: Если вы используете язык с письмом справа наЛево, область навигации по страницам будет находиться справа от рабочей области.
Вспомогательная область
Если объекты перемещаются не с той страницы, в вспомогательная область. С помощью вспомогательной области можно легко использовать несколько объектов при разметке страницы. Чтобы просмотреть все объекты во вспомогательной области, установите флажок «вспомогательНая область «. Чтобы скрыть объекты вспомогательной области и просмотреть четкое представление страницы, снимите флажок «Вспомогательная область «. Объекты, частично находящиеся на странице, будут обрезаны, чтобы часть вспомогательной области не отображалась.
Диспетчер графики
Область задач диспетчера графики помогает эффективно управлять всеми рисунками, вставленными в публикацию, например внедренными рисунками или связанными рисунками. Дополнительные сведения см. в разделе Управление рисунками с помощью области задач Диспетчер графики.
Базовые планы
Для точного выравнивания строк текста по нескольким столбцам можно использовать опорные направляющие. Этот параметр выводит или скрывает опорные направляющие в публикации. Дополнительные сведения см. в разделе Структурирование страницы с помощью направляющих разметки.
Масштаб
Группа » масштаб » содержит несколько инструментов, позволяющих управлять тем, насколько велика страница на экране, чтобы лучше видеть и работать с подробными сведениями путем увеличения масштаба, а также более точно просматривать страницу в целом.
При нажатии этой кнопки будет возвращено отображение выбранной страницы или двух страниц до 100% фактического размера.
Страница целиком
Эта кнопка позволяет увеличить масштаб страницы, чтобы вся страница или двухстраничный разворот поместится в окне отображения.
Масштаб
Это поле выделения позволяет точно выбрать масштаб. Вы можете выбрать один из вариантов в раскрывающемся меню или ввести любой процент и нажать клавишу Ввод.
Ширина страницы
При нажатии этой кнопки Ширина страницы изменится так, чтобы она отображалась в окне отображения. Это может означать, что высота страницы находится выше и под окном просмотра.
Выбранные объекты
Этот параметр становится доступным при выделении одного или нескольких объектов, таких как текстовые поля или рисунки. Нажатие этой кнопки приведет к увеличению масштаба страницы, чтобы выбранные объекты заполнили окно отображения. Чтобы вернуться к другому масштабу, просто выберите один из других параметров в группе масштаб .
Window
Эта группа помогает управлять несколькими окнами Publisher одновременно.
Упорядочить все
Нажатие этой кнопки приведет к изменению размера и перемещению открытых окон Publisher, чтобы они были рядом.
Каскад
Этот параметр приведет к тому, что все будет открывать Windows для изменения размера и перемещения, чтобы расположить окна слева направо от левого верхнего угла к нижнему.
Переключение окон
В этом выпадающем на экран выводится список всех открытых окон Publisher, позволяющий выбрать любое из этих окон и перейти к ним.
LiveInternetLiveInternet
—Музыка
—Рубрики
- Лоскутное шитьё. (3258)
- рукоделие (1295)
- Кулинария. (916)
- сад огород (850)
- Выпечка. (776)
- канзаши (700)
- вязание крючком (627)
- стихи (518)
- Заготовки на зиму. (439)
- вязание (428)
- здоровье (349)
- про компьютер (319)
- вязание спицами (270)
- Валяние. (262)
- советы (186)
- новогодние поделки (179)
- цветы (170)
- интересные материалы (165)
- плетение из газет (146)
- Вышивка крестиком (145)
- сумки (126)
- игрушки (122)
- музыка (104)
- тряпичная кукла (98)
- стежка (82)
- вышивка лентами (68)
- кройка и шитьё (56)
- куклы (49)
- притчи (40)
- прихватки (34)
- гильоширование (31)
- самодельное вино (25)
- тильда (25)
- оригами (24)
- бисероплетение (23)
- буфы (18)
- школа (10)
- традиционный русский костюм (10)
- рисование (10)
- декупаж (9)
- поздравления (7)
- плетение из тканевых полосок (6)
- вязание из полиэтиленовых пакетов (6)
- юмор (5)
- пэчворк без иголки (5)
- конкурсы (3)
- лонгстич (вышивка длинным стежком) (3)
- гильоширование (3)
- бродилочки по сайтам (2)
- ниткография (2)
- рамочки (2)
- ганутель (1)
- филейное вязание (1)
- сказки (1)
- флористика (1)
- фильмы (0)
—Поиск по дневнику
—Подписка по e-mail
—Интересы
—Постоянные читатели
—Сообщества
—Трансляции
—Статистика
Microsoft Office Word. Рецензирование, вкладка Вид и вкладка Надстройки.
Microsoft Office Word. Рецензирование, вкладка Вид и вкладка Надстройки.
Microsoft Office Word. Оставшиеся вкладки.
Первой рассмотрим самую крупную из этих 3 вкладок — вкладку Рецензирование.
На этой вкладке у нас находятся инструменты для работы с текстом, только не с его оформлением и внешним видом, а с его содержанием. Например, если Вы хотите узнать, как перевести слово, как подобрать синонимы к словам или как исправить слово с ошибкой в word, то всё это можно найти именно здесь.
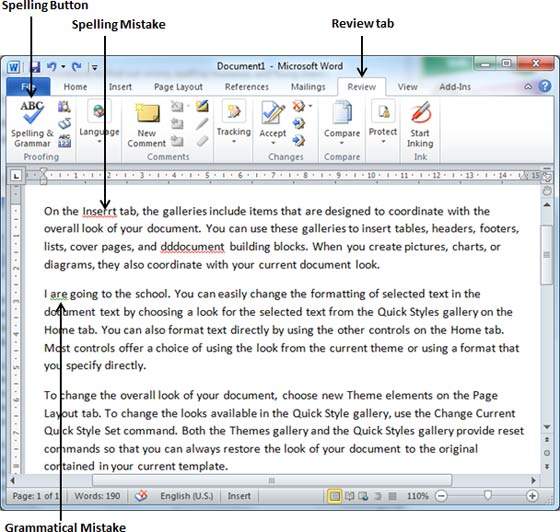
В принципе, эти функции настроены автоматически, но знать, как проверить текст на ошибки в ворде, всё равно не помешает. Сначала посмотрим, как программа сама автоматически определяет ошибки. Например, если Вы неправильно напечатали слово или сделали опечатку, то ворд подчеркнёт это слово красной волнистой линией.
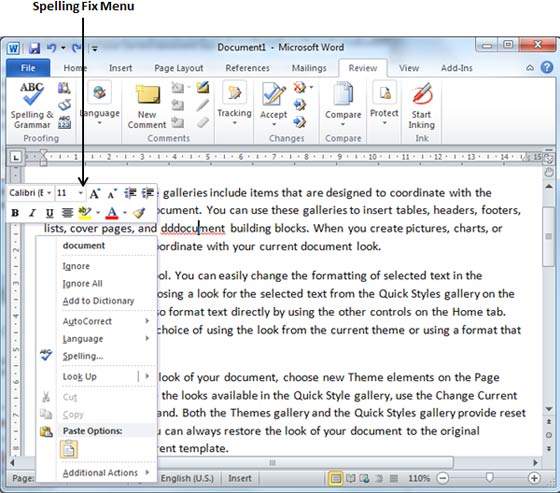
Теперь, чтобы исправить ошибку, щёлкаем по слову правой кнопкой мышки. Появляется список с возможными исправлениями. Иногда здесь могут быть просто разные похожие слова, иногда разные падежи одного и того же слова. Выбираем нужный вариант, слово исправляется.
Также важно помнить, что ворд подчёркивает не только слова с ошибкой, но и слова, которых в его базе нет. Это ещё необязательно ошибка, и тогда Вы можете щёлкнуть правой кнопкой мышки по слову и выбрать строчку Добавить в словарь.
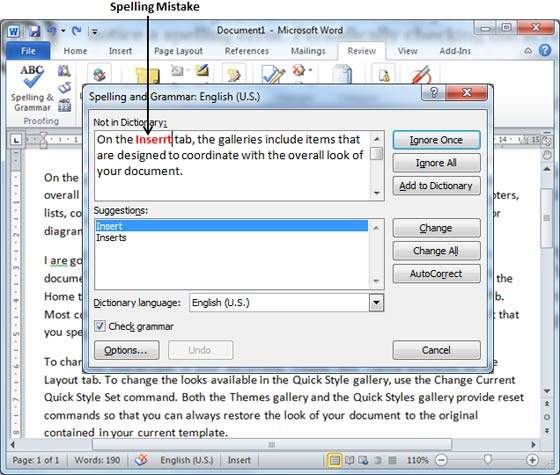
В следующий раз программа больше не будет подчёркивать это слово как ошибку. А теперь рассмотрим, как настроить правописание в ворде. Чтобы более тщательно проверить текст на ошибки в word, нажимаем на кнопку Правописание.
Открывается окно, в котором показывается текст и якобы найденная в нём ошибка. Если ошибка действительно есть, нажимаете кнопку Изменить и тогда программа её исправляет. Если ошибки нет, но программа просто автоматически что-то отметила, нажимайте кнопку Пропустить, и тогда всё останется, как есть.
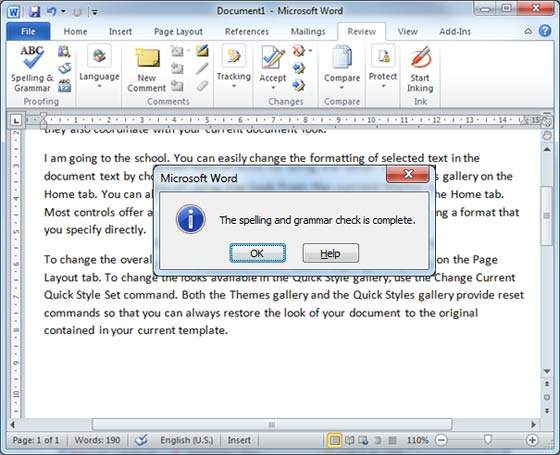
Вот мы и разобрались, как проверить текст на ошибки. Правда, иногда лучше по ходу печати следить за подчёркиваниями и вовремя их исправлять, тогда кнопка Правописание вовсе не понадобится.
Далее у нас идёт кнопка Справочники в ворде.
При нажатии справа открывается панель, в которой перечислены встроенные в программу справочники, словари, тезаурус.
Тезаурус — это словарь с синонимами, антонимами, омонимами и прочими связанными словами. Так что, если Вам надо подобрать синонимы к слову, выделите нужное слово и нажмите кнопку Тезаурус.
Здесь же, в справочниках, можно найти и перевод. Конечно, весь текст так не перевести, но перевод отдельных слов на другие языки вполне удачен.
Теперь рассмотрим, как создать примечание в word. Для чего это нужно? Это нужно в тех случаях, когда Вам не надо распечатывать документ, а вместо этого его будут просматривать исключительно на компьютере. Тогда можно размещать различные примечания, которые будут выноситься за страницу, тем самым никак не усложняя восприятие основного текста. Итак, чтобы сделать примечание в word, надо выделить слово или фразу, которую собираетесь пояснить, и нажать кнопку Создать примечание. Затем в появившейся сбоку рамке вводим пояснение.
Так можно к одному и тому же слову добавлять несколько примечаний, просто выделяем тот же текст и жмём Создать примечание нужное количество раз.
Если хотите удалить примечание в word, поместите курсор в то примечание, которое хотите удалить, и нажмите кнопку с крестиком.
Ещё на вкладке Рецензирование Вам может пригодиться кнопка Статистика. Если, скажем, у Вас есть строгое ограничение на количество слов или символов, которое должно быть в документе, то здесь это количество можно проверить. Выделяете Ваш текст, затем жмёте кнопку Статистика.
Появится окошко с необходимой информацией. Знаки здесь — это не только буквы и цифры, но ещё и знаки препинания. Ну и пробелы иногда считают за знаки, а иногда — нет, потому здесь указываются оба варианта.
Только будьте внимательны: если не выделяете нужный Вам отрывок текста, то даётся информация по всему документу. Итак, с тем как посчитать количество символов в ворде мы разобрались.
На этом наше знакомство со вкладкой Рецензирование окончено. Там есть и другие инструменты, но они Вам вряд ли пригодятся. Так что чтобы не запоминать лишнее и не запутаться, перейдём к вкладке Вид.
Вкладка Вид.
Здесь можно настраивать, как у Вас будет отображаться документ для наиболее удобной работы с ним. Например, если у Вас большой документ, можно включить режим чтения.
Просто нажимаете кнопку, и тогда текст будет отображаться, как в книжке. Чтобы сделать чтение ещё более удобным, можете нажать кнопку Параметры просмотра в правом верхнем углу и настроить размер отображаемого текста, количество страниц. При этом в самом документе размер текста не меняется, это только здесь, чтобы удобнее было читать. Там же рядом нажмите на кнопку Закрыть, чтобы отключить режим чтения и вернуться к разметке страницы.
Также можно отобразить как вэб-документ, но это если Вы собираетесь напрямую размещать текст в интернете. Ещё можно посмотреть, как выглядит структура документа в word.
Здесь отображаются абзацы и различные элементы документа, если, например, у Вас есть оглавление, сноски, или текст разных уровней, как в списках. Чтобы вернуться к разметке страницы, просто нажмите Закрыть режим структуры.
Если Вы хотите отобразить один только текст без лишних настроек оформления, фона и графических фигур, Вам пригодится Черновик в ворде.
А сейчас рассмотрим, как включить линейку в ворде 2007 или в ворде 2010. В одном из предыдущих уроков мы уже рассматривали, где находится линейка в ворде: это полосы с отметками вверху и слева от документа, с помощью которых можно настраивать поля. Так вот, если вдруг в ворде исчезла линейка, надо перейти на вкладку Вид и здесь найти пункт Линейка. Ставите галочку, чтобы появилась линейка. Если хотите убрать линейку в ворде, галочку снимаете.
На этой же вкладке можно включить сетку в ворде. Ставим галочку, и за текстом появляется сетка из небольших квадратиков, по которым можно более точно выровнять текст или другие объекты. Чтобы отключить сетку в word, просто снимаем галочку, как и в случае с линейкой.
Если у Вас в тексте есть заголовки и в нём много страниц, то вполне может пригодитьсясхема документа word. Также можно посмотреть эскизы страниц в ворде, тогда слева отобразится список страниц документа для удобства навигации. Для этого просто отмечаете галочки в пунктах Схема документа или Эскизы. Если Вы этих пунктов не находите, то у Вас, вероятно, более новая версия программа, и тогда вместо них должен быть пункт Область навигации.
Ставите галочку и слева увидите панель навигации, в которой и можно выбрать отображение документа в виде схемы или эскизов.
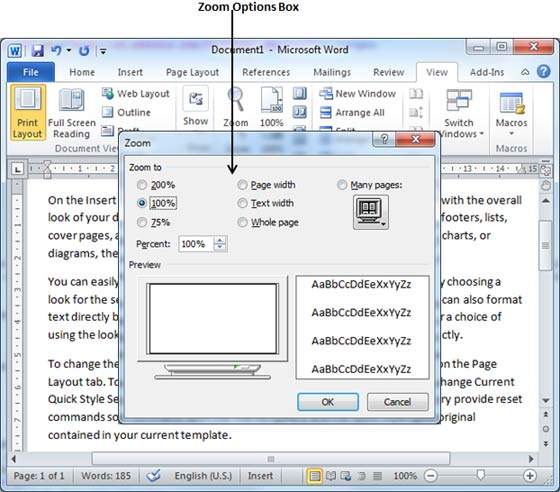
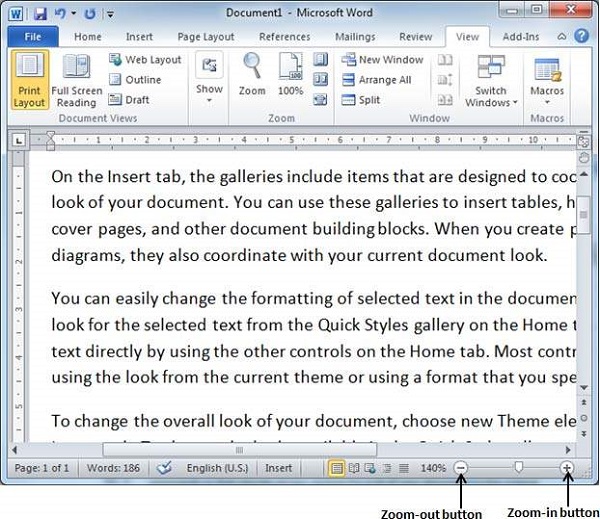
Рассмотрим опции масштабирования. Надеюсь, Вы помните, что увеличивать или уменьшать масштаб отображения текста можно перетягивая бегунок в правом нижнем углу или нажимая кнопки +/- там же. Ну вот если нажать кнопку Масштаб, то появится окно с несколькими дополнительными возможностями. Бывает быстрее и удобнее выбрать здесь отображение по ширине страницы или по ширине текста, вместо того, чтобы настраивать всё вручную.
Ну и остальные кнопки говорят сами за себя: можно отобразить документ в его оригинальном стопроцентном масштабе, показывать 1 или 2 страницы.
Остальные функции на этой вкладке Вам вряд ли пригодятся, потому перейдём ко вкладке Надстройки. На этой вкладке отображаются настраиваемые панели инструментов. Например, если Вы устанавливаете программу, которая частично встраивается в ворд, то для управления ею появится отдельная панель во вкладке Надстройки.
На этом наше весьма поверхностное знакомство с вордом окончено, хотя даже при таком рассмотрении Вы наверняка узнали о многих новых и полезных возможностях этой программы. Главное — не бойтесь дальше изучать программу и совершенствовать свои навыки работы с ней. Ведь в наше время умение красиво и толково оформить документ может оказаться очень важным преимуществом и выручить Вас в самых разных ситуациях.
Word 2010 имеет множество различных настроек и панелей просмотра, которые вы можете выбрать. Они полезны, когда вам нужно просмотреть нетипичные элементы, такие как метки форматирования и различные разрывы. Однако, если вы забудете выйти из представления, к которому вы переключились, или если кто-то еще использовал ваш компьютер и изменил представление, то вы можете быть озадачены тем, как вернуться к обычному представлению в Word 2010. К счастью, в Word 2010 есть отдельный меню, в котором вы можете указать большинство желаемых настроек просмотра, а также вернуться к обычному виду, к которому вы привыкли.
Если ваше окно просмотра Word 2010 просто отображает гигантский белый холст без разрывов страниц в любом направлении, то вы, вероятно, в «Черновой вариант» Посмотреть. Это представление используется в определенных ситуациях, но для обычного пользователя, который просто пытается создать обычный документ, отсутствие разделенных страниц может быть немного неприятным. К счастью, вы можете переключиться из этого представления и вернуться к желаемому виду по умолчанию.
Шаг 1. Откройте окно Word 2010, в котором ваш документ отображается неправильно.
Шаг 2: Нажмите «Посмотреть» вкладка в верхней части окна.
Шаг 3: Нажмите «Компоновка страницы» смотреть в «Представления документов» раздел ленты в верхней части окна.
«Компоновка страницы» Представление — это то, что используется по умолчанию для большинства ситуаций Word 2010, но вы также можете выбрать другие параметры в разделе «Представления документа», чтобы увидеть, предпочитаете ли вы один из этих вариантов.
Getting Started Word 2010
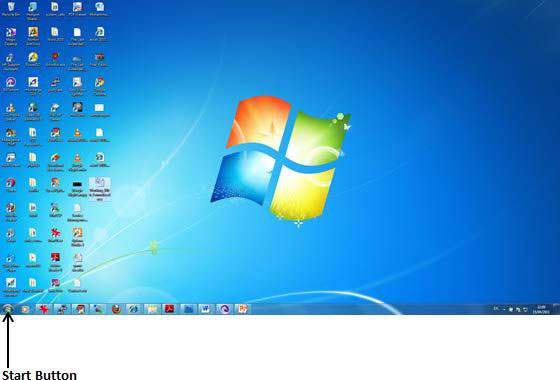
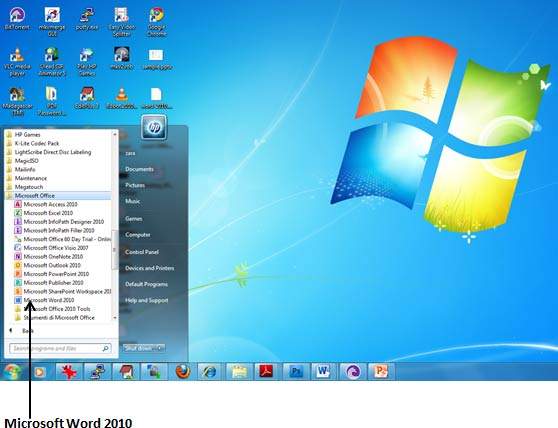
In this chapter, we will discuss how to get started with Word 2010. We will understand how to start a Word 2010 application in simple steps. Assuming you have Microsoft Office 2010 installed in your PC, to start the Word application, follow these steps −
Step 1 − Click the Start button.
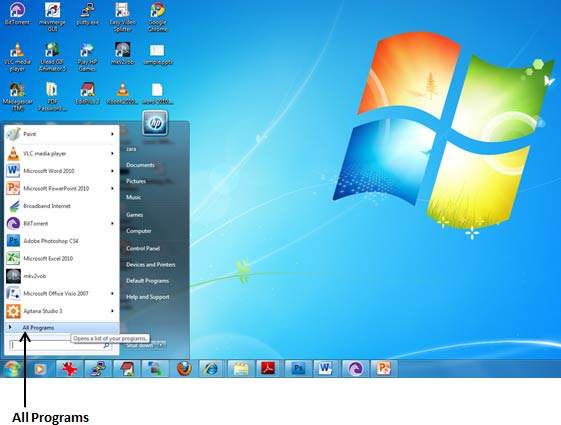
Step 2 − Click the All Programs option from the menu.
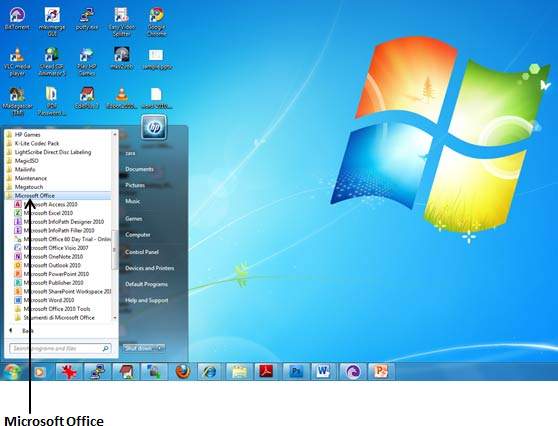
Step 3 − Search for Microsoft Office from the submenu and click it.
Step 4 − Search for Microsoft Word 2010 from the submenu and click it.
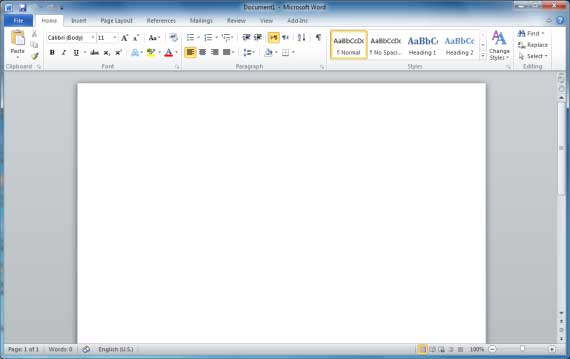
This will launch the Microsoft Word 2010 application and you will see the following window.
Explore Window in Word 2010
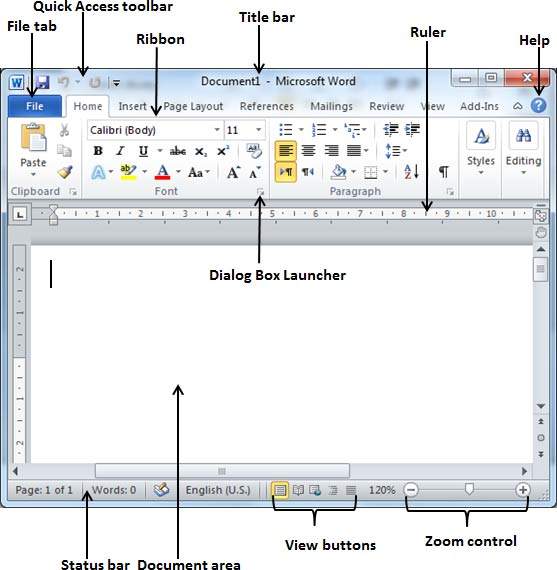
In this chapter, we will understand how to explore Window in Word 2010. Following is the basic window which you get when you start the Word application. Let us understand the various important parts of this window..
File Tab
The File tab replaces the Office button from Word 2007. You can click it to check the Backstage view. This is where you come when you need to open or save files, create new documents, print a document, and do other file-related operations.
Quick Access Toolbar
This you will find just above the File tab. This is a convenient resting place for the mostfrequently used commands in Word. You can customize this toolbar based on your comfort.
Ribbon
Ribbon contains commands organized in three components −
-
Tabs − These appear across the top of the Ribbon and contain groups of related commands. Home, Insert, Page Layout are examples of ribbon tabs.
-
Groups − They organize related commands; each group name appears below the group on the Ribbon. For example, group of commands related to fonts or group of commands related to alignment, etc.
-
Commands − Commands appear within each group as mentioned above.
Title bar
This lies in the middle and at the top of the window. Title bar shows the program and document titles.
Rulers
Word has two rulers — a horizontal ruler and a vertical ruler. The horizontal ruler appears just beneath the Ribbon and is used to set margins and tab stops. The vertical ruler appears on the left edge of the Word window and is used to gauge the vertical position of elements on the page.
Help
The Help Icon can be used to get word related help anytime you like. This provides nice tutorial on various subjects related to word.
Zoom Control
Zoom control lets you zoom in for a closer look at your text. The zoom control consists of a slider that you can slide left or right to zoom in or out; you can click the + buttons to increase or decrease the zoom factor.
View Buttons
The group of five buttons located to the left of the Zoom control, near the bottom of the screen, lets you switch through the Word’s various document views.
-
Print Layout view − This displays pages exactly as they will appear when printed.
-
Full Screen Reading view − This gives a full screen view of the document.
-
Web Layout view − This shows how a document appears when viewed by a Web browser, such as Internet Explorer.
-
Outline view − This lets you work with outlines established using Word’s standard heading styles.
-
Draft view − This formats text as it appears on the printed page with a few exceptions. For example, headers and footers aren’t shown. Most people prefer this mode.
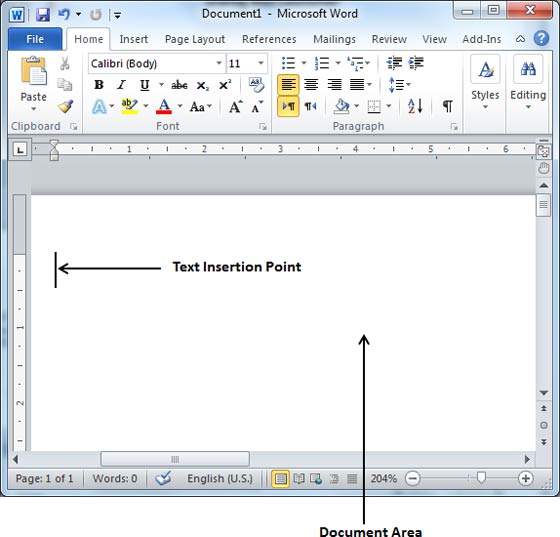
Document Area
This is the area where you type. The flashing vertical bar is called the insertion point and it represents the location where text will appear when you type.
Status Bar
This displays the document information as well as the insertion point location. From left to right, this bar contains the total number of pages and words in the document, language, etc.
You can configure the status bar by right-clicking anywhere on it and by selecting or deselecting options from the provided list.
Dialog Box Launcher
This appears as very small arrow in the lower-right corner of many groups on the Ribbon. Clicking this button opens a dialog box or task pane that provides more options about the group.
Backstage View in Word 2010
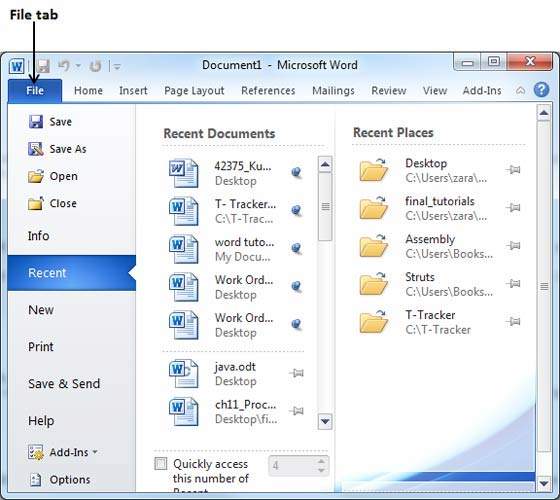
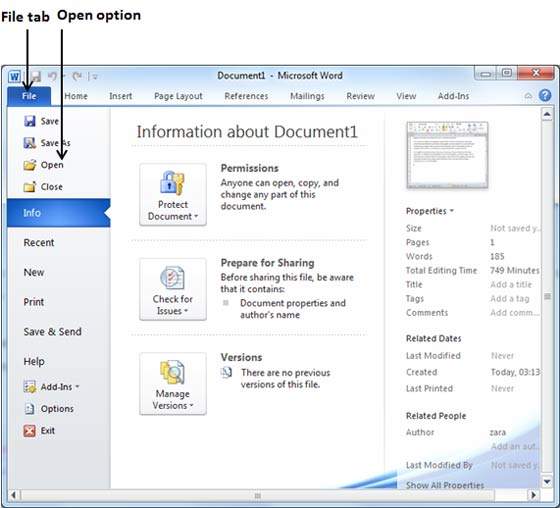
In this chapter, we will discuss the Backstage View in Word 2010. The Backstage view was introduced in Word 2010. This acts as the central place for managing your documents. The backstage view helps in creating new documents, saving and opening documents, printing and sharing documents, and so on.
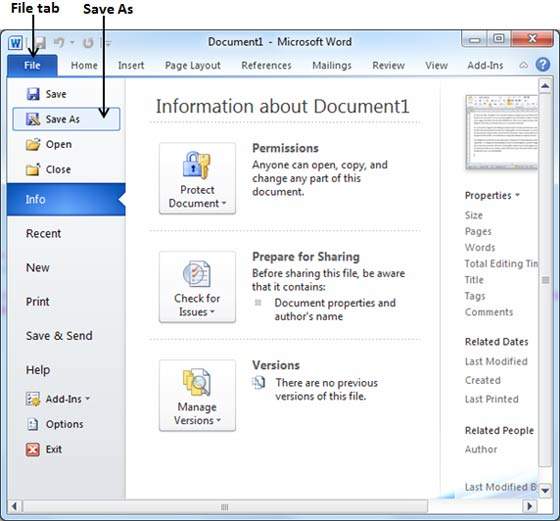
Getting to the Backstage View is easy: Just click the File tab, located in the upper-left corner of the Word Ribbon. If you already do not have any opened document, then you will see a window listing down all the recently opened documents as follows −
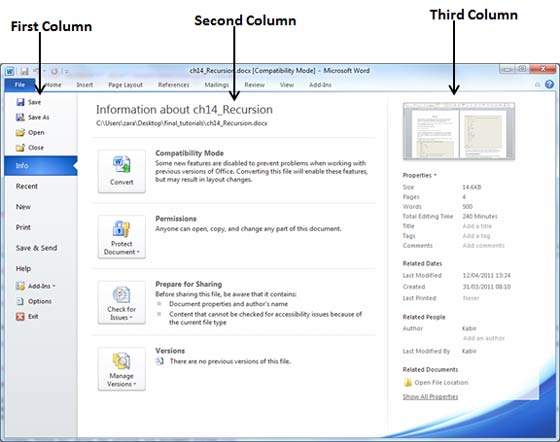
If you already have an opened document, then it will display a window showing detail about the opened document as shown below. Backstage view shows three columns when you select most of the available options in the first column.
The first column of the backstage view will have following options −
| S.No | Option & Description |
|---|---|
| 1 |
Save If an existing document is opened, it will be saved as is, otherwise it will display a dialogue box asking for the document name. |
| 2 |
Save As A dialogue box will be displayed asking for document name and document type, by default it will save in word 2010 format with extension .docx. |
| 3 |
Open This option is used to open an existing word document. |
| 4 |
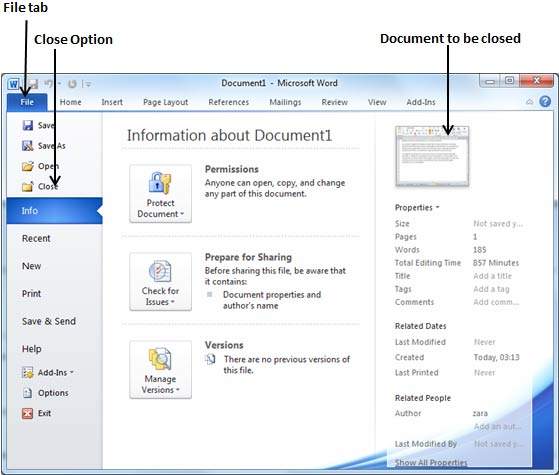
Close This option is used to close an open document. |
| 5 |
Info This option displays information about the opened document. |
| 6 |
Recent This option lists down all the recently opened documents |
| 7 |
New This option is used to open a new document. |
| 8 |
This option is used to print an open document. |
| 9 |
Save & Send This option will save an open document and will display options to send the document using email, etc. |
| 10 |
Help This option is used to get the required help about Word 2010. |
| 11 |
Options This option is used to set various option related to Word 2010. |
| 12 |
Exit Use this option to close the document and exit. |
Document Information
When you click the Info option available in the first column, it displays the following information in the second column of the backstage view −
-
Compatibility Mode − If the document is not a native Word 2007/2010 document, a Convert button appears here, enabling you to easily update its format. Otherwise, this category does not appear.
-
Permissions − You can use this option to protect your word document. You can set a password so that nobody can open your document, or you can lock the document so that nobody can edit your document.
-
Prepare for Sharing − This section highlights important information you should know about your document before you send it to others, such as a record of the edits you made as you developed the document.
-
Versions − If the document has been saved several times, you may be able to access the previous versions of it from this section.
Document Properties
When you click the Info option available in the first column, it displays various properties in the third column of the backstage view. These properties include the document size, the number of pages in the document, the total number of words in the document, the name of the author etc.
You can also edit various properties by clicking on the property value and if the property is editable, then it will display a text box where you can add your text like title, tags, comments, Author.
Exit Backstage View
It is simple to exit from the Backstage View. Either click on the File tab or press the Esc button on the keyboard to go back to the working mode of Word.
Entering Text — Microsoft Word 2010
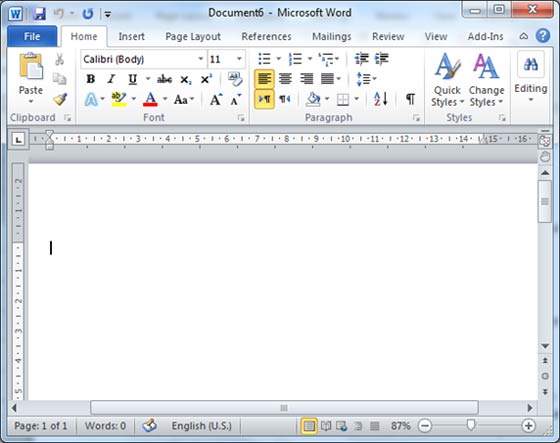
In this chapter, let us discuss how to enter text with Microsoft Word 2010. Let us see how easy it is to enter text in a Word document. We assume you know that when you start Word, it displays a new document by default as shown below −
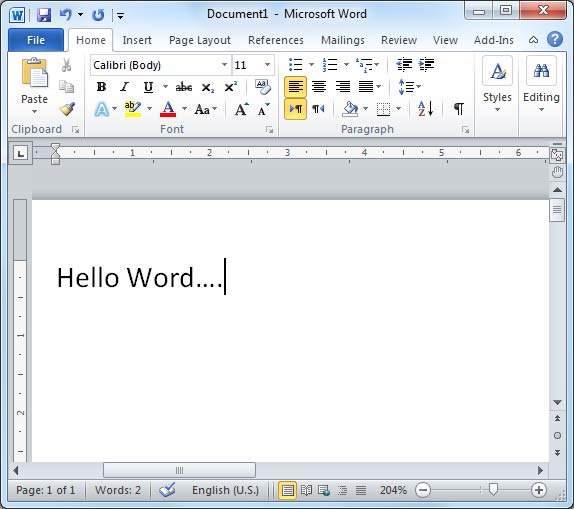
Document area is the area where you type your text. The flashing vertical bar is called the insertion point and it represents the location where the text will appear when you type. keep the cursor at the text insertion point and start typing the text. We typed only two words «Hello Word» as shown below. The text appears to the left of the insertion point as you type −
The following are the two important points that will help you while typing −
-
You do not need to press Enter to start a new line. As the insertion point reaches the end of the line, Word automatically starts a new one. You will need to press Enter, to add a new paragraph.
-
When you want to add more than one space between words, use the Tab key instead of the spacebar. This way you can properly align text by using the proportional fonts.
Move Around in Word 2010
In this chapter, we will discuss how to move around in Word 2010. Word provides a number of ways to move around a document using the mouse and the keyboard.
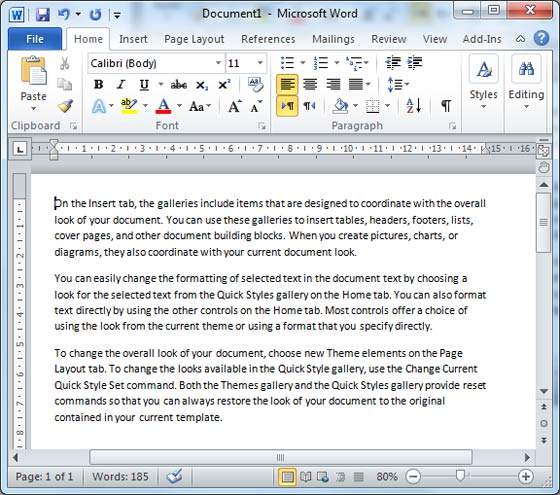
To begin with, let us create some sample text. To create a sample text, there is a short cut available. Open a new document and type =rand() and press Enter. Word will create the following content for you −
Moving with Mouse
You can easily move the insertion point by clicking in your text anywhere on the screen. There may be instances when a document is big and you cannot see a place where you want to move. Here, you will have to use the scroll bars, as shown in the following screenshot −
You can scroll through your document by rolling your mouse wheel, which is equivalent to clicking the up-arrow or down-arrow buttons in the scroll bar.
Moving with Scroll Bars
As shown in the above screenshot, there are two scroll bars: one for moving vertically within the document, and one for moving horizontally. Using the vertical scroll bar, you may −
-
Move upward by one line by clicking the upward-pointing scroll arrow.
-
Move downward by one line by clicking the downward-pointing scroll arrow.
-
Move one next page, using the next page button (footnote).
-
Move one previous page, using the previous page button (footnote).
-
Use the Browse Object button to move through the document, going from one chosen object to the next.
Moving with Keyboard
The following keyboard commands, used for moving around your document, also move the insertion point −
| Keystroke | Where the Insertion Point Moves |
|---|---|
 |
Forward one character |
 |
Back one character |
 |
Up one line |

|
Down one line |
| PageUp | To the previous screen |
| PageDown | To the next screen |
| Home | To the beginning of the current line |
| End | To the end of the current line |
You can move word by word or paragraph by paragraph. You would have to hold down the Ctrl key while pressing an arrow key, which moves the insertion point as described here −
| Key Combination | Where the Insertion Point Moves |
|---|---|
Ctrl +  |
To the next word |
Ctrl +  |
To the previous word |
Ctrl +  |
To the start of the previous paragraph |
Ctrl +  |
To the start of the next paragraph |
| Ctrl + PageUp | To the previous browse object |
| Ctrl + PageDown | To the next browse object |
| Ctrl + Home | To the beginning of the document |
| Ctrl + End | To the end of the document |
| Shift + F5 | To the last place you changed in your document. |
Moving with Go To Command
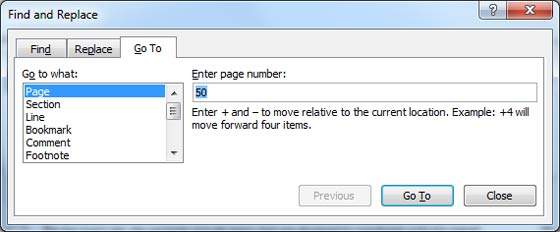
Press the F5 key to use the Go To command. This will display a dialogue box where you will have various options to reach to a particular page.
Normally, we use the page number, the line number or the section number to go directly to a particular page and finally press the Go To button.
Save Document in Word 2010
In this chapter, we will discuss how to save a document in Word 2010.
Saving New Document
Once you are done with typing in your new Word document, it is time to save your document to avoid losing work you have done on a Word document. Following are the steps to save an edited Word document −
Step 1 − Click the File tab and select the Save As option.
Step 2 − Select a folder where you will like to save the document, Enter the file name which you want to give to your document and Select the Save As option, by default it is the .docx format.
Step 3 − Finally, click on the Save button and your document will be saved with the entered name in the selected folder.
Saving New Changes
There may be an instance when you open an existing document and edit it partially or completely, or an instance where you may like to save the changes in between editing of the document. If you want to save this document with the same name, then you can use either of the following simple options −
-
Just press the Ctrl + S keys to save the changes.
-
Optionally you can click on the floppy icon available at the top left corner and just above the File tab. This option will also help you save the changes.
-
You can also use the third method to save the changes, which is the Save option available just above the Save As option as shown in the above screenshot.
If your document is new and it was never saved so far, then with either of the three options, Word will display a dialogue box to let you select a folder, and enter the document name as explained in case of saving new document.
Opening a Document in Word 2010
In this chapter, we will discuss how to open a document in Word 2010.
Opening New Document
A new, blank document always opens when you start Microsoft Word. Suppose you want to start another new document while you are working on another document, or you closed an already opened document and want to start a new document. Here are the steps to open a new document −
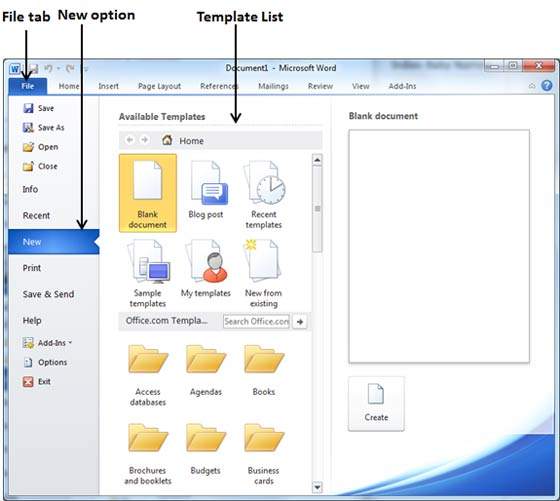
Step 1 − Click the File tab and select the New option.
Step 2 − When you select the New option from the first column, it will display a list of templates in the second column. Double-click on the Blank document; this is the first option in the template list. We will discuss the other templates available in the list in the following chapters.
You should have your blank document as shown below. The document is now ready for you to start typing your text.
You can use a shortcut to open a blank document anytime. Try using the Ctrl + N keys and you will see a new blank document similar to the one in the above screenshot.
Opening Existing Document
There may be a situation when you open an existing document and edit it partially or completely. Follow the steps given below to open an existing document −
Step 1 − Click the File tab and select the Open option.
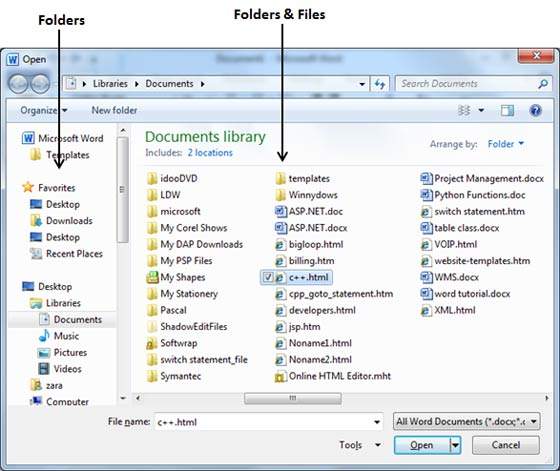
Step 2 − This will display the following file Open dialog box. This lets you navigate through different folders and files, and also lets you select a file which you want to open.
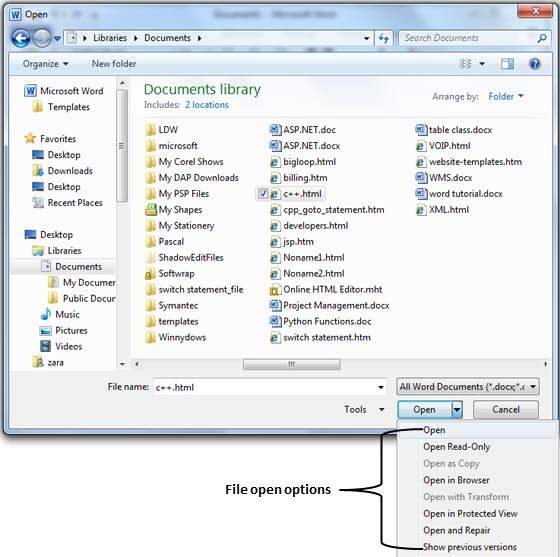
Step 3 − Finally, locate and select a file which you want to open and click the small triangle available on the Open button to open the file. You will have different options to open the file, but simply use the Open option.
This will open your selected file. You can use the Open Read-Only option if you are willing just to read the file and you have no intention to modify, i.e., edit the file. Other options can be used for advanced usage.
Closing a Document in Word 2010
In this chapter, we will understand how to close a document in Word 2010. When you finish working with a document, you will proceed to close the document. Closing a document removes it from your computer screen and if you had other documents open, Word displays the last document you used otherwise, you see a blank Word window. Here are simple steps to close an opened document −
Step 1 − Click the File tab and select the Close option.
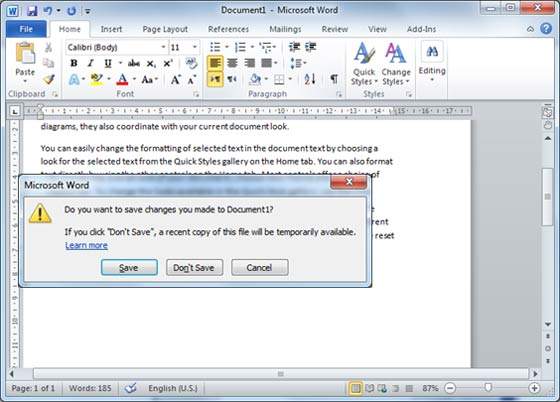
Step 2 − When you select the Close option and if the document is not saved before closing, it will display the following Warning box asking whether the document should be saved or not.
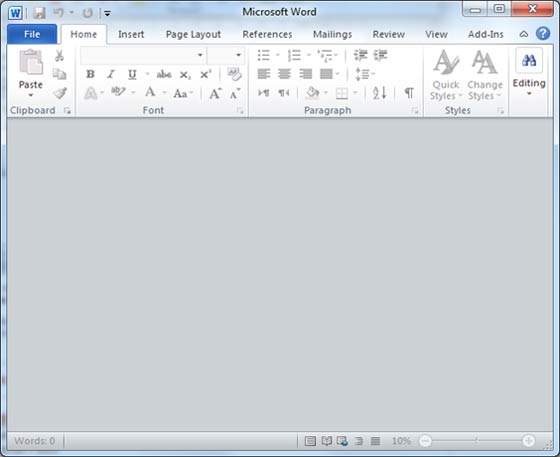
Step 3 − To save the changes, click Save, otherwise click Don’t Save. To go back to the document, click Cancel. This will close the document and if you have other documents open, Word displays the last document you used, otherwise, you see a blank Word window as shown below −
Context Help in Word 2010
In this chapter, we will discuss Context Help in Word 2010. Microsoft Office provides more than one method for calling up Help when you need it. We will discuss a few important methods in this chapter −
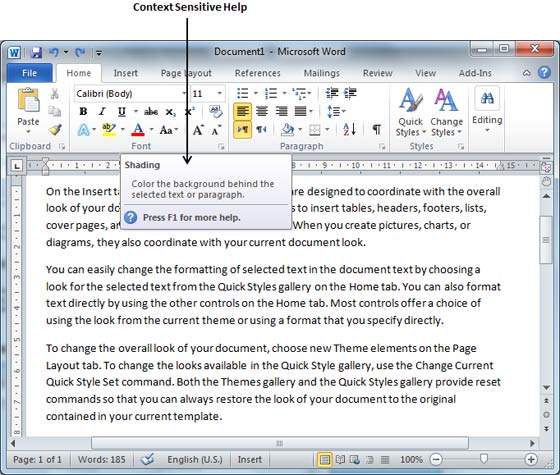
Context Sensitive Help
This is the easiest way of getting help about any of the options available at word screen. You just need to bring your mouse pointer over an option and wait for 2 seconds, MS Word will pop-up a small balloon help giving you detail about the operation. If word has additional help for that option, then it gives the option Press F1 for more help as shown below when you bring your mouse pointer over the color fill option. You can press the F1 key to get further help on this option.
Using F1 Key
You can press the F1 key when you are in the middle of doing something and Office will display the various categories of help as shown below. You can either search a keyword using the Search option or you can browse the listed categories to go through a topic in detail −
Using Help Icon
You can also have similar help window as shown above, by clicking the Help icon located just above the right edge of the ribbon as shown below −
Using Help Option
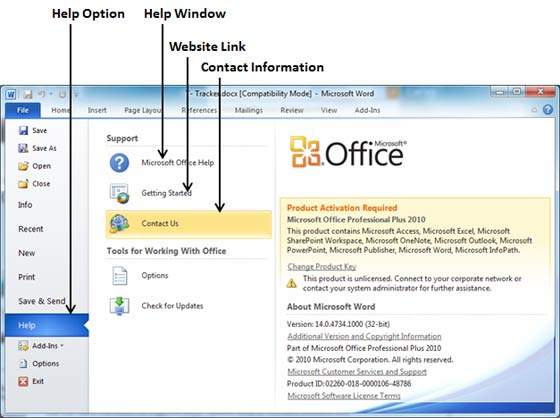
You can communicate with Microsoft using the Help option available under the File tab.
As shown above, you can use Microsoft Office Help to launch the Help window, or Getting Started link to go to Microsoft’s official website, otherwise use the Contact us option to contact Microsoft via email or phone.
Insert Text in Word 2010
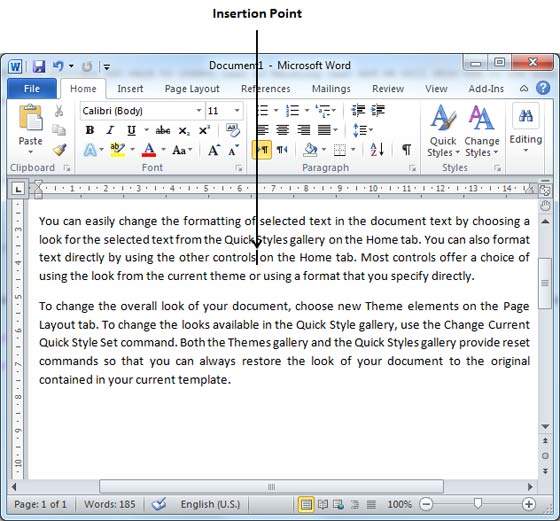
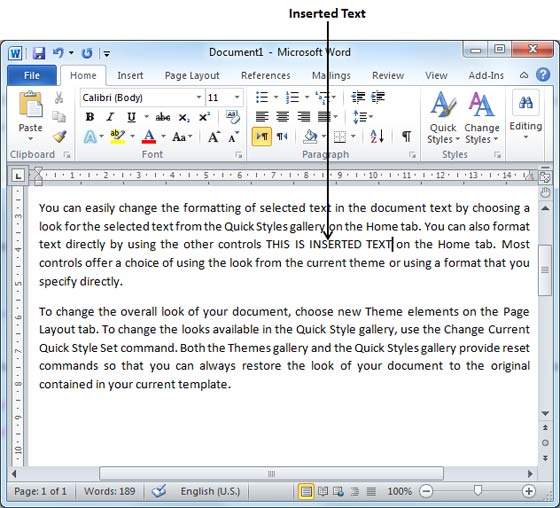
In this chapter, we will discuss how to insert text in Word 2010. Many times it is required to go back and insert additional text in an existing line. Microsoft Word provides two ways to insert text in existing text and we will show how to use both the methods of inserting text −
Insert and Add Text
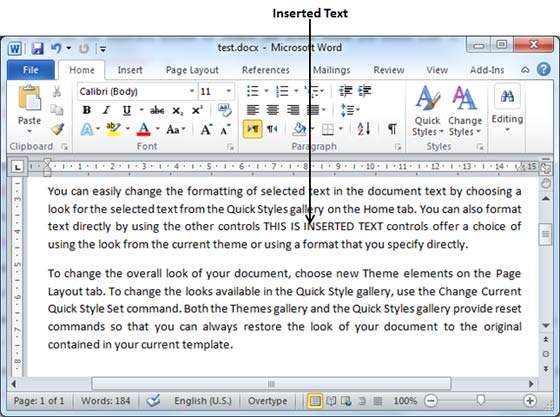
First we will see how inserted text will be added into the existing content without replacing any existing content.
Step 1 − Click the location where you wish to insert text; you can also use the keyboard arrows to locate the place where the text needs to be inserted.
Step 2 − Start typing the text that needs to be inserted. Word inserts the text to the left of the insertion point, moving the existing text to the right
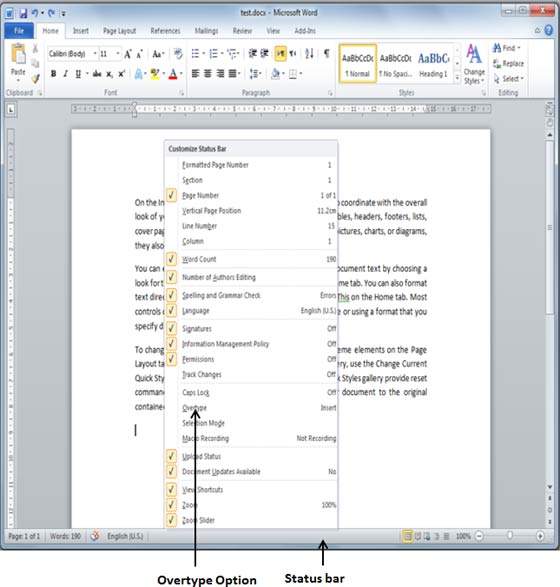
Insert and Replace Text
In the Insertion mode, text will be added into the existing content but same time it will over write all the content which comes in its way.
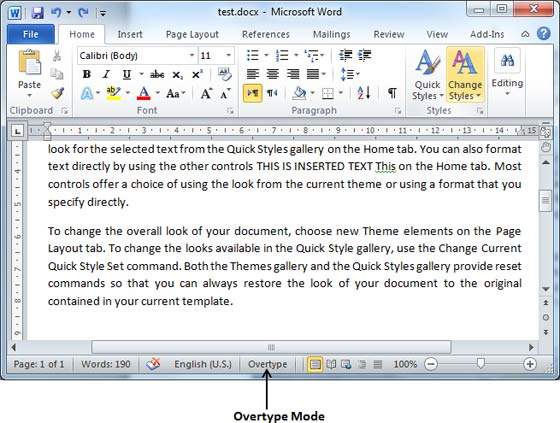
Step 1 − Right-click the status bar and select the Overtype option from the displayed menu.
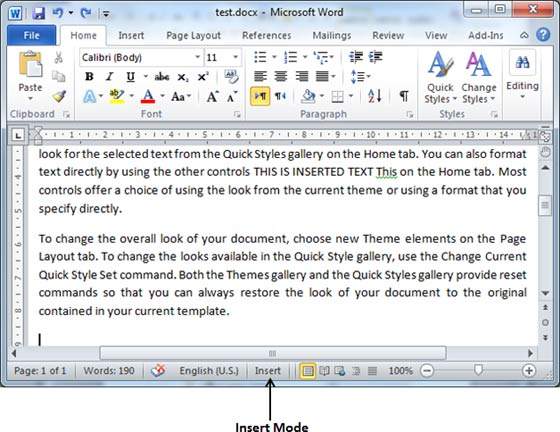
When you select the Overtype option, the status bar will show the insert mode as shown below −
Step 2 − Click on the Insert text available at the status bar and it will switch to the Overtype mode as shown below −
Step 3 − Now click the location where the text needs to be inserted or you can use the keyboard arrows to locate the place where the text needs to be inserted.
Step 4 − Start typing the text that needs to be inserted. Word will replace the existing text with the newly typed text without moving the position of the exiting test.
Note − Microsoft Word 2010 disabled the functionality of the Insert key and it does nothing, so you will have to follow-up with the above mentioned procedure to turn-on or turn-off the Insert mode.
Select Text in Word 2010
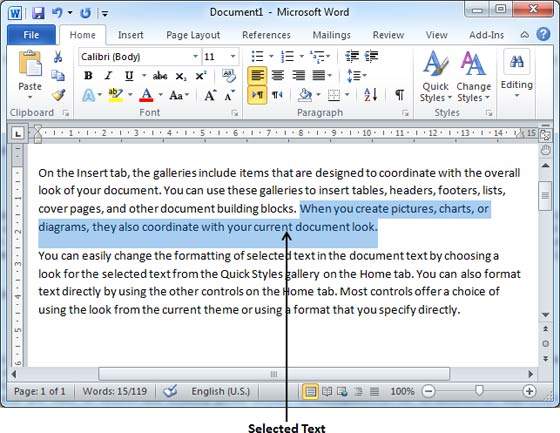
In this chapter, we will discuss how to select text in Word 2010. Selecting a text is one of the most important skills required while editing a word document. You can perform various operations on a selected text; you can delete the selected text, copy it, move it, apply formatting to it, change its capitalization, etc.
The most common method of selecting a text is to click and drag the mouse over the text you want to select. Following table lists down a few other simple methods that will help you in selecting text in different scenarios −
| S.No | Component & Selection Method |
|---|---|
| 1 |
Selecting text between two points Click at the start of the block of text, hold down Shift, and click at the end of the block. |
| 2 |
Selecting a single word Double-click anywhere on the word you want to select. |
| 3 |
Selecting a paragraph Triple-click anywhere on the paragraph you want to select. |
| 4 |
Selecting a sentence Hold down the Ctrl key and click anywhere in the sentence you want to select. |
| 5 |
Selecting a column of text Hold down Alt, click and hold the mouse button, and drag over the column you want to select. |
Note that only one part of the document can be in the selected state. If you have one portion of the document in selected state and as soon as you try to select any other part of the document, previous part will automatically be de-selected.
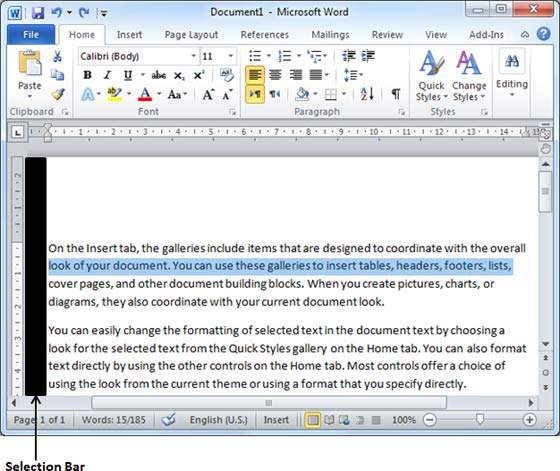
Using the Selection Bar
The black shaded area in the following screen shot is called the selection bar. When you bring your cursor in this area, it turns into a rightward-pointing arrow.
You can use the selection bar to select the various components of a document as described in the following table −
| S.No | Component & Selection Method |
|---|---|
| 1 |
Selecting a line Bring your mouse in the selection bar area and click in front of the line you want to select. |
| 2 |
Selecting a paragraph Bring your mouse in the selection bar area and double click in front of the paragraph you want to select. |
| 3 |
Selecting the document Bring your mouse in the selection bar area and triple-click. |
Using the Keyboard
Keyboard provides very good support when you want to select various components of the document as described in the following table −
| S.No | Key & Selection Method Selecting Text |
|---|---|
| 1 |
Ctrl + A Press Ctrl + A keys to select the entire document. |
| 2 |
Shift Keep pressing the Shift key and use any of the arrow keys to select the portion of text. |
| 3 |
F8 Press F8 and then use any of the arrows keys to select the portion of text. |
| 4 |
Ctrl + Shift + F8 Press Ctrl + Shift + F8 and then use any of the arrows keys to select column of the text. |
Delete Text in Word 2010
In this chapter, we will discuss how to delete text in Word 2010. It is very common to delete text and retype the content in your Word document. You might type something you did not want to type or there is something extra which is not required in the document. Regardless of the reason, Word offers you various ways of deleting the text in partial or complete content of the document.
Using Backspace & Delete Keys
The most basic deletion technique is to delete characters one at a time by pressing either the backspace key or the delete key. Following table describes how you can delete single character or a whole word by using either of these two keys −
| S.No | Keys & Deletion Methods |
|---|---|
| 1 |
Backspace Keep the insertion point just after the character you want to delete and press the Backspace key. Word deletes the character immediately to the left of the insertion point. |
| 2 |
Ctrl + Backspace Keep the insertion point just after the word you want to delete and press Ctrl + Backspace key. Word deletes the whole word immediately to the left of the insertion point. |
| 3 |
Delete Keep the insertion point just before the character you want to delete and press the Delete key. Word deletes the character immediately to the right of the insertion point. |
| 4 |
Ctrl + Delete Keep the insertion point just before the word you want to delete and press Ctrl + Delete key. Word deletes the word immediately to the right of the insertion point. |
Using Selection Method
You have learnt how to select various parts of a Word document. You can make use of that learning to delete those selected parts as described in the following table −
| S.No | Component Selection & Delete Methods |
|---|---|
| 1 |
Deleting text between two points Click at the start of the block of text, hold down the Shift key, and click at the end of the block to select the portion of text and finally press either the Backspace key or the Delete key. |
| 2 |
Deleting a single word Double-click anywhere on the word you want to delete and finally press either the Backspace key or the Delete key. |
| 3 |
Deleting a paragraph Triple-click anywhere on the paragraph you want to delete and finally press either the Backspace key or the Delete key. |
| 4 |
Deleting a sentence Hold down the Ctrl key and click anywhere in the sentence you want to delete and finally press either the Backspace or the Delete key. |
| 5 |
Deleting a column of text Hold down the Alt key, click and hold the mouse button, and drag over the column you want to delete and finally press either the Backspace key or the Delete key. |
| 6 |
Deleting a line Bring your mouse in the selection bar area and click in front of the line you want to delete and finally press either the Backspace key or the Delete key. |
| 7 |
Deleting entire document content Press Ctrl + A keys to delete the entire document and finally press either the Backspace key or the Delete key. |
Note − The black shaded area in the following screen shot is called the selection bar. When you bring your cursor in this area, it turns into a rightward-pointing arrow.
Move Text in Word 2010
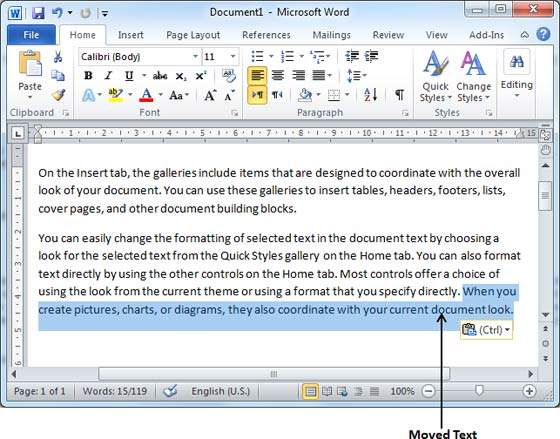
In this chapter, we will discuss how to move text in Word 2010. At times, it is required to move a text from one location to another location in the same document or in any another document. You can move text from one location in a document to another by using the drag-and-drop technique with the help of mouse. This tutorial will teach you how to use the drag and drop technique to move text.
Move within the same document
Step 1 − Select a portion of the text using any of the text selection methods.
Step 2 − Now take your mouse pointer over the selected text and hold the left button of the mouse and keep holding it while moving around the document.
Step 3 − Take your mouse pointer to the place where you want to move the selected text and release the mouse button. You will see that the selected text is moved to the desired location.
Move within different documents
You can move the selected text from one document to another document. Following are some simple steps which will help you in moving text from one document to another document.
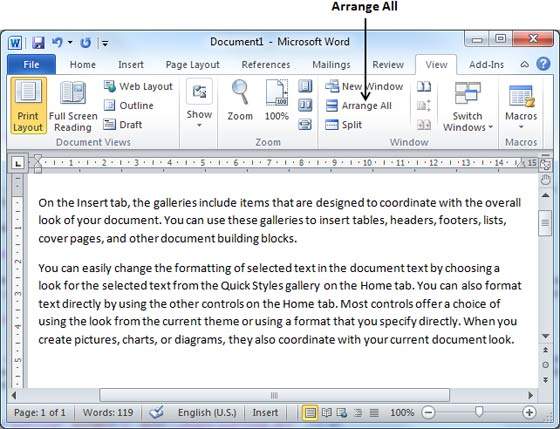
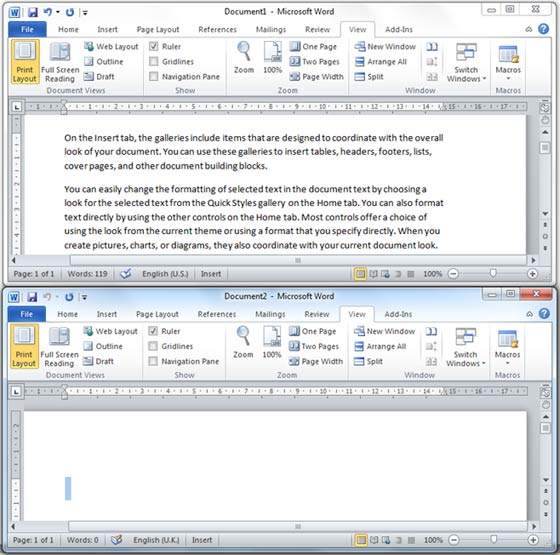
Step 1 − Keep both the documents opened and to ensure that both documents are visible, click the Arrange All button on the View tab on the Ribbon.
This will display both the documents as shown below −
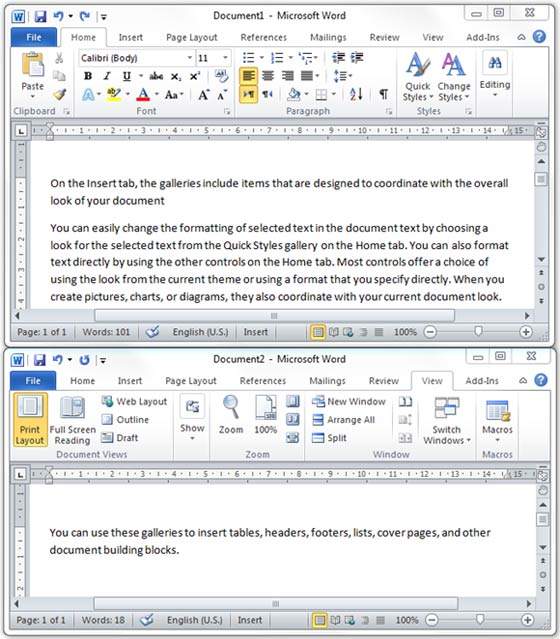
Step 2 − Now, select a portion of the text using any of the text selection methods.
Step 3 − Take your mouse pointer over the selected text and hold the left button of the mouse and keep holding it while moving around the document.
Step 4 − Take your mouse pointer at the place in the second document where you want to move the selected text and release the mouse button. You will see that the selected text is moved to the desired location in the second document.
Note − In case you have more than two documents, you can use the Alt + Tab keys to switch through the different documents and select the desired destination document.
Copy & Paste in Word 2010
In this chapter, we will discuss how to copy, cut and paste in Word 2010. In the previous chapter, we understood how we can select the desired text and move it to any other location in the same document or in any other document. This tutorial will teach you how to use copy, cut and paste techniques to duplicate a text leaving the original text intact or removing the original text completely.
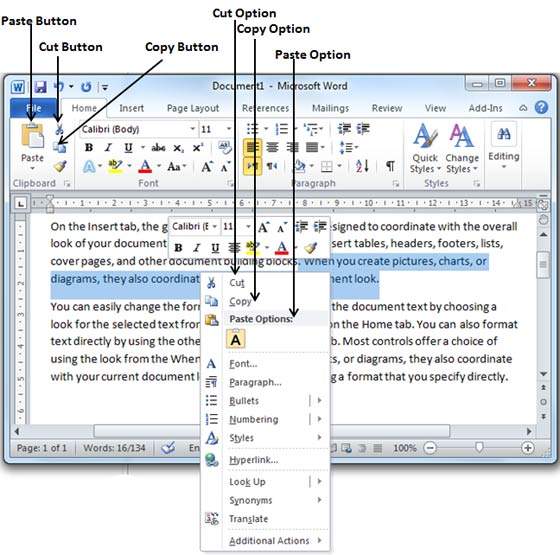
To use copy and paste or cut and paste operations, Word makes use of a temporary memory which is called the clipboard. When you copy or cut a text, it stay on the clipboard temporarily and in the second step you can paste this content at the desired location.
Copy & Paste Operation
The Copy operation will just copy the content from its original place and create a duplicate copy of the content at the desired location without deleting the text from it’s the original location. Following is the procedure to copy the content in word −
Step 1 − Select a portion of the text using any of the text selection methods.
Step 2 − You have various options available to copy the selected text in clipboard. You can make use of any one of the options −
-
Using Right-Click − When you right-click on the selected text, it will display the copy option, click this option to copy the selected content in clipboard.
-
Using Ribbon Copy Button − After selecting text, you can use the copy button available at the ribbon to copy the selected content in clipboard.
-
Using Ctrl + c Keys − After selecting a text, just press Ctrl + c keys to copy the selected content in clipboard.
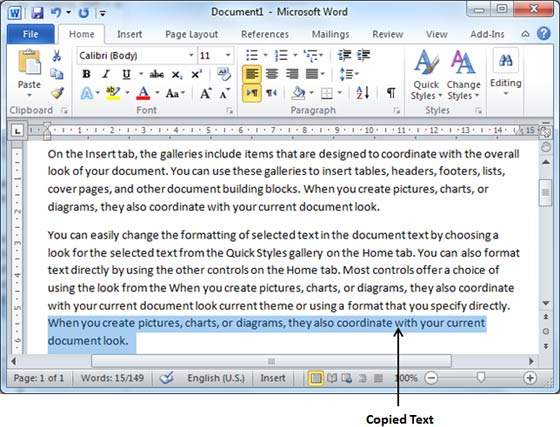
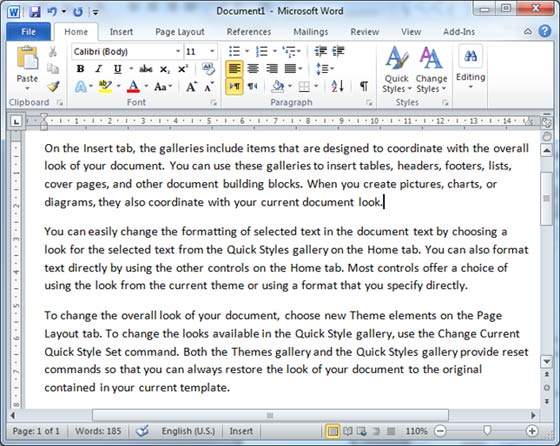
Step 3 − Finally click at the place where you want to copy the selected text and use either of these two simple options −
-
Using Ribbon Paste Button − Just click the Paste button available at the ribbon to paste the copied content at the desired location.
-
Using Ctrl + v Keys − This is simplest way of pasting the content. Just press Ctrl + v keys to paste the content at the new location.
Note − You can repeat the Paste operation as many times as you like to paste the same content.
Cut & Paste Operation
The Cut operation will cut the content from its original place and move the content from its original location to a new desired location. Following is the procedure to move the content in word −
Step 1 − Select a portion of the text using any of the text selection methods.
Step 2 − Now, you have various options available to cut the selected text and put it in the clipboard. You can make use of one of the options −
-
Using Right-Click − If right-click on the selected portion of text, it will display cut option, just click this option to cut the selected content and keep it in clipboard.
-
Using Ribbon Cut Button − After selecting a portion of text, you can use cut button available at the ribbon to cut the selected content and keep it in clipboard.
-
Using Ctrl + x Keys − After selecting a portion of text, just press Ctrl + x keys to cut the selected content and keep it in clipboard.
Step 3 − Finally, click at the place where you want to move the selected text and use either of these two simple options −
-
Using Ribbon Paste Button − Just click the Paste button available at the ribbon to paste the content at the new location.
-
Using Ctrl + v Keys − This is simplest way of pasting the content. Just press Ctrl + v keys to paste the content at the new location.
Note − You can repeat the Paste operation as many times as you like to paste the same content.
Copy, Cut & Paste in different documents
You can use the same procedure that we discussed above to copy and paste or cut and paste content from one document to another document. This is very simple, just copy or cut the desired content from one document and go into another document where you want to paste the content and use mentioned step to paste the content.
You can use the Alt + Tab keys to switch through the different documents and select the desired destination document.
Find & Replace in Word 2010
In this chapter, we will discuss the Find and Replace operation in Word 2010. While working on editing a document you come across a situation very frequently when you want to search a particular word in your document and many times you will be willing to replace this word with another word at a few or all the places throughout the document. Here, we will understand how to find a word or phrase in a word document and how to replace an existing word with any other word using simple steps.
Find Command
The Find command enables you to locate specific text in your document. Following are the steps to find a word document in the following screen −
Step 1 − Let us work out on a sample text available in our Word document. Just type =rand() and press Enter; the following screen will appear −
Step 2 − Click the Find option in the Editing group on the Home tab or press Ctrl + F to launch the Navigation pane −
Step 3 − Enter a word which you want to search in the Search box, as soon as you finish typing, Word searches for the text you entered and displays the results in the navigation pane and highlights the word in the document as in the following screenshot −
Step 4 − You can click the clear button (X) to clear the search and results and perform another search.
Step 5 − You can use further options while searching for a word. Click the option button to display the options menu and then click the Options option; this will display a list of options. You can select the options like match case to perform case-sensitive search.
Step 6 − Finally, if you are done with the Search operation, you can click the close button (X) to close the Navigation Pane.
Find & Replace Operation
We assume you are an expert in searching a word or phrase in a word document as explained above. This section will teach you how you can replace an existing word in your document. Following are the simple steps −
Step 1 − Click the Replace option in the Editing group on the Home tab or press Ctrl + H to launch the Find and Replace dialog box shown in Step 2 −
Step 2 − Type a word which you want to search. You can also replace the word using the Find and Replace dialog box as in the following screenshot −
Step 3 − Click the Replace button available on the Find and Replace dialog box and you will see the first occurrence of the searched word would be replaced with the replace with word. Clicking again on Replace button would replace next occurrence of the searched word. If you will click Replace All button then it would replace all the found words in one go. You can also use Find Next button just to search the next occurence and later you can use Replace button to replace the found word.
Step 4 − You can use More >> button available on the dialog box to use more options and to make your search more specific like case sensitive search or searching for whole word only etc.
Step 5 − Finally, if you are done with the Find and Replace operation, you can click the Close (X) or Cancel button of the dialog box to close the box.
Spell Check in Word 2010
In this chapter, we will discuss how to check spelling and grammar in Word 2010. Microsoft Word provides a decent Spelling and Grammar Checker which enables you to search for and correct all spelling and grammar mistakes in your document. Word is intelligent enough to identify misspelled or misused, as well as grammar errors and underlines them as follows.
- A red underline beneath spelling errors.
- A green underline beneath grammar errors.
- A blue line under correctly spelled but misused words.
Check Spelling and Grammar using Review tab
Here is the simple procedure to find out the spelling mistakes and fix them −
Step 1 − Click the Review tab and then click the Spelling & Grammar button.
Step 2 − A Spelling and Grammar dialog box will appear and will display the wrong spellings or errors in grammar. You will also get suggestions to correct as shown below −
Now you have following options to fix the spelling mistakes −
-
Ignore − If you are willing to ignore a word, then click this button and Word ignores the word throughout the document.
-
Ignore All − Like Ignore, but this ignores all occurrences of the same misspelling, not just once but throughout the document.
-
Add to Dictionary − Choose Add to Dictionary to add the word to the Word spelling dictionary.
-
Change − This will change the wrong word using the suggested correct word.
-
Change All − Like Change, but this changes all occurrences of the same misspelling, not just once but throughout the document.
-
AutoCorrect − If you select a suggestion, Word creates an AutoCorrect entry that automatically corrects this spelling error from now on.
Following are the different options in case you have grammatical mistake −
-
Next Sentence − You can click Next Sentence to direct the grammar checker to skip ahead to the next sentence.
-
Explain − The grammar checker displays a description of the rule that caused the sentence to be flagged as a possible error.
-
Options − This will open the Word Options dialog box to allow you to change the behavior of the grammar checker or spelling options.
-
Undo − This will undo the last grammar changed.
Step 3 − Select one of the given suggestions you want to use and click the Change option to fix the spelling or grammar mistake and repeat the step to fix all the spelling or grammar mistake.
Step 4 − Word displays a dialog box when it finishes checking for spelling and grammar mistakes, finally Click OK.
Check Spelling and Grammar using Right Click
If you will right-click the mouse button over a misspelled word, then it will show you the correct suggestions and the above mentioned options to fix the spelling or grammar mistake. Try it yourself.
Zoom In-Out in Word 2010
In this chapter, we will discuss how to zoom in and zoom out in Word 2010. Microsoft Word provides a functionality to apply zoom-in and zoom-out operations on a document. When we apply the zoom-in operation, it enlarges the size of text whereas applying the zoom-out operation reduces the size of text.
A zoom operation just changes the size of the font on-screen without impacting any other attribute of the document. You can apply the zoom operation in various ways as explained in this chapter.
Zoom-in & Zoom-out using view tab
Here is the simple procedure to apply the zoom-in or the zoom-out operations using the View tab −
Step 1 − Click the View tab and then click the Zoom button as shown below.
Step 2 − When you click the Zoom button, a Zoom dialog box will appear as shown below. This will display the zoom options box to select a value to reduce or increase the size of the document on-screen. By default, it will be 100%; you can select 200% to increase the size of the font or 75% to reduce the size of the font.
You can click the Many pages down arrow and select to display multiple pages.
Step 3 − Once you are done with selecting an option, click OK to apply the changes on the document.
Step 4 − Try different options available, for example Page Width and Text Width.
Zoom-in & Zoom-out using (+) and (-) Buttons
The following screenshot shows two buttons Zoom-out which is the (-) button and Zoom-in which is the (+) button.
Step 1 − Click the Zoom-out button, you will find that your document size will decrease by 10% each time you click the button. Similar way, if you click on Zoom-in button your document size will increase by 10% each time you click the button.
Step 2 − Try this simple operation with different values to see the difference. The above screenshot shows 140% zoom-in view of the document.
Special Symbols in Word 2010
In this chapter, we will discuss the use of special symbols in Word 2010. Your keyboard may not have many characters available but you want to use those characters in your document; in such situations, you have the option to insert Special Symbols the way we will further understand in this chapter.
To insert symbols that are occasionally used, follow the steps in this section. If you find yourself using a particular symbol frequently, you can assign a keyboard shortcut to it.
Insert Special Symbols
Here is a simple procedure to apply zoom-in or zoom-out operation using the View tab −
Step 1 − To insert a special symbol, bring your cursor at the place where you want to insert the symbol. Click the Insert tab. You will find two options under the symbol button (a) Equation and (b) Symbols. Click either of these two options based on your requirement. You will further use equations while preparing mathematical or scientific or any similar document. For now, we are going to understand the use of the Symbol button as shown below.
Step 2 − When you click the Symbol button, a small list of symbols will appear as shown below.
Step 3 − Now click on any of the available symbols in the box to insert that in your document at the selected location. If you do not find the desired symbol in this small box, then you can click at the More Symbols option to have a wide range of symbols as shown below in the symbol dialog box. You can select any of the symbol and then click the Insert button to insert the selected symbol.
Assign Shortcut Key
You can assign a keyboard shortcut to type any of the available symbol. Following are the steps to assign Ctrl + Q key to insert the © symbol which is one of the available symbols in the special symbols list −
Step 1 − Assume you already have the following symbol dialog box opened.
Step 2 − Click the symbol for which a shortcut key needs to be assigned. Now click Shortcut Key button which will display the following Customize Keyboard dialog box.
Step 3 − Now type the selected shortcut key in the shortcut key box. You press Ctrl + Q and then click the Assign button to assign the shortcut key. You will see that the selected key will be added in the list of assigned keys. Finally, use the Close button to close the dialog box.
Step 4 − Now try to type Ctrl + Q using the keyboard directly and you will find that you are able to type © symbol without going into the symbol dialog box.
Undo Changes in Word 2010
In this chapter, we will discuss how to undo and redo changes in Word 2010. Microsoft word provides two important features called the Undo and the Repeat or Redo. The Undo feature is used to undo the previous action and the Repeat or Redo feature is used to repeat the previous action.
For example, if you mistakenly delete text, you can use the Undo feature to recover it. In a similar way, if you delete a character and you want to delete more characters then you can use the Repeat operation.
How to use Undo & Repeat operations
You can access the Undo and Repeat buttons from the Quick Access toolbar. You should make a note that the Repeat button is also called Redo button and both the operations have the same meaning.
Here is the simple procedure to apply undo or repeat (redo) operations −
Step 1 − Let us type some text in a blank document. Now click the Repeat (Redo) button and you will see that Word will repeat the same operation for you.
Step 2 − Now to examine the undo operation, let us delete the last word operation character by character so that you have the following text remaining in the line.
Step 3 − Let us try to click the Undo button one by one. You will see that Word will recover all the deleted characters one by one after performing a few undo operations.
Shortcuts to use Undo & Repeat operations
Though you can access the Undo and Repeat commands from the Quick Access toolbar, but because these commands are the most frequently used commands, we recommend you memorize their keyboard shortcuts which are as follows −
| S.No | Shortcuts & Operation |
|---|---|
| 1 |
Ctrl + Z Undoes the previous action. |
| 2 |
Ctrl + Y Repeats the previous action. |
Note that if the previous action was Undo, Ctrl+Y redoes the Undone action.
Setting Text Fonts in Word 2010
In this chapter, we will discuss how to set the text fonts and size in Word 2010. Microsoft word allows you to use different fonts with different size. You can change your document’s appearance by changing the fonts and their size. Usually you use different fonts for paragraphs and headings. It is important to learn how to use different fonts. This chapter will teach you how to change a font and its size in simple steps.
Change the Font Type & Size
We will understand in brief the font buttons that we will further use in this tutorial. Following is a screenshot to show you a few font related buttons.
Step 1 − Select the portion of text the font of which needs to be changed and click the Home tab. Now click the Font Type button to list down all the fonts available as shown below.
Step 2 − Try to move the mouse pointer over the listed fonts. You will see that the text font changes when you move the mouse pointer over different fonts. You can use the Font Scroll Bar to display more fonts available. Finally select a desired font by clicking over the font name in the list. We have selected MV Boli as the font for our sample text.
Step 3 − Similar way, to change the font size, click over the Font Size button which will display a font size list. You will use the same procedure to select a desired font size that you have used while selecting a font type.
Use Shrink and Grow Buttons
You can use a quick way to reduce or enlarge the font size. As shown in the first screenshot, the Shrink Font button can be used to reduce the font size whereas the Grow Font button can be used to enlarge the font size.
Try to click either of these two buttons and you will see the effect. You can click a single button multiple times to apply the effect. Each time you click either of the buttons, it will enlarge or reduce the font size by 1 point.
Clear Formatting Options
All of the setting can be reset to plain text, or the default formatting. To reset text to default settings −
Step 1 − Select the portion of text that you want to reset.
Step 2 − Click the Clear Formatting button in the Home tab Font group, or simply use Ctrl + SPACEBAR.
Text Decoration in Word 2010
In this chapter, we will discuss text decoration in Word 2010. When we use the term decorate, it means decorate by putting the text in italics, underlining the text or making it bold to look more fancy and much more. In this chapter, we will also learn how we can strikethrough a text.
Making text bold
We use bold text to give more emphasis on the sentence. It is very simple to change a selected portion of text into bold font by following two simple steps −
Step 1 − Select the portion of text that the font of which needs to be made bold. You can use any of the text selection methods to select the portion of text.
Step 2 − Click the Font Bold [ B ] button in the Home tab Font group, or simply use Ctrl + B keys to make the selected portion of text bold.
Making Text Italic
An italic text appears with a small inclination and we use the italicized text to differentiate it from other text. It is very simple to change the selected text into italic font by following two simple steps −
Step 1 − Select the portion of text the font of which needs to be italicized. You can use any of the text selection methods to select the portion of text.
Step 2 − Click the Font Italic [ I ] button in the Home tab Font group, or simply use the Ctrl + I keys to convert the portion of text in italic font.
Underline the Text
An underlined portion of text appears with an underline and we use the underlined portion of text to make it more distinguished from other text. It is very simple to change the selected text into underlined font by following two simple steps −
Step 1 − Select the portion of text which needs to be underlined. You can use any of the text selection method to select the portion of text.
Step 2 − Click Font Underline [ U ] button in the Home tab Font group, or simply use the Ctrl + U keys to put an underline under the text.
Strikethrough the Text
Strikethrough portion of text will look as if a line has been drawn through the middle of it. A strikethrough portion of text indicates that it has been deleted and that the portion of text is not required any more. It is very simple to change a selected portion of text into a strikethrough portion of text by following two simple steps −
Step 1 − Select the portion of text that you want to change to a bold font. You can use any of the text selection method to select the portion of text.
Step 2 − Click Font Strikethrough [ abc ] button in the Home tab Font group to put a line in the middle of the text which is called strikethrough the text.
Change Text Case in Word 2010
In this chapter, we will discuss how to change text cases in Word 2010. You can also capitalize a character you are typing by pressing and holding the SHIFT key while you type. You can also press the CAPS LOCK to have every letter that you type capitalized, and then press the CAPS LOCK again to turn off capitalization.
Change Text to Sentence Case
A sentence case is the case where the first character of every sentence is capitalized. It is very simple to change the selected portion of text into sentence case by following two simple steps −
Step 1 − Select the portion of text that that needs to be put in sentence case. You can use any of the text selection methods to select the portion of text.
Step 2 − Click the Change Case button and then select the Sentence Case option to capitalize the first character of every selected sentence.
Change Text to Lowercase
Changing text to lowercase is where every word of a sentence is in lowercase. It is very simple to change a selected portion of text into lowercase by following two simple steps −
Step 1 − Select the portion of text that needs to be put in lowercase. You can use any of the text selection methods to select the portion of text.
Step 2 − Click the Change Case button and then select Lowercase option to display all the selected words in lowercase.
Change Text to Uppercase
This is where every word of a sentence is in uppercase. It is very simple to change selected text into uppercase by following two simple steps −
Step 1 − Select the portion of text that you want to change to a bold font. You can use any of the text selection method to select the portion of text.
Step 2 − Click the Change Case button and then select UPPERCASE option to display all selected words in all caps. All characters of every selected word will be capitalized.
Capitalize Text
A capitalize case is the case where every first character of every selected word is in capital. This is very simple to change selected text into capitalize by following two simple steps −
Step 1 − Select the portion of text that needs to be capitalized. You can use any of the text selection method to select the portion of text.
Step 2 − Click the Change Case button and then select the Capitalize Each Word option to put a leading cap on each selected word.
Toggle the Text
The Toggle operation will change the case of every character in reverse way. A capital character will become a character in lower case and a character in lower case will become a character in upper case. It is very simple to toggle case of the text by following two simple steps −
Step 1 − Select the portion of text that you want to change to a bold font. You can use any of the text selection method to select the portion of text.
Step 2 − Click the Change Case button and then select the tOGGLE cASE option to change all the words in lowercase into words in uppercase; the words in uppercase words change to words in lowercase.
Change Text Color in Word 2010
In this chapter, we will discuss how to change text colors in Word 2010. We will also understand how to mark text which should look like it was marked with a highlighter pen. In addition, we will learn how to apply different effects on portions of text.
Change Font Colors
The text that we type comes in black by default; you can always change the color of the font to a color of your choice. It is very simple to change the text color by following two simple steps −
Step 1 − Select the portion of text the font color of which needs to be changed. You can use any of the text selection method to select the portion of text.
Step 2 − Click the Font Color button triangle to display a list of colors. Try to move your mouse pointer over different colors and you will see the text color will change automatically. You can select any of the colors available by simply clicking over it.
If you click at the left portion of the Font Color button, the selected color gets applied to the text automatically; you need to click over the small triangle to display a list of colors.
If you do not find a color of your choice, you can use the More Colors option to display the color pallet box which allows you to select a color from a range of colors.
Highlight Text with Colors
You can highlight a selected portion of text using any color and it will look like it was marked with a highlighter pen. Usually we highlight a text using yellow color. It is very simple to highlight a portion of text with a color by following two simple steps
Step 1 − Select the portion of text that needs to be highlighted with color. You can use any of the text selection method to select the portion of text.
Step 2 − Click the Text Highlight Color button triangle to display a list of colors. Try to move your mouse pointer over different colors and you will see the text color changes automatically. You can select any of the colors available by simply clicking over it.
If you click at the left portion of the Text Highlight Color button, then the selected color gets applied to the portion of text automatically; you need to click over the small triangle to display a list of colors.
Apply Text Effects
Microsoft word provides a list of text effect which add to the beauty of your document, especially to the cover page or the headings of the document. This is very simple to apply various text effects by following two simple steps −
Step 1 − Select the portion of text that you want to change to a bold font. You can use any of the text selection method to select the portion of text.
Step 2 − Click the Text Effect button to display a list of effects including shadow, outline, glow, reflection etc. Try to move your mouse pointer over different effects and you will see the text effect will change automatically. You can select any of the text effect available by simply clicking over it.
Text Alignments in Word 2010
In this chapter, we will discuss text alignments in Word 2010. There are four types of paragraph alignment available in Microsoft Word — left-aligned, center-aligned, rightaligned, and justified.
Left-Aligned Text
A paragraph’s text is left aligned when it is aligned evenly along the left margin. Here is a simple procedure to make a paragraph text left-aligned.
Step 1 − Click anywhere on the paragraph you want to align and click the Align Text Left button available on the Home tab or simply press the Ctrl + L keys.
Center Aligned Text
A paragraph’s text will be said center aligned if it is in the center of the left and right margins. Here is a simple procedure to make a paragraph text center aligned.
Step 1 − Click anywhere on the paragraph you want to align and click the Center button available on the Home tab or simply press the Ctrl + E keys.
Right-Aligned Text
A paragraph’s text is right-aligned when it is aligned evenly along the right margin. Here is a simple procedure to make a paragraph text right-aligned.
Step 1 − Click anywhere on the paragraph you want to align and click the Align Text Right button available on the Home tab or simply press the Ctrl + R keys.
Justified Text
A paragraph’s text is justified when it is aligned evenly along both the left and the right margins. Following is a simple procedure to make a paragraph text justified.
Step 1 − Click anywhere on the paragraph you want to align and click the Justify button available on the Home tab or simply press the Ctrl + J keys.
When you click the Justify button, it displays four options, justify, justify low, justify high and justify medium. You need to select only the justify option. The difference between these options is that low justify creates little space between two words, medium creates a more space than low justify and high creates maximum space between two words to justify the text.
Indent Paragraphs in Word 2010
In this chapter, we will discuss the how to indent paragraphs in Word 2010. As you know the margin settings determine the blank space that appears on each side of a paragraph. You can indent paragraphs in your document from the left margin, the right margin, or both the margins. This chapter will teach you how to indent your paragraphs with or without the first line of the paragraphs.
Left Indentation
Left indentation means to move the left edge of the paragraph inward towards the center of the paragraph. Let us use the following steps to create left indentation.
Step 1 − Click anywhere on the paragraph you want to indent left and click the Increase Indent button available on the Home tab or simply press the Ctrl + M keys. You can click multiple times to create deeper indentation.
Step 2 − You can remove left indentation by clicking the Decrease Indent button available on Home tab or simply press Ctrl + Shift+ M keys. You can click multiple times to remove deeper indentation.
You can also use the Paragraph Dialog Box to set left and right indentations. We will see this dialog box in the last section of this chapter.
Right Indentation
Right indentation means to move the right edge of the paragraph inward towards the center of the paragraph. Let us use the following steps to create right indentation.
Step 1 − Click anywhere on the paragraph you want to indent and then click on the Increase Right Indent spinner available on the Page Layout tab. You can click on the spinner multiple times to create deeper indentation. You can use the Left Indent spinners as well to set left indentation from the same place.
Step 2 − You can remove right indentation by clicking the Decrease Right Indent spinner in the opposite direction.
You can also use the Paragraph Dialog Box to set the left and the right indentations. We will see this dialog box in the next section.
First Line Indentation
You can move the left side of the first line of a paragraph inward toward the center. Let us see the procedure to perform first line indentation.
Step 1 − Click anywhere on the paragraph you want to indent right and click the Paragraph Dialog Box launcher available on the Home tab.
Step 2 − Click the Before Text spinner to set left indentation and select the First Line Option to move the left side of the first line of a paragraph inward toward the center. You can control the movement by setting the Indentation Unit. A preview box will give only the idea and not the indentation status.
Hanging Indentation
You can move the left side of the first line of a paragraph leftward, away from the center which is called the hanging indentation. Let us see the procedure to perform hanging indentation.
Step 1 − Click anywhere on the paragraph you want to indent right and click the Paragraph Dialog Box launcher available on the Home tab.
Step 2 − Click the Before Text spinner to set left indentation and select Hanging Option to move the left side of the first line of a paragraph leftward, away from the center. You can control the movement by setting the Indentation Unit. A preview box will give only the idea and not the indentation status.
You can use the After Text spinner to set the right indentation. You can try it yourself.
Create Bullets in Word 2010
Microsoft word provides bullets and numbers to put a list of items in a nice order. This chapter will teach you simple steps to create either the bulleted or the numbered lists in simple steps.
Create a List from Existing Text
This is very simple to convert a list of lines into a bulleted or numbered list. Following are the simple steps to create either bulleted list or numbered list.
Step 1 − Select a list of text to which you want to assign bullets or numbers. You can use any of the text selection method to select the portion of text.
Step 2 − Click the Bullet Button triangle to display a list of bullets you want to assign to the list. You can select any of the bullet style available by simply clicking over it.
Step 3 − If you are willing to create a list with numbers, then click the Numbering Button triangle instead of the bullet button to display a list of numbers you want to assign to the list. You can select any of the numbering style available by simply clicking over it.
Create a List as You Type
You can create a bulleted list as you type. Word will automatically format it according to your text. Following are the simple steps to create bulleted list as you type.
Step 1 − Type *, and then either press the SPACEBAR or press the TAB key, and then type the rest of what you want in the first item of the bulleted list.
Step 2 − When you are done with typing, press Enter to add the item in the list automatically and go to add next item in the list.
Step 3 − Repeat Step 2 for each list item.
You can create a numbered list as you type. Word will automatically format it according to your text. Following are the simple steps to create numbered list as you type.
Step 1 − Type 1, and then either press the SPACEBAR or press the TAB key, and then type the rest of what you want in the first item of the numbered list.
Step 2 − When you are done with typing, press Enter to add the item in the list automatically and go to add next item in the list.
Step 3 − Repeat Step 2 for each list item.
You can create sub-lists. These sub-lists are called multi-lists. It is simple to create sublists; press the Tab key to put items in sub-list. You can try it yourself.
Set Line Spacing in Word 2010
In this chapter, let us discuss how to set line spacing in Word 2010. A line spacing is the distance between two lines in a Microsoft Word document. You can increase or decrease this distance as per your requirement by following a few simple steps. This chapter will explain how to set the distance between two lines as well as how to set the distance between two paragraphs.
Spacing between Lines
Following are the simple steps to adjust spacing between two lines of the document.
Step 1 − Select the paragraph or paragraphs for which you want to define spacing. You can use any of the text selection method to select the paragraph(s).
Step 2 − Click the Line and Paragraph Spacing Button triangle to display a list of options to adjust space between the lines. You can select any of the option available by simply clicking over it.
Spacing between Paragraphs
You can also set distance between two paragraphs. Following are the simple steps to set this distance.
Step 1 − Select the paragraph or paragraphs for which you want to define spacing and click the Paragraph Dialog Box launcher available on the Home tab.
Step 2 − Click the Before spinner to increase or decrease the space before the selected paragraph. Similar way, click the After spinner to increase or decrease the space after the selected paragraph. Finally, click the OK button to apply the changes.
You can use the Line Spacing option available at the dialog box to set line spacing as we have seen in previous example. You can try it yourself.
Borders and Shades in Word 2010
In this chapter, we will discuss how to work on borders and shades in Word 2010. Microsoft Word allows you to place a border on any or all of the four sides of selected text, paragraphs, and pages. You can also add different shades to the space occupied by the selected text, paragraphs, and pages. This chapter will teach you how to add any of the borders (left, right, top or bottom) around a text or paragraph or a page and how to add different shadows to them.
Add Borders to Text
Following are the simple steps to add border to any text or paragraph.
Step 1 − Select the portion of text or paragraph to which you want to add border. You can use any of the text selection method to select the paragraph(s).
Step 2 − Click the Border Button to display a list of options to put a border around the selected text or paragraph. You can select any of the option available by simply clicking over it.
Step 3 − Try to add different borders like left, right top or bottom by selecting different options from the border options.
Step 4 − To delete the existing border, simply select the No Border option from the border options.
Note − You can add a horizontal line by selecting the Horizontal Line option from the border options. Otherwise type — (three hyphens) and press ENTER. A single, light horizontal line will be created between the left and the right margins.
Add Borders to Page
You can add borders of your choice to word pages by following the steps given below.
Step 1 − Click the Border Button to display a list of options to put a border. Select the Border and Shading option available at the bottom of the list of options as shown in the above screenshot. This will display a Border and Shading dialog box. This dialog box can be used to set borders and shading around a selected text or page borders.
Step 2 − Click the Page Border tab which will display a list of border settings, styles and options whether this border should be applied to the whole document or just one page or the first page.
Step 3 − You can use the Preview section to disable or enable left, right, top or bottom borders of the page. Follow the instruction given in the preview section itself.
Step 4 − You can customize your border by setting its color, width by using different art available under the style section.
You can have similar or even better borders as given below.
Add Shades to Text
The following steps will help you understand how to add shades on a selected portion of text or a paragraph(s).
Step 1 − Click the Border Button to display a list of options to put a border. Select the Border and Shading option available at the bottom of the list of options as shown in the above screenshot. This will display a Border and Shading dialog box. This dialog box can be used to set borders and shading around a selected portion of text or page borders.
Step 2 − Click the Shading tab; this tab will display the options to select fill, color and style and whether this border should be applied to a paragraph or a portion of text.
Step 3 − You can use the Preview section to have an idea about the expected result. Once you are done, click the OK button to apply the result.
Set Tabs in Word 2010
In this chapter, we will discuss how to set tabs in Word 2010. Microsoft Word tabs help in setting up information properly within a column. Word enables you to set left, center, right, decimal, or bar tabs to line up columnar information. By default, Word places tabs every .5 inch across the page between the left and right margins.
| S.No | Tab & Description |
|---|---|
| 1 |
Left Left-aligns text at tab stop and this is the default tab. |
| 2 |
Center Centers text over tab stop. |
| 3 |
Right Right-aligns text at tab stop. |
| 4 |
Decimal Aligns numbers at decimal point over tab stop. |
| 5 |
Bar Creates a bar to separate the text. |
Setting a Tab
Following are the simple steps to set the center and the right tabs in a Word document. You can use similar steps but different tabs to set up decimal and bar tabs.
Step 1 − Type some text that you want to line up with the tab stops. Press the Tab key only once between each column of information you to want to line up. I typed the following three lines.
Step 2 − Select a tab type using the Tab button; assume the center tab and finally select the paragraph or paragraphs the tabs of which you want to set. Next click the ruler where you want the tab to appear, a tab will appear at the ruler where you just clicked and the selected portion of text will be adjusted in the center.
Step 3 − Now select the right tab using the Tab Button and click the ruler at the right side where you want to align the text at the right side. A right tab will appear at the ruler where you just clicked and the selected portion of text will be right-aligned.
Moving a Tab
You can move an already set tab at a particular location by following the steps given below.
Step 1 − Click just before the line for which you want to change the tab setting. Drag the tab sign available at the ruler to the left or right.
Step 2 − A vertical line marks its position as you drag and when you click and drag a tab, the text moves with the tab.
Apply Formatting in Word 2010
In this chapter, we will discuss how to copy and apply formatting in Word 2010. If you already have a well formatted portion of text and you want to apply similar formatting to another portion of text, then Microsoft Word provides a feature to copy and apply a format from one portion of text to another portion of text. This is very useful and a time saving operation.
Copy and Apply of text formatting works for various text attributes; for example, text fonts, text colors, margins, headings, etc.
Copy and Apply Text Formatting
The following steps will help you understand how to copy and apply text formatting from one portion of text in your document to another portion of text in your document.
Step 1 − Select the portion of text containing the formatting that you want to copy. I have selected a text which has bold and underlined font as shown below.
Step 2 − click the Home tab and click the Format Painter button to copy the format of the selected text. As soon as you click the format painter button, the mouse pointer changes to a paint brush when you move the mouse over your document.
Step 3 − Now you are ready to apply the copied text format to any of the selected text. So select a text using mouse where you want to apply the copied text format. While selecting a portion of text, you have to make sure that your mouse pointer is still in paint brush shape. After selecting the text, just release the right-click button of the mouse and you will see that newly selected text is changed to the format used for the original selection. You can click anywhere outside the selection to continue working on your document for further editing.
Copy and Apply Text Formatting multiple times
Step 1 − If you are intended to apply formatting at multiple places, then you will have to double-click the Format Painter button while copying the text format. Later on, you just keep selecting the text where you want to apply the text formatting.
Step 2 − When you are done with applying formatting at all the places, click Format Painter to come out of the format applying operation.
Adjust Page Margins in Word 2010
In this chapter, we will discuss how to adjust page margins in Word 2010. Margins are the space between the edge of the paper and the text. You can adjust the right, left, top, and bottom margins of your document. By default, Word sets all margins left, right, top, and bottom to 1 inch.
In the screenshot given below, I have shown top, left and right margins, if you will type the complete page, word will leave 1-inch bottom margin as well.
Adjust Margins
The following steps will help you understand how to set margins for an open document.
Step 1 − Open the document the margins of which need to be set. If you want the margins to be applied only to a selected part of a document, select that particular part.
Step 2 − Click the Page Layout tab, and click the Margins button in the Page Setup group. This will display a list of options to be selected but you have to click the Custom Margins option available at the bottom.
You can also select any of the predefined margins from the list, but using custom margins option you will have more control on all the settings.
Step 3 − You will have to display a Page Dialog Box as shown below where you can set top, left, right and bottom margins under the Margins Tab. Select the Apply to: option to apply the margin on selected text or complete document.
Step 4 − If you are going to bind the document and want to add an extra amount of space on one edge for the binding, enter that amount in the Gutter text box, and select the side the gutter is on with the Gutter Position drop-down list. After setting all the desired values for all the margins, click the OK button to apply the margins.
Header and Footer in Word 2010
In this chapter, we will discuss how to add header and footer in Word 2010. Headers and footers are parts of a document that contain special information such as page numbers and the total number of pages, the document title, company logo, any photo, etc. The header appears at the top of every page, and the footer appears at the bottom of every page.
Add Header and Footer
The following steps will help you understand how to add header and footer in a Word document.
Step 1 − Click the Insert tab, and click either the Header button or the Footer button that which needs to be added first. Assume you are going to add Header; when you click the Header button it will display a list of built-in Headers from where you can choose any of the headers by simply clicking on it.
Step 2 − Once you select any of the headers, it will be applied to the document in editable mode and the text in your document will appear dimmed, Header and Footer buttons appear on the Ribbon and a Close Header and Footer button will also appear at the top-right corner.
Step 3 − Finally, you can type your information whatever you want to have in your document header and once you are done, click Close Header and Footer to come out of the header insertion mode. You will see the final result as follows.
You can follow a similar procedure to add footer in your document.
Edit Header and Footer
The following steps will help you understand how to edit the existing header or footer of your document.
Step 1 − Click the Insert tab, and click either the Header button or Footer button or whatever you want to edit. Assume you are going to edit the Header, so when you click the Header button it will display a list of options including the Edit Header option.
Step 2 − Click on the Edit Header option and Word will display the editable header as shown in the following screenshot.
Step 3 − Now you can edit your document header and once you are done, click Close Header and Footer to come out of the edit header mode.
You can follow a similar procedure to edit the footer in your document.
Add Page Numbers in Word 2010
In this chapter, we will discuss how to add page numbers in Word 2010. Microsoft Word automatically assigns page numbers on the pages of your document. Typically, page numbers are printed either in header or footer but you have the option that can display the page number in the left or right margins at the top or the bottom of a page.
Add Page Numbers
Following are the simple steps to add page numbers in a Word document.
Step 1 − Click the Insert tab, and click the Page Number button available in the header and footer section. This will display a list of options to display the page number at the top, bottom, current position etc.
Step 2 − When you move your mouse pointer over the available options, it displays further styles of page numbers to be displayed. For example, when I take the mouse pointer at the Bottom of Page option it displays the following list of styles.
Step 3 − Finally, select any one of the page number styles. I selected the Accent Bar 1 style by clicking over it. You will be directed to the Page Footer modification mode. Click the Close Header and Footer button to come out of the Footer Edit mode.
You can format your page numbers using the Format Page Numbers option available under the listed options.
Remove Page Numbers
The following steps will help you remove page numbering from a Word document.
Step 1 − Click the Insert tab, and click the Page Number button available in the header and footer section. This will display a list of options to display page number at the top, bottom, current position, etc. At the bottom, you will have the Remove Page Numbers option. Just click this option and it will delete all the page numbers set in your document.
Insert Page Breaks in Word 2010
In this chapter, we will discuss how to insert page breaks in Word 2010. Microsoft Word automatically starts a new page when the current page fills with text but you can insert a page break to force Word to start text on a new page. You can insert a page break using either the mouse or the keyboard.
Insert Page Breaks
The following steps will help you insert page breaks in a Word document.
Step 1 − Bring your insertion point immediately before the text that has to appear on a new page.
Step 2 − Click the Insert tab, and click the Page Break button available in the Pages group.
Word inserts a page break and moves all text after the page break onto a new page. You can also use the Ctrl + Enter keys to create a page break at the pointed location.
Delete a Page Break
Just put the insertion point on the previous page of the page break that needs to be deleted. Press the Delete key multiple times until both the pages get merged.
Insert Blank Pages in Word 2010
In this chapter, let us discuss how to insert blank pages in Word 2010. A blank page is a page which does not have any text or any other content over it. This chapter will also make you understand how to delete a blank page from your Microsoft Word document.
Insert Blank Pages
Following are the simple steps to insert blank page in a word document.
Step 1 − Bring your insertion point immediately before the text where you want to insert a blank page.
Step 2 − Click the Insert tab, and click the Blank Page button available in the Pages group.
Word inserts a new blank page and moves all the text after the page break onto a new page.
Delete Blank Pages
The following steps will help you delete blank page from a Word document.
Step 1 − Click the Home tab, and click the Show/Hide ¶ paragraph marks button available in the Paragraph group or simply press the Ctrl + Shift + * keys. This will display all the page breaks as shown below −
Step 2 − Bring your cursor immediately before the Page Break mark available on the blank page and press the Delete Key. This will delete the blank page and again you can click the Show/Hide ¶ paragraph marks button to hide all the paragraph marks.
Cover Pages in Word 2010
In this chapter, we will discuss Almost all the good documents and books have an attractive first page that includes the document title, its subject, author and publisher name etc. This first page is is the Cover Page and Microsoft Word provides an easy way to add a cover page.
Add Cover Pages
Following are the simple steps to add a cover page in a Word document.
Step 1 − Click the Insert tab, and click the Cover Page button available in the Pages group. This will display a list of Built-in Cover Pages as shown below.
Step 2 − Choose a cover page from the options available in the gallery. The selected cover page will be added as the first page of your document which can later be modified according to the requirements. If you want to place the cover page elsewhere except the first page, right-click the cover page in the gallery and select the location you want from the menu that appears.
Delete Cover Pages
The following steps will help you understand how to delete an existing cover page from a Word document.
Step 1 − Click the Insert tab, and click the Cover Page button available in the Pages group. This will display a list of Built-in Cover Pages as shown below. You will find a Remove Current Cover Page option available at the bottom of the cover page gallery.
Step 2 − Click the Remove Current Cover Page option and your cover page will be deleted from your document.
Page Orientation in Word 2010
In this chapter, we will discuss page orientation in Word 2010. Page Orientation is useful when you print your pages. By default, Microsoft Word shows a page in portrait orientation and in this case the width of the page is less than the height of the page; the page will be 8.5 inches × 11 inches.
You can change the page orientation from portrait to landscape orientation. In such case, the width of the page will be more than the height of the page and page will be 11 inches × 8.5 inches.
Change Page Orientation
The following steps will help you understand how to change the page orientation of a word document.
Step 1 − Open the Word document the orientation of which needs to be changed. By default, orientation will be Portrait Orientation as shown below.
Step 2 − Click the Page Layout tab, and click the Orientation button available in the Page Setup group. This will display an Option Menu having both the options (Portrait & Landscape) to be selected.
Step 3 − Click any of the options you want to set to orientation. Because our page is already in portrait orientation, we will click the Landscape option to change my orientation to landscape orientation.
Create a Table in Word 2010
In this chapter, we will discuss how to create a table in Word 2010. A table is a structure of vertical columns and horizontal rows with a cell at every intersection. Each cell can contain text or graphics, and you can format the table in any way you want. Usually the top row in the table is kept as a table header and can be used to put some informative instruction.
Create a Table
The following steps will help you understand how to create a table in a Word document.
Step 1 − Click the Insert tab followed by the Table button. This will display a simple grid as shown below. When you move your mouse over the grid cells, it makes a table in the table that appears in the document. You can make your table having the desired number of rows and columns.
Step 2 − Click the square representing the lower-right corner of your table, which will create an actual table in your document and Word goes in the table design mode. The table design mode has many options to work with as shown below.
Step 3 − This is an optional step that can be worked out if you want to have a fancy table. Click the Table Styles button to display a gallery of table styles. When you move your mouse over any of the styles, it shows real time preview of your actual table.
Step 4 − To select any of the styles, just click the built-in table style and you will see that the selected style has been applied on your table.
Delete a Table
Following are the simple steps to delete an existing table from a word document.
Step 1 − Click anywhere in the table you want to delete.
Step 2 − Click the Layout tab, and click the Delete Table option under the Delete Table Button to delete the complete table from the document along with its content.
Rows & Columns in Word 2010
In this chapter, we will discuss how to work with rows and columns in Word 2010. As discussed in the previous chapter, a table is a structure of vertical columns and horizontal rows with a cell at every intersection. A Word table can contain as many as 63 columns but the number of rows is unlimited. This chapter will teach you how to add and delete rows and columns in a table.
Add a Row
Following are the simple steps to add rows in a table of a word document.
Step 1 − Click a row where you want to add an additional row and then click the Layout tab; it will show the following screen.
Step 2 − Now use the Row & Column group of buttons to add any row below or above to the selected row. If you click the Insert Below button, it will add a row just below the selected row as follows.
If you click the Insert Above button, it will add a row just above the selected row.
Delete a Row
The following steps will help you delete rows from a table of a Word document.
Step 1 − Click a row which you want to delete from the table and then click the Layout tab; it will show the following screen.
Step 2 − Click the Layout tab, and then click the Delete Rows option under the Delete Table Button to delete the selected row.
Add a Column
The following steps will help you add columns in a table of a Word document.
Step 1 − Click a column where you want to add an additional column and then click the Layout tab; it will show the following screen.
Step 2 − Now use the Row & Column group of buttons to add any column to the left or right of the selected column. If you click the Insert Left button, it will add a column just left to the selected column as follows.
If you click the Insert Right button, it will add a column just next to the selected column.
Delete a Column
Following are the simple steps to delete columns from a table of a word document.
Step 1 − Click a column which you want to delete from the table and then click the Layout tab; it will show the following screen.
Step 2 − Click the Layout tab, and click the Delete Column option under the Delete Table Button to delete the selected column.
Move a Table in Word 2010
In this chapter, we will discuss how to move a table in Word 2010. Microsoft Word allows to move a table from one location to another location along with its content. This chapter will give you simple steps to move a table within the same document, though you can move a table from one document to another document using the cut and paste operation.
Move a Table
The following steps will help you move a table within the same Word document.
Step 1 − Bring your mouse pointer over the table which you want to move from one location to another location. As soon as you bring your mouse pointer inside the table, a small Cross Icon will appear at the top-left corner of the table as shown below.
Step 2 − Click over the small Cross Icon which will select the whole table. Once the table is selected, use the Cut button or simply press the Ctrl + X keys to cut the table from its original location.
Step 3 − Bring your insertion point at the location where you want to move the table and use Paste button or simply press Ctrl + V keys to paste the table at the new location.
Resize a Table in Word 2010
In this chapter, we will discuss how to resize a table in Word 2010. Microsoft Word allows to resize a table to make it smaller and bigger as per your requirement.
Resize a Table
The following steps will help you resize a table available in a Word document.
Step 1 − Bring your mouse pointer over the table which you want to resize. As soon as you bring your mouse pointer inside the table, a small Cross Icon will appear at the top-left corner and a small Resize Icon will appear at the bottom-right corner of the table as shown below.
Step 2 − Bring the mouse pointer over the Resize Icon till it changes to a diagonal doublesided arrow and this is the time when you need to press the left mouse button and keep holding the button while resizing the table. Drag the table up to make it shorter or down to make it larger. You can drag the table diagonally to simultaneously change both the width and the height of the table.
Merging Cells in Word 2010
In this chapter, we will discuss how to merge table cells in Word 2010. Microsoft Word allows the merging of two or more cells to create one large cell. You will frequently need to merge columns of the top row to create the title of the table. You can merge cells either row-wise or column-wise, rather you cannot merge cells diagonally. This chapter will teach you how to merge multiple rows or columns.
Merging Cells
The following steps will help you merge table cells in a Word document.
Step 1 − Bring your mouse pointer position inside the first cell that you want to merge. Now press the Shift key and click the cells around the cell which you want to merge into the first cell. This will highlight the cells which you click and they will be ready to be merged.
Step 2 − Now click the Layout tab and then click the Merge Cells button which will merge all the selected cells.
After merging the cells, all the content of the cells will be scrambled which you can fix later as you like. For example, you can convert the merged cells text into title or some other description. For example, let us have center-aligned and bigger font text as follows on top of the table.
Split a Table in Word 2010
In this chapter, let us discuss how to split a table in Word 2010. Microsoft Word allows splitting a table into multiple tables but a single operation will always divide a table into two tables. This chapter will teach you how to split a table into two smaller tables.
Split a Table
Following are the simple steps to split a table into two tables in a Word document.
Step 1 − Bring your mouse pointer position anywhere in the row that should appear as the first row of the new table.
Step 2 − Now click the Layout tab and then click the Split Table button which will split the table into two tables and the selected row will become the first row of the lower table.
After splitting the table into two tables, you can further divide it into two parts and you can continue dividing the Word tables as long as a table has more than one row.
Split Cells in Word 2010
In this chapter, we will discuss how to split table cells in Word 2010. Microsoft Word allows splitting a cell into multiple cells. We will understand how to split a cell into multiple smaller sub-cells.
Split a Cell
The following steps will help you split a cell into two sub-cells of a table available in word document.
Step 1 − Bring your mouse pointer position inside the cell that has to be divided into multiple cells.
Step 2 − Now click the Layout tab and then click the Split Cells button; this will display a dialog box asking for the number of rows and columns to be created from the selected cell.
Step 3 − Select the desired number of rows and columns that have to go into the resultant cell and finally click the OK button to apply the result.
You can divide a cell into multiple cells either row-wise or column-wise or both.
Add Formula in Word 2010
In this chapter, we will discuss how to add formula to a table in Word 2010. Microsoft Word allows you to use mathematical formula in table cells which can be used to add numbers, to find the average of numbers, or find the largest or the smallest number in table cells you specify. There is a list of formulae, you can choose from the many based on the requirement. This chapter will teach you how to use formula in word tables.
Add a Formula
Following are the simple steps to add formula in a table cell available in Word document.
Step 1 − Consider the following table with the total number of rows. Click in a cell that should contain the sum of the rows.
Step 2 − Now click the Layout tab and then click the Formula button; this will display a Formula Dialog Box which will suggest a default formula, which is =SUM(LEFT) in our case. You can select a number format using Number Format List Box to display the result or you can change the formula using the Formula List Box.
Step 3 − Now click OK to apply the formula and you will see that the left cells have been added and the sum has been put in the total cell where we wanted to have it. You can repeat the procedure to have the sum of other two rows as well.
Cell Formulae
The Formula dialog box provides the following important functions to be used as formula in a cell.
| S.No | Formula & Description |
|---|---|
| 1 |
AVERAGE( ) The average of a list of cells |
| 2 |
COUNT( ) The number of items in a list of cells |
| 3 |
MAX( ) The largest value in a list of cells |
| 4 |
MIN( ) The smallest value in a list of cells |
| 5 |
PRODUCT( ) The multiplication of a list of cells |
| 6 |
SUM( ) The sum of a list of cells |
We assume you are familiar with how to create a spreadsheet program; you can construct your word cell formula. Word formulae uses a reference system to refer to an individual table cells. Each column is identified by a letter, starting with A for the first column, B for the second column, and so on. After the letter comes the row number. Thus, the first cell in the first row is A1, the third cell in the fourth row is C4, and so on.
Following are useful points to help you in constructing a word cell formula.
| S.No | Cell References and Description |
|---|---|
| 1 | A single cell reference, such as B3 or F7 |
| 2 | A range of cells, such as A4:A9 or C5:C13 |
| 3 | A series of individual cells, such as A3, B4, C5 |
| 4 | ABOVE, referring to all cells in the column above the current cell. |
| 5 | BELOW, referring to all cells in the column below the current cell. |
| 6 | LEFT, referring to all cells in the row to the left of the current cell |
| 7 | RIGHT, referring to all cells in the row to the right of the current cell |
You can also construct simple Math expressions, such as B3+B5*10 by using simple mathematical operators +, -, /, *, %.
Borders & Shades in Word 2010
In this chapter, we will discuss how to apply table borders and shades in Word 2010. Microsoft Word allows you to place a border on any or all of the four sides of a table very similar to text, paragraphs, and pages. You can also add shades to table rows and columns. This chapter will teach you how to add borders (left, right, top or bottom) around a table and how to add different shades to various rows and columns of the table.
Add Borders to Table
The following steps will help you add borders in a table cell available in Word document.
Step 1 − Select the table to which you want to add border. To select a table, click over the table anywhere which will make the Cross icon visible at the top-left corner of the table. Click this cross icon to select the table.
Step 2 − Click the Border button to display a list of options to put a border around the selected table. You can select any of the option available by simply clicking over it.
Step 3 − Try to add and remove different borders like left, right, top or bottom by selecting different options from the border options.
Step 4 − You can apply border to any of the selected row or column. You can try it yourself.
Step 5 − To delete the existing border, simply select the No Border option from the border options.
Using Border Options
You can add borders of your choice to word table by following the simple steps given below.
Step 1 − Click the Border button to display a list of options to put a border. Select the Border and Shading option available at the bottom of the list of options as shown in the above screenshot. This will display a Border and Shading dialog box. This dialog box can be used to set borders and shading around a selected table.
Step 2 − Click the Border tab; this will display a list of border settings, styles and options whether this border should be applied to the table or text or paragraph.
Step 3 − You can use the Preview section to disable or enable left, right, top or bottom borders of the selected table or row or column. Follow the given instructions in the preview section itself to design the border you like.
Step 4 − You can customize your border by setting its color, width by using different width thickness available under the style section.
Add Shades To Table
The following steps will help you add shades on a selected table or its rows or columns.
Step 1 − Select a row or column where you want to apply a shade of your choice.
Step 2 − Click the Border button to display a list of options to put a border. Select the Border and Shading option available at the bottom of the list of options. This will display a Border and Shading dialog box. This dialog box can be used to set borders and shading around selected row(s) or column(s).
Step 2 − Click the Shading tab which will display options to select fill, color and style and whether this border should be applied to cell or table or selected portion of text.
Step 3 − You can use the Preview section to have an idea about the expected result. Once you are done, click the OK button to apply the result.
Quick Styles in Word 2010
In this chapter, we will discuss how to apply quick styles in Word 2010. Microsoft Word provides a gallery of Quick Styles that you can apply to headings, titles, text, and lists. Quick styles come with canned formatting choices, such as font, boldface, and color which we will understand in this chapter.
Apply Quick Styles
The following steps will help you understand how to apply quick styles to a selected portion of text.
Step 1 − Select a portion of text to which you want to apply some style. Using style, you can change the selected portion of text as a heading or subheading or title of the document. You can try using different styles on your text based on your requirement.
Step 2 − Click the Home tab and then move your mouse pointer over the available styles in the Style Gallery. You will see that the selected portion of text will change its style based on the selected style. You can display more available styles by clicking the More Style button.
Step 3 − Finally, to apply a selected style, click over the style and you will find that it is has been applied on the selected portion of text.
You can bring a text to its normal appearance by selecting the Normal style available in the Style Gallery.
Change Styles
The Change Style function allows you to change the default font, color, paragraph spacing and style set for a document. The following steps will help you change the default style.
Step 1 − Open the document the style of which needs to be changed. Click the Home tab and then click the Change Styles button; this will show you all the options that can be changed. You can change the Style, the Font, the Color and the Spacing of the paragraph.
Step 2 − If the style set needs to be changed, click the Style Set option; this will display a submenu to select any of the available style set. When you move your mouse over the different style sets, you will get real time text preview to give an idea about the final result.
Step 3 − To apply a selected style set, click over the style set and you will find that it is has been applied on your document.
Similarly, you can try applying Font, Color and Paragraph Spacing. You can try these options yourself.
Use Templates in Word 2010
In this chapter, we will discuss how to use templates in Word 2010. Microsoft Word template is a collection of styles which defines paragraph styles for regular text paragraphs, a title, and different levels of headings. You can use any of the already existing templates for your Word document or you can design a template which can be used for all your company documents.
Using Existing Template
We will now understand how to use an already existing template for your newly created word document. A template is selected at the time when you create a new blank document.
Step 1 − To start a new document, click the File tab and then click the New option; this will display the Available Templates.
Step 2 − Microsoft Word provides a list of templates arranged under Sample Templates or you can download hundreds of templates from office.com which are arranged in different categories. We will use Sample Templates for our document. For this, we need to click over Sample Templates; this will display a gallery of templates. You can try using the office.com option to select a template based on your requirement.
Step 3 − You can browse a list of available templates and finally select one of them for your document by double-clicking over the template. We will select Equity Report template for our report requirement. While selecting a template for your document, you should select the Document Option available in the third column. This opens your document with predefined setting with which you can modify document title, author name, heading, etc. based on your document requirement.
Create New Template
You can create a fresh new template based on your requirement or you can modify an existing template and save it for later use as a template. A Microsoft Word template file has an extension of .dotx. The following steps will help you create a new template.
Step 1 − To create a new template using an existing template, click the File tab and then click the New option; this will display the Available Templates to be selected. Select any of the available template and open it with the Template Option turned on.
Step 2 − You can now modify an open template as per your requirements and once you are done, you can save this template with a .dotx extension which is a standard extension for Microsoft Word Templates.
You can create a template from a new document as well. Click the File button, and click New option to open a new document. Under Available Templates, double click Blank Document to create a new document template. Save the template with a unique name and .dotx extension.
You can save the created template anywhere you click and whenever you like to use this template, just double-click over the template file and it will open a new template based document for you.
Use Graphics in Word 2010
In this chapter, we will discuss how to use graphics in Word 2010. You can add beauty to your Microsoft Word documents by inserting a variety of graphics. This chapter will teach you two ways of adding graphics.
Adding Picture in Document
The following steps will help you add an existing picture in your word document. It is assumed that you already have a picture available on your machine before you add this picture in your Word document.
Step 1 − Click on your document where you want to add a picture.
Step 2 − Click the Insert tab and then click the Picture option available in illustrations group, which will display the Insert Picture dialog box.
Step 3 − You can select a required picture using the Insert Picture dialog box. When you will click the Insert button, selected picture will be inserted in your document. You can play with your inserted picture in different ways, like you can apply quick styles to your picture, you can resize it, or you can change its color too. To try it, just -lick your inserted image and Word will give you numerous options available under the Format tab to format your inserted graphics.
You can try yourself to insert other available graphics like Clipart, Different Shapes, Charts and SmartArt or Screenshots.
Adding WordArt in Document
WordArt provides a way to add fancy words in your Word document. You can document your text in a variety of ways. The following steps will help you add WordArt in your document.
Step 1 − Click in your document where you want to add WordArt.
Step 2 − Click the Insert tab and then click the WordArt option available in the Text group; this will display a gallery of WordArt.
Step 3 − You can select any of the WordArt style from the displayed gallery by clicking on it. Now you can modify the inserted text as per your requirement and you can make it further beautiful by using different options available. To try it, just double-click your inserted WordArt and Word will give you numerous options available from the Format tab to format your image. Most frequently used options are Shape Styles and WordArt Styles.
You can try yourself to apply different options on the inserted WordArt by changing its shape styles, colors, WordArt Styles, etc.
Auto Correction in Word 2010
In this chapter, we will discuss auto correction in Word 2010. The AutoCorrect feature automatically corrects common typographical errors when you make them. Let us learn how to use the auto correction option available in Microsoft Word 2010 to correct the spelling automatically as you type the words in your documents.
Setting AutoCorrect
The following steps will help to enable the AutoCorrect feature in Microsoft Word.
Step 1 − Click the File tab, click Options, and then click the Proofing option available in the left most column, it will display the Word Options dialog box.
Step 2 − Click the AutoCorrect Options button which will display the AutoCorrect dialog box and then click the AutoCorrect tab. Now you have to make sure all the options are enabled, especially the Replace Text as you type option. It is also recommended to be careful when you turn off an option.
Step 3 − Select from among the following options, depending on your preferences.
| S.No | Option and Description |
|---|---|
| 1 |
Show AutoCorrect Options Buttons This option will be used to display a small blue button or bar beneath text that was automatically corrected. Click this button to see a menu, where you can undo the correction or set AutoCorrect options. |
| 2 |
Correct TWo INitial CApitals This option changes the second letter in a pair of capital letters to lowercase. |
| 3 |
Capitalize first letter of sentences This option capitalizes the first letter following the end of a sentence. |
| 4 |
Capitalize first letter of table cells This option will be used to capitalize the first letter of a word in a table cell. |
| 5 |
Capitalize names of days This option will be used to capitalize the names of the days of the week. |
| 6 |
Correct accidental usage of cAPS LOCK key This option will be used to correct capitalization errors that occur when you type with the CAPS LOCK key depressed and turns off this key. |
| 7 |
Replace text as you type This option replaces typographical errors with the correct words as shown in the list beneath it. |
| 8 |
Automatically use suggestions from the spelling checker This option tells Word to replace spelling errors with words from the dictionary as you type. |
Although Word comes preconfigured with hundreds of AutoCorrect entries, you can also manually add entries using the following dialog box and use the Replace and With text boxes to add more entries. I added an entry for Markiting which should be replaced with Marketing. You can use the Add button to add multiple entries.
Step 4 − Click OK to close the AutoCorrect Options dialog box and again click OK to close the Word Options dialog box. Now try to type Markiting and as soon as you type this word, Microsoft Word autocorrects it with the correct word Marketing word.
Auto Formatting in Word 2010
In this chapter, we will discuss auto formatting in Word 2010. The AutoFormat feature automatically formats a document as you type it by applying the associated styles to text. Let us learn how to use the auto format option available in Microsoft Word 2010 to format the typed content. For example, if you type three dashes — and press enter, Word will automatically create a line for you. Similarly, Word will automatically format two dashes — into an em dash (—).
Setting AutoFormat
The following steps will help you set the AutoFormat feature in your Microsoft Word.
Step 1 − Click the File tab, click Options, and then click the Proofing option available in the left most column, it will display the Word Options dialog box.
Step 2 − Click the AutoCrrect Options button; this will display the AutoCorrect dialog box and then click the AutoFormat As You Type tab to determine what items Word will automatically format for you as you type.
Step 3 − Select from among the following options, depending on your preferences.
| S.No | Option and Description |
|---|---|
| 1 |
«Straight quotes» with “smart quotes” This option will be used to replace the plain quotation characters with curly quotation characters. |
| 2 |
Fractions (1/2) with fraction character (½) This option will be used to replace the fractions typed with numbers and slashes with fraction characters. |
| 3 |
*Bold* and _italic_ with real formatting This option will be used to format text enclosed within asterisks (*) as bold and text enclosed within underscores ( _ ) as italic. |
| 4 |
Internet and network paths with hyperlinks This option will be used to format e-mail addresses and URLs as clickable hyperlink fields. |
| 5 |
Ordinals (1st) with superscript This option will be used to format ordinal numbers with a superscript like 1st becomes 1st. |
| 6 |
Hyphens (—) with dash (—) This option will be used to replace a single hyphen with an en dash (.) and two hyphens with an em dash (—). |
| 7 |
Automatic bulleted lists This option will be used to apply bulleted list formatting to paragraphs beginning with *, o, or — followed by a space or tab character. |
| 8 |
Automatic numbered lists This option will be used to apply numbered list formatting to paragraphs beginning with a number or letter followed by a space or a tab character. |
| 9 |
Border lines This option will be used to apply paragraph border styles when you type three or more hyphens, underscores, or equal signs (=). |
| 10 |
Tables This option will be used to create a table when you type a series of hyphens with plus signs to indicate the column edges. Try with +——+——+ ) and then press Enter. |
| 11 |
Built-in heading styles This option will be used to apply heading styles to heading text. |
| 12 |
Format beginning of list item like the one before it This option will be used to replace plain quotation characters with curly quotation characters. |
| 13 |
Set left- and first-indent with tabs and backspaces This option sets left indentation on the tab ruler based on the tabs and backspaces you type. |
| 14 |
Define styles based on your formatting This option automatically creates or modifies styles based on manual formatting that you apply to your document. |
Step 4 − Finally click OK to close the AutoCorrect Options dialog box and again click OK to close the Word Options dialog box.
Table of Contents in Word 2010
In this chapter, we will discuss how to create table of contents in Word 2010. A table of contents (or TOC) is a list of headings in the order in which they appear in the document. You can set a list of headings which should be a part of the table of contents. Let us learn how to create a Table of Contents. A table of content helps in navigating through a Word document by providing associated page numbers and direct links to various headings available on those pages.
Create Table of Contents
The following will help you to create Table of Contents in your Microsoft Word using various levels of headings.
Step 1 − Consider a document having different levels of headings.
Step 2 − You can insert a table of content anywhere in the document, but the best place is always at the beginning of the document. So bring your insertion point at the beginning of the document and then click the References tab followed by the Table of Content button; this will display a list of Table of Contents options.
Step 3 − Select any of the displayed options by simply clicking on it. A table of content will be inserted at the selected location.
Step 4 − You can select number of levels of headings in your table of content. If you click on the Insert Table of Content option available in the option menu, then it will show you a dialog box where you can select the number of levels you want to have in your table of content. You can turn ON or turn OFF the Show Page Numbers option. Once done, click the OK button to apply the options.
Now if you press the Ctrl key and then click over the any link available in the table of content, it will take you directly to the associated page.
Update Table of Contents
When you work on a Word document, then number of pages and their content keep varying and accordingly you need to update your Table of Contents. Following are the simple steps to update an existing Table of Contents in your Microsoft Word.
Step 1 − Consider you already have a table of content as shown above. Click the References tab followed by the Update Table button; this will display the Update Table of Contents dialog box with two options.
Step 2 − If you want to update just the page numbers then select the first option Update page numbers only available in the dialog box but if you want to update page numbers as well, then select the second option Update entire table and you will find your table of content updated with all the latest changes.
Delete Table of Contents
The following steps will help you delete an existing Table of Contents from Microsoft Word.
Step 1 − Consider you already have a table of content as shown above. Click the References tab and next Table of Contents button which will display a list of Table of Contents options along with Remove Table of Contents option available at the bottom.
Step 2 − Click over the Remove Table of Contents option to delete the existing table of contents.
Preview Documents in Word 2010
In this chapter, we will discuss the preview of documents in Word 2010. When you are ready for printing your Word document, it is always recommended to preview the document before you send the document for final printing. During preview of the document you might discover that the set margin is not appropriate or many items may not look good after printing so better to fix them after having a preview of the document. You can also have the option to specify which pages to print, select a printer, specify the paper size on which you want to print, and set the other printing options.
Preview Documents
The following steps will help you preview your Microsoft Word Document.
Step 1 − Open the document the preview of which you want to see.
Step 2 − Click the File tab followed by the Print option; this will display a preview of the document in the right column. You can scroll up or scroll down your document to walk through the document using the given Scrollbar. In the next chapter, we will learn how to print the previewed document and how to set different printing options.
Step 3 − Once you are done with your preview, you can click the Home tab to go to the actual content of the document.
Printing Documents in Word 2010
In this chapter, we will discuss how to print documents in Word 2010. Consider you are done with previewing and proofing your document and ready for the final printing. This chapter will teach you how to print a part or a complete Microsoft Word document.
Printing Documents
The following steps will help you print your Microsoft Word document.
Step 1 − Open the document for which you want to see the preview. Next click the File tab followed by the Print option which will display a preview of the document in the right column. You can scroll up or scroll down your document to walk through the document using given Scrollbar. The middle column gives various options to be set before you send your document to the printer.
Step 2 − You can set various other printing options available. Select from among the following options, depending on your preferences.
| S.No | Option and Description |
|---|---|
| 1 |
Copies Set the number of copies to be printed; by default, you will have one copy of the document. |
| 2 |
Print Custom Range This option will be used to print a particular page of the document. Type the number in Pages option, if you want to print all the pages from 7 till 10 then you would have to specify this option as 7-10 and Word will print only 7th, 8th, 9th and 10th pages. |
| 3 |
Print One Sided By default, you print one side of the page. There is one more option where you will turn up your page manually in case you want to print your page on both sides of the page. |
| 4 |
Collated By default, multiple copies will print Collated; if you are printing multiple copies and you want the copies uncollated, select the Uncollated option. |
| 5 |
Orientation By default, page orientation is set to Portrait; if you are printing your document in landscape mode then select the Landscape mode. |
| 6 |
A4 By default, the page size is A4, but you can select other page sizes available in the dropdown list. |
| 7 |
Custom Margin Click the Custom Margins dropdown list to choose the document margins you want to use. For instance, if you want to print fewer pages, you can create narrower margins; to print with more white space, create wider margins. |
| 8 |
1 Page Per Sheet By default, the number of pages per sheet is 1 but you can print multiple pages on a single sheet. Select any option you like from the given dropdown list by clicking over the 1 Page Per Sheet option. |
Step 3 − Once you are done with your setting, click on the Print button which will send your document to the printer for final printing.
Email Documents using Word 2010
In this chapter, we will discuss how to email documents using Word 2010. Microsoft Word can be used to send a Word document in an email as an attachment directly at the given email address without opening your email program. This chapter will teach you simple ways of sending email in a variety of formats, including a Word document file (DOC) attachment or a PDF, among others.
Mailing Documents
Following are the simple steps to send a word document as an attachment at the given email address.
Step 1 − Open the document you want to send using e-mail as an attachment.
Step 2 − Click the File tab and then click the Save & Send option from the left most column; this will display a number of options to Save & Send, you will have to select the Send using Email option available in the middle column.
Step 3 − The third column will have various options to send email which allows you to send your document as an attachment in DOC format or you can send your Word document in a PDF format. Click a method to send the document. I’m going to send my document in PDF format.
When you click the Send as PDF option, it displays the following screen where you can type the email address to which you want to send your document, email subject and other additional messages as well. To send email to multiple recipients, separate each e-mail address with a semicolon (;) and a space.
Translate Word 2010 Document
In this chapter, we will discuss how to translate a Word 2010 document. Microsoft Word has an option to translate a complete Word document from one language to another language using simple step. Let us learn how we can translate document content from English to some other language (Spanish).
Translate Document Using Microsoft Translator
The following steps will help you translate a document from one language to another language.
Step 1 − Click the Review tab and then click the Translate button; this will display different options to be selected.
Step 2 − Select the Choose Translation Language option simply by clicking over it. This will display a Translation Language Options dialog box asking for selecting from and to languages. Here From is the source document’s language and To is the target document’s language.
Step 3 − After selecting From Language and To Language, click OK. Now again go to Review tab and then click Translate button which will display different options to be selected. Select top option Translate Document option from the given options, this will display Translate Whole Document dialog box asking for your permission to send your document over the internet to be translated by Microsoft Translator.
Step 4 − To translate your document, you can click the Send button. This will send your document over the internet to be translated and you will have your document translated in your target language.
Step 5 − Now you can copy your translated content manually in any other document and save it for final use.
Compare Documents in Word 2010
In this chapter, we will discuss how to compare documents in Word 2010. Sometime you modify a Microsoft Word document without turning on the Track Changes mode; in such cases, tracking the changes becomes difficult and you will have to compare the original document with the modified document word by word. But you do not need to compare it manually, Microsoft Word provides an option to compare two documents very easily. Let us see how it can be done.
Compare Two Documents
Let us have the following two documents, (a) Original document (b) Modified version of the same document as follows
Original Document
Modified Document
The following steps will help you compare the two documents.
Step 1 − Click the Review tab and then click the Compare button. This will display the two options to be selected.
Step 2 − Select the Compare option simply by clicking over it. This will display a Compare Documents dialog box asking for the two versions of the Word document that need to be compared with each other.
Step 3 − Select the Original Document and the Revised Document and click the OK button to display the differences in two documents. Left column on the screen would show all the changes done over the course of changes and you will see original as well as modified version of the document on the same screen. You can walk through these changes using the Previous & Next button available under the Review tab.
NOTE − While comparing two documents you can use the different settings available at the Compare Documents dialog box under the More button.
Document Security in Word 2010
Microsoft Word provides a high level of security for your word generated documents. You can set a password for a document to stop unauthorized reading and editing of the document or if you want someone just to read the document then you can set editing restriction on your word document. This chapter will teach you how to make your document password protected and restricted from editing and formatting.
Set Document Password
Once you set a password for a document then you will be able to open the document only if you know the password. If you forget your password, then there is no way to recover it and to open the document. So you need to be careful while setting a password for your important document.
The following steps will help you set a password for a Word document.
Step 1 − Open a Word document for which you want to set a password.
Step 2 − Click the File tab and then click the Info option and finally the Protect Document button which will display a list of options to be selected.
Step 3 − Select the Encrypt with Password option simply by clicking over it. This will display an Encrypt Document dialog box asking for a password to encrypt the document. The same dialog box will appear twice to enter the same password. After entering password each time, click the OK button.
Step 4 − Save the changes, and finally you will have your document password protected. Next time when someone tries to open this document, it will ask for the password before displaying the document content, which confirms that now your document is password protected and you need password to open the document.
Remove Document Password
You can remove a document password only after opening it successfully. The following steps will help you remove password protection from your Word document.
Step 1 − Open a Word document the password of which needs to be removed. You will need the correct password to open the document.
Step 2 − Click the File tab followed by the Info option and finally the Protect Document button which will display a list of options to be selected.
Step 3 − Select the Encrypt with Password option simply by clicking over it. This will display an Encrypt Document dialog box and password which will be in a dotted pattern. You need to remove this dotted pattern from the box and make it clear to remove the password from the document.
Now when you will open your document next time, Word will not ask you for any password because you have removed the password protection from the document.
Set Editing & Formatting Restrictions
The following steps will help you set editing restrictions in a Word document.
Step 1 − Open a Word document for which you want to set editing restrictions.
Step 2 − Click the File tab and then click the Info option and finally the Protect Document button which will display a list of options to be selected.
Step 3 − Select the Restrict Editing option simply by clicking over it. This will open the actual document and it will also give you the option to set editing restrictions in the Restrict Formatting and Editing area. Here you can set formatting as well as editing restrictions on the document.
Step 4 − One you are done with your setting, click the Yes, Start Enforcing Protection button which will display a Start Enforcing Protection dialog box asking for password so that no one else can change the setting. You can enter the password or you can leave it simply blank which means there is no password setting for this protection.
Step 5 − Finally click the OK button and you will find that your document is editing (or formatting if you applied) protected.
Remove Editing & Formatting Restrictions
You can remove the editing restriction from your document using these simple steps.
Step 1 − Open a Word document for which you want to remove the editing restriction.
Step 2 − Click the File tab and then click the Info option and finally the Protect Document button; this will display a list of options to be selected.
Step 3 − Select the Restrict Editing option simply by clicking over it. This will display the Restrict Formatting and Editing area as follows.
Step 4 − Now click the Stop Protection button. If you had set up a password at the time of setting the editing or formatting restrictions, then you will need the same password to remove the editing or formatting restrictions. Word will now ask for the same using the Unprotect Document Dialog box , otherwise it will simply remove the restrictions.
Set Watermark in Word 2010
In this chapter, we will discuss how to set watermark in a Word document. A watermark is a picture that shows up faintly behind the text on a Word document page. When you draft a document, you can watermark the document with Draft Copy stamp, or you can watermark a duplicate document with the Duplicate stamp. Microsoft Word allows you to stamp with watermark using simple steps explained in this chapter.
Set Standard Watermark
The following steps will help you set standard watermark in word document. A standard watermark is the one which is already defined by words and cannot modify their font or color etc.
Step 1 − Open a word document in which you want to add a watermark.
Step 2 − Click the Page Layout tab and then click the Watermark button to display a list of standard watermark options.
Step 3 − You can select any of the available standard watermarks by simply clicking over it. This will be applied to all the pages of the word. Assume we select the Confidential watermark.
Set Custom Watermark
The following steps will help you set custom watermark in word document. A custom watermark is the one which can be modified text and its font, color and size etc.
Step 1 − Open a Word document in which you want to add a watermark.
Step 2 − Click the Page Layout tab and then click the Watermark button to display a list of standard watermark options. At the bottom, you will find the Custom Watermark option.
Step 3 − Click over the Custom Watermark option; this will display the Printed Watermark dialog box.
Step 4 − Now you can set a picture as watermark or you can set predefined text as watermark; you can also type your text in the Text box available at Printed Watermark dialog box. We will set text watermark as DUPLICATE and also set its font color and font size. Once all the parameters are set, click the OK button to set the parameters.
Remove Watermark
The following steps will help you remove an existing watermark from a Word document.
Step 1 − Open a Word document the watermark of which needs to be deleted.
Step 2 − Click the Page Layout tab followed by the Watermark button to display a list of standard watermark options. At the bottom, you will find the Remove Watermark option.
Step 3 − Click Remove Watermark option; this will delete the existing watermark from the document.


