
There are at least five six ways to add a vertical line in Word. Vertical lines can help accentuate a piece of text in Word, but knowing how to add them is not as intuitive as adding a horizontal line.
- Adding a border
- Or a Page Border
- Using the shape tool
- Adding a bar tab
- Adding lines to columns
- Add lines either side of text
These are most common options available. With all the features in Word there are other more complicated choices. We thought of four more vertical formatting tricks in Word
Adding a Border
Add a vertical line next to a paragraph is to simply add a side border to the paragraph.
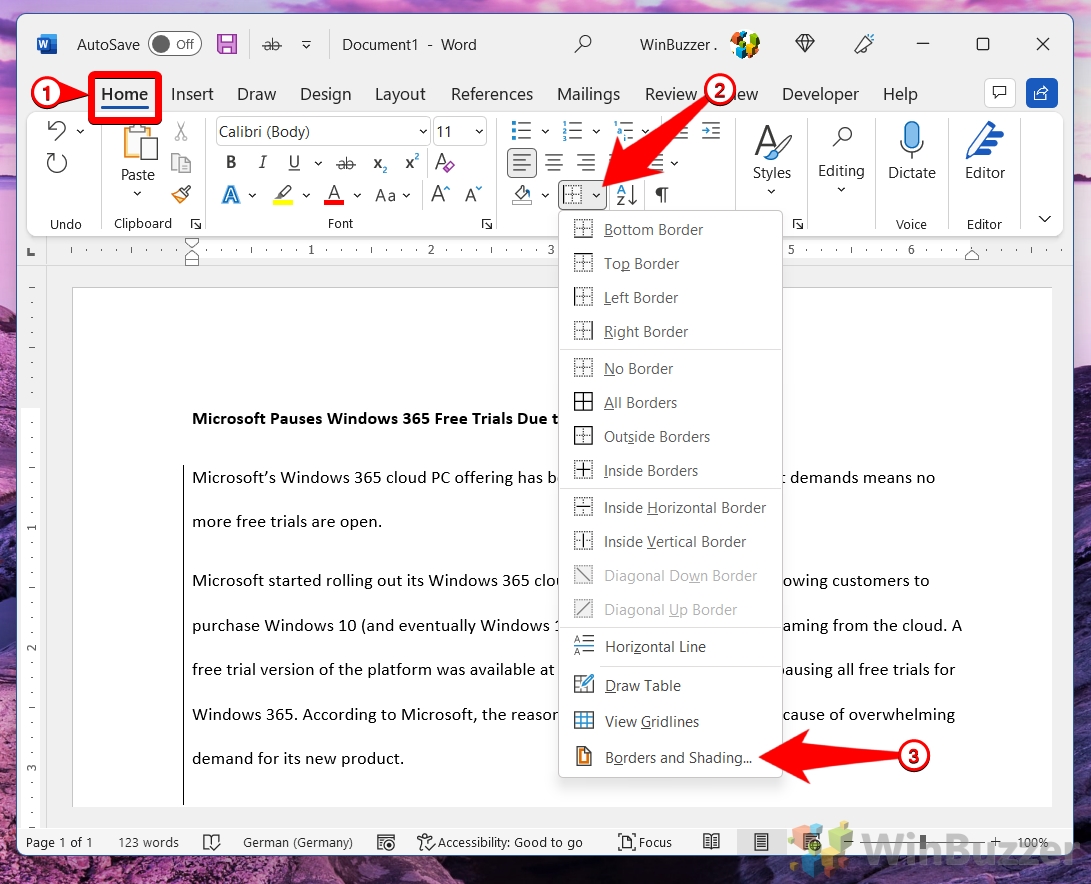
Highlight the paragraph you wish to add a line to, go to Home | Paragraph, and click the Borders dropdown.

This gives you options to insert borders in various locations. To insert a vertical line to the left or right of the text, select Left Border or Right Border.
The Left or Right border options insert a plain black line next to the text. If you want to have more control over the color or style of your line, instead select Borders and Shading at the bottom of the list.
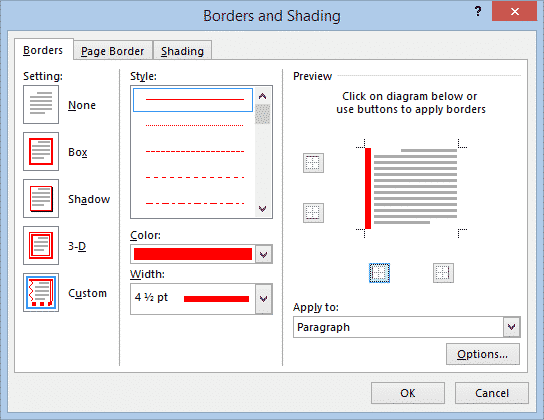
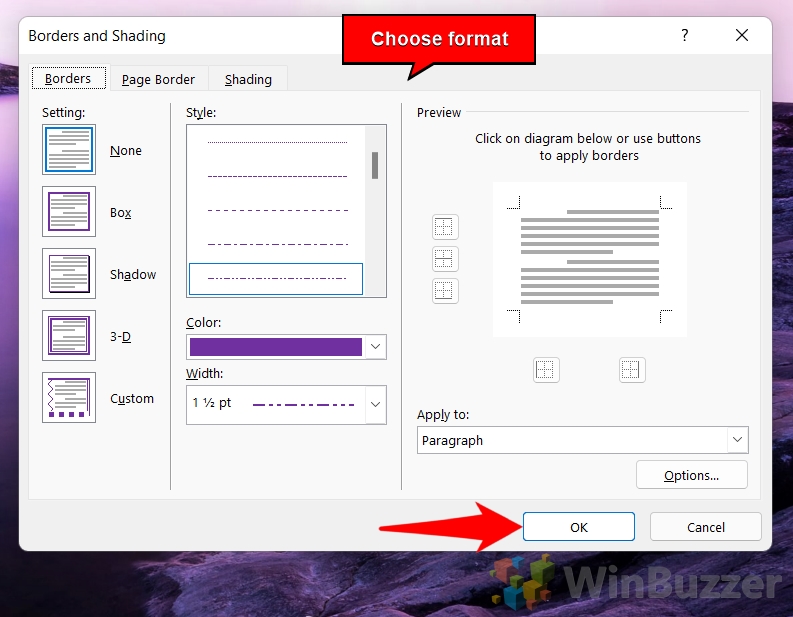
Custom Borders
Click Custom on the left-hand side of the dialog box, to enable you to choose individual borders to add. In the middle section, you can select the style, color and width of the line. On the right-hand side, click the box to indicate where you want the border to appear (top, bottom, left or right). The preview will give you an indication of how your line will appear.
Note that the boxes for the border positions are toggle keys, so if a border that you don’t want is appearing in the preview, just click the appropriate box to remove it.
A line inserted by this method is anchored to the paragraph(s) it is applied to and will move if you move a paragraph.
Add a Page Border
The same thing can be done at the page level.
Design | Page Background } Page Borders | Page Border.

Like a paragraph border, select the style of border you want then click the Preview sides. Remove the top and bottom borders, leaving left or right depending on your needs.
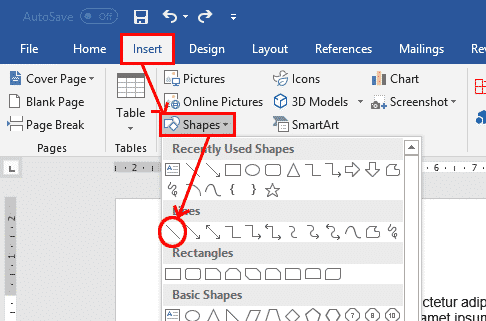
To add a vertical line using the shape tool, go to Insert | Shapes and select the Line tool.
Place the cursor where you want the line to start, and drag to where you want the other end of the line to be. Holding the Shift key while you drag will ensure that the line is straight.
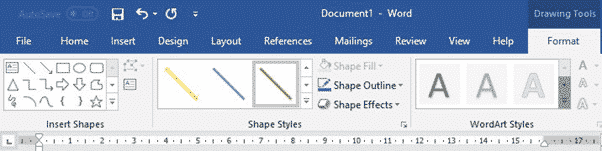
Once you have finished creating the line, the Format tab becomes live on the ribbon, where you can change the color, shape and style of the line.
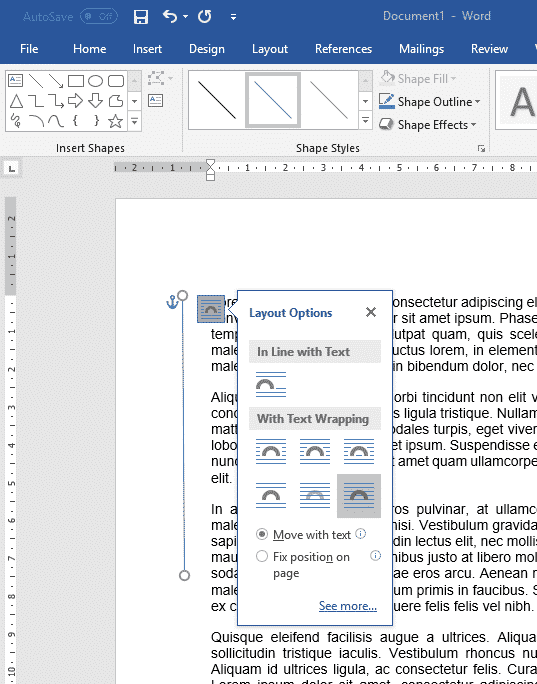
Click the Layout button next to the line to see options regarding how you want the line to interact with your text.
To move or resize the line, grab one of the end points and move it. If you hold the Control key while you move, both ends of the line will move as if around a fulcrum.
Adding a Bar Tab
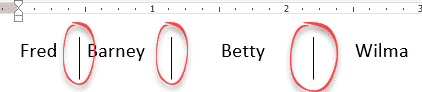
Another way to add a vertical line to text is to use the Tab feature, but instead of inserting a tab, you will add a ‘bar’ or vertical line. Bar tabs are the lesser known Tab formatting option which separate tabbed items with a visible bar like this:
The shape tool can be used to add a line in any location and of any length, a bar tab can only be applied to whole paragraphs.
Make the ruler is visible at the top of your document, to help you find the correct position for the bar tab. If you cannot see the ruler, go to View | Show, and tick the Ruler box.
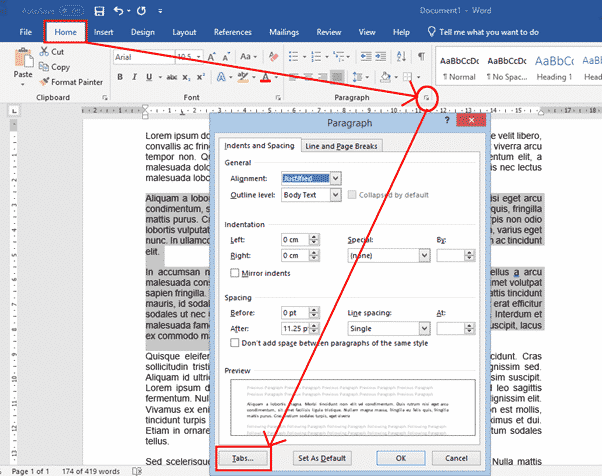
To insert a bar tab, select the paragraphs that you want the bar to appear beside, go to Home | Paragraph and open the Paragraph dialog box. Then click the Tabs button at the bottom of the dialog box.
Tab Stop Positions
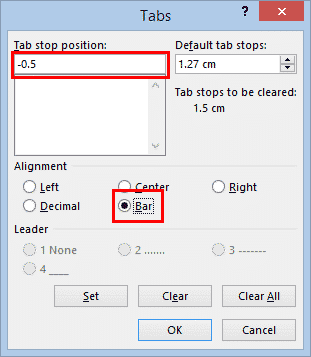
In the Tab Stop Position box, enter the position where you want the line to appear. You can use the ruler at the top of the screen to work out what value to enter. In the example pictured, the text starts at 0 on the ruler, so if you want the line to appear to the left of the existing text, you may enter “-0.5”. If you want it to appear to the right of the text, you may enter “17”.
Then select Bar under Alignment and click OK.
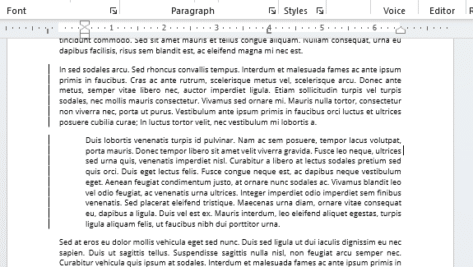
With the values entered in the above figure, the text would then look like this:
Note that a line inserted by this method is anchored to the paragraph(s) it is applied to. If you move a paragraph around, the line will go with the paragraph to its new location.
If you wish to later delete the line, highlight the paragraph, open the tab dialog again and click Clear.
Adding Lines to Columns
If you are arranging your text into columns, you can insert a vertical line between the columns.
To arrange your text into columns, select the text, go to Layout | Columns and select the number of columns you want.
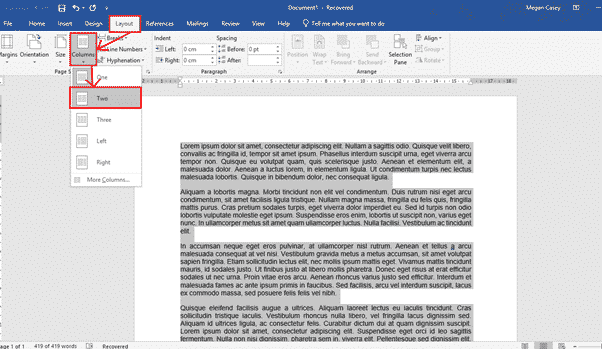
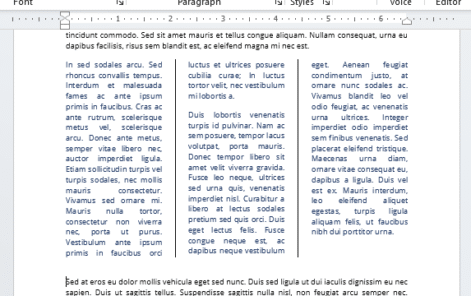
Now that your text is arranged into columns, click anywhere within the columns, and go to Layout | Columns again, but this time select More Columns at the bottom of the list. In the dialog box, simply tick the Line Between box, and click OK.

Vertical lines either side of text
One way to put vertical lines on both sides of text is to add empty columns either side using Layout | Breaks | Column Break. Three column breaks will do the job, two to make empty columns plus one at the bottom of the middle text column.
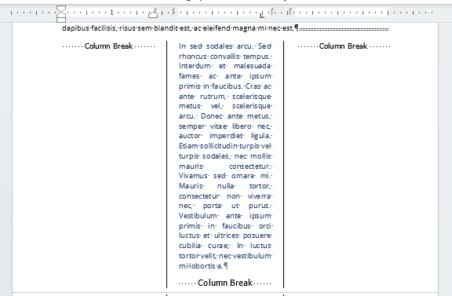
Note that if you wish to add a line to the left or right of the columns, this can be done using any of the other methods described above.
See Color the Column dividing line in Word
Four more vertical formatting tricks in Word
Whether you want to separate your text into two columns or create a border around your text, learning how to insert a vertical line in Word is useful.
A few days back, we shared how to insert a horizontal line. In this post, we will share simple techniques to insert a vertical line.
Learning this function is especially beneficial for creating newsletters or pages of a newspaper, as you would have to separate the text into different columns.
- Using shapes
- Adding a paragraph border
- Adding a page border
- Adding a bar tab
- Adding columns
Let’s get started.
Method 1: Using shapes
The most basic method of adding a vertical line in Word is by using the Shapes tool. The benefit of this method is that you can choose the type of line you want to add (e.g. a line with an arrow) and you can insert it anywhere on the page.
Step 1: Open your Word document.
Open an existing document or create a new one using one of the several templates Word offers.

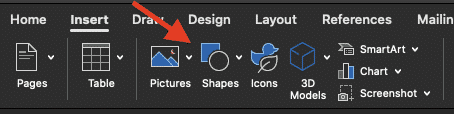
Step 2: Click on the Insert tab.
This tab is located between the Home and Draw tabs. Click on it to find the different types of items that you can insert in your document.

Step 3: Click on the Illustrations button.
The Illustrations button is between the Table and Add-ins buttons. When you click on it, you will see the Shapes option.

Step 4: Click on the Shapes option.
You have several options for shapes. The second row consists of the different types of lines you can add in your document.

Step 5: Choose a line template.
Choose the line template that you would like to add to your document. For example, you can choose the straight line with no arrows or the line with an arrow at only one of the ends.

Step 6: Draw the line.
Click on the line that you would like to draw then drag the pointer across the page. To ensure that your line is vertical, press the Shift key on your keyboard as you’re drawing the line.

You can insert this line anywhere in your document, even next to the text on the page and on it.


Method 2: Adding a paragraph border
The next method of adding a vertical line in your Word doc is by adding a border. You can try this method if you just want to add borders to your page and don’t want to insert a vertical line in the middle of the page.
Step 1: Click on the Home tab.
The Home tab is the default tab that you’re on when you open your Word document.
However, if you’re on a different tab, click on the Home tab to add the borders.

Step 2: Click on the Borders option.
The Borders option is located in the third group in the Home tab. You will find it among other tools like the Spacing and Fill tools.

Once you click on this option, you will see the different options you have for borders.

Step 3: Choose one or more border types.
The two types of vertical borders you can choose are left and right borders. Pick one or both of them depending on how you want to format your text.
This is how the page looks with only the left border:

This is how it looks with only the right border:

And finally, this is how it looks with both borders:

Alternative Step 3: Choose the Borders and Shading option to create a custom border.
Word also gives you the freedom to create a border of your choice. Click on the Borders and Shading option from the drop-down menu.

This will open up a box where you can customize your border.

You can change the style of your border by choosing from several options, including dotted and wavy styles. You can also change the color and width of your border to anything you want- the sky’s the limit!

A great thing is that you can preview what your vertical border is going to look like before making a selection. You can make sure that you’re only adding vertical borders by deselecting the top and bottom options.

Here’s a look at an example of a custom border:
Note that this line moves along with your paragraphs: so, it will extend if you add more paragraphs and shorten if you delete any paragraphs.
Method 3: Adding a page border
The borders that we discussed so far are paragraph borders. They only apply to the individual paragraphs on the page. In this section, we will learn how to apply borders to the entire page.
Step 1: Click on the Borders option.
Once again, you have to open the drop-down menu by clicking on the Borders option in the Home tab.
Step 2: Select the Borders and Shading option and go to Page Border.
The second option at the top of the box is Page Border. Click on this.

Step 3: Customize your page border.
Similar to the paragraph border, you can customize the style, color, and width of your page border as well. You can deselect the top and bottom options to make sure that you’re only adding vertical lines.

One really interesting option you have in this case is the Art option. Instead of having simple vertical lines, you can choose an icon to add as a border.

Here’s a tacky example:

Again, you can choose from several different options and preview your border before making a selection.
Method 4: Adding bar tabs
You can also use the Tab tool to add a vertical line in your Word documents. You can add these tabs anywhere in your document.
Step 1: Make sure that you can see the ruler.
Having the ruler visible will help you find the right position for your tabs. If it isn’t already, you can show your ruler by going to the View tab and checking the Ruler box.

Step 2: Open the Line and Paragraph Spacing dialog box.
Go to the Home tab and click on the Line and Paragraph Spacing button. There, you will find Line Spacing Options. Click on this to open a dialog box.


Step 3: Click on Tabs.
At the bottom left corner of the box, you can see the Tabs option.

Step 4: Click on Bar and customize other features of your bar tab.
In the Alignment section, choose the Bar option. You can also change the other features of your bar tab, such as the Tab Stops. You can use the ruler to figure out the right stops for your bar tab.
For example, assuming that your text starts at 0, you can enter -0.5 to insert a bar tab to the left of the text and 7 to insert it to the right of the text.
This type of vertical line is also applied to the paragraphs, so its length changes with the length of the paragraphs on the page.
Method 5: Adding columns
You can also organize your text into columns and insert lines between the columns.
Step 1: Click on the Layouts tab.
This tab is located between the Design and References tabs. Click on it.

Step 2: Click on the Columns button.
This button is at the top left corner of the page. It will open up a drop-down menu. Click on the More Columns option and add the number of columns that you would like to divide your text into. Then, click on the Line Between option.

Your text may look something like this:

Conclusion
So there you have it- five methods that you can use to add a vertical line in your Word doc. It’s always useful to learn more than one method as you never know when they may come in handy.
В процессе оформления документа в текстовом редакторе Microsoft Word пользователю может понадобиться сделать вертикальный текст в Ворде. Это необходимо, например, для печати вертикально расположенного текста или для оформления документа со сложной структурой.
В программе Word можно набирать текст, расположенный горизонтально или вертикально. В случае необходимости вы можете изменить горизонтальное расположение текста на вертикальное направление текста.
Содержание:
- Как в таблице Ворд сделать текст вертикально
- Как в Ворде написать текст вертикально с помощью функции «Надпись»
- Указываем направление текста в макете фигуры
- Как сделать направление текста в Ворде вертикально в SmartArt
- Как расположить текст вертикально столбиком в Ворде
- Выводы статьи
- Как сделать вертикальный текст в Word (видео)
В связи с этим, у пользователей возникают вопросы о том, как сделать вертикальный текст в программе MS Word. Решить данную проблему можно несколькими способами.
В редакторе Word вертикальный текст можно напечатать следующими методами:
- вертикальный текст вводится в Ворде в таблице;
- вертикальное положение текста создается с помощью надписи;
- установка направления текста в формате фигуры;
- набор текста в столбик;
- использование шаблона рисунка в SmartArt.
Вы можете вставить текст с вертикальным направлением в любом месте документа Word, используя предложенные варианты.
В этом руководстве вы найдете инструкции о том, как расположить текст вертикально в документе, открытом в разных версиях программы Word. Необходимые действия выполняются подобным образом, имеются только некоторые отличия в интерфейсе приложения.
Как в таблице Ворд сделать текст вертикально
Использование таблицы — первое, что обычно рекомендуют пользователю, когда его интересует ответ на вопрос о том, как в Ворде сделать вертикальный текст. Это довольно простой способ для изменения направления текста в документе.
Выполните следующие действия:
- В окне открытого документа Word установите курсор мыши в том месте, где необходимо вывести вертикальное расположение текста.
- Войдите во вкладку «Вставка», а затем щелкните по кнопке «Таблица».
- В выпадающем меню нажмите на одну или несколько ячеек, в зависимости от того, сколько вертикальных надписей вам нужно сделать.

- В ячейке таблицы наберите необходимый текст.
- Нажмите на правую кнопку мыши, а в контекстном меню выберите пункт «Направление текста…».

- В окне «Направление текста – Ячейка таблицы», в группе «Ориентация» нажмите сначала на подходящий вариант размещения текста, а потом на «ОК».

- Потяните край таблицы за нижнюю линию, чтобы сузить и растянуть ее до нужного размера.

- Щелкните внутри таблицы правой кнопкой мыши.
- Выберите «Свойства таблицы…». В Word 2007-2010 можно сразу нажать на пункт «Границы и заливка…», потому что там есть такой пункт в контекстном меню.

- В окне «Свойства таблицы», во вкладке «Таблица» нажмите на кнопку «Границы и заливка…».

- В окне «Границы и заливка», во вкладке «Граница», в опции «Тип:» нажмите на «Нет».

- Подтвердите свои действия нажатием на кнопку «ОК».
- В результате, у вас появилось вертикальное направление текста в Ворде без границы таблицы.

Как в Ворде написать текст вертикально с помощью функции «Надпись»
Сейчас мы разберем, как написать текст вертикально, используя функцию «Надпись». Этот простой способ поможет вам быстро вставить в документ необходимый текст в вертикальном положении.
Пройдите несколько последовательных шагов:
- Откройте вкладку «Вставка».
- В группе «Текст» нажмите на кнопку «Текстовое поле».

- В открывшемся меню выберите «Простая надпись».

- В окне документа появиться текстовое поле с надписью по умолчанию.

- Нажмите на клавишу «Del» (Delete) для удаления имеющегося текста.
- Напишите там свой текст.
- Кликните по краю границы, а затем с помощью кнопки с поворотом вручную поверните текст как вам нужно.

Выполняя подобную операцию с использованием функции надписи, вы можете повернуть текст автоматически, а не вручную.
Проделайте следующее:
- После создания надписи войдите во вкладку «Формат фигуры» («Формат»).
- В группе «Текст» нажмите на значок «Направление текста».
- Выберите вариант: «Повернуть на 90°» или «Повернуть на 270°». В зависимости от выбранного варианта, текст надписи расположится сверху вниз или снизу вверх.

- Чтобы удалить контур надписи, кликните по значку «Контур фигуры» в группе «Стили фигур», а выпадающем меню нажмите «Нет контура».

Указываем направление текста в макете фигуры
Похожий на предыдущий способ предполагает использование формата фигуры, в которой набирается нужный вам текст.
Выполните следующее:
- Из меню «Вставка» в группе «Текст» нажмите на «Текстовое поле».
- В открывшемся меню нажмите на пункт «Добавление надписи».
- С помощью указателя мыши начертите контур, в который нужно будет вставить текст.
- Напишите необходимый текст.
- Щелкните по краю контура, а в контекстном меню нажмите «Формат фигуры…».

- В области «Формат фигуры», в разделе «Параметры фигуры» («Макет фигуры») нажмите на кнопку «Макет и свойства».
- В опции «Надпись», в параметре «Направление текста» укажите: «Повернуть на 270°» или «Повернуть на 90°».

- Отрегулируйте правильное отображение текста по высоте и ширине.
- Кликните по границе контура.
- В открывшемся меню нажмите на «Контур», выберите параметр «Нет контура».

Как сделать направление текста в Ворде вертикально в SmartArt
Этот способ подходит, если вам нужно добавить в документ Word вертикальный текст, помещенный в какой-нибудь рисунок с готовым блоком. В этом случае, мы используем графические объекты SmartArt.
Сделайте следующее:
- Войдите во вкладку «Вставка», в группе «Иллюстрации» нажмите на кнопку «SmartArt».

- В окне «Выбор рисунка SmartArt» выберите «Простой блочный список» или другой подходящий вариант.

- Введите нужный текст в выбранную фигуру.
- Щелкните правой кнопкой мыши, в открывшемся меню нажмите на пункт «Формат фигуры…».
- В области «Формат фигуры» откройте «Параметры текста», а в опции «Направление текста» установите значение поворота.

- Подгоните текст по масштабу, в случае необходимости измените размер шрифта.
- Удалите из документа остальные фигуры, если они не нужны, используя функцию «Вырезать».
Как расположить текст вертикально столбиком в Ворде
Данный метод не самый подходящий для наших целей, но есть и такой вариант, который можно использовать. Суть метода в том, чтобы вводить по одной букве с новой строки, постепенно набирая наше выражение в столбик. Затем нужно будет изменить междустрочный интервал между отдельными буквами набранного текста, чтобы привести его в более подходящий вид.
Проделайте следующие действия:
- Набирайте по одной букве из слова или словосочетания, а затем сразу нажимайте на клавишу «Enter».
- Введите следующую букву с новой строчки, и так далее.
- После того, как текст расположился столбиком, нам необходимо сократить межстрочные интервалы, чтобы привести его в более благоприятный вид.
- В группе «Абзац» нажмите на кнопку «Интервал».
- В открывшемся меню нажмите на пункт «Другие варианты междустрочных интервалов…».
- В окне «Абзац», во вкладке «Отступы и интервалы», перейдите к группе «Интервал», а в параметре «междустрочный:» установите соответствующее значение. Опытным путем выяснилось, что без искажений исходного текста подходит величина не ниже «0,7».
- Нажмите на кнопку «ОК».

Выводы статьи
В процессе редактирования некоторым пользователям необходимо узнать о том, как сделать вертикальное направление текста в документе Word. Это бывает нужно для оформления или форматирования документа. Существует несколько способов с помощью которых пользователь может расположить вертикальный текст в необходимом месте редактируемого документа, открытого в программе Microsoft Word.
Как сделать вертикальный текст в Word (видео)
Похожие публикации:
- Как сделать колонки в Word: полное руководство
- Как объединить документы Ворд в один файл
- Как скрыть текст в Word
- Как поставить ударение над буквой в Ворде — 3 способа
- Как выделить текст в Word: разные способы

Contents
- 1 How to Use AutoFormat to Insert a Line in Word
- 2 How to Use the Horizontal Line Tool to Draw a Line in Word
- 3 How to Insert a Horizontal or Vertical Line in Word
- 4 How to Draw a Line in Word with the Shapes Tool
- 5 How to Make a Vertical Line in Word and Separate Text into Columns
- 6 Insert a Vertical Line in Word Using a Bar Tab
- 7 How to Insert a Horizontal Line in Word Online
- 8 Extra: How to Draw in Word
- 9 Extra: How to Add a Page Border in Microsoft Word
Vertical and Horizontal lines have many uses in a document. They can help to split up content, draw the eye to a particular place, or just provide visual flavor. In this guide, we’re going to show you how to insert a line in Word using a variety of methods that often have slightly different outcomes.
Vertical and horizontal lines in Word are useful
For example, you can add lines to a Word document by using symbols on your keyboard, the table tool, borders, shapes, drawing tools, or tabs.
Typically, you’ll find that it’s harder to make a vertical line in Word than a horizontal one, but it’s still very much possible. You can even have the vertical line automatically split your text into two columns, which is useful if you’re making a newspaper or leaflet.
We’ll show you this and more below:
How to Use AutoFormat to Insert a Line in Word
One of the easiest ways to insert a horizontal line in Word is by taking advantage of the symbols on your keyboard and Word’s AutoFormat capabilities. The software will automatically turn certain symbols into a continuous line when you string them together:
- Type three hyphens, equals, asterisk, underline, tilde, or hash symbols and press Enter
Word will draw a line across your page automatically, stopping the margins. You can remove the line at any time by adjusting the “Borders” section of the “Home” tab.


How to Use the Horizontal Line Tool to Draw a Line in Word
It’s tucked away, but Microsoft Word has a dedicated horizontal line tool that you can use to quickly add a horizontal line across your document. Here’s where to find it:
- Open the Home ribbon and press “Paragraph > Border icon > Horizontal line”

- The horizontal line will appear wherever you placed your cursor

- Double-click the line to adjust its width, thickness, and color, then press “OK”


One of the methods we showed so far to create horizontal lines in Word made indirect use of the border feature. If we use the border tool directly, however, we can insert a vertical line in Word, too. Here’s how:
- For horizontal lines: Place your cursor and insert a bottom border
After placing your cursor where you want the line across the page, open the “Home” tab of your ribbon, click the border icon, then press “Bottom Border”.

- The line will appear wherever you placed your cursor

- For vertical lines: insert a left or right border
You can add a vertical line in Word at the left or right edge of your document. Bear in mind that this can only be a maximum of 31px from the edge of your page. If you’d like it further away or in the center, use one of the methods below instead.
Select your text, open the “Home” tab of your ribbon, then press the border icon, followed by “Left Border” and/or “Right Border”.

- The vertical line will follow your text down the page

- Press “Home > Border icon > Borders and Shading…” to adjust its style

- Choose the line type, color, and width of your vertical line, then press “OK”
You can also press the “Options” button to change the spacing of your border.

- Check how the style looks in your document

- Press “Home > Border icon > No Border” to remove the line

- Your line will no longer show on your document


How to Draw a Line in Word with the Shapes Tool
If you want complete freedom over where you add lines to a Word document, the shapes tool is your friend. It’ll let you draw anywhere on your document and even have options to allow you to shift text to make space for it. This is you’d use it:
- Open the “Insert” tab of your ribbon and press “Shapes > Lines > Line”

- Click and drag your cursor across the page to draw a line

- Change your formatting in the “Shape Format” tab with the line selected
You can also press the
 icon next to the line to change how the text interacts with your shape.
 - Right-click your line and press “Format Shape…” for more options

- Change the line formatting options to your liking
The line will update instantly on your page as you make the changes.


How to Make a Vertical Line in Word and Separate Text into Columns
If you’re making a newspaper or leaflet, it may be beneficial to separate your text into multiple columns with a vertical line between them. With a few clicks, it’s completely possible to do this in Word.
- Select your text, open the “Layout” tab, then press “Columns > Two”

- Click on a column and press “Columns > More Columns…” in the “Layout” tab

- Check the “Line between” box and press “OK”

- Word will place a line between your columns for visual clarity


Insert a Vertical Line in Word Using a Bar Tab
Bar tabs aren’t just a way to streamline your alcohol purchases. In Microsoft Word, they act as a line you can place at any point along your ruler. They’re very much hidden away, though, so you’ll want to follow along to see how to use them:
- Select your paragraph, open the “Home” tab and press the “Paragraph Settings” icon in the “Paragraph” section of the ribbon

- Press the “Tabs…” button in the bottom-left of the “Paragraph” pop-out

- Set your tab stop position, tick “Bar” in the “Alignment” section, and press ” Set > OK”
The Tab stop position determines the position at which Word will place the vertical line on your page. You can set negative values here to place the line outside of your page margins.
Check the ruler of your document so you can get an accurate measurement.

- Word will add the vertical line to your document

- Remove the line by opening paragraph settings and pressing the “Clear” button in the “Tabs” section


How to Insert a Horizontal Line in Word Online
Word Online’s features are significantly pared back compared to the desktop app, but you can still insert a horizontal line with a bit of creativity. We like to use the table and drawing features:
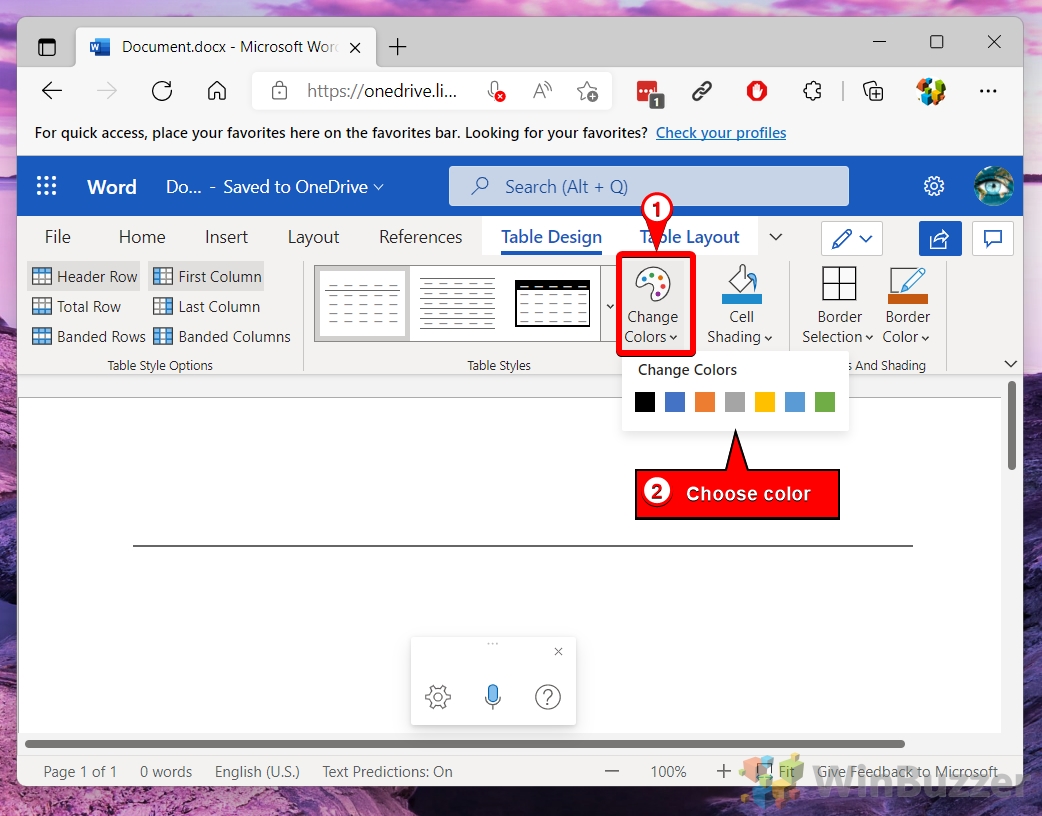
- Open the “Insert” tab of the ribbon and press “Table > 1×1 Table”

- Press the dropdown next to the “Table Styles” section of the ribbon

- Select the first option under “List Tables”

- Press “Change Colors” and choose a color for your line

- OR: Press the “Drawing” button in the “Insert” tab

- Press the “Shapes” button in the drawing preview and select the “Line” tool

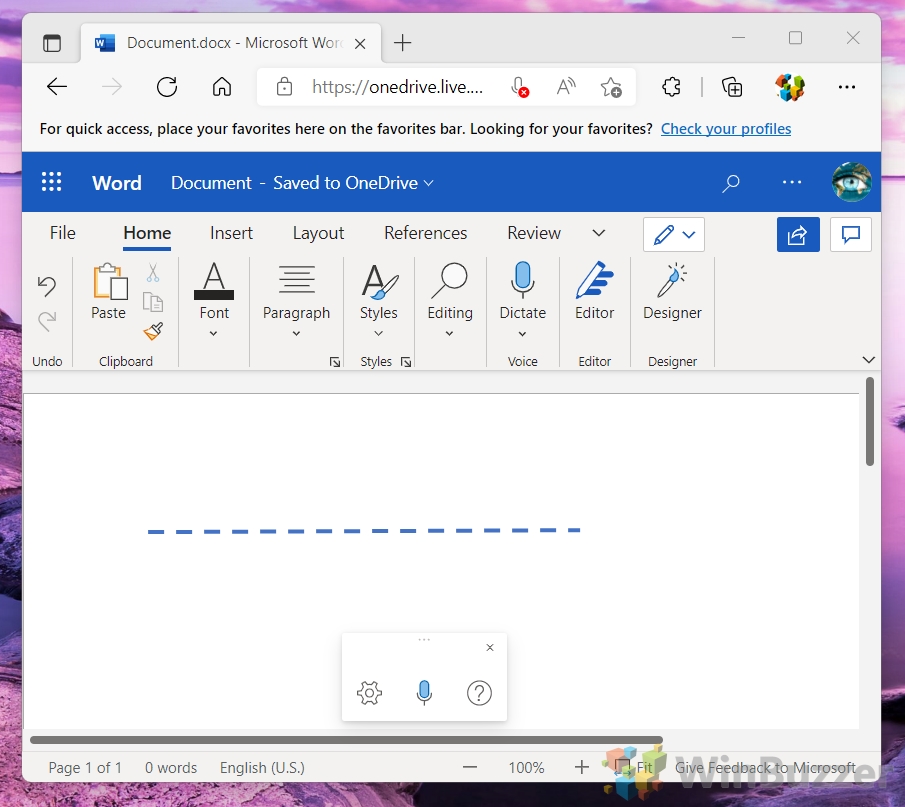
- Click and drag to make your line

- Adjust the line as necessary using the handles on the edges

- Press the three dots in the toolbar and choose color, weight, and style options for your line

- Press “Save and Close”

- Your horizontal line will now appear in your document


If you’d like to go further than just basic lines, follow our how to draw in Microsoft Word guide. It’ll walk you through adding various preset shapes and drawing freehand.

If you’re looking to add horizontal and vertical lines around the entire perimeter of your document, check out our how to add a page border guide instead. It’ll get you where you need to be in a few short minutes.

Adding a vertical line to your Microsoft Word Document can guide the flow of your text.
Vertical lines may also highlight, emphasise and draw your readers attention to a certain section of text. They are a great way to subtly ensure that section of text is given the attention you intended it to receive.
Although adding a vertical line is not quite as intuitive as adding a horizontal line it is still possible and fairly simple.
In this article, we will walk you through a few easy to follow steps to add a vertical line to a Microsoft Word Document. This option allows you to change to the style and length of your vertical line as well as exactly where it is positioned on your page.
It’s vertical lines, the flexible way.

Adding a Vertical Line to your Word Document
- Open Word
- Click the Insert Tab
- Find and Click Shapes
- Select a line from the Line group
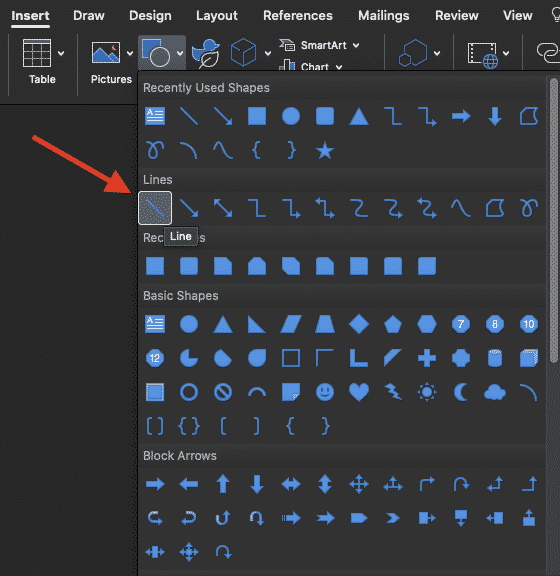
- Click the space on your page that you would like the line to start, but don’t release the cursor just yet
- Drag the cursor to where you would like the line to end
- Release the cursor
You have now successfully added a vertical line to your document, you can increase the length of the line by re-clicking the top or bottom of you line and dragging it a little further.
Would you like a simpler solution to your Microsoft Word Collaboration issues?
Collaborating in Word can be tricky.
It’s safe to say 99% of us have experienced the gut reaching feeling of realisation when you press save and realise you’ve saved over your last version by mistake. You had every intention of clicking ‘save as’ but you were too quick and your brain jumped straight to ‘save’. Poof, your colleague’s old version is gone, replaced by your file.
You only just pressed save, so there must be a way to recover the file.
You find the old version by restoring the old document, perfect. Now you’ve lost all of your new edits, forcing you to restart the whole process again, losing an hour of precious billable time.

If you haven’t accidentally saved over a file before, you may have opened your colleague’s file and started to make your suggested changes. You saw a typo, so quickly updated that. Then you realised they had some old stats in there that you had since updated, so you update those. Followed by some formatting, a few words changed to make it all sound more polished and wooala, the updated version is ready to go.
Smugly press ‘save as’ rather than ‘save’, you didn’t overwrite the old version but you realise once you press exit that you’d forgotten to turn on tracked changes.
Without tracked changes on, no-one else knows what you changed or updated and there is no way for them to check your changes before they are added to the master file.
Before you go back and start again, this time with tracked changes on quickly google ‘better ways to collaborate in Word’, or take our word for it, there is a better way, and it comes in the form of a tool called Simul Docs.

Simul Docs was built to make collaborating in Word easy.
Once you are a Simul Docs user, you can either drag and drop or upload your Word document into Simul and continue working as normal from the Simul dashboard – editing, typing and making changes (its similar to working in Word Online, or Google Docs. It’s still the same Word file, just living online). Or if you’d prefer to continue using the desktop Word, just click ‘Open in Word’ from the Simul dashboard and the document will pop up in you Word itself.
Either way, all of the amazing features we are about to show you will work in Simul or on your desktop once you’ve got Simul on your team.

Simul knows that when you are collaborating, tracking all changes is important. Therefore, when you open any version of your document and start to make changes Simul will track them, track changes are automatically on, every time you open the file.
It’s unlikely that you will ever want to save over your colleague’s file either, so once you make a change to the document Simul will automatically save your updated document as a new version. You can continue making as many changes (all tracked!), updated or edits as you please. Once you have finished, save or exit and Simul has everything stored you.

Next time you open Simul Docs to review the document, you’ll see a versions list sitting on your dashboard. Here you can neatly see each version of your document, organised in numerical order and who made changes in or owns each version.
You can use the versions list to refer back to old versions with ease, each saved version will show you the changes made in that version and who made them when.
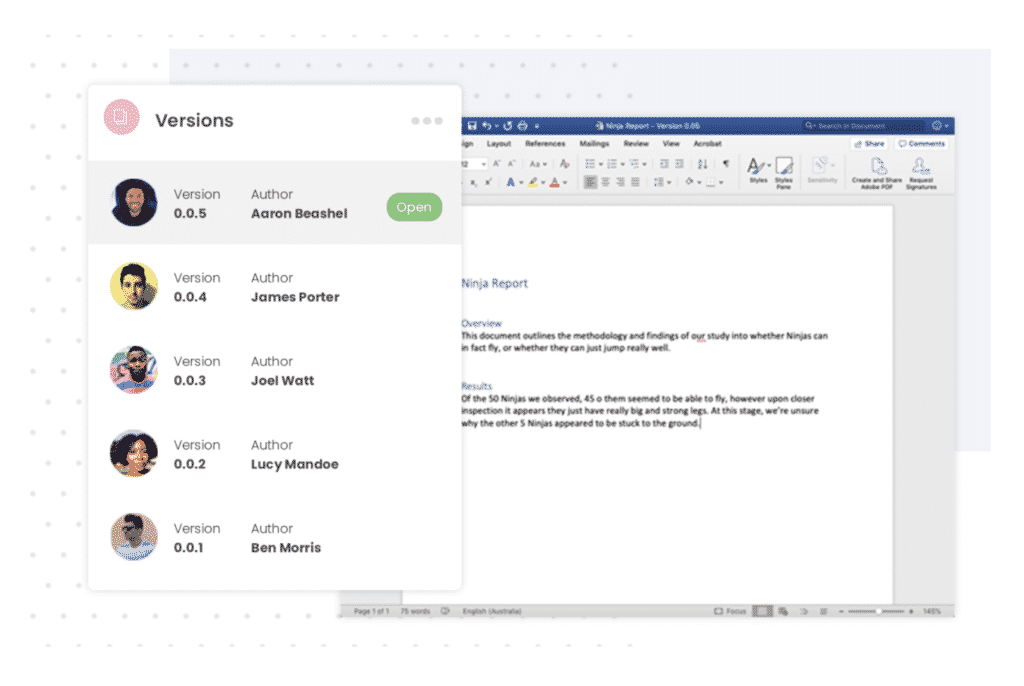
You can even compare two old versions if you like, to see what happened between them. Or, if two of your co-workers accidentally open the document at the same time and make changes, leaving you with two different versions of the same file Simul will flag this, and then offer you the option to accept/decline each author’s changes before the tool merges the documents together so you can continue collaborating with ease.

With tracked changes automatically on, version control handled, easy merging and so much more.
Simul Docs is the collaboration tool you’ve been waiting for.