
There are at least five six ways to add a vertical line in Word. Vertical lines can help accentuate a piece of text in Word, but knowing how to add them is not as intuitive as adding a horizontal line.
- Adding a border
- Or a Page Border
- Using the shape tool
- Adding a bar tab
- Adding lines to columns
- Add lines either side of text
These are most common options available. With all the features in Word there are other more complicated choices. We thought of four more vertical formatting tricks in Word
Adding a Border
Add a vertical line next to a paragraph is to simply add a side border to the paragraph.
Highlight the paragraph you wish to add a line to, go to Home | Paragraph, and click the Borders dropdown.

This gives you options to insert borders in various locations. To insert a vertical line to the left or right of the text, select Left Border or Right Border.
The Left or Right border options insert a plain black line next to the text. If you want to have more control over the color or style of your line, instead select Borders and Shading at the bottom of the list.
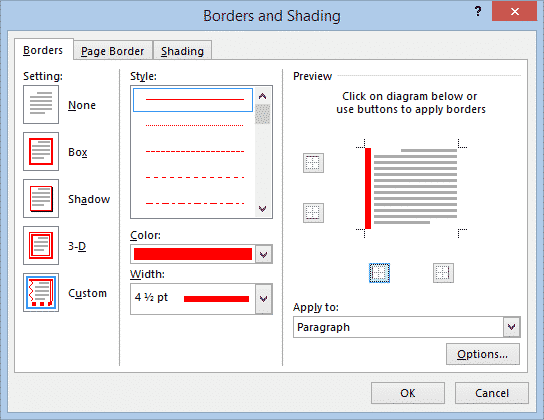
Custom Borders
Click Custom on the left-hand side of the dialog box, to enable you to choose individual borders to add. In the middle section, you can select the style, color and width of the line. On the right-hand side, click the box to indicate where you want the border to appear (top, bottom, left or right). The preview will give you an indication of how your line will appear.
Note that the boxes for the border positions are toggle keys, so if a border that you don’t want is appearing in the preview, just click the appropriate box to remove it.
A line inserted by this method is anchored to the paragraph(s) it is applied to and will move if you move a paragraph.
Add a Page Border
The same thing can be done at the page level.
Design | Page Background } Page Borders | Page Border.

Like a paragraph border, select the style of border you want then click the Preview sides. Remove the top and bottom borders, leaving left or right depending on your needs.
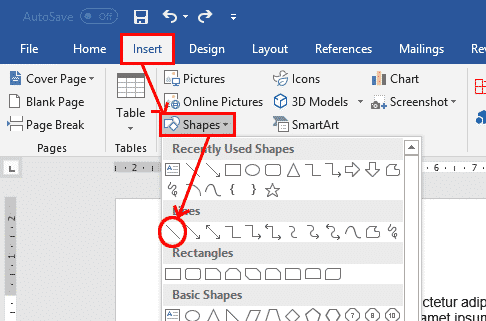
To add a vertical line using the shape tool, go to Insert | Shapes and select the Line tool.
Place the cursor where you want the line to start, and drag to where you want the other end of the line to be. Holding the Shift key while you drag will ensure that the line is straight.
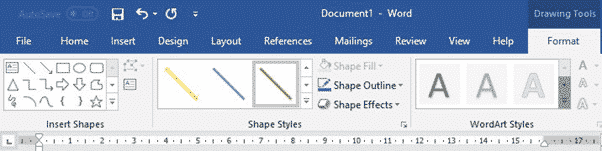
Once you have finished creating the line, the Format tab becomes live on the ribbon, where you can change the color, shape and style of the line.
Click the Layout button next to the line to see options regarding how you want the line to interact with your text.
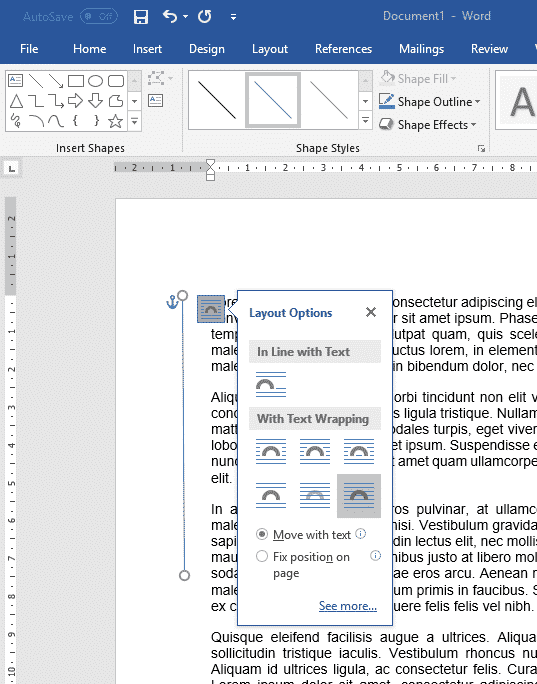
To move or resize the line, grab one of the end points and move it. If you hold the Control key while you move, both ends of the line will move as if around a fulcrum.
Adding a Bar Tab
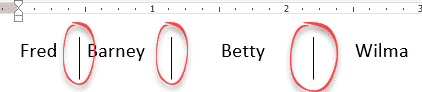
Another way to add a vertical line to text is to use the Tab feature, but instead of inserting a tab, you will add a ‘bar’ or vertical line. Bar tabs are the lesser known Tab formatting option which separate tabbed items with a visible bar like this:
The shape tool can be used to add a line in any location and of any length, a bar tab can only be applied to whole paragraphs.
Make the ruler is visible at the top of your document, to help you find the correct position for the bar tab. If you cannot see the ruler, go to View | Show, and tick the Ruler box.
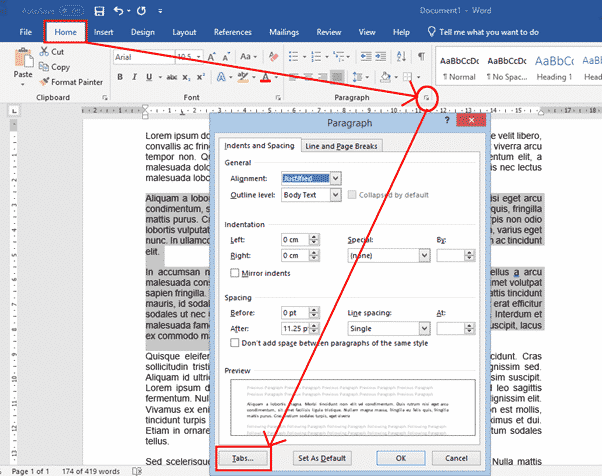
To insert a bar tab, select the paragraphs that you want the bar to appear beside, go to Home | Paragraph and open the Paragraph dialog box. Then click the Tabs button at the bottom of the dialog box.
Tab Stop Positions
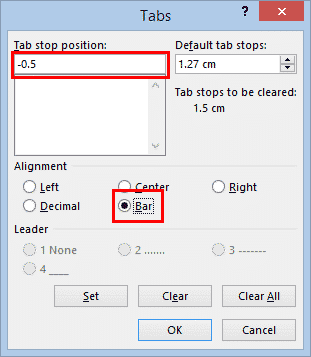
In the Tab Stop Position box, enter the position where you want the line to appear. You can use the ruler at the top of the screen to work out what value to enter. In the example pictured, the text starts at 0 on the ruler, so if you want the line to appear to the left of the existing text, you may enter “-0.5”. If you want it to appear to the right of the text, you may enter “17”.
Then select Bar under Alignment and click OK.
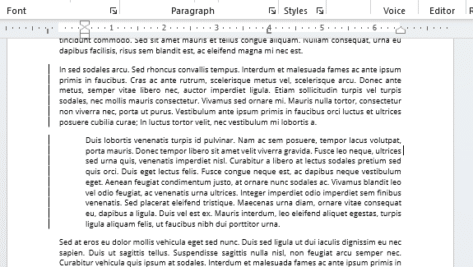
With the values entered in the above figure, the text would then look like this:
Note that a line inserted by this method is anchored to the paragraph(s) it is applied to. If you move a paragraph around, the line will go with the paragraph to its new location.
If you wish to later delete the line, highlight the paragraph, open the tab dialog again and click Clear.
Adding Lines to Columns
If you are arranging your text into columns, you can insert a vertical line between the columns.
To arrange your text into columns, select the text, go to Layout | Columns and select the number of columns you want.
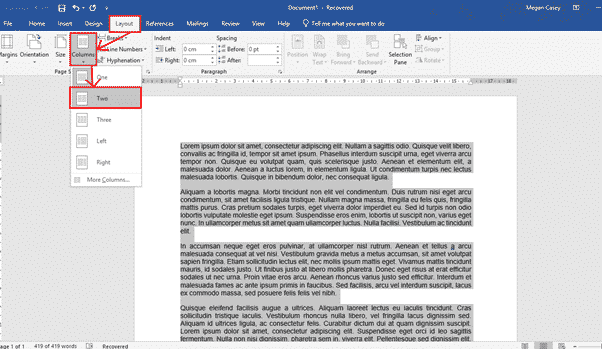
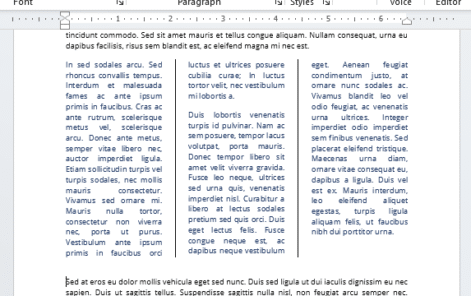
Now that your text is arranged into columns, click anywhere within the columns, and go to Layout | Columns again, but this time select More Columns at the bottom of the list. In the dialog box, simply tick the Line Between box, and click OK.

Vertical lines either side of text
One way to put vertical lines on both sides of text is to add empty columns either side using Layout | Breaks | Column Break. Three column breaks will do the job, two to make empty columns plus one at the bottom of the middle text column.
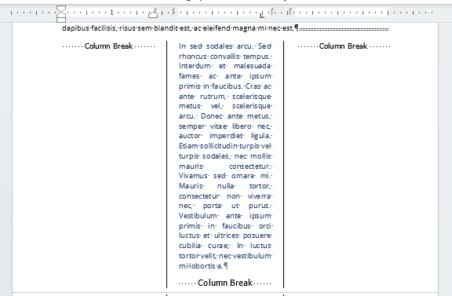
Note that if you wish to add a line to the left or right of the columns, this can be done using any of the other methods described above.
See Color the Column dividing line in Word
Four more vertical formatting tricks in Word
Whether you want to separate your text into two columns or create a border around your text, learning how to insert a vertical line in Word is useful.
A few days back, we shared how to insert a horizontal line. In this post, we will share simple techniques to insert a vertical line.
Learning this function is especially beneficial for creating newsletters or pages of a newspaper, as you would have to separate the text into different columns.
- Using shapes
- Adding a paragraph border
- Adding a page border
- Adding a bar tab
- Adding columns
Let’s get started.
Method 1: Using shapes
The most basic method of adding a vertical line in Word is by using the Shapes tool. The benefit of this method is that you can choose the type of line you want to add (e.g. a line with an arrow) and you can insert it anywhere on the page.
Step 1: Open your Word document.
Open an existing document or create a new one using one of the several templates Word offers.

Step 2: Click on the Insert tab.
This tab is located between the Home and Draw tabs. Click on it to find the different types of items that you can insert in your document.

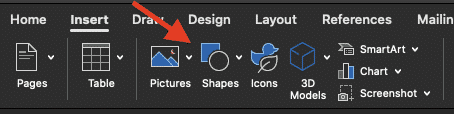
Step 3: Click on the Illustrations button.
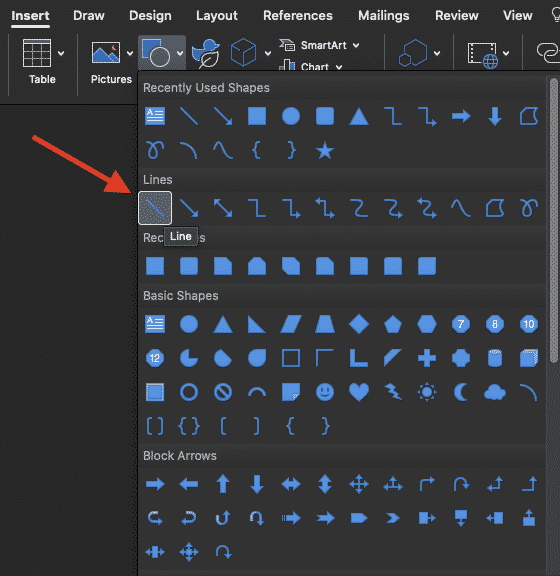
The Illustrations button is between the Table and Add-ins buttons. When you click on it, you will see the Shapes option.

Step 4: Click on the Shapes option.
You have several options for shapes. The second row consists of the different types of lines you can add in your document.

Step 5: Choose a line template.
Choose the line template that you would like to add to your document. For example, you can choose the straight line with no arrows or the line with an arrow at only one of the ends.

Step 6: Draw the line.
Click on the line that you would like to draw then drag the pointer across the page. To ensure that your line is vertical, press the Shift key on your keyboard as you’re drawing the line.

You can insert this line anywhere in your document, even next to the text on the page and on it.


Method 2: Adding a paragraph border
The next method of adding a vertical line in your Word doc is by adding a border. You can try this method if you just want to add borders to your page and don’t want to insert a vertical line in the middle of the page.
Step 1: Click on the Home tab.
The Home tab is the default tab that you’re on when you open your Word document.
However, if you’re on a different tab, click on the Home tab to add the borders.

Step 2: Click on the Borders option.
The Borders option is located in the third group in the Home tab. You will find it among other tools like the Spacing and Fill tools.

Once you click on this option, you will see the different options you have for borders.

Step 3: Choose one or more border types.
The two types of vertical borders you can choose are left and right borders. Pick one or both of them depending on how you want to format your text.
This is how the page looks with only the left border:

This is how it looks with only the right border:

And finally, this is how it looks with both borders:

Alternative Step 3: Choose the Borders and Shading option to create a custom border.
Word also gives you the freedom to create a border of your choice. Click on the Borders and Shading option from the drop-down menu.

This will open up a box where you can customize your border.

You can change the style of your border by choosing from several options, including dotted and wavy styles. You can also change the color and width of your border to anything you want- the sky’s the limit!

A great thing is that you can preview what your vertical border is going to look like before making a selection. You can make sure that you’re only adding vertical borders by deselecting the top and bottom options.

Here’s a look at an example of a custom border:
Note that this line moves along with your paragraphs: so, it will extend if you add more paragraphs and shorten if you delete any paragraphs.
Method 3: Adding a page border
The borders that we discussed so far are paragraph borders. They only apply to the individual paragraphs on the page. In this section, we will learn how to apply borders to the entire page.
Step 1: Click on the Borders option.
Once again, you have to open the drop-down menu by clicking on the Borders option in the Home tab.
Step 2: Select the Borders and Shading option and go to Page Border.
The second option at the top of the box is Page Border. Click on this.

Step 3: Customize your page border.
Similar to the paragraph border, you can customize the style, color, and width of your page border as well. You can deselect the top and bottom options to make sure that you’re only adding vertical lines.

One really interesting option you have in this case is the Art option. Instead of having simple vertical lines, you can choose an icon to add as a border.

Here’s a tacky example:

Again, you can choose from several different options and preview your border before making a selection.
Method 4: Adding bar tabs
You can also use the Tab tool to add a vertical line in your Word documents. You can add these tabs anywhere in your document.
Step 1: Make sure that you can see the ruler.
Having the ruler visible will help you find the right position for your tabs. If it isn’t already, you can show your ruler by going to the View tab and checking the Ruler box.

Step 2: Open the Line and Paragraph Spacing dialog box.
Go to the Home tab and click on the Line and Paragraph Spacing button. There, you will find Line Spacing Options. Click on this to open a dialog box.


Step 3: Click on Tabs.
At the bottom left corner of the box, you can see the Tabs option.

Step 4: Click on Bar and customize other features of your bar tab.
In the Alignment section, choose the Bar option. You can also change the other features of your bar tab, such as the Tab Stops. You can use the ruler to figure out the right stops for your bar tab.
For example, assuming that your text starts at 0, you can enter -0.5 to insert a bar tab to the left of the text and 7 to insert it to the right of the text.
This type of vertical line is also applied to the paragraphs, so its length changes with the length of the paragraphs on the page.
Method 5: Adding columns
You can also organize your text into columns and insert lines between the columns.
Step 1: Click on the Layouts tab.
This tab is located between the Design and References tabs. Click on it.

Step 2: Click on the Columns button.
This button is at the top left corner of the page. It will open up a drop-down menu. Click on the More Columns option and add the number of columns that you would like to divide your text into. Then, click on the Line Between option.

Your text may look something like this:

Conclusion
So there you have it- five methods that you can use to add a vertical line in your Word doc. It’s always useful to learn more than one method as you never know when they may come in handy.
Adding a vertical line to your Microsoft Word Document can guide the flow of your text.
Vertical lines may also highlight, emphasise and draw your readers attention to a certain section of text. They are a great way to subtly ensure that section of text is given the attention you intended it to receive.
Although adding a vertical line is not quite as intuitive as adding a horizontal line it is still possible and fairly simple.
In this article, we will walk you through a few easy to follow steps to add a vertical line to a Microsoft Word Document. This option allows you to change to the style and length of your vertical line as well as exactly where it is positioned on your page.
It’s vertical lines, the flexible way.

Adding a Vertical Line to your Word Document
- Open Word
- Click the Insert Tab
- Find and Click Shapes
- Select a line from the Line group
- Click the space on your page that you would like the line to start, but don’t release the cursor just yet
- Drag the cursor to where you would like the line to end
- Release the cursor
You have now successfully added a vertical line to your document, you can increase the length of the line by re-clicking the top or bottom of you line and dragging it a little further.
Would you like a simpler solution to your Microsoft Word Collaboration issues?
Collaborating in Word can be tricky.
It’s safe to say 99% of us have experienced the gut reaching feeling of realisation when you press save and realise you’ve saved over your last version by mistake. You had every intention of clicking ‘save as’ but you were too quick and your brain jumped straight to ‘save’. Poof, your colleague’s old version is gone, replaced by your file.
You only just pressed save, so there must be a way to recover the file.
You find the old version by restoring the old document, perfect. Now you’ve lost all of your new edits, forcing you to restart the whole process again, losing an hour of precious billable time.

If you haven’t accidentally saved over a file before, you may have opened your colleague’s file and started to make your suggested changes. You saw a typo, so quickly updated that. Then you realised they had some old stats in there that you had since updated, so you update those. Followed by some formatting, a few words changed to make it all sound more polished and wooala, the updated version is ready to go.
Smugly press ‘save as’ rather than ‘save’, you didn’t overwrite the old version but you realise once you press exit that you’d forgotten to turn on tracked changes.
Without tracked changes on, no-one else knows what you changed or updated and there is no way for them to check your changes before they are added to the master file.
Before you go back and start again, this time with tracked changes on quickly google ‘better ways to collaborate in Word’, or take our word for it, there is a better way, and it comes in the form of a tool called Simul Docs.

Simul Docs was built to make collaborating in Word easy.
Once you are a Simul Docs user, you can either drag and drop or upload your Word document into Simul and continue working as normal from the Simul dashboard – editing, typing and making changes (its similar to working in Word Online, or Google Docs. It’s still the same Word file, just living online). Or if you’d prefer to continue using the desktop Word, just click ‘Open in Word’ from the Simul dashboard and the document will pop up in you Word itself.
Either way, all of the amazing features we are about to show you will work in Simul or on your desktop once you’ve got Simul on your team.

Simul knows that when you are collaborating, tracking all changes is important. Therefore, when you open any version of your document and start to make changes Simul will track them, track changes are automatically on, every time you open the file.
It’s unlikely that you will ever want to save over your colleague’s file either, so once you make a change to the document Simul will automatically save your updated document as a new version. You can continue making as many changes (all tracked!), updated or edits as you please. Once you have finished, save or exit and Simul has everything stored you.

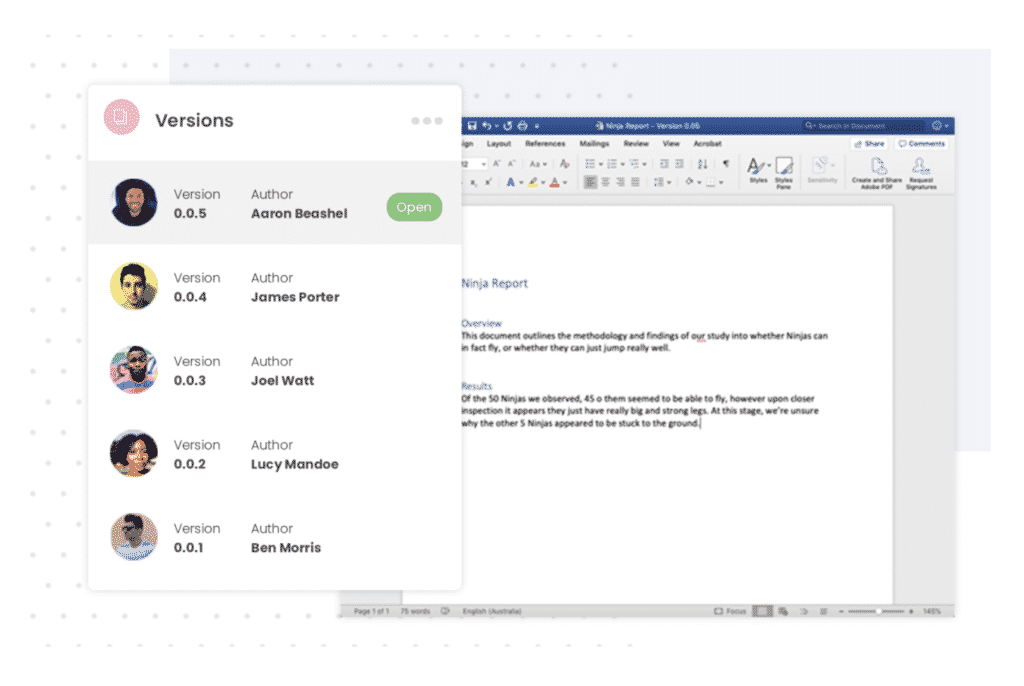
Next time you open Simul Docs to review the document, you’ll see a versions list sitting on your dashboard. Here you can neatly see each version of your document, organised in numerical order and who made changes in or owns each version.
You can use the versions list to refer back to old versions with ease, each saved version will show you the changes made in that version and who made them when.
You can even compare two old versions if you like, to see what happened between them. Or, if two of your co-workers accidentally open the document at the same time and make changes, leaving you with two different versions of the same file Simul will flag this, and then offer you the option to accept/decline each author’s changes before the tool merges the documents together so you can continue collaborating with ease.

With tracked changes automatically on, version control handled, easy merging and so much more.
Simul Docs is the collaboration tool you’ve been waiting for.
Contents
- 1 How do I make a straight vertical line in Word?
- 2 How do you insert a straight line in Word?
- 3 How can we draw vertical line?
- 4 How do I draw a horizontal line in Word?
- 5 What is an example of a vertical line?
- 6 How do I make a freehand line in Word?
- 7 How do I draw a straight line in Word 365?
- 8 Which tool is used to draw a straight line?
- 9 What is vertical word?
- 10 What draws a horizontal line?
- 11 How do you use pen in Word?
- 12 Is there a drawing tool on word?
How do I make a straight vertical line in Word?
Use Shapes to Insert a Horizontal or Vertical Line in Word
- Position the cursor where you want to insert a line.
- Go to Insert > Illustrations group > Shapes dropdown arrow.
- In the Lines group, choose the shape of the line.
- Click and drag across the document with the mouse pressed till the endpoint. (
How do you insert a straight line in Word?
Insert a line
- On the Insert tab, select Shapes.
- Under Lines, select any line style you like.
- Select a location in the document, hold and drag your pointer to a different location, and then release the mouse button.
To make a vertical line, use border-left or border-right property. The height property is used to set the height of border (vertical line) element. Position property is used to set the position of vertical line. Example 1: It creates a vertical line using border-left, height and position property.
How do I draw a horizontal line in Word?
Use the Horizontal Line Tool to Insert a Line in Word
- Place the cursor where you want to insert a line.
- Go to the Home tab.
- In the Paragraph group, select the Borders drop-down arrow and choose Horizontal Line.
- To change the look of the line, double-click the line in the document.
What is an example of a vertical line?
A vertical line is a line extending up and down. On a table (like the one shown to the right), the legs of the table are vertical lines. The y-axis is an example of a vertical line.
How do I make a freehand line in Word?
For freehand drawings, press the Draw tab instead.
- Inserting Shapes into Microsoft Word.
- Press on one of the pre-set shapes or line options to select it—your cursor will change at this point.
- Once this happens, draw onto your Word document directly to insert the shape or line you selected.
How do I draw a straight line in Word 365?
Draw a line without connection points
- On the Insert tab, in the Illustrations group, click Shapes.
- Under Lines, click any line style you like.
- Click one location in the document, hold and drag your pointer to a different location, and then release the mouse button.
Which tool is used to draw a straight line?
A ruler or a scale is a mathematical instrument that is used to draw straight lines.
What is vertical word?
adjective. being in a position or direction perpendicular to the plane of the horizon; upright; plumb. of, relating to, or situated at the vertex.
What draws a horizontal line?
All lines in a mechanical drawing are made with the aid of an instrument. Horizontal lines are drawn with the upper edge of the T-square blade as a guide.
How do you use pen in Word?
How to Use a Pen With MS Word
- Connect your writing tablet to your computer.
- Open the document you wish to write pen marks on.
- Click on the “Review” tab.
- Click “Start Inking” on the far right of the screen to begin using the tablet with Microsoft Word.
- Touch on the tablet to write using the pen tool.
Is there a drawing tool on word?
You can draw freely in Microsoft Word using the “Draw” feature whether you have Word for Mac or Windows. You can also insert customizable shapes into your document, or draw using the “Scribble” feature. The process of drawing in Word varies based on which version of Word and device you’re using.
Lines are an essential design element. In Microsoft Word, a horizontal or vertical line can divide a document and guide the flow of the text. You can insert a line in Word and format it differently to change a humble line into something more appealing.
It’s so simple, after all. But if you don’t know all the ways to do it, then this primer on how to insert a line in Word is for you.
How Do You Insert a Straight Line in Word With the Keyboard?
Did you know that you can quickly add a line in Word by typing a few characters? Word’s AutoFormat feature types stuff for you as you type it. You may have already seen it in action when it creates automatic bulleted lists.
You can insert not only a straight line but also add lines with different designs. Here’s how it works:
- Place the cursor in the spot where you would like to start your horizontal line.
- Then, type three characters for any possible line styles you see in the screenshot below—press Enter. For example, to draw a dotted line, type *** and press Enter.
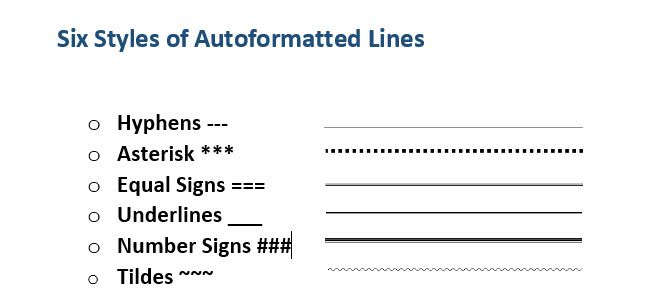
As you will see, you will get six variations of the standard horizontal line.
- Plain single line with three hyphens (—)
- Broken or dotted line with three asterisks (***)
- Plain double line with three equal signs (===)
- Bold single line with three underline symbols (___)
- Triple line with a thick center with Three number signs (###)
- Wavy line with three tildes (~~~)
The line takes up the entire width of the page. When added inside a column, the line is inserted to match the width of the column. If you want to add text above or below the line, put your cursor where you want the text and begin typing.
You will also notice a tiny AutoCorrect Options button pop up next to the line. This is a shortcut that allows you to undo the automatic line when you don’t need it, stop them altogether, or dive into the AutoFormat options dialog.
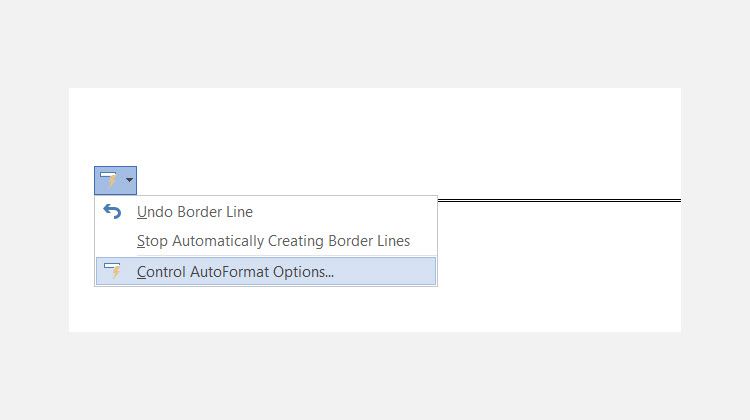
You can turn off these lines permanently from the AutoFormat options dialog.
Go to AutoFormat As You Type tab > Apply as you type section > uncheck Border lines.
Insert a Horizontal Line From the Ribbon
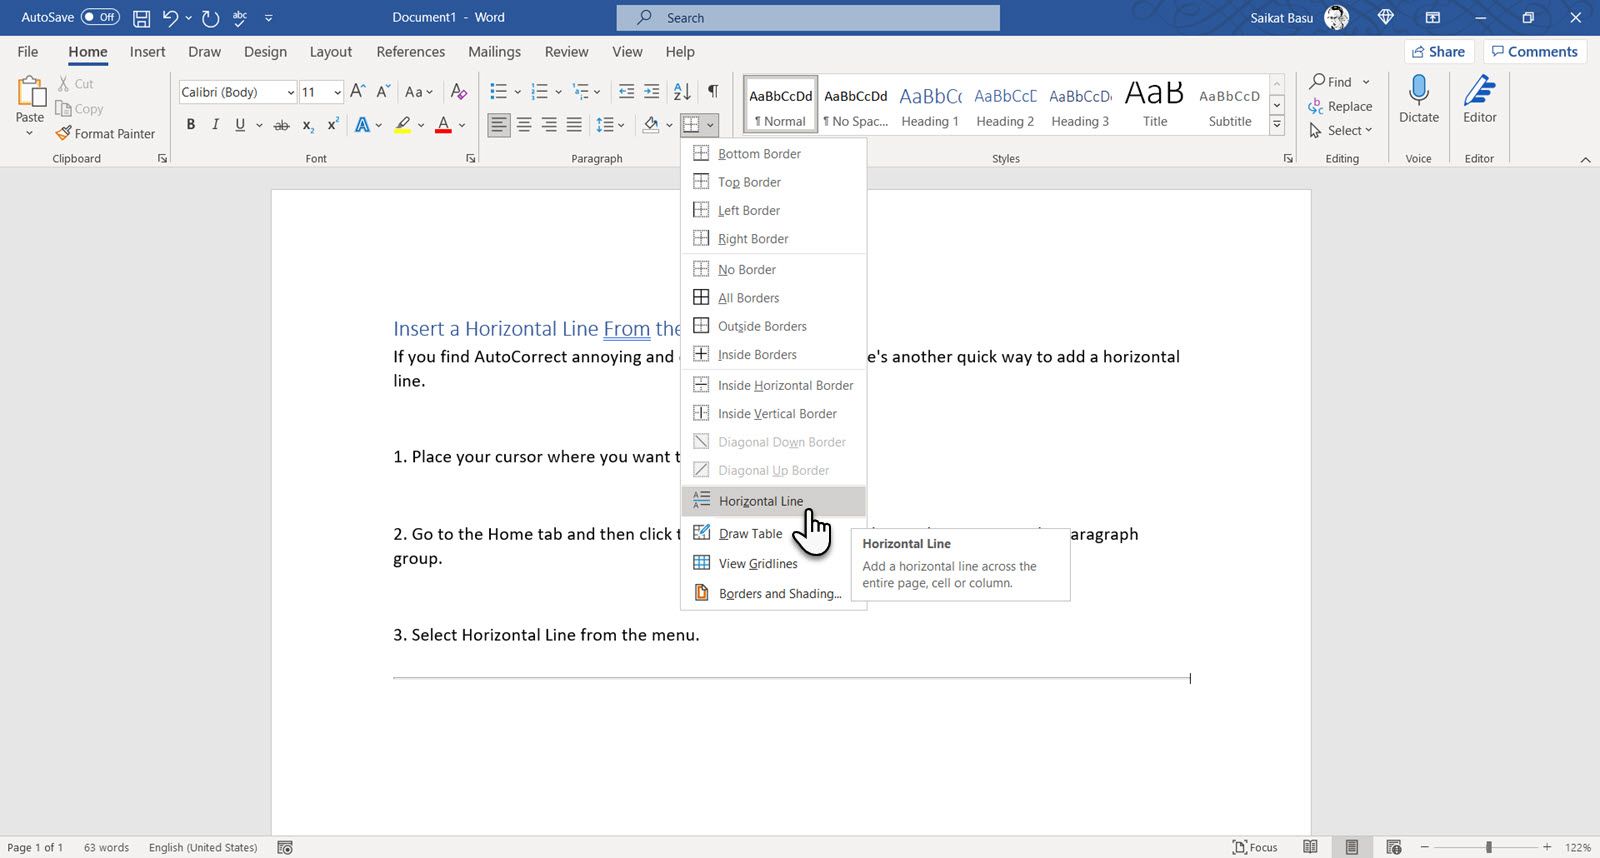
If you find AutoCorrect annoying and disabled the option, there’s another quick way to add a horizontal line.
1. Place your cursor where you want to insert the line.
2. Go to the Home tab and then click the dropdown arrow for the Borders option in the Paragraph group.
3. Select Horizontal Line from the menu.
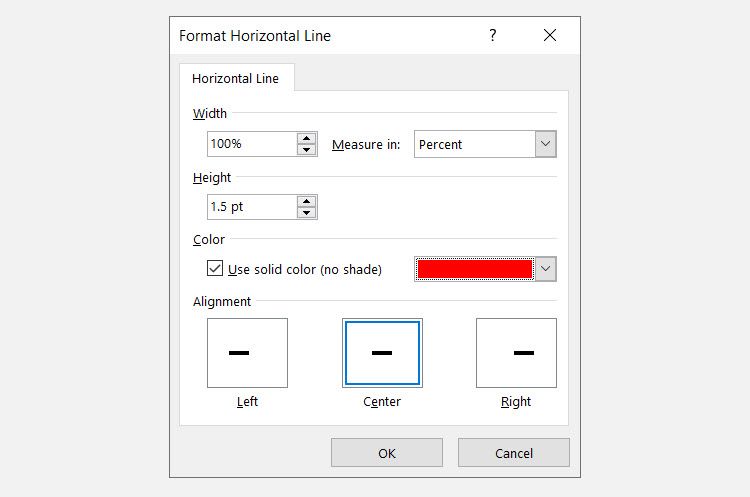
4. To tweak the look of this horizontal line, double-click the line. The Format Horizontal Line dialog box enables you to modify the width, height, color, and alignment of the line.
5. To resize a line, select the line with a double click and then drag any of the resizing points to change the length or width.
6. To remove the line, select it and press Delete on your keyboard.
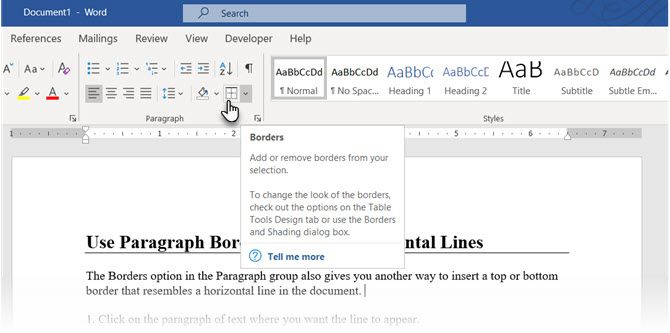
Use Borders to Add Horizontal and Vertical Lines
The Borders option in the Paragraph group also gives you another way to insert a top or bottom border that resembles a horizontal line in the document.
1. Click on the paragraph of text where you want the line to appear.
2. Got to Home and the Paragraph group. Click on the Border button. The Bottom border is usually the default. This places a line below the selected text on the page, or the paragraph if you haven’t selected any text.
3. For other options (like a vertical border), you can click on the tiny dropdown arrow on the Borders button to access a list of options.
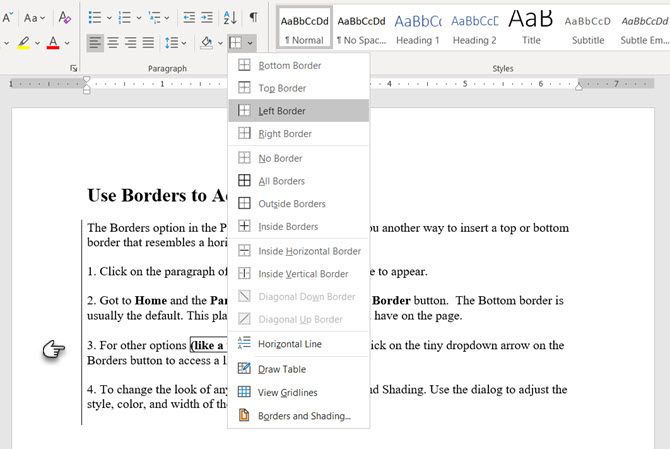
4. To change the look of any border, click on Borders and ShadiThen, use Use the dialog to adjust the border’s style, color, and width.
5. Deleting this horizontal line in your Word document may not be obvious but it easy enough.
Use Shapes to Insert a Horizontal or Vertical Line in Word
The Shapes menu contains several line options. These line shapes come with one crucial difference—you can draw them at different angles. Then, after you draw the line, you can customize the color and appearance to make decorative horizontal or vertical lines even in the middle of a Word document.
1. Position the cursor where you want to insert a line.
2. Go to Insert > Illustrations group > Shapes dropdown arrow.
3. In the Lines group, choose the shape of the line.
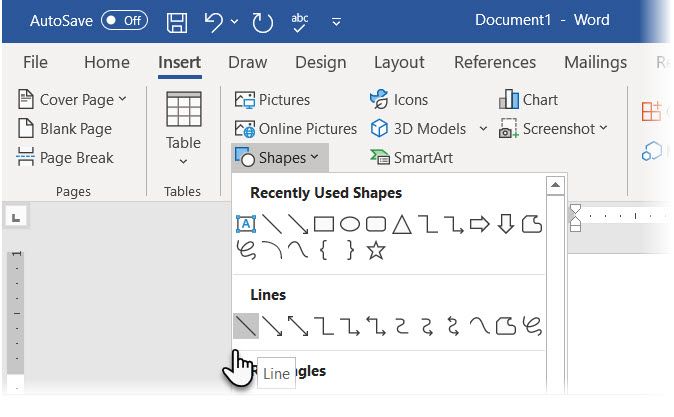
4. Click and drag across the document with the mouse pressed till the endpoint. (Tip: Hold down the Shift key to insert a straight line that is either horizontal or vertical)
5. Keep the line selected to customize the appearance of the line with the Shape Format tab on the Ribbon.
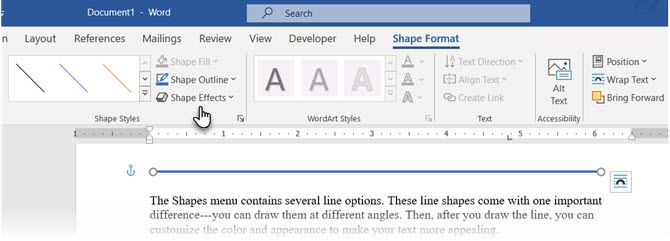
6. Go to the Shape Styles tab, change the color, use a different line style, or apply effects.
7. You can also right-click on the line and choose Format Shape from the context menu to open more options for changing the look.
How to Add a Vertical Line and Separate Text into Columns
Text arranged into columns is a basic layout technique. For example, you can separate text blocks into multiple columns and insert a vertical line between them.
1. Select the text.
2. Go to Ribbon > Layout > (Page Setup group) Columns. Click on the dropdown and select the number of columns you want.
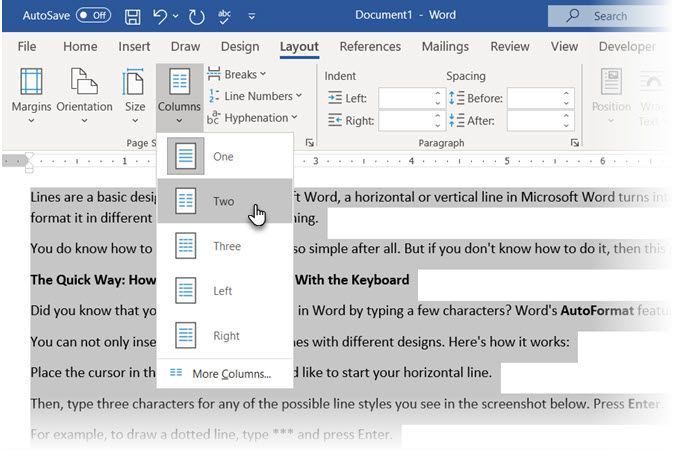
3. The text is now arranged into columns. Click on any column and go to Layout > Columns > More Columns.
4. In the Columns dialog box, check the Line Between box and click OK.
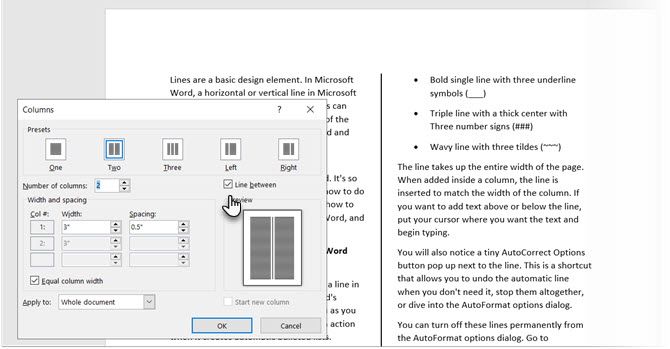
Note that you can also change the number of columns and the spacing between them from this dialog.
How to Use a Bar Tab to Insert a Vertical Line
Tab stops in Word help align lines and paragraphs. The bar tab, on the other hand, doesn’t set a tab. Instead, it. It inserts a vertical line and demarcates your paragraph into columns.
1. Select the paragraph where you want to add the vertical line.
2. Go to Ribbon > Home. In the Paragraph group click the tiny arrow to open the Paragraph Settings.
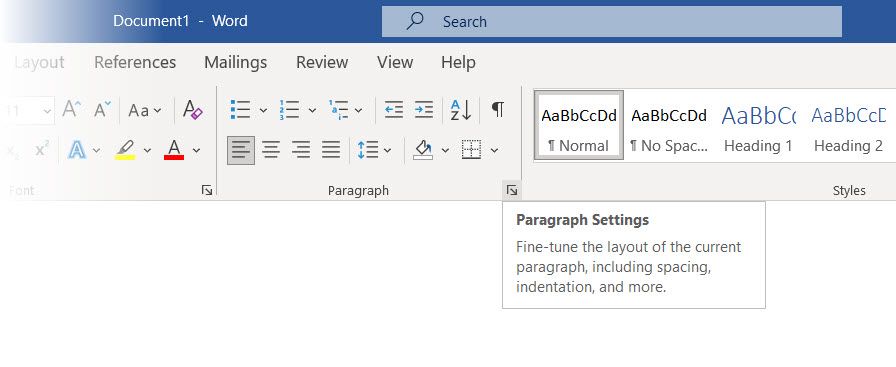
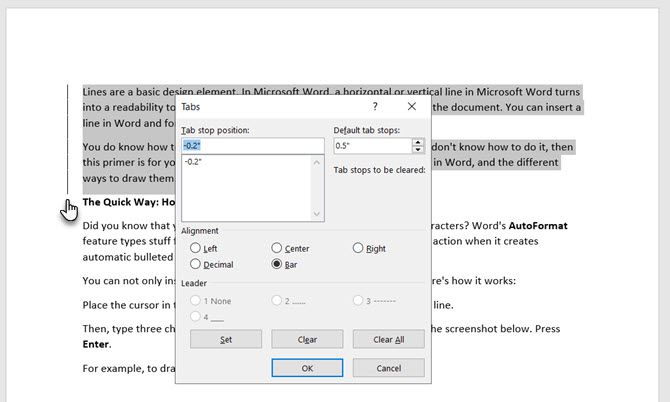
3. Click the Tabs button at the bottom of the dialog.
4. In the Tab stop position box, enter the position where you want the vertical line to appear. You can use the ruler at the top of the screen to gauge a value to enter.
5. Click the Bar button in the Alignment section. Click on Set and OK.
As you can see, I have set it to «-0.2» to make it appear just to the left of the first paragraph. To delete the vertical line, delete the bar tab.
Also: Want to make blank lines where the reader can fill in some information? You can use tabs to quickly create empty lines in forms with Microsoft Word.
How to Insert a Graphic for Creative Lines in Word
Using pictures for horizontal and vertical lines can be a creative workaround. But use them with care and avoid overusing them in a document as a stretched or condensed image can end up looking back on paper or the screen.
A graphic can be used as a straight line horizontally and vertically. Here’s how:
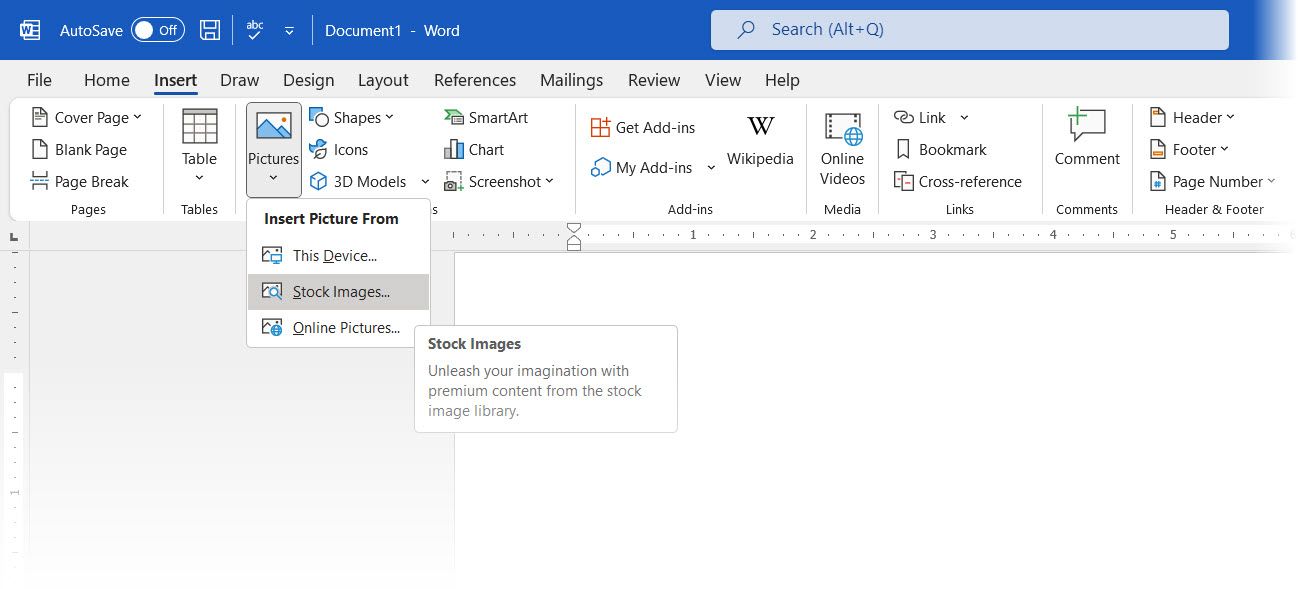
- Go to Ribbon > Insert > Picture.

- Choose one of the image sources from the dropdown. For instance, select This device to upload a line graphic you created in another program.
- The screenshot below sources an illustration from Stock Images. The anchor points around the image help compress and stretch the image to something that resembles a straight line. Use the rotation handle to flip the graphic for a vertical line.

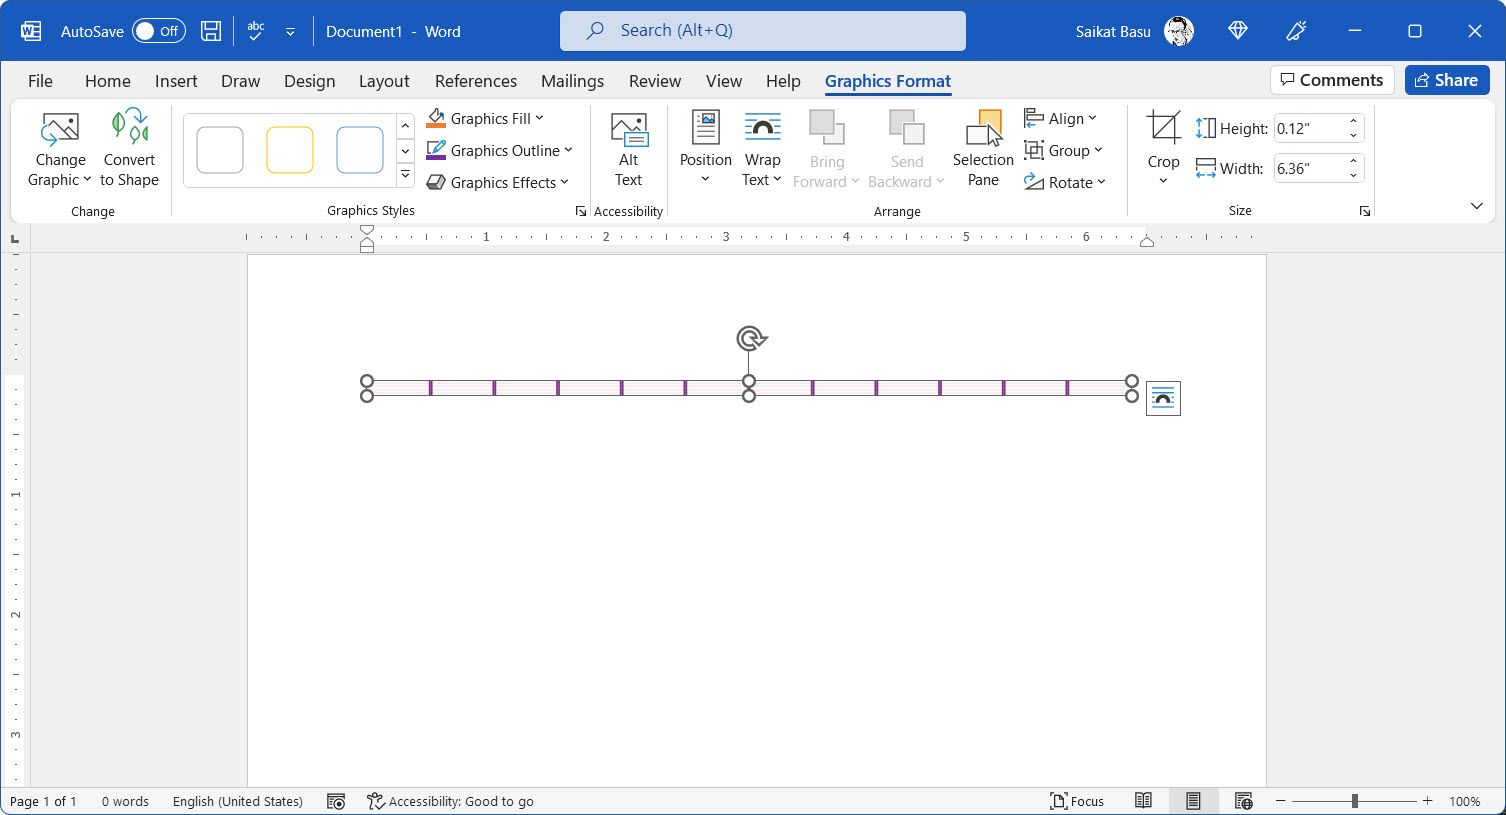
You can use these pseudo-lines as separators or as parts of the header or footer of your document. Use the Graphics Format toolbar on the Ribbon to format this illustration with Graphics Fill, Graphics Outline, and Graphics Effects.
Draw a Line in Your Word Document
Horizontal lines are more obvious and familiar. But adding vertical lines at the right place can boost the visual appeal of your content. Lines aren’t mere decorations… they can lead your eye to the most critical part of a document when used with subtlety.
Think about lines and use these methods the next time you sit down to write a professional report with Microsoft Word.