
Align text horizontally
-
In the text box, select the text that you want to change the horizontal alignment for.
-
On the Home tab, click the alignment option that you want
 .
.
 .
.Align text vertically
You can align all the text in a text box with the top, middle, or bottom of the text box.
-
Click the outer edge of the text box to select it.
-
On the Shape Format tab, click Format Pane.
-
Click the Shape Options tab if it isn’t already selected.
-
Click the text box icon
, and then click Text Box. -
Choose Top, Middle, or Bottom from the Vertical alignment drop-down list.
 , and then click Text Box.
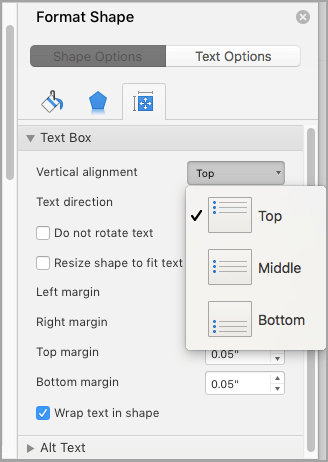
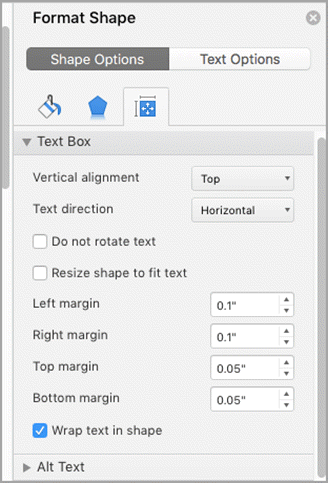
Adjust the text box margins
-
Click the outer edge of the text box to select it.
-
On the Shape Format tab, click Format Pane.
-
Click the Shape Options tab if it isn’t already selected.
-
Click the text box icon
, and then click Text Box. -
You can adjust the left, right, top, and bottom margins.
Important:
Office for Mac 2011 is no longer supported. Upgrade to Microsoft 365 to work anywhere from any device and continue to receive support.
Upgrade now
Align text horizontally
-
In the text box, select the text that you want to change the horizontal alignment for.
-
On the Home tab, under Paragraph, click the alignment option that you want
.
Align text vertically
You can align all the text in a text box with the top, middle, or bottom of the text box.
-
Click the outer edge of the text box to select it.
-
Click the Format tab (the purple contextual tab that appears next to the Home tab), and then under Text Box, click Change text alignment within the text box
. -
Click the alignment option that you want.
 .
.Adjust the text box margins
-
Click the outer edge of the text box to select it.
-
On the Format menu, click Shape.
-
In the left pane of the Format Shape dialog box, click Text Box.
-
Under Internal Margin, adjust the measurements to increase or decrease the distance between the text and the outer border of the text box.
Position text vertically in a shape or text box
- Right-click the border of the shape or text box.
- On the shortcut menu, select Format Shape, and then select Text Box in the left pane.
- Under Text layout, select the option that you want in the Vertical alignment list.
- Select Close.
Contents
- 1 How do I write vertically in Word?
- 2 How do you flip text vertically in Word?
- 3 How do I vertically align text in Word 2020?
- 4 How do I make text vertical in Word for Mac?
- 5 How do you vertically align text?
- 6 How do I center text vertically in a text box in Word?
- 7 How do you write downwards in Word?
- 8 How do I change the direction of text in Word for Mac?
- 9 How do you type vertically on a Mac?
- 10 How do you type in the middle of a Word document on a Mac?
- 11 How do I center content vertically?
- 12 How do I align text vertically in a button?
- 13 What tool is used for vertical alignment?
- 14 How do I make text vertical in Word 2019?
- 15 How do I center text vertically in a text box in Word 2010?
- 16 How do I group all text boxes in Word?
- 17 How do I align text horizontally?
- 18 What are the 4 alignment options?
- 19 How do you align some text left and some right?
- 20 How do you type vertically in pages?
How do I write vertically in Word?
To change text orientation, follow these steps:
- Select the AutoShape, text box, or table cell that contains the text whose orientation you want to change.
- Choose the Text Direction option from the Format menu. Word displays the Text Direction dialog box.
- Choose an orientation from those offered.
- Click on OK.
How do you flip text vertically in Word?
Rotate a text box
- Go to View > Print Layout.
- Select the text box that you want to rotate or flip, and then select Format.
- Under Arrange, select Rotate. To rotate a text box to any degree, on the object, drag the rotation handle .
- Select any of the following: Rotate Right 90. Rotate Left 90. Flip Vertical. Flip Horizontal.
How do I vertically align text in Word 2020?
In the Page Setup dialog box, choose the Layout tab. In the Page section, select the Vertical alignment drop-down arrow and choose an alignment. In the Preview section, select the Apply to drop-down arrow and choose Selected text. Select OK to apply the alignment to the selected text.
How do I make text vertical in Word for Mac?
Position text vertically in a shape or text box
- Select the text in the shape or text box.
- On the Home tab, under Paragraph, click. , and then click the vertical alignment that you want.
How do you vertically align text?
How to Vertically Center Text with CSS
- Use the CSS vertical-align property.
- Use CSS Flexbox.
- Use the CSS display property.
- Use the CSS line-height property.
- Set equal top and bottom padding.
- Set absolute positioning and negative margin.
- Set absolute positioning and stretching.
- Set the CSS transform property.
How do I center text vertically in a text box in Word?
Align text vertically
- Right-click the text box for which you want to set vertical alignment.
- On the shortcut menu, click Format Text Box.
- In the Format Text Box dialog box, click the Text Box tab.
- In the Vertical alignment box, select Top, Middle, or Bottom.
- Click OK.
How do you write downwards in Word?
Click on Format in the toolbar and select Text Direction from the drop-down menu. A dialog box will pop up giving you the option to change the text orientation.
How do I change the direction of text in Word for Mac?
In Word for Mac: Click the text box, click Shape Format > Arrange > Rotate > Rotate, and click More Rotation Options. From the Size tab, change the rotation angle so the text points in the direction you need.
How do you type vertically on a Mac?
Use vertical text in a text box or shape
- Control-click the object you want to use vertical text.
- Choose Turn On Vertical Text.
- To make the text horizontal again, Control-click the object, then choose Turn Off Vertical Text.
How do you type in the middle of a Word document on a Mac?
Select the text that you want to center. in the Page Setup group, and then click the Layout tab. In the Vertical alignment box, click Center. In the Apply to box, click Selected text, and then click OK.
How do I center content vertically?
The CSS just sizes the div, vertically center aligns the span by setting the div’s line-height equal to its height, and makes the span an inline-block with vertical-align: middle. Then it sets the line-height back to normal for the span, so its contents will flow naturally inside the block.
How do I align text vertically in a button?
Use line-height to center it vertically. I usually use the same value as its height. No need to use padding-top or margin-top for vertical align. Just use display: table-cell; and vertical-align: middle; .
What tool is used for vertical alignment?
A plumb bob, or plummet, is a weight, usually with a pointed tip on the bottom, suspended from a string and used as a vertical reference line, or plumb-line.
How do I make text vertical in Word 2019?
Position text vertically in a shape or text box
- Right-click the border of the shape or text box.
- On the shortcut menu, select Format Shape, and then select Text Box in the left pane.
- Under Text layout, select the option that you want in the Vertical alignment list.
- Select Close.
How do I center text vertically in a text box in Word 2010?
Align text vertically
- Click the outer edge of the text box to select it.
- On the Shape Format tab, click Format Pane.
- Click the Shape Options tab if it isn’t already selected.
- Click the text box icon. , and then click Text Box.
- Choose Top, Middle, or Bottom from the Vertical alignment drop-down list.
How do I group all text boxes in Word?
Grouping objects
- Hold the Shift (or Ctrl) key and click the objects you want to group.
- Click the Group command on the Format tab, then select Group.
- The selected objects will now be grouped.
How do I align text horizontally?
To align text horizontally on a page, highlight the text you want to center. Next, click the “Center Alignment” icon in the “Paragraph” group of the “Home” tab. Alternatively, you can use the Ctrl+E keyboard shortcut. Your text will now be horizontally aligned.
What are the 4 alignment options?
There are four main alignments: left, right, center, and justified. Left-aligned text is text that is aligned with a left edge. Right-aligned text is text that is aligned with a right edge.
How do you align some text left and some right?
Figure B
- On the Home tab, click the Paragraph group’s dialog launcher and then click Tabs in the bottom-left corner.
- Enter 6.5 in the Tab stop position.
- Click Right in the Alignment section (Figure C).
- Click Set.
- Click OK.
How do you type vertically in pages?
Use vertical text in an entire document in Pages
- With the document open, click the Document button in the toolbar.
- Select the checkbox next to Vertical Text. All existing body text is automatically converted to vertical. Any new text boxes and shapes you add will also use vertical text.
![]()
Download Article
An easy-to-follow guide on changing the direction of text in Microsoft Word
![]()
Download Article
- Rotating Text
- Making Text Vertical
- Mirroring Text
- Changing Paper Orientation
|
|
|
Do you want to type vertically in word? You can create vertical text by creating a textbox and adjusting its settings to set the position. You can change the text’s direction, rotate it, and mirror it. You could also change the document’s orientation from portrait to landscape mode. This wikiHow will show you how to write vertically in word on your Windows or Mac computer.
Things You Should Know
- Create a textbox with your text. Click «Shape Format» → «Text Direction» → «Rotate all text 90°».
- To make text vertical, drag the right-center circle of your textbox towards the left.
- To mirror text, right-click the textbox, then «Format Shape». Click «Effects», then input «180» into the X or Y Rotation field.
-
1
-
2
Create a textbox. To do this, click the Insert tab in the top toolbar, then click the Text Box icon in the Text section. You can select Simple Text Box from the presets.
Advertisement
-
3
Insert your text. Input the text you want to edit. You can copy and paste from another program into Microsoft Word.
- Make sure the textbox is still selected.
-
4
Click Shape Format. You can find this at the top toolbar, next to Help. Alternatively, double-click the edge of the textbox to be quickly redirected.
-
5
Click Text Direction. This will be in the Text section.
- A drop-down menu will open.
-
6
Select Rotate all text 90°. You can also select Rotate all text 270° if you want the top of the words to face the left side.
- Your text will be rotated.
- You can continue to edit your text in the textbox. The words will type in the direction set.


Advertisement
-
1
Open a project in Microsoft Word. This looks like a W on top of a blue square. Microsoft Word is available to install for Windows and Mac.
- You must have a subscription to use Office 365.
-
2
Create a textbox. To do this, click the Insert tab in the top toolbar, then click the Text Box icon in the Text section. You can select Simple Text Box from the presets.
-
3
Insert your text. Input the text you want to edit. You can copy and paste from another program into Microsoft Word.
- Make sure the textbox is still selected.
-
4
Click and drag the center circle on the right towards the left. With the textbox selected, you’ll see four circles at each point of the text box and one circle between each corner. Use the middle circle on the left side.
- As you drag the text box towards the left, it will become smaller. The text inside will adjust to fit the size of the box in vertical format.
- Make sure not to drag past the point of the left line. This could result in the words returning to their normal positions.
-
5
Remove the textbox lines (optional). If you want to remove the lines around the text, double-click the textbox to return to the Shape Format tab.
- Click Shape Outline, then select No Outline from the drop-down menu.
- The textbox lines will be hidden. Be sure to save your document if you need to return to it later.


Advertisement
-
1
Open a project in Microsoft Word. This looks like a W on top of a blue square. Microsoft Word is available to install for Windows and Mac.
- You must have a subscription to use Office 365.
-
2
Create a text box. To do this, click the Insert tab in the top toolbar, then click the Text Box icon in the Text section. You can select Simple Text Box from the presets.
-
3
Insert your text. Input the text you want to edit. You can copy and paste from another program into Microsoft Word.
- Make sure the textbox is still selected.
-
4
Right-click the textbox. A drop-down menu will open.
-
5
Click Format Shape…. This will be at the very bottom of the menu.
- A panel will open on the right side.
- If you don’t see this option, make sure the textbox is selected, not the text.
-
6
Click the «Effects» icon. This looks like a pentagon, next to the paint bucket icon.
-
7
Enter 180 in the X or Y field. If you want your text to be mirrored left-right, enter 180 into the X Rotation field. If you want your text to be mirrored up-down, enter 180 into the Y Rotation field.
- The changes will take effect immediately.
-
8
Remove the textbox lines (optional). If you want to remove the lines around the text, double-click the textbox to return to the Shape Format tab.
- Click Shape Outline, then select No Outline from the drop-down menu.
- The textbox lines will be hidden. You can print your document if needed.


Advertisement
-
1
Open a project in Microsoft Word. This looks like a W on top of a blue square. Microsoft Word is available to install for Windows and Mac.
- You must have a subscription to use Office 365.
- Use this method if you want to change your paper orientation from portrait to landscape.
-
2
Click Layout. This will be in the top toolbar, between Design and References.
-
3
Click Orientation. You can find this at the top, next to Margins.
- A drop-down menu will open.
-
4
Click Landscape. Your Microsoft Word document will change to landscape orientation.
- If you change back to portrait mode after inputting text, the text will follow the portrait mode orientation. It will not save in its landscape position.


Advertisement
Ask a Question
200 characters left
Include your email address to get a message when this question is answered.
Submit
Advertisement
Thanks for submitting a tip for review!
About This Article
Article SummaryX
1. Click Insert.
2. Click Text.
3. Click Text Box.
4. Click Draw Text Box.
5. Click and drag a text box.
6. Type text into the box.
7. Hover the mouse over the box outline.
8. Click the rotation icon and drag in any direction.
Did this summary help you?
Thanks to all authors for creating a page that has been read 1,279,441 times.
Is this article up to date?

Microsoft Word comes equipped with a tool that allows users to align text both vertically and horizontally, giving you complete freedom for determining the position of text in a Word document. Here’s how it all works.
Horizontal alignment, also known as centered alignment, positions the text evenly between the margins on either side of the page. This tool also allows you to be selective with the text you align horizontally, giving you more control over what you can do to your document.
RELATED: How to Change the Alignment of the Numbers in a Numbered List in Microsoft Word
To align text horizontally on a page, highlight the text you want to center. Next, click the “Center Alignment” icon in the “Paragraph” group of the “Home” tab. Alternatively, you can use the Ctrl+E keyboard shortcut.

Your text will now be horizontally aligned. If you don’t already have text typed, it’s also an option to select the center alignment option before entering the text. It’s all up to you.
Aligning Text Vertically in Word
As you’ve probably guessed, vertical alignment positions the text evenly between the upper and lower margins of the page. You won’t notice a difference in the text alignment if you use it on a page that’s already full of text.
To see any real difference, try enabling the horizontal text option before inputting the text in your document.
RELATED: How to Align Text After a Bullet in PowerPoint
To align text vertically on a page, head over to the “Layout” tab and select the small icon in the bottom-right corner of the “Page Setup” group.
This opens the “Page Setup” dialog box. Select the “Layout” tab and then click the arrow next to “Vertical Alignment” in the “Page” section. A selection of vertical alignment options will appear. Go ahead and click “Center” (or choose another option that better suits your requirements).
Your text will now reflect the selected vertical alignment option.
What if you only want to align specific text in the document vertically? There’s also an easy way to make this happen.
First, highlight the text you want to align vertically. Once selected, head back to the “Layout” tab of the “Page Setup” dialog box. Next, choose the desired vertical alignment type, open the drop-down menu next to “Apply To,” select “Selected text,” and then click the “OK” button.
The selected text will now reflect the selected vertical alignment option.
READ NEXT
- › How to Perfectly Align Objects and Images in Microsoft Word
- › How to Center Text in a Microsoft Word Table
- › This 64 GB Flash Drive From Samsung Is Just $8 Right Now
- › Five Types of Phone Damage That Aren’t Covered by Your Free Warranty
- › Spotify Is Shutting Down Its Free Online Game
- › Save Hundreds on Elegoo’s New PHECDA Laser Engraver Through Kickstarter
- › Android’s Nearby Share Has (Unofficially) Arrived on Mac
- › How to Get a Refund on the PlayStation Store
How-To Geek is where you turn when you want experts to explain technology. Since we launched in 2006, our articles have been read billions of times. Want to know more?
Change Word’s default vertical alignment for special design effects
Updated on October 21, 2022
What to Know
- To center text in Word, use the Vertical alignment menu.
- The Vertical Alignment menu also controls Top, Justified, and Bottom text alignment.
- To center text in Word for only part of the document, highlight what you want to center before choosing Vertical Alignment.
This article explains how to center text in Word. Instructions apply to Word for Microsoft 365, Word 2019, Word 2016, Word 2013, Word 2010, Word 2007, and Word 2003.
How to Vertically Align Text in Word
When you want to position text in a section of a document relative to the top and bottom margins, use vertical alignment.
To reflect a change in the vertical alignment, the document page or pages must be only partially full of text.
For Microsoft Word 2019, 2016, 2013, 2010, and 2007
-
Open the Word document in which you want to vertically align the text.
-
Go to the Layout tab (or Page Layout, depending on the version of Word).
-
In the Page Setup group, select the Page Setup dialog launcher (which is located in the lower-right corner of the group).
-
In the Page Setup dialog box, choose the Layout tab.
-
In the Page section, select the Vertical alignment drop-down arrow and choose either Top, Center, Justified, or Bottom.
If you choose Justified, the text is spread out evenly from top to bottom.
-
Select OK.
-
Your text will now be aligned the way you selected.
For Word 2003
To vertically align text in Microsoft Word 2003:
-
Select File.
-
Choose Page Setup.
-
In the Page Setup dialog box, select Layout.
-
Select the Vertical alignment drop-down arrow and choose either Top, Center, Justified, or Bottom.
-
Select OK.
Vertically Align Part of a Word Document
When you use the steps above, the default condition is to change the vertical alignment of the entire Microsoft Word document. If you want to change the alignment of only part of the document, select the text you want to vertically align.
Here’s how to vertically align part of a document:
-
Select the text you want to vertically align.
-
Go to the Layout tab (or Page Layout, depending on the version of Word).
-
In the Page Setup group, select the Page Setup dialog launcher (it’s located in the lower-right corner of the group).
-
In the Page Setup dialog box, choose the Layout tab.
-
In the Page section, select the Vertical alignment drop-down arrow and choose an alignment.
-
In the Preview section, select the Apply to drop-down arrow and choose Selected text.
-
Select OK to apply the alignment to the selected text.
-
Any text before or after the selection retains the existing alignment choices.
If you don’t select text prior to performing the alignment selection, the Selected text preference can only be applied from the cursor’s current location to the end of the document.
To make this work, position the cursor, then:
-
Go to the Layout tab (or Page Layout, depending on the version of Word).
-
In the Page Setup group, select the Page Setup dialog launcher (which is located in the lower-right corner of the group).
-
In the Page Setup dialog box, choose the Layout tab.
-
In the Page section, select the Vertical alignment drop-down arrow and choose an alignment.
-
In the Preview section, select the Apply to drop-down arrow and choose This point forward.
-
Select OK to apply the alignment to the text.
FAQ
-
What is the default text alignment in Microsoft Word?
The standard text alignment default in Word (and most other word processing programs) is left-justified.
-
How do I create vertical text in Microsoft Word?
Create a text box and type what you want into it, then right-click on the edge of the box and select Format Shape from the drop-down menu. Select Size/Layout & Properties > Text Box, then open the drop-down menu next to Text Direction. From there, choose the options that best suit your needs.
Thanks for letting us know!
Get the Latest Tech News Delivered Every Day
Subscribe