
В данной статье я научу вас автоматизировать Microsoft Excel средствами VBS.
В прошлой статье я описывал работу с Word.
Привожу сразу код, так как он подробно прокомментирован:
|
1 2 3 4 5 6 7 8 9 10 11 12 13 14 15 16 17 18 19 20 21 22 23 24 25 26 27 28 29 30 31 32 33 34 35 36 37 38 |
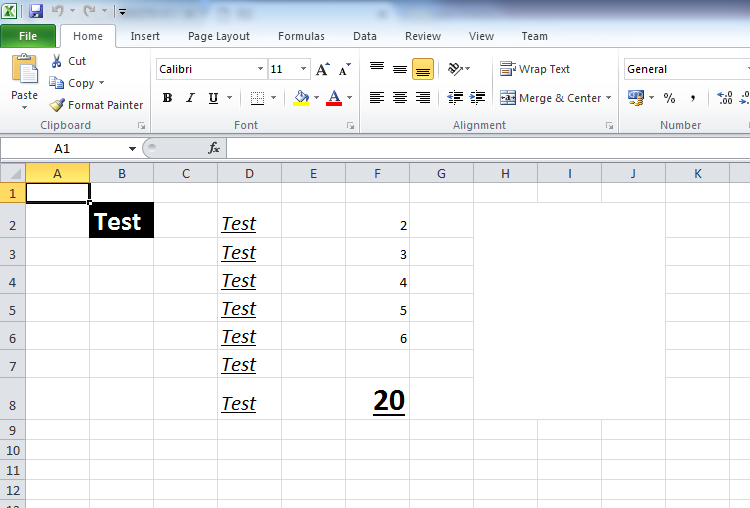
Option Explicit Dim oExcelApp ‘ Объявляем переменные Dim oRangeD2D8 Dim oRangeH2J8 Set oExcelApp = CreateObject(«Excel.Application») ‘ Создаём объект с Excel—ем oExcelApp.Visible = True ‘ Делаем Excel видимым oExcelApp.Workbooks.Add ‘ Добавляем книгу в Excel oExcelApp.Cells(2,2).Font.Bold = True ‘ Делаем текст жирным в ячейке 1,1 oExcelApp.Cells(2,2).Font.Size = 20 ‘ Устанавливаем размер шрифта oExcelApp.Cells(2,2).Font.ColorIndex = 2 ‘ Устанавливаем цвет текста oExcelApp.Cells(2,2).Interior.ColorIndex = 1 ‘ Устанавливаем цвет ячейки oExcelApp.Cells(2,2).Value = «Test» ‘ Добавляем данные Set oRangeD2D8 = oExcelApp.Range(«D2″,»D8») ‘ Получаем доступ к ряду ячеек oRangeD2D8.Font.Size = 16 ‘ Устанавливаем размер шрифта oRangeD2D8.Font.Italic = True ‘ Делаем курсивный текст oRangeD2D8.Font.Underline = True ‘ Делаем текст подчёркнутым oRangeD2D8.Value = «Test» ‘ Устанавливаем для всех них текст Dim i For i = 2 To 6 oExcelApp.Cells(i,6).Value = i ‘ заполняем ячейки числами Next oExcelApp.Cells(8,6).Font.Bold = True oExcelApp.Cells(8,6).Font.Underline = True oExcelApp.Cells(8,6).Font.Size = 24 oExcelApp.Cells(8,6).Formula = «=SUM(F2:F6)» ‘ Добавляем формулу, которая в ячейке F8 отобразит сумму ранее добавленных цифр Set oRangeH2J8 = oExcelApp.Range(«H2»,«J8») ‘ Получаем доступ к ячейкам H2:J8 oRangeH2J8.Merge ‘ Объединяем группу ячеек oExcelApp.Save ‘ Сохраняем Excel файл oExcelApp.Quit ‘ Закрываем Excel |
Результат работы скрипта:
Помогла ли вам данная статья, ответьте в комментариях.
![]() Загрузка…
Загрузка…
(Excel Object Model in VBScript)
Excel Application operations using Excel Application Object
Excel Application Object:
It is used to perform operations on Excel Application.
Create Excel Application Object:
Set Variable = CreateObject(“Excel.Application”)
———————-
Excel Application
Excel Workbook / File
Excel Worksheet / Sheet
Excel File Operations using VBScript Examples:
1) Create an Excel file
Dim objExcel
Set objExcel = CreateObject(“Excel.Application”)
objExcel.Visible = True ‘To view the operation (Creating Excel file) during Execution.
objExcel.Workbooks.Add ‘Create New Workbook / file
objExcel.ActiveWorkbook.SaveAs “C:UsersgcreddyDesktopQTP.xls” ‘Save the Excel workbook /file
objExcel.Quit ‘To close the Excel Application
Set objExcel = Nothing ‘To release the memory
—————————————————
2) Check the existence of QTP file, if not exist then create the file.Dim objFso, objExcel, FilePath
FilePath = “C:UsersgcreddyDesktopQTP.xls”
Set objFso = CreateObject(“Scripting.FileSystemObject”)
Set objExcel = CreateObject(“Excel.Application”)
If Not objFso.FileExists(FilePath) Then
objExcel.Workbooks.Add ‘Create New Workbook / file
objExcel.ActiveWorkbook.SaveAs FilePath
objExcel.Quit
End If
Set objExcel = Nothing ‘To release the memory
—————————————————-
3) Check the existence of QTP file, if exists then open the file and enter some data, If not exist then create the file and enter some data (Using Excel Application Object only)
Dim objFso, objExcel, FilePath
FilePath = “C:UsersgcreddyDesktopQTP.xlsx”
Set objFso = CreateObject(“Scripting.FileSystemObject”)
Set objExcel = CreateObject(“Excel.Application”)
If Not objFso.FileExists(FilePath) Then
objExcel.Workbooks.Add
objExcel.Worksheets(1).Cells(1, 1) = “Hello UFT”
objExcel.ActiveWorkbook.SaveAs FilePath
Else
objExcel.Workbooks.Open (FilePath)
objExcel.Worksheets(1).Cells(1, 1) = “Hello UFT”
objExcel.ActiveWorkbook.Save
End If
objExcel.Quit
Set objExcel = Nothing

Excel Objects
1) Excel Application Object
It is used to perform operations on Excel Application.
Set Variable = CreateObject(“Excel.Application”)
——————————–
2) Excel Workbook object
It is used to work with specified Excel file / Workbook
Set Variable = ExcelApplicationObject.Workbooks.Add / Open(“Filepath”)
——————————–
3) Excel Worksheet object
It is used to work with specified work sheet
Set Varaible = ExcelWorkbookObject.Worksheets(Sheet Id / “Sheet name”)
——————————————————-
Excel Application is always only one.
We may have one or more Workbooks.
We may have multiple sheets in every workbook.
———————————————
> Using (“Excel.Application”) class value we create Excel Application Object.
> We create Excel Workbook object using Excel Application Object.
> We create Excel Worksheet object using Excel workbook object.
————————————–
Difference between File system object model and Excel object model in case of Sub objects.
In File system object model creating Text stream object is mandatory to perform File internal operations like Read, Write, Compare, Search etc…
In Excel Object model creating sub and sub-sub objects optional, if you want to work with multiple files and multiple sheets then we can use sub and sub-sub objects.
———————————————————-
4) Check the existence of QTP file, if exists then open the file and enter some data, If not exist then create the file and enter some data (Using Main and sub objects)
Dim objFso, objExcel, objWorkbook, objWorksheet, FilePath
FilePath = “C:UsersgcreddyDesktopQTP.xlsx”
Set objFso = CreateObject(“Scripting.FileSystemObject”)
Set objExcel = CreateObject(“Excel.Application”)
If Not objFso.FileExists(FilePath) Then
Set objWorkbook = objExcel.Workbooks.Add
Set objWorksheet = objWorkbook.Worksheets(1)
objWorksheet.Cells(1, 1) = “Hello UFT”
objWorkbook.SaveAs FilePath
Else
Set objWorkbook = objExcel.Workbooks.Open (FilePath)
Set objWorksheet = objworkbook.Worksheets(1)
objWorksheet.Cells(1, 1) = “Hello UFT”
objWorkbook.Save
End If
objExcel.Quit
Set objExcel = Nothing
————————————————
5) Read data form Excel file and perform Data driven Testing for Login Functionality.
Dim objExcel, objWorkbook, objWorksheet, i, RowsCount
Set objExcel = CreateObject(“Excel.Application”)
Set objWorkbook = objExcel.Workbooks.Open(“C:UsersgcreddyDesktopQTP.xlsx”)
Set objWorksheet = objWorkbook.Worksheets(1)
RowsCount = objWorksheet.UsedRange.Rows.Count
For i = 2 To RowsCount Step 1
SystemUtil.Run “C:Program FilesHPUnified Functional Testingsamplesflightappflight4a.exe”
Dialog(“Login”).Activate
Dialog(“Login”).WinEdit(“Agent Name:”).Set objWorksheet.Cells(i, “A”) ‘i is Row, A is Column Name
Dialog(“Login”).WinEdit(“Password:”).Set objWorksheet.Cells(i, 2) ‘ 2 is Column id
wait 2
Dialog(“Login”).WinButton(“OK”).Click
Window(“Flight Reservation”).Close
Next
objExcel.Quit
Set objWorksheet = Nothing
Set objWorkbook = Nothing
Set objExcel = Nothing
————————————————
6) Read data form Excel file and perform Data driven Testing for Login Functionality. And write Test Result to the Same file 3rd column.
Dim objExcel, objWorkbook, objWorksheet, i, RowsCount
Set objExcel = CreateObject(“Excel.Application”)
Set objWorkbook = objExcel.Workbooks.Open(“C:UsersgcreddyDesktopQTP.xlsx”)
Set objWorksheet = objWorkbook.Worksheets(1)
RowsCount = objWorksheet.UsedRange.Rows.Count
For i = 2 To RowsCount Step 1
SystemUtil.Run “C:Program FilesHPUnified Functional Testingsamplesflightappflight4a.exe”
Dialog(“Login”).Activate
Dialog(“Login”).WinEdit(“Agent Name:”).Set objWorksheet.Cells(i, “A”) ‘i is Row, A is Column Name
Dialog(“Login”).WinEdit(“Password:”).Set objWorksheet.Cells(i, 2) ‘ 2 is Column id
wait 2
Dialog(“Login”).WinButton(“OK”).Click
If Window(“Flight Reservation”).Exist (12) Then
Window(“Flight Reservation”).Close
objWorksheet.Cells(i, 3) = “Login Successful – Passed”
Else
SystemUtil.CloseDescendentProcesses
objWorksheet.Cells(i, 3) = “Login Unsuccessful – Failed”
End If
Next
objWorkbook.Save
objExcel.Quit
Set objWorksheet = Nothing
Set objWorkbook = Nothing
Set objExcel = Nothing
————————————————
7) Read data form Excel file and perform Data driven Testing for Login Functionality. And write Test Result and Error messages to the same file.Dim objExcel, objWorkbook, objWorksheet, i, RowsCount
Set objExcel = CreateObject(“Excel.Application”)
Set objWorkbook = objExcel.Workbooks.Open(“C:UsersgcreddyDesktopQTP.xlsx”)
Set objWorksheet = objWorkbook.Worksheets(1)
RowsCount = objWorksheet.UsedRange.Rows.Count
For i = 2 To RowsCount Step 1
SystemUtil.Run “C:Program FilesHPUnified Functional Testingsamplesflightappflight4a.exe”
Dialog(“Login”).Activate
Dialog(“Login”).WinEdit(“Agent Name:”).Set objWorksheet.Cells(i, “A”) ‘i is Row, A is Column Name
Dialog(“Login”).WinEdit(“Password:”).Set objWorksheet.Cells(i, 2) ‘ 2 is Column id
wait 2
Dialog(“Login”).WinButton(“OK”).Click
If Window(“Flight Reservation”).Exist (12) Then
Window(“Flight Reservation”).Close
objWorksheet.Cells(i, 3) = “Login Successful – Passed”
Else
objWorksheet.Cells(i, 4) = Dialog(“Login”).Dialog(“Flight Reservations”).Static(“Agent name must be at”).GetROProperty(“text”)
SystemUtil.CloseDescendentProcesses
objWorksheet.Cells(i, 3) = “Login Unsuccessful – Failed”
End If
Next
objWorkbook.Save
objExcel.Quit
Set objWorksheet = Nothing
Set objWorkbook = Nothing
Set objExcel = Nothing
——————————————–
 Read Button Names from Login Dialog and export to Excel file 2nd sheet.Dim objExcel, objWorkbook, objWorksheet, oButton, Buttons, i
Set objExcel = CreateObject(“Excel.Application”)
Set objWorkbook= objExcel.Workbooks.Open (“C:UsersgcreddyDesktopQTP.xlsx”)
Set objworksheet = objWorkbook.Worksheets(2)
Set oButton = Description.Create
oButton(“Class Name”).Value = “WinButton”
Set Buttons = Dialog(“Login”).ChildObjects(oButton)
Msgbox Buttons.Count
objWorksheet.cells(1, 1) = “Button Names”
For i = 0 To Buttons.Count – 1 Step 1
objWorksheet.cells(i+2, 1) = Buttons(i).GetRoProperty(“text”)
Next
objWorkbook.Save
objExcel.Quit
Set objWorksheet = Nothing
Set objWorkbook = Nothing
Set objexcel = Nothing
—————————————————
9) Read Link names from Google Home page and export to Excel file 3rd sheet.Dim objExcel, objWorkbook, objWorksheet, oLink, Links, i
Set objExcel = CreateObject(“Excel.Application”)
Set objWorkbook= objExcel.Workbooks.Open (“C:UsersgcreddyDesktopQTP.xlsx”)
Set objworksheet = objWorkbook.Worksheets(3)
Set oLink = Description.Create
oLink(“micclass”).Value = “Link”
Set Links = Browser(“Google”).Page(“Google”).ChildObjects(oLink)
Msgbox Links.Count
objWorksheet.cells(1, 1) = “Link Names”
For i = 0 To Links.Count – 1 Step 1
objWorksheet.cells(i+2, 1) = Links(i).GetRoProperty(“text”)
Next
objWorkbook.Save
objExcel.Quit
Set objWorksheet = Nothing
Set objWorkbook = Nothing
Set objexcel = Nothing
—————————————————
10) Read Customer names from 1 to 10 Records and export to Excel
Dim objExcel, objWorkbook, objWorksheet, Customer_Name, i
Set objExcel = CreateObject(“Excel.Application”)
Set objWorkbook= objExcel.Workbooks.Open (“C:UsersgcreddyDesktopQTP.xlsx”)
Set objworksheet = objWorkbook.Worksheets(2)
objWorksheet.cells(1, 1) = “Customer Names”
For i = 1 To 10 Step 1
Window(“Flight Reservation”).Activate
Window(“Flight Reservation”).WinButton(“Button”).Click
Window(“Flight Reservation”).Dialog(“Open Order”).WinCheckBox(“Order No.”).Set “ON”
Window(“Flight Reservation”).Dialog(“Open Order”).WinEdit(“Edit”).Set i
Window(“Flight Reservation”).Dialog(“Open Order”).WinButton(“OK”).Click
Customer_Name = Window(“Flight Reservation”).WinEdit(“Name:”).GetROProperty(“text”)
objWorksheet.Cells(i+1, 1) = Customer_Name
Next
objWorkbook.Save
objExcel.Quit
Set objWorksheet = Nothing
Set objWorkbook = Nothing
Set objexcel = Nothing
————————————————–
11) Create an Excel File and Rename 1st sheet as “Module”, 2nd sheet as “TestCase”, and 3rd sheet as “TestStep”.
Dim objExcel
Set objExcel = CreateObject(“Excel.Application”)
objExcel.Workbooks.Add
objExcel.Worksheets(1).Name = “Module”
objExcel.Worksheets(2).Name = “TestCase”
objExcel.Worksheets(3).Name = “TestStep”
objExcel.ActiveWorkbook.SaveAs “C:UsersgcreddyDesktopQTP2.xlsx”
objExcel.Quit
Set objExcel = Nothing
12) Create an Excel file and Add one more sheet.Dim objExcel
Set objExcel = CreateObject(“Excel.Application”)
objExcel.Workbooks.Add ‘Create New workbook
objexcel.Worksheets.Add ‘Create New worksheet
objExcel.ActiveWorkbook.SaveAs “C:UsersgcreddyDesktopQTP3.xlsx”
objExcel.Quit
Set objExcel = Nothing
———————————————
Assignment:
Create an Excel file and Move 1st sheet to 3rd position.
Creation Time:
Sheet1 Sheet2 sheet3
Move 1st sheet to 3rd position
Sheet2 Sheet3 Sheet1
————————————————–
Comparison examples:
i) One to one comparison (Textual and binary)
ii) Many to many comparison
————————————————-
Follow me on social media:
Table of Contents
- Purpose
- Example Case (Input Excel File)
- Other Considerations and Further Steps
- Code Snippet
- Customize Code to Your Enviornment (Domain, OU, etc.)
- Execute the Script
- Sample Output / Results
- See Also
Purpose
This article explains how to use a VBScript application to read a single-column Excel spreadsheet containing a list of computers, check that list against Active Directory (AD), and then update the spreadsheet with the corresponding computer’s
AD Description field, if present.
In the event the computer does not exist in Active Directory, the Description field on the Excel spreadsheet will be updated with the text «NOT FOUND IN AD.»In the event the computer exists in AD, but the description field in AD is empty, the Description field in the Excel spreadsheet will be updated with the word «BLANK» next to the computer on the list.
Example Case (Input Excel File)
Below is an example of what the initial spreadsheet would look like.
WARNING: DO NOT HAVE EXCEL OPEN – Not even for other spreadsheets during the script run!
In this scenario, the below primary constraints were tested:
1)
Include 2 valid AD server names with valid descriptions in AD, one with name
2)
Include 1 valid AD server name, with no description blank, one non-existent server
3)
Include 1 invalid AD server name
The tested list includes the specific entries listed below:
·
FileserverA (this would have a description in AD)
·
FileserverB (no description in AD)
·
Test (this would have a description in AD)
·
BrZmN (this would be a non-existent server)
Below is a screen-shot of the initial (pre-script) servers.xlsx document:
Other Considerations and Further Steps
Preferably, delete any other worksheet tabs, so that the only tab remaining is “Sheet1.” Alternatively, you can forego the deletion of other tabs, since this script deals with “Sheet1” only.
Your initial “servers.xlsx” document should contain only the left-most Column 1 populated with your server names and, per the existing script design; your script should be located in your “c:scripts” folder. Alternatively, you may already
have a number of server names with Description fields already filled in. This will not be an issue, since the script automatically will bypass any Excel server record that already contains a non-blank description beside it in Column 2. Therefore, it is acceptable
for your initial spreadsheet already to contain data in Column 2.
Note: You may, if desired, customize the script to have different behavior if Column 2 contains data; i.e., you may wish to have the script always update the Column 2 (Description) field in Excel with the then-current data found in
AD (or with “BLANK” and/or “NOT FOUND IN AD» for each such occurrence).
After you ensure that you have entered the server names into your spreadsheet Column 1 as desired and required; save the following script to your “c:scripts” with the file name “checkservers.vbs.”
(Note: The assumption here is that you know how to open Notepad and paste and save the below code).
Code Snippet
NOTE: Below is only a snippet (portion) of the full code for general understanding. The below code section WILL NOT WORK, unless you click and download/save the code from the embedded links
below or from the «References» section!
The basic premise that the code uses is as follows:
1) Read through all rows of Col 1 on an Excel document (Main code section)
2) Read through each AD computer record (Subroutine section)
3) Update Excel with Description from AD (Main code section)
[Start of Code snippet section]
'-------------------------------------------------------------------------
' Start of MAIN code (checkservers.vbs)
'-------------------------------------------------------------------------
' VBScript: checkservers.vbs
' Author: Jeff Mason aka TNJMAN aka bitdoctor
' 09/06/2013
'
'Basic premise: 1) Read through all rows of Col 1 on an Excel document
' 2) Read through each AD computer record
' 3) Update Excel with Description from AD
'Assumptions/Notes:
' 1) Create Excel document (c:scriptsservers.xlsx) with ONE worksheet,
' containing only "server name" in Column 1
‘Other assumptions in the FULL SCRIPT, download now
' Assumptions:
' You must Set excelPath = "C:scriptsservers.xlsx" (or wherever your xlsx file is)
' You must have at least "read" permissions to AD/LDAP
'
Option
Explicit
Dim
objExcel
Dim
excelPath
Dim
worksheetCount
Dim
counter
' To count rows and/or columns
Dim
currentWorkSheet
‘…
excelPath =
"C:scriptsservers.xlsx"
‘Full code is listed in the FULL SCRIPT, download now
WScript.Echo
"Reading Data from Path/File: "
& excelPath
Set
objExcel = CreateObject("Excel.Application")
objExcel.DisplayAlerts = 0
' Don't display any messages about conversion and so forth
WScript.Echo
"-------------------------------------------------------"
WScript.Echo
"Reading data from worksheet "
& workSheetCount
WScript.Echo
"-------------------------------------------------------"
& vbCRLF
Set
currentWorkSheet = objExcel.ActiveWorkbook.Worksheets(workSheetCount)
' What is the leftmost column in the spreadsheet that has data in it
left = currentWorksheet.UsedRange.Column
Set
Cells = currentWorksheet.Cells
'-----------------------------------------------------------------------------
' Row Loop - Loop through each row in the worksheet (but only for Column 1)
'
' Only deal with Cols 1 & 2 of Sheet1, since SERVER=Col1 and DESCRIPTION=Col2
' Column 2 is built by "checksvr" subroutine, based on Column 1)
'
For
row = 0 to (usedRowsCount-1)
' only look at rows/cols in the "used" range
curRow = row+top
' curCol = column+left
If
IsEmpty(strDescription) Then
' If Col 2 already populated, skip to next row in sheet
If
Not
(IsEmpty(server)) Then
‘Full code is listed in the FULL SCRIPT, download now
End
If
End
If
Next
'
' End Row loop
'-----------------------------------------------------------------------------
' Done with the current worksheet, release the memory
Set
currentWorkSheet = Nothing
‘Save and close the workbook - Full code is listed in the FULL SCRIPT, download now
WScript.Echo
"Finished."
Set
currentWorkSheet = Nothing
' Finished with Excel object, release it from memory & get out !!!
Set
objExcel = Nothing
WScript.Quit(0)
'-------------------------------------------------------------------------
' End of MAIN code
'-------------------------------------------------------------------------
'-------------------------------------------------------------------------
' Subroutine (checksvr) to check for the sever name in Active Directory
'-------------------------------------------------------------------------
'
Sub
checksvr(svr)
On
Error
ResumeNext
' Point to the domain/ldap root
' Query all Active Directory (normally, leave this commented, query specific OU(s)
' strRoot = objRootDSE.Get("DefaultNamingContext") 'Uncomment to search ENTIRE AD TREE
' Query a specific Organizational Unit
strRoot =
"OU=Servers,DC=YOUR-DOMAIN,DC=com"
' Comment this out, if searching ALL OF AD
‘…
objCn.Provider =
"ADsDSOObject"
objCn.Open
"Active Directory Provider"
' Filter the query for only sAMAccountName,description of any computers in AD
objCmd.commandtext = …
‘…
svrcmp = UCase(svr) &
"$" 'Upper-case the Server entry from the spreadsheet for consistent compare
svrflag =
"" 'Clear out the "found-server" flag
Do
While
NotobjRes.EOF
' If description is blank/null, set the value to the word "BLANK"
strDescription =
""
If
Not
(IsNUll(objRes.Fields("description").Value))
Then
‘ …
‘Full code is listed in the FULL SCRIPT, download now
' We want to check ALL descriptions, including null descriptions
' But only for the server passed into this script as an argument
If
svrcmp = objRes.Fields("sAMAccountName").Value
Then
'If Excel server name found in AD, set svrflag = "TRUE" & end the subroutine
svrflag =
"TRUE"
'Write this to the Excel spreadsheet / exit the subroutine
Exit
Sub
End
If
'Move to / read the next AD resource record
objRes.MoveNext
Loop
'If flag never set to "TRUE" then fall out through here - server not found in AD
strDescription =
"NOT FOUND IN AD"
objRes.close
ObjCn.close
'-------------------------------------------------------------------------
End
Sub
'-------------------------------------------------------------------------
[End of Code snippet section]
Customize Code to Your Enviornment (Domain, OU, etc.)
You must edit the full code and customize the “strRoot” variable in the script to match your own AD environment.
Caution: Take care to modify only the 2nd “strRoot” line, since the 1st strRoot line is commented out.
In the script, a generic line is included (strRoot = «OU=Servers,DC=YOUR-DOMAIN,DC=com«); this is the only line that should need to be customized, before saving your script.
As an example, if your domain is “contoso.com,” and your servers are located in the “Servers” Organizational Unit (OU), then the requisite modified “strRoot” line would look like the following:
strRoot = «OU=Servers,DC=contoso,DC=com«
After modifying the “strRoot” line to match your AD environment, save the modified script as “c:scriptscheckservers.vbs.”
Execute the Script
Next, invoke a command shell from your Windows workstation computer: Click “Start,“ then type “cmd” and press Enter. This will invoke the Windows Command Shell (often called the DOS Command Prompt).

Change your working directory to your scripts folder and execute the “checkservers.vbs” script (i.e., type “cscript checkservers.vbs” and press Enter):

Sample Output / Results
Following is the output from a live run of the “checkservers.vbs” script, followed by the spreadsheet after the updates applied by the script:
c:scripts>cscript checkservers.vbs
Microsoft (R) Windows Script Host Version 5.8
Copyright (C) Microsoft Corporation. All rights reserved.
Reading Data from Path/File: C:scriptsservers.xlsx
——————————————————-
Reading data from worksheet 1
——————————————————-
Finished.
c:scripts>
After executing the “checkservers.vbs” script against the “servers.xlsx” initial spreadsheet, below is a screen-shot of the resultant, updated “servers.xlsx” spreadsheet:

Note: The script found a description for the first computer name, “FileserverA,” in AD and updated line 1 with the description, “Main file server.” The script found that “FileserverB” existed in AD, but had an empty Description
field, thus the script updated the spreadsheet with the word “BLANK.” The script bypassed checking the computer named “Test,” because the spreadsheet already contained a description entry for that computer. The script did not find an entry for computer “BrZmN,”
thus the script updated the spreadsheet with the phrase, “NOT FOUND IN AD.”
See Also
The
above-referenced TechNet published script can be obtained from above embedded links or from the following link:
http://gallery.technet.microsoft.com/scriptcenter/VBScript-to-read-Excel-ce3bff05
Base code for parsing through AD was found here:
Mr. Gregory Shiro’s script for parsing AD was found in TechNet forums (used for subroutine):
http://tinyurl.com/ljwjfwe
— VBA & VBS Portal
— Wiki: Portal of TechNet Wiki Portals
How do I create an excel file using VBScript? I searched the net but it just mentions opening an existing file.
This is the extraction from the Internet shown below
Set objExcel = CreateObject("Excel.Application")
Set objWorkbook = objExcel.Workbooks.Open("C:ScriptsNew_users.xls")
I want to know how do you create a new excel file or .xls using vbscript?
Thanks and regards
Maddy
![]()
ckpepper02
3,2675 gold badges29 silver badges43 bronze badges
asked Jul 14, 2009 at 5:36
2
Here is a sample code
strFileName = "c:test.xls"

Set objExcel = CreateObject("Excel.Application")
objExcel.Visible = True

Set objWorkbook = objExcel.Workbooks.Add()
objWorkbook.SaveAs(strFileName)

objExcel.Quit
answered Jul 14, 2009 at 5:52
![]()
ShobanShoban
22.9k8 gold badges63 silver badges107 bronze badges
1
set objExcel = CreateObject("Excel.Application")
objExcel.Application.DisplayAlerts = False
set objWorkbook=objExcel.workbooks.add()
objExcel.cells(1,1).value = "Test value"
objExcel.cells(1,2).value = "Test data"
objWorkbook.Saveas "c:testXLS.xls"
objWorkbook.Close
objExcel.workbooks.close
objExcel.quit
set objExcel = nothing `
![]()
CJ7
22.3k65 gold badges186 silver badges318 bronze badges
answered Mar 23, 2015 at 11:48
![]()
MD5MD5
1,31615 silver badges14 bronze badges
'Create Excel

Set objExcel = Wscript.CreateObject("Excel.Application")

objExcel.visible = True

Set objWb = objExcel.Workbooks.Add

objWb.Saveas("D:Example.xlsx")

objExcel.Quit
answered May 17, 2016 at 7:26
![]()
Set objExcel = CreateObject("Excel.Application")
objExcel.Visible = true
Set objWorkbook = objExcel.Workbooks.Add()
Set objWorksheet = objWorkbook.Worksheets(1)

intRow = 2
dim ch
objWorksheet.Cells(1,1) = "Name"
objWorksheet.Cells(1,2) = "Subject1"
objWorksheet.Cells(1,3) = "Subject2"
objWorksheet.Cells(1,4) = "Total"
for intRow = 2 to  10000
name= InputBox("Enter your name")
sb1 = cint(InputBox("Enter your Marks in Subject 1"))
sb2 = cint(InputBox("Enter your Marks in Subject 2"))
total= sb1+sb2+sb3+sb4
objExcel.Cells(intRow, 1).Value = name
objExcel.Cells(intRow, 2).Value = sb1
objExcel.Cells(intRow, 3).Value = sb2
objExcel.Cells(intRow, 4).Value = total
ch = InputBox("Do you want continue..? if no then type no or y to continue")
    If ch = "no" Then Exit For
Next

objExcel.Cells.EntireColumn.AutoFit

MsgBox "Done"
enter code here
answered Jan 14, 2015 at 5:21
![]()
PiushPiush
212 bronze badges
This code creates the file temp.xls in the desktop but it uses the SpecialFolders property, which is very useful sometimes!
set WshShell = WScript.CreateObject("WScript.Shell")
strDesktop = WshShell.SpecialFolders("Desktop")

set objExcel = CreateObject("Excel.Application")
Set objWorkbook = objExcel.Workbooks.Add()
objWorkbook.SaveAs(strDesktop & "temp.xls")
answered Sep 15, 2015 at 13:37
![]()
Содержание
- Базовые скрипты для сценариев Office в Excel
- Основные сведения о скриптах
- Чтение и ведение журнала одной ячейки
- Чтение активной ячейки
- Добавление данных в диапазон
- Изменение соседней ячейки
- Изменение всех смежных ячеек
- Изменение каждой отдельной ячейки в диапазоне
- Получение групп ячеек на основе специальных условий
- Видимость строк и столбцов
- Скрытие столбцов
- Показать все строки и столбцы
- Заморозка выделенных ячеек
- Коллекции
- Итерации по коллекциям
- Запрос и удаление из коллекции
- Таблицы
- Создание отсортированных таблиц
- Фильтрация таблицы
- Динамические ссылки на табличные значения
- Перед скриптом
- После скрипта
- Отображение данных
- Применение условного форматирования
- Запись значений «Общий итог» из сводной таблицы
- Создание раскрывающегося списка с помощью проверки данных
- Формулы
- Одна формула
- Обработка ошибки, #SPILL! возвращаемой формулой
- Замените все формулы их результирующих значений
- Предложить новые примеры
- simply-coded / CreateExcelFile.vbs
- VBScript Tutorial 8
- VBScript Tutorial 8
- (Excel Object Model in VBScript)
- Excel File Operations using VBScript Examples:
- Excel Objects
Базовые скрипты для сценариев Office в Excel
Ниже приведены простые скрипты, которые можно использовать в собственных книгах. Чтобы использовать их в Excel, выполните следующие действия:
- Откройте книгу в Excel.
- Откройте вкладку Автоматизировать.
- Выберите Создать сценарий.
- Замените весь скрипт образцом по своему выбору.
- Выберите Выполнить в области задач редактора кода.
Основные сведения о скриптах
В этих примерах демонстрируются основные стандартные блоки для сценариев Office. Разверните эти скрипты, чтобы расширить решение и решить распространенные проблемы.
Чтение и ведение журнала одной ячейки
Этот пример считывает значение A1 и выводит его на консоль.
Чтение активной ячейки
Этот скрипт регистрирует значение текущей активной ячейки. Если выбрано несколько ячеек, верхняя левая ячейка будет зарегистрирована.
Добавление данных в диапазон
Этот скрипт добавляет набор значений на новый лист. Значения начинаются в ячейке A1. Данные, используемые в этом скрипте, предопределены, но могут быть источником из других мест в книге или из нее.
Изменение соседней ячейки
Этот скрипт получает смежные ячейки по относительным ссылкам. Обратите внимание, что если активная ячейка находится в верхней строке, часть сценария завершается ошибкой, так как она ссылается на ячейку над выбранной в данный момент.
Изменение всех смежных ячеек
Этот скрипт копирует форматирование в активной ячейке в соседние ячейки. Обратите внимание, что этот скрипт работает только в том случае, если активная ячейка не размещена на краю листа.
Изменение каждой отдельной ячейки в диапазоне
Этот скрипт выполняет цикл над текущим диапазоном выбора. Он очищает текущее форматирование и задает цвет заливки в каждой ячейке случайным цветом.
Получение групп ячеек на основе специальных условий
Этот скрипт получает все пустые ячейки в используемом диапазоне текущего листа. Затем он выделяет все эти ячейки желтым фоном.
Видимость строк и столбцов
В этих примерах показано, как отображать, скрывать и закреплять строки и столбцы.
Скрытие столбцов
Этот скрипт скрывает столбцы «D», «F» и «J».
Показать все строки и столбцы
Этот скрипт получает используемый диапазон листа, проверяет наличие скрытых строк и столбцов и отображает их.
Заморозка выделенных ячеек
Этот скрипт проверяет, какие ячейки выбраны в настоящее время, и замораживает выделение, чтобы эти ячейки всегда были видимы.
Коллекции
Эти примеры работают с коллекциями объектов в книге.
Итерации по коллекциям
Этот скрипт получает и регистрирует имена всех листов в книге. Он также задает для цветов вкладки случайный цвет.
Запрос и удаление из коллекции
Этот скрипт создает новый лист. Он проверяет наличие существующей копии листа и удаляет ее перед созданием нового листа.
В примерах в этом разделе показано, как использовать объект JavaScript Date .
В следующем примере возвращается текущая дата и время, а затем эти значения записываются в две ячейки активного листа.
Следующий пример считывает дату, хранящуюся в Excel, и преобразует ее в объект JavaScript Date. Он использует числовой серийный номер даты в качестве входных данных для даты JavaScript. Этот серийный номер описан в статье о функции NOW().
Таблицы
Примеры в этом разделе демонстрируют распространенные взаимодействия с таблицами Excel.
Создание отсортированных таблиц
Этот пример создает таблицу из используемого диапазона текущего листа, а затем сортирует ее по первому столбцу.
Фильтрация таблицы
Этот пример фильтрует существующую таблицу, используя значения в одном из столбцов.
Скопируйте отфильтрованные сведения в книгу с помощью Range.copyFrom . Добавьте следующую строку в конец сценария, чтобы создать новый лист с отфильтрованными данными.
Динамические ссылки на табличные значения
Этот скрипт использует синтаксис @COLUMN_NAME для задания формул в столбце таблицы. Имена столбцов в таблице можно изменить, не изменяя этот скрипт.
Перед скриптом
| Month | ЦЕНА | Проданные единицы | Итого |
|---|---|---|---|
| Января | 45 | 5 | |
| Февраля | 45 | 3 | |
| Мар | 45 | 6 |
После скрипта
| Month | ЦЕНА | Проданные единицы | Итого |
|---|---|---|---|
| Января | 45 | 5 | 225 |
| Февраля | 45 | 3 | 135 |
| Мар | 45 | 6 | 270 |
Отображение данных
В этих примерах показано, как работать с данными на листе и предоставлять пользователям лучшее представление или организацию.
Применение условного форматирования
В этом примере применяется условное форматирование к используемому в настоящее время диапазону на листе. Условное форматирование — это зеленая заливка для верхних 10 % значений.
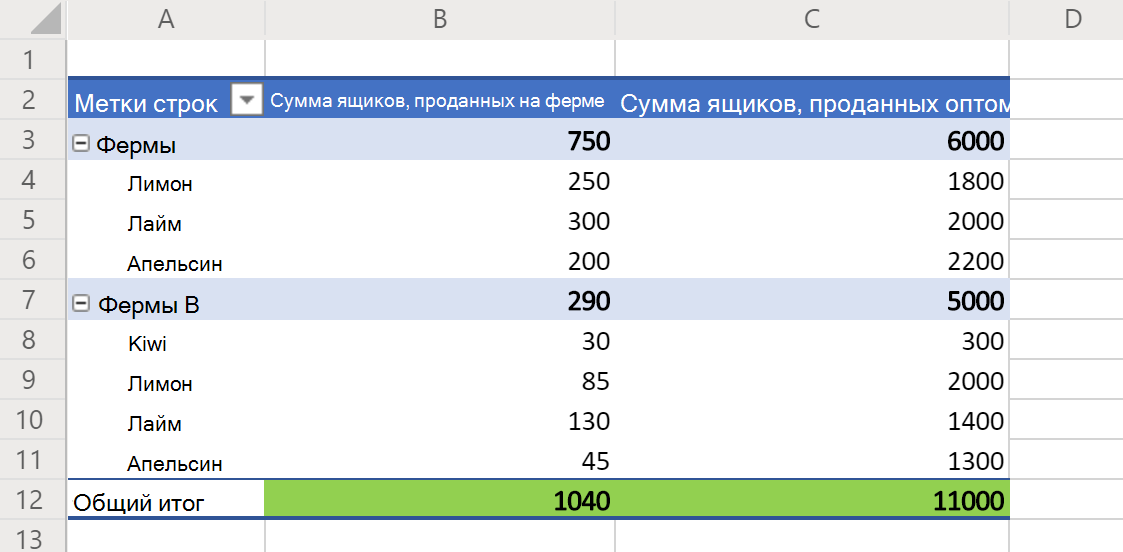
Запись значений «Общий итог» из сводной таблицы
Этот пример находит первую сводную таблицу в книге и записывает значения в ячейки «Общий итог» (как выделено зеленым цветом на рисунке ниже).
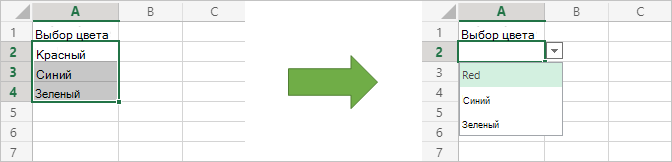
Создание раскрывающегося списка с помощью проверки данных
Этот скрипт создает раскрывающийся список выделения для ячейки. В качестве вариантов для списка используются существующие значения выбранного диапазона.
Формулы
В этих примерах используются формулы Excel и показано, как работать с ними в скриптах.
Одна формула
Этот скрипт задает формулу ячейки, а затем показывает, как Excel сохраняет формулу и значение ячейки отдельно.
Обработка ошибки, #SPILL! возвращаемой формулой
Этот скрипт транспонирует диапазон «A1:D2» в «A4:B7» с помощью функции TRANSPOSE. Если транспонирование приводит к #SPILL ошибке, оно очищает целевой диапазон и снова применяет формулу.
Замените все формулы их результирующих значений
Этот скрипт заменяет каждую ячейку текущего листа, содержащую формулу с результатом этой формулы. Это означает, что после выполнения скрипта не будет никаких формул, только значения.
Предложить новые примеры
Мы приветствуем предложения по новым образцам. Если существует распространенный сценарий, который поможет другим разработчикам скриптов, сообщите нам в разделе отзывов в нижней части страницы.
Источник
simply-coded / CreateExcelFile.vbs
This file contains bidirectional Unicode text that may be interpreted or compiled differently than what appears below. To review, open the file in an editor that reveals hidden Unicode characters. Learn more about bidirectional Unicode characters
| ‘Microsoft Excel Automation Basics |
| ‘:: Create and edit an Excel File. |
| ‘——————————— |
| ‘create the excel object |
| Set objExcel = CreateObject( «Excel.Application» ) |
| ‘view the excel program and file, set to false to hide the whole process |
| objExcel.Visible = True |
| ‘add a new workbook |
| Set objWorkbook = objExcel.Workbooks.Add |
| ‘set a cell value at row 3 column 5 |
| objExcel.Cells( 3 , 5 ).Value = «new value» |
| ‘change a cell value |
| objExcel.Cells( 3 , 5 ).Value = «something different» |
| ‘delete a cell value |
| objExcel.Cells( 3 , 5 ).Value = «» |
| ‘get a cell value and set it to a variable |
| r3c5 = objExcel.Cells( 3 , 5 ).Value |
| ‘save the new excel file (make sure to change the location) ‘xls for 2003 or earlier |
| objWorkbook.SaveAs «C:UsersUserNameDesktopvbsTest.xlsx» |
| ‘close the workbook |
| objWorkbook.Close |
| ‘exit the excel program |
| objExcel.Quit |
| ‘release objects |
| Set objExcel = Nothing |
| Set objWorkbook = Nothing |
This file contains bidirectional Unicode text that may be interpreted or compiled differently than what appears below. To review, open the file in an editor that reveals hidden Unicode characters. Learn more about bidirectional Unicode characters
Источник
VBScript Tutorial 8
VBScript Tutorial 8
(Excel Object Model in VBScript)
Excel Application operations using Excel Application Object
Excel Application Object:
It is used to perform operations on Excel Application.
Create Excel Application Object:
Set Variable = CreateObject(“Excel.Application”)
———————-
Excel Application
Excel Workbook / File
Excel Worksheet / Sheet
Excel File Operations using VBScript Examples:
1) Create an Excel file
Dim objExcel
Set objExcel = CreateObject(“Excel.Application”)
objExcel.Visible = True ‘To view the operation (Creating Excel file) during Execution.
objExcel.Workbooks.Add ‘Create New Workbook / file
objExcel.ActiveWorkbook.SaveAs “C:UsersgcreddyDesktopQTP.xls” ‘Save the Excel workbook /file
objExcel.Quit ‘To close the Excel Application
Set objExcel = Nothing ‘To release the memory
—————————————————
2) Check the existence of QTP file, if not exist then create the file.Dim objFso, objExcel, FilePath
FilePath = “C:UsersgcreddyDesktopQTP.xls”
Set objFso = CreateObject(“Scripting.FileSystemObject”)
Set objExcel = CreateObject(“Excel.Application”)
If Not objFso.FileExists(FilePath) Then
objExcel.Workbooks.Add ‘Create New Workbook / file
objExcel.ActiveWorkbook.SaveAs FilePath
objExcel.Quit
End If
Set objExcel = Nothing ‘To release the memory
—————————————————-
3) Check the existence of QTP file, if exists then open the file and enter some data, If not exist then create the file and enter some data (Using Excel Application Object only)
Dim objFso, objExcel, FilePath
FilePath = “C:UsersgcreddyDesktopQTP.xlsx”
Set objFso = CreateObject(“Scripting.FileSystemObject”)
Set objExcel = CreateObject(“Excel.Application”)
If Not objFso.FileExists(FilePath) Then
objExcel.Workbooks.Add
objExcel.Worksheets(1).Cells(1, 1) = “Hello UFT”
objExcel.ActiveWorkbook.SaveAs FilePath
Else
objExcel.Workbooks.Open (FilePath)
objExcel.Worksheets(1).Cells(1, 1) = “Hello UFT”
objExcel.ActiveWorkbook.Save
End If
objExcel.Quit
Set objExcel = Nothing
Excel Object Model in VBScript
Excel Objects
1) Excel Application Object
It is used to perform operations on Excel Application.
Set Variable = CreateObject(“Excel.Application”)
——————————–
2) Excel Workbook object
It is used to work with specified Excel file / Workbook
Set Variable = ExcelApplicationObject.Workbooks.Add / Open(“Filepath”)
——————————–
3) Excel Worksheet object
It is used to work with specified work sheet
Set Varaible = ExcelWorkbookObject.Worksheets(Sheet Id / “Sheet name”)
——————————————————-
Excel Application is always only one.
We may have one or more Workbooks.
We may have multiple sheets in every workbook.
———————————————
> Using (“Excel.Application”) class value we create Excel Application Object.
> We create Excel Workbook object using Excel Application Object.
> We create Excel Worksheet object using Excel workbook object.
————————————–
Difference between File system object model and Excel object model in case of Sub objects.
In File system object model creating Text stream object is mandatory to perform File internal operations like Read, Write, Compare, Search etc…
In Excel Object model creating sub and sub-sub objects optional, if you want to work with multiple files and multiple sheets then we can use sub and sub-sub objects.
———————————————————-
4) Check the existence of QTP file, if exists then open the file and enter some data, If not exist then create the file and enter some data (Using Main and sub objects)
Dim objFso, objExcel, objWorkbook, objWorksheet, FilePath
FilePath = “C:UsersgcreddyDesktopQTP.xlsx”
Set objFso = CreateObject(“Scripting.FileSystemObject”)
Set objExcel = CreateObject(“Excel.Application”)
If Not objFso.FileExists(FilePath) Then
Set objWorkbook = objExcel.Workbooks.Add
Set objWorksheet = objWorkbook.Worksheets(1)
objWorksheet.Cells(1, 1) = “Hello UFT”
objWorkbook.SaveAs FilePath
Else
Set objWorkbook = objExcel.Workbooks.Open (FilePath)
Set objWorksheet = objworkbook.Worksheets(1)
objWorksheet.Cells(1, 1) = “Hello UFT”
objWorkbook.Save
End If
objExcel.Quit
Set objExcel = Nothing
————————————————
5) Read data form Excel file and perform Data driven Testing for Login Functionality.
Dim objExcel, objWorkbook, objWorksheet, i, RowsCount
Set objExcel = CreateObject(“Excel.Application”)
Set objWorkbook = objExcel.Workbooks.Open(“C:UsersgcreddyDesktopQTP.xlsx”)
Set objWorksheet = objWorkbook.Worksheets(1)
For i = 2 To RowsCount Step 1
SystemUtil.Run “C:Program FilesHPUnified Functional Testingsamplesflightappflight4a.exe”
Dialog(“Login”).Activate
Dialog(“Login”).WinEdit(“Agent Name:”).Set objWorksheet.Cells(i, “A”) ‘i is Row, A is Column Name
Dialog(“Login”).WinEdit(“Password:”).Set objWorksheet.Cells(i, 2) ‘ 2 is Column id
wait 2
Dialog(“Login”).WinButton(“OK”).Click
Window(“Flight Reservation”).Close
Next
objExcel.Quit
Set objWorksheet = Nothing
Set objWorkbook = Nothing
Set objExcel = Nothing
————————————————
6) Read data form Excel file and perform Data driven Testing for Login Functionality. And write Test Result to the Same file 3rd column.
Dim objExcel, objWorkbook, objWorksheet, i, RowsCount
Set objExcel = CreateObject(“Excel.Application”)
Set objWorkbook = objExcel.Workbooks.Open(“C:UsersgcreddyDesktopQTP.xlsx”)
Set objWorksheet = objWorkbook.Worksheets(1)
For i = 2 To RowsCount Step 1
SystemUtil.Run “C:Program FilesHPUnified Functional Testingsamplesflightappflight4a.exe”
Dialog(“Login”).Activate
Dialog(“Login”).WinEdit(“Agent Name:”).Set objWorksheet.Cells(i, “A”) ‘i is Row, A is Column Name
Dialog(“Login”).WinEdit(“Password:”).Set objWorksheet.Cells(i, 2) ‘ 2 is Column id
wait 2
Dialog(“Login”).WinButton(“OK”).Click
If Window(“Flight Reservation”).Exist (12) Then
Window(“Flight Reservation”).Close
objWorksheet.Cells(i, 3) = “Login Successful – Passed”
Else
SystemUtil.CloseDescendentProcesses
objWorksheet.Cells(i, 3) = “Login Unsuccessful – Failed”
End If
Next
objWorkbook.Save
objExcel.Quit
Set objWorksheet = Nothing
Set objWorkbook = Nothing
Set objExcel = Nothing
————————————————
7) Read data form Excel file and perform Data driven Testing for Login Functionality. And write Test Result and Error messages to the same file.Dim objExcel, objWorkbook, objWorksheet, i, RowsCount
Set objExcel = CreateObject(“Excel.Application”)
Set objWorkbook = objExcel.Workbooks.Open(“C:UsersgcreddyDesktopQTP.xlsx”)
Set objWorksheet = objWorkbook.Worksheets(1)
For i = 2 To RowsCount Step 1
SystemUtil.Run “C:Program FilesHPUnified Functional Testingsamplesflightappflight4a.exe”
Dialog(“Login”).Activate
Dialog(“Login”).WinEdit(“Agent Name:”).Set objWorksheet.Cells(i, “A”) ‘i is Row, A is Column Name
Dialog(“Login”).WinEdit(“Password:”).Set objWorksheet.Cells(i, 2) ‘ 2 is Column id
wait 2
Dialog(“Login”).WinButton(“OK”).Click
If Window(“Flight Reservation”).Exist (12) Then
Window(“Flight Reservation”).Close
objWorksheet.Cells(i, 3) = “Login Successful – Passed”
Else
objWorksheet.Cells(i, 4) = Dialog(“Login”).Dialog(“Flight Reservations”).Static(“Agent name must be at”).GetROProperty(“text”)
SystemUtil.CloseDescendentProcesses
objWorksheet.Cells(i, 3) = “Login Unsuccessful – Failed”
End If
Next
objWorkbook.Save
objExcel.Quit
Set objWorksheet = Nothing
Set objWorkbook = Nothing
Set objExcel = Nothing
——————————————–
Read Button Names from Login Dialog and export to Excel file 2nd sheet. Dim objExcel, objWorkbook, objWorksheet, oButton, Buttons, i
Set objExcel = CreateObject(“Excel.Application”)
Set objWorkbook= objExcel.Workbooks.Open (“C:UsersgcreddyDesktopQTP.xlsx”)
Set objworksheet = objWorkbook.Worksheets(2)
Set oButton = Description.Create
oButton(“Class Name”).Value = “WinButton”
Set Buttons = Dialog(“Login”).ChildObjects(oButton)
Msgbox Buttons.Count
objWorksheet.cells(1, 1) = “Button Names”
For i = 0 To Buttons.Count – 1 Step 1
objWorksheet.cells(i+2, 1) = Buttons(i).GetRoProperty(“text”)
Next
objWorkbook.Save
objExcel.Quit
Set objWorksheet = Nothing
Set objWorkbook = Nothing
Set objexcel = Nothing
—————————————————
9) Read Link names from Google Home page and export to Excel file 3rd sheet .Dim objExcel, objWorkbook, objWorksheet, oLink, Links, i
Set objExcel = CreateObject(“Excel.Application”)
Set objWorkbook= objExcel.Workbooks.Open (“C:UsersgcreddyDesktopQTP.xlsx”)
Set objworksheet = objWorkbook.Worksheets(3)
Set oLink = Description.Create
oLink(“micclass”).Value = “Link”
Set Links = Browser(“Google”).Page(“Google”).ChildObjects(oLink)
Msgbox Links.Count
objWorksheet.cells(1, 1) = “Link Names”
For i = 0 To Links.Count – 1 Step 1
objWorksheet.cells(i+2, 1) = Links(i).GetRoProperty(“text”)
Next
objWorkbook.Save
objExcel.Quit
Set objWorksheet = Nothing
Set objWorkbook = Nothing
Set objexcel = Nothing
—————————————————
10) Read Customer names from 1 to 10 Records and export to Excel
Dim objExcel, objWorkbook, objWorksheet, Customer_Name, i
Set objExcel = CreateObject(“Excel.Application”)
Set objWorkbook= objExcel.Workbooks.Open (“C:UsersgcreddyDesktopQTP.xlsx”)
Set objworksheet = objWorkbook.Worksheets(2)
objWorksheet.cells(1, 1) = “Customer Names”
For i = 1 To 10 Step 1
Window(“Flight Reservation”).Activate
Window(“Flight Reservation”).WinButton(“Button”).Click
Window(“Flight Reservation”).Dialog(“Open Order”).WinCheckBox(“Order No.”).Set “ON”
Window(“Flight Reservation”).Dialog(“Open Order”).WinEdit(“Edit”).Set i
Window(“Flight Reservation”).Dialog(“Open Order”).WinButton(“OK”).Click
Customer_Name = Window(“Flight Reservation”).WinEdit(“Name:”).GetROProperty(“text”)
objWorksheet.Cells(i+1, 1) = Customer_Name
Next
objWorkbook.Save
objExcel.Quit
Set objWorksheet = Nothing
Set objWorkbook = Nothing
Set objexcel = Nothing
————————————————–
11) Create an Excel File and Rename 1st sheet as “Module”, 2nd sheet as “TestCase”, and 3rd sheet as “TestStep”.
Dim objExcel
Set objExcel = CreateObject(“Excel.Application”)
objExcel.Workbooks.Add
objExcel.Worksheets(1).Name = “Module”
objExcel.Worksheets(2).Name = “TestCase”
objExcel.Worksheets(3).Name = “TestStep”
objExcel.ActiveWorkbook.SaveAs “C:UsersgcreddyDesktopQTP2.xlsx”
objExcel.Quit
Set objExcel = Nothing
12) Create an Excel file and Add one more sheet.Dim objExcel
Set objExcel = CreateObject(“Excel.Application”)
objExcel.Workbooks.Add ‘Create New workbook
objexcel.Worksheets.Add ‘Create New worksheet
objExcel.ActiveWorkbook.SaveAs “C:UsersgcreddyDesktopQTP3.xlsx”
objExcel.Quit
Set objExcel = Nothing
———————————————
Assignment:
Create an Excel file and Move 1st sheet to 3rd position.
Sheet1 Sheet2 sheet3
Move 1st sheet to 3rd position
Sheet2 Sheet3 Sheet1
————————————————–
Comparison examples:
i) One to one comparison (Textual and binary)
ii) Many to many comparison
————————————————-
Follow me on social media:
Источник