
Home / VBA / VBA With Statement (With – End With)
Key Points
- Use the VBA With Statement to minimize the code.
- You can use a single object at a time while using the With Statement.
What is VBA With Statement
VBA With is a statement to specify an object for once and then run multiple statements for it. In simple words, by using the “WITH” statement to specify an object, and after that, you can access all the properties and methods in one go. It starts with the “With” and ends with “End With”.
Syntax of VBA With Statement
Following is the syntax that you need to use for using With statement in VBA:
With [OBJECT]
      [Statement]
End With
- With: It’s the starting keyword for the statement that tells VBA that you are specifying the object mentioned.
- Object: Here, you need to specify the object that you want to use.
- Statement: A statement(s) that you want to run with the specified object.
- End With: It’s the ending keyword for the statement.
Example to understand the VBA With Statement
Let’s take an example to understand with the statement in depth. Let’s say you want to change, the font color, size, and font name of cell A1. For doing all these three things you need to access three different properties of VBA font and the code would be:
Range("A1").Font.Color = RGB(0, 0, 255)
Range("A1").Font.Size = 16
Range("A1").Font.Name = "Consolas"
But here we going to use the With Statement instead of the above code. To use the VBA With Statement, you can use the following steps:
- First, type the keyboard “With”.
- After that, use the VBA Range to specify the cell A1 with using the font object to specify the font object.

- Next, you need to enter the code for all three properties and the values that you want to apply.

- In the end, use the keyword “End With” to end the statement.


Here’s the code that you have just written.
Sub MyMacro()

With Range("A1").Font
        .Color = RGB(0, 0, 255)
        .Size = 16
        .Name = "Consolas"
End With

End Sub
Now let’s have a look at both codes and try to understand what is the difference that we have got by using the “With” statement.

In the first code, you have used the font object three times and then further used the property that you want to access and want to make changes to it.
But in the second code, you have used the With statement and specified the font object at once. And then three lines of code within the “With” statement to access all three properties.
When you use the “With” statement and specify an object, it tells VBA that all the statements that you have written need to run with the object mentioned. It not only gives you a structured code but also makes a macro run faster and gives it greater efficiency.
Nested With Statement
I told you in the starting that you can only specify a single object to use the With statement. But there is a way to use more than one or even multiple objects with it. That’s by using VBA LOOPS, and we are going to use FOR EACH LOOP to loop through multiple objects and use the “With”.
Let me tell you an example; you need to loop through all the worksheets and do apply all the following things to all the cells in each worksheet.
- Font Size: 16
- Font: Verdena
And in the workbook, you have five worksheets, as I have in the following example:

Use the following steps to write a nested “With” statement.
- First, you need to declare a variable to use a worksheet object.

- After that, as I said, you need to use For Each Loop. So, you need to write a code with the loop that can loop through all the worksheets.

- Now, enter the with statement which can apply font setting that we have discussed above. For referrring to all the cells in the worksheet you can use the “Cells” while specifing the object.


Here’s the full code that you have just written.
Sub MyMacro()

Dim ws As Worksheet

For Each ws In ActiveWorkbook.Worksheets
    With Cells
        .Font.Size = 16
        .Font.Name = "Verdena"
    End With
Next ws

End Sub
Выполняет
блок операторов с повторяющимися
ссылками на один объект или структуру.
With
object
[
statements ]
End
With
Части
|
Термин |
Определение |
|
object |
Обязательный.Переменная |
|
statements |
Необязательный.Одна |
|
End |
Обязательный.Завершает |
Заметки
With…End
With позволяет выполнить ряд операторов
с указанным объектом без повторного
указания имени объекта.Если классификационный
путь к объекту слишком длинный,
использование With…End With может повысить
производительность.Блок With также
уменьшает количество повторных наборов
классификационного пути и риск неверного
ввода одного из его элементов.
Например,
чтобы изменить ряд различных свойств
одного объекта, поместите операторы
присваивания свойств внутрь блока
With…End With, сославшись на объект лишь
единожды, а не на каждом свойстве.
Правила
-
Типы
данных. Тип данных у object может быть
любым типом класса или структуры или
даже простейшим типом Visual Basic (например
Integer).Платформа .NET Framework поддерживает
все простейшие типы, а также классы или
структуры, к членам которых можно
получить доступ в блоке With. -
Объявление.
Необходимо объявить object перед блоком
With.Невозможно объявить его уже в
операторе With. -
Число
итераций. Блок With — это не итерационная
конструкция.Если внутри блока не
существует циклов, инструкции выполняются
лишь раз. -
Вложенные
структуры. Структуры With…End With можно
вкладывать друг в друга.Пример см. в
разделе Практическое
руководство. Выполнение нескольких
действий над объектом (Visual Basic).
Но
поскольку члены внешних операторов
маскируются во внутренних инструкциях,
внутри внутреннего блока With придется
использовать полные имена при ссылках
на члены объектов внешнего блока With.
Также
можно вложить друг в друга различные
виды управляющих структур.Дополнительные
сведения см. в разделе Вложенные
структуры управления (Visual Basic).
-
Выход
из структуры. Visual Basic не поддерживает
Оператор
Exit (Visual Basic)
для передачи управления вовне из блока
With.Если необходимо выйти до выполнения
всех инструкций, поместите метку на
оператор End With и для перехода к нему
используйте Оператор
GoTo.Дополнительные
сведения см. в разделе Практическое
руководство. Операторы меток (Visual
Basic).
Невозможно
передать управление извне блока With
вовнутрь, или наоборот.Можно вызвать
процедуру из блока, но управление
вернется к следующей инструкции.
-
Доступ
к другим объектам. После входа в блок
With нельзя переназначить object до прохождения
через инструкцию End With.Таким образом,
можно получить доступ к методам и
свойствам только заданного объекта
без их полного описания.Можно использовать
методы и свойства других объектов,
однако необходимо указывать их имена
полностью.
Пример
В
следующем примере блок With используется
для выполнения последовательности
инструкций на одном объекте.В примере
предполагается, что объект testObject уже
создан и имеет все эти свойства.
VB
With
testObject
.Height
= 100
.Text
= «Hello, World»
.ForeColor
= System.Drawing.Color.Green
.Font
= New System.Drawing.Font(.Font,
System.Drawing.FontStyle.Bold)
End
With
23.Какие
либо действия процедуры повторяющиеся
заданное количество раз или пока
выполняется или не выполняется некоторое
условие называют циклом.
Процесс
выполнения все операторов, заключенных
в структуру цикла, один раз называется
итерацией
цикла.
Структуры
цикла, всегда выполняющиеся заданное
количество раз, называются циклами
с фиксированным числом итераций.
Другие типы структур цикла повторяются
переменное количество раз в зависимости
от некоторого набора условий. Такие
циклы называются неопределенными
циклами.
Блок
операторов, находящийся между началом
и концом цикла называется «тело
цикла».
Самой
простой структурой цикла является
фиксированный
цикл.
Цикл
For..Next
Синтаксис
For
counter
= Start
To End
[Step StepSize]
Statements
Next
[counter]
Counter
— любая численная переменная VBA
Start
— любое численное выражение , определяет
начальное значение для переменной
counter
End
— численное выражение, определяет
конечное значение для переменной
counter
Statements
— один, несколько или ни одного оператора
VBA (тело цикла).
По
умолчанию VBA увеличивает переменную
counter
на 1 каждый раз при выполнении операторов
в цикле. Можно задать другое значение
(SterSize
— любое численное выражение), на которое
будет изменяться counter.
Ключевое
слово Next
сообщает VBA о том, что достигнут конец
цикла. Необязательная переменная counter
после ключевого слова Next
должна быть той же самой переменной
counter,
которая была задана после ключевого
слова For
в начале структуры цикла.
24.Оператор
While…Wend позволяет организовать выполнение
некоторой последовательности операторов
до тех пор,пока заданное условие имеет
значение True (истина). Синтаксис
оператораWhile…Wend:
While
<Условие>
[Операторы]
Wend
ОператорWhile…Wend содержит элементы,
представленные в таблице:
|
Элемент |
Описание |
|
<Условие> Оператор |
Числовое, Необязательный |
При
входе в цикл вычисляется и анализируется
заданное условие. Если условие имеет
значениеTrue, то выполняется весь набор
операторов, расположенных до служебного
слова Wend– конца цикла. После этого
управление возвращается оператору
While и опять проверяется условие. Если
оно имеет значение True, то снова выполняются
все операторы до Wend. В противном случае
выполнение программы продолжается с
оператора, следующего за служебным
словом Wend. Циклы While…Wendмогут иметь любую
глубину вложенности.
Соседние файлы в предмете [НЕСОРТИРОВАННОЕ]
- #
- #
- #
- #
- #
- #
- #
- #
- #
- #
- #
Author: Oscar Cronquist Article last updated on February 02, 2018
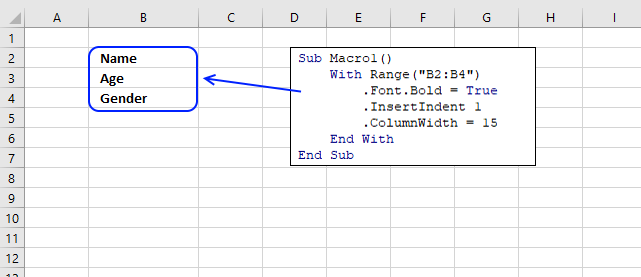
The With … End With statement allows you to write shorter code by referring to an object only once instead of using it with each property.
The picture above shows a macro that changes a few properties of the Range Object.
Statement Syntax
With object
[ code]
End With
The following macro changes the cells in cell range B2:B4 to bold, indents the text and changes the column width to 15.
Sub Macro1()
With Range("B2:B4")
    .Font.Bold = True
    .InsertIndent 1
    .ColumnWidth = 15
End With
End Sub
With end with statement category
More than 1300 Excel formulas
Excel categories
Latest updated articles.
More than 300 Excel functions with detailed information including syntax, arguments, return values, and examples for most of the functions used in Excel formulas.
More than 1300 formulas organized in subcategories.
Excel Tables simplifies your work with data, adding or removing data, filtering, totals, sorting, enhance readability using cell formatting, cell references, formulas, and more.
Allows you to filter data based on selected value , a given text, or other criteria. It also lets you filter existing data or move filtered values to a new location.
Lets you control what a user can type into a cell. It allows you to specifiy conditions and show a custom message if entered data is not valid.
Lets the user work more efficiently by showing a list that the user can select a value from. This lets you control what is shown in the list and is faster than typing into a cell.
Lets you name one or more cells, this makes it easier to find cells using the Name box, read and understand formulas containing names instead of cell references.
The Excel Solver is a free add-in that uses objective cells, constraints based on formulas on a worksheet to perform what-if analysis and other decision problems like permutations and combinations.
An Excel feature that lets you visualize data in a graph.
Format cells or cell values based a condition or criteria, there a multiple built-in Conditional Formatting tools you can use or use a custom-made conditional formatting formula.
Lets you quickly summarize vast amounts of data in a very user-friendly way. This powerful Excel feature lets you then analyze, organize and categorize important data efficiently.
VBA stands for Visual Basic for Applications and is a computer programming language developed by Microsoft, it allows you to automate time-consuming tasks and create custom functions.
A program or subroutine built in VBA that anyone can create. Use the macro-recorder to quickly create your own VBA macros.
UDF stands for User Defined Functions and is custom built functions anyone can create.
A list of all published articles.
Working On an Object
As in any other language, in VBA too there may be situations where we continuously work on a specific object.
For example, we may like to apply conditional formatting to a cell based on its information by changing the font face, font color, background color, underline, bold or italics, etc. When this action needs to be coded, we will have to use a block of code in which each line starts with:
Sheets(“<sheet name>”).cells( <row num> , <col num> ).
The “With–End With” Block
The repetitive part of the code as seen in the above example can be used once and made common to all the lines in the block using the With–End With pair of statements.
Syntax
With <object expression>
[<block of code where each line starts with a period .>]
End With
Where
- Block of code/statements between “With” and “End With” statements are completely optional.
<object expression>can be elaborated as
<object name > [. <property name>][. <property name>][. <property name>]……
Example
To elaborate on our example above, the code to format a cell would be:
Sub format_cell()
    Cells(20, 1).Interior.Pattern = xlSolid
    Cells(20, 1).Interior.PatternColorIndex = xlAutomatic
    Cells(20, 1).Interior.Color = 65535
    Cells(20, 1).Interior.TintAndShade = 0
    Cells(20, 1).Interior.PatternTintAndShade = 0
    Cells(20, 1).Font.ThemeColor = xlThemeColorAccent6
    Cells(20, 1).Font.TintAndShade = 0
    Cells(20, 1).Font.Bold = True
    Cells(20, 1).Font.Italic = True
    Cells(20, 1).Font.Underline = xlUnderlineStyleSingle
End Sub
But this code could also be written as:
Sub format_cell_with()
With Cells(20, 1).Interior
.Pattern = xlSolid
.PatternColorIndex = xlAutomatic
.Color = 65535
.TintAndShade = 0
.PatternTintAndShade = 0
End With
With Cells(20, 1).Font
.ThemeColor = xlThemeColorAccent6
.TintAndShade = 0
.Bold = True
.Italic = True
.Underline = xlUnderlineStyleSingle
End With
End Sub

Using Nested “With–End” With Statements
One or more “With” statements can be nested within other “With” statements depending on your requirements. For example, the object expression of the outer “with” statement should be a part of the whole object expression of the inner “with” block object expression.
Here’s an example to help you understand:
Userform – Textbox Formatting
In this example, we set the properties of a specific text box using the VBA code module. These lines are typed in the Userform’s “initialize” method so that the property values are set when the form loads.


Private Sub UserForm_Initialize()
    TextBox1.BorderStyle = fmBorderStyleSingle
    TextBox1.BackColor = yellow
    TextBox1.AutoSize = True
    TextBox1.BackStyle = fmBackStyleTransparent
    TextBox1.CanPaste = True
    TextBox1.Enabled = True
    TextBox1.Font.Bold = True
    TextBox1.Font.Italic = True
    TextBox1.Font.Size = 5
End Sub
This can also be done easily using the “With and End With” statement:
Private Sub UserForm_Initialize()
 With TextBox1
    .BorderStyle = fmBorderStyleSingle
    .BackColor = yellow
    .AutoSize = True
    .BackStyle = fmBackStyleTransparent
    .CanPaste = True
    .Enabled = True
 End With
 With TextBox1.Font
    .Bold = True
    .Italic = True
    .Size = 5
    End With
End Sub

Now, we can also write the same code using a nested “With” block.
In this case, the object expression for the first with block is Textbox1 and the object expression for the second with block is Textbox1.Font. The first one’s object expression is a part of the second one. So, we can rewrite the code as:
Private Sub UserForm_Initialize()

 With TextBox1
    .BorderStyle = fmBorderStyleSingle
    .BackColor = yellow
    .AutoSize = True
    .BackStyle = fmBackStyleTransparent
    .CanPaste = True
    .Enabled = True
    With .Font
        .Bold = True
        .Italic = True
        .Size = 5
    End With
 End With

End Sub

Real Time Scenario – Use “With” Statement With “If” Statement
In this example, we will highlight a cell in orange color and change the font properties if it has the word “India” in it.
Sub format_cell_with()
For i = 1 To 9
For j = 1 To 4
cellcontent = Cells(i, j).Value
If InStr(cellcontent, "India") &amp;gt; 0 Then
With Cells(i, j).Interior
.Pattern = xlSolid
.PatternColorIndex = xlAutomatic
.ThemeColor = xlThemeColorAccent2
.TintAndShade = 0.399975585192419
.PatternTintAndShade = 0
With Cells(20, 1).Font
.Bold = True
.Italic = True
.Underline = xlUnderlineStyleSingle
End With
End With
End If
Next
Next
End Sub

Conclusion
This “With–End With” statement helps in organizing and reducing the number of characters in your code, thereby making it easy to maintain. At the same time, it might be difficult to debug the issues with such code when there are too many statements within the block. This is because we might scroll through the page to read the code and find it difficult to understand the object expressions connected with the statements in that block. This can lead to runtime errors that waste our time.
In VBA, during the runtime, if we want to check the state or properties of an object, we just highlight its reference from the code and select “add to watch window” from the context menu to get them added to the watch window. With reference to other languages like UFT that provide us with object spy and highlight object features, this “With” statement can be a hindrance as we need to highlight the whole line of code while debugging.
In short, when the “With” statement is used, highlighting the full reference to the object might become cumbersome during runtime, though it is possible.
Tagged with: Conditional, conditional formatting, end with, end with statement, Excel, Microsoft Excel, statements, VBA, with, with and end with, with statement
Return to VBA Code Examples
This article will demonstrate how to use With and End With in VBA
Excel provides us with the opportunity to learn VBA by recording macros. These macros record literally everything that we do on the screen and convert the actions into VBA code. We can then analyze this code and learn from it.
When we record a macro in VBA, most significantly when we are changing the format of cells, the macro will more often than not use the With… End With Syntax in it’s recording. Understanding what these mean and are used for is an important part of VBA.
Recording a Macro
To record a macro in Excel, in the Ribbon, select View > Macro > Record Macro.
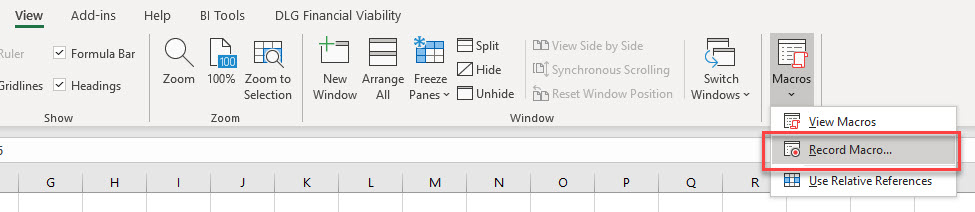
OR
Developer > Record Macro

Note: If you don’t see the Developer Ribbon, you’ll need to enable it. Click HERE to learn how to do this.
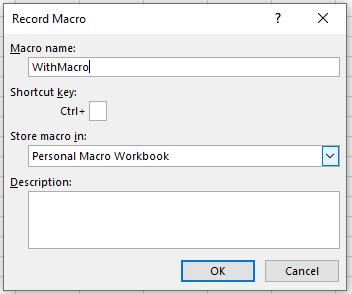
Type in the name for the macro, and click OK.
Highlight some cells, and then format them for Bold, change the color to red and amend the font size. Then click Stop in the bottom left hand corner of the screen to stop recording macro.
WITH Statement Syntax
To view / edit your recorded Macro: In the Ribbon, select View > Macros > View Macros. Select the macro just recorded, and then click Edit.
OR
In the Ribbon, select Developer > Visual Basic to switch to the VBE Window.
The recorded macro may look something like the example below
Sub WithMacro()
  Range("A2:C10").Select
  Selection.Font.Bold = True
  Selection.Font.Size = 12
  With Selection.Font
    .Color = -16776961
    .TintAndShade = 0
  End With
End Sub
Firstly, we have selected the range A2:C10.
We have then set the bold to true and the font size to 12. Note that the code “Selection.Font” is repeated for these lines.
The macro has then recorded us changing the color of the text – note that this time, the Selection.Font has a WITH in front of it, and the 2 properties that are being amended (the color and the tintandshade) have a period (.) in front of them. The area of code is then completed with an END WITH.
To simplify this code, we can move the Bold and the Size to be within the WITH statement, and therefore remove the need to repeat the the word Selection.
Sub WithMacro()
  Range("A2:C10").Select
  With Selection.Font
   .Bold = True
   .Size = 12
   .Color = -16776961
   .TintAndShade = 0
  End With
End Sub
The Syntax of a WITH… END WITH statement is therefore very simply:
WITH Object
'properties to format/change
END WITH
We could have amended the code in a different way:
Sub RemoveWith()
 Range("A2:C10").Select
 Selection.Font.Bold = True
 Selection.Font.Size = 12
 Selection.Font.Color = -16776961
 Selection.Font.TintAndShade = 0
End Sub
In the above example, we have added in the words Selection.Font to each line of the code. We have therefore referred repetitively to the Selection.Font Object in the code.
However, using the WITH statement means that we need only refer to this Object once in the code. It is a cleaner way of coding – it tells VBA to begin at WITH and the end at END WITH – the code to run is all enclosed within those 2 words. It makes the macro run faster and more efficiently (especially for longer macros), and adds structure to your code.
VBA Coding Made Easy
Stop searching for VBA code online. Learn more about AutoMacro — A VBA Code Builder that allows beginners to code procedures from scratch with minimal coding knowledge and with many time-saving features for all users!

Learn More!