
Sub ExcelRangeToWord()
‘PURPOSE: Copy/Paste An Excel Table Into a New Word Document
‘NOTE: Must have Word Object Library Active in Order to Run _
(VBE > Tools > References > Microsoft Word 12.0 Object Library)
‘SOURCE: www.TheSpreadsheetGuru.com
Dim tbl As Excel.Range
Dim WordApp As Word.Application
Dim myDoc As Word.Document
Dim WordTable As Word.Table
‘Optimize Code
Application.ScreenUpdating = False
Application.EnableEvents = False
‘Copy Range from Excel
Set tbl = ThisWorkbook.Worksheets(Sheet1.Name).ListObjects(«Table1»).Range
‘Create an Instance of MS Word
On Error Resume Next
‘Is MS Word already opened?
Set WordApp = GetObject(class:=»Word.Application»)
‘Clear the error between errors
Err.Clear
‘If MS Word is not already open then open MS Word
If WordApp Is Nothing Then Set WordApp = CreateObject(class:=»Word.Application»)
‘Handle if the Word Application is not found
If Err.Number = 429 Then
MsgBox «Microsoft Word could not be found, aborting.»
GoTo EndRoutine
End If
On Error GoTo 0
‘Make MS Word Visible and Active
WordApp.Visible = True
WordApp.Activate
‘Create a New Document
Set myDoc = WordApp.Documents.Add
‘Copy Excel Table Range
tbl.Copy
‘Paste Table into MS Word
myDoc.Paragraphs(1).Range.PasteExcelTable _
LinkedToExcel:=False, _
WordFormatting:=False, _
RTF:=False
‘Autofit Table so it fits inside Word Document
Set WordTable = myDoc.Tables(1)
WordTable.AutoFitBehavior (wdAutoFitWindow)
EndRoutine:
‘Optimize Code
Application.ScreenUpdating = True
Application.EnableEvents = True
‘Clear The Clipboard
Application.CutCopyMode = False
End Sub
In this part of the code we are determining if Microsoft Word is open or not. If Word is already open, we can set a variable equal to the entire program by using GetObject. If MS Word is not currently running we can use CreateObject to run an instance of Word and then set a variable equal to that specific instance of MS Word.
When using CreateObject, the target application will start running but it is not visible on screen. Therefore we need to turn the Visible setting on (equal to true). Also, VBA with Word is a little bit different than with Excel in that it is much more dependent on its window showing on screen. Therefore a second command must be written to Activate Microsoft Word.
Copy From Excel, Paste Onto Document
Now that you have a new document created, you can command Excel to paste your table into MS Word. Near the beginning of the code, there was a line that allowed you to specify the exact table you wanted to copy. The variable tbl was used to remember this table range and to allow you to reference the range later on in the code.
Guru Tip: It is a good idea to place code that may need to be manually changed at some point in the future near the beginning of the subroutine. This prevents you from having to scroll through your code and pinpoint the exact place where you spelled out which range you wanted to copy or which worksheet you wanted to pull data from. This can save you a bunch of time and prevent confusion!
Word has a special method called PasteExcelTable, which (as you can guess) allows you paste in an Excel table. There are three variables you can tweak to get you table looking and functioning just the way you want.
-
LinkedToExcel — True links the pasted table to the original Excel file so that changes made to the Excel file are reflected in Microsoft Word.
-
WordFormatting — True formats the table using the formatting in the Word document. False formats the table according to the original Excel file.
-
RTF — True pastes the Excel table using Rich Text Format (RTF). False pastes the Excel table as HTML.
Now for the last step! Depending on how large your table is, it may be spilling outside of your document page. In order to prevent this from happening you can go ahead and use AutoFitBehavior to resize the table to fit perfectly inside your Word document.
About The Author
Hey there! I’m Chris and I run TheSpreadsheetGuru website in my spare time. By day, I’m actually a finance professional who relies on Microsoft Excel quite heavily in the corporate world. I love taking the things I learn in the “real world” and sharing them with everyone here on this site so that you too can become a spreadsheet guru at your company.
Through my years in the corporate world, I’ve been able to pick up on opportunities to make working with Excel better and have built a variety of Excel add-ins, from inserting tickmark symbols to automating copy/pasting from Excel to PowerPoint. If you’d like to keep up to date with the latest Excel news and directly get emailed the most meaningful Excel tips I’ve learned over the years, you can sign up for my free newsletters. I hope I was able to provide you with some value today and I hope to see you back here soon!
— Chris
Founder, TheSpreadsheetGuru.com
Вставка таблицы Excel в документ Word с помощью кода VBA Excel. Метод Selection.PasteExcelTable: синтаксис, параметры, пример использования.
Работа с Word из кода VBA Excel
Часть 6. Вставка таблицы Excel в документ Word
[Часть 1] [Часть 2] [Часть 3] [Часть 4] [Часть 5] [Часть 6]
Метод Selection.PasteExcelTable
Метод Range.Paste, использующийся в VBA Word для вставки в документ таблиц, скопированных в буфер обмена из другого документа Word, не применим для вставки в документ таблиц, скопированных из книги Excel. Для этих целей используется метод Selection.PasteExcelTable.
Selection.PasteExcelTable — это метод, предназначенный для вставки Excel-таблицы из буфера обмена в документ Word и ее форматирования в соответствии с заданными параметрами.
Синтаксис
|
Expression.PasteExcelTable(LinkedToExcel, WordFormatting, RTF) |
Expression — переменная, представляющая объект Selection. В том числе, это может быть курсор или закладка.
Параметры
Все параметры метода Selection.PasteExcelTable логического типа и являются обязательными.
| Параметр | Описание |
|---|---|
| LinkedToExcel | True — вставленная таблица связывается с исходным файлом Excel, чтобы изменения, внесенные в файл Excel, отображались в Microsoft Word. False — связь между вставленной таблицей и таблицей в исходном файле не устанавливается. |
| WordFormatting | True — вставленная таблица будет отформатирована как таблица документа Word. False — вставленная таблица будет отформатирована в соответствии с исходным файлом Excel. |
| RTF | True — Excel-таблица будет вставлена в расширенном текстовом формате (RTF). False — Excel-таблица будет вставлена в формате HTML-таблицы. |
Допустим, у нас есть таблица Excel, начинающаяся с ячейки A1 (или с любой другой), и нам необходимо скопировать эту таблицу в существующий документ Word, вставив ее на место закладки «Закладка1».
Решение:
|
Sub Primer() Dim myWord As New Word.Application, myDoc As Word.Document ‘Открываем существующий документ Word Set myDoc = myWord.Documents.Open(«C:ТестоваяДокумент1.docx») ‘Копируем таблицу на активном листе в буфер обмена ‘Вместо ячейки Range(«A1») можно указать любую другую, расположенную внутри таблицы Range(«A1»).CurrentRegion.Copy ‘Вставляем таблицу из буфера обмена на место закладки myDoc.Bookmarks(«Закладка1»).Range.PasteExcelTable False, False, False ‘Отображаем программу Word myWord.Visible = True ‘Очищаем переменные Set myWord = Nothing Set myDoc = Nothing End Sub |
Если необходимо таблицу вставить в конец документа, строку
|
myDoc.Bookmarks(«Закладка1»).Range.PasteExcelTable False, False, False |
следует заменить на
|
With myDoc ‘Переводим курсор в конец документа .Range(.Range.Characters.Count — 1, .Range.Characters.Count — 1).Select ‘Добавляем перенос строки, если необходимо .ActiveWindow.Selection.InsertAfter vbCr ‘Переводим курсор в конец документа .Range(.Range.Characters.Count — 1, .Range.Characters.Count — 1).Select ‘Вставляем таблицу из буфера обмена .ActiveWindow.Selection.PasteExcelTable False, False, False End With |

VBA is a very powerful tool you can use to automate a lot of work between multiple Microsoft Office applications. One common activity you can automate using VBA is inserting an Excel table into a Word document.
Visual Basic for Applications (VBA) is a potent tool to automate a lot of work between multiple Microsoft Office applications. One common activity you can automate using VBA is inserting an Excel table into a Word document.
There are two ways you can do this. The first is automating a straight copy and paste of an existing range from Excel into a new table in a Word document. The second is performing calculations in Excel, creating a new table in Word, and writing the results to the table.
You could try to record a macro to do this, but macros will only let you automate tasks inside of Word. In this article, you’ll learn how to write VBA code to automate these actions between Excel and Word.
Copy And Paste An Excel Range Into Word With VBA
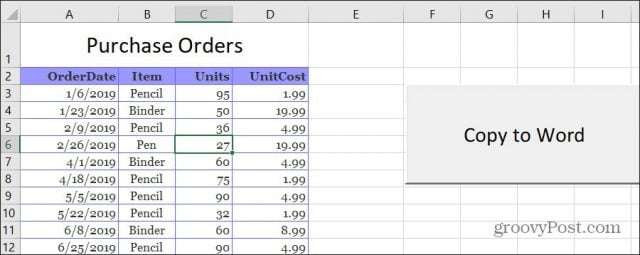
In both examples, we’ll start with a sample Excel spreadsheet. This sample is a list of purchase orders for a variety of products.

Let’s say you’d like to copy and paste the entire range of cells in this worksheet into a Word document. To do this, you’ll need to write a VBA function that’ll run when you click a “Copy To Word” button.
Select Developer from the menu and select Insert from the Controls group in the ribbon. In the drop-down list, select the Button control under ActiveX Controls.
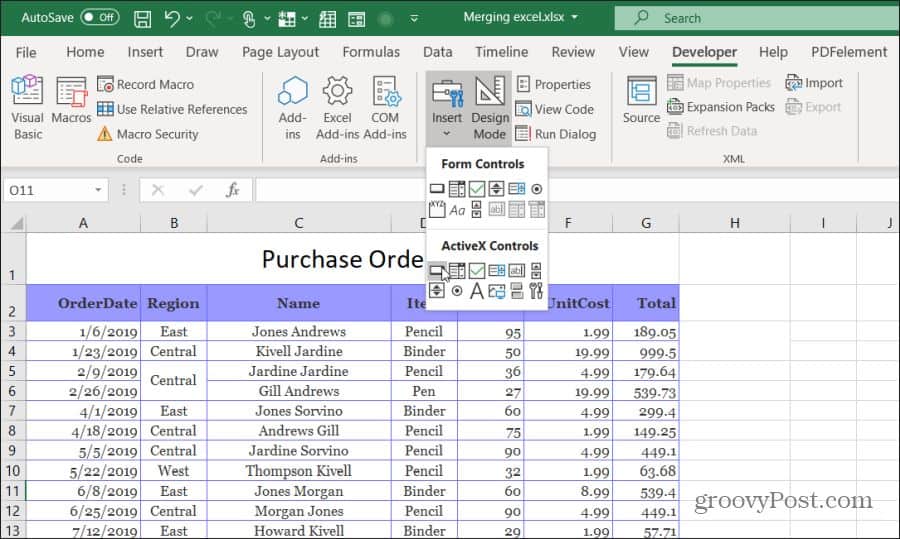
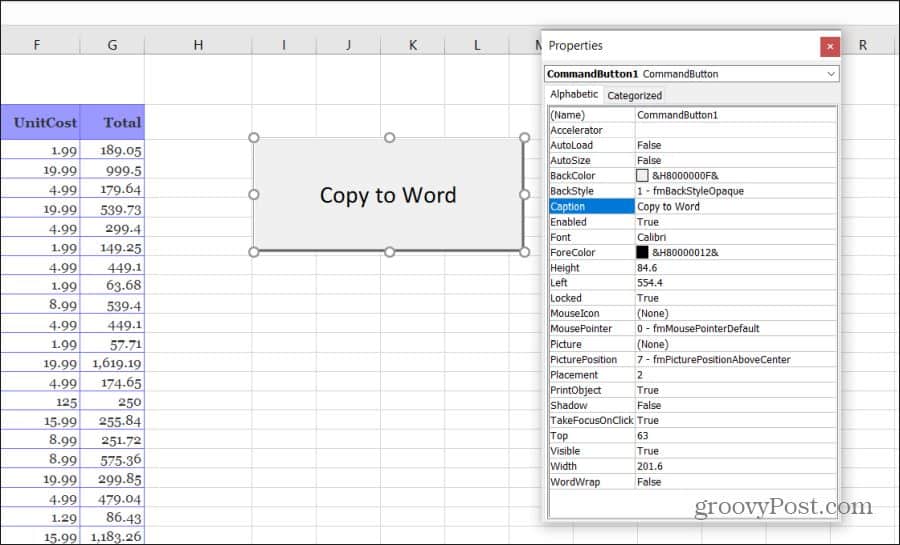
Next, draw the command button on the right side of the sheet. You can change the caption to “Copy to Word” by right-clicking the button and selecting Properties. Change the caption text, and you can use Font to update font size and style.
Note: If you don’t see Developer in your Excel menu, then add it. Select File, Options, Customize Ribbon, and select All Commands from the left drop-down. Then move Developer from the left pane to the right and select OK to finish.
Write The Copy And Paste VBA Code
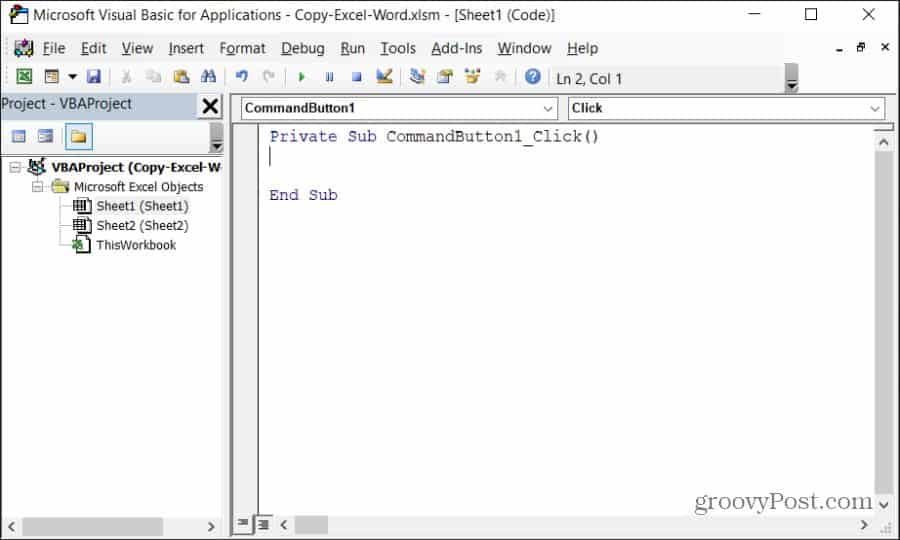
Now you’re ready to start writing VBA code. To get started, double-click the new Copy to Word button to open the code editor window.
You should see a subroutine called Commandbutton1_Click() as shown below.
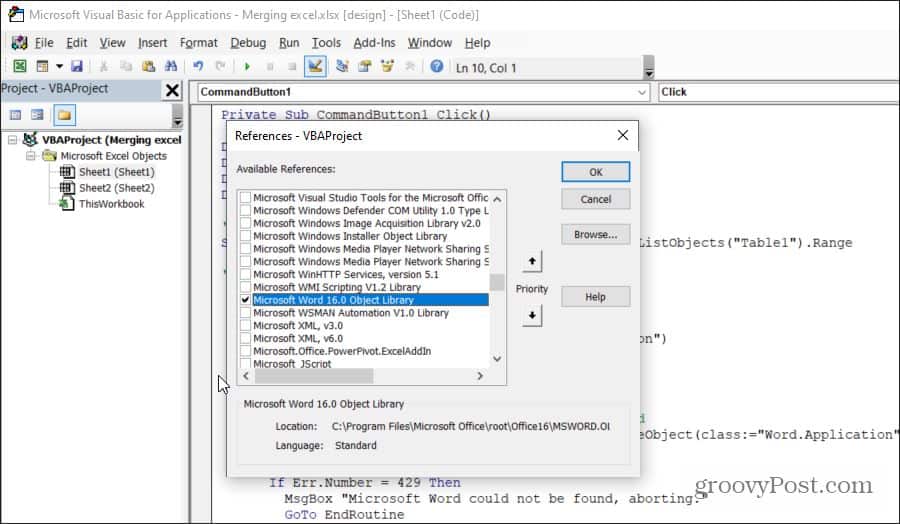
You’ll want to copy each section of the code below. Before you start coding, to control Word on your computer using VBA, you’ll need to enable the Microsoft Word reference library.
In the code editor, select Tools from the menu and select References. In the list of Available References, scroll down and enable Microsoft Word 16.0 Object Library.
Select OK, and you’re ready to start coding. We’ll go through each section of code at a time, so you understand what that code does and why.
First, you need to create the variables and objects that’ll hold the range and allow you to control the Word application.
Dim tblRange As Excel.Range

Dim WordApp As Word.Application

Dim WordDoc As Word.Document

Dim WordTable As Word.Table
The next line of code selects a specific range of cells and saves it to an Excel Range object in VBA.
Set tblRange = ThisWorkbook.Worksheets("Sheet1").Range("A2:G44")
Next, you want to check if the Word application is already open on the computer. You can reference the Word application using a special “class” reference with the VBA GetObject command to accomplish this. If Word isn’t already opened, then the next line will launch it using the CreateObject function. The “On Error Resume Next” line prevents any error from the first GetObject function (if Word isn’t already open) from stopping the execution of the next line in the program.
On Error Resume Next

Set WordApp = GetObject(class:="Word.Application")

If WordApp Is Nothing Then Set WordApp = CreateObject(class:="Word.Application")
Now that the Word application is launched, you want to make it visible to the user and activate it for use.
WordApp.Visible = True

WordApp.Activate
Next, you want to create a new document inside the Word application.
Set WordDoc = WordApp.Documents.Add
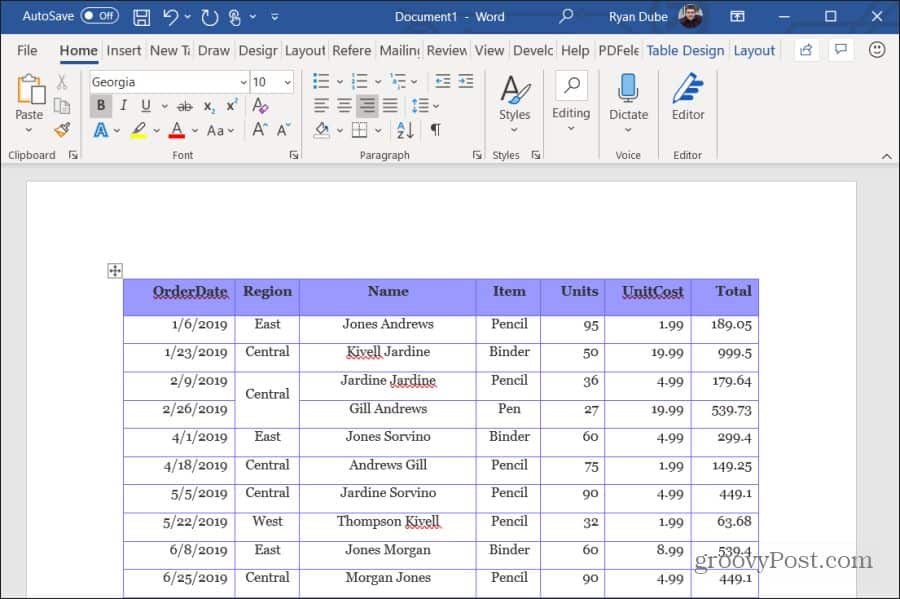
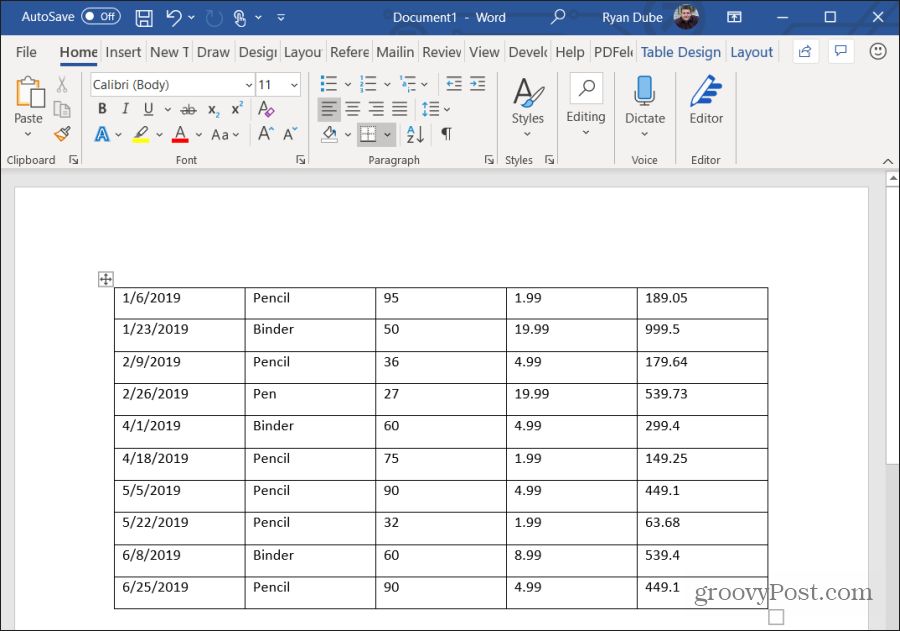
Finally, you’ll copy and paste the range of cells into a new table in the Word document.
tblRange.Copy

WordDoc.Paragraphs(1).Range.PasteExcelTable _

LinkedToExcel:=False, _

WordFormatting:=False, _

RTF:=False
The switches in the above function will insert a non-linked table using source Excel formatting (not Word formatting) and not using rich text format.
Finally, to deal with Excel ranges that are wider than the document, you’ll need to autofit the new table, so it fits within the margins of your new Word document.
Set WordTable = WordDoc.Tables(1)

WordTable.AutoFitBehavior (wdAutoFitWindow)
And now you’re done! Save the file as a macro-enabled Excel file (.xlsm extension). Close the editor, save the original Excel file again, and then click your command button to see your code in action!
Write Excel Results Into A Word Table With VBA
In this next section, you’ll write VBA code that performs calculations on values in Excel and writes those to a table in Word.
For this example, we’ll pull 10 rows worth of data, calculate, and write the results to a table in a Word document. Also, the original table will contain four columns, and the VBA code will pull the first ten rows of data from that range.
Just as in the last section, we’ll go through each section at a time, so you understand what that code does and why.
First, create the variables and objects that’ll hold the data and allow you to write to the Word application.
Dim tblRange As Excel.Range

Dim WrdRange As Word.Range

Dim WordApp As Word.Application

Dim WordDoc As Word.Document

Dim WordTable As Word.Table

Dim intRows

Dim intColumns

Dim strDate As String

Dim strItem As String

Dim intUnits As Variant

Dim intCost As Variant

Dim intTotal As Variant
Next, set the total columns and rows you want to read from the Excel range.
intNoOfRows = 10

intNoOfColumns = 5
Repeat the same code as the last section that’ll open Word if it isn’t already open.
On Error Resume Next

Set WordApp = GetObject(class:="Word.Application")

If WordApp Is Nothing Then Set WordApp = CreateObject(class:="Word.Application")

WordApp.Visible = True

WordApp.Activate

Set WordDoc = WordApp.Documents.Add
The next four lines create a table inside that newly opened Word document.
Set WrdRange = WordDoc.Range(0, 0)

WordDoc.Tables.Add WrdRange, intNoOfRows, intNoOfColumns

Set WordTable = WordDoc.Tables(1)

WordTable.Borders.Enable = True
Finally, the following loop will perform these actions:
- For each row, put the order date, item, units, and cost into variables
- Calculate unit times cost (total sale) and store that in a variable
- For each column, write the values to the Word table, including the calculated total sale in the last cell
- Move on to the next row, and repeat the procedure above
Here’s what that code looks like:
 For i = 1 To intNoOfRows

For j = 1 To intNoOfColumns

If j = 1 Then

strDate = tblRange.Cells(i + 1, j).Value

strItem = tblRange.Cells(i + 1, j + 1).Value

intUnits = Val(tblRange.Cells(i + 1, j + 2).Value)

intCost = Val(tblRange.Cells(i + 1, j + 3).Value)

intTotal = intUnits * intCost

End If

Select Case j

Case Is = 1

WordTable.Cell(i, j).Range.Text = strDate

Case Is = 2

WordTable.Cell(i, j).Range.Text = strItem

Case Is = 3

WordTable.Cell(i, j).Range.Text = intUnits

Case Is = 4

WordTable.Cell(i, j).Range.Text = intCost

Case Is = 5

WordTable.Cell(i, j).Range.Text = intTotal

Case Else

End Select

Next

Next
The “Cells” function in the first part pulls the cell values out of Excel. Cells(x,y) means it pulls the cell’s value at row x and column y.
The “Cell” function in the last part writes to the cells in the Word table, using the same row and column assignments.
Once you save and run this VBA code, you’ll see the results in your newly created Word document.
As you can see, it isn’t too complicated to create some useful automation between Excel and Word. It’s just a matter of understanding how the various “objects” work to create and control both the Excel and the Word applications on your computer.
![]()
I have updated the code, check and let me know if it is working?
Before running the macro go to Microsoft Visual basic for Applications window
then in tools-> references
and check the «Microsoft Word xx object library»
and ok
then delete the table you have pasted in your template and save it, as the macro will paste that, you don’t want two of them.
Updated macro
Sub runMacro()

    save_path = ThisWorkbook.Path & ""

    Call makeDocument("Name 1", save_path)
    Call makeDocument("Name 2", save_path)
    Call makeDocument("Name 3", save_path)

End Sub

Sub makeDocument(sheet_name, save_path)

     'Remember: this code requires a referece to the Word object model

     'dimension some local variables
    Dim rng As Range 'our source range
    Dim wdApp As New Word.Application 'a new instance of Word
    Dim wdDoc As Word.Document 'our new Word document
    Dim t As Word.Range 'the new table in Word as a range
    Dim myWordFile As String 'path to Word template


     'initialize the Word template path
     'here, it's set to be in the same directory as our source workbook
    myWordFile = ThisWorkbook.Path & "/Word Template.docx"

     'get the range of the contiguous data from Cell A1
    'Set rng = Range("A1").CurrentRegion
    Set rng = Sheets(sheet_name).Range("A1:E23")
     'you can do some pre-formatting with the range here
    'rng.HorizontalAlignment = xlCenter 'center align the data
    rng.Copy 'copy the range

     'open a new word document from the template
    Set wdDoc = wdApp.Documents.Add(myWordFile)

    'wdDoc.Paragraphs(2).Range.PasteExcelTable False, False, flase

    Set t = wdDoc.Content 'set the range in Word
    Set t = wdDoc.Paragraphs(2).Range

    t.Paste 'paste in the table
    With t 'working with the table range
        '.Style = "Strong" 'set the style created for the table
        '.Style = "Grid Table 4 - Accent 2"
         'we can use the range object to do some more formatting
         'here, I'm matching the table with using the Excel range's properties
        .Tables(1).Columns.SetWidth (rng.Width / rng.Columns.Count), wdAdjustSameWidth
    End With

     'until now the Word app has been a background process
    wdApp.Visible = True
     'we could use the Word app object to finish off
     'you may also want to things like generate a filename and save the file
    wdApp.Activate

    file_name = save_path & sheet_name 'set the directory where files would be saved

    'save file
    wdDoc.SaveAs2 Filename:=file_name, FileFormat:= _
    wdFormatXMLDocument, LockComments:=False, Password:="", AddToRecentFiles _
    :=True, WritePassword:="", ReadOnlyRecommended:=False, EmbedTrueTypeFonts _
    :=False, SaveNativePictureFormat:=False, SaveFormsData:=False, _
    SaveAsAOCELetter:=False, CompatibilityMode:=15


End Sub
| title | ms.prod | ms.assetid | ms.date | ms.localizationpriority |
|---|---|---|---|---|
|
Working with tables |
word |
cf0858b7-6b39-4c90-552e-edb695b5cda3 |
06/08/2019 |
medium |
This topic includes Visual Basic examples related to the tasks identified in the following sections.
Creating a table, inserting text, and applying formatting
The following example inserts a four-column, three-row table at the beginning of the active document. The For Each…Next structure is used to step through each cell in the table. Within the For Each…Next structure, the InsertAfter method of the Range object is used to add text to the table cells (Cell 1, Cell 2, and so on).
Sub CreateNewTable()
 Dim docActive As Document
 Dim tblNew As Table
 Dim celTable As Cell
 Dim intCount As Integer

 Set docActive = ActiveDocument
 Set tblNew = docActive.Tables.Add( _
 Range:=docActive.Range(Start:=0, End:=0), NumRows:=3, _
 NumColumns:=4)
 intCount = 1

 For Each celTable In tblNew.Range.Cells
  celTable.Range.InsertAfter "Cell " & intCount
  intCount = intCount + 1
 Next celTable

 tblNew.AutoFormat Format:=wdTableFormatColorful2, _
 ApplyBorders:=True, ApplyFont:=True, ApplyColor:=True
End Sub
Inserting text into a table cell
The following example inserts text into the first cell of the first table in the active document. The Cell method returns a single Cell object. The Range property returns a Range object. The Delete method is used to delete the existing text and the InsertAfter method inserts the «Cell 1,1» text.
Sub InsertTextInCell()
 If ActiveDocument.Tables.Count >= 1 Then
  With ActiveDocument.Tables(1).Cell(Row:=1, Column:=1).Range
   .Delete
   .InsertAfter Text:="Cell 1,1"
  End With
 End If
End Sub
Returning text from a table cell without returning the end of cell marker
The following example returns and displays the contents of each cell in the first row of the first document table.
Sub ReturnTableText()
 Dim tblOne As Table
 Dim celTable As Cell
 Dim rngTable As Range

 Set tblOne = ActiveDocument.Tables(1)
 For Each celTable In tblOne.Rows(1).Cells
  Set rngTable = ActiveDocument.Range(Start:=celTable.Range.Start, _
  End:=celTable.Range.End - 1)
  MsgBox rngTable.Text
 Next celTable
End Sub
Sub ReturnCellText()
 Dim tblOne As Table
 Dim celTable As Cell
 Dim rngTable As Range

 Set tblOne = ActiveDocument.Tables(1)
 For Each celTable In tblOne.Rows(1).Cells
  Set rngTable = celTable.Range
  rngTable.MoveEnd Unit:=wdCharacter, Count:=-1
  MsgBox rngTable.Text
 Next celTable
End Sub
Converting existing text to a table
The following example inserts tab-delimited text at the beginning of the active document and then converts the text to a table.
Sub ConvertExistingText()
 With Documents.Add.Content
  .InsertBefore "one" & vbTab & "two" & vbTab & "three" & vbCr
  .ConvertToTable Separator:=Chr(9), NumRows:=1, NumColumns:=3
 End With
End Sub
Returning the contents of each table cell
The following example defines an array equal to the number of cells in the first document table (assuming Option Base 1). The For Each…Next structure is used to return the contents of each table cell and assign the text to the corresponding array element.
Sub ReturnCellContentsToArray()
 Dim intCells As Integer
 Dim celTable As Cell
 Dim strCells() As String
 Dim intCount As Integer
 Dim rngText As Range

 If ActiveDocument.Tables.Count >= 1 Then
  With ActiveDocument.Tables(1).Range
   intCells = .Cells.Count
   ReDim strCells(intCells)
   intCount = 1
   For Each celTable In .Cells
    Set rngText = celTable.Range
    rngText.MoveEnd Unit:=wdCharacter, Count:=-1
    strCells(intCount) = rngText
    intCount = intCount + 1
   Next celTable
  End With
 End If
End Sub
Copying all tables in the active document into a new document
This example copies the tables from the current document into a new document.
Sub CopyTablesToNewDoc()
 Dim docOld As Document
 Dim rngDoc As Range
 Dim tblDoc As Table

 If ActiveDocument.Tables.Count >= 1 Then
  Set docOld = ActiveDocument
  Set rngDoc = Documents.Add.Range(Start:=0, End:=0)
  For Each tblDoc In docOld.Tables
   tblDoc.Range.Copy
   With rngDoc
    .Paste
    .Collapse Direction:=wdCollapseEnd
    .InsertParagraphAfter
    .Collapse Direction:=wdCollapseEnd
   End With
  Next
 End If
End Sub
[!includeSupport and feedback]