Sub ExcelRangeToWord()
‘PURPOSE: Copy/Paste An Excel Table Into a New Word Document
‘NOTE: Must have Word Object Library Active in Order to Run _
(VBE > Tools > References > Microsoft Word 12.0 Object Library)
‘SOURCE: www.TheSpreadsheetGuru.com
Dim tbl As Excel.Range
Dim WordApp As Word.Application
Dim myDoc As Word.Document
Dim WordTable As Word.Table
‘Optimize Code
Application.ScreenUpdating = False
Application.EnableEvents = False
‘Copy Range from Excel
Set tbl = ThisWorkbook.Worksheets(Sheet1.Name).ListObjects(«Table1»).Range
‘Create an Instance of MS Word
On Error Resume Next
‘Is MS Word already opened?
Set WordApp = GetObject(class:=»Word.Application»)
‘Clear the error between errors
Err.Clear
‘If MS Word is not already open then open MS Word
If WordApp Is Nothing Then Set WordApp = CreateObject(class:=»Word.Application»)
‘Handle if the Word Application is not found
If Err.Number = 429 Then
MsgBox «Microsoft Word could not be found, aborting.»
GoTo EndRoutine
End If
On Error GoTo 0
‘Make MS Word Visible and Active
WordApp.Visible = True
WordApp.Activate
‘Create a New Document
Set myDoc = WordApp.Documents.Add
‘Copy Excel Table Range
tbl.Copy
‘Paste Table into MS Word
myDoc.Paragraphs(1).Range.PasteExcelTable _
LinkedToExcel:=False, _
WordFormatting:=False, _
RTF:=False
‘Autofit Table so it fits inside Word Document
Set WordTable = myDoc.Tables(1)
WordTable.AutoFitBehavior (wdAutoFitWindow)
EndRoutine:
‘Optimize Code
Application.ScreenUpdating = True
Application.EnableEvents = True
‘Clear The Clipboard
Application.CutCopyMode = False
End Sub
In this part of the code we are determining if Microsoft Word is open or not. If Word is already open, we can set a variable equal to the entire program by using GetObject. If MS Word is not currently running we can use CreateObject to run an instance of Word and then set a variable equal to that specific instance of MS Word.
When using CreateObject, the target application will start running but it is not visible on screen. Therefore we need to turn the Visible setting on (equal to true). Also, VBA with Word is a little bit different than with Excel in that it is much more dependent on its window showing on screen. Therefore a second command must be written to Activate Microsoft Word.
Copy From Excel, Paste Onto Document
Now that you have a new document created, you can command Excel to paste your table into MS Word. Near the beginning of the code, there was a line that allowed you to specify the exact table you wanted to copy. The variable tbl was used to remember this table range and to allow you to reference the range later on in the code.
Guru Tip: It is a good idea to place code that may need to be manually changed at some point in the future near the beginning of the subroutine. This prevents you from having to scroll through your code and pinpoint the exact place where you spelled out which range you wanted to copy or which worksheet you wanted to pull data from. This can save you a bunch of time and prevent confusion!
Word has a special method called PasteExcelTable, which (as you can guess) allows you paste in an Excel table. There are three variables you can tweak to get you table looking and functioning just the way you want.
-
LinkedToExcel — True links the pasted table to the original Excel file so that changes made to the Excel file are reflected in Microsoft Word.
-
WordFormatting — True formats the table using the formatting in the Word document. False formats the table according to the original Excel file.
-
RTF — True pastes the Excel table using Rich Text Format (RTF). False pastes the Excel table as HTML.
Now for the last step! Depending on how large your table is, it may be spilling outside of your document page. In order to prevent this from happening you can go ahead and use AutoFitBehavior to resize the table to fit perfectly inside your Word document.
About The Author
Hey there! I’m Chris and I run TheSpreadsheetGuru website in my spare time. By day, I’m actually a finance professional who relies on Microsoft Excel quite heavily in the corporate world. I love taking the things I learn in the “real world” and sharing them with everyone here on this site so that you too can become a spreadsheet guru at your company.
Through my years in the corporate world, I’ve been able to pick up on opportunities to make working with Excel better and have built a variety of Excel add-ins, from inserting tickmark symbols to automating copy/pasting from Excel to PowerPoint. If you’d like to keep up to date with the latest Excel news and directly get emailed the most meaningful Excel tips I’ve learned over the years, you can sign up for my free newsletters. I hope I was able to provide you with some value today and I hope to see you back here soon!
— Chris
Founder, TheSpreadsheetGuru.com
To copy data from Excel to a Word file using VBA we need to access the word application using Excel VBA. In this tutorial we will learn how to open a word application, add a document and copy-paste data from excel to it.
In this article, we will use the Early Binding method to create an object of word application instead of using the late binding. You can read about it here in detail.
The Process Of Copying Excel Data To A Word File Using Excel VBA
To copy data from excel to a word file using VBA, we first need to open the Word Application of course. Then add a document to it (if you want a new document). Copy data from excel file. Select the paragraph on the doc and paste on it.Finally save and close the document. Each of these steps can be done easily from Excel. You will not need to interact with the Word Document.
Let’s get started with an example without getting any further into theory. Because Iron Man said, «Sometimes you gotta run before you can walk».
Example : Paste Excel Data To Word Using VBA
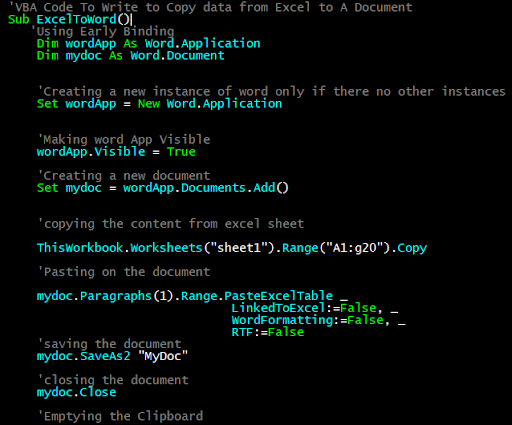
The below code is an example of how you can copy some range of excel and paste it into a new word document and save it on the drive to use later
'VBA Code To Write to Copy data from Excel to A Document

Sub ExcelToWord()

   'Using Early Binding

    Dim wordApp As Word.Application

    Dim mydoc As Word.Document


    'Creating a new instance of word only if there no other instances

    Set wordApp = New Word.Application


    'Making word App Visible

    wordApp.Visible = True


    'Creating a new document

    Set mydoc = wordApp.Documents.Add()


    'copying the content from excel sheet


    ThisWorkbook.Worksheets("sheet1").Range("A1:g20").Copy


    'Pasting on the document


    mydoc.Paragraphs(1).Range.PasteExcelTable _

                               LinkedToExcel:=False, _

                               WordFormatting:=False,

                               RTF:=False

    'saving the document

    mydoc.SaveAs2 "MyDoc"


    'closing the document

    mydoc.Close


    'Emptying the Clipboard

    CutCopyMode = False


End Sub
Explanation of the Code:
Well I have explained each step in the code itself using comments but let’s have some word about the lines we have used in this sub.
‘Created variables of word application and document type
Dim wordApp As Word.Application
Dim mydoc As Word.Document
Here we have declared two variables of the required types. We can do this because we have already added the reference to the word application. You can do this by going to tools in menu. Find references option and then look for the word reference.
‘Creating a new instance of word only if there no other instances
Set wordApp = New Word.Application
‘Making word App Visible
wordApp.Visible = True
‘Creating a new document
Set mydoc = wordApp.Documents.Add()
In the first line above, we are intentiating the wordApp variable with an object of type Word.App using the New keyword. This will open the Word Application.
In the second line we are making the word application visible so that we can work with it.
In the next line, we add a new document to the word application using Word.Documents.Add() function. This is stored in the mydoc variable.
‘copying the content from excel sheet
ThisWorkbook.Worksheets(«sheet1»).Range(«A1:G20»).Copy
Here we are simply copying a range from excel. You must have done it before. It is stored on the clipboard.
‘Pasting on the document
mydoc.Paragraphs(1).Range.PasteExcelTable _
LinkedToExcel:=False, _
WordFormatting:=False,
RTF:=False
We are using the PasteExcelTable method of Paragraph.Range class of mydoc to paste data from clipboard.
‘saving the document
mydoc.SaveAs2 «MyDoc»
‘closing the document
mydoc.Close
‘Emptying the Clipboard
CutCopyMode = False
We are saving the document with the name MyDoc. Then we close the document using the Close function. Finally we release the clipboard to be used by others.
So yeah guys, this is how you can create a new Word document and copy Excel data to it using VBA. I have not gone into details as it would make the article exhaustingly long. This was only to learn how you can paste to a word document through Excel. I hope it helped you understand the process. If you have any questions regarding this article, you can contact me through the comments section below.
Related Articles:
Getting Started With Excel VBA UserForms| I will explain how to create a form in excel, how to use VBA toolbox, how to handle user inputs and finally how to store the user inputs. We will go through these topics using one example and step by step guide.
VBA variables in Excel| VBA stands for Visual Basic for Applications. It is a programming language from Microsoft. It is used with Microsoft Office applications such as MSExcel, MS-Word and MS-Access whereas VBA variables are specific keywords.
Excel VBA Variable Scope| In all the programming languages, we have variable access specifiers that define from where a defined variable can be accessed. Excel VBA is no Exception. VBA too has scope specifiers.
ByRef and ByVal Arguments | When an argument is passed as a ByRef argument to a different sub or function, the reference of the actual variable is sent. Any changes made into the copy of the variable, will reflect in the original argument.
Delete sheets without confirmation prompts using VBA in Microsoft Excel | Since you are deleting sheets using VBA, you know what you are doing. You would like to tell Excel not to show this warning and delete the damn sheet.
Add And Save New Workbook Using VBA In Microsoft Excel 2016| In this code, we first created a reference to a workbook object. And then we initialized it with a new workbook object. The benefit of this approach is that you can do operations on this new workbook easily. Like saving, closing, deleting, etc
Display A Message On The Excel VBA Status Bar| The status bar in excel can be used as a code monitor. When your VBA code is lengthy and you do several tasks using VBA, you often disable the screen update so that you don’t see that screen flickering.
Turn Off Warning Messages Using VBA In Microsoft Excel 2016| This code not only disables VBA alerts but also increases the time efficiency of the code. Let’s see how.
Popular Articles:
50 Excel Shortcuts to Increase Your Productivity | Get faster at your task. These 50 shortcuts will make you work even faster on Excel.
The VLOOKUP Function in Excel | This is one of the most used and popular functions of excel that is used to lookup value from different ranges and sheets.
COUNTIF in Excel 2016 | Count values with conditions using this amazing function. You don’t need to filter your data to count specific values. Countif function is essential to prepare your dashboard.
How to use SUMIF Function in Excel | This is another dashboard essential function. This helps you sum up values on specific conditions.
i am copying cells from excel into an open word document. the way i am doing this is just copying the contents of a cell into the clipboard and REPLACING a specific KEYWORD in the word document like so:
if cell A1 = "some word" i need too replace the string «QUERYA1» in the word document
i am doing it like this:
Sub NoFormatPaste()

    wdFind.Replacement.Text = ""
    wdFind.Forward = True
    wdFind.Wrap = wdFindContinue
    wdFind.Execute
    If IsEmpty(Selection.Text) And Len(Selection.Text) = 0 Then
    ClipEmpty.PutInClipboard
    appWd.Selection.PasteSpecial DataType:=wdPasteText
    End
    Else
    appWd.Selection.PasteSpecial DataType:=wdPasteText
    End If
    CutCopyMode = False

End Sub
when this sub runs, it works on every field except it gives an error if the cell is empty. i have this formula in the cell: =+IF(K10="XXX","",K10)
when this formula yields NOTHING or a blank, and i run my macro, i get an error on PASTING this into word. i am getting an error called 4168 command failed/command execution on this line:
appWd.Selection.PasteSpecial DataType:=wdPasteText
here is my complete code:
Dim appWd As Word.Application
Dim wdFind As Object
Dim ClipEmpty As New MSForms.DataObject
Dim ClipT As String

Sub FormatPaste()

    wdFind.Replacement.Text = ""
    wdFind.Forward = True
    wdFind.Wrap = wdFindContinue
    wdFind.Execute
    If IsEmpty(Selection.Text) And Len(Selection.Text) = 0 Then
    ClipEmpty.PutInClipboard
    appWd.Selection.Paste
    End
    Else
    appWd.Selection.Paste
    End If
    CutCopyMode = False

End Sub

Sub NoFormatPaste()

    wdFind.Replacement.Text = ""
    wdFind.Forward = True
    wdFind.Wrap = wdFindContinue
    wdFind.Execute
    If IsEmpty(Selection.Text) And Len(Selection.Text) = 0 Then
    ClipEmpty.PutInClipboard
    appWd.Selection.PasteSpecial DataType:=wdPasteText
    End
    Else
    appWd.Selection.PasteSpecial DataType:=wdPasteText
    End If
    CutCopyMode = False

End Sub

Sub CopyDatatoWord()

Dim docWD As Word.Document
Dim sheet1 As Object
Dim sheet2 As Object
Dim SaveCell1 As String
Dim SaveCell2 As String
Dim SaveCell3 As String
Dim Dir1 As String
Dim Dir2 As String


    Set appWd = CreateObject("Word.Application")
    appWd.Visible = True
    'Set docWD = appWD.Documents.Open("S:Practice Quarterly Reports2011 Q1 - V5Practice Profile Template 2011.docx")
    Set docWD = appWd.Documents.Open("C:Documents and SettingsjhillDesktopPractice Profile Template 2011.docx")

    'Select Sheet where copying from in excel
    Set sheet1 = Sheets("TABLES")
    Set sheet2 = Sheets("REPORT INFO")
    Set wdFind = appWd.Selection.Find
    ClipT = "  "
    ClipEmpty.SetText ClipT

    sheet1.Range("B3:B6").Copy
    wdFind.Text = "Qwerty01"
    Call FormatPaste

    sheet1.Range("B10:B15").Copy
    wdFind.Text = "Qwerty02"
    Call FormatPaste

    sheet1.Range("C21:D28").Copy
    wdFind.Text = "Qwerty03"
    Call FormatPaste

    sheet1.Range("B32:F42").Copy
    wdFind.Text = "Qwerty04"
    Call FormatPaste

    sheet1.Range("B46:D52").Copy
    wdFind.Text = "Qwerty05"
    Call FormatPaste

    sheet1.Range("B58:F68").Copy
    wdFind.Text = "Qwerty06"
    Call FormatPaste

    sheet1.Range("B74:G84").Copy
    wdFind.Text = "Qwerty07"
    Call FormatPaste

    sheet1.Range("B87").Copy
    wdFind.Text = "Qwerty08"
    Call NoFormatPaste

    sheet1.Range("B88").Copy
    wdFind.Text = "Qwerty09"
    Call NoFormatPaste

    sheet1.Range("B89").Copy
    wdFind.Text = "Qwerty10"
    Call NoFormatPaste

    sheet1.Range("B90").Copy
    wdFind.Text = "Qwerty11"
    Call NoFormatPaste

    sheet1.Range("B91").Copy
    wdFind.Text = "Qwerty12"
    Call NoFormatPaste

    sheet1.Range("B92").Copy
    wdFind.Text = "Qwerty13"
    Call NoFormatPaste

    sheet1.Range("B93").Copy
    wdFind.Text = "Qwerty14"
    Call NoFormatPaste

    sheet1.Range("B94").Copy
    wdFind.Text = "Qwerty15"
    Call NoFormatPaste

    sheet2.Range("D4").Copy
    wdFind.Text = "Qwerty16"
    Call NoFormatPaste

    sheet2.Range("B5").Copy
    wdFind.Text = "Qwerty17"
    Call NoFormatPaste


    sheet2.Range("D4").Copy
    wdFind.Text = "Qwerty18"
    Call NoFormatPaste

    sheet2.Range("B8").Copy
    wdFind.Text = "Qwerty19"
    Call NoFormatPaste

    sheet2.Range("B9").Copy
    wdFind.Text = "Qwerty20"
    Call NoFormatPaste

    sheet2.Range("B10").Copy
    wdFind.Text = "Qwerty21"
    Call NoFormatPaste

    sheet2.Range("B11").Copy
    wdFind.Text = "Qwerty22"
    Call NoFormatPaste

    sheet2.Range("B12").Copy
    wdFind.Text = "Qwerty23"
    Call NoFormatPaste

    sheet2.Range("B13").Copy
    wdFind.Text = "Qwerty24"
    Call NoFormatPaste

    sheet2.Range("B14").Copy
    wdFind.Text = "Qwerty25"
    Call NoFormatPaste

    sheet2.Range("B15").Copy
    wdFind.Text = "Qwerty26"
    Call NoFormatPaste

    sheet2.Range("B16").Copy
    wdFind.Text = "Qwerty27"
    Call NoFormatPaste

    sheet2.Range("B17").Copy
    wdFind.Text = "Qwerty28"
    Call NoFormatPaste

    sheet2.Range("B5").Copy
    wdFind.Text = "Qwerty29"
    Call NoFormatPaste

    sheet2.Range("B5").Copy
    wdFind.Text = "Qwerty30"
    Call NoFormatPaste

    sheet2.Range("B5").Copy
    wdFind.Text = "Qwerty31"
    Call NoFormatPaste

    SaveCell1 = sheet2.Range("D3").Text
    SaveCell2 = sheet2.Range("B6").Text
    SaveCell3 = SaveCell2 & "" & SaveCell1

    Dir1 = "\annapurnaSharedPractice Quarterly Reports2011 Q1 - V5 & SaveCell2"
    Dir2 = "\annapurnaSharedPractice Quarterly Reports2011 Q1 - V5 & SaveCell3"


    If Len(Dir1) = False Then
    MkDir Dir1
    End If


    'docWD.SaveAs (Dir2 & ".docx")
    docWD.SaveAs ("\annapurnaSharedPractice Quarterly ReportsQ1_2011Test.docx")

    'appWD.Quit

Set appWd = Nothing
Set docWD = Nothing
Set appXL = Nothing
Set wbXL = Nothing

End Sub
what am i doing wrong? what is the reason i get an error only on the paste of a blank
VBA is a very powerful tool you can use to automate a lot of work between multiple Microsoft Office applications. One common activity you can automate using VBA is inserting an Excel table into a Word document.
Visual Basic for Applications (VBA) is a potent tool to automate a lot of work between multiple Microsoft Office applications. One common activity you can automate using VBA is inserting an Excel table into a Word document.
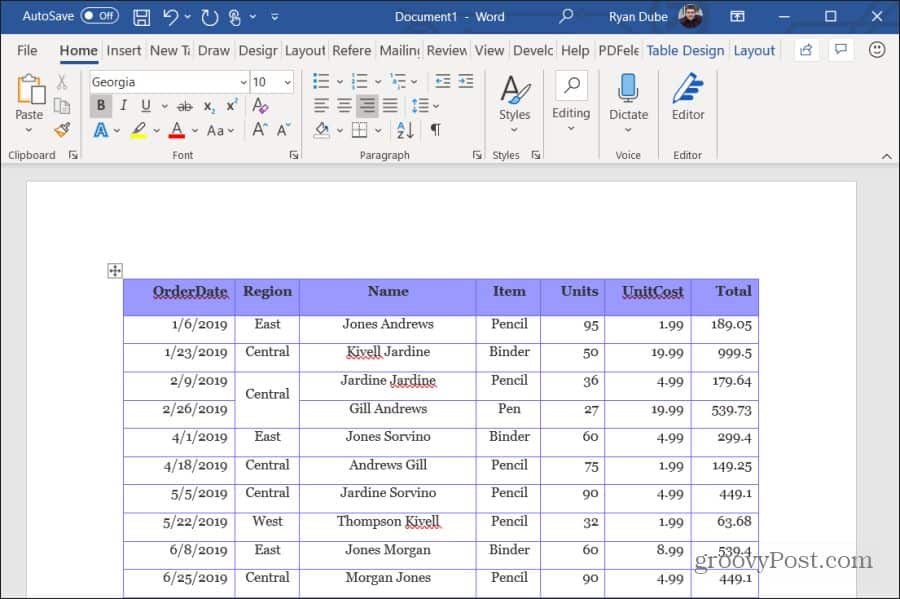
There are two ways you can do this. The first is automating a straight copy and paste of an existing range from Excel into a new table in a Word document. The second is performing calculations in Excel, creating a new table in Word, and writing the results to the table.
You could try to record a macro to do this, but macros will only let you automate tasks inside of Word. In this article, you’ll learn how to write VBA code to automate these actions between Excel and Word.
Copy And Paste An Excel Range Into Word With VBA
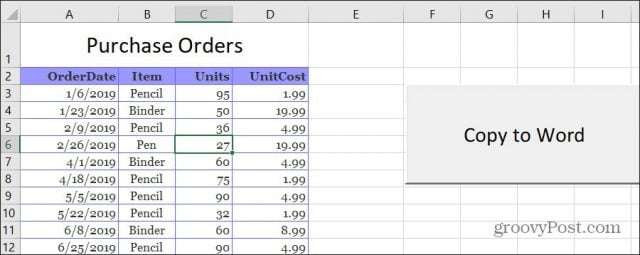
In both examples, we’ll start with a sample Excel spreadsheet. This sample is a list of purchase orders for a variety of products.
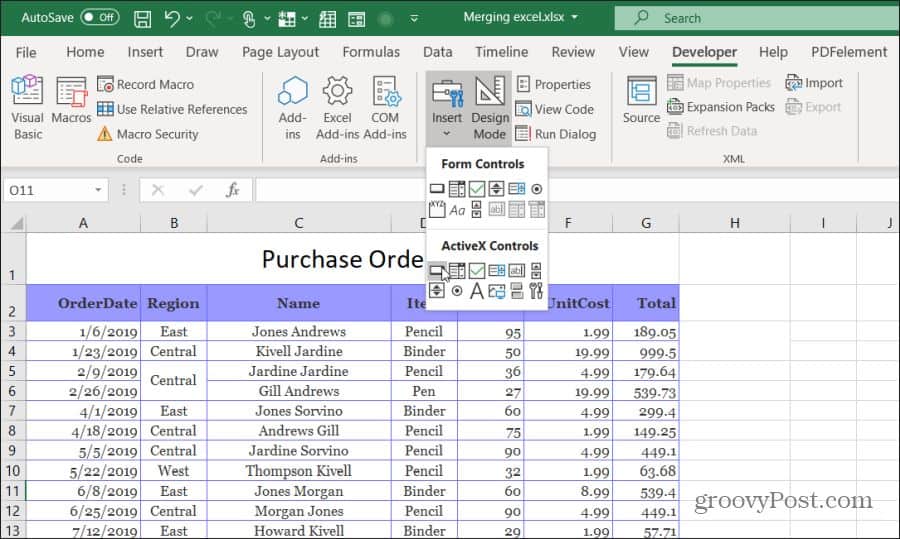
Let’s say you’d like to copy and paste the entire range of cells in this worksheet into a Word document. To do this, you’ll need to write a VBA function that’ll run when you click a “Copy To Word” button.
Select Developer from the menu and select Insert from the Controls group in the ribbon. In the drop-down list, select the Button control under ActiveX Controls.
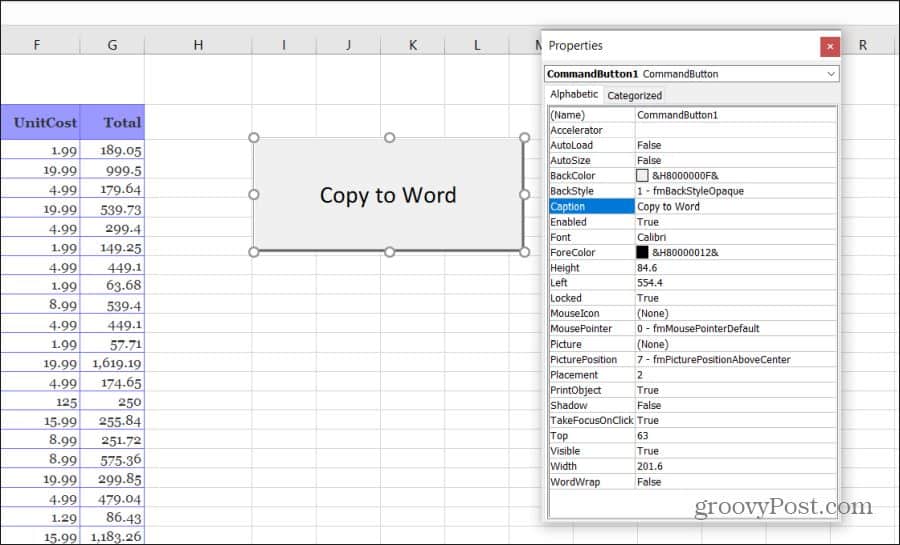
Next, draw the command button on the right side of the sheet. You can change the caption to “Copy to Word” by right-clicking the button and selecting Properties. Change the caption text, and you can use Font to update font size and style.
Note: If you don’t see Developer in your Excel menu, then add it. Select File, Options, Customize Ribbon, and select All Commands from the left drop-down. Then move Developer from the left pane to the right and select OK to finish.
Write The Copy And Paste VBA Code
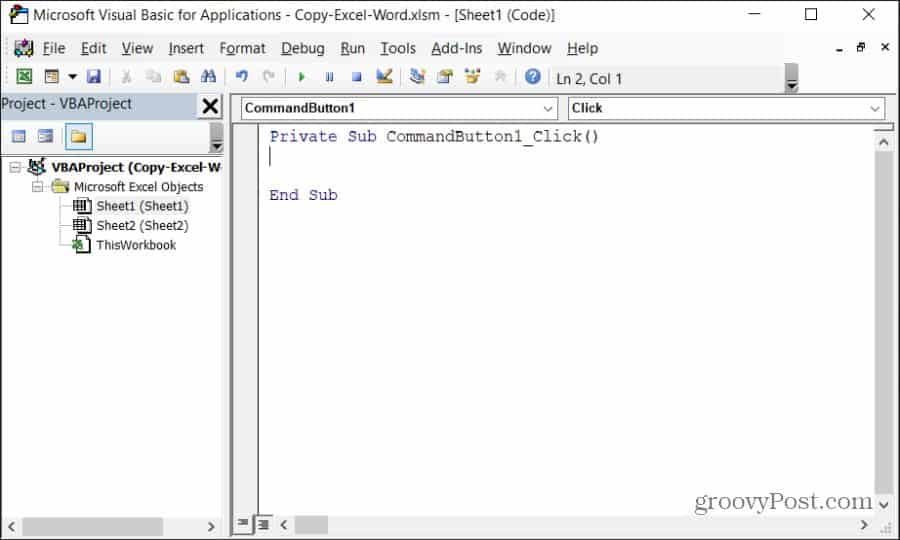
Now you’re ready to start writing VBA code. To get started, double-click the new Copy to Word button to open the code editor window.
You should see a subroutine called Commandbutton1_Click() as shown below.
You’ll want to copy each section of the code below. Before you start coding, to control Word on your computer using VBA, you’ll need to enable the Microsoft Word reference library.
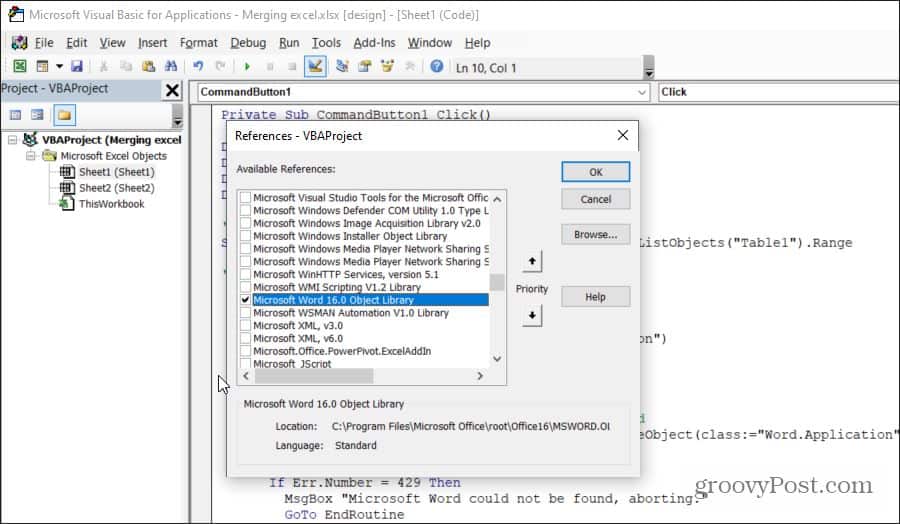
In the code editor, select Tools from the menu and select References. In the list of Available References, scroll down and enable Microsoft Word 16.0 Object Library.
Select OK, and you’re ready to start coding. We’ll go through each section of code at a time, so you understand what that code does and why.
First, you need to create the variables and objects that’ll hold the range and allow you to control the Word application.
Dim tblRange As Excel.Range

Dim WordApp As Word.Application

Dim WordDoc As Word.Document

Dim WordTable As Word.Table
The next line of code selects a specific range of cells and saves it to an Excel Range object in VBA.
Set tblRange = ThisWorkbook.Worksheets("Sheet1").Range("A2:G44")
Next, you want to check if the Word application is already open on the computer. You can reference the Word application using a special “class” reference with the VBA GetObject command to accomplish this. If Word isn’t already opened, then the next line will launch it using the CreateObject function. The “On Error Resume Next” line prevents any error from the first GetObject function (if Word isn’t already open) from stopping the execution of the next line in the program.
On Error Resume Next

Set WordApp = GetObject(class:="Word.Application")

If WordApp Is Nothing Then Set WordApp = CreateObject(class:="Word.Application")
Now that the Word application is launched, you want to make it visible to the user and activate it for use.
WordApp.Visible = True

WordApp.Activate
Next, you want to create a new document inside the Word application.
Set WordDoc = WordApp.Documents.Add
Finally, you’ll copy and paste the range of cells into a new table in the Word document.
tblRange.Copy

WordDoc.Paragraphs(1).Range.PasteExcelTable _

LinkedToExcel:=False, _

WordFormatting:=False, _

RTF:=False
The switches in the above function will insert a non-linked table using source Excel formatting (not Word formatting) and not using rich text format.
Finally, to deal with Excel ranges that are wider than the document, you’ll need to autofit the new table, so it fits within the margins of your new Word document.
Set WordTable = WordDoc.Tables(1)

WordTable.AutoFitBehavior (wdAutoFitWindow)
And now you’re done! Save the file as a macro-enabled Excel file (.xlsm extension). Close the editor, save the original Excel file again, and then click your command button to see your code in action!
Write Excel Results Into A Word Table With VBA
In this next section, you’ll write VBA code that performs calculations on values in Excel and writes those to a table in Word.
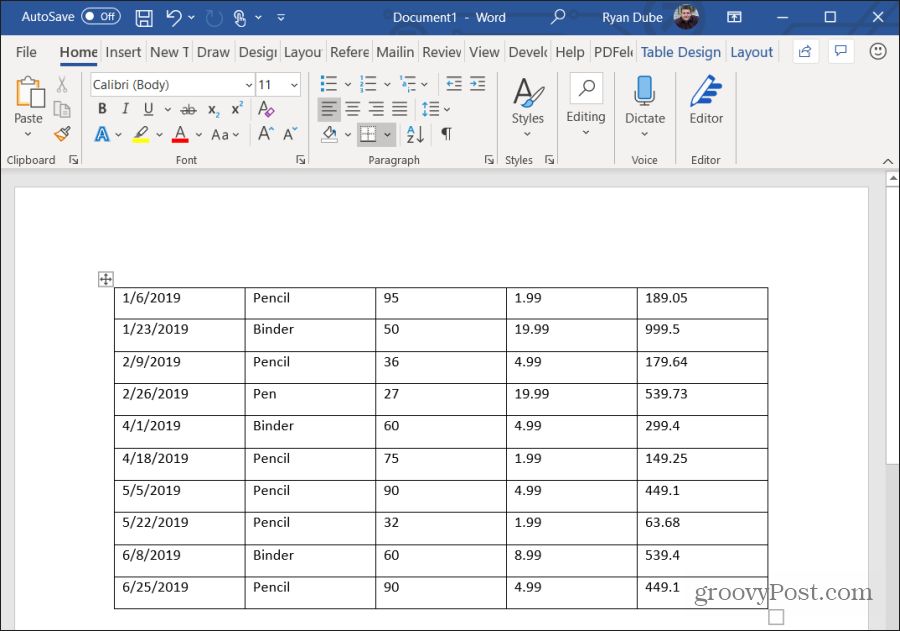
For this example, we’ll pull 10 rows worth of data, calculate, and write the results to a table in a Word document. Also, the original table will contain four columns, and the VBA code will pull the first ten rows of data from that range.
Just as in the last section, we’ll go through each section at a time, so you understand what that code does and why.
First, create the variables and objects that’ll hold the data and allow you to write to the Word application.
Dim tblRange As Excel.Range

Dim WrdRange As Word.Range

Dim WordApp As Word.Application

Dim WordDoc As Word.Document

Dim WordTable As Word.Table

Dim intRows

Dim intColumns

Dim strDate As String

Dim strItem As String

Dim intUnits As Variant

Dim intCost As Variant

Dim intTotal As Variant
Next, set the total columns and rows you want to read from the Excel range.
intNoOfRows = 10

intNoOfColumns = 5
Repeat the same code as the last section that’ll open Word if it isn’t already open.
On Error Resume Next

Set WordApp = GetObject(class:="Word.Application")

If WordApp Is Nothing Then Set WordApp = CreateObject(class:="Word.Application")

WordApp.Visible = True

WordApp.Activate

Set WordDoc = WordApp.Documents.Add
The next four lines create a table inside that newly opened Word document.
Set WrdRange = WordDoc.Range(0, 0)

WordDoc.Tables.Add WrdRange, intNoOfRows, intNoOfColumns

Set WordTable = WordDoc.Tables(1)

WordTable.Borders.Enable = True
Finally, the following loop will perform these actions:
- For each row, put the order date, item, units, and cost into variables
- Calculate unit times cost (total sale) and store that in a variable
- For each column, write the values to the Word table, including the calculated total sale in the last cell
- Move on to the next row, and repeat the procedure above
Here’s what that code looks like:
 For i = 1 To intNoOfRows

For j = 1 To intNoOfColumns

If j = 1 Then

strDate = tblRange.Cells(i + 1, j).Value

strItem = tblRange.Cells(i + 1, j + 1).Value

intUnits = Val(tblRange.Cells(i + 1, j + 2).Value)

intCost = Val(tblRange.Cells(i + 1, j + 3).Value)

intTotal = intUnits * intCost

End If

Select Case j

Case Is = 1

WordTable.Cell(i, j).Range.Text = strDate

Case Is = 2

WordTable.Cell(i, j).Range.Text = strItem

Case Is = 3

WordTable.Cell(i, j).Range.Text = intUnits

Case Is = 4

WordTable.Cell(i, j).Range.Text = intCost

Case Is = 5

WordTable.Cell(i, j).Range.Text = intTotal

Case Else

End Select

Next

Next
The “Cells” function in the first part pulls the cell values out of Excel. Cells(x,y) means it pulls the cell’s value at row x and column y.
The “Cell” function in the last part writes to the cells in the Word table, using the same row and column assignments.
Once you save and run this VBA code, you’ll see the results in your newly created Word document.
As you can see, it isn’t too complicated to create some useful automation between Excel and Word. It’s just a matter of understanding how the various “objects” work to create and control both the Excel and the Word applications on your computer.
In Previous Article we saw how to Copy Content from a Word Document and Paste in in to the Active Workbook. Now in this Article i am going to write a function will Select a Range from Excel and paste the content in a New Word Document.
Here there are two possible way of copying and pasting in Word Document. Also while pasting in the word Document you can format the Doc as per your requirement. Below 3rd point describe about that.
1. Copy only the Content and paste it in Word Document as Content.
Sub CopyToWord()

    Dim objWord As New Word.Application
    'Copy the range Which you want to paste in a New Word Document
    Range("A1:B10").Copy

    With objWord
        .Documents.Add
        .Selection.Paste
        .Visible = True
    End With

End Sub
2. Copy the Excel Range as Picture and paste it in word Doc.
Sub CopyToWord()

    Dim objWord As New Word.Application
    'Copy the range Which you want to paste in a
    ' New Word Document as a Picture
    Range("A1:B10").CopyPicture xlPrinter

    With objWord
        .Documents.Add
        .Selection.Paste
        .Visible = True
    End With

End Sub
3. Font Formatting of Word Document while pasting
Sub CopyRangeToWord()

	Dim objWord As New Word.Application
	Dim objDoc As New Word.Document

	Set objDoc = objWord.Documents.Add
	objWord.Visible = True
	Range("A1:B10").Copy
	 With objDoc.Paragraphs(objDoc.Paragraphs.Count).Range
           'All formatting goes here
	    .Paste
	    .Font.Name = "broadway"
	    .Font.Color = wdColorBlue
	    .Font.Bold = True
	    .Font.Italic = True
         .Font.Allcaps = True
         .Font.Size = 20
	End With

End Sub

