
Summary: Introduces new programmers to using Visual Basic for Applications (VBA) programming to extend Microsoft Word 2010. This topic summarizes the VBA language, instructions about how to access VBA in Word 2010, a detailed solution to a real-world Word VBA programming problem, and tips about how to program and debugging.
Applies to: Microsoft Word 2010 | Microsoft Office Word 2007 | Microsoft Office Word 2003
What is a Macro, Why Would I Want One, and How Can I Create One?
A macro enables you to put Word on autopilot.
It can be frustrating to perform a frequent task in Word if you have to use a long sequence of mouse clicks or key strokes every time that you perform the task. When you write a macro, you can bundle up a collection of commands and instruct Word to start them with only one click or one keystroke.
This article assumes that you are a skilled user of Word. It also does not assume that you know anything about computer programming or software development.
This article is in two parts:
- The first part of the article describes an end-to-end example: how to write a simple macro, where you can save it, how to create a button on the Quick Access Toolbar or create a keyboard shortcut to run the macro, and how to copy that macro to another computer (so you can use it at home and at work, or so you can share it with a colleague). That will give you a simple example.
- The second part of the article examines macros in detail: how to write more complex macros and how to ensure that your macro actually does what you want and does not create errors or problems.
Part 1: An End-to-End Macro Example
One purpose of macros is to enable you to perform a task with one click or one keystroke.
I often create documents that contain hyperlinks to Web sites. By default, Word requires me to follow, or open, a hyperlink, by pressing CTRL while clicking the hyperlink. The following image shows the default option for following a hyperlink.
Figure 1. Press CTRL and click the hyperlink to follow it
 The following image shows the alternative option for following a hyperlink by clicking it.
Figure 2. Click to follow hyperlink
 Sometimes that is useful, but sometimes I prefer to follow a hyperlink by clicking it (Figure 2). I may configure that setting many times a day. To do that, click the File button, and under Help, I click Options. In the Word Options dialog, I click Advanced, and then under Editing options, I select (or clear) Use CTRL+Click to follow hyperlink and then click OK. Doing that sequence of mouse clicks repeatedly is frustrating. I want to be able to click one time to configure this setting.
This section describes how to create a simple macro to toggle between using CTRL+Click and only clicking a hyperlink. To create this macro, you will learn how to:
- Create a Word Macro-Enabled Template file (.dotm) to store your macro and save it in the Word Startup folder.
- Open and use the Visual Basic Editor, which is part of Word.
- Write a macro in the Visual Basic Editor.
- Test your macro.
- Create a button on the Quick Access Toolbar to run your macro.
- Create a keyboard shortcut to run your macro.
- Save your file, load it as an add-in and, if you need to, share it with a colleague, or use it on another computer.
This section describes each step.
Creating a File to Hold Your Macro
Before you start to write a macro, think about how and where you want to save it.
Word lets you save macros in two Word file types: a Word Macro-Enabled Document file (.docm) and a Word Macro-Enabled Template file (.dotm). It is not a recommended practice to store macros in a document. Macros are usually stored in a Word Macro-Enabled Template file (.dotm).
It is possible to save macros in the Normal Template (Normal.dotm), but that makes it difficult to organize or share your macros. It is usually better to create your own file and store your macros there.
Where to save your template file depends on how you want to use the macros. You must decide whether you want to use your macros with all the documents that you might work on or only with some documents.
For example, you may create a template for monthly sales reports, and you may have macros to format those reports. In this case, save the template file in the User Templates folder, and use that template as the basis for new documents. (To verify the User Templates folder, click the File tab, and then click Options. In the Word Options dialog, click Advanced, and then click the File Locations button.) If a macro is stored in a template, then only documents attached to that template can access the macro. Other documents will be unable to “see” the macro.
In this article, you will create macros that can be used by any document. To do that, you will create a Macro-Enabled Template file. First, close any Word files that you have open. To create the new file to hold your macros, click the File button, click New, and then click My Templates. In the New dialog box, select the Template option button and then click OK. Save the file as a Macro-Enabled Template file that is named MyWordTools.dotm in the Word Startup folder. (To verify the Word Startup folder, click the File tab, and then click Options. In the Word Options dialog, click Advanced, and then click the File Locations button.)
Using the Visual Basic Editor
Word macros are written in a programming language called Visual Basic for Applications (VBA).
You write macros in a part of Word that most users never see: the Visual Basic Editor (the VBE). Open the VBE by using any one of the following methods:
- Press the keyboard shortcut, Alt+F11
- Click the Visual Basic button on the Developer tab. To do that, click the File tab, and then click Options. On the Word Options dialog box, click Customize Ribbon. In the right side of the dialog box, select the Developer tab. Click OK to return to your document, and then on the Developer tab, click the Visual Basic button.
- Add the Visual Basic command to the Quick Access Toolbar.
Before you start to use the VBE, on the Tools menu, click Options. In the Options dialog box, on the Editor tab, ensure that all the check boxes are selected.
In the upper-left side of the VBE you will see the Project Explorer. This shows all files that are currently open in Word. Expect to see Normal (which refers to Normal.dotm) and MyWordTools (the new file that you just created).
The following image shows the MyWordTools project in the Visual Basic Editor Project Explorer.
Figure 3. Visual Basic Editor Project Explorer
 Within your file, macros are stored in Modules. To add a module to your file, in the Project Explorer, select the MyWordTools file (Figure 3). On the Insert menu, click Module. When you add a module to your file, you will see the module added in the Project Explorer and in the Properties Window under it (Figure 4). You can rename a module using the Properties Window. Leave the name as Module1.
The following image shows Module1 in the Visual Basic Editor Project Explorer.
Figure 4. Visual Basic Editor Project Explorer
 Finally, you will see that the entry for your file is named TemplateProject. Although it is not necessary, it is recommended that you give it a more descriptive name. To do that, right-click the entry for the MyWordTools file, and then click TemplateProject Properties on the shortcut menu (Figure 5).
The following image shows the TemplateProject Properties… menu item
Figure 5. Properties menu item
 In the Template Project-Project Properties dialog, change the Project name to MyWordTools.
Writing Your Macro
The large white area on the right in the VBE is where you write the code of your macro. If you cannot see it, on the View menu, click Code to see the code window. Word automatically inserts the statement Option Explicit at the top of the code window. Do not delete this.
You want a macro to toggle between the two possible settings, in Word, for following a hyperlink. It will work like other buttons that toggle a setting in Word. The Bold button on the Home tab, for example, will text bold if it is not bold and make text not bold text if it is currently bold.
Copy and paste the following macro code example into the code window.
Sub ToggleHyperlinkCtrlClick()
    Options.CtrlClickHyperlinkToOpen = Not Options.CtrlClickHyperlinkToOpen
End Sub
This is a short macro named ToggleHyperlinkCtrlClick, and it only has one line of code. The one line of code in our macro means «Change the Word option that controls whether I have to use CTRL+Click to open a hyperlink to the opposite of its current setting, that is, to Not its current setting» (Figure 6).
The following image shows a line-by-line explanation of the ToggleHyperLinkCtrlClick method.
Figure 6. Explanation of the ToggleHyperLinkCtrlClick method

Testing Your Macro
To test your macro, use the following procedure.
To test the macro
- Arrange the Word and VBE windows so you can see them side by side.
- Click the main Word window. Type several paragraphs of text into the MyWordTools.dotm document. Include some hyperlinks in your text (Figure 7).
The following image shows the MyWordTools document and the ToggleHyperLinkCtrlClick code in the VBE side by side.
Figure 7. Document and Visual Basic Editor side by side

- In the VBE, click anywhere within your macro. To run your macro, on the Run menu, click Run Sub/User Form or press F5.
- The setting to follow a hyperlink will be changed. Mouse over a hyperlink in the main Word window to see that the tooltip has changed.
- Re-run the macro to toggle the setting.

You can also run your macro within Word itself. On the View tab, in the Macros group, click the Macros button. Your ToggleHyperlinkCtrlClick macro will be listed in the Macros dialog. To run your macro, click the name of the macro, then click the Run button.
Creating a Button on the Quick Access Toolbar to Run Your Macro
To get one-click access to your macro, you can add a button to the Quick Access Toolbar. To do that, use the following procedure.
To create a button on the Quick Access Toolbar
- Right-click the Quick Access Toolbar and then click Customize Quick Access Toolbar on the shortcut menu.
- Under Customize the Quick Access Toolbar, in the Choose commands from list, select Macros.
- In the Customize Quick Access Toolbar list, select MyWordTools.dotm. (You must select MyWordTools.dotm so that Word will save the button on the Quick Access Toolbar in the MyWordTools.dotm file. Only then will the button be available when you copy that file to another computer.)
- Select the ToggleHyperlinkCtrlClick macro and then click Add.
- Click the Modify button to select a symbol and change the name to ToggleHyperlinkCtrlClick.
You can now run your macro at any time by clicking the new button on the Quick Access Toolbar.
Creating a Keyboard Shortcut to Run Your Macro
You can also create a keyboard shortcut to run your macro. To do that, use the following procedure.
To create a keyboard shortcut to run the macro
- Right-click the Quick Access Toolbar, and then click Customize the Ribbon on the shortcut menu. Next to Keyboard shortcuts, click the Customize button.
The following image shows the Customize Keyboard dialog box
Figure 8. Customize Keyboard dialog box
- In the Customize Keyboard dialog box (Figure 8), you must:
- In the Categories list, select Macros.
- In the Macros list, click your macro name.
- Click in the Press new shortcut key box, and type the keyboard shortcut that you want to use. I used Alt+H, which I can remember because this toggles the setting for Hyperlinks. The dialog box also tells me that this shortcut is currently unassigned, so I will not interfere with an existing keyboard shortcut.
- In the Save changes in list, select MyWordTools.dotm. (You must select MyWordTools.dotm so that Word will save the keyboard shortcut in the MyWordTools.dotm file. Only then will the button be available when you copy that file to another computer.)
- Click Assign.

To run your macro, press Alt+H.
Finishing Up
You have now created a new file to hold your macro (MyWordTools.dotm), added a Module (Module1), created your macro (known as ToggleHyperlinkCtrlClick), created a button on the Quick Access Toolbar to start the macro, and created a keyboard shortcut to start the macro. Now, save the MyWordTools.dotm file (you can do this in the VBE or from the main Word window).
Because you have finished with the VBE, close it and return to Word. To do that, in the VBE, click the File menu and then click Close and Return to Microsoft Word.
To text your macro, click your button on the Quick Access Toolbar. When you confirm that it is working, save and close the file.
Managing and Loading Add-ins
The plan was that this macro should be available regardless of what document that you are working on. However, if you create a new document (use CTRL+N) you will be unable to see your button on the Quick Access Toolbar. There is no way to start your macro.
To make the macro stored in MyWordTools.dotm available to any document that you have open, you must load MyWordTools.dotm as an add-in. (When a .dotm file is used as an add-in it is also known as a ‘global template’.) You can load a .dotm file as an add-in either manually or automatically:
- To load a .dotm file as an add-in manually, close the.dotm file if it is currently open. On the Developer tab, click the AddIns button. In the Templates and Add-ins dialog, click Add, locate your .dotm file and then click Open.
- To load a .dotm file as an add-in automatically, the .dotm file must be saved in the Word Startup folder. Quit and restart Word. Word will load your add-in automatically.
You can see what add-ins are currently loaded in Word. On the Developer tab, click the Add-Ins button.
Because you saved MyWordTools.dotm in the Word Startup folder, close and restart Word. Word will automatically load your MyWordTools.dotm as an add-in. You should see the button on the Quick Access Toolbar, and you can use your macro.
When MyWordTools.dotm is loaded as an add-in, you will not see any of the text you may have left in the main Word window in MyWordTools.dotm. Word makes no use of any content on the face of the document itself. Delete any text in the main Word window before you save a .dotm file that is used as an add-in.
It is important to differentiate between opening an add-in file (for example, by clicking File and then clicking Open) and loading an add-in (for example, by using the Add-Ins button on the Developer tab). Open a file when you want to edit it and test it. Load the file as an add-in when you want to use it.
 Caution: Caution: |
|---|
| Never load a file as an add-in if that file is currently open in Word. Never open and edit an add-in file if it is currently loaded as an add-in. This may result in unpredictable behavior. |
Using Your Macro on Another Computer
To use your macro, you must have:
- The macro code.
- A button on the Quick Access toolbar that runs the macro.
- The keyboard shortcut that runs the macro.
You saved all three in MyWordTools.dotm. So, to use your macro on another computer, or to share your macro, you just have to to copy MyWordTools.dotm to the Word Startup folder on another computer. When you start Word, Word will load MyWordTools.dotm as an add-in and your macro, the button and the keyboard shortcut will all be available.
Part 2: Writing More Complex Macros
The end-to-end example in Part 1 includes a simple one-line macro. Part 2 describes how to extend that basic end-to-end process to create more complex macros.
Adding Additional Macros to the MyWordTools.dotm File
The file that you created in Part 1, MyWordTools.dotm, now contains one module (Module1), and that module contains one macro (ToggleHyperlinkCtrlClick).
Do not edit a file while it is loaded as an add-in. To add additional macros to your file, you must:
- Unload the file as an add-in. To do that, on the Developer tab, click Add-Ins, and then click to clear the check box for your add-in and then click OK.
- Open the file for editing. To do that, click the File tab. Under Info, click Open. Locate the file, click the file, and then click Open.
When your file is open for editing, you can:
- Add a macro to the existing module, Module1, by typing in the code window, or
- Add a new module to the file, and type a new macro in the new module.
Which method that you use depends on how complex your macros are. If you only have several short macros, then it is common to put them all in one module. If you have many long macros, you may prefer to store them in separate modules and rename each module to indicate what macros the module contains.
When you have added a new macro to your file, you can test it, create a button for it on the Quick Access Toolbar, and create a keyboard shortcut for it, exactly as you did for your first macro.
Comments
Professional developers generally include comments in their code to explain what the code is intended to do.
You can add comments to your macros by preceding the text of the comment with a single apostrophe. By default, the VBE displays comments in green.
Writing Robust Code: A Macro to Sort Text
There are two things to consider if you share a macro with a colleague. First, the other person’s computer is almost definitely not set up identical to yours. Second, the other person is likely to be less forgiving of poor code than you are. So your code must be robust.
If a macro is robust then the user will not see inexplicable error messages and the macro will do what it is intended to do—no more and no less.
To demonstrate some issues in writing robust code, consider the following macro that is used to sort text.
It takes several mouse clicks to sort several paragraphs of text. If you must sort text frequently, it may be useful to have a single button to do a simple sort (and when you must do a more complex sort, the builtin button will still be available to you on the Home tab). This macro action is shown in the following code example.
Sub SortText1()
' A macro to sort the selected text
     Selection.Sort
End Sub
You can test this macro as you tested the previous one. Tile the Word and VBE windows side by side. In the main Word window, type several paragraphs of text and select them. In the VBE, run the macro by clicking in the macro code and pressing F5. Word will sort the paragraphs alphabetically.
Our SortText1 macro seems to work well. However, it is not robust. To see what can go wrong, insert a picture into your document. Make it a floating picture. To do that, select the picture. On the Format tab, under Picture Tools, in the Arrange group, click Position. Select any one of the With Text Wrapping page position options.
Select your picture, and then run the SortText1 macro. Because it does not make sense for Word to sort one floating picture, you will see an error message from Visual Basic. That is not a robust macro!
Our one line of code, Selection.Sort, only works correctly if you have selected ordinary text. Before you find a way to solve that problem, consider another problem.
| Caution: |
|---|
| If you click in your document without selecting any text and run the SortText1 macro, the whole document is sorted. At best, that is unexpected; at worst, it might corrupt data. |
The following code example shows how to restrict the macro to sorting only when there are two or more paragraphs of selected text.
Sub SortText2()
' A macro to sort the Selection if the user has selected more than one
' paragraph of text.
    If Selection.Paragraphs.Count > 1 Then
        Selection.Sort
    End If
End Sub
Experiment running the SortText2 macro. Unlike SortText1, this macro will not display an error message if you select a picture and then run the macro. Also, it will not let you accidentally sort your whole document. To see what happens, use the following procedure to step through the code one line at a time.
To step through the VBA code
- Click in the main Word window, and select your picture.
- Click anywhere within the SortText2 macro.
- Press F8. Word will highlight the first line in the macro (
Sub SortText2()). - Press F8 repeatedly to step line by line through the code.
Using F8 to step through code is a common way to see what the code is doing, and to troubleshoot problem code. In this case, you see that, when a picture is selected, Word processes the If statement, but skips the Selection.Sort statement.
There are several important things to see in the new SortText2 macro:
- You can use If and End If to control whether Word processes code or skips it.
- The If line ends with the keyword Then.
- Each If must have a corresponding End If.
- This macro uses
Selectiontwo times.Selection.Paragraphs.Countprovides information about what the user has selected.Selection.Sortsorts the selected text.
The following code example show how to extend this macro to provide information to the user by using the Else and MsgBox keywords.
Sub SortText3()
    If Selection.Paragraphs.Count > 1 Then
        ' The user has selected more than one paragraph of text.
        ' Sort the selection.
        Selection.Sort
    Else
        ' Tell the user what to do.
        MsgBox "Please select two or more paragraphs and try again."
    End If
End Sub
From this macro, you can see that:
- You can use If…Then, Else and End If to control whether Word processes code or skips it.
- Using an Else statement is optional. Each If statement may have zero or one Else statements.
- If you use Else, you still need an End If.
- The command displays a message to the user on the screen. Type the text of the message after the keyword MsgBox, and enclose it in double quotation marks. If you provide any text in a macro (such as the text of this message), you must enclose it in quotation marks («). Without quotation marks, Word would try to find «Please» in the Word object model. Because Word does not know what «Please» means, the macro would cause an error message.
To see the problem, use the following procedure.
To test the SortText3 macro
- Create a button on the Quick Access Toolbar to start the SortText3 macro. Instruct Word to save the button in MyWordTools.dotm.
- Test your button to ensure that it runs the SortText3 macro.
- Save the MyWordTools.dotm file
- Quit and restart Word
- If a document is open, close it so that there is no document open.
- Test your button on the Quick Access Toolbar again.
You should see an error message. The error is occurring because the first line of the macro refers to the Selection. The add-in is loaded. If no document is open in the main Word window, then there is no Selection. Without a Selection, Word cannot run the code in your macro.
Make one more change to the macro to make it robust. Add a comment to the top of the macro. That is a good way to document your macro so anyone will know what the macro is intended to do.
Unload the add-in, and then open the file for editing. Replace your existing macro with the following code example.
Sub SortText()
' A macro to sort the selected text, if the user has selected
' more than one paragraphIf Documents.Count > 0 Then
' The user has at least one document open.If Selection.Paragraphs.Count > 1 Then
' The user has selected more than one paragraph
' of text, so sort it.
Selection.Sort
Else
' Tell the user what to do.
MsgBox "Please select two or more paragraphs and try again."
End If
End If
End Sub
In this final version of SortText, this example used nested If…End If blocks. It is important to indent lines of code. Each If is matched to the correct End If.
A macro that is not robust can result in:
- Error messages (for example, when the Selection object was used, but there was no document open, and therefore no Selection), or
- Unwanted behavior (for example, when the
Selection.Sortcommand unintentionally sorted the whole document).
Here are tips for writing robust macros.
- If your macro refers to the Selection, create a test document and test your macro by running it after you select different parts of the document: just click so you have selected no text, move the curso to the top of the document or the bottom of the document, or select a single word, several paragraphs, a picture, part or all of a table, text in the header or footer, text in a footnote or endnote or comment, and so on.
- Close your file, load it as an add-in and test your macro to ensure that the macro works if there is no document open. Use
If Documents.Count > 0to verify if a document is open.
Learning About the Word Object Model
The macros created to this point have used three important Word elements:
- Options. This refers to the Options used to set up Word.
- Documents. This refers to all the Documents currently open in Word. You can use the keyword ActiveDocument to refer to the currently-active document.
- Selection. This refers to whatever the user has selected in the ActiveDocument. It might be one word, several paragraphs, a picture, or any other kind of content.
For each of these macros, the following lower-level elements were used:
- CtrlClickHyperlinkToOpen
- Count
- Selection.Sort
These elements (Options, Documents, and Selection) are known as Objects, and together they are part of the Word object model.
An object model is a hierarchy. The hierarchy includes all the parts of Word that you might need a macro to control. For example, the ActiveDocument object refers to the currently-active document.
If your current document that is contained a table with at least 3 rows and at least 2 columns, then the following would display the text in the second cell in the third row of the first table in the active document.
MsgBox ActiveDocument.Tables(1).Rows(3).Cells(2).Range.Text
A macro can manipulate an object (such as the Selection object or the ActiveDocument object). Actually, objects have two ways to manipulate them: methods and properties.
Methods are like verbs, they describe action. For example:
ActiveDocument.PrintPreviewActiveDocument.AcceptAllRevisionsShown
Properties are like adjectives, they describe objects. For example:
MsgBox ActiveDocument.Paragraphs(1).Range.TextActiveDocument.Paragraphs(1).Range.Text = “New text for Paragraph 1”
In the first example here the macro is “reading” the Text property and displaying the text in a message box. In the second example, the macro is “writing” (or setting) the Text property. Running that line of code will change the existing text in the first paragraph to “New text for Paragraph 1”.
In general, your macro can “read” a property or it can “write” a property. However, some properties are readonly. For example, the Documents object has a property named .Count. Consider the following:
MsgBox Documents.Count ' Reports the number of currentlyopen documents.Documents.Count = 4 ' Does not work: .Count is a readonly property.
Writing Shortcut Code: A Macro to Toggle the Display of Text Boundaries
When I am editing a big document, I like to see the text boundaries in my document. When I am proofreading, I prefer to turn off text boundaries. I may turn the display of text boundaries on and off many times in a day. To do that, I click the File button, and under Help, I click Options. In the Word Options dialog, I click Advanced, and then under Show Document Content, I select (or clear) Show Text Boundaries and then click OK. Doing that sequence of mouse clicks repeatedly is frustrating. I would prefer to click one time to turn text boundaries on or off.
The following code example is a macro that is used to toggle the display of text boundaries.
Sub ToggleTextBoundaries1()
ActiveDocument.ActiveWindow.View.ShowTextBoundaries = Not ActiveDocument.ActiveWindow.View.ShowTextBoundaries
End Sub
Word does not mind that the single line of code is so long, but it is much to type, and can be difficult for humans to read. To shorten the macro and make it easier to read, use the With keyword as shown in the following code example.
Sub ToggleTextBoundaries2()
    With ActiveDocument.ActiveWindow.View
        .ShowTextBoundaries = Not .ShowTextBoundaries
    End With
End Sub
Within the object model, you can “drill down” from one object to another using a period (“.”) between each item of the hierarchy. Because the period marks off a child object from its parent, you cannot start a line of code with a period—except when using the With keyword.
Each With must be paired to an End With statement. Between the With and End With, you can use a period to begin a shortcut.
With ActiveDocument.ActiveWindow.View
        ' Between With and End With you can use
        ' a period to begin shortcut code.
        ' The shortcut will refer to ActiveDocument.ActiveWindow.View.
    End With
For example, between this With and End With, the shortcut .ShowTextBoundaries refers to ActiveDocument.ActiveWindow.View.ShowTextBoundaries.
When you have code that refers to the same object several times, it will be less to type, and easier to read, if you use With and End With.
This is not yet a robust macro, but you can make a final solid version as shown in the following code example.
Sub ToggleTextBoundaries()
    If Documents.Count > 0 Then
        With ActiveDocument.ActiveWindow.View
            .ShowTextBoundaries = Not .ShowTextBoundaries
        End With
    End If
End Sub
In this final version of ToggleTextBoundaries, there is a With…End With block nested in an If…End If block. By indenting the lines, you ensure that each With is matched to its End With, and each If statement is matched to its End If statement.
Using With and the Selection Object: A Macro to Insert a Landscape Section
Here is a more complete example using the With keyword: a macro to insert a landscape section at the cursor.
This macro uses the With keyword with the Selection object (that is, With Selection). As you become more skilled in writing macros, you will find that you use the Selection object less and less, because it is often more effective to use a Range object. Studying this macro is a good way to learn how Word manages the Selection. With Word and the VBE tiled side by side, click within the macro and press F8 repeatedly to step through the macro line by line, to see what happens in the main Word window.
This macro also shows that, when you have many lines of text it is recommended that you break them up into logical ‘paragraphs,’ with comments to describe what the code is intended to do.
Public Sub InsertLandscapeSectionHere()
' Purpose: Insert a landscape section at the insertion point,
' and insert text to tell the user where the landscape section is.
If Documents.Count > 0 Then
' The user has a document open, so insert a
' landscape section.
With Selection
' Do not accidentally over-write selected text
.Collapse Direction:=wdCollapseStart' Insert section breaks with blank paragraphs
' in the new section.
.TypeParagraph
.Style = ActiveDocument.Styles(wdStyleNormal)
.InsertBreak Type:=wdSectionBreakNextPage
.TypeParagraph
.TypeParagraph
.TypeParagraph
.InsertBreak Type:=wdSectionBreakNextPage
.MoveUp Unit:=wdLine, Count:=3' Set the orientation of new section to landscape.
.PageSetup.Orientation = wdOrientLandscape' Provide guidance to the user.
.TypeText Text:="Your landscape section starts here."
End With
Else
' Tell the user what to do.
MsgBox "Please open a document and try again."
End If
End Sub
You will see two kinds of syntax in this macro:
- The first syntax is uses an equal sign (=):
Selection.PageSetup.Orientation = wdOrientLandscape - The second syntax uses a colon and an equal sign (=):
Selection.InsertBreak Type:=wdSectionBreakNextPage.
For more information about the differences between these syntax types, see the article “Understanding Visual Basic Syntax” in the VBE Help.
Learning More About Word Macros and the Visual Basic Editor
The Visual Basic Editor (VBE) includes tools to help you write your own macros. The following is a list of things to consider:
- You can customize the menu and toolbars in the VBE. One useful customization is to create keyboard shortcuts for comments. To do this, right-click in open space near the menu or toolbars and select Customize. In the Customize dialog, on the Toolbars tab, select the Edit toolbar. Leave the Customize dialog box open. On the Edit toolbar, right-click the Comment block button, change the name to &Comment, then click Image and Text. Do the same to the Uncomment block button, renaming it as &Uncomment. You can now select several lines of code and use the keyboard shortcuts Alt+C and Alt+U to comment, or uncomment, the selected code.
- The VBE includes a large amount of Help information. This will be your main source of information about the Word object model:
- For general information, in the VBE, on the Help menu, click Microsoft Visual Basic for Applications Help. Be sure that you display the Table of Contents by clicking the little book icon in the toolbar of the client help viewer. It makes browsing the developer help much more intuitive. In particular, under Concepts, read the topics at Frequently Asked Visual Basic Questions.
- For specific help about a keyword or an object from the Word object model (such as ActiveDocument), click in the word and press F1 to read help about that keyword or object.
Conclusion
Word macros can be long, complex, and powerful. You could write a macro to talk to an external database, perform calculations and return the result to Word. You can also write a macro in Word to control Excel, PowerPoint, or Outlook. Sometimes simple macros can be useful and save you time.
If your macro is to format text, it may be better to create a Style instead of writing a macro. If the macro is to control the layout of a document, it may be better to create a new template. Also, there may be a built-in command that you can add to the Quick Access Toolbar (when customizing the Quick Access Toolbar, in the Choose Commands From: list, click All Commands).
Have fun creating macros, but do not re-invent the wheel by writing a macro to do what Word can already do on its own.
In Word, you can use compatibility options to change the way Word handles the layout of a document. Instead of turning on and off compatibility options manually via the user interface in Word, you can handle the settings via VBA (macros). This requires that you know the name (or number) to use in the VBA code to set a specific option.
This article helps you find the names to use in VBA macros to set any compatibility option in Word. You will also find macros ready for use, including code for setting all compatibility options in different versions of Word. In addition, you will find VBA macros that show how to change the Compatibility Mode of a Word document.
The article covers all the following Word versions: Word 2003, 2007, 2010, 2013, 2016, 2019, 2021, and Word for Microsoft 365. See How to find out what version of Word you have, if needed.
For details about how to access the compatibility options manually via the user interface in Word, see my article Word Layout Options & Compatibility Options. That article also includes descriptions of the options and a list showing the names of all compatibility options in English and Danish side by side.
For information about Compatibility Mode in Word, see my article Word Compatibility Mode – What Is It?.
This article was first published March 5, 2020.
List of all 70 Word compatibility option names and the related VBA names
The WdCompatibility Enumeration includes constant names and values you can use to set the individual compatibility options via VBA in Word. For example, all compatibility options in the active document can be set via VBA by calling ActiveDocument.Compatibility with the appropriate WdCompatibility constant.
The list below shows the English compatibility option names (column 2) together with the related WdCompatibility Enumeration values (column 3) and WdCompatibility Enumeration names (column 4).
The numbers in the first column are only added for easier reference. Note that the numbers correspond to the numbers used in the lists in my article Word Layout Options & Compatibility Options. This means that you can quickly find the same option in the different lists.
In cases where the same option has been renamed between Word versions, the old name is shown in parentheses below the new name, incl. information about to which Word version(s) the old name applies.
Important differences between Word 2007 and other Word versions when setting some compatibility options via VBA
For unknown reasons, some compatibility options behave differently in Word 2007 than in other Word versions when setting the options via VBA. It seems to be a bug in Word 2007. The following applies:
- In Word 2007, you must set any compatibility option to TRUE to turn it ON. Correspondingly, you must set any compatibility option to FALSE to turn it OFF. This seems logical at first glance. However, it is not. If you note the names of the VBA members of the WdCompatibility Enumeration listed below, you will see that some names in VBA are opposite to the names in the user interface. For example, if the user interface name says «Do…», the corresponding WdCompatibility Enumeration constant says «Don’t…».
- In all other version of Word than Word 2007, some compatibility options must be set to FALSE to be turned ON and TRUE to be turned OFF.
These differences in behavior of some compatibility options mean that you need to check any code for setting compatibility options to make sure the TRUE/FALSE settings are correct for the version of Word in use. If the same VBA code is to be used both in Word 2007 and other versions of Word and if you need to set any of the compatibility options that differ, your code must check for the Word version and handle the settings depending on whether it is Word 2007 or another Word version. See VBA the example below.
In the macros available in this article, I have set the TRUE/FALSE values correctly for the version(s) of Word each of the macros is created for.
In the list below, I have added a note below the options that must be FALSE to be turned ON and TRUE to be turned OFF in all versions except Word 2007.
Note that the list below does not show to which version(s) of Word each compatibility applies. To go to a page with an extended list that shows both the information below plus information about which Word version(s) each of the compatibility option applies to, click the button below.
|
No. |
Compatibility option names |
VBA |
VBA |
|
1 |
Add space for underlines |
21 |
wdNoSpaceForUL NOTE: False = ON, True = OFF (except Word 2007) |
|
2 |
Adjust line height to grid height in the table |
36 |
wdDontAdjustLineHeightInTable NOTE: False = ON, True = OFF (except Word 2007) |
|
3 |
Align table rows independently |
39 |
wdAlignTablesRowByRow |
|
4 |
Allow hyphenation between pages or columns |
71 |
wdAllowHyphenationAtTrackBottom |
|
5 |
Allow space between paragraphs of the same style in a table |
54 |
wdAllowSpaceOfSameStyleInTable |
|
6 |
Allow table rows to lay out apart |
41 |
wdLayoutTableRowsApart |
|
7 |
Allow tables to extend into margins |
50 |
wdGrowAutofit |
|
8 |
Auto space the way Word 95 does (Word 2003: Auto space like Word 95) |
38 |
wdAutospaceLikeWW7 |
|
9 |
Balance SBCS characters and DBCS characters |
16 |
wdDontBalanceSingleByteDoubleByteWidth NOTE: False = ON, True = OFF (except Word 2007) |
|
10 |
Combine table borders the way Word 5.x for the Macintosh does |
9 |
wdOrigWordTableRules |
|
11 |
Convert backslash characters into yen signs |
13 |
wdLeaveBackslashAlone NOTE: False = ON, True = OFF (except Word 2007) |
|
12 |
Disable OpenType Font Formatting Features |
66 |
wdDisableOTKerning |
|
13 |
Do full justification the way WordPerfect 6.x for Windows does |
31 |
wdWPJustification |
|
14 |
Don’t add automatic tab stop for hanging indent |
1 |
wdNoTabHangIndent |
|
15 |
Don’t add extra space for raised/lowered characters |
2 |
wdNoSpaceRaiseLower |
|
16 |
Don’t add leading (extra space) between rows of text |
20 |
wdNoLeading |
|
17 |
Don’t allow hanging punctuation with character grid |
47 |
wdDontWrapTextWithPunctuation |
|
18 |
Don’t autofit tables next to wrapped objects |
56 |
wdDontAutofitConstrainedTables |
|
19 |
Don’t balance columns at the start of Continuous sections |
5 |
wdNoColumnBalance |
|
20 |
Don’t blank the area behind metafile pictures |
10 |
wdTransparentMetafiles |
|
21 |
Don’t break constrained tables forced onto the page |
62 |
wdDontBreakConstrainedForcedTables |
|
22 |
Don’t break wrapped tables across pages |
43 |
wdDontBreakWrappedTables |
|
23 |
Don’t center «exact line height» lines |
28 |
wdExactOnTop |
|
24 |
Don’t expand character spaces on a line that ends with SHIFT+RETURN |
14 |
wdExpandShiftReturn NOTE: False = ON, True = OFF (except Word 2007) |
|
25 |
Don’t snap text to grid inside table with inline objects |
44 |
wdDontSnapTextToGridInTableWithObjects |
|
26 |
Don’t use Asian rules for line breaks with character grid |
48 |
wdDontUseAsianBreakRulesInGrid |
|
27 |
Don’t use hanging indent as tab stop for bullets and numbering |
52 |
wdDontUseIndentAsNumberingTabStop |
|
28 |
Don’t use HTML paragraph auto spacing |
35 |
wdDontUseHTMLParagraphAutoSpacing |
|
29 |
Don’t use proportional width for Korean characters |
59 |
wdHangulWidthLikeWW11 |
|
30 |
Don’t vertically align inside of textboxes |
63 |
wdDontVertAlignInTextbox |
|
31 |
Don’t vertically align table cells containing shapes |
61 |
wdDontVertAlignCellWithShape |
|
32 |
Draw underline on trailing spaces |
15 |
wdDontULTrailSpace NOTE: False = ON, True = OFF (except Word 2007) |
|
33 |
Expand/condense by whole number of points |
18 |
wdSpacingInWholePoints |
|
34 |
Forget last tab alignment |
37 |
wdForgetLastTabAlignment |
|
35 |
Lay out AutoShapes the way Word 97 does |
33 |
wdShapeLayoutLikeWW8 |
|
36 |
Lay out footnotes the way Word 6.x/95/97 does |
34 |
wdFootnoteLayoutLikeWW8 |
|
37 |
Lay out tables with raw width |
40 |
wdLayoutRawTableWidth |
|
38 |
Print body text before header/footer |
19 |
wdPrintBodyTextBeforeHeader |
|
39 |
Print colors as black on noncolor printers |
3 |
wdPrintColBlack |
|
40 |
Select entire field with first or last character |
45 |
wdSelectFieldWithFirstOrLastCharacter |
|
41 |
Set the width of a space like WordPerfect 5.x |
30 |
wdWPSpaceWidth |
|
42 |
Show hard page or column breaks in frames |
11 |
wdShowBreaksInFrames |
|
43 |
Split apart page break and paragraph mark |
60 |
wdSplitPgBreakAndParaMark |
|
44 |
Substitute fonts based on font size |
25 |
wdSubFontBySize |
|
45 |
Suppress extra line spacing at bottom of page |
29 |
wdSuppressBottomSpacing |
|
46 |
Suppress extra line spacing at top of page |
8 |
wdSuppressTopSpacing |
|
47 |
Suppress extra line spacing at top of page the way Word 5.x for the Macintosh does (Word 2003: Suppress extra line spacing at top of page like Word 5.x for the Mac) |
17 |
wdSuppressTopSpacingMac5 |
|
48 |
Suppress extra line spacing the way WordPerfect 5.x does (Word 2003: Suppress extra line spacing like WordPerfect 5.x) |
23 |
wdNoExtraLineSpacing |
|
49 |
Suppress Space Before after a hard page or column break |
7 |
wdSuppressSpBfAfterPgBrk |
|
50 |
Swap inside and outside mirror indents and relative positioning |
67 |
wdFlipMirrorIndents |
|
51 |
Swap left and right borders on odd facing pages |
12 |
wdSwapBordersFacingPages |
|
52 |
Treat * as ** in mail merge data sources |
6 |
wdConvMailMergeEsc |
|
53 |
Truncate font height |
24 |
wdTruncateFontHeight |
|
54 |
Underline tab character in numbered lists |
58 |
wdUnderlineTabInNumList |
|
55 |
Use cached paragraph information for column balancing |
65 |
wdCachedColBalance |
|
56 |
Use larger small caps the way Word 5.x for the Macintosh does |
22 |
wdMWSmallCaps |
|
57 |
Use line-breaking rules |
46 |
wdApplyBreakingRules |
|
58 |
Use Normal style for bulleted and numbered lists |
51 |
wdUseNormalStyleForList |
|
59 |
Use printer metrics to lay out document |
26 |
wdUsePrinterMetrics |
|
60 |
Use Word 2002 table style rules |
49 |
wdUseWord2002TableStyleRules |
|
61 |
Use Word 2002-2007 style evaluation rules for font size and paragraph justification in tables |
68 |
wdDontOverrideTableStyleFontSzAndJustification |
|
62 |
Use Word 2003 hanging-punctuation rules |
53 |
wdFELineBreak11 |
|
63 |
Use Word 2003 indent rules for text next to wrapped objects |
55 |
wdWW11IndentRules |
|
64 |
Use Word 2003 kerning pair rules |
64 |
wdWord11KerningPairs |
|
65 |
Use Word 2013 rules for hyphenation between pages and columns |
72 |
wdUseWord2013TrackBottomHyphenation |
|
66 |
Use Word 2003 table autofit rules |
57 |
wdAutofitLikeWW11 |
|
67 |
Use Word 6.x/95 border rules |
27 |
wdWW6BorderRules |
|
68 |
Use Word 97 line-breaking rules for Asian text |
42 |
wdUseWord97LineBreakingRules |
|
69 |
Wrap lines the way Word 6.0 does (Word 2003: Lines wrap like Word 6.0) |
32 |
wdLineWrapLikeWord6 |
|
70 |
Wrap trailing spaces to next line |
4 |
wdWrapTrailSpaces |
VBA macros – detect or change the compatibility mode of a document
If a Word document shows the text Compatibility Mode in the title bar, it means that the document was created or last saved in an earlier version of Word than the version you are using.
- You can use VBA to find out which version of Word a document is compatible with.
- You can use VBA to change the compatibility mode of a document.
See the VBA examples below.
The WdCompatibilityMode enumeration
The WdCompatibilityMode enumeration specifies the compatibility mode that Word uses when opening a document.
In the VBA code, you can use either the name or the value.
- The code is easier to read for others (and for yourself later) if you use the names.
- On the other hand, the code will fail with run-time error 5843 if you use a name from a newer version of Word than the version in which the code is running.
See the rules described below for more details.
|
Name |
Value |
Description – Long, read-only |
|
wdWord2003 |
11 |
Mode that is most compatible with Word 2003. If opened in Word 2007 or newer version, features new to Word compared to Word 2003 are disabled. |
|
wdWord2007 |
12 |
Mode that is most compatible with Word 2007. If opened in Word 2010 or newer version, features new to Word compared to Word 2007 are disabled. |
|
wdWord2010 |
14 |
Mode that is most compatible with Word 2010. If opened in Word 2013 or newer version, features new to Word compared to Word 2010 are disabled. |
|
wdWord2013 |
15 |
Common mode for Word 2013, 2016, 2019, 2021, and 365. All features in the Word version in question are enabled. |
|
wdCurrent |
65535 |
Compatibility mode equivalent to the current version of Word, i.e. the version in use when running the VBA code. |
RULE 1 no. 1– You can’t set the compatibility mode to a version newer than the current Word version
You can’t set the Compatibility Mode of a document to a version newer than the current Word version in which the VBA code is running.
If, for example, you are using Word 2010 and attempt to set the compatibility mode to wdWord2013, the macro will fail with run-time error 5843, «One of the values passed to this method or property is out range.» (see the illustration below).
If you use the value instead (i.e. 15 instead of wdWord2013 in the example used here), no run-time error will occur but the code will do nothing!
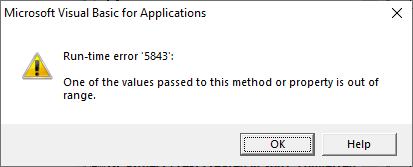
Run-time error 5843 occurs if you try to set the compatibility mode to a Word version never than the current version.
RULE no. 2 – You can’t set a compatibility option if that option is not available in the current compatibility mode
You can’t set a compatibility option if that option is not available in the current Compatibility Mode. You will need to first change the Compatibility mode and then set the Compatibility option.
If, for example, you are using Word 2019 and attempt to set a compatibility option that is not found in Word 2019, the macro will fail with run-time error 6213, «One of the values passed to this method or property is out range for this file format.» (see the illustration below).
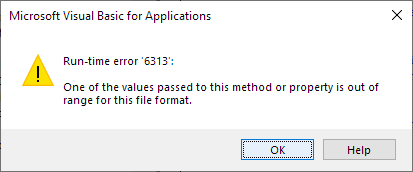
Run-time error 6313 occurs if you try to set a compatibility option that is not available in the current compatibility mode of the document.
VBA – Set the active document to be compatible with Word 2003
ActiveDocument.SetCompatibilityMode wdWord2003
In this example and the examples for other Word versions below, you may add the parameter name, Mode, if you want. The result is the same:
ActiveDocument.SetCompatibilityMode Mode:=wdWord2003
VBA – Set the active document to be compatible with Word 2007
ActiveDocument.SetCompatibilityMode wdWord2007
VBA – Set the active document to be compatible with Word 2010
ActiveDocument.SetCompatibilityMode wdWord2010
VBA – Set the active document to be compatible with Word 2013, 2016, 2019, 2021, 365
ActiveDocument.SetCompatibilityMode wdWord2013
VBA – Set the active document to be compatible with the current version of Word
The current Word version is the version in use when running the VBA code.
ActiveDocument.SetCompatibilityMode wdCurrent
VBA – Find out whether the active document is compatible with the current version of Word
Before running VBA code that only works with documents in a specific Compatibility Mode, you should add code to check the mode before running such code.
Each Word version has an Application.Version number. In Word 2013 and earlier versions, the Application.Version number match the WdCompatibilityMode enumeration value. However, Application.Version is in the format ##.0 (e.g. 11.0 for Word 2003, 14.0 for Word 2010). Therefore, the Val function is used in the VBA code below in order to compare the values of Application.Version and the WdCompatibilityMode enumeration value.
You will find an overview of Word version numbers in my wordaddins.com article here.
Since Word 2013 and newer versions share the same WdCompatibilityMode enumeration value, the VBA code can’t just compare Val(Application.Version) with the WdCompatibilityMode enumeration value. Therefore, the example below operates on Word 2010 and earlier versus Word 2013 and newer versions.
The VBA code below can be used with Word 2003, 2007, 2010, 2013, 2016, 2019, 2021, and 365. The code sets blnIsCompatible to True if the active document is compatible with the current Word version and False if not. You can the use the result to determine what to do next.
In the VBA code below, 15 is used instead of wdWord2013 to prevent a run-time error in case the code is running in Word 2010 or earlier version.
Dim lngVersion As Long
Dim blnIsCompatible As Boolean
lngVersion = Val(Application.Version)
If lngVersion <= 14 Then
If lngVersion = ActiveDocument.CompatibilityMode Then
blnIsCompatible = True
Else
blnIsCompatible = False
End If
ElseIf lngVersion >= 15 Then
If ActiveDocument.CompatibilityMode = 15 Then
blnIsCompatible = True
Else
blnIsCompatible = False
End If
End If
If blnIsCompatible = True Then
Else
End If
VBA – Find the actual compatibility mode of the active document
Dim lngCompMode As Long
lngCompMode = ActiveDocument.CompatibilityMode
VBA – Find out whether the active document is in a specific compatibility mode, e.g. Word 2010
In the example below, it is checked whether the active document is in Word 2010 compatibility mode. Replace wdWord2010 with another WdCompatibilityMode enumeration constant to check for another version.
With ActiveDocument
If .CompatibilityMode = wdWord2010 Then
Else
End If
End With
VBA – Change the Compatibility Mode and turn on a compatibility option available in the new mode
If you need to set a compatibility option that is not available in the actual Compatibility Mode of a document but in earlier Word version, you can get access to that compatibility option by changing the Compatibility Mode of the document.
Note that setting the Compatibility Mode to an earlier version of Word may influence other layout details too in addition to the one(s) you specifically want to change.
In the example below, the Compatibility Mode of the active document is set to Word 2010 and the compatibility option Select entire field with first or last character is turned on.
With ActiveDocument
    .SetCompatibilityMode wdWord2010
    .Compatibility(wdSelectFieldWithFirstOrLastCharacter) = True
End With
VBA – Set a compatibility option that acts differently in Word 2007 in code that is to be used in both Word 2007 and other Word versions
As described above, some compatibility options are to be set to True in Word 2007 and False in other Word versions (or vice versa) to obtain the same result.
If you are writing VBA code that is to be used both Word 2007 and other versions of Word, you need to take this into account.
The example below turns ON one of the compatibility options that behaves differently in Word 2007, wdExpandShiftReturn (option no. 24 in the lists). The code checks for the Word version in order to apply True or False as needed:
If Val(Application.Version) = 12 Then
ActiveDocument.Compatibility(wdExpandShiftReturn) = True
Else
ActiveDocument.Compatibility(wdExpandShiftReturn) = False
End If
VBA – set all compatibility options – Word 2003
Below, you will find two macros, each including code for setting all compatibility options in documents in Word 2003 format. MACRO 1 turns on all compatibility options in the active document. MACRO 2 turns off all compatibility options in the active document.
- Word 2003 includes 50 compatibility options. For each compatibility option, the macros below include a comment showing the related English (US) name used in the user interface of Word.
- You can adjust each individual setting in the macros as desired by changing True to False of vice versa.
MACRO 1 Word 2003 – turn ON all compatibility options
IMPORTANT: Note that some of the compatibility options must be set to False to be turned ON!
Sub SetAllCompatibilityOptions_Word2003_TurnON()
With ActiveDocument
.Compatibility(wdNoSpaceForUL) = False
.Compatibility(wdDontAdjustLineHeightInTable) = False
.Compatibility(wdAlignTablesRowByRow) = True
.Compatibility(wdLayoutTableRowsApart) = True
.Compatibility(wdGrowAutofit) = True
.Compatibility(wdAutospaceLikeWW7) = True
.Compatibility(wdDontBalanceSingleByteDoubleByteWidth) = False
.Compatibility(wdOrigWordTableRules) = True
.Compatibility(wdLeaveBackslashAlone) = False
.Compatibility(wdWPJustification) = True
.Compatibility(wdNoTabHangIndent) = True
.Compatibility(wdNoSpaceRaiseLower) = True
.Compatibility(wdNoLeading) = True
.Compatibility(wdDontWrapTextWithPunctuation) = True
.Compatibility(wdNoColumnBalance) = True
.Compatibility(wdDontBreakWrappedTables) = True
.Compatibility(wdTransparentMetafiles) = True
.Compatibility(wdExactOnTop) = True
.Compatibility(wdExpandShiftReturn) = False
.Compatibility(wdDontSnapTextToGridInTableWithObjects) = True
.Compatibility(wdDontUseAsianBreakRulesInGrid) = True
.Compatibility(wdDontUseHTMLParagraphAutoSpacing) = True
.Compatibility(wdDontULTrailSpace) = False
.Compatibility(wdSpacingInWholePoints) = True
.Compatibility(wdForgetLastTabAlignment) = True
.Compatibility(wdShapeLayoutLikeWW8) = True
.Compatibility(wdFootnoteLayoutLikeWW8) = True
.Compatibility(wdLayoutRawTableWidth) = True
.Compatibility(wdPrintBodyTextBeforeHeader) = True
.Compatibility(wdPrintColBlack) = True
.Compatibility(wdSelectFieldWithFirstOrLastCharacter) = True
.Compatibility(wdWPSpaceWidth) = True
.Compatibility(wdShowBreaksInFrames) = True
.Compatibility(wdSubFontBySize) = True
.Compatibility(wdSuppressBottomSpacing) = True
.Compatibility(wdSuppressTopSpacing) = True
.Compatibility(wdSuppressTopSpacingMac5) = True
.Compatibility(wdNoExtraLineSpacing) = True
.Compatibility(wdSuppressSpBfAfterPgBrk) = True
.Compatibility(wdSwapBordersFacingPages) = True
.Compatibility(wdConvMailMergeEsc) = True
.Compatibility(wdTruncateFontHeight) = True
.Compatibility(wdMWSmallCaps) = True
.Compatibility(wdApplyBreakingRules) = True
.Compatibility(wdUsePrinterMetrics) = True
.Compatibility(wdUseWord2002TableStyleRules) = True
.Compatibility(wdWW6BorderRules) = True
.Compatibility(wdUseWord97LineBreakingRules) = True
.Compatibility(wdLineWrapLikeWord6) = True
.Compatibility(wdWrapTrailSpaces) = True
End With
End Sub
MACRO 2 Word 2003 – turn OFF all compatibility options
IMPORTANT: Note that some of the compatibility options must be set to True to be turned OFF!
Sub SetAllCompatibilityOptions_Word2003_TurnOFF()
With ActiveDocument
.Compatibility(wdNoSpaceForUL) = True
.Compatibility(wdDontAdjustLineHeightInTable) = True
.Compatibility(wdAlignTablesRowByRow) = False
.Compatibility(wdLayoutTableRowsApart) = False
.Compatibility(wdGrowAutofit) = False
.Compatibility(wdAutospaceLikeWW7) = False
.Compatibility(wdDontBalanceSingleByteDoubleByteWidth) = True
.Compatibility(wdOrigWordTableRules) = False
.Compatibility(wdLeaveBackslashAlone) = True
.Compatibility(wdWPJustification) = False
.Compatibility(wdNoTabHangIndent) = False
.Compatibility(wdNoSpaceRaiseLower) = False
.Compatibility(wdNoLeading) = False
.Compatibility(wdDontWrapTextWithPunctuation) = False
.Compatibility(wdNoColumnBalance) = False
.Compatibility(wdDontBreakWrappedTables) = False
.Compatibility(wdTransparentMetafiles) = False
.Compatibility(wdExactOnTop) = False
.Compatibility(wdExpandShiftReturn) = True
.Compatibility(wdDontSnapTextToGridInTableWithObjects) = False
.Compatibility(wdDontUseAsianBreakRulesInGrid) = False
.Compatibility(wdDontUseHTMLParagraphAutoSpacing) = False
.Compatibility(wdDontULTrailSpace) = True
.Compatibility(wdSpacingInWholePoints) = False
.Compatibility(wdForgetLastTabAlignment) = False
.Compatibility(wdShapeLayoutLikeWW8) = False
.Compatibility(wdFootnoteLayoutLikeWW8) = False
.Compatibility(wdLayoutRawTableWidth) = False
.Compatibility(wdPrintBodyTextBeforeHeader) = False
.Compatibility(wdPrintColBlack) = False
.Compatibility(wdSelectFieldWithFirstOrLastCharacter) = False
.Compatibility(wdWPSpaceWidth) = False
.Compatibility(wdShowBreaksInFrames) = False
.Compatibility(wdSubFontBySize) = False
.Compatibility(wdSuppressBottomSpacing) = False
.Compatibility(wdSuppressTopSpacing) = False
.Compatibility(wdSuppressTopSpacingMac5) = False
.Compatibility(wdNoExtraLineSpacing) = False
.Compatibility(wdSuppressSpBfAfterPgBrk) = False
.Compatibility(wdSwapBordersFacingPages) = False
.Compatibility(wdConvMailMergeEsc) = False
.Compatibility(wdTruncateFontHeight) = False
.Compatibility(wdMWSmallCaps) = False
.Compatibility(wdApplyBreakingRules) = False
.Compatibility(wdUsePrinterMetrics) = False
.Compatibility(wdUseWord2002TableStyleRules) = False
.Compatibility(wdWW6BorderRules) = False
.Compatibility(wdUseWord97LineBreakingRules) = False
.Compatibility(wdLineWrapLikeWord6) = False
.Compatibility(wdWrapTrailSpaces) = False
End With
End Sub
VBA – set all compatibility options – Word 2007
Below, you will find two macros, each including code for setting all compatibility options in documents in Word 2007 format. MACRO 1 turns on all compatibility options in the active document. MACRO 2 turns off all compatibility options in the active document.
- Word 2007 includes 63 compatibility options. For each compatibility option, the macros below include a comment showing the related English (US) name used in the user interface of Word.
- You can adjust each individual setting in the macros as desired by changing True to False of vice versa.
MACRO 1 Word 2007 – turn ON all compatibility options
IMPORTANT: As opposed to all the other versions of Word, all compatibility options In Word 2007 must be set to True to be turned ON.
Sub SetAllCompatibilityOptions_Word2007_TurnON()
With ActiveDocument
.Compatibility(wdNoSpaceForUL) = True
.Compatibility(wdDontAdjustLineHeightInTable) = True
.Compatibility(wdAlignTablesRowByRow) = True
.Compatibility(wdAllowSpaceOfSameStyleInTable) = True
.Compatibility(wdLayoutTableRowsApart) = True
.Compatibility(wdGrowAutofit) = True
.Compatibility(wdAutospaceLikeWW7) = True
.Compatibility(wdDontBalanceSingleByteDoubleByteWidth) = True
.Compatibility(wdOrigWordTableRules) = True
.Compatibility(wdLeaveBackslashAlone) = True
.Compatibility(wdWPJustification) = True
.Compatibility(wdNoTabHangIndent) = True
.Compatibility(wdNoSpaceRaiseLower) = True
.Compatibility(wdNoLeading) = True
.Compatibility(wdDontWrapTextWithPunctuation) = True
.Compatibility(wdDontAutofitConstrainedTables) = True
.Compatibility(wdNoColumnBalance) = True
.Compatibility(wdDontBreakConstrainedForcedTables) = True
.Compatibility(wdDontBreakWrappedTables) = True
.Compatibility(wdExactOnTop) = True
.Compatibility(wdExpandShiftReturn) = True
.Compatibility(wdDontSnapTextToGridInTableWithObjects) = True
.Compatibility(wdDontUseAsianBreakRulesInGrid) = True
.Compatibility(wdDontUseIndentAsNumberingTabStop) = True
.Compatibility(wdDontUseHTMLParagraphAutoSpacing) = True
.Compatibility(wdHangulWidthLikeWW11) = True
.Compatibility(wdDontVertAlignInTextbox) = True
.Compatibility(wdDontVertAlignCellWithShape) = True
.Compatibility(wdDontULTrailSpace) = True
.Compatibility(wdSpacingInWholePoints) = True
.Compatibility(wdForgetLastTabAlignment) = True
.Compatibility(wdShapeLayoutLikeWW8) = True
.Compatibility(wdFootnoteLayoutLikeWW8) = True
.Compatibility(wdLayoutRawTableWidth) = True
.Compatibility(wdPrintBodyTextBeforeHeader) = True
.Compatibility(wdPrintColBlack) = True
.Compatibility(wdSelectFieldWithFirstOrLastCharacter) = True
.Compatibility(wdShowBreaksInFrames) = True
.Compatibility(wdSplitPgBreakAndParaMark) = True
.Compatibility(wdSubFontBySize) = True
.Compatibility(wdSuppressBottomSpacing) = True
.Compatibility(wdSuppressTopSpacing) = True
.Compatibility(wdSuppressTopSpacingMac5) = True
.Compatibility(wdNoExtraLineSpacing) = True
.Compatibility(wdSuppressSpBfAfterPgBrk) = True
.Compatibility(wdSwapBordersFacingPages) = True
.Compatibility(wdConvMailMergeEsc) = True
.Compatibility(wdTruncateFontHeight) = True
.Compatibility(wdUnderlineTabInNumList) = True
.Compatibility(wdCachedColBalance) = True
.Compatibility(wdMWSmallCaps) = True
.Compatibility(wdApplyBreakingRules) = True
.Compatibility(wdUseNormalStyleForList) = True
.Compatibility(wdUsePrinterMetrics) = True
.Compatibility(wdUseWord2002TableStyleRules) = True
.Compatibility(wdWW11IndentRules) = True
.Compatibility(wdWord11KerningPairs) = True
.Compatibility(wdFELineBreak11) = True
.Compatibility(wdAutofitLikeWW11) = True
.Compatibility(wdWW6BorderRules) = True
.Compatibility(wdUseWord97LineBreakingRules) = True
.Compatibility(wdLineWrapLikeWord6) = True
.Compatibility(wdWrapTrailSpaces) = True
End With
End Sub
MACRO 2 Word 2007 – turn OFF all compatibility options
IMPORTANT: As opposed to all the other versions of Word, all compatibility options In Word 2007 must be set to False to be turned OFF.
Sub SetAllCompatibilityOptions_Word2007_TurnOFF()
With ActiveDocument
.Compatibility(wdNoSpaceForUL) = False
.Compatibility(wdDontAdjustLineHeightInTable) = False
.Compatibility(wdAlignTablesRowByRow) = False
.Compatibility(wdAllowSpaceOfSameStyleInTable) = False
.Compatibility(wdLayoutTableRowsApart) = False
.Compatibility(wdGrowAutofit) = False
.Compatibility(wdAutospaceLikeWW7) = False
.Compatibility(wdDontBalanceSingleByteDoubleByteWidth) = False
.Compatibility(wdOrigWordTableRules) = False
.Compatibility(wdLeaveBackslashAlone) = False
.Compatibility(wdWPJustification) = False
.Compatibility(wdNoTabHangIndent) = False
.Compatibility(wdNoSpaceRaiseLower) = False
.Compatibility(wdNoLeading) = False
.Compatibility(wdDontWrapTextWithPunctuation) = False
.Compatibility(wdDontAutofitConstrainedTables) = False
.Compatibility(wdNoColumnBalance) = False
.Compatibility(wdDontBreakConstrainedForcedTables) = False
.Compatibility(wdDontBreakWrappedTables) = False
.Compatibility(wdExactOnTop) = False
.Compatibility(wdExpandShiftReturn) = False
.Compatibility(wdDontSnapTextToGridInTableWithObjects) = False
.Compatibility(wdDontUseAsianBreakRulesInGrid) = False
.Compatibility(wdDontUseIndentAsNumberingTabStop) = False
.Compatibility(wdDontUseHTMLParagraphAutoSpacing) = False
.Compatibility(wdHangulWidthLikeWW11) = False
.Compatibility(wdDontVertAlignInTextbox) = False
.Compatibility(wdDontVertAlignCellWithShape) = False
.Compatibility(wdDontULTrailSpace) = False
.Compatibility(wdSpacingInWholePoints) = False
.Compatibility(wdForgetLastTabAlignment) = False
.Compatibility(wdShapeLayoutLikeWW8) = False
.Compatibility(wdFootnoteLayoutLikeWW8) = False
.Compatibility(wdLayoutRawTableWidth) = False
.Compatibility(wdPrintBodyTextBeforeHeader) = False
.Compatibility(wdPrintColBlack) = False
.Compatibility(wdSelectFieldWithFirstOrLastCharacter) = False
.Compatibility(wdShowBreaksInFrames) = False
.Compatibility(wdSplitPgBreakAndParaMark) = False
.Compatibility(wdSubFontBySize) = False
.Compatibility(wdSuppressBottomSpacing) = False
.Compatibility(wdSuppressTopSpacing) = False
.Compatibility(wdSuppressTopSpacingMac5) = False
.Compatibility(wdNoExtraLineSpacing) = False
.Compatibility(wdSuppressSpBfAfterPgBrk) = False
.Compatibility(wdSwapBordersFacingPages) = False
.Compatibility(wdConvMailMergeEsc) = False
.Compatibility(wdTruncateFontHeight) = False
.Compatibility(wdUnderlineTabInNumList) = False
.Compatibility(wdCachedColBalance) = False
.Compatibility(wdMWSmallCaps) = False
.Compatibility(wdApplyBreakingRules) = False
.Compatibility(wdUseNormalStyleForList) = False
.Compatibility(wdUsePrinterMetrics) = False
.Compatibility(wdUseWord2002TableStyleRules) = False
.Compatibility(wdWW11IndentRules) = False
.Compatibility(wdWord11KerningPairs) = False
.Compatibility(wdFELineBreak11) = False
.Compatibility(wdAutofitLikeWW11) = False
.Compatibility(wdWW6BorderRules) = False
.Compatibility(wdUseWord97LineBreakingRules) = False
.Compatibility(wdLineWrapLikeWord6) = False
.Compatibility(wdWrapTrailSpaces) = False
End With
End Sub
VBA – set all compatibility options – Word 2010
Below, you will find two macros, each including code for setting all compatibility options in documents in Word 2010 format. MACRO 1 turns on all compatibility options in the active document. MACRO 2 turns off all compatibility options in the active document.
- Word 2010 includes 66 compatibility options. For each compatibility option, the macros below include a comment showing the related English (US) name used in the user interface of Word.
- You can adjust each individual setting in the macros as desired by changing True to False of vice versa.
MACRO 1 Word 2010 – turn ON all compatibility options
IMPORTANT: Note that some of the compatibility options must be set to False to be turned ON!
Sub SetAllCompatibilityOptions_Word2010_TurnON()
With ActiveDocument
.Compatibility(wdNoSpaceForUL) = False
.Compatibility(wdDontAdjustLineHeightInTable) = False
.Compatibility(wdAlignTablesRowByRow) = True
.Compatibility(wdAllowSpaceOfSameStyleInTable) = True
.Compatibility(wdLayoutTableRowsApart) = True
.Compatibility(wdGrowAutofit) = True
.Compatibility(wdAutospaceLikeWW7) = True
.Compatibility(wdDontBalanceSingleByteDoubleByteWidth) = False
.Compatibility(wdOrigWordTableRules) = True
.Compatibility(wdLeaveBackslashAlone) = False
.Compatibility(wdDisableOTKerning) = True
.Compatibility(wdWPJustification) = True
.Compatibility(wdNoTabHangIndent) = True
.Compatibility(wdNoSpaceRaiseLower) = True
.Compatibility(wdNoLeading) = True
.Compatibility(wdDontWrapTextWithPunctuation) = True
.Compatibility(wdDontAutofitConstrainedTables) = True
.Compatibility(wdNoColumnBalance) = True
.Compatibility(wdDontBreakConstrainedForcedTables) = True
.Compatibility(wdDontBreakWrappedTables) = True
.Compatibility(wdExactOnTop) = True
.Compatibility(wdExpandShiftReturn) = False
.Compatibility(wdDontSnapTextToGridInTableWithObjects) = True
.Compatibility(wdDontUseAsianBreakRulesInGrid) = True
.Compatibility(wdDontUseIndentAsNumberingTabStop) = True
.Compatibility(wdDontUseHTMLParagraphAutoSpacing) = True
.Compatibility(wdHangulWidthLikeWW11) = True
.Compatibility(wdDontVertAlignInTextbox) = True
.Compatibility(wdDontVertAlignCellWithShape) = True
.Compatibility(wdDontULTrailSpace) = False
.Compatibility(wdSpacingInWholePoints) = True
.Compatibility(wdForgetLastTabAlignment) = True
.Compatibility(wdShapeLayoutLikeWW8) = True
.Compatibility(wdFootnoteLayoutLikeWW8) = True
.Compatibility(wdLayoutRawTableWidth) = True
.Compatibility(wdPrintBodyTextBeforeHeader) = True
.Compatibility(wdPrintColBlack) = True
.Compatibility(wdSelectFieldWithFirstOrLastCharacter) = True
.Compatibility(wdShowBreaksInFrames) = True
.Compatibility(wdSplitPgBreakAndParaMark) = True
.Compatibility(wdSubFontBySize) = True
.Compatibility(wdSuppressBottomSpacing) = True
.Compatibility(wdSuppressTopSpacing) = True
.Compatibility(wdSuppressTopSpacingMac5) = True
.Compatibility(wdNoExtraLineSpacing) = True
.Compatibility(wdSuppressSpBfAfterPgBrk) = True
.Compatibility(wdFlipMirrorIndents) = True
.Compatibility(wdSwapBordersFacingPages) = True
.Compatibility(wdConvMailMergeEsc) = True
.Compatibility(wdTruncateFontHeight) = True
.Compatibility(wdUnderlineTabInNumList) = True
.Compatibility(wdCachedColBalance) = True
.Compatibility(wdMWSmallCaps) = True
.Compatibility(wdApplyBreakingRules) = True
.Compatibility(wdUseNormalStyleForList) = True
.Compatibility(wdUsePrinterMetrics) = True
.Compatibility(wdUseWord2002TableStyleRules) = True
.Compatibility(wdDontOverrideTableStyleFontSzAndJustification) = True
.Compatibility(wdFELineBreak11) = True
.Compatibility(wdWW11IndentRules) = True
.Compatibility(wdWord11KerningPairs) = True
.Compatibility(wdAutofitLikeWW11) = True
.Compatibility(wdWW6BorderRules) = True
.Compatibility(wdUseWord97LineBreakingRules) = True
.Compatibility(wdLineWrapLikeWord6) = True
.Compatibility(wdWrapTrailSpaces) = True
End With
End Sub
MACRO 2 Word 2010 – turn OFF all compatibility options
IMPORTANT: Note that some of the compatibility options must be set to True to be turned OFF!
Sub SetAllCompatibilityOptions_Word2010_TurnOFF()
With ActiveDocument
.Compatibility(wdNoSpaceForUL) = True
.Compatibility(wdDontAdjustLineHeightInTable) = True
.Compatibility(wdAlignTablesRowByRow) = False
.Compatibility(wdAllowSpaceOfSameStyleInTable) = False
.Compatibility(wdLayoutTableRowsApart) = False
.Compatibility(wdGrowAutofit) = False
.Compatibility(wdAutospaceLikeWW7) = False
.Compatibility(wdDontBalanceSingleByteDoubleByteWidth) = True
.Compatibility(wdOrigWordTableRules) = False
.Compatibility(wdLeaveBackslashAlone) = True
.Compatibility(wdDisableOTKerning) = False
.Compatibility(wdWPJustification) = False
.Compatibility(wdNoTabHangIndent) = False
.Compatibility(wdNoSpaceRaiseLower) = False
.Compatibility(wdNoLeading) = False
.Compatibility(wdDontWrapTextWithPunctuation) = False
.Compatibility(wdDontAutofitConstrainedTables) = False
.Compatibility(wdNoColumnBalance) = False
.Compatibility(wdDontBreakConstrainedForcedTables) = False
.Compatibility(wdDontBreakWrappedTables) = False
.Compatibility(wdExactOnTop) = False
.Compatibility(wdExpandShiftReturn) = True
.Compatibility(wdDontSnapTextToGridInTableWithObjects) = False
.Compatibility(wdDontUseAsianBreakRulesInGrid) = False
.Compatibility(wdDontUseIndentAsNumberingTabStop) = False
.Compatibility(wdDontUseHTMLParagraphAutoSpacing) = False
.Compatibility(wdHangulWidthLikeWW11) = False
.Compatibility(wdDontVertAlignInTextbox) = False
.Compatibility(wdDontVertAlignCellWithShape) = False
.Compatibility(wdDontULTrailSpace) = True
.Compatibility(wdSpacingInWholePoints) = False
.Compatibility(wdForgetLastTabAlignment) = False
.Compatibility(wdShapeLayoutLikeWW8) = False
.Compatibility(wdFootnoteLayoutLikeWW8) = False
.Compatibility(wdLayoutRawTableWidth) = False
.Compatibility(wdPrintBodyTextBeforeHeader) = False
.Compatibility(wdPrintColBlack) = False
.Compatibility(wdSelectFieldWithFirstOrLastCharacter) = False
.Compatibility(wdShowBreaksInFrames) = False
.Compatibility(wdSplitPgBreakAndParaMark) = False
.Compatibility(wdSubFontBySize) = False
.Compatibility(wdSuppressBottomSpacing) = False
.Compatibility(wdSuppressTopSpacing) = False
.Compatibility(wdSuppressTopSpacingMac5) = False
.Compatibility(wdNoExtraLineSpacing) = False
.Compatibility(wdSuppressSpBfAfterPgBrk) = False
.Compatibility(wdFlipMirrorIndents) = False
.Compatibility(wdSwapBordersFacingPages) = False
.Compatibility(wdConvMailMergeEsc) = False
.Compatibility(wdTruncateFontHeight) = False
.Compatibility(wdUnderlineTabInNumList) = False
.Compatibility(wdCachedColBalance) = False
.Compatibility(wdMWSmallCaps) = False
.Compatibility(wdApplyBreakingRules) = False
.Compatibility(wdUseNormalStyleForList) = False
.Compatibility(wdUsePrinterMetrics) = False
.Compatibility(wdUseWord2002TableStyleRules) = False
.Compatibility(wdDontOverrideTableStyleFontSzAndJustification) = False
.Compatibility(wdFELineBreak11) = False
.Compatibility(wdWW11IndentRules) = False
.Compatibility(wdWord11KerningPairs) = False
.Compatibility(wdAutofitLikeWW11) = False
.Compatibility(wdWW6BorderRules) = False
.Compatibility(wdUseWord97LineBreakingRules) = False
.Compatibility(wdLineWrapLikeWord6) = False
.Compatibility(wdWrapTrailSpaces) = False
End With
End Sub
VBA – set all compatibility options – Word 2013, 2016, 2019, 2021, 365
Below, you will find two macros, each including code for setting all compatibility options in documents in Word 2013, 2016, 2019, or 365 format. MACRO 1 turns on all compatibility options in the active document. MACRO 2 turns off all compatibility options in the active document.
- Word 2013, 2016, 2019, and 365 include 13 compatibility options. For each compatibility option, the macros below include a comment showing the related English (US) name used in the user interface of Word.
- You can adjust each individual setting in the macros as desired by changing True to False of vice versa.
MACRO 1 Word 2013, 2016, 2019, 2021, 365 – turn ON all compatibility options
IMPORTANT: Note that some of the compatibility options must be set to False to be turned ON!
Sub SetAllCompatibilityOptions_Word2013_2016_2019_2021_365_TurnON()
With ActiveDocument
.Compatibility(wdNoSpaceForUL) = False
.Compatibility(wdDontAdjustLineHeightInTable) = False
.Compatibility(wdAllowHyphenationAtTrackBottom) = True
.Compatibility(wdDontBalanceSingleByteDoubleByteWidth) = False
.Compatibility(wdLeaveBackslashAlone) = False
.Compatibility(wdExactOnTop) = True
.Compatibility(wdExpandShiftReturn) = False
.Compatibility(wdDontUseHTMLParagraphAutoSpacing) = True
.Compatibility(wdDontULTrailSpace) = False
.Compatibility(wdSuppressBottomSpacing) = True
.Compatibility(wdSuppressTopSpacing) = True
.Compatibility(wdApplyBreakingRules) = True
.Compatibility(wdUseWord2013TrackBottomHyphenation) = True
End With
End Sub
MACRO 2 Word 2013, 2016, 2019, 2021, 365 – turn OFF all compatibility options
IMPORTANT: Note that some of the compatibility options must be set to True to be turned OFF!
Sub SetAllCompatibilityOptions_Word2013_2016_2019_2021_365_TurnOFF()
With ActiveDocument
.Compatibility(wdNoSpaceForUL) = True
.Compatibility(wdDontAdjustLineHeightInTable) = True
.Compatibility(wdAllowHyphenationAtTrackBottom) = False
.Compatibility(wdDontBalanceSingleByteDoubleByteWidth) = True
.Compatibility(wdLeaveBackslashAlone) = True
.Compatibility(wdExactOnTop) = False
.Compatibility(wdExpandShiftReturn) = True
.Compatibility(wdDontUseHTMLParagraphAutoSpacing) = False
.Compatibility(wdDontULTrailSpace) = True
.Compatibility(wdSuppressBottomSpacing) = False
.Compatibility(wdSuppressTopSpacing) = False
.Compatibility(wdApplyBreakingRules) = False
.Compatibility(wdUseWord2013TrackBottomHyphenation) = False
End With
End Sub
Related information
Overview of all compatibility options and information about in which Word versions each option is found: For details about how to access the compatibility options manually via the user interface in Word, see my article Word Layout Options & Compatibility Options. The article also includes lists showing which layout options and compatibility options are found in the different versions of Word.
Show Extended List of Compatibility Options, incl. Word Version Info.
Finding Word terms in another language than your Word: You can use the Microsoft Language Portal to look up Word terminology in another language than your Word version.
For information about Compatibility Mode in Word, see my article Word Compatibility Mode – What Is It?.
word-vba
This repository contains macros written in Word VBA. Mike Pope is the host.
There are two branches: master and word-vba-feature
Versions of Word
I use Word 2013 for Windows, but much of this applies to earlier versions of Word. Most of it probably applies to Word for the Mac, but I cannot guarantee that.
Installing macros
To install macros, you need to be able to open the macro editor in Microsoft Word. In Windows, you can do this by pressing Alt+F11 while you’re in a document. If you’ve configured Word to show the Developer tab, you can also use the Code area of the ribbon to manage macros.
Here’s a primer on how to use the VBA editing environment and work with macros:
Getting Started with VBA in Word 2010
List of macros
Here’s a brief description of what’s in this repo:
change-plaintext-to-normal.mac
This was written in response to a query to on the Word-Pc list. If you open up a pure-text file in Word, Word formats the text in the file as the style named
Plain Text. The poster wondered if there was a way to have Word instead show everythign inNormal. There might be a better way to do that, but this macro seems to do the trick. It relies on the fact that Word runsAutoNew,AutoOpen, andAutoClosemacros if they exist when (respectively) you create, open, and close a document.
show-hide-revisions.mac
This macro toggles revision marks. In the language of the Word UI, it’s the equivalent of the following:
Review (tab) > Tracking > [All Markup|No Markup]
This macro is particularly suitable for mapping to a keystroke. I use
Alt+V,AMore info: http://mikepope.com/blog/DisplayBlog.aspx?permalink=2407
toggle-smart-quotes.mac
Turns on/off the feature in Word that converts straight quotes to curly quotes. Most useful when this has a keyboard shortcut assigned to it.
Managing the Styles pane
set-styles-panel-to-all-alphabetical.mac
Changes the display in the Styles pane to a) show all styles in b) alphabetical order.
HTML-related macros
convert-all-links.mac
Walks through all Word hyperlinks and converts them to
<a>elements (withtarget="_blank").
An interesting feature of this macro is that it walks backward through the collection of links. The issue is that as each hyperlink is converted, it stops being a hyperlink and is thus removed from the collection. This confuses any code that is walking the collection.
convert-to-ul-list.mac
Converts the selected text to a
<ul>list. Each paragraph becomes one list item.
make-bold.mac
Adds
<b></b>tags around the selected text.
make-code.mac
Adds
<code></code>tags around the selected text.
- Remove From My Forums
-
Question
-
I have a very elaborate Word Template written in VBA. And ported throughout the Office line of It works fine in Word 2007 but changes in Word 2010 broke it. If the user clicks «Save As» and then checks the «Maintain Compatibility with previous versions of
Word» check box, it works fine. The problem is that I need to save from VBA and when I do so, it saves the document in 2010 format and it breaks my macro.The only way to get it to work again is to save it as a «Word 97-2003 Document (*.doc)» and then save it again as a «Word Document (*.dotx)» with the compatibility box checked.
Any help would be greatly appreciated.
Thanks!
Answers
-
If you use SaveAs2, there is a CompatibilityMode parameter ..
ActiveDocument.SaveAs2 FileName:=»whatever», CompatibilityMode:=12
Enjoy,
Tony
www.WordArticles.com-
Marked as answer by
Friday, April 1, 2011 9:00 PM
-
Marked as answer by
Содержание
- VBA PDF (бесплатные загрузки)
- Примеры Word VBA «Шпаргалка»
- Учебное пособие по макросам Word VBA
- Пример простого макроса Word
- Объект документа Word
- Документы
- Диапазон, выделение, абзацы
- Примеры макросов Word
Добро пожаловать в наше мега-руководство по Word VBA / макросам!
Эта страница содержит:
-
- Учебное пособие по Word VBA в формате PDF (бесплатная загрузка)
- Word VBA «Шпаргалка», содержащая список наиболее часто используемых фрагментов кода Word VBA.
- Полное руководство по Word VBA / Macro.
- Список всех наших руководств по макросам Word VBA с возможностью поиска
Возможно, вас заинтересует наше интерактивное руководство по VBA для Excel. Хотя некоторые из примеров / упражнений относятся к Excel VBA, большая часть содержимого является общим для всех VBA, и вам может быть полезно изучить такие концепции, как If, Loops, MessageBoxes и т. Д.
VBA PDF (бесплатные загрузки)
Загрузите наше бесплатное руководство по Microsoft Word VBA! Или учебники VBA для других программ Office!

Скачать
Ниже вы найдете простые примеры кода VBA для работы с Microsoft Word.
Выбрать / перейти к
ОписаниеКод VBABackspaceSelection.TypeBackspaceВыбрать весь документSelection.HomeKey Unit: = wdStory
Selection.ExtendКопироватьSelection.CopyУдалитьSelection.Delete Unit: = wdCharacter, Count: = 1Вставить послеSelection.InsertAfter «текст»Начало строкиSelection.HomeKey Unit: = wdLineКонец линииSelection.EndKey Unit: = wdLineВставитьSelection.PasteВыбрать всеSelection.WholeStoryВыбрать всю строкуSelection.EndKey Unit: = wdLine, Extend: = wdExtendВверх по абзацуSelection.MoveUp Unit: = wdParagraph, Count: = 1Переместить вправо на один символSelection.MoveRight Unit: = wdCharacter, Count: = 1Переместить вправо на одну ячейку в таблицеSelection.MoveRight Unit: = wdCellПерейти к началу документаSelection.HomeKey Unit: = wdStoryПерейти в конец документаSelection.EndKey Unit: = wdStoryПерейти на страницу 1Selection.GoTo What: = wdGoToPage, Which: = wdGoToNext, Name: = ”1 ″Перейти к началу страницыSelection.GoTo What: = wdGoToBookmark, Name: = ” Page”
Selection.MoveLeft Unit: = wdCharacter, Count: = 1
Return to Top
Закладки
ОписаниеКод VBAДобавлятьС ActiveDocument.Bookmarks
.Add Range: = Selection.Range, Name: = «Name».
.DefaultSorting = wdSortByName
.ShowHidden = Ложь
Конец сСчитатьDim n as Integer
n = ActiveDocument.Bookmarks.CountУдалитьActiveDocument.Bookmarks («Имя закладки»). УдалитьСуществуют?Если ActiveDocument.Bookmarks.Exists («BookmarkName») = True, то
‘Сделай что-нибудь
Конец, еслиПерейти кSelection.GoTo What: = wdGoToBookmark, Name: = ”BookmarkName”ВыбиратьActiveDocument.Bookmarks («Имя закладки»). ВыберитеЗаменить текстSelection.GoTo What: = wdGoToBookmark, Name: = ”BookmarkName”
Selection.Delete Unit: = wdCharacter, Count: = 1
Selection.InsertAfter «Новый текст»
ActiveDocument.Bookmarks.Add Range: = Selection.Range, _
Name: = ”BookmarkName”
Return to Top
Документ
ОписаниеКод VBAАктивироватьДокументы («Example.doc»). АктивироватьДобавить в переменнуюDim doc As Document
Установить doc = Documents.AddДобавлятьDocuments.AddДобавить (из другого документа)Documents.Add Template: = ”C: Forms FormDoc.doc”, _
NewTemplate: = FalseЗакрыватьДокументы («Example.doc»). ЗакрытьЗакрыть — сохранить измененияДокументы («Example.doc»). Закройте SaveChanges: = wdSaveChangesЗакрыть — не сохранятьДокументы («Example.doc»). Закройте SaveChanges: = wdDoNotSaveChanges.Закрыть — запрос на сохранениеДокументы («Example.doc»). Закройте SaveChanges: = wdPromptToSaveChanges.
Return to Top
Столбцы
ОписаниеКод VBAСохранить какДокументы («Example.doc»). SaveAs («C: Example Example.doc»)СохранитьДокументы («Example.doc»). СохранитьЗащищатьДокументы («Example.doc»). Защитить пароль: = «пароль»Снять защитуДокументы («Example.doc»). Снять пароль: = «пароль»Число страницDim varNumberPages как вариант
varNumberPages = _
ActiveDocument.Content.Information (wdActiveEndAdjustedPageNumber)РаспечататьДокументы («Example.doc»). Распечатать
Return to Top
Устали искать примеры кода VBA? Попробуйте AutoMacro!
Шрифт
ОписаниеКод VBAРазмерSelection.Font.Size = 12ЖирныйSelection.Font.Bold = TrueКурсивSelection.Font.Italic = TrueПодчеркиваниеSelection.Font.Underline = wdUnderlineSingleВсе заглавные буквыSelection.Font.AllCaps = TrueЦветSelection.Font.TextColor = vbRedИмяSelection.Font.Name = «Абади»Нижний индексSelection.Font.Subscript = TrueSuperScriptSelection.Font.Superscript = TrueЦвет выделенияSelection.Range.HighlightColorIndex = wdYellowСтильSelection.Style = ActiveDocument.Styles («Нормальный»)
Return to Top
Вставлять
ОписаниеКод VBAВставить автотекстSelection.TypeText Текст: = ”a3 ″
Selection.Range.InsertAutoTextВставить код датыВставить файлSelection.InsertFile («C: Docs Something.doc»)Вставить разрыв страницыSelection.InsertBreak Тип: = wdPageBreakВставить символ абзацаSelection.TypeText Text: = Chr $ (182)Вставить вкладкуSelection.TypeText Текст: = vbTabВставить текстSelection.TypeText Text: = «Любой текст»Вставить абзац типаSelection.TypeParagraphВставить абзацSelection.InsertParagraph
Return to Top
Петли
ОписаниеКод VBAСделать до конца документаСделать до ActiveDocument.Bookmarks (« Sel») = ActiveDocument.Bookmarks (« EndOfDoc»)
‘Сделай что-нибудь
SubДля каждого документа в ДокументахDim doc As Document
Для каждого документа в документах
‘Сделай что-нибудь
Следующий документЦикл по абзацамПодпункты через абзацы
Dim i As Long, iParCount As Long
iParCount = ActiveDocument.Paragraphs.CountFori = 1 На iParCount
ActiveDocument.Paragraphs (i) .Alignment = wdAlignParagraphLeft
Далее я
Return to Top
Пункт
ОписаниеКод VBAKeepLinesTogetherSelection.ParagraphFormat.KeepTogether = TrueKeepWithNextSelection.ParagraphFormat.KeepWithNext = ИстинаПробел послеSelection.ParagraphFormat.SpaceAfter = 12Пространство доSelection.ParagraphFormat.SpaceBefore = 0Выровнять по центруSelection.ParagraphFormat.Alignment = wdAlignParagraphCenterВыровнять по правому краюSelection.ParagraphFormat.Alignment = wdAlignParagraphRightВыровнять по левому краюSelection.ParagraphFormat.Alignment = wdAlignParagraphLeftЛевый отступSelection.ParagraphFormat.LeftIndent = InchesToPoints (3,75)Правый отступSelection.ParagraphFormat.RightIndent = InchesToPoints (1)Межстрочный интервалС Selection.ParagraphFormat
.LineSpacingRule = wdLineSpaceExactly
.LineSpacing = 12
Конец сПеребрать все абзацыПодпункты через абзацы
Dim i As Long, iParCount As Long
iParCount = ActiveDocument.Paragraphs.CountFori = 1 На iParCount
ActiveDocument.Paragraphs (i) .Alignment = wdAlignParagraphLeft
Далее я
Return to Top
Учебное пособие по макросам Word VBA
Это руководство по использованию VBA с Microsoft Word. Это руководство научит вас писать простой макрос и взаимодействовать с документами, диапазонами, выделениями и абзацами.
Примечание. Если вы новичок в Macros / VBA, вам также может быть полезна эта статья: Как писать макросы VBA с нуля.
VBA — это язык программирования, используемый для автоматизации программ Microsoft Office, включая Word, Excel, Outlook, PowerPoint и Access.
Макросы представляют собой блоки кода VBA, которые выполняют определенные задачи.
Когда ты Записать макрос, Word запишет код VBA в макрос, что позволит вам повторять ваши действия. Вы можете увидеть список всех доступных макросов из Просмотр> Макросы.

После записи макроса вы сможете редактировать макрос из списка макросов:

Когда вы нажимаете Редактировать, вы открываете Редактор VBA. Используя редактор VBA, вы можете редактировать записанные макросы или писать макрос Word с нуля. Для доступа к редактору VBA используйте ярлык ALT + F11 или щелкните Visual Basic от Лента разработчика.

Пример простого макроса Word
Это простой пример макроса Word VBA. Он выполняет следующие задачи:
- Открывает документ Word
- Записывает в документ
- Закрывает и сохраняет документ Word.
| 123456789101112131415 | Sub WordMacroExample ()’Открыть документ и назначить переменнойDim oDoc как документУстановите oDoc = Documents.Open («c: Users something NewDocument.docx»).’Написать в документSelection.TypeText «www.automateexcel.com»Selection.TypeParagraph’Сохранить и закрыть документoDoc.SaveoDoc.CloseКонец подписки |
Основы работы с макросами Word
Весь код VBA должен храниться в подобных процедурах. Чтобы создать процедуру в VBA, введите «Sub WordMacroExample» (где «WordMacroExample» — желаемое имя макроса) и нажмите ВХОДИТЬ. VBA автоматически добавит круглые скобки и End Sub.

Объект документа Word
При взаимодействии с Microsoft Word в VBA вы часто будете ссылаться на Word «Объекты». Наиболее распространенные объекты:
Объект приложения — сам Microsoft Word
Объект документа — документ Word
Объект диапазона — Часть документа Word
Объект выделения — Выбранный диапазон или положение курсора.
заявка
Приложение — это объект «верхнего уровня». Через него можно получить доступ ко всем остальным объектам Word.
Помимо доступа к другим объектам Word, можно применить настройки «уровня приложения»:
| 1 | Application.Options.AllowDragAndDrop = True |
Это пример доступа к «Выборке» в «Windows (1)» в Приложении:
| 1 | Application.Windows (1) .Selection.Characters.Count |
Однако к наиболее распространенным объектам Word можно получить доступ напрямую, без ввода полной иерархии. Поэтому вместо этого вы можете (и должны) просто ввести:
| 1 | Selection.Characters.Count |
Документы
ActiveDocument
Часто у вас есть два или более документов, открытых в Word, и вам нужно указать, с каким конкретным документом Word следует взаимодействовать. Один из способов указать, какой документ использовать ActiveDocument. Например:
| 1 | ActiveDocument.PrintOut |
… Напечатал бы ActiveDocument. ActiveDocument — это документ в Word, который «имеет фокус»
Чтобы переключить ActiveDocument, используйте команду Activate:
| 1 | Документы («Example.docx»). Активировать |
Этот документ
Вместо использования ActiveDocument для ссылки на активный документ вы можете использовать ThisDocument для ссылки на документ, в котором хранится макрос. Этот документ никогда не изменится.
Переменные документа
Однако для более сложных макросов может быть сложно отслеживать активный документ. Также может быть неприятно переключаться между документами.
Вместо этого вы можете использовать переменные документа.
Этот макрос назначит ActiveDocument переменной, а затем распечатает документ, используя переменную:
| 12345 | Sub VarExample ()Dim oDoc как документУстановите oDoc = ActiveDocumentoDoc.PrintOutКонец подписки |
Документ Методы
Открыть документ
Чтобы открыть документ Word:
| 1 | Documents.Open «c: Users SomeOne Desktop Test PM.docx» |
Мы рекомендуем всегда назначать документ переменной при его открытии:
| 12 | Dim oDoc как документУстановите oDoc = Documents.Open («c: Users SomeOne Desktop Test PM.docx»). |
Создать новый документ
Чтобы создать новый документ Word:
Мы можем указать Word создать новый документ на основе некоторого шаблона:
| 1 | Documents.Add Template: = «C: Program Files Microsoft Office Templates MyTemplate.dotx» |
Как всегда, присвоение документа переменной при создании или открытии помогает избавить от серьезных проблем:
| 12 | Dim oDoc как документУстановите oDoc = Documents.Add (Template: = «C: Program Files Microsoft Office Templates MyTemplate.dotx») |
Сохранить документ
Чтобы сохранить документ:
или Сохранить как:
| 1 | ActiveDocument.SaveAs FileName: = c: Users SomeOne Desktop test2.docx «, FileFormat: = wdFormatDocument |
Закрыть документ
Чтобы закрыть документ и сохранить изменения:
| 1 | ActiveDocument.Close wdSaveChanges |
или без сохранения изменений:
| 1 | ActiveDocument.Close wdDoNotSaveChanges |
Распечатать документ
Это напечатает активный документ:
| 1 | ActiveDocument.PrintOut |
Диапазон, выделение, абзацы
Диапазон а также Выбор являются, вероятно, наиболее важными объектами в Word VBA и, безусловно, наиболее часто используемыми.
Диапазон относится к некоторой части документа, обычно, но не обязательно, к тексту.
Выбор относится к выделенному тексту (или другому объекту, например изображениям) или, если ничего не выделено, к точке вставки.
Абзацы представляют абзацы в документе. Это менее важно, чем кажется, потому что у вас нет прямого доступа к тексту абзаца (вам нужно получить доступ к определенному диапазону абзацев, чтобы внести изменения).
Диапазон
Диапазон может быть любой частью документа, включая весь документ:
| 12 | Dim oRange As RangeУстановите oRange = ActiveDocument.Content |
или он может быть маленьким, как один символ.
Другой пример, этот диапазон будет относиться к первому слову в документе:
| 12 | Dim oRange As RangeУстановите oRange = ActiveDocument.Range.Words (1) |
Обычно вам нужно получить диапазон, который относится к определенной части документа, а затем изменить его.
В следующем примере мы выделим первое слово второго абзаца жирным шрифтом:
| 123 | Dim oRange As RangeУстановите oRange = ActiveDocument.Paragraphs (2) .Range.Words (1)oRange.Bold = True |
Установить текст диапазона
Чтобы установить текстовое значение диапазона:
| 123 | Dim oRange As RangeУстановите oRange = ActiveDocument.Paragraphs (2) .Range.Words (1)oRange.Text = «Привет» |
(Совет: обратите внимание на пробел после «Hello». Поскольку слово «объект» включает пробел после слова, просто «hello» мы получим «Hellonext word»)
С диапазонами можно делать сотни вещей. Всего несколько примеров (предполагается, что вы уже сделали объектную переменную апельсин относится к интересующему диапазону):
Изменить шрифт
| 1 | oRange.Font.Name = «Arial» |
Отображение в окне сообщения количества символов в определенном диапазоне
| 1 | MsgBox oRange.Characters.Count |
Вставьте текст перед ним
| 1 | oRange.InsertBefore «это вставленный текст» |
Добавить сноску к диапазону
| 12 | ActiveDocument.Footnotes.Add Диапазон: = oRange, _Text: = «Подробнее читайте на easyexcel.net.» |
Скопируйте в буфер обмена
| 1234 | oRange.CopyЧасто вам нужно перейти к конкретному диапазону. Итак, вы можете начать, начать и закончитьoRange.Start = 5oRange.End = 50 |
После приведенного выше кода oRange будет относиться к тексту, начинающемуся с пятого и заканчивающемуся 50-м символом в документе.
Выбор
Выбор используется даже шире, чем Диапазон, потому что с ним легче работать Выборы чем Диапазоны, ЕСЛИ ваш макрос взаимодействует ТОЛЬКО с ActiveDocument.
Сначала выберите желаемую часть вашего документа. Например, выберите второй абзац в активном документе:
| 1 | ActiveDocument.Paragraphs (2) .Range.Select |
Затем вы можете использовать объект выбора для ввода текста:
| 1 | Selection.TypeText «Какой-то текст» |
Мы можем ввести несколько абзацев ниже «Некоторый текст»:
| 12 | Selection.TypeText «Какой-то текст»Selection.TypeParagraph |
Часто необходимо знать, выделен ли какой-то текст или у нас есть только точка вставки:
| 12345 | Если Selection.Type wdSelectionIP ТогдаSelection.Font.Bold = TrueЕщеMsgBox «Вам нужно выделить текст».Конец, если |
При работе с объектом Selection мы хотим поместить точку вставки в определенное место и запускать команды, начиная с этой точки.
Начало документа:
| 1 | Selection.HomeKey Unit: = wdStory, Extend: = wdMove |
Начало текущей строки:
| 1 | Selection.HomeKey Unit: = wdLine, Extend: = wdMove |
Параметр Extend wdMove перемещает точку вставки. Вместо этого вы можете использовать wdExtend, который выделит весь текст между текущей точкой вставки.
| 1 | Selection.HomeKey Unit: = wdLine, Extend: = wdExtend |
Переместить выделение
Самый полезный метод изменения положения точки вставки — «Перемещение». Чтобы переместить выделение на два символа вперед:
| 1 | Selection.Move Unit: = wdCharacter, Count: = 2 |
чтобы переместить его назад, используйте отрицательное число для параметра Count:
| 1 | Selection.Move Unit: = wdCharacter, Count: = — 2 |
Параметр единицы измерения может быть wdCharacter, wdWord, wdLine или другим (используйте справку Word VBA, чтобы увидеть другие).
Чтобы вместо этого переместить слова:
| 1 | Selection.Move unit: = wdWord, Count: = 2 |
С выделением легче работать (по сравнению с диапазонами), потому что он похож на робота, использующего Word, имитирующего человека. Где находится точка вставки — какое-то действие произойдет. Но это означает, что вы должны позаботиться о том, где находится точка вставки! Это непросто после многих шагов в коде. В противном случае Word изменит текст в нежелательном месте.
Если вам нужно какое-то свойство или метод, недоступный в объекте Selection, вы всегда можете легко получить диапазон, связанный с выбором:
| 1 | Установите oRange = Selection.Range. |
СОВЕТ: Использование Выбор часто проще, чем использование диапазонов, но также и медленнее (важно, когда вы имеете дело с большими документами)
Абзацы
Вы не можете напрямую использовать объект Paragraphs для изменения текста:
| 1 | ActiveDocument.Paragraphs (1) .Text = «Нет, это не сработает» |
Выше не сработает (на самом деле выдаст ошибку). Вам нужно сначала получить диапазон, связанный с конкретным абзацем:
| 1 | ActiveDocument.Paragraphs (1) .Range.Text = «Теперь работает :)» |
Но вы можете напрямую изменить его стиль:
| 1 | ActiveDocument.Paragraphs (1) .Style = «Нормальный» |
или измените форматирование на уровне абзаца:
| 1 | ActiveDocument.Paragraphs (1) .LeftIndent = 10 |
или, может быть, вы хотите сохранить этот абзац на одной строке со следующим абзацем:
| 1 | ActiveDocument.Paragraphs (1) .KeepWithNext = True |
Сделайте абзац по центру:
| 1 | ActiveDocument.Paragraphs (1) .Alignment = wdAlignParagraphCenter |
ОЧЕНЬ полезно назначить конкретный абзац объектной переменной. Если мы присвоим переменной конкретный абзац, нам не нужно беспокоиться, станет ли первый абзац вторым, потому что мы вставили перед ним один абзац:
| 12 | dim oPara как абзацУстановите oPara = Selection.Paragraphs (1) ‘здесь мы присваиваем первый абзац текущего выделения переменной |
Вот пример, в котором мы вставляем абзац над первым абзацем, но мы все еще можем ссылаться на старый первый абзац, потому что он был назначен переменной:
| 1234567 | Sub ParagraphExample ()Dim oPara как абзацУстановить oPara = ActiveDocument.Paragraphs (1)MsgBox oPara.Range.TextoPara.Range.InsertParagraphBefore ‘Вставить абзацMsgBox oPara.Range.TextКонец подписки |
Объект абзаца очень часто используется в циклах:
| 123456789101112 | Sub LoopThroughParagraphs ()Dim oPara как абзацДля каждого параметра в ActiveDocument.Paragraphs«Сделай что-нибудь с этим. Мы просто покажем’текст абзаца, если его стиль — «Заголовок 4″Если oPara.Style = «Заголовок 4», тоMsgBox oPara.Range.TextКонец, еслиДалее oParaКонец подписки |
Word VBA Tutorial Заключение
В этом руководстве были рассмотрены основы Word VBA. Если вы новичок в VBA, вам также следует ознакомиться с нашим общим руководством по VBA, чтобы узнать больше о переменных, циклах, окнах сообщений, настройках, условной логике и многом другом.
Примеры макросов Word
| Примеры макросов Word |
|---|
| Шаблоны |
| Добавить новые документы |
| Подсчет слов в выделенном фрагменте |
| Текстовые поля |
| Сохранить как PDF |
| Закладки |
| Таблицы |
| Найти, найти и заменить |
| Открытые документы |
Word VBA: часто задаваемые вопросы
Что такое макрос Word?
Макрос — это общий термин, обозначающий набор инструкций по программированию, которые автоматизируют задачи. Макросы Word автоматизируют задачи в Word с помощью языка программирования VBA.
Есть ли в слове VBA?
Да, в Microsoft Word есть редактор VBA. Доступ к нему можно получить, нажав клавиши ALT + F11 или перейдя в раздел «Разработчик»> «Visual Basic».
Как использовать VBA в Word?
1. Откройте редактор VBA (ALT + F11 или Разработчик> Visual Basic).
2. Выберите «Вставить»> «Модуль», чтобы создать модуль кода.
3. Введите «Sub HelloWorld» и нажмите Enter.
4. Между строками «Sub HelloWorld» и «End Sub» введите «MsgBox« Hello World! »
5. Вы создали макрос!
6. Теперь нажмите «F5», чтобы запустить макрос.