
Как вывести элементы данного массива в документ ворд?
Sub Задание2()
    Dim i, n As Integer
    Dim arr(1 To 1000) As Long
    n = InputBox("Введите число, не меньше 1")

    For i = 1 To n
        Randomize
        arr(i) = Int((n * 3 - 1 + 1) * Rnd + 1)
    Next

End Sub
![]()
cauf
2,50412 серебряных знаков24 бронзовых знака
задан 9 мая 2020 в 16:46
![]()
Вставить в конец документа:
For i = 1 To n
  ActiveDocument.Content.InsertAfter Text:=arr(i) & " "
Next
ответ дан 11 мая 2020 в 13:59
![]()
ЭникейщикЭникейщик
24.9k7 золотых знаков29 серебряных знаков46 бронзовых знаков
Using Excel VBA to create Microsoft Word documents
In these examples, we generate Microsoft Word Documents with various formatting features using
the Microsoft Excel VBA scripting language. These techniques can have many useful applications.
For instance if you have a list of data like a price or product list in Excel that you want to present
in a formatted Word Document, these techniques can prove useful.
In these examples, we assume the reader has at least basic knowledge of VBA, so we will not
go over basics of creating and running scripts. This code has been tested on Microsoft Word and Excel
2007. Some changes may be required for other versions of Word and Excel.
Writing to Word
Inserting a Table of Contents
Inserting Tabs
Inserting Tables
Inserting Bullet List
more on Inserting Tables
Multiple Features
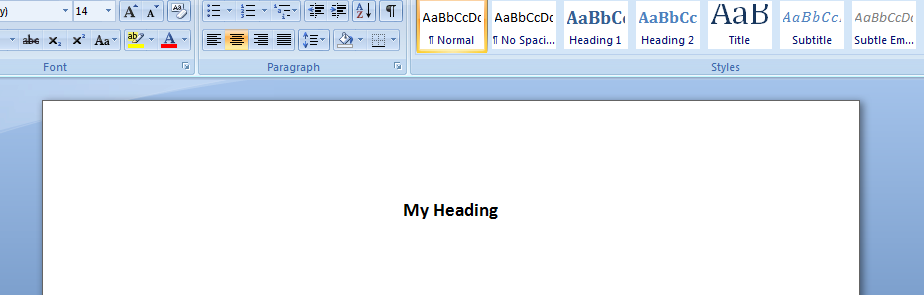
Function that demonstrates VBA writing to a Microsoft Word document
The following code illustrates the use of VBA Word.Application object and related properties.
In this example, we create a new Word Document add some text.
    'In Tools > References, add reference to "Microsoft Word XX.X Object Library" before running.

    'Early Binding
    Dim wdApp As Word.Application
    Set wdApp = New Word.Application

    'Alternatively, we can use Late Binding
    'Dim wdApp As Object
    'Set wdApp = CreateObject("word.Application")

    With wdApp
        .Visible = True
        .Activate
        .Documents.Add

        With .Selection
            .ParagraphFormat.Alignment = wdAlignParagraphCenter
            .Font.Bold = True
            .Font.Name = "arial"
            .Font.Size = 14
            .TypeText ("My Heading")
            .TypeParagraph
        End With
    End With
Some VBA Vocabulary
ParagraphFormat
Represents all the formatting for a paragraph.
output in MS Word:
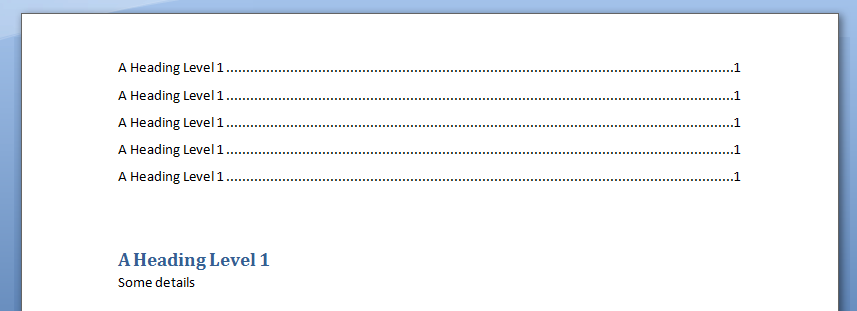
Inserting a Table of Contents into Word Document using Excel VBA
In this example, we generate a Table of Contents into a Word Document using Excel VBA
Sub sAddTableOfContents()

    Dim wdApp As Word.Application
    Set wdApp = New Word.Application

    'Alternatively, we can use Late Binding
    'Dim wdApp As Object
    'Set wdApp = CreateObject("word.Application")

    Dim wdDoc As Word.Document
    Set wdDoc = wdApp.Documents.Add

    ' Note we define a Word.range, as the default range wouled be an Excel range!
    Dim myWordRange As Word.range
    Dim Counter As Integer

    wdApp.Visible = True
    wdApp.Activate

    'Insert Some Headers
    With wdApp
        For Counter = 1 To 5
            .Selection.TypeParagraph
            .Selection.Style = "Heading 1"
            .Selection.TypeText "A Heading Level 1"
            .Selection.TypeParagraph
            .Selection.TypeText "Some details"
        Next
    End With

    ' We want to put table of contents at the top of the page
	Set myWordRange = wdApp.ActiveDocument.range(0, 0)

    wdApp.ActiveDocument.TablesOfContents.Add _
     range:=myWordRange, _
     UseFields:=False, _
     UseHeadingStyles:=True, _
     LowerHeadingLevel:=3, _
     UpperHeadingLevel:=1

End Sub
Some VBA Vocabulary
ActiveDocument.TablesOfContents.Add
The TablesOfContents property to return the TablesOfContents collection.
Use the Add method to add a table of contents to a document.
Some TablesOfContents Parameters
Range The range where you want the table of contents to appear. The table of contents replaces the range, if the range isn’t collapsed.
UseHeadingStyles True to use built-in heading styles to create the table of contents. The default value is True.
UpperHeadingLevel The starting heading level for the table of contents. Corresponds to the starting value used with the o switch for a Table of Contents (TOC) field. The default value is 1.
LowerHeadingLevel The ending heading level for the table of contents. Corresponds to the ending value used with the o switch for a Table of Contents (TOC) field. The default value is 9.
output Word Table in MS Word:
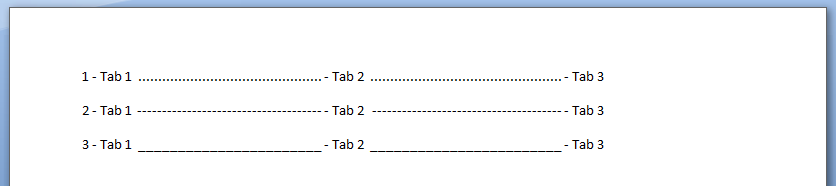
Write Microsoft Word Tabs
A function that writes tabbed content to a Microsoft Word Document. Note in each iteration, we change the
value of the leader character (characters that are inserted in the otherwise blank area created by the tab).
Public Sub sWriteMicrosoftTabs()

    'In Tools > References, add reference to "Microsoft Word XX.X Object Library" before running.

    'Early Binding
    Dim wdApp As Word.Application
    Set wdApp = New Word.Application

    'Alternatively, we can use Late Binding
    'Dim wdApp As Object
    'Set wdApp = CreateObject("word.Application")

    With wdApp
        .Visible = True
        .Activate
        .Documents.Add

        For Counter = 1 To 3
            .Selection.TypeText Text:=Counter & " - Tab 1 "

            ' position to 2.5 inches
            .Selection.Paragraphs.TabStops.Add Position:=Application.InchesToPoints(2.5), _
                Leader:=Counter, Alignment:=wdAlignTabLeft

            .Selection.TypeText Text:=vbTab & " - Tab 2 "

            ' position to 5 inches
            .Selection.Paragraphs.TabStops.Add Position:=Application.InchesToPoints(5), _
                Leader:=Counter, Alignment:=wdAlignTabLeft

            .Selection.TypeText Text:=vbTab & " - Tab 3 "

            .Selection.TypeParagraph
        Next Counter

    End With
End Sub
Some VBA Vocabulary
.TabStops.Add Use the TabStops property to return the TabStops collection. In the example above,
nprogram adds a tab stop positioned at 0, 2.5 and 5 inches.
output in MS Word:
Write Microsoft Word Tables
In this example, we generate a Microsoft Table using Excel VBA
Sub sWriteMSWordTable ()

    'In Tools > References, add reference to "Microsoft Word XX.X Object Library" before running.

    'Early Binding
    Dim wdApp As Word.Application
    Set wdApp = New Word.Application

    'Alternatively, we can use Late Binding
    'Dim wdApp As Object
    'Set wdApp = CreateObject("word.Application")

    With wdApp
        .Visible = True
        .Activate
        .Documents.Add

        With .Selection

            .Tables.Add _
                    Range:=wdApp.Selection.Range, _
                    NumRows:=1, NumColumns:=3, _
                    DefaultTableBehavior:=wdWord9TableBehavior, _
                    AutoFitBehavior:=wdAutoFitContent

            For counter = 1 To 12
                .TypeText Text:="Cell " & counter
                If counter <> 12 Then
                    .MoveRight Unit:=wdCell
                End If
            Next

        End With

    End With

End Sub
Some VBA vocabulary
Table.AddTable object that represents a new, blank table added to a document.
Table.Add properties
Range The range where you want the table to appear. The table replaces the range, if the range isn’t collapsed.
NumRows The number of rows you want to include in the table.
NumColumns The number of columns you want to include in the table.
DefaultTableBehavior Sets a value that specifies whether Microsoft Word automatically resizes cells in tables to fit the cells� contents (AutoFit). Can be either of the following constants: wdWord8TableBehavior (AutoFit disabled) or wdWord9TableBehavior (AutoFit enabled). The default constant is wdWord8TableBehavior.
AutoFitBehavior Sets the AutoFit rules for how Word sizes tables. Can be one of the WdAutoFitBehavior constants.
output in MS Word:

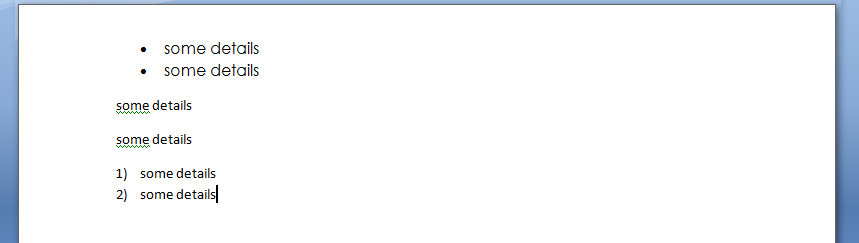
Write Microsoft Word bullet list
In this example, we write with bullet list and outline numbers with Excel VBA
    'In Tools > References, add reference to "Microsoft Word XX.X Object Library" before running.

    'Early Binding
    Dim wdApp As Word.Application
    Set wdApp = New Word.Application

    'Alternatively, we can use Late Binding
    'Dim wdApp As Object
    'Set wdApp = CreateObject("word.Application")

    With wdApp
        .Visible = True
        .Activate
        .Documents.Add
        ' turn on bullets
        .ListGalleries(wdBulletGallery).ListTemplates(1).Name = ""
        .Selection.Range.ListFormat.ApplyListTemplate ListTemplate:=.ListGalleries(wdBulletGallery).ListTemplates(1), _
            continuepreviouslist:=False, applyto:=wdListApplyToWholeList, defaultlistbehavior:=wdWord9ListBehavior

        With .Selection
            .ParagraphFormat.Alignment = wdAlignParagraphLeft
            .Font.Bold = False
            .Font.Name = "Century Gothic"
            .Font.Size = 12
            .TypeText ("some details")
            .TypeParagraph
            .TypeText ("some details")
            .TypeParagraph
        End With

        ' turn off bullets
        .Selection.Range.ListFormat.RemoveNumbers wdBulletGallery

        With .Selection
            .ParagraphFormat.Alignment = wdAlignParagraphLeft
            .TypeText ("some details")
            .TypeParagraph
            .TypeText ("some details")
            .TypeParagraph

        End With

        ' turn on outline numbers
        .ListGalleries(wdOutlineNumberGallery).ListTemplates(1).Name = ""
        .Selection.Range.ListFormat.ApplyListTemplate ListTemplate:=.ListGalleries(wdOutlineNumberGallery).ListTemplates(1), _
            continuepreviouslist:=False, applyto:=wdListApplyToWholeList, defaultlistbehavior:=wdWord9ListBehavior

        With .Selection
            .ParagraphFormat.Alignment = wdAlignParagraphLeft
            .TypeText ("some details")
            .TypeParagraph
            .TypeText ("some details")

        End With

    End With
output in MS Word:
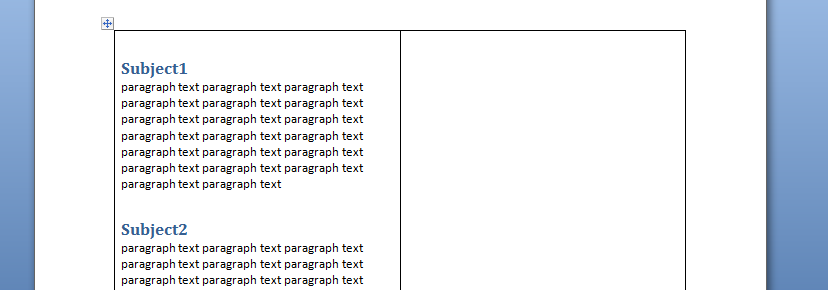
Another example of Writing Tables to Microsoft Word
In this example we will create a word document with 20 paragraphs. Each paragraph will have a header with a header style element
   'In Tools > References, add reference to "Microsoft Word XX.X Object Library" before running.
    Dim wdApp As Word.Application
    Dim wdDoc As Word.Document

    Set wdApp = New Word.Application
    wdApp.Visible = True


    Dim x As Integer
    Dim y As Integer

    wdApp.Visible = True
    wdApp.Activate
    wdApp.Documents.Add

    wdApp.ActiveDocument.Tables.Add Range:=wdApp.Selection.Range, NumRows:=2, NumColumns:= _
        2, DefaultTableBehavior:=wdWord9TableBehavior, AutoFitBehavior:= _
        wdAutoFitFixed

    With wdApp.Selection.Tables(1)
        If .Style <> "Table Grid" Then
            .Style = "Table Grid"
        End If
        .ApplyStyleHeadingRows = True
        .ApplyStyleLastRow = False
        .ApplyStyleFirstColumn = True
        .ApplyStyleLastColumn = False
        .ApplyStyleRowBands = True
        .ApplyStyleColumnBands = False
    End With

    With wdApp.Selection

        For x = 1 To 2
            ' set style name
            .Style = "Heading 1"
            .TypeText "Subject" & x
            .TypeParagraph
            .Style = "No Spacing"
            For y = 1 To 20
                .TypeText "paragraph text "
            Next y
            .TypeParagraph
        Next x

        ' new paragraph
        .TypeParagraph

        ' toggle bold on
        .Font.Bold = wdToggle
        .TypeText Text:="show some text in bold"
        .TypeParagraph

        'toggle bold off
        .Font.Bold = wdToggle
        .TypeText "show some text in regular front weight"
        .TypeParagraph


    End With
Some VBA vocabulary
TypeText
Inserts specified text at the beginning of the current selection. The selection is turned into an insertion point at the end of the inserted text.
If Options.ReplaceSelection = True then the original selection will be replaced. This behaves exactly the same as typing some text at the keyboard.
TypeParagraph
Insert a new blank paragraph. The selection is turned into an insertion point after the inserted paragraph mark. If Options.ReplaceSelection = True then the original selection will be replaced. This behaves exactly the same as pressing the Enter key.
output in MS Word:
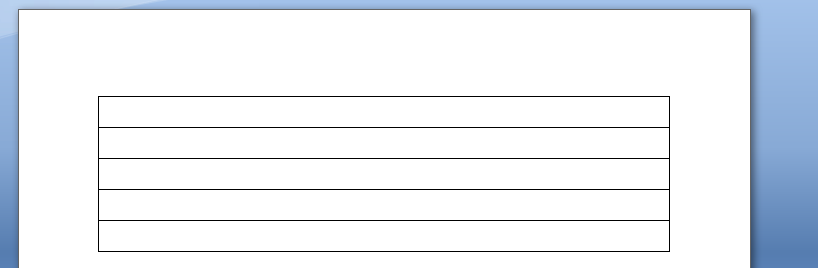
Generating a Word table with VBA
	'In Tools > References, add reference to "Microsoft Word XX.X Object Library" before running.

	Dim wdApp As Word.Application
	Dim wdDoc As Word.Document
	Dim r As Integer

	Set wdApp = CreateObject("Word.Application")
	wdApp.Visible = True

	Set wdDoc = wdApp.Documents.Add
	wdApp.Activate

	Dim wdTbl As Word.Table
	Set wdTbl = wdDoc.Tables.Add(Range:=wdDoc.Range, NumRows:=5, NumColumns:=1)

	With wdTbl

		.Borders(wdBorderTop).LineStyle = wdLineStyleSingle
		.Borders(wdBorderLeft).LineStyle = wdLineStyleSingle
		.Borders(wdBorderBottom).LineStyle = wdLineStyleSingle
		.Borders(wdBorderRight).LineStyle = wdLineStyleSingle
		.Borders(wdBorderHorizontal).LineStyle = wdLineStyleSingle
		.Borders(wdBorderVertical).LineStyle = wdLineStyleSingle

		For r = 1 To 5
			.Cell(r, 1).Range.Text = ActiveSheet.Cells(r, 1).Value
		Next r
	End With
output in MS Word:
Option Explicit
Dim wdApp As Word.Application
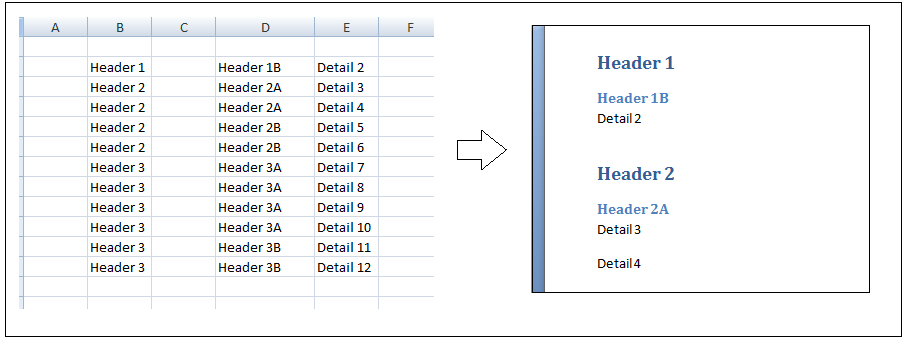
Sub extractToWord()
'In Tools > References, add reference to "Microsoft Word 12 Object Library" before running.
Dim lastCell
Dim rng As Range
Dim row As Range
Dim cell As Range
Dim arrayOfColumns
arrayOfColumns = Array("", "", "", "", "", "", "", "", "", "", "", "", "", "", "")
Dim thisRow As Range
Dim thisCell As Range
Dim myStyle As String
' get last cell in column B
lastCell = getLastCell()
Set rng = Range("B2:H" & lastCell)
'iterate through rows
For Each thisRow In rng.Rows
'iterate through cells in row row
For Each thisCell In thisRow.Cells
If thisCell.Value = arrayOfColumns(thisCell.Column) Or thisCell.Value = "" Then
' do nothing
''frWriteLine thisCell.Value, "Normal"
''frWriteLine arrayOfColumns(thisCell.Column), "Normal"
If thisCell.Value = arrayOfColumns(thisCell.Column) Or thisCell.Value = "" Then
End If
Else
myStyle = "Normal"
Select Case thisCell.Column
Case 2
myStyle = "Heading 1"
Case 3
myStyle = "Heading 2"
Case 4
myStyle = "Heading 3"
Case Is > 5
myStyle = "Normal"
End Select
frWriteLine thisCell.Value, myStyle
End If
arrayOfColumns(thisCell.Column) = thisCell.Value
Next thisCell
Next thisRow
End Sub
Public Function getLastCell() As Integer
Dim lastRowNumber As Long
Dim lastRowString As String
Dim lastRowAddress As String
With ActiveSheet
getLastCell = .Cells(.Rows.Count, 2).End(xlUp).row
End With
End Function
Public Function frWriteLine(someData As Variant, myStyle As String)
If wdApp Is Nothing Then
Set wdApp = New Word.Application
With wdApp
.Visible = True
.Activate
.Documents.Add
End With
End If
With wdApp
With .Selection
.ParagraphFormat.Alignment = wdAlignParagraphCenter
.Style = myStyle
.TypeText (someData)
.TypeParagraph
End With
End With
End Function
output in MS Word:
![]()
Сообщение от Казанский

или через поиск:
Нифига тне понятно. Так не работает, крашит:
| Visual Basic | ||
|
Крашит сразу.
Решил попробовать еще вот так:
| Visual Basic | ||
|
Но оно вообще не находит, просто ничего не происходит при нажатии (В условие замены текста писал MsgBox для отображения, ничего не происходило). И условие добавления текста тоже, не знаю.. Может это работает так?
| Visual Basic | ||
|
Добавлено через 4 минуты
Я еще это нашел
| Visual Basic | ||
|
но как этим пользоваться не понимаю, что это? ЧТо за закладка? как ее добавить?
In this article I will explain how you can write data from an excel workbook to a word document. The first step in doing this is to determine where the code is going to be written. There are 3 options:
- In the excel workbook
- In the word document
- In a 3rd file
I will only consider the first two cases in this article.
–
Example 1, Excel VBA:
Lets assume we have an excel workbook with the following data:

Lets assume we are going to write the code in the excel workbook.
Step 1:
The first step would be to automate a word document. In the article below I’ve explained there are 2 methods for this.
- Early binding
- Late binding
To prevent compatibility issues I will be using late binding in this example:
- VBA, Automating Word From Excel
The function below will automate a word document and make it visible:
Sub  main()

Dim  objWord As  Object

Dim  objDoc As  Object

Set  objWord = CreateObject("Word.Application")

objWord.Visible = True

Set  objDoc = objWord.documents.Add()

End  Sub
Step 2:
The code below will write data from the excel sheet to the word document:
Dim  i As  Integer

Dim  strValue As  String

For  i = 1 To 5

    'bring focus to the document created

    objDoc.Activate

    'read the value from the cell

    strValue = Cells(i + 1, 1)

    'write the value to the document

    objWord.Selection.TypeText Text:=strValue

    'move to the next line

    objWord.Selection.TypeParagraph

Next  i
Complete Version:
Below you can see the complete code. It automates a word document and writes the values from the cells B2:B6 to it:
Option  Explicit

Sub  main()

Dim  objWord As  Object

Dim  objDoc As  Object

Set  objWord = CreateObject("Word.Application")

objWord.Visible = True

Set  objDoc = objWord.documents.Add


Dim  i As  Integer

Dim  strValue As  String

For  i = 1 To 5

    'bring focus to the document created

    objDoc.Activate

    'read the value from the cell

    strValue = Cells(i + 1, 1)

    'write the value to the document

    objWord.Selection.TypeText Text:=strValue

    'move to the next line

    objWord.Selection.TypeParagraph

Next  i

End  Sub
Result:

–
Example 2, Word VBA:
In this example the code will be written inside a word document. Therefore the excel workbook will be automated.
Step 1:
The first step would be to get the path of the excel workbook from the user. This can be done using an open file dialog. I have covered this topic in the article below:
- Excel VBA, Open File Dialog
Although the article was written for excel, the concept can be used in VBA for Word too. The code below will display an open file dialog and ask the user to select the path of the file to open. The path will be stored in the variable strPath:
Sub  Example2()

Dim  intChoice As  Integer

Dim  strPath As  String


'only allow the user to select one file

Application.FileDialog(msoFileDialogOpen).AllowMultiSelect = False

'make the file dialog visible to the user

intChoice = Application.FileDialog(msoFileDialogOpen).Show

'determine what choice the user made

If  intChoice <> 0 Then

    'get the file path selected by the user

    strPath = Application.FileDialog( _

        msoFileDialogOpen).SelectedItems(1)

End If

End  Sub
Result:

Step 2:
The function below receives as input a file path and automates that excel workbook:
Private  Sub  AutomateExcel(ByVal  strPath As  String)

Dim  objExcel As  Object

Dim  objWorkbook As  Object


Set  objExcel = CreateObject("Excel.Application")

objExcel.Visible = True

Set  objWorkbook = objExcel.workbooks.Open(strPath)

End  Sub
Step 3:
The function below receives as input an reference to the excel workbook. It clears all the data in the current word document and it reads the values from the workbook:
Private  Sub  ReadData(ByRef objWorkbook As  Object)

Dim  i As  Integer


Selection.WholeStory

Selection.Delete Unit:=wdCharacter, Count:=1

For  i = 1 To  5

    Selection.TypeText Text:= _

        objWorkbook.sheets(1).Cells(i + 1, 1)

    'move to the next line

    Selection.TypeParagraph

Next  i

End  Sub
Complete Version:
By putting it all together we end up with the code below:
Option  Explicit


Sub  Example2()

Dim  intChoice As  Integer

Dim  strPath As  String


'only allow the user to select one file

Application.FileDialog(msoFileDialogOpen).AllowMultiSelect = False

'make the file dialog visible to the user

intChoice = Application.FileDialog(msoFileDialogOpen).Show

'determine what choice the user made

If  intChoice <> 0 Then

    'get the file path selected by the user

    strPath = Application.FileDialog( _

        msoFileDialogOpen).SelectedItems(1)

    Call  AutomateExcel(strPath)

End If

End  Sub
Private  Sub  AutomateExcel(ByVal  strPath As  String)

Dim  objExcel As  Object

Dim  objWorkbook As  Object


Set  objExcel = CreateObject("Excel.Application")

objExcel.Visible = True

Set  objWorkbook = objExcel.workbooks.Open(strPath)

Call  ReadData(objWorkbook)

End  Sub
Private  Sub  ReadData(ByRef objWorkbook As  Object)

Dim  i As  Integer

Selection.WholeStory

Selection.Delete Unit:=wdCharacter, Count:=1

For  i = 1 To  5

    Selection.TypeText Text:= _

        objWorkbook.sheets(1).Cells(i + 1, 1)

    'move to the next line

    Selection.TypeParagraph

Next  i

End  Sub
Result:
You can download the file and code related to this article from the links below:
- Excel to Word.docm
- Excel to Word.xlsm
See also:
- Word VBA, Open Document
- Word Automation VBA, Common Errors
- Word VBA, Apply Macro to Multiple Files
- Word VBA, Modify Header For Multiple Files
- Word Automation VBA, Common Errors
- VBA, Automating Word From Excel
If you need assistance with your code, or you are looking for a VBA programmer to hire feel free to contact me. Also please visit my website www.software-solutions-online.com
Использование шаблонного документа MS Word для формирования отчета
- Автор: Still Zero
- Уровень знаний: начальный
- Подразделы: нет
- Дата публикации: 26.05.2005
В моей практике встречалась несколько раз следующая задача: необходимо напечатать отчет, содержащий текст договора. Текст договора размещается на 6-ти страницах. На этих страницах в разных местах размещаются данные из моей программы, например, реквизиты фирм, заключающих договор. Я к тому клоню, что данных мало, а текста безумно много. И если вы попытаетесь набрать текст договора в стандартном форматере отчетов, то, если мягко сказать, проклянете все на свете.
К счастью существует простой и легкий путь для решения этой задачи. Суть метода в использовании шаблона документа. Т.е. у вас существует заготовка отчета, в котором указано в какие места, какие данные вставлять. Остается только открыть этот шаблон и заполнить необходимыми данными.
В качестве шаблона могут выступать документы различных форматов. Вы можете использовать MS Excel, MS Word, Notepad или HTML для подготовки шаблона. В этой статье я расскажу каким образом записать данные в документ MS Word-а при помощи OLE.
Создание шаблона
Откройте MS Word и создайте новый документ. Заполните его необходимым содержимым. Расставьте определенные вами «метки» в документе, в которые вы будете вставлять данные. Я для этих целей использую квадратные скобки и понятное для меня имя переменной, например так:
ФИО сотрудника: [DATA:FIO]
Здесь «ФИО сотрудника» — текст шаблона, а «[DATA:FIO]» — метка.
Сохраните шаблон.
Макросы
MS Office имеет встроенный язык VBA (Visual basic for application), с помощью которого можно создавать программы для приложений пакета. VBA для MS Word-а и для MS Excel-я несколько отличаются, но суть использования одна.
OLE это технология, позволяющая использовать объекты, созданные другими приложениями. Эти объекты «встраиваются» в операционную систему при установке/первом запуске приложения.
MS Word добавляет в систему несколько объектов, такие как Word.Basic, Word.Document, Word.Picture и т.п. Я рекомендую использовать объект Word.Application, так как этот объект позволяет использовать все методы VBA.
Первое, что необходимо сделать — открыть шаблонный документ. Для этого необходимо выполнить команду VBA. Я не знаю синтаксис команды открытия документа и не вижу надобности запоминать или учить VBA. Я использую такую возможность MS Word-а как запись макроса. Откройте «пустой» MS Word. Зайдите в меню «Сервис/Макрос/Начать запись», задайте имя макроса. Теперь меню «Файл/Открыть», выберете необходимый шаблонный документ. Остановите запись макроса (Сервис/Макрос/Остановить запись). Все. MS Word подготовил набор команд для открытия документа, для просмотра необходимо зайти в меню «Сервис/Макрос/Макросы». В списке выберите ваш записанный макрос и нажмите изменить. Откроется окно редактора VBA, в которым вы увидите текст макроса.
VBA использует «родную» dot-нотацию для своих методов и свойств. К сожалению использование dot-нотации в Кларионе разрешено не всегда. Но, в MS Word-е предусмотрена также «старая»-нотация, которую Кларион поддерживает.
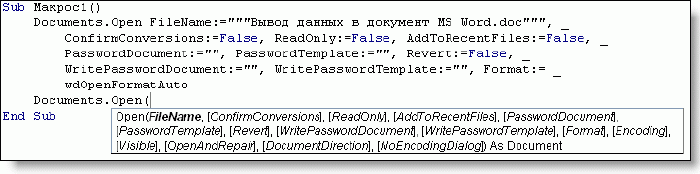
Как вы видите из рисунка, команда открытия документа содержит всего лишь один обязательный параметр — имя открываемого файла, остальные параметры необязательны.
Таким образом, используя макросы, вы можете получить информацию по необходимым вам командам наиболее быстро. Хотя без чтения документации все же не обойтись 🙂
Кодирование
Я думаю, вы поняли как узнать команды VBA необходимые для выполнения вашей задачи. В нашем случае последовательность команд такова:
- открыть шаблонный документ
- найти метки и заменить их на данные
- сохранить документ под другим именем
Перед тем как начать выполнение команд VBA необходимо создать объект OLE. Это можно сделать, добавив OLE-контрол на окно, или, что я рекомендую, использовать нижеследующий код:
feqOLE   LONG                          ! метка OLE-контрола
code
feqOLE=create(0,CREATE:Ole)            ! создали OLE-контрол
feqOLE{Prop:Create}='Word.Application' ! сказали, что этот контрол использует Word
feqOLE{Prop:ReportException}=TRUE      ! для отладки-показываем сообщения об ошибках OLE
:
destroy(feqOLE)                        ! уничтожили OLE-контрол
Здесь используется динамическое создание контролов и свойства OLE-контролов. Подробнее о этих и других свойствах вы можете прочитать в стандартной документации.
Теперь можно выполнять команды VBA:
feqOLE{'Visible'}=1                                     ! показали Word
feqOLE{'Documents.Open("C:C55APPSOleWordtest.doc")'}! открыли шаблонный документ
feqOLE{'Selection.Find.ClearFormatting'}                ! очистили ранее указанные параметры поиска
feqOLE{'Selection.Find.Replacement.ClearFormatting'}    !очистили ранее указанные параметры замены
! ищем '[DATA:FIO]' и меняем на 'Иванов', по всему документу
feqOLE{'Application.Selection.Find.Execute("[DATA:FIO]",,,,,,1,1,,"Иванов", 2)'}
feqOLE{'Application.Selection.GoTo(11, 1)'}             ! встали на начало документа
feqOLE{'Application.ActiveDocument.SaveAs("C:C55APPSOleWordtest1.doc")'} ! сохранили документ
Известные проблемы
В разных версиях MS Office команды VBA могут отличаться друг от друга.
Во многих командах VBA используются константы. Для того чтобы узнать значение команды используйте макрос VBA: «MsgBox константа», который покажет окно с значением этой константы.
Для открытия/сохранения документов желательно использовать полный путь к файлу. Если вы укажете только имя файла, например, «test.doc», то MS Word будет считать, что файл находится в папке «Мои документы».
После использования объекта вы должны его уничтожить командой DESTROY. Но после выполнения этой команды winword.exe все равно остается «висеть» в списке процессов, т.е. не происходит его реального уничтожения. На практике его уничтожают «три раза» 🙂
loop 3 times
    destroy(feqOLE) ! уничтожили OLE-контрол
end
Пример собран на C55H, ABC (для Legacy код будет абсолютно таким же).
Пример проверен на MS Office XP.
Не забудьте указать корректные пути к файлу шаблона.
OLE MS Word (738)
© Project Zero, 2005-2006. Все права защищены.