
Время на прочтение
7 мин
Количество просмотров 312K
Приветствую всех.
В этом посте я расскажу, что такое VBA и как с ним работать в Microsoft Excel 2007/2010 (для более старых версий изменяется лишь интерфейс — код, скорее всего, будет таким же) для автоматизации различной рутины.

VBA (Visual Basic for Applications) — это упрощенная версия Visual Basic, встроенная в множество продуктов линейки Microsoft Office. Она позволяет писать программы прямо в файле конкретного документа. Вам не требуется устанавливать различные IDE — всё, включая отладчик, уже есть в Excel.
Еще при помощи Visual Studio Tools for Office можно писать макросы на C# и также встраивать их. Спасибо, FireStorm.
Сразу скажу — писать на других языках (C++/Delphi/PHP) также возможно, но требуется научится читать, изменять и писать файлы офиса — встраивать в документы не получится. А интерфейсы Microsoft работают через COM. Чтобы вы поняли весь ужас, вот Hello World с использованием COM.
Поэтому, увы, будем учить Visual Basic.
Чуть-чуть подготовки и постановка задачи
Итак, поехали. Открываем Excel.
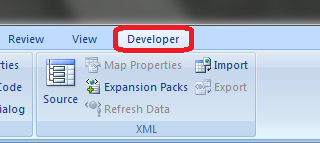
Для начала давайте добавим в Ribbon панель «Разработчик». В ней находятся кнопки, текстовые поля и пр. элементы для конструирования форм.

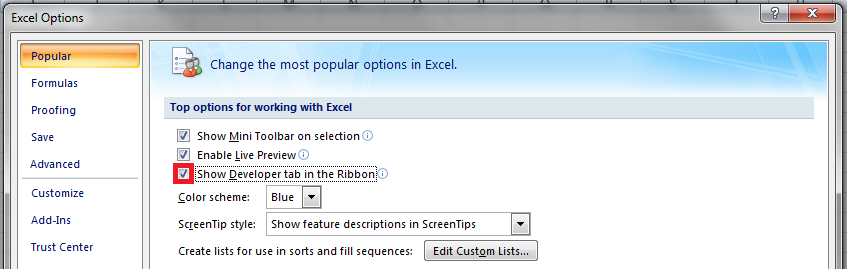
Появилась вкладка.
Теперь давайте подумаем, на каком примере мы будем изучать VBA. Недавно мне потребовалось красиво оформить прайс-лист, выглядевший, как таблица. Идём в гугл, набираем «прайс-лист» и качаем любой, который оформлен примерно так (не сочтите за рекламу, пожалуйста):

То есть требуется, чтобы было как минимум две группы, по которым можно объединить товары (в нашем случае это будут Тип и Производитель — в таком порядке). Для того, чтобы предложенный мною алгоритм работал корректно, отсортируйте товары так, чтобы товары из одной группы стояли подряд (сначала по Типу, потом по Производителю).
Результат, которого хотим добиться, выглядит примерно так:

Разумеется, если смотреть прайс только на компьютере, то можно добавить фильтры и будет гораздо удобнее искать нужный товар. Однако мы хотим научится кодить и задача вполне подходящая, не так ли?
Кодим
Для начала требуется создать кнопку, при нажатии на которую будет вызываться наша програма. Кнопки находятся в панели «Разработчик» и появляются по кнопке «Вставить». Вам нужен компонент формы «Кнопка». Нажали, поставили на любое место в листе. Далее, если не появилось окно назначения макроса, надо нажать правой кнопкой и выбрать пункт «Назначить макрос». Назовём его FormatPrice. Важно, чтобы перед именем макроса ничего не было — иначе он создастся в отдельном модуле, а не в пространстве имен книги. В этому случае вам будет недоступно быстрое обращение к выделенному листу. Нажимаем кнопку «Новый».


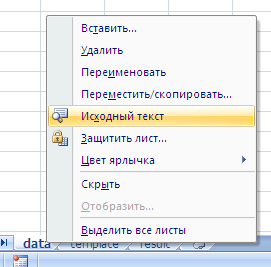
И вот мы в среде разработки VB. Также её можно вызвать из контекстного меню командой «Исходный текст»/«View code».

Перед вами окно с заглушкой процедуры. Можете его развернуть. Код должен выглядеть примерно так:
Sub FormatPrice()End Sub
Напишем Hello World:
Sub FormatPrice()

    MsgBox "Hello World!"

End Sub
И запустим либо щелкнув по кнопке (предварительно сняв с неё выделение), либо клавишей F5 прямо из редактора.
Тут, пожалуй, следует отвлечься на небольшой ликбез по поводу синтаксиса VB. Кто его знает — может смело пропустить этот раздел до конца. Основное отличие Visual Basic от Pascal/C/Java в том, что команды разделяются не ;, а переносом строки или двоеточием (:), если очень хочется написать несколько команд в одну строку. Чтобы понять основные правила синтаксиса, приведу абстрактный код.
Примеры синтаксиса
' Процедура. Ничего не возвращает

' Перегрузка в VBA отсутствует

Sub foo(a As String, b As String)

    ' Exit Sub ' Это значит "выйти из процедуры"

    MsgBox a + ";" + b

End Sub' Функция. Вовращает Integer

Function LengthSqr(x As Integer, y As Integer) As Integer

    ' Exit Function

    LengthSqr = x * x + y * y

End FunctionSub FormatPrice()

    Dim s1 As String, s2 As String

    s1 = "str1"

    s2 = "str2"

    If s1 <> s2 Then

        foo "123", "456" ' Скобки при вызове процедур запрещены

    End IfDim res As sTRING ' Регистр в VB не важен. Впрочем, редактор Вас поправит

    Dim i As Integer

    ' Цикл всегда состоит из нескольких строк

    For i = 1 To 10

        res = res + CStr(i) ' Конвертация чего угодно в String

        If i = 5 Then Exit For

    Next iDim x As Double

    x = Val("1.234") ' Парсинг чисел

    x = x + 10

    MsgBox xOn Error Resume Next ' Обработка ошибок - игнорировать все ошибки

    x = 5 / 0

    MsgBox xOn Error GoTo Err ' При ошибке перейти к метке Err

    x = 5 / 0

    MsgBox "OK!"

    GoTo ne
Err:
MsgBox
"Err!"
ne:
On Error GoTo 0 ' Отключаем обработку ошибок
' Циклы бывает, какие захотите
Do While True
Exit DoLoop 'While True
Do 'Until False
Exit Do
Loop Until False
' А вот при вызове функций, от которых хотим получить значение, скобки нужны.
' Val также умеет возвращать Integer
Select Case LengthSqr(Len("abc"), Val("4"))
Case 24
MsgBox "0"
Case 25
MsgBox "1"
Case 26
MsgBox "2"
End Select' Двухмерный массив.
' Можно также менять размеры командой ReDim (Preserve) - см. google
Dim arr(1 to 10, 5 to 6) As Integer
arr(1, 6) = 8Dim coll As New Collection
Dim coll2 As Collection
coll.Add "item", "key"
Set coll2 = coll ' Все присваивания объектов должны производится командой Set
MsgBox coll2("key")
Set coll2 = New Collection
MsgBox coll2.Count
End Sub
Грабли-1. При копировании кода из IDE (в английском Excel) есь текст конвертируется в 1252 Latin-1. Поэтому, если хотите сохранить русские комментарии — надо сохранить крокозябры как Latin-1, а потом открыть в 1251.
Грабли-2. Т.к. VB позволяет использовать необъявленные переменные, я всегда в начале кода (перед всеми процедурами) ставлю строчку Option Explicit. Эта директива запрещает интерпретатору заводить переменные самостоятельно.
Грабли-3. Глобальные переменные можно объявлять только до первой функции/процедуры. Локальные — в любом месте процедуры/функции.
Еще немного дополнительных функций, которые могут пригодится: InPos, Mid, Trim, LBound, UBound. Также ответы на все вопросы по поводу работы функций/их параметров можно получить в MSDN.
Надеюсь, что этого Вам хватит, чтобы не пугаться кода и самостоятельно написать какое-нибудь домашнее задание по информатике. По ходу поста я буду ненавязчиво знакомить Вас с новыми конструкциями.
Кодим много и под Excel
В этой части мы уже начнём кодить нечто, что умеет работать с нашими листами в Excel. Для начала создадим отдельный лист с именем result (лист с данными назовём data). Теперь, наверное, нужно этот лист очистить от того, что на нём есть. Также мы «выделим» лист с данными, чтобы каждый раз не писать длинное обращение к массиву с листами.
Sub FormatPrice()

    Sheets("result").Cells.Clear

    Sheets("data").Activate

End Sub
Работа с диапазонами ячеек
Вся работа в Excel VBA производится с диапазонами ячеек. Они создаются функцией Range и возвращают объект типа Range. У него есть всё необходимое для работы с данными и/или оформлением. Кстати сказать, свойство Cells листа — это тоже Range.
Примеры работы с Range
Sheets("result").Activate

Dim r As Range

Set r = Range("A1")

r.Value = "123"

Set r = Range("A3,A5")

r.Font.Color = vbRed

r.Value = "456"

Set r = Range("A6:A7")

r.Value = "=A1+A3"
Теперь давайте поймем алгоритм работы нашего кода. Итак, у каждой строчки листа data, начиная со второй, есть некоторые данные, которые нас не интересуют (ID, название и цена) и есть две вложенные группы, к которым она принадлежит (тип и производитель). Более того, эти строки отсортированы. Пока мы забудем про пропуски перед началом новой группы — так будет проще. Я предлагаю такой алгоритм:
- Считали группы из очередной строки.
- Пробегаемся по всем группам в порядке приоритета (вначале более крупные)
- Если текущая группа не совпадает, вызываем процедуру AddGroup(i, name), где i — номер группы (от номера текущей до максимума), name — её имя. Несколько вызовов необходимы, чтобы создать не только наш заголовок, но и всё более мелкие.
- После отрисовки всех необходимых заголовков делаем еще одну строку и заполняем её данными.
Для упрощения работы рекомендую определить следующие функции-сокращения:
Function GetCol(Col As Integer) As String

    GetCol = Chr(Asc("A") + Col)

End FunctionFunction GetCellS(Sheet As String, Col As Integer, Row As Integer) As Range

    Set GetCellS = Sheets(Sheet).Range(GetCol(Col) + CStr(Row))

End FunctionFunction GetCell(Col As Integer, Row As Integer) As Range

    Set GetCell = Range(GetCol(Col) + CStr(Row))

End Function
Далее определим глобальную переменную «текущая строчка»: Dim CurRow As Integer. В начале процедуры её следует сделать равной единице. Еще нам потребуется переменная-«текущая строка в data», массив с именами групп текущей предыдущей строк. Потом можно написать цикл «пока первая ячейка в строке непуста».
Глобальные переменные
Option Explicit ' про эту строчку я уже рассказывал

Dim CurRow As Integer

Const GroupsCount As Integer = 2

Const DataCount As Integer = 3
FormatPrice
Sub FormatPrice()

    Dim I As Integer ' строка в data

    CurRow = 1

    Dim Groups(1 To GroupsCount) As String

    Dim PrGroups(1 To GroupsCount) As String
Sheets(
"data").Activate
I = 2
Do While True
If GetCell(0, I).Value = "" Then Exit Do
' ...
I = I + 1
Loop
End Sub
Теперь надо заполнить массив Groups:
На месте многоточия
Dim I2 As Integer

For I2 = 1 To GroupsCount

    Groups(I2) = GetCell(I2, I)

Next I2

' ...

For I2 = 1 To GroupsCount ' VB не умеет копировать массивы

    PrGroups(I2) = Groups(I2)

Next I2

I =  I + 1
И создать заголовки:
На месте многоточия в предыдущем куске
For I2 = 1 To GroupsCount

    If Groups(I2) <> PrGroups(I2) Then

        Dim I3 As Integer

        For I3 = I2 To GroupsCount

            AddHeader I3, Groups(I3)

        Next I3

        Exit For

    End If

Next I2
Не забудем про процедуру AddHeader:
Перед FormatPrice
Sub AddHeader(Ty As Integer, Name As String)

    GetCellS("result", 1, CurRow).Value = Name

    CurRow = CurRow + 1

End Sub
Теперь надо перенести всякую информацию в result
For I2 = 0 To DataCount - 1

    GetCellS("result", I2, CurRow).Value = GetCell(I2, I)

Next I2
Подогнать столбцы по ширине и выбрать лист result для показа результата
После цикла в конце FormatPrice
Sheets("Result").Activate

Columns.AutoFit
Всё. Можно любоваться первой версией.

Некрасиво, но похоже. Давайте разбираться с форматированием. Сначала изменим процедуру AddHeader:
Sub AddHeader(Ty As Integer, Name As String)

    Sheets("result").Range("A" + CStr(CurRow) + ":C" + CStr(CurRow)).Merge

    ' Чтобы не заводить переменную и не писать каждый раз длинный вызов

    ' можно воспользоваться блоком With

    With GetCellS("result", 0, CurRow)

        .Value = Name

        .Font.Italic = True

        .Font.Name = "Cambria"

        Select Case Ty

        Case 1 ' Тип

            .Font.Bold = True

            .Font.Size = 16

        Case 2 ' Производитель

            .Font.Size = 12

        End Select

        .HorizontalAlignment = xlCenter

    End With

    CurRow = CurRow + 1

End Sub
Уже лучше:

Осталось только сделать границы. Тут уже нам требуется работать со всеми объединёнными ячейками, иначе бордюр будет только у одной:

Поэтому чуть-чуть меняем код с добавлением стиля границ:
Sub AddHeader(Ty As Integer, Name As String)

    With Sheets("result").Range("A" + CStr(CurRow) + ":C" + CStr(CurRow))

        .Merge

        .Value = Name

        .Font.Italic = True

        .Font.Name = "Cambria"

        .HorizontalAlignment = xlCenterSelect Case Ty

        Case 1 ' Тип

            .Font.Bold = True

            .Font.Size = 16

            .Borders(xlTop).Weight = xlThick

        Case 2 ' Производитель

            .Font.Size = 12

            .Borders(xlTop).Weight = xlMedium

        End Select

        .Borders(xlBottom).Weight = xlMedium ' По убыванию: xlThick, xlMedium, xlThin, xlHairline

    End With

    CurRow = CurRow + 1

End Sub

Осталось лишь добится пропусков перед началом новой группы. Это легко:
В начале FormatPrice
Dim I As Integer ' строка в  data

CurRow = 0 ' чтобы не было пропуска в самом начале

Dim Groups(1 To GroupsCount) As String
В цикле расстановки заголовков
If Groups(I2) <> PrGroups(I2) Then

    CurRow = CurRow + 1

    Dim I3 As Integer

В точности то, что и хотели.
Надеюсь, что эта статья помогла вам немного освоится с программированием для Excel на VBA. Домашнее задание — добавить заголовки «ID, Название, Цена» в результат. Подсказка: CurRow = 0 CurRow = 1.
Файл можно скачать тут (min.us) или тут (Dropbox). Не забудьте разрешить исполнение макросов. Если кто-нибудь подскажет человеческих файлохостинг, залью туда.
Спасибо за внимание.
Буду рад конструктивной критике в комментариях.
UPD: Перезалил пример на Dropbox и min.us.
UPD2: На самом деле, при вызове процедуры с одним параметром скобки можно поставить. Либо использовать конструкцию Call Foo(«bar», 1, 2, 3) — тут скобки нужны постоянно.
What is AutoMacro?
AutoMacro is an add-in for VBA that installs directly into the Visual Basic Editor. It comes loaded with code generators, an extensive code library, the ability to create your own code library, and many other time-saving tools and utilities that add much needed functionality to the outdated VBA Editor.
AutoMacro does not need to be installed on a computer for the generated code to run. Once the code is generated, anyone can use it!

Code Builders
- Generate VBA code from scratch
- Visual interfaces «Code Helpers»
Learn More
Code Library
- Hundreds of ready-to-use code examples
- Save your own code
Learn More
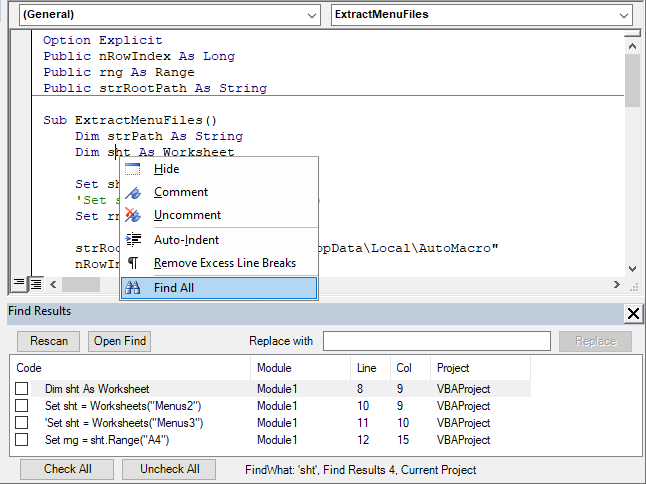
Find All References
Right-click to Find All to quickly see all references to a variable, procedure, or object. Navigate to references with a simple click.
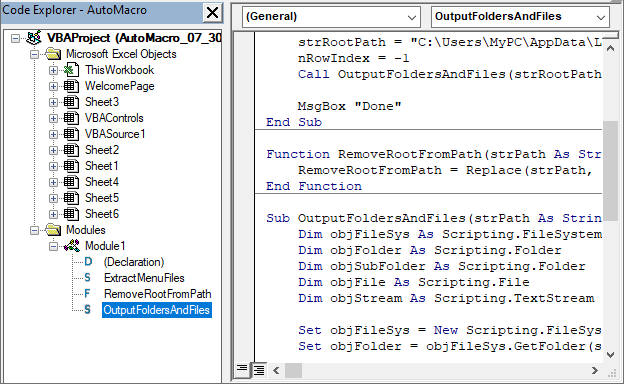
Advanced Project Explorer
A replacement Project Explorer that lists each module’s procedures. Double-click for quick navigation.
Formatting Tools
Tools to format VBA Code:
- Comment / Uncomment multiple lines
- Code indenter
- Remove excess blank lines
Learn More
Navigation Tools
Tools to navigate VBA:
- Back / Forward Buttons
- Create bookmarks and goto with shortcut keys
- Close all windows
- Close all windows except active
Learn More
Misc. Utilities
- Sort code
- Show line numbers
- Mass import / export of code modules
- Copy & Paste UserForm controls & their code
Learn More
Join the Thousands of Professionals Who Use AutoMacro
«I use it almost every day. A great tool for getting things done, but also a great tool for learning how to do things! This is one purchase this year I have no regrets about.»
Galen — USA
![]()
4.7 Average Rating!
See Pricing
Other AutoMacro Features
Code Library
Hundreds of Ready-to-use code examples.
Save your own frequently used code and share with team members.
Learn More
Code Generators
Code Generators build code from scratch via visual interfaces.
No coding knowledge required!
Learn More
Beginner
1 User — 1 PC
- Interactive VBA Tutorial
- 100+ ready-to-use code examples
- Procedure, Loops, & Copy Paste Builders
- All other code generators
- Coding tools
- Create your own code library
- Transfer Activations to other PCs
- Access to new features & updates
One-time fee
Click for Alternative Payment Options


Upgrade Anytime!
Developer
1 User — 3 PCs
- Interactive VBA Tutorial
- Hundreds of ready-to-use code examples
- Procedure, Loops, & Copy Paste Builders
- All other code generators
- Coding tools
- Create your own code library
- Transfer Activations to other PCs
- Access to new features & updates
One-time fee
Click for Alternative Payment Options
Upgrade Anytime!
Developer+
1 User — 3 Transferable PCs & Updates
- Interactive VBA Tutorial
- Hundreds of ready-to-use code examples
- Procedure, Loops, & Copy Paste Builders
- All other code generators
- Coding tools
- Create your own code library
- Transfer activations to other PCs
- Access to new features & updates
One-time fee + $20 Annual
Click for Alternative Payment Options

AutoMacro has been used by employees of these organizations. These organizations do not endorse, approve, sponsor, or otherwise have any affiliation with this website, Spreadsheet Boot Camp LLC, or ToolFive Software LLC.
FAQ and Other Information
What is your refund policy?
We have a 30-day, no-questions-asked, 100% money-back guarantee. If you’re unsatisfied for any reason, let us know and we will refund your order!
Can I try AutoMacro before I buy?
Can I install AutoMacro on my Work Computer?
Yes! AutoMacro works in many corporate environments. It was designed to be as unobtrusive as possible and should install without the need for «admin privileges».
Will AutoMacro work on my system?
AutoMacro is compatible with all versions of Microsoft Office for PCs.
32-bit or 64-bit
Office 2003, 2007, 2010, 2013, 2016, 2019, Office 365, etc.
All Versions of Windows
Surface Pro
AutoMacro is not compatible with Mac operating systems. However, some Mac users running Windows OS are able to use AutoMacro.
If you have doubts, please try the download link above to check.
AutoMacro is not compatible with Citrix environments.
Can I deduct this purchase on my taxes?
See this page from the IRS on Employee Business Expenses.
Can I use on more than one computer?
The Beginner version entitles you to a single-use license code valid for 1 computer. The Developer version is valid for 3 computers. The Developer+ allows you to transfer activations between PCs, so that AutoMacro can be activated on any 3 PCs at one time.
Does AutoMacro work with PowerPoint, Word, or Access?
Yes! AutoMacro functions in any program with the Visual Basic Editor.
Specific code examples were developed for Excel, Access, Outlook, Word, and PowerPoint.
Visit AutoMacro’s FAQ Page
Join the Thousands of Professionals Who Use AutoMacro
«Great product, haven’t stopped using it since I purchased it. It doesn’t just write your code, it teaches as you go!»
Tony D — United Kingdom
![]()
4.7 Average Rating!
See Pricing
Steve Rynearson:
Creator of AutoMacro
Over the years, I’ve spent countless hours searching online for example code and adapting that code to my needs.
I often found myself clicking the same links and copying the same code. I thought there has to be a better way!
AutoMacro eliminates much of this need to search online for code. Instead simply use the menus to select pre-built code or use the builders to generate code for your exact needs.
Additionally, the coding tools will save you time and help you develop more professional looking code.
For anyone coding VBA, AutoMacro is a life-saver. You’ll code much faster, develop more professional code, and learn VBA much faster (if you’re not already an expert).
Skip to content

Block or Report
Block or report vbatools
Popular repositories
-
Macro Tools VBA — add-in, tool for automating the development of macros in the Visual Basic Editor (VBE) MS Excel and Word
VBA
47
8
-
Add Context Menu For User Forms Text Box VBA
VBA
10
1
-
Class add Splitter in UserForms VBA
VBA
5
1
-
UserForms MsgBox Close After Time
VBA
4
1
-
image magnification on UserForms VBA
VBA
3
1
-
Class resize user form без API
VBA
3
37
contributions
in the last year
No contributions on Sunday, April 10, 2022
No contributions on Monday, April 11, 2022
No contributions on Tuesday, April 12, 2022
No contributions on Wednesday, April 13, 2022
No contributions on Thursday, April 14, 2022
No contributions on Friday, April 15, 2022
No contributions on Saturday, April 16, 2022
No contributions on Sunday, April 17, 2022
No contributions on Monday, April 18, 2022
No contributions on Tuesday, April 19, 2022
No contributions on Wednesday, April 20, 2022
No contributions on Thursday, April 21, 2022
No contributions on Friday, April 22, 2022
No contributions on Saturday, April 23, 2022
No contributions on Sunday, April 24, 2022
No contributions on Monday, April 25, 2022
No contributions on Tuesday, April 26, 2022
No contributions on Wednesday, April 27, 2022
No contributions on Thursday, April 28, 2022
No contributions on Friday, April 29, 2022
No contributions on Saturday, April 30, 2022
No contributions on Sunday, May 1, 2022
No contributions on Monday, May 2, 2022
No contributions on Tuesday, May 3, 2022
No contributions on Wednesday, May 4, 2022
No contributions on Thursday, May 5, 2022
No contributions on Friday, May 6, 2022
No contributions on Saturday, May 7, 2022
No contributions on Sunday, May 8, 2022
No contributions on Monday, May 9, 2022
No contributions on Tuesday, May 10, 2022
No contributions on Wednesday, May 11, 2022
No contributions on Thursday, May 12, 2022
No contributions on Friday, May 13, 2022
No contributions on Saturday, May 14, 2022
No contributions on Sunday, May 15, 2022
No contributions on Monday, May 16, 2022
No contributions on Tuesday, May 17, 2022
No contributions on Wednesday, May 18, 2022
No contributions on Thursday, May 19, 2022
No contributions on Friday, May 20, 2022
No contributions on Saturday, May 21, 2022
No contributions on Sunday, May 22, 2022
No contributions on Monday, May 23, 2022
No contributions on Tuesday, May 24, 2022
No contributions on Wednesday, May 25, 2022
No contributions on Thursday, May 26, 2022
No contributions on Friday, May 27, 2022
No contributions on Saturday, May 28, 2022
No contributions on Sunday, May 29, 2022
No contributions on Monday, May 30, 2022
No contributions on Tuesday, May 31, 2022
No contributions on Wednesday, June 1, 2022
No contributions on Thursday, June 2, 2022
No contributions on Friday, June 3, 2022
No contributions on Saturday, June 4, 2022
No contributions on Sunday, June 5, 2022
No contributions on Monday, June 6, 2022
No contributions on Tuesday, June 7, 2022
No contributions on Wednesday, June 8, 2022
No contributions on Thursday, June 9, 2022
No contributions on Friday, June 10, 2022
No contributions on Saturday, June 11, 2022
No contributions on Sunday, June 12, 2022
No contributions on Monday, June 13, 2022
No contributions on Tuesday, June 14, 2022
No contributions on Wednesday, June 15, 2022
No contributions on Thursday, June 16, 2022
No contributions on Friday, June 17, 2022
No contributions on Saturday, June 18, 2022
No contributions on Sunday, June 19, 2022
No contributions on Monday, June 20, 2022
No contributions on Tuesday, June 21, 2022
No contributions on Wednesday, June 22, 2022
No contributions on Thursday, June 23, 2022
26 contributions on Friday, June 24, 2022
3 contributions on Saturday, June 25, 2022
No contributions on Sunday, June 26, 2022
No contributions on Monday, June 27, 2022
No contributions on Tuesday, June 28, 2022
No contributions on Wednesday, June 29, 2022
No contributions on Thursday, June 30, 2022
2 contributions on Friday, July 1, 2022
1 contribution on Saturday, July 2, 2022
1 contribution on Sunday, July 3, 2022
2 contributions on Monday, July 4, 2022
No contributions on Tuesday, July 5, 2022
1 contribution on Wednesday, July 6, 2022
No contributions on Thursday, July 7, 2022
No contributions on Friday, July 8, 2022
No contributions on Saturday, July 9, 2022
No contributions on Sunday, July 10, 2022
No contributions on Monday, July 11, 2022
No contributions on Tuesday, July 12, 2022
No contributions on Wednesday, July 13, 2022
No contributions on Thursday, July 14, 2022
No contributions on Friday, July 15, 2022
No contributions on Saturday, July 16, 2022
No contributions on Sunday, July 17, 2022
No contributions on Monday, July 18, 2022
No contributions on Tuesday, July 19, 2022
No contributions on Wednesday, July 20, 2022
No contributions on Thursday, July 21, 2022
No contributions on Friday, July 22, 2022
No contributions on Saturday, July 23, 2022
No contributions on Sunday, July 24, 2022
No contributions on Monday, July 25, 2022
No contributions on Tuesday, July 26, 2022
No contributions on Wednesday, July 27, 2022
No contributions on Thursday, July 28, 2022
No contributions on Friday, July 29, 2022
No contributions on Saturday, July 30, 2022
No contributions on Sunday, July 31, 2022
No contributions on Monday, August 1, 2022
No contributions on Tuesday, August 2, 2022
No contributions on Wednesday, August 3, 2022
No contributions on Thursday, August 4, 2022
No contributions on Friday, August 5, 2022
No contributions on Saturday, August 6, 2022
No contributions on Sunday, August 7, 2022
No contributions on Monday, August 8, 2022
No contributions on Tuesday, August 9, 2022
No contributions on Wednesday, August 10, 2022
1 contribution on Thursday, August 11, 2022
No contributions on Friday, August 12, 2022
No contributions on Saturday, August 13, 2022
No contributions on Sunday, August 14, 2022
No contributions on Monday, August 15, 2022
No contributions on Tuesday, August 16, 2022
No contributions on Wednesday, August 17, 2022
No contributions on Thursday, August 18, 2022
No contributions on Friday, August 19, 2022
No contributions on Saturday, August 20, 2022
No contributions on Sunday, August 21, 2022
No contributions on Monday, August 22, 2022
No contributions on Tuesday, August 23, 2022
No contributions on Wednesday, August 24, 2022
No contributions on Thursday, August 25, 2022
No contributions on Friday, August 26, 2022
No contributions on Saturday, August 27, 2022
No contributions on Sunday, August 28, 2022
No contributions on Monday, August 29, 2022
No contributions on Tuesday, August 30, 2022
No contributions on Wednesday, August 31, 2022
No contributions on Thursday, September 1, 2022
No contributions on Friday, September 2, 2022
No contributions on Saturday, September 3, 2022
No contributions on Sunday, September 4, 2022
No contributions on Monday, September 5, 2022
No contributions on Tuesday, September 6, 2022
No contributions on Wednesday, September 7, 2022
No contributions on Thursday, September 8, 2022
No contributions on Friday, September 9, 2022
No contributions on Saturday, September 10, 2022
No contributions on Sunday, September 11, 2022
No contributions on Monday, September 12, 2022
No contributions on Tuesday, September 13, 2022
No contributions on Wednesday, September 14, 2022
No contributions on Thursday, September 15, 2022
No contributions on Friday, September 16, 2022
No contributions on Saturday, September 17, 2022
No contributions on Sunday, September 18, 2022
No contributions on Monday, September 19, 2022
No contributions on Tuesday, September 20, 2022
No contributions on Wednesday, September 21, 2022
No contributions on Thursday, September 22, 2022
No contributions on Friday, September 23, 2022
No contributions on Saturday, September 24, 2022
No contributions on Sunday, September 25, 2022
No contributions on Monday, September 26, 2022
No contributions on Tuesday, September 27, 2022
No contributions on Wednesday, September 28, 2022
No contributions on Thursday, September 29, 2022
No contributions on Friday, September 30, 2022
No contributions on Saturday, October 1, 2022
No contributions on Sunday, October 2, 2022
No contributions on Monday, October 3, 2022
No contributions on Tuesday, October 4, 2022
No contributions on Wednesday, October 5, 2022
No contributions on Thursday, October 6, 2022
No contributions on Friday, October 7, 2022
No contributions on Saturday, October 8, 2022
No contributions on Sunday, October 9, 2022
No contributions on Monday, October 10, 2022
No contributions on Tuesday, October 11, 2022
No contributions on Wednesday, October 12, 2022
No contributions on Thursday, October 13, 2022
No contributions on Friday, October 14, 2022
No contributions on Saturday, October 15, 2022
No contributions on Sunday, October 16, 2022
No contributions on Monday, October 17, 2022
No contributions on Tuesday, October 18, 2022
No contributions on Wednesday, October 19, 2022
No contributions on Thursday, October 20, 2022
No contributions on Friday, October 21, 2022
No contributions on Saturday, October 22, 2022
No contributions on Sunday, October 23, 2022
No contributions on Monday, October 24, 2022
No contributions on Tuesday, October 25, 2022
No contributions on Wednesday, October 26, 2022
No contributions on Thursday, October 27, 2022
No contributions on Friday, October 28, 2022
No contributions on Saturday, October 29, 2022
No contributions on Sunday, October 30, 2022
No contributions on Monday, October 31, 2022
No contributions on Tuesday, November 1, 2022
No contributions on Wednesday, November 2, 2022
No contributions on Thursday, November 3, 2022
No contributions on Friday, November 4, 2022
No contributions on Saturday, November 5, 2022
No contributions on Sunday, November 6, 2022
No contributions on Monday, November 7, 2022
No contributions on Tuesday, November 8, 2022
No contributions on Wednesday, November 9, 2022
No contributions on Thursday, November 10, 2022
No contributions on Friday, November 11, 2022
No contributions on Saturday, November 12, 2022
No contributions on Sunday, November 13, 2022
No contributions on Monday, November 14, 2022
No contributions on Tuesday, November 15, 2022
No contributions on Wednesday, November 16, 2022
No contributions on Thursday, November 17, 2022
No contributions on Friday, November 18, 2022
No contributions on Saturday, November 19, 2022
No contributions on Sunday, November 20, 2022
No contributions on Monday, November 21, 2022
No contributions on Tuesday, November 22, 2022
No contributions on Wednesday, November 23, 2022
No contributions on Thursday, November 24, 2022
No contributions on Friday, November 25, 2022
No contributions on Saturday, November 26, 2022
No contributions on Sunday, November 27, 2022
No contributions on Monday, November 28, 2022
No contributions on Tuesday, November 29, 2022
No contributions on Wednesday, November 30, 2022
No contributions on Thursday, December 1, 2022
No contributions on Friday, December 2, 2022
No contributions on Saturday, December 3, 2022
No contributions on Sunday, December 4, 2022
No contributions on Monday, December 5, 2022
No contributions on Tuesday, December 6, 2022
No contributions on Wednesday, December 7, 2022
No contributions on Thursday, December 8, 2022
No contributions on Friday, December 9, 2022
No contributions on Saturday, December 10, 2022
No contributions on Sunday, December 11, 2022
No contributions on Monday, December 12, 2022
No contributions on Tuesday, December 13, 2022
No contributions on Wednesday, December 14, 2022
No contributions on Thursday, December 15, 2022
No contributions on Friday, December 16, 2022
No contributions on Saturday, December 17, 2022
No contributions on Sunday, December 18, 2022
No contributions on Monday, December 19, 2022
No contributions on Tuesday, December 20, 2022
No contributions on Wednesday, December 21, 2022
No contributions on Thursday, December 22, 2022
No contributions on Friday, December 23, 2022
No contributions on Saturday, December 24, 2022
No contributions on Sunday, December 25, 2022
No contributions on Monday, December 26, 2022
No contributions on Tuesday, December 27, 2022
No contributions on Wednesday, December 28, 2022
No contributions on Thursday, December 29, 2022
No contributions on Friday, December 30, 2022
No contributions on Saturday, December 31, 2022
No contributions on Sunday, January 1, 2023
No contributions on Monday, January 2, 2023
No contributions on Tuesday, January 3, 2023
No contributions on Wednesday, January 4, 2023
No contributions on Thursday, January 5, 2023
No contributions on Friday, January 6, 2023
No contributions on Saturday, January 7, 2023
No contributions on Sunday, January 8, 2023
No contributions on Monday, January 9, 2023
No contributions on Tuesday, January 10, 2023
No contributions on Wednesday, January 11, 2023
No contributions on Thursday, January 12, 2023
No contributions on Friday, January 13, 2023
No contributions on Saturday, January 14, 2023
No contributions on Sunday, January 15, 2023
No contributions on Monday, January 16, 2023
No contributions on Tuesday, January 17, 2023
No contributions on Wednesday, January 18, 2023
No contributions on Thursday, January 19, 2023
No contributions on Friday, January 20, 2023
No contributions on Saturday, January 21, 2023
No contributions on Sunday, January 22, 2023
No contributions on Monday, January 23, 2023
No contributions on Tuesday, January 24, 2023
No contributions on Wednesday, January 25, 2023
No contributions on Thursday, January 26, 2023
No contributions on Friday, January 27, 2023
No contributions on Saturday, January 28, 2023
No contributions on Sunday, January 29, 2023
No contributions on Monday, January 30, 2023
No contributions on Tuesday, January 31, 2023
No contributions on Wednesday, February 1, 2023
No contributions on Thursday, February 2, 2023
No contributions on Friday, February 3, 2023
No contributions on Saturday, February 4, 2023
No contributions on Sunday, February 5, 2023
No contributions on Monday, February 6, 2023
No contributions on Tuesday, February 7, 2023
No contributions on Wednesday, February 8, 2023
No contributions on Thursday, February 9, 2023
No contributions on Friday, February 10, 2023
No contributions on Saturday, February 11, 2023
No contributions on Sunday, February 12, 2023
No contributions on Monday, February 13, 2023
No contributions on Tuesday, February 14, 2023
No contributions on Wednesday, February 15, 2023
No contributions on Thursday, February 16, 2023
No contributions on Friday, February 17, 2023
No contributions on Saturday, February 18, 2023
No contributions on Sunday, February 19, 2023
No contributions on Monday, February 20, 2023
No contributions on Tuesday, February 21, 2023
No contributions on Wednesday, February 22, 2023
No contributions on Thursday, February 23, 2023
No contributions on Friday, February 24, 2023
No contributions on Saturday, February 25, 2023
No contributions on Sunday, February 26, 2023
No contributions on Monday, February 27, 2023
No contributions on Tuesday, February 28, 2023
No contributions on Wednesday, March 1, 2023
No contributions on Thursday, March 2, 2023
No contributions on Friday, March 3, 2023
No contributions on Saturday, March 4, 2023
No contributions on Sunday, March 5, 2023
No contributions on Monday, March 6, 2023
No contributions on Tuesday, March 7, 2023
No contributions on Wednesday, March 8, 2023
No contributions on Thursday, March 9, 2023
No contributions on Friday, March 10, 2023
No contributions on Saturday, March 11, 2023
No contributions on Sunday, March 12, 2023
No contributions on Monday, March 13, 2023
No contributions on Tuesday, March 14, 2023
No contributions on Wednesday, March 15, 2023
No contributions on Thursday, March 16, 2023
No contributions on Friday, March 17, 2023
No contributions on Saturday, March 18, 2023
No contributions on Sunday, March 19, 2023
No contributions on Monday, March 20, 2023
No contributions on Tuesday, March 21, 2023
No contributions on Wednesday, March 22, 2023
No contributions on Thursday, March 23, 2023
No contributions on Friday, March 24, 2023
No contributions on Saturday, March 25, 2023
No contributions on Sunday, March 26, 2023
No contributions on Monday, March 27, 2023
No contributions on Tuesday, March 28, 2023
No contributions on Wednesday, March 29, 2023
No contributions on Thursday, March 30, 2023
No contributions on Friday, March 31, 2023
No contributions on Saturday, April 1, 2023
No contributions on Sunday, April 2, 2023
No contributions on Monday, April 3, 2023
No contributions on Tuesday, April 4, 2023
No contributions on Wednesday, April 5, 2023
No contributions on Thursday, April 6, 2023
No contributions on Friday, April 7, 2023
No contributions on Saturday, April 8, 2023
No contributions on Sunday, April 9, 2023
No contributions on Monday, April 10, 2023
No contributions on Tuesday, April 11, 2023
No contributions on Wednesday, April 12, 2023
No contributions on Thursday, April 13, 2023
No contributions on Friday, April 14, 2023
Apr
May
Jun
Jul
Aug
Sep
Oct
Nov
Dec
Jan
Feb
Mar
Apr
Mon
Wed
Fri
- 2023
- 2022
- 2021
Contribution activity
April 2023
vbatools has no activity
yet for this period.
Written by Puneet for Excel 2007, Excel 2010, Excel 2013, Excel 2016, Excel 2019, Excel for Mac

KEY POINTS
- Visual Basic Editor is a code editor for VBA.
- It’s a separate application but you can only use it with Excel.
- You need to have the developer tab on the ribbon to access it.
- You can also use the keyboard shortcut (Alt + F11).
- It also stores the macros that you recode with the macro recorder.
- It has multiple tools to help you to write and manage all the codes.
The world of VBA starts with the Visual Basic Editor (VBE).
It’s the place where you write and manage all the macro codes and if you ask me about VBE, I’d say if you are serious about learning VBA you need to understand all the components of VBE.
That’s why it’s part of our VBA tutorial and in this guide, we have covered every single aspect of Visual Basic Editor to make you understand its functionality.
So, let’s get started.
I will be using different words (VBA editor, VB editor, or VBE) in this guide for referring to the Visual Basic Editor, so don’t be confused with it.
What is the Visual Basic Editor?
Visual Basic Editor is an application (a separate one) in which you can write and save all the VBA codes. In simple words, it’s a code editor for Excel in which you can write all the macros and store them. Even though it is a separate application (VB Editor) you can only use it with Excel.
Yes, that’s right. You can’t run VBE separately; there must be an Excel workbook open for using VBE.
Visual Basic Editor is the only way to write a VBA code in Excel. In fact, all Microsoft applications that host VBA use the Visual Basic Editor for script writing (writing code).
Below is the VBE:
Microsoft Windows

Mac

VBA is one of the ADVANCED EXCEL SKILLS and to master the VBA; you need to learn all the aspects of Visual Basic Editor.
Open the Visual Basic Editor
From the developer tab
To open the visual basic editor, you need to have the developer tab on the ribbon and to activate the developer tab (steps to add).

Now on the developer tab, in the code group, there is a button called “Visual Basic” and when you click on this button it opens the VB editor.

Shortcut Key (Window)
You can also use the keyboard shortcut key Alt + F11 to open the VBE in windows and Opt + F11 or Fn + Opt + F11 for MAC.
Even if you don’t have the developer tab on the ribbon, this shortcut key will still work and open the editor.
Edit a Macro from the List
If you want to open the VBA editor to edit a specific macro, then you can open the macros list from the developer tab.

And click on the edit button to open the VB editor to edit that specific macro.

On Quick Access Toolbar
You can also add a button on the quick access toolbar to open the VBA editor. For this, you need to click on the drop-down on the quick access toolbar and open more commands.

And then select the developer tab from “Choose Commands From” and then add the visual basic editor to the quick access toolbar by clicking on the add button.

Now you can open the visual basic editor from the button that you have on the QAT.

From the Worksheet Tab
You can also open the VBA editor by right-clicking on the worksheet tab and clicking on the view code. It will instantly take you to the code window of that worksheet.

Components of Visual Basic Editor
When you open the VBA editor first time it looks like an old application and to understand how it works you need to go component by component.

The user interface is the same (almost) for all the Excel versions in the last more than 15 years, so no matter which Excel version you are using, you can learn about Visual Basic Editor from this guide. Yes, VBE has different components which can help you in different ways, so let’s explore them one by one.
- Menu Bar
- Tool Bar
- Project Window
- Properties Window
- Code Window
- Immediate Window
- Watch Window
- Object Browser
- Find and Replace
- Locals Window
Just like any other application VBA editor has a menu bar where you can find all the options that are available to the user.
Now in the menu bar, each tab is a category of options that are available to use. Let’s suppose, in the edit menu, you can see all the options from cut-copy-paste, find and replace, and adding indent and outdent.

Along with all the options (most of them), you can find the shortcut keys to use those options.
2. Tool Bar
Just below the menu bar, you have the toolbar which is a collection of some of the options that a normal user needs to use more frequently. When you open the visual basic editor first time you will only have the standard toolbar, just like the image below.

But there are total four toolbars that you can add and use.
- Debug
- Edit
- Standard
- User Form
If you go to the view tab in the menu bar you have the option to add or remove these toolbars.

And you can also add or remove buttons from the toolbar if you want.

You can also move a toolbar just by dragging and dropping from the small dots on the right side.

3. Project Window/ Project Explorer
The project window is the place where you can see all the ongoing projects. Whenever you open a file and then open the visual basic editor you can see the hierarchy of that file in the project window.

Every project further has a collection of objects:
- Worksheet: Each worksheet in a workbook lists as an object.
- The Workbook: It represents the workbook itself as an object.
- Module: It’s the place where you write code or recorded macros stores.
- Chart Sheet: Chart sheet in the workbook will also be listed there.

When you open the VB editor, you’ll find the project window there by default. But if it’s not there somehow you can add it from the View (Menu Bar) or you can use the shortcut key Control + R.
Each object that is listed on the project window has its own code window which you can open by double click on it or you can right-click and select the view code option.

The project window is the best way to navigate through all the ongoing projects and when you start working with the editor you will get to know more about it.
4. Properties Window
As the name suggests the properties window gives you access to the properties of the selected object. Each object, for example, a worksheet has its own properties that you can see and make changes in it.

For each property, there is a drop-down on the right side from where you can change or edit that property.

Quick Tip: You can change the name of a project from the properties window.

And, if the properties window is not there by default you can activate it from the view (menu bar), or you can also use the shortcut key F4.

5. Code Window
The code window is the place where you write codes and do most of your work (editing, writing, and testing). In simple words, the code window is the place where you do all the programming.

When you first see it, it looks like a simple text editor, but it has Intellisense that can help you while programming.
There is no way I have found to add line number in the code window as other code editors have but still, VB editor indicates you the line number of the code.
Note
There’s no way I have found to add line number in the code window as other code editors have but still, VB editor indicates you the line number of the code.
6. Immediate Window
Immediate Window is the place where you can debug your code. You can type a line of code and test how it works. Let’s say if you want to test the following code:
Range("A1").Value = 9999All you need to do is enter type a question mark and then paste the code there and HIT enter. It will immediately show the result of the code.

The other way is to add Debug.Print before the code and get its result value in the immediate window.
Sub Macro1()
Debug.Print Range("A1").Value = "Yes"
End Sub
By default, the immediate window won’t be there when you open the visual basic editor, so you need to activate it from the view tab in the menu bar. You can also use the shortcut key Control + G.
7. Watch Window
Just like Excel Watch Window, the visual basic editor also has a watch window where you can add expressions to track them. You simply need to select the expression and then right-click and go to add a watch.

In the below example, I have added the Selection.Value to the add watch.

Now, to activate the watch window, go to the view menu and click on the watch window option.

And here you have the watch window tracking the added expression.
![]()
8. Object Browser
VBA has its own object browser which can help you to work with all the objects by finding all the properties and which you can use.

Imagine if you want to use the range object, the object browser will tell you about all the properties and method that comes with it. Look at the below example.

To open the object browser, use the shortcut key F2 or you can also go to the view tab and click on the object browser to open it.
9. Find and Replace
Just like the find and replace in Excel, the VBA editor has its own find and replace option that you can use to find and replace values from procedures. To open the FIND option, you can use the shortcut key Control + F, and to open the replace you can use the shortcut key Control + H.

Otherwise, you can open both options from the edit menu.

The find and replace option in VBE gives you different search patterns, like, if you want to find and replace something from the current procedure, from the current module, or from the current project.
You can also use the CASE SENSITIVE search and decide the direction of the search as well.
10. Locals Window
You can use the Locals window in VBE to displays all declared variables in the current procedure and their present values.
Using VB Editor to Write a Code
At this point, you know all the major components of the VBA editor, so now let’s learn how to add code in it.
Module Code Window Vs Object Code Window
There are two different types of code windows and both look just the same but there is a difference that you need to know.
- Module Code Window: Code in the normal module can be executed manually or you can also call it from a separate procedure.
- Object Code Window: Code in the object code window can be executed by using an event. Let’s suppose you want to run code when you double click on a cell, in that case, you need to use the double click event and you need to add code to that worksheet.
2. Module Code Window
You will be writing most of the VBA code in a module. To add code in a module you need to use the SUB procedure or the FUNCTION procedure.
- Sub procedure
- Function procedure
The difference between a sub and a function procedure is sub procedure can’t return a value, on the other hand, a function procedure can return a value.
When you record a macro that code goes straight into a module that VBA inserts automatically when you use the macro recorder.
Insert a Module
When you need to write code, you have to insert a module and for this, you simply need to go to the project window and right-click on the project name, and from that menu go to insert and select module.

Remove a Module
You can also remove a module if it doesn’t require anymore so you just simply need to right-click on the module and select remove.

And when you click on remove, it asks you if you want to back up that module before removing it. There is also an option where you can export a module to save it as a file in your system.
3. Object Code Window
Open the code window for the object you simply need to double click on it and in its the code window, there is a dropdown from where you can select the event that you want to use to execute the code.

Imagine if you want to write the code and want to execute on the double click then you need to select “BeforeDoubleClick” from the dropdown.
Understanding Design Mode, Run Mode, and Debug Mode
You can use the visual basic editor in three different modes depending on the face of programming, writing the code, locating an error, and fixing an error.
- Design Mode: Normally, when you are working in VB editor on a code you are in the design mode. Even then you just writing the code instead of designing a user form or a form you are in the design mode, like typing a code. This is also called design time.
- Run Mode: When you run a code to test a code that is how it works you are in the run mode. The best example to define this mode is when you execute a code using the Run button from the toolbar. This is also called runtime.
- Break Mode: When a code is running and in between the execution is suspended, at that time you are in break mode. In this mode, you can run a code step by step. This is also called debugging.
Tips to work with VB editor like a PRO
Just like any other programming language in VBA you can also use comments to define how that code works. Using comments is a good habit and it can help you in so many ways.
- Track Changes
- Contact Details of the Programmer
- How to Troubleshoot the Code
- And much more
To add a comment, you need to type an apostrophe and then the line of code.
Related Tip: VBA Comment Block
Quick Info
Now, look at the below example where I am adding add a VBA function (VBA LEFT Function), and the moment I type the name of the function, it shows me a tooltip for all the arguments which I need to define.

You can also use the shortcut key Control + I or use the quick info option from the EDIT menu.

Auto List Members
Each object in VBA comes with some properties and methods and when you insert an object or a command in the code window and then you enter (.) it shows you the complete list of properties and methods which come with that object.

In the above example, when I added a (.) after the borders property of the range, it showed me all the available properties that are available to access.
List Constants
While defining expressions for a property or a method you can use the list of constants available. In the below example, while using the Border Around method it showed me all the constants which are available for the weight argument.

You can use the shortcut key Control + Shift + J to get the list of constants or you can also go to the edit menu and use the option from there.

Activate Option Explicit
While writing VBA codes you will need to use variables and one of the most important things while using variables is to declare their data type. And there’s a chance that you could forget to declare it.
But when you use the option explicit statement, then you have to declare the data type for every single variable which you are using, and if you fail to do so VBA will show an error message. It’s like forcing yourself to declare every single variable with its data type. For this, you can go to the tools menu and open the options.

And from the options, tick mark “Require Variable Declaration” and click OK.

Now every module will have an Option Explicit statement at the beginning, and you have to declare every single variable.

Change the Code Window View
When you can write multiple codes in a single code window and VBA separate them with a divider, but if you want to have a more focused view, you can change the view of the code window. Below I have the codes in a single module.

But I can change this view from the view buttons from the bottom left of the window.

Now I have only active code visible.
Run a Code Step by Step
When you write a VBA code there could be a chance that that code has a bug or an error that can come while executing it. In that case, the best way is to execute that code step by step and validate each line of code.

For this, you can use shortcut key F8 to execute a code line by line or use step into option from the debug menu.

And there is also a button on the debug toolbar that you can use.

Code Indenting
When you write lengthy and complex codes then it’s important to structure them in the right way so that you can understand them later. For this, there’s one thing which comes handy, INDENTING. Indenting is basically structuring the code using tabs, below is an example.

To add indenting in a line you can use the TAB key from the keyboard, or you can also use the indent/outdent buttons from the toolbar.

Get Code from a Text File
The visual basic editor allows you to import VBA codes from a text file without copy-pasting. Once you insert a module you can go to the insert menu and select the file option from there.

It opens the dialog box where you can locate the text file and import all the codes from it to the current module.
R1C1 Reference Style
If you ever worked with the R1C1 reference style, then I’m sure you can agree on this point that way easier to write codes with it.
R1C1 Reference Style
Line Break
Even though you can adjust the width of the code window and make it wide but there could be a situation when you will be dealing with long lines of code that makes it hard to read.
The best way to deal with this problem is to add a line break. Basically, a line break is something when you break a line into two lines using the line break character.
Use a SPACE & UNDERSCORE and hit enter to add a line break.

Formatting
When it comes to user interface visual basic editor is not that good looking. But there are few formatting options that you can use to customize it or change its look the way you want.
From the Tools Menu Options Editor Format, you can access the formatting option where you can change the font style size or background color as well

Check out this video on customizing the VBA editor for a dark theme.
Personal Macro Workbook
There could be some macros that you need to access within all the workbooks that you use.
In that case, you can use the Personal Macro Workbook that can help you to store all the important codes in one place and you can access them from all the workbooks.

Using Bookmarks
The visual basic editor allows you to add bookmarks to a line from Right Click ➤ Toggle ➤ Bookmark.

And then you can also navigate between bookmarks from the option from the edit menu.

Syntax Checking
When you write codes in the code window VBA check for the syntax error and notify you when you make a syntax error. This option is activated by default, but you can also turn it off if you don’t want VBA to notify you every time you make an error.
Tools Menu ➤ Options ➤ Editor Tab ➤ Auto Syntax Check.

But I would recommend you not to deactivate it because it can help you to identify all the syntax errors that you make while writing codes.
List of Macros
If you have a lot of macros in a module, there is an option that you can use to see all the macros (Tools ➤ Macro).

There’s one big benefit of using this list option is that you can run a macro, delete it, and edit it without navigating to that procedure.
Locking a Project with a Password
Visual Basic Editor also gives you an option to lock a module with a password. So, if you don’t want the users to know the code and don’t want them to make a change in the code, you can use this option.

Tools Menu ➤ VBAProject Properties ➤ Protection Tab

Important Shortcut Keys
- Shift + F7: Object browser.
- F5: Run macro.
- Tab: Add an indent.
- Alt + Q: Close.
- F8: Step into.
- Control + H: Find and replace.
- Control + G: Immediate Window.
- Control + R: Project Explorer.
- F4: Properties window.
Learn some AMAZING Keyboard Shortcuts: Excel Keyboard Shortcuts Cheat Sheet
Alternative to Visual Basic Editor
Well, I have tried quite a few other editors to write a macro but the problem which I have found is that without the Intellisense it’s really hard to use anything other than the visual basic editor itself.

VBA editor works along with Excel, you can test your codes instantly and you can save them into the workbook. But are a few names to try.
Visual Studio Code | Ultra Edit
Points to Remember
- You can maximize or minimize the code window.
- You can change a project’s name anytime.
- The project window is the best way to navigate through the editor.
- It will make a line red if there’s an error in it while writing the code.
- You can also add a bookmark to a line of code from the Right-Click Menu Toggle Bookmark.
- You cannot use the visual basic editor without opening an Excel workbook.
More on VBA
- VBA Functions
- VBA to Add a New Sheet
- VBA Code to Activate a Worksheet
- VBA IF Then Statement
- VBA User Defined Function
- VBA Message Box
- VBA to Extract Hyperlink
- Macro to Highlight Duplicate Values
- VBA to Create a Pivot Table
[icon name=”bell” class=”” unprefixed_class=””] VBA is one of the Advanced Excel Skills
Should I need to install the Visual Basic Editor?
No. You don’t need to install the visual basic editor. It comes pre-installed with the Microsoft Office applications.
What if I don’t have the Developer Tab on the Ribbon?
If you don’t have the developer tab on the Excel ribbon, you can activate it from the Excel ribbon.
Is there an alternative to the Visual Basic Editor?
Not really. The IntelliSense that you have in the VBE makes it perfect to use to write VBA codes.
How to Use the VBA Editor in Excel: Quick Guide (2023)
Excel’s Visual Basic for Applications (VBA) editor is a very powerful tool.
It lets you write and edit custom scripts that automate actions in Excel.
In fact, when you record a macro it is stored in VBA code in the VBA editor.
But writing a macro from the VBA editor directly gives you more flexibility than recording a macro in the traditional manner.
You can create better VBA code and complete more complicated tasks by working directly with Visual Basic for Applications.
In this tutorial, I show you the basics of how to use Excel’s VBA editor. Let’s get into it!
What is the VBA editor?
The Visual Basic editor, also called the VBA editor, VB editor, or VBE, is an interface for creating scripts.
VBA (Visual Basic for Applications) is the coding language that’s used to create these scripts.

Visual Basic is a full-featured programming language, but Microsoft Office’s very own VBA programming language is easier to get the hang of, so you can get started with developing applications much more quicker.
If you’ve done any programming in an integrated development environment (IDE), the VBA editor in Excel will look familiar. It lets you create, manage, and run VBA code on your Excel spreadsheet.
Let’s take a look at how to open the Visual Basic editor and do a few basic things.
How to use the VBA editor in Excel
Before you start coding, you’ll need to open the VBA editor. To do this, head to the Developer tab and click the Visual Basic button:

If you don’t see the Developer tab, go to File > Options > Customize Ribbon and make sure that the developer tab is checked in the right pane. If you want a more thorough explanation of how to add the developer tab in Excel, read it here.
You can also open the VBA editor with the shortcut key Alt + F11.
As you can see, the VBA editor is packed full of buttons, menu bars, and options. Don’t worry—we’ll go through the important ones in this guide.
In this guide, we’ll focus on the most basic parts of the Visual Basic editor.
The project view, in the left, vertical, menu bar in the VBA editor, has a folder called Modules.

This folder holds Excel VBA modules, which are like containers for VBA code. When you record macros, they’re included in a module.
Modules also contain the code window where you’ll be writing code (if you’re not recording it).
To add a new, empty module, click the Insert menu button and select Module.

If there was no Modules folder in VBAProject, the folder will be created and there will be a new module inside of it. This is where you’ll put your Excel VBA code when you’re ready to write it.
To delete a module, right-click it in the left pane and select Remove [module name].

Excel will ask you to confirm the removal. You may export the module if you’d like to save it.
Finally, let’s look at running a macro from the Visual Basic Editor window.
After you’ve created a macro, either by coding it directly or recording it from the standard Excel interface, you can run it from this view.
To run a macro, just click the Run Macro button in the menu bar:

You can also press the shortcut key F5 on your keyboard to run the macro from the VBA editor.
PRO TIP: Change the name of a module
If you’re developing big spreadsheets with lots of VBA, all the macro codes won’t be able to fit in one single module. You’ll need more. You can easily add those from the menu bar, but as you add more, it becomes increasingly more difficult to figure out what macros are in what modules.
Luckily, you can easily change the name of a module in the Properties window.
Add the Properties code window from the Insert button on the menu bar.
If the Project window is missing
If it looks like this when you open the Visual Basic editor:

The code window is missing, there’s no left vertical menu bar. Nothing is visible except the horizontal menu bar on top 🤷
You need to click on the ‘View’ tab on the menu bar, and then click to show the ‘Project Explorer’ window.
That’s it – Now what?
This was a simple Excel tutorial on getting started with the Visual Basic editor in Excel and should get you on the right track to write code (or record it).
Mastering the Excel VBA editor is important for both beginners and advanced Excel users.
When you write more VBA code, you’ll see that the Excel VBA editor becomes a better help for you in your work.
For instance, it helps you autocomplete your VBA coding with IntelliSense, helps you find syntax errors with auto syntax check, debug with the immediate window, uses the object code window, and much more.
For now, play around with the VBA editor to get a feel for where the buttons and menus are, and start getting used to the structure of VBA.
If you want to dive deeper into VBA programming, check out my free 30-minute VBA course here.
Other resources
The VBA editor is just a tiny portion of what macros are all about. You definitely need to check out my big VBA guide here.
Frequently asked questions
To open the Visual Basic Editor in Excel, follow these steps:
- Click the Developer tab.
- Click the Visual Basic button in the Code group on the Developer tab. This opens the VBA editor.
- Alternatively, you can open the VBA editor by pressing the Alt + F11 shortcut keys.
There is no need to install the VBA editor. It should already be available in your Excel program.
But you might be missing the developer tab. To add it:
- Click the File tab and Options.
- Then click the Customize Ribbon tab.
- Under Customize the Ribbon, in the right pane, select the Developer check box.
- Click OK.
Kasper Langmann2023-01-30T19:50:45+00:00
Page load link