|
peat Пользователь Сообщений: 119 |
#1 13.01.2014 08:14:36 Гуру, вновь нужна ваша помощь))
Наверное, этот код делает вам больно))) Хотя если добавить строку сохранения в *.xlsm то все будет, в принципе, хорошо) Пытался еще вот так, по найденному в гугле способу, но не получилось адаптировать под свои нужды:
помогите, пожалуйста) Изменено: peat — 14.01.2014 00:56:31 |
||||
|
lexey_fan Пользователь Сообщений: 436 |
как должен выглядеть .txt файл, или это не имеет значения? Если очень захотеть — можно в космос полететь |
|
peat Пользователь Сообщений: 119 |
lexey_fan
Имеет) Должен выглядеть так же, как если бы эти ячейки в 5 столбцах были бы выделены, копированы и вставлены в пустой тхт. Собственно, рабочий вариант это и делает) |
|
AndreTM Пользователь Сообщений: 454 |
#4 13.01.2014 18:06:39
То есть вам нужен типа CSV с текстом без кавычек и с табом-разделителем? экспорт в CSV , хоть будет на ком потренироваться |
||
|
peat Пользователь Сообщений: 119 |
AndreTM
к сожалению, я сейчас не располагаю примером, будет только завтра) Совсем забыл сказать — кавычек у меня там нет, разделитель целой и дробной части — точка. Мои файлы, наверное, не очень интересны вам для эксперимента т.к. просты аки 3 копейки)) Изменено: peat — 13.01.2014 18:34:23 |
|
AndreTM Пользователь Сообщений: 454 |
CSV — это так, для обозначения вида вывода. Текст — он и в Африке текст. А расширение вы можете задать любое, если укажете имя выходного файла. |
|
peat Пользователь Сообщений: 119 |
AndreTM
что-то не очень корректно работает ваш код, к сожалению(( |
|
lexey_fan Пользователь Сообщений: 436 |
Надеюсь AndreTM не заругает Если очень захотеть — можно в космос полететь |
|
peat Пользователь Сообщений: 119 |
lexey_fan
уже ближе, но, почему-то отрубается первый столбец, а в первую строку какая-то ересь выводится) |
|
lexey_fan Пользователь Сообщений: 436 |
Используйте кнопочку пример 1 Если очень захотеть — можно в космос полететь |
|
peat Пользователь Сообщений: 119 |
lexey_fan
теперь только дата перевернута))) 2013.12.01 вместо 01.12.2013 — изменю тип даты и все будет ок) Изменено: peat — 14.01.2014 10:04:57 |
|
lexey_fan Пользователь Сообщений: 436 |
спасибо автору: AndreTM , тут полностью его заслуга Если очень захотеть — можно в космос полететь |
|
AndreTM Пользователь Сообщений: 454 |
#13 14.01.2014 14:15:58 Используйте следующий код:
|
||
|
AndreTM Пользователь Сообщений: 454 |
#14 14.01.2014 14:29:48 Можно поступить проще — использовать одну готовую процедуру под нужный вам вид (предварительно даты можно не конвертировать — поменяются в ней):
|
||
|
peat Пользователь Сообщений: 119 |
#15 16.01.2014 11:05:54 я, все-таки, поступил более проще и надежнее — но только для моего случая:
Но вам огромное спасибо за помощь, узнал пару приемов и все такое)
ничего и нет. Ну еще принт и мой способ saveas txt… |
||||
|
Олег Дудкин Пользователь Сообщений: 1 |
#16 15.09.2020 12:15:47 Вот эта программа работает на перенос с Excel в блокнот строк и столбцов Function Export2txt(fn As String, Rg As Range) nLastRow = Rg.Rows.Count On Error Resume Next: Err.Clear ts.Write (cOutAll) End Function Sub Ìàêðîñ1() ‘ Dim rg1 As Range, res, a As String res = Export2txt(fn:=a, Rg:=rg1) End Sub Прикрепленные файлы
Изменено: Олег Дудкин — 15.09.2020 12:24:03 |
I am looking to have my Macro save a new sheet that i created as a .txt file. this is the code i have so far.
Sub Move()
'
' Move Macro
'
' Keyboard Shortcut: Ctrl+m
'
Sheets("Sheet1").Select
Range("A1").Select
Range(Selection, Selection.End(xlToRight)).Select
Range(Selection, Selection.End(xlDown)).Select
Selection.Copy
Workbooks.Add
ActiveSheet.Paste

ActiveWorkbook.SaveAs Filename:="e:" & _
"HDR" + Format(Now(), "YYYYMMDDhhmmss") & ".txt"

End Sub
That includes my macro. I am having trouble with the last part where it saves as a .txt file.
I am currently getting a bunch of crap on my .txt file, here is an example,
«PK ! !}ñU{ Š [Content_Types].xml ¢( ÌTÝNÂ0¾7ñ–Þš€‰1†Á…⥒ˆPÚ3¶ÐµMOÁñöž•Ÿ¨».
Any help would be great.
asked Oct 1, 2014 at 21:32
2
Manually changing the extension of the file name does not actually change the file type. The SaveAs method takes a file type argument. The code you want is
ActiveWorkbook.SaveAs Filename:="e:" & "HDR" + Format(Now(), "YYYYMMDDhhmmss") _
& ".txt", FileFormat:= xlTextWindows
Doing a search from within Excel help for XlFileFormat will get you (almost) the full list of possible file formats, including 6 text formats, and 4 CSV formats.
answered Oct 1, 2014 at 21:41
DegustafDegustaf
2,6352 gold badges15 silver badges27 bronze badges
1
Adding txt to the name does not automatically encode the word document into plain text format.
Instead attempt
ActiveWorkbook.SaveAs Filename:="e:" & _
"HDR" + Format(Now(), "YYYYMMDDhhmmss") & ".txt", FileFormat:=wdFormatText, Encoding:=1252
answered Oct 1, 2014 at 21:42
AJYAJY
1882 silver badges12 bronze badges
1
The ActiveWorkbook.SaveAs method adds double quote to the beginning and end of every line in the file.
This method parses each line from a given range and transforms it into a CSV file:
Sub SaveSheetToCSVorTXT()
    Dim xFileName As Variant
    Dim rng As Range
    Dim DelimChar As String

    DelimChar = "," 'The delimitation character to be used in the saved file. This will be used to separate cells in the same row

    xFileName = Application.GetSaveAsFilename(ActiveSheet.Name, "CSV File (*.csv), *.csv, Text File (*.txt), *.txt")
    If xFileName = False Then Exit Sub

    If Dir(xFileName) <> "" Then
        If MsgBox("File '" & xFileName & "' already existe.  Overwrite?", vbYesNo + vbExclamation) <> vbYes Then Exit Sub
        Kill xFileName
    End If

    Open xFileName For Output As #1
    'Save range contents. Examples of ranges:
    'Set rng = Activesheet.Range("A1:D4")   'A rectangle between 2 cells
    'Set rng = Activesheet.columns(1)       'An entire column
    Set rng = ActiveSheet.Range("B14").CurrentRegion   'The "region" from a cell. This is the same as pressing CTRL+T on the selected cell

    For i = 1 To rng.Rows.Count
        For j = 1 To rng.Columns.Count
            lineText = IIf(j = 1, "", lineText & DelimChar) & rng.Cells(i, j)
        Next j
        Print #1, lineText
    Next i
    Close #1

    MsgBox "File saved!"
End Sub
answered Feb 28, 2020 at 22:30
cyberponkcyberponk
1,51617 silver badges19 bronze badges
This VBA Program reads an Excel Range (Sales Data) and write to a Text file (Sales.txt)
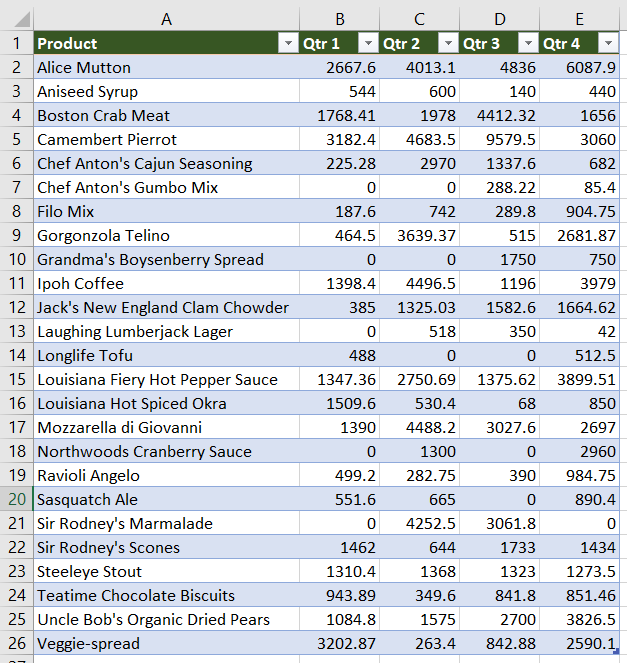
Excel VBA code to read data from an Excel file (Sales Data – Range “A1:E26”). Need two “For loop” for rows and columns. Write each value with a comma in the text file till the end of columns (write without comma only the last column value). Do the above step until reach the end of rows.
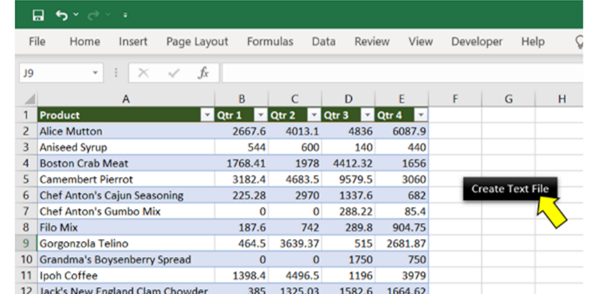
Sales Data in Excel: 5 columns and 25 rows
Sales Data
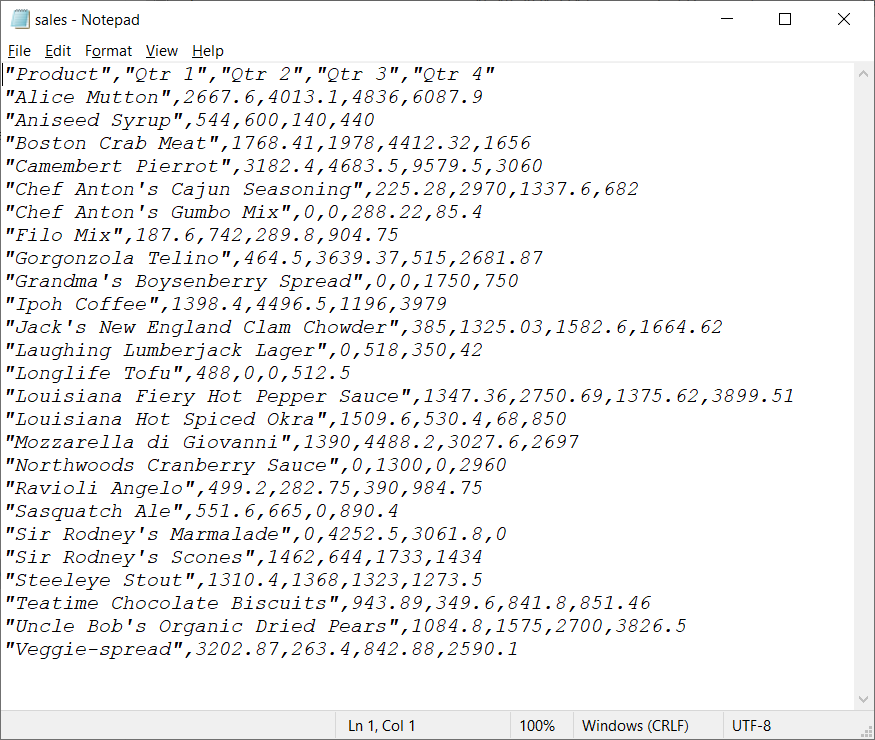
VBA code to create a text file as below
VBA Code:
- Declaring Variables :
| Variable | Data Type | Comments |
|---|---|---|
| myFileName | String | Output text file (Full path with file name) |
| rng | Range | Excel range to read |
| cellVal | Variant | Variable to assign each cell value |
| row | Integer | Iterate rows |
| col | Integer | Iterate columns |
'Variable declarations
Dim myFileName As String, rng As Range, cellVal As Variant, row As Integer, col As Integer
- Initialize variables:
- myFileName: The file name with the full path of the output text file
- rng: Excel range to read data from an excel.
'Full path of the text file
myFileName = "D:ExcelWriteTextsales.txt"
'Data range need to write on text file
Set rng = ActiveSheet.Range("A1:E26")
Open the output text file and assign a variable “#1”
'Open text file
Open myFileName For Output As #1
‘Nested loop to iterate both rows and columns of a given range eg: “A1:E26” [5 columns and 26 rows]
'Number of Rows
For row = 1 To rng.Rows.Count
   'Number of Columns
   For col = 1 To rng.Columns.Count
Assign the value to variable cellVal
cellVal = rng.Cells(row, col).Value
Write cellVal with comma. If the col is equal to the last column of a row. write-only value without the comma.
'write cellVal on text file
    If col = rng.Columns.Count Then
        Write #1, cellVal
    Else
        Write #1, cellVal,
    End If
Close both for loops
   Next col
Next row
Close the file
Close #1
Approach:
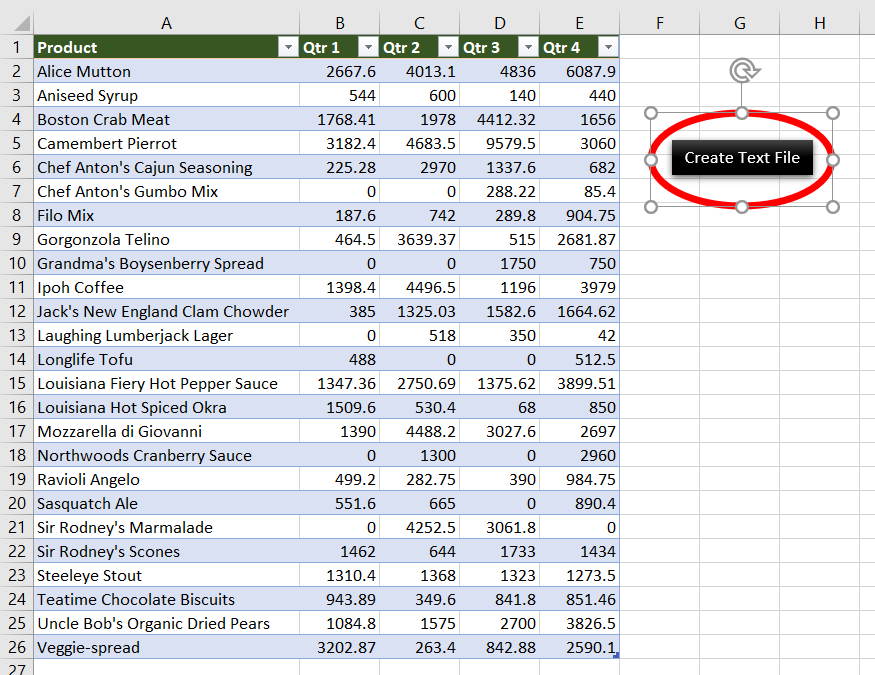
Step 1: Add a shape (Create Text File) to your worksheet
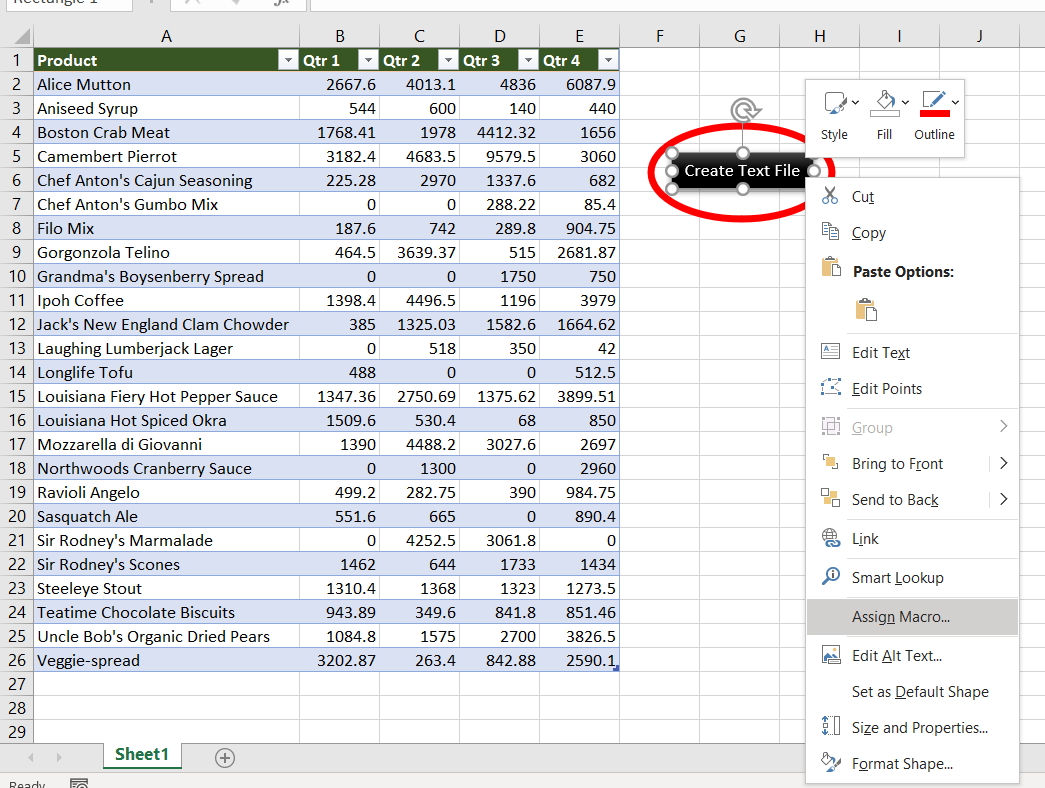
Step 2: Right-click on “Create a Text file” and “Assign Macro..”
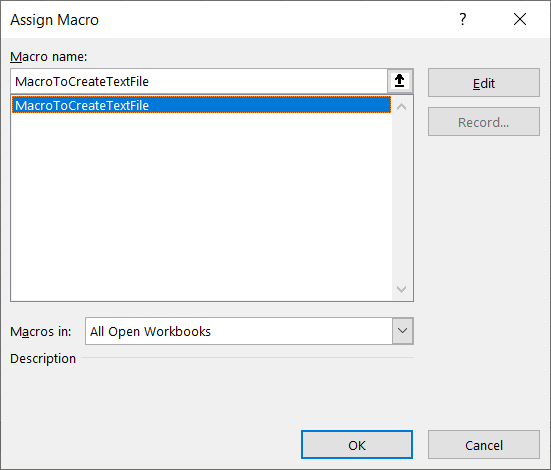
Step 3: Select MacroToCreateTextFile
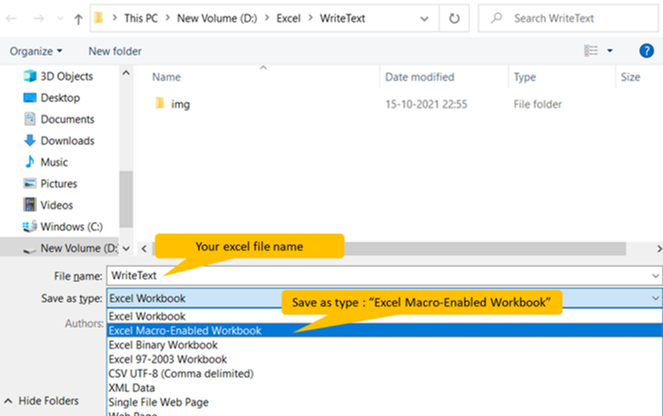
Step 4: Save your excel file as “Excel Macro-Enabled Workbook” *.xlsm
Step 5: Click “Create Text file”
In VBA, we can open or read or write a text file. To write a text file means the data we have in an Excel sheet, and we want it to be a text file or a notepad file. Therefore, there are two methods: the FileSystemObject property of VBA and the Open and Write method in VBA.
In most corporate companies, once finalizing the report, they look to upload the report to the database. They use the “Text Files” format to update the database to upload to the database. We usually copy the data from Excel and paste it into a text file. We rely on text files because they are very easy to work with because of their lightweight and simpler ways. By using VBA codingVBA code refers to a set of instructions written by the user in the Visual Basic Applications programming language on a Visual Basic Editor (VBE) to perform a specific task.read more, we can automate the task of copying data from an Excel file to a text file. This article will show you how to copy or write data from an Excel file to a text file using VBA code.
Table of contents
- Excel VBA Write Text File
- How to Write Data to Text Files using VBA?
- Syntax of Open Text File
- Example #1
- Step 1: Declare Variable
- Step 2: Determine File Number
- Step 3: Assign File Path
- Step 4: Assign Free File Function
- Step 5: Open Text File
- Step 6: Use the Print/Write Method
- Step 7: Save and Close Text File
- Example #2
- Recommended Articles
- How to Write Data to Text Files using VBA?
You are free to use this image on your website, templates, etc, Please provide us with an attribution linkArticle Link to be Hyperlinked
For eg:
Source: VBA Write Text File (wallstreetmojo.com)
How to Write Data to Text Files using VBA?
Writing data from Excel to text is complex and requires very good knowledge of VBA coding. Follow the below steps to write the VBA code to copy dataFile Copy is an inbuilt VBA function that is used to copy a file from one location to another. To use this function, we must specify the current file path as well as the destination file path. read more from Excel to a text file.
Before we show you how to write the code, let me explain how to open the text file using an open statement.
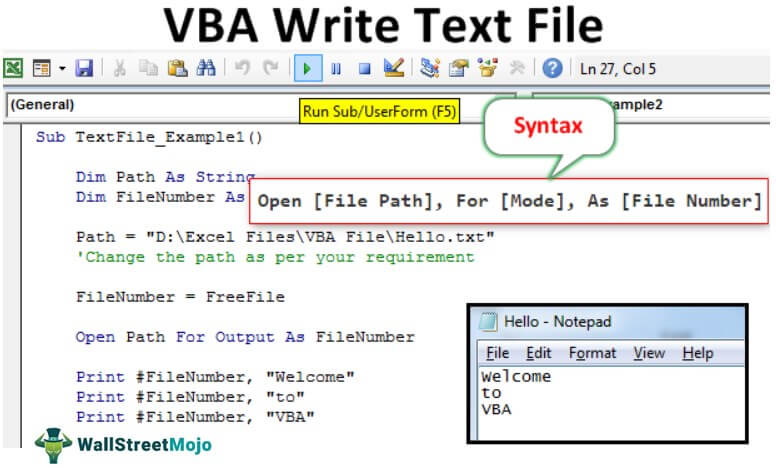
Syntax of Open Text File
Open [File Path], For [Mode], As [File Number]
File Path: The path of the file we are trying to open on the computer.
Mode: Mode is the control we can have over opening text files. We can have three types of control over the text file.
- Input Mode: This suggests “Read-only” control of the opening text file. If we use “Input Mode,” we cannot do anything with the file. Instead, we can just read the contents of the text file.
- Output Mode: We can write the content on this option. We need to remember that it will overwrite all the existing data. So, we must be wary of the possible loss of old data.
- Append Mode: This mode is completely the opposite of the Output Mode. Using this method, we can write the new data at the end of the existing data in the file.
File Number: This will count the text file number of all the opened text files. It will recognize the opened file numbers in integer values from 1 to 511. However, assigning the file number is tricky and leads to confusion. For this, we can use the free File function.
Free File returns the unique number for the opened files. This way, we can assign the unique file number without duplicate values.
You can download this VBA Write Text File Template here – VBA Write Text File Template
Example #1
Follow the below steps to write the code to create a new text file.
Assume you already have a text file named “Hello.txt” in your computer storage, and we will show you how to write the data in it.
Step 1: Declare Variable
Declare the variable to hold the file path as String.
Code:
Sub TextFile_Example1()

  Dim Path As String

End Sub
Step 2: Determine File Number
To determine which file number we refer to, declare one more variable as IntegerIn VBA, an integer is a data type that may be assigned to any variable and used to hold integer values. In VBA, the bracket for the maximum number of integer variables that can be kept is similar to that in other languages. Using the DIM statement, any variable can be defined as an integer variable.read more.
Code:
Sub TextFile_Example1()

  Dim Path As String
  Dim FileNumber As Integer

End Sub
Step 3: Assign File Path
Now, assign the file path with a name for the Path variable.
Code:
Sub TextFile_Example1()

  Dim Path As String
  Dim FileNumber As Integer

  Path = "D:Excel FilesVBA FileHello.txt"
     'Change the path as per your requirement

End Sub
Step 4: Assign Free File Function
Now, assign the function “Free File” to store unique file numbers for the File Number variable.
Code:
Sub TextFile_Example1()

  Dim Path As String
  Dim FileNumber As Integer

  Path = "D:Excel FilesVBA FileHello.txt"
    'Change the path as per your requirement

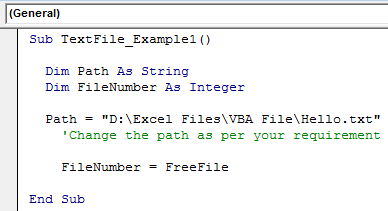
  FileNumber = FreeFile

End Sub
Step 5: Open Text File
Now, we need to open the text file to work with it. As we have explained, we need to use the OPEN statement to open the text file.
Step 6: Use the Print/Write Method
Once the file opens, we need to write something in it. We need either the “Write” or “Print” method to write in the text file.
Code:
Sub TextFile_Example1()

    Dim Path As String
    Dim FileNumber As Integer

    Path = "D:Excel FilesVBA FileHello.txt"
       'Change the path as per your requirement

    FileNumber = FreeFile

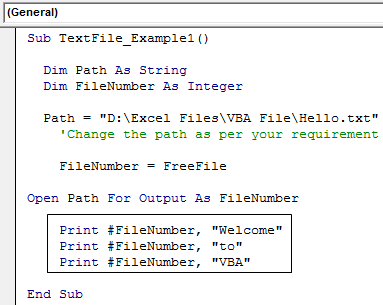
Open Path For Output As FileNumber

    Print #FileNumber, "Welcome"
    Print #FileNumber, "to"
    Print #FileNumber, "VBA"

End Sub
First, we need to mention the file number (here, we have assigned the file through the “FileNumber” variable), then we need to add the content we want to add to a text file.
Step 7: Save and Close Text File
Once we write the content in a text file, we need to save and close the text file.
Code:
Sub TextFile_Example1()

  Dim Path As String
  Dim FileNumber As Integer

  Path = "D:Excel FilesVBA FileHello.txt"
     'Change the path as per your requirement

   FileNumber = FreeFile

Open Path For Output As FileNumber

   Print #FileNumber, "Welcome"
   Print #FileNumber, "to"
   Print #FileNumber, "VBA"

   Close FileNumber

End Sub
Now, run the code manually or through the shortcut excel keyAn Excel shortcut is a technique of performing a manual task in a quicker way.read more F5. It will write the mentioned content in the mentioned text file.
Example #2
Now, we will see how to write the data of the Excel sheet into a text file.
For this example, we have created simple data in Excel like below.
Step 1: With the continuation of the old example, define two more variables as Integer to find the last row and last column.
Code:
Sub TextFile_Example2()

   Dim Path As String
   Dim FileNumber As Integer
   Dim LR As Integer
   Dim LC As Integer

End Sub
Step 2: Find the last used row and column in the worksheet.
Step 3: Now, assign the file path and file number.
Step 4: Use the OPEN statement to open the text file.
Step 5: We need to loop through rows and columns, so declare two more variables as Integer.
Step 6: Now, open the loop to loop through the row (For next loop in VBAAll programming languages make use of the VBA For Next loop. After the FOR statement, there is a criterion in this loop, and the code loops until the criteria are reached. read more)
Step 7: To loop through columns, open one more loop inside the existing loop.
Step 8: We need to write the same data line until it reaches the last column. So for this, apply the IF statement in VBA.
Step 9: Now, save and close the text file.
This code will write the details to a text file, but to open the text file after writing, we need to use the below code.
Code:
Sub TextFile_Example2()

    Dim Path As String
    Dim FileNumber As Integer
    Dim LR As Integer
    Dim LC As Integer

    Dim k As Integer
    Dim i As Integer

   LR = Worksheets("Text").Cells(Rows.Count, 1).End(xlUp).Row
   LC = Worksheets("Text").Cells(1, Columns.Count).End(xlToLeft).Column

   Path = "D:Excel FilesVBA FileHello.txt"
   FileNumber = FreeFile

   Open Path For Output As FileNumber

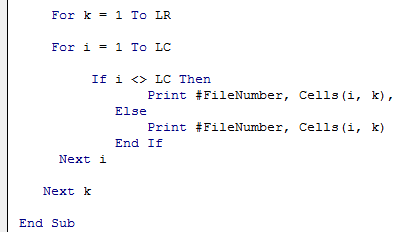
   For k = 1 To LR

       For i = 1 To LC
           If i <> LC Then
               Print #FileNumber, Cells(i, k),
           Else
              Print #FileNumber, Cells(i, k)
           End If
      Next i

   Next k

   Close FileNumber

   Shell "notepad.exe " & Path, vbNormalFocus

End Sub
So, run the code using the F5 key or manually. Then, it will copy the data below.
Recommended Articles
This article is a guide to VBA Write Text File. Here, we learn how to copy/write data from a worksheet to a text file with practical examples and a downloadable template. Below you can find some useful Excel VBA articles: –
- VBA Wait
- VBA FileDialog
- InStr VBA Function
Задача: скопировать заданную область из таблицы Excel в текстовый файл. Данные из столбцов должны разделяться знаками табуляции, данные из строк — находиться в отдельных строках.
Есть несколько способов решения данной задачи. Ниже приведён VBA код трёх вариантов.
Open ActiveWorkbook.Path & “текстовый файл.txt” For Output As #1
bText = “Заголовок1" & vbTab & "Заголовок2" & vbTab & "Заголовок3”
 Print #1, bText
 For Each c In ActiveSheet.UsedRange
  Print #1, c.Address(0, 0), c.Value
 Next
Close #1
Для копирования в текстовый файл в формат Unicode:
Dim buffer As String
Open "C:Unicode.txt" For Binary As #1
 buffer = StrConv(strText2Write, vbUnicode) + _
  StrConv(vbCrLf, vbUnicode)
 Put #1, , buffer
Close #1
Ещё более простой способ сохранения в текстовый файл в юникоде:
path = "C:"
ActiveWorkbook.SaveAs Filename:=path & "Имя_файла.txt", _
 FileFormat:=xlUnicodeText
ActiveWorkbook.Close True
Ещё варианты:
- How to write out Unicode text files in VBA
- Save/Export Worksheet as unicode txt file


