So far in this series about using VBA to control other Office applications, we have looked at the basics of controlling other office applications and specifically how to create macros to control Word from within Excel. Our approach for creating macros to control Word was using the Macro Recorder. We record very short actions, copy and paste the code into the Excel VBA Editor, then adapt the code to include the references to the Word Application. Slowly, action by action we build up our Macro using recorded code. It would be logical to think we could use the principles we learned for Word and apply them to PowerPoint.
But, there is one big problem to using this approach with PowerPoint: PowerPoint does not have a Macro Recorder. We can use VBA code in PowerPoint, but there is no Macro Recorder to create it. As a result, we cannot record PowerPoint VBA code to copy into our Excel Macro.
But the lack of PowerPoint’s Macro Recorder is not going to stop us. If we want to control PowerPoint from within Excel we just need to find a different approach. Here are the three methods we will consider to obtain valid PowerPoint VBA code.
- The beauty of the Object Model (how to use Excel code to control PowerPoint)
- Taking code from the internet
- Using the Object Browser and IntelliSense to help write the code
However, before we get there we need to enable the Developer Ribbon in PowerPoint. This is so we can check the code works before moving it into Excel.
Enable the PowerPoint Developer Ribbon
If you have enabled the Excel Developer menu it is the same process in PowerPoint.
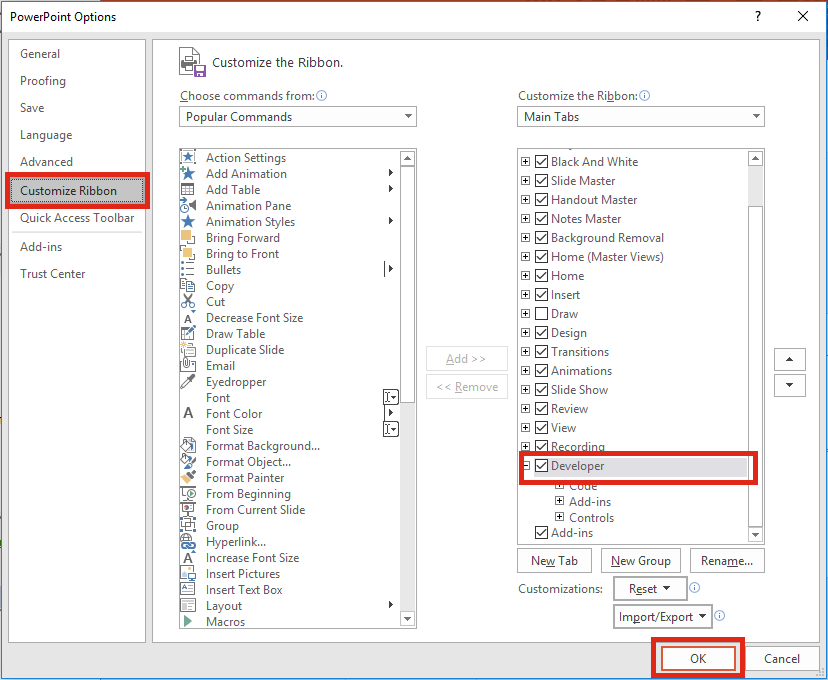
In PowerPoint: File -> Options -> Customize Ribbon
Then tick the Developer Ribbon option then click OK.
The beauty of the Object Model
The object model is the underlying structure of all the objects within Excel. Within VBA, a cell is an object, a chart is an object, a drawn shape is an object. Each of these objects has methods (the actions we can do to the objects – e.g. adding or deleting) and properties (the attributes of the objects – e.g. it’s height or width). The Object Model to control objects in Excel is similar to the Object Model in PowerPoint.
Here is some recorded Excel VBA code to create a shape and color it red.
ActiveSheet.Shapes.AddShape(msoShapeRectangle, 50, 50, 50, 50).Select
With Selection.ShapeRange.Fill
    .Visible = msoTrue
    .ForeColor.RGB = RGB(255, 0, 0)
    .Transparency = 0
    .Solid
End With
Here is some Powerpoint VBA code to create a shape and color it red (using the Excel VBA Code as start point).
Dim myShape As Shape
Set myShape = ActiveWindow.View.Slide.Shapes.AddShape(msoShapeRectangle, 50, 50, 50, 50)

With myShape.Fill
    .Visible = msoTrue
    .ForeColor.RGB = RGB(255, 0, 0)
    .Transparency = 0
    .Solid
End With
In the code below I have highlighted in red the PowerPoint code which is exactly the same as the Excel VBA code.
Dim myShape As Shape
Set myShape = ActiveWindow.View.Slide.Shapes.AddShape(msoShapeRectangle, 50, 50, 50, 50)

With myShape.Fill
    .Visible = msoTrue
    .ForeColor.RGB = RGB(255, 0, 0)
    .Transparency = 0
    .Solid
End With
Did you notice that most of the code was the same? The key differences were how we referred to the application, and the presentation. In Excel we might use “ActiveSheet” to refer to the current worksheet, but in PowerPoint we might use “ActiveWindow.View.Slide“. Once we know this we can adapt code we have recorded in Excel. We can change the references to the PowerPoint Object Model and the code will work.
Before you get too excited . . . this isn’t guaranteed to work with all objects. Just because something works in Excel it does not mean it will work perfectly in PowerPoint. But it is a method to try.
Using Early Binding, our code could be adapted as follows – changes from the code directly above colored in red.
Dim pptApp As PowerPoint.Application
Set pptApp = New PowerPoint.Application

Dim myShape As Object
Set myShape = pptApp.ActiveWindow.View.Slide.Shapes. _
AddShape(msoShapeRectangle, 50, 50, 50, 50)

With myShape.Fill
    .Visible = msoTrue
    .ForeColor.RGB = RGB(255, 0, 0)
    .Transparency = 0
    .Solid
End With
With just a few carefully thought out changes to the Excel code we can now control PowerPoint from within Excel. The changes from the PowerPoint code are:
- Reference to the PowerPoint application now included
- All Object variables (such as shapes) must be created as Object in the Dim statement
Taking code from the internet
You have the option to take code straight from the internet – certainly not a bad idea. The individuals who run websites which share code want you to learn by using that code, so make the most of it.
If you really want to understand what the code means that I recommend you follow the 1 golden rule:
If you want to copy code that you do not understand you must type it out yourself – do not just copy and paste.
There is not as much PowerPoint VBA code out there on the internet as Excel VBA code, but it is there. Once you understand the Object Model it is reasonably straightforward.
PowerPoint VBA reference sources:
- Excel Off the Grid – PowerPoint VBA Library
- The Spreadsheet Guru
- Microsoft Developer Network
- Office Tips
- PPTAlchemy
Using the Object Browser and IntelliSense to help write the code
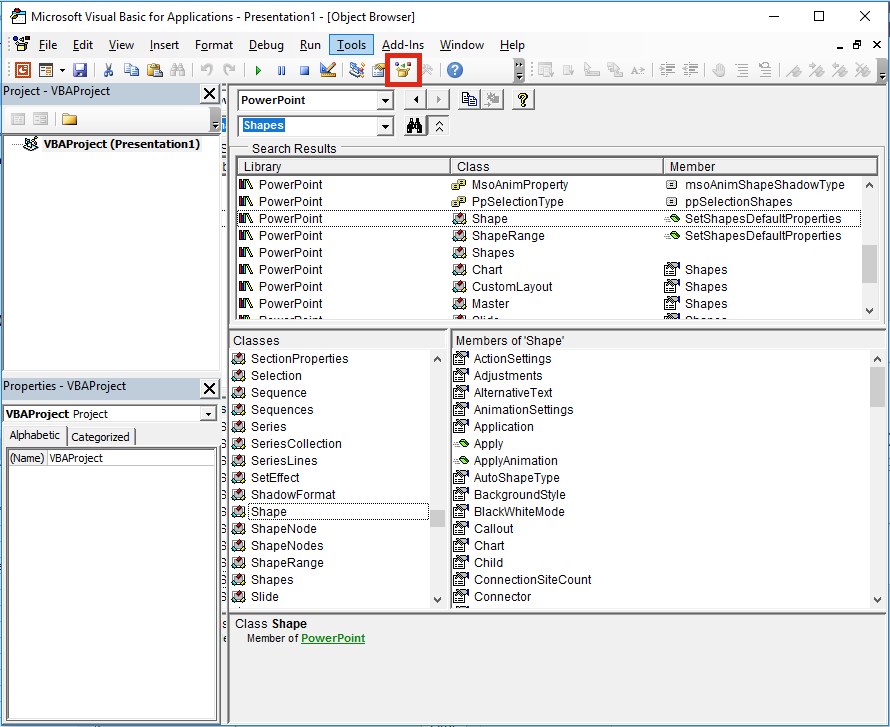
The Object Browser is the library of objects in VBA. To view the Object Browser click View -> Object Browser (or shortcut F2) from within the Visual Basic Editor. The screenshot below shows the Object Browser window.
From within the Object Browser it is possible to search for the name of any object. The Search Results window shows all the places in the object model where that object exists. The Members window shows all the objects, methods and properties available for the object.
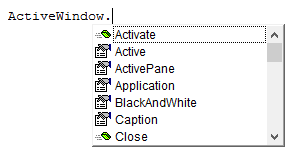
IntelliSense is the feature which shows the small boxes as you type VBA code (see image below).
If we have a piece of code, and we are not sure what could come next then just scroll through the IntelliSense options (these are the same options as shown within the Object Browser). If it’s not in the IntelliSense list then it’s not viable code.
Conclusion
So, there we have it. 3 ways to write valid PowerPoint VBA code. None of this is straightforward, so when you stumble across an issue, Google is definitely your best friend. Chances are that somebody else has had the same problem before you.
About the author
Hey, I’m Mark, and I run Excel Off The Grid.
My parents tell me that at the age of 7 I declared I was going to become a qualified accountant. I was either psychic or had no imagination, as that is exactly what happened. However, it wasn’t until I was 35 that my journey really began.
In 2015, I started a new job, for which I was regularly working after 10pm. As a result, I rarely saw my children during the week. So, I started searching for the secrets to automating Excel. I discovered that by building a small number of simple tools, I could combine them together in different ways to automate nearly all my regular tasks. This meant I could work less hours (and I got pay raises!). Today, I teach these techniques to other professionals in our training program so they too can spend less time at work (and more time with their children and doing the things they love).
Do you need help adapting this post to your needs?
I’m guessing the examples in this post don’t exactly match your situation. We all use Excel differently, so it’s impossible to write a post that will meet everybody’s needs. By taking the time to understand the techniques and principles in this post (and elsewhere on this site), you should be able to adapt it to your needs.
But, if you’re still struggling you should:
- Read other blogs, or watch YouTube videos on the same topic. You will benefit much more by discovering your own solutions.
- Ask the ‘Excel Ninja’ in your office. It’s amazing what things other people know.
- Ask a question in a forum like Mr Excel, or the Microsoft Answers Community. Remember, the people on these forums are generally giving their time for free. So take care to craft your question, make sure it’s clear and concise. List all the things you’ve tried, and provide screenshots, code segments and example workbooks.
- Use Excel Rescue, who are my consultancy partner. They help by providing solutions to smaller Excel problems.
What next?
Don’t go yet, there is plenty more to learn on Excel Off The Grid. Check out the latest posts:
Данный материал основан и доработан по материалам оригинальной статьи «EasyTweaks — How to create and add slides to PowerPoint presentations with VBA».
Существует ли способ автоматизировать создание презентаций PowerPoint с нуля с последующим быстрым добавлением слайдов к существующей презентации? Мы подумали, что данную задачу для PowerPoint вполне под силу решить с помощью макросов. Однако, как известно, PowerPoint не включает средство записи макросов Macro Recorder (в отличие от Excel и Word, которые имеют встроенные средства записи макросов). Поэтому у нас остаётся лишь старый добрый Visual Basic for Application (VBA), который мы можем использовать для создания простых макросов для автоматизации PowerPoint. Разумеется, существуют и альтернативные варианты автоматизации PowerPoint, но они выходят за рамки данной статьи.
В этом кратком руководстве мы рассмотрим три различных варианта использования:
- Создание новой презентации (пустой или по шаблону);
- Добавление слайдов к существующей презентации;
- Сочетание двух предыдущих вариантов.
Итак, приступим.
Создайте презентацию PowerPoint и сохраните ее с возможностью выполнения макросов (файл с расширением *.pptm).
Посмотрите на Ленту (Ribbon). Если в Ленте нет вкладки «Разработчик» (Developer), то перед началом написания кода необходимо включить эту вкладку (меню ленты File — Options).
Далее во вкладке Trust Center, включите возможность выполнения макросов в PowerPoint.
После того, как вы сделаете вкладку «Разработчик» (Developer) видимой для вашей ленты, перейдите на эту вкладку и нажмите кнопку Visual Basic (или просто нажмите Alt + F11), чтобы открыть Visual Basic IDE.
Макрос VBA для создания презентации и добавления слайдов
В редакторе Visual Basic щелкните правой кнопкой мыши VBAProject и выберете пункт вставки модуля (Insert > Module).
Вставьте следующий код во вновь созданный модуль:
Sub CreatePres_AddSlides()
Dim NewPres as Presentation
Dim NewSlide as Slide
Set NewPres = Presentations.Add
NewPres.SaveAs("MyPresentation.pptx")
' Title Slide
Set NewSlide = ActivePresentation.Slides.Add(Index:=1, Layout:=ppLayoutTitle)
'This statement adds a blank slide in the second place
Set NewSlide = ActivePresentation.Slides.Add(Index:=2, Layout:=ppLayoutBlank)
'Save the new PowerPoint file
NewPres.SaveAs("MyPresentation.pptx")
End Sub
Нажмите в меню File, а затем Save… При сохранении следует выбрать формат с поддержкой макросов (*.pptm):
Чтобы запустить код, нажмите Run, а затем выберите Run Sub/UserForm (или просто F5).
В итоге мы увидим созданный и открытый файл презентации.
Теперь редактор Visual Basic можно закрыть.
Как создавать и вставлять Фигуры (Shapes) в PowerPoint с помощью VBA
Захотелось автоматизировать довольно обыденную задачу по созданию слайдов PowerPoint. При автоматизации PowerPoint вы обычно работаете с коллекцией слайдов и фигур. Слайды говорят сами за себя, а фигуры — это почти все остальное, включая текстовые поля, кнопки действий, медиа-объекты, метки, изображения, выноски, блок-схемы и т.д.. Хотя мы будем демонстрировать приемы работы с PowerPoint, часть синтаксиса на самом деле вполне применима к Microsoft Word и Excel.
Приступим к работе с фигурами. Во-первых, давайте продолжим и откроем редактор VBA, нажав Alt + F11. Если вы следовали предыдущему руководству, у вас должен быть Module1 в вашем списке модулей.
Добавление текстового поля через VBA
Начнем с добавления вертикального текстового поля к нашему первому слайду презентации. Добавьте следующий код в Module1, затем нажмите кнопку Сохранить (Ctrl + S) и запустите макрос (пункт меню Run Sub/User Form или просто нажмите F5).
Sub CreateTextBox()
Set MySlide = ActivePresentation.Slides(2)
    With MySlide.Shapes
        .AddTextbox(Orientation:=msoTextOrientationVertical, _
Left:=90, Top:=200, Width:=80, Height:=200).TextFrame.TextRange.Text = ("Это моё вертикальное тестовое поле")
End With
End Sub
Обратите внимание, что вы можете довольно легко изменить размер текстового поля с помощью VBA. В этом случае мы изменим размер первой фигуры на втором слайде, свободно меняйте код при необходимости.
Sub ResizeText()
Set MyShape = ActivePresentation.Slides(2).Shapes(1)
'Add your required dimensions as needed below
With MyShape
.Width = 200
.Height = 35
End With
End Sub
Текстовые эффекты PowerPoint с VBA
Давайте теперь предположим, что мы хотим добавить текстовое поле ко всем слайдам в презентации, на этот раз немного более визуально привлекательное. Для этого мы будем использовать VBA для создания пользовательских текстовых эффектов, которые мы можем встроить в один или несколько слайдов презентации. Сначала мы пройдемся по слайдам презентации, а затем добавим текстовый эффект по мере необходимости.
Sub SetEffects()
Dim i As Integer
For i = 1 To ActivePresentation.Slides.Count
ActivePresentation.Slides(i) _
.Shapes.AddTextEffect msoTextEffect12, "Проба пера", _
"Segoe UI", 32, msoTrue, msoTrue, 650, 50
Next
End Sub
Посмотрим, что получилось:
Обратите внимание, что вы можете использовать простой водяной знак для достижения этого конкретного результата.
Выноски PowerPoint с VBA
В нашем следующем примере мы добавим выноску ко второму слайду презентации.
Sub CreateCallout()
ActivePresentation.Slides(2).Shapes.AddCallout(Type:=msoCalloutTwo, Left:=200, Top:=50, _
Width:=300, Height:=100).TextFrame.TextRange.Text = "Моя выноска"
End Sub
Создание презентации PowerPoint из книги Excel
Рассмотрим ещё один случай, когда вы хотите создать презентацию PowerPoint прямо из электронной таблицы Excel. Вы можете использовать аналогичный метод в Word и других приложениях Microsoft Office.
Данный пример демонстрирует возможность вызова другого приложения MS Office из первоначально запущенного приложения (прим. пер.).
Сперва создайте новую книгу Excel и сохраните ее как книгу с макросами (файл с расширением *.xlsm).
Войдите в редактор Visual Basic Editor (меню ленты Developer > Visual Basic, либо сочетанием клавиш Alt+F11)
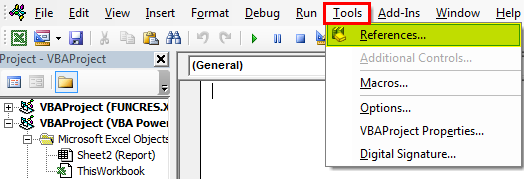
В редакторе VBE свяжите электронную таблицу с моделью данных PowerPoint, выбрав в меню (Tools > References), Microsoft PowerPoint Object Library.
Вставьте новый модуль VBA для внесения кода процедуры Visual Basic.
Вставьте приведенный ниже код VBA непосредственно в модуль VBA и нажмите иконку Save.
(При необходимости, вы можете внести свои изменения в сценарий.)
Sub CreatePresentationFromExcel()
'
Dim MyPPt As PowerPoint.Application
Dim NewPres As PowerPoint.Presentation
Dim NewSlide As Slide
Set MyPPt = CreateObject("PowerPoint.Application")
'
Set NewPres = MyPPt.Presentations.Add
Set NewSlide = MyPPt.ActivePresentation.Slides.Add(Index:=1, Layout:=ppLayoutTitle)
'
End Sub
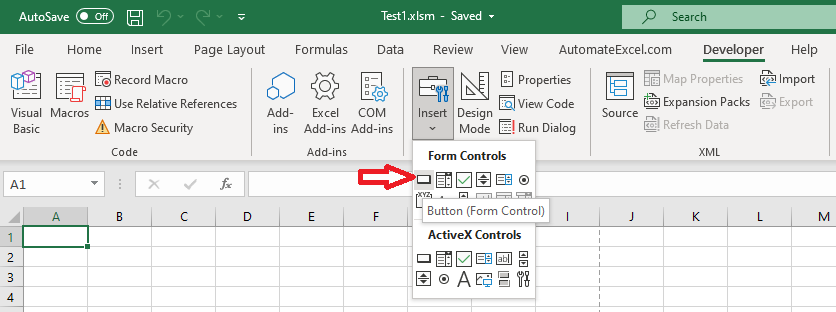
Вставьте кнопку прямо в электронную таблицу Excel (меню Developer > Insert, а затем выберите Button (Form Control)).
Привяжите в диалоговом окне процедуру VBA, созданную вами ранее, к вставляемой кнопке.
Нажмите кнопку и проверьте результат.
Excel VBA PowerPoint
Using VBA, we can automate the work we do for PowerPoint. But first, to use VBA code or snippets to work in PowerPoint, first work through the security options in PowerPoint to enable all Macros. Then, we can use PowerPoint VBA reference for Macros in MS PowerPoint.
The beauty of VBA is that we can reference other Microsoft products like “Microsoft Word” and “Microsoft PowerPoint.” We usually create reports in Excel and then create PowerPoint presentations. All Excel users usually spend a considerable amount of time preparing the presentation from Excel data and reports. If you spend considerable time preparing PowerPoint presentations, this tutorial will show you how to create a PowerPoint presentation from Excel using VBA CodingVBA code refers to a set of instructions written by the user in the Visual Basic Applications programming language on a Visual Basic Editor (VBE) to perform a specific task.read more.
Table of contents
- Excel VBA PowerPoint
- Enable Powerpoint Object Model
- VBA Tutorial to Create PowerPoint Presentation
- Recommended Articles
You are free to use this image on your website, templates, etc, Please provide us with an attribution linkArticle Link to be Hyperlinked
For eg:
Source: VBA PowerPoint (wallstreetmojo.com)
Enable Powerpoint Object Model
Let us follow the below steps..
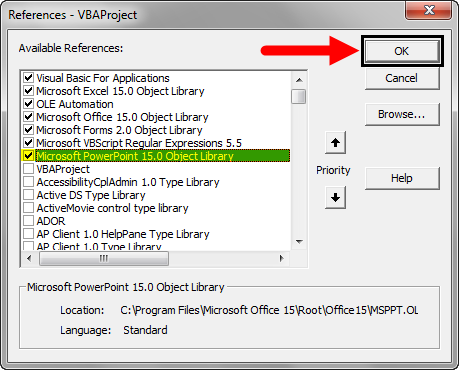
- Open “VBA Editor.” Then, go to “Tools” and “References.”
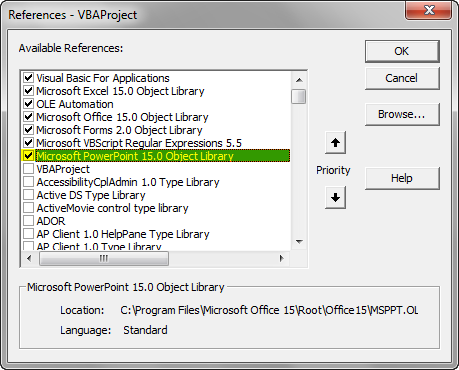
- Now, you will see all the references to the “VBA Project.” Scroll down and select “Microsoft PowerPoint 15.0 Object Library”.
- Click on “OK.” Now, we can access PowerPoint from Excel.
VBA Tutorial to Create PowerPoint Presentation
We can create PPT in “Early Binding” and “Late Binding.” Finally, we will show you how to create a PowerPoint presentationThe full form of PPT is PowerPoint Presentation. They are generally used in corporate meetings for educational purposes such as training, induction, etc. and are even used by students for creating their high school/ college projects and assignments. Such presentations are prepared by sourcing and combining individual slides together into one with the help of MS PowerPoint Software.read more using the “Early Binding” technique.
You can download this VBA PowerPoint Excel Template here – VBA PowerPoint Excel Template
Usually, from Excel, we prepare presentations based on charts and interpretation of the charts. So, for this purpose, we have created some simple excel chartsIn Excel, a graph or chart lets us visualize information we’ve gathered from our data. It allows us to visualize data in easy-to-understand pictorial ways. The following components are required to create charts or graphs in Excel: 1 — Numerical Data, 2 — Data Headings, and 3 — Data in Proper Order.read more and interpretations in the same worksheet.
Step 1: Start the subroutine in VBASUB in VBA is a procedure which contains all the code which automatically gives the statement of end sub and the middle portion is used for coding. Sub statement can be both public and private and the name of the subprocedure is mandatory in VBA.read more. We have already enabled the PowerPoint object model in the earlier steps to access PowerPoint. To access this, we need to declare the variable as PowerPoint.Application.
Code:
Sub PPT_Example()

    Dim PPApp As PowerPoint.Application
End Sub
Step 2: To add the presentation to PowerPoint, we need to declare a variable as PowerPoint.Presentation.
Code:
Dim PPPresentation As PowerPoint.Presentation
Step 3: After adding the presentation to the PowerPoint, we need to add a Slide to declare the variable as PowerPoint.Slide.
Code:
Dim PPSlide As PowerPoint.Slide
Step 4: Once we add the slide to the PowerPoint, we need to use shapes in the PowerPoint, i.e., text boxes, to declare a variable as PowerPoint.Shape.
Code:
Dim PPShape As PowerPoint.Shape
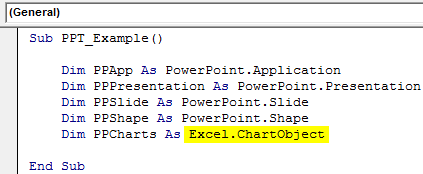
Step 5: Now, we need to declare the variable as Excel to access all the charts in the worksheet.ChartObjects.
Code:
Dim PPCharts As Excel.ChartObject
These variables are enough to start the proceedings.
Step 6: Now, we need to launch the PowerPoint from Excel. Since it is an external object, we need to set this as a new PowerPoint.
Code:
Set PPApp = New PowerPoint.Application
It will launch the new PowerPoint from Excel.
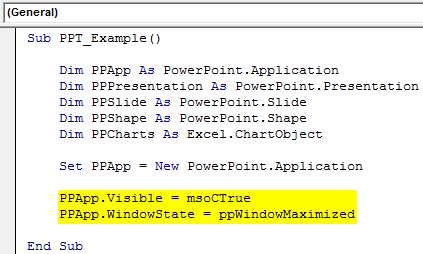
Step 7: The variable PPApp is equal to the PowerPoint we launched. Now, make this PowerPoint visible and maximize the window.
Code:
PPApp.Visible = msoCTrue
PPApp.WindowState = ppWindowMaximized
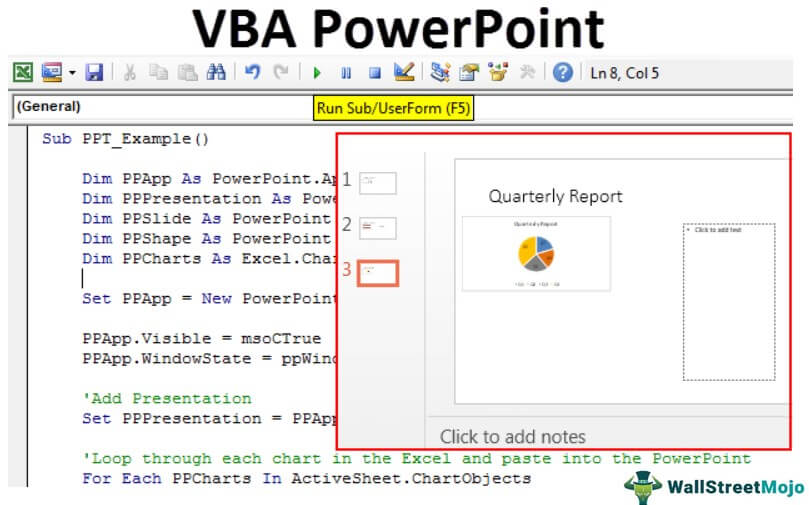
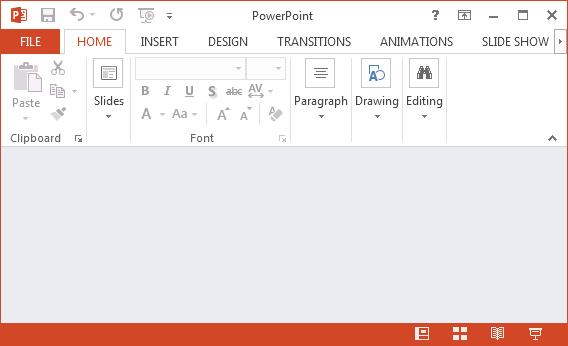
Now, just run the code using the F5 key or manually. You should see the PowerPoint app launched like the one below.
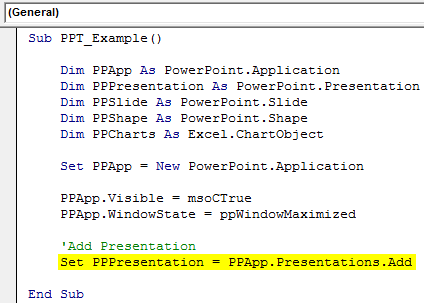
Step 8: We need to add a presentation to the PowerPoint app we have launched.
Code:
Set PPPresentation = PPApp.Presentations.Add
Now, we should see the PowerPoint presentation like this.
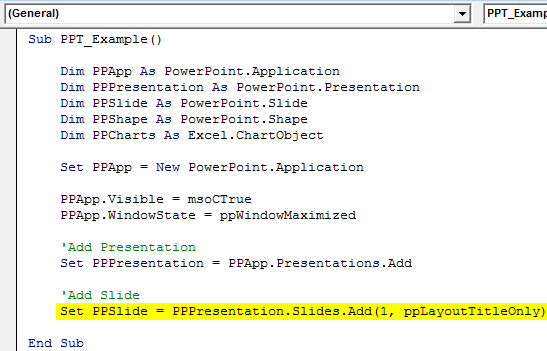
Step 9: We need to add a slide after adding the presentation
Code:
Set PPSlide = PPPresentation.Slides.Add(1, ppLayoutTitleOnly)
Now, this will add the title slide like the below.
Step 10: Now that we have more than one chart in the worksheet, we need to loop through each chart and paste it into the presentation. Below is the code to copy and paste the chart and interpretation.
Below is the complete code for you.
Sub PPT_Example()

    Dim PPApp As PowerPoint.Application
    Dim PPPresentation As PowerPoint.Presentation
    Dim PPSlide  As PowerPoint.Slide
    Dim PPShape As PowerPoint.Shape
    Dim PPCharts As Excel.ChartObject

    Set PPApp = New PowerPoint.Application

    PPApp.Visible = msoCTrue
    PPApp.WindowState = ppWindowMaximized

    'Add Presentation
     Set PPPresentation = PPApp.Presentations.Add

     'Loop through each chart in the Excel and paste into the PowerPoint
     For Each PPCharts In ActiveSheet.ChartObjects
       PPApp.ActivePresentation.Slides.Add PPApp.ActivePresentation.Slides.Count + 1, ppLayoutText
       PPApp.ActiveWindow.View.GotoSlide PPApp.ActivePresentation.Slides.Count
       Set PPSlide = PPApp.ActivePresentation.Slides(PPApp.ActivePresentation.Slides.Count)

    'Copy the chart and paste in Powerpoint
     PPCharts.Select
     ActiveChart.ChartArea.Copy
     PPSlide.Shapes.PasteSpecial(DataType:=ppPasteMetafilePicture).Select

    'Add heading to the slide
     PPSlide.Shapes(1).TextFrame.TextRange.Text = PPCharts.Chart.ChartTitle.Text

    'Allignment of the chart
     PPApp.ActiveWindow.Selection.ShapeRange.Left = 15
     PPApp.ActiveWindow.Selection.ShapeRange.Top = 125

     PPSlide.Shapes(2).Width = 200
     PPSlide.Shapes(2).Left = 505

     'Add interpretation
        If InStr(PPSlide.Shapes(1).TextFrame.TextRange.Text, "Region") Then
           PPSlide.Shapes(2).TextFrame.TextRange.Text = Range("K2").Value & vbNewLine
           PPSlide.Shapes(2).TextFrame.TextRange.InsertAfter (Range("K3").Value & vbNewLine)
     'Else if the chart is the "Renewable" consumption chart, then enter the appropriate comments
         ElseIf InStr(PPSlide.Shapes(1).TextFrame.TextRange.Text, "Month") Then
           PPSlide.Shapes(2).TextFrame.TextRange.Text = Range("K20").Value & vbNewLine
           PPSlide.Shapes(2).TextFrame.TextRange.InsertAfter (Range("K21").Value & vbNewLine)
           PPSlide.Shapes(2).TextFrame.TextRange.InsertAfter (Range("K22").Value & vbNewLine)
      End If

   'Now let's change the font size of the callouts box
      PPSlide.Shapes(2).TextFrame.TextRange.Font.Size = 16

Next PPCharts

End Sub
Recommended Articles
This article is a guide to VBA PowerPoint Tutorial. Here, we learn how to create a PowerPoint presentation using the “Early Binding” technique in VBA code, examples, and a downloadable template. Below are some useful Excel articles related to VBA: –
- VBA ByRef Function
- Excel VBA Charts
- VBA Val Function
- Create VBA Pivot Table
Содержание
- VBA PowerPoint
- Excel VBA PowerPoint
- Enable Powerpoint Object Model
- VBA Tutorial to Create PowerPoint Presentation
- Recommended Articles
- Как управлять презентациями Microsoft PowerPoint с помощью VBA
- Макрос VBA для создания презентации и добавления слайдов
- Как создавать и вставлять Фигуры (Shapes) в PowerPoint с помощью VBA
- Создание презентации PowerPoint из книги Excel
- Working with PowerPoint in Excel VBA
VBA PowerPoint
Excel VBA PowerPoint
Using VBA, we can automate the work we do for PowerPoint. But first, to use VBA code or snippets to work in PowerPoint, first work through the security options in PowerPoint to enable all Macros. Then, we can use PowerPoint VBA reference for Macros in MS PowerPoint.
The beauty of VBA is that we can reference other Microsoft products like “Microsoft Word” and “Microsoft PowerPoint.” We usually create reports in Excel and then create PowerPoint presentations. All Excel users usually spend a considerable amount of time preparing the presentation from Excel data and reports. If you spend considerable time preparing PowerPoint presentations, this tutorial will show you how to create a PowerPoint presentation from Excel using VBA Coding Using VBA Coding VBA code refers to a set of instructions written by the user in the Visual Basic Applications programming language on a Visual Basic Editor (VBE) to perform a specific task. read more .
Table of contents
You are free to use this image on your website, templates, etc., Please provide us with an attribution link How to Provide Attribution? Article Link to be Hyperlinked
For eg:
Source: VBA PowerPoint (wallstreetmojo.com)
Enable Powerpoint Object Model
Let us follow the below steps..
- Open “VBA Editor.” Then, go to “Tools” and “References.”
Now, you will see all the references to the “VBA Project.” Scroll down and select “Microsoft PowerPoint 15.0 Object Library”.
Click on “OK.” Now, we can access PowerPoint from Excel.
VBA Tutorial to Create PowerPoint Presentation


Code:
Step 2: To add the presentation to PowerPoint, we need to declare a variable as PowerPoint.Presentation.
Code:
Step 3: After adding the presentation to the PowerPoint, we need to add a Slide to declare the variable as PowerPoint.Slide.
Code:
Step 4: Once we add the slide to the PowerPoint, we need to use shapes in the PowerPoint, i.e., text boxes, to declare a variable as PowerPoint.Shape.
Code:
Step 5: Now, we need to declare the variable as Excel to access all the charts in the worksheet.ChartObjects.
Code:
These variables are enough to start the proceedings.
Step 6: Now, we need to launch the PowerPoint from Excel. Since it is an external object, we need to set this as a new PowerPoint.
Code:
It will launch the new PowerPoint from Excel.
Step 7: The variable PPApp is equal to the PowerPoint we launched. Now, make this PowerPoint visible and maximize the window.
Code:
Now, just run the code using the F5 key or manually. You should see the PowerPoint app launched like the one below.
Step 8: We need to add a presentation to the PowerPoint app we have launched.
Code:
Now, we should see the PowerPoint presentation like this.
Step 9: We need to add a slide after adding the presentation
Code:
Now, this will add the title slide like the below.
Step 10: Now that we have more than one chart in the worksheet, we need to loop through each chart and paste it into the presentation. Below is the code to copy and paste the chart and interpretation.
Below is the complete code for you.
Recommended Articles
This article is a guide to VBA PowerPoint Tutorial. Here, we learn how to create a PowerPoint presentation using the “Early Binding” technique in VBA code, examples, and a downloadable template. Below are some useful Excel articles related to VBA: –
Источник
Как управлять презентациями Microsoft PowerPoint с помощью VBA

Существует ли способ автоматизировать создание презентаций PowerPoint с нуля с последующим быстрым добавлением слайдов к существующей презентации? Мы подумали, что данную задачу для PowerPoint вполне под силу решить с помощью макросов. Однако, как известно, PowerPoint не включает средство записи макросов Macro Recorder (в отличие от Excel и Word, которые имеют встроенные средства записи макросов). Поэтому у нас остаётся лишь старый добрый Visual Basic for Application (VBA), который мы можем использовать для создания простых макросов для автоматизации PowerPoint. Разумеется, существуют и альтернативные варианты автоматизации PowerPoint, но они выходят за рамки данной статьи.
В этом кратком руководстве мы рассмотрим три различных варианта использования:
- Создание новой презентации (пустой или по шаблону);
- Добавление слайдов к существующей презентации;
- Сочетание двух предыдущих вариантов.
Создайте презентацию PowerPoint и сохраните ее с возможностью выполнения макросов (файл с расширением *.pptm).
Посмотрите на Ленту (Ribbon). Если в Ленте нет вкладки «Разработчик» (Developer), то перед началом написания кода необходимо включить эту вкладку (меню ленты File — Options).
Далее во вкладке Trust Center, включите возможность выполнения макросов в PowerPoint.
После того, как вы сделаете вкладку «Разработчик» (Developer) видимой для вашей ленты, перейдите на эту вкладку и нажмите кнопку Visual Basic (или просто нажмите Alt + F11), чтобы открыть Visual Basic IDE.
Макрос VBA для создания презентации и добавления слайдов
В редакторе Visual Basic щелкните правой кнопкой мыши VBAProject и выберете пункт вставки модуля (Insert > Module).
Вставьте следующий код во вновь созданный модуль:
Нажмите в меню File, а затем Save… При сохранении следует выбрать формат с поддержкой макросов (*.pptm):
Чтобы запустить код, нажмите Run, а затем выберите Run Sub/UserForm (или просто F5).
В итоге мы увидим созданный и открытый файл презентации.
Теперь редактор Visual Basic можно закрыть.
Как создавать и вставлять Фигуры (Shapes) в PowerPoint с помощью VBA
Захотелось автоматизировать довольно обыденную задачу по созданию слайдов PowerPoint. При автоматизации PowerPoint вы обычно работаете с коллекцией слайдов и фигур. Слайды говорят сами за себя, а фигуры — это почти все остальное, включая текстовые поля, кнопки действий, медиа-объекты, метки, изображения, выноски, блок-схемы и т.д.. Хотя мы будем демонстрировать приемы работы с PowerPoint, часть синтаксиса на самом деле вполне применима к Microsoft Word и Excel.
Приступим к работе с фигурами. Во-первых, давайте продолжим и откроем редактор VBA, нажав Alt + F11. Если вы следовали предыдущему руководству, у вас должен быть Module1 в вашем списке модулей.
Добавление текстового поля через VBA
Начнем с добавления вертикального текстового поля к нашему первому слайду презентации. Добавьте следующий код в Module1 , затем нажмите кнопку Сохранить (Ctrl + S) и запустите макрос (пункт меню Run Sub/User Form или просто нажмите F5).
Обратите внимание, что вы можете довольно легко изменить размер текстового поля с помощью VBA. В этом случае мы изменим размер первой фигуры на втором слайде, свободно меняйте код при необходимости.
Текстовые эффекты PowerPoint с VBA
Давайте теперь предположим, что мы хотим добавить текстовое поле ко всем слайдам в презентации, на этот раз немного более визуально привлекательное. Для этого мы будем использовать VBA для создания пользовательских текстовых эффектов, которые мы можем встроить в один или несколько слайдов презентации. Сначала мы пройдемся по слайдам презентации, а затем добавим текстовый эффект по мере необходимости.
Посмотрим, что получилось:
Обратите внимание, что вы можете использовать простой водяной знак для достижения этого конкретного результата.
Выноски PowerPoint с VBA
В нашем следующем примере мы добавим выноску ко второму слайду презентации.
Создание презентации PowerPoint из книги Excel
Рассмотрим ещё один случай, когда вы хотите создать презентацию PowerPoint прямо из электронной таблицы Excel. Вы можете использовать аналогичный метод в Word и других приложениях Microsoft Office.
Данный пример демонстрирует возможность вызова другого приложения MS Office из первоначально запущенного приложения (прим. пер.).
Сперва создайте новую книгу Excel и сохраните ее как книгу с макросами (файл с расширением *.xlsm).
Войдите в редактор Visual Basic Editor (меню ленты Developer > Visual Basic, либо сочетанием клавиш Alt+F11)
В редакторе VBE свяжите электронную таблицу с моделью данных PowerPoint, выбрав в меню (Tools > References), Microsoft PowerPoint Object Library.
Вставьте новый модуль VBA для внесения кода процедуры Visual Basic.
Вставьте приведенный ниже код VBA непосредственно в модуль VBA и нажмите иконку Save.
(При необходимости, вы можете внести свои изменения в сценарий.)
Вставьте кнопку прямо в электронную таблицу Excel (меню Developer > Insert, а затем выберите Button (Form Control)).
Привяжите в диалоговом окне процедуру VBA, созданную вами ранее, к вставляемой кнопке.
Источник
Working with PowerPoint in Excel VBA
VBA is common to all the applications within the Office Suite. This means that data in an Excel spreadsheet can be automatically exported to PowerPoint as well.
The advantage of knowing how to use VBA to automate these tasks saves a lot of time. Instead of manually copying from Excel and pasting into PowerPoint, everything can be automated, using the appropriate procedures in VBA. Our book VBA Automation for Excel 2019 Cookbook addresses these topics.
We will cover the following recipes in this article:
• Creating a new instance of PowerPoint
• Creating presentations and slides
• Adding text to textboxes
• Copying Excel content into PowerPoint
By the end, you will be able to initiate a PowerPoint slideshow from within Excel.
Technical requirements
This cookbook was written and designed to be used with MS Office 2019 and MS Office 365, installed on either Windows 8, 8.1, or 10.
If your hardware and software meet these requirements, you are good to go.
The code for this book is stored at the following link: https://github.com/ PacktPublishing/VBA-Automation-for-Excel-2019-Cookbook.
Please visit the following link to check the CiA videos: https://bit.ly/3jQRvVk.
Creating a new instance of PowerPoint
The process of setting a reference to the object library with Word is similar to that of PowerPoint. Hence, the same must be done with PowerPoint, or else Excel cannot communicate with PowerPoint at all.
In this recipe, we will be creating a new instance of PowerPoint from within Excel.
Getting ready
Open Excel and activate a new workbook. Save the file as a macro-enabled file on your desktop and call it PPoint_Interaction.xlsm. Sheet1 should be active. Press Alt + F11 to switch to the VBA Editor, and then insert a new module.
It is a prerequisite that MS PowerPoint must also be installed on your computer in order for the instructions in this recipe to work effectively.
How to do it…
Here is how to link PowerPoint to Excel:
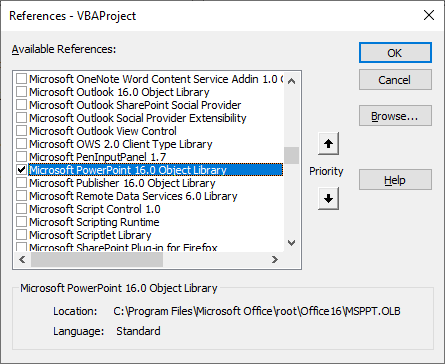
1. In the VBA Editor, click on Tools | References. The References — VBAProject dialog box will open:
2. Scroll down the list of available references until you find Microsoft PowerPoint 16.0 Object Library:
3. Once selected, click on OK to save the selection and also to close the dialog box.
4. With the object library in place, we can initiate PowerPoint from within Excel. There are several ways of doing this, but for this recipe, we will be using this specific technique:
Sub CreatePPointSlides()
Dim PowPntApp As PowerPOint.Application
Set PowPntApp = New PowerPoint.Application
PowPntApp.Visible = True
PowPntApp.Activate
End Sub
5. Test the Sub procedure by pressing F5. A new instance of PowerPoint will appear on your screen, with no presentation or slide active. Close the application once you know that the Sub procedure is working:
With the Microsoft PowerPoint object library enabled, it is possible to use PowerPoint keywords and methods within Excel.
Actions such as opening an instance of PowerPoint, which was previously not possible, can now be done.
Creating presentations and slides
Opening PowerPoint without opening a new presentation is not very useful. It stands to reason that a new presentation, with at least one slide, should be initiated together with the application.
Getting ready
With Excel still open, make sure that PPoint_Interaction.xlsm is available.
Module1 in the VBA Editor must be visible.
How to do it…
Here are the steps to follow:
1. Add the next lines of code to the Sub procedure to open a new presentation with a new slide:
Sub CreatePPointSlides()
Dim PowPntApp As PowerPoint.Application
Dim PowPntPrsnt As PowerPoint.Presentation
Dim PowPntSlide As PowerPoint.Slide
Set PowPntApp = New PowerPoint.Application
PowPntApp.Visible = True
PowPntApp.Activate
Set PowPntPrsnt = PowPntApp.Presentations.Add
Set PowPntSlide = _
PowPntPrsnt.Slides.Add(1, ppLayoutTitle)
End Sub
2. If you now run the procedure, PowerPoint will open again, this time displaying not only a new presentation, but also a new slide.
3. Close PowerPoint, but don’t save anything. Return to the VBA Editor in Excel.
Opening a new instance of PowerPoint creates a new presentation as well as a new, empty slide. By using the appropriate VBA coding in Excel, the process can be automated.
Adding text to textboxes
It’s all very well to know how to open PowerPoint, create presentations, and make a slide available. The next objective is to add text to the two available textboxes on Slide1.
In this recipe, we will be adding text to the textboxes on Slide1.
Getting ready
Make sure PPoint_Interaction.xlsm is still open, and that the VBA Editor is active.
How to do it…
These are the steps to enter and format text in PowerPoint:
1. To add text to a PowerPoint presentation via Excel, add the following line of code:
Sub CreatePPointSlides()
Dim PowPntApp As PowerPoint.Application
Dim PowPntPrsnt As PowerPoint.Presentation
Dim PowPntSlide As PowerPoint.Slide
Set PowPntApp = New PowerPoint.Application
PowPntApp.Visible = True
PowPntApp.Activate
Set PowPntPrsnt = PowPntApp.Presentations.Add
Set PowPntSlide = _
PowPntPrsnt.Slides.Add(1, ppLayoutTitle)
PowPntSlide.Shapes(1).TextFrame.TextRange = _
“Employee Information Slide” PowPntSlide.Shapes(2).TextFrame.TextRange = _
“by Presenter”
End Sub
2. Press F5. Running the Sub procedure will now result in a new instance of PowerPoint, with a new presentation and slide open:
3. Each textbox will have its own line of text. Close PowerPoint without saving, since there is more code to add to our procedure in Excel.
Using the appropriate code will enable you to add customized text to individual textboxes on a slide.
Copying Excel content into PowerPoint
Automatically copying content from Excel to PowerPoint saves a lot of time. What we need to do now is select data, copy it, and then paste that into yet another newly inserted slide.
In this recipe, we will be copying a table into PowerPoint.
Getting ready
Make sure that PPoint_Interaction.xlsm is still open. Activate Sheet1, and enter the following data:
How to do it…
Follow these steps to copy text from Excel to PowerPoint:
1. Before selecting anything in Excel, we need to insert a new blank slide in PowerPoint. Add the following lines of code:
Sub CreatePowPntShow()
Dim PowPntApp As PowerPoint.Application
Dim PowPntPrsnt As PowerPoint.Presentation
Dim PowPntSlide As PowerPoint.Slide
Set PowPntApp = New PowerPoint.Application
PowPntApp.Visible = True
PowPntApp.Activate
Set PowPntPrsnt = PowPntApp.Presentations.Add
Set PowPntSlide = _
PowPntPrsnt.Slides.Add(1, ppLayoutTitle)
PowPntSlide.Shapes(1).TextFrame.TextRange = _
“Employee Information”
PowPntSlide.Shapes(2).TextFrame.TextRange = _
“by Presenter”
Set PowPntSlide = _
PowPntPrsnt.Slides.Add(2, ppLayoutBlank)
PowPntSlide.Select
2. Run the Sub procedure to check your coding. We know that the first part will work, but in this case, we need to check whether a second slide was inserted:
3. To select the data in Excel, add the following line of code, directly below the previous entry. This will select the data on Sheet1 and then copy it:
4. Once the data has been copied, it must be pasted into the current slide. Enter the next line of code, once again directly below the previous line of code:
5. The last thing we need to do is close down the document, and finally, PowerPoint itself. Just add the following two lines in a new line after the filename:
Selecting data in Excel, copying it, and then pasting it into PowerPoint can all be automated with VBA in Excel.
There’s more…
As a finishing touch, we can add code to create a unique filename for each PowerPoint presentation:
1. We can create a unique name for the file every time it is saved. Add the following lines after .Shapes.Paste:
PowPntPrsnt.SaveAs Environ(“UserProfile”) _
& “DesktopEmployeeInformation “ _
& Format(Now, “yyyy-mm-dd hh-mm-ss”) & “.pptx”
2. Every time you run the procedure now, a new file with a unique name will be saved.
3. The complete Sub procedure should look like this:
Sub CreatePPointSlides()
Dim PowPntApp As PowerPoint.Application
Dim PowPntPrsnt As PowerPoint.Presentation
Dim PowPntSlide As PowerPoint.Slide
Set PowPntApp = New PowerPoint.Application
PowPntApp.Visible = True
PowPntApp.Activate
Set PowPntPrsnt = PowPntApp.Presentations.Add
Set PowPntSlide = _
PowPntPrsnt.Slides.Add(1, ppLayoutTitle)
PowPntSlide.Shapes(1).TextFrame.TextRange = _
“Employee Information”
PowPntSlide.Shapes(2).TextFrame.TextRange = _
“by Presenter”
Set PowPntSlide = _ PowPntPrsnt.Slides.Add(2, ppLayoutBlank) PowPntSlide.Select
Range(“A1”).CurrentRegion.Copy
PowPntSlide.Shapes.Paste
PowPntPrsnt.SaveAs Environ(“UserProfile”) _
& “DesktopEmployeeInformation “ _
& Format(Now, “yyyy-mm-dd hh-mm-ss”) & “.pptx”
PowPntPrsnt.Close
PowPntApp.Quit
End Sub
Following the instructions in this recipe will enable you to select information in Excel, copy it there, and then paste it into a specific slide in PowerPoint.
To read in depth here is the link of the book VBA Automation for Excel 2019 Cookbook by Mike Van Niekerk.
Источник
Excel VBA PowerPoint Tutorial
VBA is a powerful tool which can be used within any area of Microsoft integrated tools. Like MS Excel, Powerpoint also has a provision for creating a macro and automating the presentation. The automation can be of any form. You have seen presentations where the slides are so big and detailed, which sometimes end up having 50+ slides just to cover a training topic or a report. So instead of adding the charts in PowerPoint from Excel, we can create a code which will directly copy the charts from Excel and paste that into PowerPoint slide.
How to Create a PowerPoint Presentation From Excel VBA?
Below is the example to create a powerpoint presentation Using VBA Code in Excel:
You can download this VBA PowerPoint Excel Template here – VBA PowerPoint Excel Template
VBA PowerPoint Example
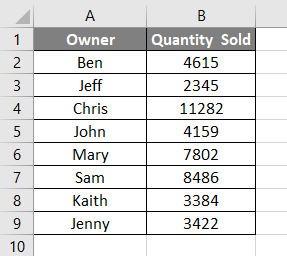
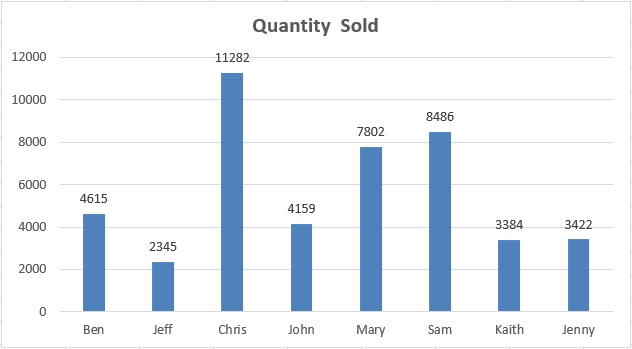
Let’s create a chart first in excel. For that, we need data. Below we have some sales data of 8 salespersons.
Now let’s create a Column Chart or Graph with the help of the above data. We will see below, we have now a column chart with the title Quantity Sold and all labels inserted.
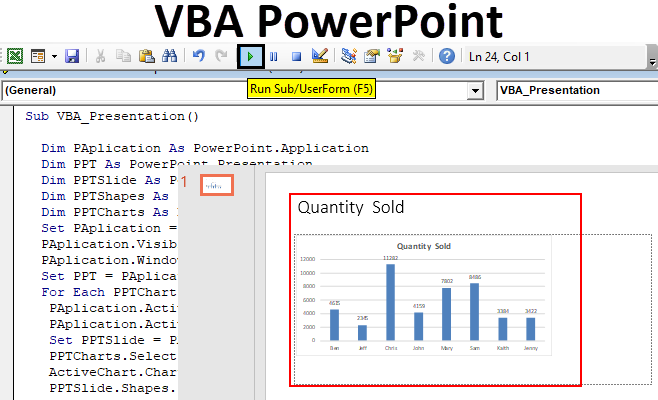
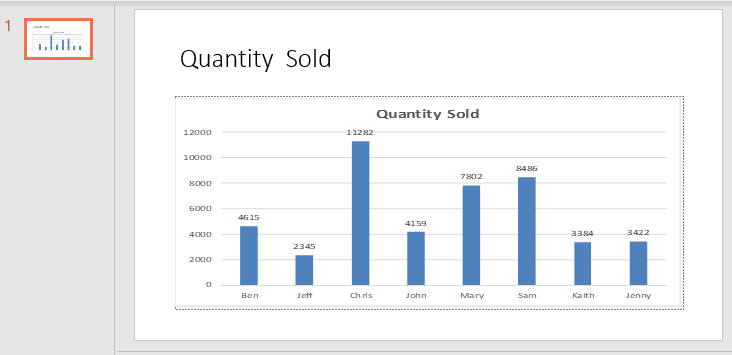
Now our task is to get this graph in PowerPoint slide as it is showing here with the title of the chart as the title of PowerPoint slide. For this, we need to enable the PowerPoint in VBA.
Follow the below steps:
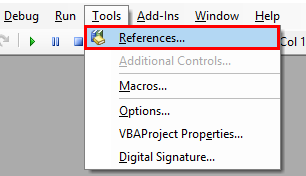
Step 1: Go to VBA Tool menu as shown below and select References… option as shown below.
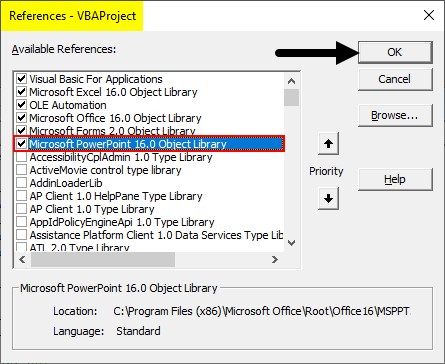
Step 2: Once we do that we will get a References VBA Project windows. From that list select MS PowerPoint 15.0 Object Library as shown below. This will activate all the commands related to MS PowerPoint in VBA. Without this, we cannot run VBA in PowerPoint. Check the box of mentioned Library and click on Ok.
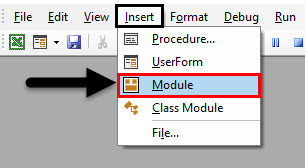
Step 3: Now for writing the code for VBA PowerPoint, we need a module. To get a new module, go to Insert menu and select a Module option as shown below.
Step 4: In that module write the subcategory of VBA PowerPoint or in any other name as per your need as shown below.
Code:
Sub VBA_Presentation()

End Sub
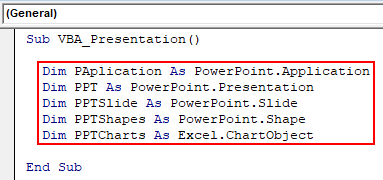
Step 5: Now for creating a presentation with the help of Chart in excel, we need few Variables. Let’s consider 5 variables as:
- PApplication for PowerPoint Application.
- PPT for PowerPoint Presentation,
- PPTSlide for PowerPoint Slide,
- PPTShapes for PowerPoints,
- PPTCharts for Excel Chart Object.
Code:
Sub VBA_Presentation()

  Dim PAplication As PowerPoint.Application
  Dim PPT As PowerPoint.Presentation
  Dim PPTSlide As PowerPoint.Slide
  Dim PPTShapes As PowerPoint.Shape
  Dim PPTCharts As Excel.ChartObject

End Sub
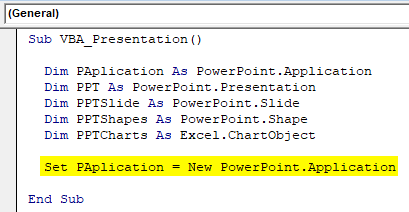
Step 6: Now use Set command to add New PowerPoint Application as shown below.
Code:
Sub VBA_Presentation()

  Dim PAplication As PowerPoint.Application
  Dim PPT As PowerPoint.Presentation
  Dim PPTSlide As PowerPoint.Slide
  Dim PPTShapes As PowerPoint.Shape
  Dim PPTCharts As Excel.ChartObject

  Set PAplication = New PowerPoint.Application

End Sub
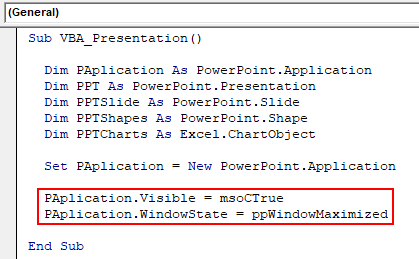
Step 7: In a line of code, make PowerPoint Application visible and use msoCTrue for mysteriously evaluating the incorrect way. And after that, the same application will get be used as Maximized in PowerPoint to get the full view.
Code:
Sub VBA_Presentation()

  Dim PAplication As PowerPoint.Application
  Dim PPT As PowerPoint.Presentation
  Dim PPTSlide As PowerPoint.Slide
  Dim PPTShapes As PowerPoint.Shape
  Dim PPTCharts As Excel.ChartObject

  Set PAplication = New PowerPoint.Application

  PAplication.Visible = msoCTrue
  PAplication.WindowState = ppWindowMaximized

End Sub
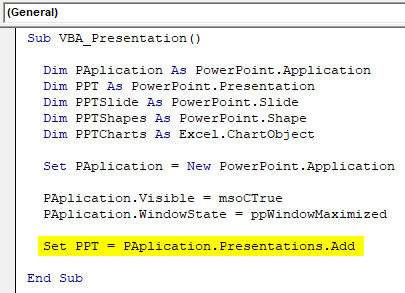
Step 8: Now set the PPT which is our presentation to add in MS PowerPoint Application,
Code:
Sub VBA_Presentation()

  Dim PAplication As PowerPoint.Application
  Dim PPT As PowerPoint.Presentation
  Dim PPTSlide As PowerPoint.Slide
  Dim PPTShapes As PowerPoint.Shape
  Dim PPTCharts As Excel.ChartObject

  Set PAplication = New PowerPoint.Application

  PAplication.Visible = msoCTrue
  PAplication.WindowState = ppWindowMaximized

  Set PPT = PAplication.Presentations.Add

End Sub
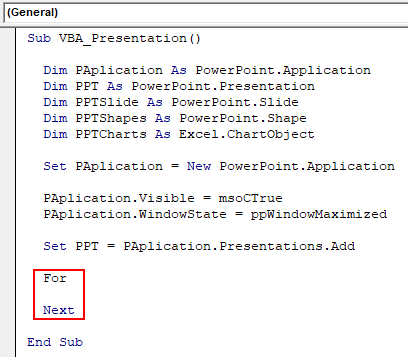
Step 9: Now we will use a combination of For-Next and If-Else loop. Starting with For-Next Loop.
Code:
Sub VBA_Presentation()

  Dim PAplication As PowerPoint.Application
  Dim PPT As PowerPoint.Presentation
  Dim PPTSlide As PowerPoint.Slide
  Dim PPTShapes As PowerPoint.Shape
  Dim PPTCharts As Excel.ChartObject

  Set PAplication = New PowerPoint.Application

  PAplication.Visible = msoCTrue
  PAplication.WindowState = ppWindowMaximized

  Set PPT = PAplication.Presentations.Add

  For

  Next

End Sub
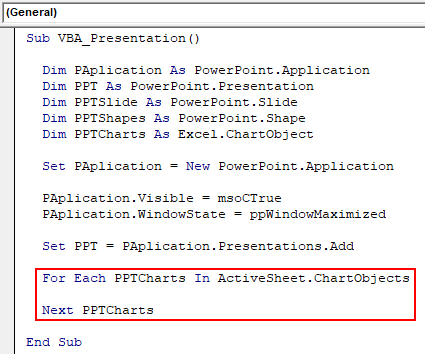
Step 10: In For loop of PPTCharts, first active charts in excel.
Code:
Sub VBA_Presentation()

  Dim PAplication As PowerPoint.Application
  Dim PPT As PowerPoint.Presentation
  Dim PPTSlide As PowerPoint.Slide
  Dim PPTShapes As PowerPoint.Shape
  Dim PPTCharts As Excel.ChartObject

  Set PAplication = New PowerPoint.Application

  PAplication.Visible = msoCTrue
  PAplication.WindowState = ppWindowMaximized

  Set PPT = PAplication.Presentations.Add

  For Each PPTCharts In ActiveSheet.ChartObjects

  Next PPTCharts

End Sub
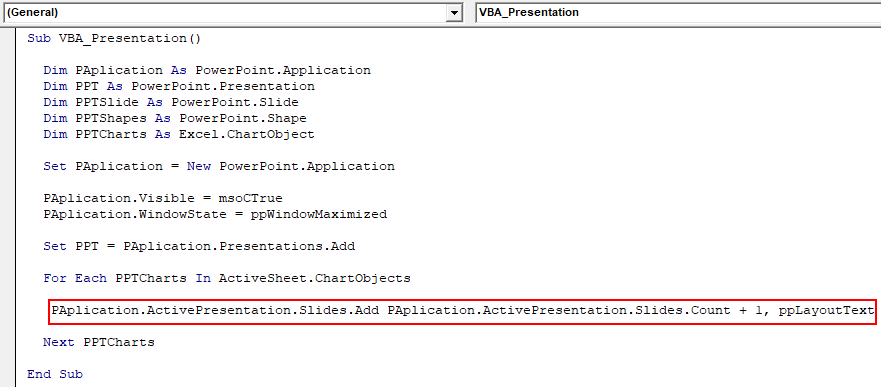
Step 11: Below is the code for pasting the chart from excel to PowerPoint slide. Use code to add a slide into defined PAplication adding +1 slide each time we run the code.
Code:
Sub VBA_Presentation()

  Dim PAplication As PowerPoint.Application
  Dim PPT As PowerPoint.Presentation
  Dim PPTSlide As PowerPoint.Slide
  Dim PPTShapes As PowerPoint.Shape
  Dim PPTCharts As Excel.ChartObject

  Set PAplication = New PowerPoint.Application

  PAplication.Visible = msoCTrue
  PAplication.WindowState = ppWindowMaximized

  Set PPT = PAplication.Presentations.Add

  For Each PPTCharts In ActiveSheet.ChartObjects

   PAplication.ActivePresentation.Slides.Add PAplication.ActivePresentation.Slides.Count + 1, ppLayoutText

  Next PPTCharts

End Sub
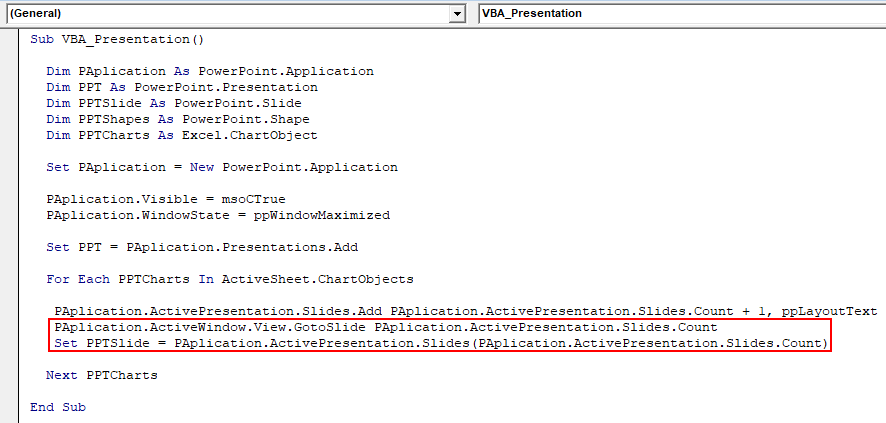
Step 12: Now on the continuation to the next line of code, use the below set of code to set an active window view. This will take use to slide after Chart gets pasted in PowerPoint presentation.
Code:
Sub VBA_Presentation()

  Dim PAplication As PowerPoint.Application
  Dim PPT As PowerPoint.Presentation
  Dim PPTSlide As PowerPoint.Slide
  Dim PPTShapes As PowerPoint.Shape
  Dim PPTCharts As Excel.ChartObject

  Set PAplication = New PowerPoint.Application

  PAplication.Visible = msoCTrue
  PAplication.WindowState = ppWindowMaximized

  Set PPT = PAplication.Presentations.Add

  For Each PPTCharts In ActiveSheet.ChartObjects

   PAplication.ActivePresentation.Slides.Add PAplication.ActivePresentation.Slides.Count + 1, ppLayoutText
   PAplication.ActiveWindow.View.GotoSlide PAplication.ActivePresentation.Slides.Count
   Set PPTSlide = PAplication.ActivePresentation.Slides(PAplication.ActivePresentation.Slides.Count)

  Next PPTCharts

End Sub
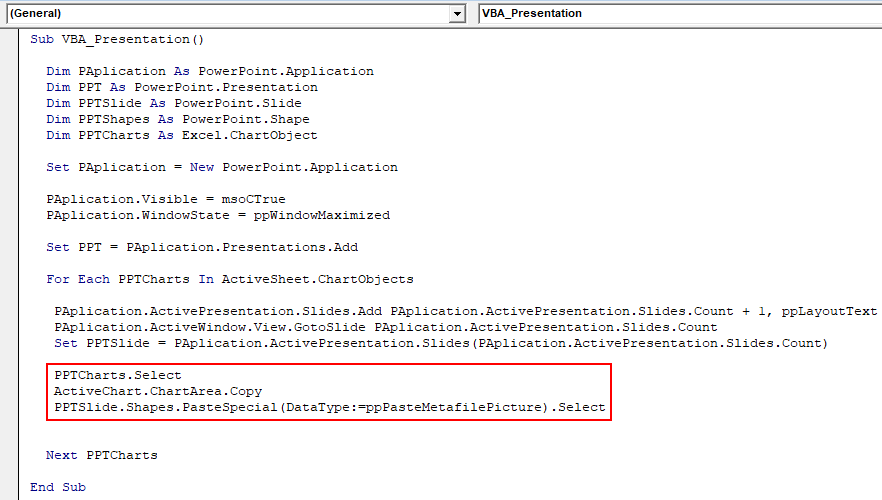
Step 13: Once done, select the PPTChart variable which we defined earlier. After that copy the selected active chart into the chart area where it will be placed. And use Paste Special command to paste the chart with pictures.
Code:
Sub VBA_Presentation()

  Dim PAplication As PowerPoint.Application
  Dim PPT As PowerPoint.Presentation
  Dim PPTSlide As PowerPoint.Slide
  Dim PPTShapes As PowerPoint.Shape
  Dim PPTCharts As Excel.ChartObject

  Set PAplication = New PowerPoint.Application

  PAplication.Visible = msoCTrue
  PAplication.WindowState = ppWindowMaximized

  Set PPT = PAplication.Presentations.Add

  For Each PPTCharts In ActiveSheet.ChartObjects

   PAplication.ActivePresentation.Slides.Add PAplication.ActivePresentation.Slides.Count + 1, ppLayoutText
   PAplication.ActiveWindow.View.GotoSlide PAplication.ActivePresentation.Slides.Count
   Set PPTSlide = PAplication.ActivePresentation.Slides(PAplication.ActivePresentation.Slides.Count)

   PPTCharts.Select
   ActiveChart.ChartArea.Copy
   PPTSlide.Shapes.PasteSpecial(DataType:=ppPasteMetafilePicture).Select

  Next PPTCharts

End Sub
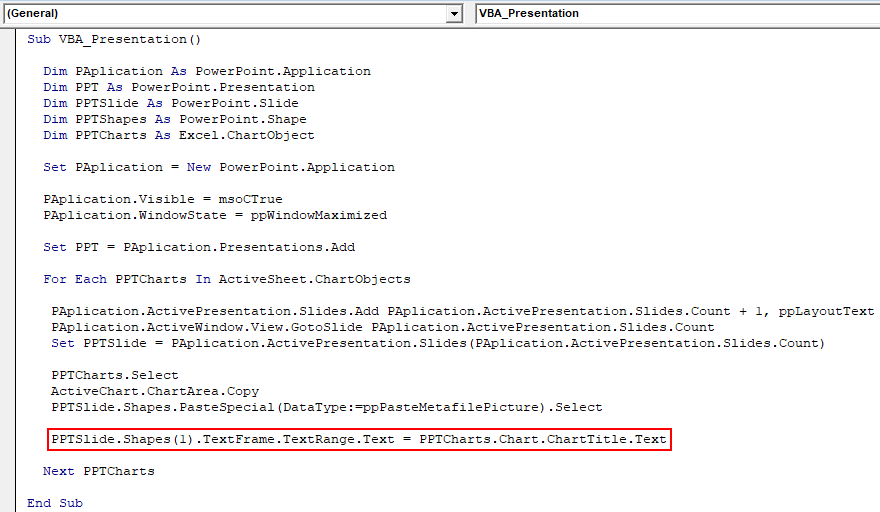
Step 14: Now select the shape of the Chart which is at first position as text range. And carry the same title which is “Quantity Sold” into the PowerPoint Presentation.
Code:
Sub VBA_Presentation()

  Dim PAplication As PowerPoint.Application
  Dim PPT As PowerPoint.Presentation
  Dim PPTSlide As PowerPoint.Slide
  Dim PPTShapes As PowerPoint.Shape
  Dim PPTCharts As Excel.ChartObject

  Set PAplication = New PowerPoint.Application

  PAplication.Visible = msoCTrue
  PAplication.WindowState = ppWindowMaximized

  Set PPT = PAplication.Presentations.Add

  For Each PPTCharts In ActiveSheet.ChartObjects

   PAplication.ActivePresentation.Slides.Add PAplication.ActivePresentation.Slides.Count + 1, ppLayoutText
   PAplication.ActiveWindow.View.GotoSlide PAplication.ActivePresentation.Slides.Count
   Set PPTSlide = PAplication.ActivePresentation.Slides(PAplication.ActivePresentation.Slides.Count)

   PPTCharts.Select
   ActiveChart.ChartArea.Copy
   PPTSlide.Shapes.PasteSpecial(DataType:=ppPasteMetafilePicture).Select

   PPTSlide.Shapes(1).TextFrame.TextRange.Text = PPTCharts.Chart.ChartTitle.Text

  Next PPTCharts

End Sub
This completes the code for VBA PowerPoint.
Step 15: Now compile the code step by step to know if any line of code has an error by pressing function key F8. And after that run the code by clicking on the Play button which is below the menu bar as shown below.
We will get the chart posted in PowerPoint file in the first slide of it as shown below.
As the code is big, so the complete code can be seen in the text box below.
Pros of Excel VBA PowerPoint
- Using VBA in Powerpoint makes easy to handle if a ppt file has so many slides with huge content.
- VBA with Powerpoint gives a touch of automation even with limited functions available.
Cons of Excel VBA PowerPoint
- We need to select the Microsoft PowerPoint 15.0 Object Library from the Reference option located in Tool menu option, which we need in the start of example-1, every time we run the code for PowerPoint.
Things to Remember
- Save the file in the Macro-Enable Presentation format after writing the code. This will help us to avoid losing the code and using the same multiple time in the future.
- Recoding feature will not work here as we need to jump from Excel to PowerPoint changing the interface between the pages.
- Always compile the code before running. This will help you to find the error in the code. This is quite helpful when we write big lines of code.
- To run and implement the code we need to open the excel sheet with Chart that we want to paste it in PowerPoint slide.
- We can align the chart in PowerPoint as per our needs.
Recommended Articles
This is a guide to VBA PowerPoint. Here we discuss how to create PowerPoint Presentation From Excel Using VBA Code along with a practical example and downloadable excel template. You can also go through our other suggested articles –
- VBA Delete Column
- Status Bar in Excel
- VBA Remove Duplicates
- Create Spreadsheet in Excel

