
Symptoms
In Microsoft Office Excel, Microsoft Visual Basic for Application (VBA) macro code that is contained «behind» a worksheet or workbook may not work correctly.
Cause
This will occur if both of the following conditions are true:
-
The code in question is contained inside an automatically-running subroutine, such as an Auto_Open or Auto_Close subroutine.
-
The code is not contained in a Visual Basic module, but «behind» a worksheet or the workbook itself.
Workaround
In order for automatically-running subroutines to work correctly in Microsoft Excel, they must be contained within a Visual Basic module.
You must insert a Visual Basic module into the workbook and then place the code in the new module.
To insert a Visual Basic module:
-
In the Project Explorer in the Visual Basic Editor, activate the workbook that contains the code in question.
-
On the Insert menu, click Module.
After the new module is inserted, cut the code from its original location and paste it into the Visual Basic module. Then, save the workbook.
More Information
In Excel, VBA code can be stored in three different locations: in a Visual Basic module, in a Visual Basic class module, and «behind» worksheets and workbooks.
To edit code «behind» a worksheet or a workbook:
-
Activate the Visual Basic Editor (press ALT+F11).
-
In the Project Explorer window, you will see entries similar to the following:
         VBAProject (Book1)
         Microsoft Excel Objects
            Sheet1 (Sheet1)
            Sheet2 (Sheet2)
            Sheet3 (Sheet3)
            ThisWorkbook
         Modules
             Module1
If you double-click one of the worksheet names or ThisWorkbook, you can type code in the code window. Such code not contained within a Visual Basic module is considered to be «behind» the worksheet or
ThisWorkbook .
If an Auto_Open, Auto_Close, or other automatically-running subroutine is stored «behind» a worksheet or ThisWorkbook, it may not function correctly when you open or close your workbook, or when you perform an action that should cause the subroutine to run.
Need more help?
Want more options?
Explore subscription benefits, browse training courses, learn how to secure your device, and more.
Communities help you ask and answer questions, give feedback, and hear from experts with rich knowledge.
Ok guys, so I had a bit of trouble with my first post regarding this problem and I had received a ton of help. However we are still running into some trouble.
What I am trying to do: I have 4 listboxes on 4 different sheets. The list boxes are looking at a column that has a list of items. The Items where the listboxes are referencing have sub items. I want the list box (when clicking the item inside the listbox), to show the sub items in text boxes that I have on the sheet. I had some code that worked in the beginning, however, when I try to use it on multiple sheets it does not work.
The first block of code is what I was originally using, but I came on here and had some help that gave me the last 2 blocks of code; that should be working but are not.
Sub ListBox1_Change()
Dim idx As Long

    If idx <> -1 Then
        idx = Sheets("sheet1").Shapes("TextBox 1").OLEFormat.Object.ListIndex
        Sheets("sheet1").Shapes("TextBox 1").OLEFormat.Object.Text =   Sheets("sheet1").Range("Q" & idx + 1).Value
    End If

End Sub
This block of code is specific to each sheet. There are about 30 total text boxes that I will be referencing on each sheet. So in actuality the below will have 30 items.
Sub ListBox1_Change()
    Handle_Change Me, "ListBox1", "Texbox1(sub-item)", "W"
    Handle_Change Me, "ListBox1", "Texbox2(sub-item)", "X"
    Handle_Change Me, "ListBox1", "Texbox3(sub-item)", "Y"
    Handle_Change Me, "ListBox1", "Texbox4(sub-item)", "Z"
    Handle_Change Me, "ListBox1", "Texbox5(sub-item)", "AA"
    Handle_Change Me, "ListBox1", "Texbox6(sub-item)", "AB"
End Sub
This is code that stay in the VBA Module
Sub Handle_Change(sht As Worksheet, lbName, tbName, colAddr)

    Dim idx As Long, lb   As msforms.ListBox

    Set lb = sht.Shapes(lbName).OLEFormat.Object.Object

    idx = lb.ListIndex
    If idx <> -1 Then
        sht.Shapes(tbName).OLEFormat.Object.Object.Text = _
                         sht.Range(colAddr & idx + 1).Value
    End If

End Sub
When I try to run it with the new code (last 2 blocks above) I get an error that says: «Compile error: User-defined type not defined» and highlights the second line of code on the Handle_change «, lb As msforms.Listbox».
Thanks for your time,
Good day
Download PC Repair Tool to quickly find & fix Windows errors automatically
While using Microsoft Visual Basic for Applications on Excel, if you get Run-time error, Class not registered, here is how you can fix the issue. It is pretty common when there are some issues with the code or Office installation. That is why you can follow these tips and tricks to get rid of this problem.

You can run various codes via Visual Basic on an Excel spreadsheet to get different things done within moments and in automation. However, while running such a code, if you get the aforementioned error, you won’t be able to do what you were looking forward to. If so, you can follow the subsequent solutions to get rid of the error, as mentioned above.
To fix Microsoft Visual Basic Run-time error Class not registered in Excel, follow these steps:
- Check the code
- Update Excel/Office
- Turn on trust access to VBA
- Repair Microsoft Office
To learn more about these steps, continue reading.
1] Check the code
It is the very first thing you need to check when you are getting the aforementioned error in Excel. If the entered or written code is wrong, the argument is missing, etc., you won’t be able to run it on your spreadsheet. As a result, you might get the error as said above. That is why it is recommended to verify the code before running it again or heading to other solutions.
Read: How to create Custom Excel Functions using VBA
2] Update Excel/Office
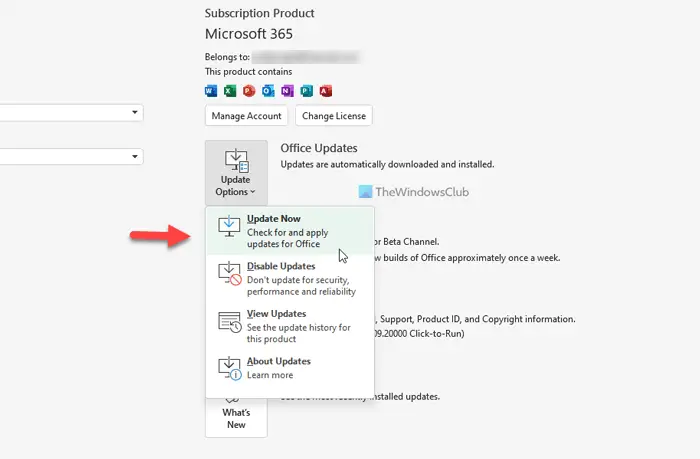
If you haven’t updated Excel or Office for a very long time, it is recommended to do that. At times, Microsoft might change various things, and that could be a reason why you are getting such an error. To update Office, do the following:
- Open Excel on your computer.
- Click on the Account.
- Expand the Update Options.
- Click the Update Now option.
Then, it will search for a pending update and install it accordingly.
3] Turn on Trust access to VBA
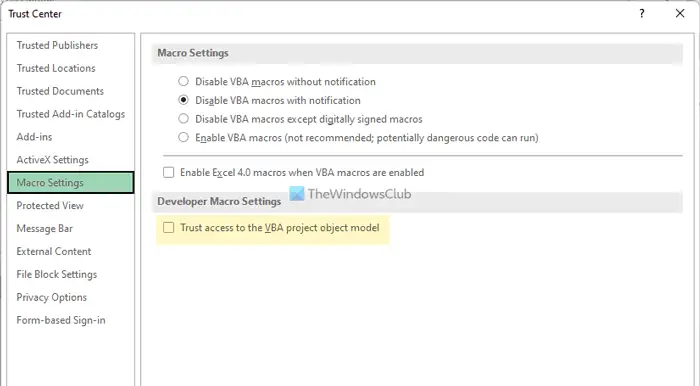
When you are getting this error, you must check if this setting is turned on or not. If not, it is suggested to enable it on your computer. To turn on trust access to the VBA project, follow these steps:
- Open Excel and click on Options.
- Switch to the Trust Center tab.
- Click the Trust Center Settings button.
- Go to the Macro Settings tab.
- Tick the Trust access to the VBA project object model checkbox.
- Click the OK button.
Then, restart Excel and check if the problem remains or not.
4] Repair Microsoft Office
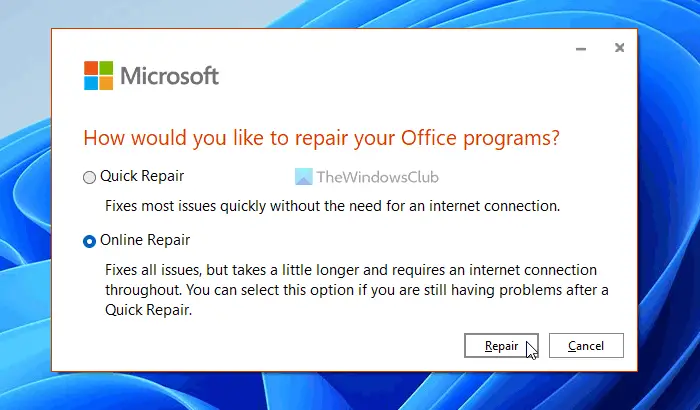
It is the last thing you need to do in order to troubleshoot the error. To repair Office on Windows 11/10, do the following:
- Press Win+I to open Windows Settings.
- Go to Apps > Apps & features.
- Click the three-dotted button of Microsoft 365.
- Select the Modify option.
- Click the Yes button in the UAC prompt.
- Choose the Online Repair option.
- Click the Repair button.
Once the process is done, you can restart your computer and check if the problem is resolved or not.
Apart from trying these solutions, you can also run the System File Checker. At times, an internal conflict can cause the above-mentioned error. If so, you can fix it with the help of SFC Scan.
How do I fix Runtime error in Excel VBA?
To fix the Run-time error in Excel VBA, you need to follow the above-mentioned solutions. You should start the troubleshooting process by verifying the code. However, if nothing works, you must repair the Office installation. In that case, select the Online Repair option instead of Quick Repair.
Read: How to fix Runtime Error 1004 in Microsoft Excel
How do I bypass VBA error in Excel?
There is no way to bypass the VBA error in Excel if you want to use the code. You must resolve the issue in order to use it without any error. A detailed guide of four solutions as mentioned above, and it is recommended to follow all of them to troubleshoot the VBA error in Excel.
Related: How to fix VBA error 400 in Excel.

When he is not writing about Microsoft Windows or Office, Sudip likes to work with Photoshop. He has managed the front end and back end of many websites over the years. He is currently pursuing his Bachelor’s degree.
Не работают макросы в Excel? Включите их выполнение, добавьте специальный модель с кодом, проверьте версию ОС и Эксель, убедитесь в соответствии пакета приложений, активируйте Майкрософт Офис, снимите блокировку файла, проверьте систему безопасности и применяемые библиотеки. Ниже подробно рассмотрим, в чем могут быть причины подобной неисправности, и какие шаги предпринимать для ее устранения.
Причины
Для начала стоит разобраться, почему не работает макрос в Excel, ведь от этого зависят дальнейшие шаги. К основным причинам стоит отнести:
- Функция отключена.
- Отключение отслеживания событий.
- Устаревшая операционная система.
- Несоответствие разработчика пакета офисных приложений.
- Устаревшая версия Майкрософт Офис.
- Неактивированная версия Excel.
- Заблокированный файл.
- Неправильные настройки безопасности.
- Отсутствие необходимой библиотеки и т. д.
Выше рассмотрены основные причины, почему не удается выполнить макрос в Excel. Все они могут быть решены самостоятельно с помощью приведенных ниже рекомендации. Подробнее на решении вопроса остановимся ниже.
Что делать
Многие пользователи теряются в ситуации, когда не включаются или вообще не работают макросы в Excel. Такая проблема не дает нормально пользоваться приложением и заставляет искать альтернативные варианты.
Включите опцию
Первое, что необходимо сделать — включить функцию для обеспечения ее работоспособности. Здесь многое зависит от версии Эксель.
Если не работают макросы в Excel 2003, сделайте следующие шаги:
- Войдите в «Сервис».
- Перейдите в раздел «Безопасность».
- Кликните «Уровень макросов «Низкий».

В случае, когда не работают макросы в Excel 2007, включите их следующим образом:
- Жмите на кнопку «Офис».
- Войдите в параметры Excel.
- Кликните на «Центр управления безопасности».
- Войдите в «Параметры центра управления безопасностью».
- Жмите на «Параметры макросов».
- Кликните на «Разрешить все …».

В ситуации, когда не работают макросы в Excel 2016, сделайте следующие шаги:
- Войдите в раздел «Файл».
- Кликните на кнопку «Параметры».
- Зайдите в «Центр управления безопасностью».
- Войдите в «Параметры центра управления безопасностью».
- Кликните на «Параметры …».
- Жмите на «Разрешить все …».

После внесения изменений параметра безопасности перезапустите приложение Excel, а именно закройте его полностью и откройте снова. Лишь после этого изменения вступают в силу.
Добавьте нужный модуль в книгу
Бывают ситуации, когда макросы включены, но не работают в Excel из-за отключения каким-либо элементом отслеживания событий. В таком случае сделайте следующее:
- Перейдите в редактор VBA с помощью клавиш Alt+F11.
- Вставьте указанный ниже код.
Sub Reset_Events()
Application.EnableEvents = True
End Sub
- Для выполнения кода поставьте курсор в любой точке между началом и концом.
- Кликните F5.

Проверьте операционную систему
В ситуации, когда не отображаются макросы в Excel, обратите внимание на тип операционной системы. К примеру, Майкрософт Офис, который подходит для Виндовс, на Мак ОС уже работать не будет. Причина в том, что в приложении используются разные библиотеки. Даже если надстройки и функционируют, могут быть сбои в работе. Вот почему при появлении проблем нужно проверить ОС на соответствие.
Обратите внимание на разработчика
Если в Экселе не работают макросы, причиной может быть другой разработчик. Так, пользователи Excel часто применяют OpenOffice или LibreOffice. Эти пакеты созданы на разных языках программирования, которые имеют индивидуальные особенности. Так, если надстройки написаны на Visual Basic for Application, он может не работать в указанных выше офисных приложениях. Вот почему необходимо уточнять, для какого пакета создан макрос / надстройка.
Проверьте версию Майкрософт Офис
В Макрософт Офис 2003 применяются надстройки xla для Excel. В современных версиях расширение поменялось на xlam. Если ставить макросы старого типа в приложения Офис 2007 и больше, никаких трудностей не происходит. Если же вы попытаетесь поставить новую надстройку на старую версию Excel, она зачастую не работает. Вот почему важно обратить внимание на этот параметр при выборе.
Убедитесь в наличии пакета VBA
Одной из причин, почему не запускается макрос в Excel, может быть отсутствие пакета VBA. Для успешного запуска надстройки необходимо, чтобы этот пакет был установлен. Иногда он уже установлен в Офис, но так происходит не всегда. Для проверки жмите комбинацию на Alt+F11. Если после этого появляется Visual Basic, компонент можно считать установленным. В ином случае его нужно поставить. Для этого:
- Зайдите в «Пуск», а далее «Панель управления / Программы и компоненты».

- Выберите программу Майкрософт Офис.
- Жмите на кнопку «Изменить».

- Запустить файл установки Setup.exe.
- Кликните на «Добавить или удалить компоненты».
- Выберите в списке Visual Basic и установите его.
Активируйте Офис
Если в Excel 2007 не работает кнопка «макросы», причиной может быть отсутствие активации приложения. Для этого жмите на кнопку «Активировать» и следуйте инструкции. В большинстве случаев такая опция является платной.
Снимите блокировку файла
Учтите, что документ, полученный с другого ПК / ноутбука, может заблокироваться. Для разблокировки файла нужно нажать ПКМ и в разделе «Общие» кликнуть на «Разблокировать».

Проверьте библиотеки
В случае, когда параметры макросов не активны в Excel, причиной может быть появление ошибки «Can’t find project or library». При этом, надстройка работает на другом ПК / ноутбуке, а здесь возникают проблемы. Ошибку легко устранить, если в окне, которое идет за сообщением об ошибке, снять отметки в полях Missing. Для вызова окна можно выбрать пункт меню Tools / References.
Проверьте настройки безопасности
В ситуации, когда не работают макросы в Excel, можно добавить надежные расположения или настроить доступ к объектной модели VBA. Для этого в Офис 2007 необходимо сделать следующее:
- Войдите в Меню
- Кликните на пункт «Параметры».
- Жмите на «Центр управления безопасностью».
- Войдите в «Параметры центра управления безопасностью».
- Кликните на «Параметры макросов» и «Доверять доступ к объектной модели проектов».

Зная, почему не работают макросы в Excel, вы можете с легкостью исправить проблему и восстановить работоспособность. Если же сложности в работе возникают, вы всегда можете воспользоваться инструкцией в статье.
В комментариях расскажите, какой из приведенных выше вариантов вам помог, и что еще можно сделать.
Отличного Вам дня!
No matter how experienced you’re with VBA coding, errors are always going to be a part of it.
The difference between a novice and an expert VBA programmer is that the expert programmers know how to effectively handle and use errors.
In this tutorial, I will show you various ways you can use to handle errors effectively in Excel VBA.
Before we get into VBA error handling, let’s first understand the different types of errors you are likely to encounter when programming in Excel VBA.
Types of VBA Errors in Excel
There are four types of errors in Excel VBA:
- Syntax errors
- Compilation errors
- Runtime errors
- Logical Errors
Let’s quickly understand what these errors are and when you’re likely to encounter these.
Syntax Error
A syntax error, as the name suggests, occurs when VBA finds something wrong with the syntax in the code.
For example, if you forget a part of the statement/syntax that is needed, then you will see the compile error.
In the below code, as soon as I hit enter after the second line, I see a compile error. This is because the IF statement needs to have the ‘Then‘ command, which is missing in the below code.

Note: When you are typing a code in Excel VBA, it checks for each sentence as soon as you hit enter. If VBA finds something missing in the syntax, it instantly shows a message with some text that can help you understand the missing part.
To make sure you see the syntax error whenever there is something missing, you need to make sure Autosyntax check is enabled. To do this, click on ‘Tools’ and then click on ‘Options’. In the options dialog box, make sure that the ‘Auto Syntax Check’ option is enabled.
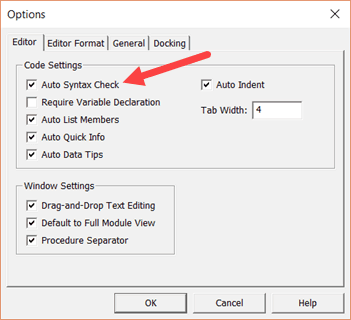
If the ‘Auto Syntax Check’ option is disabled, VBA will still highlight the line with the syntax error in red, but it will not show the error dialog box.
Compile Error
Compile errors occur when something is missing that is needed for the code to run.
For example, in the below code, as soon as I try to run the code, it will show the following error. This happens as I have used the IF Then statement without closing it with the mandatory ‘End If’.
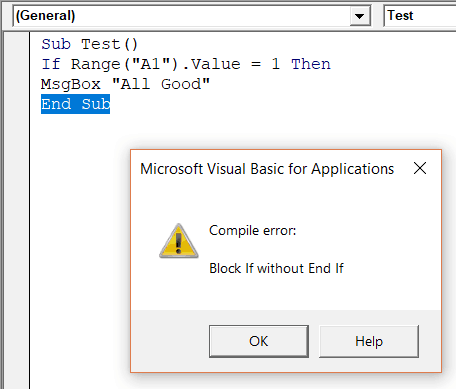
A syntax error is also a type of compile error. A syntax error occurs as soon as you hit enter and VBA identifies that something is missing. A compilation error can also occur when VBA doesn’t find anything missing while typing the code, but it does when the code is compiled or executed.
VBA checks each line as you’re typing the code and highlights the syntax error as soon as the line is incorrect and you hit enter. Compile errors, on the other hand, are only identified when the entire code is analyzed by VBA.
Below are some scenarios where you’ll encounter the compile error:
- Using an IF Statement without the End IF
- Using For statement with the Next
- Using Select statement without using the End Select
- Not declaring the variable (this works only when Option Explicit is enabled)
- Calling a Sub/Function that does not exist (or with wrong parameters)
Note about ‘Option Explicit’: When you add ‘Option Explicit’, you will be required to declare all the variables before running the code. If there is any variable that has not been declared, VBA would show an error. This is a good practice as it shows an error in case you have a misspelled variable. You can read more about Option Explicit here.
Run Time Errors
Runtime errors are those that occur when the code is running.
Run time errors will occur only when all the syntax and compile errors are being taken care of.
For example, if you run code that is supposed to open an Excel workbook, but that workbook is unavailable (either deleted or name changed), your code would give you a runtime error.
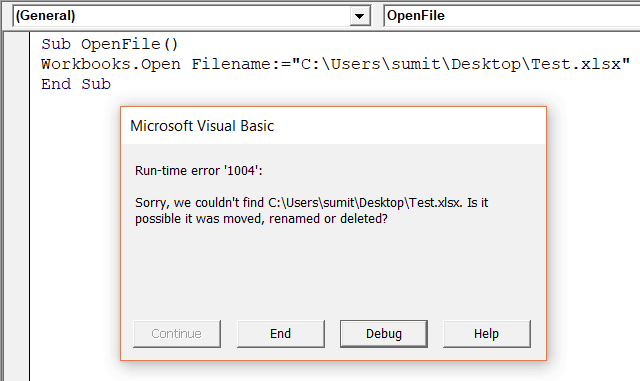
When a runtime error occurs, it will stop the code and show you the error dialog box.
The message in the Run-time error dialog box is a little more helpful. It tries to explain the problem that can help you correct it.
If you click on the Debug button, it will highlight the part of the code that is leading to the error.

If you have corrected the error, you can click on the Run button in the toolbar (or press F5) to continue running the code from where it left.
Or you can also click on the End button to come out of the code.
Important: In case you click the End button in the dialog box, it will stop the code at the line at which is encountered. However, all the lines of code before that would have been executed.
Logical Errors
Logical errors would not make your code stop but can lead to wrong results. These could also be the most difficult types of errors to troubleshoot.
These errors are not highlighted by the compiler and need to be manually tackled.
One example of logical error (that I often find myself stuck with) is running into an endless loop.
Another example could be when it gives a result which is wrong. For example, you may end up using a wrong variable in the code or add two variables where one is incorrect.
There are a few ways I use to tackle logical errors:
- Insert Message Box at some place in the code and highlight values/data that can help understand if eberything is going as expected.
- Instead of running the code at one go, go through each line one by one. To do this, click anywhere in the code and press F8. you would notice that each time you press F8, one line gets executed. This allows you to go through the code one line at a time and identify the logical errors.
Using Debug to Find Compile/Syntax Errors
Once you’re done with the code, it’s a good practice to first compile it before running.
To compile a code, click on the Debug option in the toolbar and click on Compile VBAProject.
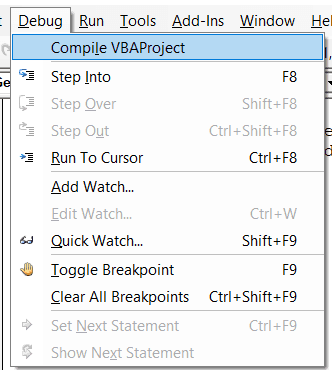
When you compile a VBA project, it goes through the code and identifies errors (if any).
In case it finds an error, it will show you a dialog box with the error. It finds errors one by one. So if it finds an error and you have corrected it, you need to run compile again to find other errors (if there are).
When you’re code is free of errors, the Compile VBAProject option will be greyed out.
Note that Compiling will only find ‘Syntax’ errors and ‘Compile’ errors. It will NOT find the run-time errors.
When you’re writing VBA code, you don’t want the errors to crop up. To avoid this, there are many error-handling methods you can use.
In the next few sections of this article, I will be covering the methods you can use for VBA error handling in Excel.
Configure Error Settings (Handled Vs Unhandled Errors)
Before you start working with your code, you need to check for one setting in Excel VBA.
Go to the VBA toolbar and click on Tools and then click on Options.
In the Options dialog box, click on the General tab and make sure that within the ‘Error Trapping’ group, ‘Break on Unhandled Errors’ is checked.
Let me explain the three options:
- Break on All Errors: This will stop your code on all types of errors, even when you have used the techniques to handle these errors.
- Break in Class Module: This will stop your code on all unhandled errors, and at the same time, if you’re using objects such as Userforms, it will also break within those objects and highlight the exact line causing the error.
- Break on Unhandled Errors: This will stop your code only for those errors that are not handled. This is the default setting as it ensures any unhandled errors are brought to your notice. If you’re using objects such as Userforms, this will not highlight the line causing the error in the object, but will only highlight the line that’s referring to that object.
Note: If you work with objects such as Userforms, you can change this setting to ‘Break on Class Modules’. The difference between #2 and #3 is that when you use Break in Class Module, it will take you to the specific line in the object that is causing the error. You can also choose to go with this instead of ‘Break on Unhandled Errors’.
So in a nutshell – if you’re just starting with Excel VBA, ensure ‘Break on Unhandled Errors’ is checked.
VBA Error Handling with ‘On Error’ Statements
When your code encounters an error, there are a few things you can do:
- Ignore the error and let the code continue
- Have an error handling code in place and run it when an error occurs
Both of these error handling methods ensures that the end user will not get to see an error.
There are a few ‘On Error’ statements that you can use to get these done.
On Error Resume Next
When you use ‘On Error Resume Next’ in your code, any encountered error will be ignored and the code will continue to run.
This error handling method is used quite often, but you need to be cautious when using it. Since it completely ignores any error that may occur, you may not be able to identify the errors that need to be corrected.
For example, if the below code is run, it will return an error.
Sub AssignValues()
x = 20 / 4
y = 30 / 0
End Sub
This happens because you can not divide a number by zero.
But if I use the ‘On Error Resume Next’ statement in this code (as shown below), it will ignore the error and I will not know that there is an issue that needs to be corrected.
Sub AssignValues()
On Error Resume Next
x = 20 / 4
y = 30 / 0
End Sub
On Error Resume Next should be used only when you clearly know the kind of errors your VBA code is expected to throw and it’s alright to ignore it.
For example, below is the VBA event code that would instantly add the date and time value in cell A1 of a newly inserted sheet (this code is added in the worksheet and not in a module).
Private Sub Workbook_NewSheet(ByVal Sh As Object)
Sh.Range("A1") = Format(Now, "dd-mmm-yyyy hh:mm:ss")
End Sub
While this works great in most cases, it would show an error if I add a chart sheet instead of a worksheet. Since a chart sheet does not have cells, the code would throw an error.
So, if I use the ‘On Error Resume Next’ statement in this code, it will work as expected with worksheets and do nothing with chart sheets.
Private Sub Workbook_NewSheet(ByVal Sh As Object)
On Error Resume Next
Sh.Range("A1") = Format(Now, "dd-mmm-yyyy hh:mm:ss")
End Sub
Note: On Error Resume Next Statement is best used when you know what kind of errors you’re likely to encounter. And then if you think it’s safe to ignore these errors, you can use it.
You can take this code to the next level by analyzing if there was an error, and displaying a relevant message for it.
The below code would show a message box that would inform the user that a worksheet has not been inserted.
Private Sub Workbook_NewSheet(ByVal Sh As Object)
On Error Resume Next
Sh.Range("A1") = Format(Now, "dd-mmm-yyyy hh:mm:ss")
If Err.Number <> 0 Then
MsgBox "Looks like you inserted a chart sheet" & vbCrLf & "Error - " & Err.Description
End If
End Sub
‘Err.Number’ is used to get the error number and ‘Err.Description’ is used to get the error description. These will be covered later in this tutorial.
On Error GoTo 0
‘On Error GoTo 0’ will stop the code on the line that causes the error and shows a message box that describes the error.
In simple terms, it enables the default error checking behavior and shows the default error message.
Then why even use it?
Normally, you don’t need to use ‘On Error Goto 0’, but it can be useful when you use it in conjunction with ‘On Error Resume Next’
Let me explain!
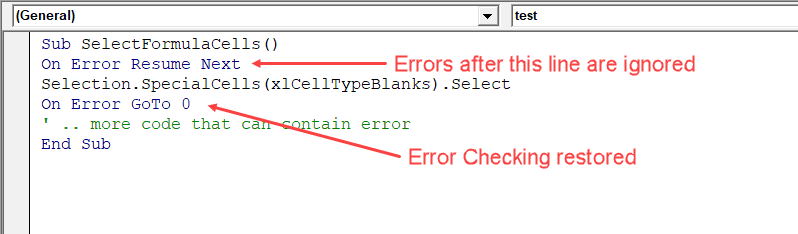
The below code would select all the blank cells in the selection.
Sub SelectFormulaCells()
Selection.SpecialCells(xlCellTypeBlanks).Select
End Sub
But it would show an error when there are no blank cells in the selected cells.
So to avoid showing the error, you can use On Error Resume next’
Now, it will also show any error when you run the below code:
Sub SelectFormulaCells()
On Error Resume Next
Selection.SpecialCells(xlCellTypeBlanks).Select
End Sub
So far, so good!
The problem arises when there is a part of the code where error can occur, and since you’re using ‘On Error Resume Next’, the code would simply ignore it and move to the next line.
For example, in the below code, there would no error prompt:
Sub SelectFormulaCells()
On Error Resume Next
Selection.SpecialCells(xlCellTypeBlanks).Select
' .. more code that can contain error
End Sub
In the above code, there are two places where an error can occur. The first place is where we are selecting all blank cells (using Selection.SpecialCells) and the second is in the remaining code.
While the first error is expected, any error after that is not.
This is where On Error Goto 0 comes to rescue.
When you use it, you reset the error setting to default, where it will start showing errors when it encounters it.
For example, in the below code, there would be no error in case there are no blank cells, but there would be an error prompt because of ’10/0′
Sub SelectFormulaCells()
On Error Resume Next
Selection.SpecialCells(xlCellTypeBlanks).Select
On Error GoTo 0
' .. more code that can contain error
End Sub
On Error Goto [Label]
The above two methods – ‘On Error Resume Next’ and ‘On Error Goto 0’ – doesn’t allow us to truly handle the error. One makes the code ignore the error and the second one resume error checking.
On Error Go [Label] is a way with which you can specify what you want to do in case your code has an error.
Below is the code structure that uses this error handler:
Sub Test()

On Error GoTo Label:
X = 10 / 0    'this line causes an error
' ....your remaining code goes here
Exit Sub

Label:
    ' code to handle the error
End Sub
Note that before the Error handling ‘Label’, there is an Exit Sub. This ensures that in case there are no errors, the sub is exited and the ‘Label’ code is not executed. In case you don’t use Exit Sub, it will always execute the ‘Label’ code.
In the example code below, when an error occurs, the code jumps and executes the code in the handler section (and shows a message box).
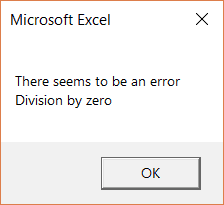
Sub Errorhandler()
On Error GoTo ErrMsg
X = 12
Y = 20 / 0
Z = 30
Exit Sub
ErrMsg:
MsgBox "There seems to be an error" & vbCrLf & Err.Description
End Sub
Note that when an error occurs, the code has already run and executed the lines before the line causing the error. In the above example, the code sets the value of X as 12, but since the error occurs in the next line, it doesn’t set the values for Y and Z.
Once the code jumps to the error handler code (ErrMsg in this example), it will continue to execute all the lines in and below the error handler code and the exit the sub.
On Error Goto -1
This one is a bit complicated, and in most cases, you’re unlikely to use this.
But I will still cover this as I have faced a situation where this was needed (feel free to ignore and jump to the next section if you’re only looking for basics).
Before I get into the mechanics of it, let me try and explain where can it be useful.
Suppose you have a code where an error is encountered. But all is good as you have one error handler in place. But what happens when there is another error in the error handler code (yeah.. somewhat like the inception movie).
In such a case, you can not use the second handler as the first error has not been cleared. So while you have handled the first error, in VBA’s memory it still exists. And the VBA memory only has a place for one error – not two or more than that.
In this scenario, you can use On Error Goto -1.
It clears the error and frees up VBA memory to handle the next error.
Enough talk!
Let’s me explain now by using examples.
Suppose I have the below code. This will throw an error as there is division by zero.
Sub Errorhandler()
X = 12
Y = 20 / 0
Z = 30
End Sub
So to handle it, I use an error handler code (with the name ErrMsg) as shown below:
Sub Errorhandler()

On Error GoTo ErrMsg

X = 12
Y = 20 / 0
Z = 30
Exit Sub

ErrMsg:
MsgBox "There seems to be an error" & vbCrLf & Err.Description
End Sub
All is good now again. As soon as the error occurs, the error handler is used and shows a message box as shown below.
Now, I expand the code so that I have more code in or after the error handler.
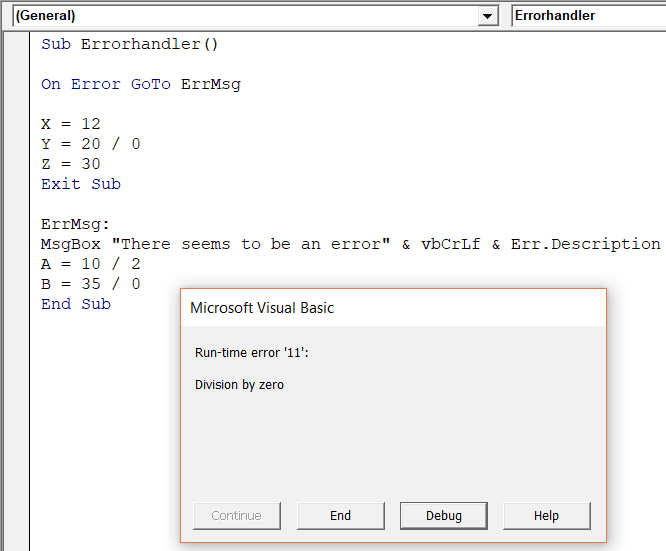
Sub Errorhandler()

On Error GoTo ErrMsg

X = 12
Y = 20 / 0
Z = 30
Exit Sub

ErrMsg:
MsgBox "There seems to be an error" & vbCrLf & Err.Description
A = 10 / 2
B = 35 / 0
End Sub
Since the first error has been handled but the second has not been, I again see an error as shown below.
Still all good. The code is behaving in the way we expected it to.
So to handle the second error, I use another error handler (ErrMsg2).
Sub Errorhandler()

On Error GoTo ErrMsg

X = 12
Y = 20 / 0
Z = 30
Exit Sub

ErrMsg:
MsgBox "There seems to be an error" & vbCrLf & Err.Description
On Error GoTo ErrMsg2
A = 10 / 2
B = 35 / 0
Exit Sub

ErrMsg2:
MsgBox "There seems to be an error again" & vbCrLf & Err.Description

End Sub
And this is where it doesn’t work as expected.
If you run the above code, it will still give you a run-time error, even after having the second error handler in place.
This happens as we didn’t clear the first error from VBA’s memory.
Yes, we handled it! But it still remains in the memory.
And when VBA encounters another error, it’s still stuck with the first error, and hence the second error handler is not used. The code stops at the line that caused the error and shows the error prompt.
To clear VBA’s memory and clear the previous error, you need to use the ‘On Error Goto -1’.
So if you add this line in the below code and run it, it will work as expected.
Sub Errorhandler()

On Error GoTo ErrMsg
X = 12
Y = 20 / 0
Z = 30
Exit Sub

ErrMsg:
MsgBox "There seems to be an error" & vbCrLf & Err.Description
On Error GoTo -1
On Error GoTo ErrMsg2
A = 10 / 2
B = 35 / 0
Exit Sub

ErrMsg2:
MsgBox "There seems to be an error again" & vbCrLf & Err.Description

End Sub
Note: The error automatically gets cleared when a subroutine ends. So, ‘On Error Goto -1’ can be useful when you’re getting two or more than two errors in the same subroutine.
The Err Object
Whenever an error occurs with a code, it’s the Err object that is used to get the details about the error (such as the error number or the description).
Err Object Properties
The Err Object has the following properties:
| Property | Description |
| Number | A number that represents the type of error. When there is no error, this value is 0 |
| Description | A short description of the error |
| Source | Project name in which the error has occurred |
| HelpContext | The help context id for the error in the help file |
| HelpFile | A string that represents the folder location and the file name of the help file |
While in most cases you don’t need to use Err object, it can sometimes be useful while handling errors in Excel.
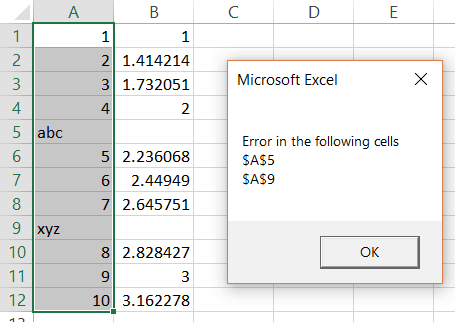
For example, suppose you have a dataset as shown below and for each number, in the selection, you want to calculate the square root in the adjacent cell.
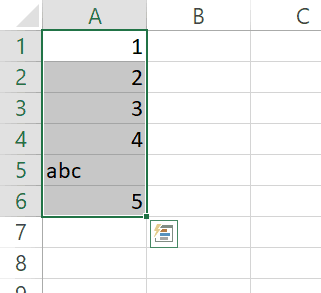
The below code can do it, but since there is a text string in cell A5, it shows an error as soon as this occurs.
Sub FindSqrRoot()
Dim rng As Range
Set rng = Selection

For Each cell In rng
    cell.Offset(0, 1).Value = Sqr(cell.Value)
Next cell

End Sub

The problem with this type of error message is that it gives you nothing about what has gone wrong and where the issue occurred.
You can use the Err object to make these error messages more meaningful.
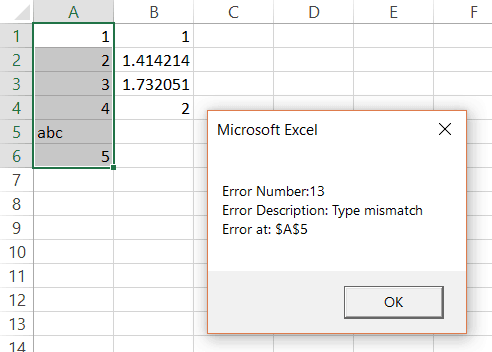
For example, if I now use the below VBA code, it will stop the code as soon as the error occurs and show a message box with the cell address of the cell where there is an issue.
Sub FindSqrRoot()
Dim rng As Range
Set rng = Selection

For Each cell In rng
    On Error GoTo ErrHandler
    cell.Offset(0, 1).Value = Sqr(cell.Value)
Next cell

ErrHandler:
MsgBox "Error Number:" & Err.Number & vbCrLf & _
    "Error Description: " & Err.Description & vbCrLf & _
    "Error at: " & cell.Address

End Sub
The above code would give you a lot more information than the simple ‘Type Mismatch’, especially the cell address so that you know where the error occurred.
You can further refine this code to make sure your code runs until the end (instead of breaking at each error) and then gives you a list of cell address where the error occurs.
The below code would do this:
Sub FindSqrRoot2()
Dim ErrorCells As String
Dim rng As Range

On Error Resume Next

Set rng = Selection
For Each cell In rng
cell.Offset(0, 1).Value = Sqr(cell.Value)

If Err.Number <> 0 Then
ErrorCells = ErrorCells & vbCrLf & cell.Address
On Error GoTo -1
End If
Next cell
MsgBox "Error in the following cells" & ErrorCells
Exit Sub

End Sub
The above code runs until the end and gives the square root of all the cells that have numbers in it (in the adjacent column). It then shows a message that lists all the cells where there was an error (as shown below):
Err Object Methods
While the Err properties are useful to show useful information about the errors, there are two Err methods as well that can help you with error handling.
| Method | Description |
| Clear | Clears all the property settings of the Err object |
| Raise | Generates a run-time error |
Let’s quickly learn what these are and how/why to use these with VBA in Excel.
Err Clear Method
Suppose you have a dataset as shown below and you want to get the square root of all these numbers in the adjacent column.
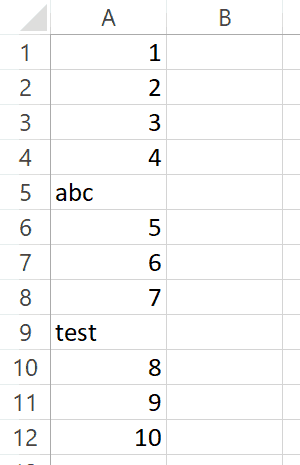
The following code will get the square roots of all the numbers in the adjacent column and show a message that an error occurred for cell A5 and A9 (as these have text in it).
Sub FindSqrRoot2()
Dim ErrorCells As String
Dim rng As Range

On Error Resume Next

Set rng = Selection
For Each cell In rng
cell.Offset(0, 1).Value = Sqr(cell.Value)

If Err.Number <> 0 Then
ErrorCells = ErrorCells & vbCrLf & cell.Address
Err.Clear
End If
Next cell
MsgBox "Error in the following cells" & ErrorCells

End Sub
Note that I have used the Err.Clear method within the If Then statement.
Once an error has occurred and trapped by the If condition, Err.Clear method resets the error number back to 0. This ensures that IF condition only trap the errors for cells where it is raised.
Had I not used the Err.Clear method, once the error occurs, it would always be true in the IF condition, and the error number has not been reset.
Another way of making this work is by using the On Error Goto -1, which resets the error completely.
Note: Err.Clear is different from On Error Goto -1. Err.Clear only clears the error description and the error number. it doesn’t completely reset it. This means that if there is another instance of error in the same code, you won’t be able to handle it before resetting it (which can be done with ‘On Error Goto -1’ and not by ‘Err.Clear’).
Err Raise Method
The Err.Raise method allows you to raise a run-time error.
Below is the syntax of using the Err.Raise method:
Err.Raise [number], [source], [description], [helpfile], [helpcontext]
All these arguments are optional and you can use these to make your error message more meaningful.
But why would you ever want to raise an error yourself?
Good question!
You can use this method when there is an instance of an error (which means that there is going to an error anyway) and then you use this method to tell the user more about the error (instead of the less helpful error message that VBA shows by default).
For example, suppose you have a dataset as shown below and you want all the cells to have numeric values only.
Sub RaiseError()
Dim rng As Range
Set rng = Selection

On Error GoTo ErrHandler

For Each Cell In rng
If Not (IsNumeric(Cell.Value)) Then
Err.Raise vbObjectError + 513, Cell.Address, "Not a number", "Test.html"
End If
Next Cell

ErrHandler:
MsgBox Err.Description & vbCrLf & Err.HelpFile
End Sub
The above code would show an error message that has the specified description and the context file.
Personally, I have never used Err.Raise as I mostly work with Excel only. But for someone who uses VBA to work with Excel along with other applications such as Outlook, Word or PowerPoint, this can be useful.
Here is a detailed article on Err.Raise method in case you want to learn more.
VBA Error Handling Best Practices
No matter how skilled you get a writing VBA code, errors are always going to be a part of it. The best coders are those who have the skills to handle these errors properly.
Here are some best practices you can use when it comes to error handling in Excel VBA.
- Use ‘On Error Go [Label]’ at the beginning of the code. This will make sure any error that can happen from there is handled.
- Use ‘On Error Resume Next’ ONLY when you’re sure about the errors that can occur. Use it with expected error only. In case you use it with unexpected errors, it will simply ignore it and move forward. You can use ‘On Error Resume Next’ with ‘Err.Raise’ if you want to ignore a certain type of error and catch the rest.
- When using error handlers, make sure you’re using Exit Sub before the handlers. This will ensure that the error handler code is executed only when there is an error (else it will always be executed).
- Use multiple error handlers to trap different kinds of errors. Having multiple error handler ensures that an error is properly addressed. For example, you would want to handle a ‘type mismatch’ error differently than a ‘Division by 0’ run-time error.
Hope you found this Excel article useful!
Here are some more Excel VBA Tutorials that you may like:
- Excel VBA Data Types – A Complete Guide
- Excel VBA Loops – For Next, Do While, Do Until, For Each
- Excel VBA Events – An Easy (and Complete) Guide
- Excel Visual Basic Editor – How to Open and Use it in Excel