
In this Article
- VBA PDF (Free Downloads)
- Word VBA Examples “CheatSheet”
- Select / Go To
- Bookmarks
- Document
- Columns
- Font
- Insert
- Loops
- Paragraph
- Word VBA Macro Tutorial
- Simple Word Macro Example
- Word Macro Basics
- Word Document Object
- Application
- Documents
- Document Methods
- Range, Selection, Paragraphs
- Range
- Selection
- Paragraphs
- Word VBA Tutorial Conclusion
- Word Macro Examples
- Word VBA FAQs
Welcome to our Word VBA / Macros Mega-Guide!
This page contains:
-
- Word VBA Tutorial PDF (Free Download)
- Word VBA “Cheat Sheet” containing a list of the most commonly used Word VBA code snippets
- Full Word VBA / Macro tutorial.
- Searchable list of all of our Word VBA Macro Tutorials
You might also be interested in our Interactive VBA Tutorial for Excel. While some of the examples / exercises are specific to Excel VBA, much of the content is generic to all VBA and you may find it useful to learn concepts like If Statements, Loops, MessageBoxes, and more.
VBA PDF (Free Downloads)
Download our free Microsoft Word VBA Tutorial! Or VBA Tutorials for other Office Programs!

Download
Word VBA Examples “CheatSheet”
Below you will find simple VBA code examples for working with Microsoft Word.
Select / Go To
Backspace
Selection.TypeBackspace
Select Entire Document
Selection.HomeKey Unit:=wdStory
Selection.Extend
Delete
Selection.Delete Unit:=wdCharacter, Count:=1
Insert After
Selection.InsertAfter “text”
Beginning of Line
Selection.HomeKey Unit:=wdLine
End of Line
Selection.EndKey Unit:=wdLine
Select All
Selection.WholeStory
Select Entire Line
Selection.EndKey Unit:=wdLine, Extend:=wdExtend
Move Up Paragraph
Selection.MoveUp Unit:=wdParagraph, Count:=1
Move Right One Character
Selection.MoveRight Unit:=wdCharacter, Count:=1
Move Right One Cell in Table
Selection.MoveRight Unit:=wdCell
Go To Start of Doc
Selection.HomeKey Unit:=wdStory
Go To End of Doc
Selection.EndKey Unit:=wdStory
Go To Page 1
Selection.GoTo What:=wdGoToPage, Which:=wdGoToNext, Name:=”1″
Go To Top of Page
Selection.GoTo What:=wdGoToBookmark, Name:=”Page”
Selection.MoveLeft Unit:=wdCharacter, Count:=1
Return to Top
Bookmarks
Add
With ActiveDocument.Bookmarks
.Add Range:=Selection.Range, Name:=”Name”
.DefaultSorting = wdSortByName
.ShowHidden = False
End With
Count
Dim n as Integer
n = ActiveDocument.Bookmarks.Count
Delete
ActiveDocument.Bookmarks(“BookmarkName”).Delete
Exists?
If ActiveDocument.Bookmarks.Exists(“BookmarkName”) = True then
‘Do something
End If
Go To
Selection.GoTo What:=wdGoToBookmark, Name:=”BookmarkName”
Select
ActiveDocument.Bookmarks(“BookmarkName”).Select
Replace Text
Selection.GoTo What:=wdGoToBookmark, Name:=”BookmarkName”
Selection.Delete Unit:=wdCharacter, Count:=1
Selection.InsertAfter “New Text”
ActiveDocument.Bookmarks.Add Range:=Selection.Range, _
Name:=”BookmarkName”
Return to Top
Document
Activate
Documents(“Example.doc”).Activate
Add to Variable
Dim doc As Document
Set doc = Documents.Add
Add (From Another Doc)
Documents.Add Template:=”C:FormsFormDoc.doc”, _
NewTemplate:=False
Close
Documents(“Example.doc”).Close
Close – Save Changes
Documents(“Example.doc”).Close SaveChanges:=wdSaveChanges
Close – Do Not Save
Documents(“Example.doc”).Close SaveChanges:=wdDoNotSaveChanges
Close – Prompt to Save
Documents(“Example.doc”).Close SaveChanges:=wdPromptToSaveChanges
Return to Top
Columns
Save As
Documents(“Example.doc”).SaveAs (“C:ExampleExample.doc”)
Save
Documents(“Example.doc”).Save
Protect
Documents(“Example.doc”).Protect Password:=”password”
Unprotect
Documents(“Example.doc”).UnProtect Password:=”password”
Number of Pages
Dim varNumberPages as Variant
varNumberPages = _
ActiveDocument.Content.Information(wdActiveEndAdjustedPageNumber)
Documents(“Example.doc”).Print
Return to Top
VBA Coding Made Easy
Stop searching for VBA code online. Learn more about AutoMacro — A VBA Code Builder that allows beginners to code procedures from scratch with minimal coding knowledge and with many time-saving features for all users!

Learn More
Font
Size
Selection.Font.Size = 12
Bold
Selection.Font.Bold = True
Italics
Selection.Font.Italic = True
Underline
Selection.Font.Underline = wdUnderlineSingle
All Caps
Selection.Font.AllCaps = True
Color
Selection.Font.TextColor = vbRed
Name
Selection.Font.Name = “Abadi”
Subscript
Selection.Font.Subscript = True
SuperScript
Selection.Font.Superscript = True
Highlight Color
Selection.Range.HighlightColorIndex = wdYellow
Style
Selection.Style = ActiveDocument.Styles(“Normal”)
Return to Top
Insert
Insert AutoText
Selection.TypeText Text:=”a3″
Selection.Range.InsertAutoText
Insert File
Selection.InsertFile (“C:DocsSomething.doc”)
Insert Page Break
Selection.InsertBreak Type:=wdPageBreak
Insert Paragraph Symbol
Selection.TypeText Text:=Chr$(182)
Insert Tab
Selection.TypeText Text:=vbTab
Insert Text
Selection.TypeText Text:=”Any Text”
Insert Type Paragraph
Selection.TypeParagraph
Insert Paragraph
Selection.InsertParagraph
Return to Top
Loops
Do Until End of Doc
Do Until ActiveDocument.Bookmarks(“Sel”) = ActiveDocument.Bookmarks(“EndOfDoc”)
‘Do Something
Sub
For Each Doc in Docs
Dim doc As Document
ForEach doc In Documents
‘Do Something
Next doc
Loop Through Paragraphs
Sub through Paragraphs
Dim i As Long, iParCount As Long
iParCount = ActiveDocument.Paragraphs.CountFori = 1 To iParCount
ActiveDocument.Paragraphs(i).Alignment = wdAlignParagraphLeft
Next i
Return to Top
VBA Programming | Code Generator does work for you!
Paragraph
KeepLinesTogether
Selection.ParagraphFormat.KeepTogether = True
KeepWithNext
Selection.ParagraphFormat.KeepWithNext = True
Space After
Selection.ParagraphFormat.SpaceAfter = 12
Space Before
Selection.ParagraphFormat.SpaceBefore = 0
Align Center
Selection.ParagraphFormat.Alignment = wdAlignParagraphCenter
Align Right
Selection.ParagraphFormat.Alignment = wdAlignParagraphRight
Align Left
Selection.ParagraphFormat.Alignment = wdAlignParagraphLeft
Left Indent
Selection.ParagraphFormat.LeftIndent = InchesToPoints(3.75)
Right Indent
Selection.ParagraphFormat.RightIndent = InchesToPoints(1)
Line Spacing
With Selection.ParagraphFormat
.LineSpacingRule = wdLineSpaceExactly
.LineSpacing = 12
End With
Loop Through All Paragraphs
Sub through Paragraphs
Dim i As Long, iParCount As Long
iParCount = ActiveDocument.Paragraphs.CountFori = 1 To iParCount
ActiveDocument.Paragraphs(i).Alignment = wdAlignParagraphLeft
Next i
Return to Top
Word VBA Macro Tutorial
This is a tutorial for using VBA with Microsoft Word. This tutorial will teach you how to write a simple Macro and interact with Documents, Ranges, Selections, and Paragraphs.
Note: If you’re brand new to Macros / VBA you might also find this article useful: How to write VBA Macros from Scratch.
VBA is the programming language used to automate Microsoft Office programs including Word, Excel, Outlook, PowerPoint, and Access.
Macros are blocks of VBA code that perform specific tasks.
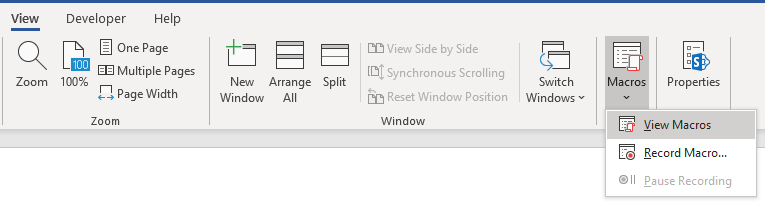
When you Record a Macro, Word will write VBA code into a Macro, allowing you to repeat your actions. You can see a list of all available Macros from View > Macros.
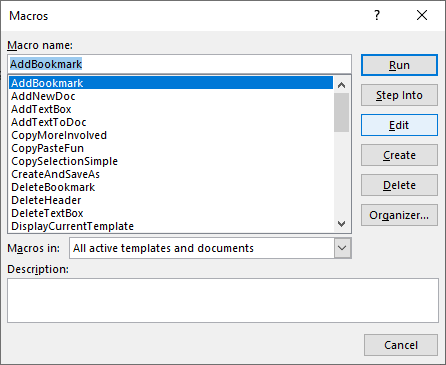
After recording a Macro, you will be able to edit the Macro from the Macro List:
When you click Edit, you open the VBA Editor. Using the VBA Editor you can edit recorded Macros or write a Word Macro from scratch. To access the VBA Editor use the shortcut ALT + F11 or click Visual Basic from the Developer Ribbon.

Simple Word Macro Example
This is a simple example of a Word VBA Macro. It performs the following tasks:
- Opens a Word Document
- Writes to Document
- Closes and Saves the Word Document.
Sub WordMacroExample()

    'Open Doc & Assign to Variable
    Dim oDoc As Document
    Set oDoc = Documents.Open("c:UserssomeoneNewDocument.docx")

    'Write To Doc
    Selection.TypeText "www.automateexcel.com"
    Selection.TypeParagraph

    'Save and Close Doc
    oDoc.Save
    oDoc.Close

End Sub
Word Macro Basics
All VBA code must be stored within procedures like this. To create a procedure in VBA type “Sub WordMacroExample” (Where “WordMacroExample” is your desired Macro name) and press ENTER. VBA will automatically add the parenthesis and End Sub.
Word Document Object
When interacting with Microsoft Word in VBA, you will frequently reference Word “Objects”. The most common objects are:
Application Object – Microsoft Word itself
Document Object – A Word document
Range Object – A part of a Word document
Selection Object – A selected range or cursor location.
AutoMacro | Ultimate VBA Add-in | Click for Free Trial!
Application
Application is the “top-level” object. All other objects in Word can be reached through it.
In addition to accessing other Word objects, there are “application-level” settings that can be applied:
Application.Options.AllowDragAndDrop = TrueThis is an example of accessing the “Selection” of “Windows(1)” with in the Application:
Application.Windows(1).Selection.Characters.CountHowever, the most common Word objects can be accessed directly, without typing the full hierarchy. So instead, you can (and should) just type:
Selection.Characters.CountDocuments
ActiveDocument
Often, you will have two or more documents opened in Word and you will need specify which specific Word Document to interact with. One way to specify which document is to use ActiveDocument. For example:
ActiveDocument.PrintOut…would print the ActiveDocument. The ActiveDocument is the document in Word which “has focus”
To switch the ActiveDocument, use the Activate command:
Documents("Example.docx").ActivateThisDocument
Instead of using ActiveDocument to reference the active document, you can use ThisDocument to reference the document where the macro is stored. ThisDocument will never change.
ThisDocument.PrintOutDocument Variables
However, for more complicated macros, it can be hard to keep track of the Active Document. It can also be frustrating to switch back and forth between documents.
Instead, you can use Document variables.
This macro will assign the ActiveDocument to a variable and then print the document using the variable:
Sub VarExample()
    Dim oDoc As Document
    Set oDoc = ActiveDocument
    oDoc.PrintOut
End Sub
Document Methods
Open Document
To Open a Word Document:
Documents.Open "c:UsersSomeOneDesktopTest PM.docx"We recommend always assigning a Document to a variable upon opening it:
Dim oDoc as Document
Set oDoc = Documents.Open("c:UsersSomeOneDesktopTest PM.docx")
Create New Document
To create a new Word Document:
Documents.AddWe can instruct Word to create a new doc based on some template:
Documents.Add Template:="C:Program FilesMicrosoft OfficeTemplatesMyTemplate.dotx"As always, it is useful and huge problem saver to assign document to variable upon creating or opening:
Dim oDoc as Document
Set oDoc = Documents.Add (Template:="C:Program FilesMicrosoft OfficeTemplatesMyTemplate.dotx")
Save Document
To save a document:
ActiveDocument.Saveor SaveAs:
ActiveDocument.SaveAs FileName:= c:UsersSomeOneDesktoptest2.docx", FileFormat:=wdFormatDocumentClose Document
To close a Document and save changes:
ActiveDocument.Close wdSaveChangesor without saving changes:
ActiveDocument.Close wdDoNotSaveChangesPrint Document
This will print the active Document:
ActiveDocument.PrintOutRange, Selection, Paragraphs
Range and Selection are probably the most important objects in Word VBA, certainly the most used.
Range refers to some portion of document, usually, but not necessarily, text.
Selection refers to selected text (or other object like pictures) or, if nothing is selected, an insertion point.
Paragraphs represent paragraphs in document. Its less important than it sounds, because you can’t directly access paragraph text (you need to access particular paragraph range to make modifications).
AutoMacro | Ultimate VBA Add-in | Click for Free Trial!
Range
Range can be any part of document, including entire document:
Dim oRange As Range
Set oRange = ActiveDocument.Content
or it can be small as one character.
Another example, this range would refer to first word in document:
Dim oRange As Range
Set oRange = ActiveDocument.Range.Words(1)
Usually, you would want to get range which refers to specific part of document and then modify it.
In the following example we will make the first word of second paragraph bold:
Dim oRange As Range
Set oRange = ActiveDocument.Paragraphs(2).Range.Words(1)
oRange.Bold = True
Set Range Text
To set the text value of a Range:
Dim oRange As Range
Set oRange = ActiveDocument.Paragraphs(2).Range.Words(1)
oRange.Text = “Hello ”
(Tip: Note the space after “Hello”. Because word object includes space after word, with just “hello” we would get “Hellonext word”)
There are hundreds of things which you can do with ranges. Just a few examples (these assume you are already made object variable oRange referring to range of interest):
Change font
oRange.Font.Name = "Arial"Display in message box number of characters in particular range
MsgBox oRange.Characters.CountInsert some text before it
oRange.InsertBefore "this is inserted text "Add a footnote to range
ActiveDocument.Footnotes.Add Range:=oRange, _
Text:="Read more at automateexcel.com."
Copy it to clipboard
oRange.Copy
Often you need to change to what is particular range referring. So you can start it’s start and end
oRange.Start = 5
oRange.End = 50
After above code, oRange would refer to text starting with fifth and ending with 50th character in document.
Selection
Selection is even more widely used than Range, because it is easier to work with Selections than Ranges, IF your macro ONLY interacts with the ActiveDocument.
First select the desired part of your document. For example select the second paragraph in active document:
ActiveDocument.Paragraphs(2).Range.SelectThen you can use the Selection Object to type some text:
Selection.TypeText "Some text"We can type some paragraphs bellow “Some text”:
Selection.TypeText "Some text"
Selection.TypeParagraph
Often, it’s necessary to know if some text is selected or we have just a insertion point:
If Selection.Type <> wdSelectionIP Then
    Selection.Font.Bold = True
Else
    MsgBox "You need to select some text."
End If
When working with Selection object we want to place insertion point to particular place, and issue commands starting from this point.
Beginning of document:
Selection.HomeKey Unit:=wdStory, Extend:=wdMoveBeginning of current line:
Selection.HomeKey Unit:=wdLine, Extend:=wdMoveThe Extend parameter wdMove moves the insertion point. Instead, you could use wdExtend which will select all text between the current insertion point.
Selection.HomeKey Unit:=wdLine, Extend:=wdExtendMove Selection
The most useful method for changing position of insertion point is Move. To move Selection two characters forward:
Selection.Move Unit:=wdCharacter, Count:=2to move it backwards, use negative number for Count parameter:
Selection.Move Unit:=wdCharacter, Count:=-2Unit parameter can be wdCharacter, wdWord, wdLine, or more (use Word VBA help to see others).
To move words instead:
Selection.Move unit:=wdWord, Count:=2Selection is easier to work with (compared to ranges) because it is like a robot using Word, mimicking human user. Where Insertion point is – some action would take place. But, this means that you must take care where insertion point is! This is not easy after many steps in code. Otherwise, Word would change text in not desired place.
In the case you need some property or method not available in Selection object you can always easily obtain range associated with selection:
Set oRange = Selection.RangeTIP: Using Selection is often easier than using ranges, but also it’s way slower (important when you deal with big documents)
Paragraphs
You can’t directly use Paragraphs object to change text:
ActiveDocument.Paragraphs(1).Text = "No, it wouldn't work"Above wouldn’t work (actually it will throw an error). You need to first obtain range associated with particular paragraph:
ActiveDocument.Paragraphs(1).Range.Text = "It works now :)"But you can directly change its style:
ActiveDocument.Paragraphs(1).Style = "Normal"or change its paragraph level formatting:
ActiveDocument.Paragraphs(1).LeftIndent = 10or maybe you want to keep this paragraph on the same line with next paragraph:
ActiveDocument.Paragraphs(1).KeepWithNext = TrueMake paragraph centered:
ActiveDocument.Paragraphs(1).Alignment = wdAlignParagraphCenterIt is VERY useful to assign a particular paragraph to object variable. If we assign particular paragraph to variable we don’t have to worry if the first paragraph becomes the second because we inserted one paragraph before it:
dim oPara as Paragraph
Set oPara = Selection.Paragraphs(1) ‘here we assign first paragraph of current selection to variable
Here is an example where we insert a paragraph above the first paragraph, but we can still reference the old first paragraph because it was assigned to a variable:
Sub ParagraphExample()
    Dim oPara As Paragraph
    Set oPara = ActiveDocument.Paragraphs(1)
    MsgBox oPara.Range.Text
    oPara.Range.InsertParagraphBefore 'Insert Paragraph
    MsgBox oPara.Range.Text
End Sub
Paragraph object is very frequently used in loops:
Sub LoopThroughParagraphs()

    Dim oPara As Paragraph
    For Each oPara In ActiveDocument.Paragraphs
        'do something with it. We will just display
        'paragraph text if its style is "Heading 4"
        If oPara.Style = "Heading 4" Then
            MsgBox oPara.Range.Text
        End If
    Next oPara

End Sub
Word VBA Tutorial Conclusion
This tutorial covered the basics of Word VBA. If you’re new to VBA, you should also review our general VBA Tutorial to learn more about Variables, Loops, MessageBoxes, Settings, Conditional Logic and much more.
AutoMacro | Ultimate VBA Add-in | Click for Free Trial!
Word Macro Examples
Word VBA FAQs
What is a Word Macro?
A Macro is a general term that refers to a set of programming instructions that automates tasks. Word Macros automate tasks in Word using the VBA programming language.
Does word have VBA?
Yes, Microsoft Word has the VBA Editor. It can be accessed with by pressing ALT + F11 or by navigating to Developer > Visual Basic.
How do I use VBA in Word?
1. Open the VBA Editor (ALT + F11 or Developer > Visual Basic)
2. Go to Insert > Module to create a Code Module
3. Type ‘Sub HelloWorld’ and press Enter
4. In between the lines ‘Sub HelloWorld’ and ‘End Sub’, type ‘MsgBox “Hello World!’
5. You’ve created a Macro!
6. Now press ‘F5’ to run the Macro
Содержание
- VBA PDF (бесплатные загрузки)
- Примеры Word VBA «Шпаргалка»
- Учебное пособие по макросам Word VBA
- Пример простого макроса Word
- Объект документа Word
- Документы
- Диапазон, выделение, абзацы
- Примеры макросов Word
Добро пожаловать в наше мега-руководство по Word VBA / макросам!
Эта страница содержит:
-
- Учебное пособие по Word VBA в формате PDF (бесплатная загрузка)
- Word VBA «Шпаргалка», содержащая список наиболее часто используемых фрагментов кода Word VBA.
- Полное руководство по Word VBA / Macro.
- Список всех наших руководств по макросам Word VBA с возможностью поиска
Возможно, вас заинтересует наше интерактивное руководство по VBA для Excel. Хотя некоторые из примеров / упражнений относятся к Excel VBA, большая часть содержимого является общим для всех VBA, и вам может быть полезно изучить такие концепции, как If, Loops, MessageBoxes и т. Д.
VBA PDF (бесплатные загрузки)
Загрузите наше бесплатное руководство по Microsoft Word VBA! Или учебники VBA для других программ Office!

Скачать
Ниже вы найдете простые примеры кода VBA для работы с Microsoft Word.
Выбрать / перейти к
ОписаниеКод VBABackspaceSelection.TypeBackspaceВыбрать весь документSelection.HomeKey Unit: = wdStory
Selection.ExtendКопироватьSelection.CopyУдалитьSelection.Delete Unit: = wdCharacter, Count: = 1Вставить послеSelection.InsertAfter «текст»Начало строкиSelection.HomeKey Unit: = wdLineКонец линииSelection.EndKey Unit: = wdLineВставитьSelection.PasteВыбрать всеSelection.WholeStoryВыбрать всю строкуSelection.EndKey Unit: = wdLine, Extend: = wdExtendВверх по абзацуSelection.MoveUp Unit: = wdParagraph, Count: = 1Переместить вправо на один символSelection.MoveRight Unit: = wdCharacter, Count: = 1Переместить вправо на одну ячейку в таблицеSelection.MoveRight Unit: = wdCellПерейти к началу документаSelection.HomeKey Unit: = wdStoryПерейти в конец документаSelection.EndKey Unit: = wdStoryПерейти на страницу 1Selection.GoTo What: = wdGoToPage, Which: = wdGoToNext, Name: = ”1 ″Перейти к началу страницыSelection.GoTo What: = wdGoToBookmark, Name: = ” Page”
Selection.MoveLeft Unit: = wdCharacter, Count: = 1
Return to Top
Закладки
ОписаниеКод VBAДобавлятьС ActiveDocument.Bookmarks
.Add Range: = Selection.Range, Name: = «Name».
.DefaultSorting = wdSortByName
.ShowHidden = Ложь
Конец сСчитатьDim n as Integer
n = ActiveDocument.Bookmarks.CountУдалитьActiveDocument.Bookmarks («Имя закладки»). УдалитьСуществуют?Если ActiveDocument.Bookmarks.Exists («BookmarkName») = True, то
‘Сделай что-нибудь
Конец, еслиПерейти кSelection.GoTo What: = wdGoToBookmark, Name: = ”BookmarkName”ВыбиратьActiveDocument.Bookmarks («Имя закладки»). ВыберитеЗаменить текстSelection.GoTo What: = wdGoToBookmark, Name: = ”BookmarkName”
Selection.Delete Unit: = wdCharacter, Count: = 1
Selection.InsertAfter «Новый текст»
ActiveDocument.Bookmarks.Add Range: = Selection.Range, _
Name: = ”BookmarkName”
Return to Top
Документ
ОписаниеКод VBAАктивироватьДокументы («Example.doc»). АктивироватьДобавить в переменнуюDim doc As Document
Установить doc = Documents.AddДобавлятьDocuments.AddДобавить (из другого документа)Documents.Add Template: = ”C: Forms FormDoc.doc”, _
NewTemplate: = FalseЗакрыватьДокументы («Example.doc»). ЗакрытьЗакрыть — сохранить измененияДокументы («Example.doc»). Закройте SaveChanges: = wdSaveChangesЗакрыть — не сохранятьДокументы («Example.doc»). Закройте SaveChanges: = wdDoNotSaveChanges.Закрыть — запрос на сохранениеДокументы («Example.doc»). Закройте SaveChanges: = wdPromptToSaveChanges.
Return to Top
Столбцы
ОписаниеКод VBAСохранить какДокументы («Example.doc»). SaveAs («C: Example Example.doc»)СохранитьДокументы («Example.doc»). СохранитьЗащищатьДокументы («Example.doc»). Защитить пароль: = «пароль»Снять защитуДокументы («Example.doc»). Снять пароль: = «пароль»Число страницDim varNumberPages как вариант
varNumberPages = _
ActiveDocument.Content.Information (wdActiveEndAdjustedPageNumber)РаспечататьДокументы («Example.doc»). Распечатать
Return to Top
Устали искать примеры кода VBA? Попробуйте AutoMacro!
Шрифт
ОписаниеКод VBAРазмерSelection.Font.Size = 12ЖирныйSelection.Font.Bold = TrueКурсивSelection.Font.Italic = TrueПодчеркиваниеSelection.Font.Underline = wdUnderlineSingleВсе заглавные буквыSelection.Font.AllCaps = TrueЦветSelection.Font.TextColor = vbRedИмяSelection.Font.Name = «Абади»Нижний индексSelection.Font.Subscript = TrueSuperScriptSelection.Font.Superscript = TrueЦвет выделенияSelection.Range.HighlightColorIndex = wdYellowСтильSelection.Style = ActiveDocument.Styles («Нормальный»)
Return to Top
Вставлять
ОписаниеКод VBAВставить автотекстSelection.TypeText Текст: = ”a3 ″
Selection.Range.InsertAutoTextВставить код датыВставить файлSelection.InsertFile («C: Docs Something.doc»)Вставить разрыв страницыSelection.InsertBreak Тип: = wdPageBreakВставить символ абзацаSelection.TypeText Text: = Chr $ (182)Вставить вкладкуSelection.TypeText Текст: = vbTabВставить текстSelection.TypeText Text: = «Любой текст»Вставить абзац типаSelection.TypeParagraphВставить абзацSelection.InsertParagraph
Return to Top
Петли
ОписаниеКод VBAСделать до конца документаСделать до ActiveDocument.Bookmarks (« Sel») = ActiveDocument.Bookmarks (« EndOfDoc»)
‘Сделай что-нибудь
SubДля каждого документа в ДокументахDim doc As Document
Для каждого документа в документах
‘Сделай что-нибудь
Следующий документЦикл по абзацамПодпункты через абзацы
Dim i As Long, iParCount As Long
iParCount = ActiveDocument.Paragraphs.CountFori = 1 На iParCount
ActiveDocument.Paragraphs (i) .Alignment = wdAlignParagraphLeft
Далее я
Return to Top
Пункт
ОписаниеКод VBAKeepLinesTogetherSelection.ParagraphFormat.KeepTogether = TrueKeepWithNextSelection.ParagraphFormat.KeepWithNext = ИстинаПробел послеSelection.ParagraphFormat.SpaceAfter = 12Пространство доSelection.ParagraphFormat.SpaceBefore = 0Выровнять по центруSelection.ParagraphFormat.Alignment = wdAlignParagraphCenterВыровнять по правому краюSelection.ParagraphFormat.Alignment = wdAlignParagraphRightВыровнять по левому краюSelection.ParagraphFormat.Alignment = wdAlignParagraphLeftЛевый отступSelection.ParagraphFormat.LeftIndent = InchesToPoints (3,75)Правый отступSelection.ParagraphFormat.RightIndent = InchesToPoints (1)Межстрочный интервалС Selection.ParagraphFormat
.LineSpacingRule = wdLineSpaceExactly
.LineSpacing = 12
Конец сПеребрать все абзацыПодпункты через абзацы
Dim i As Long, iParCount As Long
iParCount = ActiveDocument.Paragraphs.CountFori = 1 На iParCount
ActiveDocument.Paragraphs (i) .Alignment = wdAlignParagraphLeft
Далее я
Return to Top
Учебное пособие по макросам Word VBA
Это руководство по использованию VBA с Microsoft Word. Это руководство научит вас писать простой макрос и взаимодействовать с документами, диапазонами, выделениями и абзацами.
Примечание. Если вы новичок в Macros / VBA, вам также может быть полезна эта статья: Как писать макросы VBA с нуля.
VBA — это язык программирования, используемый для автоматизации программ Microsoft Office, включая Word, Excel, Outlook, PowerPoint и Access.
Макросы представляют собой блоки кода VBA, которые выполняют определенные задачи.
Когда ты Записать макрос, Word запишет код VBA в макрос, что позволит вам повторять ваши действия. Вы можете увидеть список всех доступных макросов из Просмотр> Макросы.

После записи макроса вы сможете редактировать макрос из списка макросов:

Когда вы нажимаете Редактировать, вы открываете Редактор VBA. Используя редактор VBA, вы можете редактировать записанные макросы или писать макрос Word с нуля. Для доступа к редактору VBA используйте ярлык ALT + F11 или щелкните Visual Basic от Лента разработчика.

Пример простого макроса Word
Это простой пример макроса Word VBA. Он выполняет следующие задачи:
- Открывает документ Word
- Записывает в документ
- Закрывает и сохраняет документ Word.
| 123456789101112131415 | Sub WordMacroExample ()’Открыть документ и назначить переменнойDim oDoc как документУстановите oDoc = Documents.Open («c: Users something NewDocument.docx»).’Написать в документSelection.TypeText «www.automateexcel.com»Selection.TypeParagraph’Сохранить и закрыть документoDoc.SaveoDoc.CloseКонец подписки |
Основы работы с макросами Word
Весь код VBA должен храниться в подобных процедурах. Чтобы создать процедуру в VBA, введите «Sub WordMacroExample» (где «WordMacroExample» — желаемое имя макроса) и нажмите ВХОДИТЬ. VBA автоматически добавит круглые скобки и End Sub.

Объект документа Word
При взаимодействии с Microsoft Word в VBA вы часто будете ссылаться на Word «Объекты». Наиболее распространенные объекты:
Объект приложения — сам Microsoft Word
Объект документа — документ Word
Объект диапазона — Часть документа Word
Объект выделения — Выбранный диапазон или положение курсора.
заявка
Приложение — это объект «верхнего уровня». Через него можно получить доступ ко всем остальным объектам Word.
Помимо доступа к другим объектам Word, можно применить настройки «уровня приложения»:
| 1 | Application.Options.AllowDragAndDrop = True |
Это пример доступа к «Выборке» в «Windows (1)» в Приложении:
| 1 | Application.Windows (1) .Selection.Characters.Count |
Однако к наиболее распространенным объектам Word можно получить доступ напрямую, без ввода полной иерархии. Поэтому вместо этого вы можете (и должны) просто ввести:
| 1 | Selection.Characters.Count |
Документы
ActiveDocument
Часто у вас есть два или более документов, открытых в Word, и вам нужно указать, с каким конкретным документом Word следует взаимодействовать. Один из способов указать, какой документ использовать ActiveDocument. Например:
| 1 | ActiveDocument.PrintOut |
… Напечатал бы ActiveDocument. ActiveDocument — это документ в Word, который «имеет фокус»
Чтобы переключить ActiveDocument, используйте команду Activate:
| 1 | Документы («Example.docx»). Активировать |
Этот документ
Вместо использования ActiveDocument для ссылки на активный документ вы можете использовать ThisDocument для ссылки на документ, в котором хранится макрос. Этот документ никогда не изменится.
Переменные документа
Однако для более сложных макросов может быть сложно отслеживать активный документ. Также может быть неприятно переключаться между документами.
Вместо этого вы можете использовать переменные документа.
Этот макрос назначит ActiveDocument переменной, а затем распечатает документ, используя переменную:
| 12345 | Sub VarExample ()Dim oDoc как документУстановите oDoc = ActiveDocumentoDoc.PrintOutКонец подписки |
Документ Методы
Открыть документ
Чтобы открыть документ Word:
| 1 | Documents.Open «c: Users SomeOne Desktop Test PM.docx» |
Мы рекомендуем всегда назначать документ переменной при его открытии:
| 12 | Dim oDoc как документУстановите oDoc = Documents.Open («c: Users SomeOne Desktop Test PM.docx»). |
Создать новый документ
Чтобы создать новый документ Word:
Мы можем указать Word создать новый документ на основе некоторого шаблона:
| 1 | Documents.Add Template: = «C: Program Files Microsoft Office Templates MyTemplate.dotx» |
Как всегда, присвоение документа переменной при создании или открытии помогает избавить от серьезных проблем:
| 12 | Dim oDoc как документУстановите oDoc = Documents.Add (Template: = «C: Program Files Microsoft Office Templates MyTemplate.dotx») |
Сохранить документ
Чтобы сохранить документ:
или Сохранить как:
| 1 | ActiveDocument.SaveAs FileName: = c: Users SomeOne Desktop test2.docx «, FileFormat: = wdFormatDocument |
Закрыть документ
Чтобы закрыть документ и сохранить изменения:
| 1 | ActiveDocument.Close wdSaveChanges |
или без сохранения изменений:
| 1 | ActiveDocument.Close wdDoNotSaveChanges |
Распечатать документ
Это напечатает активный документ:
| 1 | ActiveDocument.PrintOut |
Диапазон, выделение, абзацы
Диапазон а также Выбор являются, вероятно, наиболее важными объектами в Word VBA и, безусловно, наиболее часто используемыми.
Диапазон относится к некоторой части документа, обычно, но не обязательно, к тексту.
Выбор относится к выделенному тексту (или другому объекту, например изображениям) или, если ничего не выделено, к точке вставки.
Абзацы представляют абзацы в документе. Это менее важно, чем кажется, потому что у вас нет прямого доступа к тексту абзаца (вам нужно получить доступ к определенному диапазону абзацев, чтобы внести изменения).
Диапазон
Диапазон может быть любой частью документа, включая весь документ:
| 12 | Dim oRange As RangeУстановите oRange = ActiveDocument.Content |
или он может быть маленьким, как один символ.
Другой пример, этот диапазон будет относиться к первому слову в документе:
| 12 | Dim oRange As RangeУстановите oRange = ActiveDocument.Range.Words (1) |
Обычно вам нужно получить диапазон, который относится к определенной части документа, а затем изменить его.
В следующем примере мы выделим первое слово второго абзаца жирным шрифтом:
| 123 | Dim oRange As RangeУстановите oRange = ActiveDocument.Paragraphs (2) .Range.Words (1)oRange.Bold = True |
Установить текст диапазона
Чтобы установить текстовое значение диапазона:
| 123 | Dim oRange As RangeУстановите oRange = ActiveDocument.Paragraphs (2) .Range.Words (1)oRange.Text = «Привет» |
(Совет: обратите внимание на пробел после «Hello». Поскольку слово «объект» включает пробел после слова, просто «hello» мы получим «Hellonext word»)
С диапазонами можно делать сотни вещей. Всего несколько примеров (предполагается, что вы уже сделали объектную переменную апельсин относится к интересующему диапазону):
Изменить шрифт
| 1 | oRange.Font.Name = «Arial» |
Отображение в окне сообщения количества символов в определенном диапазоне
| 1 | MsgBox oRange.Characters.Count |
Вставьте текст перед ним
| 1 | oRange.InsertBefore «это вставленный текст» |
Добавить сноску к диапазону
| 12 | ActiveDocument.Footnotes.Add Диапазон: = oRange, _Text: = «Подробнее читайте на easyexcel.net.» |
Скопируйте в буфер обмена
| 1234 | oRange.CopyЧасто вам нужно перейти к конкретному диапазону. Итак, вы можете начать, начать и закончитьoRange.Start = 5oRange.End = 50 |
После приведенного выше кода oRange будет относиться к тексту, начинающемуся с пятого и заканчивающемуся 50-м символом в документе.
Выбор
Выбор используется даже шире, чем Диапазон, потому что с ним легче работать Выборы чем Диапазоны, ЕСЛИ ваш макрос взаимодействует ТОЛЬКО с ActiveDocument.
Сначала выберите желаемую часть вашего документа. Например, выберите второй абзац в активном документе:
| 1 | ActiveDocument.Paragraphs (2) .Range.Select |
Затем вы можете использовать объект выбора для ввода текста:
| 1 | Selection.TypeText «Какой-то текст» |
Мы можем ввести несколько абзацев ниже «Некоторый текст»:
| 12 | Selection.TypeText «Какой-то текст»Selection.TypeParagraph |
Часто необходимо знать, выделен ли какой-то текст или у нас есть только точка вставки:
| 12345 | Если Selection.Type wdSelectionIP ТогдаSelection.Font.Bold = TrueЕщеMsgBox «Вам нужно выделить текст».Конец, если |
При работе с объектом Selection мы хотим поместить точку вставки в определенное место и запускать команды, начиная с этой точки.
Начало документа:
| 1 | Selection.HomeKey Unit: = wdStory, Extend: = wdMove |
Начало текущей строки:
| 1 | Selection.HomeKey Unit: = wdLine, Extend: = wdMove |
Параметр Extend wdMove перемещает точку вставки. Вместо этого вы можете использовать wdExtend, который выделит весь текст между текущей точкой вставки.
| 1 | Selection.HomeKey Unit: = wdLine, Extend: = wdExtend |
Переместить выделение
Самый полезный метод изменения положения точки вставки — «Перемещение». Чтобы переместить выделение на два символа вперед:
| 1 | Selection.Move Unit: = wdCharacter, Count: = 2 |
чтобы переместить его назад, используйте отрицательное число для параметра Count:
| 1 | Selection.Move Unit: = wdCharacter, Count: = — 2 |
Параметр единицы измерения может быть wdCharacter, wdWord, wdLine или другим (используйте справку Word VBA, чтобы увидеть другие).
Чтобы вместо этого переместить слова:
| 1 | Selection.Move unit: = wdWord, Count: = 2 |
С выделением легче работать (по сравнению с диапазонами), потому что он похож на робота, использующего Word, имитирующего человека. Где находится точка вставки — какое-то действие произойдет. Но это означает, что вы должны позаботиться о том, где находится точка вставки! Это непросто после многих шагов в коде. В противном случае Word изменит текст в нежелательном месте.
Если вам нужно какое-то свойство или метод, недоступный в объекте Selection, вы всегда можете легко получить диапазон, связанный с выбором:
| 1 | Установите oRange = Selection.Range. |
СОВЕТ: Использование Выбор часто проще, чем использование диапазонов, но также и медленнее (важно, когда вы имеете дело с большими документами)
Абзацы
Вы не можете напрямую использовать объект Paragraphs для изменения текста:
| 1 | ActiveDocument.Paragraphs (1) .Text = «Нет, это не сработает» |
Выше не сработает (на самом деле выдаст ошибку). Вам нужно сначала получить диапазон, связанный с конкретным абзацем:
| 1 | ActiveDocument.Paragraphs (1) .Range.Text = «Теперь работает :)» |
Но вы можете напрямую изменить его стиль:
| 1 | ActiveDocument.Paragraphs (1) .Style = «Нормальный» |
или измените форматирование на уровне абзаца:
| 1 | ActiveDocument.Paragraphs (1) .LeftIndent = 10 |
или, может быть, вы хотите сохранить этот абзац на одной строке со следующим абзацем:
| 1 | ActiveDocument.Paragraphs (1) .KeepWithNext = True |
Сделайте абзац по центру:
| 1 | ActiveDocument.Paragraphs (1) .Alignment = wdAlignParagraphCenter |
ОЧЕНЬ полезно назначить конкретный абзац объектной переменной. Если мы присвоим переменной конкретный абзац, нам не нужно беспокоиться, станет ли первый абзац вторым, потому что мы вставили перед ним один абзац:
| 12 | dim oPara как абзацУстановите oPara = Selection.Paragraphs (1) ‘здесь мы присваиваем первый абзац текущего выделения переменной |
Вот пример, в котором мы вставляем абзац над первым абзацем, но мы все еще можем ссылаться на старый первый абзац, потому что он был назначен переменной:
| 1234567 | Sub ParagraphExample ()Dim oPara как абзацУстановить oPara = ActiveDocument.Paragraphs (1)MsgBox oPara.Range.TextoPara.Range.InsertParagraphBefore ‘Вставить абзацMsgBox oPara.Range.TextКонец подписки |
Объект абзаца очень часто используется в циклах:
| 123456789101112 | Sub LoopThroughParagraphs ()Dim oPara как абзацДля каждого параметра в ActiveDocument.Paragraphs«Сделай что-нибудь с этим. Мы просто покажем’текст абзаца, если его стиль — «Заголовок 4″Если oPara.Style = «Заголовок 4», тоMsgBox oPara.Range.TextКонец, еслиДалее oParaКонец подписки |
Word VBA Tutorial Заключение
В этом руководстве были рассмотрены основы Word VBA. Если вы новичок в VBA, вам также следует ознакомиться с нашим общим руководством по VBA, чтобы узнать больше о переменных, циклах, окнах сообщений, настройках, условной логике и многом другом.
Примеры макросов Word
| Примеры макросов Word |
|---|
| Шаблоны |
| Добавить новые документы |
| Подсчет слов в выделенном фрагменте |
| Текстовые поля |
| Сохранить как PDF |
| Закладки |
| Таблицы |
| Найти, найти и заменить |
| Открытые документы |
Word VBA: часто задаваемые вопросы
Что такое макрос Word?
Макрос — это общий термин, обозначающий набор инструкций по программированию, которые автоматизируют задачи. Макросы Word автоматизируют задачи в Word с помощью языка программирования VBA.
Есть ли в слове VBA?
Да, в Microsoft Word есть редактор VBA. Доступ к нему можно получить, нажав клавиши ALT + F11 или перейдя в раздел «Разработчик»> «Visual Basic».
Как использовать VBA в Word?
1. Откройте редактор VBA (ALT + F11 или Разработчик> Visual Basic).
2. Выберите «Вставить»> «Модуль», чтобы создать модуль кода.
3. Введите «Sub HelloWorld» и нажмите Enter.
4. Между строками «Sub HelloWorld» и «End Sub» введите «MsgBox« Hello World! »
5. Вы создали макрос!
6. Теперь нажмите «F5», чтобы запустить макрос.
Applicability: Word 365, 2019, 2016; Windows and MAC OS X operating systems.
Here’s a question from a reader::
I am a teacher typically use Word 2019 to write my documents. I often need to change the font and size of my document paragraphs. Is there a way to automate my work with Macros, so i can modify my document paragraph with a one click? I am sure this is going to save me a couple of hours per week, which i’ll gladly invest in other tasks.
Thanks for your question. The key advantage of Macros is that they allow you automate your tasks in Microsoft Office applications. Macros can be either recorded or manually coded using Visual Basic for Applications (VBA). Word ships a Macro recorder that allows you to develop automation scripts without coding. If you are just starting out with automation, this might be a good enough solution. That said, with a little bit of VBA knowledge, you can write efficient and powerful Macros.
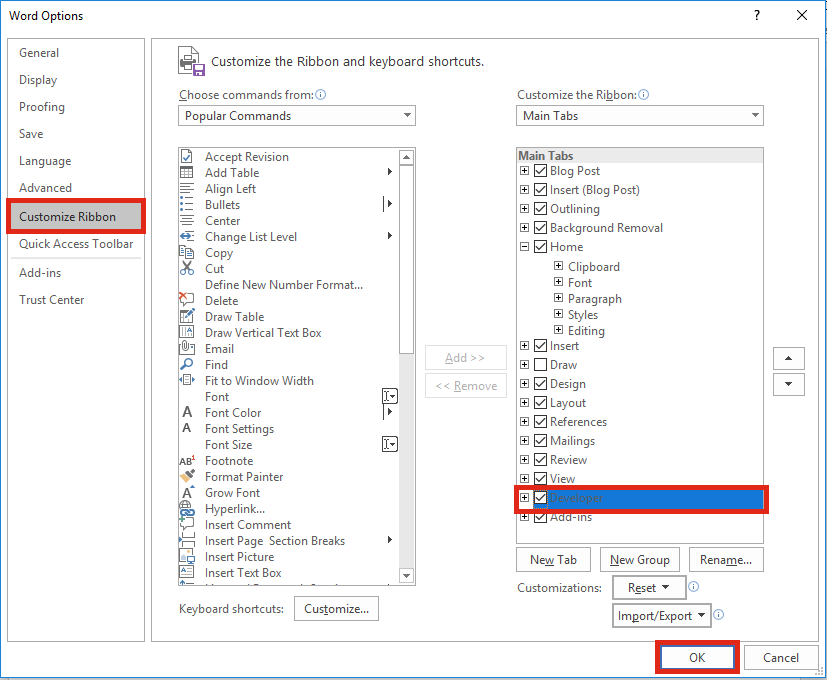
Enabling the developer tab in Word
If you don’t see the Developer tab in your Microsoft Word Ribbon, you’ll need to setup your Macro development environment.
- Open a new Word document. In case that you would like to work on an existing file, ensure that you have a copy for backup, before making any changes.
- Now, go ahead and make the developer menu visible in the Ribbon.
Recording a Word Macro – a practical example
- Now, hit the newly added Developer tab.
- Go to the Code button group.

- Hit the Record Macro button to invoke the Macro recorder function.

- Define a meaningful name for your Macro. Note:As the name you provide will be used in the auto created VBA code, Ensure no spaces in the Macro name.

- Note: Although it’s possible to assign Macros to buttons , for simplicity we’ll run Macro manually via the View tab or Developer tabs.
- Execute the sequence of steps you would like to record. In this case, you’ll record the following steps:
- Select a specific paragraph in your document.
- Go to the Home tab.
- Set the font to Times New Roman.
- Set the Font Size to 16.
- Center your Text by hitting Ctrl +E.
- Once Done, return to the Developer tab and hit Stop Recording.
- Now let us take a look at the auto-generated VBA code. Hit Macros and then highlight the AutoFormat Macro and hit Edit.

- Close the VBA Editor.
Save your work in a Word Macro enabled template
- Hit File, then Save As.
- In the Save As dialog right hand side, determine your saving location and provide a meaningful name to your Workbook.

- Choose Word Macro Enabled Document as your document type. Note: Your Word document will be saved with the .docm suffix.
- Hit the Save Button.
Executing your macro
- Open your Word document.
- Select the Paragraph you would like to automatically format. Just as an example, here’s the paragraph i chose:

- Go to the View tab.
- Hit the Macros button.
- Select your AutoFormat Macro
- Hit Run – this will apply the macro on the selected paragraph.
- Voi’la , nice result!


Assigning your Macro to Buttons or keyboard shortcuts
Note: This is an optional step that should be attempted after you have followed the Macro recording tutorial above.
OK, so far we got our Macro basics working. Now it’s time to improve a bit our Macro usability in the Word doc. Let me show you how you can associate your Macro with a quick access button, so you can launch it more easily.
- Right click on the Ribbon and select Customize the Quick Access Toolbar.
- The Word Options dialog will come up.
- In the Choose commands from dropdown, select Macros.
- Highlight your Macro and hit the Add>> Button to add a shortcut to your Macro to the Quick Access Toolbar.
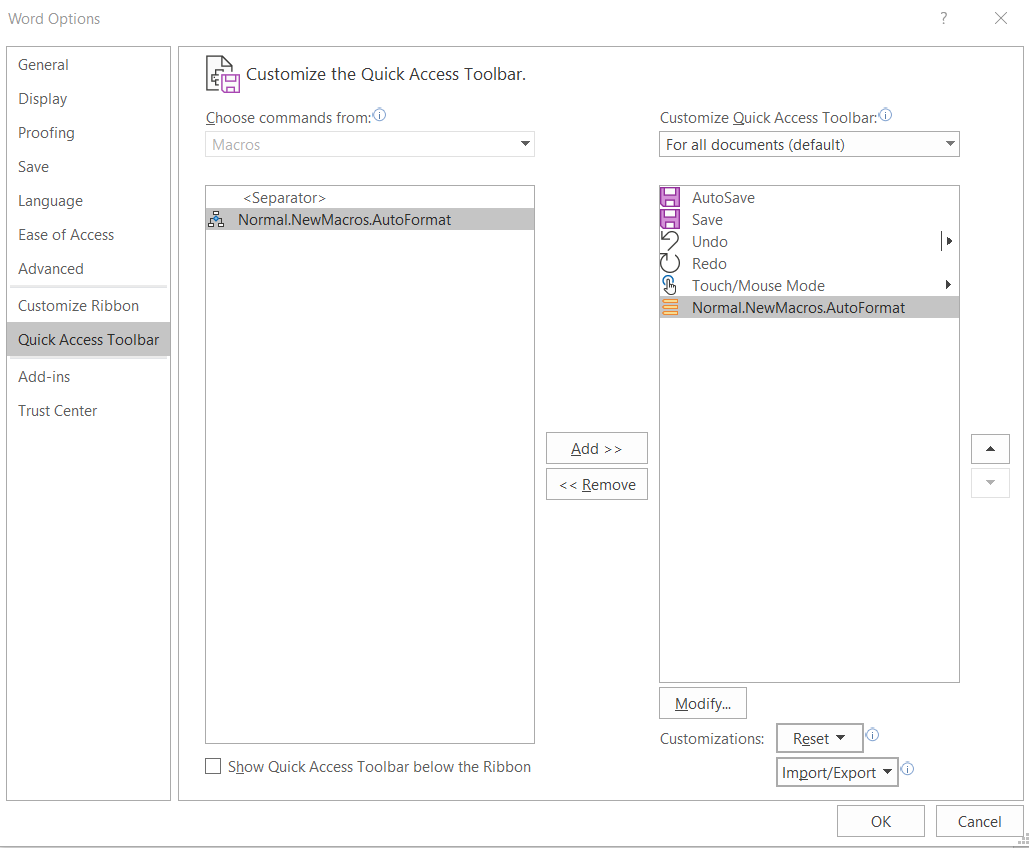
- Hit the Modify… button to define a suitable icon for your Macro.
- Define a Display name for your button.
- Hit OK.
- Now, you can launch your Macro from the Quick Access Toolbar, just above the Ribbon.
Note: You are able to associate your Word Macro not only with quick access buttons but also with command buttons embedded in your document and specific custom keyboard shortcuts.
Creating Word Macros using VBA
With some simple Visual Basic for Applications coding skills we can edit the macros and write programs to automate various kinds of works using VBA.
Aside Note: FYI – some of the Microsoft Office applications, such as Powerpoint and Outlook, do not have built in macro recorders. Therefore, writing VBA is mandatory for writing Powerpoint macros and automating Outlook.
- To edit a macro, click on the Developer tab and select Macros in the code option.
- Click on the macro and select Edit.
- The Visual Basic for applications editor will open up.
- Let’s assume that we want to manually edit the Macro we have recorded in the previous step, so that Word not only set the Size, font and alignment of the paragraph, but also the color.
- Setting the color of a section is achieved using the following VBA command:
[code] Selection.Font.Color [/code]
- In our case, we’ll want to set it to a random blue, so we’ll append the following snippet to our Recorded macro:
[code] Selection.Font.Color = 16737792[/code]
- Here’s how your VBA code should look like:

- In the VBA Editor hit File and then Save.
- Back to your document, run your Macro on a paragraph and observe the font color change.

- Voi’la!
Useful Word Macro example you can write
Since publishing this tutorial, many readers asked for more in depth examples of Word Macros. This list covers the most prevalent tasks you can automate using Visual Basic in Word. Here we go:
Create and Save New Document
Sub CreateNewDoc()
'This small snippet first creates a new document, then it checks whether a document with the same name already exists before saving.
Dim myDoc As New Document
Dim filePath As String

'Modify your file path as needed
filePath = "C:MyNewDoc.docx"

Set myDoc = Documents.Add
With myDoc
If Dir(filePath) = "" Then
.SaveAs2 (filePath)
Else

'You have already an existing document

MsgBox ("Please use a different file name")
End If
End With

myDoc.Close SaveChanges:=wdPromptToSaveChanges

End Sub
Note: When creating new documents, you are able to specify the template (.dotm/.dotx files) you would like to use. Templates are typically stored at: C:Users<your_user_name>AppDataRoamingMicrosoftTemplates
Documents.Add <strong>Template:=<your_template_folder></strong>Open a Word document with VBA
Sub OpenDoc()
'This code checks whether your document exists and then opens it
filePath = "C:MyNewDoc.docx"

If Dir(filePath) = "" Then
MsgBox ("file doesn't exist")
Else
Documents.Open (filePath)
End If

End Sub
Closing one/all open documents
Sub CloseDoc()

'This code closes a specific document
filePath = "C:MyNewDoc.docx"
Documents(filePath).Close SaveChanges:=wdPromptToSaveChanges
End Sub
Sub CloseAllDocs()
'This code closes all opened documents in your computer
Documents.Close SaveChanges:=wdPromptToSaveChanges
End SubSaving Word as PDF
Here’s how to easily automate saving of Word documents as PDF files.
Sub SaveAsPdf()
'This code saves a word document in a PDF format
FileName = Left(CStr(ActiveDocument.Name), Len(CStr(ActiveDocument.Name)) - 5)
ActiveDocument.SaveAs2 FileName:="c:" + FileName + ".pdf", FileFormat:=wdFormatPDF

End Sub
Inserting header and footer
This code sets the header and footer of your Word document first page.
Sub InsertHeaderFooterFirstPage()
Dim myDoc As Document
Dim headerText As String
Dim footerText As String

Set myDoc = ActiveDocument
'Replace the header and footer text as needed
headerText = "This document was written by you"
footerText = "All rights reserved to you"

With myDoc.Sections(1)
'We first ensure that we can set different header and footer texts
.PageSetup.DifferentFirstPageHeaderFooter = True
'Setting the header and footer texts
.Headers(wdHeaderFooterFirstPage).Range.Text = headerText
.Footers(wdHeaderFooterFirstPage).Range.Text = footerText

End With

End Sub
Additional Word Macro ideas
Here are a few more ideas which we’ll be posting in the upcoming future.
- Find and Replace (Execute Method)
- Insert a paragraph (before and after a selection)
- Printing documents programatically
- Working with tables
This concludes our tutorial for today. As you just saw, there is a lot to be done with the Word macro recorder and VBA Macros in Word. In case you are looking for more specific help that goes beyond the scope of this tutorial, kindly contact us via our contact form.
This post is the second in a series about controlling other applications from Excel using VBA. In the first part we looked at the basics of how to reference other applications using Early Binding or Late Binding. In this post, we will look at how we can automate Word from Excel even though we don’t know any VBA code for Word… yet. The process we will use for this is as follows:
- Enable the Word Developer menu
- Record a Word macro
- Add the code to Excel VBA and amend
- Record macros in Excel if necessary
- Repeat the previous steps until macro complete
I am not an Excel VBA expert (I’m more of an Excel VBA tinkerer), and I am certainly not a Word VBA expert. The process I am about to show you may not create the most efficient code, but I know this process works, because I have used it myself to automate lots tasks using Microsoft Word.
Enable the Word Developer menu
If you have enabled the Excel Developer menu it is the same process in Word.
In Word: File -> Options -> Customize Ribbon
Then tick the Developer Ribbon option, OK.
Record a Word Macro
The key to the success of this method is taking small sections of code and building up a complex macro bit by bit. Using the Word Macro Recorder is again, similar to the Excel Macro recorder.
Click on: Developer -> Record Macro

For the example in this post, we will create a macro which will open a new Word document, then copy a chart from Excel and paste it into that Word document. We will tackle this one stage at a time. Firstly, lets create the macro to open a new word document.
Click – Developer -> Record Macro. The Record Macro window will open.
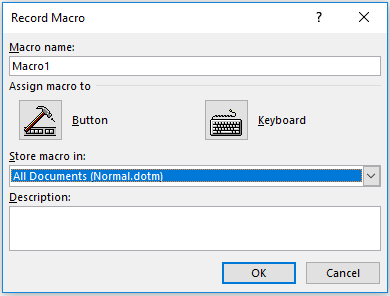
Make a note of the “Store macro in” option, as we will need to know where to find the recorded code later. Normal.dotm is fine for now. Click OK – the Macro Recorder is now running.
Open a new Word Document – File -> New -> Blank Document
Stop the Macro from recording – Developer -> Stop Recording

We can now view the code for opening a new Word Document in the Visual Basic Editor. Click: Developer -> Visual Basic.

Find the location of your recorded code in the Visual Basic Editor. In this example: Normal -> Modules -> NewMacros.
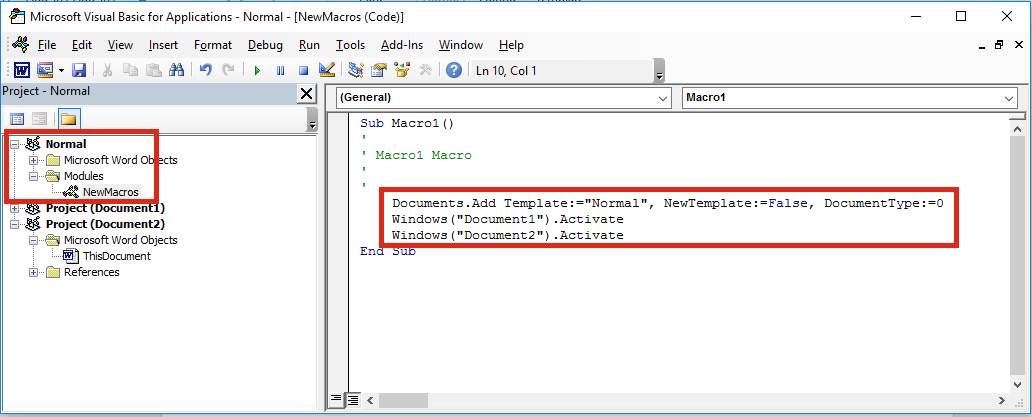
Your code should look like the following. It may be slightly different, but not significantly.
Sub Macro1()
'
' Macro1 Macro
'
'
    Documents.Add Template:="Normal", NewTemplate:=False, DocumentType:=0
    Windows("Document1").Activate
    Windows("Document2").Activate
End Sub
Add the code to Excel VBA and amend
Let’s head back to the Excel VBA Editor and use the Early Binding method to control to Microsoft Word. In the Visual Basic Editor click Tools -> References select Microsoft Word x.xx Object Library. Then click OK.
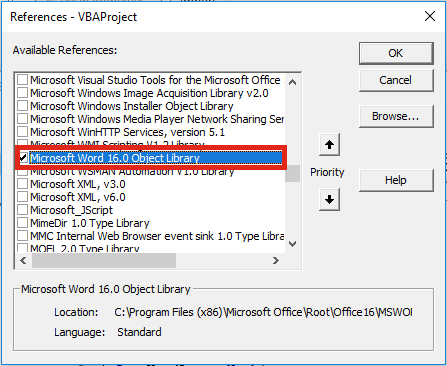
As we are using Early Binding we need to declare the Application as a variable as follows:
Dim WordApp As Word.Application
Set WordApp = New Word.Application
Now copy and paste the code from the Word VBA Editor into the Excel VBA Editor.
The Word VBA code started with Documents.Add, all we have to do is add our application variable to the front of that line of code. Now becomes WordApp.Documents.Add . . .
Often, Selecting and Activating Objects is not required in VBA code, so I have not copied those statements into the code below.
Sub CreateWordDocument()

'Connect using Early Binding.
'Remember to set the reference to the Word Object Library
'In VBE Editor Tools -> References -> Microsoft Word x.xx Object Library
Dim WordApp As Word.Application
Set WordApp = New Word.Application

WordApp.Documents.Add Template:="Normal", NewTemplate:=False, DocumentType:=0
WordApp.Visible = True 'New Apps will be hidden by default, so make visible

Set WordApp = Nothing 'release the memory

End Sub
A point to note, when an application is opened with VBA, it is normally opened in the background. To make the Word document visible I have added the following code:
WordApp.Visible = True
Record macros in Excel (if necessary)
If we want to copy Excel content into a Word document, we will need to copy that content using Excel VBA. We can use the Macro Recorder in Excel to obtain the VBA code for copying, then we can use the Word Macro Recorder to obtain the VBA code for pasting.
Macro Recording from Excel – selecting a worksheet and copying chart
Sheets("Sheet1").Select
ActiveSheet.ChartObjects("Chart 1").Activate
ActiveChart.ChartArea.Copy
Macro Recording from Word – pasting a chart into a document
Selection.PasteSpecial Link:=False, DataType:=wdPasteEnhancedMetafile, _
        Placement:=wdInLine, DisplayAsIcon:=False
We can add both Macro recordings into our Excel macro. Remember to add WordApp. at the start of each statement of Word VBA code.
Sub CreateWordDocument()

'Connect using Early Binding.
'Remember to set the reference to the Word Object Library
'In VBE Editor Tools -> References -> Microsoft Word x.xx Object Library
Dim WordApp As Word.Application
Set WordApp = New Word.Application

WordApp.Documents.Add Template:="Normal", NewTemplate:=False, DocumentType:=0
WordApp.Visible = True 'New Apps will be hidden by default, so make visible

'code copied from Excel Macro recorder
Sheets("Sheet1").Select
Selection.ChartObjects("Chart 1").ChartArea.Copy

'code copied from Word Macro recorder with WordApp. added to the front.
WordApp.Selection.PasteSpecial Link:=False, DataType:=wdPasteEnhancedMetafile, _
        Placement:=wdInLine, DisplayAsIcon:=False

Set WordApp = Nothing 'release the memory

End Sub
This code is not particularly efficient; it contains a few unnecessary sections code. However… it works!
Repeat the previous steps until macro complete
By repeating the same steps above; recording short actions, then transferring the code into Excel, we can slowly build up much more complex Macros. The key is to keep the actions short, if you do too many actions with the Macro Recorder, code starts to look long and scary.
If you’ve you tried to use the Macro Recorder before you will know that this is not as easy as it seems. And this simple tutorial may make you think it is easy, when it’s not. Sometimes, it can be quite frustrating trying to find out where the issues and errors are. The key to success is recording very short actions, such as those below and copying them into the Visual Basic Editor.
'Pressing the Enter Key to move to a new line in Word
WordApp.Selection.TypeParagraph

'Turn on/off Bold Text
WordApp.Selection.Font.Bold = wdToggle

'Change Font Size
WordApp.Selection.Font.Size = 16

'Type some text
WordApp.Selection.TypeText Text:="Here is some text"
You will soon build up a standard library of code that you can use to control Word for most basic tasks.
In recorded VBA code from Word, the word “Selection” in the code often refers to the document itself. It is possible to make the code a little bit more efficient by declaring the document as a variable. If we were opening a specific document, we could include this at the start, just below the declaration of the application.
'Declare a specific document as a variable
Dim WordDocument As Object
Set WordDocument = WordApp.Documents.Open(sourceFileName)
Or, if we created a new document we could include the following below the declaration of the application variable.
'Delcare a new document as a variable
Dim WordDocument As Object
Set WordDocument = WordApp.Documents.Add Template:="Normal", _
NewTemplate:=False, DocumentType:=0
If we have created the document as a variable we can then reference the specific document. This code:
WordApp.Selection.TypeParagraph
Would become this code:
WordDocument.TypeParagraph
Or this code:
WordApp.Selection.TypeText Text:="Here is some text"
Would become this code:
WordDocument.TypeText Text:="Here is some text"
This method is much better, as it doesn’t rely on the Selection of the user being in the right place.
Conclusion
We have seen in this post that it is possible to create complex Macros to automate Word from Excel using VBA. By understanding how to declare variables for the application and documents we can create much more robust macros, even without knowing a lot of VBA code.
Related Posts:
- 5 quick ways to embed a Word document in Excel
- Controlling Powerpoint from Excel using VBA
- Edit links in Word using VBA
- How to link Excel to Word

About the author
Hey, I’m Mark, and I run Excel Off The Grid.
My parents tell me that at the age of 7 I declared I was going to become a qualified accountant. I was either psychic or had no imagination, as that is exactly what happened. However, it wasn’t until I was 35 that my journey really began.
In 2015, I started a new job, for which I was regularly working after 10pm. As a result, I rarely saw my children during the week. So, I started searching for the secrets to automating Excel. I discovered that by building a small number of simple tools, I could combine them together in different ways to automate nearly all my regular tasks. This meant I could work less hours (and I got pay raises!). Today, I teach these techniques to other professionals in our training program so they too can spend less time at work (and more time with their children and doing the things they love).
Do you need help adapting this post to your needs?
I’m guessing the examples in this post don’t exactly match your situation. We all use Excel differently, so it’s impossible to write a post that will meet everybody’s needs. By taking the time to understand the techniques and principles in this post (and elsewhere on this site), you should be able to adapt it to your needs.
But, if you’re still struggling you should:
- Read other blogs, or watch YouTube videos on the same topic. You will benefit much more by discovering your own solutions.
- Ask the ‘Excel Ninja’ in your office. It’s amazing what things other people know.
- Ask a question in a forum like Mr Excel, or the Microsoft Answers Community. Remember, the people on these forums are generally giving their time for free. So take care to craft your question, make sure it’s clear and concise. List all the things you’ve tried, and provide screenshots, code segments and example workbooks.
- Use Excel Rescue, who are my consultancy partner. They help by providing solutions to smaller Excel problems.
What next?
Don’t go yet, there is plenty more to learn on Excel Off The Grid. Check out the latest posts:

Возможно, у вас есть ощущение, что тема макросов в Ворде достаточно маргинальная. Кто ими может пользоваться-то вообще? Ну, малварь делают иногда… Да и пишутся они на давно забытом VBA (Visual Basic for Applications, он же несколько урезанный Visual Basic 6 в интерпретируемом виде), фу!
Но на самом деле у многих ведь возникает потребность то какой-нибудь отчётик в ворде написать, то курсовую оформить, то резюме перед отправкой в компанию вашей мечты подправить… А у некоторых работа напрямую связана с Word. Часто различные системы документации предлагают экспорт в форматы doc или docx, которые нужны вашим заказчикам. И бывает, что документы после экспорта выглядят фигово, приходится их исправлять.
Работа в ворде нередко подразумевает выполнение каких-то однообразных повторяющихся действий, которые иногда (но далеко не всегда!) решаются грамотной настройкой стилей и их применением, а также использованием шаблонов. Как же автоматизировать всё остальное? Тут-то нам на помощь приходят те самые макросы.
Что же в них такого хорошего? Ну, например, они автоматически и достаточно быстро выполняют за вас однообразные действия. Могут что-то подсчитать, переформатировать документ, пометить аннотациями подозрительные места, — словом, всё, что запрограммируете. Могут даже в режиме реального времени что-то исправлять и о чем-то предупреждать, пока вы пишете документ. VBA в Word позволяет автоматизировать практически все действия, которые вы можете выполнить с документом вручную.
Макросы можно прикрепить как к конкретному документу (в чём для нас мало пользы, а для писателей троянов это единственная опция), так и к самому ворду, что позволяет применять макросы к любому документу, с которым вы работаете.
Макросы работают в любой версии Word и требуют минимум правок при переносе с одной версии на другую (а чаще всего вообще не требуют). На макросах можно даже реализовать полноценный пользовательский интерфейс с формами!
Давайте же занырнём в Visual Basic и напишем что-нибудь полезное! В качестве первого примера я покажу, как сделать макрос, который заменит два и более последовательных перевода строки на единственный. Это часто требуется при исправлении документов после экспорта из систем документации, или если вы хотите удалить случайно проставленные лишние переводы строк в собственноручно написанном документе. Макрос сделаем добротный, с пользовательским интерфейсом и прогрессом выполнения операции.
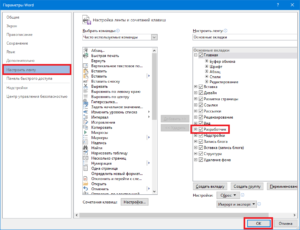
Чтобы начать писать или использовать макросы, сначала требуется убедиться, что в Word’е отображается панель «Разработчик» («Developer»). Если она у вас не отображается, следует зайти после создания нового документа в меню «Файл» («File») -> «Параметры» («Options») -> «Настроить ленту» («Customize Ribbon»), после чего найти там и установить флажок «Разработчик» («Developer»).
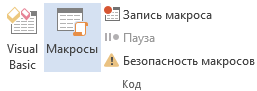
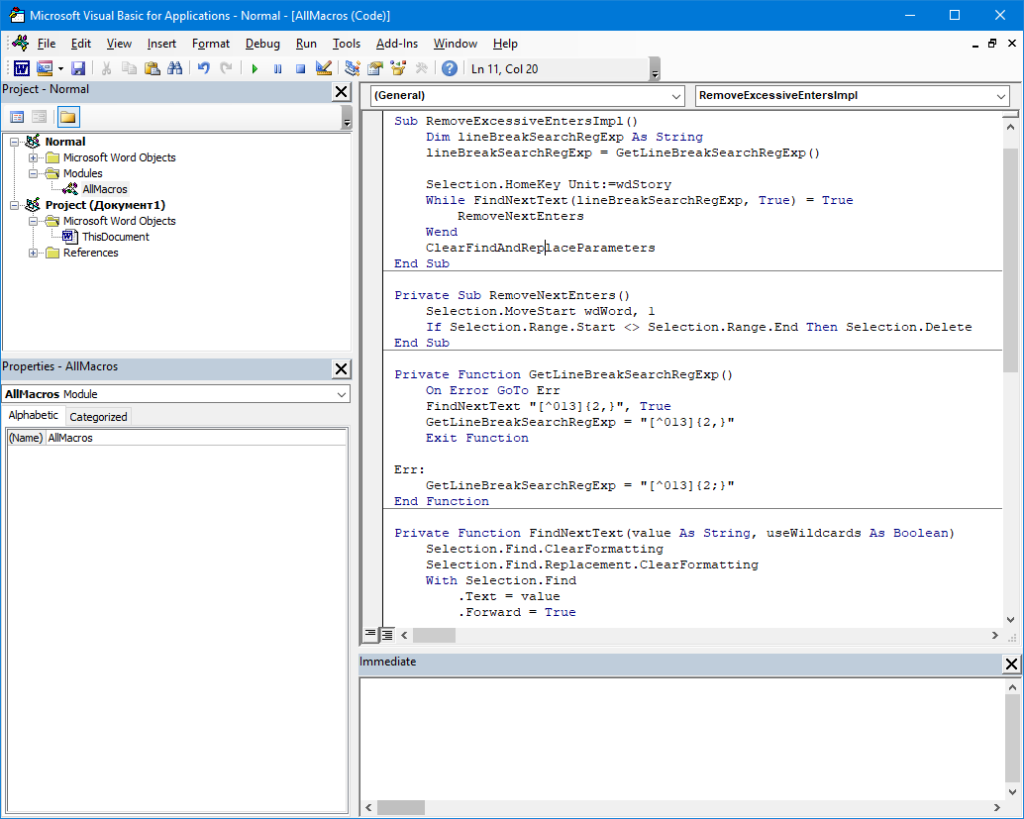
После этого нужно зайти на вкладку «Разработчик» и выбрать меню «Visual Basic».
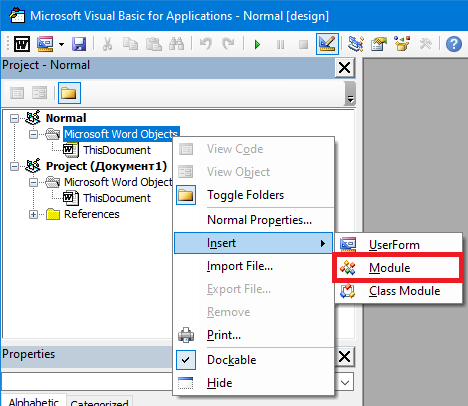
В открывшемся окне слева вы увидите два проекта: «Normal» и проект, относящийся к текущему открытому документу. Возможно, в проекте «Normal» у вас уже будет какой-то файл в каталоге «Modules». В любом случае, создайте новый модуль, кликнув правой кнопкой по проекту «Normal» и выбрав «Insert» -> «Module».
Созданный модуль представляет из себя файл, куда мы и будем писать код макросов. Можно переименовать модуль (по умолчанию его имя будет «Module1») в окне «Properties» -> «Name». Я назову свой модуль «AllMacros». Теперь откроем код модуля, дважды кликнув по его имени, и приступим к созданию макроса. Напомню, что наша цель — заменить два и более последовательных перевода строки на единственный, произведя замены по всему документу. Очевидно, нам потребуется функция, которая осуществляет поиск по тексту, ведь мы хотим найти несколько последовательных переводов строки. В Word это эквивалентно началу нового параграфа. Вы могли бы осуществить поиск начала нового параграфа через обычное окно поиска, введя в поле поиска ^p, ^13 или ^013 (что соответствует ASCII-коду перевода строки). Функция поиска будет выглядеть так:
|
1 2 3 4 5 6 7 8 9 10 11 12 13 14 15 16 17 18 19 20 21 |
Private Function FindNextText(text As String, useWildcards As Boolean) Selection.Find.ClearFormatting Selection.Find.Replacement.ClearFormatting With Selection.Find .Text = text .Forward = True .Format = False .MatchCase = False .MatchWholeWord = False .MatchKashida = False .MatchDiacritics = False .MatchAlefHamza = False .MatchControl = False .MatchWildcards = useWildcards .MatchSoundsLike = False .MatchAllWordForms = False .Wrap = wdFindStop End With Selection.Find.Execute FindNextText = Selection.Find.Found End Function |
Давайте разберём, что тут происходит. Мы объявляем функцию с двумя параметрами. Первый имеет тип String — это текст для поиска, а второй Boolean говорит о том, нужно ли использовать символы подстановки (wildcards). Про них я поговорю позже. В следующих двух строках 2 и 3 мы очищаем форматирование для строки поиска и строки замены, если оно было задано пользователем. Word позволяет задать форматирование строки поиска/замены, а для нашей задачи это не требуется. Далее мы задаём набор параметров для объекта Selection.Find: выставляем неинтересные нам параметры в False, параметр Text — это текст, который мы хотим найти, а параметр MatchWildcards указывает на использование символов подстановки. Параметр Wrap говорит о том, следует ли продолжать поиск, когда мы дошли до той точки, с которой поиск начали, и у нас его значение установлено в wdFindStop, так как мы хотим остановиться, когда дойдём до конца документа, и не зацикливать поиск.
Вообще, всё это обилие свойств и объектов из объектной модели Word, Excel и PowerPoint (да, там тоже есть макросы) хорошо описано в MSDN. Например, вот тут перечислены свойства и методы объекта Find. Есть русская документация (скажем, эта страница), но она выполнена совершенно кринжовым машинным переводом, невозможно читать:
![]()
Есть совершенно смехотворные страницы:

В общем, лучше читайте на английском. 
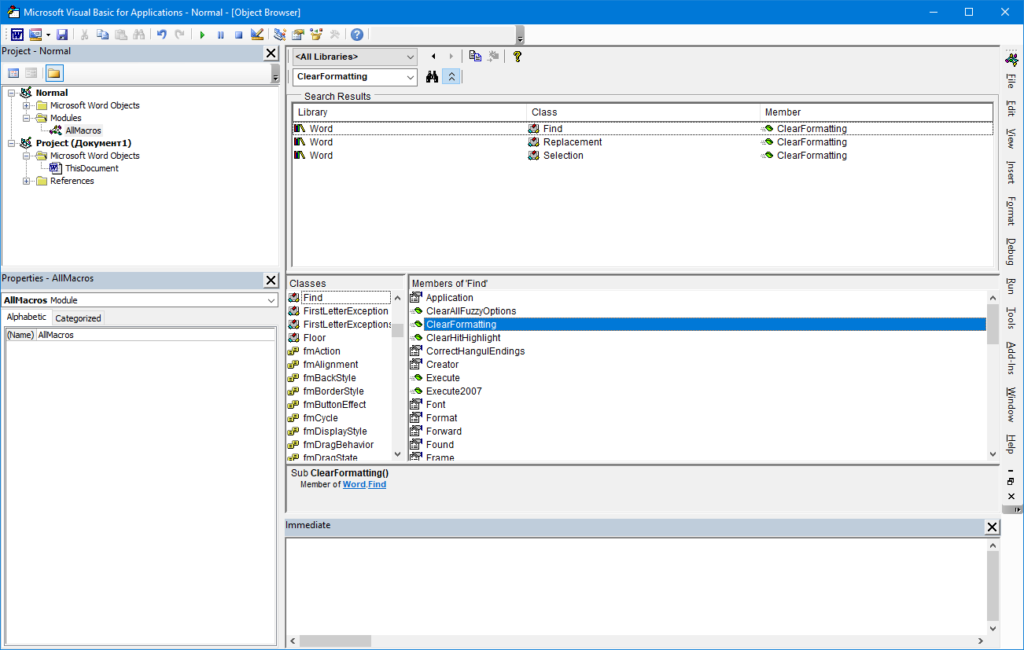
Кроме того, все доступные объекты, их свойства и методы можно посмотреть прямо в редакторе VBA в самом Word’е. Для этого нужно нажать F2 или выбрать меню «View» -> «Object browser», что приведет к открытию браузера объектов (Object browser), в котором можно пролистать или поискать то, что вам доступно.
Но вернёмся к нашей функции. На строке 19 мы непосредственно выполняем поиск заданного текста с указанными параметрами. Строка 20 — эта конструкция, аналогичная return в си-подобных языках, указывает возвращаемое значение функции. Мы возвращаем булевое значение Selection.Find.Found, которое говорит о том, было ли что-то найдено.
Хочу заметить, что использование объекта Selection.Find и изменение его свойств заменит их значения и для пользователя. Например, если вы в Word искали что-то хитроумное с конкретно заданными параметрами, то выполнение макроса заменит ваши параметры поиска на те, которые мы задали в макросе. В идеале, их можно запомнить, а потом вернуть, но мы не будем так сильно заморачиваться, а просто всё за собой подчистим. Сделаем функцию, которая сбрасывает параметры в значения по умолчанию:
|
Private Sub ClearFindAndReplaceParameters() With Selection.Find .ClearFormatting .Replacement.ClearFormatting .Text = «» .Replacement.Text = «» .Forward = True .Wrap = wdFindStop .Format = False .MatchCase = False .MatchWholeWord = False .MatchWildcards = False .MatchSoundsLike = False .MatchAllWordForms = False End With End Sub |
Обратите внимание, что это уже Sub, а не Function, потому что мы не хотим из этой процедуры возвращать никакое значение. Это аналог функции void в си-подобных языках.
Теперь нужно определить, как нам найти два или более последовательных перевода строки. Для этого нам и потребуются упомянутые ранее wildcards. Word поддерживает символы подстановки при поиске, и по своей функциональности они напоминают регулярные выражения. Кстати, вы можете ими пользоваться и без макросов из окна расширенного поиска:
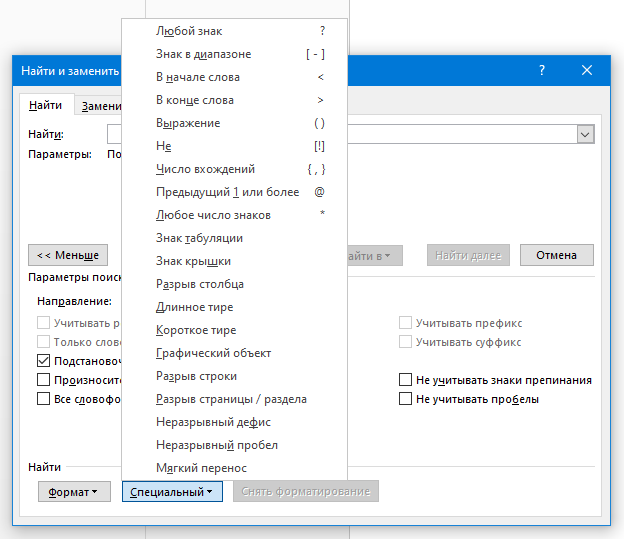
Хорошее описание символов подстановки я нашел здесь, правда, на английском языке. Составим регулярное выражение для поиска двух и более последовательных переводов строки: [^013]{2,}. Это очень похоже на классическое регулярное выражение Perl или PCRE, но в квадратных скобках в уникальном стиле Word мы задаем символ перевода строки. Фигурные скобки указывают, что символов перевода подряд должно быть два или более. Тут, кстати, есть нюанс: не во всех версиях/локализациях Word такая регулярка заработает. В некоторых случаях вместо запятой потребуется указать точку с запятой (да, в Microsoft иногда делают крайне странные вещи). Чтобы сделать наш макрос более универсальным, напишем функцию, которая вернёт регулярное выражение, пригодное для поиска в той версии Word, в которой эту функцию запустили:
|
Private Function GetLineBreakSearchRegExp() On Error GoTo Err FindNextText «[^013]{2,}», True GetLineBreakSearchRegExp = «[^013]{2,}» Exit Function Err: GetLineBreakSearchRegExp = «[^013]{2;}» End Function |
Здесь мы сначала пытаемся осуществить поиск с помощью wildcard’а [^013]{2,}. Если всё окей, то вернём из функции этот самый wildcard как рабочий (строка 4). В противном случае произойдёт ошибка, но мы готовы её обработать: мы установили обработчик всех ошибок в строке 2. Нас перекинет на метку Err, и тут мы вернём wildcard, который пригоден для других ревизий Word (в котором запятая внутри фигурных скобок заменена на точку с запятой).
Далее напишем функцию, которая будет заменять несколько последовательных переводов строки на единственный:
|
Private Sub RemoveNextEnters() Selection.MoveStart wdWord, 1 If Selection.Range.Start <> Selection.Range.End Then Selection.Delete End Sub |
Эта функция подразумевает, что вызывать её будут тогда, когда объект Selection указывает на найденные несколько переводов строки. В строке 2 перемещаем начало выделения (а в выделены у нас будут все найденные последовательные переводы строки) на один символ вперед, а затем в строке 3, если начало выделения не совпадает с его концом, удаляем его содержимое. Таким образом, если было выделено три перевода строки, мы отступаем вперед на 1 символ (оставляя один перевод строки нетронутым), а затем удаляем оставшиеся два.
Осталось написать последнюю функцию, которая будет всем управлять.
|
Sub RemoveExcessiveEnters() Dim lineBreakSearchRegExp As String lineBreakSearchRegExp = GetLineBreakSearchRegExp() Selection.HomeKey Unit:=wdStory While FindNextText(lineBreakSearchRegExp, True) = True RemoveNextEnters Wend ClearFindAndReplaceParameters End Sub |
Здесь мы оперируем ранее написанными функциями. Сначала получаем текст регулярного выражения (wildcard’а) для поиска нескольких переводов строки подряд, затем вызовом HomeKey в строке 5 переходим в самое начало документа (перемещаем туда курсор), а затем в цикле ищем все интересующие нас места и удаляем излишние переводы строки. В конце сбрасываем параметры поиска на значения по умолчанию.
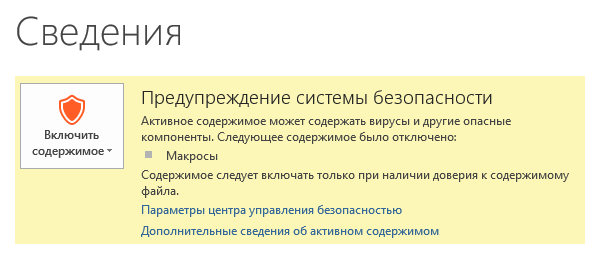
Вот и всё, макрос можно запускать! Обратите внимание, что все функции, кроме последней, мы пометили Private. Мы не хотим, чтобы их вызывали напрямую. Доступной для вызова снаружи будет только функция RemoveExcessiveEnters. Перед запуском макроса стоит убедиться, что макросы включены. Если вылазит такая панель, то нужно нажать «Включить содержимое» («Enable content»):
![]()
Если такой панели нет, то можно зайти в меню «Файл» («File») -> «Сведения» («Info») и включить макросы уже оттуда:
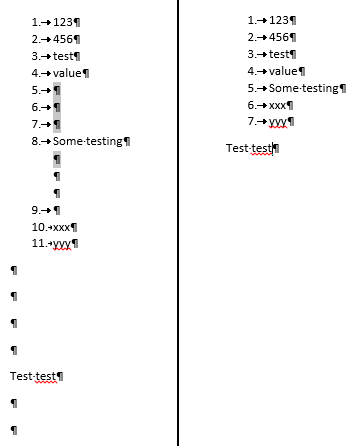
Вы можете включить макросы на время одного сеанса Word (это по умолчанию и происходит, если нажимаете «Включить содержимое»), так что после перезапуска Word макросы снова будут отключены. Для запуска макроса возвращаемся в Word на панель «Разработчик» и нажимаем кнопку «Макросы» («Macros»), выбираем наш макрос RemoveExcessiveEnters и нажимаем «Выполнить» («Run»). Разумеется, у вас должен быть открыт какой-нибудь подопытный документ, где имеются лишние переводы строк. В качестве бонуса наш макрос ещё и удалит пустые элементы списков, потому что они представляют из себя точно такие же несколько переводов строки подряд.
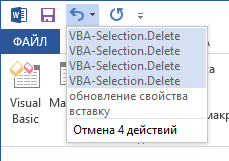
Макрос выполняется достаточно быстро. Его действие можно отменить (каждый шаг независимо), открыв меню выполненных действий:
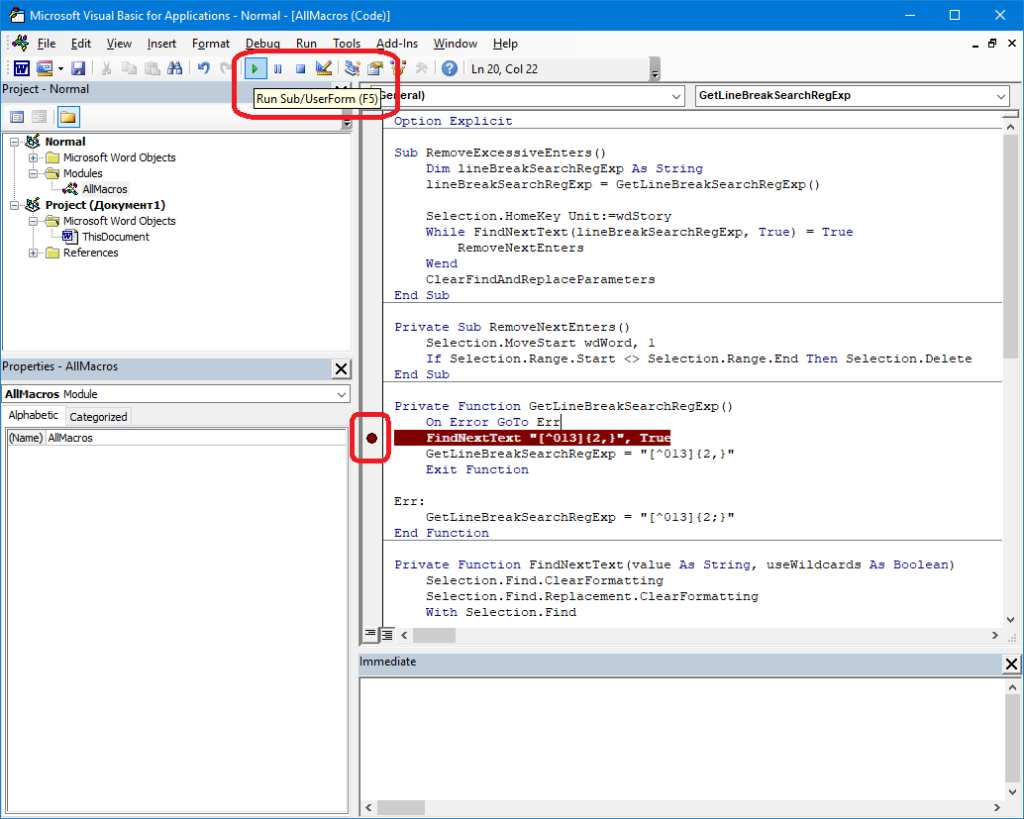
Макросы можно отлаживать через окно VBA, в котором мы писали макрос. Кликнув слева от строки кода, можно, как и в других средах разработки, поставить точку останова, а потом запустить макрос кнопкой «Run». Запустится та функция, на которой у вас находится курсор. Если вы поставите курсор на функцию с параметрами, то появится обычный запрос на выбор макроса для запуска, как при нажатии на кнопку «Макросы» в Word.
Думаю, что материала для одной статьи уже вполне достаточно. Я, конечно, пообещал горы функционала в виде интерфейса пользователя, отслеживания прогресса выполнения, и всё это обязательно будет, но в следующей публикации.
Код макроса можно скачать тут. Вы сможете его импортировать к себе в Word, кликнув правой кнопкой на «Normal» -> «Import file…» и выбрав загруженный файл.
P.S. Кстати, рекомендую создавать бэкапы своих макросов, экспортируя их куда-нибудь на диск. Даже лицензионный Word имеет свойство их иногда по какой-то причине удалять из шаблона Normal, в котором мы их создавали.