
To get the most out of Excel and VBA, you need to know how to use loops efficiently.
In VBA, loops allow you to go through a set of objects/values and analyze it one by one. You can also perform specific tasks for each loop.
Here is a simple example of using VBA loops in Excel.
Suppose you have a dataset and you want to highlight all the cells in even rows. You can use a VBA loop to go through the range and analyze each cell row number. If it turns out to be even, you give it a color, else you leave it as is.
Now this, of course, is very simple of looping in Excel VBA (and you can also do this using conditional formatting).
In real life, you can do a lot more with VBA loops in Excel that can help you automate tasks.
Here are some more practical examples where VBA loops can be useful:
- Looping through a range of cells and analyzing each cell (highlight cells with a specific text in it).
- Looping through all the worksheets and do something with each (such as protect/unprotect it).
- Loop through all the open workbooks (and save each workbook or close all except the active workbook).
- Loop through all the characters in a cell (and extract the numeric part from a string).
- Loop through all the values an array.
- Loop through all the charts/objects (and give a border or change the background color).
Now to best use loops in Excel VBA, you need to know about the different kinds that exist and the correct syntax of each.

In this tutorial, I’ll showcase different types of Excel VBA loops and cover a few examples for each loop
Note: This is going to be a huge tutorial, where I will try and cover each VBA loop in some detail. I recommend you bookmark this page for future reference.
If you’re interested in learning VBA the easy way, check out my Online Excel VBA Training.
For Next Loop
The ‘For Next’ loop allows you to go through a block of code for the specified number of times.
For example, if I ask you to add the integers from 1 to 10 manually, you would add the first two numbers, then add the third number to the result, then add the fourth number to the result, as so on..
Isn’t it?
The same logic is used in the For Next loop in VBA.
You specify how many times you want the loop to run and also specify what you want the code to do each time the loop is run.
Below is the syntax of the For Next loop:
For Counter = Start To End [Step Value]
[Code Block to Execute]
Next [counter]
In the For Next loop, you can use a Counter (or any variable) that will be used to run the loop. This counter allows you to run this loop for a required number of times.
For example, if I want to add the first 10 positive integers, then my Counter value would be from 1 to 10.
Let’s have a look at a few examples to better understand how For Next loop works.
Example 1 – Adding the first 10 positive integers
Below is the code that will add the first 10 positive integers using a For Next loop.
It will then display a message box showing the sum of these numbers.
Sub AddNumbers()
Dim Total As Integer
Dim Count As Integer
Total = 0
For Count = 1 To 10
Total = Total + Count
Next Count
MsgBox Total
End Sub
In this code, the value of Total is set to 0 before getting into the For Next loop.
Once it gets into the loop, it holds the total value after every loop. So after the first loop, when Counter is 1, ‘Total’ value becomes 1, and after the second loop it becomes 3 (1+2), and so on.
And finally, when the loop ends, ‘Total’ variable has the sum of the first 10 positive integers.
A MsgBox then simply displays the result in a message box.
Example 2 – Adding the first 5 Even Positive Integers
To sum the first five even positive integers (i.e, 2,4,6,8, and 10), you need a similar code with a condition to only consider the even numbers and ignore the odd numbers.
Here is a code that will do it:
Sub AddEvenNumbers()
Dim Total As Integer
Dim Count As Integer
Total = 0
For Count = 2 To 10 Step 2
Total = Total + Count
Next Count
MsgBox Total
End Sub
Note that we started the Count value from 2 and also used ‘Step 2‘.
When you use ‘Step 2’, it tells the code to increment the ‘Count’ value by 2 every time the loop is run.
So the Count value starts from 2 and then becomes 4, 6, 8 and 10 as the looping occurs.
NOTE: Another way of doing this could be to run the loop from 1 to 10 and within the loop check whether the number is even or odd. However, using Step, in this case, is a more efficient way as it does not require the loop to run 10 times, but only 5 times.
The Step value can also be negative. In such as case, the Counter starts at a higher value and keeps getting decremented by the specified Step value.
Example 3 – Entering Serial Number in the Selected Cells
You can also use the For Next loop to go through a collection of objects (such as cells or worksheets or workbooks),
Here is an example that quickly enters serial numbers in all the selected cells.
Sub EnterSerialNumber()
Dim Rng As Range
Dim Counter As Integer
Dim RowCount As Integer
Set Rng = Selection
RowCount = Rng.Rows.Count
For Counter = 1 To RowCount
ActiveCell.Offset(Counter - 1, 0).Value = Counter
Next Counter
End Sub
The above code first counts the number of selected rows and then assigns this value to the variable RowCount. We then run the loop from ‘1 to RowCount’.
Also note that since selection can be any number of rows, we have Set the variable Rng to Selection (with the line ‘Set Rng = Selection’). Now we can use the ‘Rng’ variable to refer to the selection in our code.
Example 4 – Protect All Worksheets in the Active Workbook
You can use the ‘For Next’ loop to go through all the worksheets in the active workbook, and protect (or unprotect) each of the worksheets.
Below is the code that will do this:
Sub ProtectWorksheets()
Dim i As Integer
For i = 1 To ActiveWorkbook.Worksheets.Count
Worksheets(i).Protect
Next i
End Sub
The above code counts the number of sheets by using ActiveWorkbook.Worksheets.Count. This tells VBA how many times the loop needs to be run.
In each instance, it refers to the Ith workbook (using Worksheets(i)) and protects it.
You can use this same code to Unprotect worksheets too. Just change the line Worksheets(i).Protect to Worksheets(i).UnProtect.
Nested ‘For Next’ Loops
You can use nested ‘For Next’ loops to get more complex automation done in Excel. A nested ‘For Next’ loop would mean that there is a ‘For Next’ loop within a ‘For Next’ loop.
Let me show you how to use this using an example.
Suppose I have 5 workbooks open in my system and I want to protect all the worksheets in all these workbooks.
Below is the code that will do this:
Sub ProtectWorksheets()
Dim i As Integer
Dim j As Integer
For i = 1 To Workbooks.Count
For j = 1 To Workbooks(i).Worksheets.Count
Workbooks(i).Worksheets(j).Protect
Next j
Next i
End Sub
The above is a nested For Next loop as we have used one For Next loop within another.
‘EXIT For’ Statements in For Next Loops
‘Exit For’ statement allows you to exit the ‘For Next’ loop completely.
You can use it in cases where you want the For Next loop to end when a certain condition is met.
Let’s take an example where you have a set of numbers in Column A and you want to highlight all the negative numbers in red font. In this case, we need to analyze each cell for its value and then change the font color accordingly.
But to make the code more efficient, we can first check if there are any negative values in the list or not. If there are no negative values, we can use the Exit For the statement to simply come out of the code.
Below is the code that does this:
Sub HghlightNegative()
Dim Rng As Range
Set Rng = Range("A1", Range("A1").End(xlDown))
Counter = Rng.Count
For i = 1 To Counter
If WorksheetFunction.Min(Rng) >= 0 Then Exit For
If Rng(i).Value < 0 Then Rng(i).Font.Color = vbRed
Next i
End Sub
When you use the ‘Exit For’ statement within a nested ‘For Next’ loop, it will come out of the loop in which it is executed and go on to execute the next line in the code after the For Next loop.
For example, in the below code, the ‘Exit For’ statement will get you out of the inner loop, but the outer loop would continue to work.
Sub SampleCode()
For i = 1 To 10
For j = 1 to 10
Exit For
Next J
Next i
End Sub
Do While Loop
A ‘Do While’ loop allows you to check for a condition and run the loop while that condition is met (or is TRUE).
There are two types of syntax in the Do While Loop.
Do [While condition]
[Code block to Execute]
Loop
and
Do
[Code block to Execute]
Loop [While condition]
The difference between these two is that in the first, the While condition is checked first before any code block is executed, and in the second case, the code block is executed first and then the While condition is checked.
This means that if the While condition is False is both the cases, the code will still run at least once in the second case (as the ‘While’ condition is checked after the code has been executed once).
Now let’s see some examples of using Do While loops in VBA.
Example 1 – Add First 10 Positive Integers using VBA
Suppose you want to add the first ten positive integers using the Do While loop in VBA.
To do this, you can use the Do While loop until the next number is less than or equal to 10. As soon as the number is greater than 1o, your loop would stop.
Here is the VBA code that will run this Do While loop and the show the result in a message box.
Sub AddFirst10PositiveIntegers()
Dim i As Integer
i = 1
Do While i <= 10
Result = Result + i
i = i + 1
Loop
MsgBox Result
End Sub
The above loop continues to work until the value of ‘i’ becomes 11. As soon as it becomes 11, the loop ends (as the While condition becomes False).
Within the loop, we have used a Result variable that holds the final value Once the loop is completed, a message box shows the value of the ‘Result’ variable.
Example 2 – Enter Dates For the Current Month
Let’s say you want to enter all the dates of the current month into a worksheet column.
You can do that by using the following Do While loop code:
Sub EnterCurrentMonthDates()
Dim CMDate As Date
Dim i As Integer
i = 0
CMDate = DateSerial(Year(Date), Month(Date), 1)
Do While Month(CMDate) = Month(Date)
Range("A1").Offset(i, 0) = CMDate
i = i + 1
CMDate = CMDate + 1
Loop
End Sub
The above code would enter all the dates in the first column of the worksheet (starting from A1). The loops continue till the Month value of the variable ‘CMDate’ matches that of the current month.
Exit Do Statement
You can use the Exit Do statement to come out of the loop. As soon as the code executes the ‘Exit Do’ line, it comes out of the Do While loop and passes the control to the next line right after the loop.
For example, if you want to enter the first 10 dates only, then you can exit the loop as soon as the first 10 dates are entered.
The below code will do this:
Sub EnterCurrentMonthDates()
Dim CMDate As Date
Dim i As Integer
i = 0
CMDate = DateSerial(Year(Date), Month(Date), 1)
Do While Month(CMDate) = Month(Date)
Range("A1").Offset(i, 0) = CMDate
i = i + 1
If i >= 10 Then Exit Do
CMDate = CMDate + 1
Loop
End Sub
In the above code, the IF statement is used to check if the value of i is greater than 10 or not. As soon as the value of ‘i’ becomes 10, Exit Do statement is executed and the loop ends.
Do Until Loop
‘Do Until’ loops are very much like the ‘Do While’ loops.
In ‘Do While’, the loop runs till the given condition is met, while in ‘Do Until’, it loops until the specified condition is met.
There are two types of syntax in the Do Until Loop.
Do [Until condition]
[Code block to Execute]
Loop
and
Do
[Code block to Execute]
Loop [Until condition]
The difference between these two is that in the first, the Until condition is checked first before any code block is executed, and in the second case, the code block is executed first and then the Until condition is checked.
This means that if the Until condition is TRUE is both cases, the code will still run at least once in the second case (as the ‘Until’ condition is checked after the code has been executed once).
Now let’s see some examples of using Do Until loops in VBA.
Note: All the examples for Do Until are the same as that of Do While. These have been modified to show you how the Do Until loop works.
Example 1 – Add First 10 Positive Integers using VBA
Suppose you want to add the first ten positive integers using the Do Until loop in VBA.
To do this, you need to run the loop until the next number is less than or equal to 10. As soon as the number is greater than 1o, your loop would stop.
Here is the VBA code that will run this loop and show the result in a message box.
Sub AddFirst10PositiveIntegers()
Dim i As Integer
i = 1
Do Until i > 10
Result = Result + i
i = i + 1
Loop
MsgBox Result
End Sub
The above loop continues to work until the value of ‘i’ becomes 11. As soon as it becomes 11, the loop ends (as the ‘Until’ condition becomes True).
Example 2 – Enter Dates For the Current Month
Let’s say you want to enter all the dates of the current month into a worksheet column.
You can do that by using the following Do Until loop code:
Sub EnterCurrentMonthDates()
Dim CMDate As Date
Dim i As Integer
i = 0
CMDate = DateSerial(Year(Date), Month(Date), 1)
Do Until Month(CMDate) <> Month(Date)
Range("A1").Offset(i, 0) = CMDate
i = i + 1
CMDate = CMDate + 1
Loop
End Sub
The above code would enter all the dates in the first column of the worksheet (starting from A1). The loop continues until the Month of variable CMDate is not equal to that of the current month.
Exit Do Statement
You can use the ‘Exit Do’ statement to come out of the loop.
As soon as the code executes the ‘Exit Do’ line, it comes out of the Do Until loop and passes the control to the next line right after the loop.
For example, if you want to enter the first 10 dates only, then you can exit the loop as soon as the first 10 dates are entered.
The below code will do this:
Sub EnterCurrentMonthDates()
Dim CMDate As Date
Dim i As Integer
i = 0
CMDate = DateSerial(Year(Date), Month(Date), 1)
Do Until Month(CMDate) <> Month(Date)
Range("A1").Offset(i, 0) = CMDate
i = i + 1
If i >= 10 Then Exit Do
CMDate = CMDate + 1
Loop
End Sub
In the above code, as soon as the value of ‘i’ becomes 10, Exit Do statment is executed and the loop ends.
For Each
In VBA, you can loop through a set of collections using the ‘For Each’ loop.
Here are some examples of collections in Excel VBA:
- A collection of all the open Workbooks.
- A collection of all worksheets in a workbook.
- A collection of all the cells in a range of selected cells.
- A collection of all the charts or shapes in the workbook.
Using the ‘For Each’ loop, you can go through each of the objects in a collection and perform some action on it.
For example, you can go through all the worksheets in a workbook and protect these, or you can go through all the cells in the selection and change the formatting.
With the ‘For Each’ loop (also referred to as the ‘For Each-Next’ loop), you don’t need to know how many objects are there in a collection.
‘For Each’ loop would automatically go through each object and perform the specified action. For example, if you want to protect all the worksheets in a workbook, the code would be the same whether you have a workbook with 3 worksheets or 30 worksheets.
Here is the syntax of For Each-Next loop in Excel VBA.
For Each element In collection
[Code Block to Execute]
Next [element]
Now let’s see a couple of examples of using the For Each Loop in Excel.
Example 1 – Go through All the Worksheets in a Workbook (and Protect it)
Suppose you have a workbook where you want to protect all the worksheets.
Below For Each-Next loop can do this easily:
Sub ProtectSheets()
Dim ws As Worksheet
For Each ws In ActiveWorkbook.Worksheets
ws.Protect
Next ws
End Sub
In the above code, we have defined ‘ws’ variable as a Worksheet object. This tells VBA that ‘ws’ should be interpreted as a worksheet object in the code.
Now we use the ‘For Each’ statement to go through each ‘ws’ (which is a worksheet object) in the collection of all the worksheets in the active workbook (given by ActiveWorkbook.Worksheets).
Note that unlike other loops where we have tried to protect all the worksheets in a workbook, here we don’t need to worry about how many worksheets are there in the workbook.
We don’t need to count these to run the loop. For Each loop ensures that all the objects are analyzed one by one.
Example 2 – Go through All the Open Workbooks (and Save All)
If you work with multiple workbooks at the same time, it can come in handy to be able to save all these workbooks at once.
Below VBA code can do this for us:
Sub SaveAllWorkbooks()
Dim wb As Workbook
For Each wb In Workbooks
wb.Save
Next wb
End Sub
Note that in this code, you don’t get a prompt that asks you to save the workbook in a specific location (if saving it for the first time).
It saves it in the default folder (it was the ‘Documents’ folder in my case). This code works best when these files are already saved and you’re making changes and you want to save all the workbooks quickly.
Example 3 – Go through All the Cells in a Selection (Highlight negative values)
Using the ‘For Each’ loop, you can loop through all the cells in a specific range or in the selected range.
This can be helpful when you want to analyze each cell and perform an action based on it.
For example, below is the code that will go through all the cells in the selection and change the cell color of the cells with negative values to red.
Sub HighlightNegativeCells()
Dim Cll As Range
For Each Cll In Selection
If Cll.Value < 0 Then
Cll.Interior.Color = vbRed
End If
Next Cll
End Sub
(Note I’ve used Cll as a short variable name for Cell. It’s advisable not to use object names such as Sheets or Range as variable names)
In the above code, the For Each-Next loop goes through the collection of cells in the selection. IF statement is used to identify if the cell value is negative or not. In case it is, the cell is given a red interior color, else it goes to the next cell.
In case you don’t have a selection, and instead want VBA to select all the filled cells in a column, starting from a specific cell (just like we use Control + Shift + Down arrow key to select all filled cells), you can use the below code:
Sub HighlightNegativeCells()
Dim Cll As Range
Dim Rng As Range
Set Rng = Range("A1", Range("A1").End(xlDown))
For Each Cll In Rng
If Cll.Value < 0 Then
Cll.Interior.Color = vbRed
End If
Next Cll
End Sub
In the above example, it doesn’t matter how many filled cells are there. It will start from cell A1 and analyze all the contiguous filled cells in the column.
You also don’t need to have cell A1 selected. You can have any far-off cell selected and when the code runs, it will still consider all the cells in column A (starting from A1) and color the negative cells.
‘Exit For’ Statment
You can use the ‘Exit For’ statement in the For Each-Next loop to come out of the loop. This is usually done in case a specific condition is met.
For example, in Example 3, as we are going through a set of cells, it can be more efficient to check if there are any negative values or not. In case there are no negative values, we can simply exit the loop and save some VBA processing time.
Below is the VBA code that will do this:
Sub HighlightNegativeCells()
Dim Cll As Range
For Each Cll In Selection
If WorksheetFunction.Min(Selection) >= 0 Then Exit For
If Cll.Value < 0 Then
Cll.Interior.Color = vbRed
End If
Next Cll
End Sub
Where to Put the VBA Code
Wondering where the VBA code goes in your Excel workbook?
Excel has a VBA backend called the VBA editor. You need to copy and paste the code in the VB Editor module code window.
Here are the steps to do this:
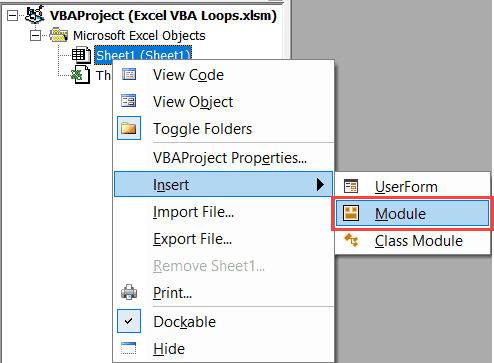
- Go to the Developer tab.

- Click on the Visual Basic option. This will open the VB editor in the backend.
- In the Project Explorer pane in the VB Editor, right-click on any object for the workbook in which you want to insert the code. If you don’t see the Project Explorer go to the View tab and click on Project Explorer.
- Go to Insert and click on Module. This will insert a module object for your workbook.

- Copy and paste the code in the module window.


You May Also Like the Following Excel Tutorials:
- How to record a macro in Excel.
- Creating User-defined functions in Excel.
- Excel VBA Msgbox
- How to Run a Macro in Excel.
- How to Create and Use Add-ins in Excel.
- Excel VBA Events – An Easy (and Complete) Guide.
- How to Sort Data in Excel using VBA (A Step-by-Step Guide).
- 24 Useful Excel Macro Examples for VBA Beginners (Ready-to-use).
- How to Use Excel VBA InStr Function (with practical EXAMPLES).
- Excel Personal Macro Workbook | Save & Use Macros in All Workbooks.
- Using Select Case in Excel VBA.
Single Loop | Double Loop | Triple Loop | Do While Loop
Looping is one of the most powerful programming techniques. A loop in Excel VBA enables you to loop through a range of cells with just a few codes lines.
Single Loop
You can use a single loop to loop through a one-dimensional range of cells.
Place a command button on your worksheet and add the following code lines:
Dim i As Integer
For i = 1 To 6
Cells(i, 1).Value = 100
Next i
Result when you click the command button on the sheet:

Explanation: The code lines between For and Next will be executed six times. For i = 1, Excel VBA enters the value 100 into the cell at the intersection of row 1 and column 1. When Excel VBA reaches Next i, it increases i with 1 and jumps back to the For statement. For i = 2, Excel VBA enters the value 100 into the cell at the intersection of row 2 and column 1, etc.
Note: it is good practice to always indent (tab) the code between the words For and Next. This makes your code easier to read.
Double Loop
You can use a double loop to loop through a two-dimensional range of cells.
Place a command button on your worksheet and add the following code lines:
Dim i As Integer, j As Integer
For i = 1 To 6
For j = 1 To 2
Cells(i, j).Value = 100
Next j
Next i
Result when you click the command button on the sheet:

Explanation: For i = 1 and j = 1, Excel VBA enters the value 100 into the cell at the intersection of row 1 and column 1. When Excel VBA reaches Next j, it increases j with 1 and jumps back to the For j statement. For i = 1 and j = 2, Excel VBA enters the value 100 into the cell at the intersection of row 1 and column 2. Next, Excel VBA ignores Next j because j only runs from 1 to 2. When Excel VBA reaches Next i, it increases i with 1 and jumps back to the For i statement. For i = 2 and j = 1, Excel VBA enters the value 100 into the cell at the intersection of row 2 and column 1, etc.
Triple Loop
You can use a triple loop to loop through two-dimensional ranges on multiple Excel worksheets.
Place a command button on your worksheet and add the following code lines:
Dim c As Integer, i As Integer, j As Integer
For c = 1 To 3
For i = 1 To 6
For j = 1 To 2
Worksheets(c).Cells(i, j).Value = 100
Next j
Next i
Next c
Explanation: The only change made compared to the code for the double loop is that we have added one more loop and added Worksheets(c). in front of Cells to get the two-dimensional range on the first sheet for c = 1, the second sheet for c = 2 and the third sheet for c = 3. Download the Excel file to see this result.
Do While Loop
Besides the For Next loop, there are other loops in Excel VBA. For example, the Do While Loop. Code placed between Do While and Loop will be repeated as long as the part after Do While is true.
1. Place a command button on your worksheet and add the following code lines:
Dim i As Integer
i = 1
Do While i < 6
Cells(i, 1).Value = 20
i = i + 1
Loop
Result when you click the command button on the sheet:

Explanation: as long as i is lower than 6, Excel VBA enters the value 20 into the cell at the intersection of row i and column 1 and increments i by 1. In Excel VBA (and in other programming languages), the symbol ‘=’ means becomes. It does not mean equal. So i = i + 1 means i becomes i + 1. In other words: take the present value of i and add 1 to it. For example, if i = 1, i becomes 1 + 1 = 2. As a result, the value 20 will be placed into column A five times (not six because Excel VBA stops when i equals 6).
2. Enter some numbers in column A.

3. Place a command button on your worksheet and add the following code lines:
Dim i As Integer
i = 1
Do While Cells(i, 1).Value <> «»
Cells(i, 2).Value = Cells(i, 1).Value + 10
i = i + 1
Loop
Result when you click the command button on the sheet:

Explanation: as long as Cells(i, 1).Value is not empty (<> means not equal to), Excel VBA enters the value into the cell at the intersection of row i and column 2, that is 10 higher than the value in the cell at the intersection of row i and column 1. Excel VBA stops when i equals 7 because Cells(7, 1).Value is empty. This is a great way to loop through any number of rows on a worksheet.
In this Article
- VBA Loop Quick Examples
- For Each Loops
- For Next Loops
- Do While Loops
- Do Until Loops
- VBA Loop Builder
- VBA For Next Loop
- For Loop Syntax
- For Loop Step
- For Loop Step – Inverse
- Nested For Loop
- Exit For
- Continue For
- VBA For Each Loop
- For Each Cell in Range
- For Each Worksheet in Workbook
- For Each Open Workbook
- For Each Shape in Worksheet
- For Each Shape in Each Worksheet in Workbook
- For Each – IF Loop
- VBA Do While Loop
- Do While
- Loop While
- VBA Do Until Loop
- Do Until
- Loop Until
- Exit Do Loop
- End or Break Loop
- More Loop Examples
- Loop Through Rows
- Loop Through Columns
- Loop Through Files in a Folder
- Loop Through Array
- Loops in Access VBA
To work effectively in VBA, you must understand Loops.
Loops allow you to repeat a code block a set number of times or repeat a code block on a each object in a set of objects.
First we will show you a few examples to show you what loops are capable of. Then we will teach you everything about loops.
VBA Loop Quick Examples
For Each Loops
For Each Loops loop through every object in a collection, such as every worksheet in workbook or every cell in a range.
Loop Through all Worksheets in Workbook
This code will loop through all worksheets in the workbook, unhiding each sheet:
Sub LoopThroughSheets()
Dim ws As Worksheet

    For Each ws In Worksheets
        ws.Visible = True
    Next

End Sub
Loop Through All Cells in Range
This code will loop through a range of cells, testing if the cell value is negative, positive, or zero:
Sub If_Loop()
Dim Cell as Range

  For Each Cell In Range("A2:A6")
    If Cell.Value > 0 Then
      Cell.Offset(0, 1).Value = "Positive"
    ElseIf Cell.Value < 0 Then
      Cell.Offset(0, 1).Value = "Negative"
    Else
      Cell.Offset(0, 1).Value = "Zero"
     End If
  Next Cell

End Sub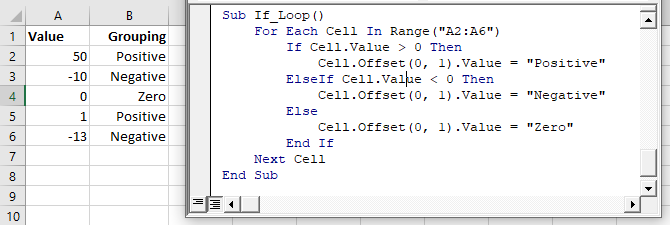
For Next Loops
Another type of “For” Loop is the For Next Loop. The For Next Loop allows you to loop through integers.
This code will loop through integers 1 through 10, displaying each with a message box:
Sub ForLoop()
    Dim i As Integer
    For i = 1 To 10
        MsgBox i
    Next i
End Sub
Do While Loops
Do While Loops will loop while a condition is met. This code will also loop through integers 1 through 10, displaying each with a message box.
Sub DoWhileLoop()
    Dim n As Integer
    n = 1
    Do While n < 11
        MsgBox n
        n = n + 1
    Loop
End Sub
Do Until Loops
Conversely, Do Until Loops will loop until a condition is met. This code does the same thing as the previous two examples.
Sub DoUntilLoop()
    Dim n As Integer
    n = 1
    Do Until n >= 10
        MsgBox n
        n = n + 1
    Loop
End Sub
We will discuss this below, but you need to be extremely careful when creating Do While or Do Until loops so that you don’t create a never ending loop.
VBA Loop Builder
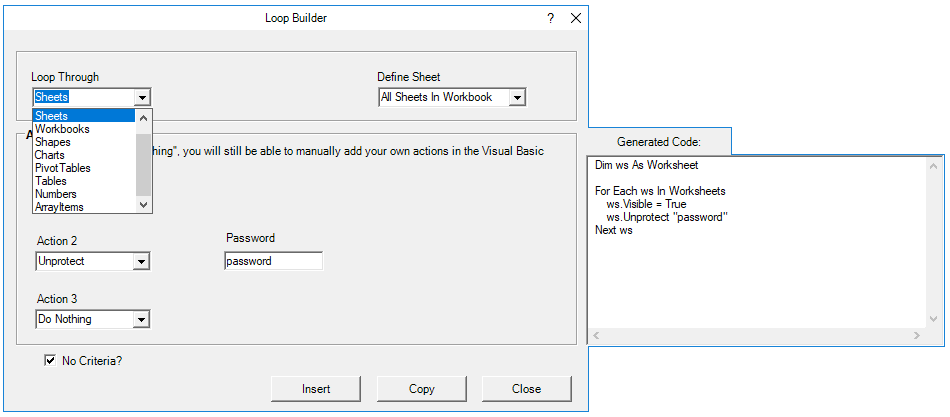
This is a screenshot of the “Loop Builder” from our Premium VBA Add-in: AutoMacro. The Loop Builder allows you to quickly and easily build loops to loop through different objects, or numbers. You can perform actions on each object and/or select only objects that meet certain criteria.
The add-in also contains many other code builders, an extensive VBA code library, and an assortment of coding tools. It’s a must have for any VBA developer.
Now we will cover the different types of loops in depth.
VBA Coding Made Easy
Stop searching for VBA code online. Learn more about AutoMacro — A VBA Code Builder that allows beginners to code procedures from scratch with minimal coding knowledge and with many time-saving features for all users!

Learn More
VBA For Next Loop
For Loop Syntax
The For Next Loop allows you to repeat a block of code a specified number of times. The syntax is:
[Dim Counter as Integer]

For Counter = Start to End [Step Value]
    [Do Something]
Next [Counter]
Where the items in brackets are optional.
- [Dim Counter as Long] – Declares the counter variable. Required if Option Explicit is declared at the top of your module.
- Counter – An integer variable used to count
- Start – The start value (Ex. 1)
- End – The end value (Ex. 10)
- [Step Value] – Allows you to count every n integers instead of every 1 integer. You can also go in reverse with a negative value (ex. Step -1)
- [Do Something] – The code that will repeat
- Next [Counter] – Closing statement to the For Next Loop. You can include the Counter or not. However, I strongly recommend including the counter as it makes your code easier to read.
If that’s confusing, don’t worry. We will review some examples:
Count to 10
This code will count to 10 using a For-Next Loop:
Sub ForEach_CountTo10()

Dim n As Integer
For n = 1 To 10
    MsgBox n
Next n

End Sub
For Loop Step
Count to 10 – Only Even Numbers
This code will count to 10 only counting even numbers:
Sub ForEach_CountTo10_Even()

Dim n As Integer
For n = 2 To 10 Step 2
    MsgBox n
Next n

End Sub
Notice we added “Step 2”. This tells the For Loop to “step” through the counter by 2. We can also use a negative step value to step in reverse:
VBA Programming | Code Generator does work for you!
For Loop Step – Inverse
Countdown from 10
This code will countdown from 10:
Sub ForEach_Countdown_Inverse()

Dim n As Integer
For n = 10 To 1 Step -1
    MsgBox n
Next n
MsgBox "Lift Off"

End Sub
Delete Rows if Cell is Blank
I’ve most frequently used a negative step For-Loop to loop through ranges of cells, deleting rows that meet certain criteria. If you loop from the top rows to the bottom rows, as you delete rows you will mess up your counter.
This example will delete rows with blank cells (starting from the bottom row):
Sub ForEach_DeleteRows_BlankCells()

Dim n As Integer
For n = 10 To 1 Step -1
    If Range("a" & n).Value = "" Then
        Range("a" & n).EntireRow.Delete
    End If
Next n

End Sub
Nested For Loop
You can “nest” one For Loop inside another For Loop. We will use Nested For Loops to create a multiplication table:
Sub Nested_ForEach_MultiplicationTable()

Dim row As Integer, col As Integer

For row = 1 To 9
    For col = 1 To 9
        Cells(row + 1, col + 1).Value = row * col
    Next col
Next row

End Sub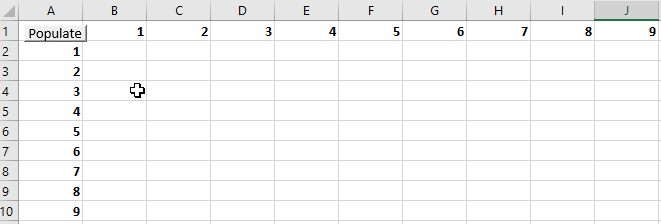
Exit For
The Exit For statement allows you to exit a For Next loop immediately.
You would usually use Exit For along with an If Statement, exiting the For Next Loop if a certain condition is met.
For example, you might use a For Loop to find a cell. Once that cell is found, you can exit the loop to speed up your code.
This code will loop through rows 1 to 1000, looking for “error” in column A. If it’s found, the code will select the cell, alert you to the found error, and exit the loop:
Sub ExitFor_Loop()

Dim i As Integer

For i = 1 To 1000
    If Range("A" & i).Value = "error" Then
        Range("A" & i).Select
        MsgBox "Error Found"
        Exit For
    End If
Next i

End Sub
Important: In the case of Nested For Loops, Exit For only exits the current For Loop, not all active Loops.
Continue For
VBA does not have the “Continue” command that’s found in Visual Basic. Instead, you will need to use “Exit”.
AutoMacro | Ultimate VBA Add-in | Click for Free Trial!
VBA For Each Loop
The VBA For Each Loop will loop through all objects in a collection:
- All cells in a range
- All worksheets in a workbook
- All shapes in a worksheet
- All open workbooks
You can also use Nested For Each Loops to:
- All cells in a range on all worksheets
- All shapes on all worksheets
- All sheets in all open workbooks
- and so on…
The syntax is:
For Each Object in Collection
[Do Something]
Next [Object]
Where:
- Object – Variable representing a Range, Worksheet, Workbook, Shape, etc. (ex. rng)
- Collection – Collection of objects (ex. Range(“a1:a10”)
- [Do Something] – Code block to run on each object
- Next [Object] – Closing statement. [Object] is optional, however strongly recommended.
For Each Cell in Range
This code will loop through each cell in a range:
Sub ForEachCell_inRange()

Dim cell As Range

For Each cell In Range("a1:a10")
    cell.Value = cell.Offset(0,1).Value
Next cell

End Sub
For Each Worksheet in Workbook
This code will loop through all worksheets in a workbook, unprotecting each sheet:
Sub ForEachSheet_inWorkbook()

Dim ws As Worksheet

For Each ws In Worksheets
    ws.Unprotect "password"
Next ws

End Sub
For Each Open Workbook
This code will save and close all open workbooks:
Sub ForEachWB_inWorkbooks()

Dim wb As Workbook

For Each wb In Workbooks
    wb.Close SaveChanges:=True
Next wb

End Sub
AutoMacro | Ultimate VBA Add-in | Click for Free Trial!
For Each Shape in Worksheet
This code will delete all shapes in the active sheet.
Sub ForEachShape()

Dim shp As Shape

For Each shp In ActiveSheet.Shapes
    shp.Delete
Next shp

End Sub
For Each Shape in Each Worksheet in Workbook
You can also nest For Each Loops. Here we will loop through all shapes in all worksheets in the active workbook:
Sub ForEachShape_inAllWorksheets()

Dim shp As Shape, ws As Worksheet

For Each ws In Worksheets
    For Each shp In ws.Shapes
        shp.Delete
    Next shp
Next ws

End Sub
For Each – IF Loop
As we’ve mentioned before, you can use an If statement within a loop, performing actions only if certain criteria is met.
This code will hide all blank rows in a range:
Sub ForEachCell_inRange()

Dim cell As Range

For Each cell In Range("a1:a10")
    If cell.Value = "" Then _
       cell.EntireRow.Hidden = True
Next cell

End Sub
VBA Do While Loop
The VBA Do While and Do Until (see next section) are very similar. They will repeat a loop while (or until) a condition is met.
The Do While Loop will repeat a loop while a condition is met.
Here is the Do While Syntax:
Do While Condition
[Do Something]
Loop
Where:
- Condition – The condition to test
- [Do Something] – The code block to repeat
You can also set up a Do While loop with the Condition at the end of the loop:
Do
[Do Something]
Loop While Condition
We will demo each one and show how they differ:
AutoMacro | Ultimate VBA Add-in | Click for Free Trial!
Do While
Here is the Do While loop example we demonstrated previously:
Sub DoWhileLoop()
    Dim n As Integer
    n = 1
    Do While n < 11
        MsgBox n
        n = n + 1
    Loop
End Sub
Loop While
Now let’s run the same procedure, except we will move the condition to the end of the loop:
Sub DoLoopWhile()
    Dim n As Integer
    n = 1
    Do
        MsgBox n
        n = n + 1
    Loop While n < 11
End Sub
VBA Do Until Loop
Do Until Loops will repeat a loop until a certain condition is met. The syntax is essentially the same as the Do While loops:
Do Until Condition
[Do Something]
Loop
and similarly the condition can go at the start or the end of the loop:
Do
[Do Something]
Loop Until Condition
Do Until
This do Until loop will count to 10, like our previous examples
Sub DoUntilLoop()
    Dim n As Integer
    n = 1
    Do Until n > 10
        MsgBox n
        n = n + 1
    Loop
End Sub
AutoMacro | Ultimate VBA Add-in | Click for Free Trial!
Loop Until
This Loop Until loop will count to 10:
Sub DoLoopUntil()
    Dim n As Integer
    n = 1
    Do
        MsgBox n
        n = n + 1
    Loop Until n > 10
End Sub
Exit Do Loop
Similar to using Exit For to exit a For Loop, you use the Exit Do command to exit a Do Loop immediately
Exit DoHere is an example of Exit Do:
Sub ExitDo_Loop()

Dim i As Integer
i = 1

Do Until i > 1000
    If Range("A" & i).Value = "error" Then
        Range("A" & i).Select
        MsgBox "Error Found"
        Exit Do
    End If
    i = i + 1
Loop

End Sub
End or Break Loop
As we mentioned above, you can use the Exit For or Exit Do to exit loops:
Exit ForExit DoHowever, these commands must be added to your code before you run your loop.
If you are trying to “break” a loop that’s currently running, you can try pressing ESC or CTRL + Pause Break on the keyboard. However, this may not work. If it doesn’t work, you’ll need to wait for your loop to end or, in the case of an endless loop, use CTRL + ALT + Delete to force close Excel.
This is why I try to avoid Do loops, it’s easier to accidentally create an endless loop forcing you to restart Excel, potentially losing your work.
More Loop Examples
AutoMacro | Ultimate VBA Add-in | Click for Free Trial!
Loop Through Rows
This will loop through all the rows in a column:
Public Sub LoopThroughRows()

Dim cell As Range

For Each cell In Range("A:A")
    If cell.value <> "" Then MsgBox cell.address & ": " & cell.Value
Next cell

End Sub
Loop Through Columns
This will loop through all columns in a row:
Public Sub LoopThroughColumns()

Dim cell As Range

For Each cell In Range("1:1")
    If cell.Value <> "" Then MsgBox cell.Address & ": " & cell.Value
Next cell

End Sub
Loop Through Files in a Folder
This code will loop through all files in a folder, creating a list:
Sub LoopThroughFiles ()

Dim oFSO As Object
Dim oFolder As Object
Dim oFile As Object
Dim i As Integer

Set oFSO = CreateObject("Scripting.FileSystemObject")

Set oFolder = oFSO.GetFolder("C:Demo)

i = 2

For Each oFile In oFolder.Files
    Range("A" & i).value = oFile.Name
    i = i + 1
Next oFile

End Sub
Loop Through Array
This code will loop through the array ‘arrList’:
For i = LBound(arrList) To UBound(arrList)
    MsgBox arrList(i)
Next i
The LBound function gets the “lower bound” of the array and UBound gets the “upper bound”.
Loops in Access VBA
Most of the examples above will also work in Access VBA. However, in Access, we loop through the Recordset Object rather than the Range Object.
Sub LoopThroughRecords()
   On Error Resume Next
   Dim dbs As Database
   Dim rst As Recordset
   Set dbs = CurrentDb
   Set rst = dbs.OpenRecordset("tblClients", dbOpenDynaset)
   With rst
      .MoveLast
      .MoveFirst
      Do Until .EOF = True
         MsgBox (rst.Fields("ClientName"))
        .MoveNext
     Loop
   End With
   rst.Close
   Set rst = Nothing
   Set dbs = Nothing
End SubLoops are used in VBA for repeating a set of statements multiple times. Loops form an essential part of any programming language, and VBA is no exception. There are five different types of loops that can be used in VBA. These are as follows:
- For Loop
- For Each Loop
- Do While Loop
- Do Until Loop
- Wend Loop (obsolete)
In this post, I will explain all these VBA Loops with examples. But before jumping into the topic, let’s understand what a loop is and why it is used.
What is a loop, and what are its uses?
Loop is an instruction that can continually repeat a set of statements until a particular condition is reached.
Loops can serve the following purposes:
- It helps in iterating a set of statements.
- It helps in checking a particular condition multiple times.
- It can also help in developing custom sleep and wait logic in code.

VBA FOR LOOP
For loop is one of the most important and frequently used loop in VBA. For Loop is sometimes also called ‘For Next Loop’.
For Loops allow you to iterate a set of statements for a specified number of times.
Syntax of VBA For Loop
The basic syntax of a VBA For loop or structure of For Loop is as follows:
For loop_ctr = start_num To end_num [step_increment]
'Statements to be executed inside the loop
Next loop_ctr
Here, ‘loop_ctr’ stands for the loop counter. It is the backbone of the ‘For Next Loop,’ and hence it is also called ‘loop timekeeper’. This variable gets incremented after each iteration until the loop ends.
‘start_num’ is the number from which the loop should begin.
‘end_num’ is the number till which the loop should continue.
‘step_increment’ is an optional parameter. It denotes by how much value the ‘loop_ctr’ should be incremented after each iteration. By default, the value of ‘step_increment’ is 1. This means that with each iteration, the ‘loop_ctr’ value is incremented by 1.
How does a VBA For Loop Work?
Let’s say we have a simple For Loop in VBA as shown below:
For loop_ctr = 1 To 100
'Statements to be executed inside the loop
Next loop_ctr
- When the program control reaches the statement ‘For loop_ctr = 1 To 100’, it reserves a space for the variable ‘loop_ctr’ in the memory and initializes it to 1.
- After this, it executes the statements inside the For Loop sequentially.
- Finally, the program control reaches the statement ‘Next loop_ctr’, here it increments the variable ‘loop_ctr’ by 1. And the control again goes to the statement ‘For loop_ctr = 1 To 100’, where it checks if the value of ‘loop_ctr’ has reached 100 or not. If the value is less than 100, then it continues the next iteration; otherwise, the loop stops.
Still not clear with the working of a For Loop? No Worries. Let’s try to understand this with the help of a flow diagram.
VBA For Next Loop Flow Diagram

Let’s try to understand the control flow as depicted in the above flow chart:
- First of all, the FOR statement is executed. This step allows the ‘loop_ctr’ and ‘step_increment’ values to be initialized.
- After this, the condition is evaluated. If the condition is TRUE, all the statements inside the loop ‘Code Block’ are executed. However, If the condition evaluates to FALSE, then the control flow jumps to the next statement outside the For loop.
- When the ‘code block’ inside the For Loop executes, the loop starts to get ready for the next iteration and increments the ‘loop_ctr’ value.
- Finally, the condition is again evaluated with the incremented ‘loop_ctr,’ and the process repeats itself.
Few Simple Examples of For Loop In VBA
Let’s see some simple examples of For Loop in VBA.
Example 1: Use VBA For Loop to print numbers from 1 to 10 in excel.
In this example, we have a range «A1:A10”, and we have to fill this range with numbers from 1-10.
To accomplish this, we can use the below code:
Sub ForLoopPrintNumbers()
Dim loop_ctr As Integer
For loop_ctr = 1 To 10
ActiveSheet.Range("A1").Offset(loop_ctr - 1, 0).Value = loop_ctr
Next loop_ctr
MsgBox "For Loop Completed!"
End Sub
Explanation:
In the above code, first of all, we have declared the loop counter ‘loop_ctr’ for our For loop. Next, along with the For statement, we have initialized the ‘loop_ctr’ to 1 and set the ‘end_num’ as 10.
Inside the For Loop body, we have written the code to write the loop_ctr value on the excel sheet in the A column. After this, there is a statement that increments the ‘loop_ctr’ for the next iteration.
Note that since we have not specified an explicit ‘step_increment’ value, so every iteration, the ‘loop_ctr’ will be incremented by 1. The For loop in the above code iterates 10 times and populates the cells in the range A1:A10 with numbers from 1-10 serially.
Example 2: Use For Loop in VBA to find the sum of all the numbers between 1 to 10.
In this example, we will loop through all the numbers between 1 to 10 and sum them. Finally, we will be displaying the sum of the numbers from 1 to 10 on the screen.
To do this we can use the following code:
Sub ForLoopSumNumbers()
Dim loop_ctr As Integer
Dim result As Integer
result = 0
For loop_ctr = 1 To 10
result = result + loop_ctr
Next loop_ctr
MsgBox "Sum of numbers from 1-10 is : " & result
End Sub
Explanation:
In the above code, first of all, we have declared the loop counter ‘loop_ctr’ for our For loop. Next, we have declared another integer variable as ‘result’ for storing the sum of numbers from 1 to 10.
After this, along with the For statement, we have initialized the ‘loop_ctr’ to 1 and set the ‘end_num’ as 10.
Inside the For Loop body, we have added the value of ‘loop_ctr’ along with the result. This means that in the first iteration, the result will be: 1, and in the second iteration, it will be : (1+2) = 3. Similarly, in the third iteration, the value will be: (3 + 3) = 6 and so on.
After the For loop body, there is a statement that increments the ‘loop_ctr’ for the next iteration.
Note that since we have not specified an explicit ‘step_increment’ value, hence with every iteration, the ‘loop_ctr’ will be incremented by 1.
The For loop in the above code iterates 10 times and sums all the numbers from 1 to 10, and finally displays the sum of these numbers in msgbox.
Example 3: Use VBA For Loop to print numbers, all even numbers from 1 to 10.
In this example, we will fill all the even numbers between 1 and 10 into cells A1 to A5.
To do this, we can use the below code:
Sub ForLoopToPrintEvenNumbers()
Dim loop_ctr As Integer
Dim cell As Integer
cell = 1For loop_ctr = 1 To 10
If loop_ctr Mod 2 = 0 Then
ActiveSheet.Range("A1").Offset(cell - 1, 0).Value = loop_ctr
cell = cell + 1
End If
Next loop_ctrMsgBox "For Loop Completed!"
End Sub
Explanation:
In the above code, first of all, we have declared the loop counter ‘loop_ctr’ for our For loop. After that, we have declared another variable ‘cell’. This variable is initialized with a value of 1.
Next, along with the For statement, we have initialized the ‘loop_ctr’ to 1 and set the ‘end_num’ as 10.
Inside the For Loop body, we have used an IF statement to check if the ‘loop_ctr’ value is even or not.
If the ‘loop_ctr’ value is Even then, we have written a statement to print the value out to the spreadsheet in the A column.
After this, we are incrementing the cell variable by 1. We have used the cell variable in our loop to print the values in the appropriate cell in the A column.
Next, there is a statement that increments the ‘loop_ctr’ for the next iteration.
Note that since we have not specified an explicit ‘step_increment’ value, after every iteration, the ‘loop_ctr’ will be incremented by 1.
The For loop in the above code iterates 10 times and populates the cells in the range A1:A5 with even numbers from 2-10.
Alternate Logic
There is another better way to accomplish the same, let’s see how.
Sub ForLoopToPrintEvenNumbers()
Dim loop_ctr As Integer
Dim cell As Integer
cell = 1For loop_ctr = 2 To 10 Step 2
ActiveSheet.Range("A1").Offset(cell - 1, 0).Value = loop_ctr
cell = cell + 1
Next loop_ctrMsgBox "For Loop Completed!"
End Sub
Explanation:
In the above code, we have looped through all the numbers between 2 to 10. Instead of the default ‘step_increment’ of 1, we are using an explicit ‘step_increment’ of 2.
In the first iteration of the for loop, the ‘loop_ctr’ value is 2, which is what gets printed in cell A1. In the second iteration, the ‘loop_ctr’ value becomes 4 (earlier value : 2 + step_increment : 2) and this number gets printed on cell A2.
Similarly, in the third iteration, the ‘loop_ctr’ value is 6 (earlier value: 4 + step_increment: 2) and it gets printed on the cell A3 and so on.
Writing a Nested For Loop
There are times when you might need to use a for loop within another for loop; this is called nesting of for loops.
VBA For loops can be nested within one another to perform complex tasks in excel. Let’s understand a nested loop with an example:
Example 4: Print numbers from 1 to 10 in all the worksheets in an excel spreadsheet using a For Loop.
In this example, we need to print numbers from 1 to 10 in all the worksheets in an excel workbook.
To do this, we can make use of the following code:
Sub ForLoopPrintNumbers()
Dim loop_ctr As Integer
Dim sheet As IntegerFor sheet = 1 To Worksheets.Count
For loop_ctr = 1 To 10
Worksheets(sheet).Range("A1").Offset(loop_ctr - 1, 0).Value = loop_ctr
Next loop_ctr
Next sheetMsgBox "For Loop Completed!"
End Sub
Explanation:
In this example, there are two For Loops, one inside another. The Outer For Loop iterates over the variable ‘sheet’, and the Inner For Loop iterates over ‘loop_ctr’ that determines the cell position.
Inside the body of the Inner For loop, we have a statement that prints the numbers between 1 to 10 in each worksheet (as per the outer loop).
The outer loop iterates over all the available sheets in the spreadsheet, whereas the inner loop iterates over the A1 to A10 for the current sheet. This makes it possible to print numbers from 1 – 10 in all the available worksheets.
Reverse For Loop in VBA
In all our previous examples, we have only seen those For loops in which the loop counter variable gets incremented from a lower value to a higher value (with each iteration).
But this is not necessary, you can also have a For Loop where the loop counter moves from a higher value to a lower value (with each iteration).
Example 5: Use a Reverse For Loop to print numbers from 1 to 10 in descending order.
Sub ReverseForLoop()
Dim loop_ctr As Integer
Dim cell As Integer
cell = 1For loop_ctr = 10 To 1 Step -1
ActiveSheet.Range("A1").Offset(cell - 1, 0).Value = loop_ctr
cell = cell + 1
Next loop_ctrMsgBox "For Loop Completed!"
End Sub
Explanation:
In this example, the loop starts with the value of ‘loop_ctr’ as 10. And then, with each iteration, the value of the loop counter is decremented by 1 (since the ‘step_increment’ is -1).
Inside the For Loop body, we print the value of the loop counter variable in the active sheet from A1:A10.
Infinite Loop Using a For Loop
An infinite loop is also sometimes called an Endless Loop. An Infinite Loop is a loop whose ending condition (often due to a logic error by the programmer) never becomes true. The loop iterates an infinite number of times or until halted by programmer/user action.
Although in the case of FOR loop, generally due to the clear start and end conditions, it is not easy to make an endless loop by logical mistake. However, there can be cases where you can by mistake reset the loop counter variable inside the loop, thereby making the loop infinite.
Below is an example of an endless for loop:
'Do not run this code
Sub InfiniteForLoop()
Dim loop_ctr As Integer
Dim cell As IntegerFor loop_ctr = 1 To 10
ActiveSheet.Range("A1").Offset(loop_ctr - 1, 0).Value = loop_ctr
loop_ctr = loop_ctr - 1
Next loop_ctrMsgBox "For Loop Completed!"
End Sub
The statement ‘loop_ctr = loop_ctr – 1’ makes the above VBA loop infinite since it resets the value of the loop_ctr with every iteration, and hence the end condition is never reached.
Tip: It is always good to not make any changes to the loop counter variable value inside the loop body.
How to Break Out or Exit of a For Loop
I believe many of you will wonder, «Why do we need to break a loop during execution»? The answer is simple: Breaking or exiting a loop can sometimes optimize the code and reduce the resource overhead.
To break a For Loop we can use the ‘Exit For’ statement.
Let’s try to see this in action with an example:
Example 6: Use a FOR loop in VBA to find the sum of the first 20 odd numbers between 1 to 100.
In this example, we have to find the first 20 odd numbers from 1 to 100 and then calculate their sum. Below is the code to do this:
Sub SumFirst20OddNumbers()
Dim loop_ctr As Integer
Dim odd_number_counter As Integer
Dim sum As IntegerFor loop_ctr = 1 To 100
If (loop_ctr Mod 2 <> 0) Then
sum = sum + loop_ctr
odd_number_counter = odd_number_counter + 1
End IfIf (odd_number_counter = 20) Then
Exit For
End If
Next loop_ctrMsgBox "Sum of top 20 odd numbers is : " & sum
End Sub
Explanation:
In this example, we have three variables – ‘loop_ctr’, ‘odd_number_counter’, and ‘sum’. The variable ‘loop_ctr’ is used as a loop counter, the ‘odd_number_counter’ variable holds the count of odd numbers that have been summed (because we only need to sum the first 20 odd numbers), and the ‘sum’ variable holds the sum of the first 20 odd numbers.
Inside the loop, we iterate all the numbers from 1 to 100, one by one (step_increment is 1 as default), and check if the number is odd. If the number is odd, we sum it and increment the ‘odd_number_counter’ by 1.
After the first IF block, another IF condition checks if the ‘odd_number_counter’ variable value is 20. If the value of ‘odd_number_counter’ is 20, then using the ‘Exit For’ statement, we are exiting out of the loop as there is no point in continuing the loop further.
Few Practical Examples of VBA For Loop
Now let’s have a look at some of the practical examples where For Loop can be used:
Example 7: Highlight alternate rows on a spreadsheet using the VBA For Loop.
In this example, we need to highlight alternate rows in a spreadsheet. To do this we can use the below code:
Sub HighlightAlternateRows()
Dim loop_ctr As Integer
Dim Max As Integer
Dim clm As Integer
Max = ActiveSheet.UsedRange.Rows.Count
clm = ActiveSheet.UsedRange.Columns.CountFor loop_ctr = 1 To Max
If loop_ctr Mod 2 = 0 Then
ActiveSheet.Range(Cells(loop_ctr, 1), Cells(loop_ctr, clm)).Interior.ColorIndex = 28
End If
Next loop_ctrMsgBox "For Loop Completed!"
End Sub
Explanation:
In the above code, we have started the loop from 1 to the number of rows in our sheet. We are then using the if statement to find the even-numbered rows for highlighting them.
Example 8: Use VBA For Loop Protect all sheets in Workbook.
In this example, we will try to create a VBA macro that loops through all the worksheets in the active workbook and protects all the worksheets.
Below is the code to do this:
Sub ProtectWorksheets()
Dim loop_ctr As Integer
For loop_ctr = 1 To ActiveWorkbook.Worksheets.Count
Worksheets(loop_ctr).Protect
Next loop_ctr
End Sub
Explanation:
In the above code, we are using a VBA for loop and iterating over all the worksheets in the open workbook. Inside the For Loop, we are trying to protect the current instance of the worksheet.
The above code can also be used to unprotect the sheets as well. Just replace the ‘Worksheets(loop_ctr).Protect’ with ‘Worksheets(loop_ctr).UnProtect’.
Example 9: Loop Over an Array of Numbers and Find the Largest and Smallest Numbers from the Array.
In this example, we have an array of numbers, and using a FOR Loop we have to iterate the array and find the smallest and the Largest numbers from the array. Below is the code to do this:
Sub ForLoopWithArrays()
Dim arr() As Variant
arr = Array(10, 12, 8, 19, 21, 5, 16)Dim min_number As Integer
Dim max_number As Integermin_number = arr(0)
max_number = arr(0)Dim loop_ctr As Integer
For loop_ctr = LBound(arr) To UBound(arr)
If arr(loop_ctr) > max_number Then
max_number = arr(loop_ctr)
End IfIf arr(loop_ctr) < min_number Then
min_number = arr(loop_ctr)
End IfNext loop_ctr
MsgBox "Largest Number: " & max_number _
& " Smallest Number: " & min_number
End Sub
Explanation:
In the above code, we have an array of numbers declared as ‘arr’ variable. In addition to that, we have two variables, ‘min_number’ and ‘max_number’, that are used for holding the minimum and maximum numbers from the array.
We initialize both the ‘min_number’ and ‘max_number’ variables to the array’s first element. Next, inside the For loop, we loop through all the array elements and check –
If the current number is greater than the ‘max_number’, then set the ‘max_number’ value equal to the current number. The next condition that we check is – If the current number is less than the ‘min_number’, then set the ‘min_number’ value equal to the current number.
Finally, we are showing the largest and the smallest numbers inside the array with the help of a msgbox.
VBA For Each Loop
For each is a more sophisticated type of For Loop. It can be used for iterating a collection of objects.
Here you don’t have to worry about the loop counter, your job is to simply pass a collection of objects, and the loop itself identifies the objects and iterates them.
Syntax of a VBA For Each Loop
The syntax of For Each Loop resembles closely to For Loop. Below is the syntax:
For Each item In collection_of_items
'Statements to be executed inside the loop
Next item
Here, ‘collection_of_items’ refers to a group of objects that you need to iterate. If you supply a single object to this parameter, it throws a «run-time error 438».
‘item’ specifies the objects inside the ‘collection_of_items’. At any particular instant inside the loop, ‘item’ contains a single object from the ‘collection_of_items’.
How a For Each Loop Works
Let’s say we have a For Each Loop as:
For Each cl In ActiveSheet.Range("A1:A10")
'Statements to be executed inside the loop
Next cl
- When the program control reaches the statement ‘For Each cl In ActiveSheet.Range(«A1:A10»)’ it evaluates the object collection and then initializes the variable ‘cl’ with the first object in the collection, i.e., cell $A$1.
- After this, it executes the statements inside the loop.
- Next, it fetches the second object from the collection and dumps it in the variable ‘cl’. And the process continues till it has fetched all objects from the collection.
Flow Diagram of a For Each Loop In VBA

Let’s try to understand the control flow as depicted in the above flow chart:
- First of all, the FOR EACH statement is executed and checks if there are any elements in the collection.
- If there are any elements present in the collection, the ‘item’ variable is initialized to the first element of the collection, and the statements inside the loop ‘Code Block’ is executed. However, If the condition evaluates to FALSE, then the control flow jumps to the next statement outside the For Each loop.
- When the ‘code block’ inside the For Each Loop executes, the loop starts to get ready for the next iteration. The ‘item’ variable is re-initialized to the next element in the collection, and the loop continues.
Few Simple Examples of VBA For Each Loop
Now let’s move to some simple examples of For Each loop.
Example 1 – Use VBA For Each Loop to display the names of all the Active Worksheets.
In this example, we will use a For Each loop to iterate through all the worksheets in the ActiveWorkbook and display the names of all the sheets using a msg box.
Sub ForEachDisplaySheetNames()
Dim sheetNames As String
For Each sht In ActiveWorkbook.Sheets
sheetNames = sheetNames & vbNewLine & sht.Name
Next shtMsgBox "The Sheet names are : " & vbNewLine & sheetNames
End Sub
Explanation:
In this example, the For Each loop takes the collection of sheets from ‘ActiveWorkbook.Sheets’ it then iterates the sheets one by one and initializes the ‘sht’ variable with the current sheet instance.
Inside the For Each block, the sheet name for each worksheet is appended to a string, and finally, outside the loop, all the sheet names are displayed using a message box.
Example 2: Use VBA For Each Loop to Sum all the Elements of an Array.
In this example, with the help of a VBA For Each loop, we will be iterating an array of numbers and find the sum of all of its elements. Below is the code to do this:
Sub ForEachSumArrayElements()
Dim arr As Variant
Dim sum As Integer
arr = Array(1, 10, 15, 17, 19, 21, 23, 27)For Each element In arr
sum = sum + element
Next elementMsgBox "The Sum is : " & sum
End Sub
Explanation:
In the above code, we have declared two variables, ‘arr’ and ‘sum’. The ‘arr’ variable is used for storing the array of numbers, and the ‘sum’ variable represents the sum of the array elements.
Inside the For Each loop, we are iterating the array elements one by one, summing them up, and storing the total in the ‘sum’ variable.
Finally, outside the For Each loop, we show the sum of the array elements using a message box.
Example 3: Use VBA For Each Loop to display the names of all the Open Workbooks.
In this example, using a For Each loop, we will loop through all the open workbooks and display their name using a message box.
Below is the code to do this:
Sub ForEachDisplayWorkbookNames()
Dim workBookNames As StringFor Each wrkbook In Workbooks
workBookNames = workBookNames & vbNewLine & wrkbook.Name
Next wrkbookMsgBox "The Workbook names are : " & vbNewLine & workBookNames
End Sub
Explanation:
In this example, the For Each loop takes the collection of workbooks, then iterates the workbooks one by one and initializes the ‘wrkbook’ variable with the current workbook instance.
Inside the For Each block, the workbook name for each workbook is appended to a string, and finally, outside the loop, all the workbook names are displayed using a message box.
Nested VBA For Each Loop
Two For Each loops can be nested within one another to perform complex tasks. Let’s understand For Each nested loop with an example:
Example 4: Display the names of all open workbooks along with their corresponding worksheets.
In this example, we will be iterating through all the open workbooks and then iterate through each workbook’s worksheets and finally display them using a message box.
Below is the code to do this:
Sub ForEachLoopNesting()
Dim result As String
For Each wrkbook In Workbooks
For Each sht In wrkbook.Sheets
result = result & vbNewLine & " Workbook : " & wrkbook.Name & " Worksheet : " & sht.Name
Next sht
Next wrkbookMsgBox result
End Sub
Explanation:
In the above code, we have used two For Each loops, one inside another. The outer For Each loop iterates through the workbooks, and the inner For Each loop iterates through the worksheets.
Inside the inner For Each block, a statement concatenates the names of the workbooks and the worksheets and stores them in a variable called ‘result’.
With each iteration, the ‘result’ variable’s new value is appended to the existing value. Finally, the value of the ‘result’ variable is displayed inside a msgbox.
How to Break Out or Exit of a For Each Loop
To break out of a For Each loop, we can use the ‘Exit For’ statement. So, ‘Exit For’ statement can break both a For loop as well as a For Each loop.
Let’s see this with an example:
Example 5: Use VBA For Each Loop to display the names of the first 3 sheets in the active workbook.
In this example, we will loop through the worksheets inside the active workbook and only display the first 3 worksheet names. Below is the code to do this:
Sub ForEachDisplayFirstThreeSheetNames()
Dim sheetNames As String
Dim sheetCounter As IntegerFor Each sht In ActiveWorkbook.Sheets
sheetNames = sheetNames & vbNewLine & sht.Name
sheetCounter = sheetCounter + 1If sheetCounter >= 3 Then
Exit For
End If
Next shtMsgBox "The Sheet names are : " & vbNewLine & sheetNames
End Sub
Explanation:
In the above code, we have a For Each loop that iterates over the worksheets inside the active workbook. Inside the loop, we are appending and storing the sheet names within the ‘sheetNames’ variable. Also, we have a ‘sheetCounter’ variable that gets incremented on each iteration.
After that, inside the loop, we also check if the value of the ‘sheetCounter’ variable has reached 3 (because we only want to display 3 sheet names).
If the ‘sheetCounter’ variable’s value has reached 3, we exit the loop using the ‘Exit For’ statement. Finally, we are displaying the value of the ‘sheetNames’ variable using a msgbox.
VBA Do While Loop
VBA Do While is another type of loop that repeatedly executes a set of statements while a condition continues to be True. The loop ends when the condition becomes false.
Syntax of Do While Loop In VBA
Do while loop has two syntaxes in VBA, these are as follows:
Syntax 1:
Do While condition
'Statements to be executed inside the loop
Loop
Or
Syntax 2:
Do
'Statements to be executed inside the loop
Loop While condition
In both the syntaxes, ‘condition’ is used as the loop backbone. On each iteration ‘While’ statement checks if the ‘condition’ evaluates to True or False. If the ‘condition’ is True, then the loop continues; otherwise, the loop terminates.
Before everything else, let’s try to understand the difference between these two syntaxes.
Difference Between the two Do While Syntaxes
As we can see in the first, do-while loop syntax, the ‘condition’ is checked as the first statement. This means if the condition is false, the do-while loop in syntax 1 will not perform any iterations.
Whereas in the second syntax, the ‘condition’ is checked as the last statement inside the loop. This means that even if the condition is false, the do-while loop in syntax 2 will perform at least 1 iteration. Only after that, the condition will be evaluated, and the next iteration will not happen.
So, syntax 2 guarantees to have at least 1 iteration irrespective of the condition being true or false.
Now, let’s try to understand how a do-while loop works.
How Does a Do While Loop Work
Syntax 1 –
Let’s say we have a Do While loop as follows:
Dim loop_ctr as Integer
loop_ctr = 1
Do While loop_ctr < 10
'Statements to be executed inside the loop
loop_ctr = loop_ctr + 1
Loop
- In the first two statements, the variable ‘loop_ctr’ is declared and initialized as 1.
- When the program control reaches the statement «Do While loop_ctr < 10», it checks if the value of the ‘loop_ctr’ is less than 10.
- If the ‘loop_ctr’ value is less than 10, the statements inside the body of the loop get executed sequentially, and finally, the ‘loop_ctr’ is incremented by 1.
- After this, the control again moves to the loop «Do While loop_ctr < 10», and the loop continues till the value of ‘loop_ctr’ becomes equal to 10.
- When the value of ‘loop_ctr’ becomes equal to 10, then the do while condition fails, and the control moves to the next statement after the do-while loop.
Syntax 2 –
Let’s say we have a Do While loop as follows:
Dim loop_ctr as Integer
loop_ctr = 1
Do
'Statements to be executed inside the loop</em>
loop_ctr = loop_ctr + 1
Loop While loop_ctr < 10
- In the first two statements, the variable ‘loop_ctr’ is declared and initialized as 1.
- When the program control reaches the «Do» statement, as there are no checks (like syntax 1), it just comes inside the loop and starts executing the statements inside the loop one by one and increments the ‘loop_ctr’ by 1.
- After executing the statements inside the loop body, it checks if the ‘loop_ctr’ is less than 10. If the ‘loop_ctr’ value is less than 10, another iteration starts.
- If the value of ‘loop_ctr’ becomes equal to 10, then the do while condition fails, and the control moves to the next statement after the do-while loop.
Note: In the second syntax, the Do-While Loop always iterates at-least-once since the condition to be checked is placed at the end of the loop.
Flow Diagram of a Do While Loop In VBA:

Let’s try to understand the control flow as depicted in the above flow chart:
Syntax 1 –
- In this Do-While syntax, the loop condition is checked along with the Do statement.
- If the condition is true, then the ‘code block’ inside the do-while loop is executed, and the next iteration begins. Each iteration before beginning checks the loop condition, and the ‘code block’ inside the do-while loop is only executed when the condition evaluates to true.
- When the loop condition becomes false, then no more loop iterations occur, and the control flow jumps to the next statement outside the Do While loop.
Syntax 2 –
- In this Do-While syntax, the loop condition is not checked along with the Do statement.
- Since for the first iteration, no condition is checked. Hence the code block inside the do-while body gets executed.
- After the first iteration, each subsequent iteration, before beginning, checks the loop condition, and the ‘code block’ inside the do-while loop is only executed when the condition evaluates to true.
- When the loop condition becomes false, then no more loop iterations occur, and the control flow jumps to the next statement outside the Do While loop.
Few Simple Examples of Do While Loop In VBA
Example 1: Use VBA Do While Loop to print numbers from 1 to 10 in excel.
In this example, we have a range «A1:A10,» and we have to fill this range with numbers from 1-10. To do this we can use the below code:
Sub DoWhileLoopPrintNumbers()
Dim loop_ctr As Integer
loop_ctr = 1Do While loop_ctr <= 10
ActiveSheet.Range("A1").Offset(loop_ctr - 1, 0).Value = loop_ctr
loop_ctr = loop_ctr + 1
LoopMsgBox ("Loop Ends")
End Sub
Explanation:
In the above code, we have declared and initialized the ‘loop_ctr’ variable for our Do While loop. Next, along with the Do while statement, we have a condition to run the loop till the ‘loop_ctr’ value is less than or equal to 10.
Inside the Do While Loop body, we have written the code to write the ‘loop_ctr’ value on the excel sheet in the A column.
After this, there is a statement that increments the ‘loop_ctr’ for the next iteration.
Example 2: Use Do While Loop in VBA to find the sum of all the numbers between 1 to 20.
In this example, we will loop through all the numbers between 1 to 20 and sum them. Finally, we will be displaying the sum of the numbers from 1 to 20 on the screen.
To do this we can use the following code:
Sub WhileLoopSumNumbers()
Dim loop_ctr As Integer
Dim result As Integer
loop_ctr = 1
result = 0Do While loop_ctr <= 20
result = result + loop_ctr
loop_ctr = loop_ctr + 1
LoopMsgBox "Sum of numbers from 1-20 is : " & result
End Sub
Explanation:
In the above code, we have declared the loop counter ‘loop_ctr’ for our Do While loop. Next, we have declared another integer variable as ‘result’ for storing the sum of numbers from 1 to 20.
After this, along with the Do while statement, we have a condition to run the loop till the ‘loop_ctr’ value is less than or equal to 20.
Inside the Do While Loop body, we have added the value of ‘loop_ctr’ along with the result. This means that in the first iteration, the result’s value will be: 1, and in the second iteration, it will be : (1+2) = 3. Similarly, in the third iteration, the value will be: (3 + 3) = 6 and so on.
After this, there is a statement that increments the ‘loop_ctr’ for the next iteration.
The Do While loop in the above code iterates 20 times, sums all the numbers from 1 to 20, and finally displays the sum of these numbers in msgbox.
Example 3: Show the unique behavior of Do While Loop (In Syntax 2) to execute at-least-once even if the condition to be checked is False.
Sub DoWhileLoopTest()
Dim loop_ctr As Integer
loop_ctr = 100Do
MsgBox "Loop Counter : " & loop_ctr
loop_ctr = loop_ctr + 1
Loop While loop_ctr <= 10End Sub
Explanation:
In the above example, we have initialized the ‘loop_ctr’ as 100 and inside the loop condition we are checking ‘loop_ctr < 10’. This means the loop is only designed to iterate when the value of ‘loop_ctr’ is less than 10. But you will notice that despite the condition this do-while loop executes once.
The reason for this is: because according to syntax 2 of the Do While loop, there is no way to check conditions at the beginning of the loop. You can only check conditions at the end of the loop.
Note: We can fix this issue by simply using the Do While loop in Syntax 1 as shown:
Sub DoWhileLoopTest()
Dim loop_ctr As Integer
loop_ctr = 100Do While loop_ctr <= 10
MsgBox "Loop Counter : " & loop_ctr
loop_ctr = loop_ctr + 1
LoopEnd Sub
Writing a Nested Do While Loop
Similar to other loops, nesting is very much possible in Do While Loops. Let’s understand nested Do While loops this with an example.
Example 4: Print numbers from 1 to 10 in all the worksheets in an excel spreadsheet using a Do While Loop.
In this example, we need to print numbers from 1 to 10 in all the worksheets in an excel workbook using a do-while loop. To do this, we can make use of the following code:
Sub NestedDoWhileLoop()
Dim loop_ctr As Integer
Dim sheet As Integer
sheet = 1Do While sheet <= Worksheets.Count
loop_ctr = 1
Do While loop_ctr <= 10
Worksheets(sheet).Range("A1").Offset(loop_ctr - 1, 0).Value = loop_ctr
loop_ctr = loop_ctr + 1
Loop
sheet = sheet + 1
LoopMsgBox "Nested While Loop Completed!"
End Sub
Explanation:
In this example, there are two Do While Loops, one inside another. The Outer Do While Loop iterates over the variable ‘sheet’ and iterates till the value of the ‘sheet’ variable is less than or equal to ‘Worksheets.Count’ (i.e., the total count of worksheets in a workbook).
Inner Do While Loop iterates over the variable ‘loop_ctr’ and iterates till the value of ‘loop_ctr’ is less than or equal to 10. This helps us to print the numbers in a sequence.
Inside the body of the Inner Do While loop, we have a statement that prints the numbers between 1 to 10 in each worksheet (as per the outer loop).
The outer loop iterates over all the available worksheets sheets in the spreadsheet, whereas the inner loop iterates over the numbers from 1 to 10 for the current sheet.
This makes it possible to print numbers from 1 – 10 in all the available worksheets.
Infinite Loop Using a Do While Loop
Unlike a For Loop, a Do While Loop does not have a clear ‘start’, ‘end’ or ‘step_increments’, so it is very easy to make logical errors resulting in an infinite or an endless loop. Below is an example of a Do While endless loop:
'Do not run this code
Sub InfiniteDoWhileLoop()
Dim loop_ctr As Integer
loop_ctr = 1Do While loop_ctr <= 10
ActiveSheet.Range("A1").Offset(loop_ctr - 1, 0).Value = loop_ctr
LoopMsgBox ("Loop Ends")
End Sub
In the above code, we have simply missed the line to increment the loop counter i.e. ‘loop_ctr = loop_ctr + 1’ and this has made the loop infinite because the value of ‘loop_ctr’ will always be 1 (since it is never incremented) and hence the loop condition ‘While loop_ctr <= 10’ will always evaluate to true.
Tip: It is always a good idea to use a For Each or For Next loop over a Do While or Do Until loop (whenever possible).
How to Break Out or Exit of a Do While Loop
To break out of a Do While loop, we can use the ‘Exit Do’ statement. As soon as the VBA engine executes the ‘Exit Do’ statement, it exits the loop and takes the control to the next statement after the Do while loop.
Let’s see this with an example:
Example 5: Use a Do While loop in VBA to find the sum of the first 15 odd numbers between 1 to 100.
In this example, we have to find the first 15 odd numbers from 1 to 100 and then calculate their sum. Below is the code to do this:
Sub SumFirst15OddNumbers()
Dim loop_ctr As Integer
Dim odd_number_counter As Integer
Dim sum As Integerloop_ctr = 1
Do While loop_ctr <= 100
If (loop_ctr Mod 2 <> 0) Then
sum = sum + loop_ctr
odd_number_counter = odd_number_counter + 1
End IfIf (odd_number_counter = 15) Then
Exit Do
End Ifloop_ctr = loop_ctr + 1
LoopMsgBox "Sum of top 15 odd numbers is : " & sum
End Sub
Explanation:
In this example, we have three variables – ‘loop_ctr’, ‘odd_number_counter’, and ‘sum’. ‘loop_ctr’ is the loop counter variable, ‘odd_number_counter’ variable holds the count of odd numbers that have been summed and the ‘sum’ variable holds the sum of the first 15 odd numbers.
Inside the Do While loop, we loop through all the numbers from 1 to 100, one by one, and check if the number is odd. If the number is odd, we sum it and increment the ‘odd_number_counter’ by 1.
After the first IF block, another IF condition checks if the ‘odd_number_counter’ variable value is 15. If the value of ‘odd_number_counter’ is 15, then using the ‘Exit Do’ statement, we are breaking the loop as there is no point in continuing the loop further.
Finally, we are displaying the value of the ‘sum’ variable using a msgbox.
VBA Do Until Loop
Do Until loop is very similar to Do While loop; the only difference between them is that –
- A ‘do-while’ loop iterates as long as a certain condition is true.
- On the other hand, a ‘do-until’ loop iterates until a condition is no longer true.
Let’s try to understand this difference in simple terms:
For Instance: If we want to write a Do Loop that iterates from 1 to 10, with while keyword, the condition would be ‘Do While loop_ctr <= 10’ and with until keyword, the same condition can be written as ‘Do Until loop_ctr > 10’.
Which means:
- Until – repeat Until the count is greater than ten
- While – repeat While the count is less than or equal to ten
With these examples, you can clearly see – using Until and While is just the opposite way of writing the same condition.
Now, let’s have a look at the syntax of Do Until Loop.
Syntax of Do Until Loop In VBA
Similar to Do While loop, Do Until also has two syntaxes:
Syntax 1 –
Do Until condition
'Statements to be executed inside the loop
Loop
Or
Syntax 2 –
Do
'Statements to be executed inside the loop
Loop Until condition
Here, ‘condition’ is used as the loop backbone, the same as in the case of Do While Loop. On each iteration, Until statement checks, if the ‘condition’ evaluates to True or False. If the ‘condition’ is False, then the loop continues. Otherwise, the loop ends.
Now, let’s try to understand the difference between these two syntaxes.
Difference Between the two Do Until Syntaxes
As we can see in the first do until loop syntax, the ‘condition’ is checked as the first statement. This means if the condition is true, the do-until loop in syntax 1 will not perform any iterations.
Whereas in the second syntax, the ‘condition’ is checked as the last statement inside the loop. This means that even if the condition is true, the do-until loop in syntax 2 will perform at least 1 iteration. Only after that, the condition will be evaluated, and the next iteration will not happen.
So, syntax 2 guarantees to have at least 1 iteration irrespective of the condition being true or false.
How a Do Until Loop Works
Syntax 1 –
Let’s say we have a Do Until loop as follows:
Dim loop_ctr As Integer
loop_ctr = 1
Do Until loop_ctr > 10
'Statements to be executed inside the loop
loop_ctr = loop_ctr + 1
Loop
- In the first two statements, a variable ‘loop_ctr’ is declared and initialized as 1.
- When the program control reaches the statement «Do Until loop_ctr > 10», it checks if the value of the ‘loop_ctr’ is greater than 10.
- If the ‘loop_ctr’ value is less than or equal to 10, the statements inside the body of the loop get executed sequentially, and finally, the ‘loop_ctr’ is incremented by 1.
- After this, the control again moves to check the condition «Do Until loop_ctr > 10», and the loop continues till the value of ‘loop_ctr’ is less than or equal to 10.
Syntax 2 –
Dim loop_ctr As Integer
loop_ctr = 1
Do
'Statements to be executed inside the loop
loop_ctr = loop_ctr + 1
Loop Until loop_ctr > 10
- In the first two statements, a variable ‘loop_ctr’ is declared and initialized as 1.
- When the program control reaches the statement Do, it simply moves to the next statement as the Do statement doesn’t force the program to check any condition.
- After this, in the following statement, a variable ‘loop_ctr’ is incremented by 1.
- Next, ‘Loop Until loop_ctr > 10’ statement checks if the value of ‘loop_ctr’ is greater than 10 or not. If it is less than or equal to 10, then the program control again jumps to the Do statement, but if the value of ‘loop_ctr’ is greater than 10, it terminates the loop and the program control moves to the next statement.
Note: Syntax 2 of Do Until Loop always iterates at-least-once since the condition that is to be checked is placed at the end of the loop.
Flow Diagram of a Do Until Loop In VBA

Let’s try to understand the control flow as depicted in the above flow chart:
Syntax 1 –
- In this Do-Until syntax, the loop condition is checked along with the Do statement.
- If the condition is false, then the ‘code block’ inside the do-until loop is executed, and the next iteration begins. Each iteration before beginning checks the loop condition, and the ‘code block’ inside the do-until loop is only executed when the condition evaluates to false.
- When the loop condition becomes true, then no more loop iterations occur, and the control flow jumps to the next statement outside the Do Until loop.
Syntax 2 –
- In this Do-Until syntax, the loop condition is not checked along with the Do statement.
- Since for the first iteration, no condition is checked. Hence the code block inside the do-until body gets executed.
- After the first iteration, each subsequent iteration, before beginning, checks the loop condition, and the ‘code block’ inside the do-until loop is only executed when the condition evaluates to false.
- When the loop condition becomes true, then no more loop iterations occur, and the control flow jumps to the next statement outside the Do Until loop.
Few Simple Examples of Do Until Loop In VBA
Example 1: Print numbers from 1 to 10 in excel using a VBA Do Until Loop.
In this example, we have a range «A1:A10,» and we have to fill this range with numbers from 1-10. To do this we can use the below code:
Sub DoUntilLoopPrintNumbers()
Dim loop_ctr As Integer
loop_ctr = 1Do Until loop_ctr < 10
ActiveSheet.Range("A1").Offset(loop_ctr - 1, 0).Value = loop_ctr
loop_ctr = loop_ctr + 1
LoopMsgBox ("Loop Ends")
End Sub
Explanation:
In the above code, first of all, we have declared and initialized the ‘loop_ctr’ variable for our Do Until loop. Next, along with the Do until statement, we have a condition to run the loop till ‘loop_ctr’ value is greater than 10.
Inside the Do Until Loop body, we have written the code to write the ‘loop_ctr’ value on the excel sheet in the A column.
After this, there is a statement that increments the ‘loop_ctr’ for the next iteration. As soon as the value of the ‘loop_ctr’ variable becomes greater than 10, the loop ends.
Example 2: Use Do Until Loop in VBA to find the sum of all the numbers between 1 to 20.
In this example, using a do until loop, we will iterate all the numbers between 1 to 20 and sum them. Finally, we will be displaying the sum of the numbers from 1 to 20 on the screen. To do this we can use the following code:
Sub DoUntilLoopSumNumbers()
Dim loop_ctr As Integer
Dim result As Integer
loop_ctr = 1
result = 0Do Until loop_ctr > 20
result = result + loop_ctr
loop_ctr = loop_ctr + 1
LoopMsgBox "Sum of numbers from 1-20 is : " & result
End Sub
Explanation:
In the above code, we have declared the loop counter ‘loop_ctr’ for our Do Until loop. Next, we have declared another integer variable as ‘result’ for storing the sum of numbers from 1 to 20.
After this, along with the Do Until statement, we have a condition to run the loop until the ‘loop_ctr’ becomes greater than 20.
Inside the Do Until Loop body, we have added the value of ‘loop_ctr’ along with the result. This means in the first iteration, the value of the result will be: 1, and in the second iteration, it will be : (1+2) = 3; similarly, in the third iteration, the value will be: (3 + 3) = 6 and so on.
After this, there is a statement that increments the ‘loop_ctr’ for the next iteration.
The Do Until loop in the above code iterates 20 times and sums all the numbers from 1 to 20, and finally displays the sum of these numbers in msgbox.
Example 3: Show the unique behavior of Do Until Loop (In Syntax 2) to execute at-least-once even if the condition to be checked is True.
Sub DoUntilLoopTest()
Dim loop_ctr As Integer
loop_ctr = 100Do
MsgBox "Loop Counter : " & loop_ctr
loop_ctr = loop_ctr + 1
Loop Until loop_ctr > 10
End Sub
Explanation:
In the above example, we have initialized the ‘loop_ctr’ as 100 and inside the loop condition we are checking ‘loop_ctr > 10’. This means the loop is only designed to iterate when the value of ‘loop_ctr’ is less than 10. But you will notice that despite the condition this do-until loop executes once.
The reason for this is: because according to syntax 2 of the Do Until loop, there is no way to check conditions at the beginning of the loop. The condition can only be checked at the end of the loop.
Note: We can fix this issue by simply using the Do Until loop in Syntax 1 as shown:
Sub DoUntilLoopTest()
Dim loop_ctr As Integer
loop_ctr = 100Do Until loop_ctr > 10
MsgBox "Loop Counter : " & loop_ctr
loop_ctr = loop_ctr + 1
Loop
End Sub
Writing a Nested Do Until Loop
Similar to other loops nesting is very much possible in Do Until Loop. Let’s see how to write a nested Do Until loop:
Example 4: Print numbers from 1 to 5 in all the worksheets in an excel spreadsheet using a Do Until Loop.
In this example, we need to print numbers from 1 to 5 in all the worksheets in an excel workbook using a do until loop. To do this, we can make use of the following code:
Sub NestedDoUntilLoop()
Dim loop_ctr As Integer
Dim sheet As Integer
sheet = 1Do Until sheet > Worksheets.Count
loop_ctr = 1
Do Until loop_ctr > 5
Worksheets(sheet).Range("A1").Offset(loop_ctr - 1, 0).Value = loop_ctr
loop_ctr = loop_ctr + 1
Loop
sheet = sheet + 1
LoopMsgBox "Nested Do Until Loop Completed!"
End Sub
Explanation:
In this example, there are two Do Until Loops, one inside another. The Outer Do Until Loop iterates over the variable ‘sheet’ and iterates until the value of the ‘sheet’ variable becomes greater than ‘Worksheets.Count’ (i.e., the total count of worksheets in a workbook).
Inner Do Until Loop iterates over the variable ‘loop_ctr’ and iterates until the value of ‘loop_ctr’ becomes greater than 5. This helps us to print the numbers in a sequence.
Inside the body of the Inner Do Until loop, we have a statement that prints the numbers between 1 to 5 in each worksheet (as per the outer loop).
The outer loop iterates over all the available worksheets in the spreadsheet, whereas the inner loop iterates over the numbers from 1 to 5 for the current sheet.
This makes it possible to print numbers from 1 – 5 in all the available worksheets.
Infinite Loop Using a Do Until Loop
Syntactically, Do Until Loop is very different from a For Loop since it does not provide a clear ‘start’, ‘end’ or ‘step_increments’, so it is very easy to make logical errors resulting in an infinite or an endless loop.
Below is an example of a Do Until endless loop:
'Do not run this code
Sub InfiniteDoUntilLoop()
Dim loop_ctr As Integer
loop_ctr = 1Do Until loop_ctr > 10
ActiveSheet.Range("A1").Offset(loop_ctr - 1, 0).Value = loop_ctr
LoopMsgBox ("Loop Ends")
End Sub
In the above code, we have simply missed the line to increment the loop counter i.e. ‘loop_ctr = loop_ctr + 1’ and this has made the loop infinite because the value of ‘loop_ctr’ will always be 1 (since it is never incremented) and hence the loop condition ‘Until loop_ctr > 10’ will always evaluate to false.
Tip: It is always a good idea to use a For Each or For Next loop over a Do While or Do Until loop (whenever possible).
How to Break Out or Exit of a Do Until Loop
Similar to a Do While Loop, a Do Until loop can also be exited using an ‘Exit Do’ statement. As soon as the VBA engine executes the ‘Exit Do’ statement, it exits the loop and takes control to the next statement after the Do Until loop.
Let’s see this with an example:
Example 5: Use a Do Until loop in VBA to find the sum of the first 20 even numbers between 1 to 100.
In this example, we must find the first 20 even numbers from 1 to 100 and then calculate their sum.
Below is the code to do this:
Sub SumFirst20EvenNumbers()
Dim loop_ctr As Integer
Dim even_number_counter As Integer
Dim sum As Integerloop_ctr = 1
Do Until loop_ctr < 100
If (loop_ctr Mod 2 = 0) Then
sum = sum + loop_ctr
even_number_counter = even_number_counter + 1
End IfIf (even_number_counter = 20) Then
Exit Do
End Ifloop_ctr = loop_ctr + 1
LoopMsgBox "Sum of top 20 even numbers is : " & sum
End Sub
Explanation:
In this example, we have three variables – ‘loop_ctr’, ‘even_number_counter’, and ‘sum’. ‘loop_ctr’ is the loop counter variable, ‘even_number_counter’ variable holds the count of even numbers that have been summed (because we only need to sum the first 20 even numbers) and ‘sum’ variable holds the sum of the first 20 even numbers.
Inside the Do Until loop, we loop through all the numbers from 1 to 100, one by one, and check if the number is even. If the number is even, we sum it and increment the ‘even_number_counter’ by 1.
After the first IF block, another IF condition checks if the ‘even_number_counter’ variable value is 20. If the value of ‘even_number_counter’ is 20, then using the ‘Exit Do’ statement, we break the loop as there is no point in running the loop further.
While Wend Loop In VBA (Obsolete)
While Wend loop was added in VBA just to make it backward compatible, Microsoft recommends using Do While Loop in place of While Wend Loop.
While Wend Loop is not as structured and flexible like a Do While Loop, it also doesn’t support the idea of prematurely exiting out of the loop.
Tip: If you are learning loops in VBA, then you can skip this topic. However, if you are dealing with a legacy code with While Wend statements, I would recommend you change them and start using the Do while loops instead.
Syntax of While Wend Loops
The syntax of While Wend Loop is as follows:
While condition
'Statements to be executed inside the loop
Wend
‘condition’ is used as the loop backbone. On each iteration, the While statement checks if the ‘condition’ evaluates to True or False. If the ‘condition’ is True, then the loop continues; otherwise, the loop terminates.
Example: Write a While Wend loop to print numbers from 1 to 10.
To do this, we can write the below code:
Sub WhileWendExample()
Dim loop_ctr As Integer
loop_ctr = 1While loop_ctr <= 10
ActiveSheet.Range("A1").Offset(loop_ctr - 1, 0).Value = loop_ctr
loop_ctr = loop_ctr + 1
WendMsgBox "Loop Ends!"
End Sub
Explanation:
In the above code, first of all, we are declaring and initializing a loop counter variable ‘loop_ctr’ as 1. Next, there is a While statement along with the condition ‘While loop_ctr <= 10’.
This means that we need to iterate until the value of the ‘loop_ctr’ variable is less than or equal to 10. After this, we are printing the value of ‘loop_ctr’ in the active worksheet and then incrementing the loop counter. When the Wend statement is encountered, the next iteration starts.
The loop in the above example iterates 10 times, and after that, the value of ‘loop_ctr’ becomes 11, and hence the loop condition becomes false, and the control moves to the statement after the while when loop.
Finally, a message’ Loop Ends!’ is presented on the screen to notify the user that the loop has ended.
How To Write VBA Code In Excel
VBA code can be added to a spreadsheet using the Visual Basic Editor. To open the Visual Basic Editor in Excel, follow the below steps:
- If you are on Windows, press the keys (ALT + F11). If you are on MAC, press the keys (Opt + F11). This will open the Visual Basic Editor.

- After the Visual Basic Editor is opened. Go to «Insert» and click the «Module» option as shown in the image. This will insert a module object for your workbook.

- Now you can copy-paste the above codes in the module and run them using the execute button as shown.
Debugging Tips
- Use the F5 key to run the code.
- Use the F9 key to insert or remove a breakpoint.
- Use the F8 key to ‘step-into’ or run the code line by line. It can be used to debug the code and execute it line by line.
So, this was all about VBA Loops. Do let us know in case you have any queries related to the topic.
If you’ve been working enough time with Visual Basic for Applications, you’re probably aware that 2 of its most powerful structures are:
- Decision-making structures, such as the If… Then… Else statement.
- Loops.
 These 2 structures allow you to create powerful, flexible, sophisticated macros.
Excel VBA loops are, however, not an easy concept to understand.
My main purpose with this Excel tutorial is to help you get the hang of Excel VBA loops. Therefore, in this blog post, I cover the main aspects you need to understand for purposes of using VBA loops to improve your macros. The topics I cover go from basic aspects, such as what is a loop, to details about the syntax and process followed by the main types of looping structures supported by Excel. The following table of contents lists (in more detail) all of the topics I cover:
Before we go into the details of the different type of loops that Excel supports, let’s start by understanding…
What Is An Excel VBA Loop
Defined very broadly, looping is repeating the execution of certain statements more than one time. Therefore, when you want or need to repeat a particular action (or course of actions) while using Visual Basic for Applications, you can use loops.
In very broad terms, an Excel VBA loop does 2 things:
- #1: Executes certain statements.
- #2: Once all the statements have been executed, it goes (loops) back to the beginning of the structure.
Each of these cycles is known as an iteration. The number of iterations can (but doesn’t have to) be fixed. Based on whether this number of repetitions is fixed or not, you can distinguish between 2 loop categories:
- Category #1: Fixed-iteration loops, which repeat the relevant statements a set number of times.
- Category #2: Indefinite loops, in which the number of iterations is more flexible.
In either case, the factor that determines the number of iterations is sometimes referred to as the loop invariant or determinant. You can generally classify loop determinants in 2 categories:
- Numeric expressions, which can be evaluated as numbers.
- Logical expressions, which evaluate to True or False.
You can write VBA loops in several different ways. The looping structures supported by Excel and covered in this VBA tutorial are the following:
- For… Next.
- For Each… Next.
- Do….
- Do While and Do Until.
- While… Wend.
In practice, you’re most likely to work with only some of these looping structures: For… Next, For Each… Next, Do While and Do Until.
Out of these looping structures, only For… Next and For Each… Next loops are (usually) classified as fixed iteration loops. The other structures are (usually) classified as indefinite loops.
I explain the main aspects you need to know to start working with any of these looping structures in the sections below. However, before we start taking a look at each of them, let’s dive deeper into the question of…
Why Learn About Excel VBA Loops
Loops are an essential part of Visual Basic for Applications and (more generally) any programming language.
From a general perspective, the main beauty of Excel VBA loops is the fact that, as explained above, they allow you to repeatedly execute certain statements. In other words: Loops allow you to repeat a task several times.
The (main) reason you need loops for these purposes is that Visual Basic for Applications is a sequential programming language. As a consequence of this, statements are generally executed in order, line-by-line, from top to bottom. VBA includes some structures that allow you to control the flow of the program (such as If… Then… Else statements). However, as a general matter, the construct that you should usually use to repeat statements is an Excel VBA loop.
Among other things, Excel VBA loops allow you to loop through all the elements within a particular group, and work with each of those elements. Some of the groups you may want to work with in such a manner include: (i) ranges of cells, (ii) open workbooks, (iii) worksheets within a workbook or within all currently open workbooks, (iv) elements of an array, (v) characters within a cell, or (vi) charts on a worksheet or workbook.
From a theoretical standpoint, you could repeat an action by repeating the relevant VBA code as many times as necessary. In most cases, it’s better to use a loop to repeatedly execute the statements (as required).
The following are some advantages of using loops instead of simply repeating blocks of code:
- Advantage #1: Loops allow you to create shorter VBA procedures.
- Advantage #2: Macros that use VBA loops are, generally, more readable and easier to test, debug, maintain or modify than macros that repeat the same block of code several times.
- Advantage #3: Looping structures are significantly more flexible, particularly when it comes to determining the number of times the execution of the statements is repeated.
The main reason why Excel VBA loops are extremely useful is their speed. Loops are significantly faster than manually repeating a task several times.
This isn’t to say that you should never repeat blocks of code in your VBA procedures. I’m aware that learning about loops requires time, although you’re already reading this Excel tutorial which provides all the information you need to start working with loops.
Furthermore, in certain (very basic) situations, the amount of up-front work required to craft a good loop may not be justified by the time you’ll save later. In other words, there may be some (very basic) situations, in which limited repeating of blocks of code may be more efficient than using loops. This may the case with procedures that meet some or (preferably) all of the following conditions:
- Condition #1: Are very short.
- Condition #2: Repeat a small number of actions.
- Condition #3: Have a low and fixed number of repetitions.
In such cases, the VBA code will be longer and (slightly) more difficult to maintain. These issues are (usually) not a big problem when working with short/simple VBA procedures.
In the end, it comes down to a cost-benefit analysis. You must determine whether the amount of up-front work required by a loop is (or isn’t) worth it in the long run.
Despite these exceptional cases where looping may not be as efficient, the fact is that using Excel VBA loops can help you improve your speed when working with Excel.
As you’ll see in this Excel tutorial, they’re not exaggerating.
In addition to the usefulness of Excel VBA loops, there’s another reason why learning about the programming aspects behind these constructs is important:
The macro recorder doesn’t record loops. Therefore, if you want to use loops in your VBA code, you must know the code behind them.
All of this doesn’t mean that you should start using loops whenever you can. Using loops inappropriately can slow down your code. Therefore, you shouldn’t always use loops while working with Visual Basic for Applications. There are (for example) several cases where you can avoid loops by using worksheet functions in VBA.
However, if you’re serious about Visual Basic for Applications, you’ll eventually need to learn about (and work with) loops. Furthermore, in order to be able to determine whether a loop is the appropriate structure to use in a particular situation, you must understand what a loop is and what are the different types of loops you can use.
Therefore, let’s take a look at the main types of loops that you can use while working with Visual Basic for Applications:
For… Next Excel VBA Loops
For… Next Excel VBA loops are perhaps the most basic type of VBA loop. They’re generally considered to be the most commonly used Excel VBA loop. Their purpose is to repeat a particular group of statements a certain number of times.
Let’s take a look at the basic syntax of the For… Next Excel VBA loop. Items within square brackets ([ ]) are generally optional.
For counter = start To end [Step step]
    [statements]
    [Exit For]
    [statements]
Next [counter]
The following are some situations (along with samples of the appropriate VBA code) where you may find For… Next Excel VBA loops helpful:
- Looping through worksheets for purposes of, for example, saving each worksheet as a separate PDF file as explained in the linked blog post from Power Spreadsheets.
- Looping through array items.
- Looping through an entire column.
- Looping through rows for purposes of deleting those that are empty, using the fourth sample macro in this Power Spreadsheets VBA tutorial.
Now, let’s take a look at the main items within this looping structure:
Item #1: Counter
This is, perhaps, the key item of any For… Next loop. The reason is quite straightforward:
For… Next Excel VBA loops repeat statements a certain number of times. Therefore, you need to keep track of the number of times the statements have been executed. You use a loop counter for these purposes.
In other words, the counter controls the looping carried out by a For… Next loop.
The loop counter is simply a normal numeric variable. The loop counter can’t be a Boolean or an array element.
A consequence of the fact that the loop counter is a normal variable is that you can change its value within the For… Next block of code.
However, even though you can change the value of the counter while you’re inside the For… Next loop itself, this isn’t generally advisable (and it’s usually considered to be a poor coding practice). Changing the value of the loop counter in such a way makes your VBA code less readable, more difficult to debug, and may have difficult to predict consequences.
So, to put it simply:
Make sure that your VBA code doesn’t change the value of the counter variable within the For… Next loop itself. Be extra careful about this.
Notice that, within the basic syntax of the For… Next loop, [counter] appears in 2 different positions:
- On the opening statement, after the For keyword.
- This instance of the counter is required.
- At the end of the For… Next loop, after the Next keyword.
- This instance of the counter is optional. If you omit the loop counter in this position, the VBA code is executed as if counter is anyway included.
- In some cases (such as when nesting loops, a topic I cover below), it may be advisable to include this second counter.
When working with Visual Basic for Applications, you’ll often see that the loop counter variable is given a very short name, such as “i”, “j”, “k” and so on. This convention has its origins in the fact that (in the past) using longer names was more inconvenient. This (however) is no longer the case.
As a consequence of the above, you don’t have to continue using the traditional counter variable naming convention when working with Excel VBA loops. In this blog post, I explain the rules that apply to variable naming within VBA and provide some suggestions and ideas about how you can name your variables.
Item #2 And Item #3: Start and End
The loop counter (item #1 above) allows your VBA code to keep track of the number of times the relevant statements have been executed.
Items #2 (start) and #3 (end) allow your VBA code to determine the initial and final values that the counter must take. In other words, these items determine the values at which the counter variable starts and stops.
The value for start doesn’t necessarily need to be smaller than the value for end. In other words, you can structure your loops using either of the following:
- A start value that is smaller than the end value (start < end).
- A start value that is larger than the end value (start > end).
- As I show below, this is very helpful in cases where you need the loop to run backwards.
When determining the starting and ending values of the looping counter, you’re not limited to just using hard-coded values. You can also use variables for these purposes. Additionally, these items can be:
- Hard-coded;
- Passed from either an input or a dialog box; or
- Passed from a value generated by a VBA procedure, including both the same procedure where the loop is or a different procedure.
When using variables, however, you should probably exercise additional caution.
The last main item your For… Next VBA loop needs in order to be able to accurately execute the relevant statements the number of times you want is…
Item #4: Step
By now, you know that a For… Next Excel VBA loop needs a loop counter (item #1 above). You also know that you need to determine the initial and final values that this particular counter takes (items #2 and #3 above).
The optional Item #4, step, allows you to determine the way in which the loop counter changes every time the statements within the For… Next loop are executed. In other words: Step is the amount by which the counter changes each time/iteration.
By appropriate use of the step you can, among other things, skip some of the values of the loop counter.
To make the concept of step clearer, imagine that you must start counting at 1 and stop when you reach 100. In VBA terms, 1 is the start counter value (item #2 of a For… Next loop) and 100 is the end counter value (item #3 of the For… Next loop).

If you’re like me, you’d probably start counting in order: 1, 2, 3, 4, 5, … and so on until you reach 100.
This way of counting may be correct. However…
There are other ways in which you can start counting at 1 and stop when you reach 100. Just to give you some examples:
- You can count by twos (2, 4, 6, 8, …, 100). You could make a further distinction between counting by even and counting by odd (1, 3, 5, 7, 9, …, 99) numbers.
- You can count by fives (5, 10, 15, 20, 25, …, 100).
- You can count by tens (10, 20, 30, 40, …, 100).
- And so on… You probably get the idea.
The For… Next Excel VBA loop works roughly like this. In other words:
- The step item determines how the loop counter changes every time an iteration is completed.
- Despite the above, you don’t need to explicitly determine a step value. If you don’t specify the step, the default value is 1.
- You can, however, set different values for step. In fact, step can be both a positive or a negative number.
- As I explain below, using a negative value for step can be very useful in certain circumstances where you need the loop to run backwards.
The step of a For… Next VBA loop plays a very important role for purposes of loop processing. I explain its specific impact further below.
Item #5: Statements
These are simply the statements that are executed the relevant number of times. Even though statements are an optional item, it’s likely that the For… Next VBA loops you create will include them.
As a general rule, there’s no restriction on the number of statements that you can have within a loop (including a For… Next loop).
Additionally, as I explain below, you can nest For… Next loops within other For… Next loops.
Item #6: Exit For Statement
Exit For statements are generally optional. The Exit For statement is a specific type of Exit statement.
Exit statements allow you to exit a block of code. In the case we’re analyzing the block of code you’re exiting is that of the For… Next loop.
In broad terms, you can use the Exit For statement for purposes of exiting (or terminating) a For… Next loop. If the relevant For…Next VBA loop isn’t nested, an Exit For statement transfers control to the statement that follows the Next keyword of the For… Next loop.
How Does The For… Next Excel VBA Loop Work
Let’s start by taking a broad look at the process followed by the For… Next Excel VBA loop:

And let’s take a more specific look at the 5 basic steps that the For… Next loop goes through before exiting the loop:
Step #1: Determine Whether Statements Must Be Executed
When working with a For… Next loop, Visual Basic for Applications must always determine whether the statements within the For… Next loop must be executed. This is done by comparing (i) the current value of the loop counter with (ii) the end value of the counter.
The rules for determining whether the statements should be executed or not depend on whether the value of step is positive or negative:
- If step is a negative value, the statements in the loop are executed as long as the loop counter is larger than or equal to the end value of the counter. Mathematically, the loop is executed if “counter >= end”.
- If step is non-negative (positive or 0), the statements within the loop are executed as long as the loop counter is smaller than or equal to the end value. In this case, the loop is executed if “counter <= end”.
As you can see, the value of step plays a key role in the process followed by a For… Next loop.
The first time the logical tests described above are carried out (when Visual Basic for Applications enters the loop for the first time), the starting value is assigned to the loop counter. For the subsequent iterations, the relevant counter value is determined in accordance with step #3 below and, therefore, depends on the value of the step.
If the conclusion reached after applying the logical tests explained above is that the statements shouldn’t be executed, the macro exits the For… Next loop. Upon exiting the For… Next loop, execution control generally goes to the statement after the Next keyword.
However, if the conditions for executing the statements again are met, the For… Next loop moves onto…
Step #2: Execute Statements
The statements within a For… Next Excel VBA loop are executed a certain number of times.
Therefore, if VBA determines that the statements within the loop must be executed according to the criteria explained in step #1 above, the macro executes the statements.
Step #3: Add Step To Counter
You already know that the main items that Visual Basic for Applications uses to determine whether the statements within a For… Next VBA loop must be executed are (i) the loop counter and (ii) the end value of the counter.
The first time the statements are executed, the value of the loop counter is its initial value. You determine this value through the start item I explain above.
Every time the statements are executed, the step is added to the counter. As I explain above, the default value of step is 1. However, as you’ve seen, you can specify other values regardless of whether they’re positive or negative.
Step #4: Repeat Step #1
Once step has been added to the loop counter in step #3, the VBA application must determine (once again) whether the loop must be executed. This means that step #1 above is executed again.
For Each… Next Excel VBA Loop
You can use the For Each… Next Excel VBA loop for purposes of repeating the execution of certain statements for each element within a particular array or collection. In broad terms:
- Arrays are sets of values that have a logical relationship between them.
- Collections are groups of related objects.
The For Each… Next Excel VBA loop is a very helpful construct for purposes of manipulating arrays and collections. The For Each… Next loop (and similar constructs such as the With… End With statement) can help you simplify your VBA code when working with objects and collections.
You’ll probably notice that, in some respects, the For Each… Next Excel VBA loop is materially similar to the For… Next loop that I explain above. One of the main advantages of the For Each… Next loop, when compared with the For… Next loop, is that the For Each… Next loop allows you to work with an array or collection without knowing the number of elements within the relevant array or collection. In other words: You don’t have to know the number of loop iterations in advance because VBA will know the number of loop iterations at execution time.
The basic syntax of the For Each… Next loop is as follows. Items within square brackets are optional.
For Each element In group
    [statements]
    [Exit For]
    [statements]
Next [element]
If you’re interested in some practical applications of the For Each… Next VBA loop, the following list may interest you:
- To delete blank rows, you can use macro #5 here, which I explain in another blog post within Power Spreadsheets.
- To loop through a Range, refer to the very simple example I include in this VBA tutorial.
- To modify all open workbooks, and using a loop to go through them.
- To go through every worksheet within every open Excel workbook.
- To loop through (and make changes to) all the graphs within the active Excel workbook.
- To change all tables within an Excel workbook or worksheet, and use loops to go through them.
- To loop through (among others) PivotTables, Shapes, Combo Boxes, Checkboxes, Option Buttons, Buttons (Form Control), Textboxes (ActiveX), Command Buttons (ActiveX) or Toggle Buttons (ActiveX).
Let’s take a closer look at each of the elements within the syntax of a For Each… Next loop:
Item #1: Element
Element makes reference to the variable that the loop uses to iterate through all of the elements within the relevant group. In order for VBA to enter a For Each… Next Excel VBA loop, there must be at least one element within the group that is being used.
There are some restrictions that apply when determining which data types you can use for the element variable. More precisely, which data types can you use is mainly determined by the characteristics of the group you’re looping through. The main restrictions you should remember for these purposes are the following:
- If the group is a collection: You can only use (i) Variant variables, (ii) generic object variables, or (iii) specific object variables.
- If the group is an array: You can only use Variant variables.
In practice, you’re more likely to encounter object variables when working with For Each… Next loops.
In certain respects, the element item within a For Each… Next loop serves a similar purpose as the loop counter in a For… Next loop. More precisely, and as I explain below, element (item #1) and group (item #2) are used by Visual Basic for Applications to determine whether the statements within the For Each… Next loop should be executed.
If you omit the last element (which appears after the Next keyword), macro execution continues as if the element is included. In other words:
- The first instance of element (on the opening statement) is required.
- The last instance of element (at the end of the loop) is optional.
- However, in some cases (such as when nesting loops), you may want to get used to including this instance of element.
Item #2: Group
As anticipated above, group represents the group of elements that you’re looping through.
As a general rule, groups can be either (i) object collections or (ii) arrays. As an exception to this rule, you can’t use arrays of user-defined types. The reason for this is that a Variant variable can’t contain a user-defined type.
Item #3: Statements
Statements are the actual statements that Excel executes for each of the items within the group that you’re working with.
Theoretically, statements are optional. In practice, most of the For Each… Next Excel VBA loops you create will include at least one statement.
Generally, you can include as many statements as you want. Furthermore, you can nest For Each… Next loops within other loops.
Item #4: Exit For Statement
The Exit For statement is optional. This statement is a specific form of the more general Exit statement.
The Exit statement by itself allows you to exit a block of, among others, For Each… Next, Function or Sub code.
You can use the Exit For statement to exit a For Each… Next loop. This is particularly useful, for example, in cases where you don’t need the loop to go through all the elements in the group.
If you use the Exit For statement within a For Each… Next Excel VBA loop, the way in which the code determines to which other statement it transfers control depends on whether the For Each… Next loop is nested or not. More precisely:
- If the For Each… Next loop is nested within other loop(s), the Exit For statement transfers control to the loop that is immediately one level above.
- If the loop isn’t nested, control is transferred to the statement that follows the Next keyword.
How Does The For Each… Next Excel VBA Loop Work
The previous sections give you a good idea of what is the basic structure and elements of the For Each… Next Excel VBA loop. Let’s take a closer look at how this structure and elements work together to achieve the purpose of repeating the execution of the statements for each element within the group.
From a broad perspective, a For Each… Next Excel VBA loop proceeds as follows:

Let’s take a look at the 5 broad steps that a For Each… Next Excel VBA loop goes through before exiting the For Each… Next loop:
Step #1: Enter The For Each Block
The first part of a For Each… Next Excel VBA loop is the For Each block.
A macro only enters this For Each block if there is at least one element in the applicable group.
Therefore, if the group that you’re working with has at least one element, the application enters the For Each block. Once this occurs, the code continues to…
Step #2: Execute Statements For First Element In Group
After the code has entered the For Each block, the macro starts executing all of the statements for the first element within the group.
However, since the main purpose of this loop is to repeat the execution of the statements for each of the elements within the relevant array or collection, this step #2 by itself isn’t enough to achieve that goal. The following steps are the ones that actually carry out the looping.
Step #3: Determine Whether There Are More Elements In Group
Once all of the statements have been executed for a particular element within the group, the For Each… Next loop looks to determine whether there are more elements in the group.
If there are no other elements within the group, the macro exits the For Each… Next loop. Once the macro exits the loop, it generally continues with the statement that follows the Next statement of the For Each… Next loop.
However, if the group contains more elements, the macro goes on to…
Step #4: Execute Statements For Next Element In Group
Notice how this step is pretty much a repetition of step #2 above. The key difference is that the element for which all of the statements are applied changes as the loop progresses.
Step #5: Repeat Step #3
From a general perspective, a For Each… Next Excel VBA loop simply (i) goes through all of the elements within the group and (ii) executes the statements for each of those elements. Therefore, step #3 above is the key in determining whether the loop continues or stops.
In other words, every single time the statements are executed for a certain element within the group, the macro checks whether there are elements left within the group (step #3). If there are still elements, the statements are executed for the next element and the loop continues.
Eventually (assuming your For Each… Next VBA loop is properly structured), the macro will get to the last element in the group. As explained above, once the applicable VBA statements are executed for the last group element, and there aren’t any other elements left, the macro:
- Exits the For Each… Next loop; and
- Generally, continues execution with the statement that follows the Next statement (that is at the end of the For Each… Next loop).
Do While And Do Until Excel VBA Loops
Do While and Do Until Excel VBA loops are 2 versions of the same VBA construct: the Do… Loop statement. Their purpose is to repeat a certain statement (or block of statements) subject to a condition being met. More precisely:
- The Do While Excel VBA loop repeats the relevant statements while a condition is met (True). Once the condition isn’t met (becomes False), Visual Basic for Applications exits the loop.
- The Do Until Excel VBA loop repeats the statements until the condition is met (becomes True). In other words, the statements are repeated as long as the condition isn’t met (False).
As you can see, Do While and Do Until VBA loops are substantially similar. Their main difference is that (i) Do While loops run while the condition is True, while (ii) Do Until loops do the opposite and run while the condition is False.
In other words: The main difference (between Do While and Do Until loops) is in how they handle the tested condition. In fact, both approaches are functionally similar (or even the same). In this context, the choice between one loop or the other (usually) boils down to how you want to manage/structure the applicable condition.
To understand the above, consider the 2 following structures, which generally lead to the same result:
- Set a condition that evaluates to True and use a Do While loop. Once the condition evaluates to False, your code exits the loop.
- For a real life example, imagine that on any particular day you sit down to work and say: “I will work while it’s daytime”. In such a case, you work while it’s daytime (the condition is True) and, once the condition evaluates to False (it’s no longer daytime), you stop working.
- Set the opposite condition and use a Do Until loop. Once the condition evaluates to True, Visual Basic for Applications exits the loop.
- Going back to the real life example above, in this case you’d say “I will work until it’s night-time”. In this situation, you work while the condition is False (it’s not night-time) and, once the condition evaluate to True (it’s night-time), you stop working.
Do Until and Do While are, to a certain extent, simply opposite ways of stating the same condition.
Let’s begin the exploration of these loops by taking a look at the basic syntax of the Do… Loop statement:
Unlike other loops that I explain in this Excel tutorial, you have 2 alternatives for structuring Do While and Do Until loops. In both cases, the items within square brackets ([ ]) are optional.
Do While And Do Until Excel VBA Loops: Syntax #1
Do [{While | Until} condition]
    [statements]
    [Exit Do]
    [statements]
    Loop
Do While And Do Until Excel VBA Loops: Syntax #2
Do
    [statements]
    [Exit Do]
    [statements]
Loop [{While | Until} condition]
Why Are There 2 Syntax Options For Do While And Do Until Excel VBA Loops
Notice that both syntax options are substantially similar. The only real difference lies in the position of “[{While | Until} condition]”.
- In syntax option #1: “[{While | Until} condition]” appears on the opening statement.
- In syntax option #2: “[{While | Until} condition]” appears at the end of the loop.
- Some authors refer to these loops as Do… Loop While or Do… Loop Until.
The position of “[{While | Until} condition]” is relevant because this is the point at which the condition that determines whether the statements within the loop must be executed 1 more time or not is evaluated. In particular:
- In syntax option #1, the statements inside the loop may never be executed.
- In syntax option #12, the statements inside the loop are always executed (at least 1 time).
These differences allow you to determine whether (i) the statements within the loop shouldn’t be executed in certain circumstances (using syntax #1), or (ii) the loop should always be executed the first time around (using syntax #2). These options provide you even greater flexibility for structuring your Excel VBA loops.
The usefulness of the second syntax may not be evident at first. You may wonder in which situations you’d want to execute the statements before checking whether the relevant condition is met…
The second syntax of Do While and Do Until VBA loops is useful when you have to:
- Carry out a particular action at least once; and
- Repeat the action, subject to some condition.
So don’t dismiss the second syntax of Do While and Do Until loops. You’re likely to eventually run into situations where they may help you.
In fact, the situations where you take an action first, and check whether the condition is met later (to determine whether you need to repeat the action) aren’t uncommon in programming.
As you can see, the syntax choice you make when working with for Do While and Do Until loops have a material impact in the way your loops work. They’re not simply cosmetic differences.
Understanding these differences is important to ensure that you know which version of a Do While or a Do Until loop is more appropriate for any particular situation you may face. However, if the difference between the syntax options for Do While and Do Until loops isn’t yet perfectly clear, don’t worry. I show you how these loops proceed (step-by-step) below.
But first, let’s take a look at the basic items that go in a Do While and a Do Until VBA loop. Notice how, despite the different syntax alternatives, these basic items remain the same.
Item #1: {While | Until}
The structure of the Do Until and Do While Excel VBA loops is substantially similar.
However, notice that, in both of the syntax options I describe above, there are curly brackets surrounding the words While and Until ({While | Until}). Here, you must state whether you’re creating a Do While or a Do Until loop by choosing the appropriate word from within the curly brackets ({ }) or, what is the same, delete the word that corresponds to the type of Do… loop that you aren’t creating.
In other words, if you’re using the first syntax option, the actual first statement (Do [{While | Until} condition]) you should use is determined as follows:
- Do While loop: Do [While condition].
- Do Until loop: Do [Until condition].
Similarly, if you’re using the second syntax option, the actual last statement (Loop [{While | Until} condition]) you should use is as follows:
- Do While loop: Loop [While condition].
- Do Until loop: Loop [Until condition].
Item #2: Condition
A condition can be structured as either of the following:
- A numeric expression, which is an expression that can be evaluated as numbers.
- A string expression, which is an expression that evaluates to a sequence of contiguous characters.
The condition must return one of the Boolean values: True or False. Null is treated as False.
From a theoretical standpoint, both items #1 and #2 are optional. However, omitting them can have undesirable consequences, as I explain below.
Item #3: Statements
As in the other types of loops that I explain in this Excel tutorial, these are simply the statements that are repeatedly executed. In the case of Do While and Do Until VBA loops, these are the statements that are executed while (in the Do While loop) or until (in the Do Until loop) the condition is met (True).
Item #4: Exit Do Statement
The Exit Do statement holds some similarities with the Exit For statement that you can use within the For Each… Next and For… Next loops. For example:
- The Exit Do statement is one of the forms of the more general Exit statement.
- You can use an Exit Do statement to create an alternate way to exit the relevant loop.
- You can generally place Exit Do statements anywhere within a Do While or Do Until loop. However, the Exit Do statement is often used after evaluating a condition (with, for example, an If… Then… Else statement).
As a general rule, the Exit Do statement exits a Do While or Do Until loop by transferring control to the statement that follows the Loop. However, if you have a nested Do While or Do Until loop, control is transferred to the loop nested one level above the current loop (the one where the executed Exit Do statement is).
How Do The Do While And Do Until Excel VBA Loops Work
By now, you probably have a good idea of how the different types of Do While and Do Until loops work. However, just as with the For… Next and For Each… Next loops, let’s take a look at the actual process carried out by each of the different Do While and Do Until loops:
Do While Excel VBA Loop: Syntax #1
The Do While loop (syntax #1, where the opening statement is “Do While condition”) proceeds as follows:

The 3 steps that the Do While loop follows (before exiting the loop) are the following:
Step #1: Test Whether Condition Is True.
I explain how you can use 2 different syntaxes for purposes of creating Do While loops above. The main difference between both syntax options is the point at which the condition that determines whether the loop must be executed one more time or not appears.
If you use the first syntax that I explain above, the opening statement of the Do While loop is “Do While condition”. In this case, the condition that determines whether the statements within the loop is executed is tested at the beginning.
In a Do While loop, the relevant statements are executed as long as the condition is True. Therefore:
- If the condition evaluates to False, the loop ends and control passes (usually) to the VBA code that appears immediately below the loop.
- If the condition evaluates to True, Visual Basic for Applications proceeds to…
Step #2: Execute The Statements.
The statements within the Do While loop are executed if the condition (evaluated in step #1 above) continues to be True.
Execution of the statements continues until Visual Basic for Applications encounters the Loop keyword at the end of the Do While VBA loop. At this point, it goes onto…
Step #3: Loop.
Once all the statements within the Do While loop have been executed, Visual Basic for Applications loops. In other words, VBA goes back to step #1 above and tests whether the condition continues to be True.
Now, compare this process with that followed by the second syntax option for the Do While Excel VBA loop. This should clear up any doubts you have regarding the procedural differences between the 2 types (syntaxes) of the Do While loop.
Do While Excel VBA Loop: Syntax #2
In the second syntax option of a Do While VBA loop, the closing statement (“Loop While condition”) is the one checking whether the required condition is met. As I explain above, these loops are sometimes referred to as Do… Loop While loops.
The following image illustrates the process followed by this type of Do While Loops:

The 3 steps followed by this type of Do While loop are substantially the same as those I describe above. The main difference is the order in which the steps are carried out.
Let’s go through each of the steps followed by a Do While when the second syntax is used:
Step #1: Execute The Statements.
When you use the second syntax for a Do While loop, the relevant condition is only tested at the end of the loop.
Therefore, regardless of whether the condition is True or False, the statements within the loop are executed. In other words, as explained above, the statements within a Do While loop that uses the second syntax (also known as a Do… Loop While loop) are always executed at least 1 time.
Once the statements are executed, Visual Basic for Applications proceeds to…
Step #2: Test The Condition.
Within this type of Do While loop, all of the statements are executed until Visual Basic for Applications encounters the statement “Loop While condition”.
At this point, the relevant condition is tested. The way in which execution continues depends on whether the condition is True or False. More precisely:
- If the condition is False, Visual Basic for Applications exits the loop. In such a case, execution usually continues with the statement following “Loop While Condition”.
- If the condition is True, VBA goes on to…
Step #3: Loop.
If the relevant condition is True, Visual Basic for Applications loops. In other words, as long as the condition being evaluated continues to be True, Visual Basic for Applications returns to step #1 above and repeats the loop.
Do Until Excel VBA Loop: Syntax #1
The difference between the 2 syntax options for a Do Until loop roughly mirrors the difference between the 2 alternatives for a Do While loop.
Let’s start by taking a look at the process followed by the first version of a Do Until VBA loop:

Notice that, this process, is substantially the same as that followed by the Do While loop (using syntax #1) that I explain above. The main difference, as explained above, is in the handling of the tested condition which is done in…
Step #1: Test Whether Condition Is False.
A Do While loop runs as long as the tested condition is True. Therefore, the question asked in step #1 of a Do While loop is whether the condition is True.
A Do Until loop asks the opposite question:
Is the condition False?
In other words, a Do Until loop tests the condition (just as a Do While loop does). However, once the condition is tested, a Do Until loop proceeds in the opposite way in which a Do While loop does. More precisely:
- If the condition is True, it exits the loop. Execution then, generally, continues with the statement following the Loop keyword.
- If the condition is False, it carries on with…
Step #2: Execute Statements.
In step #2, a Do Until loop simply executes the statements within its body. In other words, all of the statements before the Loop keyword are executed.
Once Visual Basic for Applications encounters the Loop keyword, it goes on to…
Step #3: Loop.
Once all of the statements within a Do Until loop have been executed, a Do Until loop returns to step #1.
Let’s finish the section about Do While and Do Until Excel VBA loops by taking a look at the second possible syntax of Do Until loops. Just as you did with Do While loops, compare the 2 syntax options you can use when working with Do Until loops.
Do Until Excel VBA Loop: Syntax #2
When working with a Do Until VBA loop using syntax #2 (also known as a Do… Loop Until loop), the statement that checks the relevant condition (Loop Until condition) is at the end of the loop. Therefore, the process followed by this type of loop is as follows:

Let’s go through the 3 main steps that this version of Do Until loop goes through before exit:
Step #1: Execute Statements.
When using the second syntax option of a Do Until loop, the statements within the loop are always executed at least 1 time. Therefore, upon entering the loop, Visual Basic for Applications executes all the statements prior to the closing loop statement (Loop Until condition).
Once the statements are executed, VBA goes on to…
Step #2: Test The Condition.
Do Until loops execute a series of statements as long as the relevant condition is False. Therefore, once VBA encounters the “Loop Until condition” statement, it tests the relevant condition and:
- If the condition evaluates to True, exits the loop. Upon exiting this type of loop, execution usually continues with the statement that follows “Loop Until condition”.
- If the condition evaluates to False, it goes onto to…
Step #3: Loop.
When looping, Visual Basic for Applications goes back to step #1 above.
In other words, as long as the condition evaluated in step #2 is False, VBA continues to go back to step #1 for purposes of executing the statements within the Do Until loop.
While working with Visual Basic for Applications, you’re likely to work most of the time with the loops that I describe above, namely:
- For… Next loops.
- For Each… Next loops.
- Do While and Do Until loops (each having 2 versions).
These, however, aren’t the only ways to create loops in Visual Basic for Applications, although they’re generally the most appropriate. Since you may eventually encounter other type of looping constructs, let’s take a look at 2 alternative looping structures, starting with…
Do… Excel VBA Loops and Avoiding Infinite Loops
In the section above, I introduce Do While and Do Until VBA loops.
As I explain in that section, the keywords While or Until and the condition items are optional.
This means that, strictly speaking, Do… loops don’t have to be Do While or Do Until loops. In other words, you can theoretically use the 2 syntaxes below to create looping structures.
However, as I explain further down this Excel tutorial, neither of these structures is really recommended nor necessary.
Do… Excel VBA Loops: Syntax #1
Do
    [statements]
    [Exit Do]
    [statements]
Loop
Do… Excel VBA Loops: Syntax #2
Do
    [statements]
    [Exit Do]
    [statements]
Loop
Notice that both of these structures are exactly the same as those I explain above when introducing the Do While or Do Until loops with a big exception:
Neither of them includes the optional (i) While or Until keywords or (ii) condition ([{While | Until} condition]).
These absences have big consequences.
As I explain above, in Do While or Do Until loops a certain group of statements is executed repeatedly while or until a particular condition is met. In the absence of these items ({While | Until} condition), there’s no mechanism to stop the looping procedure. In other words: The Do… Loop runs forever because nothing stops it from doing so.
This is sometimes called an infinite loop.
You can actually stop the execution of a such a macro by, for example:
- Pressing the keyboard shortcuts “Ctrl + Break”, although some computer may require different key combinations.
- Use Windows’ Task-Manager (keyboard shortcut “Ctrl + Alt + Del”) to shut down Excel.
- Restart your computer.
However, as I explain in the previous sections of this Excel tutorial, there are better ways to stop the looping.
One option, is to use (i) If… Then… Else statement to carry out conditional tests and determine whether certain conditions are met and, based on the result of the logical test, (ii) continue looping or use the Exit Do statement (which I explain below) to exit the Do… Excel VBA loop.
In most cases, however, the simplest option is likely to stick to Do While and Do Until loops. These constructs allow you to easily determine when Visual Basic for Applications should exit the relevant loop. Therefore, the appropriate use of the Do While and Do Until loops should allow you to achieve the same objectives as an unrestricted Do… VBA loop without the added complexity.
And finally, always ensure the applicable condition (that terminates at loop) will eventually be satisfied. This comment is applicable to other types of Excel VBA loops (not only the Do… loop), particularly Do While loops.
While… Wend Excel VBA Loops
You’ve already seen several different types of Excel VBA loops in the previous sections:
- For… Next loops.
- For Each… Next loops.
- Do While and Do Until loops.
- Do… loops.
There is, however, an additional looping structure that doesn’t appear in this list: The While… Wend loop.
The term “Wend” is a contraction of While… End.
The While… Wend loop exists mainly for compatibility purposes with earlier languages. Therefore, this type of Excel VBA loop is relatively rare and you’re unlikely to work (or find it) too frequently while working with Visual Basic for Applications.
In fact, instead of using While… Wend loops, you’re probably better off using the Do While and Do Until loops that I introduce above. In particular, the general Do… Loop structure is more robust and flexible (than the While… Wend loop). In particular, as you’ll notice below:
- When using the While… Wend Excel VBA loop, you don’t have the possibility of specifying whether the condition should be tested at the beginning or at the end of the loop. As I explain above, Do While and Do Until loops allow you to do this.
- When using Do While and Do Until loops, you can use the Exit Do statement to create alternate exits to the loop. The While… Wend looping structure isn’t as flexible in this regard.
However, the While… Wend looping structure exists and works (if you choose to use it). Therefore, to the extent that you may still encounter it, I might as well introduce it in this Excel tutorial about VBA loops.
The main purpose of the While… Wend VBA loop is to execute certain statements as long as a particular condition is True. Once the condition isn’t met (becomes False), VBA exits the loop.
The basic syntax of the While… Wend loop is as follows:
While condition
    [statements]
Wend
The items within this type of statement may look familiar. After all, they’re substantially similar to some of the elements in the other type of VBA loops that I describe further above. In any case, let’s take a look at those items:
Item #1: Condition
The condition within a While… Wend loop is a numeric or string expression evaluating to either True or False. Similar to what happens with the Do While and Do Until loops, if condition is Null, Visual Basic for Applications treats it as False.
Item #2: Statements
These are the actual statements that Visual Basic for Applications executes repeatedly while the condition is True.
After understanding the basic elements and purpose of the While… Wend statement, we can dive into the actual process followed by this type of Excel VBA loop:
How Does The While… Wend Excel VBA Loop Work
The following diagram illustrates the basics of how the While… Wend loop proceeds:

Notice how this process is materially similar to that followed by the Do While VBA loop I explain above.
The following are the 3 main steps within this process:
Step #1: Check Whether Condition Is True
The main purpose of the While… Wend VBA loop is to execute certain statements as long as the applicable condition is True. Therefore, the process begins by checking whether the condition is actually True.
If the condition isn’t True, Visual Basic for Applications exits the loop. In such cases, execution generally continues with the statement that appears after “Wend”.
If the condition is indeed True, the VBA code proceeds to…
Step #2: Execute All Statements
If the condition within the While… Wend loop is True, all of the statements within the loop are executed.
Execution goes on until the VBA code encounters the Wend statement. At that point, the code goes on to…
Step #3: Repeat Step #1
Once the Wend statement is encountered, control goes back to the While statement that opens the While… Wend loop (step #1 above). This allows the code to check (again) whether the condition continues to be True.
Excel VBA Loops: The Exit Statement And Nesting
As with most VBA constructs, once you understand the basic steps of Excel VBA loops, you can start creating more complex and sophisticated loops. Let’s take a look at 2 common ways you can start doing this:
Excel VBA Loops And The Exit Statement
As explained above, the Exit For statement allows you to exit a For Each… Next or For… Next loop while the Exit Do statement allows you to exit a Do While or Do Until loop. In other words, once Visual Basic for Applications encounters the statement, the relevant loop is immediately terminated.
Note that you can’t use the Exit statement to exit a While… Wend Excel VBA loop.
The usual way of exiting loops is the one I explain in the relevant sections above. More precisely:
- Visual Basic for Applications exits a For… Next loop when the current value of the loop counter variable is (i) larger than the end value of the counter (if the step is positive), or (ii) smaller than the end value of the counter if the loop counter runs backwards (the step is negative) (see step #1 of a For… Next loop above).
- A For Each… Next loop is exited once the relevant VBA statements are executed for the last group element (see steps #3 and #5 of a For Each… Next loop above).
- VBA code exits a Do While VBA loop when the relevant condition isn’t met any longer.
- Visual Basic for Applications exits a Do Until loop when the applicable condition is met.
By using Exit For or Exit Do statements you can create alternate exits when working with loops.
You may wonder why would you want to create an alternate exit to a loop…
One of the main reasons why you may want to use the Exit For or Exit Do statements to create an alternate exit to a loop is that it can greatly speed your code.
The truth is that, in some macros, you simply don’t need to go through the whole looping structure.
This is the case, for example, when you create VBA applications whose objective may be achieved without having to (i) wait until a condition becomes False (or True) in the case of Do While or Do Until loops, or (ii) loop through each element within a group in the case of For Each… Next loops. Consider, for example, a situation where you must find a single record meeting certain criteria. In such a case, once you find the specific record you’re looking for, you can exit/stop the loop.
Other situations where you may want to use the Exit statement include cases where your procedure is responding to an error or to the user cancelling the procedure.
This, however, doesn’t mean that you should use the Exit statement profusely.
To a certain extent, there’s debate regarding the use of the Exit statement and, more precisely, whether this is a good coding practice. Some advanced Excel VBA users argue that the optional Exit statement is rarely necessary. In fact, from this perspective, using the Exit For statement too often may be a sign that your approach to building/structuring loops could be improved.
In any case, the Exit statement exists. Some practitioners agree that there are cases (such as the 3 I mention above) where using the Exit statement is generally acceptable. This is the case with some advanced Excel VBA users who cannot justify continuing a loop after the loop’s objective has been met (for example, you’ve found what you need).
The use of the Exit statement is probably one of those topics where you’ll build your own opinion and practices as you go along. While doing so, you may want to keep in mind that this debate exists.
Personally, whenever working with VBA loops, I do the following:
- Use the Exit statement sparingly; and
- Ask whether I could structure a loop in such a way that allows me to avoid an unnecessary Exit statement.
As a general rule, there aren’t restrictions as to where you should place the Exit For or Exit Do statements. However, they’re usually included after carrying out a conditional test. One way in which you do this is by (i) using the If… Then… Else statement for purposes of checking whether a condition is met and, (ii) depending on whether the condition is met or not, using the Exit For or Exit Do statement to exit the Excel VBA loop.
Nesting Excel VBA Loops
For purposes of this VBA tutorial, nesting a loop means placing a loop within another loop.
You can generally nest loops within other loops. In these cases, a loop (the nested loop) runs within another loop (the outer loop).
As a general rule, you have a good amount of freedom when combining loops by nesting them. You can (for example):
- Nest For… Next or For Each… Next loops within other For… Next or For Each… Next loops.
- Nest For… Next or For Each… Next loops within Do While or Do Until loops.
- Nest Do While or Do Until loops within other Do While or Do Until loops.
- Next Do While or Do Until loops within For… Next or For Each… Next loops.
Even though you can nest loops within loops of a different type, you can’t overlap control structures. This means that each nested VBA loop must close/end with its outer nested level.
More generally, when nesting Excel VBA loops, you’ll probably want to be very organized and ensure that the structure of each loop is clearly differentiated. This allows you to, among others, guarantee that:
- The opening and closing statements of each loop match appropriately.
- For example, as explained in Microsoft’s Official Documentation for the case of While… Wend loops, each “Wend” matches the most recent “While”. Therefore, you want to ensure that the individual statements within your code are where they should be.
- Each element within a For Each… Next loop is unique.
- Each loop counter variable in a For… Next loop has a unique name (as it should be).
Some of the habits that may help you adequately organize the code of your nested Excel VBA loops and make it more readable are the following:
- Habit #1: Make adequate use of indentations. In the case of loops, the lines of code inside a loop have additional indentation.
- The settings of the Visual Basic Editor allow you to determine certain settings regarding code indentation. You can, for example, enable or disable the Auto Indent setting, which makes the indentation of each line of code equal to that of the previous line. You can also use these settings to determine the indentation width. The default tab width is 4 characters.
- Habit #2: When working with For… Next and For Each… Next VBA loops, include the second (and last) instance of the counter or element item.
- As I explain above, the last statement of For… Next loops is “Next [counter]” and the last statement of For Each… Next loops is “Next [element]”. In both cases, the item within square brackets ([ ]) is optional. However, including the counter or element helps improve readability and prevent bugs.
Further to the above, you may want to avoid generating too much complexity when nesting loops. If your VBA code includes too many levels of nested loops (according to some VBA authorities you can theoretically have up to 16 levels), it will likely be difficult to read, modify and maintain.
If you find yourself in the situation where a particular VBA application has too many nested loops, consider whether you can restructure that part of your VBA code for purposes of achieving the same goal using a less complex process.
Conclusion
After reading this Excel tutorial, you know all the basic concepts and information you need to start creating and implementing loops in your VBA applications and macros.
In addition to knowing what a loop is and what are its uses and advantages, you know what are the main looping structures that Excel supports and (out of those structures), which are the types of loops that you’re most likely to encounter and use in practice:
- For… Next loops.
- For Each… Next loops.
- Do While and Do Until loops.
In case you ever need it, you’re now also familiar with While… Wend loops, and understand what is a Do… loop and why you should take extra precautions to avoid infinite loops. Finally, you’ve seen 2 ways in which you can modify the way your loops proceed and add some complexity (as well as the reasons why you shouldn’t overdo this):
- The Exit statement.
- Nesting.
With all these knowledge, you’re ready to start creating amazing Excel VBA loops. You’ll probably start developing your own style and preferences about how to work with loops.