
This VBA tutorial will teach you the basics of using VBA with Excel. No prior coding experience? No problem! Because VBA is integrated into Excel, coding is very intuitive. Beginners can learn VBA very quickly!
The tutorial is 100% free. No sign-up is required, but by creating an account you’ll be able to save your tutorial progress, and receive many other VBA resources for free!

The tutorial contains 100 exercises spread across 10 chapters. The course is meant to replicate a «boot camp» experience where you learn very quickly by immediately completing exercises related to the course topics.
Each exericse has a «Hint» button, showing you the correct answer. So if you’re stuck, you can easily see the correct answer.
The course contents are listed below:

Introduction
This is a tutorial about writing code in Excel spreadsheets using Visual Basic for Applications (VBA).
Excel is one of Microsoft’s most popular products. In 2016, the CEO of Microsoft said «Think about a world without Excel. That’s just impossible for me.” Well, maybe the world can’t think without Excel.
- In 1996, there were over 30 million users of Microsoft Excel (source).
- Today, there are an estimated 750 million users of Microsoft Excel. That’s a little more than the population of Europe and 25x more users than there were in 1996.
We’re one big happy family!
In this tutorial, you’ll learn about VBA and how to write code in an Excel spreadsheet using Visual Basic.
Prerequisites
You don’t need any prior programming experience to understand this tutorial. However, you will need:
- Basic to intermediate familiarity with Microsoft Excel
- If you want to follow along with the VBA examples in this article, you will need access to Microsoft Excel, preferably the latest version (2019) but Excel 2016 and Excel 2013 will work just fine.
- A willingness to try new things
Learning Objectives
Over the course of this article, you will learn:
- What VBA is
- Why you would use VBA
- How to get set up in Excel to write VBA
- How to solve some real-world problems with VBA
Important Concepts
Here are some important concepts that you should be familiar with to fully understand this tutorial.
Objects: Excel is object-oriented, which means everything is an object — the Excel window, the workbook, a sheet, a chart, a cell. VBA allows users to manipulate and perform actions with objects in Excel.
If you don’t have any experience with object-oriented programming and this is a brand new concept, take a second to let that sink in!
Procedures: a procedure is a chunk of VBA code, written in the Visual Basic Editor, that accomplishes a task. Sometimes, this is also referred to as a macro (more on macros below). There are two types of procedures:
- Subroutines: a group of VBA statements that performs one or more actions
- Functions: a group of VBA statements that performs one or more actions and returns one or more values
Note: you can have functions operating inside of subroutines. You’ll see later.
Macros: If you’ve spent any time learning more advanced Excel functionality, you’ve probably encountered the concept of a “macro.” Excel users can record macros, consisting of user commands/keystrokes/clicks, and play them back at lightning speed to accomplish repetitive tasks. Recorded macros generate VBA code, which you can then examine. It’s actually quite fun to record a simple macro and then look at the VBA code.
Please keep in mind that sometimes it may be easier and faster to record a macro rather than hand-code a VBA procedure.
For example, maybe you work in project management. Once a week, you have to turn a raw exported report from your project management system into a beautifully formatted, clean report for leadership. You need to format the names of the over-budget projects in bold red text. You could record the formatting changes as a macro and run that whenever you need to make the change.
What is VBA?
Visual Basic for Applications is a programming language developed by Microsoft. Each software program in the Microsoft Office suite is bundled with the VBA language at no extra cost. VBA allows Microsoft Office users to create small programs that operate within Microsoft Office software programs.
Think of VBA like a pizza oven within a restaurant. Excel is the restaurant. The kitchen comes with standard commercial appliances, like large refrigerators, stoves, and regular ole’ ovens — those are all of Excel’s standard features.
But what if you want to make wood-fired pizza? Can’t do that in a standard commercial baking oven. VBA is the pizza oven.

Yum.
Why use VBA in Excel?
Because wood-fired pizza is the best!
But seriously.
A lot of people spend a lot of time in Excel as a part of their jobs. Time in Excel moves differently, too. Depending on the circumstances, 10 minutes in Excel can feel like eternity if you’re not able to do what you need, or 10 hours can go by very quickly if everything is going great. Which is when you should ask yourself, why on earth am I spending 10 hours in Excel?
Sometimes, those days are inevitable. But if you’re spending 8-10 hours everyday in Excel doing repetitive tasks, repeating a lot of the same processes, trying to clean up after other users of the file, or even updating other files after changes are made to the Excel file, a VBA procedure just might be the solution for you.
You should consider using VBA if you need to:
- Automate repetitive tasks
- Create easy ways for users to interact with your spreadsheets
- Manipulate large amounts of data
Getting Set Up to Write VBA in Excel
Developer Tab
To write VBA, you’ll need to add the Developer tab to the ribbon, so you’ll see the ribbon like this.

To add the Developer tab to the ribbon:
- On the File tab, go to Options > Customize Ribbon.
- Under Customize the Ribbon and under Main Tabs, select the Developer check box.
After you show the tab, the Developer tab stays visible, unless you clear the check box or have to reinstall Excel. For more information, see Microsoft help documentation.
VBA Editor
Navigate to the Developer Tab, and click the Visual Basic button. A new window will pop up — this is the Visual Basic Editor. For the purposes of this tutorial, you just need to be familiar with the Project Explorer pane and the Property Properties pane.

Excel VBA Examples
First, let’s create a file for us to play around in.
- Open a new Excel file
- Save it as a macro-enabled workbook (. xlsm)
- Select the Developer tab
- Open the VBA Editor
Let’s rock and roll with some easy examples to get you writing code in a spreadsheet using Visual Basic.
Example #1: Display a Message when Users Open the Excel Workbook
In the VBA Editor, select Insert -> New Module
Write this code in the Module window (don’t paste!):
Sub Auto_Open()
MsgBox («Welcome to the XYZ Workbook.»)
End Sub
Save, close the workbook, and reopen the workbook. This dialog should display.
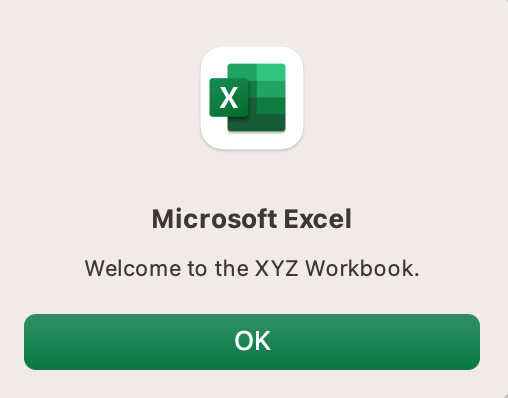
Ta da!
How is it doing that?
Depending on your familiarity with programming, you may have some guesses. It’s not particularly complex, but there’s quite a lot going on:
- Sub (short for “Subroutine): remember from the beginning, “a group of VBA statements that performs one or more actions.”
- Auto_Open: this is the specific subroutine. It automatically runs your code when the Excel file opens — this is the event that triggers the procedure. Auto_Open will only run when the workbook is opened manually; it will not run if the workbook is opened via code from another workbook (Workbook_Open will do that, learn more about the difference between the two).
- By default, a subroutine’s access is public. This means any other module can use this subroutine. All examples in this tutorial will be public subroutines. If needed, you can declare subroutines as private. This may be needed in some situations. Learn more about subroutine access modifiers.
- msgBox: this is a function — a group of VBA statements that performs one or more actions and returns a value. The returned value is the message “Welcome to the XYZ Workbook.”
In short, this is a simple subroutine that contains a function.
When could I use this?
Maybe you have a very important file that is accessed infrequently (say, once a quarter), but automatically updated daily by another VBA procedure. When it is accessed, it’s by many people in multiple departments, all across the company.
- Problem: Most of the time when users access the file, they are confused about the purpose of this file (why it exists), how it is updated so often, who maintains it, and how they should interact with it. New hires always have tons of questions, and you have to field these questions over and over and over again.
- Solution: create a user message that contains a concise answer to each of these frequently answered questions.
Real World Examples
- Use the MsgBox function to display a message when there is any event: user closes an Excel workbook, user prints, a new sheet is added to the workbook, etc.
- Use the MsgBox function to display a message when a user needs to fulfill a condition before closing an Excel workbook
- Use the InputBox function to get information from the user
Example #2: Allow User to Execute another Procedure
In the VBA Editor, select Insert -> New Module
Write this code in the Module window (don’t paste!):
Sub UserReportQuery()
Dim UserInput As Long
Dim Answer As Integer
UserInput = vbYesNo
Answer = MsgBox(«Process the XYZ Report?», UserInput)
If Answer = vbYes Then ProcessReport
End Sub
Sub ProcessReport()
MsgBox («Thanks for processing the XYZ Report.»)
End Sub
Save and navigate back to the Developer tab of Excel and select the “Button” option. Click on a cell and assign the UserReportQuery macro to the button.
Now click the button. This message should display:
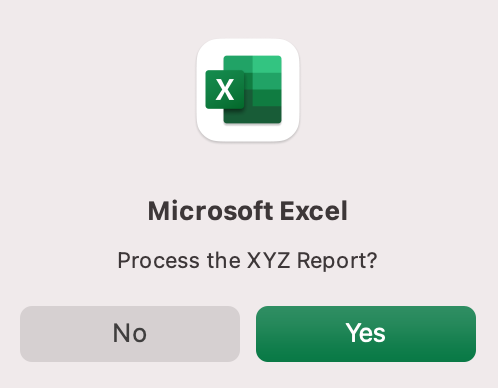
Click “yes” or hit Enter.
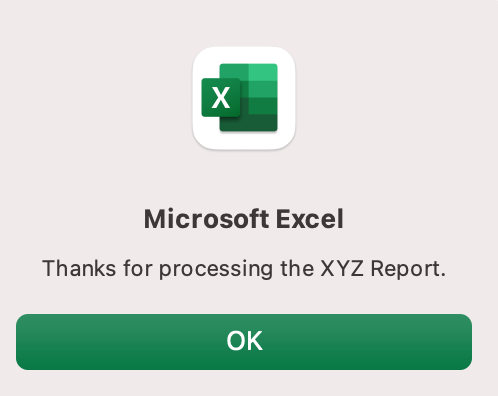
Once again, tada!
Please note that the secondary subroutine, ProcessReport, could be anything. I’ll demonstrate more possibilities in example #3. But first…
How is it doing that?
This example builds on the previous example and has quite a few new elements. Let’s go over the new stuff:
- Dim UserInput As Long: Dim is short for “dimension” and allows you to declare variable names. In this case, UserInput is the variable name and Long is the data type. In plain English, this line means “Here’s a variable called “UserInput”, and it’s a Long variable type.”
- Dim Answer As Integer: declares another variable called “Answer,” with a data type of Integer. Learn more about data types here.
- UserInput = vbYesNo: assigns a value to the variable. In this case, vbYesNo, which displays Yes and No buttons. There are many button types, learn more here.
- Answer = MsgBox(“Process the XYZ Report?”, UserInput): assigns the value of the variable Answer to be a MsgBox function and the UserInput variable. Yes, a variable within a variable.
- If Answer = vbYes Then ProcessReport: this is an “If statement,” a conditional statement, which allows us to say if x is true, then do y. In this case, if the user has selected “Yes,” then execute the ProcessReport subroutine.
When could I use this?
This could be used in many, many ways. The value and versatility of this functionality is more so defined by what the secondary subroutine does.
For example, maybe you have a file that is used to generate 3 different weekly reports. These reports are formatted in dramatically different ways.
- Problem: Each time one of these reports needs to be generated, a user opens the file and changes formatting and charts; so on and so forth. This file is being edited extensively at least 3 times per week, and it takes at least 30 minutes each time it’s edited.
- Solution: create 1 button per report type, which automatically reformats the necessary components of the reports and generates the necessary charts.
Real World Examples
- Create a dialog box for user to automatically populate certain information across multiple sheets
- Use the InputBox function to get information from the user, which is then populated across multiple sheets
Example #3: Add Numbers to a Range with a For-Next Loop
For loops are very useful if you need to perform repetitive tasks on a specific range of values — arrays or cell ranges. In plain English, a loop says “for each x, do y.”
In the VBA Editor, select Insert -> New Module
Write this code in the Module window (don’t paste!):
Sub LoopExample()
Dim X As Integer
For X = 1 To 100
Range(«A» & X).Value = X
Next X
End Sub
Save and navigate back to the Developer tab of Excel and select the Macros button. Run the LoopExample macro.
This should happen:
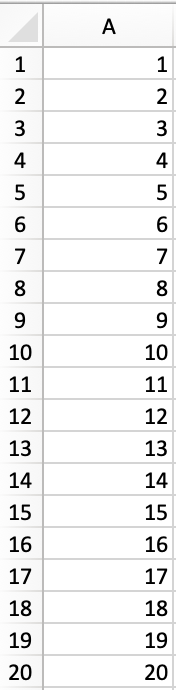
Etc, until the 100th row.
How is it doing that?
- Dim X As Integer: declares the variable X as a data type of Integer.
- For X = 1 To 100: this is the start of the For loop. Simply put, it tells the loop to keep repeating until X = 100. X is the counter. The loop will keep executing until X = 100, execute one last time, and then stop.
- Range(«A» & X).Value = X: this declares the range of the loop and what to put in that range. Since X = 1 initially, the first cell will be A1, at which point the loop will put X into that cell.
- Next X: this tells the loop to run again
When could I use this?
The For-Next loop is one of the most powerful functionalities of VBA; there are numerous potential use cases. This is a more complex example that would require multiple layers of logic, but it communicates the world of possibilities in For-Next loops.
Maybe you have a list of all products sold at your bakery in Column A, the type of product in Column B (cakes, donuts, or muffins), the cost of ingredients in Column C, and the market average cost of each product type in another sheet.
You need to figure out what should be the retail price of each product. You’re thinking it should be the cost of ingredients plus 20%, but also 1.2% under market average if possible. A For-Next loop would allow you to do this type of calculation.
Real World Examples
- Use a loop with a nested if statement to add specific values to a separate array only if they meet certain conditions
- Perform mathematical calculations on each value in a range, e.g. calculate additional charges and add them to the value
- Loop through each character in a string and extract all numbers
- Randomly select a number of values from an array
Conclusion
Now that we’ve talked about pizza and muffins and oh-yeah, how to write VBA code in Excel spreadsheets, let’s do a learning check. See if you can answer these questions.
- What is VBA?
- How do I get set up to start using VBA in Excel?
- Why and when would you use VBA?
- What are some problems I could solve with VBA?
If you have a fair idea of how to you could answer these questions, then this was successful.
Whether you’re an occasional user or a power user, I hope this tutorial provided useful information about what can be accomplished with just a bit of code in your Excel spreadsheets.
Happy coding!
Learning Resources
- Excel VBA Programming for Dummies, John Walkenbach
- Get Started with VBA, Microsoft Documentation
- Learning VBA in Excel, Lynda
A bit about me
I’m Chloe Tucker, an artist and developer in Portland, Oregon. As a former educator, I’m continuously searching for the intersection of learning and teaching, or technology and art. Reach out to me on Twitter @_chloetucker and check out my website at chloe.dev.
Learn to code for free. freeCodeCamp’s open source curriculum has helped more than 40,000 people get jobs as developers. Get started
Welcome to the ultimate Excel VBA Tutorial (Visual Basic for Applications)! You will walk the journey from being an VBA Zero to becoming an VBA Hero. This VBA tutorial is not aimed only at teaching you how to write VBA macros in Excel – it’s a general introduction to VBA. However, some sections as you will notice are indeed aimed at Excel (e.g. the Workbooks and Worksheets section).
Visual Basic Editor Tutorial
To start programming in VBA you need to be able to access the Developer ribbon tab in Excel to open the VBA Developer environment (VBE). Read the article to learn how to:
You will learn:
- Enable the Excel Developer ribbon tab
- Walkthrough of the VBE windows
- Shortcuts how to open the VBA window
How to Record Macros
Recording macros is a great way to test and learn writing new code. Simply record a series of steps and see what the output code looks like instead of Googling it.
You will learn:
- Record your first Excel macro
- Run the recorded macro
- Review the generated code
How to Debug VBA
Debugging code is the process of line by line code execution often to understand the process and to identify and resolve macro runtime errors. Learning to debug VBA code in the Excel VBE is key skill.
You will learn:
- How to Run, Break or Reset your code
- Learn what are breakpoints and how to use them
- See how to run your code step by step and the various debugging shortcuts
VBA Functions and Procedures
To execute VBA Code you need to start with a VBA Sub (procedure). VBA Functions on the other hand allow you process and input to return and output that can be used for other purposes.
You will learn:
- Create your first Hello World VBA macro using a VBA Sub
- Learn the basics of VBA Subs as well as how they are different from VBA Functions
- Understand how you can pass arguments to a Sub/Function
VBA Variables
In order to process data you need to store it somewhere. In this tutorial you will learn how to use the VBA Dim statement to declare VBA Variables and all Data Types available in VBA (strings, numbers etc.).
You will learn:
- The available data types in VBA
- How to declare and define variables
- Constants vs Variables
- Private vs Public Variables
VBA Conditions – If…Else
Making decisions is hard, but a must in programming. The VBA If…Then…Else statement is a basic conditional statement for making simple boolean decisions in your VBA code.
You will learn:
- The If…Else statement to run code basis conditions met
- Boolean operators such as <, = etc.
- The Iif function
VBA Select Case
The VBA If statement is great for writing several conditions. In some cases, however, there is a need to enumerate many scenarios based on values of specific variables. The VBA Select Case statement saves a lot of time compared to VBA If.
You will learn:
- The Switch…Case statement to run several conditions basis a single variable
- Case Is statment
Using VBA Loops: For, ForEach
VBA For loops are necessary for running a scope of code several times, enumerating through tables or running code in a simple loop.
You will learn:
- The For…Next statement to run iterations basis a variable
- The ForEach…Next statement iterate a collection
- For vs ForEach and when each should be used
Using VBA Loops: Do While, Do Until
VBA For loops allow you to run a loop for a specific amount of iterations. For cases when a loops needs to be run until a condition is met (Do Until) or needs to run while a condition is met (Do While), read the tutorial.
You will learn:
- Do…While and Do…Until loops
- How to exit / continue a Do…While Loop
Excel VBA Range
Learn how to change values of cells in Excel, change the format of an Excel Range etc. Go to the tutorial to learn everything of how to interact in your VBA Macro with an Excel worksheet.
Excel Cells Formatting
Learn in this tutorial to format Excel cells – change their size, background color, borders, style and more.
VBA UserForm
UserForms allow you to create you own pop-up windows for users to interact with, similar to Message Boxes.
This Excel VBA tutorial for beginners covers in-depth lessons to learn VBA Excel and VBA basics. This Visual Basic for Applications Excel Tutorial covers all the basics as well as advanced concepts of VBA for beginners.
What is VBA?
VBA stands for Visual Basic for Applications. It is a combination of the Microsoft’s event-driven programming language Visual Basic with Microsoft Office Applications such as Microsoft Excel. VBA enables you to automate various activities in Excel like generating reports, preparing charts & graphs, doing calculations, etc. This automation activity is also often referred as Macro. This way it helps users to save their time spent behind running the repetitive steps.
Excel VBA Syllabus
Introduction
Advanced Stuff
| 👉 Lesson 1 | VBA Controls — VBA Form Control & ActiveX Controls in Excel |
| 👉 Lesson 2 | VBA Arithmetic Operators — Multiplication, Division & Addition |
| 👉 Lesson 3 | VBA String Functions — VBA String Operators & Manipulation Functions |
| 👉 Lesson 4 | VBA Comparison Operators — Not equal, Less than or Equal to |
| 👉 Lesson 5 | VBA Logical Operators — AND, OR, NOT, IF NOT in Excel VBA |
| 👉 Lesson 6 | Excel VBA Subroutine — How to Call Sub in VBA with Example |
| 👉 Lesson 7 | Excel VBA Function Tutorial — Return, Call, Examples |
| 👉 Lesson 8 | Excel VBA Range Object — What is, How to Use |
| 👉 Lesson 9 | Web Scraping with VBA — Learn Web Scraping from basics |
Must Know!
Why learn Excel VBA?
Excel VBA enables you to use English like statements to write instructions for creating various applications. Excel VBA is easy to learn, and it has easy to use User Interface in which you just have to drag and drop the interface controls. It also allows you to enhance Excel functionality by making it behave the way you want.
What is VBA used for?
VBA is used for both personal use as well as business uses. You can automate your daily routine tasks using simple VBA macros for personal use. For business use, you can create strong programs and leverage the power of Excel in your custom programs using VBA.
Prerequisites for learning VBA Excel Tutorial?
Nothing! This Excel VBA training assumes you as an absolute beginner to VBA. However, it is desirable if you know the basics of Excel and how the functions in Excel work, it will boost your learning speed and understanding.
What will you learn in this Excel VBA tutorial?
In this Excel VBA tutorial, you will learn all the basics of VBA like introduction to Macros, VBA data types, variables, arrays, etc. You will also learn the advanced concepts of Excel VBA like VBA Excel form control, ActiveX control, VBA operators, subroutines, functions, objects, web scraping with VBA and many more interesting topics.
Welcome to part one of the Ultimate VBA Tutorial for beginners.
If you are brand new to VBA, then make sure that you have read the post How To Create a Macro From Scratch in Excel so that your environment is set up correctly to run macros.
In this Excel VBA tutorial you will learn how to create real-world macros. The focus is on learning by doing. This tutorial has coding examples and activities to help you on your way. You will find a quiz at the end of this VBA tutorial. You can use this to test your knowledge and see how much you have learned.
In part one of this VBA tutorial we will concentrate on the basics of creating Excel macros. See the next sections for the learning outcomes and for tips on getting started with VBA.
“The noblest pleasure is the joy of understanding.” – Leonardo da Vinci
Learning Outcomes for this VBA Tutorial
When you finish this VBA tutorial you will be able to:
- Create a module
- Create a sub
- Understand the difference between a module and sub
- Run the code in a sub
- Write a value to a cell
- Copy the value from one cell to another
- Copy values from one range of cells to another
- Copy values between difference worksheets
- Test your output using the Immediate Window
- Write code faster using the With Statement
- Create and use variables
- Copy from a cell to a variable and vice versa
Before we get started, let’s look at some simple tips that will help you on your journey.
The Six Killer Tips For This VBA Tutorial
- Practice, Practice, Practice – Don’t try to learn by reading. Try the examples and activities.
- Type the code examples instead of copying and pasting – this will help you understand the code better.
- Have a clearly defined target for learning VBA. One you will know when you reach.
- Don’t be put off by errors. They help you write proper code.
- Start by creating simple macros for your work. Then create more complex ones as you get better.
- Don’t be afraid to work through each tutorial more than once.The more times you do it the more deeply embedded the knowledge will become.
Basic Terms Used in this VBA Tutorial
Excel Macros: A macro is a group of programming instructions we use to create automated tasks.
VBA: VBA is the programming language we use to create macros. It is short for Visual Basic for Applications.
Line of code: This a VBA instruction. Generally speaking, they perform one task.
Sub: A sub is made up of one or more lines of code. When we “Run” the sub, VBA goes through all the lines of code and carries out the appropriate actions. A macro and a sub are essentially the same thing.
Module: A module is simply a container for our subs. A module contains subs which in turn contain lines of code. There is no limit(within reason) to the number of modules in a workbook or the number of subs in a module.
VBA Editor: This is where we write our code. Pressing Alt + F11 switches between Excel and the Visual Basic Editor. If the Visual Basic editor is not currently open then pressing Alt + F11 will automatically open it.
The screenshot below shows the main parts of the Visual Basic Editor:

The Visual Basic Editor
Tip for the VBA Tutorial Activities
When you are working on the activities in this VBA Tutorial it is a good idea to close all other Excel workbooks.
Creating a Module
In Excel, we use the VBA language to create macros. VBA stands for Visual Basic for Applications.
When we use the term Excel Macros we are referring to VBA. The term macro is essentially another name for a sub. Any time you see the terms Excel Macros or VBA just remember they are referring to the same thing.
In VBA we create lines of instructions for VBA to process. We place the lines of code in a sub. These subs are stored in modules.
We can place our subs in the module of the worksheet. However, we generally only place code for worksheet events here.
In VBA, we create new modules to hold most of our subs. So for our first activity let’s go ahead and create a new module.
Activity 1
- Open a new blank workbook in Excel.
- Open the Visual Basic Editor(Alt + F11).
- Go to the Project – VBAProject window on the left(Ctrl + R if it is not visible).
- Right-click on the workbook and click Insert and then Module.
- Click on Module1 in the Project – VBAProject window.
- In the Properties window in the bottom left(F4 if not visible), change the module name from module1 to MyFirstModule.
End of Activity 1
The module is where you place your code. It is simply a container for code and you don’t use it for anything else.
You can think of a module like a section in a bookshop. It’s sole purpose is to store books and having similar books in a particular section makes the overall shop more organised.
The main window(or code window) is where the code is written. To view the code for any module including the worksheets you can double-click on the item in the Project – VBAProject window.
Let’s do this now so you can become familiar with the code window.
Activity 2
- Open a new workbook and create a new module like you did in the last activity.
- Double-click on the new module in the Project – VBAProject window.
- The code window for this module will open. You will see the name in the title bar of Visual Basic.

End of Activity 2
You can have as many modules as you like in a workbook and as many subs as you like within a module. It’s up to you how you want to name the modules and how you organize your subs within your modules.
In the next part of this VBA Tutorial, we are going to look at using subs.
How to Use Subs
A line of code is the instruction(s) we give to VBA. We group the lines of code into a sub. We place these subs in a module.
We create a sub so that VBA will process the instructions we give it. To do this we get VBA to Run the sub. When we select Run Sub from the menu, VBA will go through the lines of code in the sub and process them one at a time in the order they have been placed.
Let’s go ahead and create a sub. Then afterward, we will have a look at the lines of code and what they do.
Activity 3
- Take the module you created in the last activity or create a new one.
- Select the module by double-clicking on it in the Project – VBAProject window. Make sure the name is visible in the title bar.
- Enter the following line in the code window and press enter.
Sub WriteValue - VBA will automatically add the second line End Sub. We place our code between these two lines.
- Between these two lines enter the line
Sheet1.Range("A1") = 5You have created a sub! Let’s take it for a test drive.
- Click in the sub to ensure the cursor is placed there. Select Run->Run Sub/Userform from the menu(or press F5).
Note: If you don’t place the cursor in the sub, VBA will display a list of available subs to run. - Open Excel(Alt + F11). You will see the value 5 in the cell A1.
- Add each of the following lines to your sub, run the sub and check the results.
Sheet1.Range("B1") = "Some text"
Sheet1.Range("C3:E5") = 5.55
Sheet1.Range("F1") = Now
You should see “Some text” in cells B1, 5.55 in the cells C3 to E5 and the current time and date in the cell F1.
End of Activity 3
Writing values to cells
Let’s look at the line of code we used in the previous section of this VBA Tutorial
Sheet1.Range("A1") = 5
We can also write this line like this
Sheet1.Range("A1").Value = 5
However in most cases we don’t need to use Value as this is the default property.
We use lines of code like these to assign(.i.e. copy) values between cells and variables.
VBA evaluates the right of the equals sign and places the result in the variable/cell/range that is to the left of the equals.
The line is saying “the left cellvariablerange will now be equal to the result of the item on the right”.

Let’s look the part of the code to the left of the equals sign
Sheet1.Range("A1") = 5
In this code , Sheet1 refers to the code name of the worksheet. We can only use the code name to reference worksheets in the workbook containing the code. We will look at this in the section The code name of the worksheet.
When we have the reference to a worksheet we can use the Range property of the worksheet to write to a range of one or more cells.
Using a line like this we can copy a value from one cell to another.
Here are some more examples:
' https://excelmacromastery.com/
Sub CopyValues()

    ' copies the value from C2 to A1
    Sheet1.Range("A1") = Sheet1.Range("C2")

    ' copies the value from D6 to A2
    Sheet1.Range("A2") = Sheet1.Range("D6")

    ' copies the value from B1 on sheet2 to A3 on sheet1
    Sheet1.Range("A3") = Sheet2.Range("B1")

    ' writes result of D1 + D2 to A4
    Sheet1.Range("A4") = Sheet2.Range("D1") + Sheet2.Range("D2")

End Sub
Now it’s your turn to try some examples. Copying between cells is a fundamental part of Excel VBA, so understanding this will really help you on your path to VBA mastery.
Activity 4
-
-
- Create a new Excel workbook.
- Manually add values to the cells in sheet1 as follows: 20 to C1 and 80 to C2.
- Create a new sub called Act4.
- Write code to place the value from C1 in cell A1.
- Write code to place the result of C2 + 50 in cell A2.
- Write code to multiply the values in cells C1 and C2. Place the results in cell A3.
- Run the code. Cells should have the values A1 20, A2 130 and A3 1600
-
End of Activity 4
Cells in Different Sheets
We can easily copy between cells on different worksheets. It is very similar to how we copy cells on the same worksheet. The only difference is the worksheet names which we use in our code.
In the next VBA Tutorial activity, we are going to write between cells on different worksheets.
Activity 5
-
-
- Add a new worksheet to the workbook from the last activity. You should now have two worksheets called which are called Sheet1 and Sheet2.
- Create a new sub called Act5.
- Add code to copy the value from C1 on Sheet1 to cell A1 on Sheet2.
- Add code to place the result from C1 + C2 on Sheet1 to cell A2 on Sheet2.
- Add code to place the result from C1 * C2 on Sheet1 to cell A3 on Sheet2.
- Run the code in the sub(F5). Cells on Sheet2 should have the values as follows:
A1 20, A2 100 and A3 1600
-
End of Activity 5
The Code Name of the Worksheet
In the activities so far, we have been using the default names of the worksheet such as Sheet1 and Sheet2. It is considered good practice to give these sheets more meaningful names.
We do this by changing the code name of the worksheet. Let’s look at the code name and what it is.
When you look in the Project – VBAProject window for a new workbook you will see Sheet1 both inside and outside of parenthesis:

-
-
- Sheet1 on the left is the code name of the worksheet.
- Sheet1 on the right(in parenthesis) is the worksheet name. This is the name you see on the tab in Excel.
-
The code name has the following attributes
-
-
- We can use it to directly reference the worksheet as we have been doing e.g.
-
Sheet1.Range("A1")
Note: We can only use the code name if the worksheet is in the same workbook as our code.
-
-
- If the worksheet name is changed our code will still work if we are using the code name to refer to the sheet.
-
The worksheet name has the following attributes
-
-
- To reference the worksheet using the worksheet name we need to use the worksheets collection of the workbook. e.g.
-
ThisWorkbook.Worksheets("Sheet1").Range("A1")
-
-
- If the worksheet name changes then we need to change the name in our code. For example, if we changed the name of our sheet from Sheet1 to Data then we would need to change the above code as follows
-
ThisWorkbook.Worksheets("Data").Range("A1")
We can only change the code name in the Properties window.
We can change the worksheet name from both the worksheet tab in Excel and from the Properties window.


In the next activity, we will change the code name of the worksheet.
Activity 6
-
-
- Open a new blank workbook and go to the Visual Basic editor.
- Click on Sheet1 in the Project – VBAProject Window(Ctrl + R if not visible).
- Go to the Properties window(F4 if not visible).
- Change the code name of the worksheet to shReport.
- Create a new module and call it modAct6.
- Add the following sub and run it(F5)
-
Sub UseCodename()
    shReport.Range("A1") = 66
End Sub
-
-
- Then add the following sub and run it(F5)
-
Sub UseWorksheetname()
    ThisWorkbook.Worksheets("Sheet1").Range("B2") = 55
End Sub
-
-
- Cell A1 should now have the value 66 and cell B2 should have the value 55.
- Change the name of the worksheet in Excel to Report i.e. right-click on the worksheet tab and rename.
- Delete the contents of the cells and run the UseCodename code again. The code should still run correctly.
- Run the UseWorksheetname sub again. You will get the error “Subscript out of Range”. This cryptically sounding error simply means that there is no worksheet called Sheet1 in the worksheets collection.
- Change the code as follows and run it again. The code will now run correctly.
-
Sub UseWorksheetname()
    ThisWorkbook.Worksheets("Report").Range("B2") = 55
End Sub
The With keyword
You may have noticed in this VBA Tutorial that we need to use the worksheet name repeatedly – each time we refer to a range in our code.
Imagine there was a simpler way of writing the code. Where we could just mention the worksheet name once and VBA would apply to any range we used after that. The good news is we can do exactly that using the With statement.
In VBA we can take any item before a full stop and use the With statement on it. Let’s rewrite some code using the With statement.
The following code is pretty similar to what we have been using so far in this VBA Tutorial:
' https://excelmacromastery.com/
Sub WriteValues()

    Sheet1.Range("A1") = Sheet1.Range("C1")
    Sheet1.Range("A2") = Sheet1.Range("C2") + 50
    Sheet1.Range("A3") = Sheet1.Range("C1") * Sheet1.Range("C2")

End Sub
Let’s update this code using the With statement:
' https://excelmacromastery.com/
Sub UsingWith()

    With Sheet1
        .Range("A1") = .Range("C1")
        .Range("A2") = .Range("C2") + 50
        .Range("A3") = .Range("C1") * .Range("C2")
    End With

End Sub
We use With and the worksheet to start the section. Anywhere VBA finds a full stop it knows to use the worksheet before it.
We can use the With statement with other types of objects in VBA including workbooks, ranges, charts and so on.
We signify the end of the With section by using the line End With.
Indenting(Tabbing) the Code
You will notice that the lines of code between the start and end With statments are tabbed once to right. We call this indenting the code.
We always indent the code between VBA sections that have a starting line and end line. Examples of these are as subs, the With statement, the If statement and the For loop.
You can tab the lines of code to the right by selecting the appropriate lines of code and pressing the Tab key. Pressing Shift and Tab will tab to the left.
Tabbing(or indenting) is useful because it makes our code more readable.
Activity 7
-
-
- Rewrite the following code using the With statement. Don’t forget to indent the code.
-
' https://excelmacromastery.com/
Sub UseWith()

Sheet1.Range("A1") = Sheet1.Range("B3") * 6
Sheet1.Cells(2, 1) = Sheet1.Range("C2") + 50
Sheet1.Range("A3") = Sheet2.Range("C3")


End Sub
End of Activity 7
Copying values between multiple cells
You can copy the values from one range of cells to another range of cells as follows
Sheet2.Range("A1:D4") = Sheet2.Range("G2:I5").Value
It is very important to notice than we use the Value property of the source range. If we leave this out it will write blank values to our destination range.
' the source cells will end up blank because Value is missing
Sheet2.Range("A1:D4") = Sheet2.Range("G2:I5")
The code above is a very efficient way to copy values between cells. When people are new to VBA they often think they need to use some form of select, copy and paste to copy cell values. However these are slow, cumbersome and unnecessary.
It is important that both the destination and source ranges are the same size.
-
-
- If the destination range is smaller then only cell in the range will be filled. This is different to copy/pasting where we only need to specify the first destination cell and Excel will fill in the rest.
- If the destination range is larger the extra cells will be filled with #N/A.
-
Activity 8
-
-
- Create a new blank workbook in Excel.
- Add a new worksheet to this workbook so there are two sheets – Sheet1 and Sheet2.
- Add the following data to the range C2:E4 on Sheet1
-

-
-
- Write code to copy the data from Sheet1 to the range B3:D5 on Sheet2.
- Run the code(F5).
- Clear the results and then change the destination range to be smaller than the source range. Run again and check the results.
- Clear the results and then change the destination range to be larger than the source range. Run again and check the results.
-
End of Activity 8
Transposing a Range of Cells
If you need to transpose the date(convert from row to column and vice versa) you can use the WorksheetFunction Transpose.
Place the values 1 to 4 in the cells A1 to A4. The following code will write the values to E1 to H1
Sheet1.Range("E1:H1") = WorksheetFunction.Transpose(Sheet1.Range("A1:A4").Value)
The following code will read from E1:H1 to L1:L4
Sheet1.Range("L1:L4") = WorksheetFunction.Transpose(Sheet1.Range("E1:H1").Value)
You will notice that these lines are long. We can split one line over multiple lines by using the underscore(_) e.g.
Sheet1.Range("E1:H1") = _
    WorksheetFunction.Transpose(Sheet1.Range("A1:A4").Value)
Sheet1.Range("L1:L4") = _
    WorksheetFunction.Transpose(Sheet1.Range("E1:H1").Value)
How to Use Variables
So far in this VBA Tutorial we haven’t used variables. Variables are an essential part of every programming language.
So what are they and why do you need them?
Variables are like cells in memory. We use them to store temporary values while our code is running.
We do three things with variables
-
-
- Declare(i.e. Create) the variable.
- Store a value in the variable.
- Read the value stored in the variable.
-
The variables types we use are the same as the data types we use in Excel.
The table below shows the common variables. There are other types but you will rarely use them. In fact you will probably use Long and String for 90% of your variables.
| Type | Details |
|---|---|
| Boolean | Can be true or false only |
| Currency | same as decimal but with 4 decimal places only |
| Date | Use for date/time |
| Double | Use for decimals |
| Long | Use for integers |
| String | Use for text |
| Variant | VBA will decide the type at runtime |
Declaring Variables
Before we use variables we should create them. If we don’t then we can run into various problems.
By default, VBA doesn’t make you declare variables. However, we should turn this behaviour on as it will save us a lot of pain in the long run.
To turn on “Require Variable Declaration” we add the following line to the top of our module
Option Explicit
To get VBA to automatically add this line, select Tools->Options from the menu and check Require Variable Declaration. Anytime you create a new module, VBA will add this line to the top.

Declaring a variable is simple. We use the format as follows
Dim variable_name As Type
We can use anything we like as the variable name. The type is one of the types from the table above. Here are some examples of declarations
Dim Total As Long
Dim Point As Double
Dim Price As Currency
Dim StartDate As Date
Dim CustomerName As String
Dim IsExpired As Boolean
Dim Item As Variant
To place a value in a variable we use the same type of statement we previously used to place a value in a cell. This is the statement with the equals sign:
' https://excelmacromastery.com/
Sub DeclaringVars()

    Dim Total As Long
    Total = 1

    Dim Price As Currency
    Price = 29.99

    Dim StartDate As Date
    StartDate = #1/21/2018#

    Dim CustomerName As String
    CustomerName = "John Smith"

End Sub
Activity 9
-
-
- Create a new sub and call it UsingVariables.
- Declare a variable for storing a count and set the value to 5.
- Declare a variable for storing the ticket price and set the value to 99.99.
- Declare a variable for storing a country and set the value to “Spain”.
- Declare a variable for storing the end date and set the value to 21st March 2020.
- Declare a variable for storing if something is completed. Set the value to False.
-
End of Activity 9
The Immediate Window
VBA has a real nifty tool that allows us to check our output. This tool is the Immediate Window. By using the Debug.Print we can write values, text and results of calculations to the Immediate Window.
To view this window you can select View->Immediate Window from the menu or press Ctrl + G.
The values will be written even if the Immediate Window is not visible.

We can use the Immediate Window to write out our variables so as to check the values they contain.
If we update the code from the last activity we can write out the values of each variable. Run the code below and check the result in the Immediate Window(Ctrl + G if not visible).
' https://excelmacromastery.com/
Sub WritingToImmediate()

    Dim count As Long
    count = 5
    Debug.Print count

    Dim ticketprice As Currency
    ticketprice = 99.99
    Debug.Print ticketprice

    Dim country As String
    country = "Spain"
    Debug.Print country

    Dim enddate As Date
    enddate = #3/21/2020#
    Debug.Print enddate

    Dim iscompleted As Boolean
    iscompleted = False
    Debug.Print iscompleted

End Sub
The Immediate is very useful for testing output before we write it to worksheets. We will be using it a lot in these tutorials.
Writing between variables and cells
We can write and read values between cells and cells, cells and variables,and variables and variables using the assignment line we have seen already.
Here are some examples
' https://excelmacromastery.com/
Sub VariablesCells()

    Dim price1 As Currency, price2 As Currency

    ' place value from A1 to price1
    price1 = Sheet1.Range("A1")

    ' place value from price1 to price2
    price2 = price1

    ' place value from price2 to cell b2
    Sheet1.Range("B2") = price2

    ' Print values to Immediate window
    Debug.Print "Price 1 is " & price1
    Debug.Print "Price 2 is " & price2

End Sub
Activity 10
-
-
- Create a blank workbook and a worksheet so it has two worksheets: Sheet1 and Sheet2.
- Place the text “New York” in cell A1 on Sheet1. Place the number 49 in cell C1 on Sheet2.
- Create a sub that reads the values into variables from these cells.
- Add code to write the values to the Immediate window.
-
End of Activity 10
Type Mismatch Errors
You may be wondering what happens if you use an incorrect type. For example, what happens if you read the number 99.55 to a Long(integer) variable type.
What happens is that VBA does it best to convert the variable. So if we assign the number 99.55 to a Long type, VBA will convert it to an integer.
In the code below it will round the number to 100.
Dim i As Long
i = 99.55
VBA will pretty much convert between any number types e.g.
' https://excelmacromastery.com/
Sub Conversion()

    Dim result As Long

    result = 26.77
    result = "25"
    result = 24.55555
    result = "24.55"
    Dim c As Currency
    c = 23
    c = "23.334"
    result = 24.55
    c = result

End Sub
However, even VBA has it’s limit. The following code will result in Type Mismatch errors as VBA cannot convert the text to a number
' https://excelmacromastery.com/
Sub Conversion()

    Dim result As Long

    result = "26.77A"

    Dim c As Currency
    c = "a34"

End Sub
Tip: The Type Mismatch error is often caused by a user accidentally placing text in a cell that should have numeric data.
Activity 11
-
-
- Declare a Double variable type called amount.
- Assign a value that causes a Type Mismatch error.
- Run the code and ensure the error occurs.
-
End of Activity 11
VBA Tutorial Assignment
We’ve covered a lot of stuff in this tutorial. So let’s put it all together in the following assignment
Tutorial One Assignment
I have created a simple workbook for this assignment. You can download it using the link below
Tutorial One Assignment Workbook
Open the assignment workbook. You will place your code here
-
-
- Create a module and call it Assignment1.
- Create a sub called Top5Report to write the data in all the columns from the top 5 countries to the Top 5 section in the Report worksheet. This is the range starting at B3 on the Report worksheet. Use the code name to refers to the worksheets.
- Create a sub call AreaReport to write all the areas size to the All the Areas section in the Report worksheet. This is the range H3:H30. Use the worksheet name to refer to the worksheets.
- Create a sub called ImmediateReport as follows, read the area and population from Russia to two variables. Print the population per square kilometre(pop/area) to the Immediate Window.
- Create a new worksheet and call it areas. Set the code name to be shAreas. Create a sub called RowsToCols that reads all the areas in D2:D11 from Countries worksheet and writes them to the range A1:J1 in the new worksheet Areas.
-
End of Tutorial Assignment
The following quiz is based on what we covered this tutorial.
VBA Tutorial One Quiz
1. What are the two main differences between the code name and the worksheet name?
2. What is the last line of a Sub?
3. What statement shortens our code by allowing us to write the object once but refer to it multiple times?
4. What does the following code do?
Sheet1.Range("D1") = result
5. What does the following code do?
Sheet1.Range("A1:C3") = Sheet2.Range("F1:H3")
6. What is the output from the following code?
Dim amount As Long
amount = 7

Debug.Print (5 + 6)  * amount
7. What is the output from the following code?
Dim amt1 As Long, amt2 As Long

amt1 = "7.99"
Debug.Print amt1

amt2 = "14a"
Debug.Print amt2
8. If we have 1,2 and 3 in the cells A1,A2 and A3 respectively, what is the result of the following code?
Sheet1.Range("B1:B4") = Sheet1.Range("A1:A3").Value
9. What does the shortcut key Alt + F11 do?
10. In the following code we declare a variable but do not assign it a value. what is the output of the Debug.Print statement?
Dim amt As Long

Debug.Print amt
Conclusion of the VBA Tutorial Part One
Congratulations on finishing tutorial one. If you have completed the activities and the quiz then you will have learned some important concepts that will stand to you as you work with VBA.
In the Tutorial 2, we are going to deal with ranges where the column or row may differ each time the application runs. In this tutorial, we will cover
-
-
- How to get the last row or column with data.
- The amazingly efficient CurrentRegion property.
- How to use flexbile rows and columns.
- When to use Range and when to use Cells.
- and much more…
-
.
Please note: that Tutorials 2 to 4 are available as part of the VBA Fundamentals course in the membership section.
What’s Next?
Planning to build or manage a VBA Application? Learn how to build 10 Excel VBA applications from scratch.