
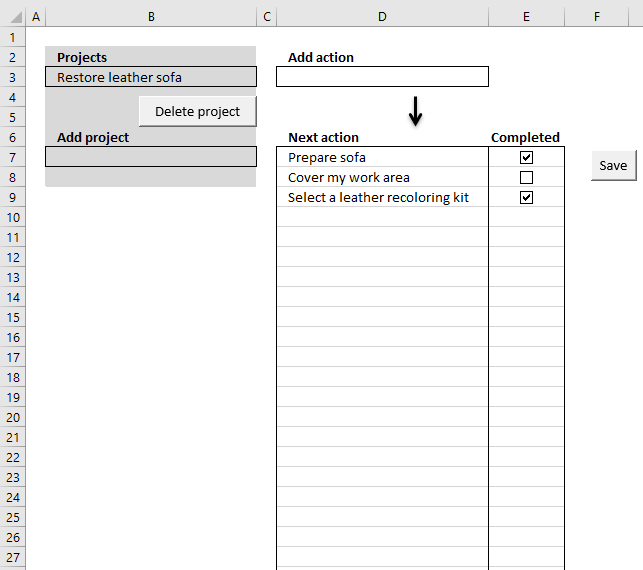
Элемент управления пользовательской формы Image, используемый в VBA Excel для добавления на форму изображения. Свойства элемента управления Image.
Image – это элемент управления пользовательской формы, предназначенный для отображения на форме изображения в формате *. bmp, *. gif, *. jpg, *. wmf, *. emf, *. ico, *. dib, *. cur.
Добавить изображение на пользовательскую форму можно и с помощью элемента управления Label, но качество, в некоторых случаях, может быть неудовлетворительным. На скриншоте ниже одинаковые изображения в формате «*. jpg» добавлены с помощью элемента управления Image – слева и Label – справа:

Основное отличие элемента управления Image от элемента управления Label заключается в поведении изображения при уменьшении размеров Image и Label до размеров меньше размеров изображения:
- изображение в элементе управления Image обрезается;
- изображение в элементе управления Label уменьшается с нарушением пропорций, подстраиваясь под новый размер элемента управления.
Изображение в элементе управления Image будет вести себя также, как в Label, если установить свойство Image.PictureSizeMode равным fmPictureSizeModeStretch.
Свойства элемента Image
| Свойство | Описание |
|---|---|
| AutoSize | Автоподбор размера элемента управления Image под размер изображения. True – размер автоматически подстраивается под изображение. False – размер элемента управления определяется свойствами Width и Height (по умолчанию), а поведение изображения зависит от свойства PictureSizeMode. |
| BackColor | Цвет заливки (фона) элемента управления Image, отображается при отсутствии изображения и на полях вокруг изображения. |
| BackStyle | Задает стиль заливки (фона) элемента управления Image: fmBackStyleTransparent (0) – фон прозрачный, fmBackStyleOpaque (1) – фон непрозрачный (по умолчанию). |
| BorderColor | Цвет рамки элемента управления. |
| BorderStyle | Стиль рамки элемента управления. |
| ControlTipText | Текст всплывающей подсказки при наведении курсора на изображение. |
| Enabled | Возможность взаимодействия пользователя с элементом управления Image. True – взаимодействие включено, False – отключено. |
| Height | Высота элемента управления. |
| Left | Расстояние от левого края внутренней границы пользовательской формы до левого края элемента управления. |
| Picture | Адрес добавляемого изображения. |
| PictureAlignment | Выравнивание изображения на элементе управления Image. |
| PictureSizeMode | Способ изменения размеров изображения в зависимости от размеров элемента управления Image. fmPictureSizeModeClip (0) – рисунок обрезается или добавляются поля (по умолчанию), fmPictureSizeModeStretch (1) – рисунок растягивается или сжимается с нарушением пропорций, заполняя собой всю площадь элемента управления Image, fmPictureSizeModeZoom (3) – рисунок растягивается или сжимается с сохранением пропорций и добавлением компенсирующих полей. |
| PictureTiling | Задает размещение изображения мозаичным способом по всему элементу управления. True – изображение размещается мозаичным способом, False – изображение размещается обычным способом (по умолчанию). |
| SpecialEffect | Определяет внешний вид элемента управления. |
| Top | Расстояние от верхнего края внутренней границы пользовательской формы до верхнего края элемента управления. |
| Visible | Видимость элемента управления Image. True – элемент управления отображается на пользовательской форме, False – скрыт. |
| Width | Ширина элемента управления. |
Примеры добавления изображений
Пример 1
Добавление изображения на элемент управления Image при загрузке пользовательской формы:
|
Private Sub UserForm_Initialize() Me.Image1.Picture = LoadPicture(«C:ФотографииПриродаБерезовая роща.jpg») End Sub |
Пример 2
Добавление изображения на элемент управления Image по адресу, записанному в ячейку таблицы Excel:
|
Private Sub CommandButton1_Click() UserForm1.Image1.Picture = LoadPicture(Worksheets(«Лист1»).Cells(1, 6)) End Sub |
I tried to imitate the original function of ‘Change Picture’ with VBA in PowerPoinT(PPT)
The code below tries to recover following properties of the original picture:
— .Left, .Top, .Width, .Height
— zOrder
— Shape Name
— HyperLink/ Action Settings
— Animation Effects
Option Explicit

Sub ChangePicture()

    Dim sld As Slide
    Dim pic As Shape, shp As Shape
    Dim x As Single, y As Single, w As Single, h As Single
    Dim PrevName As String
    Dim z As Long
    Dim actions As ActionSettings
    Dim HasAnim As Boolean
    Dim PictureFile As String
    Dim i As Long

    On Error GoTo ErrExit:
    If ActiveWindow.Selection.Type <> ppSelectionShapes Then MsgBox "Select a picture first": Exit Sub
    Set pic = ActiveWindow.Selection.ShapeRange(1)
    On Error GoTo 0

    'Open FileDialog
    With Application.FileDialog(msoFileDialogFilePicker)
        .AllowMultiSelect = False
        .Filters.Clear
        .Filters.Add "Picture File", "*.emf;*.jpg;*.png;*.gif;*.bmp"
        .InitialFileName = ActivePresentation.Path & ""
        If .Show Then PictureFile = .SelectedItems(1) Else Exit Sub
    End With

    'save some properties of the original picture
    x = pic.Left
    y = pic.Top
    w = pic.Width
    h = pic.Height
    PrevName = pic.Name
    z = pic.ZOrderPosition
    Set actions = pic.ActionSettings    'Hyperlink and action settings
    Set sld = pic.Parent
    If Not sld.TimeLine.MainSequence.FindFirstAnimationFor(pic) Is Nothing Then
        pic.PickupAnimation 'animation effect <- only supported in ver 2010 above
        HasAnim = True
    End If

    'insert new picture on the slide
    Set shp = sld.Shapes.AddPicture(PictureFile, False, True, x, y)

    'recover original property
    With shp
        .Name = "Copied_ " & PrevName

        .LockAspectRatio = False
        .Width = w
        .Height = h

        If HasAnim Then .ApplyAnimation 'recover animation effects

        'recover shape order
        .ZOrder msoSendToBack
        While .ZOrderPosition < z
            .ZOrder msoBringForward
        Wend

        'recover actions
        For i = 1 To actions.Count
            .ActionSettings(i).action = actions(i).action
            .ActionSettings(i).Run = actions(i).Run
            .ActionSettings(i).Hyperlink.Address = actions(i).Hyperlink.Address
            .ActionSettings(i).Hyperlink.SubAddress = actions(i).Hyperlink.SubAddress
        Next i

    End With

    'delete the old one
    pic.Delete
    shp.Name = Mid(shp.Name, 8)  'recover name

ErrExit:
    Set shp = Nothing
    Set pic = Nothing
    Set sld = Nothing

End Sub
How to use:
I suggest you to add this macro into the Quick Access Toolbar list.
(Goto Option or Right-click on the Ribbon menu))
First, select a Picture on the slide which you want to change.
Then, if the FileDialog window opens, choose a new picture.
It’s done. By using this method, you can bypass the ‘Bing Search and One-Drive Window’ in ver 2016 when you want to change a picture.
In the code, there might(or should) be some mistakes or something missing.
I’d appreciate it if somebody or any moderator correct those errors in the code.
But mostly, I found that it works fine.
Also, I admit that there are still more properties of the original shape to recover — like the line property of the shape, transparency, pictureformat and so on.
I think this can be a beginning for people who want to duplicate those TOO MANY properties of a shape.
I hope this is helpful to somebody.
|
nerf Пользователь Сообщений: 104 |
Здравствуйте, подскажите пожалуйста, как можно с помощью средств vba перекрасить рисунок в какой ни будь другой цвет. В excel 7 запускаю запись макроса, на панели быстрого доступа выбираю формат / перекрасить / другие варианты, выбираю любой из цветов, рисунок перекрашивается, но макроредактором ничего не записывается. Думаю, нет смысла прикреплять пример. Искал в поисковиках и по форуму, но ничего схожего не нашел, только лишь форматирование цвета фигур. |
|
Jack Famous  Пользователь Сообщений: 10848 OS: Win 8.1 Корп. x64 | Excel 2016 x64: | Browser: Chrome |
#2 19.03.2018 19:17:28 здравствуйте
ошибаетесь Изменено: Jack Famous — 19.03.2018 19:17:45 Во всех делах очень полезно периодически ставить знак вопроса к тому, что вы с давних пор считали не требующим доказательств (Бертран Рассел) ►Благодарности сюда◄ |
||
|
Catboyun  Пользователь Сообщений: 1631 |
#3 19.03.2018 19:28:36
возможно и нет
2007
таки да, |
||||||
|
nerf Пользователь Сообщений: 104 |
Рисунок состоит из вставленного обычного изображения, жму курсивом мышки на рисунок, на панели быстрого доступа выбираю формат / перекрасить / другие варианты, выбираю цвет и рисунок меняет цвет. Если делаю тоже самое, но с записью макроса, то код макроса по итогу получается пустой. Возможно, такое не предусмотрено возможностями офиса.. В файле два изображения, первый изначальный рисунок, а второй после того как вручную в экселе перекрасил. Прикрепленные файлы
|
|
Jack Famous Пользователь Сообщений: 10848 OS: Win 8.1 Корп. x64 | Excel 2016 x64: | Browser: Chrome |
nerf, а можно поинтересоваться, зачем делать в Excel то, для чего он не предназначен… Во всех делах очень полезно периодически ставить знак вопроса к тому, что вы с давних пор считали не требующим доказательств (Бертран Рассел) ►Благодарности сюда◄ |
|
nerf Пользователь Сообщений: 104 |
Jack Famous, про программы знаю, но было желательно выполнять перекрашивание в рамках экселя. Решения данного вопроса не нашел, но сейчас нашел как обойтись без перекрашивания. Но если кто сталкивался с тем же чем и я, и знает решение данного вопроса, то может кому ни будь пригодится ответ на вопрос. Принципе можно тему закрывать) |
|
Андрей VG  Пользователь Сообщений: 11878 Excel 2016, 365 |
Доброе время суток Shape.Fill.PictureEffects |
|
Anchoret Пользователь Сообщений: 1059 Anchoret |
#8 19.03.2018 20:45:47 Изменить фон:
|
||
|
Jungl  Пользователь Сообщений: 830 |
#9 19.03.2018 20:47:00 nerf, открыл ваш пример, оба одинаковых рисунка Вам типа этого нужно?
|
||
|
БМВ  Модератор Сообщений: 21378 Excel 2013, 2016 |
nerf, MSDN говорит что метод recolor доступен только в Publisher. Следовательно, могу допустить что то, что задумано , не получится прямым методом. Изменено: БМВ — 19.03.2018 21:06:36 По вопросам из тем форума, личку не читаю. |
|
nerf Пользователь Сообщений: 104 |
Андрей VG, спасибо, можно попробовать покопаться возможно что ни будь получится))) |
|
nerf Пользователь Сообщений: 104 |
Anchoret, Jungl, в ваших случаях перекрашивается фон, а было задумано чтобы перекрашивался сам рисунок, так же как если перекрашивать через свойства «перекрасить», но все равно спасибо)) БМВ, я тоже уже больше склоняюсь к вашему мнению. |
|
Dima S  Пользователь Сообщений: 2063 |
#13 12.09.2019 02:21:15 Теме больше года, но может кому то пригодится как вариант:
где Picture 1 — перекрашеный рисунок-шаблон. |
||
Author: Oscar Cronquist Article last updated on January 21, 2020

Rahul asks:
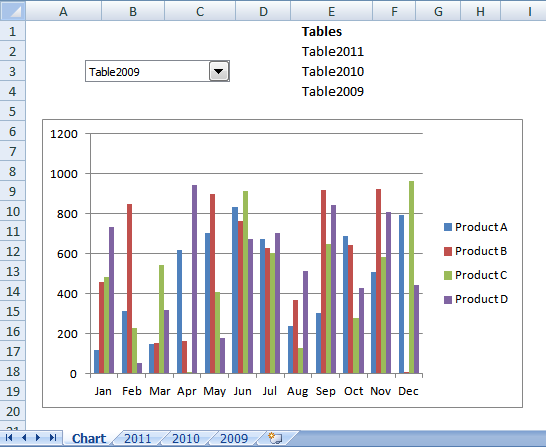
I want to know how to create a vlookup sheet, and when we enter a name in a cell Excel shows all the details and a photo.
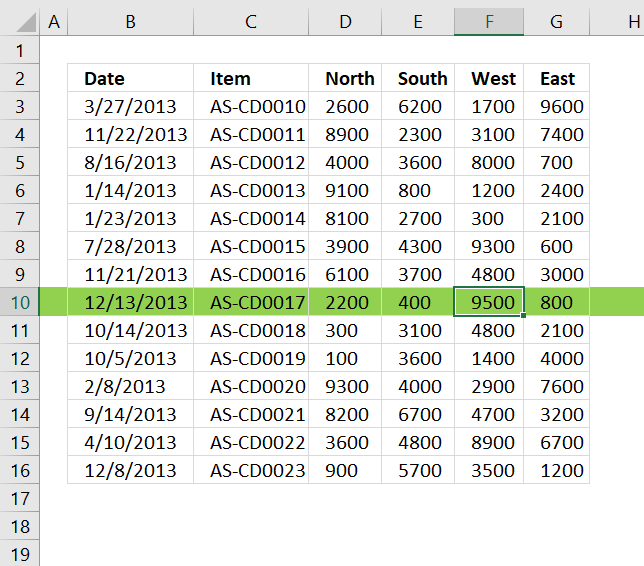
The formula in cell C4 uses the value in cell C2 to lookup the correct region specified in the «Data» worksheet. You can easily add more details using this approach for example in cell D4.
Formula in cell C4:
=INDEX(Data!B2:B9,MATCH(C2,Data!A2:A9,0))
The MATCH function looks for a matching value in cell range A2:A9 in worksheet Data using condition specified in cell C2 located on worksheet «Lookup».
MATCH(C2,Data!A2:A9,0)
becomes
MATCH(«Giraffe», {«Giraffe»; «Rhino»; «Elephant»; «Buffalo»; «Lion»; «Tiger»; «Hippo»; «Cheetah»}, 0)
The third argument is 0 (zero) meaning there must be an exact match or the function returns an error.
MATCH(«Giraffe», {«Giraffe»; «Rhino»; «Elephant»; «Buffalo»; «Lion»; «Tiger»; «Hippo»; «Cheetah»}, 0)
returns 1. The value «Giraffe» is the first value in the array.
The INDEX function returns a value from cell range B2:B9 in worksheet Data using a row argument which we calculated in the previous step.
INDEX(Data!B2:B9,MATCH(C2,Data!A2:A9,0))
becomes
INDEX(Data!B2:B9, 1)
becomes
INDEX({«Africa»; «Africa»; «Africa, Asia»; «Africa»; «Africa, Asia»; «Africa, Asia»; «Africa»; «Africa»}, 1)
and returns «Africa» in cell C4.
The following formula in cell C6 extracts the corresponding file path and file name, however, the value is hidden with the use of cell formatting.
Formula in cell C6:
=INDEX(Data!C2:C9,MATCH(C2,Data!A2:A9,0))
I have hidden the contents in cell C6.
- Select cell C6.
- Press Ctrl + 1 to open the cell formatting dialog box.
- Press with left mouse button on Custom
- Type ;;;
- Press with left mouse button on OK button.
Data sheet
The Data worksheet contains the item names in column A, the details in column B and the file name and file path in column C.
VBA code
'Event code
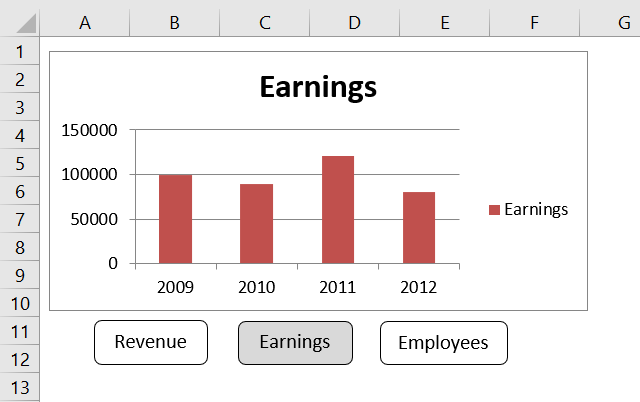
Private Sub Worksheet_Change(ByVal Target As Range)
'Check if cell C2 has been changed
If Target.Address = "$C$2" Then
'Delete the previous image
Shapes(1).Delete
'Insert and select image specified in cell C6
Pictures.Insert(ActiveSheet.Range("C6").Value).Select
'The With ... End With statement allows you to write shorter code by referring to an object only once instead of using it with each property.
With Selection
'Change image height to 120.24 points
.Height = 120.24
'Change image width to 180 points
.Width = 180
'Position image 96.75 points from left border of Excel worksheet
.Left = 96.75
'Position image 90 points from top border of Excel worksheet
.Top = 90
End With
'Select cell C3 of active worksheet
Range("C3").Select
End If
End Sub
The VBA code above is event code meaning it is rund if a cell value changes. Event code is put in a worksheet or a workbook module and not in a regular module, there are detailed instructions below on where to put the code.
The VBA code above is not going to work great if you have other shapes or images placed in the same worksheet.
The following line deletes the first image in the active worksheet and if you have more images the code may delete one of those images which is not ideal.
Shapes(1).Delete
The workaround is to save the image name to another cell which is then used to remove the old image next time the code is rund. This prevents multiple images being inserted on top of each other and keeps the workbook size smaller.
If there is no value in cell D6 the code will error out, to prevent that from happening I have enabled error handling while image being deleted.
'Event code
Private Sub Worksheet_Change(ByVal Target As Range)

'Check if cell C2 has been changed
If Target.Address = "$C$2" Then

    'Enable error handling
    On Error Resume Next

       'Delete image using the name saved in cell D6
       ActiveSheet.Shapes(Range("D6")).Delete

    'Disable error handling
    On Error GoTo 0

    'Insert and select image specified in cell C6
    ActiveSheet.Pictures.Insert(ActiveSheet.Range("C6").Value).Select

    'The With ... End With statement allows you to write shorter code by referring to an object only once instead of using it with each property.
    With Selection

        'Change image height to 120.24 points
        .Height = 120.24

        'Change image width to 180 points
        .Width = 180

        'Position image 96.75 points from left border of Excel worksheet
        .Left = 96.75

        'Position image 90 points from top border of Excel worksheet
        .Top = 90

        'Save image name to cell D6
        Range("D6") = .Name
    End With

    'Select cell C3
    Range("C3").Select
End If
End Sub
Make sure you apply cell formatting to cell D6 as well.
Where to put the VBA event code?

- Press with right mouse button on on the worksheet name.
- Press with left mouse button on «View Code».

- Paste code below to sheet module.
- Exit VB editor.

Note, make sure to save your workbook with file extension *.xlsm in order to keep the code attached to the workbook.
Animated image
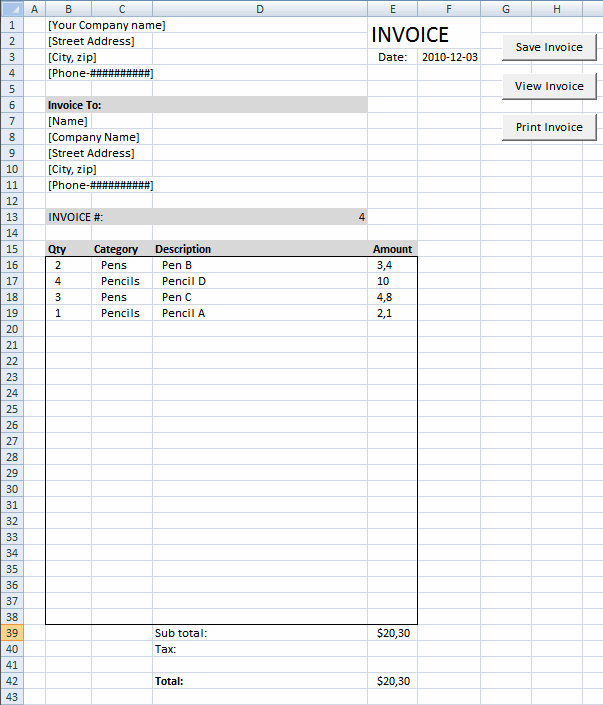
Save invoice data [VBA]
This article demonstrates a macro that copies values between sheets. I am using the invoice template workbook. This macro copies […]
Open Excel files in a folder [VBA]
This tutorial shows you how to list excel files in a specific folder and create adjacent checkboxes, using VBA. The […]
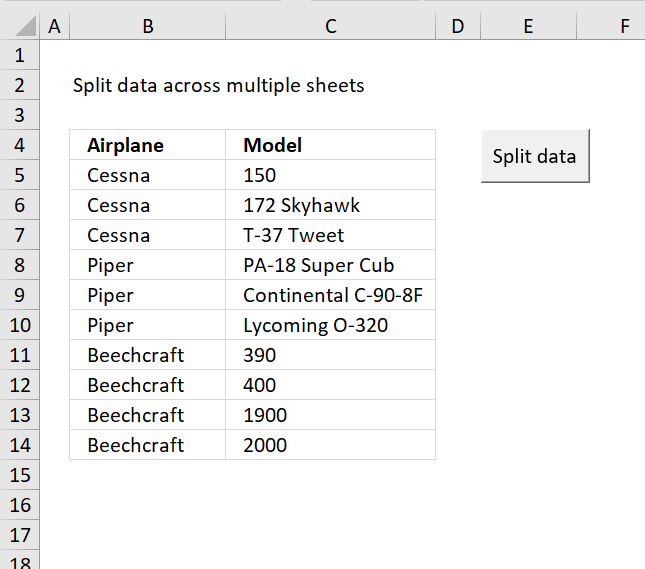
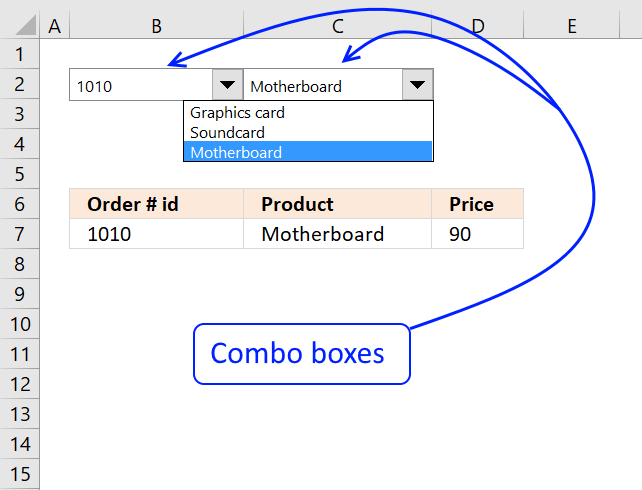
Working with COMBO BOXES [Form Controls]
This blog post demonstrates how to create, populate and change comboboxes (form control) programmatically. Form controls are not as flexible […]
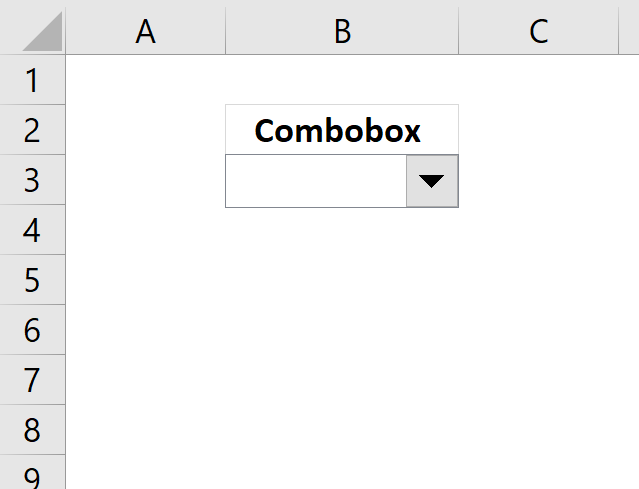
Identify missing numbers in a column
The image above shows an array formula in cell D6 that extracts missing numbers i cell range B3:B7, the lower […]

Excel calendar [VBA]
This workbook contains two worksheets, one worksheet shows a calendar and the other worksheet is used to store events. The […]
Working with FILES
In this blog article, I will demonstrate basic file copying techniques using VBA (Visual Basic for Applications). I will also […]
Auto resize columns as you type
Excel does not resize columns as you type by default as the image above demonstrates. You can easily resize all […]
Create a Print button [VBA]
This article describes how to create a button and place it on an Excel worksheet then assign a macro to […]

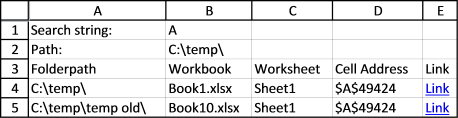
Search all workbooks in a folder
Today I’ll show you how to search all Excel workbooks with file extensions xls, xlsx and xlsm in a given folder for a […]
Save invoice data [VBA]
This article demonstrates a macro that copies values between sheets. I am using the invoice template workbook. This macro copies […]

Open Excel files in a folder [VBA]
This tutorial shows you how to list excel files in a specific folder and create adjacent checkboxes, using VBA. The […]
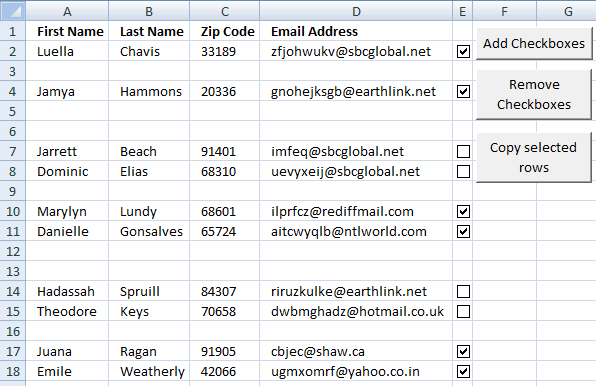
Copy selected rows (checkboxes) (2/2)
This article demonstrates a macro that copies selected rows based on enabled check boxes. The image above shows data on […]
Working with COMBO BOXES [Form Controls]
This blog post demonstrates how to create, populate and change comboboxes (form control) programmatically. Form controls are not as flexible […]
Identify missing numbers in a column
The image above shows an array formula in cell D6 that extracts missing numbers i cell range B3:B7, the lower […]
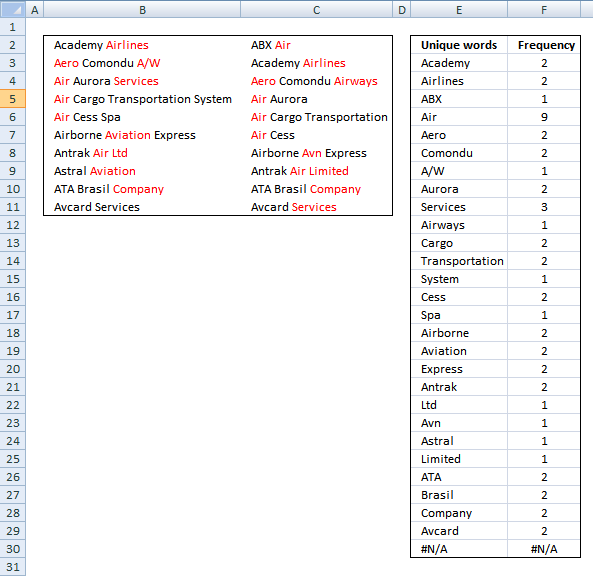
Analyze word frequency in a cell range
This article demonstrates two ways to calculate the number of times each word appears in a given range of cells. […]
Excel calendar [VBA]
This workbook contains two worksheets, one worksheet shows a calendar and the other worksheet is used to store events. The […]
Working with FILES
In this blog article, I will demonstrate basic file copying techniques using VBA (Visual Basic for Applications). I will also […]
Auto resize columns as you type
Excel does not resize columns as you type by default as the image above demonstrates. You can easily resize all […]
Create a Print button [VBA]
This article describes how to create a button and place it on an Excel worksheet then assign a macro to […]
Latest updated articles.
More than 300 Excel functions with detailed information including syntax, arguments, return values, and examples for most of the functions used in Excel formulas.
More than 1300 formulas organized in subcategories.
Excel Tables simplifies your work with data, adding or removing data, filtering, totals, sorting, enhance readability using cell formatting, cell references, formulas, and more.
Allows you to filter data based on selected value , a given text, or other criteria. It also lets you filter existing data or move filtered values to a new location.
Lets you control what a user can type into a cell. It allows you to specifiy conditions and show a custom message if entered data is not valid.
Lets the user work more efficiently by showing a list that the user can select a value from. This lets you control what is shown in the list and is faster than typing into a cell.
Lets you name one or more cells, this makes it easier to find cells using the Name box, read and understand formulas containing names instead of cell references.
The Excel Solver is a free add-in that uses objective cells, constraints based on formulas on a worksheet to perform what-if analysis and other decision problems like permutations and combinations.
An Excel feature that lets you visualize data in a graph.
Format cells or cell values based a condition or criteria, there a multiple built-in Conditional Formatting tools you can use or use a custom-made conditional formatting formula.
Lets you quickly summarize vast amounts of data in a very user-friendly way. This powerful Excel feature lets you then analyze, organize and categorize important data efficiently.
VBA stands for Visual Basic for Applications and is a computer programming language developed by Microsoft, it allows you to automate time-consuming tasks and create custom functions.
A program or subroutine built in VBA that anyone can create. Use the macro-recorder to quickly create your own VBA macros.
UDF stands for User Defined Functions and is custom built functions anyone can create.
A list of all published articles.
|
Динамическое изменение изображения в ячейке |
||||||||
Ответить |
||||||||
Ответить |
||||||||
Ответить |
||||||||
Ответить |
||||||||
Ответить |
||||||||
Ответить |
||||||||
Ответить |

