
Bottom line: Learn 18 tips & shortcuts to save time with writing VBA macros for Excel or other Office applications.
Skill level: Intermediate
At the beginning of last year I wrote a popular post on 17 Excel Shortcuts for 2017. I decided to continue the tradition this year and write a post on tips & shortcuts that will save you time when writing VBA macros.
These are some of my favorite tips, and also some favorites from the blog, YouTube Channel, and my VBA Pro Course. If you’re not familiar with VBA yet, but always wanted to learn, then check out my upcoming webinar on “The Modern Excel Power Tools”.
Check out our new VBA Keyboard Shortcuts List with over 25 shortcuts for the Windows and Mac versions of Excel.
Obviously there are a TON of shortcuts & tips for VBA. So please leave a comment at the bottom of the post with your favorite tips. This way we can all learn from each other! 🙂
Download the PDF
Here is a printable PDF version of the article.
Page Index
- Alt+F11 to Open the VB Editor
- Store Your Macros in The Personal Macro Workbook
- Ctrl+Space to Auto Complete
- Intellisense for Worksheets
- Use Comments Liberally
- F8 to Step Through Each Line of Code
- Assign Macros to Shapes
- Automate Repetitive Tasks with The For Next Loop
- Use Option Explicit
- Excel Tables (ListObjects)
- Get Code with the Macro Recorder
- The Immediate Window
- Assign a Keyboard Shortcut to a Macro
- Check That a Range is Selected
- Ctrl + Y to Delete a Line of Code
- Ctrl + i for Quick Info
- Ctrl+J Opens the Intellisense Drop Down
- Worksheet Functions
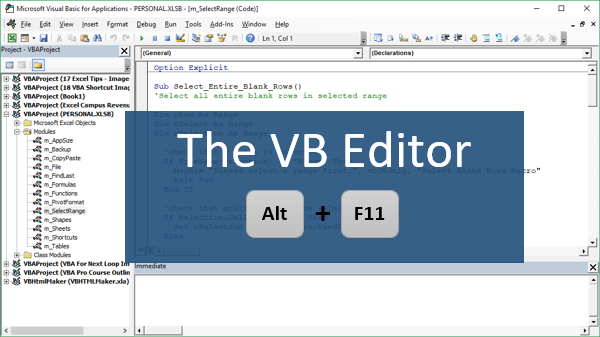
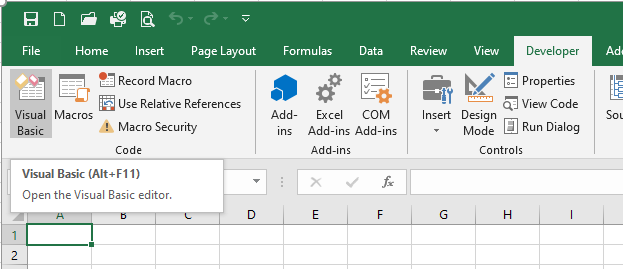
#1 – Alt+F11 to Open the VB Editor
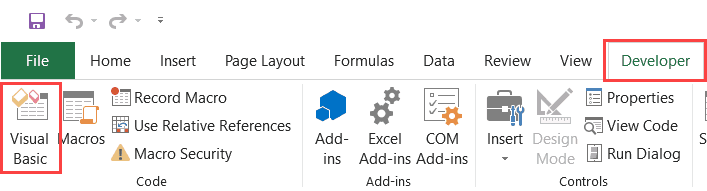
The VB Editor is the application we use to write macros and create userforms. It can be opened by clicking the Visual Basic button on the Developer tab in Excel.
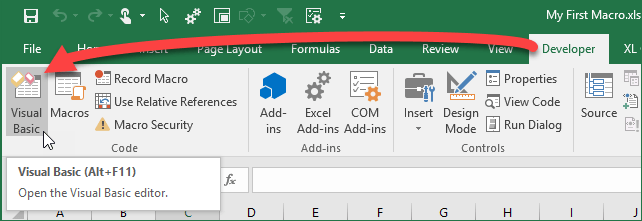
The keyboard shortcut to open the VB Editor in any Windows version of Excel is Alt+F11.
The shortcut in the Mac version is Opt+F11 or Fn+Opt+F11.
If you don’t see the Developer tab in the Ribbon, click the image to learn how to enable it: 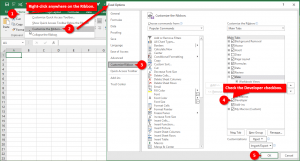
The Fn (Function) Keys on Laptops
If you are using a laptop keyboard then you might also need to press & hold the Fn key before pressing F11. The function keys on laptops are typically multi-use keys, and require the Fn key to be pressed to activate the function keys (F1–F12).
Some laptops have a Fn Lock feature that makes the function keys primary, which means you won’t have to press the Fn key when pressing F1-F12.
Checkout my article on the Best Keyboards for Excel Keyboard Shortcuts to learn more.
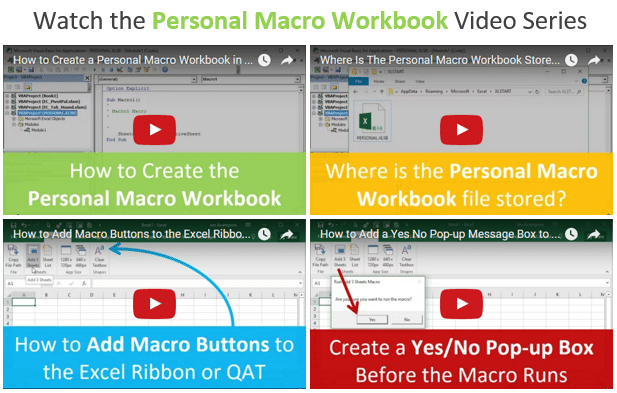
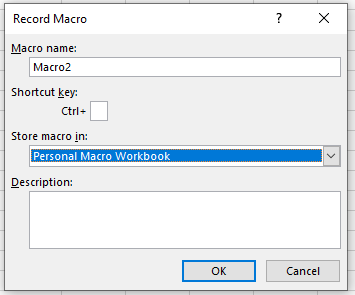
#2 – Store Your Macros in The Personal Macro Workbook
The Personal Macro Workbook (PMW) is a great place to store the macros you use often. This workbook opens in the background every time we open Excel, making our macros easily accessible.
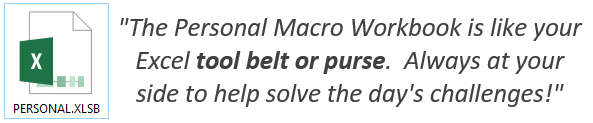
We can also create custom toolbars with buttons to run our macros. I like to think of the PMW as our Excel tool belt that can save us time with task we do every day.
For example, I have an article with a macro that creates a list of unique values on a new blank sheet. We can store this macro in our PMW and assign it to a button in the ribbon or keyboard shortcut, and then run it any time on any open workbook.
Checkout my free video series on how to create your Personal Macro Workbook to learn more. There is also a video in that series on how to add macro buttons to a custom ribbon.
#3 – Ctrl+Space to Auto Complete
This is definitely one of the keyboard shortcuts I use the most in VBA. When we are typing code, Ctrl+Space opens the Intellisense drop-down menu that contains a list of matching objects, properties, methods, constants, and variables.
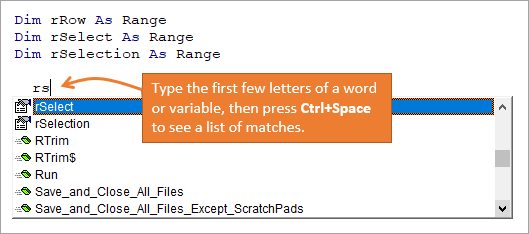
To use the Ctrl+Space shortcut in the VB Editor:
- Start typing a line of code like ActiveCell.
- After typing the first few letters, press Ctrl+Space
- You will see a list of all VBA words that start with Act.
- Press the Up/Down arrows to select the word
- Then press Tab or Enter to complete the word.
There are two major benefits to this shortcut:
- It saves time with having to type long words and variable names.
- It prevents typos because VBA is completing the words for you.
These benefits can be a HUGE time saver when debugging your code.
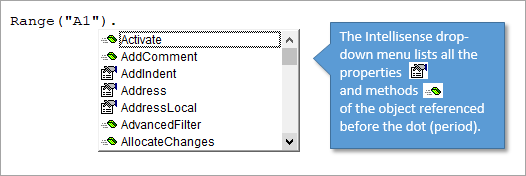
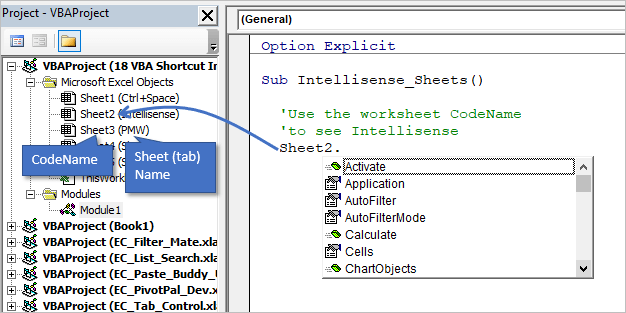
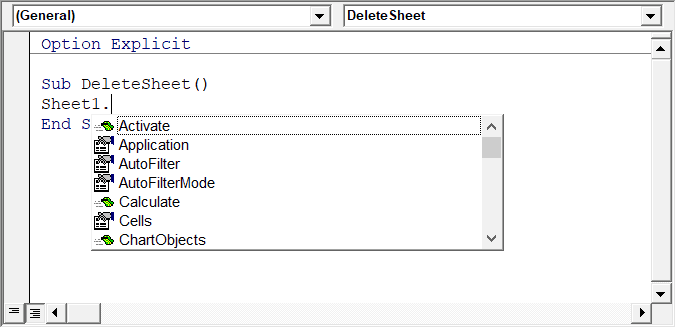
#4 – Intellisense for Worksheets
We typically also see the Intellisense drop-down menu after typing a period (.) in the VB Editor.
However, sometimes it doesn’t work. One common case is with the Worksheets property.
If we type Worksheets("Sheet1"). , we do NOT see the Intellisense menu. This can be frustrating and cause you to think that Intellisense is not working.

The reason it doesn’t work is because the Worksheets property can contain reference to one or multiple sheets. Depending on the reference, the properties and methods will be different for each case. It would be great if Intellisense was still intelligent enough to recognize this, but it’s just one of those things we have to live with…
There are two ways to get around it and see Intellisense for worksheets:
- Use the CodeName of the worksheet we want to reference. This is my preferred method for referencing worksheets because the code will not break if a user changes a sheet name.

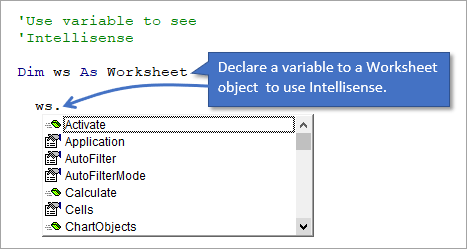
- Set the worksheet to a Worksheets object variable first. Then when we type the variable name followed by a dot (
ws.), the Intellisense menu will appear.
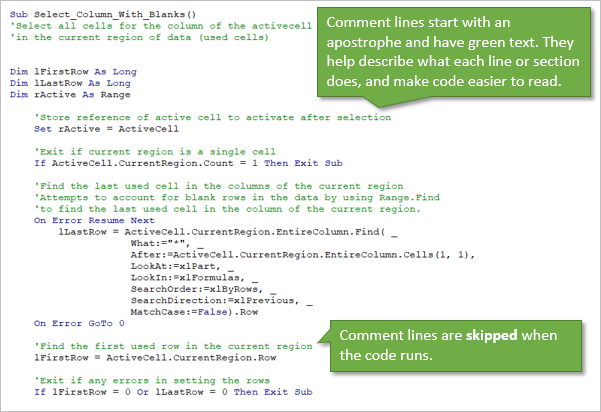
#5 – Use Comments Liberally
We can add comments to our code that help explain what each section of code does.
To create a comment in VBA you type an apostrophe at the beginning of the line. Once you move the text cursor off the line, the text will turn green.
The green text makes it easy to distinguish comments when reading code. VBA completely ignores comment lines, and you can add as many as you’d like.
Commenting your code is somewhat of a controversial topic. Some developers believe that properly written code should speak for itself, and that you don’t need to add extra comments. I see their point, but this doesn’t work for me for two reasons.
- When I come back to my own projects months/years later, I don’t remember what the entire macro does. Comments are like headings in this blog post, and make it easy to scan through the macro to find the section you are looking for. They also quickly tell us what each section does.
- If you are going to share your VBA project or eventually hand it off to someone else for maintenance, then it will be much easier for them to learn your code if you add a lot of comments. I call this “politely planning your legacy”. 🙂
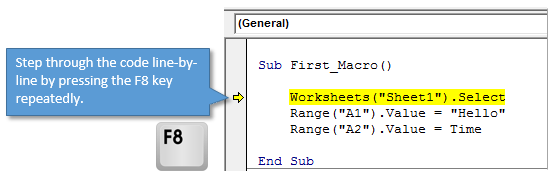
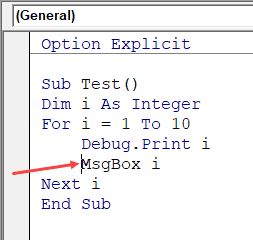
#6 – F8 to Step Through Each Line of Code
The keyboard shortcut to step through each line of code is F8. The Mac equivalent for Step Into/Through is Cmd+Shift+I.
This allows us to test and debug each line of code in our macros. We can also open Excel side-by-side with the VB Editor (or on a separate monitor) to see the actions being performed in Excel as each line runs.
A lot times this can help you quickly find an error with a sheet or range reference.
To use the Step Into/Through shortcut:
- Click inside the macro you want to run. You can click any line of code. The macro will always start at the top.
- Press F8.
- The macro name will be highlighted yellow.
- Press F8 again to run that line and highlight the next line.
- Continue to press F8 to run each line.
It’s important to note that the yellow highlighted line has NOT been run yet. It will be run when you press F8 again.
I cover this technique in more detail in my free upcoming webinar on “The 7 Steps to Getting Started with Macros & VBA”.
#7 – Assign Macros to Shapes
The sheet controls for buttons that run macros are a bit dated looking. Fortunately we can also use any shape in Excel to run a macro. The shapes can be colored and formatted to make them look more like modern buttons you find on the web and mobile apps.
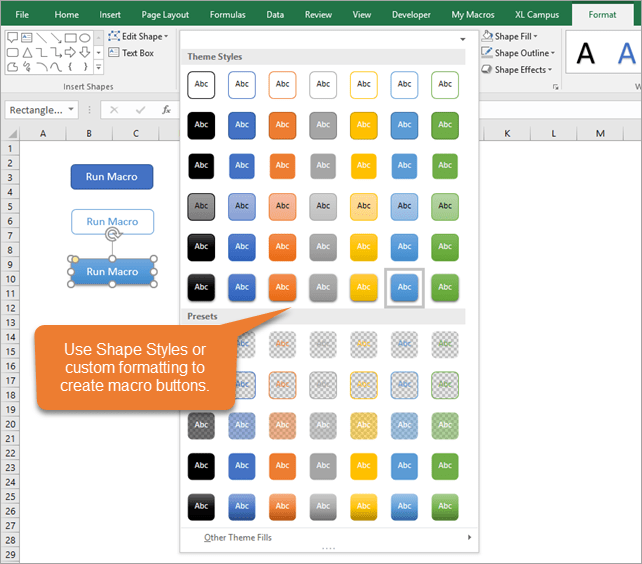
To assign a macro so a shape:
- Insert a shape on a worksheet, and format it to your liking. This will usually be a rectangular or circle shape that contains text.
- Right-click the shape and choose “Assign Macro…”.
- Select the macro from the list and press OK. The macro will usually be one that is stored in the same workbook as the shape.
- Click off the shape by selecting a cell in the worksheet.
- When you hover the shape the cursor will change to the hand pointer. Clicking the shape will run the macro.
I recommend having a Yes/No message box appear before the macro actually runs. This prevents any accidental button presses. Checkout my video on adding a Yes/No message box to your macros. It’s part of my video series on the Personal Macro Workbook.
#8 – Automate Repetitive Tasks with The For Next Loop
We tend to do a lot of the same tasks over and over again in Excel. This can be tasks like: applying formatting to multiple ranges/sheets, creating a list of sheets, copying data to each workbook, setting filters on each pivot table, etc.
Loops are one of the most powerful tools in VBA that allow us to automate these tasks. The loop will loop through each item in a collection (think worksheets in a workbook or cells in a range), and perform whatever code you like on each item.
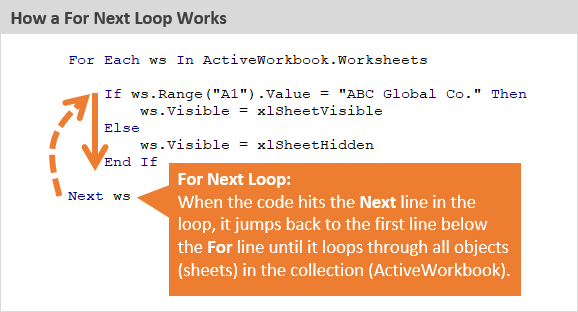
There are a few different types of loops, but the For Next Loop is the most common. Checkout my in-depth article on The For Next Loop in VBA for more details on this must-know coding technique.
In my free upcoming webinar on “The 7 Steps to Getting Started with Macros & VBA”, I explain how to use a For Next Loop to list all the sheets in any workbook. This creates a quick table of contents with a click of a button.
#9 – Use Option Explicit
This is another controversial topic, but I require (politely ask) that all members of my VBA Pro Course use Option Explicit.
So, what is it and why?
Option Explicit requires us to declare all variables. When we see lines of code with Dim statements at the top of a macro, this is declaring a variable.
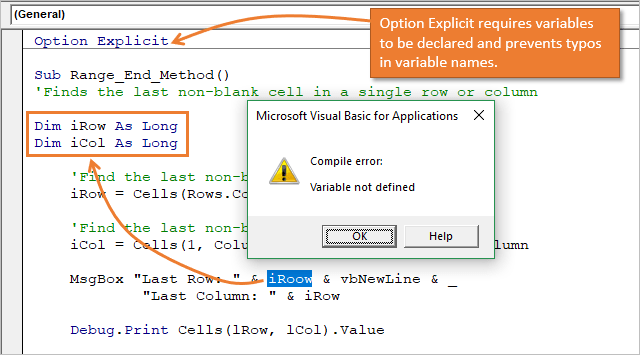
We are basically telling VBA to create the variable in memory to be used later while the code is running. We can then set values or references to objects to these variables in the macro below the Dim statement.
The MAJOR benefit with Option Explicit is that it prevents typos and saves time. The VB Editor will throw a Compile Error: Variable Not Defined when you try to run the code if a variable in the code is not declared. It will also highlight the variable so you can declare it or fix a typo.
If you don’t have Option Explicit on and misspell a variable, the code will still run and can produce errors in the results. If your macro is long then then it can take A LOT of time to find these typos. Trust me. Been there done that!
Option Explicit prevents these errors and helps keep you sane. 🙂
To turn Option Explicit on you simply type the words Option Explicit at the top of the code module. You can also have the VB Editor automatically add the words to new code modules by going to Tools > Options > check the “Require Variable Declaration” checkbox. Option Explicit will now appear at the top of each NEW code module you create.
#10 – Excel Tables (ListObjects)
There are a lot of benefits of using Excel Tables in our workbooks. They save time with formatting data, auto-fill formulas, and work great as the source of a pivot table.
Excel Tables also make it much easier to write VBA code for dynamic ranges of data. This is a list or data set where the number of rows or columns is constantly changing as you get new/updated data.
For example, the following line of code references the cells in range A2:A15.
Range("A2:A10").Font.Bold = True
That is a hard-coded range reference. If you add new data to the bottom, you will have to manually change the code to include the new rows.
However, if we store the data in an Excel Table and reference the Table column, we don’t have to worry about this.
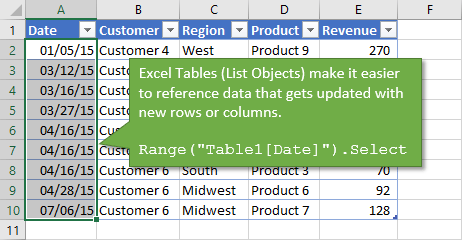
The following line of code references the same column.
Range("Table1[Date]").Font.Bold = True
The advantage here is that the code will automatically include new rows added to the Table. No manual updating or maintenance of the code is needed.
We can also reference Excel Tables with the ListObjects object, properties, and methods in VBA.
ActiveSheet.ListObjects("Table57").ListColumns("Date").DataBodyRange.Font.Bold = True
There are definitely some advantages to using ListObjects when it comes to modifying the Table structure (adding/deleting rows/columns) and properties, and looping through the Table. Checkout my good friend Chris Newman’s article on ListObjects in VBA for more examples.
#11 – Get Code with the Macro Recorder
The Macro Recorder is an amazing feature of Excel and VBA. It creates VBA code as we take actions in Excel.
For example, after we turn the macro recorder on, we can go do our normal work in Excel like writing formulas or copying and pasting data. The macro recorder will create all the VBA code for these actions, and store it in a code module.
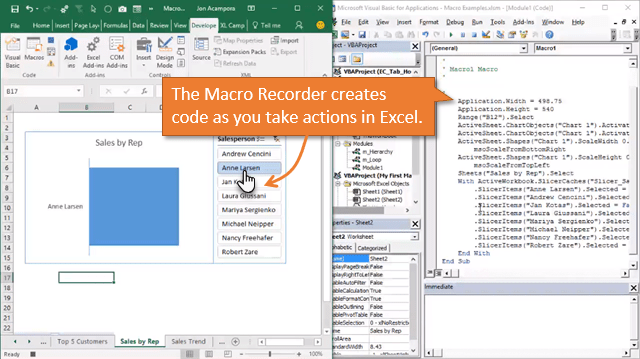
This is a great tool to use when we are first start with macros. And it’s also a great tool for learning and getting snippets of code. The Excel object model is massive, and it’s impossible (for me) to memorize all the property, method, and object references. So the macro recorder is a great way to get some code for a pivot table, list object, slicer, shape, or any other object you are not familiar with.
The macro recorder also has its limitations. It’s NOT going to create code for loops, if statements, error handling, message boxes, etc. We need to learn how to write code to implement these more advanced techniques that allow us to fully automate processes and create applications in Excel.
Checkout my free upcoming webinar on “The 7 Steps to Getting Started with Macros & VBA”.
#12 – The Immediate Window
The Immediate Window in the VB Editor allows us to run a single line of code. We can run an action (method) on an object, or return the result of the code back to the Immediate Window. Maybe we want to determine how many worksheets are in a workbook.
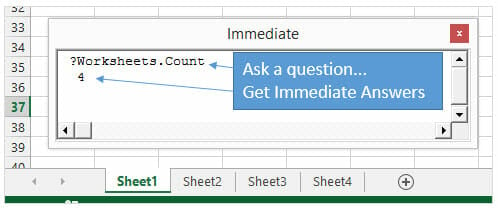
Type ?Worksheets.Count and hit Enter. The result will be displayed on the line below.
The Immediate Window is also the place that the Debug.Print method outputs to.
The keyboard shortcut to open the Immediate Window in the VB Editor is Ctrl+G
Checkout my article on 5 Uses for the Immediate Window in VBA for more details.
#13 – Assign a Keyboard Shortcut to a Macro
We can also assign keyboard shortcuts to run macros that we use frequently. I recommend storing these macros in your Personal Macro Workbook.
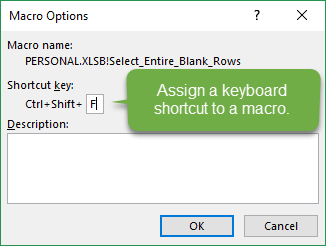
To assign the keyboard shortcut:
- Press the Macros button on the Developer or View Tab in the ribbon.
- Select the file that contains the macro from the Macros In drop down.
- Select the macro from the list box.
- Press the “Options…” button.
- Type the letter in the Shortcut key box that you want to assign the macro to. All shortcuts will start with Ctrl. You can hold the Shift key while typing the letter to create a Ctrl+Shift shortcut. This is usually recommended because most of the Ctrl+key combinations already have dedicated keyboard shortcuts in Excel.
- Press OK and close the macros window.
- You can now press the shortcut key combination to run the assigned macro.
#14 – Check That a Range is Selected
Sometimes you will want to make sure the user has a range (cells) selected before your macro runs. If they have a shape (chart, slicer, etc.) selected then this might cause errors in your code.
For example, I have a macro that deletes the blank rows in the selected range. For this macro to run properly the user needs to have a range of cells selected first.
Here is code that will check if a range is selected.
'Check that a range is selected
If TypeName(Selection) <> "Range" Then
  MsgBox "Please select a range first.", vbOKOnly, "Select Range"
  Exit Sub
End If
The TypeName function returns the data type or name of the object for a given variable or object. In this case it evaluates the Selection and returns the type of object that is selected. If it’s not (<>) a range, then the If statement is true.
You typically want to put this at the top of the macro. If a range is NOT selected then a Message Box (pop-up window) will appear that instructs the user to select a range. The Exit Sub line will end the macro.
#15 – Ctrl + Y to Delete a Line of Code
In the VB Editor, Ctrl+Y deletes the line of code that the text cursor is in.
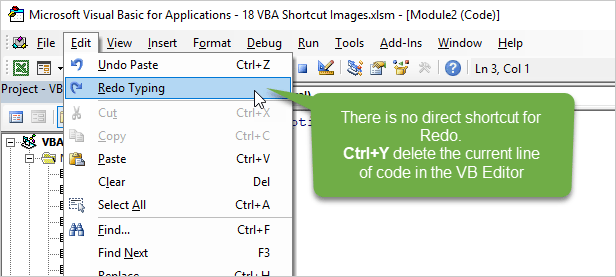
This creates a lot of confusion since Ctrl+Y is typically used for the Redo command in almost every other application, including Excel!
If you look at the Edit menu in the VB Editor you will see that there is no dedicated shortcut for Redo. We can use Alt, E, R as an alternative shortcut for Redo.
This is just one of those weird quirks of VBA that is really good to know.
#16 – Ctrl + i for Quick Info
This is another great keyboard shortcut to know. Ctrl+i displays the screentip that you see writing or running code. This allows you to see all the parameters in a property, method, or function.
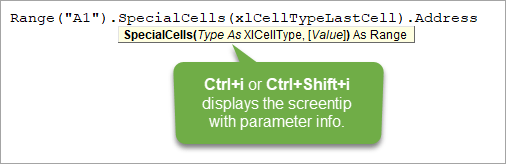
To use the Ctrl+i shortcut:
- Place the text cursor in the word you want to display the info screentip for.
- Press Ctrl+i.
- The screentip will appear.
- Press Escape to close it or move the cursor.
If you have variable selected within a line and you want to see the parameter info instead of the variable’s value/data type, then press Ctrl+Shift+i to see parameter info.
#17 – Ctrl+J Opens the Intellisense Drop Down
The Ctrl+J shortcut will open the Intellisense drop down menu that displays a list of objects, properties, methods, variables, etc.
I typically use this when I’ve typed a partial line of code and ended it with a period, like Range(“A1”).
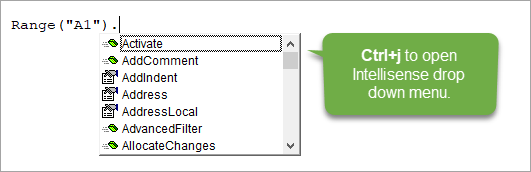
I then want to come back to that line and see the Intellisense drop down. Pressing Ctrl+J opens the menu. Otherwise, you have to delete the period and type it again.
We can also use Ctrl+J to select a different variable from the list. If you used the wrong variable name somewhere, or need to change it, hit Ctrl+J to see a list of the variable names. If you prefix your variable names (aka Hungarian notation), then the other variables should be pretty close by in that list.
#18 – Worksheet Functions
Did you know we can use worksheet functions in VBA? These are functions we use in a formula in Excel like: vlookup, match, countif, max, min, etc.
Type WorksheetFunction. in a macro to see a list of all the Excel functions that are available in VBA.

This is the best of both worlds in my opinion. We can use the power of Excel functions in our VBA code.
The screentip for the function shows the number of arguments, but it does NOT show the names of the arguments. So we typically need to type a formula in Excel to determine what each argument is (unless you have them memorized).
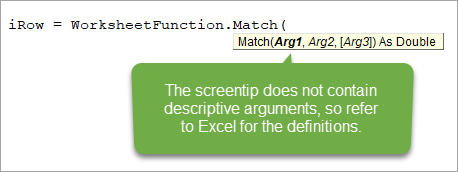
The worksheet function I use the most often in VBA is Match. We can use Match to lookup a value and return the row or column number of the cell that contains the matching value. This can sometimes be easier then using the Range.Find method. Checkout my article & videos on how to find the last used cell on a sheet for more on the Range.Find method.
Download the PDF
Here is a printable PDF version of the article.
What Is Your Favorite Shortcut or Tip for VBA?
I hope you enjoyed that list and learned something new. Maybe this has inspired you to learn more about macros & VBA. If so, please check out my free upcoming webinar on “The Modern Excel Blueprint”.
I would also like to know what your favorite tip or shortcut is that was not included in this article. Please leave a comment below and share yours. There are no right or wrong answers, and this will be a great way to learn from everyone.
Thanks again for your support and I wish you all the best in 2018! 🙂
Excel for Microsoft 365 Excel for Microsoft 365 for Mac Excel 2021 Excel 2021 for Mac Excel 2019 Excel 2019 for Mac Excel 2016 Excel 2016 for Mac Excel 2013 Excel 2010 Excel 2007 Excel Starter 2010 More…Less
There are several ways to run a macro in Microsoft Excel. A macro is an action or a set of actions that you can use to automate tasks. Macros are recorded in the Visual Basic for Applications programming language. You can always run a macro by clicking the Macros command on the Developer tab on the ribbon. Depending on how a macro is assigned to run, you might also be able to run it by pressing a combination shortcut key, by clicking a button on the Quick Access Toolbar or in a custom group on the ribbon, or by clicking on an object, graphic, or control. In addition, you can run a macro automatically whenever you open a workbook.
Before you run macros
Before you start working on macros you should enable the Developer tab.
-
For Windows, go to File > Options > Customize Ribbon.
-
For Mac, go to Excel > Preferences… > Ribbon & Toolbar.
-
Then, in the Customize the Ribbon section, under Main Tabs, check the Developer check box, and press OK.
-
Open the workbook that contains the macro.
-
On the Developer tab, in the Code group, click Macros.
-
In the Macro name box, click the macro that you want to run, and press the Run button.
-
You also have other choices:
-
Options — Add a shortcut key, or a macro description.
-
Step — This will open the Visual Basic Editor to the first line of the macro. Pressing F8 will let you step through the macro code one line at a time.
-
Edit — This will open the Visual Basic Editor and let you edit the macro code as needed. Once you’ve made changes, you can press F5 to run the macro from the editor.
-
You can add a combination shortcut key to a macro when you record it, and you can also add one to an existing macro:
-
On the Developer tab, in the Code group, click Macros.
-
In the Macro name box, click the macro that you want to assign to a combination shortcut key.
-
Click Options.
The Macro Options dialog box appears.
-
In the Shortcut key box, type any lowercase or uppercase letter that you want to use with the shortcut key.
Notes:
-
For Windows, the shortcut key for lowercase letters is Ctrl+letter. For uppercase letters, it’s Ctrl+Shift+Letter.
-
For Mac, the shortcut key for lowercase letters is Option+Command+letter, but Ctrl+letter will work as well. For uppercase letters, it’s Ctrl+Shift+Letter.
-
Be careful assigning shortcut keys, because they will override any equivalent default Excel shortcut key while the workbook that contains the macro is open. For example, if you assign a macro to Ctrl+z, you’ll lose the ability to Undo. Because of this, it’s generally a good idea to use Ctrl+Shift+Uppercase letter instead, like Ctrl+Shift+Z, which doesn’t have an equivalent shortcut in Excel.
For a list of Ctrl combination shortcut keys that are already assigned in Excel, see the article Excel shortcut and function keys.
-
-
In the Description box, type a description of the macro.
-
Click OK to save your changes, and then click Cancel to close the Macro dialog box.
To run a macro from a button on the Quick Access toolbar, you first have to add the button to the toolbar. To do that, see Assign a macro to a button.
You can create a custom group that appears on a tab in the ribbon, and then assign a macro to a button in that group. For example, you can add a custom group named «My Macros» to the Developer tab, and then add a macro (that appears as a button) to the new group. To do that, see Assign a macro to a button.
Run a macro by clicking an area on a graphic object
You can create a hotspot on a graphic that users can click to run a macro.
-
In the worksheet, insert a graphic object, such as a picture, or draw a shape. A common scenario is to draw a Rounded Rectangle shape, and format it so it looks like a button.
To learn about inserting a graphic object, see Add, change, or delete shapes.
-
Right-click the hotspot that you created, and then click Assign Macro.
-
Do one of the following:
-
To assign an existing macro to the graphic object, double-click the macro or enter its name in the Macro name box.
-
To record a new macro to assign to the selected graphic object, click Record, type a name for the macro in the Record Macro dialog box, and then click OK to begin recording your macro. When you finish recording the macro, click Stop Recording
 on the Developer tab in the Code group.
Tip: You can also click Stop Recording
on the left side of the status bar. -
To edit an existing macro, click the name of the macro in the Macro name box, and then click Edit.
-
-
Click OK.
 on the Developer tab in the Code group.
On the Developer tab, click Visual Basic to launch the Visual Basic Editor (VBE). Browse the Project Explorer to the module that contains the macro you want to run, and open it. All of the macros in that module will be listed in the pane on the right. Select the macro you want to run, by placing your cursor anywhere within the macro, and press F5, or on the menu, go to Run > Run Macro.
Create a Workbook_Open event.
The following example uses the Open event to run a macro when you open the workbook.
-
Open the workbook where you want to add the macro, or create a new workbook.
-
On the Developer tab, in the Code group, click Visual Basic.
-
In the Project Explorer window, right-click the ThisWorkbook object, and then click View Code.
Tip: If the Project Explorer window is not visible, on the View menu, click Project Explorer.
-
In the Object list above the Code window, select Workbook.
This automatically creates an empty procedure for the Open event, such as this:
Private Sub Workbook_Open()
End Sub
-
Add the following lines of code to the procedure:
Private Sub Workbook_Open()
MsgBox Date
Worksheets(«Sheet1»).Range(«A1»).Value = Date
End Sub -
Switch to Excel and save the workbook as a macro-enabled workbook (.xlsm).
-
Close and reopen the workbook. When you open the workbook again, Excel runs the Workbook_Open procedure, which displays today’s date in a message box.
-
Click OK in the message box.
Note: The cell A1 on Sheet1 also contains the date as a result of running the Workbook_Open procedure.
Need more help?
You can always ask an expert in the Excel Tech Community or get support in the Answers community.
Top of Page
See Also
Automatically run a macro when opening a workbook
Automate tasks with the Macro Recorder
Record a macro to open specific workbooks when Excel starts
Create and save all your macros in a single workbook
Save a macro
Need more help?
Do you want to learn how to run a VBA macro in Microsoft Excel? This guide will show you all the methods you can use to run your VBA code.
Microsoft Excel is a powerful spreadsheet application that offers users a variety of features and capabilities. One of the most popular features of Excel is the ability to create and run VBA macros.
A macro is a small scripts written in the VBA (Visual Basic for Applications) programming language that can be run in your desktop Excel app.
Macros can save you a lot of time and energy when working in Excel. They can be used to automate tedious tasks and save you hours of work each week.
But in order to leverage this time saving tool, you will need to know how to run your VBA macros.
Follow this guide and you’ll be able to start running macros like a pro in no time!
Run VBA Macro from the Developer Tab
The most common method for running a macro is from the Developer tab in the Excel ribbon.
This tab is hidden by default, so you will need to enable the Developer tab in your desktop Excel app first.
Follow these steps to run a VBA macro from the Developer tab.
- Go to the Developer tab.
- Press the Macros command in the Code section.
This will open the Macro menu which lists all the macros available to run.
- Select the macro which you want to run.
- Press the Run button.
That’s it! Your chosen macro code will now execute!
💡 Tip: Use the Macros in dropdown option to select the location of macros to run. You can select a specific workbook, All Open Workbooks, or This Workbook.
Run VBA from the View Tab
The Macro command is also available in the View tab.
Go to the View tab and press the Macros button to launch the Macros menu.
This opens the same Macro dialog box as before and you can select the macro and press the Run button.
Run VBA Macro from Macro Menu with a Keyboard Shortcut
There is an easier way to open the Macro menu! There’s no need to use the Developer or View tab since there is a dedicated keyboard shortcut to open the Macro menu.
You can use the Alt + F8 keyboard shortcut to open the Macro menu.
Run VBA Macro from a Keyboard Shortcut
You can entirely bypass the Macro dialog box by assigning a keyboard shortcut to your desired Macro.
If this is a macro that you want to use a lot, then assigning a shortcut is a good way to avoid the many clicks needed when running a macro through the Macro menu.
Follow these steps to assign your macro a dedicated keyboard shortcut.
- Open the Macro menu.
- Select the macro to which you want to assign a keyboard shortcut.
- Press the Options button.
This will open up the Macro Options menu where you can add a description for the macro and assign a keyboard shortcut.
- Add a character into the Shortcut key input box.
- Press the OK button in the Macro Options menu.
- Press the Cancel button in the Macros menu.
⚠️ Warning: This chosen shortcut key will override any existing keyboard shortcut, so you should avoid using keys taken by commonly used shortcuts such as copy, paste etc.
A lot of Ctrl and single key combinations are already taken with commonly used commands, so you might want to create a Ctrl + Shift shortcut instead.
💡 Tip: Hold the Shift key while entering a key in the Shortcut key input to create a Ctrl + Shift shortcut.
Run VBA Macro from a Form Control Button
If other people are using your spreadsheet solution, they might not realise they can run your macros to help complete their work.
This is where a button is the preferred choice to run a macro. It makes the act of running your macro easy and obvious!
You can create a Form Control Button to run the macro when you click the button. This can be placed anywhere in the spreadsheet since is floats over top of the grid. This means it won’t interfere with the rest of your data or formulas.
Follow these steps to insert a Form Control Button and assign a macro to it.
- Go to the Developer tab.
- Click on the Insert command.
- Choose the Button option found in the Form Controls section.
This will not actually insert a button yet. You will notice your cursor has now turned into a small black plus sign. This will allow you to draw a button in your sheet.
- Left click and drag anywhere in the sheet.
When you release the click and drag action, the Assign Macro menu will immediately pop up and you will be able to assign your macro to the button.
- Select your macro.
- Press the OK button.
Now you have a button in your sheet which will run your select VBA macro when clicked.
💡 Tip: Righ click on the button and select Edit Text to change the text displayed on the button.
Run VBA Macro from any Shape, Icon, or Image
Form Control buttons are pretty ugly and outdated. They also don’t have many options to customize the look, but thankfully they aren’t the only way to make a button to run your macros!
There are some much more stylish options like using an image, shape, or icon as a button to run your macros.
Follow these steps to assign a macro to any object such as an image, shape, or icon.
- Right click on the object.
- Select Assign Macro option from the menu.
- Select the macro from the Assign Macro menu.
- Press the OK button.
Now when you click on the shape, image, or icon it will execute the macro code!
Run VBA Macro from a Quick Access Toolbar Command
Another option is to add your most frequently used macros to the Quick Access Toolbar.
The Quick Access Toolbar is a customizable set of commands that are always visible so you can easily use them at any time. You can even add a macro so it can be run with a click.
Follow these steps to add a macro to your Quick Access Toolbar.
- Right-click anywhere on the Quick Access Toolbar.
- Select the Customize Quick Access Toolbar option from the menu.
This will open the Excel Options menu on the Quick Access Toolbar section.
- Select Macros from the Choose commands from dropdown.
- Select the macro you want to add to your Quick Access Toolbar.
- Press the Add button.
- Press the OK button.
When you press the Add button you will see the selected macro gets added to your list of commands. You can use the Up and Down arrow buttons to adjust the order this macro will appear in your commands.
💡 Tip: Press the Modify button in the Excel Options to change the icon and label of the macro that will appear in your Quick Access Toolbar!
Now you should have a new icon available in the Quick Access Toolbar. Click on this to run your select macro.
💡 Tip: An easy way to use the commands in your Quick Access Toolbar is with the Alt hotkey shortcuts. In this example, the command is in the 8th position starting from the undo command, so you can press the Alt + 8 to run the macro.
Run VBA Macro from a Custom Ribbon Command
If you have an entire repertoire of macros and you’re running out of room in the Quick Access Toolbar, then adding a custom ribbon tab to organize your macros could be the ideal solution.
Excel allows you to add your own custom ribbons and fill them with your favorite macros as well as any other commands you frequently use.
Follow these steps to add a macro to the Excel ribbon.
- Right click anywhere on the Excel ribbon.
- Select the Customize the Ribbon option from the menu.
This will open the Excel Options menu on the Customize Ribbon section.
- Press the New Tab button to create your new ribbon tab.
- Press the Rename button to give your tab a name.
Each tab will need at least one group, and this is automatically created when you create a new tab. You can also rename the group. Both of these names will be displayed in your Excel ribbon.
Now you will be able to add a macro into the new tab and group.
- Select the Macros option from the Choose commands from dripdown.
- Select the macro which you want to add into the ribbon.
- Press the Add button.
- Press the OK button.
💡 Tip: Select the tab and use the Up or Down arrow buttons to adjust the position of the new tab in your ribbon.
You now have a new custom tab that can hold all your most frequently used macros. 😃
Run VBA Macro from Visual Basic Editor Run Menu
The visual basic editor (VBE) is the environment where you write VBA code, so it makes sense that you should be able to also run your code from it.
A lot of people like to test their code as they develop their solutions and this means frequently running your macros from the the editor. Your current code can always be run from the Run menu in the VBE.
Follow these steps to run your macro from the Run menu in the visual basic editor.
- Select the macro you want to run.
You can select the macro by either placing the cursor in the code or selecting the macro name from the dropdown menu in the top right.
- Go to the Run menu.
- Select the Run Sub/UserForm option from the menu.
This will run your selected macro!
Run VBA Macro from Visual Basic Editor Toolbar
The visual basic editor comes with a toolbar for easy access to the most frequently used commands.
Follow these steps to run your macro from the toolbar.
- Select the macro you want to run.
- Press the Play button in the toolbar.
This will run your selected macro!
📝 Note: If you don’t see this toolbar you might need to enable it. Go to the View menu then Toolbars and check the Standard option.
Run VBA Macro from Visual Basic Editor Keyboard Shortcut
There are a lot of very useful keyboard shortcuts for using the visual basic editor.
Running a macro from the VBE is a very common task, so it’s no surprise there is also a keyboard shortcut available for this.
Press the F5 key while in the VBE and the currently selected macro will run!
Run VBA Macro from Another Macro
You can easily run a macro from a macro in Excel.
This is a good practice when it comes to programming. Creating smaller procedures and then reusing them within your main macro can be more efficient to run and easier to maintain the code.
Sub ExampleCode()
    MsgBox ("Hello world!")
End Sub

Sub MainCode()
    Call ExampleCode
    MsgBox ("Goodbye!")
End Sub
You can easily run any macro from within a macro using a single line of code. The above example will run the ExampleCode macro from the MainCode macro.
Run VBA Macro from a Worksheet Event
Did you know you can automatically run a macro?
You can automatically run a macro based on events that happen in your Excel worksheet!
For example, you can have a macro run anytime someone changes a value in the sheet.
Follow these steps to create a worksheet event-driven macro.
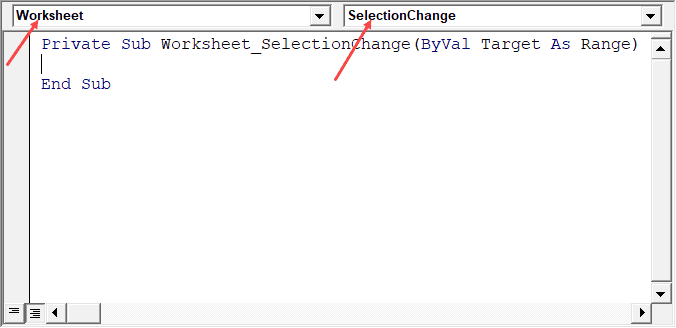
- Select the Sheet in which you want to trigger the macro. All your workbook sheets will be listed in the Microsoft Excel Object folder of the VBE Projects.
- Select the Worksheet options from the dropdown menu.
- Select the event type that should trigger your macro.
Private Sub Worksheet_Change(ByVal Target As Range)

End Sub
When you select the type of event, it will insert a bit of code into the editor. For example, the Change event trigger will insert the above code.
- Place any code you want to run when the event occurs inside the generated code.
If you have an existing macro that you want to run, you can call it using a Call YourMacroName single line of code.
This macro will now run anytime you make changes in any cell within Sheet1.
Private Sub Worksheet_Change(ByVal Target As Range)
    If Target.Address = "$A$1" Then Call ExampleCode
End Sub
You might want to limit the macro to only running when the change event occurs in a particular cell or range. This is possible by setting conditions for the Target in your code.
In the above example, the ExampleCode macro will only be called when changes are made to cell A1.
Run VBA Macro from a Hyperlink
Did you know you can trigger your macros to run when you click on a hyperlink in Excel?
This is particular worksheet event method is worth its own mention!
Private Sub Worksheet_FollowHyperlink(ByVal Target As Hyperlink)
    If Target.Address = "B2" Then Call ExampleCode
End Sub
The above code will run every time you click the hyperlink in cell B2 in Sheet2.
The code will execute and then take you to the hyperlinked address!
Run VBA Macro from a Workbook Event
There is also the possibility to automatically run a macro based on workbook events such as when you open or close the file.
This is a great option to make sure a task is performed before you do anything else in your workbook.
Follow these steps to run a macro automatically when you open your Excel file.
- Select ThisWorkbook found in the Microsoft Excel Object folder of the VBE Projects.
- Select Workbook from the dropdown menu.
- Select Open from the event type dropdown menu.
Private Sub Workbook_Open()

End Sub
This will insert the above code into the code editor. You can then add any code inside which you want run when you open the file. You can also call any macro here with the Call YourMacroName single line of code.
Conclusions
VBA macros can be used to automate your tasks in Excel, so it’s important you know how to run them.
There are many methods to run your desired macros depending on your situation.
You can use the Excel ribbon, a keyboard shortcut, or a customized quick access command when you want to manually run a macro. Also, you can attach your macros to run from buttons in the workbook to make it more user friendly.
You might need to occasionally run your VBA macros while developing your solutions to test them. This can be done several ways in the visual basic editor.
You can even trigger your macros based on certain worksheet or workbook events for the ultimate in automation.
Are you using macros in Excel. Did you know all these methods to run your macros? Do you know any others? Let me know in the comments below!
About the Author
John is a Microsoft MVP and qualified actuary with over 15 years of experience. He has worked in a variety of industries, including insurance, ad tech, and most recently Power Platform consulting. He is a keen problem solver and has a passion for using technology to make businesses more efficient.
In this Article
- Use Alt + F11 to open the VBE
- Quick keys in the VBE
- Recording a Macro
- Using the Personal Macro workbook
- Indenting Code
- Commenting Code
- Writing in Lower Case
- Using Intellisense
- Auto-Complete
- Option Explicit and Compiling Code
- The Immediate Window and Debugging
This tutorial will show you a variety of really useful shortcuts in VBA
Use Alt + F11 to open the VBE
Usually to get to the Visual Basic Editor, you need to click the Visual Basic button on the Excel ribbon. However, you can Press Alt + F11 instead!
Quick keys in the VBE
CTRL + R– shows the Project Explorer.
CTRL + G – shows the Immediate Window.
F4 – shows the Properties Window.
F2 – shows the Object Browser.
F5 – runs the Procedure you are in.
F8 – allows you to step through code in Break mode.
Recording a Macro
One of the best ways to learn VBA is to record a macro, and then analyze the code. It is also a very quick way of writing code, but the recorder will record EVERY keystroke, so you may need to edit your code to remove redundant lines.
Lets examine the macro below recorded by the macro recorder, and see how we can make it more efficient.
Sub TestFormat()
'
' TestFormat Macro
'
' Keyboard Shortcut: Ctrl+Shift+T
'
ActiveCell.FormulaR1C1 = "Applese"
Range("D3").Select
ActiveCell.FormulaR1C1 = "Pears"
Range("E3").Select
ActiveCell.FormulaR1C1 = "Peaches"
Range("C4").Select
ActiveCell.FormulaR1C1 = "12"
Range("D4").Select
ActiveCell.FormulaR1C1 = "14"
Range("E4").Select
ActiveCell.FormulaR1C1 = "16"
Range("C5").Select
ActiveCell.FormulaR1C1 = "20"
Range("D5").Select
ActiveCell.FormulaR1C1 = "25"
Range("E5").Select
ActiveCell.FormulaR1C1 = "26"
Range("C6:E6").Select
Range("E6").Activate
Selection.FormulaR1C1 = "=SUM(R[-2]C:R[-1]C)"
Selection.Borders(xlDiagonalDown).LineStyle = xlNone
Selection.Borders(xlDiagonalUp).LineStyle = xlNone
Selection.Borders(xlEdgeLeft).LineStyle = xlNone
With Selection.Borders(xlEdgeTop)
.LineStyle = xlContinuous
.ColorIndex = 0
.TintAndShade = 0
.Weight = xlThin
End With
With Selection.Borders(xlEdgeBottom)
.LineStyle = xlDouble
.ColorIndex = 0
.TintAndShade = 0
.Weight = xlThick
End With
Selection.Borders(xlEdgeRight).LineStyle = xlNone
Selection.Borders(xlInsideVertical).LineStyle = xlNone
Selection.Borders(xlInsideHorizontal).LineStyle = xlNone
Range("C4:E6").Select
Selection.NumberFormat = _
"_-[$$-en-US]* #,##0.00_ ;_-[$$-en-US]* -#,##0.00 ;_-[$$-en-US]* ""-""??_ ;_-@_ "
Range("C3:E3").Select
Selection.Font.Bold = True
Range("C3").Select
ActiveCell.FormulaR1C1 = "Apples"
End Sub
Now look at the code below which will achieve the same result
Sub TestFormat()
' Keyboard Shortcut: Ctrl+Shift+T
   Range("C3") = "Apples"
   Range("D3") = "Pears"
   Range("E3") = "Peaches"
   Range("C4") = 12
   Range("D4") = 14
   Range("C4") = 16
   Range("C5") = 20
   Range("D5") = 25
   Range("E5") = "26"
   Range("C6:E6").Select
   Selection.FormulaR1C1 = "=SUM(R[-2]C:R[-1]C)"
   Selection.Borders(xlEdgeTop).LineStyle = xlContinuous
   Selection.Borders(xlEdgeBottom).LineStyle = xlDouble
   Range("C4:E6").Select
   Selection.NumberFormat = _
   "_-[$$-en-US]* #,##0.00_ ;_-[$$-en-US]* -#,##0.00 ;_-[$$-en-US]* ""-""??_ ;_-@_ "
   Range("C3:E3").Select
   Selection.Font.Bold = True
End Sub
By cutting out a lot of redundant code, and amending recorded code where possible, we can make the macro much more effective and easy to read.
Using the Personal Macro workbook
If you want a macro to be able to be used within all your Excel files, you can store the macro in the Personal Macro workbook – this workbook is hidden and is open all the time in Excel, making any macros stored in there, global macros.
If you do not see a Personal Macro Workbook in you VBE window, record a macro and specify for it to be stored in the Personal Macro workbook.
Indenting Code
When you indent your code, you immediately make it easier to read and for someone else to follow. To indent multiple lines of code, you can select them, and press the Tab key.
Similarly, to outdent the code, press Shift+Tab and the code will move to the left again.
Adding comments to your code is another way to make it easy to read and navigate. You add a comment to the code by putting a single quotation mark at the beginning of the line as shown below.
VBA Coding Made Easy
Stop searching for VBA code online. Learn more about AutoMacro — A VBA Code Builder that allows beginners to code procedures from scratch with minimal coding knowledge and with many time-saving features for all users!

Learn More
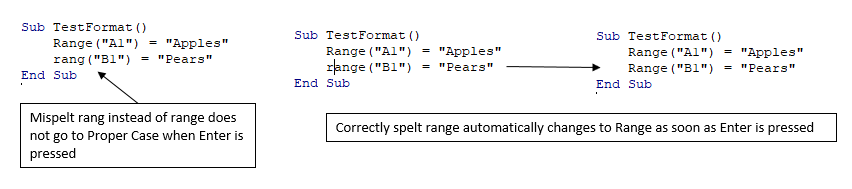
Writing in Lower Case
VBA uses Proper Case in code. If you write in lower case, and it doesn’t change to Proper Case, you can quickly see where you have made a mistake.
Using Intellisense
Intellisense pops up when you are writing code and gives you a list of all the Properties, Methods and Events that are available to the object you are working with. It normally pops up automatically after you type a period when you are typing your code.
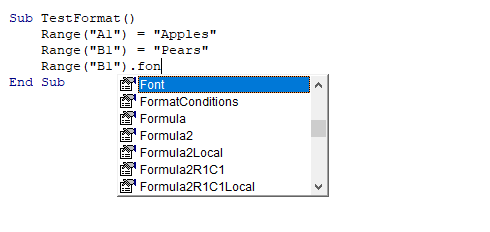
You can also force it to show up by pressing Ctl+j.

Similarly, when you are using functions in Excel that take arguments, these normally pop up automatically.
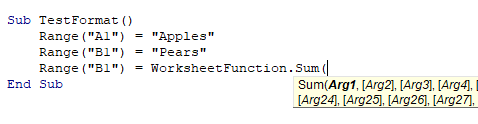
You can force them to show up by pressing Ctl+i.
Auto-Complete
You can use the Ctl+Space key combination to use auto-complete when writing code.
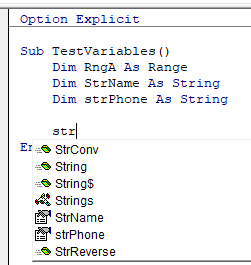
In the example above, all the Properties, Methods, Events and Variables beginning with str will appear in the list for you to select from.
VBA Programming | Code Generator does work for you!
Option Explicit and Compiling Code
Making sure you have Option Explicit at the top of all your modules ensures all your variable are declared and prevents you from making spelling mistakes in the variable names. If you have Option Explicit on, and you compile or run your code, you will get an error if a variable name is not recognized.
The Immediate Window and Debugging
The Immediate Window (you can switch it on using Ctl+g) allows you to debug your code and find the value of variables while you are in this debug mode.
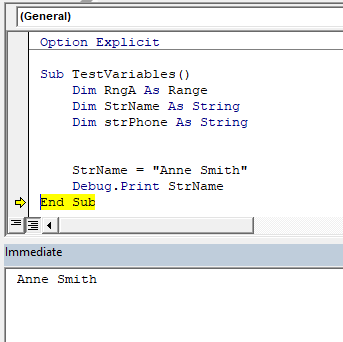
Sub TestVariables
'declare the variable
    Dim strName as string
'populate the variable
    strName = "Anne Smith"
'use F8 to step through the code and send the  variable value using debug.print to the immediate window
   Debug.Print strName
End subThe first step to working with VBA in Excel is to get yourself familiarized with the Visual Basic Editor (also called the VBA Editor or VB Editor).
In this tutorial, I will cover all there is to know about the VBA Editor and some useful options that you should know when coding in Excel VBA.
What is Visual Basic Editor in Excel?
Visual Basic Editor is a separate application that is a part of Excel and opens whenever you open an Excel workbook. By default, it’s hidden and to access it, you need to activate it.
VB Editor is the place where you keep the VB code.
There are multiple ways you get the code in the VB Editor:
- When you record a macro, it automatically creates a new module in the VB Editor and inserts the code in that module.
- You can manually type VB code in the VB editor.
- You can copy a code from some other workbook or from the internet and paste it in the VB Editor.
Opening the VB Editor
There are various ways to open the Visual Basic Editor in Excel:
- Using a Keyboard Shortcut (easiest and fastest)
- Using the Developer Tab.
- Using the Worksheet Tabs.
Let’s go through each of these quickly.
Keyboard Shortcut to Open the Visual Basic Editor
The easiest way to open the Visual Basic editor is to use the keyboard shortcut – ALT + F11 (hold the ALT key and press the F11 key).

As soon as you do this, it will open a separate window for the Visual Basic editor.
This shortcut works as a toggle, so when you use it again, it will take you back to the Excel application (without closing the VB Editor).
The shortcut for the Mac version is Opt + F11 or Fn + Opt + F11
Using the Developer Tab
To open the Visual Basic Editor from the ribbon:
- Click the Developer tab (if you don’t see a developer tab, read this on how to get it).
- In the Code group, click on Visual Basic.
Using the Worksheet Tab
This is a less used method to open the Vb Editor.
Go to any of the worksheet tabs, right-click, and select ‘View Code’.
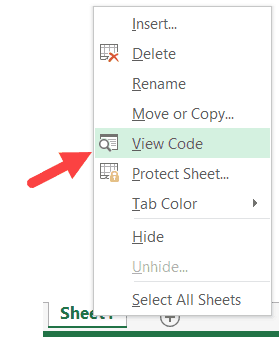
This method wouldn’t just open the VB Editor, it will also take you to the code window for that worksheet object.
This is useful when you want to write code that works only for a specific worksheet. This is usually the case with worksheet events.
Anatomy of the Visual Basic Editor in Excel
When you open the VB Editor for the first time, it may look a bit overwhelming.
There are different options and sections that may seem completely new at first.
Also, it still has an old Excel 97 days look. While Excel has improved tremendously in design and usability over the years, the VB Editor has not seen any change in the way it looks.
In this section, I will take you through the different parts of the Visual Basic Editor application.
Note: When I started using VBA years ago, I was quite overwhelmed with all these new options and windows. But as you get used to working with VBA, you would get comfortable with most of these. And most of the time, you’ll not be required to use all the options, only a hand full.
Below is an image of the different components of the VB Editor. These are then described in detail in the below sections of this tutorial.
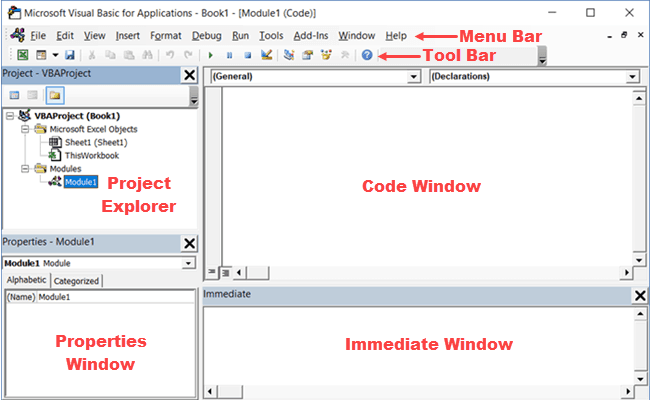
Now let’s quickly go through each of these components and understand what it does:
Menu Bar
This is where you have all the options that you can use in the VB Editor. It is similar to the Excel ribbon where you have tabs and options with each tab.
You can explore the available options by clicking on each of the menu element.
You will notice that most of the options in VB Editor have keyboard shortcuts mentioned next to it. Once you get used to a few keyboard shortcuts, working with the VB Editor becomes really easy.
Tool Bar
By default, there is a toolbar in the VB Editor which has some useful options that you’re likely to need most often. This is just like the Quick Access Toolbar in Excel. It gives you quick access to some of the useful options.
You can customize it a little by removing or adding options to it (by clicking on the small downward pointing arrow at the end of the toolbar).

In most cases, the default toolbar is all you need when working with the VB Editor.
You can move the toolbar above the menu bar by clicking on the three gray dots (at the beginning of the toolbar) and dragging it above the menu bar.
Note: There are four toolbars in the VB Editor – Standard, Debug, Edit, and User form. What you see in the image above (which is also the default) is the standard toolbar. You can access other toolbars by going to the View option and hovering the cursor on the Toolbars option. You can add one or more toolbars to the VB Editor if you want.
Project Explorer
Project Explorer is a window on the left that shows all the objects currently open in Excel.
When you’re working with Excel, every workbook or add-in that is open is a project. And each of these projects can have a collection of objects in it.
For example, in the below image, the Project Explorer shows the two workbooks that are open (Book1 and Book2) and the objects in each workbook (worksheets, ThisWorkbook, and Module in Book1).
There is a plus icon to the left of objects that you can use to collapse the list of objects or expand and see the complete list of objects.
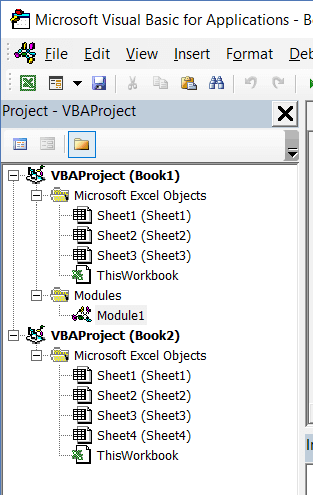
The following objects can be a part of the Project Explorer:
- All open Workbooks – within each workbook (which is also called a project), you can have the following objects:
- Worksheet object for each worksheet in the workbook
- ThisWorkbook object which represents the workbook itself
- Chartsheet object for each chart sheet (these are not as common as worksheets)
- Modules – This is where the code that is generated with a macro recorder goes. You can also write or copy-paste VBA code here.
- All open Add-ins
Consider the Project Explorer as a place that outlines all the objects open in Excel at the given time.
The keyboard shortcut to open the Project Explorer is Control + R (hold the control key and then press R). To close it, simply click the close icon at the top right of the Project Explorer window.
Note: For every object in Project Explorer, there is a code window in which you can write the code (or copy and paste it from somewhere). The code window appears when you double click on the object.
Properties Window
Properties window is where you get to see the properties of the select object. If you don’t have the Properties window already, you can get it by using the keyboard shortcut F4 (or go to the View tab and click Properties window).
Properties window is a floating window which you can dock in the VB Editor. In the below example, I have docked it just below the Project Explorer.
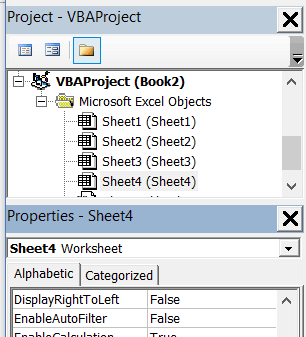
Properties window allows us to change the properties of a selected object. For example, if I want to make a worksheet hidden (or very hidden), I can do that by changing the Visible Property of the selected worksheet object.
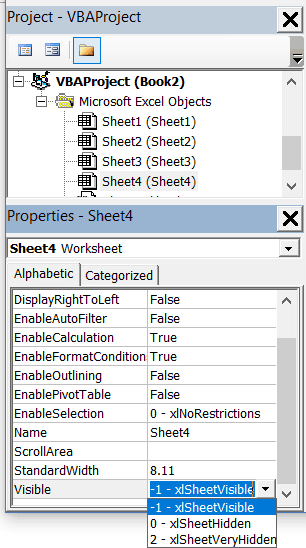
Related: Hiding a Worksheet in Excel (that can not be un-hidden easily)
Code Window
There is a code window for each object that is listed in the Project Explorer. You can open the code window for an object by double-clicking on it in the Project Explorer area.
Code window is where you’ll write your code or copy paste a code from somewhere else.
When you record a macro, the code for it goes into the code window of a module. Excel automatically inserts a module to place the code in it when recording a macro.
Related: How to Run a Macro (VBA Code) in Excel.
Immediate Window
The Immediate window is mostly used when debugging code. One way I use the Immediate window is by using a Print.Debug statement within the code and then run the code.
It helps me to debug the code and determine where my code gets stuck. If I get the result of Print.Debug in the immediate window, I know the code worked at least till that line.
If you’re new to VBA coding, it may take you some time to be able to use the immediate window for debugging.
By default, the immediate window is not visible in the VB Editor. You can get it by using the keyboard shortcut Control + G (or can go to the View tab and click on ‘Immediate Window’).
Where to Add Code in the VB Editor
I hope you now have a basic understanding of what VB Editor is and what all parts it has.
In this section of this tutorial, I will show you where to add a VBA code in the Visual Basic Editor.
There are two places where you can add the VBA code in Excel:
- The code window for an object. These objects can be a workbook, worksheet, User Form, etc.
- The code window of a module.
Module Code Window Vs Object Code Window
Let me first quickly clear the difference between adding a code in a module vs adding a code in an object code window.
When you add a code to any of the objects, it’s dependent on some action of that object that will trigger that code. For example, if you want to unhide all the worksheets in a workbook as soon as you open that workbook, then the code would go in the ThisWorkbook object (which represents the workbook).
The trigger, in this case, is opening the workbook.
Similarly, if you want to protect a worksheet as soon as some other worksheet is activated, the code for that would go in the worksheet code window.
These triggers are called events and you can associate a code to be executed when an event occurs.
Related: Learn more about Events in VBA.
On the contrary, the code in the module needs to be executed either manually (or it can be called from other subroutines as well).
When you record a macro, Excel automatically creates a module and inserts the recorded macro code in it. Now if you have to run this code, you need to manually execute the macro.
Adding VBA Code in Module
While recording a macro automatically creates a module and inserts the code in it, there are some limitations when using a macro recorder. For example, it can not use loops or If Then Else conditions.
In such cases, it’s better to either copy and paste the code manually or write the code yourself.
A module can be used to hold the following types of VBA codes:
- Declarations: You can declare variables in a module. Declaring variables allows you to specify what type of data a variable can hold. You can declare a variable for a sub-routine only or for all sub-routines in the module (or all modules)
- Subroutines (Procedures): This is the code that has the steps you want VBA to perform.
- Function Procedures: This is a code that returns a single value and you can use it to create custom functions (also called User Defined Functions or UDFs in VBA)
By default, a module is not a part of the workbook. You need to insert it first before using it.
Adding a Module in the VB Editor
Below are the steps to add a module:
- Right-click on any object of the workbook (in which you want the module).

- Hover the cursor on the Insert option.
- Click on Module.


This would instantly create a folder called Module and insert an object called Module 1. If you already have a module inserted, the above steps would insert another module.
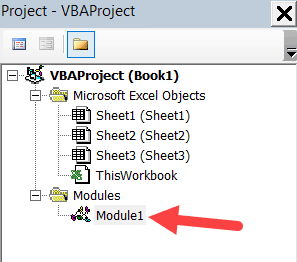
Once the module is inserted, you can double click on the module object in the Project Explorer and it will open the code window for it.
Now you can copy-paste the code or write it yourself.
Removing the Module
Below are the steps to remove a module in Excel VBA:
- Right-click on the module that you want to remove.
- Click on Remove Module option.

- In the dialog box that opens, click on No.


Note: You can export a module before removing it. It gets saved as a .bas file and you can import it in some other project. To export a module, right-click on the module and click on ‘Export file’.
Adding Code to the Object Code Window
To open the code window for an object, simply double-click on it.
When it opens, you can enter the code manually or copy-paste the code from other modules or from the internet.
Note that some of the objects allow you to choose the event for which you want to write the code.
For example, if you want to write a code for something to happen when selection is changed in the worksheet, you need to first select worksheets from the drop-down at the top left of the code window and then select the change event from the drop-down on the right.
Note: These events are specific to the object. When you open the code window for a workbook, you will see the events related to the workbook object. When you open the code window for a worksheet, you will see the events related to the worksheet object.
Customizing the VB Editor
While the default settings of the Visual Basic Editor are good enough for most users, it does allow you to further customize the interface and a few functionalities.
In this section of the tutorial, I will show you all the options you have when customizing the VB Editor.
To customize the VB Editor environment, click Tools in the menu bar and then click on Options.
This would open the Options dialog box which will give you all the customization options in the VB Editor. The ‘Options’ dialog box has four tabs (as shown below) that have various customizations options for the Visual Basic Editor.
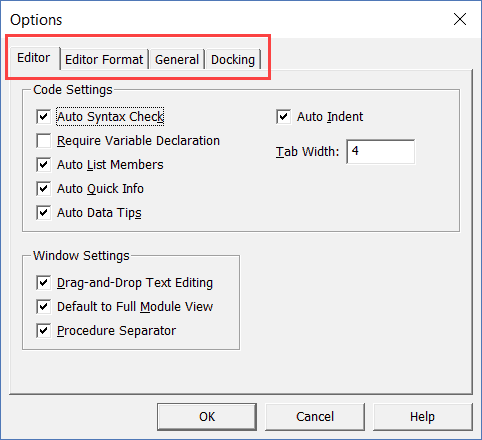
Let’s quickly go through each of these tabs and the important options in each.
Editor Tab
While the inbuilt settings work fine in most cases, let me still go through the options in this tab.
As you get more proficient working with VBA in Excel, you may want to customize the VB Editor using some of these options.
Auto Syntax Check
When working with VBA in Excel, as soon as you make a syntax error, you will be greeted by a pop-up dialog box (with some description about the error). Something as shown below:
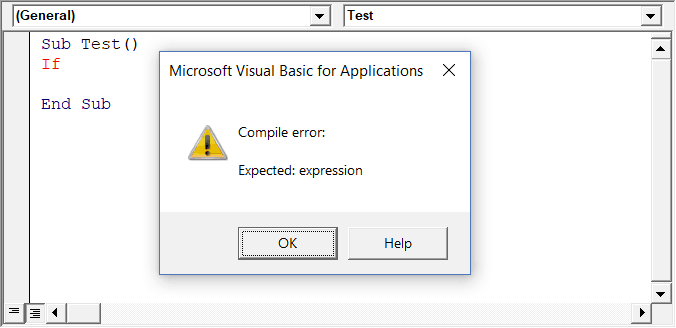
If you disable this option, this pop-up box will not appear even when you make a syntax error. However, there would be a change in color in the code text to indicate that there is an error.
If you’re a beginner, I recommend you keep this option enabled. As you get more experienced with coding, you may start finding these pop-up boxes irritating, and then you can disable this option.
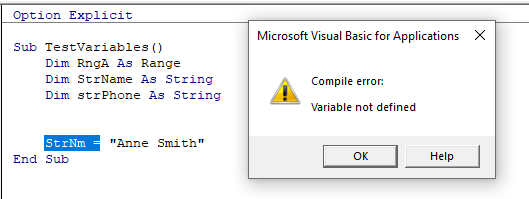
Require Variable Declaration
This is one option I recommend enabling.
When you’re working with VBA, you would be using variables to hold different data types and objects.
When you enable this option, it automatically inserts the ‘Option Explicit’ statement at the top of the code window. This forces you to declare all the variables that you’re using in your code. If you don’t declare a variable and try to execute the code, it will show an error (as shown below).
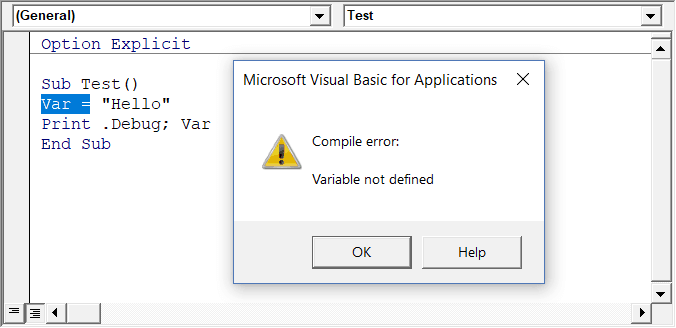
In the above case, I used the variable Var, but I didn’t declare it. So when I try to run the code, it shows an error.
This option is quite useful when you have a lot of variables. It often helps me find misspelled variables names as they are considered as undeclared and an error is shown.
Note: When you enable this option, it does not impact the existing modules.
Auto List Member
This option is quite useful as it helps you get a list of properties of methods for an object.
For example, if I want to delete a worksheet (Sheet1), I need to use the line Sheet1.Delete.
While I am typing the code, as soon as I type the dot, it will show me all the methods and properties associated with the Worksheet object (as shown below).
Auto list feature is great as it allows you to:
- Quickly select the property and method from the list and saves time
- Shows you all the properties and methods which you may not be aware of
- Avoid making spelling errors
This option is enabled by default and I recommend keeping it that way.
Auto Quick Info Options
When you type a function in Excel worksheet, it shows you some information about the function – such as the arguments it takes.
Similarly, when you type a function in VBA, it shows you some information (as shown below). But for that to happen, you need to make sure the Auto Quick Info option is enabled (which it is by default).
Auto Data Tips Options
When you’re going through your code line by line and place your cursor above a variable name, it will show you the value of the variable.
I find it quite useful when debugging the code or going through the code line by line which has loops in it.

In the above example, as soon as I put the cursor over the variable (var), it shows the value it holds.
This option is enabled by default and I recommend you keep it that way.
Auto Indent
Since VBA codes can get long and messy, using indentation increases the readability of the code.
When writing code, you can indent using the tab key.
This option ensures that when you are done with the indented line and hit enter, the next line doesn’t start from the very beginning, but has the same indentation as the previous line.
In the above example, after I write the Debug.Print line and hit enter, it will start right below it (with the same indentation level).
I find this option useful and turning this off would mean manually indenting each line in a block of code that I want indented.
You can change the indentation value if you want. I keep it at the default value.
Drag and Drop Text Editing
When this option is enabled, it allows you to select a block of code and drag and drop it.
It saves time as you don’t have to first cut and then paste it. You can simply select and drag it.
This option is enabled by default and I recommend you keep it that way.
Default to Full Module View
When this option is enabled, you will be able to see all the procedures in a module in one single scrollable list.
If you disable this option, you will only be able to see one module at a time. You will have to make a selection of the module you want to see from the drop-down at the top right of the code window.
This option is enabled by default and I recommend keeping it that way.
One reason you may want to disable it when you have multiple procedures that are huge and scrolling across these is taking time, or when you have a lot of procedures and you want to quickly find it instead of wasting time in scrolling.
Procedure Separator
When this option is enabled, you will see a line (a kind of divider) between two procedures.
I find this useful as it visually shows when one procedure ends and the other one starts.
It’s enabled by default and I recommend keeping it that way.
Editor Format Tab
With the options in the Editor Format tab, you can customize the way your code looks in the code window.
Personally, I keep all the default options as I am fine with it. If you want, you can tweak this based on your preference.
To make a change, you need to first select an option in the Code Colors box. Once an option is selected, you can modify the foreground, background, and indicator color for it.
The font type and font size can also be set in this tab. It’s recommended to use a fixed-width font such as Courier New, as it makes the code more readable.
Note that the font type and size setting will remain the same for all code types (i.e., all the code types shown in the code color box).
Below is an image where I have selected Breakpoint, and I can change the formatting of it.
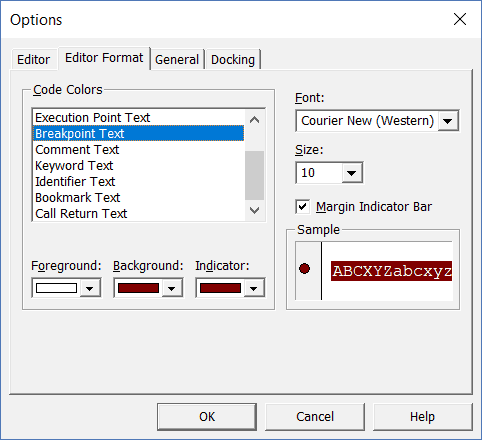
Note: The Margin Indicator Bar option when enabled shows a little margin bar to the left of the code. It’s helpful as it shows useful indicators when executing the code. In the above example, when you set a breakpoint, it will automatically show a red dot to the left of the line in the margin bar. Alternatively, to set a breakpoint, you can simply click on the margin bar on the left of the code line that you want as the breakpoint.
By default, Margin Indicator Bar is enabled and I recommend keeping it that way.
One of my VBA course students found this customization options useful and she was color blind. Using the options here, she was able to set the color and formats that made it easy for her to work with VBA.
General Tab
The General tab has many options but you don’t need to change any of it.
I recommend you keep all the options as is.
One important option to know about in this tab is Error Handling.
By default, ‘Break on Unhandled Errors’ is selected and I recommend keeping it that way.
This option means that if your code encounters an error, and you have not handled that error in your code already, then it will break and stop. But if you have addressed the error (such as by using On Error Resume Next or On Error Goto options), then it will not break (as the errors are not unhandled).
Docking Tab
In this tab, you can specify which windows you want to get docked.
Docking means that you can fix the position of a window (such as project explorer or the Properties window) so that it doesn’t float around and you can view all the different windows at the same time.
If you don’t dock, you will be able to view one window at a time in full-screen mode and will have to switch to the other one.
I recommend keeping the default settings.
Other Excel tutorials you may like:
- How to Remove Macros From an Excel Workbook
- Comments in Excel VBA (Add, Remove, Block Commenting)
- Using Active Cell in VBA in Excel (Examples)