
I received an interesting question today – on how to easily publish an Excel file to a web page. Although there are a ton of ways to approach this problem (ranging from Excel Services in SharePoint to Excel Interop or ClosedXML) let us say we want to restrict to using only Excel and VBA. Printing Excel to HTML is a very useful feature if you want to publish your data/Workbook online.
The concept itself is very simple as HTML files are text files and therefore the problem is only to structure the data correctly in VBA before saving it to a HTML file.
I wanted to explore today 2 options:
- Generating a HTML file via VBA
- Generating a HTML file via the Publish feature in Excel
Both options are fairly useful ones – with the first one offering more flexibility and the second one being much easier to use.
Generating HTML via VBA
So lets start with the simple example of generating an Excel file from scratch just with VBA.
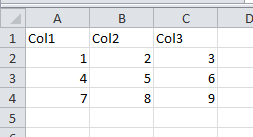
We have the following Excel table (ranging from A1 to C3):
The Code
Sub Test()
    RangeToHtml Range("A1:C3"), "test.html"
End Sub

Sub RangeToHtml(rng As Range, fileName As String)
    Dim resBeg As String
    resBeg = "<html><head></head><body><table>"
    resEnd = "</table></body></html>"
    For i = 1 To rng.Rows.Count
        '---Rows---
        resBeg = resBeg & "<tr>"
        For j = 1 To rng.Columns.Count
            '---Columns---
            resBeg = resBeg & "<td>"
            resBeg = resBeg & rng.Cells(i, j).Value
            resBeg = resBeg & "</td>"
        Next j
        resBeg = resBeg & "</tr>"
    Next i
    Call SaveStringToFile(resBeg & resEnd, fileName)
End Sub

Sub SaveStringToFile(str As String, fileName As String)
    Open fileName For Output As #1
    Print #1, str
    Close #1
End Sub
Excel to HTML: The result
Lets see the result (actual HTML posted to this page):
| Col1 | Col2 | Col3 |
| 1 | 2 | 3 |
| 4 | 5 | 6 |
Nothing extraordinary – just a very simple table without any formatting.
What the code does is traverse through the Excel Range replacing rows with the
tag and columns (or rather cells) with the
tag inserting the cell’s contents within. A very simple example.
Excel Publish to HTML feaure
The Publish to HTML feature is a neat capability that allows you to export your entire Workbook as a HTML web page through which you can easily navigate. You can easily Publish your Excel Workbook from VBA or directly from Excel.
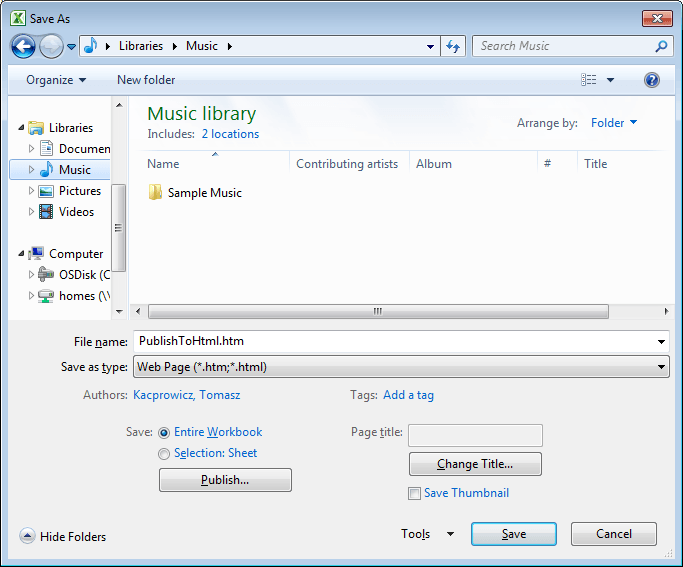
To publish the Excel file go to Save As and select Publish to configure the publish options:
Alternatively you can use the VBA code below to achieve the same:
 With ActiveWorkbook.PublishObjects.Add(xlSourceRange, _
        "PublishToHtml.htm", ";Sheet1", "$A$1:$C$4", _
        xlHtmlStatic, "PublishToHtml", "")
        .Publish (True)
 End With
Easy as that! The additional advantage is that the Publish to Excel feature will keep some of your formatting settings e.g. bold, italic fonts etc. Some, however, usually will be omitted e.g. borders.
Conclusions
Without resorting to external solutions there are least 2 easy options of generating html files from Excel. Personally I would prefer to have control over my HTML file and use VBA possibly adding my own css styles and formatting.
Convert Excel Range into HTML Table through VBA

As a VBA developer you may frequently come cross with a requirement of sending an email through Outlook along with an HTML table inside email body. Adding an HTML table in email body is very simple task if you do manually, just copy the range in Excel and paste it on email. It is little difficult in VBA to copy Excel range into email body. To convert Excel range into HTML table, you need to play with HTML tags. Below is the code which can make your life easy
Excel VBA Code to Convert Excel Range to HTML using VBA:
'Following function converts Excel range to HTML table
Public Function ConvertRangeToHTMLTable(rInput As Range) As String
'Declare variables
 Dim rRow As Range
Dim rCell As Range
Dim strReturn As String
'Define table format and font
 strReturn = "<Table border='1' cellspacing='0' cellpadding='7' style='border-
collapse:collapse;border:none'> "
'Loop through each row in the range
For Each rRow In rInput.Rows
 'Start new html row
strReturn = strReturn & " <tr align='Center'; style='height:10.00pt'> "
For Each rCell In rRow.Cells
'If it is row 1 then it is header row that need to be bold
 If rCell.Row = 1 Then
strReturn = strReturn & "<td valign='Center' style='border:solid
windowtext 1.0pt; padding:0cm 5.4pt 0cm 5.4pt;height:1.05pt'><b>" & rCell.Text & "</b>
</td>"
 Else
 strReturn = strReturn & "<td valign='Center' style='border:solid
windowtext 1.0pt; padding:0cm 5.4pt 0cm 5.4pt;height:1.05pt'>" & rCell.Text & "</td>"
 End If
 Next rCell
 'End a row
strReturn = strReturn & "</tr>"
 Next rRow
 'Close the font tag
strReturn = strReturn & "</font></table>"
'Return html format
ConvertRangeToHTMLTable = strReturn
End Function
Convert Excel Range into HTML Table through VBA
Below Excel Macro creates an email in outlook and call the above function to add Excel Range as HTML Table in Email Body
'This function creates an email in Outlook and call the ConvertRangeToHTMLTable function
to add Excel range as HTML table in Email body
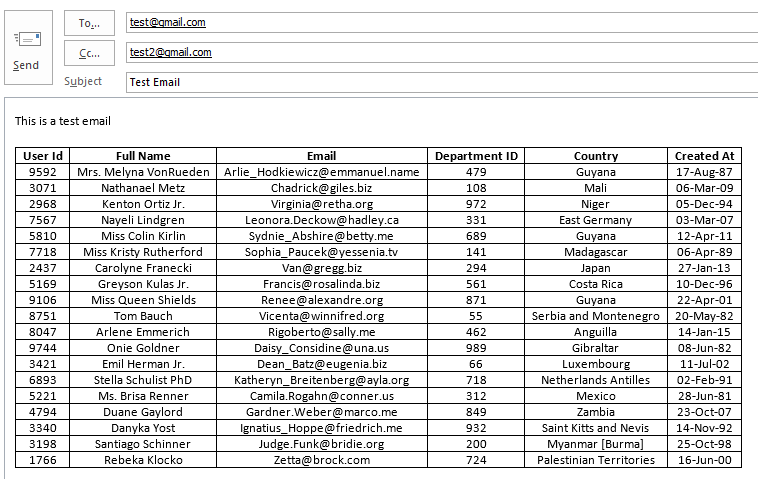
Sub CreateOutlookEmail()
'Declare variable
Dim objMail As Outlook.MailItem
'Create new Outlook email object
Set objMail = Outlook.CreateItem(olMailItem)
'Assign To
objMail.To = "[email protected]"
'Assign Cc
objMail.CC = "[email protected]"
'Assign Subject
objMail.Subject = "Test Email"
'Define HTML email body
'Tip: Here i have converted range A1:F20 of Sheet1 in HTML table, you can modify the
same as per your requirement
objMail.HTMLBody = "<P><font size='2' face='Calibri' color='black'>This is a test email</font></P>" & ConvertRangeToHTMLTable(Sheet1.Range("A1:F20"))
objMail.HTMLBody = "<P><font size='2' face='Calibri' color='black'>This is a test email</font></P>" & ConvertRangeToHTMLTable(Sheet1.Range("A1:F20"))
'Show the email to User
objMail.Display
'Send the email
'objMail.Send
'Close the object
Set objMail = Nothing
End Sub
It is worth to mention that you must have MS Outlook installed in your system to use this code and you also need to add Outlook reference (Microsoft Outlook XX.X Object Library) in Excel VBA from Menu Bar (Tools>References…). You can read this post to see how to add Outlook Object Library in Excel Reference.
To use this code in your Excel file, follow below steps:
1. Open an Excel file
2. Press Alt+F11
3. Insert a Module (Insert>Module) from menu bar
4. Paste the code in the module
5. Now add a shape in Excel sheet
6. Give a name to the shape like ‘Create Email’
7. Right click on the shape and select ‘Assign Macro…’
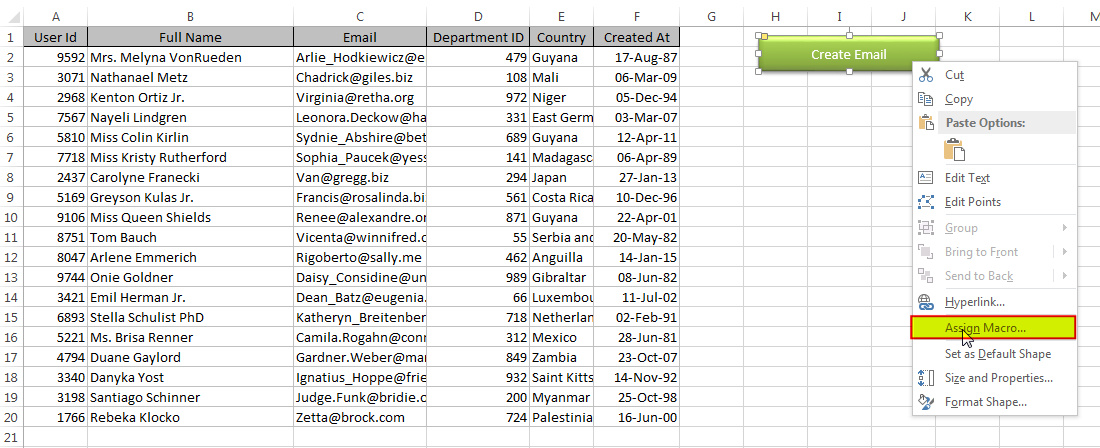
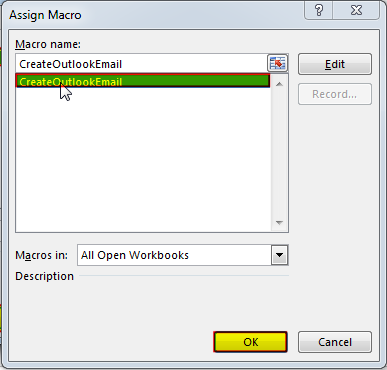
8. Select ‘CreateOutlookEmail’ from the list and click on ‘Ok’ button
Download Practice File
You can also practice this through our practice files. Click on the below link to download the practice file.
Recommended Articles
- Create Pareto Chart In Excel
- Time and Motion Study – Complete Guide
- How to find duplicates in excel?
- VBA to Read Excel Data using Connection String
- Few Simple Excel Tips – Excel Learner Should Know
Please leave your valuable comments in Comments section:
Excel VBA Course : Beginners to Advanced
We are offering Excel VBA Course for Beginners to Experts at discounted prices. The courses includes On Demand Videos, Practice Assignments, Q&A Support from our Experts. Also after successfully completion of the certification, will share the success with Certificate of Completion
This course is going to help you to excel your skills in Excel VBA with our real time case studies.
Lets get connected and start learning now. Click here to Enroll.
11 Comments
-
thank you I was looking for this code from sometime
-
Corrrect the 1st code
Declare the variable “rInput”.-
Thanks for your response Sandeep. As we checked rInput is already declared as input parameter of ConvertRangeToHTMLTable function; hence need not to be declared separately.
-
-
Hello – I’ve been working with this but I can’t figure out how to change the header row to bold. I’m using the function for 3 seperate tables on the same sheet and using If rCell.Row = 1 this is the first row in the sheet, not in the range? How do I select the first row in the range?
-
Hi Jason,
Can you try to replace
If rCell.Row = 1 ThenwithIf rCell.Row - rInput.Row = 0 Then.Regards
ExcelSirJi Team
-
-
hello, i copy and pasted your code. in the email, i got a super small table with no code. the problem is rCell.Text is not displaying the text. When i replace rCell.Text with something else, like “hello”, it works perfectly.
-
Hi Gordon,
We are not able to reproduce the error of small text. The error seems to be more related to data that you are trying to convert in HTML Table. Can you try the same code with any other Excel file?
Regards
ExcelSirJi
-
-
Hello – this macro works perfectly thank you! However there are empty rows in my range that I am converting to a table, but when I do the macro the table does not have blank rows. Is there a way I can leave the blank cells as blank rows in the output table?
-
Hi Morgan,
You can try following code to fix the height of the row in table:
Public Function ConvertRangeToHTMLTable(rInput As Range) As String
    'Declare variables
    Dim rRow As Range
    Dim rCell As Range
    Dim strReturn As String
    'Define table format and font
    strReturn = "<Table border='1' cellspacing='0' cellpadding='7' style='border-collapse:collapse;border:none'><font size='2' face='Calibri' color='black'>  "
    'Loop through each row in the range
    For Each rRow In rInput.Rows
        'Start new html row
        strReturn = strReturn & " <tr align='Center'; style='height:13.00pt'> "
        For Each rCell In rRow.Cells
            'If it is row 1 then it is header row that need to be bold
            If rCell.Row = 1 Then
                strReturn = strReturn & "<td valign='Center' style='border:solid windowtext 1.0pt; padding:0cm 5.4pt 0cm 5.4pt;height:13.00pt'><b>" & rCell.Text & "</b></td>"
            Else
                strReturn = strReturn & "<td valign='Center' style='border:solid windowtext 1.0pt; padding:0cm 5.4pt 0cm 5.4pt;height:13.00pt'>" & rCell.Text & "</td>"
            End If
        Next rCell
        'End a row
        strReturn = strReturn & "</tr>"
    Next rRow
    'Close the font tag
    strReturn = strReturn & "</font></table>"
    'Return html format
    ConvertRangeToHTMLTable = strReturn
End Function
Regards,
Your Excel Mate
-
-
Hello,
great, that’s exactly what I was looking for.
I added a small function for wrap text in the cells.
BR Karl-Heinz
Function WrapText(strValue As String) As String
‘*Declare variables
Dim strtxt As String, i As Long, MyValues
‘*Split value from Cell with chr(10) to get more lines
MyValues = Split(strValue, Chr(10))
‘*Create temp string with breaks
For i = LBound(MyValues) To UBound(MyValues)
strtxt = strtxt & IIf(Len(strtxt) > 0, “”, “”) & MyValues(i)
Next i
WrapText = strtxt
End FunctionPublic Function ConvertRangeToHTMLTable(rInput As Range) As String
‘*Declare variables
Dim rRow As Range
Dim rCell As Range
Dim strReturn As String
Dim strValue As String‘*Define table format and font
strReturn = ” ”
‘*Loop through each row in the range
For Each rRow In rInput.Rows
‘*Start new html row
strReturn = strReturn & ” ”
For Each rCell In rRow.Cells
‘*If it is row 1 then it is header row that need to be bold
If rCell.Row = 1 Then
‘*Check if wrap-text is available
If InStr(1, rCell.Value, Chr(10), vbBinaryCompare) > 0 Then strValue = WrapText(rCell.Value) Else strValue = rCell.Value
strReturn = strReturn & “” & strValue & “”
Else
If InStr(1, rCell.Value, Chr(10), vbBinaryCompare) > 0 Then strValue = WrapText(rCell.Value) Else strValue = rCell.Value
strReturn = strReturn & “” & strValue & “”
End If
Next rCell
‘*End a row
strReturn = strReturn & “”
Next rRow
‘*Close the font tag
strReturn = strReturn & “”
‘*Return html format
ConvertRangeToHTMLTable = strReturn
End Function-
Thanks for the value addition 🙂
-
Leave a Reply
Содержание
- Convert Excel to HTML Table Tags – VBA Macro Code
- Excel to HTML Table
- VBA Macro Code – Convert Excel Table to HTML
- Download Excel to HTML Table Converter
- Convert a Formatted Cell in Excel into HTML Tag using VBA
- Convert Formatted Cell in Excel to HTML
- Excel Worksheet Cell with Single format to HTML
- Convert Cell in Excel to HTML – Multiple Format Text
- Analyst Cave
- Export Excel to HTML – convert tables to HTML
- Generating HTML via VBA
- The Code
- Excel to HTML: The result
- Excel Publish to HTML feaure
- Conclusions
- Web Scraping – How to fill a Web Form from Excel using VBA
- Tools you can use
- How the Macro executes
- How to get the id of the Elements
- Daily Dose of Excel
- Haphazardly Posted Excel Information and Other Stuff
- Roll Your Own HTML from Excel VBA
- 11 thoughts on “ Roll Your Own HTML from Excel VBA ”
Excel to HTML Table
Do you want to copy the Excel Table to a webpage?
Most of the time, It is easy to represent data in table format. Excel spreadsheet is the one that can create table format data in seconds. But, to make it as HTML page, we need too many tags to be added for each cell. It is not tough, not anymore.
Here is the easy solution.
- Download the Excel at end of this page.
- Copy the content to this Excel.
- Click the Convert ‘Excel to HTML Table’ button.
- Get the HTML code written to file.
- Use it in your webpage.
If you are already a VBA gig, then just use the free code available in this page, that just does the same.
VBA Macro Code – Convert Excel Table to HTML
This VBA code just loops thru all the rows & columns in the Excel table in the first sheet.
First Row Header: Instead of checking for font style, code in the Excel file attached below, converts the first row as header.
Table Width: Each column width in Excel is set to width of each column in HTML Table.
If the data also has any data to be bold then consider changing the code accordingly.
Download Excel to HTML Table Converter
This converter app has all the functionalities explained above as same. Except for this one.
Bold Data: If the row is Bold, then it is considered as Table header. If it is not bold, then it is considered as table cell data.
Just download this Excel app, Enable security options for macro & content when asked for, then copy paste your data to the first sheet & Click on convert button.
This app only converts spreadsheet into a plain HTML table. The formatting within the table are ignored.
Источник
Convert a Formatted Cell in Excel into HTML Tag using VBA
Convert Formatted Cell in Excel to HTML
To get the font and formatting style of a text in worksheet follow these methods.
- Excel Worksheet Cell format – Single Format
- Text with Different formats in same cell – Multiple Format
When we type any text in a Worksheet, we change the default format to give importance to some area of text. We can change the format of a text color, background color, font size, font family, underline, bold, make the text italics etc.,
Let’s see how to read these formatting styles of a Excel sheet cell and convert it into its equivalent HTML code.
Please enable JavaScript
Excel Worksheet Cell with Single format to HTML
To convert Excel to HTML, when a cell has only single format, then the following VBA code can be used. This VBA code reads the font format property of cell. Then converts each property into its equivalent HTML tag.
To use this code, first insert a new module in VB editor. Then copy paste this code. (Press alt F11 -> Menu -> Insert -> Module).
The function takes any cell as its parameter. To test this code, enter any text in cell A1 with bold,underlined and color it, then in cell Be enter this formula.
Note: Function ‘ColorIdx_to_RGB‘ from above code get the Color code and converts into RGB code in VBA.
Convert Cell in Excel to HTML – Multiple Format Text
Consider you have text with multiple formats in a cell like the one below.
“This Text has multiple formats and needs to converted to HTML“.
To convert this text with so many font formats, the previous methods wont work. To make it work, we have to read format of each character in the cell, get its format (whether bold, italics, underlined, superscript, subscript or strikethrough). Then convert those formats into HTML equivalent.
Download the below Excel app that can convert such complex text formats into HTML tag.
If you are satisfied with the functionality and working of this VBA code, then you can the Excel Macro VBA code from this link at a cheap and affordable price.
Источник
Analyst Cave
Simply the best place to learn Excel and Analytics
Home » Export Excel to HTML – convert tables to HTML
Export Excel to HTML – convert tables to HTML
I received an interesting question today – on how to easily publish an Excel file to a web page. Although there are a ton of ways to approach this problem (ranging from Excel Services in SharePoint to Excel Interop or ClosedXML) let us say we want to restrict to using only Excel and VBA. Printing Excel to HTML is a very useful feature if you want to publish your data/Workbook online.
The concept itself is very simple as HTML files are text files and therefore the problem is only to structure the data correctly in VBA before saving it to a HTML file.
I wanted to explore today 2 options:
- Generating a HTML file via VBA
- Generating a HTML file via the Publish feature in Excel
Both options are fairly useful ones – with the first one offering more flexibility and the second one being much easier to use.
Generating HTML via VBA
So lets start with the simple example of generating an Excel file from scratch just with VBA.
We have the following Excel table (ranging from A1 to C3):
The Code
Excel to HTML: The result
Lets see the result (actual HTML posted to this page):
| Col1 | Col2 | Col3 |
| 1 | 2 | 3 |
| 4 | 5 | 6 |
Nothing extraordinary – just a very simple table without any formatting.
What the code does is traverse through the Excel Range replacing rows with the
tag and columns (or rather cells) with the
tag inserting the cell’s contents within. A very simple example.
Excel Publish to HTML feaure
The Publish to HTML feature is a neat capability that allows you to export your entire Workbook as a HTML web page through which you can easily navigate. You can easily Publish your Excel Workbook from VBA or directly from Excel.
To publish the Excel file go to Save As and select Publish to configure the publish options:
Alternatively you can use the VBA code below to achieve the same:
Easy as that! The additional advantage is that the Publish to Excel feature will keep some of your formatting settings e.g. bold, italic fonts etc. Some, however, usually will be omitted e.g. borders.
Conclusions
Without resorting to external solutions there are least 2 easy options of generating html files from Excel. Personally I would prefer to have control over my HTML file and use VBA possibly adding my own css styles and formatting.
Источник
Web Scraping – How to fill a Web Form from Excel using VBA
Tools you can use
You can extract contents (data) from any website or a webpage from your Excel worksheet, like extract stock quotes from a web page etc.
Contents in a web page are embed inside HTML elements. That is, the content or the data is written either between HTML tags like <p>, <div> etc. or data is typed in textboxes. Each HTML element on a web page has two important attributes, such as, the id and/or name . The id , in particular makes an HTML element unique. These id’s are often used to extract data from the elements.
Not just extracting, we can pass data to a web page dynamically from Excel, like filling a form.
Here’s a sample form, a contact form that I have designed especially for my Macro to work. The form has few textboxes (or input boxes) and a button, which when clicked will save the form data in a text (or .txt) file.
The macro that I am sharing will fill the form and will automatically click the Save Button (on the sample web page).
Note: I am assuming, you have Internet Explorer (any version like 9, 10, 11 etc.) installed in your computer. There is an IE installed on Windows 10 too.
We need Microsoft’s Internet Explorer to open the web page. Therefore, we’ll first add an object reference. From the top menu of your VBA editor, click Tools -> References… . In the References window, find and select Microsoft HTML Object Library and click OK.
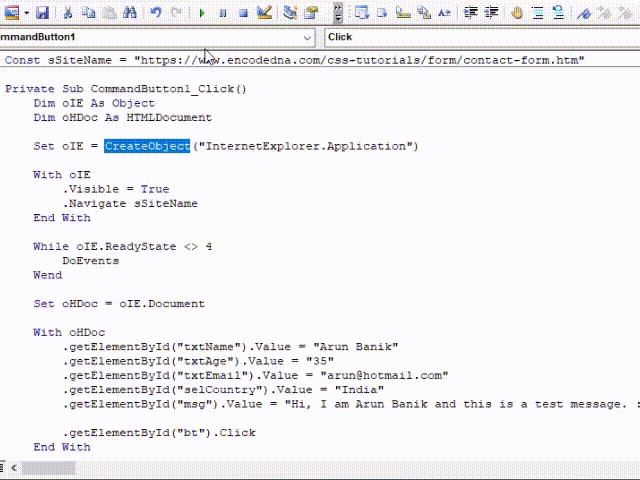
Here’s the macro.
The code executes when you click a button (an ActiveX control). Alternatively, you can simply run the code by press F5 from your VBA IDE. It will open Internet Explorer and will automatically fill the form with data like name, age, email etc and save (download) the data in a .txt file named formData.txt (the name of the .txt file is defined in the web page).
How the Macro executes
In the beginning of the code, I have defined a Const , where I have assigned the URL of the web page.
Const sSiteName = «https://www.encodedna.com/css-tutorials/form/contact-form.htm»
Next, I have created two objects. Object oIE for Internet Explorer and object oHDoc for HTMLDocument property.
I have not added any reference of Internet Explorer , rather I have just created an object oIE using CreateObject() method and now I can open IE browser from my worksheet.
Set oIE = CreateObject(«InternetExplorer.Application»)
The browser is kept visible, so I can see the output (the filling of the form).
The HTMLDocument property object will give me access to the HTML elements and its attributes on the web page. Now, see this line here … .getElementById(«txtName»).Value = «Arun Banik»
The .getElementById() method (its an HTML DOM element and JavaScript developers are familiar with it), is commonly used to get an HTML element by its id . The method takes a parameter in the form of an «id». Look at this again.
.getElementById(«txtName»).Value = «Arun Banik»
The id is txtName . It’s the id of first textbox or input box on the web page, which we are filling. The method is followed by the property Value . That’s how I am assigning values to each textbox.
Note: If the elements have name, then you can use this …
oHDoc.getElementsByName
In-addition, there is a dropdown list (with Country names) on the web page (if you have noticed) and using the same method .getElementById() , I’ll assign a value to it.
Finally, the program will click the button on the web page to save the data.
.getElementById(«bt»).Click
How to get the id of the Elements
Now, at this stage, you might be wondering, how I got the ids from that web page. It is simple. Just follow these steps.
1) Click this link to open the page, preferably on Chrome browser.
2) Set focus on the textbox using the mouse and right click the mouse. Now, choose the option Inspect (if you are using Chrome Browser).
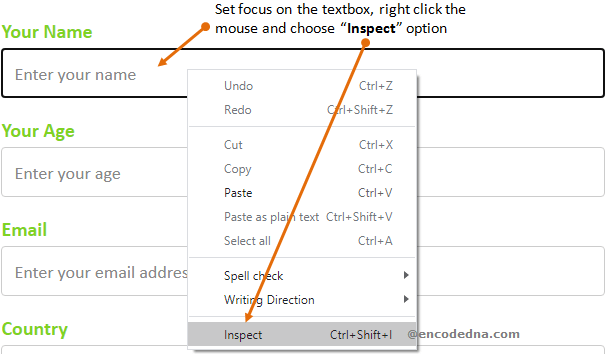
3) It will open DevTools or the Developer Tools window, highlighting the <input> element. You will see id=“txtName” . I am using this id in my Macro.
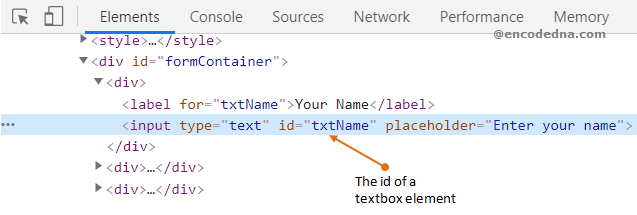
4) Follow the 1st three steps to get the id’s of other elements.
You can get the ids and names of elements from any website by following the above steps.
Well, that’s it. Let me know if you have any queries regarding Web Scraping.
Thanks for reading. ☺
Источник
Daily Dose of Excel
Haphazardly Posted Excel Information and Other Stuff
Roll Your Own HTML from Excel VBA
You probably know that you can save an Excel workbook in HTML format. I do it for my golf league and it works fine. It also generates a pig of an HTML file, mainly because Microsoft is trying to have high fidelity (make it look the same in the browser as it does in the desktop).
For my most recent sports-related project, I just didn’t want such a large file. I run an NFL survivor pool. You can read all the rules if you like, but basically each participant selects one NFL team per week. If that team wins, the participant survives. If they lose, they’re done. Whoever is left at the end is the winner. I needed a quick and easy way to update the results on a web page.
I start with this spreadsheet:
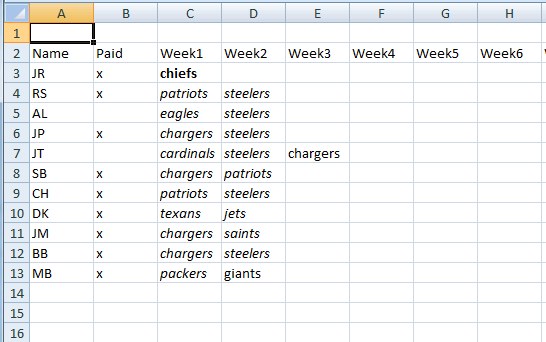
Bold teams means a loss. Italicized teams are winners. Unformatted teams means they haven’t played yet (or I haven’t updated yet). The end result is this:
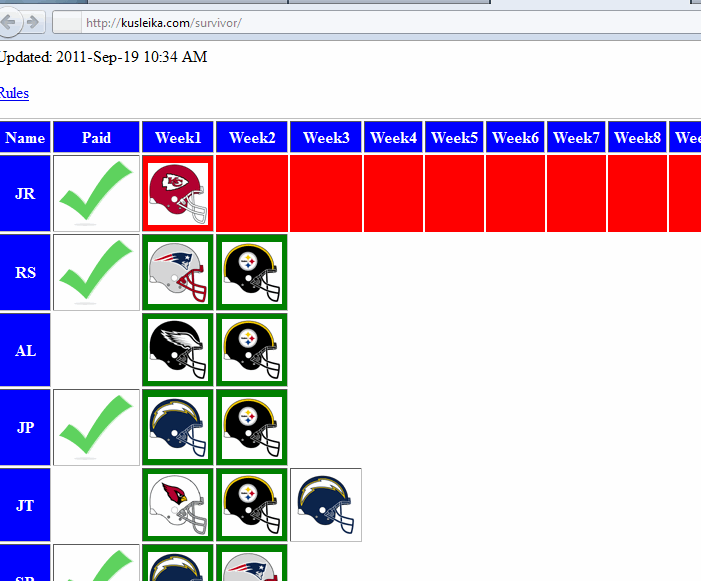
I found a bunch of images of NFL helmets and a free green checkmark image on the interwebs. Now all I have to do is read the data and convert it to HTML. Here’s the code:
Dim rRow As Range
Dim rCell As Range
Dim sHtml As String
Dim sBody As String
Dim sTable As String
Dim sRow As String
Dim bLoss As Boolean
Dim lFnum As Long
Dim sFname As String
Const sPAIDIMG As String = » «
‘header
sHtml = Tag(«DK Survivor Pool», «title») & vbNewLine
sHtml = sHtml & »
»
sHtml = Tag(sHtml, «head», , True) & vbNewLine
‘body
sBody = Tag(«DK Survivor Pool», «h1») & vbNewLine
sBody = sBody & Tag(«Updated: » & Format(Now, «yyyy-mmm-dd hh:mm AM/PM»), «p») & vbNewLine
sBody = sBody & Tag(Tag(«Rules», «a», «href = «»survivorrules.html»»»), «p») & vbNewLine
‘table
For Each rRow In Sheet1.Range(«A2:S13»).Rows
bLoss = False
For Each rCell In rRow.Cells
If rCell.Column = 1 Or rCell.Row = 2 Then
sRow = sRow & AddClass(Tag(rCell.Value, «td»), «name»)
ElseIf rCell.Column = 2 Then
If IsEmpty(rCell.Value) Then
sRow = sRow & Tag(«», «td»)
Else
sRow = sRow & Tag(sPAIDIMG, «td»)
End If
Else
Select Case True
Case rCell.Font.Bold
sRow = sRow & AddClass(Tag(MakeImage(rCell.Value), «td»), «loss»)
bLoss = True
Case rCell.Font.Italic
sRow = sRow & AddClass(Tag(MakeImage(rCell.Value), «td»), «win»)
Case IsEmpty(rCell.Value)
If bLoss Then
sRow = sRow & AddClass(Tag(«», «td»), «loss»)
Else
sRow = sRow & Tag(«», «td»)
End If
Case Else
sRow = sRow & Tag(MakeImage(rCell.Value), «td»)
End Select
End If
Next rCell
sTable = sTable & Tag(sRow, «tr») & vbNewLine
sRow = «»»»
Next rRow
sBody = sBody & Tag(sTable, «table», «border=»»1″» cellpadding=»»5″»», True)
sHtml = sHtml & Tag(sBody, «body», , True)
sHtml = Tag(sHtml, «html», , True)
If Len(Dir(«C:Test_Datadebug.ini»)) = 0 Then
sFname = «C: UsersdickDropboxSportsSurvivorindex.html»»»
Else
sFname = «C:UsersdickMy DocumentsMy DropboxSportsSurvivorindex.html»»»
End If
lFnum = FreeFile
Open sFname For Output As lFnum
Print #lFnum, sHtml
Close lFnum
Creating text files from scratch can be a pain in the butt, but HTML files are worse. You have to get all those tags right and properly closed. I hate unindented HTML, so there’s more work there too. Generally I try to work from the inside out on HTML files. That way I can a pass a couple of arguments into a function to make the tags and be assured that I don’t miss something. Take the header section for example. First I pass “DK Survivor Pool” and “title” into the Tag function. That function looks like this:
Function Tag(sValue As String, sTag As String, Optional sAttr As String = «», Optional bIndent As Boolean = False) As String
Dim sReturn As String
If Len(sAttr) > 0 Then
sAttr = Space(1) & sAttr
End If
If bIndent Then
sValue = vbTab & Replace(sValue, vbNewLine, vbNewLine & vbTab)
sReturn = » » & vbNewLine & sValue & vbNewLine & » »
Else
sReturn = » » & sValue & » »
End If
(WordPress doesn’t like HTML so there’s an extra space in the closing tag part.) I get back something that looks like this
DK Survivor Pool
Next, I append the link tag manually because it doesn’t really fit into my inside-out dynamic. Finally, I call sHtml = Tag(sHtml, «head», , True) & vbNewLine to wrap what I have in a head tag. I also set the optional Indent argument to true and get this:
DK Survivor Pool
The code wraps whatever I send it, in whatever tag I send it, and indents along the way. The other optional argument is for including attributes within the tag. I want my table tag to have border=”1″ and cellpadding=”5″ so I supply those to the function when needed. I use the class attribute a lot to format winners and losers. I created a separate function to add a class attribute so I wouldn’t have to type it in the code.
Function AddClass(sTag As String, sClass As String) As String
AddClass = Replace(sTag, «>», » » & sClass & «»»>», 1, 1)
The last helper function is to create an image tag. My Tag function is good for enclosing something in opening and closing tags. The image tag is self-closing, so it gets its own home. On the spreadsheet, I record the team name so that it matches the image file name. If I type “eagles” for a Philadelphia pick, the MakeImage function returns
Function MakeImage(sValue As String) As String
The main code basically loops through all the cells, determines the HTML necessary, and appends it to one long string. That string is then written to a file. Once complete, I manually FTP that file up to my web server. A couple of other notes on the code:
Losing teams are colored red and that participant doesn’t get to select any more. I wanted all the succeeding weeks to be red also. I use the bLoss variable to handle this. When I get to a loss, I set bLoss to True. When an empty cell is detected (no selection yet), I add the “loss” class to the td tag to color it red.
The last part is the location of the file. My dropbox folder is in two different places on two different computers. I’m not sure why this is, but I think it relates to which operating system was installed when I installed Dropbox. Back in the Windows XP days, Dropbox put it in My DocumentsMy Dropbox and in Windows 7, it’s directly under the user folder and they dropped the “My”. At least I think that’s what happened. To differentiate the two, I found a file that I’m absolutely sure is on one computer and absolutely sure isn’t on the other. I use Len(Dir(..)) to test the existence of the file and change the path accordingly. I think we both know this will break some time in the future, but it works for now.
One of the downsides to the inside-out approach for concatenating HTML is code readability. If I’m just building a string one character at a time, it’s pretty easy to follow along. When I use functions to wrap strings in tags, it’s a little harder. You might expect that the html opening tag would be near the top of the procedure, but it’s actually the last tag I add because it’s “outside”.
Finally, if you’re new to creating big strings in VBA, you should note that to embed a double quote into a string, you use two double quotes in succession.
11 thoughts on “ Roll Your Own HTML from Excel VBA ”
Don’t know if you considered the use of a XML library or not.
Since HTML is a type of XML, how about using the MSXML library to generate the document? For examples search Google (or Bing if you prefer) for ‘vba create xml’ (you know what to do with the quotes ). One example, albeit simplistic, is at http://www.freevbcode.com/ShowCode.asp?ID=1919
I imagine a realistic solution will probably be recursive. An example of reading a XML document is at http://msdn.microsoft.com/en-us/library/aa468547.aspx
I agree, the use of XML for the data, and an XSLT stylesheet and MSXML to reformat the data into a HTML file, will greatly reduce these lines of code to
That would be pretty neat to see a comparison done with XML vs the way Kusleika did it. I don’t think I’ll spend the time on it though, so if anyone does it, let me know so I can see what the comparison would be.
The code below uses the MS XML library to convert a worksheet into a HTML document. It includes the capability of adding images in place of cell values. Functionally, it is along the lines of the original post though it is missing some elements. However, it includes enough capabilities that it should be easily adaptable to the original task.
Dim RootELe As MSXML2.IXMLDOMElement: Set RootELe = aDoc.createElement( “html” )
aDoc.appendChild RootELe
Dim HeadEle As IXMLDOMElement
Set HeadEle = RootELe.appendChild(aDoc.createElement( “head” ))
Dim StyleLink As IXMLDOMElement
Set StyleLink = HeadEle.appendChild(aDoc.createElement( “link” ))
setAttributes StyleLink, “rel” , “stylesheet” , “type” , “text/css” , “href” , “my_style.css”
Dim BodyEle As IXMLDOMElement: Set BodyEle = RootELe.appendChild(aDoc.createElement( “body” ))
Dim TableEle As IXMLDOMElement
Set TableEle = BodyEle.appendChild(aDoc.createElement( “table” ))
Dim I As Long
With ActiveSheet.UsedRange
For I = 1 To .Rows.Count
Dim RowEle As IXMLDOMElement
Set RowEle = TableEle.appendChild(aDoc.createElement( “tr” ))
Dim J As Long
For J = 1 To .Columns.Count
Dim CellEle As IXMLDOMElement
Set CellEle = RowEle.appendChild(aDoc.createElement( “td” ))
With .Cells(I, J)
If IsEmpty(.Value) Then
CellEle.Text = ” “
Else
Dim ImgEle As IXMLDOMElement
Set ImgEle = aDoc.createElement( “img” )
setAttributes ImgEle, “src” , .Value & “left.bmp” , “alt” , .Value
CellEle.appendChild ImgEle
End If
If .Font.Bold Then CellEle.setAttribute “class” , “loss”
If .Font.Italic Then CellEle.setAttribute “class” , “win”
End With
Next J
Next I
End With
aDoc.Save “c: empxmltest.htm”
End Sub
I have very little knowledge about XML. Thanks for sharing
“One of the downsides to the inside-out approach for concatenating HTML is code readability. If I’m just building a string one character at a time, it’s pretty easy to follow along. When I use functions to wrap strings in tags, it’s a little harder. You might expect that the html opening tag would be near the top of the procedure, but it’s actually the last tag I add because it’s “outside”.”
In addition to the MSXML approach, here’s another way of doing this from the ‘top to the bottom.’ Use a stack to save the ending tags and when ready pop the stack.
The below if a functional example.
Depending on how the initial raw data is stored in the workbook, using XML and XSLT Stylesheets within VBA would produce more elegant results.
Create a table in a worksheet and map it to an XML Schema .xsd file from the “Source” button on the XML section on the developer tab. The data can then be exported to an xml file as below. Use the MS Excel XML Toolbox to create and assign a Schema file to the set of data to be exported. – http://www.microsoft.com/download/en/details.aspx?id=21031
Create an XSLT stylesheet, with a name of formatTable.xsl, as below. The stylesheet will loop thru the data in the xml file and format as a simple html table with a conditional check on the data stored in the Value element and format with appropriate colour.
as a replacement for greater than symbol —>
Insert a new module into the workbook and use the VBA procedure below
Public Sub sbConvertData()
‘Pre-requisite is a reference to Microsoft XML 6.0
Dim oXML As New MSXML2.DOMDocument30
Dim oXSL As New MSXML2.DOMDocument30
Dim sXML As String
Dim sDataFile As String
Dim sStylesheetFile As String
Dim sResultFile As String
Dim bLoaded As Boolean
ThisWorkbook.XmlMaps(1).Export ThisWorkbook.Path & Application.PathSeparator & “data.xml”, True
sDataFile = ThisWorkbook.Path & Application.PathSeparator & “data.xml”
sStylesheetFile = ThisWorkbook.Path & Application.PathSeparator & “formatTable.xsl”
sResultFile = ThisWorkbook.Path & Application.PathSeparator & “result.html”
‘Load asynchronously
oXML.async = False
oXSL.async = False
‘Load XML
bLoaded = oXML.Load(sDataFile)
If Not bLoaded Then
MsgBox oXML.parseError.Line & vbTab & oXML.parseError.reason, vbExclamation + vbOKOnly
GoTo HandleExit
End If
bLoaded = oXSL.Load(sStylesheetFile)
If Not bLoaded Then
MsgBox oXSL.parseError.Line & vbTab & oXSL.parseError.reason, vbExclamation + vbOKOnly
GoTo HandleExit
End If
Open sResultFile For Output As #1
Print #1, sXML
Close #1
HandleExit:
‘Check if object exists as release
If Not oXML Is Nothing Then Set oXML = Nothing
If Not oXSL Is Nothing Then Set oXSL = Nothing
Exit Sub
HandleError:
MsgBox Err.Number & vbTab & Err.Description, vbExclamation + vbOKOnly
Resume HandleExit
End Sub
The resulting HTML file will show the data exported and formatted into a table.
oops….looks like the stylesheet and xml did not save properly…
Источник
The Code below will create an html file from a table in your excel file. It will write the entire table and search for the number of lines and columns to write it all that is showing.
Please make sure to edit the html section of the table itself. On my example I wanted to transpose lines and columns and print them one by one.
Also, make sure to adjust if you want a table main header with a title. Remember to adjust the colspan.
This example can be tweaked to write any table into an html file.
Lastly, I put in a little extra where it will ask you where you want to save the file.
Sub CreateHTML()
  'Define your variables.
  Dim iRow As Long
  Dim tRow As Long
  Dim iStage As Integer
  Dim iCounter As Integer
  Dim iPage As Integer
  Dim lastCol As Integer
  Dim lastRow As Integer

  'Find the last Column Number
   With ActiveSheet
       lastCol = .Cells(1, .Columns.Count).End(xlToLeft).Column
   End With

  'Find the last Column Row
   With ActiveSheet
       lastRow = .Cells(.Rows.Count, "A").End(xlUp).Row
   End With

  'Create an .html file in the assigned directory.
  Dim sFile As Variant

   sFile = Application.GetSaveAsFilename(fileFilter:="HTML Files (*.html), *.htm")

   If fileName <> False Then
   SaveWorkbook = fileName
   End If

  'Open up the temp HTML file and format the header.
  Open sFile For Output As #1
  Print #1, "<html>"
  Print #1, "<head>"
  Print #1, "<style type=""text/css"">"
  Print #1, "table {font-size: 16px;font-family: Optimum, Helvetica, sans-serif; border-collapse: collapse}"
  Print #1, "tr {border-bottom: thin solid #A9A9A9;}"
  Print #1, "td {padding: 4px; margin: 3px; padding-left: 20px; width: 75%; text-align: justify;}"
  Print #1, "th { background-color: #A9A9A9; color: #FFF; font-weight: bold; font-size: 28px; text-align: center;}"
  Print #1, "td:first-child { font-weight: bold; width: 25%;}"
  Print #1, "</style>"
  Print #1, "</head>"
  Print #1, "<body>"
  Print #1, "<table class=""table""><thead><tr class=""firstrow""><th colspan=""2"">INSERT TABLE MAIN HEADER HERE - WATCH OUT FOR TABLE COLSPAN</th></tr></thead><tbody>"

  'Translate the first column of the table into the first level of the hierarchy.
  tRow = 1

     'Start on the 2nd row to avoid the header. - iRow=2 / tRow is the table header
     For iRow = 2 To lastRow


     For iCounter = 1 To lastCol

  'EDIT HERE TO CHANGE IT TO YOUR LINKING
  Print #1, "<tr><td>"
  Print #1, Cells(tRow, iCounter).Value
  Print #1, "</td><td>"
  Print #1, Cells(iRow, iCounter).Value
  Print #1, "</td></tr>"

     Next iCounter
  Next iRow

  'Add ending HTML tags
  Print #1, "</body>"
  Print #1, "</html>"
  Close
  End Sub
Convert Formatted Cell in Excel to HTML
To get the font and formatting style of a text in worksheet follow these methods.
- Excel Worksheet Cell format – Single Format
- Text with Different formats in same cell – Multiple Format
When we type any text in a Worksheet, we change the default format to give importance to some area of text. We can change the format of a text color, background color, font size, font family, underline, bold, make the text italics etc.,
Let’s see how to read these formatting styles of a Excel sheet cell and convert it into its equivalent HTML code.
Excel Worksheet Cell with Single format to HTML
To convert Excel to HTML, when a cell has only single format, then the following VBA code can be used. This VBA code reads the font format property of cell. Then converts each property into its equivalent HTML tag.
To use this code, first insert a new module in VB editor. Then copy paste this code. (Press alt F11 -> Menu -> Insert -> Module).
'Code from Officetricks.com - Convert Cell in Excel to HTML Format
Function Convert_Excel_Cell_To_HTML_Single_Format(iCell As Range) As String
    Dim flgSubscript As Boolean, flgSuperscript As Boolean, flgStrikethrough As Boolean
    Dim flgBold As Boolean, flgItalic As Boolean, flgUline As Boolean
    Dim htmlTagText As String, htmlTagStart As String, htmlTagEnd As String
    htmlTagText = ""

    If iCell.Font.Bold Then
        htmlTagStart = htmlTagStart & "<b>"
        htmlTagEnd = "</b>" & htmlTagEnd
    End If
    If iCell.Font.Underline > 0 Then
        htmlTagStart = htmlTagStart & "<u>"
        htmlTagEnd = "</u>" & htmlTagEnd
    End If
    If iCell.Font.Italic Then
        htmlTagStart = htmlTagStart & "<i>"
        htmlTagEnd = "</i>" & htmlTagEnd
    End If

    If iCell.Font.Subscript Then
        htmlTagStart = htmlTagStart & "<sub>"
        htmlTagEnd = "</sub>" & htmlTagEnd
    End If
    If iCell.Font.Superscript Then
        htmlTagStart = htmlTagStart & "<sup>"
        htmlTagEnd = "</sup>" & htmlTagEnd
    End If
    If iCell.Font.Strikethrough Then
        htmlTagStart = htmlTagStart & "<del>"
        htmlTagEnd = "</del>" & htmlTagEnd
    End If

    htmlTagText = "<p style='font-family:" & Chr(34) & iCell.Font.Name & Chr(34)
    htmlTagText = htmlTagText & ";font-size:" & iCell.Font.Size & "pt"
    htmlTagText = htmlTagText & ";color:#" & ColorIdx_to_RGB(iCell.Font.Color) & "'>"
    htmlTagText = htmlTagText & iCell.Value & "</p>"
    htmlTagText = htmlTagStart & htmlTagText & htmlTagEnd

    Convert_Excel_Cell_To_HTML_Single_Format = htmlTagText
End Function

Function ColorIdx_to_RGB(cColorIndex As String) As String
    Dim cRed As String, cGreen As String, cBlue As String
    cColorIndex = Right("000000" & VBA.Hex(cColorIndex), 6)
    cBlue = Left(cColorIndex, 2)
    cGreen = Mid(cColorIndex, 3, 2)
    cRed = Right(cColorIndex, 2)
    ColorIdx_to_RGB = cRed & cGreen & cBlue
End Function
The function takes any cell as its parameter. To test this code, enter any text in cell A1 with bold,underlined and color it, then in cell Be enter this formula.
‘=Convert_Excel_Cell_To_HTML_Single_Format(A1)’
Note: Function ‘ColorIdx_to_RGB‘ from above code get the Color code and converts into RGB code in VBA.
Convert Cell in Excel to HTML – Multiple Format Text
Consider you have text with multiple formats in a cell like the one below.
“This Text has multiple formats and needs to converted to HTML“.
To convert this text with so many font formats, the previous methods wont work. To make it work, we have to read format of each character in the cell, get its format (whether bold, italics, underlined, superscript, subscript or strikethrough). Then convert those formats into HTML equivalent.
Download the below Excel app that can convert such complex text formats into HTML tag.
Download Excel App to Convert Formatted Cell to HTML using VBA Downloaded 1,136 Times
If you are satisfied with the functionality and working of this VBA code, then you can the Excel Macro VBA code from this link at a cheap and affordable price.
For any queries or additional functionalities leave a comment or email to author@officetricks.com