

Using Excel for Mac is a great way to gather and analyse data. However, the amount of data collected by businesses is becoming challenging to manage, so Mac users are turning to VBA macros to help.
Using Excel VBA for Mac enables you to streamline processes and automate mundane tasks. Depending on the Excel versions you’re running, one way to do this is by adding Excel VBA macros in the VBA editor dialogue box/code window.
As a team of expert Excel Programmers, The Excel Experts understand the many benefits of using VBA and how it works on different types of computers, such as Macs.
Like many software tools, VBA works slightly differently on Mac compared to the Windows version. While the fundamentals are the same, there are some differences that Mac users need to be aware of when creating a personal macro workbook.
If your company uses Mac Office, and you want to learn more about how to use Excel VBA on these computers, then keep reading.
We’ve put together this guide to everything you need to know about VBA, the benefits of using it and how you can get started using it on your Mac today.

What Is VBA? (Visual Basic For Applications)
VBA, which stands for Visual Basic For Applications, is the programming language created by Microsoft that allows users to modify Excel worksheets and create custom solutions that suit their needs.
When using VBA in Excel, users can create macros, which are sets of instructions that can help them automate basic tasks such as sending automatic emails and making specific calculations or moving data from one part of the sheet to another.
VBA can be used across a range of Microsoft Office applications. As well as Excel, it can also be used in PowerPoint, Publisher, Word and more.
As such, learning how to use VBA is important when you’re trying to make the most of Microsoft’s suite of solutions and adapt them to fit your organisation’s unique needs.
NEED HELP WITH EXCEL VBA?
The Excel Experts can help you or your business complete an unfinished project, integrate web applications, automate tasks, and much more.

What Is Visual Basic Editor?
Visual Basic Editor is a separate application from Excel, which helps users to use VBA in Excel. Therefore, when you’re learning to use VBA, it’s vital that you download VB Editor and learn how to use it.
It is the application where you keep and edit your VBA code. It’s separate from your Excel workbooks and can help you to improve your programming skills and keep your VBA code safe, particularly if your spreadsheets are communal and you give other users file access.
With VBA editor, you can manage your code and learn new skills. The editor is very different to traditional Excel and other Microsoft applications, but it is also intuitive and easy to learn thanks to the simple user interface.

Opening The Visual Basic Editor For MAC
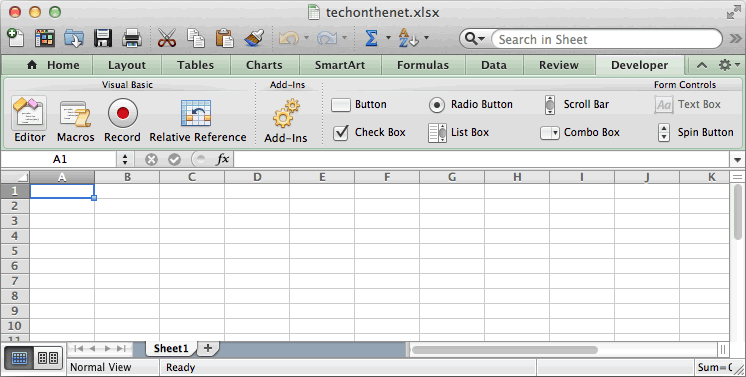
There are multiple ways to open the Visual Basic Editor in Excel 2011 for Mac. One way is to click on the “Developer” tab and then click on the “Visual Basic” button.
Another way is to press “Ctrl+F11” simultaneously.
What Are Excel Macros?
A macro is effectively an instruction, which you can make in Excel using VBA. A macro can be run as many times as you like, and when it’s being run, the macro will fulfil its task.
One prime example of a macro is setting up a workbook to automatically send an email to a specific group of addresses. You can put the email addresses and any other personalised info into an Excel workbook and set up the macro to automatically fill in a Word document as the emails are being created.
Then, when you run the macro, the emails will be created and automatically sent with personalised information, saving you time and hard work.
If you want to use macros, you need to create a macro-enabled workbook in Excel. These workbooks are different from normal spreadsheets and can have security issues, particularly if you take macros from the internet, which might potentially be dangerous. You can also create your own macros using the macro recorder feature.
So, when you’re using macros, you should collaborate with the professionals here at The Excel Experts. We can help you to create bespoke instructions and manage them. Our team can also assist your staff and support them so that they always use macros correctly.

Will Excel Macros Work On Mac?
If you have Excel downloaded onto your Mac, macros will definitely work. However, macros don’t work on Apple’s version of Excel, called Numbers, so if you try using them there, you’ll like get an error message.
So, if you haven’t downloaded Microsoft Office onto your Mac, you should do so immediately to start making and using macros.

Discover how to use Microsoft Excel with the latest edition from Leonard J Ledger.
Enabling Macros In Excel On Mac
Enabling macros in Excel on Mac is as easy as working on a Microsoft computer, but slightly different from Windows versions. Thankfully, Microsoft recognises that many computer users love Macs, so they’ve created guidelines to help you easily enable macros on a Mac.
All you have to do is open the Excel menu bar and then go to the Preferences menu. Click on the Security and Privacy section and click macros that you want enabled.
If you’re happy with the macros you have, then you can allow your computer to run all macros. If you want to manually enable macros or to only allow macros with a notification, then these options are available also so that you can choose the best approach for you.
Manually Recording A Macro In Excel On Mac
To manually record a macro in Excel when using a Mac, you need first to open Excel and go to Preferences again. You then need to select Ribbons and Toolbar, then select the Developer tab.
Then when you save your preferences, the Developer tab will remain visible on the side of your Excel screen whenever you have the program open.
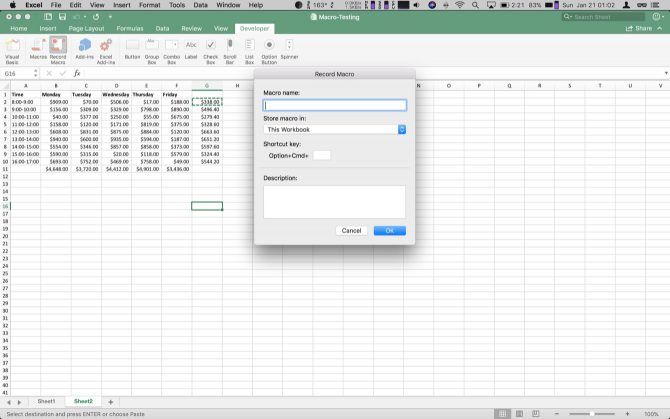
Once you have the Developer tab open, you can select Record Macro and follow the instructions to create the macro. You’ll need to include a macro name, description and shortcut key, as well as the instructions that you want to give the program while it runs the macro.

Benefits Of Using Excel VBA For Mac
If you’re looking to supercharge your Excel workbooks, then using VBA can be the ideal solution for you and your organisation. Especially as it can be used with other Office apps.
Using Excel VBA for Mac offers many benefits, as it can allow you to improve automation throughout your organisation and streamline your administrative processes.
Here are some of the main benefits of using Excel VBA for Mac.
It Saves Time
Macros can save you time and effort by following code and automating simple tasks, such as sending mass emails or linking specific Microsoft programs and transferring data between them. This can save you and your team valuable time and allow you to continue to drive your business forward towards greater success.
Macros Reduce Repetitive Tasks
Undertaking repetitive tasks, such as manual data entry, can be de-motivating for your staff, so using a macro to do them instead can help you to support your team.
Personalisation Is Easy
Macros can easily be changed to suit what you need using the code editor. You can set and change the parameters you need to get the solutions required to support your organisation.
Using Macros On Excel Is Easier Than You Might Think
Using macros on Excel is intuitive and remarkably easy, so it’s worth spending some time learning about these innovative tools, as it will save your team a lot of time and effort going forward.
Making Macros Is Free
While learning how to make macros and improve your company’s VBA knowledge can come at a cost, making your own macros is free. If you want to collaborate with experts like us to get bespoke macros for your business, then you can easily do this at an affordable cost.
In Summary: Use VBA For Mac To Automate Tasks And Save Time
As this article highlights, VBA is a useful solution that can help you to personalise your Excel workbooks and save you time and effort.
While VBA can save you a lot of time if you use it correctly, if you make mistakes, these could take a lot of hard work and effort to rectify.
As such, you need to make sure that you understand VBA and the basics of Excel and how the two work. Once you know how to use VBA in Excel, you can start testing it out and learning about the practical implications of this versatile programming language.
The first step in learning how to use VBA is to check out Excel training courses to learn the basics. Then you can start using bespoke Excel tools and custom Excel spreadsheets to make the most of your business’s data and save your precious time.

About The Excel Experts
For business leaders and executives who aren’t experienced in using Excel and VBA, The Excel Experts are here to help. Whether your team uses Macs or another brand of computer, we can help you to understand the benefits of VBA and use it.
We offer loads of useful resources on our blog, so you can learn more about how to make the most out of Excel and other Microsoft products.
To get more bespoke support and tailored advice on how to use our Excel services to support your business, then you can get in touch with us or visit our Excel VBA Consulting page.
Our friendly and experienced team is always happy to help business leaders from across the corporate market make the most of Excel.
NEED HELP WITH EXCEL VBA?
The Excel Experts can help you or your business complete an unfinished project, integrate web applications, automate tasks, and much more.
Written by Puneet for Excel 2007, Excel 2010, Excel 2013, Excel 2016, Excel 2019, Excel for Mac

KEY POINTS
- Visual Basic Editor is a code editor for VBA.
- It’s a separate application but you can only use it with Excel.
- You need to have the developer tab on the ribbon to access it.
- You can also use the keyboard shortcut (Alt + F11).
- It also stores the macros that you recode with the macro recorder.
- It has multiple tools to help you to write and manage all the codes.
The world of VBA starts with the Visual Basic Editor (VBE).
It’s the place where you write and manage all the macro codes and if you ask me about VBE, I’d say if you are serious about learning VBA you need to understand all the components of VBE.
That’s why it’s part of our VBA tutorial and in this guide, we have covered every single aspect of Visual Basic Editor to make you understand its functionality.
So, let’s get started.
I will be using different words (VBA editor, VB editor, or VBE) in this guide for referring to the Visual Basic Editor, so don’t be confused with it.
What is the Visual Basic Editor?
Visual Basic Editor is an application (a separate one) in which you can write and save all the VBA codes. In simple words, it’s a code editor for Excel in which you can write all the macros and store them. Even though it is a separate application (VB Editor) you can only use it with Excel.
Yes, that’s right. You can’t run VBE separately; there must be an Excel workbook open for using VBE.
Visual Basic Editor is the only way to write a VBA code in Excel. In fact, all Microsoft applications that host VBA use the Visual Basic Editor for script writing (writing code).
Below is the VBE:
Microsoft Windows

Mac

VBA is one of the ADVANCED EXCEL SKILLS and to master the VBA; you need to learn all the aspects of Visual Basic Editor.
Open the Visual Basic Editor
From the developer tab
To open the visual basic editor, you need to have the developer tab on the ribbon and to activate the developer tab (steps to add).

Now on the developer tab, in the code group, there is a button called “Visual Basic” and when you click on this button it opens the VB editor.

Shortcut Key (Window)
You can also use the keyboard shortcut key Alt + F11 to open the VBE in windows and Opt + F11 or Fn + Opt + F11 for MAC.
Even if you don’t have the developer tab on the ribbon, this shortcut key will still work and open the editor.
Edit a Macro from the List
If you want to open the VBA editor to edit a specific macro, then you can open the macros list from the developer tab.

And click on the edit button to open the VB editor to edit that specific macro.

On Quick Access Toolbar
You can also add a button on the quick access toolbar to open the VBA editor. For this, you need to click on the drop-down on the quick access toolbar and open more commands.

And then select the developer tab from “Choose Commands From” and then add the visual basic editor to the quick access toolbar by clicking on the add button.

Now you can open the visual basic editor from the button that you have on the QAT.

From the Worksheet Tab
You can also open the VBA editor by right-clicking on the worksheet tab and clicking on the view code. It will instantly take you to the code window of that worksheet.

Components of Visual Basic Editor
When you open the VBA editor first time it looks like an old application and to understand how it works you need to go component by component.

The user interface is the same (almost) for all the Excel versions in the last more than 15 years, so no matter which Excel version you are using, you can learn about Visual Basic Editor from this guide. Yes, VBE has different components which can help you in different ways, so let’s explore them one by one.
- Menu Bar
- Tool Bar
- Project Window
- Properties Window
- Code Window
- Immediate Window
- Watch Window
- Object Browser
- Find and Replace
- Locals Window
Just like any other application VBA editor has a menu bar where you can find all the options that are available to the user.
Now in the menu bar, each tab is a category of options that are available to use. Let’s suppose, in the edit menu, you can see all the options from cut-copy-paste, find and replace, and adding indent and outdent.

Along with all the options (most of them), you can find the shortcut keys to use those options.
2. Tool Bar
Just below the menu bar, you have the toolbar which is a collection of some of the options that a normal user needs to use more frequently. When you open the visual basic editor first time you will only have the standard toolbar, just like the image below.

But there are total four toolbars that you can add and use.
- Debug
- Edit
- Standard
- User Form
If you go to the view tab in the menu bar you have the option to add or remove these toolbars.

And you can also add or remove buttons from the toolbar if you want.

You can also move a toolbar just by dragging and dropping from the small dots on the right side.

3. Project Window/ Project Explorer
The project window is the place where you can see all the ongoing projects. Whenever you open a file and then open the visual basic editor you can see the hierarchy of that file in the project window.

Every project further has a collection of objects:
- Worksheet: Each worksheet in a workbook lists as an object.
- The Workbook: It represents the workbook itself as an object.
- Module: It’s the place where you write code or recorded macros stores.
- Chart Sheet: Chart sheet in the workbook will also be listed there.

When you open the VB editor, you’ll find the project window there by default. But if it’s not there somehow you can add it from the View (Menu Bar) or you can use the shortcut key Control + R.
Each object that is listed on the project window has its own code window which you can open by double click on it or you can right-click and select the view code option.

The project window is the best way to navigate through all the ongoing projects and when you start working with the editor you will get to know more about it.
4. Properties Window
As the name suggests the properties window gives you access to the properties of the selected object. Each object, for example, a worksheet has its own properties that you can see and make changes in it.

For each property, there is a drop-down on the right side from where you can change or edit that property.

Quick Tip: You can change the name of a project from the properties window.

And, if the properties window is not there by default you can activate it from the view (menu bar), or you can also use the shortcut key F4.

5. Code Window
The code window is the place where you write codes and do most of your work (editing, writing, and testing). In simple words, the code window is the place where you do all the programming.

When you first see it, it looks like a simple text editor, but it has Intellisense that can help you while programming.
There is no way I have found to add line number in the code window as other code editors have but still, VB editor indicates you the line number of the code.
Note
There’s no way I have found to add line number in the code window as other code editors have but still, VB editor indicates you the line number of the code.
6. Immediate Window
Immediate Window is the place where you can debug your code. You can type a line of code and test how it works. Let’s say if you want to test the following code:
Range("A1").Value = 9999All you need to do is enter type a question mark and then paste the code there and HIT enter. It will immediately show the result of the code.

The other way is to add Debug.Print before the code and get its result value in the immediate window.
Sub Macro1()
Debug.Print Range("A1").Value = "Yes"
End Sub
By default, the immediate window won’t be there when you open the visual basic editor, so you need to activate it from the view tab in the menu bar. You can also use the shortcut key Control + G.
7. Watch Window
Just like Excel Watch Window, the visual basic editor also has a watch window where you can add expressions to track them. You simply need to select the expression and then right-click and go to add a watch.

In the below example, I have added the Selection.Value to the add watch.

Now, to activate the watch window, go to the view menu and click on the watch window option.

And here you have the watch window tracking the added expression.
![]()
8. Object Browser
VBA has its own object browser which can help you to work with all the objects by finding all the properties and which you can use.

Imagine if you want to use the range object, the object browser will tell you about all the properties and method that comes with it. Look at the below example.

To open the object browser, use the shortcut key F2 or you can also go to the view tab and click on the object browser to open it.
9. Find and Replace
Just like the find and replace in Excel, the VBA editor has its own find and replace option that you can use to find and replace values from procedures. To open the FIND option, you can use the shortcut key Control + F, and to open the replace you can use the shortcut key Control + H.

Otherwise, you can open both options from the edit menu.

The find and replace option in VBE gives you different search patterns, like, if you want to find and replace something from the current procedure, from the current module, or from the current project.
You can also use the CASE SENSITIVE search and decide the direction of the search as well.
10. Locals Window
You can use the Locals window in VBE to displays all declared variables in the current procedure and their present values.
Using VB Editor to Write a Code
At this point, you know all the major components of the VBA editor, so now let’s learn how to add code in it.
Module Code Window Vs Object Code Window
There are two different types of code windows and both look just the same but there is a difference that you need to know.
- Module Code Window: Code in the normal module can be executed manually or you can also call it from a separate procedure.
- Object Code Window: Code in the object code window can be executed by using an event. Let’s suppose you want to run code when you double click on a cell, in that case, you need to use the double click event and you need to add code to that worksheet.
2. Module Code Window
You will be writing most of the VBA code in a module. To add code in a module you need to use the SUB procedure or the FUNCTION procedure.
- Sub procedure
- Function procedure
The difference between a sub and a function procedure is sub procedure can’t return a value, on the other hand, a function procedure can return a value.
When you record a macro that code goes straight into a module that VBA inserts automatically when you use the macro recorder.
Insert a Module
When you need to write code, you have to insert a module and for this, you simply need to go to the project window and right-click on the project name, and from that menu go to insert and select module.

Remove a Module
You can also remove a module if it doesn’t require anymore so you just simply need to right-click on the module and select remove.

And when you click on remove, it asks you if you want to back up that module before removing it. There is also an option where you can export a module to save it as a file in your system.
3. Object Code Window
Open the code window for the object you simply need to double click on it and in its the code window, there is a dropdown from where you can select the event that you want to use to execute the code.

Imagine if you want to write the code and want to execute on the double click then you need to select “BeforeDoubleClick” from the dropdown.
Understanding Design Mode, Run Mode, and Debug Mode
You can use the visual basic editor in three different modes depending on the face of programming, writing the code, locating an error, and fixing an error.
- Design Mode: Normally, when you are working in VB editor on a code you are in the design mode. Even then you just writing the code instead of designing a user form or a form you are in the design mode, like typing a code. This is also called design time.
- Run Mode: When you run a code to test a code that is how it works you are in the run mode. The best example to define this mode is when you execute a code using the Run button from the toolbar. This is also called runtime.
- Break Mode: When a code is running and in between the execution is suspended, at that time you are in break mode. In this mode, you can run a code step by step. This is also called debugging.
Tips to work with VB editor like a PRO
Just like any other programming language in VBA you can also use comments to define how that code works. Using comments is a good habit and it can help you in so many ways.
- Track Changes
- Contact Details of the Programmer
- How to Troubleshoot the Code
- And much more
To add a comment, you need to type an apostrophe and then the line of code.
Related Tip: VBA Comment Block
Quick Info
Now, look at the below example where I am adding add a VBA function (VBA LEFT Function), and the moment I type the name of the function, it shows me a tooltip for all the arguments which I need to define.

You can also use the shortcut key Control + I or use the quick info option from the EDIT menu.

Auto List Members
Each object in VBA comes with some properties and methods and when you insert an object or a command in the code window and then you enter (.) it shows you the complete list of properties and methods which come with that object.

In the above example, when I added a (.) after the borders property of the range, it showed me all the available properties that are available to access.
List Constants
While defining expressions for a property or a method you can use the list of constants available. In the below example, while using the Border Around method it showed me all the constants which are available for the weight argument.

You can use the shortcut key Control + Shift + J to get the list of constants or you can also go to the edit menu and use the option from there.

Activate Option Explicit
While writing VBA codes you will need to use variables and one of the most important things while using variables is to declare their data type. And there’s a chance that you could forget to declare it.
But when you use the option explicit statement, then you have to declare the data type for every single variable which you are using, and if you fail to do so VBA will show an error message. It’s like forcing yourself to declare every single variable with its data type. For this, you can go to the tools menu and open the options.

And from the options, tick mark “Require Variable Declaration” and click OK.

Now every module will have an Option Explicit statement at the beginning, and you have to declare every single variable.

Change the Code Window View
When you can write multiple codes in a single code window and VBA separate them with a divider, but if you want to have a more focused view, you can change the view of the code window. Below I have the codes in a single module.

But I can change this view from the view buttons from the bottom left of the window.

Now I have only active code visible.
Run a Code Step by Step
When you write a VBA code there could be a chance that that code has a bug or an error that can come while executing it. In that case, the best way is to execute that code step by step and validate each line of code.

For this, you can use shortcut key F8 to execute a code line by line or use step into option from the debug menu.

And there is also a button on the debug toolbar that you can use.

Code Indenting
When you write lengthy and complex codes then it’s important to structure them in the right way so that you can understand them later. For this, there’s one thing which comes handy, INDENTING. Indenting is basically structuring the code using tabs, below is an example.

To add indenting in a line you can use the TAB key from the keyboard, or you can also use the indent/outdent buttons from the toolbar.

Get Code from a Text File
The visual basic editor allows you to import VBA codes from a text file without copy-pasting. Once you insert a module you can go to the insert menu and select the file option from there.

It opens the dialog box where you can locate the text file and import all the codes from it to the current module.
R1C1 Reference Style
If you ever worked with the R1C1 reference style, then I’m sure you can agree on this point that way easier to write codes with it.
R1C1 Reference Style
Line Break
Even though you can adjust the width of the code window and make it wide but there could be a situation when you will be dealing with long lines of code that makes it hard to read.
The best way to deal with this problem is to add a line break. Basically, a line break is something when you break a line into two lines using the line break character.
Use a SPACE & UNDERSCORE and hit enter to add a line break.

Formatting
When it comes to user interface visual basic editor is not that good looking. But there are few formatting options that you can use to customize it or change its look the way you want.
From the Tools Menu Options Editor Format, you can access the formatting option where you can change the font style size or background color as well

Check out this video on customizing the VBA editor for a dark theme.
Personal Macro Workbook
There could be some macros that you need to access within all the workbooks that you use.
In that case, you can use the Personal Macro Workbook that can help you to store all the important codes in one place and you can access them from all the workbooks.

Using Bookmarks
The visual basic editor allows you to add bookmarks to a line from Right Click ➤ Toggle ➤ Bookmark.

And then you can also navigate between bookmarks from the option from the edit menu.

Syntax Checking
When you write codes in the code window VBA check for the syntax error and notify you when you make a syntax error. This option is activated by default, but you can also turn it off if you don’t want VBA to notify you every time you make an error.
Tools Menu ➤ Options ➤ Editor Tab ➤ Auto Syntax Check.

But I would recommend you not to deactivate it because it can help you to identify all the syntax errors that you make while writing codes.
List of Macros
If you have a lot of macros in a module, there is an option that you can use to see all the macros (Tools ➤ Macro).

There’s one big benefit of using this list option is that you can run a macro, delete it, and edit it without navigating to that procedure.
Locking a Project with a Password
Visual Basic Editor also gives you an option to lock a module with a password. So, if you don’t want the users to know the code and don’t want them to make a change in the code, you can use this option.

Tools Menu ➤ VBAProject Properties ➤ Protection Tab

Important Shortcut Keys
- Shift + F7: Object browser.
- F5: Run macro.
- Tab: Add an indent.
- Alt + Q: Close.
- F8: Step into.
- Control + H: Find and replace.
- Control + G: Immediate Window.
- Control + R: Project Explorer.
- F4: Properties window.
Learn some AMAZING Keyboard Shortcuts: Excel Keyboard Shortcuts Cheat Sheet
Alternative to Visual Basic Editor
Well, I have tried quite a few other editors to write a macro but the problem which I have found is that without the Intellisense it’s really hard to use anything other than the visual basic editor itself.

VBA editor works along with Excel, you can test your codes instantly and you can save them into the workbook. But are a few names to try.
Visual Studio Code | Ultra Edit
Points to Remember
- You can maximize or minimize the code window.
- You can change a project’s name anytime.
- The project window is the best way to navigate through the editor.
- It will make a line red if there’s an error in it while writing the code.
- You can also add a bookmark to a line of code from the Right-Click Menu Toggle Bookmark.
- You cannot use the visual basic editor without opening an Excel workbook.
More on VBA
- VBA Functions
- VBA to Add a New Sheet
- VBA Code to Activate a Worksheet
- VBA IF Then Statement
- VBA User Defined Function
- VBA Message Box
- VBA to Extract Hyperlink
- Macro to Highlight Duplicate Values
- VBA to Create a Pivot Table
[icon name=”bell” class=”” unprefixed_class=””] VBA is one of the Advanced Excel Skills
Should I need to install the Visual Basic Editor?
No. You don’t need to install the visual basic editor. It comes pre-installed with the Microsoft Office applications.
What if I don’t have the Developer Tab on the Ribbon?
If you don’t have the developer tab on the Excel ribbon, you can activate it from the Excel ribbon.
Is there an alternative to the Visual Basic Editor?
Not really. The IntelliSense that you have in the VBE makes it perfect to use to write VBA codes.
Bottom line: A new updated VB Editor has just been released for Excel 2016 for Mac to make it easier to write VBA Macros.
Skill level: Beginner
Big Update to the VB Editor for Mac
I know many Mac users have been waiting along time for this, and I’m excited to share that an update to the VB Editor is finally here!
Microsoft just released a new build of Excel that contains a new VB Editor, which we use to write VBA macros in Excel.
The new VB Editor contains a lot of the features we are used to seeing in the Windows versions of Excel, or Excel 2011 for Mac.
In the video above I highlight some of the many new improvements to the editor. Here is a list of the major new features.
- Intellisense drop-down menus for auto-filling code.
- Toolbars with buttons to for commands like: indenting, comment blocks, run, reset (stop), step into, etc.
- VBA Project, Properties, Immediate, Locals, and Watch windows.
- Debugging features and options.
- Keyboard shortcuts listed next to each command on the top menus.
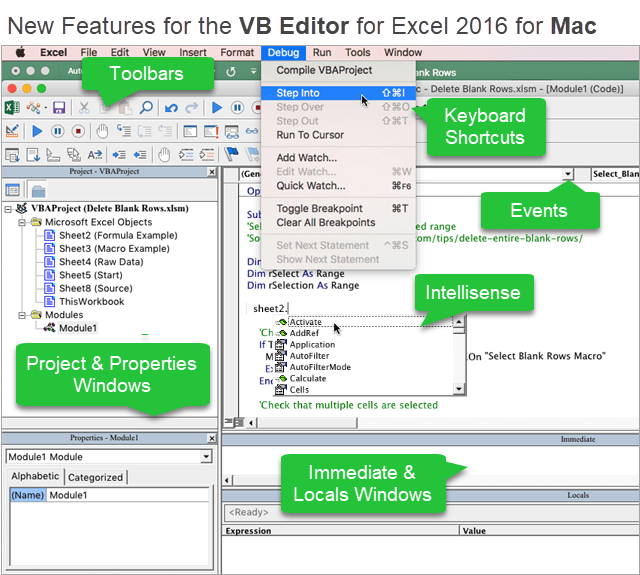
This new VB Editor feels a lot more like the VB Editor we are used to on the Windows version of Excel.
The one notable feature that is missing right now is userforms. The latest version (7.1) does not have any features that allow you to create, modify, or even view an existing userform. I’m hoping that will be updated in the near future as well.
You can vote for the userforms feature on the Excel UserVoice site. Microsoft uses this site to help prioritize feature updates, so please vote there if you want userforms back.
Even with the absence of userforms, this new VB Editor is a huge leap forward from the editor that was originally shipped with Excel 2016 for Mac. If you are a Mac user, you will now be able to write macros to help you automate Excel and save time with your job.
If you are new to macros or want to learn more, checkout my upcoming free webinar on The 7 Steps to Getting Started with Macros & VBA.

Get the Office Insiders Fast Pre-Release Build
Important Note: You no longer need the Insiders Fast build to get the new VB Editor. You might just need to update Office which can be done from the Help > Check for Updates menu. Here is the page with the release notes for Office that lists all the recent updates.
To get the updated version you will need to be on an Office 365 subscription and on the Office Insiders Fast Program. That program is free to join and open to everyone.
It allows you to download and install pre-release builds of Excel. The latest build is 16.6 at the time of this writing, and it includes PivotCharts and a new VB Editor for writing VBA macros. Two awesome updates for Mac users.
Checkout my video on how to join Office Insiders and get the pre-release version. It’s really easy to do!
Help Microsoft with Feedback
As part of the Pre-release Program, Microsoft would love to get your feedback on how to make pivot charts better.
If you find any bugs or have any suggestions you can provide feedback by:
- Clicking the smiley face icon in the top-right corner of Excel.
- Click the “Tell Us What Can Be Better” option.
- Complete the form and hit Send.
The Excel development team will receive the feedback and use it to make Excel even better.
If you are excited about this update, please leave a comment below and let us know. Thank you! 🙂

This Excel tutorial explains how to open the Visual Basic Editor in Excel 2011 for Mac (with screenshots and step-by-step instructions).
You can access the VBA environment in Excel 2011 for Mac by opening the Visual Basic editor.
First, be sure that the Developer tab is visible in the toolbar in Excel.
The Developer tab is the toolbar that has the buttons to open the VBA editor and create Form Controls like buttons, checkboxes, etc.
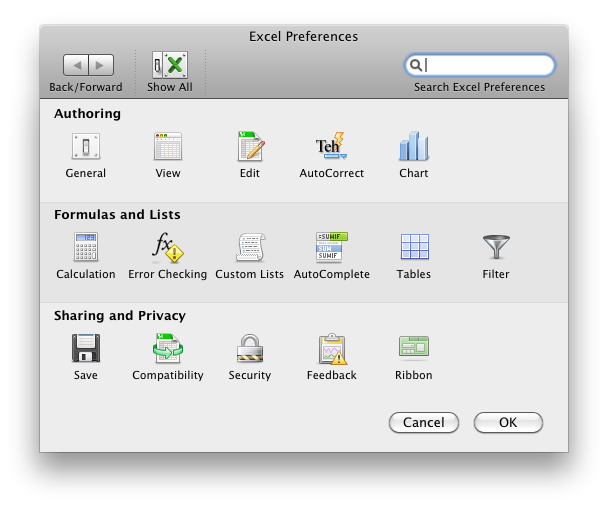
To display the Developer tab, click on Preferences under the Excel menu at the top of the screen.
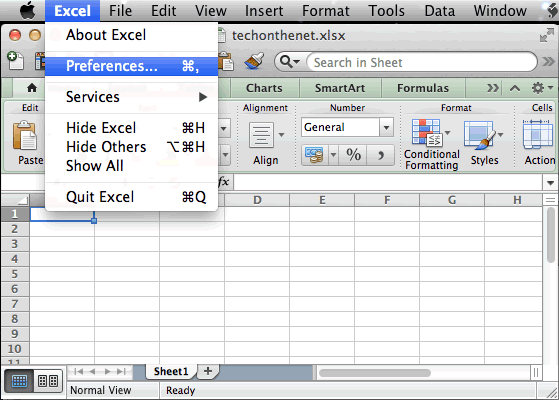
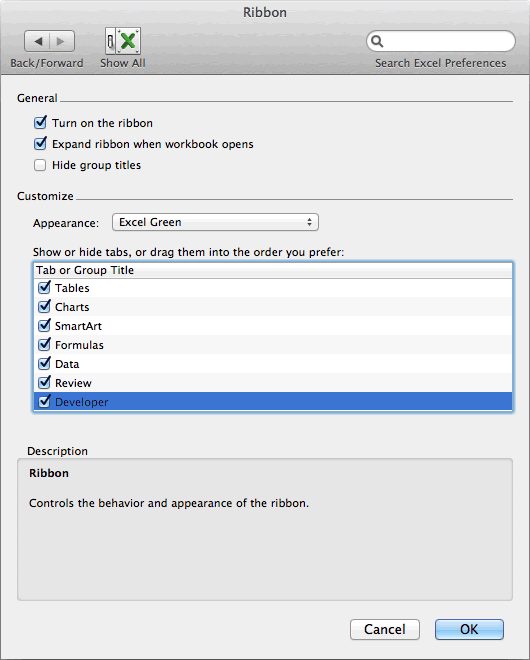
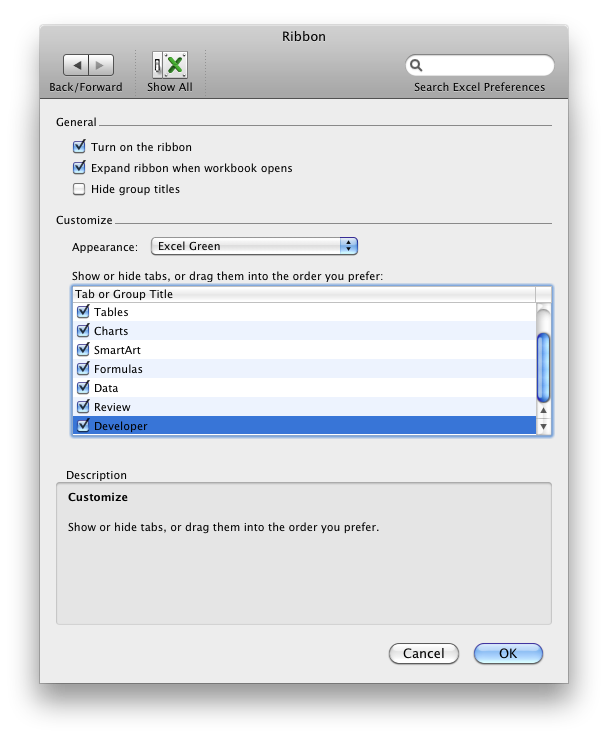
When the Excel Preferences window appears, click on the Ribbon icon in the Sharing and Privacy section.
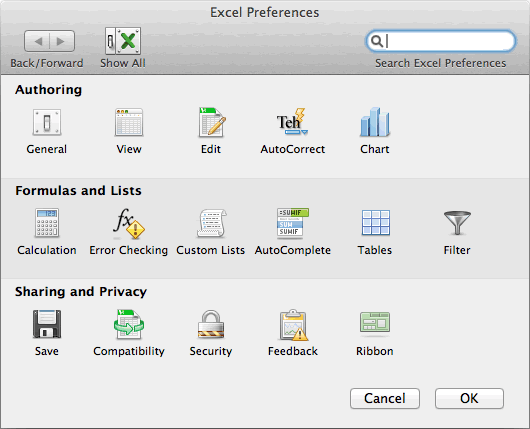
In the Customize section, check Developer in the list of tabs to show. Then click on the OK button.
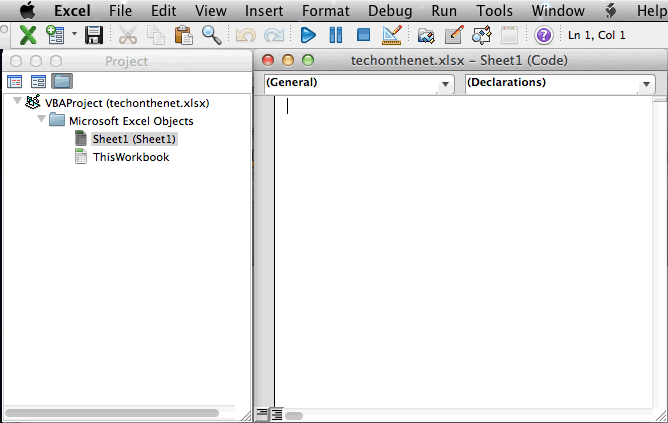
Select the Developer tab from the toolbar at the top of the screen. Then click on the Editor option in the Visual Basic group.
Now the Microsoft Visual Basic editor should appear and you can view your VBA code.
Excel on the Mac has not always been the same powerhouse it was on Windows. Macros really wouldn’t work unless they were created exclusively for the Mac.
Starting in 2013, Microsoft brought back macros. There are two types of macros: those you can create by quickly recording your actions, and those that use VBA to design more advanced automations. With Office 2016, Excel is using the same codebase on all platforms. This change will make it easier for macros to work across platforms.
So let’s take a look at how this currently works on macOS.
Enabling Macros in Excel on Mac
Working with macros in Excel on your Mac may not be enabled by default. This setting is because macros can be a possible malware vector. The easiest way to tell is to see if you have the Developer tab available on the Ribbon in Excel. If you don’t see it, it is simple to enable.
Click on Excel in the menu bar, and then select Preferences in the dropdown. In the menu, click on Ribbon & Toolbar. In the right-hand list, Developer should be at the bottom, click the checkbox. Finally, click Save and you should see the Developer tab show up at the end of the Ribbon.
After you create each workbook with macros, save it in a new format .xlsm to use the macros after reopening the file. If you forget, Excel will remind you each time you try to save. You’ll also need to enable macros every time you open the file.
Manually Recording a Macro in Excel on Mac
Though you can code macros, that might not be for everyone. If you’re not ready to start working with VBA, Excel lets you record the steps for your macro in an existing sheet. Click on the Developer tab to see your options.
You’re looking for the third option in the Ribbon, Record Macro. Click this, and a dialog pops up allowing you to name your macro and set a keyboard shortcut. You can scope your macro to the Current Workbook, a New Workbook, or in your Personal Macro Workbook. The Personal Macro Workbook is in your user profile and lets you use your macros between your files.
Once you record your actions, they are available on this same tab. Clicking macros will bring up the saved macros in your workbook. Click on your macro name and click Run to run your recorded actions.
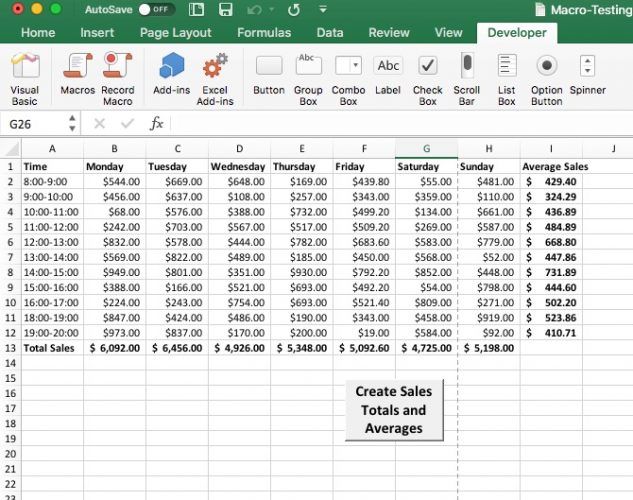
Example 1: Daily Sales Total and Hourly Average
For an example macro, you are going to run through a daily sales sheet, with the sales broken down by hourly totals. Your macro is going to add a daily sales total, and then add an average in the last column of each hourly period. If you work in retail or other sales position, this is a helpful sheet to track revenue.
We need to set up the first sheet. Using this first blank as a template to copy into a new tab each day could save you some time. In the first column/row put Hour/Date. Across the top add Monday through Friday.
Then in the first column put a break down of hourly totals from 8-5. I used 24-hour time, but you can use AM/PM notation if you prefer. Your sheet should match the screenshot above.
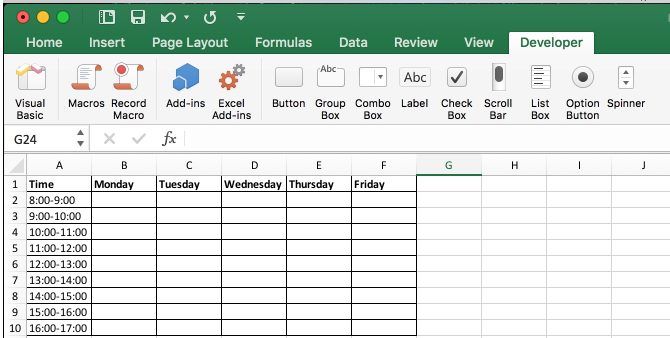
Add a new tab, and copy your template into it. Then fill out your sales data for the day. (If you don’t have data to populate this sheet, you can enter =RandBetween(10,1000) in all the cells to create dummy data.) Next, click on Developer in the Ribbon.
Then, click on Record Macro. In the dialog enter the name as AverageandSum and leave it stored in This Workbook. You can set a shortcut key if you like. You can enter a description if you need more details on what the macro does. Click okay to start setting up the macro.
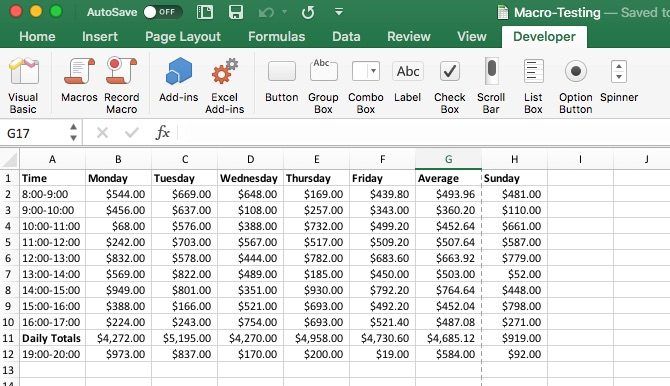
At the bottom of the hourly listings enter Daily Totals. In the cell next to it, enter =SUM(B2:B10). Then copy and paste that into the rest of the columns. Then in the header add Average after the last column. Then in the next cell down, enter =Average(B2:F2). Then, paste that into the cells in rest of the column.
Then click Stop Recording. Your macro is now able to use on each new sheet you add to your workbook. Once you have another sheet of data, go back to Developer and click Macros. Your macro should be highlighted, click run to add your sums and averages.
This example can save you a couple of steps, but for more complex actions that can add up. If you do the same operations on data with identical formatting, use recorded macros.
VBA Macros in Excel on Mac
Manually recorded macros in Excel help with data that is always in the same size and shape. It is also useful if you want to perform actions on the entire sheet. You can use your macro to prove the problem.
Add another hour and day to the sheet and run the macro. You’ll see the macro overwrites your new data. The way we get around this is using code to make the macro more dynamic using VBA, which is a slimmed down version of Visual Basic. The implementation focuses on automation for Office.
It is not as easy to pick up as Applescript, but Office’s automation is entirely built around Visual Basic. So once you work with it here, you are quickly able to turn around and use it in other Office apps. (It can also be a big help if you’re stuck with a Windows PC at work.)
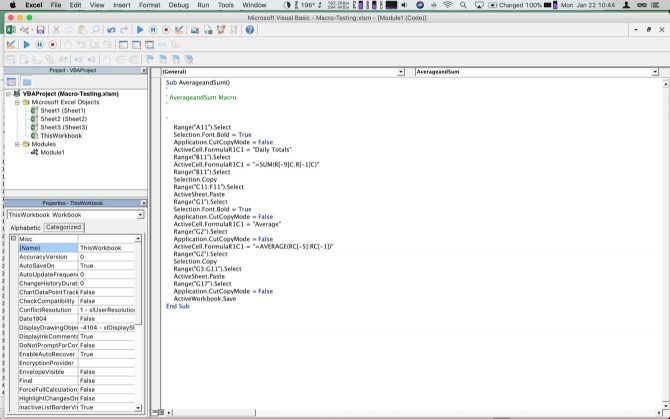
When working with VBA in Excel, you have a separate Window. The screenshot above is our recorded macro as it appears in the code editor. The windowed mode can be helpful to play around with your code as you’re learning. When your macro gets hung up, there are debugging tools to look at the state of your variables and sheet data.
Office 2016 now comes with the full Visual Basic editor. It allows you to use the Object Browser and debugging tools that used to be limited to the Windows version. You can access the Object Browser by going to View > Object Browser or just press Shift + Command + B. You can then browse through all the classes, methods, and properties available. It was very helpful in constructing the code in the next section.
Example 2: Daily Sales Total and Hourly Average With Code
Before you start coding your macro, let’s start by adding a button to the template. This step makes it much easier for a novice user to access your macro. They can click a button to call the macro rather than digging into the tabs and menus.
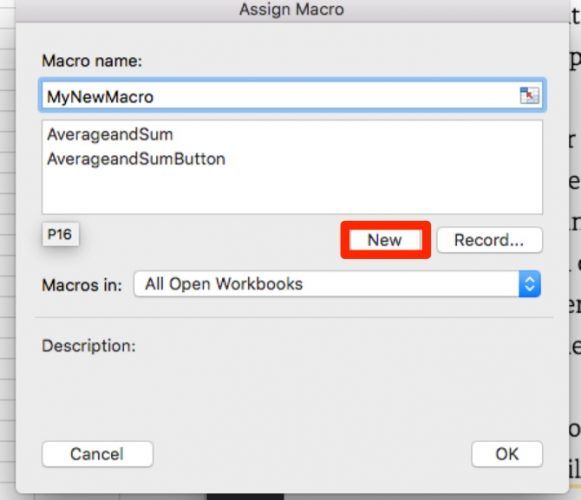
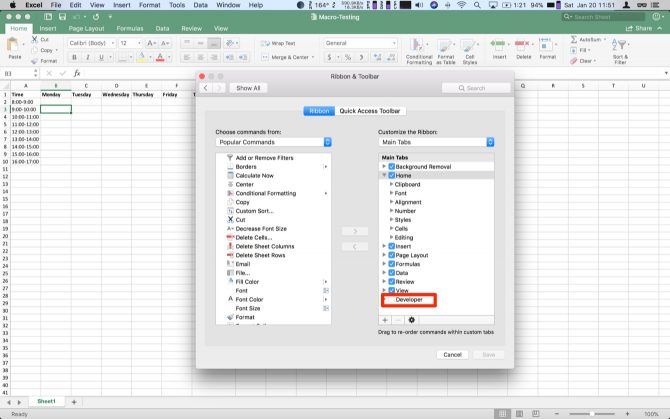
Switch back to the blank template sheet you created in the last step. Click on Developer to get back to the tab. Once you’re on the tab, click on Button. Next, click somewhere in the sheet on the template to place the button. The macros menu comes up, name your macro and click New.
The Visual Basic Window will open up; you’ll see it listed as Module2 in the project browser. The code pane will have Sub AverageandSumButton() at the top and a few lines down End Sub. Your code needs to go between these two, as it is the beginning and the end of your macro.
Step 1: Declaring Variables
To begin, you will need to declare all of your variables. These are in the code block below, but a note about how they are constructed. You should declare all variables using Dim before the name, and then as with the datatype.
 Sub AverageandSumButton()
  Dim RowPlaceHolder As Integer
  Dim ColumnPlaceHolder As Integer
  Dim StringHolder As String
  Dim AllCells As Range
  Dim TargetCells As Range
  Dim AverageTarget As Range
  Dim SumTarget As Range
Now that you have all of your variables, you need to use some of the range variables right away. Ranges are objects that hold sections of the worksheet as addresses. The variable All Cells will be set to all the active cells on the sheet, which includes the column and row labels. You get this by calling the ActiveSheet object and then it’s UsedRange property.
The problem is you don’t want the labels included in the average and sum data. Instead, you’ll use a subset of the AllCells range. This will be the TargetCells range. You manually declare its range. Its start address is going to be the cell at the second row in the second column of the range.
You call this by calling your AllCells range, using its Cells class to get that specific cell using (2,2). To get the final cell in the range, you will still call AllCells. This time using SpecialCells method to get the property xlCellTypeLastCell. You can see both of these in the code block below.
   Set AllCells = ActiveSheet.UsedRange
  Set TargetCells = Range(AllCells.Cells(2, 2), AllCells.SpecialCells(xlCellTypeLastCell))
Step 2: For Each Loops
The next two sections of code are For Each loops. These loops go through an object to act on each subset of that object. In this case, you are doing two of them, one for each row and one for each column. Since they are almost exactly the same, only one of them is here; but both are in the code block. The details are virtually identical.
Before you start the loop for each row, you need to set the target column where the loop writes the average of each row. You use the ColumnPlaceHolder variable to set this target. You set it equal to the Count variable of the Cells class of AllCells. Add one to it to move it to the right of your data by appending +1.
Next, you are going to start the loop by using For Each. Then you want to create a variable for the subset, in this case, subRow. After the In, we set the main object we are parsing TargetCells. Append .Rows at the end to limit the loop to only each row, instead of every cell in the range.
Inside the loop, you use the ActiveSheet.Cells method to set a specific target on the sheet. The coordinates are set by using subRow.Row to get the row the loop is currently in. Then, you use ColumnPlaceHolder for the other coordinate.
You use this for all three steps. The first you append .value after the parentheses and set equal to WorksheetFunction.Average(subRow). This writes the formula for the average of the row into your target cell. The next line you append .Style and set that equal to «Currency». This step matches the rest of your sheet. On the last line, you append .Font.Bold and set it equal to True. (Note there are not quotes around this one, as it is the boolean value.) This line bolds the font to make the summary info stand out from the rest of the sheet.
Both steps are in the code example below. The second loop swaps rows for columns and changes the formula to Sum. Using this method ties your calculations to the format of the current sheet. Otherwise, its linked to the size at the time you record the macro. So when you work more days or hours, the function grows with your data.
   ColumnPlaceHolder = AllCells.Columns.Count + 1
  For Each subRow In TargetCells.Rows
  ActiveSheet.Cells(subRow.Row, ColumnPlaceHolder).Value = WorksheetFunction.Average(subRow)
  ActiveSheet.Cells(subRow.Row, ColumnPlaceHolder).Style = "Currency"
  ActiveSheet.Cells(subRow.Row, ColumnPlaceHolder).Font.Bold = True
  Next subRow
  RowPlaceHolder = AllCells.Rows.Count + 1
  For Each subColumn In TargetCells.Columns
  ActiveSheet.Cells(RowPlaceHolder, subColumn.Column).Value = WorksheetFunction.Sum(subColumn)
  ActiveSheet.Cells(RowPlaceHolder, subColumn.Column).Style = "Currency"
  ActiveSheet.Cells(RowPlaceHolder, subColumn.Column).Font.Bold = "True"
  Next subColumn
Step 3: Label Your Summaries
Next, label the new row and column, set RowPlaceHolder and ColumnPlaceHolder again. First, use AllCells.Row to get the first row in the range, and then AllCells.Column+1 to get the last column. Then you will use the same method as the loop to set the value to «Average Sales». You’ll also use the same .Font.Bold property to bold your new label.
Then reverse it, setting your placeholders to the first column and last row to add «Total Sales». You want to bold this as well.
Both steps are in the code block below. This is the end of the macro noted by End Sub. You should now have the entire macro, and be able to click the button to run it. You can paste all these code blocks in order into your excel sheet if you want to cheat, but where is the fun in that?
   ColumnPlaceHolder = AllCells.Columns.Count + 1
  RowPlaceHolder = AllCells.Row
  ActiveSheet.Cells(RowPlaceHolder, ColumnPlaceHolder).Value = "Average Sales"
  ActiveSheet.Cells(RowPlaceHolder, ColumnPlaceHolder).Font.Bold = True
  ColumnPlaceHolder = AllCells.Column
  RowPlaceHolder = AllCells.Rows.Count + 1
  ActiveSheet.Cells(RowPlaceHolder, ColumnPlaceHolder).Value = "Total Sales"
  ActiveSheet.Cells(RowPlaceHolder, ColumnPlaceHolder).Font.Bold = True
End Sub
What’s Next for Macros in Excel on Mac?
Recorded macros are great to use for predictable repetition. Even if it’s something as simple as resizing all cells and bolding headers, these can save you time. Just avoid common macro mistakes.
Visual Basic opens the door for Mac Excel users to dig deep into Office automation. Visual Basic was traditionally only available on Windows. It allows your macros to adapt to the data dynamically, making them more versatile. If you have the patience, this can be the doorway to more advanced programming.
Want more time-saving spreadsheet tricks? Learn how to highlight specific data automatically with conditional formatting in Excel and conditional highlighting in Numbers on Mac.
Содержание
- Можно ли программировать VBA на маке?
- Warwick Systems Biology Centre
- Browser specific fileopen dialog box
- Enabling file access on Excel 2016 for macs
- Getting the directory from a full path
- Browsing for a filename
- Loading queryTables
- MS Excel 2011 for Mac: Open the Visual Basic Editor
- MacLochlainns Weblog
- Excel 2011 supports UDFs?
- where will I find visual basic on mac?
Можно ли программировать VBA на маке?
Всем доброго дня. В вузе программируем на VBA. Есть ли смысл кодить VBA на МасОs? Мой препод сказал, что это геморно: мол покупайте винду ибо на маке у вас ничего не получиться. Но найдя с десяток видосов на ютубе, как индусы спокойно кодят вба на маках, стал сомневаться в профессиональности своего препода. Может его завербовал БиллГейтс хм.
Кстати для чего вообще нужен VBA? Неужели функционала экселя и ворда не хватает и нужно дополнительно программировать?
- Вопрос задан 05 сент. 2022
- 195 просмотров
Простой 1 комментарий
Кстати для чего вообще нужен VBA?
Если Вы задаетесь такими вопросами, значит он Вам еще не нужен =)
В формулах MS Excel’я нет циклов, но порой они нужны, пять же если Вы выполняете однотипные действия, например нужно текст из нескольких ячеек собрать в одну строку и сделать это на большой выборке, когда идут сложные условия и их много, когда требуются сложные сортировки данных, в общем когда у Вас большие портянки текста и цифр и с этим нужно что-то делать, как то структурировать и приводить разношерстный текст к единому стандарту, да и еще потребуется интерфейс. тогда приходит на помощь VBA, например на нем можно сделать всплывающее-окно календарик — для вставки даты в ячейку, навигатор по листам книги, запись данных в Word/Excel/Txt данных или наоборот считывание в автоматическом режиме, работа с базами данных, динамическое построение графиков при смене строки курсором и т.д. и т.п.
Неужели функционала экселя и ворда не хватает и нужно дополнительно программировать?
VBA это мини-автоматизация. Вот приходят к Вам постоянно одни и те же данные, Вам с ними что-то нужно сделать, а потом результат отправить почтой. VBA это позволяет сделать. Нажал на кнопку и получил результат, а иначе придется делать вручную. Макросы это просто программа которая делает все то же что и ты, но по заранее известному шаблону и за тебя. Неужели ты думаешь что это не нужно и глупо?
Всем доброго дня. В вузе программируем на VBA. Есть ли смысл кодить VBA на МасОs?
Источник
Warwick Systems Biology Centre
There are a number of problems associated with creating a spreadsheet that works on Apple macs and Windows which can select and open files using a ‘open file’ dialog box
- Difficulty in creating a fileopen dialog box for macs
- Error 1004 returned when refreshing a queryTable after the filename has been changed
- Writing vba that works on both OSs given the range of functions that are required on one, but generate fatal errors on the other.
The following code provides solutions to most of these problems, opening three text files using tableQueries based on the name of one of the files that is found using a find file dialog box. Some of these ideas were incorporated into Phil Brady’s notes on porting a VBA application to a MAC
Browser specific fileopen dialog box
The following is the Windows version of the code for opening a dialog box for selecting a file
And this is for macs:
The fileopen dialog box on a mac is best implemented with applescript. This script catches errors within the Apple script and returns the error number as text (which always begins with a ‘-‘) allowing the calling code to decide what to do. This catches ‘errors’ such as clicking the cancel button and opening with a directory that does not exist. I was not able to identify detailed error info if I caught the error in the VBA.
Enabling file access on Excel 2016 for macs
In the 2016+ versions of Excel, VBA operates in a sandbox which means that explicit permission has to be granted if any files are to be opened. This is not required if the file has been identified with a appleScript ‘fileopen dialog box. For other files this is granted using the GrantAccessToMultipleFiles method. This is wrapped in a method because if it is encountered in code prior to Excel 2016, or on a mac then it throws an untrappable error
Getting the directory from a full path
This gets the directory from a full path
Browsing for a filename
This the function called by the ‘Browse’ button, which calls the OS specific browse subroutine and handles the responses for the mac filedialog, and then goes into common code to see whether the returned value should be placed in the spreadsheet and the query tables loaded using Load_Click
Loading queryTables
This method is either called as part of the processing when ‘Browse’ is clicked, or can be called independently to refresh the files if the names have not changed. It makes use of three queryTables that have already been placed in the appropriate positions in the spreadsheets. The ‘Browse’ button selects the filename which ends _results.txt which is associated with the first queryTable. The other two filenames are derived from the _results.txt filenames Because they have not been explicietly selected by the user the mac security requires that the user confirms that it is OK to load them.
On a mac the code has to deal with the fact that the mac fileOpen dialog box uses path variables with a ‘:’ separator bu the grant access function uses a ‘/’ separator and must start with ‘/User. ‘
Источник
MS Excel 2011 for Mac: Open the Visual Basic Editor
This Excel tutorial explains how to open the Visual Basic Editor in Excel 2011 for Mac (with screenshots and step-by-step instructions).
See solution in other versions of Excel :
You can access the VBA environment in Excel 2011 for Mac by opening the Visual Basic editor.
First, be sure that the Developer tab is visible in the toolbar in Excel.
The Developer tab is the toolbar that has the buttons to open the VBA editor and create Form Controls like buttons, checkboxes, etc.
To display the Developer tab, click on Preferences under the Excel menu at the top of the screen.
When the Excel Preferences window appears, click on the Ribbon icon in the Sharing and Privacy section.
In the Customize section, check Developer in the list of tabs to show. Then click on the OK button.
Select the Developer tab from the toolbar at the top of the screen. Then click on the Editor option in the Visual Basic group.
Now the Microsoft Visual Basic editor should appear and you can view your VBA code.
Источник
MacLochlainns Weblog
Michael McLaughlin’s Technical Blog
Excel 2011 supports UDFs?
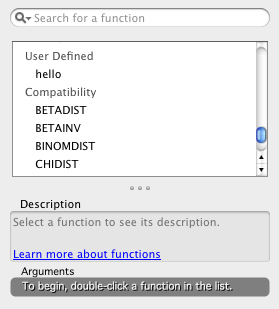
I had a chance (30 minutes) to play with Excel 2011 on the Mac OS X today. I was shocked to discover that Excel 2011 didn’t appear to support User-Defined Functions (UDFs) like Excel 2010 for Windows. My understanding was that this release would be one where it implemented Visual Basic for Applications (VBA) like Windows. Initially I thought it didn’t but I bought my own copy, did a full install with Visual Basic, and it appears that Microsoft has delivered. Oops, my bad for assuming the machine I played on originally had a solid installation. It appears to have had only a standard installation.
Watch out because UDFs fail with a #NAME! error on a standard install of Excel 2011. While they’re found in the Insert Function dialog in both cases, they only appear to work with a full installation. The downside for Insert Function is that, like Excel 2008, it has no quick poplist to narrow the function choices to groups. We have the big list once more.
Here are my test functions:
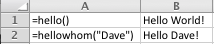
Function hello() hello = «Hello World!» End Function Function hellowhom(nameIn As Variant) hellowhom = «Hello » + CStr(nameIn) + «!» End Function
I think I found the trick to get Excel 2011 recognize and run User-Defined Functions. Make sure you do a custom installation and check Visual Basic for Application. Anyway, you can test these functions like that shown below. Column A contains the text of the formulas (a preceding single quote does that), and column B contains actual function calls.
Enabling the Developer ribbon took a few moments when I got my own copy. I figured that updating this was better than making a new post on the blog and linking them. It’s a three step process.
- Navigate to the Excel menu item and select Preferences…, as shown below.

- In the Excel Preferences shown below, click the Ribbon icon.
- In the Show or hide tabs, or drag them into the order you prefer: box shown below, enable the Developer checkbox.
It’s awesome, now accountants and economists can switch to Mac OS X without having to host a virtual machine with Microsoft Excel.
Источник
where will I find visual basic on mac?
I have migrated microsoft office to my new macbook pro and its saying visual basic is not installed? where would this reside on the mac? Can I install it?
OS X Mavericks (10.9.1)
Posted on Jan 9, 2014 12:44 AM
Loading page content
Page content loaded
There is no Visual Basic in the Mac product. Microsoft chose not to implement it. If you absolutely have to use it, you need to create a Bootcamp partition and install Windows, or use Parallels to create a virtual machine running Windows.
Applications/Microsoft Office 2011/Office/Visual Basic for Applications.framework/Visual Basic for Applications
But let me know if you get MS Word to Connect with it.
There is no Visual Basic in the Mac product.
I am not sure that infromation is correct.
For example you can get Visual Basic for Excel in Office for Mac 2011 as follows: http://www.techonthenet.com/excel/macros/visual_basic_editor2011.php
1. Choose Excel Menu > Preferences
2. Choose Ribbon in the Sharing and Privacy section.
3. In the Customize section, check Developer in the list of tabs. Click OK.
4. Select the Developer tab from the toolbar at the top of the screen.
5. Click on the Editor option in the Visual Basic group.
Now the Microsoft Visual Basic editor should appear and you can view your VBA code.
I just ran into this problem trying to use Dragon Dictate in the beta for Microsoft Word 15(16?) on my iMac Retina 5K . Reading one of the above posts I started with Finder, opened the Applications folder, then I right-clicked on the Microsoft Word icon. One of the menu items that showed up was «show package contents». I selected that and a window opened containing one folder icon named Contents so I clicked on that. Several folders then showed up and one was named Frameworks. I clicked on that and was met by window filled with what looked like little Lego cubes, and one of those cubes was named » Visual Basic for applications.framework». When I clicked that, small window opened on my screen with a bunch of lines of what looked like software commands. The final line said that the installation was successful. Hoping that I had achieved my goal, I went back to Microsoft Word and was happy to find that Dragon Dictate was now able to run.
(However, just to be clear, when I say that Dragon Dictate is now able to run in MS Word, I’m NOT saying that it runs properly in Microsoft Word, nor for that fact does it operate properly in the Mac email app. One thing I’ve run into repeatedly is that a lot of problems show up when I direct it to select a particular word. Sometimes it does it properly, but more often it moves the cursor back in my document several lines, even several paragraphs, a nd selects parts of two words that are next to each other as well as the space in between them. From that point on many other functional features stop work properly. An example just occurred: In the second sentence before this one, I initially spoke the word «select» in its singular form, but when I asked it to be selected so that I could convert it to its plural form the cursor highlighted the word «select», but then kept moving backwards through the paragraph highlighting everything along the way!! Now a variety of additional malfunctions are showing up so much so that I turned off Dragon and typed this last bit.)
Источник
Visual Basic for Applications, or VBA, is a Microsoft programming language that allows users to create scripts to execute certain actions or functions in a document by using Macros. It is most widely used in Excel to manage large quantities of data; however, other uses do exist. In this article we will show you how to activate VBA in Excel. These methods should work on both PC and Mac.
How to access VBA in Excel?
Access to VBA is turned off by default in Excel as a security precaution. Microsoft Office is vulnerable to Macro viruses, which can be spread to other documents if VBA is enabled. However, enabling VBA does not increase your likelihood of contracting a computer virus if you use it correctly and with caution.
To get started manipulating data, you will need to add the VBA add-in and enable access. This article will explain how to get started with VBA on your Windows computer.
How to activate the VBA add-in?
- To enable/disable the VBA tool, first, open Excel, click Options and select Add-ins. In the list that displays, find the add-in Analysis ToolPalk — VBA, and select OK:

- VBA add-in will now be active. Next, you must ensure the VBA tool is enabled.
How to enable or disable Access to VBA in Excel?
To enable/disable VBA tool, first open Excel, click Options, and find the Trust Center. Here, select the Trust Center Settings, and search for Macro Settings:

To enable access to VBA, ensure to check the option Trust access to the VBA project object model. To disable it, make sure that the box is unchecked:

Need more help with Excel? Check out our forum!