

This Excel tutorial explains the VBA environment in Excel 2003 (with screenshots and step-by-step instructions).
What is VBA?
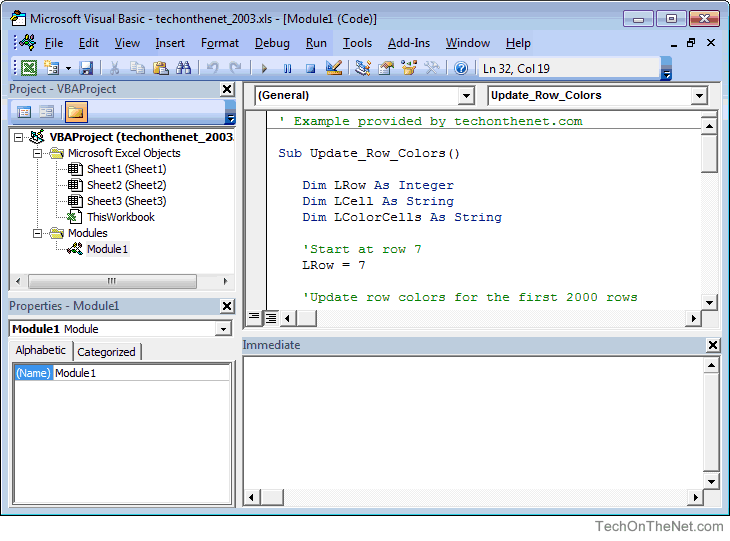
The Microsoft Visual Basic window displays your VBA environment in Excel 2003:
VBA standards for Visual Basic for Applications and is the language embedded within your spreadsheet in Excel 2003.
You use VBA in Excel whenever you do one of the following:
- Record a macro.
- Run a macro.
- Create a new function.
- Create a new subroutine.
- Define a variable.
- Place code on the click of a button.
These are just some of the examples of when you might be running VBA code in Excel 2003.

По Excel написано немало книг. Но книга, которую вы держите в своих руках, является особенной — в ней разработка приложений электронных таблиц рассматривается в широком контексте. VBA — это всего лишь один из компонентов среды разработки пользовательских приложений, хотя и довольно существенный. Данная книга поможет вам разобраться в тонкостях разработки приложений с помощью VBA. В ней описаны многочисленные средства языка VBA, его возможности и среда использования. Вначале вашему вниманию будет предложен обзор возможностей программы, далее вы перейдете к определению концепций VBA-программирования, а затем познакомитесь с самим языком. Если вы начинающий программист на VBA, то в данном издании найдете всю необходимую информацию, которая потребуется для дальнейшей работы. Если вы уже обладаете завидным опытом работы с VBA, то эта книга обогатит и приумножит ваши знания, пополнив их новыми методиками и примерами из реальной жизни.
На русском языке.
Качество:
хорошее (с примерами файлов)
Введение
Всем нам приходится — кому реже, кому чаще — повторять одни и те же действия и операции в Excel. Любая офисная работа предполагает некую «рутинную составляющую» — одни и те же еженедельные отчеты, одни и те же действия по обработке поступивших данных, заполнение однообразных таблиц или бланков и т.д. Использование макросов и пользовательских функций позволяет автоматизировать эти операции, перекладывая монотонную однообразную работу на плечи Excel. Другим поводом для использования макросов в вашей работе может стать необходимость добавить в Microsoft Excel недостающие, но нужные вам функции. Например функцию сборки данных с разных листов на один итоговый лист, разнесения данных обратно, вывод суммы прописью и т.д.
Макрос — это запрограммированная последовательность действий (программа, процедура), записанная на языке программирования Visual Basic for Applications (VBA). Мы можем запускать макрос сколько угодно раз, заставляя Excel выполнять последовательность любых нужных нам действий, которые нам не хочется выполнять вручную.
В принципе, существует великое множество языков программирования (Pascal, Fortran, C++, C#, Java, ASP, PHP…), но для всех программ пакета Microsoft Office стандартом является именно встроенный язык VBA. Команды этого языка понимает любое офисное приложение, будь то Excel, Word, Outlook или Access.
Способ 1. Создание макросов в редакторе Visual Basic
Для ввода команд и формирования программы, т.е. создания макроса необходимо открыть специальное окно — редактор программ на VBA, встроенный в Microsoft Excel.
- В старых версиях (Excel 2003 и старше) для этого идем в меню Сервис — Макрос — Редактор Visual Basic (Toos — Macro — Visual Basic Editor).
- В новых версиях (Excel 2007 и новее) для этого нужно сначала отобразить вкладку Разработчик (Developer). Выбираем Файл — Параметры — Настройка ленты (File — Options — Customize Ribbon) и включаем в правой части окна флажок Разработчик (Developer). Теперь на появившейся вкладке нам будут доступны основные инструменты для работы с макросами, в том числе и нужная нам кнопка Редактор Visual Basic (Visual Basic Editor)
 :
:
 :
:К сожалению, интерфейс редактора VBA и файлы справки не переводятся компанией Microsoft на русский язык, поэтому с английскими командами в меню и окнах придется смириться:

Макросы (т.е. наборы команд на языке VBA) хранятся в программных модулях. В любой книге Excel мы можем создать любое количество программных модулей и разместить там наши макросы. Один модуль может содержать любое количество макросов. Доступ ко всем модулям осуществляется с помощью окна Project Explorer в левом верхнем углу редактора (если его не видно, нажмите CTRL+R). Программные модули бывают нескольких типов для разных ситуаций:
- Обычные модули — используются в большинстве случаев, когда речь идет о макросах. Для создания такого модуля выберите в меню Insert — Module. В появившееся окно нового пустого модуля можно вводить команды на VBA, набирая их с клавиатуры или копируя их из другого модуля, с этого сайта или еще откуда нибудь:

- Модуль Эта книга — также виден в левом верхнем углу редактора Visual Basic в окне, которое называется Project Explorer. В этот модуль обычно записываются макросы, которые должны выполнятся при наступлении каких-либо событий в книге (открытие или сохранение книги, печать файла и т.п.):

- Модуль листа — доступен через Project Explorer и через контекстное меню листа, т.е. правой кнопкой мыши по ярлычку листа — команда Исходный текст (View Source). Сюда записывают макросы, которые должны выполняться при наступлении определенных событий на листе (изменение данных в ячейках, пересчет листа, копирование или удаление листа и т.д.)


Обычный макрос, введенный в стандартный модуль выглядит примерно так:

Давайте разберем приведенный выше в качестве примера макрос Zamena:
- Любой макрос должен начинаться с оператора Sub, за которым идет имя макроса и список аргументов (входных значений) в скобках. Если аргументов нет, то скобки надо оставить пустыми.
- Любой макрос должен заканчиваться оператором End Sub.
- Все, что находится между Sub и End Sub — тело макроса, т.е. команды, которые будут выполняться при запуске макроса. В данном случае макрос выделяет ячейку заливает выделенных диапазон (Selection) желтым цветом (код = 6) и затем проходит в цикле по всем ячейкам, заменяя формулы на значения. В конце выводится окно сообщения (MsgBox).
С ходу ясно, что вот так сразу, без предварительной подготовки и опыта в программировании вообще и на VBA в частности, сложновато будет сообразить какие именно команды и как надо вводить, чтобы макрос автоматически выполнял все действия, которые, например, Вы делаете для создания еженедельного отчета для руководства компании. Поэтому мы переходим ко второму способу создания макросов, а именно…
Способ 2. Запись макросов макрорекордером
Макрорекордер — это небольшая программа, встроенная в Excel, которая переводит любое действие пользователя на язык программирования VBA и записывает получившуюся команду в программный модуль. Если мы включим макрорекордер на запись, а затем начнем создавать свой еженедельный отчет, то макрорекордер начнет записывать команды вслед за каждым нашим действием и, в итоге, мы получим макрос создающий отчет как если бы он был написан программистом. Такой способ создания макросов не требует знаний пользователя о программировании и VBA и позволяет пользоваться макросами как неким аналогом видеозаписи: включил запись, выполнил операци, перемотал пленку и запустил выполнение тех же действий еще раз. Естественно у такого способа есть свои плюсы и минусы:
- Макрорекордер записывает только те действия, которые выполняются в пределах окна Microsoft Excel. Как только вы закрываете Excel или переключаетесь в другую программу — запись останавливается.
- Макрорекордер может записать только те действия, для которых есть команды меню или кнопки в Excel. Программист же может написать макрос, который делает то, что Excel никогда не умел (сортировку по цвету, например или что-то подобное).
- Если во время записи макроса макрорекордером вы ошиблись — ошибка будет записана. Однако смело можете давить на кнопку отмены последнего действия (Undo) — во время записи макроса макрорекордером она не просто возрвращает Вас в предыдущее состояние, но и стирает последнюю записанную команду на VBA.
Чтобы включить запись необходимо:
- в Excel 2003 и старше — выбрать в меню Сервис — Макрос — Начать запись (Tools — Macro — Record New Macro)
- в Excel 2007 и новее — нажать кнопку Запись макроса (Record macro) на вкладке Разработчик (Developer)
Затем необходимо настроить параметры записываемого макроса в окне Запись макроса:

- Имя макроса — подойдет любое имя на русском или английском языке. Имя должно начинаться с буквы и не содержать пробелов и знаков препинания.
- Сочетание клавиш — будет потом использоваться для быстрого запуска макроса. Если забудете сочетание или вообще его не введете, то макрос можно будет запустить через меню Сервис — Макрос — Макросы — Выполнить (Tools — Macro — Macros — Run) или с помощью кнопки Макросы (Macros) на вкладке Разработчик (Developer) или нажав ALT+F8.
- Сохранить в… — здесь задается место, куда будет сохранен текст макроса, т.е. набор команд на VBA из которых и состоит макрос.:
- Эта книга — макрос сохраняется в модуль текущей книги и, как следствие, будет выполнятся только пока эта книга открыта в Excel
- Новая книга — макрос сохраняется в шаблон, на основе которого создается любая новая пустая книга в Excel, т.е. макрос будет содержаться во всех новых книгах, создаваемых на данном компьютере начиная с текущего момента
- Личная книга макросов — это специальная книга Excel с именем Personal.xls, которая используется как хранилище макросов. Все макросы из Personal.xls загружаются в память при старте Excel и могут быть запущены в любой момент и в любой книге.
После включения записи и выполнения действий, которые необходимо записать, запись можно остановить командой Остановить запись (Stop Recording).
Запуск и редактирование макросов
Управление всеми доступными макросами производится в окне, которое можно открыть с помощью кнопки Макросы (Macros) на вкладке Разработчик (Developer) или — в старых версиях Excel — через меню Сервис — Макрос — Макросы (Tools — Macro — Macros):

- Любой выделенный в списке макрос можно запустить кнопкой Выполнить (Run).
- Кнопка Параметры (Options) позволяет посмотреть и отредактировать сочетание клавиш для быстрого запуска макроса.
- Кнопка Изменить (Edit) открывает редактор Visual Basic (см. выше) и позволяет просмотреть и отредактировать текст макроса на VBA.
Создание кнопки для запуска макросов
Чтобы не запоминать сочетание клавиш для запуска макроса, лучше создать кнопку и назначить ей нужный макрос. Кнопка может быть нескольких типов:
Кнопка на панели инструментов в Excel 2003 и старше
Откройте меню Сервис — Настройка (Tools — Customize) и перейдите на вкладку Команды (Commands). В категории Макросы легко найти веселый желтый «колобок» — Настраиваемую кнопку (Custom button):

Перетащите ее к себе на панель инструментов и затем щелкните по ней правой кнопкой мыши. В контекстом меню можно назначить кнопке макрос, выбрать другой значок и имя:

Кнопка на панели быстрого доступа в Excel 2007 и новее
Щелкните правой кнопкой мыши по панели быстрого доступа в левом верхнем углу окна Excel и выберите команду Настройка панели быстрого доступа (Customise Quick Access Toolbar):

Затем в открывшемся окне выберите категорию Макросы и при помощи кнопки Добавить (Add) перенесите выбранный макрос в правую половину окна, т.е. на панель быстрого доступа:

Кнопка на листе
Этот способ подходит для любой версии Excel. Мы добавим кнопку запуска макроса прямо на рабочий лист, как графический объект. Для этого:
- В Excel 2003 и старше — откройте панель инструментов Формы через меню Вид — Панели инструментов — Формы (View — Toolbars — Forms)
- В Excel 2007 и новее — откройте выпадающий список Вставить (Insert) на вкладке Разработчик (Developer)
Выберите объект Кнопка (Button):

Затем нарисуйте кнопку на листе, удерживая левую кнопку мыши. Автоматически появится окно, где нужно выбрать макрос, который должен запускаться при щелчке по нарисованной кнопке.
Создание пользовательских функций на VBA
Создание пользовательских функций или, как их иногда еще называют, UDF-функций (User Defined Functions) принципиально не отличается от создания макроса в обычном программном модуле. Разница только в том, что макрос выполняет последовательность действий с объектами книги (ячейками, формулами и значениями, листами, диаграммами и т.д.), а пользовательская функция — только с теми значениями, которые мы передадим ей как аргументы (исходные данные для расчета).
Чтобы создать пользовательскую функцию для расчета, например, налога на добавленную стоимость (НДС) откроем редактор VBA, добавим новый модуль через меню Insert — Module и введем туда текст нашей функции:

Обратите внимание, что в отличие от макросов функции имеют заголовок Function вместо Sub и непустой список аргументов (в нашем случае это Summa). После ввода кода наша функция становится доступна в обычном окне Мастера функций (Вставка — Функция) в категории Определенные пользователем (User Defined):

После выбора функции выделяем ячейки с аргументами (с суммой, для которой надо посчитать НДС) как в случае с обычной функцией:

Where I’m at the developers have been updated to Excel 2007, but most of the users haven’t. I’m building a spreadsheet template (*.xlt) for a user that’s gonna need some vba code included, and I’m wondering what issues I’m likely to run into building this in 2007 instead of 2003? I don’t have access to a machine with Excel 2003 for testing, and I’m worried this particular project is headed for disaster.
![]()
shruti1810
3,8202 gold badges15 silver badges28 bronze badges
asked Oct 13, 2008 at 16:51
![]()
Joel CoehoornJoel Coehoorn
395k113 gold badges563 silver badges792 bronze badges
2
The VBA language hasn’t changed, but there are additional objects in Office 2007 that are not in Office 2003. Naturally, this will cause a runtime error when you try to access these items in a 2003 environment. What’s stopping you from setting about a virtual machine with Excel 2003 to develop under?
answered Oct 13, 2008 at 17:03
![]()
1
Rather than depending on a probably incomplete list of objects and methods which have been added to Excel 2007’s object library, the best (mmost relliable) practice is to always develop in the oldest version of Excel likely to be used to run the code.
answered Nov 4, 2008 at 4:50
2
One difference I discovered is that a subroutine must have a different signature to be called from a menu (in Excel 2003) than when called from the ribbon (in Excel 2007). Whatsmore, Excel 2003 doesn’t recognise IRibbonControl and throws compile errors.
To work toward cross-version compatability, I use a Conditional Compilation Argument and then check that in pre-processor macros.
e.g.
#If USINGRIBBON Then
    Public Sub CallFromRibbon(control As IRibbonControl)
#Else
    Public Sub CallFromRibbon()
#End If
    ' Code here
   End Sub
This does mean that you have to save one version of your add-in with the USINGRIBBON flag set to false (for Excel2003) and another with the USINGRIBBON flag set to true (for Excel2007), but this is far easier than maintaining two completely separate codebases.
answered Feb 8, 2010 at 11:54
![]()
Chris SpicerChris Spicer
2,1341 gold badge13 silver badges22 bronze badges
billb2112 is right. There are numerous changes to Excel 2007 over excel 2003 that are not backward compatible. While the language might not have changed, the objects have been updated. Some have had additional properties added, some work differently and some functions in Excel have changed.
You need to be very careful that what you code works in Excel 2003.
I would suggest as billb2112 said that you get a virtual machine to not only test in but also to code in. I do all my Excel development for clients who only have 2003 in a 2003 machine. Note that if users have Excel 2002 or 2000 there are even more differences as you go back and you will simply get runtime errors on any code that these older versions don’t support.
update
unfortunately jeffs answer is not quite correct. while yes the vba language hasn’t been updated it is not the same in 2007 as in 2003. as in 2003 its not the same as in 2002 etc.
what has happened is extra and additional functions and arguments for functions have been added. for example there are more options in the FIND function in Excel in 2003 than in 2002. thus if you record a macro (the best way to find these problems) in 2003 and then run it in 2002 you will have run time errors relating to the new arguments that simply do not work in the 2002 VBA editor. following the same process for functions that have changed in excel 2007 and then going back to 2003 to test will help you locate these problems. some examples include conditional formatting, colours (themes) and numerous new spreadsheet functions.
jon peltier has the best advice from that regard — develop in the oldest possible version that the client /user will use.
Virtual PC 2007 is free to download and install. you will just need a licensed copy of XP/Vista and office to install to run in it.
answered Oct 15, 2008 at 6:51
![]()
SpyJournalSpyJournal
2891 gold badge2 silver badges8 bronze badges
1
i used to develop a lot of macros under 2003, what a POTA,, things like Find, Dir and some others are not available or something change. therefore some erros can be expected, i used to count from 65000 row to the first non empty row to count the rows to work on…. now more rows means more work to do
answered Sep 30, 2009 at 17:21
1
Введение
Без преувеличения
можно сказать, Microsoft
Office
любых версий является самым полезным
и самым используемым продуктом Microsoft.
И современный руководитель, и менеджер,
и преподаватель, и студент, и школьник
– все, кто имеет в своем распоряжении
компьютер, в той или иной степени
используют эту систему.
Одним из наиболее
важных и полезных аспектов подготовки
Microsoft
Office
к выполнению определенных задач является
автоматизация процессов взаимодействия
пользователя с приложениями Microsoft
Office.
Эти приложения не являются законченными
продуктами, настроенными на выполнение
всех возможных задач, а представляют
собой системы, которые нуждаются в
определенной настройке, что обеспечивается
разнообразными средствами, как
интерактивными, так и программными. Все
приложения Microsoft
Office
поддерживают язык программирования
Visual
Basic
for
Applications
(VBA).
VBA
позволяет работать с Microsoft
Office,
как с некоторым конструктором: в
распоряжении разработчика VBA-приложения
не только большое количество объектов
и коллекций, но и возможности настроек,
позволяющие до такой степени программно
настроить любое приложение, что
пользователь такого приложения может
и не понять, с каким приложением происходит
«общение».
Важнейшим
достоинством VBA
является возможность объединять любые
приложения Microsoft
Office
для решения, практически, любых задач
по обработке информации. В этом смысле
Microsoft
Office
можно считать системой программирования,
подобной C++,
Delphi
и т.д., но с более мощными и разнообразными
функциями, поскольку здесь имеется
неизмеримо большее количество управляемых
системой объектов и готовых решений
для конечных пользователей.
Привлекательная
особенность VBA
в том, что он очень удобен для первого
знакомства с программированием в среде
Windows.
Этому способствует широкое распространение
приложений Microsoft
Office,
бесконечное разнообразие возможных
практических задач, интуитивно понятная
интегрированная среда редактора Visual
Basic,
возможность обучения программированию
посредством анализа кода, записанного
при помощи макрорекордера, наличие
огромного количества объектов, которыми
можно управлять из VB-кода. Более глубокие
знания VBA-программирования позволят
решать, практически, любые задачи: от
автоматизации создания простых документов
до обработки баз данных с использованием
как настольных, так и сетевых СУБД.
В данном пособии
предлагается набор заданий, объединенных
в лабораторные работы по изучаемым
вопросам. Каждая лабораторная работа
предполагает выполнение заданий по
прописанным действиям, осмысление
проделанного и выполнение упражнений
на закрепление полученных навыков.
На базе предложенного
материала можно организовать вариативность
в преподавании VBA
в зависимости от подготовки студентов.
Лабораторные работы охватывают основы
языка Visual
Basic,
а также операции по созданию макросов,
процедур и функций, приложений обработки
электронных таблиц с
3
использованием
диалоговых окон. Предполагается освоить
язык программирования Visual
Basic.
Рекомендуется
начать изучение VBA
с лекционного курса по данной теме. Он
создаст теоретическую основу для
практической деятельности.
По структуре каждая
работа имеет следующие составные части:
ь
цель
занятия;
ь
необходимые
материалы к заданиям;
ь
справочный
материал;
ь
комментированные
практические задания;
ь
упражнения
для самостоятельной работы;
ь
контрольные
вопросы.
Благодаря такой
структуре обучаемый имеет все условия
для качественного освоения материала
лабораторных работ. Упражнения
предполагают выполнение операций,
аналогичных комментированным практическим
заданиям, но самостоятельно. Это приводит
к осмыслению и закреплению полученных
навыков.
Пособие может быть
использовано аспирантами и студентами
любых специальностей, изучающими
дисциплины «Информатика, численные
методы и компьютерная графика», «Основы
информационных технологий».
4
Независимо от
используемых вами операционной системы
и программных приложений вы часто
выполняете одни и те же последовательности
команд для многих рутинных задач. Вместо
повторения последовательности команд
каждый раз, когда вам необходимо выполнить
какую-либо задачу, вы можете создать
макрос
(macro),
который вместо вас будет выполнять эту
последовательность. Макросы позволяют
вводить одиночную команду, выполняющую
ту же задачу, для реализации которой
вам было бы необходимо вводить несколько
команд вручную.
Макросы, кроме
удобства, имеют и другие преимущества.
Поскольку компьютеры больше приспособлены
для выполнения повторяющихся задач,
чем люди, запись макрорекордером
неоднократно
выполняемых команд повышает точность
и скорость работы. Другим преимуществом
использования макросов является то,
что при их выполнении обычно нет
необходимости в присутствии
человека-оператора.
Макрорекордер
(или просто «рекордер») записывает все
действия пользователя, включая ошибки
и неправильные запуски. Когда программа
воспроизводит макрос, она выполняет
каждую записанную рекордером команду
точно в такой последовательности, в
которой вы их выполняли во время записи.
Записанные
макрорекордером макросы лишены гибкости,
поэтому они не могут реагировать на
изменившиеся или меняющиеся условия.
Законченный макрос сохраняется как
процедура VBA.
На языке VBA
вы можете написать макрос, который
проверяет соответствие различным
предопределенным условиям и выбирает
соответствующую последовательность
действий на основе этих условий. Что
касается повторяющихся действий в самом
макросе, записанные рекордером макросы
имеют значительные ограничения. Если
вам необходимо, чтобы записанный макрос
повторял какое-либо действие несколько
раз, вы должны вручную повторять это
действие нужное количество раз, когда
записываете макрос. Такой макрос всегда
повторяет это действие одинаковое
количество раз, всякий раз, когда вы его
запускаете, до тех пор, пока вы не
отредактируете или не перезапишете
его.
Кроме улучшения
определенных макросов, записанных
макрорекордером, вы можете использовать
VBA
для соединения, организации и управления
несколькими записанными макросами, с
помощью которых вы выполняете сложную
общую задачу, состоящую из нескольких
меньших задач.
С помощью макросов
можно создавать пользовательские меню,
диалоговые окна и панели инструментов,
которые могут до неузнаваемости изменить
интерфейс всем известных продуктов
Word,
Excel,
Access,
PowerPoint.
Уместно здесь отметить также и возможность
создания разнообразной системы проверки
данных, вводимых пользователем в
диалоговых окнах. Когда вы научитесь
писать программы на языке VBA,
вы, скорее всего, уже никогда не станете
начинать создание макроса с использования
рекордера.
5
Лабораторная
работа № 1. Запись
новых макросов в Excel.
Выполнение
макросов
Цель занятия:
Уметь задавать
стартовые условия для макроса, запускать
макроредактор и присваивать имя макросу,
выполнять действия,
которые необходимо записать для
использования позже,
останавливать макроредактор, запускать
на выполнения макросы.
Материалы к
занятию: MS
Excel
2003.
Задание 1. Создайте
макрос в Excel,
который форматирует текст в текущей
ячейке шрифтом Arial,
полужирным, 12 размером.
1. Задайте
стартовые условия.
Для этого:
^Запустите Excel
2003 (Пуск/Все программы ► /Microsoft
Office
► /Microsoft
Office
Excel
2003), если он
еще не запущен;
-
откройте какую-либо
рабочую книгу; -
выберите какой-либо
рабочий лист; -
выделите любую
ячейку в рабочем листе.
2. Выберете
место и имя хранения макроса.
Для этого:
• выберете
в меню Сервис/Макрос/Начать
запись… (Tools/Macro/Record
New
Macro…);
* в
раскрывшимся диалоговом окне Запись
макроса (Record
Macro)
(рис. 1), в
текстовом окне Имя
макроса (Macro
Name)
введите
FormatArialBold12
в качестве
имени макроса;

Рис. 1
ь
оставьте
без изменений текст, который Excel
вставила в поле Описание
(Description),
но добавьте следующее: Форматирует
текст диапазона: Arial,
Bold,
12; этот
дополнительный комментарий поможет
вам (и другим) определить назначение
данного макроса;
ь
в списке
Сохранить в
(Store
macro
in)
для выбора места, в котором будет сохранен
записанный макрос выберите Личная
книга макросов;
ь
если вы
уверены в том, что будете часто использовать
макрос, который
6
собираетесь
записывать, можете назначить для его
запуска горячую клавишу; если — да,
введите горячую клавишу в текстовое
окно Сочетание
клавиш (Shortcut
Key)
окна Запись
макроса;
* щелкните
на кнопке ОК
для начала
записи макроса; как только вы щелкните
на кнопке ОК
в диалоговом
окне Запись
макроса, Excel
запустит
макрорекордер,
отобразит панель ^
Остановить
запись (Stop
Recorder)
и начнет
запись ваших действий. Макрорекордер
сохранит каждое ваше действие в новом
макросе.
Замечание 1.
Доступными
вариантами при сохранении макросов
являются Личная
книга макросов (Personal
Macro
Workbook),
Новая книга (New
Workbook)
и Эта
книга (This
Workbook).
Когда вы
выбираете в качестве места для хранения
макроса Личная
книга макросов, Excel
сохраняет макрос в файле специальной
книги с именем Personal.xls
в папке, в которую установлена Excel.
Excel
автоматически открывает эту книгу
каждый раз в начале работы. Поскольку
вам всегда доступны макросы из всех
открытых книг, макрос, сохраненный в
книге Personal.xls,
также будет доступен вам всегда. Если
книга Personal.xls
не существует, Excel
создаст ее. Выбор Эта
книга приведет
к тому, что Excel
сохранит новый макрос в текущей активной
рабочей книге. Выбор Новая
книга приведет
к созданию в Excel
новой рабочей книги, в которой будет
сохранен этот макрос, — рабочая книга,
которая была активной при запуске вами
макрорекордера, остается активной
рабочей книгой; любые действия, которые
вы записываете, выполняются в этой
книге, а не в новой рабочей книге,
созданной для сохранения макроса.
Замечание 2. Не
всегда при запуске макрорекордера вы
можете увидеть на экране панель Остановить
запись. Поскольку
это — обычная панель, ее можно отображать
или не отображать. Этим, как и другими
панелями, управляет команда Панели
инструментов (Toolbars)
меню Вид
(View).
В любом
случае (при наличии на экране панели
Остановить
запись или
ее отсутствии) вы можете остановить
макрорекордер, выбрав Сервис/Макрос/Остановить
запись.
3. Запишите действия
и остановите макрорекордер.
Для этого:
-
выберите команду
Формат/Ячейки…
(Format/Cells…)
для отображения
диалогового окна Формат
ячеек (Format
Cells); -
щелкните на ярлычке
Шрифт (Font)
для отображения
опций шрифта (рис. 2); -
выберите Arial
в списке
Шрифт (Font);
выполните
этот шаг, даже если шрифт Arial
уже выбран;
-
выберите Полужирный
(Bold)
в списке
Начертание
(Font
Style);
-
щелкните на кнопке
ОК, чтобы
закрыть диалоговое окно Формат
ячеек и
изменить выделенную ячейку в рабочем
листе; -
щелкните на кнопке
Остановить
запись (Stop
Macro)
на панели
Остановить
запись (Stop
Recorder)
или выберите
команду Сервис/Макрос/Остановить
запись (Tools/Macro/Stop
Recording).
7

Рис. 2
Замечание 3. По
умолчанию панель l?f
Остановить
запись в
Excel
содержит две командные кнопки. Левая
кнопка — это кнопка Остановить
запись (Stop);
щелкните на
этой кнопке для остановки макрорекордера.
Правая кнопка -это кнопка Относительная
ссылка (Relative
Reference).
По умолчанию
Excel
записывает абсолютные ссылки на ячейки
в ваши макросы. Кнопка Относительная
ссылка является
кнопкой-переключателем (toggle).
Когда запись с относительными ссылками
отключена, кнопка Относительная
ссылка выглядит
плоской; при помещении курсора мыши на
кнопку вид кнопки изменяется и она
выглядит отжатой. Когда запись с
относительной ссылкой включена, кнопка
Относительная
ссылка на
панели Остановить
запись нажата
(находится в «утопленном» положении).
Щелкая на кнопке Относительная
ссылка, можно
включать и выключать запись с относительными
ссылками во время записи по вашему
желанию.
Задание 2. Выполните
макрос FormatArialBoIdl2.
Для этого:
^выберите ячейку
в рабочем листе (предпочтительнее
ячейку, содержащую некоторый текст,
чтобы вы могли видеть изменения);
^выберите команду
Сервис/Макрос/Макросы…
для отображения
диалогового окна Макрос;
• выберите макрос
PERSONAL.XLS!FormatAriaIBoIdl2
в списке Имя
макроса и
щелкните на кнопке Выполнить
для запуска
макроса FormatArialBoldl2.
Текст в любой ячейке, которая была
выделена до запуска вами этого макроса,
будет теперь иметь формат полужирного
шрифта Arial
12-го размера.
Упражнение
-
Создайте макрос
в Excel,
который вычисляет сумму ячеек A1,
A2
и выводит результат в ячейку A3 шрифтом
Times
New
Roman,
курсивом, 12 размером. -
Создайте макрос
в Excel,
который выводит на желтом фоне синими
буквами в текущую ячейку имя, а справа
от нее фамилию шрифтом Arial,
полужирным, 12 размером. -
Создайте макрос
в Excel,
который выводит красными буквами в
ячейку A3 слово “Частное:”,
справа от
нее выводит частное ячеек A1 и A2 шрифтом
8
Times
New
Roman,
курсивом, 12 размера.
Макросы Visual
Basic
for
Applications
сохраняются как часть файлов, в которых
Excel
(а также Word
и Access)
обычно содержит свои данные, – макросы
сохраняются в файлах рабочих книг в
Excel.
Макросы сохраняются в специальной части
файла данных, называемой Modules
(модули).
Модуль VBA
содержит исходный
код (source
code)
макроса – текстовое представление
инструкций. Каждый файл рабочей книги
Excel
может не содержать модулей или содержать
один или несколько модулей. Модули,
сохраняемые в одной рабочей книге Excel,
имеют общее название Project
(проект).
При записи макроса
в Excel
вы можете определять только рабочую
книгу, в которой Excel
сохраняет записанный макрос, – текущую
рабочую книгу, новую рабочую книгу или
рабочую книгу Personal.xls.
Excel
выбирает модуль, в котором сохраняется
записанный макрос, и при необходимости
создает этот модуль. Когда Excel
создает модуль, в котором сохраняется
записанный макрос, модулю присваивается
имя ModuleN,
где N
– это
количество модулей, созданных для
определенной рабочей книги во время
текущего сеанса работы. Например, в
первый раз, когда вы сохраняете записанный
макрос в Personal.xls
(личной книге макросов), Excel
создает модуль с именем Module1.
Если вы продолжаете записывать макросы
в том же сеансе работы и сохранять их в
Personal.xls,
Excel
продолжает сохранять записанные макросы
в том же модуле Module1
до тех пор,
пока вы не выберете другую рабочую
книгу. Если позже в том же сеансе работы
вы опять захотите сохранить записанные
макросы в Personal.xls,
Excel
добавляет другой модуль с именем Module2
в эту книгу.
Если какая-либо
рабочая книга уже содержит модуль с тем
же именем, что выбран в Excel
для нового модуля, Excel
увеличивает число в имени модуля до тех
пор, пока имя нового модуля не будет
отличаться от имен существующих модулей.
Для просмотра
модулей, сохраненных в определенной
рабочей книге (и исходного кода макроса,
который они содержат), вам необходимо
использовать компонент Visual
Basic
Editor
(Редактор Visual
Basic).
Этот компонент предоставляет
инструментальные средства, которые
используются для создания новых модулей,
просмотра содержимого существующих
модулей, создания и редактирования
исходного кода макроса, создания
пользовательских диалоговых окон и
выполнения других задач, относящихся
к написанию и обслуживанию программ на
VBA.
Редактор Visual
Basic
(Редактор VB)
содержит одни и те же возможности в
Excel,
Word
и Access.
Задание 3. Запустите
Редактор VB.
Для этого:
ь
выберите
Сервис/Макрос/Редактор
Visual
Basic
(Tools/Macro/Visual
Basic
Editor)
или нажмите сочетание клавиш Alt+F11;
ь
выберите
в меню View/Code
или нажмите
клавишу F7.
Excel
запустит Редактор VB
(рис. 3).
9
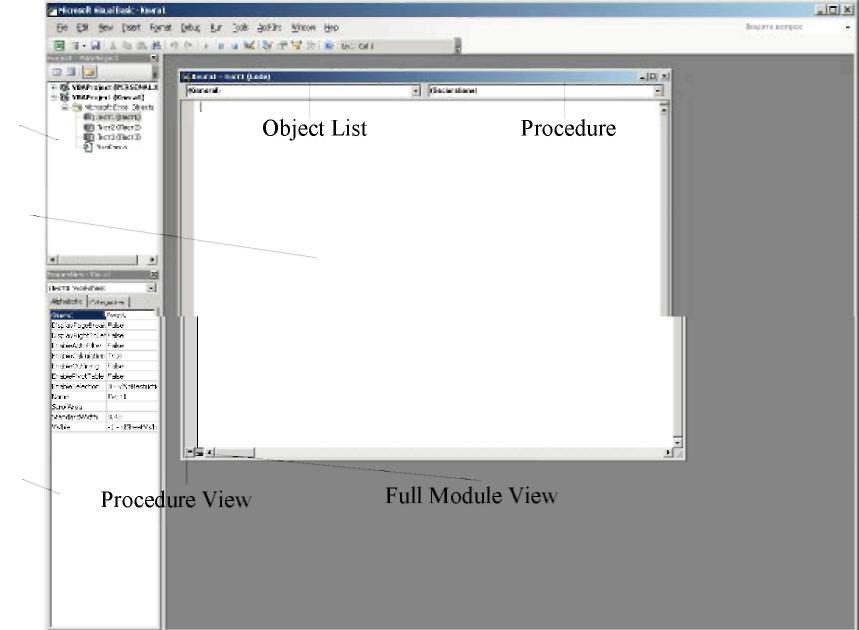
Project
Explorer
Code
Window
Properties
Window
Рис. 3
Окна Редактора
VB
В окне Редактора
VB
имеются три дочерних окна, каждое из
которых отображает важную информацию
о VBA-проекте.
Project
(Проект) — это
группа модулей и других объектов,
сохраняемых в определенной рабочей
книге или шаблоне рабочей книги. Каждое
из окон Редактора VB
отображается по умолчанию в прикрепленных
(docked)
положениях (рис. 3).
Если необходимо,
вы можете переместить любое из дочерних
окон Редактора VB
в любое место на экране, перетаскивая
строку
заголовка (title
bar)
этого окна
таким же образом, каким бы вы перемещали
любое окно на рабочем столе Windows.
Перетаскивание одного из дочерних окон
из его прикрепленного положения приводит
к тому, что оно становится плавающим
окном. Плавающие
(floating)
окна всегда
остаются видимыми поверх других окон.
Вы можете также изменять размер любого
из дочерних окон Редактора VB,
расширяя или уменьшая рамку окна для
увеличения или уменьшения его размера,
что подобно изменению размера любого
окна на рабочем столе Windows.
Project
Explorer
(Окно проекта)
содержит дерево-диаграмму открытых в
данный момент файлов (рабочих книг) и
объектов, содержащихся в этих файлах
(объекты host-приложения,
модули, ссылки, формы и так далее). Project
Explorer
можно использовать для перехода к
различным модулям и другим объектам в
проекте VB
при помощи кнопок (панели инструментов
этого окна) =
View
Code
(Программа),
^ View
Object
(Объект) и
Ш. Toggle
Folders
(Папки).
Properties
Window
(Окно свойств)
содержит все свойства объекта текущего
выбора. Вкладка Alphabetic
(по алфавиту)
этого окна предоставляет список
10
свойств выделенного
объекта, составленный из имен свойств
в алфавитном порядке. Вкладка Categorized
(по категориям)
отображает свойства объекта, отсортированные
по категориям.
Code
Window
— это окно,
в котором вы можете просматривать,
редактировать или создавать исходный
код VBA.
В режиме F
Full
Module
View
весь исходный
код макроса в модуле отображается сразу
в прокручивающемся текстовом окне, а
макрос отделяется от другого макроса
серой линией. Редактор VB
позволяет также просматривать содержимое
модуля в режиме 1=
Procedure
View
(представление
процедуры). Чтобы выбрать режим просмотра,
щелкайте кнопки в нижнем левом углу
Code
Window
(рис. 3).
Когда Code
Window
находится в режиме Procedure
View,
видимым является исходный код только
одного макроса. Используйте раскрывающийся
список Procedure
(процедура)
для просмотра другого макроса. В режиме
Full
Module
View
вы можете также использовать раскрывающийся
список Procedure
для быстрого перехода к отдельному
макросу.
Используйте список
Object
List
(объект) для
выбора объекта, процедуры которого
хотите просмотреть или редактировать.
В случае стандартных модулей, таких как
модули, в которых сохраняются записанные
вами макросы, единственным выбором в
списке Object
List
является General
(общая
область).
Меню Редактора
VB
В Редакторе VB
меню File
(Файл)
предоставляет команды, необходимые для
сохранения изменений в проекте VBA
и вывода на экран исходного кода вашего
макроса VBA.
В табл. 1 приведены команды меню File,
их горячие клавиши и назначение каждой
команды.
Таблица 1 —
Команды меню File
|
Команда |
Горячая клавиша |
Действие |
|
Save (сохранить <проект>) |
Ctrl+S |
Сохраняет текущий |
|
Import |
Ctrl+M |
Добавляет |
|
Export |
Ctrl+E |
Сохраняет текущий |
|
Remove |
Перманентно |
11
|
Команда |
Горячая клавиша |
Действие |
|
Print… |
Ctrl+P |
Печатает модуль |
|
Close |
Alt+Q |
Закрывает Редактор |
Меню Edit
(Правка)
содержит команды, относящиеся к управлению
исходным кодом макроса в Code
Window
и объектами в формах. В табл. 2 приведены
имеющиеся команды меню Edit,
их горячие клавиши и описывается
действие, выполняемое каждой командой.
Таблица 2 –
Команды меню Edit
|
Команда |
Горячая клавиша |
Действие |
|
Undo |
Ctrl+Z |
Отменяет самую |
|
Redo |
Возвращает самую |
|
|
Cut |
Ctrl+X |
Вырезает выделенный |
|
Сору |
Ctrl+C |
Копирует выделенный |
|
Paste |
Ctrl+V |
Вставляет текст |
|
Clear |
Del |
Удаляет выделенный |
|
Select |
Ctrl+A |
Выделяет весь |
|
Find… |
Ctrl+F |
Подобно команде |
|
Find |
F3 |
Повторяет |
|
Replace… |
Ctrl+H |
Подобно команде |
|
Indent (увеличить отступ) |
Tab |
Смещает весь |
12
|
Команда |
Горячая клавиша |
Действие |
|
Outdent (уменьшить отступ) |
Shift+Tab |
|
|
List |
Ctrl+J |
Открывает список |
|
List |
Ctrl+ |
Открывает список |
|
Quick |
Ctrl+I |
Открывает |
|
Parameter |
Ctrl+ |
Открывает |
|
Complete |
Ctrl+Space |
|
|
Bookmarks |
Открывает подменю |
Меню View
(Вид) содержит
команды, позволяющие выбирать элементы
Редактора VB
для просмотра и способ просмотра. В
табл. 3 приведены команды меню View,
их горячие клавиши и действие, производимое
каждой командой.
Таблица 3 –
Команды меню View
|
Команда |
Горячая клавиша |
Действие |
|
Code |
F7 |
Активизирует |
|
Object |
Shift+F7 |
Отображает объект |
13
|
Команда |
Горячая клавиша |
Действие |
|
Definition |
Shift+F2 |
|
|
Last |
Ctrl+ |
|
|
Object (просмотр объектов) |
F2 |
Открывает Object |
|
Immediate |
Ctrl+G |
Отображает окно |
|
Locals |
Отображает |
|
|
Watch
контрольного |
Отображает окно |
|
|
Call |
Ctrl+L |
Отображает список |
|
Project |
Ctrl+R |
Отображает |
|
Properties |
F4 |
Отображает |
|
Toolbox |
Отображает |
|
|
Tab |
Отображает |
|
|
Toolbars |
Отображает |
|
|
Microsoft Excel |
Alt+Fll |
Возвращает вас |
Команды меню Insert
(Вставка)
позволяют добавлять различные объекты,
14
такие
как модули и формы, в ваш проект. В меню
Insert
никакие команды не имеют «горячих
клавиш». В табл. 4 приведены действия,
выполняемые каждой командой этого меню.
Таблица 4 –
Команды меню Insert
Команда Действие
Procedure…
(процедура)
UseForm
Вставляет новую
процедуру (Sub,
Function
или Property)
в текущий
модуль. Процедура – это еще одно название
макроса. Добавляет
новую форму (используется для
создания
пользовательских
диалоговых окон) в проект. Module
(модуль) Добавляет новый модуль в
проект. Редактор VB
дает этому модулю
имя в соответствии с правилами, описанными
ранее.
Class
Module
(модуль
класса)
File…
(файл)
Добавляет в проект
class
module
(модуль
класса).
Модули класса используются для создания
пользовательских объектов в
вашем проекте.
Позволяет вставлять
текстовый файл, содержащий исходный
код VBA,
в модуль.
Команды меню Format
(Формат)
используются при создании пользовательских
диалоговых окон и других форм. Команды
меню Format
позволяют выравнивать объекты в форме
по отношению друг к другу, настраивать
размер элемента управления в соответствии
с его содержимым и выполнять многие
другие полезные задачи. Команды меню
Format
представлены здесь для полноты изложения
материала, хотя вы не будете их применять
до тех пор, пока не начнете создавать
собственные пользовательские диалоговые
окна. В табл. 5 приведены команды меню
Format
и их действия. Заметьте, что эти команды
не имеют «горячих клавиш».
Таблица 5 –
Команды меню Format
Команда Действие
Align
(выровнять)
Открывает подменю
команд, которые позволяют выравнивать
выбранные объекты
в форме по отношению друг к другу.
Здесь можно
выравнивать объекты по верхней/нижней,
правой/левой
границам, по центру или середине
создаваемого
объекта.
Make
Same
Size
(выровнять
размер)
Size to
Fit
(подогнать
размер)
Size to
Grid
(выровнять
размер по сетке)
Открывает подменю
команд, позволяющих изменять размер
выделенных объектов
до размера указанного объекта.
Одновременно
изменяет ширину и высоту объекта
до соответствия размеру его содержимого.
Одновременно
изменяет ширину и высоту объекта до
ближайших меток сетки. Йри разработке
форм Редактор VB
отображает в форме сетку, чтобы было
легче располагать и изменять
размеры объектов в форме.
15
Команда Действие
|
Horizontal |
Открывает подменю |
|
Vertical |
Открывает подменю |
|
Center |
Открывает подменю |
|
Arrange (разместить кнопки) |
Открывает подменю |
|
Group |
Связывает |
|
Ungroup |
Отменяет |
|
Order |
Открывает подменю |
Команды меню Debug
(Отладка)
используются при выполнении тестирования
или отладки макросов. Debugging
– так
называется процесс нахождения и
исправления ошибок в программе. В табл.
6 приведены команды меню Debug,
их «горячие клавиши» и выполняемые
действия.
Таблица 6 –
Команды меню Debug
|
Команда |
Горячая клавиша |
Действие |
|
Compile (компилировать <проект>) |
Компилирует |
|
|
Step (шаг |
F8 |
Выполняет исходный |
|
Step |
Shift+F8 |
Подобно команде |
16
|
Команда |
Горячая клавиша |
Действие |
|
Step (шаг |
Ctrl+ |
|
|
Run |
Ctrl+F8 |
Выполняет |
|
Add |
Позволяет |
|
|
Edit |
Ctrl+W |
Позволяет |
|
Quick (контрольное значение) |
Shift+F9 |
|
|
Toggle |
F9 |
Отмечает место |
|
Clear Breakpoints |
Ctrl+ |
Удаляет все точки |
|
Set |
Ctrl+F9 |
Позволяет менять |
|
Show Statement (показать следующую инструкцию) |
Приводит к |
Команды меню Debug
позволяют непосредственно контролировать
выполнение макроса, останавливать и
запускать макрос в заданных точках и
отслеживать выполнение макроса по
шагам.
Команды меню Run
(Запуск)
позволяют начать выполнение макроса,
прерывать или возобновлять его выполнение
или возвращать прерванный макрос в
состояние до выполнения (табл. 7).
17
Таблица 7 –
Команды меню Run
|
Команда |
Горячая клавиша |
Действие |
|
Run |
F5 |
Приводит к тому, |
|
Break |
Ctrl+Break |
Прерывает |
|
Resert |
Устанавливает |
|
|
Design |
Включает и |
Команды меню Tools
(Сервис) не
только позволяют выбрать макрос для
выполнения, но и получить доступ к
внешним библиотекам макросов и
дополнительным элементам управления
форм (кроме встроенных в VBA).
Команды меню Tools
обеспечивают также доступ к диалоговому
окну Options
(параметры) Редактора VB
и свойствам проекта VBA
текущего выбора в Project
Explorer.
В табл. 8 приведены команды меню Tools
и их действия. Команды меню Tools
не имеют
«горячих клавиш».
Таблица 8 –
Команды меню Tools
|
Команда |
|
|
References… |
Отображает |
|
Additional |
Отображает |
|
Macros… |
Отображает |
18
|
Команда |
|
|
Options… |
Отображает |
|
<project> |
Отображает |
|
Digital |
Отображает |
В меню Add—lns
находится
всего одна команда, Add—In
Manager,
которая приводит к отображению диалогового
окна Add—In
Manager.
Это окно позволяет регистрировать,
загружать или выгружать и определять
поведение дополнений.
В Редакторе VB
имеются два дополнительных меню: Window
(окно) и Help
(помощь). Оба
этих меню содержат команды, идентичные
меню Window
и Help,
имеющимся в других приложениях Microsoft
Windows.
Команды в меню Window
позволяют выбирать активное окно,
разбивать текущее окно, размещать
дочерние окна вертикально и горизонтально,
организовывать дочерние окна VB
в виде каскада или выравнивать значки
минимизированных дочерних окон. Команды
меню Help
также идентичны командам меню Help
в Word,
Excel
и других приложениях Microsoft
Windows.
Меню Help
Редактора VB
позволяет получать контекстно-зависимую
подсказку посредством справочной
системы Microsoft
Office
и просматривать файлы справочной системы
VBA
для host-приложения, из которого вы
запустили Редактор VB.
Если у вас имеется модем или доступ к
Internet,
вы можете использовать Help/MSDN
on
the
Web
для соединения
с разнообразными страницами Web,
содержащими информацию о продуктах
Microsoft
и VBA.
Последняя команда в меню Help
– это команда About
Microsoft
Visual
Basic.
Она отображает диалоговое окно, содержащее
сведения об авторских правах на Microsoft
Visual
Basic.
Диалоговое окно About
Microsoft
Visual
Basic
содержит также командную кнопку System
Info…,
которая отображает информацию о вашей
вычислительной системе: какие драйверы
видеосистемы, звуковой системы и принтера
установлены, какие программы загружены
в память в данное время, какие программы
зарегистрированы в системном реестре
(Windows
System
Registry)
и другую техническую информацию.
Панелями
инструментов Редактора VB
По умолчанию
Редактор VB
отображает только панель инструментов
Standard
(рис. 4). В
конце панели, справа, находится кнопка
(со стрелкой) More
Buttons.
Если вы хотите удалить с панели или
добавить некоторые кнопки на панель
Standard,
нажмите на эту кнопку, а затем укажите
соответствующую кнопку в появляющемся
меню.
19
Запуск программы
Помощник по Office
Окно проекта
Сброс
Вырезать Отменить
Вставить
Панель
Прервать
Окно
Вставка объекта
аца,1
Сохранить
1-1
h
Найти
Дополнительные
кнопки элементов
LnS,ColZ
свойств
Копировать
Приложение Excel
Повторить
Конструктор
Просмотр объектов
Позиция курсора
Рис. 4
Кроме панели
Standard
Редактор VB
предлагает еще три панели: Edit
(правка),
Debug
(отладка) и
UseForm.
Вы можете управлять
тем, какие панели инструментов отображает
Редактор VB
с помощью команды View/Toolbars
(Вид/Панели
инструментов).
Контрольные
вопросы
-
Что такое макрос?
-
Что такое
макрорекордер? Каковы его возможности? -
Как задаются
стартовые условия для макроса? -
Как записать
макрос? -
Как выполнить
макрос? -
Назовите основные
компоненты интегрированной среды VBA.
Соседние файлы в папке Visual Basic
- #
02.05.2014311.81 Кб44Расчётно-графическая работа [5].xls
- #
02.05.20143.44 Mб22Расчётно-графическая работа [6].xls
- #
02.05.20142.88 Mб26Расчётно-графическая работа [7].xls
- #
02.05.2014202.75 Кб25Расчётно-графическая работа [8].xls
- #
02.05.20143.44 Mб30Расчётно-графическая работа [9].xls
- #
Microsoft Excel is a deep program rich in features and functionality. One of the most powerful features of Excel is the ability to write programs in Visual Basic for Applications that run «behind» your worksheets to turn Excel into a calculation-oriented development platform for creating special purpose spreadsheets which can function as applications in their own right.
Service Pack[edit | edit source]
A service pack (in short SP) is a collection of updates, fixes or enhancements to a software program delivered in the form of a single installable package.
A service pack can be incremental, which means it only contains the updates that were not present in the previous service packs or, it can be cumulative, which means it includes the contents of all its predecessors. In the case of Microsoft’s products, an incremental update was called a service release. For example, Office 2000 must be upgraded to service release 1 (SR-1) before one can install SP2.
Macro Security[edit | edit source]
Macro security settings are located in the Trust Center. However, if you work in an organization, your system administrator might have changed the default settings to prevent anyone from changing any settings and execute macros.
Macro Recording[edit | edit source]
A great way of learning about Excel VBA is using its macro recording function. With the function, you tell Excel to start recording, then perform various steps as if you were working without a macro recorder, and finally, tell Excel to stop recording. VBA code corresponding to what you did using Excel GUI has been recorded by Excel. While the code often cannot be meaningfully used without a modification, by starting from it and modifying it you can save a lot of time that would otherwise be spent reading the VBA documentation.
Menu paths:
- Excel 2000, 2003: Tools > Macro > Record New Macro.
- Excel 2007: View (tab) > Macros (group) > down-pointing triangle below Macros button > Record Macro
- Excel 2007: Developer (tab) > Code (group) > Record Macro
Links:
- Use Microsoft Office Excel 2007 macros to speed up work at microsoft.com
- Create a macro (Excel 2003) at microsoft.com
- Record and use Excel macros (Excel 2000) at microsoft.com
Enabling Developer tab[edit | edit source]
Developer tab allows you to insert various user interface controls such as buttons. In order to use it, you first have to enable it.
Menu paths to enable the tab:
- Excel 2007: round Office button > Excel Options (button at bottom) > Popular > Show Developer tab in the Ribbon (check box)
- Excel 2010: File (tab) > Options (button) > Customize Ribbon (button) > Developer (check box)
Links:
- How to: Show the Developer Tab on the Ribbon for Excel 2007 at microsoft.com
- How to: Show the Developer Tab on the Ribbon for Excel 2010 at microsoft.com
Making an XLA[edit | edit source]
- Works on: Excel 2002 SP-2, Excel 2000 SR-1
An XLA is one way to make a VBA code-library. It’s basically just a normal spreadsheet(.xls file) but has its worksheets hidden. Here’s how to create a new one:
- New Workbook
- Save-As …Name it whatever
- Hit Alt-F11
- In the Project-tree, select VBAProject(whatever.xls)/ThisWorkbook
- Hit F4 to get Properties View
- Find Property IsAddin and set to True
- Hit Save
- Close Excel
- Rename whatever.xls to whatever.xla
Alternatively, you can use Save As / Excel AddIn.
Accessing the Registry[edit | edit source]
- Works on: Microsoft Excel 2002 SP-2
This recipe is for reading/writing keys local to your application—this is to provide persistent settings for your VBA app. It does not cover arbitrary access to the Registry (i.e. looking at any key).
The VBA sub/functions are SaveSetting and GetSetting. You can type the following into the Immediate window to get a feel for how these work:
SaveSetting "MyApplicationName", "MyConfigSection", "MyKeyName", "Hello World"
MsgBox GetSetting("MyApplicationName", "MyConfigSection", "MyKeyName")
If you want to iterate over all keys in a given section you can do so as follows:
Sub ShowAllKeys()
   Dim mySettings As Variant
   mySettings = GetAllSettings("MyApplicationName", "MyConfigSection")
   If Not IsEmpty(MySettings) Then
      Dim counter As Integer
      For counter = LBound(mySettings) To UBound(mySettings)
          Dim keyname As String: keyname = mySettings(counter, 0)
          Dim keyval As String: keyval = mySettings(counter, 1)
          MsgBox keyname & "=" & keyval
      Next
   End If
End Sub
You can also delete a registry key as follows:
DeleteSetting "MyApplicationName", "MyConfigSection", "MyKeyName"
FYI: Excel/VBA sticks this in the following registry location:
MyComputerHKEY_CURRENT_USERSoftwareVB and VBA Program SettingsMyApplicationNameMyConfigSection
…where MyApplication and MyConfigSection are whatever you specified in your SaveSettings call.
They end up in HKEY_CURRENT_USERSoftwareVB and VBA Program SettingsMyApplicationNameMyConfigSection.
[edit | edit source]
- Works on: Microsoft Excel 2002 SP-2
Make the following call from VBA:
Application.DisplayAlerts = False
Making Cells Read-Only[edit | edit source]
- Works on: Microsoft Excel 2002 SP-2
Sub ProtectMe()
  Range("A1:IV65536").Locked = False
  Range("A1").Locked = True
  ActiveSheet.Protect Password:="Test"
End Sub
Finding Non-Empty Portion of Worksheet[edit | edit source]
A Worksheet has a maximum size of 65536 rows by 256 columns. However if you want to iterate over all cells you probably don’t want to visit all of the empty ones. For this purpose the Worksheet provides the UsedRange property. For example:
ActiveSheet.UsedRange.Rows.Count
tells you how many non-empty rows are in the given worksheet. Empty rows which are in between the first and last used row are counted as well. Example: If a given Worksheet has entries in cells A7 and B16, used range is considered to be A7:B16, which counts for a total of 10 rows.
Using Events[edit | edit source]
- Works on: Microsoft Excel 2002 SP-2
Consider the following class definition—Assume its a class called CMyClass:
Option Explicit
Dim WithEvents mySheet As Worksheet

Public Sub Init(aWS as Worksheet)
   Set MySheet = aWS
End Sub

Private Sub mySheet_SelectionChange(ByVal Target As Range)
   Dim MyRange As Range
   For Each MyRange in Target
      Debug.Print CStr(MyRange)
   Next
End Sub
The main ideas here are:
- By declaring mySheet WithEvents, you’re saying that CMyClass is listening to mySheet’s events.
- By declaring the member sub mySheet_SelectionChange you’re indicating how an instance of CMyClass should react if mySheet experiences a selection change (i.e. the user selects a new cell or range of cells); The general pattern for events is sub memberVarName_EventName(params).
- You can disconnect the eventing between the given worksheet and CMyClass by setting mySheet = nothing;
- You can create classes that throw events of your design using:
- You would declare at the top of the class: Public Event SomeNiceEventName(YourFavoriteParam1 as WhateverType, etc…),
- You could then raise that event (i.e. firing it to whatever listeners your class has) using RaiseEvent SomeNiceEvent(«Some nice event happened.»);
- VBA in Excel doesn’t like the letters r or c used as variables. Those letters mean ‘row’ and ‘column’ elsewhere.
A little more detail is given here: [1]
Caveat: Uncaught Exceptions[edit | edit source]
Caveat: Uncaught exceptions in event-handlers cause VBE to mysteriously reset. If you are causing an uncaught exception in an event-handler, you probably won’t get an error popup. Instead, VBE will just reset. For this reason you should make sure you’re catching exceptions in all of your event handlers.
Caveat: Online-Help Typos[edit | edit source]
Some versions of Excel can have typos in the F1-help. Here’s an example of a Click handler with the correct parameters:
 Private Sub clicksrc_Click(ByVal Ctrl As Office.CommandBarButton, CancelDefault As Boolean)
    MsgBox "I got a click!"
 End Sub
Iterating Over MultiSelected Cells[edit | edit source]
- Works on: Microsoft Excel 2002 SP-2
The following code-snippet writes «YAY!» in each cell selected by the user:
For Each Cell in Selection
   Cell.Value = "YAY!"
Next
Exporting VBA Code[edit | edit source]
- Works on Microsoft Excel 2002 SP-2
The following code provides a very primitive routine to write serializes the VBA code in your modules to files:
Option Explicit
Private Sub Workbook_BeforeSave(ByVal SaveAsUI As Boolean, Cancel As Boolean)
  Dim objModule As Object
  On Error Resume Next

  For Each objModule In ThisWorkbook.VBProject.VBComponents
    DoEvents
    If objModule.CodeModule.CountOfLines > 0 Then
      objModule.Export objModule.Name & ".bas"
    End If
  Next objModule

End Sub
Resize a Named Range[edit | edit source]
- Excel 2003
Note that the Resize property of Range objects does not change the size of the range object. It returns a new anonymous Range object. Easiest way to do this is to set the .Name property of the Resized range:
Sub ResizeRange(ByVal RangeName As String, _
                Optional NewRowCount As Long = 0, _
                Optional NewColumnCount As Long = 0)

  Dim oRange As Range
  Set oRange = Range(RangeName)
  If NewRowCount = 0 Then
    NewRowCount = oRange.Rows.Count
  End If
  If NewColumnCount = 0 Then
    NewColumnCount = oRange.Columns.Count
  End If

  oRange.Resize(NewRowCount, NewColumnCount).Name = RangeName

End Sub
Creating a Named Range[edit | edit source]
- Excel 2002
Named Ranges allow the user to refer to a cell or range of cells by name instead of by their cell address. This name can be used in other cell formulas as well as in VBA (e.g. using the [SomeName]). There are two sorts of named ranges: Workbook Names and Worksheet Names.
To create a Workbook Name you can select the cell you want to name, pull down Insert—>Name—>Define… This will bring up the «Define Name» dialog. Here you can enter the new name for your cell.
The create a Worksheet Name you follow the same procedure but precede the name with Sheetname!, e.g. Sheet1!InitialValue to create a named-range only visible from within worksheet Sheet1.
When there are two variables with the same name, one local (Worksheet Name) and one global (Workbook Name), the spreadsheet uses the local variable.
There is no way to visualize a named range. The closest thing is to pull down again Insert—>Name—>Define…, but this method does not show if a variable is a local Worksheet Name or a global Workbook Name.
The named range can be a single cell, part of a row, part of a column or a rectangular group of cells. Each one behaves differently:
- A single cell can be referenced anywhere in the worksheet or, if it’s defined globally (workbook name), anywhere in any worksheet.
- A group of cells composing part of a row can only be referenced in a parallel row. For example, if the named variable is mass and it spans the cells C5:L5, then a reference to mass’ at cell E8 (say, a formula like =mass * (3e8)^2) would take the value at C8, but a reference to mass at cell M9 would return an error
- Similarly, a group of cells composing part of a column can only be referenced in a parallel column. Cells outside the range will return an error
- A group of cells that define a rectangular array of sides greater than one is only useful to be referenced in other worksheets — so, there’s no point in defining them locally (worksheet name). For example, if covmatrix are the cells Sheet1!B2:D4, then if cell Sheet2!C3 has the formula =1/sqrt(covmatrix), then it will return 1/sqrt(Sheet1!C3).
Reading a File[edit | edit source]
Reading a file line by line AKA for each line of a file:
  MyFileName = "C:UsersJoeDesktopFile.txt"
  FileNo = FreeFile()
  Open MyFileName For Input As #FileNo
  While Not EOF(FileNo)
    Line Input #FileNo, MyLine
    MsgBox MyLine
  Wend
  Close #FileNo
Links:
- Open at Visual Basic for Applications Reference, msdn.microsoft.com
- Close at Visual Basic for Applications Reference, msdn.microsoft.com
- Line Input at Visual Basic for Applications Reference, msdn.microsoft.com
Writing to a File[edit | edit source]
Writing to a file:
  MyFileName = "C:UsersJoeDesktopFile.txt"
  FileNo = FreeFile()
  Open MyFileName For Output As #FileNo
  For I = 1 To 10
    Print #FileNo, Str(I);
    ' The semicolon above prevents printing of a newline
  Next
  Close #FileNo
Writing the tab-separated content of the current worksheet to a text file, disregarding some of cell content formatting such as percentages:
  MyFileName = "C:UsersJoeDesktopFile.txt"
  FileNo = FreeFile()
  Open MyFileName For Output As #FileNo
  RowCount = ActiveSheet.UsedRange.Cells.Rows.Count
  ColumnCount = ActiveSheet.UsedRange.Cells.Columns.Count
  For RowNo = 1 To RowCount
    For ColNo = 1 To ColumnCount
      Print #FileNo, Cells(RowNo, ColNo); ' The semicolon bars newline printing
      If ColNo < ColumnCount Then
        Print #FileNo, vbTab;
      End If
    Next
    If RowNo < RowCount Then
      Print #FileNo, vbNewline;
    End If
  Next
  Close #FileNo
Links:
- Open at Visual Basic for Applications Reference, msdn.microsoft.com
- Close at Visual Basic for Applications Reference, msdn.microsoft.com
- Print # at Visual Basic for Applications Reference, msdn.microsoft.com
File Existence[edit | edit source]
Testing whether a file exists:
  If Dir(MyFileName) <> "" Then
    MsgBox "The file exists."
  End If
Directories[edit | edit source]
Making a directory:
MkDir "C:UsersJoeDesktopTestFolder"
Removing a directory:
RmDir "C:UsersJoeDesktopTestFolder"
Changing to a directory:
Changing the current drive:
Listing the content of a directory, using a custom filter encompassing two file extensions:
Directory = "C:UsersJoe Hoe"
Set Files = New Collection
Set FileFullPaths = New Collection
MyFile = Dir(Directory)
While MyFile <> ""
  Extension = LCase(Right(MyFile, 4))
  If Extension = ".txt" Or Extension = ".bat" Then
    Files.Add MyFile
    FileFullPaths.Add Directory & MyFile
  End If
  MyFile = Dir() 'Next file or folder
Wend
Links:
- ChDir at Visual Basic for Applications Reference, msdn.microsoft.com
- ChDrive at Visual Basic for Applications Reference, msdn.microsoft.com
- Dir at Visual Basic for Applications Reference, msdn.microsoft.com
- MkDir at Visual Basic for Applications Reference, msdn.microsoft.com
- RmDir at Visual Basic for Applications Reference, msdn.microsoft.com
Grep[edit | edit source]
Searching for a regular expression in the lines of the files of a directory aka grepping:
Directory = "C:UsersJoe Hoe"
PatternString = "target.*path"

MyFile = Dir(Directory)
Set Lines = New Collection
Set RegExp = CreateObject("VBScript.RegExp")
RegExp.Pattern = PatternString
RegExp.IgnoreCase = True
While MyFile <> ""
  Extension = LCase(Right(MyFile, 4))
  If Extension = ".txt" Or Extension = ".bat" Then
    MyFullFileName = Directory & MyFile
    FileNo = FreeFile()
    Open MyFullFileName For Input As #FileNo
    While Not EOF(FileNo)
      Line Input #FileNo, MyLine
      If RegExp.Test(MyLine) Then
        Lines.Add MyLine
      End If
    Wend
    Close #FileNo
  End If
  MyFile = Dir() 'Next file or folder
Wend
'Lines is a collection of the matching lines
Clipboard[edit | edit source]
Prerequisites: Accessing the clipboard from an Excel sheet requires that a reference to MSForms (Microsoft Forms Object Library) is set in the sheet. You can set the reference by adding and subsequent removing of a user form, via Insert > UserForm in a pop-up menu. To check the presence of a reference, see Tools > References menu.
Placing text on the clipboard:
Set MyClipboard = New MSForms.DataObject
MyClipboard.SetText "My string"
MyClipboard.PutInClipboard
Getting text from the clipboard:
Set MyClipboard = New MSForms.DataObject
MyClipboard.GetFromClipboard
TextContent = MyClipboard.GetText
Links:
- DataObject Class at msdn.microsoft.com; contains a section on Visual Basic, whose applicability to Excel VBA is unclear
Range[edit | edit source]
A range is a set of cells. The cells in a range do not need to be adjacent. However, the cells in a single range do need to belong to a single worksheet.
Defining a new range:
Set MyRange = Selection 'The current selection, possibly of multiple cells
Set MyRange = ActiveCell 'The single active cell
Set MyRange = Cells(1, 2) 'Row=1, Column=2 AKA B
Set MyRange = Cells(1, 1).Offset(0, 1) '=Cells(1, 2)
Set MyRange = Cells(1, 2).Offset(0, -1) '=Cells(1, 1)
Set MyRange = Cells(1, 1).Offset(0, -1) 'An error
Set MyRange = Range("A1:C2") 'Letters indicate columns; numbers indicate rows
Set MyRange = Range("A1:A3,C1:C3") 'A discontinuous range
Set MyRange = Range("B2:C2").Cells(1, 1) '=Cells(2, 2) =Range("B2")
Set MyRange = Rows(1) 'An entire row
Set MyRange = Columns(1) 'An entire column
Set MyRange = Cells(2,2).EntireRow
Set MyRange = Cells(2,2).EntireColumn
Set MyRange = Range("B1:C1").EntireColumn 'Two entire columns
Set MyRange = Range("B2:D4").End(xlUp) '=Cells(1, 2) =Range("B1")
Set MyRange = Range("B2:D4").End(xlToLeft) '=Cells(2, 1) = Range("A2")
Set MyRange = Range("B2:D4").End(xlDown) '=Cells(<last row number>, 2)
Set MyRange = Range("B2:D4").End(xlToRight) '=Cells(2, <last column number>)
Iterating a range AKA for each cell in a range:
Set MyRange = Selection
For Each Cell in MyRange
  MsgBox Cell
Next
Iterating rows and iterating columns AKA for each row of a range and for each column of a range, even if discontiguous:
Set Rng = Range("A1:B1,D3:E3") 'Discontiguous range
For Each Row In Rng.Rows
  RowNo = Row.Row
Next
For Each Column In Rng.Columns
  ColNo = Column.Column
Next
Making an union (a range subsuming both) or intersection (a range covering only cells in common) of two ranges:
Set MyRange = Range("A1:C2")
Set MyRange = Union(MyRange, Range("A5:C5"))
MyRange.Interior.Color = RGB(230, 230, 0)
Set MyRange = Intersect(MyRange, Columns(2))
MyRange.Interior.Color = RGB(230, 100, 0)
Selecting a range:
Set MyRange = Sheets(1).Range("A1:B1,D1:E1")
MyRange.Select 'Even a discontinuous range can be selected
Activating a cell:
Range("A1:B2").Select 'Affects Selection, generally of multiple cells
Range("A2").Activate 'Affects ActiveCell, the single one
Finding out about a range AKA learning about a range, including the number of cells AKA cell count, the first row, the last row, the first column, the last column, row count, and column count:
Set Rng = Range("B2:D4") 'Contiguous range
NumberOfCells = Rng.Cells.Count
FirstRowNo = Rng.Row
LastRowNo = Rng.Row + Rng.Rows.Count - 1 'Only for contiguous ranges
FirstColNo = Rng.Column
LastColNo = Rng.Column + Rng.Columns.Count - 1 'Only for contiguous ranges

Set Rng = Range("A1:B1,D1:E1") 'Discontiguous range
BrokenLastColNo = Rng.Column + Rng.Columns.Count - 1 'Only for contiguous ranges
'Do it the correct way for discontiguous range
LastColNo = 0
For Each Cell in Rng
  If Cell.Column > LastColNo then
    LastColNo = Cell.Column
  End If
Next

Set RangeWorksheet = Rng.Worksheet
Links:
- Range Collection at Excel 2003 VBA Language Reference at msdn
- Referring to Multiple Ranges at Excel 2003 VBA Language Reference at msdn
- End Property at Excel 2003 VBA Language Reference at msdn
- Intersect Method at Excel 2003 VBA Language Reference at msdn
- Union Method at Excel 2003 VBA Language Reference at msdn
Worksheet[edit | edit source]
To create, access, or delete worksheets, you can use the methods of Worksheet objects. Examples follow.
Set MyNewWorksheet = Sheets.Add 'Create
Set MyNewWorksheet2 = Sheets.Add(After:=Sheets(Sheets.Count)) 'Create and place as the last sheet
MyNewWorksheet.Name = "My Sheet"
Set IndexedWorksheet = Sheets(1) 'Access by index
Set NamedWorksheet = Sheets("Name") 'Access by name
Set NamedWorksheet2 = Worksheets("Name") 'Does the same thing as the line above
MyNewWorksheet.Delete
Sheets("Name").Cells(1,1) = "New Value" 'Access the cells of the worksheet
Sheets("Name").Cells.Clear 'Clear an entire worksheet, including formatting and cell values
Sheets("Name").Columns(1).Sort key1:=Sheets("Name").Range("A1") 'Sort the first column
Sheets("Name").Columns(1).Sort key1:=Sheets("Name").Range("A1"), _
  order1:=xlDescending, header:=xlYes 'Use descending instead of ascending; do not sort
                                      ' the first cell, considering it a header
MyNewWorksheet2.Visible = xlSheetHidden
MyNewWorksheet2.Visible = xlSheetVisible
Obtaining an existing sheet by name or creating it if it does not exist:
NewSheetName = "My Sheet"
Set MySheet = Nothing
On Error Resume Next
Set MySheet = Sheets(NewSheetName)
On Error GoTo 0
If MySheet Is Nothing Then
  Set MySheet = Sheets.Add(After:=Sheets(Sheets.Count))
  MySheet.Name = NewSheetName
End If
Links:
- Worksheet Object at Excel 2003 VBA Language Reference at mdsn
- Sheets Collection Object at Excel 2003 VBA Language Reference at mdsn
Searching[edit | edit source]
You can search for values in a sheet as follows:
Dim SoughtString As String
SoughtString = "London"
Set ForeignKeySheet = Sheets("CitySize")
Set FoundCell = ForeignKeySheet.Columns(1).Find(SoughtString, LookAt:=xlWhole)
If Not FoundCell Is Nothing Then
  'The value associated with the key is in column 2
  CitySize = FoundCell.Offset(0, 1)
End If
If you want to have a substring match, drop «LookAt:=xlWhole» or use «LookAt:=xlPart».
Links:
- Find Method (Excel 2003 VBA Language Reference) at msdn
Cell Formatting[edit | edit source]
You can format cells including text color, background color, font properties and border, but also formatting as a number, percent or text from VBA as follows:
  Selection.Characters.Font.Color = RGB(0, 0, 255) 'Foreground color AKA text color
  Selection.Interior.Color = RGB(230, 230, 230) 'Background color
  Selection.Characters.Font.ColorIndex = xlAutomatic 'Reset foreground color
  Selection.Interior.Color = xlAutomatic 'Reset background color
  Selection.Font.Name = "Verdana" 'Font face
  Selection.Font.Size = 8 'Font size
  Selection.Font.Bold = True
  Selection.Font.Italic = True
  Selection.Font.Underline = True
  'Selection.Font.Strikethrough = True
  Selection.Font.Name = Application.StandardFont 'See also ClearFormats below
  Selection.Font.Size = Application.StandardFontSize 'See also ClearFormats below
  'Selection.Borders.LineStyle = xlLineStyleNone or xlDouble or xlDashDotDot or other
  Selection.Borders.Weight = xlMedium ' xlHairline, xlThin, xlMedium, or xlThick
  'Selection.Borders(xlEdgeBottom).Weight = xlThick
  ' LineStyle and Weight interact in strange ways.
  Selection.Borders.Color = RGB(127, 127, 0) 'Will be overridden below; applies to all borders
  Selection.Borders(xlEdgeBottom).Color = RGB(255, 0, 0)
  Selection.Borders(xlEdgeTop).Color = RGB(0, 255, 0)
  Selection.Borders(xlEdgeLeft).Color = RGB(0, 0, 255)
  Selection.Borders(xlEdgeRight).Color = RGB(0, 127, 127)
  Selection.Borders(xlInsideHorizontal).Color = &H7FFF00 'A tricky hex matching RGB(0, 255, 127)
  Selection.Borders(xlInsideVertical).Color = RGB(255, 127, 0)

  Selection.NumberFormat = "General"
  Selection.NumberFormat = "00" 'As a number with zero decimal places, showing at least two digits
  Selection.NumberFormat = "0.000" 'As a number, showing three decimal places and no more
  Selection.NumberFormat = "0.0%" 'As a percent with one decimal place
  Selection.NumberFormat = "@" 'As text
  Selection.NumberFormat = "0.00E+00" 'As a number in scientific notation,
                                      'the string before E formatting the significand
  Selection.NumberFormat = "m/d/yyyy" 'As a date; whether "/" is shown depends on locale
  Selection.NumberFormat = "d. mmmm yyyy hh:mm:ss" 'As date, showing the month using a word,
                                      'also showing time

  Selection.ClearFormats 'Remove formatting, keeping cell content.
                         'Removes also the formatting set using NumberFormat.
Links:
- Font Object (Excel 2003 VBA Language Reference) at msdn
- Borders Collection (Excel 2003 VBA Language Reference) at msdn
- LineStyle Property (Excel 2003 VBA Language Reference) at msdn
- Weight Property (Excel 2003 VBA Language Reference) at msdn
- NumberFormat Property (Excel 2003 VBA Language Reference) at msdn
Color[edit | edit source]
In Excel VBA, RGB colors are plain numbers rather than objects. Some color examples are listed in #Cell Formatting.
Some examples:
Selection.Characters.Font.Color = RGB(0, 0, 255) 'Foreground color AKA text color
Selection.Interior.Color = RGB(230, 230, 230) 'Background color
Selection.Characters.Font.ColorIndex = xlAutomatic 'Reset foreground color
Selection.Comment.Shape.Fill.ForeColor.RGB = RGB(220, 255, 160)
'The above is the fill color, that is, the background color
Selection.Comment.Shape.TextFrame.Characters.Font.ColorIndex = 3 'Red per default
'Selection.Comment.Shape.TextFrame.Characters.Font.Color = RGB(255, 0, 0) 'Does not work in Excel 2007
If False Then
  ActiveWorkbook.Colors(3) = RGB(200, 0, 0) 'Make the red in the index 5 a bit darker
End If
Setting the background color of the cells of the 1st column to the row number color index:
For ColorIndex = 1 to 56
  Cells(ColorIndex,1).Interior.ColorIndex = ColorIndex
Next
Color index in the default palette:
- 0 — Automatic
- 1 — Black
- 2 — White
- 3 — Red
- 4 — Green
- 5 — Blue
- 6 — Yellow
- 7 — Magenta
- 8 — Cyan
- 9 — Dark red
- 10 — Dark green
- 11 — Dark blue
- … etc., through 56
Finding all cells whose text color approaches green:
  TargetColor = RGB(0, 255, 0)
  Tolerance = 200
  'Extract the color components. The extraction is unneeded, but if the target
  'color came from the color of a selected cell, it would be needed.
  TmpColor = TargetColor
  TargetColorRed = TmpColor Mod 256
  TmpColor = TmpColor  256
  TargetColorGreen = TmpColor Mod 256
  TmpColor = TmpColor  256
  TargetColorBlue = TmpColor Mod 256

  For Each Cell In ActiveSheet.UsedRange.Cells
    MyColor = Cell.Characters.Font.Color 'Color is a number
    'Extract the RGB components of the color
    Red = MyColor Mod 256
    MyColor = MyColor  256
    Green = MyColor Mod 256
    MyColor = MyColor  256
    Blue = MyColor Mod 256
    'Find the distance from the target color
    Distance = ((Red - TargetColorRed) ^ 2 + _
                (Green - TargetColorGreen) ^ 2 + _
                (Blue - TargetColorBlue) ^ 2) ^ 0.5
    If Distance < Tolerance Then
      Cell.Interior.Color = RGB(230, 230, 230) 'Mark the cell using its background color
    End If
  Next
Links:
- Color Property at Excel 2003 VBA Language Reference at msdn
- ColorIndex Property at Excel 2003 VBA Language Reference at msdn
- Colors Property at Excel 2003 VBA Language Reference at msdn
- ColorType Property at Excel 2003 VBA Language Reference at msdn
- PatternColor Property at Excel 2003 VBA Language Reference at msdn
- PatternColorIndex Property at Excel 2003 VBA Language Reference at msdn
Visibility[edit | edit source]
Hiding a row (hide a row, hide row):
Rows(2).Hidden = True
'Rows(2).Hidden = False 'Show it again
Hiding several rows at once:
Range("A1:A3").EntireRow.Hidden = True 'Hide rows 1, 2, and 3
Hiding the rows of the currently selected cells:
Selection.EntireRow.Hidden = True
Looping over rows that are visible AKA shown AKA not hidden:
For RowNo = 1 To 10
  If Not Rows(RowNo).Hidden Then
    'Do something on the row
  End If
Next
Toggling the visibility of rows:
For RowNo = 1 To 10
  If Not Rows(RowNo).Hidden Then
    Rows(RowNo).Hidden = True
  Else
    Rows(RowNo).Hidden = False
  End If
Next
Hiding a column (hide a column, hide column):
Columns(2).Hidden = True
'Columns(2).Hidden = False 'Show it again
Hiding several columns at once:
Range("A1:C1").EntireColumn.Hidden = True 'Hide columns 1, 2, and 3
Hiding the columns of the currently selected cells:
Selection.EntireColumn.Hidden = True
Other tricks pertaining to visibility of columns work in a direct analogy to the examples for rows above.
Hyperlink[edit | edit source]
Opening or following a hyperlink (open a hyperlink, follow a hyperlink, open hyperlink, follow hyperlink):
ActiveWorkbook.FollowHyperlink "http://www.microsoft.com"
Opening the Wikipedia article for the article title found in the single active cell by opening a put-together URL:
ActiveWorkbook.FollowHyperlink "http://en.wikipedia.org/wiki/" & ActiveCell
Opening a Wikipedia article per article title in any of the currently selected cells:
For Each Cell In Selection
  ActiveWorkbook.FollowHyperlink "http://en.wikipedia.org/wiki/" & Cell
Next
Opening a local hyperlink, with a possible pop-up asking for confirmation for security reasons:
ActiveWorkbook.FollowHyperlink "file://C:UsersJoe HoeDesktopTest.txt"
Links:
- FollowHyperlink Method (Excel 2003 VBA Language Reference) at msdn
Temporary file[edit | edit source]
Getting a temporary file, with unclear robustness of the following method, which uses random numbers and tests for file existence:
Function GetTempFile(Prefix As String, Suffix As String) As String
  TempFolder = Environ$("tmp")
  Randomize
  While True
    TempFileName = TempFolder & "" & Prefix & CStr(Int(10000000 * Rnd)) & Suffix
    If Dir(TempFileName) = "" Then 'Then the file does not exist
      GetTempFile = TempFileName
      Exit Function
    End If
  Wend
End Function
Links:
- How To Use GetTempFileName API to Create a Unique Temporary File at Microsoft.com
Command Output[edit | edit source]
If you do not mind a popping up console window, here is a way of obtaining output of a command from Excel VBA:
Set MyShell = CreateObject("WScript.Shell")
Set ExecObject = MyShell.Exec("tasklist /v")
' AllText = ExecObject.StdOut.ReadAll
Do While Not ExecObject.StdOut.AtEndOfStream
  Line = ExecObject.StdOut.ReadLine()
  If InStr(Line, "AcroRd32.exe") > 0 Then
    'Do something
  End If
Loop
If having a console window popping up is not acceptable and you are okay with creating a temporary file, here is another way of obtaining output of a command from Excel VBA:
'Summary: Run "attrib" on the file in column A (1) of the row
'of the currently selected cell, writing the result into
'column B (2) of the row.

'Get temp file name
TempFolder = Environ$("tmp")
Randomize
TempFileName = ""
While TempFileName = ""
  TempFileNameCand = TempFolder & "" & "mytmp" & CStr(Int(10000000 * Rnd)) & ".tmp"
  If Dir(TempFileNameCand) = "" Then 'Then the file does not exist
    TempFileName = TempFileNameCand
  End If
Wend

'Run the command
Set MyShell = CreateObject("WScript.Shell")
MyCommand = "cmd /c attrib """ & Cells(Selection.Row, 1) & """ >" & TempFileName
MyShell.Run MyCommand, 0, True '0 = show no window
'Although attrib has an exe file, we need to use "cmd" for the
'redirection to work.

FileNo = FreeFile()
Open TempFileName For Input As #FileNo
While Not EOF(FileNo)
  Line Input #FileNo, MyLine
  Cells(Selection.Row, 2) = MyLine
Wend
Close #FileNo
Kill TempFileName 'Delete the file to clean up, although not strictly necessary
Using cmd /c, you can run chains of commands connected using & or | as well:
Set MyShell = CreateObject("WScript.Shell")
Set ExecObject = MyShell.Exec("cmd /c cd /d C:UsersJoe Hoe & findstr /s knowledge *.txt")
' AllText = ExecObject.StdOut.ReadAll
Do While Not ExecObject.StdOut.AtEndOfStream
  Line = ExecObject.StdOut.ReadLine()
  'Do something
Loop
Links:
- Capture output value from a shell command in VBA? at stackoverflow
Dimensions[edit | edit source]
Row height and column width:
Selection.RowHeight = 15
Cells(1,1).RowHeight = 15 'Can be applied to cells, not only to rows
Rows(4).AutoFit 'Automatically adjust row height
'Cells(4, 1).AutoFit 'Error
Cells(4, 1).EntireRow.AutoFit
Selection.EntireRow.AutoFit 'Auto fit the row height of the current selection
ActiveSheet.UsedRange.Rows.AutoFit 'Auto fit the row height of the entire sheet
Selection.RowHeight = ActiveSheet.StandardHeight

Columns(1).ColumnWidth = 70
Cells(1,1).ColumnWidth = 70 'Can be applied to cells, not only to columns
Columns(2).AutoFit 'Automatically adjust column width
Selection.EntireRow.AutoFit 'Auto fit the column width of the current selection
ActiveSheet.UsedRange.Columns.AutoFit 'Auto fit the column width of the entire sheet
Selection.ColumnWidth = ActiveSheet.StandardWidth
Links:
- RowHeight Property at Excel 2003 VBA Language Reference at msdn
- ColumnWidth Property at Excel 2003 VBA Language Reference at msdn
- StandardHeight Property at Excel 2003 VBA Language Reference at msdn
- StandardWidth Property at Excel 2003 VBA Language Reference at msdn
[edit | edit source]
Working with comment aka note:
If Cells(1,1).Comment Is Nothing Then
  Cells(1,1).AddComment Text:="Hey"
  'AddComment throws an error if the cell already has a comment
  'Range("A2:A3").AddComment Text:="Hey" 'Error
  'AddComment throws an error if applies to more than one cell at once.
End If
Cells(1,1).Comment.Text Text:=Selection.Comment.Text & " there"
Cells(1,1).Comment.Visible = True 'Prevent the comment from autohiding
Cells(1,1).Comment.Visible = False 'The default setting
Cells(1,1).Comment.Shape.Fill.ForeColor.RGB = RGB(220, 255, 160)
'The above is the fill color, that is, the background color
Cells(1,1).Comment.Shape.Height = 60
Cells(1,1).Comment.Shape.Width = 80
Cells(1,1).Comment.Shape.TextFrame.Characters.Font.Name = "Verdana"
Cells(1,1).Comment.Shape.TextFrame.Characters.Font.Size = 9
Cells(1,1).Comment.Shape.TextFrame.Characters(1, 3).Font.Bold = True
If False Then
  'Selection.Comment.Delete
  Cells(1,1).ClearComments
  Range("A1:A2").ClearComments 'Can apply to several cells at once
  Cells(1,1).PasteSpecial Paste:=xlPasteComments
End If
Collecting all comments of the sheet into a string:
CommentString = ""
For Each Comment in ActiveSheet.Comments
  CommentString = CommentString & " " & Comment.Text
Next
Links:
- Comment Object at Excel 2003 VBA Language Reference at msdn
- Shape Object at Excel 2003 VBA Language Reference at msdn
IsEmpty[edit | edit source]
Approximately speaking, tells whether a variable has been initialized and not yet written to.
Can be used to tell whether a cell is empty; the presence of a comment attached to the cell or formatting of the cell does not make a cell non-empty.
Examples:
Set MyCell = Cells(1, 1)
If IsEmpty(MyCell) Then
  MyCell.Value = "New value"
End If
'
MyCell.Value = ""
Result1 = IsEmpty(MyCell) 'True
'
Dim MyVar
Result2 = IsEmpty(MyVar) 'True
MyVar = ""
Result3 = IsEmpty(MyVar) 'False
MyVar = Empty
Result4 = IsEmpty(MyVar) 'True
Links:
- IsEmpty at Excel 2010 VBA Language Reference at msdn
IsNull[edit | edit source]
Tells whether an expression is Null, which is distinct from Empty.
Null can be assigned to variant variables; it cannot be assigned to variables dimensioned as strings or integers. Null cannot be assigned to objects, unlike Nothing.
Examples:
Result1 = IsNull(Null)   'True
Result2 = IsNull(Empty)  'False
'
Dim MyVar As Variant
MyVar = Null             'All right
Result3 = IsNull(MyVar)  'True
Dim MyColl As Collection
Set MyColl = Nothing     'All right
Set MyColl = Null        'Error
Dim MyStr As String
MyStr = Null             'Error
Dim MyInt As Integer
MyInt = Null             'Error
Links:
- IsNull at Excel 2013 VBA Language Reference at msdn
Add-Ins at Startup[edit | edit source]
Controlling what add-ins Excel opens at startup:
Microsoft Excel 2003: Configure loaded add-ins via Tools -> Add-ins. Their list is mirrored in the following Registry key, but there’s no advantage in editing the Registry:
HKCUSoftwareMicrosoftOffice11.0ExcelInit Commands
Microsoft Excel 2002 SP-2:When you start Excel, it may automatically load addins (i.e. those you added from Tools -> Add-Ins). The list of add-ins that get loaded come from the following registry key:
HKCUSoftwareMicrosoftOffice10.0ExcelOptions
Under this key you may find a list of string-variables:
- OPEN
- OPEN1
- OPEN2
- etc…
The values of these variables is the name of the add-in. Excel, on start-up, will attempt to load the add-in in string-variable OPEN first, then OPEN1 (if present), onward until it runs out of such string-variables. It seems like Excel will automatically renumber the keys if they are not consecutive (i.e. OPEN1, OPEN3, OPEN4 will become OPEN1, OPEN2, OPEN3).
Note also the list of add-ins presented when you do Tools -> Add-Ons is, in part, populated by the contents of the following key:
HKCUSoftwareMicrosoftOffice10.0ExcelAddin Manager
See also the following MS KB article: How to Remove Entries from Add-Ins Dialog Box.
Chart direct from VBA array data[edit | edit source]
Charts need not be based on the values in cells of a spreadsheet, but can also be made directly in VBA from an array. The following code makes a chart of the relative frequency of characters in a string, in percent of the total, or normalized to a maximum of unity. There is also an option to sort the display and the content can be changed by modifying the content or sequence of the vRef array. Procedures to remove charts and test the functions are included.
Sub TestChartOfStrFreq()
    'run this to make a chart

    Dim str As String, n As Long, c As Long

    'place user string here
    str = ""

    'if no user string use these random charas
    If str = "" Then
        Do
           DoEvents
           Randomize
           n = Int((127 - 0 + 1) * Rnd + 0)
            Select Case n
            'numbers, and upper and lower letters
            Case 48 To 57, 65 To 90, 97 To 122
               str = str & Chr(n)
               c = c + 1
            End Select
        Loop Until c = 1000
    End If

    If ChartOfStrFreq(str, 1, 1) Then MsgBox "Chart done..."

End Sub

Sub DeleteAllWorkbookCharts5()
'run this to delete all charts
    Dim oC
    Application.DisplayAlerts = False
        For Each oC In ThisWorkbook.Charts
           oC.Delete
        Next oC
    Application.DisplayAlerts = True

End Sub

Function ChartOfStrFreq(sIn As String, Optional bSort As Boolean = False, Optional bNormalize As Boolean = False) As Boolean
'makes Excel bar-graph chart for percentage incidence of vRef charas in string (or normalized to max value= 1)
'bSort = True for descending percent otherwise vRef sequence

'PREP
    Dim vRef As Variant, LBC As Long, UBC As Long, LBR As Long, UBR As Long
    Dim vW() As Variant, x() As Variant, y() As Variant
    Dim sUC As String, nC As Long, n As Long, sS As String, nS As Long
    Dim vR As Variant, bCond As Boolean, SortIndex As Long, temp As Variant
    Dim t As Variant, i As Long, j As Long, q As Long, max As Variant
    Dim bXValueLabels As Boolean, sT As String, sX As String, sY As String

    If sIn = "" Then
       MsgBox "Empty input string - closing"
       Exit Function
    End If

    'load the intended x-axis display set here...add to it and delete as required
    vRef = Array("A", "B", "C", "D", "E", "F", "G", "H", "I", "J", "K", "L", "M", _
                 "N", "O", "P", "Q", "R", "S", "T", "U", "V", "W", "X", "Y", "Z", _
                 "0", "1", "2", "3", "4", "5", "6", "7", "8", "9")

    'set axis labels etc...
    sT = "Selective Distribution from a " & Len(sIn) & "-Character String"
    sX = "Character Set of Interest"
    If bNormalize Then
       sY = "Count Divided by Maximum Value"
    Else
       sY = "Percentage of Original String"
    End If
    bXValueLabels = True


    LBC = LBound(vRef): UBC = UBound(vRef)
    ReDim vW(0 To 2, LBC To UBC)
    LBR = LBound(vW, 1): UBR = UBound(vW, 1)
    ReDim x(LBC To UBC)
    ReDim y(LBC To UBC)

'COUNT
    sUC = UCase(sIn)
    nC = Len(sIn)
    For n = LBC To UBC
       vW(0, n) = vRef(n) 'all charas to first row
       sS = vW(0, n)
       'count hits in string for each chara in ref set
       vW(1, n) = UBound(Split(sUC, sS)) - LBound(Split(sUC, sS)) 'count hits
       'calculate hits as percentages of total chara count
       vW(2, n) = Round(((vW(1, n)) * 100 / nC), 2)
    Next n

'NORMALIZE
    If bNormalize Then
        max = vW(1, FindMax(vW, 1))
        For n = LBC To UBC
           temp = vW(1, n)
           vW(2, n) = Round((temp / max), 2)
        Next n
    End If

'SORT
    If bSort Then
        SortIndex = 2
        'descending sort, on rows
        For i = LBC To UBC - 1
            For j = LBC To UBC - 1
                bCond = vW(SortIndex, j) < vW(SortIndex, j + 1)
                If bCond Then
                    For q = LBR To UBR
                        t = vW(q, j)
                        vW(q, j) = vW(q, j + 1)
                        vW(q, j + 1) = t
                    Next q
                End If
            Next
        Next
    End If

'CHART
    'transfer data to chart arrays
    For n = LBC To UBC
        x(n) = vW(0, n) 'x axis data
        y(n) = vW(2, n) 'y axis data
    Next n

    'make chart
    Charts.Add
    ActiveChart.ChartType = xlColumnClustered 'column chart

    'assign the data and labels to a series
    With ActiveChart.SeriesCollection
       If .count = 0 Then .NewSeries
          If bXValueLabels Then
             .Item(1).ApplyDataLabels Type:=xlDataLabelsShowValue
             .Item(1).DataLabels.Orientation = 60
          End If
       If Val(Application.Version) >= 12 Then
          .Item(1).Values = y
          .Item(1).XValues = x
       Else
          .Item(1).Select
          Names.Add "_", x
          ExecuteExcel4Macro "series.x(!_)"
          Names.Add "_", y
          ExecuteExcel4Macro "series.y(,!_)"
          Names("_").Delete
       End If
    End With

    'apply title string, x and y axis strings, and delete legend
    With ActiveChart
       .HasTitle = True
       .ChartTitle.Text = sT
       .SetElement (msoElementPrimaryCategoryAxisTitleAdjacentToAxis) 'X
       .Axes(xlCategory).AxisTitle.Text = sX
       .SetElement (msoElementPrimaryValueAxisTitleRotated) 'Y
       .Axes(xlValue).AxisTitle.Text = sY
       .Legend.Delete
    End With

    ActiveChart.ChartArea.Select

ChartOfStrFreq = True

End Function

Public Function FindMax(arr() As Variant, row As Long) As Long
  Dim myMax As Long
  Dim i As Long

  For i = LBound(arr, 2) To UBound(arr, 2)
    If arr(row, i) > myMax Then
      myMax = arr(row, i)
      FindMax = i
    End If
  Next i
End Function
Nuking Retained State[edit | edit source]
- Works on: Microsoft Excel 2002 SP-2
- OS: Windows XP
Nuking Excel’s Retained State: Excel remembers all sorts of things between runs: What addins to load, what buttons and menus to display, etc. Sometime you’ll want to clean all of this stuff up and bring Excel back to its factory state.
Nuking Excel Checklist:
- Make sure the following directories are empty:
- C:Program FilesMicrosoft OfficeOffice10xlstart
- C:appsxpapplication dataMicrosoftxlstart
- Nuke the auto-open keys from the registry(as shown below);
- Nuke all .xlbs – For example check here:
- C:appsxpapplication dataMicrosoftExcel
[edit | edit source]
- Visual Basic
External links[edit | edit source]
- The Mr. Excel Forum: This is a great super-active forum where Excel power-users can often be found.
- Woody’s Lounge
- J Rubin’s ExcelTip.com
- OzGrid
- Express
- Chip Pearson
- Ron de Bruin
- BygSoftware.com: This site has loads of practical examples showing Excel’s potential
- Aspose.Cells for .NET/Java : A component available for .NET and Java that can be used by developers to create and manipulate Excel files without the need for MS Office to be installed on the system.
VBA Code Excel Macro Examples Useful 100+ How Tos for Basic and Advanced Users
VBA Code Excel Macro Examples – Useful Macros, Codes, 100+ How To explained for Basic Beginners to Advanced VBA users. Tutorials to learn Excel 2003, 2007, 2010, 2013 Macros and Mastering in VBA. Selected examples to deal with different objects, methods and properties in Excel. Numerous free most useful VBA codes and tips will help you to deal with various Excel Objects like Cell, Range, Worksheets, Workbooks, Application, Charts, Pivot Tables, Hyperlinks, functions, User Forms, MsgBox, ListBox, ComboBox. Also provided free example codes to deal with MS Word, PowerPoint, Outlook, Access, Other Applications and File Handling. If you think that I missed any useful code, please feel free to write us. We will respond with a solution with in couple of days and publish here to make it available for all VBA Users.
100+ Excel VBA макросов коды Примеры | excel VBA makro kod örnekleri | Excel的VBA宏代码范例 | Excel-VBA-Makros Codes Beispiele | excel VBA Macro Codes Contoh | एक्सेल VBA मैक्रो कोड्स उदाहरण.

The Most Useful VBA Codes Excel Examples Macros! Learning Path
Learn VBA Codes Excel Examples Macros and do almost everything! We have explained verity of examples to cover most frequently used codes. Start learning …!
Cells and Range Objects : VBA Codes Excel Examples Macros
Reading data from a Cell was my first exciting VBA Code when I stared learning Excel VBA. Then I successfully write data to Excel Cells. That was my first happy moment which motivated me to engage with VBA from last 10 years.
Here are the common VBA Codes Excel Examples Macros to deal with Cell and Range Objects of Worksheet.
You can find examples on reading and writing the data, selecting, copying and pasting the data.
Clearing, changing font color, font to bold, background color of cells or range. We can also see the examples on merging cells, adding comments and changing the font case to lower or upper using Excel VBA.
- Write Data to Worksheet Cell in Excel VBA
- Writing and Reading Excel Worksheet Cells Ranges in VBA
- Read or Get Data from Worksheet Cell to VBA in Excel
- Select Cell Range in Excel VBA
- Copy Data from One Range to Another in Excel VBA
- Clear Cells in Excel Range Worksheet using VBA
- Change Font Color in Excel VBA
- Change Font to Bold in Excel VBA
- Change Text Case – Upper Lower in Excel VBA
- Change Background Color of Cell Range in Excel VBA
- Merge UnMerge Cell Range in Excel VBA
- Add Clear Comments in Excel VBA
Top
Rows and Columns Objects: VBA Codes Excel Examples Macros
Cell and Range objects helps to reading and writing the data from worksheet. Now we will look into Rows and Columns of the Worksheet, helps to show or hide the data. Here you can find the VBA Codes Excel Examples Macros on delete rows, columns, change row height, column width. Hiding or un-hiding columns or rows. Inserting or deleting Rows or Columns. And finding the Last row, or columns in the worksheet in different situations.
- Change Row Height and Column Width using Excel VBA
- Delete Rows and Columns in Excel VBA
- Hide UnHide Columns in Excel Worksheet using VBA
- Hide UnHide Rows in Excel Worksheet using VBA
- Finding last used Column with data in particular Row
- Finding last used Row with data in particular Column
- Inserting Columns in Excel Worksheet using VBA
- Inserting Rows in Excel Worksheet using VBA
- Find Last Column with data in Worksheet using Excel VBA
- Finding last used Row with data in Excel Worksheet using VBA
Top
Worksheet and Workbook Objects: VBA Codes Excel Examples Macros
Now we will see the VBA Codes Excel Examples Macros on Worksheet and Workbook Objects. Here you can find creating new workbook, opening, closing and saving workbook. And example to show running a macro on opening or staring the workbook. We will also see how to protecting or unprotecting Excel workbooks or worksheets, Copying the data from one worksheet to another worksheet.
Hiding and unhiding worksheets. Changing the tab color of worksheet. Activating workbooks or worksheet, etc.
- Create New Workbook in Excel VBA
- Run a Macro Automatically on Opening Excel Workbook
- Open and Close Excel Workbook using VBA
- Save Workbook Using Excel VBA to Specific Folder
- Protect and Unprotect Excel Workbook using VBA
- Protect and UnProtect Worksheets in Excel VBA
- Hide UnHide Worksheets in Excel VBA
- Delete Worksheet in Excel VBA
- Copy Data from one Worksheet to another in Excel VBA
- Change the Color of Sheet Tabs in Excel VBA
- Activate Workbook Or Worksheet in Excel VBA
- Get Active Workbook or Worksheet Name Path FullName in Excel VBA
Top
Hyperlink: VBA Codes Excel Examples Macros
Hyperlinks are most widely used concepts in Excel. We generally use hyperlinks to navigate or open a file, link or folder. But we can do many other things using Hyperlinks. Examples in this topic will show you the power of Hyperlinks in Excel VBA. We have covered the following examples in this tutorial:
- Add Create Hyperlinks in Excel VBA
- Removing Hyperlinks in Excel VBA
- VBA Open File Folder Website Using FollowHyperlink method in Excel
- VBA Create Send Emails Using FollowHyperlink Method – Send Keys in Excel
Hyperlinks in Excel VBA – Explained with Examples!
Charts : VBA Codes Excel Examples Macros
Another powerful tool in Excel is charting. You can create rich visualized dashboards using Excel Charts and VBA. We have covered most commonly used Charting VBA Codes Excel Examples Macros. In this topic will show you how to deal with different chart objects to automate the charting process using VBA. Examples on creating charts, changing chart types. Changing chart axes titles, chart title, axis format, primary and secondary axes. We have provided more than 33 example to cover A-z of Excel Chart VBA.
- Example tutorials on Creating Charts using Excel VBA
- Example tutorials on Chart Type using Excel VBA
- Example Tutorials on Formatting Chart Objects using Excel VBA
- Example Tutorials on Chart Collection in Excel VBA
- Other useful Examples and tutorials on Excel VBA Charting
- Excel VBA Charting Constants and Enumeration
Excel Chart VBA Examples and Tutorials
Tables: VBA Codes Excel Examples Macros
Tables in Excel help to manage our data in Excel and give the more control over the data. In this example we will see the different VBA Codes Excel Examples Macros like creating tables, sorting tables data and applying filters in the data. We have provided following example to deal with Tables using Excel VBA.
- Create Tables in Excel VBA
- Sorting Tables in Excel VBA
- Filtering Tables in Excel VBA
- Clear Toggle Table Filters in Excel VBA
Tables in Excel VBA – Explained with Examples!
Top
Pivot Tables: VBA Codes Excel Examples Macros
Pivot tables help us to summarize the data and analyze it. VBA Codes Excel Examples Macros provided for creating pivot tables, pivot charts, adding calculated, changing row fields, column fields, value field fields in pivot tables using VBA. We have provided the following example to deal with pivot tables using Excel VBA, we will add some more examples to do more tasks using pivot tables.
- Creating Pivot Tables in Excel VBA
- Create Pivot Chart using Excel VBA
- Create Pivot Column Chart using Excel VBA
- Create Calculated Pivot Field in Excel VBA
Pivot Tables in Excel VBA – Explained with Examples!
Names: VBA Codes Excel Examples Macros
Names are another time saving feature in the Excel. We can define the names to Cells, Ranges and Tables and use them across the worksheets in the workbook. Her we will see how to add or remove the Names using VBA. Hiding and un-hiding names from the users. Follwing examples covered in this topic to deal with Names using Excel VBA.
- Adding Names in Excel VBA
- Deleting Names in Excel VBA
- Hide UnHide Names in Excel VBA
Names in Excel VBA – Explained with Examples!
Top
Other Applications: VBA Codes Excel Examples Macros
VBA is powerful, it can interact with the other applications like MS Word, PowerPoint, Access, Outlook, Internet Explorer, VBScript etc. Here are examples to deal with other application from Excel. Below examples are covered in this tutorial:
- Interact with PowerPoint from Excel VBA
- Dealing with MS Word From Excel VBA
- Interact with MS Access from Excel VBA
- Interact with Outlook from Excel VBA
- Dealing with Internet Explorer
- Dealing with Other Applications from Excel VBA – Calculator
- Run VBScript from Excel VBA
- VBA to Attach Send An Excel Chart to Outlook Email
Excel VBA to Interact with Other Applications
Application Object: Excel VBA Codes Examples Macros
Mastering the Application Objects Examples help you to fasten your VBA programs and writing optimized code in Excel VBA. Examples for stopping or displaying application alerts, stopping or enabling screen updating, stopping or enabling application events. The following example procedures and functions are covered in this topic to fasten and speed up VBA code processing.
- Stop Screen Updating
- Stop Events in Excel VBA – Disable Enable
- Stop Application Alerts in Excel VBA – Disable Enable
- Display Progress on Statusbar in VBA Excel
- Set Windows State in Excel VBA – Minimize Maximize Normal
- Toggle Full Screen in Excel VBA
- Get User Name in VBA Excel
- Stop Calculations in Excel VBA – Manual Automatic
- Open Visual Basic Editor (VBE) – Open Module with VBA
- VBA to Exit from Procedure or Function
Fasten VBA Code – Application Objects Explained with Examples
File Handling: Excel VBA Examples Macros Codes
File handling examples are provided to creating deleting files, folders. Copying Files and Folders and Moving from one location to another location. And displaying file or folder dialog boxes to browse the files or folders. And check if files exists in a folder using VBA.
- Check if Folder Exists using Excel VBA
- Opening Folders using VBA Excel
- Creating Folders in Excel VBA
- Copying Folders From One Location to Another in Excel VBA
- Move Folder From One Location to Another in Excel VBA
- Deleting Folders in VBA Excel
- Make File Read Only in VBA Excel
- Copy all Excel Files One Folder to Another in VBA Excel
- Opening Files Using File Dialog Box in Excel VBA
- Customize File or Folder Dialog Box in VBA Excel
- Excel VBA File Dialog Box – Displaying Vanilla Dialog Box to Pick Files
Folders and File Handling in Excel VBA
Some more VBA examples are added to deal with Files and Folders using Excel VBA:
- Delete Files Using VBA
- Copy Files from One Location to Another folder or directory in Excel VBA
Top
Miscellaneous Excel VBA Examples Macros Codes
- Remove Alpha Special characters from Range using Excel VBA
A Powerful & Multi-purpose Templates for project management. Now seamlessly manage your projects, tasks, meetings, presentations, teams, customers, stakeholders and time. This page describes all the amazing new features and options that come with our premium templates.
Save Up to 85% LIMITED TIME OFFER

All-in-One Pack
120+ Project Management Templates
Essential Pack
50+ Project Management Templates
Excel Pack
50+ Excel PM Templates
PowerPoint Pack
50+ Excel PM Templates
MS Word Pack
25+ Word PM Templates
Ultimate Project Management Template
Ultimate Resource Management Template
Project Portfolio Management Templates
Related Posts
- The Most Useful VBA Codes Excel Examples Macros! Learning Path
- Cells and Range Objects : VBA Codes Excel Examples Macros
- Rows and Columns Objects: VBA Codes Excel Examples Macros
- Worksheet and Workbook Objects: VBA Codes Excel Examples Macros
- Hyperlink: VBA Codes Excel Examples Macros
- Charts : VBA Codes Excel Examples Macros
- Tables: VBA Codes Excel Examples Macros
- Pivot Tables: VBA Codes Excel Examples Macros
- Names: VBA Codes Excel Examples Macros
- Other Applications: VBA Codes Excel Examples Macros
- Application Object: Excel VBA Codes Examples Macros
- File Handling: Excel VBA Examples Macros Codes
- Miscellaneous Excel VBA Examples Macros Codes
VBA Reference
Effortlessly
Manage Your Projects
120+ Project Management Templates
Seamlessly manage your projects with our powerful & multi-purpose templates for project management.
120+ PM Templates Includes:
183 Comments
-
Chitanya
March 3, 2013 at 8:23 PM — ReplyHi,
How to add excel chart to email body?
Thanks,
Chitanya -
PNRao
March 3, 2013 at 10:23 PM — Reply -
Chitanya
March 5, 2013 at 12:22 PM — Reply -
PNRao
March 6, 2013 at 12:19 AM — Reply -
Spoorthi M
May 2, 2013 at 9:35 AM — ReplyHi Team,
A very intersting site to learn VB. The thing which i liked here most is user friendly & explanation of each n every concepts very precisely. Applause for the whole team. Great JOB!!!
Regards
Spoorthi M -
PNRao
May 2, 2013 at 8:07 PM — Reply -
Lody
August 28, 2013 at 7:44 AM — ReplyHi PNRao,
It’s very interesting site to learn step by step VBA in easy way. Please allow me to copy your lesson learning. thank you -
PNRao
August 30, 2013 at 9:55 AM — ReplyHi Lody,
Thanks for visiting us. Unfortunately you should not copy the content from our site as it is against our terms and policies. We are a team working in day and night to build this. You can feel free to use our site as a reference for your queries our for learning purpose. We don’t allow the people to copy and duplicate our content.For more details, please read our terms and conditions:
Privacy Policy | Terms of Use
Thanks-PNRao
-
Amrut Parab
October 23, 2013 at 6:39 PM — ReplyCan we get 100+ Examples for Basic and Advanced Users in PDF format So that we can work or Refer while offline
-
Amrut Parab
October 23, 2013 at 6:43 PM — ReplyOk I got it, I read last comment Just now, Thanks for Good Effort,This website is best for all freshers who want to learn VBA programing, you are Amazing Guys.
May god Bless you. -
PNRao
October 23, 2013 at 11:13 PM — ReplyHi Amrut,
Thanks for visiting our site.
Yes, I am working on 100+ Excel VBA Examples and providing to my blog readers as soon as possible (with in a month).
Thanks
PNRao -
Mahendra
October 25, 2013 at 8:53 PM — ReplyHi,
I would like to know about the matrix multiplication,transpose and inverse of a matrix (mXn). Kindly help me on this.
Thanks
Maahendra -
PNRao
October 27, 2013 at 12:39 AM — ReplyHi Mahendra,
I will post the example programs ASAP.
Thanks-PNRao
-
Vivek
November 13, 2013 at 3:44 PM — ReplyHi ,
I am new to Excel VBA and my need is to create multiple worksheets on the same workbook based on the values from a range of cells(Text) from the Index Sheet and also i have to give hyperlink to the corresponding sheets.
For Eg:
cell A1 contains “Name”, a work sheets should be created on this name and Cell A1 should have hyper link to the created worksheet.
cell A1 will be in Index or 1st page.Thanks
-
Vivek
November 13, 2013 at 3:58 PM — ReplyHi,
I am very new to Excel VBA. I want to add multiple worksheets in the same workbook and i have to rename it with the values from a range of cells from the Index page. And also each sheet should be hyper linked to the corresponding Cell in the range.
For Eg:
Cell A1 has “Name”, i have to create a worksheet with that name and that created sheet has to be hyper linked with Cell A1.Thanks
-
Jaimin
November 13, 2013 at 9:37 PM — ReplyHow to write vba macro to copy data from one sheet to another without using “copy” command ?
-
PNRao
November 14, 2013 at 1:37 PM — ReplyHi Jaimin,
You can use for loop to get the data from one sheet to another sheet. For instance, if you want to get the data of cells A1:A20 from Sheet2 to cells B1:B20 of sheet1.
For iCntr=1 to 20

Sheets1.Cells(iCntr,2).value=Sheets2.Cells(iCntr,1)

Next
Its depending up on your requirement. If you want to copy only few cells. you can do it without using for loop.
However Copy command [Sheets2.Range(“A1:A10”).Copy Destination:=Sheets1.Range(“B1)] works more faster, you can copy the data including formats.
Hope this helps!
Thanks – PNRao! -
PNRao
November 14, 2013 at 2:32 PM — ReplyHi Vivek,
Here is the example program for your requirement.
[code language=”vb”]
Sub sbCreateTOCSheetHyperLinks()iCntr = 5 ‘ worksheets names starts from 5th row
‘loop until the cell is blank
Do While Sheets(«Index»).Range(«A» & iCntr) <> «»‘If you want to add new worksheets from last worksheet
Sheets.Add After:=Sheets(ActiveWorkbook.Worksheets.Count)
ActiveSheet.Name = Sheets(«Index»).Range(«A» & iCntr)Sheets(«Index»).Activate
‘delete if any existing hyperlink
Range(«A» & iCntr).Hyperlinks.Delete‘add hyperlinks
Sheets(«Index»).Hyperlinks.Add Anchor:=Range(«A» & iCntr), Address:=»», _
SubAddress:=»’» & Sheets(«Index»).Range(«A» & iCntr).Value & «’!A1», _
TextToDisplay:=Sheets(«Index»).Range(«A» & iCntr).ValueiCntr = iCntr + 1
LoopEnd Sub
[/code]You can download the example file form our downloads page: Download Now
You can use our add-in to create better TOC in easy way.
Hope this helps!
Thanks-PNRao!
-
Jagadesh.K
November 17, 2013 at 5:37 PM — ReplyHi Team,
I want to Split data into multiple worksheets based on column(this column will contain numbers)
with VBA code. It will be more helpful if you would help on this.
Thanks
-
PNRao
November 17, 2013 at 5:47 PM — ReplyHi Jagadeesh,
Please check for the example (Copy Data from One Sheet to Different Sheets:) in the following page:
Excel VBA Downloads
Hope this help you to do your task.
Thanks-PNRao!
-
Hi,
Really thanks for that, really that helps me a lot….
-
PNRao
November 22, 2013 at 11:59 PM — ReplyYou are most welcome!
Thanks-PNRao!
-
Mukund Joshi
December 21, 2013 at 1:12 AM — ReplyHi,
I am at a beginner level of learning VBA. So far it really helped me a lot at my workplace to drag my manager’s attention. I prefer referring your site and I really love the way you interpret useful info in the simplest way. Your work actually attracted me towards learning more & more of VB. Thank you for your hard work & knowledge sharing! -
PNRao
December 22, 2013 at 11:23 AM — ReplyHi Joshi,
Thank you for your comments, I am happy that our blog is helping and creating interest towards learning VBA.
Thanks-PNRao!
-
nitin chugh
December 31, 2013 at 8:46 PM — Replyhow to send email through excel using macro or without macro
-
PNRao
January 2, 2014 at 11:00 PM — Reply -
Mark Paull
January 5, 2014 at 8:12 PM — ReplyHi great site – i’m self learning VBA mostly through using the record macro function and analysing the coded output. Trying to make use of the text held within an object to drive an action based on the digit held within this object.
Fantastically built side in terms of content and style
-
PNRao
January 5, 2014 at 9:38 PM — ReplyThanks Paull! Enjoy learning VBA. -PNRao!
-
Patrizio
January 7, 2014 at 9:54 PM — ReplyHi,
first of all congrats for the amazing helpful website.
I am wondering if you could help me with this VBA issue:
1) Hypothesize we have in “sheet1” cell a1, a3, a5, a7 and so on with a gap of 2.
2) I would like a Macro that links (instead of copy if possible) cell b1, b2, b3, b4 and so on of “sheet2” to cell a1, a3, a5 … of “sheet1” (basically removing the Gap)Hope I was clear.
Thanks a lot for your help,
Patrizio
-
PNRao
January 8, 2014 at 12:18 AM — ReplyHi Patrizio,
Thanks for your comments. Here are VBA macros for your requirement.
[code language=”vb”]
Sub sbFill_OddRows()
‘Declaration
Dim iCntr, jCntr, lastRow As Long
‘iCntr to iterate Sheet2
‘jCntr to iterate Sheet1
‘lastRow for storeing last row with data in Sheet2lastRow = 25
‘Assuming you have data up to 25th row in Sheet2
‘If the last row is not fixed, then check
‘our most useful vba examples to find Last row
‘in different scenariosjCntr = 1
For iCntr = 1 To lastRow
Sheet1.Cells(jCntr, 1) = Sheet2.Cells(iCntr, 1)
jCntr = jCntr + 2 ‘increasing jCntr to skip one row
NextEnd Sub
‘*To fill even rows: Same as above with one change
Sub sbFill_EvenRows()
Dim iCntr, jCntr, lastRow As Long
lastRow = 25jCntr = 2 ‘ 1 to fill Odd rows, 2 to fill Even rows
For iCntr = 1 To lastRow
Sheet1.Cells(jCntr, 1) = Sheet2.Cells(iCntr, 1)
jCntr = jCntr + 2
NextEnd Sub
[/code]Hope this helps, let me know if you need more clarification.
Thanks-PNRao!
-
E Sivakuamr
February 7, 2014 at 2:39 PM — ReplyHi,
I want to insert multiple objeats using VBA,Please help me on this.Ex:Coulamn c is having the 100 objects names,I want to search in my system and i want to insert repect to that coulmn.
-
PNRao
February 9, 2014 at 6:33 PM — ReplyHi Sivakumar,
Thanks for writing us! Could you please specify your problem in more detailed.I understand that you will have your object names in C column of on of the sheet and you want to insert them just right to that respective cell. The thing I could not understand is Object: What are you referencing as object? is this a image?… please elaborate your question.
Thanks-PNRao!
-
Ashish
February 12, 2014 at 9:39 PM — Replyhi this is my query, could you please help
i have these percentages
35%,40%,25% and then i have a value say 50,000
i have made a tab on which i click and it should calculate the percentages itselfwill the same macro run for multiple entries?
-
Anurag Mishra
February 21, 2014 at 3:50 PM — ReplyHi Team,
I want to extract data from MSSQL server between two date and this date must be insert by user in the text box of a vba form so give me an example where we take the date from text box n put it on SQL query and direct extract the data from the server.
Thankyou
-
sravan
February 21, 2014 at 5:17 PM — ReplyHi,
Can you please show me the code to insert alphabets from A to Z in Horizontally and vertically.
Thanks,
Sravan -
PNRao
February 22, 2014 at 11:18 AM — Reply -
PNRao
February 22, 2014 at 11:23 AM — ReplyHere you go…
Sub sbPrintAlphabetsVertically()For iCntr = 1 To 26
Cells(iCntr, 1) = Chr(64 + iCntr)
NextEnd Sub
Sub sbPrintAlphabetsHorizonatally()
For iCntr = 1 To 26
Cells(1, iCntr) = Chr(64 + iCntr)
NextEnd Sub
Thanks-PNRao!
-
Aslam
February 24, 2014 at 6:35 PM — ReplyHi
I am new to VBA can u please show me the code to search amount with negative sign in particular column and move it next/ before that column.
Thanks in advance,
Aslam
-
arc
February 25, 2014 at 7:39 AM — ReplySimilar to PNRao response. I want to selectively pick data out of a column (the picks will be stepped apart by 3) , select the picks and paste to another column in contiguous fashion (meaning continuous-no step). This works in manually recording a macro and running it but I cannot make it work with programmed VBA language. Excel 2003.
Thanks
arc -
PNRao
February 25, 2014 at 11:31 PM — ReplyHi Arc,
You can use STEP statement. Here is the example code:Assuming you have data in Column A: A1,A4,A7,…..
And you want to print in Column B: B1,B2,B3…
Sub sbPrintColumnAByStep3InColumnB()

Dim iCntr, jCntr, lastRow As Long

lastRow = 50 ' Last Row of Column A with data:You can change this

jCntr = 1 ' Counter for Column B

For iCntr = 1 To lastRow Step 3

    Cells(jCntr, 2) = Cells(iCntr, 1)

    jCntr = jCntr + 1

Next

End Sub
Thanks-PNRao! -
PNRao
February 25, 2014 at 11:37 PM — ReplyHi Aslam,
You can just check if the Column A value is <0 then print into Column B. Here is the Example:
Sub sbPrintNegativeColumnAValuesInToColumnB()

Dim iCntr, jCntr, lastRow As Long

lastRow = 50 ‘ Last Row of Column A with data:You can change this

For iCntr = 1 To lastRow

    If Cells(iCntr, 1) < 0 Then Cells(iCntr, 2) = Cells(iCntr, 1)

Next

End Sub
-
PNRao
February 25, 2014 at 11:49 PM — ReplyHi Ashish,
I am assuming you have your Value at A1 and Percentages at B1,B2,B3 and you want to print the percentage of that values in C1,C2,C3.
for this you can use simple formula in C1=A1*B1/100 [Example, if you have 200 in A1 and 10 in B1, this will pront 20 in C1]
Sorry, your question is not clear, please provide more information. So that I can help you.
Thanks-PNRao! -
gc pathalla
March 3, 2014 at 12:43 AM — ReplyGreat Site!!
Very Helpful!!
Thanks a Lot!!
-
PNRao
March 3, 2014 at 10:49 PM — ReplyHi gcpathalla,
Thanks for your comments.
Thanks-PNRao! -
Satish Telgote
April 17, 2014 at 8:29 PM — ReplyHi, I am beginner, please advise me how to create tracker in VB using excel sheet. In a Excel sheet there are data in 5 column with titles, wanted to create Title on VB template. If I search with 1st Co data rest 4 columns data should be reflect e.g Column A Contain Dates, Column B contains Days, Column C Contains Activity etc
If the VB template if I input Dates Field all 4 Fields reflects relevant data
Regards
Satish Telgote -
PNRao
April 17, 2014 at 10:50 PM — ReplyHi Satish,
You can use Vlookup formula to achieve this. If you want to build your own function, you can loop through the each row and display the column data wherever its matching the given criteria.
The sample code looks like this:
Dim dtAVal as Date

Dim lastRow as Long

Dim blnFound as Boolean

blnFound =False

dtAVal = cdate(InputBox1.value) ' Your input date to find the respective data

lastRow=200 'Your last row in the worksheet
'looping through all rows and trying to get match row number
For iCntr=1 to lastRow
If Cells(iCntr,1)=dtAVal then
blnFound =True
exit For
End if
Nextif blnFound =True then
'Fill the respective data into other columns
TextBox2.Value=Cells(iCntr,2) 'Column B
TextBox3.Value=Cells(iCntr,3) 'Column C
TextBox4.Value=Cells(iCntr,4) 'Column Dend if
Hope this helps!
Thanks-PNRao! -
Gajanan Ashok Pujari
April 20, 2014 at 2:08 PM — ReplyHi, i heed an help, as i need coding , when some one click in txt box, then time should start, and when click on submit, should stop the time,
-
Malin Tedesund
April 24, 2014 at 7:24 PM — ReplyHi!
Also very much a beginner! I am trying to link excel to ppt using VBA, more precisely I want to be able to automize “moving” the value of one cell in excel to a specific location in my ppt presentation. Hoping this is possible and if so I could really use some help.
Thank you in advance,
Malin Tedesund -
PNRao
April 24, 2014 at 8:39 PM — ReplyHi Malin,
Thanks for visiting our blog. PPT automation is 100% possible with Excel VBA.
I am assuming, you want to export data/figures from Excel to particular slide in the PPT with required format. We can automate anything with PPT using Excel VBA, we can design a tool to do this task.
Please let us know your requirement, you can send the files and requirement to info@analysistabs.com.Thanks-PNRao!
-
PNRao
April 24, 2014 at 9:03 PM — ReplyHi Gajanan Ashok Pujari,
You can create two variables on module level variable 1 to capture the time on text box click. And the variable 2 is to capture the time on Submit button click. Now you can get the time difference of the variable 1 from variable 2.Hope this helps!
Thanks-PNRao! -
Lailuma
April 26, 2014 at 12:09 PM — ReplyHi,
As I visit this website this is the best website for VBA developers.
I have a problem I have a folder with about 700 excel workbooks as telephone bills. I want to first divide all workbooks into proper folders. how can I move these files in to proper folder when I run the macro first it ask me about the Source Folder, second wants to select the files then it ask the Destination folder. if it is possible please help me in this regard.Thanks in advance,
Lailuma
-
PNRao
April 27, 2014 at 12:47 PM — ReplyHi Lailuma,
You can do this as explained below:
Create 3 buttons in Worksheet
Button1: Place at Range A3 – This is to select the Source Folder: Use the File dialog to pick the folder name and put the folder path into Range B3[vb]
Set fldFolder = Application.FileDialog(msoFileDialogFolderPicker)
With fldFolder
.ButtonName = «Hello choose a Folder Now»
.Title = «Choose a Folder»
.Show
Range(«B3»)=.SelectedItems(1)
End With
[/vb]Button2: Place at Range A4 – This is to choose your files from the source folder: Use the File dialog to pick the multiple file names.
[vb]
Set fldFile = Application.FileDialog(msoFileDialogFilePicker)
With fldFile
.ButtonName = «Hello choose your Files Now»
.Title = » Choose an Excel File»
.Show
For iCntr= 1 to .SelectedItems.Count
Range(«B» iCntr+4 )=.SelectedItems(iCntr)
Next
End With
[/vb]
Now you have your file names ready to move into a another folder.
Button3: Place at Range A5 – This is to choose your destination folder. use the the same method to choose a folder shown for Button1. And loop through the files in your worksheet and move the file.
See the file handling examples to move the files from one location to another location.Hope this helps.
Thanks-PNRao! -
Adam Sanderson
April 30, 2014 at 11:23 PM — ReplyThis website is really great! I am looking to compile cell A1 from 50 different tabs in 50 different spreadsheets that are all in one folder, into one column on one spreadsheet. Please help!!
-
Lailuma
May 3, 2014 at 5:45 PM — ReplyHi I have worked with the above code unfortunately it is not working an give “Run-time error ‘1004’: Method ‘Range’ of object ‘_Worksheet’ Message. if it is possible could you please write me the entire code.
Thanks,
Lailuma
-
PNRao
May 4, 2014 at 11:42 AM — ReplyHi Luiluma,
Could you please let us know the code which you have tried. And the Office Version which you have tried. So that we can help you to fix the issue.Thanks-PNRao!
-
PNRao
May 4, 2014 at 11:56 AM — ReplyHi Adam,
You can loop through all the files in the folder and then fetch the range A1 and put it in your destination sheet.
[vb]
Sub sbLoopThroughAllFilesInFolderGetData()
Dim StrFolder As String
StrFolder = Dir(«c:temp») ‘ Your folder name
iCntr = 0
Do While Len(StrFolder) > 0
iCntr = iCntr + 1
Set wb = Workbooks.Open(StrFolder) ‘open each file here
Cells(iCntr, 1) = StrFolder ‘ this your file name
Cells(iCntr, 2) = wb.Sheets(«Sheet1»).Range(«A1») ‘ this your data from Range A1
StrFolder = Dir
Loop
End Sub
[/vb]Thanks-PNRao!
-
Umesh Shinde
May 10, 2014 at 2:21 PM — ReplyI want to open text document in excel which is pipe saperator and last column as date and time i want date and time saperately while clicking command button
-
Rajeev
May 20, 2014 at 12:09 PM — ReplyHello,
I learnt many things from given Example.
Many Thanks
Thanks and Regards,
Rajeev -
PNRao
May 20, 2014 at 10:22 PM — ReplyHi Rajeev, Thanks for your comments – PNRao!
-
Lucia
June 6, 2014 at 8:17 PM — ReplySome other features of Microsoft Office 2010: microsoft
Publisher 2010 Access. There are several ways you can run your
brand new macro. Connecting your employees with specific information and expertise.Feel free to surf to my web site: Microsoft Office 365 serial number, Lucia,
-
Ary
June 14, 2014 at 2:15 AM — ReplyHey.. Thank you for your very helpful website. I am new to VBA and i am now stuck at this problem. I have a big data for temperature.
1. 21.40
2. 21.45
3. 21.38
4. 22.89
5. 23.27
……1000. 85.54and so on. And i put these data in Column A. So for each temperature, i want to assign their density and heat coeff. values in Column B (respective to the temperature). So i try this:
Dim Temp As Range, Density As Double
Set Temp = Range(“A1:A1000”)
Temp = Range(“A1:A1000”).Value
If Temp = 21 Then
Density = 998.08
ElseIf Temp=22 Then
Density = 997.86
ElseIf…(I do until the required Temp)
End If
Range(“B1:B1000”).Value = DensityAnd i got mismatch error. Could you please help me?
Thanks.Regards,
Ary -
PNRao
June 14, 2014 at 9:16 PM — ReplyHi Ary,
You can’t put everything in one-shot, use the for loop instead.
Sub temperature2HeatCoeff()

Dim iCntr As Long

Dim Temp As Double, Density As Double

For iCntr = 1 To 1000

    Temp = Range("A" & iCntr)

    If Temp = 21 Then

        Density = 998.08

    ElseIf Temp = 22 Then

        Density = 997.86

    'ElseIf…(I do until the required Temp)

       ' ----

    End If

    Range("B" & iCntr) = Density

Next

End Sub
-
Ary
June 17, 2014 at 3:04 AM — ReplyThank you very much. With your help now i can do it.
-
PNRao
June 17, 2014 at 10:58 PM — Reply -
Ary
June 25, 2014 at 4:33 AM — ReplyHi PNRao,
I need some help on this. Okay, as example i have data in excel and this is only a part of them:
Temp : (21, 22, 23, 24, 25, 26, 29, 30, 26 25, 24, 23, 22), (24, 25, 26, 30, 27, 28, 29, 25, 21, 19), (20, 22, 23, 36,30, 34, 35, 30, 25, 23), (24, 26, 30, 34, 28, 25, 20)
These are temperature of a liquid. The temperature are increasing until the peak and then go down until certain temperature (one cycle). Then it is increasing and goes down again(next cycle). In these example there are 4 cycles. And it repeats until i have a few cycles.
For every each of the temperature, i can calculate its volume.
I try to write code to detect these cycles because i want to calculate the average volume for each cycle. But i don’t have idea how to start since i am new to VBA.Thank you
-
Charl
June 25, 2014 at 11:08 AM — ReplyHi, I’m trying to get part of a tag out of a cell into a new cell, the tag looks like this: “xxx-xxx-xxx-xxx-xxxxxx” or some look like this: “xxx-xxx-xxx-xxx-xxxxxx-xxxxxx”, I just want to get the last part of the tag (after the last “-“) into a new cell, I have +-35000 tags to do this with. can you tell met how to go about please.
-
PNRao
June 26, 2014 at 12:11 AM — ReplyHi Ary,
Here is the code, I am assuming your volume data in Column A (I pasted all your data in the column A from row 1 to Row 40)
Sub CycleAverage()

Dim lRow As Long
lRow = Range("A" & Rows.Count).End(xlUp).Row
'Find
totSum = 0
totCount = 0
AvgVolCntr = 1
For iCntr = 1 To lRow
totSum = totSum + Range("A" & iCntr)
totCount = totCount + 1'If New Cycle Starts : When I find series of values some thing like this: 2-1-2 or 9-3-4 or a blank
If iCntr > 2 Then
If (Range("A" & iCntr) > Range("A" & iCntr - 1) And _
Range("A" & iCntr - 1) < Range("A" & iCntr - 2)) Or Range("A" & iCntr) = " Then'print Averages in Column D & E
Range("D" & AvgVolCntr) = "Cycle: " & AvgVolCntr
Range("E" & AvgVolCntr) = totSum / totCount'and set totals to zero
totSum = 0
totCount = 0'increase AvgVolCntr
AvgVolCntr = AvgVolCntr + 1
End If
End IfNext iCntr
End Sub
Hope this helps! Thanks — PNRao!
-
PNRao
June 26, 2014 at 12:27 AM — ReplyHi Charl,
You can find last sting using this VBA code:
Assuming that you have your data in Column A. And printing the last string in Column B
Sub find_Last_String()

Dim lrow As Long
'find last row
lrow = Range("A" & Rows.Count).End(xlUp).Row'process from first row to last row
For iCntr = 1 To lrow
MyString = Cells(iCntr, 1)
findLastHypen = Len(MyString) - InStr(1, StrReverse(MyString), "-")
finalString = Mid(MyString, findLastHypen + 2, Len(MyString) - findLastHypen)
'print in Column B
Cells(iCntr, 2) = finalString
Next
End SubHope this helps! Thanks – PNRao!
-
Ary
June 27, 2014 at 12:47 AM — ReplyThank you so much. This helps me a lot
-
Charl
June 27, 2014 at 12:14 PM — ReplyThanks PNRao, this is exactly what I needed.
-
Evan
June 28, 2014 at 6:49 AM — ReplyEverything is very open with a very clear description of the
challenges. It was definitely informative. Your website is
useful. Thank you for sharing! -
PNRao
June 28, 2014 at 10:47 PM — ReplyHi Evan, Thanks for your comments-PNRao!
-
Sumit
July 2, 2014 at 2:00 PM — ReplyI want a macro for replacing all the names same as in one cell say with a name in another cell.
-
PNRao
July 2, 2014 at 3:57 PM — ReplyHi Sumit,
Assuming Range A1 is having the name to find, Range B1 is having the Name to be replaced with.The following code will find the name mentioned at Range A1 and Replace with the name mentioned at Range B1:
Sub VBAToReplaceAString()
strToReplace = Range(“A1”).Value
strReplaceWith = Range(“B1”).ValueCells.Replace What:=strToReplace, Replacement:=strReplaceWith, LookAt:=xlPart, _
SearchOrder:=xlByRows, MatchCase:=False, SearchFormat:=False, _
ReplaceFormat:=False
Range(“A1”).Value = strToReplace
End SubHope this helps-Thanks-PNRao!
-
Deependu
July 7, 2014 at 2:15 AM — ReplyVery Nice website, Thankyou Mr Rao for your support & great efforts, its simply Great Effort…
-
PNRao
July 7, 2014 at 3:20 PM — ReplyThank you Mr. Deependu – We are very happy to receive such a sweet feedback from our reader.
Thanks-PNRao! -
Krishna M
July 12, 2014 at 3:35 PM — ReplyDear Sir,
I would like to register for the Aug 2014 course. Upon entering my e-mail id, i did not receive any mail from your site. Could you please let me know the procedure to register for the VBA macro course.Thanks,
Krishna M -
PNRao
July 12, 2014 at 7:00 PM — ReplyYou’r registration is successful, and I can send the discount detail before starting our online classes!
Thanks-PNRao!
-
kevin
August 7, 2014 at 3:12 PM — Replyhi i m new to VBA…could you please tell me how to do coding for BFS algorithm in excel?please reply ASAP..
-
Joey
August 8, 2014 at 7:33 AM — ReplyHi, I need some help:
Given:
– The stock price is 68.
– The risk-free rate is 0.05.
– The stock’s expected return is 0.15 when jumps are ignored.
– The stock’s volatility is 0.3.
– When jumps are ignored, stock prices are lognormally distributed.
– The annual number of jumps follows a Poisson distribution with l = 1.8.
– Jump magnitudes are lognormal with aj = -0.1 and sj = 0.3.Using control variate method to estimate the value of an European call option with 0.5 year to maturity and strike price of 70. Given 95% confidence interval as answer on the spreadsheet with proper statement and annotation.
Report on the estimate by (i) crude method (ii) control variate method and (iii) efficient of the control variate method over the crude method for 5000 simulations.
Thanks!
-
Brett
August 14, 2014 at 4:59 PM — ReplySay I have 18 files in a folder and I need to plot the 5th column of data each file onto the same graph. Any advice on this? Thanks so much!
-
PNRao
August 17, 2014 at 11:27 AM — ReplyHi Joey,
Could you please provide me sample file. So that it is easy to understand your problem to help you.Thanks-PNRao!
-
PNRao
August 17, 2014 at 11:36 AM — ReplyHi Brett,
You can do this using formulas, if your data ranges are always fixed. Other method is using VBA, you can write a simple macro to retrieve the data from all those file and plot a chart.
Thanks-PNRao!
-
Roopert
September 12, 2014 at 9:33 PM — Replyhi,
I’m trying to sum a column/range within a column or row using VBA. I’d like to use the worksheetfunctions SUM, but I can’t seem to get it to work correctly. In fact I keep getting an error. Maybe I should be using something else? Please help.
Thanks – Roopert
-
allan
September 15, 2014 at 5:36 AM — ReplyHi PNRao,
I have an excel project that I am currently working on and I want to use VBA. I want to change the font color of all negative values, like for example column A, B and C. I update these values every month so the the value for let say, row 1 might be positive this month but negative next month. Just the negative values that i want the font color be changed into red and all the positive values remain black. Sorry, I am just new on VBA and macro.
Thanks in advance PNRao!
-
Hardeep Singh
September 24, 2014 at 8:21 PM — ReplyHello Sir,
Need your help?
I want to pull all the data from sheet1 to sheet2, using a commandbutton and two textbox in which i want to give the date range (such as 09/01/2014 to 09/25/2014) and will pull the complete information between that range from sheet1 (that is master sheet) to Sheet2 (that where I want the data between that date range).
Thanks -
PNRao
September 26, 2014 at 9:44 PM — ReplyHi Hardeep Singh,
Assuming that you have data in sheet1 in Column A and B and you want these records into sheet2 based on given date range.
If you have date in Column A:startDate = “09/01/2014”
endDate = “09/25/2014”
lRow = 100 ‘ This is thelast row in sheet1: please refer our 100+ codes if your last row is not fixed.
jCntr = 1
For iCntr = 1 To lRow
If Format(Sheets(“Sheet1”).Range(“A” & iCntr), “dd/mm/yyyy”) >= startDate And Format(Sheets(“Sheet1”).Range(“A” & iCntr), “dd/mm/yyyy”) <= endDate Then
Sheets(«Sheet2»).Range(«A» & jCntr) = Sheets(«Sheet1»).Range(«A» & iCntr)
jCntr = jCntr + 1
End If
NextHope this helps.
Thanks-PNRao! -
Kay
October 3, 2014 at 1:52 AM — ReplyHi Rao,
Help me with a script to add a comma after every 2words in a cell.
Eg: Column A (How to add a comma after every two words in excel); so the result in Column B(How to, Add a, comma after, every two, words in, excel)Also another script: Column A (How to split cell after every three words and result in four different column and the rest in last column)
so the result will be in Column B(How to split); Column C(Cell after every); Column D(three words and); Column E(result in four different column and the rest in last column) -
PNRao
October 3, 2014 at 9:10 PM — ReplyAnswer for your first query:
Sub sbUsage()
lRow = 20 ‘Last row with data in Cloumn A
For iCntr = 1 To lRow
Range(“B” & iCntr) = fnCommasEvery2TwoWords(Range(“A” & iCntr))
Next
End SubFunction fnCommasEvery2TwoWords(ByVal strText As String)
arrText = Split(strText)
If UBound(arrText, 1) >= 2 Then
strText = ”
For iCntr = 0 To UBound(arrText, 1) Step 2
If iCntr = 0 Then
strText = arrText(iCntr) & ” ” & arrText(iCntr + 1)
ElseIf iCntr + 1 <= UBound(arrText, 1) Then
strText = strText & «, » & arrText(iCntr) & » » & arrText(iCntr + 1)
Else
strText = strText & «, » & arrText(iCntr)
End If
Next
End If
fnCommasEvery2TwoWords = strText
End Function
I hope, now you can solve the second query yourself.
Thanks-PNRao!
-
Kay
October 12, 2014 at 4:01 AM — ReplyHi Rao,
Thank you for your help but am getting error..
Compile Error: Syntax errors…and “Cannot execute in break mode” -
PNRao
October 12, 2014 at 10:08 AM — ReplyHi Kay,
Could you please post the VBA code which you are trying.
Thanks-PNRao!
-
Kabanda James
October 18, 2014 at 9:49 PM — ReplyGreetings,
I am trying to develop a tax calculator using Excel VBA. I request you to assist me with a code for a separator for every three digits, for instance 1,000,000 and 234,456 etc.
I will be very grateful if my request is considered. -
Paudel
October 19, 2014 at 11:44 AM — Replyheloo
i am new in vba. i want to write a program that subtracts such that it can carry over from another cell in relative mode. eg, i want to subtract 2003 6 18 from 2014 10 19 such that it takes carryover a month that is adding up 12 in second cell and 30 days in another cell. all these number are in different cells.
thank you in advance. -
PNRao
October 20, 2014 at 6:52 PM — ReplyHi James,
You can use number formats:
Assuming that you have 1000000 in Range A1:
Sub GFormatNumbersWithCommas()MsgBox Format(Range(“A1”), “#,##0”)
‘OR
Range(“B1”) = Range(“A1”)
Range(“B1”).NumberFormat = “#,##0”End Sub
Thanks-PNRao!
-
Vasu
October 22, 2014 at 12:08 AM — ReplyIt’s Great place to learn excel programming… I am very new to this site.
I have a question, please help me on this.
From this place I learnt how to hide and unhide excel sheet via VBA. Now my question is I want to hide sheet in excel and should open by using activex button and close the sheet completely after review. Is it possible to do it in VBA please help me. -
Vasu
October 22, 2014 at 11:00 PM — ReplyHello,
I am beginner to VBA, and I am trying to do some automation in my project,… Please help me.I have around 20 to 25 tabs in my excel file and I want to hide all this only on pressing a button I need this tab to open then there should be close option which hides the file again.
could you please help me with code for this.
Regards,
Vasu -
Anandh
October 22, 2014 at 11:49 PM — ReplyI am looking for an code to send email automatically, when a range of cells are changed in an excel sheet(irrespective of Alphabets or numericals).
-
PNRao
October 23, 2014 at 5:31 PM — ReplyHi Vasu,
You can use the same method to hide the sheets.
Follow the below process for your requirement:
-> Enter 0 at some range (Example at Range A1000)
-> Add two activeX controls (Review Now, Complete)
-> when user press the Review Now, check if range A1000= 0 then un hide the sheet to review
-> when user press the ‘Complete’, enter 1 at A1000 and hide the sheetHope this helps!
Thanks-PNRao! -
PNRao
October 23, 2014 at 5:39 PM — ReplyHi Vasu,
You can not hide all sheets at any particular time, at least one sheet should be opened. Follow the below approach.
-> Have a Home worksheet
-> here you can provide the environment to choose a sheet and provide button to open it
-> the below macro will help you to do this:
Sub sbHideAllExceptOne()
shtToShow = “SheetToShow” ‘Change this as per your requirement
Sheets(shtToShow).Visible = True
For Each sht In ThisWorkbook.Worksheets
If sht.Name shtToShow Then sht.Visible = False
Next
End SubThanks-PNRao!
-
vasu
October 31, 2014 at 11:43 PM — Reply -
PNRao
November 1, 2014 at 10:44 AM — Reply -
sravan
November 5, 2014 at 9:18 AM — ReplyReally it’s good website. Hope you are not updating on Facebook. Every day at-least post a tip or code which will make the blog or our forum & we all mutual friend have scope to have a chat
Even I have same query if i have a Excel sheet close I wish to copy the data & close the file need code in VBA. -
Vineet Dubey
November 7, 2014 at 3:59 AM — ReplyHi Mr. Rao,
It really feels good to see this site and these posts. Hats off to your efforts in developing programs and people with their skills so that they can earn bread and butter.My question is that how do i protect a folder from getting deleted. I want to protect the folder and the contents of the folder from being deleted. Is there a way out through VBA ?
My second question is that how do i add a specific content in all the worksheets in an excel file. there may be different tabs in excel and they might varry. we have to run a loop which will open all the existing tabs in an excel sheet and add that specific content. some times there are 12 tabs and some times there are 15 or 16 or 20 or even more than that. Could you please help me with a code to solve this thing.
-
PNRao
November 10, 2014 at 9:50 PM — ReplyHi sravan, Thanks for suggestions. Yes, I am thinking to Best ways to create a best VBA forum to discuss our ideas. I am working on it.
I am going to launch it soon. -
Shyam
November 26, 2014 at 10:31 AM — ReplyHi,
1) I want to know what will a vba vlookup function will return if the values in two columns in different sheets match.
2) Sample syntax to compare 2 columns present in two sheets. -
Kalim
December 5, 2014 at 4:17 PM — ReplyHi Mr Rao,
i am working in excel since 2005, i just wanted to learn VBA, please guide
Thanks,
Kalim -
lavanya
December 18, 2014 at 11:30 AM — Replyhello I am very new to VBA, i am developing a project in excel. the project is like validating a excel,
I have to compare two cells on some condition.
if the result cell is blank it should show some message or i should not able to save excel
I need the code for this. please help -
Hi Mr. Rao,
I need to move one excel sheet from one folder to another while the status box in one of the sheets changes to completed. The problem is, the excel sheet has got dataconnection from another sheet. I do not want that data connection to be affected, while moving it to the new folder. Could you please help me here.
-
Hi Mr. Rao,
I need to update the details of certain columns of a sharepoint list based on the changes in an excel sheet. Right now, I am doing it manually. Is it possible to automate it. Could you please help
-
Nick R
January 18, 2015 at 10:05 AM — ReplyI have a bunch of data on one sheet, I need a macro to sort all the data to separate sheets based on the data in Column “H” for example. Column “H” is item location, I need all items from Location A to be sorted to its respective sheet. I need a macro that is going to be efficient as there will be thousands of lines that need sorted. I am not very familiar with VBA so Any Help would be greatly appreciated.
-
Raghu Rao
January 20, 2015 at 9:17 AM — ReplyI have a list of all member information in one sheet and another sheet has list of all members who have paid their dues.
How do I generate a list of members who are yet to pay from these 2 sheets. I do not have much experience with VBA and any help would be appreciated. -
meena
January 21, 2015 at 4:48 PM — Replyiam very new to thisVB,can you explan me
-
PNRao
January 23, 2015 at 10:36 AM — ReplyHi Raghu,
Please check the below macro:
Sub HighlightUnMatchedCells()

Dim lRowS1 As Long
Dim blnMatched As Boolean
'Finding last row with data
lRowS2 = Sheets("Sheet2").Range("A100000").End(xlUp).Row 'Sheet1

For iCntr = 1 To lRowS2 'Checking if Sheet2 names (in column A)are exitst in sheet1 (column A)
    If Sheets("Sheet2").Range("A" & iCntr) <> " Then 'check if it is not blank
        blnMatched = False
        On Error GoTo skipA
        If Application.WorksheetFunction.Match(Sheets("Sheet2").Range("A" & iCntr), Sheets("Sheet1").Range("A:A"), 0) > 0 Then blnMatched = True
skipA:

       If blnMatched = True Then ' already paid
           Sheets("Sheet2").Range("A" & iCntr).Interior.ColorIndex = 4
        Else 'not yet paid
            Sheets("Sheet2").Range("A" & iCntr).Interior.ColorIndex = 3
        End If
    End If
Next

End Sub
Hope this helps!
Thanks-PNRao! -
PNRao
January 23, 2015 at 10:52 AM — Reply -
Hello Rao,
I am new to VB, need your help for the below mentioned problem.
I have temperature dependent Material properties like Yield strength for example in Excel sheet A.
The values are obtained for the required temperature by interpolating in that particular excel sheet A.
Right now I am working on New Excel sheet B, where the results are to be displayed when the temperature value is entered.
Problem is the the results are required for different temperature, which cant be done once you have linked to that sheet A, bcoz when you enter the required temperature value, old results are also getting modified, with respect to last entered value.
Required your help to write one marco which selects the particular material in that sheet A and displays the value (Yield Strength)in sheet B in first row and also when selected for different temperature the results previous should remain as it isand display the latest results in second row.
-
Adrian Sorinel
February 3, 2015 at 11:40 AM — ReplyHi PNRao,
Congretulations for your work.
Could you please help me with the following problem?Background:
I have an exel worksheet (36 columns and 13102 rows) which have to be distributed daily basis to other 4 people in order to bring them input and to be send back.
Action:
All these worksheets together must update a master worksheet from whrere a report will be issued.
Question:
Which macro do I need to get an automatically update from all worksheets into master worksheet (as final version).Thank you very much,
Adrian -
PNRao
February 3, 2015 at 10:17 PM — ReplyHi Shrikara,
Please provide a sample file.
Thanks-PNRao!
-
PNRao
February 3, 2015 at 10:24 PM — ReplyHi Adrian,
Thank you for your comments!
You can use ADO, to retrieve the the data and update into one worksheet. Please refer the below links:
http://analysistabs.com/excel-vba/ado-sql-macros-connecting-database/And some of these 100+ examples will help you to read and write the data in Excel.
Please feel free to ask if in case of any questions you have. You can post example files (with dummy data) to get the exact solution.
Thanks-PNRao!
-
Hello Rao,
I tried sending the reference files to the info@analysistabs.com email id, which I am facing issues. Can I have some other Email-id for which I can send these files.
Regards
Shrikara Rao -
Hello Rao,
Please send me a email id for which I can send a sample presentation.
Because the email sent to ‘info@analysistabs.com’ is giving delivery failure message.Looking forward your email id for which all details can be sent.
Regards
Shrikara -
anne
February 24, 2015 at 4:31 PM — Replyhi. Im just a beginner in using macro. Hope you can help me with this. What are the codes that i need to run a macro using a button. The button is in sheet 1, once I click it ,the macro will perform in sheet 2. The macro that Im making is for formatting data. The data is in sheet2, and i want the sheet 1 to contain only the button. Is this workable? thanks for the help.
-
mamatha
February 26, 2015 at 3:40 PM — ReplyHello PNRao,
Im very new to VBA Excel programming could you help me with the following problem
I have the following code with a button to generate respective plots with data. now i have to write a small code to Change the Format of the plot which is Default (Black dotted line) i need a code like to add a check box for the data with a button to chnge the Format and colour of the line maually could you help me through this.
Im very thankful if you provide a code for me.
Thank you

Private Sub CommandButton1_Click()
Set nwsht = Sheets.Add(after:=Sheets(Worksheets.Count)) ‘add a new sheet
‘ nwsheet.Activate
ActiveSheet.Range(“B3:c4”).Select ‘basic formatting legende
With Selection
.MergeCells = True
.HorizontalAlignment = xlCenter
.VerticalAlignment = xlCenter
.Value = “Legende”
.Font.Bold = True
.ColumnWidth = 5
End WithActiveSheet.Range(“B6:c7”).Select ‘basic formatting legende
With Selection
.MergeCells = True
.HorizontalAlignment = xlCenter
.VerticalAlignment = xlCenter
.Value = “Akustik”
.Font.Bold = True
.ColumnWidth = 5
End WithActiveSheet.Range(“B9:c10”).Select ‘basic formatting legende
With Selection
.MergeCells = True
.HorizontalAlignment = xlCenter
.VerticalAlignment = xlCenter
.Value = “Werte”
.Font.Bold = True
.ColumnWidth = 5
End WithActiveSheet.Range(“D1:d500”).ColumnWidth = 1 ‘basic formatting
ActiveSheet.Range(“G1:G500”).ColumnWidth = 1 ‘basic formatting
ActiveSheet.Range(“E3:F4”).Select ‘basic formatting legende cellWith Selection
.MergeCells = True
.HorizontalAlignment = xlCenter
.VerticalAlignment = xlCenter
.ColumnWidth = 20
.Font.Bold = True
End WithActiveSheet.Range(“E5:G5”).RowHeight = 5 ‘basic formatting
ActiveSheet.Range(“E6:F7”).Select ‘basic formatting Ordnungen cell
With Selection
.MergeCells = True
.HorizontalAlignment = xlCenter
.VerticalAlignment = xlCenter
.ColumnWidth = 20
.Font.Bold = True
‘ .Value = “Gesamt”
End With
ActiveSheet.Range(“E8:G8”).RowHeight = 5 ‘basic formattingActiveSheet.Range(“E9:F10”).Select ‘basic formatting Ordnungen werte cell
With Selection
.MergeCells = True
.HorizontalAlignment = xlCenter
.VerticalAlignment = xlCenter
.ColumnWidth = 20
.Font.Bold = True
End With
ActiveSheet.Range(“E11:G11”).RowHeight = 5 ‘basic formattingActiveSheet.Range(“E12:E13”).Select ‘basic formatting drehzahl cell
With Selection
.MergeCells = True
.HorizontalAlignment = xlCenter
.VerticalAlignment = xlCenter
.RowHeight = 20
.Value = “Drehzahl [rpm]”
.Font.Bold = True
End With
ActiveSheet.Range(“F12:F13”).Select ‘basic formatting drehzahl cell
With Selection
.MergeCells = True
.HorizontalAlignment = xlCenter
.VerticalAlignment = xlCenter
.RowHeight = 20
.Value = “dB[A]/dB[lin]”
.Font.Bold = True
End With
ActiveSheet.Range(“E14:G14”).RowHeight = 2 ‘basic formattingActiveSheet.Range(“E6″).Select ‘data validation for Ordnungen
With Selection.Validation
.Delete
.Add Type:=xlValidateList, AlertStyle:=xlValidAlertStop, Operator:= _
xlBetween, Formula1:=”=moeglischplots”
.IgnoreBlank = True
.InCellDropdown = True
.InputTitle = ”
.ErrorTitle = ”
.InputMessage = ”
.ErrorMessage = ”
.ShowInput = True
.ShowError = True
End With
ActiveSheet.Range(“E6”).Value = “Gesamt”ActiveSheet.Range(“$Z$27”).Value = “Datei”
ActiveSheet.Range(“$Z$27”).Font.Color = RGB(255, 0, 0)ActiveSheet.Range(“$Z$28”).Value = “Gesamt”
ActiveSheet.Range(“$Z$29”).Value = “Ordnungen”
ActiveSheet.Range(“$Z$30”).Value = “Oktaven”ActiveSheet.Range(“$AA$28”).Value = “Ordnungen”
ActiveSheet.Range(“$AA$29”).Value = “Ordnungen”
ActiveSheet.Range(“$AA$30”).Value = “Oktaven”ActiveSheet.Range(“$AB$28”).Value = Application.WorksheetFunction.VLookup(ActiveSheet.Range(“E6”), ActiveSheet.Range(“Z28:AA28”), 2, False) ‘ SVERWEIS(E6,$Z$28:$AA$30,2,FALSCH)] ‘vlookup für gesamt als ordnungen
ActiveSheet.Range(“E9″).Select ‘data validation for indirekt
With Selection.Validation
.Delete
.Add Type:=xlValidateList, AlertStyle:=xlValidAlertStop, Operator:= _
xlBetween, Formula1:=”=INDIRECT($E$6)”
.IgnoreBlank = True
.InCellDropdown = True
.InputTitle = ”
.ErrorTitle = ”
.InputMessage = ”
.ErrorMessage = “Kein Zugriff”
.ShowInput = True
.ShowError = True
End WithActiveSheet.Range(“I2:J7”).Select ‘space for button
Selection.Interior.ColorIndex = 2
Selection.Borders(xlEdgeTop).LineStyle = xlContinuous
Selection.Borders(xlEdgeTop).Weight = xlThin
Selection.Borders(xlEdgeLeft).LineStyle = xlContinuous
Selection.Borders(xlEdgeLeft).Weight = xlThin
Selection.Borders(xlEdgeRight).LineStyle = xlContinuous
Selection.Borders(xlEdgeRight).Weight = xlThin
Selection.Borders(xlEdgeBottom).LineStyle = xlContinuous
Selection.Borders(xlEdgeBottom).Weight = xlThinActiveSheet.Range(“B3:f4”).Select ‘legend box
Selection.Borders(xlEdgeTop).LineStyle = xlDash
Selection.Borders(xlEdgeTop).Weight = xlThin
Selection.Borders(xlEdgeLeft).LineStyle = xlDash
Selection.Borders(xlEdgeLeft).Weight = xlThin
Selection.Borders(xlEdgeRight).LineStyle = xlDash
Selection.Borders(xlEdgeRight).Weight = xlThin
Selection.Borders(xlEdgeBottom).LineStyle = xlDash
Selection.Borders(xlEdgeBottom).Weight = xlThinActiveSheet.Range(“B6:f7”).Select ‘akustik box
Selection.Borders(xlEdgeTop).LineStyle = xlContinuous
Selection.Borders(xlEdgeTop).Weight = xlThin
Selection.Borders(xlEdgeLeft).LineStyle = xlContinuous
Selection.Borders(xlEdgeLeft).Weight = xlThin
Selection.Borders(xlEdgeRight).LineStyle = xlContinuous
Selection.Borders(xlEdgeRight).Weight = xlThin
Selection.Borders(xlEdgeBottom).LineStyle = xlContinuous
Selection.Borders(xlEdgeBottom).Weight = xlThinActiveSheet.Range(“B9:f10”).Select ‘werte box
Selection.Borders(xlEdgeTop).LineStyle = xlContinuous
Selection.Borders(xlEdgeTop).Weight = xlThin
Selection.Borders(xlEdgeLeft).LineStyle = xlContinuous
Selection.Borders(xlEdgeLeft).Weight = xlThin
Selection.Borders(xlEdgeRight).LineStyle = xlContinuous
Selection.Borders(xlEdgeRight).Weight = xlThin
Selection.Borders(xlEdgeBottom).LineStyle = xlContinuous
Selection.Borders(xlEdgeBottom).Weight = xlThinActiveSheet.Range(“E15:f1000”).Select ‘zahlen box
Selection.Borders(xlEdgeTop).LineStyle = xlContinuous
Selection.Borders(xlEdgeTop).Weight = xlThin
Selection.Borders(xlEdgeLeft).LineStyle = xlContinuous
Selection.Borders(xlEdgeLeft).Weight = xlThin
Selection.Borders(xlEdgeRight).LineStyle = xlContinuous
Selection.Borders(xlEdgeRight).Weight = xlThin
Selection.Borders(xlEdgeBottom).LineStyle = xlContinuous
Selection.Borders(xlEdgeBottom).Weight = xlThinActiveSheet.Range(“E12:f13”).Select ‘zahlen box
Selection.Borders(xlEdgeTop).LineStyle = xlContinuous
Selection.Borders(xlEdgeTop).Weight = xlThin
Selection.Borders(xlEdgeLeft).LineStyle = xlContinuous
Selection.Borders(xlEdgeLeft).Weight = xlThin
Selection.Borders(xlEdgeRight).LineStyle = xlContinuous
Selection.Borders(xlEdgeRight).Weight = xlThin
Selection.Borders(xlEdgeBottom).LineStyle = xlContinuous
Selection.Borders(xlEdgeBottom).Weight = xlThinActiveSheet.Range(“A15:D15”).Select ‘copy hinweis
Selection.MergeCells = True
Selection.HorizontalAlignment = xlCenter
Selection.VerticalAlignment = xlCenter
Selection.Font.Bold = False
Selection.Font.Size = 7
Selection.Value = “datei ab hier kopierien”
Selection.Borders(xlEdgeTop).LineStyle = xlContinuous
Selection.Borders(xlEdgeTop).Weight = xlThin
Selection.Borders(xlEdgeLeft).LineStyle = xlContinuous
Selection.Borders(xlEdgeLeft).Weight = xlThin
Selection.Borders(xlEdgeRight).LineStyle = xlContinuous
Selection.Borders(xlEdgeRight).Weight = xlThin
Selection.Borders(xlEdgeBottom).LineStyle = xlContinuous
Selection.Borders(xlEdgeBottom).Weight = xlThinActiveSheet.Range(“I12:K13”).Select
Selection.MergeCells = True
Selection.Value = “Lastenheft Datei”
Selection.HorizontalAlignment = xlCenter
Selection.VerticalAlignment = xlCenter
Selection.Font.Bold = True
Selection.Font.Size = 16
Selection.Font.Italic = True
Selection.Borders(xlEdgeTop).LineStyle = xlDash
Selection.Borders(xlEdgeTop).Weight = xlMedium
Selection.Borders(xlEdgeLeft).LineStyle = xlDash
Selection.Borders(xlEdgeLeft).Weight = xlMedium
Selection.Borders(xlEdgeRight).LineStyle = xlDash
Selection.Borders(xlEdgeRight).Weight = xlMedium
Selection.Borders(xlEdgeBottom).LineStyle = xlDash
Selection.Borders(xlEdgeBottom).Weight = xlMediumCall Lastenhefteingufen.CreateButton
End Sub
-
Jim Kevin Frazier
February 27, 2015 at 8:30 PM — ReplyI know nothing about VBA but I would like to know if I could write something that would tranpose data in rows to columns.
I have a list of names in rows, that have lost of data in the colums that repeat, for example below:
I need all the cities to appear in columns with just the one nameName City
John San Fran
John Cleveland
John Detroit
Can some one help, I have a big spreadsheet -
PNRao
March 2, 2015 at 7:41 PM — ReplyHi Anne,
It is possible, you can download the example files and explore the code.
Thanks-PNRao! -
valliappan
March 7, 2015 at 12:40 PM — Replyi dono how to insert the text box value to the tables weather can You provide the program for that?????
-
Rose
April 7, 2015 at 4:47 PM — ReplyJust want to ask how can I create a very simple accounting system using vbA where i can input data and generate then after.
-
Sven Holm
April 18, 2015 at 4:31 AM — ReplyHello
Is there code to bring data from another application into an excel file on a recurring time based interval.
Intervals are 5min,15min,30min and 1hour for about 40 sets of different data.Regards
Sven Holm -
Mathew
April 29, 2015 at 4:04 PM — ReplyHello,
i need a code to check a loop for multiple range name aa, ab, ac..for range e1:r24, s1:af24, ag2:at24 logically & give output range based on cell value, till the loop ends. In output i want to limit the worksheet size to 74 columns & then it should move to the next blank row.. -
nikolas
June 18, 2015 at 3:45 PM — Replyhi all , if enyone have ocupation in oil and gas geology, thy will anderstand me, i want do well constructions with VBA inputbox, means if i put options of oil wells, i want to do picture of construction, if anyone have idea wat i want, contact me i will show him exect wat i mean, thx a lots
-
Joey
July 11, 2015 at 1:00 AM — ReplyHello,
I am comparing a series of different materials across different year with varying amounts of dollars spent depending on the type of “contract”. These are then followed by 3 different teams, which each contain many people who “supply” the teams. I want to make these into a series of drop down menus. Meaning that once you click on one drop own menu, the next menu ill give you another choice.
For example
•Metal: Aluminum
•Forecasted Change in Year 17: 10%
•Type of Contract and it’s corresponding Spend 100,000 for fixed contracts, $50,000 for adjustable, etc.
•Team: 3 teams…each has roughly 60 suppliers who supply each team. Each supplier also has 4 sets of data to follow it (individual total spend, adjusted spend, and two more for anything that may come up).Is this possible? I know this is a pain, but I’m hoping anyone might be willing to help me. Thank you!
-
Ali
September 4, 2015 at 8:51 PM — ReplyHi there,
First off, thanks a lot for this fantastic page.
How can we find the last used row in a particular column within a specific range, lets say Range(“A3:E10”)? and likewise for the last used column in a row?
That would be really helpful.
Thanks.
-
mohsen
November 17, 2015 at 6:09 PM — Replyhi to all
i have a ?
How can disabled the click event in the worksheet in Excel 2007 ?
tanks for all user -
PNRao
November 17, 2015 at 9:55 PM — ReplyHi,
You can disable all the application events by Application.EnableEvents = False.
But worksheet events are user defined in the worksheet module or workbook modules. Please check and comment the codes to disable the worksheet events.Please provide the enough description of your requirement to understand better.
Thanks-PNRao! -
VSharp
November 27, 2015 at 3:07 AM — ReplyHi,
I am using Excel 2007, I have a drop down box so users can select ‘Yes’ or ‘No’. If ‘Yes’ is selected how do I create a pop up message asking the user to complete a particular question (i.e. now complete Question 2), but if the user selects ‘No’ from the drop down box the pop up message will ask the user to complete a different question (i.e. now complete Question 3), please help!
Many thanks VSharp -
PNRao
November 27, 2015 at 4:53 PM — ReplyHi VSharp,
Here is the code for the above question.
Private Sub UserForm_Initialize()
    ComboBox1.AddItem "Yes"
    ComboBox1.AddItem "No"
End Sub

Private Sub ComboBox1_Change()
If ComboBox1.ListIndex = 0 Then
    MsgBox "Now complete Question 2", vbInformation
Else
   MsgBox "Now complete Question 3", vbInformation
End If
End Sub
Regards-Valli
-
Lloyd
December 6, 2015 at 4:32 AM — ReplyI am trying to get a message box to appear if someone enters date in a cell that is not empty. I would like it to ask if they really want to change the value (yes, no) if Yes, allow change if No, end routine. If cell is empty then just allow input.
Is this possible.
Thanks in advance for any help you can offer. -
Lloyd
December 7, 2015 at 4:15 AM — ReplyThe above post should sat enters data in a cell not date
-
Jay
December 14, 2015 at 4:02 PM — ReplyHI,
We have 3 sheets.Sheet1:
Features John
a L1
b L2
c
d L4Sheet2:
w x y z
a 1
b 1
c 1
d 1Sheet3:
Area John
w L1
x
y
zHere a,b,c,d are features and w,x,y,z are areas. Sheet-2 is the mapping between feature and area. Suppose, in feature “a” John has L1 level. Now, we will check in Sheet2. In Sheet2 for “a” we need to check the nonblank cells, so here for “a” we have nonblank cell in “w” column. That means “a” has relation with “w”. So, in Sheet-3 “L1” value is stored in “w” row for John, like I have put “L1” in “w” row for John.
We have to design a button to fill the entire Sheet-3 on a single click.
Please help me.Thanks.
-
Uday
January 19, 2016 at 12:31 PM — ReplyHi,
I want to learn VBA(Macros) and need to know where i can get learning on coding from Basics.
**had good knowledge on Excel
Regards
Uday -
Rajashree
February 11, 2016 at 5:05 PM — ReplyHi, Thank you so much for the info it is really helping me out. but however, i am stuck with a situation where, i’am trying to merge few top and few bottom rows into one. For example,
Names Status
abc active
abc active
cbv closed
dfg closed
abc closedHere, how can i merge all those “abc” into one column without loosing any data?
any help in this would be appreciated. -
Ghie
February 15, 2016 at 1:16 PM — ReplyHelp
I have columns A-G
A = Either Arrival of Departure
B = military time (ex 1200, 2330, etc)
C = value if A=Arrival and B1200
E = value if A=Departure and B>1200
F = value if A=Departure and B<=1200I need a a column G which gives either the value C,D,E,F depending on A and B
-
balaviswanath
February 19, 2016 at 2:58 PM — ReplyHi Everyone,
I want to export comma(,) in to a text file using vba script using any function writeline and write .
Thanks,
Bala Viswanath. -
Limbani
February 21, 2016 at 9:50 PM — Replythanks for sharing the article i love to share with my buddies..
-
khirod kumar
March 29, 2016 at 10:59 AM — ReplyHello pn Raw,
I want to learn vba and I know very well advance excel and now I working as a mis executive .
I don’t know anything about vba so how to start vba can u give me basic vba book or any types of material that will help me my email I’d -
satvir
April 7, 2016 at 3:29 PM — ReplyHi,
Thank you for providing us helpful tricks.I am trying to run this VBA but it’s not working well.
I have got a table which is filtered. I want to multiply column b visible values only with 0 till the column b is blank.
I will appreciate your response.
Thanks
Satvir -
Kevin
April 12, 2016 at 7:58 PM — ReplyThank you very much for sharing this article!!
-
vishal jadhav
June 16, 2016 at 7:03 PM — ReplyHI,
I WANT TO KNOW About
i have one excel sheet in that 1 to 12400 rows
in rows written authorise to send and below that categorie1,……. categories 8
after that same as authorise to receive below that categorie 1,…….categories 8
in multiple time both written .
my scenario is need to delete only authorise to receive below that categorie 1,……..categories 8 but never want to delete categories of authorise to send. help me .and tell particular macro.
regards
vishal jadhav -
vishal jadhav
June 17, 2016 at 1:13 PM — ReplyHI,
i want to know aboutin my excel sheet have some data name location amt large data
i want add time from one application want to add automate time from application to my excel sheet.for each transaction -
Ajit
June 22, 2016 at 1:24 AM — ReplyHi
I am trying to use conditional formatting with VBA and a for or while loop. For example I have a worksheet which has dataset1 from ranges A1:Z3 which I want to use as the reference to be checked against. I have dataset2 which is from ranges A5:Z6 which I want to check against the first dataset1 in A1:Z3
I have the following code which I am using;
x = x + 1
With Range(Cells(x + 1, y + 1), Cells(x + 1, y + 1)).FormatConditions.Add( _
Type:=xlExpression, _
Formula1:=”=$I3$I7″)
.Interior.Color = RGB(255, 0, 0)
.Font.Color = RGB(255, 255, 0)End With
I would like to replace the cells which are in the line Formula1:=”=$I3$I7″) with something which can be incremented.
Please help.
Thanks
-
vee
June 23, 2016 at 12:40 PM — ReplyThank you very much. This is an excellent collection of useful VBA code!
-
ashu
June 29, 2016 at 2:42 PM — ReplyHiii, i m new to VBA…could you please tell me how to do coding for create a invoice template using buttons
i.e new, save ,delete ,update buttons
-
vishal
October 14, 2016 at 10:53 AM — Replyhi
i have a queri about vba
i have data sheet in data sheet i need to filter for date and need to add formula after 3 column .
for example ab column date filter then want formula in ad column equal to .need suggestion
regards
vishal jadhav -
ylnv prasadrao
October 28, 2016 at 6:50 AM — ReplyRespected Sir,
1.How to rounded off next rupee, if the value is 50 paise and above using excel vba?
1.How to rounded off lower rupee, if the value is 50 paise and below using excel vba?Thanking you sir,
Prasad
-
Mahendra
November 8, 2016 at 2:53 AM — ReplyHi how can I open only one instance at a time in excel 2010 using VBA code, any idea please?
-
Sharad Hardikar
November 12, 2016 at 7:54 PM — ReplyHi!
I passed an multidimensional array (7,9) to range A2:I10. The result however was the data got passed to column B to I and the last column was not passed. I changed the range to A2:J10 and all data got passed to columns B to J. On both occasions, The second row was blank and column A was blank. While I could not get a solution and had to move the data by deleting the row 2 and Column A cells throughcode, what is the reason for this phenomena? -
Nabi
November 15, 2016 at 3:17 PM — ReplyHi, I am Nabi, I have an excel macro VBA stock sheet but my Exit month wise item under report do not work when I click the Exit month button and try to see month wise report on that time report do not show and I got msg. box. The msg box has show report not available. So plz help me how can show my month wise (exit item report).
-
Vonjie
December 8, 2016 at 3:21 AM — ReplyHello,
Great effort in all of the comments that you have helped.
Hope you could help me too.
I want to create a Button that will gather all the data in the assigned cells and make it inserted in the existing table assigned per Person/borrower.
Table is Borrower’s logs of their individual payments as well as showing the remaining balance.
Example: Columns are Date, Payment Amount, Balance(this may not show, I just have to Subtract another cell with is Principal Amount versus its Payment.
Date Payment Amt Balance
1,000.00
12/1/16 300.00 700.00
12/3/16 50.00 650.00
13/6/16 275.00 375.00Best Regards,
Vonjie
-
Noufiya
December 19, 2016 at 8:23 PM — ReplyHi,
I am new to VBA. And i feel interesting to study VBA while gone through this site.
Now i try to modify my little projects in excel into in terms of VBA. My project is simple,
I have a set of standard values in a sheet. With reference to this standard values, my result after 1 production is analysed for each row. Each row contains different item so i need to set different formula. Fortunately i had done it well
. .Now my aim is,
1) Copy each row into new sheet, (for eg: row1= A1:K1, row2= A2:K2…..row1=Ai: Ki). i need to copy only 1 row into new sheet…and each row contains formula. i need to copy this formula too. And the sheet name changes to item name( in first the column)2) Now i have 89 items (i.e.rows) to copy to different sheets. in the second sheet in my workbook is a commend box. where , if i click on a command box, its name is an item name, then corresponding sheet will activate. and i can edit it. all other sheets are on hide.
3) if I enter 90th row once, these above procedures must be followed.
So if i enter details in 90th row, and then click on command box in the same sheet, a new sheet with a copy of 90th row only generate. also this worksheet is saved under another command box on the second sheet.
hoping you will understand what i mean.
your earliest reply will be highly appreciated.
thank you very much
Noufi
-
vishal
December 20, 2016 at 6:29 PM — Replyhi
vishal here‘pre/post
Dim MyFile As String
Dim SORT_File As String
Dim LastRow As String
MyFile = Application.GetOpenFilename()
Workbooks.Open filename:=MyFile
MyFile = ActiveWorkbook.Name
Sheets(“Data”).Select
LastRow = Cells(Rows.Count, 2).End(xlUp).Row
For r1 = 2 To LastRow
Windows(MyFile).Activate
Sheets(“Data”).Select
If sheet2.Range(“AG” & r1).Value = “4:00 PM” Thensheet2.Range(“AN” & r1).Value = “=IF(P2<=$AN$1,»»Pre»»,»»Post»»)»
Else
sheet2.Range(«AN» & r1).Value = «=IF(P2<=$AO$1,»»Pre»»,»»Post»»)»
End If
Next
i have written this macro but tell me why not run this macro.need help anyoneregards
vishal jadhav -
vishal
December 21, 2016 at 1:50 PM — ReplyQUESTION:- RANGE A1 AND COLUMN 1 AUTOFILTER CRITERIA :- “04:00 PM”
IF RANGEA1&LASTROW.VALUE=”04:00 PM” THEN RANGE B2&LASTROW.VALUE= IBYB
IF RANGE A1&LASTROW.VALUE=”03:30 PM” THEN RANGE B2&LASTROW.VALUE=REMITTANCE
END IF END IFGIVE ME SOLUTION.
VISHAL -
gaurav gangh
December 21, 2016 at 2:11 PM — ReplyHi,
I have an excel file with xml mappings done which has links from another excel file, i need a code where the code automatically saves the file to a specified file name as soon as the xml mapped file receives any changes from the excel file.
regards
Gaurav Gangh -
subrahmanyam
January 7, 2017 at 11:48 AM — ReplyHi,
We are trying to build dashboard based on various types of data in excel sheets All these excel files will be located in specified path. All these files have commonly one unique field . Also , i have one more excel file which contains master list of that unique field.
For example :
I have 5 sheets in one specified folder.
all the files having one Project code as unique field.
However I need to create dashboard based on the portfolio under which the above projects are falling.
Like : for a project code “PPP” i have mapping of portfolio as “ABC”. This data will be stored in one excel file apart from the above mentioned 5 files.Now i need to generate data based on this mapping and rest 5 excel files and then have dashboards created on top of that.
Need help in having the code for this problem.
thank you.
-
Ordan
January 18, 2017 at 7:13 PM — ReplyHi there,
Is there anyway to add button that once you press it, will add the same pre-made data table?
Regards
Ordan Gilboa -
Blessy
February 10, 2017 at 1:47 PM — ReplyHi Suppose I have value 100, 101,105 in column A and column B has different values for eg 20,40,80,60 and I want to fetch the values only those are in front of 100 in Excel 2010.
Can you please advise how can it be done -
rajadurai
March 15, 2017 at 5:46 PM — ReplyOption Explicit
Dim binNew As Boolean
Dim TRows, THows, i As LongPrivate Sub UserForm_Click()
End Sub
Private Sub CmdClose_Click()
If CmdClose.Caption = “Close” Then
Unload Me
Else
CmdClose.Caption = “Close”
CmdNew.Enabled = True
CmdDelete.Enabled = True
End If
End SubPrivate Sub CmdNew_Click()
binNew = True
txtEmpNo.Text = ”
txtEmpName.Text = ”
txtAddr1.Text = ”
txtAddr2.Text = ”
txtAddr3.Text = ”CmdClose.Caption = “Cancel”
CmdNew.Enabled = False
CmdSave.Enabled = True
CmdDelete.Enabled = False
End SubPrivate Sub cmdSave_Click()
If Trim(txtEmpNo.Text) = ” Then
MsgBox “Enter Emp. No. “, vbCritical, “Save”
Exit Sub
End If
Call prSave
End SubPrivate Sub prSave()
If binNew = True Then
THows = Worksheets(“Data”).Range(“A1”).CurrentRegion.Rows.Count
With Worksheets(“Data”).Range(“A1″)
.Offset(THows, 0).Value = txtEmpNo.Text
.Offset(THows, 1).Value = txtEmpName.Text
.Offset(THows, 2).Value = txtAddr1.Text
.Offset(THows, 3).Value = txtAddr2.Text
.Offset(THows, 4).Value = txtAddr3.TextEnd With
txtEmpNo.Text = ”
txtEmpName.Text = ”
txtAddr1.Text = ”
txtAddr2.Text = ”
txtAddr3.Text = ”Call PrComboBoxFill
Else
For i = 2 To TRows
If Trim(Worksheets(“Data”).Cells(i, 1).Value) = Trim(ComboBox1.Text) Then
Worksheets(“Data”).Cells(i, 1).Value = txtEmpNo.Text
Worksheets(“Data”).Cells(i, 2).Value = txtEmpName.Text
Worksheets(“Data”).Cells(i, 3).Value = txtAddr1.Text
Worksheets(“Data”).Cells(i, 4).Value = txtAddr2.Text
Worksheets(“Data”).Cells(i, 5).Value = txtAddr3.TexttxtEmpNo.Text = ”
txtEmpName.Text = ”
txtAddr1.Text = ”
txtAddr2.Text = ”
txtAddr3.Text = ”Exit For
End If
Next i
End If
binNew = FalseEnd Sub
————————————-
Private Sub cmdDelete_Click()
TRows = Worksheets(“Data”).Range(“A1”).CurrentRegion.Rows.Count
Dim strDel
strDel = MagBox(“Delete ?”, vbYesNo, “Delete”)
If strDel = vbYes Then
For i = 2 To TRows
If Trims(Worksheets(“Data”).Cells(i, 1).Value) = Trim(ComboBox1.Text) Then‘ sheet1.range(i & “:” & i).Delete
Worksheets(“Data”).Range(i & “:” & i).DeleteTxtEmpNo.Text = ”
txtEmpName.Text = ”
TxtempAddr1.Text = ”
TxtempAddr2.Text = ”
TxtempAddr3.Text = ”
TxtempAddr4.Text = ”
Call prCoboBoxFill
Exit For
End If
Next i
If Trim(ComboBox1.Text) = ” Then
cmdSave.Enabled = False
cmdDelete.Enabled = False
Else
cmdSave.Enabled = True
cmdDelete.Enabled = True
End If
End If
End Sub
——————————–
Private Sub CmdClose_Click()
If CmdClose.Caption = “Close” Then
Unload Me
Else
CmdClose.Caption = “Close”
CmdNew.Enabled = True
CmdDelete.Enabled = True
End If
End Sub
————————————-Private Sub PrComboBoxFill()
TRows = Worksheets(“Data”).Range(“A1”).CurrentRegion.Rows.Count
ComboBox1.Clear
For i = 2 To TRows
ComboBox1.AddItem Worksheets(“Data”).Cells(i, 1).ValueNext i
End Sub
—————————————————–
Private Sub Userform_Initialize()
Call PrComboBoxFillCmdSave.Enabled = False
CmdDelete.Enabled = FalseEnd Sub
—————————————————–
Private Sub cmdsearch_Click()
binNew = False
txtEmpNo.Text = ”
txtEmpName.Text = ”
txtAddr1.Text = ”
txtAddr2.Text = ”
txtAddr3.Text = ”TRows = Worksheets(“Data”).Range(“A1”).CurrentRegion.Rows.Count
For i = 2 To TRows
If Val(Trim(Worksheets(“Data”).Cells(i, 1).Value)) = Val(Trim(ComboBox1.Text)) ThentxtEmpNo.Text = Worksheets(“Data”).Cells(i, 1).Value
txtEmpName.Text = Worksheets(“Data”).Cells(i, 2).Value
txtAddr1.Text = Worksheets(“Data”).Cells(i, 3).Value
txtAddr2.Text = Worksheets(“Data”).Cells(i, 4).Value
txtAddr3.Text = Worksheets(“Data”).Cells(i, 5).ValueExit For
End If
Next i
If txtEmpNo.Text = ” Then
Else
CmdSave.Enabled = True
CmdDelete.Enabled = True
End If
End Sub
————————————————-————————————————
-
rajadurai
March 15, 2017 at 6:32 PM — Reply -
ravi
March 16, 2017 at 4:29 PM — ReplyOption Explicit
Dim binNew As Boolean
Dim TRows, THows, i As LongPrivate Sub UserForm_Click()
End Sub
Private Sub CmdClose_Click()
If CmdClose.Caption = “Close” Then
Unload Me
Else
CmdClose.Caption = “Close”
CmdNew.Enabled = True
CmdDelete.Enabled = True
End If
End SubPrivate Sub CmdNew_Click()
binNew = True
txtEmpNo.Text = ”
txtEmpName.Text = ”
txtAddr1.Text = ”
txtAddr2.Text = ”
txtAddr3.Text = ”CmdClose.Caption = “Cancel”
CmdNew.Enabled = False
CmdSave.Enabled = True
CmdDelete.Enabled = False
End SubPrivate Sub cmdSave_Click()
If Trim(txtEmpNo.Text) = ” Then
MsgBox “Enter Emp. No. “, vbCritical, “Save”
Exit Sub
End If
Call prSave
End SubPrivate Sub prSave()
If binNew = True Then
THows = Worksheets(“Data”).Range(“A1”).CurrentRegion.Rows.Count
With Worksheets(“Data”).Range(“A1″)
.Offset(THows, 0).Value = txtEmpNo.Text
.Offset(THows, 1).Value = txtEmpName.Text
.Offset(THows, 2).Value = txtAddr1.Text
.Offset(THows, 3).Value = txtAddr2.Text
.Offset(THows, 4).Value = txtAddr3.TextEnd With
txtEmpNo.Text = ”
txtEmpName.Text = ”
txtAddr1.Text = ”
txtAddr2.Text = ”
txtAddr3.Text = ”Call PrComboBoxFill
Else
For i = 2 To TRows
If Trim(Worksheets(“Data”).Cells(i, 1).Value) = Trim(ComboBox1.Text) Then
Worksheets(“Data”).Cells(i, 1).Value = txtEmpNo.Text
Worksheets(“Data”).Cells(i, 2).Value = txtEmpName.Text
Worksheets(“Data”).Cells(i, 3).Value = txtAddr1.Text
Worksheets(“Data”).Cells(i, 4).Value = txtAddr2.Text
Worksheets(“Data”).Cells(i, 5).Value = txtAddr3.TexttxtEmpNo.Text = ”
txtEmpName.Text = ”
txtAddr1.Text = ”
txtAddr2.Text = ”
txtAddr3.Text = ”Exit For
End If
Next i
End If
binNew = FalseEnd Sub
————————————-
Private Sub cmdDelete_Click()
TRows = Worksheets(“Data”).Range(“A1”).CurrentRegion.Rows.Count
Dim strDel
strDel = MagBox(“Delete ?”, vbYesNo, “Delete”)
If strDel = vbYes Then
For i = 2 To TRows
If Trims(Worksheets(“Data”).Cells(i, 1).Value) = Trim(ComboBox1.Text) Then‘ sheet1.range(i & “:” & i).Delete
Worksheets(“Data”).Range(i & “:” & i).DeleteTxtEmpNo.Text = ”
txtEmpName.Text = ”
TxtempAddr1.Text = ”
TxtempAddr2.Text = ”
TxtempAddr3.Text = ”
TxtempAddr4.Text = ”
Call prCoboBoxFill
Exit For
End If
Next i
If Trim(ComboBox1.Text) = ” Then
cmdSave.Enabled = False
cmdDelete.Enabled = False
Else
cmdSave.Enabled = True
cmdDelete.Enabled = True
End If
End If
End Sub
——————————–
Private Sub CmdClose_Click()
If CmdClose.Caption = “Close” Then
Unload Me
Else
CmdClose.Caption = “Close”
CmdNew.Enabled = True
CmdDelete.Enabled = True
End If
End Sub
————————————-Private Sub PrComboBoxFill()
TRows = Worksheets(“Data”).Range(“A1”).CurrentRegion.Rows.Count
ComboBox1.Clear
For i = 2 To TRows -
raj
March 16, 2017 at 4:31 PM — Reply -
Subha
May 12, 2017 at 6:15 PM — ReplyHello,
I’m at the beginner level in VBA. I’m trying to automatically update the values entered in a table one sheet to a table in another sheet(on a monthly basis). It would be great if you could provide me with some references for this case. Thanks for the help. -
chris
June 7, 2017 at 12:52 AM — ReplyLooking for vba code to run a macro when I click on a cell
-
Jerry
June 25, 2017 at 6:53 PM — ReplyHi, I am very new to VBA programming and am basically trying to self-learn from using your website. Thank you so much for all of the helpful information.
I’m trying to create a macro that will look at all of the values in Colum F on Sheet 1 and if the value is > 0 then I want to copy that whole row to sheet 2. For instance, I have a table in sheet 1 that is 1000 rows long. In column F of that table, only 10 of those rows contain values that are greater than zero. I want to copy those 10 rows to Shwet 2 and I want them to be contiguous.
I tried writing this program myself and got it to work somewhat. The problem I’m having is that I cannot figure out how to make it contiguous on sheet 2. And also it’s copying rows from sheet 1 that have no data, but they do have some type of formatting. I don’t want it to copy those rows.
-
PNRao
July 17, 2017 at 2:44 PM — ReplyYou can use the worksheet events to to call your macros in respective worksheet module:
Private Sub Worksheet_BeforeDoubleClick(ByVal Target As Range, Cancel As Boolean)
'Call your Macro here
MsgBox "Double Click"
End Sub

Private Sub Worksheet_SelectionChange(ByVal Target As Range)
'Call your Macro here
MsgBox "When you Change the Selection"
End Sub
-
Katherine Ingersoll
July 24, 2017 at 12:02 AM — ReplyHi there:
We have a business in Belize and import our inventory from the US. The cost of duty on the imports differs in percentage based upon a list of harmonized tariff codes. I have the list of tariff codes and the respective duty percentage for each.
I also have the manufacturer’s product list with the respective tariff codes. I need to be able to quickly create a new spreadsheet which will calculate the “landed cost” of the manufacture’s product given the currency conversion of BZD to USD plus the cost of the duty.
For example:
The tariff spreadsheet might have a description of “Oil” with a tariff code of XYZ with an import duty of 15%. The product list has a price of US$5.00 for an item with the tariff code of XYZ
I need to know how much that product costs me (cost plus duty) in Belize dollars for our POS system. The currency conversion is 1USD=2BZD.
So the cost of the product needs to be first converted to Belize dollars and then the duty percentage added to it based upon the corresponding tariff code. So in this example US$5.00 is BZ$10.00, plus duty of 15% equals a “landed cost” of $11.50.
There are a gazillion products and another gazillion tariff codes.
I’m not sure where/how to even begin to tackle this task. Your help would be immensely appreciated.
-
Yousaf
July 29, 2017 at 1:34 PM — ReplyHi Dear Sir/Madam.
How we decrease input value equal to zero. Thanks in advance. -
Fadi
September 22, 2017 at 8:03 PM — ReplyHi
I have an excel sheet with a list of 2500 motor names and some other specs.
I have a motor checklist where I should put the name of each motor and some other specs of each motor, I have to do it for all the motors I have.
I want to do it automatically and save each motor with it’s name so I can be able to print them afterwards.Your help would be immensely appreciated
-
Vasant Shetti
November 3, 2017 at 3:27 PM — ReplyHi,
I want help to write an output report in VBA thru the input data
Can you help with the code -
ABHISHEK CHITTILLA
November 20, 2017 at 10:12 AM — ReplyHello,
Our company wants to import all the data for the same part into a single spreadsheet, How can we insert all the spreadsheets into a single spreadsheet, is there any programming code for that -
Dilipkumar.H
January 2, 2018 at 9:49 AM — ReplyHi I have a data in Sheet 1. I need to copy the data’s in the range of dates & description.
ex : From Date : 1st Oct 2017, To Date : 31st Oct 2017, Description : Fruit. I need to copy this data from Sheet 1 to New Workbook using excel user form. -
Shibu
January 13, 2018 at 7:08 PM — ReplyFirst sheet
Date Sap code recvd qty
13 Jan 18. 101. 10
14 Jan 18. 102. 20
15 Jan 18. 103. 30Second sheet
Date Sap code. Issued qty
13 Jan 18. 101. 5
14 Jan 18. 102. 5
15 Jan 18. 103. 5I want the results to appear in below third sheet if I enter reciept and issues on daily basis as below
Master list to be updated
Sap code. Receipt. Issues
13jan 14jan 15jan 13jan 14jan 15jan
101. Xx. Xx. Xx. X. X. X
102. Xx. Xx. Xx. X. X. X
103. Xx. Xx. Xx. X. X. X
104
105
And so onI want the values in place of xx for reciept and x for issues.
How do I make a vba code for it or is there any other formula in excel.
I tried my best but could not do it. A pivot with external connection is not working because the master list contains many sap codes that may or may not be received or issued.Please help, thanks in advance.
-
Hello,
I need to take data stored in Excel files and populate (copy and paste ) the data into web forms, submit the form then loop through the enitre process until I have gone through the entire Excel file.
So the Excel file will have a many number of rows but always 4 colums of data per row.
I then need to:
1) login to the site (),
2) Navigate the site to get to the correct forms
3) Insert the data from Excel into the correct form field (column 1 and 2 data goes to Field 1 & 2, Field 3 to selected from drop down box based on column 3, Field 4 data pasted from column 4)
4) submit the data
5) do the process again and again to complete the entire rows
I want to create a macro for the above task. Hopefully the above points are helpful to understand my requirement.
Please help me
Thanks in advance. -
Suresh
February 10, 2019 at 5:20 PM — ReplyHi Team, I need the excel macro , which compare the 2 excel sheets/tabs (which is having data A to AZ and which is having many rows).
1. Compare the 2 excel sheet , highlight the new rows depending upon the multiple criteria
2. In last column there is comments which is added manually Jan2019 month , however in Feb209 number of rows will be increased and so highlight the new rows depending upon the multiple criterias .And copy those comments as well.in Feb2019 sheet.
3.Highlighted new rows last comment section will be blank.Could you please provide me the excel macro for above conditions.
Thanks in advance.
Regards
Suresh -
Satish
July 13, 2019 at 7:47 PM — ReplyHi VBA Expert,
I would like to append many workbooks by rows which consist of two sheets “sheet1” and “Sheet2” in to single Workbook without opening any excel sheets.
column length is fixed but rows length may vary.
Please help me to do this task using VBA macro.
Thanks in advance!!!
-
Suresh Dasari
September 6, 2019 at 3:12 PM — ReplyThanks for the detailed article.

Effectively Manage Your
Projects and Resources
ANALYSISTABS.COM provides free and premium project management tools, templates and dashboards for effectively managing the projects and analyzing the data.
We’re a crew of professionals expertise in Excel VBA, Business Analysis, Project Management. We’re Sharing our map to Project success with innovative tools, templates, tutorials and tips.
Project Management
Excel VBA
Download Free Excel 2007, 2010, 2013 Add-in for Creating Innovative Dashboards, Tools for Data Mining, Analysis, Visualization. Learn VBA for MS Excel, Word, PowerPoint, Access, Outlook to develop applications for retail, insurance, banking, finance, telecom, healthcare domains.
Page load link

3 Realtime VBA Projects
with Source Code!
Go to Top
Now, after having learned what Excel VBA is, let’s move a bit further and see what is VB Editor.
VB Editor (or more commonly known as VBE) is the tool used to create, modify and maintain Visual Basic for Applications (VBA) procedures and modules in Excel.
NOTE: Many people also refer VBE as Excel IDE, IDE stands for integrated development environment. So, do not confuse between these terms as they are more or less same.
Now, let’s see how you can access VBE.
How to Open VBE in Excel:
Opening and accessing VBE is very simple, there are various ways to do it and below I am going to show you top three ways to do it:
1. Using Shortcut Key to open VBE [The Easiest Way]: Open your spreadsheet and then simply press ALT + F11 key while in the main/normal Excel window, to open the Visual Basic Editor.
2. Access VBE from Menu in Excel 2003: To open VBE in Excel 2003, navigate to Tools > Macro > Visual Basic Editor. As shown below:
 : VBA Basics 002 1")
3. Access VBE from Ribbon in Excel 2007 and Later Versions: Visual Basic Editor in Excel 2007 or later Versions can be opened from ‘Developer’ Tab. But generally, Developer tab is hidden by default in Excel. So, first you need to un-hide the developer tab and then open the VB Editor.
To display Developer tab in Excel 2007 or later version simply navigate to File > Options > Customize Ribbon, check the ‘Developer’ checkbox and click ‘Ok’.
As shown in the below image.
 : VBA Basics 002 2")
After this, your Developer Tab will become visible. And now to open VB Editor, simply navigate to Developer Tab in the ribbon and click the Visual basic button as shown.
 : VBA Basics 002 3")
Getting Familiar with VBE:
When you open VBE using any of the methods mentioned above, you will typically see a window that is more or less like the one in below image.
 : VBA Basics 002 4")
VBE can be divided into 5 basic parts (represented by the numbers), below is the description about them:
1. Menu Bar: This the first and one of the most important part that you see in the Visual Basic Editor. Menu Bar contains menus to access most functions of the VBE. Clicking the menu label brings up the corresponding menu.
 : VBA Basics 002 5")
Below the Menu Bar, there is a standard toolbar that holds the most frequently used commands in VBE. Above image shows the various options present on the standard toolbar.
2. Project Window: Project Window is located to the immediate left of Code window, it shows you all the projects that you have and enables you to easily navigate through them. If Project Window is not opened by default in VBE, then press Ctrl + R to open it.
3. Properties Window: The Properties window displays and allows editing of the properties of the currently active object. If Properties window is not opened by default in VBE, then press F4 to open it.
4. Code Window: The code window is the area where we will actually write the code. The macros that you record in the workbook, are recorded on module sheets to which generic names are assigned, such as Module1, Module2, and so forth.
These module sheets are visible in the Project window and when you double click them in the project window they open up and show the code inside them in the code window.
5 Immediate Window: In the Immediate window, you can type in commands, set values, examine values and debug or evaluate expressions. If immediate window is not opened by default in VBE, then press CTRL + ALT + I to open it.
Note: There is nothing to panic, if at first you don’t see all the windows in your Visual Basic Editor. If some of the windows are missing you can add them from the ‘View’ tab. You can also re-position these windows based on your personal preferences and ease of use.
Now, after understanding the significance of all these windows in Visual Basic Editor, I suggest you to take 10-15 minutes out of your busy schedule and open the VB Editor in Excel and then explore various options and menus on the editor. Because the more time you spend on this, more confident you will feel while using it next time.
Cheers! Have a nice day.