
Элемент управления пользовательской формы CheckBox для выбора или невыбора его пользователем и передачи результата в VBA Excel. Свойства «Флажка», примеры кода.
UserForm.CheckBox – это элемент управления пользовательской формы, предназначенный для передачи в код VBA информации о выборе или невыборе его пользователем и возвращающий одно из двух значений: False (галочки нет) или True (галочка установлена).

Элемент управления CheckBox состоит из флажка и надписи. В VBA Excel флажок имеет квадратную форму, надпись расположена справа от него. Надпись реагирует на нажатие мышью так же, как и флажок.
По тексту статьи значение слова «Флажок» в кавычках равно значению слова CheckBox, флажок без кавычек обозначает квадрат с галочкой или без нее.
Кроме состояний «выбран» или «не выбран», существует и третье состояние флажка: серая галочка на сером фоне. Получить такое состояние на пользовательской форме можно путем присвоения свойству CheckBox.Value значения Null.

Надписи флажков выведены с помощью следующего кода VBA Excel:
|
Private Sub UserForm_Initialize() CheckBox1.Value = False CheckBox1.Caption = «CheckBox1.Value = « _ & CheckBox1.Value CheckBox2.Value = Null CheckBox2.Caption = «CheckBox2.Value = « _ & CheckBox2.Value CheckBox3.Value = True CheckBox3.Caption = «CheckBox3.Value = « _ & CheckBox3.Value End Sub |
Интересно было посмотреть, какое значение отобразится в надписи элемента управления CheckBox2. Обратите внимание на то, что если строку CheckBox2.Caption = "CheckBox2.Value = " & CheckBox2.Value заменить на CheckBox2.Caption = CheckBox2.Value, будет сгенерирована ошибка, так как в VBA не существует текстового отображения значения Null.
Эксперименты показали, что отобразить «Флажок» в третьем состоянии можно также с помощью присвоения свойству CheckBox.Value значения «пустая строка».
Элемент управления CheckBox может использоваться на пользовательской форме для
- выбора или отмены каких-либо параметров и условий,
- отображения или скрытия других элементов управления,
- изменение доступности других элементов управления для взаимодействия с пользователем.
Если требуется выбор только одной опции из группы предложенных, для этой цели в VBA Excel используется набор элементов управления OptionButton.
Свойства элемента «Флажок»
| Свойство | Описание |
|---|---|
| AutoSize | Автоподбор размера «Флажка». True – размер автоматически подстраивается под длину набираемой строки. False – размер элемента управления определяется свойствами Width и Height. |
| ControlSource | Ссылка на источник данных для свойства Value. |
| ControlTipText | Текст всплывающей подсказки при наведении курсора на CheckBox. |
| Enabled | Возможность взаимодействия пользователя с элементом управления. True – взаимодействие включено, False – отключено (цвет флажка и надписи становится серым). |
| Font | Шрифт, начертание и размер текста надписи. |
| Height | Высота элемента управления. |
| Left | Расстояние от левого края внутренней границы пользовательской формы до левого края элемента управления. |
| Picture | Добавление изображения вместо текста надписи или дополнительно к нему. |
| PicturePosition | Выравнивание изображения и текста в поле надписи. |
| TabIndex | Определяет позицию элемента управления в очереди на получение фокуса при табуляции, вызываемой нажатием клавиш «Tab», «Enter». Отсчет начинается с 0. |
| TextAlign* | Выравнивание текста надписи: 1 (fmTextAlignLeft) – по левому краю, 2 (fmTextAlignCenter) – по центру, 3 (fmTextAlignRight) – по правому краю. |
| Top | Расстояние от верхнего края внутренней границы пользовательской формы до верхнего края элемента управления. |
| TripleState | Определяет, может ли пользователь делать выбор между двумя состояниями «Флажка» или между тремя, включая серую галочку на сером квадрате. True – доступны три состояния, False – доступны два состояния. |
| Value | Значение «Флажка»: True – галочка установлена, False – галочка не установлена, Null – серая галочка на сером квадрате. |
| Visible | Видимость элемента CheckBox. True – элемент отображается на пользовательской форме, False – скрыт. |
| Width | Ширина элемента управления. |
| WordWrap | Перенос текста надписи на новую строку при достижении границы ее поля. True – перенос включен, False – перенос выключен. |
* При загруженной в поле надписи картинке свойство TextAlign не работает, следует использовать свойство PicturePosition.
Свойство по умолчанию для элемента CheckBox – Value, основное событие – Click.
В таблице перечислены только основные, часто используемые свойства «Флажка». Все доступные свойства отображены в окне Properties элемента управления CheckBox.
Примеры использования CheckBox
Пример 1
Отображение элемента управления CheckBox на пользовательской форме с параметрами, заданными в коде VBA Excel:
|
Private Sub UserForm_Initialize() With CheckBox1 .Caption = «Нажмите на меня» .ControlSource = «A1» .Value = False .Left = 12 .Top = 12 End With End Sub |

Размещается данная процедура в модуле пользовательской формы.
Если несколько элементов управления CheckBox привязать к одной ячейке, то при клике на одном из них, менять свое состояние будут и все остальные.
Пример 2
Смена надписи «Флажка» в зависимости от его состояния:
|
1 2 3 4 5 6 7 8 9 10 11 12 13 14 15 16 17 18 |
‘Устанавливаем первоначальные ‘значения свойств «Флажка» Private Sub UserForm_Initialize() With CheckBox1 .Caption = «Поставьте галочку» .Value = False .TripleState = False End With End Sub ‘Меняем надпись «Флажка» при ‘смене параметра CheckBox1.Value Private Sub CheckBox1_Change() If CheckBox1.Value Then CheckBox1.Caption = «Снимите галочку» Else CheckBox1.Caption = «Поставьте галочку» End If End Sub |

Пример 3
Скрытие и отображение, изменение доступности других элементов управления с помощью «Флажка».
Для реализации этого примера необходимо создать пользовательскую форму с четырьмя элементами управления: CheckBox1, TextBox1, TextBox2 и CommandButton1. А в модуле формы разместить следующий код:
|
1 2 3 4 5 6 7 8 9 10 11 12 13 14 15 16 17 18 19 20 21 22 23 24 25 26 27 28 29 30 31 32 33 34 35 36 37 38 39 40 41 |
‘Устанавливаем первоначальные ‘значения свойств элементов управления Private Sub UserForm_Initialize() With CheckBox1 .Caption = «Хочу сложить два числа» .Value = False .TripleState = False End With With TextBox1 .Enabled = False .Text = «Слагаемое 1» End With With TextBox2 .Enabled = False .Text = «Слагаемое 2» End With With CommandButton1 .Caption = «Сложить» .Visible = False End With End Sub ‘Меняем свойства других элементов ‘управления при смене состояния «Флажка» Private Sub CheckBox1_Change() If CheckBox1.Value Then TextBox1.Enabled = True TextBox2.Enabled = True CommandButton1.Visible = True Else TextBox1.Enabled = False TextBox2.Enabled = False CommandButton1.Visible = False End If End Sub ‘Складываем два числа Private Sub CommandButton1_Click() If IsNumeric(TextBox1) And IsNumeric(TextBox2) Then MsgBox TextBox1 & » + « & TextBox2 & » = « _ & CDbl(TextBox1) + CDbl(TextBox2) End If End Sub |
Форма открывается с недоступными для пользователя текстовыми полями и скрытой кнопкой «Сложить»:

После установки галочки на флажке текстовые поля становятся доступными для редактирования, и отображается кнопка «Сложить»:

Return to VBA Code Examples
In VBA, you can create a CheckBox where a user can check or uncheck the option. Checkboxes are often used in UserForms, but can also be used in a Worksheet. In this tutorial, you will learn how to create a Checkbox (in both VBA and in Excel Worksheets), get a user choice in VBA and use it in code.
If you want to learn how to create a Listbox, click here: VBA Listbox
If you want to learn how to create a Combobox, click here: VBA Combobox
Create a Checkbox
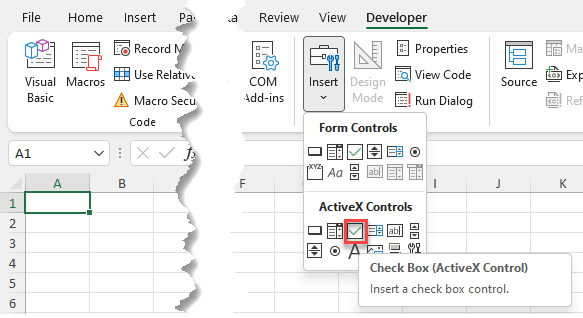
In order to insert a Checkbox in the Worksheet, you need to go to the Developer tab, click Insert and under ActiveX Controls choose Check Box:
When you select the Checkbox which you inserted, you can click on Properties under the Developer tab:
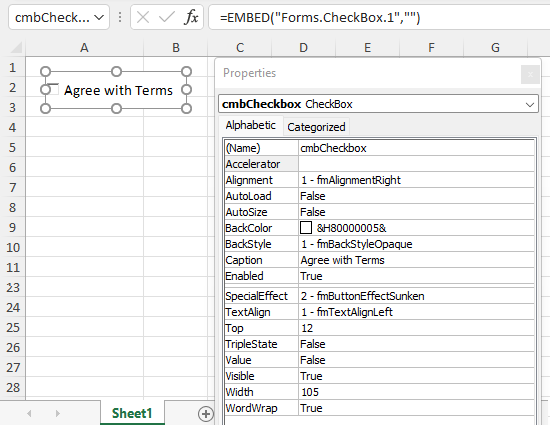
Here you can set different properties of the Checkbox. First, we changed the attribute Name to cmbCheckbox. Next, we can use the Checkbox with this name in VBA code.
Also, we changed the text which appears next to the checkbox to Agree with Terms. To do this, you need to set the attribute Caption.
Get a Selected Item of a Checkbox in VBA
The purpose of a Checkbox is to get a user’s choice (checkbox checked or not). In order to retrieve a value that is selected by user, you need to use this code:
If Sheet1.cmbCheckBox.Value = True Then
    Sheet1.Range("C3") = "Agree"
Else
    Sheet1.Range("C3") = "Don't agree"
End If
We want to populate the cell C3 with Agree if the checkbox is checked and Don’t agree otherwise. The value of the checkbox is in the Value attribute of the object Sheet1.cmbCheckbox. The value of the checkbox can be true or false.

As we checked the checkbox, the value of Sheet1.cmbCheckbox.Value is true, so the result in C3 is Agree.
Use a Checkbox in a UserForm
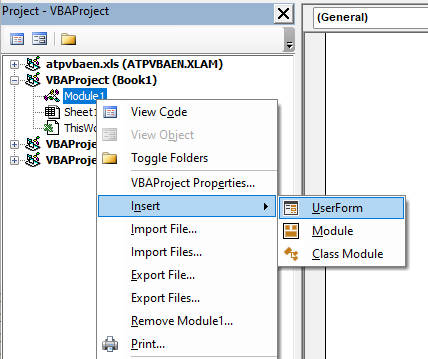
As we mentioned, Checkboxes are most often used in UserForms. To explain how you can do it, we will first insert an Userform. In the VBA Editor, right-click on Module name, click on Insert and choose UserForm:
To display controls for inserting, you need to enable the Toolbox. To do this, click on the Toolbox icon in the toolbar. After that, you will get the windows with all the controls available. You can click on Checkbox to create it in the Userform:
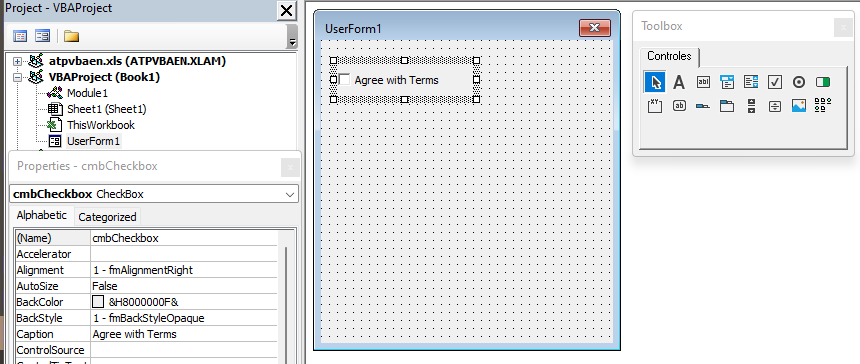
In the properties window, we will change the name of the Checkbox to chbCheckBox and caption to Agree with Terms. When we run the Userform, we get the Checkbox in it.
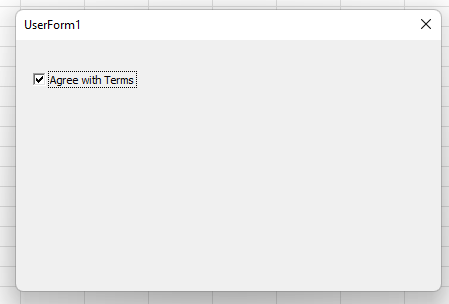
If you want to get selected value from the Checkbox, you need to use the same logic for the Checkbox in a Worksheet, which is explained earlier in the article.
VBA Coding Made Easy
Stop searching for VBA code online. Learn more about AutoMacro — A VBA Code Builder that allows beginners to code procedures from scratch with minimal coding knowledge and with many time-saving features for all users!

Learn More!
Get our FREE VBA eBook of the 30 most useful Excel VBA macros.
Automate Excel so that you can save time and stop doing the jobs a trained monkey could do.
Claim your free eBook

Checkboxes are one of the easiest ways to create interaction with users. Controlling them with VBA makes them more flexible and more useful in Excel applications.
Here is a collection of the most common code snippets and settings.
Create Check Boxes
The following code will create a checkbox
Sub CreateCheckBoxes()

'Create variable
Dim chkBox As CheckBox

'Create checkbox
Set chkBox = ActiveSheet.CheckBoxes.Add(Top:=0, Height:=1, Width:=1, Left:=0)

End Sub
Loop through all the checkboxes
If you want to apply the same settings or values to all the checkboxes on a worksheet this can be achieved by looping through the checkboxs and applying the settings individually.
Sub LoopThroughCheckboxes()

'Create variable
Dim chkBox As CheckBox

'Loop through each check box on active sheet
For Each chkBox In ActiveSheet.CheckBoxes

    'Do something to each checkbox using chkBox.

Next chkBox

End Sub
Set checkbox to a variable
The macro below will set a checkbox to a variable.
Sub SetCheckboxToVariable()

'Create variable
Dim chkBox As CheckBox

'Set the variable to a specific checkbox
Set chkBox = ActiveSheet.CheckBoxes("CheckBoxName")

End Sub
Common checkbox settings
The settings you are most likely to need to change are included in the macro below.
Sub CommonCheckboxSettings()

'Create variable
Dim chkBox As CheckBox

'Set the variable to a specific checkbox
Set chkBox = ActiveSheet.CheckBoxes("CheckBoxName")

'Set the variable to the name of the Checkbox calling the macro
Set chkBox = ActiveSheet.CheckBoxes(Application.Caller)
'Set the checkbox name
chkBox.Name = "CheckBoxName"

'Set the value of a check box (3 possible values)
chkBox.value = xlOff
chkBox.value = xlOn
chkBox.value = xlMixed

'Set the shading of the can to True or False
chkBox.Display3DShading = True
chkBox.Display3DShading = False

'Set the linked cell
chkBox.LinkedCell = "$E$5"

'Reset the linked cell to nothing
chkBox.LinkedCell = ""

'Set position of the checkbox
With chkBox
    .Top = 20
    .Left = 20
    .Height = 20
    .Width = 20
End With

'Change the checkboxes caption
chkBox.Caption = "check box caption"

'Display the name of the sheet containing the checkbox
MsgBox chkBox.Parent.Name

'Display the address of the cell with the top left pixel
'of the check box
MsgBox chkBox.TopLeftCell.Address

'Display the address of the cell with the bottom right pixel
'of the check box
MsgBox chkBox.BottomRightCell

'Set the macro to be called with clicking the checkbox
chkBox.OnAction = "NameOfMacro"

'Remove the macro being called
chkBox.OnAction = ""

'Is the checkbox enabled? True or False
chkBox.Enabled = False
chkBox.Enabled = True

'Set the checkbox to not move with cells
chkBox.Placement = xlFreeFloating

'Set the checkbox to move with the cells
chkBox.Placement = xlMove

'Set the print option of the checkbox True or False
chkBox.PrintObject = True
chkBox.PrintObject = False

'Delete the checkbox
chkBox.Delete

End Sub
Delete all the checkboxes on the active sheet
Sub DeleteAllCheckBoxes()

ActiveSheet.CheckBoxes.Delete

End Sub

About the author
Hey, I’m Mark, and I run Excel Off The Grid.
My parents tell me that at the age of 7 I declared I was going to become a qualified accountant. I was either psychic or had no imagination, as that is exactly what happened. However, it wasn’t until I was 35 that my journey really began.
In 2015, I started a new job, for which I was regularly working after 10pm. As a result, I rarely saw my children during the week. So, I started searching for the secrets to automating Excel. I discovered that by building a small number of simple tools, I could combine them together in different ways to automate nearly all my regular tasks. This meant I could work less hours (and I got pay raises!). Today, I teach these techniques to other professionals in our training program so they too can spend less time at work (and more time with their children and doing the things they love).
Do you need help adapting this post to your needs?
I’m guessing the examples in this post don’t exactly match your situation. We all use Excel differently, so it’s impossible to write a post that will meet everybody’s needs. By taking the time to understand the techniques and principles in this post (and elsewhere on this site), you should be able to adapt it to your needs.
But, if you’re still struggling you should:
- Read other blogs, or watch YouTube videos on the same topic. You will benefit much more by discovering your own solutions.
- Ask the ‘Excel Ninja’ in your office. It’s amazing what things other people know.
- Ask a question in a forum like Mr Excel, or the Microsoft Answers Community. Remember, the people on these forums are generally giving their time for free. So take care to craft your question, make sure it’s clear and concise. List all the things you’ve tried, and provide screenshots, code segments and example workbooks.
- Use Excel Rescue, who are my consultancy partner. They help by providing solutions to smaller Excel problems.
What next?
Don’t go yet, there is plenty more to learn on Excel Off The Grid. Check out the latest posts:
Inserting a checkbox in Excel is an easy task. The checkbox control is available in the Excel developer tools option. Checkbox and other controls like dropdowns can be quite helpful while designing forms in Excel.
These controls prevent users from entering some unwanted data in your forms, and hence they are preferred.
In this post, we will understand how to insert a checkbox in Excel. After that, we will also see an example of how checkboxes can ease data analysis tasks. 1")
How to Insert a Checkbox in Excel
Excel checkbox control is present in the «Developer Tools» menu item. And by default «Developer Tools» menu item is hidden in Excel. So first of all, we need to make this option available in the Excel top ribbon, and after that, we can use the checkbox control. Below is a step by step procedure for adding a checkbox to Excel:
- Navigate to Excel Options > Customize Ribbon: With the Excel sheet opened, navigate to «File»> «Options»> «Customize Ribbon» tab. You can also press the keys «ALT + F + T» to open the excel options and then navigate to the «Customize Ribbon» tab.
 2")
- Enable Developer Tools Tab: By default, «Developer» option would be unchecked in the «Main Tabs». Check the «Developer» option and click the «OK» button.
- Go to Developer Tab > Insert Option > Checkbox Option: After this, you will be able to see a «Developer» tab on your Excel ribbon. Inside the «Developer» tab, click on the «Insert» dropdown and select the form «Checkbox» control as shown.
 3")
- Click the Checkbox Option: Now, you can draw a checkbox anywhere on your excel sheet.
- Format Checkbox Control: Next, you can customize your checkbox using the «Format Control» option.
How to Capture the Checkbox State
After adding the checkbox to your spreadsheet, you need to capture its state. Checkbox state can tell you if the checkbox is currently checked or not.
For capturing the state of a checkbox, you need to associate it with a cell. After associating the checkbox with a cell, the cell displays ‘True’ if the checkbox is checked; otherwise, it displays ‘False’.
To associate checkbox to a cell, follow the below steps:
- Right-click over the checkbox and select the option ‘Format Control’ from the context menu as shown.
 4")
- Clicking on the ‘Format Control’ option will open a ‘Format Control’ window. Inside the ‘Format Control’ window navigate to the ‘Control’ tab.
 5")
- On the control tab, click on the ‘cell link’ input box and then select an empty cell on the spreadsheet which you wish to associate with the checkbox.
 6")
Tip: To keep track of the cell links for corresponding checkboxes, it’s always a good idea to set the cell links in a column adjacent to the checkbox. This way, it gets easier to find the cell links associated with the checkboxes whenever you want. Also, you can hide the column containing the cell links so that your spreadsheet is clutter-free.
How To Insert Multiple Checkboxes Fast in Excel
In the above sections, we saw, how to add a single checkbox to excel, but there can be times where you would need to have tens or hundreds of checkboxes in your worksheet. Adding such a huge number of checkboxes on by one is not a feasible option.
So, let’s see how can we add multiple checkboxes to excel fast:
- First of all, add a checkbox manually, by selecting the checkbox option from the Developer tab.
 7")
- Next, adjust the position of the checkbox.
 8")
- Optional Step: Format the checkbox as required. In this example, we are setting the checkbox text as blank.
 9")
- After this, right-click over the checkbox and select the ‘Format Control’ option from the context menu.
 10")
- In the ‘Format Control’ window, navigate to the ‘Properties’ tab and check if the option «Move but don’t size cells» option is selected. If this option is not selected, select it and click the «OK» button.
 11")
- Finally, when the check box is positioned correctly and formatted correctly. Drag the fill handle to all the rows below.
 12")
- And it’s done! Now you will see checkboxes copied against all the rows.
 13")
As you can see in the screenshot above, we have inserted checkboxes for all the rows in our list. But the list cannot be used as such, because we still haven’t set the cell links for all those checkboxes. Now let’s see how to add cell links for multiple checkboxes.
Setting the Cell Link for Multiple Checkboxes
Setting cell links for multiple checkboxes manually can become very tedious. So, we can use a VBA code that can set checkbox cell links for multiple checkboxes in excel.
Follow the following steps to use this VBA code:
- With your Excel workbook opened, Press «Alt + F11» to open Visual Basic Editor (VBE).
- Right-click on the workbook name in the «Project-VBAProject» pane and select Insert -> Module from the context menu.
 14")
- Copy the following VBA code:
Sub LinkCheckBoxes()
Dim chk As CheckBox
Dim lCol As Long
lCol = 1 'number of columns to the right for linkFor Each chk In ActiveSheet.CheckBoxes
 chk.LinkedCell = chk.TopLeftCell.Cells.Offset(0, lCol).Address
Next chk
End Sub
Note: Depending on the offset between the checkbox and the column where you wish to set the cell links set the value of ‘lcol’ column. In this example, we have set it to 1, which means, the cell links will be generated in the column next to the checkboxes.
 15")
- After doing the changes, run the code using ‘F5’ key.
 16")
- Close the VBA editor, and you would see the cell links for all the checkboxes are generated.
How to Insert Multiple Checkboxes Without Developer Tab
In the above sections, we have seen how to add checkboxes from the developer tab. In this section, we will see how you can add multiple checkboxes to excel without using the developer tab.
For this, we can use a VBA script, that accepts the range where the checkbox needs to be included and the cell link offset as user inputs, and based on these inputs the VBA script creates the checkboxes in the specified range.
Let’s see how to use this VBA script:
- With your Excel workbook opened, Press «Alt + F11» to open Visual Basic Editor (VBE).
- Right-click on the workbook name in the «Project-VBAProject» pane and select Insert -> Module from the context menu.
- Copy the following VBA code:
Sub CreateCheckBoxes()
'Declare variables
Dim c As Range
Dim chkBox As CheckBox
Dim chkBoxRange As Range
Dim cellLinkOffsetCol As Double
'Ingore errors if user clicks Cancel or X
On Error Resume Next
'Input Box to select cell Range
Set chkBoxRange = Application.InputBox(Prompt:="Select cell range", Title:="Create checkboxes", Type:=8)
'Input Box to enter the celllink offset
cellLinkOffsetCol = Application.InputBox("Set the offset column for cell links", "Cell Link OffSet")
'Exit the code if user clicks Cancel or X
If Err.Number <> 0 Then Exit Sub
'Turn error checking back on
On Error GoTo 0
'Loop through each cell in the selected cells
For Each c In chkBoxRange 'Add the checkbox
 Set chkBox = chkBoxRange.Parent.CheckBoxes.Add(0, 1, 1, 0)
 With chkBox
 'Set the checkbox position
 .Top = c.Top + c.Height / 2 - chkBox.Height / 2
 .Left = c.Left + c.Width / 2 - chkBox.Width / 2
 'Set the linked cell to the cell with the checkbox
 .LinkedCell = c.Offset(0, cellLinkOffsetCol).Address(external:=True)
 'Enable the checkBox to be used when worksheet protection applied
 .Locked = False
 'Set the name and caption
 .Caption = ""
 .Name = c.Address
 End With
Next c
End Sub
 18")
- After doing the changes, run the code using ‘F5’ key.
 19")
- Select the checkbox range and enter the desired cell link offset, and the checkboxes would be created.
How to Delete a Checkbox in Excel
Deleting a single checkbox is relatively straightforward – select the checkbox and press the delete button on your keyboard.
Option 1: Using ‘Ctrl’ key to delete multiple checkboxes
If you want to delete multiple checkboxes from your spreadsheet, follow the below steps to delete them:
- 1. Press the ‘ctrl’ key on the keyboard and click on checkboxes you wish to delete. Doing this will select the clicked checkboxes, as shown.
 20")
- 2. Next, press the delete key on the keyboard and all the selected checkboxes will be deleted.
Option 2: Using ‘Selection Pane’ to delete multiple checkboxes
Another way to delete multiple checkboxes in excel is by using the selection pane. Follow the below steps:
- On the spreadsheet, in the «Home» tab > «Editing» section. Click the «Find and Select» option in the ribbon and select the «Selection Pane» option from the context menu.
 21")
- From the selection pane, select all the checkboxes that you wish to delete and press the ‘Delete’ key.
 22")
Option 3: Using ‘Go To Special’ to delete multiple objects
If you wish to delete all the excel checkboxes from a sheet, then you can make use of the select all objects option. But another point that you should note is – this approach would delete all the other objects like shapes, dropdowns, charts, dropdowns, etc. present in the active sheet.
Follow the below steps:
- On the spreadsheet, in the «Home» tab > «Editing» section. Click the «Find and Select» option in the ribbon and select the option «Go To Special»
 23")
- On the «Go To Special» window, select the option «objects» and check the «OK» button. Doing this will select all the objects present in the active sheet.
 24")
- Finally, press the delete key from the keyboard, and all the objects will be deleted.
Option 4: Using VBA Macro to Delete Multiple Checkboxes
If you have a lot of checkboxes in your spreadsheet and only want to delete the checkboxes (not all the objects), then this is the option for you. Below is a script that will delete all the checkboxes from your active sheet.
Follow the below steps:
- With your Excel workbook opened, Press «Alt + F11» to open Visual Basic Editor (VBE).
- Right-click on the workbook name in the «Project-VBAProject» pane and select Insert -> Module from the context menu.
- Copy the following VBA code:
Sub DeleteCheckbox()
For Each vShape In ActiveSheet.Shapes
 If vShape.FormControlType = xlCheckBox Then
 vShape.DeleteEnd If
Next vShape
End Sub
 26")
- After doing the changes, run the code using ‘F5’ key and all the checkboxes present in the active sheet will get deleted.
How to Edit Checkbox Text
Editing checkbox text or checkbox caption is straightforward. To edit checkbox text, you need to right-click over the textbox and select the option «Edit Text.»
 27")
Doing this will move the cursor at the beginning of the checkbox caption and allow you to edit it as follows.
 28")
Perfect!
But wait! Notice how the text displayed in Name Box is still the same, even though the checkbox text is changed.
Difference Between Checkbox Caption and Checkbox Name
The text in front of the checkbox is called checkbox ‘caption’, whereas the name that you see in the Name Box is the backend ‘name’ of the checkbox.
When you click the «Edit Text» option by right-clicking over the checkbox control, it only changes the caption of the checkbox.
 29")
However, if you want to change the backend name of the checkbox, you need to right-click over the checkbox and then type a suitable name in the Name Box.
Formatting a Checkbox Control in Excel
Although there are not many things that you can do to make your checkboxes stand out, still there are a few customizations that can be done. Following a list of customizations that excel allows with checkbox controls:
Selecting Background Color and Transparency for Checkbox Control
To choose a background color for your checkbox – right-click over the checkbox and click on the option «Format Control». Inside the «Format Control» window > «Color and Lines» tab > «Fill» section, you can choose a background color and desired transparency for your checkbox.
 30")
Selecting Border Color for the Checkbox Control
To create a checkbox border – Inside the «Format Control» window > «Color and Lines» tab > «Lines» section you can choose a border for your checkbox.
Choosing a 3D Shade Effect for Checkbox Control
To give your checkboxes a slight 3D effect – Inside the «Format Control» window > «Control» tab > 3-D shading option.
 31")
ActiveX Checkboxes In Excel
Until now, in this article, we have only talked about Excel Form Checkbox, but there is another type of checkbox that Microsoft Excel makes available – that is known as ActiveX Checkbox.
 32")
ActiveX checkboxes can also be added from the «Developer» Tab > «Insert» button. Also, in most aspects, an ActiveX checkbox is very similar to a form checkbox, but there are some critical differences between the two:
- ActiveX checkboxes provide more formatting options. In ActiveX checkboxes, you can change the checkbox caption font, have an image as a background, change the mouse pointer while it hovers over the checkbox, etc.
- ActiveX controls are external components and hence are loaded separately this sometimes causes them to freeze or become unresponsive. On the other hand, Form controls are built into Excel, and therefore they do not have any such issues.
- ActiveX is a Microsoft-based technology and is not supported by other operating systems like Mac.
- Also, many computers don’t trust ActiveX by default, and ActiveX controls are disabled unless you add them to the Trust Center.
- Another essential difference between the Form controls and ActiveX controls is that – ActiveX controls can be directly accessed as objects in the VBA Code (faster) whereas to access form controls you need to find the form controls on the active sheet (slower).
How to Assign a Macro to a Checkbox
We have already seen how to associate cell links with checkboxes in excel and perform actions based on the checkbox value. Now, let’s understand how to assign macros with checkboxes and execute the macros when the checkbox is clicked.
To associate a macro with the checkbox, follow these steps:
- Right-click over the checkbox and click the option «Assign Macro»
 33")
- On the «Assign Macro» window, give a meaningful name to the macro and click the «New» button, this will open the VBA editor.
 34")
- On the VBA editor, you can write the macro. For the sake of this example, we will be writing a macro that toggles the visibility of A Column. If the column is visible clicking the checkbox will hide it else if the column is hidden clicking the checkbox will unhide it.
 35")
- The VBA code is as follows:
Sub ToggleAColumnVisibility()
If ActiveSheet.Columns("A").Hidden = True Then
 Columns("A").Hidden = False
Else
 Columns("A").Hidden = True
End If
End Sub
- Save the macro and close the VBA editor.
 36")
- Now, try clicking on the checkbox and see how to toggles the visibility Column A.
Another example of using macro with excel checkbox: Selecting All Checkboxes using a Single Checkbox in Excel
Practical Examples of Using Checkboxes in Excel
Now let’s see some of the practical examples of excel checkboxes:
Example 1: Using Excel Checkboxes to Track Stock Availability for a Store
 37")
In the above example, we have a list of grocery items, with a checkbox against each one of them. The checkbox indicates the availability status of the item. As soon as the item is checked a label «Available» gets populated in-front of it and for unchecked checkboxes, a title «Out of Stock» is shown.
This is done simply by using built-in checkbox functionality and if statements. To accomplish this first, we have inserted a checkbox in the sheet and then selected its ‘cell link’ as the corresponding cell in range «E:E».
For instance, the ‘Cell link’ for checkbox at «B3» cell is «$E$3». And similarly, the ‘Cell link’ for checkbox at «B9» is «$E$9». This means – when the «B3» checkbox is checked the value at the «E3» cell will change to «True» otherwise the value will be «False».
 38")
Secondly, we have used an if based formula in front of these cells. The formula is:
=IF(E2=TRUE,"Available","Out of Stock")
The job of this IF statement is simply to read the value of the corresponding cell in «E:E» range and if its value is «True» then it displays a message «Available» otherwise the message will be «Out of Stock».
For instance, if the checkbox at ‘B6’ is checked so the value at ‘E6’ will be «True» and hence the value at ‘C6’ will be «Available».
Later, we have used an Excel Countif Function to find the total number of available items.
=COUNTIF(C2:C11,"Available")
And a similar COUNTIF Function is used for finding the total number of items unavailable:
=COUNTIF(C2:C11, "Out of Stock")
Example 2: Using Excel Checkboxes to create a To-Do List
 39")
In this example, we have a to-do list with tasks and their corresponding statuses represented by checkboxes. For each checkbox, the related cell link is set in the D-column in front of the checkbox.
Finally, in the summary section, we have counted the total number of tasks using the formula:
=COUNTA(D3:D13)
For calculating the completed tasks we have made use of the cell links, all the cell links with a value TRUE are considered to be associated with completed tasks. And based on this we have come up with a formula:
=COUNTIF($D$3:$D$13,TRUE)
 40")
Completed task percentage is calculated by using a simple percentage formula, i.e. (number of completed tasks/number of total tasks)*100 :
=B19/B18%
So, this was all about inserting and using a checkbox in Excel. Please feel free to share any comments or queries related to the topic.
Excel VBA UserForm CheckBox
CheckBox is one of the UserForm control. You can select and drag CheckBox on the UserForm. CheckBox Control is used to specify or indicate binary choice. That is either Turn on or off a value. When we use more checkboxs, you can select more than one CheckBox at a time on the UserForm. You can select multiple check boxes in a group box. Please find more details about CheckBox Control in the following chapter.
- VBA CheckBox Control on the UserForm
- Add dynamic CheckBox Control on the UserForm using VBA
- Select or UnSelect a CheckBox using VBA
- Check if a check box is selected or not using VBA
- More details about Checkbox control
VBA ActiveX CheckBox Control on the UserForm
-
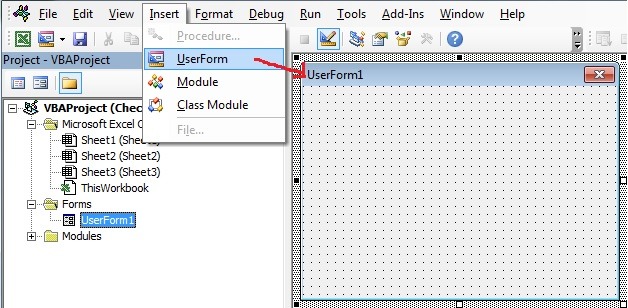
- Go To Developer Tab and then click Visual Basic from the Code or Press Alt+F11.
- Go To Insert Menu, Click UsereForm. Please find the screenshot for the same.
-
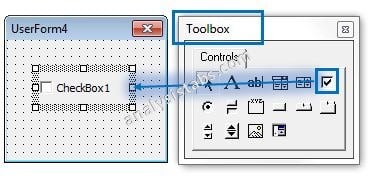
- Drag a check box on the Userform from the Toolbox. Please find the screenshot for the same.
-
- Now, you can see the following code.
Private Sub CheckBox1_Click()

End Sub
Note: In the above code ‘CheckBox1’ is the Check box name.
-
- Please add the following statements to the procedure.
Private Sub CheckBox1_Click()
    If UserForm2.CheckBox1.Value = True Then
       MsgBox "Checkbox has Checked", , "Checkbox"
    Else
       MsgBox "Checkbox has UnChecked", , "Checkbox"
    End If
End Sub
- Run the above macro by pressing F5.
- Check and uncheck the check box twice to get the two different outputs.
Add dynamic CheckBox Control on the UserForm using VBA
Please find the following steps and example code, it will show you how to add dynamic checkbox control on the userform.
-
- Add command button on the userform from the toolbox.
- Right click on the command button, click properties
- Change the command button caption to ‘Create_Checkbox’
- Double click on the command button
- Now, it shows following code.
Private Sub CommandButton1_Click()

End Sub
-
- Call the below procedure named ‘Add_Dynamic_Checkbox’ and find the below procedure to run.
Private Sub CommandButton1_Click()
    Call Add_Dynamic_Checkbox
End Sub
Procedure to call in the Command Button:
Sub Add_Dynamic_Checkbox()
    'Add Dynamic Checkbox and assign it to object 'Cbx'
    Set Cbx = UserForm2.Controls.Add("Forms.CheckBox.1")

    'Assign Checkbox Name
    Cbx.Caption = "Checkbox2"

    'Checkbox Position
    Cbx.Left = 10
    Cbx.Top = 10
End Sub
-
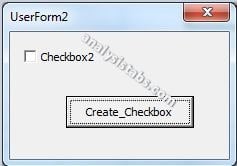
- Now, click F5 to run the macro, click ‘Create_Checkbox’ button to see the result.
- You can see the created dynamic check box in the following screen shot.
output:
Select or UnSelect a CheckBox using VBA?
Please find the below code to know how to select or UnSelect a check box using VBA. In the below example we are using value property of the check box to select or UnSelect a check box.
‘ To select check box
CheckBox1.Value=True

‘ To unselect check box
CheckBox1.Value=False
Check if a check box is selected or not using VBA
Please find the below code to know how to check if a check box is selected or not using VBA. In the below example we are using value property of the check box.
Sub ChkBox_Ex1()
If CheckBox1.Value = True Then
MsgBox “CheckBox has selected”
Else
MsgBox “CheckBox has not selected”
End If
End Sub
More details about Check box control
Here is the link more about how to add check box control on the Worksheet or UserForm in Excel.
Read More …
Here is the one more link to more about how to add check box control on the Worksheet or UserForm using VBA in Excel.
Read More …
Here is the one more link to more about how to remove check box control on the Worksheet or UserForm in Excel.
Read More …
A Powerful & Multi-purpose Templates for project management. Now seamlessly manage your projects, tasks, meetings, presentations, teams, customers, stakeholders and time. This page describes all the amazing new features and options that come with our premium templates.
Save Up to 85% LIMITED TIME OFFER

All-in-One Pack
120+ Project Management Templates
Essential Pack
50+ Project Management Templates
Excel Pack
50+ Excel PM Templates
PowerPoint Pack
50+ Excel PM Templates
MS Word Pack
25+ Word PM Templates
Ultimate Project Management Template
Ultimate Resource Management Template
Project Portfolio Management Templates
-
-
- In this topic:
-
- VBA ActiveX CheckBox Control on the UserForm
- Add dynamic CheckBox Control on the UserForm using VBA
-
- Procedure to call in the Command Button:
-
- Select or UnSelect a CheckBox using VBA?
- Check if a check box is selected or not using VBA
- More details about Check box control
VBA Reference
Effortlessly
Manage Your Projects
120+ Project Management Templates
Seamlessly manage your projects with our powerful & multi-purpose templates for project management.
120+ PM Templates Includes:
Effectively Manage Your
Projects and Resources
ANALYSISTABS.COM provides free and premium project management tools, templates and dashboards for effectively managing the projects and analyzing the data.
We’re a crew of professionals expertise in Excel VBA, Business Analysis, Project Management. We’re Sharing our map to Project success with innovative tools, templates, tutorials and tips.
Project Management
Excel VBA
Download Free Excel 2007, 2010, 2013 Add-in for Creating Innovative Dashboards, Tools for Data Mining, Analysis, Visualization. Learn VBA for MS Excel, Word, PowerPoint, Access, Outlook to develop applications for retail, insurance, banking, finance, telecom, healthcare domains.
Page load link

3 Realtime VBA Projects
with Source Code!
Go to Top

One of the coolest things about Excel is the ability to add Form Controls. Form Controls are interactive UI elements you have probably seen many times. They can be:
- Command Buttons
- Combo boxes
- Checkboxes
Form Controls are great because they are intuitive ways to interact with a piece of software that everyone can understand. Implementing them in an Excel sheet can really open up the complexity options in your project.
But, how do you use them? Form Controls can bring a lot to your application, but they are a little more complicated to configure and use in VBA. In this blog post, I am going to go through each Form Control and explain how to configure it, interact with it, and use it in a piece of code.
Let’s get started!
Adding Form Controls To A Spreadsheet
To add Form Controls to a spreadsheet, you will need to enable the Developer section of the toolbar:

If you do not see this tab on your toolbar, navigate to File –> Options:

And go to the ‘Customize Ribbon’ section:

Add the Developer option to your Main Tabs and click ‘OK.’ You should then be set to add Form Controls.
Command Button Form Controls
The first option you have for Form Controls is the command button. This is one of the most basic controls found in any application.
It is simply a button that you click on to trigger some other action. You can also format the label on the button and give it a few different colors and sizes. To add a command button to a sheet, go to your ‘Developer’ tab and under ‘Insert,’ select the first option:

Once selected, your cursor will change into a crosshair. You can now click and drag a rectangle onto your sheet, and the rectangle will be the size of your button:

When you let go of your mouse, Excel will automatically open a window that will ask you if you want to link a macro to this button:

In this case, thus button was the 8th Form Control I added to this sheet, so it shows up automatically as ‘Button8.’ When you go further into the macro by clicking ‘New,’ you will see the following:
Sub Button8_Click()

End Sub
With this, you can now create an event for your button to trigger when its clicked. Let’s create a button that puts a hard-coded value into a cell:
Sub Button8_Click()
    ActiveSheet.Cells(1, 1).Value = "Button was clicked!"
End Sub

Pretty easy right!? You can change the macro that gets fired off of this button by right-clicking on it and selecting ‘Assign Macro,’ and then choose the macro you want.
Command Button in VBA
Having a button and a macro are great, but what if you wanted to access your button in a macro? Well, paste the following code below and you can paste the button text in a cell:
Sub Button8_Click()
    ActiveSheet.Cells(1, 1).Value = ActiveSheet.Shapes("Button 8").OLEFormat.Object.Caption
End Sub
It’s important to note that there is a space between ‘Button’ and ‘8’ in the above macro. To access Form Controls on your sheet in VBA, you need to use the syntax:
Activesheet.Shapes([Optional Object Name]).OLEFormat.ObjectThe above syntax will then let you access a Form Controls properties and methods. For the command button, its properties and methods are listed here.
In this example, I am using the ‘Caption’ property to get the text on the button and paste it in a cell:

Ta-da! You can build some really advanced logic on your spreadsheets with controls once you can access them in VBA.
Combo Box Form Controls
The combo box, also known as a drop-down list, is a box with an arrow that shows you options when clicked. Clicking one of the options select it as the controls value:
To add a combo box to your spreadsheet, click on the ‘Insert’ option under the ‘Developer’ ribbon and select the second option:

Now, when you select this option, your cursor will, again, turn into a crosshair. Draw the size of the rectangle you want the combo box to be and it will render on the page.
You’ll notice you are not prompted to assign the combo box to a macro once it’s rendered. Normally, the combo box is not designed to trigger a macro, but it can be. Before we get to that, let’s configure our combo box. Right-click on it and select ‘Format Control’ and navigate to the ‘Control’ tab:

The tabs before control allow allow you to configure the visuals of the combo box, but the Control tab is where you can configure its values and what cell you can see the selected value index in.
In some other cells on the sheet, type in the values you want in the combo box, each in a separate cell, and link them to your input:

Select a single cell for the ‘Cell link’ option, and that cell will get the index of the combo box value selected, and it will update every time to combo box is updated:

Now, try out your combo box!


Pretty cool! You can also assign a macro to a combo box in the same way you can to a Command Button, and it will fire every time the value of the combo box is updated.
Combo Box In VBA
Having a combo box is great and being able to assign a macro to it is also helpful. But what if you wanted to put some more complex logic in the macro? Say you only wanted the macro to do something when a certain combo box value was selected. To get the value of a combo box in VBA:
Sub DropDown11_Change()
    Dim index As Long

    index = ActiveSheet.Shapes("Drop Down 11").OLEFormat.Object.ListIndex
    If index = 2 Then
        ActiveSheet.Cells(1, 4).Value = ActiveSheet.Shapes("Drop Down 11").OLEFormat.Object.List(index)
    Else
        ActiveSheet.Cells(1, 4).Value = ""
    End If
End Sub
The above code will get the index of the combo box value when it changes. If that index is 2, we write the value of the list item in our cell. If not, it clears the cell out:

When we select the second option:

And picking something else again:

As you can see, you can do a lot with VBA and Form Controls once you get the hang of it. The other methods and properties available for a combo box can be seen here.
Checkbox Form Controls
Everyone has used a checkbox when interacting with a web app. A checkbox give users a simple way to specify a ‘True’ or ‘False’ value:
To insert a check box on an Excel sheet, select the ‘Insert’ option under the ‘Developer’ tab and select the third option:

When you select it, your cursor will turn into a crosshair. Click on the sheet where you want your checkbox to render and it will appear:
For a checkbox, the most important configuration option is the ‘Cell link.’ You can specify a cell to hold the value of the checkbox as it changes:

Specify the cell you want to hold the checkbox value and:

Pretty cool! You can also assign a macro to checkbox and it will fire upon change.
Checkbox In VBA
A checkbox is very handy, but in a macro, the most important part of it is getting the checkbox value. Say you wanted to fire a macro and check that checkbox value to build some interesting logic:
Sub CheckBox12_Click()
    Dim checkboxvalue As Integer

    checkboxvalue = ActiveSheet.Shapes("Check Box 12").OLEFormat.Object.Value
    Debug.Print (checkboxvalue)
End Sub
If you run this macro, you can see in the VBA window that a value of True = 1 and a value of False = -4146. Why? I’m not sure, but you can use it for whatever logic you need!

You can see other properties and methods of the checkbox Form Control here.
Iterating Over Multiple Form Controls
Once you start using Form Controls in VBA, you can use the Shapes() method to get all the controls on a page and start iterating over them to see what;s on your sheet and how you can get their properties:
Sub ShapeNames()
For Each obj In ActiveSheet.Shapes()
    Debug.Print (obj.OLEFormat.Object.Name)
Next
End Sub
Running the above code for my sheet, I get:

The above code can be very helpful in figuring out what’s on your sheet and how you can reference it. Try combining From Controls with some of the other VBA code to make a dynamic, living application. Happy macro’ing!
<<Lesson 21>> [Contents] <<Lesson 23>>
There are many Excel VBA controls that can be used to perform certain tasks by writing Excel VBA code for them. These controls are also known as Active-X controls. These controls are Excel VBA objects so they have their own properties, methods and events. They can be found on the Excel Control Toolbox, as shown in theFigure 17.1. We shall deal with the checkbox, the textbox and the option button.

Figure 22.1
22.1 The CheckBox
The Checkbox is a very useful control in Excel VBA. It allows the user to select one or more items by checking the check box or check boxes concerned. For example, you may create a shopping cart where the user can click on check boxes that correspond to the items they intend to buy, and the total payment can be computed at the same time.One of the most important properties of the checkbox is Value. If the check box is selected or checked, the value is true, whilst if it is not selected or unchecked, the Value is False.
The usage of the checkbox is illustrated in Example 22.1
Example 22.1
In this example, the user can choose to display the sale volume of one type of fruits sold or total sale volume. The code is shown below:
Private Sub CommandButton1_Click()
If CheckBox1.Value = True And CheckBox2.Value = False Then
MsgBox “Quantity of apple sold is” & Cells (2, 2).Value
ElseIf CheckBox2.Value = True And CheckBox1.Value = False Then
MsgBox “Quantity of orange sold is ” & Cells(2, 3).Value
Else
MsgBox “Quantity of Fruits sold is” & Cells (2, 4).Value
End If
End Sub
The Interface is shown in Figure 22.2

Figure 22.2
22.2 The TextBox
The TextBox is the standard Excel VBA control for accepting input from the user as well as to display the output. It can handle string (text) and numeric data but not images.
Example 22.2
In this example, we inserted two text boxes and display the sum of numbers entered into the two text boxes in a message box. The Val function is used to convert the string into numeric values because the text box treats the number entered as a string.
Private Sub CommandButton1_Click ()
Dim x As Variant, y As Variant, z As Variant
x = TextBox1.Text
y = TextBox2.Text
z = Val(x) + Val(y)
MsgBox “The Sum of ” & x & ” and ” & y & ” is ” & z
End Sub

Figure 17.3
22.3 The Option Button
The option button control also lets the user selects one of the choices. However, two or more option buttons must work together because as one of the option buttons is selected, the other option button will be deselected. In fact, only one option button can be selected at one time. When an option button is selected, its value is set to “True” and when it is deselected; its value is set to “False”.
Example 22.3
This example demonstrates the usage of the option buttons. In this example, the Message box will display the option button selected by the user. The output interface is shown in Figure 22.4.
The code
Private Sub OptionButton1_Click ()
MsgBox “Option 1 is selected”
End Sub
Private Sub OptionButton2_Click()
MsgBox “Option 2 is selected”
End Sub
Private Sub OptionButton3_Click()
MsgBox “Option 3 is selected”
End Sub
The Output Interface

<<Lesson 21>> [Contents] <<Lesson 23>>