
|
Marshal Пользователь Сообщений: 83 |
#1 18.10.2016 02:18:33 Доброго времени. Но данная защита снимается нажатием правой кнопкой на листе «Снять защиту листа». Всем спасибо
|
||
|
vikttur Пользователь Сообщений: 47199 |
#2 18.10.2016 02:22:31
|
||
|
Marshal Пользователь Сообщений: 83 |
Спасибо за ответ. с этим я и воююю |
|
k61 Пользователь Сообщений: 2441 |
#4 18.10.2016 02:51:08 Прикрутка:
|
||
|
Marshal Пользователь Сообщений: 83 |
#5 18.10.2016 04:25:06 Спасибо большое, прикрутил.
|
||
I want to stop others from editing the cell contents in my excel sheet using VBA. Is it possible to do this?
![]()
armstrhb
4,0243 gold badges20 silver badges28 bronze badges
asked Jun 14, 2010 at 13:05
![]()
1
You can first choose which cells you don’t want to be protected (to be user-editable) by setting the Locked status of them to False:
Worksheets("Sheet1").Range("B2:C3").Locked = False
Then, you can protect the sheet, and all the other cells will be protected.
The code to do this, and still allow your VBA code to modify the cells is:
Worksheets("Sheet1").Protect UserInterfaceOnly:=True
or
Call Worksheets("Sheet1").Protect(UserInterfaceOnly:=True)
answered Jun 14, 2010 at 17:31
![]()
Lance RobertsLance Roberts
22.2k32 gold badges112 silver badges129 bronze badges
5
Try using the Worksheet.Protect method, like so:
Sub ProtectActiveSheet()
    Dim ws As Worksheet
    Set ws = ActiveSheet
    ws.Protect DrawingObjects:=True, Contents:=True, _
        Scenarios:=True, Password="SamplePassword"
End Sub
You should, however, be concerned about including the password in your VBA code. You don’t necessarily need a password if you’re only trying to put up a simple barrier that keeps a user from making small mistakes like deleting formulas, etc.
Also, if you want to see how to do certain things in VBA in Excel, try recording a Macro and looking at the code it generates. That’s a good way to get started in VBA.
answered Jun 14, 2010 at 13:54
![]()
Ben McCormackBen McCormack
31.8k46 gold badges145 silver badges221 bronze badges
Let’s say for example in one case, if you want to locked cells from range A1 to I50 then below is the code:
Worksheets("Enter your sheet name").Range("A1:I50").Locked = True
ActiveSheet.Protect Password:="Enter your Password"
In another case if you already have a protected sheet then follow below code:
ActiveSheet.Unprotect Password:="Enter your Password"
Worksheets("Enter your sheet name").Range("A1:I50").Locked = True
ActiveSheet.Protect Password:="Enter your Password"
answered Sep 18, 2013 at 9:40
![]()
Milan ShethMilan Sheth
84412 silver badges10 bronze badges
You can also do it on the worksheet level captured in the worksheet’s change event. If that suites your needs better. Allows for dynamic locking based on values, criteria, ect…
Private Sub Worksheet_Change(ByVal Target As Range)

    'set your criteria here
    If Target.Column = 1 Then

        'must disable events if you change the sheet as it will
        'continually trigger the change event
        Application.EnableEvents = False
        Application.Undo
        Application.EnableEvents = True

        MsgBox "You cannot do that!"
    End If
End Sub
answered Jun 15, 2010 at 15:28
![]()
FinkFink
3,31619 silver badges26 bronze badges
Sub LockCells()

Range("A1:A1").Select

Selection.Locked = True

Selection.FormulaHidden = False

ActiveSheet.Protect DrawingObjects:=False, Contents:=True, Scenarios:= False, AllowFormattingCells:=True, AllowFormattingColumns:=True, AllowFormattingRows:=True, AllowInsertingColumns:=True, AllowInsertingRows:=True, AllowInsertingHyperlinks:=True, AllowDeletingColumns:=True, AllowDeletingRows:=True, AllowSorting:=True, AllowFiltering:=True, AllowUsingPivotTables:=True

End Sub
answered Jun 14, 2010 at 21:41
![]()
Содержание
- Worksheet.Protect method (Excel)
- Syntax
- Parameters
- Remarks
- Support and feedback
- Метод Worksheet.Protect (Excel)
- Синтаксис
- Параметры
- Замечания
- Поддержка и обратная связь
Worksheet.Protect method (Excel)
Protects a worksheet so that it cannot be modified.
Syntax
expression.Protect (Password, DrawingObjects, Contents, Scenarios, UserInterfaceOnly, AllowFormattingCells, AllowFormattingColumns, AllowFormattingRows, AllowInsertingColumns, AllowInsertingRows, AllowInsertingHyperlinks, AllowDeletingColumns, AllowDeletingRows, AllowSorting, AllowFiltering, AllowUsingPivotTables)
expression A variable that represents a Worksheet object.
Parameters
| Name | Required/Optional | Data type | Description |
|---|---|---|---|
| Password | Optional | Variant | A string that specifies a case-sensitive password for the worksheet or workbook. If this argument is omitted, you can unprotect the worksheet or workbook without using a password. Otherwise, you must specify the password to unprotect the worksheet or workbook. If you forget the password, you cannot unprotect the worksheet or workbook. |
Use strong passwords that combine uppercase and lowercase letters, numbers, and symbols. Weak passwords don’t mix these elements. Strong password: Y6dh!et5. Weak password: House27. Passwords should be 8 or more characters in length. A pass phrase that uses 14 or more characters is better.
It’s critical that you remember your password. If you forget your password, Microsoft cannot retrieve it. Store the passwords that you write down in a secure place away from the information that they help protect. DrawingObjects Optional Variant True to protect shapes. The default value is True. Contents Optional Variant True to protect contents. For a chart, this protects the entire chart. For a worksheet, this protects the locked cells. The default value is True. Scenarios Optional Variant True to protect scenarios. This argument is valid only for worksheets. The default value is True. UserInterfaceOnly Optional Variant True to protect the user interface, but not macros. If this argument is omitted, protection applies both to macros and to the user interface. AllowFormattingCells Optional Variant True allows the user to format any cell on a protected worksheet. The default value is False. AllowFormattingColumns Optional Variant True allows the user to format any column on a protected worksheet. The default value is False. AllowFormattingRows Optional Variant True allows the user to format any row on a protected worksheet. The default value is False. AllowInsertingColumns Optional Variant True allows the user to insert columns on the protected worksheet. The default value is False. AllowInsertingRows Optional Variant True allows the user to insert rows on the protected worksheet. The default value is False. AllowInsertingHyperlinks Optional Variant True allows the user to insert hyperlinks on the protected worksheet. The default value is False. AllowDeletingColumns Optional Variant True allows the user to delete columns on the protected worksheet, where every cell in the column to be deleted is unlocked. The default value is False. AllowDeletingRows Optional Variant True allows the user to delete rows on the protected worksheet, where every cell in the row to be deleted is unlocked. The default value is False. AllowSorting Optional Variant True allows the user to sort on the protected worksheet. Every cell in the sort range must be unlocked or unprotected. The default value is False. AllowFiltering Optional Variant True allows the user to set filters on the protected worksheet. Users can change filter criteria but can not enable or disable an auto filter. Users can set filters on an existing auto filter. The default value is False. AllowUsingPivotTables Optional Variant True allows the user to use PivotTable reports on the protected worksheet. The default value is False.
In previous versions, if you apply this method with the UserInterfaceOnly argument set to True and then save the workbook, the entire worksheet (not just the interface) will be fully protected when you reopen the workbook. To re-enable the user interface protection after the workbook is opened, you must again apply this method with UserInterfaceOnly set to True.
If you want to make changes to a protected worksheet, it is possible to use the Protect method on a protected worksheet if the password is supplied. Also, another method would be to unprotect the worksheet, make the necessary changes, and then protect the worksheet again.
Unprotected means that the cell may be locked (Format Cells dialog box) but is included in a range defined in the Allow Users to Edit Ranges dialog box, and the user has unprotected the range with a password or has been validated via NT permissions.
Support and feedback
Have questions or feedback about Office VBA or this documentation? Please see Office VBA support and feedback for guidance about the ways you can receive support and provide feedback.
Источник
Метод Worksheet.Protect (Excel)
Защищает лист, чтобы его нельзя было изменить.
Синтаксис
expression. Защита (Password, DrawingObjects, Contents, Scenarios, UserInterfaceOnly, AllowFormattingCells, AllowFormattingColumns, AllowFormattingRows, AllowInsertingColumns, AllowInsertingRows, AllowInsertingHyperlinks, AllowDeletingColumns, AllowDeletingRows, AllowSorting, AllowFiltering, AllowUsingPivotTables )
Выражение Переменная, представляющая объект Worksheet .
Параметры
| Имя | Обязательный или необязательный | Тип данных | Описание |
|---|---|---|---|
| Password | Необязательный | Variant | Строка, указывающая пароль для листа или книги с учетом регистра. Если этот аргумент опущен, можно снять защиту листа или книги, не используя пароль. В противном случае необходимо указать пароль для отмены защиты листа или книги. Если вы забыли пароль, вы не сможете снять защиту листа или книги. |
Используйте надежные пароли, содержащие строчные и прописные буквы, цифры и знаки. В слабых паролях эти элементы не комбинируются. Надежный пароль: Y6dh!et5. Слабый пароль: House27. Длина паролей должна быть не меньше 8 символов. В парольной фразе лучше использовать 14 или более символов.
Очень важно запомнить пароль. Если вы его забудете, корпорация Майкрософт не сможет его восстановить. Храните пароли, записанные на бумаге, в безопасном месте вдали от информации, которую они защищают. DrawingObjects Необязательный Variant Значение true для защиты фигур. Значение по умолчанию — True. Contents Необязательный Variant Значение true для защиты содержимого. Для диаграммы это защищает всю диаграмму. Для листа это защищает заблокированные ячейки. Значение по умолчанию — True. Scenarios Необязательный Variant Значение true для защиты сценариев. Этот аргумент действителен только для листов. Значение по умолчанию — True. UserInterfaceOnly Необязательный Variant Значение true для защиты пользовательского интерфейса, но не макросов. Если этот аргумент опущен, защита применяется как к макросам, так и к пользовательскому интерфейсу. AllowFormattingCells Необязательный Variant Значение True позволяет пользователю форматировать любую ячейку на защищенном листе. Значение по умолчанию — False. AllowFormattingColumns Необязательный Variant Значение True позволяет пользователю форматировать любой столбец на защищенном листе. Значение по умолчанию — False. AllowFormattingRows Необязательный Variant Значение True позволяет пользователю форматировать любую строку на защищенном листе. Значение по умолчанию — False. AllowInsertingColumns Необязательный Variant Значение True позволяет пользователю вставлять столбцы на защищенный лист. Значение по умолчанию — False. AllowInsertingRows Необязательный Variant Значение True позволяет пользователю вставлять строки на защищенный лист. Значение по умолчанию — False. AllowInsertingHyperlinks Необязательный Variant Значение True позволяет пользователю вставлять гиперссылки на защищенный лист. Значение по умолчанию — False. AllowDeletingColumns Необязательный Variant Значение True позволяет пользователю удалять столбцы на защищенном листе, где каждая ячейка удаляемого столбца разблокирована. Значение по умолчанию — False. AllowDeletingRows Необязательный Variant Значение True позволяет пользователю удалять строки на защищенном листе, где каждая ячейка в удаляемой строке разблокирована. Значение по умолчанию — False. AllowSorting Необязательный Variant Значение True позволяет пользователю выполнять сортировку на защищенном листе. Каждая ячейка в диапазоне сортировки должна быть разблокирована или не защищена. Значение по умолчанию — False. AllowFiltering Необязательный Variant Значение True позволяет пользователю задавать фильтры на защищенном листе. Пользователи могут изменять условия фильтра, но не могут включать или отключать автоматический фильтр. Пользователи могут задавать фильтры для существующего автофильтра. Значение по умолчанию — False. AllowUsingPivotTables Необязательный Variant Значение True позволяет пользователю использовать отчеты сводной таблицы на защищенном листе. Значение по умолчанию — False.
Замечания
В предыдущих версиях, если применить этот метод с аргументом UserInterfaceOnly , равным True , а затем сохранить книгу, при повторном открытии книги будет полностью защищен весь лист (а не только интерфейс). Чтобы повторно включить защиту пользовательского интерфейса после открытия книги, необходимо снова применить этот метод, если параметр UserInterfaceOnly имеет значение True.
Если вы хотите внести изменения в защищенный лист, можно использовать метод Protect на защищенном листе, если указан пароль. Кроме того, другой метод — снять защиту листа, внести необходимые изменения, а затем снова защитить лист.
Незащищено означает, что ячейка может быть заблокирована (диалоговое окно Форматирование ячеек ), но включена в диапазон, определенный в диалоговом окне Разрешить пользователям изменять диапазоны , и пользователь отключил защиту диапазона паролем или был проверен с помощью разрешений NT.
Поддержка и обратная связь
Есть вопросы или отзывы, касающиеся Office VBA или этой статьи? Руководство по другим способам получения поддержки и отправки отзывов см. в статье Поддержка Office VBA и обратная связь.
Источник
You can modify a sheet via code by taking these actions
- Unprotect
- Modify
- Protect
In code this would be:
Sub UnProtect_Modify_Protect()

  ThisWorkbook.Worksheets("Sheet1").Unprotect Password:="Password"
'Unprotect

  ThisWorkbook.ActiveSheet.Range("A1").FormulaR1C1 = "Changed"
'Modify

  ThisWorkbook.Worksheets("Sheet1").Protect Password:="Password"
'Protect

End Sub
The weakness of this method is that if the code is interrupted and error handling does not capture it, the worksheet could be left in an unprotected state.
The code could be improved by taking these actions
- Re-protect
- Modify
The code to do this would be:
Sub Re-Protect_Modify()

ThisWorkbook.Worksheets("Sheet1").Protect Password:="Password", _
 UserInterfaceOnly:=True
'Protect, even if already protected

  ThisWorkbook.ActiveSheet.Range("A1").FormulaR1C1 = "Changed"
'Modify

End Sub
This code renews the protection on the worksheet, but with the ‘UserInterfaceOnly’ set to true. This allows VBA code to modify the worksheet, while keeping the worksheet protected from user input via the UI, even if execution is interrupted.
This setting is lost when the workbook is closed and re-opened. The worksheet protection is still maintained.
So the ‘Re-protection’ code needs to be included at the start of any procedure that attempts to modify the worksheet or can just be run once when the workbook is opened.
This macro allows you to have a cell automatically locked after a user enters something into it or into another specific cell, range, column, or row.
This is different than just locking an entire spreadsheet because you still want to be able to edit and work with the other cells in the worksheet without having to select and unlock them individually.
Sections:
Unlock the Cells
Macro to Auto-Lock Cells
Lock a Specific Cell
Lock Cell Other Than the One that was Edited
Lock Last Edited Cell
Lock Cell in a Specific Column or Row
Notes
Unlock the Cells
The first thing you have to do is to unlock all of the cells in the worksheet.
- Select all of the cells by hitting Ctrl + A or clicking the square next to row 1 and column A.

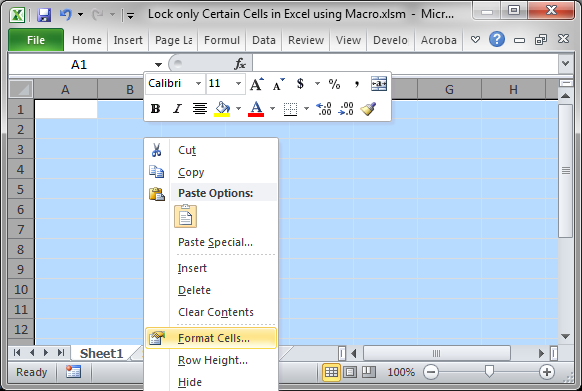
- Right click in the worksheet and choose Format Cells
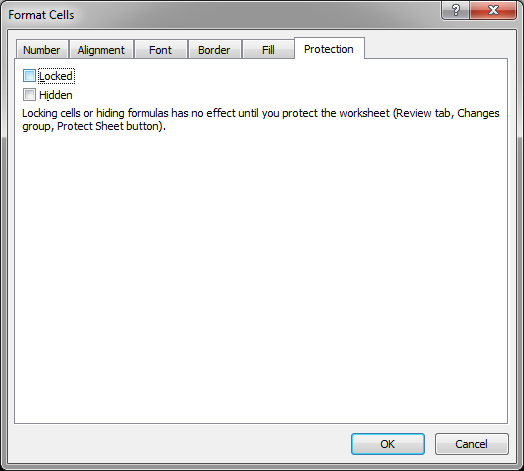
- Go to the Protection tab and uncheck the Locked option at the top.
- Hit OK and you’re done with this part.

Now, none of the cells in the worksheet are protected, which means that all of the cells in the worksheet will be editable when you go to protect the worksheet.
This needs to be done so that only specific cells that we choose will be locked from editing.
Macro to Auto-Lock Cells
Private Sub Worksheet_Change(ByVal Target As Range)

If Target.Address = "$A$1" And Target.Value <> "" Then

    ActiveSheet.Protect Contents:=False
    Range(Target.Address).Locked = True
    ActiveSheet.Protect Contents:=True

End If

End Sub
The important code is this part:
ActiveSheet.Protect Contents:=False
Range(Target.Address).Locked = True
ActiveSheet.Protect Contents:=True
It unprotects the worksheet, locks the cell, and then re-protects the sheet.
This macro needs to be installed into the worksheet where it will run. To do this, right-click the tab of the desired worksheet and click View Code and paste the macro into the window that opens.
This example is a generic example that is easy to modify. It checks which cell was edited and, if a certain cell was edited, it is then locked.
I will show you how to edit this macro in the examples below.
Lock a Specific Cell
Looking at the macro above, this is the line that limits the macro to run only on specific cells:
If Target.Address = "$A$1" And Target.Value <> "" Then
This says that a cell should be locked only if cell A1 was edited and it is not empty.
To make the macro work on cell B1 or D15 or any cell, just replace $A$1 with the desired cell reference. You must put dollar signs in front of the column and row reference for this to work.
You can also lock the cell only if a certain value was input by changing <> «» in the line above to = «desired value» and that allows you to do something like lock the cell only if OK was entered or something similar.
Lock Cell Other Than the One that was Edited
Change this line:
Range(Target.Address).Locked = True
Target.Address is the cell that will be locked and this says to lock the cell that was just edited.
To lock another cell, just use the Range method of referencing cells.
To lock cell B5, it would be Range(B5).Locked = True
Continue that pattern for whichever cell or range you want to lock.
Lock Last Edited Cell
You can lock the last edited cell regardless of which one it was by removing the IF statement in the macro and leaving it like this:
Private Sub Worksheet_Change(ByVal Target As Range)

ActiveSheet.Protect Contents:=False
Range(Target.Address).Locked = True
ActiveSheet.Protect Contents:=True

End Sub
Lock Cell in a Specific Column or Row
To limit the locking to a certain column or row, change the IF statement.
Limit to a row:
If Target.Row = 1 And Target.Value <> "" Then
Change the 1 to whichever row you want and the code will only run on that row.
Limit to a Column:
If Target.Column = 1 And Target.Value <> "" Then
Change the 1 to whichever column you want the code to run on.
Notes
This is a handy macro that allows you to have a lot of control over a worksheet and protecting the data within it.
I didn’t show you how to password protect the worksheet here because I wanted to focus on the method needed to protect only specific cells. Once you get this form of the macro running well, then, add-in the other pieces that you want, like password protection.
Make sure to download the sample file attached to this tutorial so you can work with these examples in Excel.
Similar Content on TeachExcel
Email List of People from Excel Using a Macro
: Send Emails from Excel Course
Send emails to everyone in a list in Excel using a macro. Th…
Loop through a Range of Cells in Excel VBA/Macros
Tutorial: How to use VBA/Macros to iterate through each cell in a range, either a row, a column, or …
Select Cells in Excel using Macros and VBA
Tutorial: This is actually a very easy thing to do and only requires a couple lines of code. Below I…
Select Ranges of Cells in Excel using Macros and VBA
Tutorial: This Excel VBA tutorial focuses specifically on selecting ranges of cells in Excel. This…
Allow Only Certain People to Edit Specific Cells in Excel
Tutorial:
How to allow only certain people to edit certain cells or ranges in Excel.
This is a sec…
Add a Drop Down Menu to a Cell in Excel — Data Validation Macro
Macro: Add a drop down menu or list to a cell in Excel with this free Excel macro. This is a grea…