Excel VBA Outlook Function
We work on lots & lots of Excel files on a daily basis and we send to many users on a daily basis. We write the same Message in the email daily and send that excel file. This gives us the scope of the automation of this task. You heard it right. This task of writing an email and sending the file can be automated with the help of VBA. The reason is that VBA can use a reference with different Microsoft Objects like outlook, word, PowerPoint, paint, etc.
So we can send the email with the help of VBA. Now I am sure you all will be excited to know how we can send an email with the help of VBA.
We will learn in this article on how to use the Outlook as Microsoft object from excel using VBA coding and how we can send an email including an attachment with the help of VBA.
How to Use Excel VBA Outlook Function?
To use VBA Outlook function, we need to do two things.
You can download this VBA Outlook Excel Template here – VBA Outlook Excel Template
- Reference Microsoft Outlook Object from Object Library in VBA.
- Write VBA code to send emails in the VBA module.
#1 – Reference of Outlook from Excel
As you know Outlook is an object and we need to provide a reference to Outlook object. So there is an Object reference library in VBA which we need to use for reference.
Follow the below steps to use the Object Reference Library.
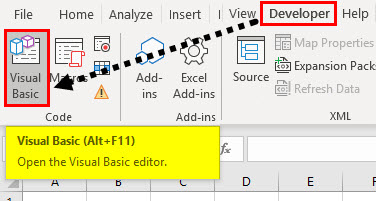
Step 1: In the Developer Tab click on Visual Basic to open the VB Editor.
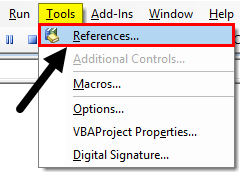
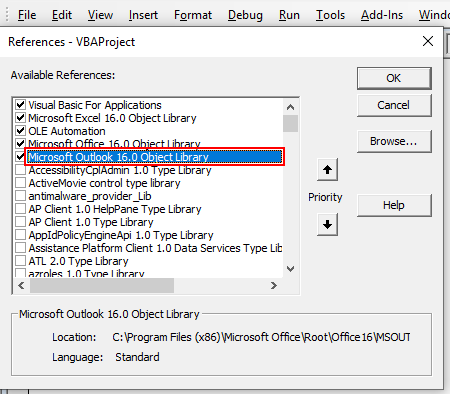
Step 2: Go to Tools and then select References as shown in the below screenshot.
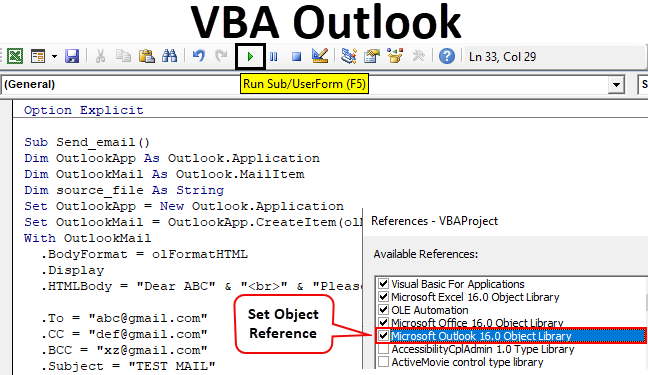
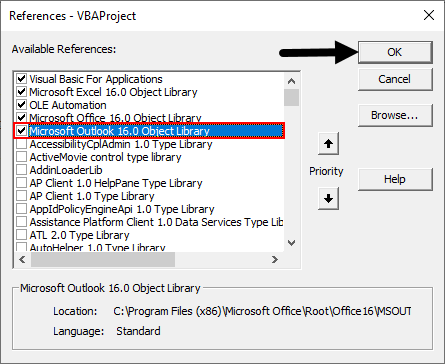
Step 3: Scroll down in the Reference Object library and select “Microsoft Outlook 16.0 Object Library” to make it available for Excel VBA.
Depending on the Microsoft office, the Outlook version may be different. In our case, it is 16.0. You can use “Microsoft Outlook 14.0 Object Library” if that is the version shown in your computer.
Check the box of Microsoft Outlook as shown in the above screenshot. Now we can use the Microsoft Outlook object in Excel VBA.
This process of setting the reference to “MICROSOFT OUTLOOK 16.0 OBJECT LIBRARY” is known as Early Binding. Without setting the object library as “MICROSOFT OUTLOOK 16.0 OBJECT LIBRARY” we cannot use the IntelliSense properties and methods of VBA which makes writing the code difficult.
#2 – Write a Code to Send Emails from VBA Outlook from Excel
Follow the below steps to write the VBA code to send email from outlook from Excel.
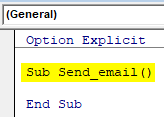
Step 1: Create a Sub Procedure by naming the macro. We will name macro as “send_email” as shown in the below screenshot.
Code:
Option Explicit

Sub Send_email()

End Sub
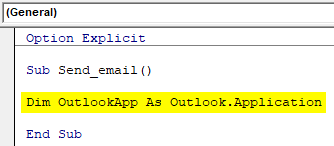
Step 2: Define the variable as Outlook. Application as shown in the below screenshot. This is the reference to the VBA Outlook Application.
Code:
Option Explicit

Sub Send_email()

Dim OutlookApp As Outlook.Application

End Sub
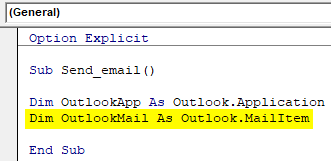
Step 3: We need to send an email in Outlook so define another variable as “Outlook.Mailitem” as shown in the below screenshot.
Code:
Option Explicit

Sub Send_email()

Dim OutlookApp As Outlook.Application
Dim OutlookMail As Outlook.MailItem

End Sub
Step 4: In the previous steps we have defined the variable now we need to set them.
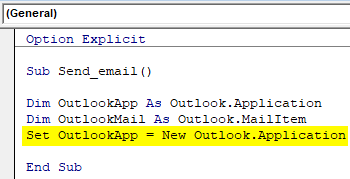
Now set the first variable “Outlook Application” as “New Outlook.Application” as shown in the below screenshot.
Code:
Option Explicit

Sub Send_email()

Dim OutlookApp As Outlook.Application
Dim OutlookMail As Outlook.MailItem
Set OutlookApp = New Outlook.Application

End Sub
Step 5: Now set the Second Variable “Outlook Mail” with the below code.
Code:
Option Explicit

Sub Send_email()

Dim OutlookApp As Outlook.Application
Dim OutlookMail As Outlook.MailItem
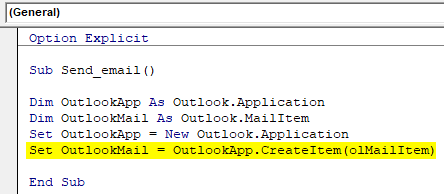
Set OutlookApp = New Outlook.Application
Set OutlookMail = OutlookApp.CreateItem(olMailItem)

End Sub
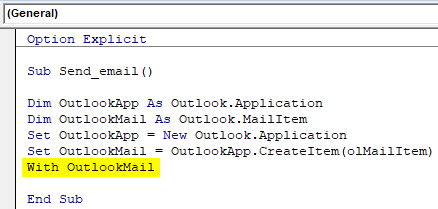
Step 6: We can now use the VBA Outlook using the “With” statement as shown in the below screenshot.
Code:
Option Explicit

Sub Send_email()

Dim OutlookApp As Outlook.Application
Dim OutlookMail As Outlook.MailItem
Set OutlookApp = New Outlook.Application
Set OutlookMail = OutlookApp.CreateItem(olMailItem)
With OutlookMail

End Sub
We now have all the access to Email items like “To”, “CC”, “BCC”, “subject”, ” Body of the email” and Many more items.
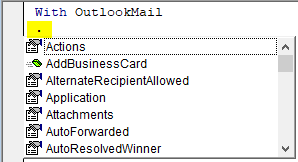
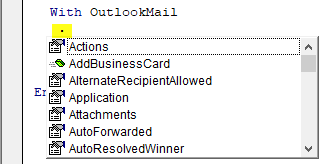
Step 7: Inside the “With” statement, we can see a list by putting a dot which is known as “Intellisense List”.
Step 8: First select the body format as olFormatHtml as shown in the below screenshot.
Code:
With OutlookMail
  .BodyFormat = olFormatHTML

End Sub
Step 9: Select “.Display” to display the mail as shown in the below screenshot.
Code:
With OutlookMail
  .BodyFormat = olFormatHTML
  .Display

End Sub
Step 10: Select “.HTMLbody” to write the email as shown in the below screenshot.
Code:
With OutlookMail
  .BodyFormat = olFormatHTML
  .Display
  .HTMLBody = "write your email here"

End Sub
We need to remember a few things while writing the email in VBA code.
“<br>” is used to include line breakup between two lines. To add signature in the email, you need to enter “& .HTMLbody”
See below example on how to write the mail in VBA.
Code:
With OutlookMail
  .BodyFormat = olFormatHTML
  .Display
  .HTMLBody = "Dear ABC" & "<br>" & "Please find the attached file" & .HTMLBody

End Sub
Step 11: Now we need to add the receiver of the email. For this, you need to use “.To”.
Code:
.To = "[email protected]"
Step 12: If you want to add someone in “CC” & “BCC”, you can use “.CC” and “.BCC” as shown in the below screenshot.
Code:
.CC = "[email protected]"
.BCC = "[email protected]"
Step 13: To add a subject for the email that we are sending, we can use “.Subject” as shown in the below screenshot.
Code:
.Subject = "TEST MAIL"
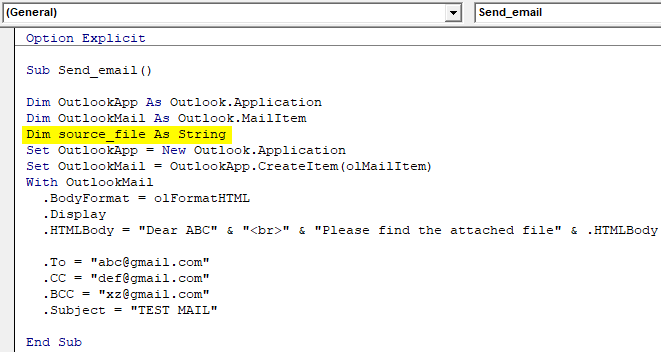
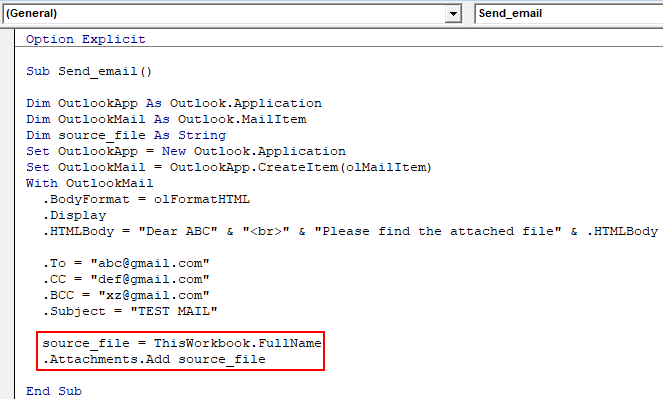
Step 14: We can add our current workbook as an attachment in the email with the help of “.Attachment” Property. To do that first declare a variable Source as a string.
Code:
Dim source_file As String
Then use the following code to attach the file in the email.
Code:
source_file = ThisWorkbook.FullName
.Attachments.Add source_file
Here ThisWorkbook is used for the current workbook and .FullName is used to get the full name of the worksheet.
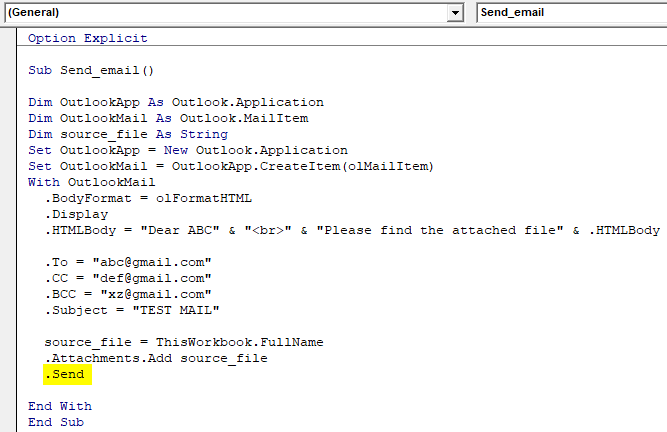
Step 15: Now the last code is to finally send the email for which we can use “.send”. But make sure to close the With and Sub procedure by “End with” and “End Sub” as shown in the below screenshot.
So the code is finally ready to send an email. We need to just run the macro now.
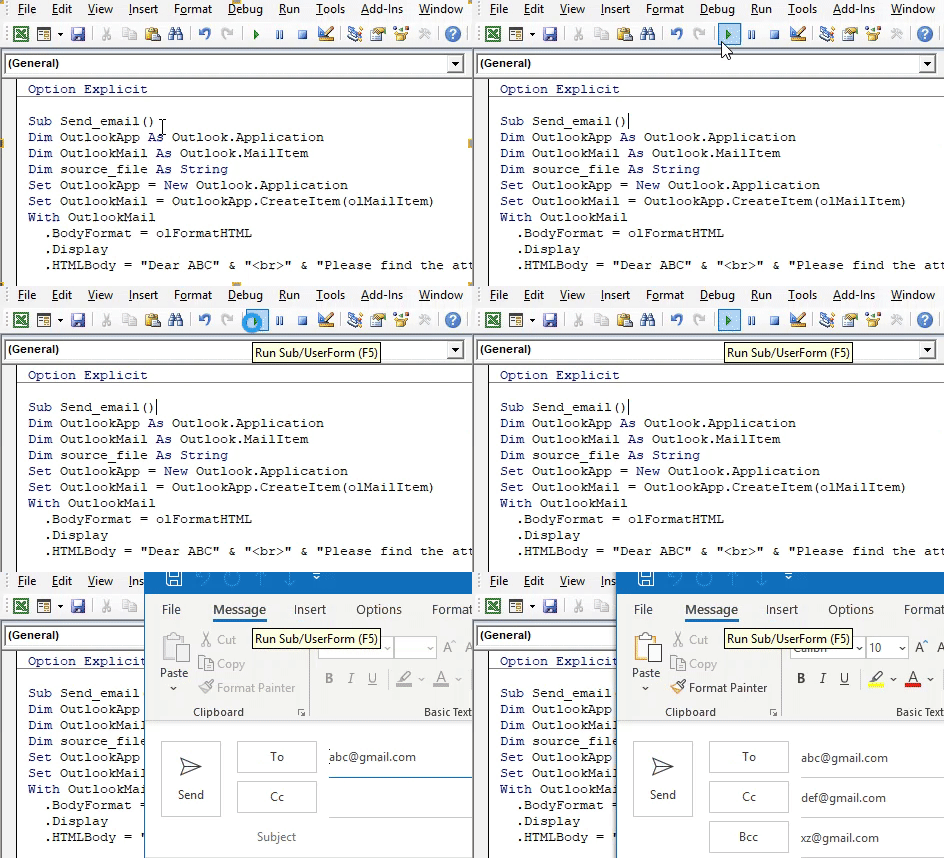
Step 16: Run the code by hitting F5 or Run button and see the output.
Final Full code
So below is the final code on how to send an email with the help of VBA Outlook.
Code:
Option Explicit

Sub Send_email()

Dim OutlookApp As Outlook.Application
Dim OutlookMail As Outlook.MailItem
Dim source_file As String
Set OutlookApp = New Outlook.Application
Set OutlookMail = OutlookApp.CreateItem(olMailItem)
With OutlookMail
  .BodyFormat = olFormatHTML
  .Display
  .HTMLBody = "Dear ABC" & "<br>" & "Please find the attached file" & .HTMLBody

  .To = "[email protected]"
  .CC = "[email protected]"
  .BCC = "[email protected]"
  .Subject = "TEST MAIL"

  source_file = ThisWorkbook.FullName
  .Attachments.Add source_file
  .Send

End With
End Sub
Example of VBA Outlook Function
Suppose there is a Team Leader and he wants to send a daily email for follow up of each member’s activity. The email will be like this.
“Hi Team,
Request you to kindly share your actions on each of your follow up items by 11 AM today.
Thanks & Regards,
Unknown
“
Follow the steps mentioned above for referencing the Microsoft Object and writing the VBA coding or you can just modify the code accordingly.
So with all the code remaining same, we need to change few things in the code be like Email ID of the receiver, Subject, Body of the email and there will be no attachment in the email.
Below is the modified code we are using to write this email.
Code:
Sub Send_teamemail()

Dim OutlookApp As Outlook.Application
Dim OutlookMail As Outlook.MailItem
Set OutlookApp = New Outlook.Application
Set OutlookMail = OutlookApp.CreateItem(olMailItem)
With OutlookMail
.BodyFormat = olFormatHTML
.Display
.HTMLBody = "Hi Team " & "<br>" & "<br>" & "Request you to kindly share
your actions on each of your follow up items by 8 PM today." & .HTMLBody

.To = "[email protected];[email protected];[email protected]"
.Subject = "Team Follow Up"
.Send

End With
End Sub
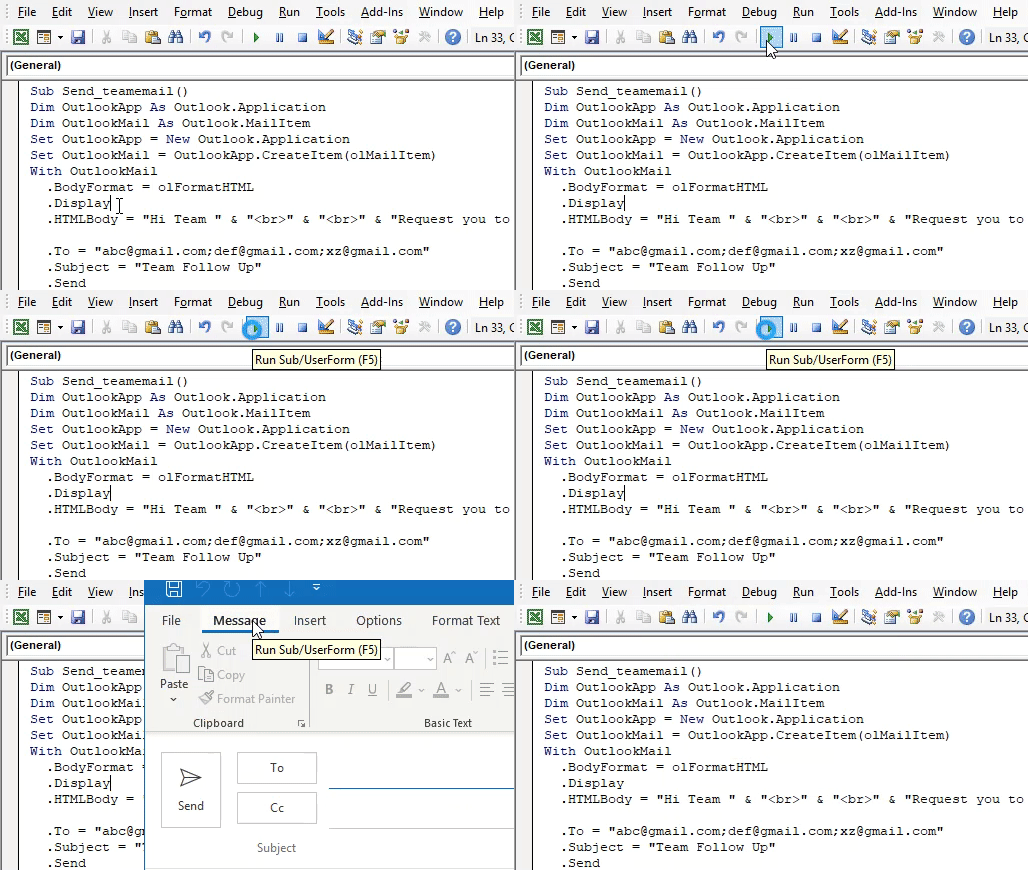
After running the macro, you will see the mail has been sent automatically from your outlook.
Things to Remember
- First, make sure you have installed Microsoft Outlook in your computer and you have login into your account.
- Make sure that the box for Microsoft Outlook in Object Library reference is always checked. The code will not run and throw an error if it is not checked.
- Defining variables and setting variables in very important in VBA coding. Without Variables, a code will not work.
- Make sure that if you want to add signature in the mail, first you should have at least one signature already created in outlook.
- Always use “<br>” to enter line gaps in the mail.
Recommended Articles
This is a guide to VBA Outlook. Here we discuss how to send emails from Outlook using VBA codes in excel along with an example and downloadable excel template. Below are some useful excel articles related to VBA –
- VBA OverFlow Error
- VBA Named Range
- VBA CLng
- VBA Option Explicit
We have seen VBA in Excel and how we automate our tasks in Excel by creating macros. In Microsoft Outlook, we also have a reference for VBA and can control Outlook using VBA. It makes our repeated tasks in Outlook easier to automate. Like Excel, we need to enable the Developer feature to use VBA in Outlook.
The beauty of VBA is we can reference other Microsoft objects like PowerPoint, Word, and Outlook. We can create beautiful presentations. We can work with Microsoft word documents. Finally, we can send the emails as well. Yes, you heard it right. We can send emails from Excel. It sounds awkward but, at the same time, puts a smile on our faces as well. This article will show you how to work with Microsoft Outlook objects from excel using VBA codingVBA code refers to a set of instructions written by the user in the Visual Basic Applications programming language on a Visual Basic Editor (VBE) to perform a specific task.read more. Read on.
Table of contents
- VBA Outlook
- How do we Reference Outlook from Excel?
- Write a Code to Send Emails from VBA Outlook from Excel
- Recommended Articles
You are free to use this image on your website, templates, etc, Please provide us with an attribution linkArticle Link to be Hyperlinked
For eg:
Source: VBA Outlook (wallstreetmojo.com)
How do we Reference Outlook from Excel?
Remember, Outlook is an object. Therefore, we need to set the reference to this in the object reference library. To set the Outlook object to reference, follow the below steps.
Step 1: Go to Visual Basic Editor.
Step 2: Go to Tools > Reference.
Step 3: In the below references, object library, scroll down, and select “MICROSOFT OUTLOOK 14.0 OBJECT LIBRARY.”
Check the “MICROSOFT OUTLOOK 14.0 OBJECT LIBRARY” box to make it available for Excel VBA.
Now, we can access the VBA Outlook object from Excel.
Write a Code to Send Emails from VBA Outlook from Excel
We can send the emails from excel through the outlook app. For this, we need to write VBA codes. Then, follow the below steps to send the emails from Outlook.
You can download this VBA Outlook to Excel Template here – VBA Outlook to Excel Template
Step 1: Create a sub procedure.
Code:
Option ExplicitVBA option explicitly makes a user mandatory to declare all the variables before using them; any undefined variable will throw an error while coding execution. We can enable it for all codes from options to require variable declaration.read more

Sub Send_Exails()

End Sub
Step 2: Define the variable as VBA Outlook.Application.
Code:
Option Explicit

Sub Send_Exails()

  Dim OutlookApp As Outlook.Application

End Sub
Step 3: The above variable reference the VBA Outlook application. In Outlook, we need to send emails, so define another variable as Outlook.MailItem.
Code:
Option Explicit

Sub Send_Exails()

  Dim OutlookApp As Outlook.Application
  Dim OutlookMail As Outlook.MailItem

End Sub
Step 4: Now, both variables are object variables. We need to set them. First, set the variable “OutlookApp” as New Outlook.Application.
Code:
Sub Send_Exails()

  Dim OutlookApp As Outlook.Application
  Dim OutlookMail As Outlook.MailItem

  Set OutlookApp = New Outlook.Application

End Sub
Step 5: Now, set the second variable, “OutlookMail,” as below.
Set OutlookMail=OutlookApp.CreateItem(olMailItem)
Code:
Sub Send_Exails()

  Dim OutlookApp As Outlook.Application
  Dim OutlookMail As Outlook.MailItem

  Set OutlookApp = New Outlook.Application
  Set OutlookMail = OutlookApp.CreateItem(olMailItem)

End Sub
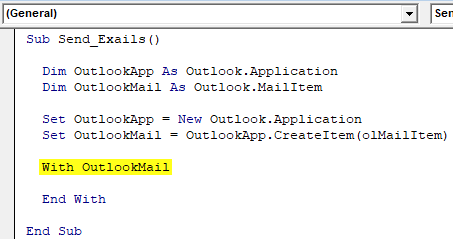
Step 6: Now, using With statement access VBA Outlook Mail.
Code:
Sub Send_Exails()

  Dim OutlookApp As Outlook.Application
  Dim OutlookMail As Outlook.MailItem

  Set OutlookApp = New Outlook.Application
  Set OutlookMail = OutlookApp.CreateItem(olMailItem)

  With OutlookMail

  End With

End Sub
Now, we can access all the items available with email items like “Body of the email,” “To,” “CC,” “BCC,” “Subject,” and many more things.
Step 7: Inside the statement, we can see the IntelliSense list by putting a dot.
Step 8: First, select the body format as olFormatHtml.
Code:
With OutlookMail
    .BodyFormat = olFormatHTML

End With
Step 9: Now display the email.
Code:
With OutlookMail
  .BodyFormat = olFormatHTML
  .Display
End With
Step 10: We need to write the email in the body of the email. For this, select HtmlBody.
Code:
With OutlookMail
  .BodyFormat = olFormatHTML
  .Display
  .HTMLBody = "Write your email here"
End With
Below is the example of the body of the email writing.
Step 11: We need to mention the receiver’s email ID after writing the email. For this access, “To.“
Step 12: Next, mention for whom you want to CC the email.
Step 13: Now, mention the BCC email ids,
Step 14: Next, we need to mention the subject of the email we are sending.
Step 15: Now, add attachments. If you want to send the current workbook as an attachment, then use the attachment as This workbook.
Step 16: Finally, send the email by using the Send method.
Now, this code will send the email from your VBA outlook mail. Use the below VBA code to send emailsWe can use VBA to automate our mailing feature in Excel to send emails to multiple users at once. To use Outlook features, we must first enable outlook scripting in VBA, and then use the application method.read more from your outlook.
To use the below code, you must set the object reference to “MICROSOFT OUTLOOK 14.0 OBJECT LIBRARY” under the object library of Excel VBA.
The library is called early binding by setting the reference to the object. We need to set the reference to the object library because without setting the object library as “MICROSOFT OUTLOOK 14.0 OBJECT LIBRARY.“ We cannot access the IntelliSense list of VBA properties and methods. It makes writing code difficult because you need to be sure of what you are writing in terms of technique and spelling.
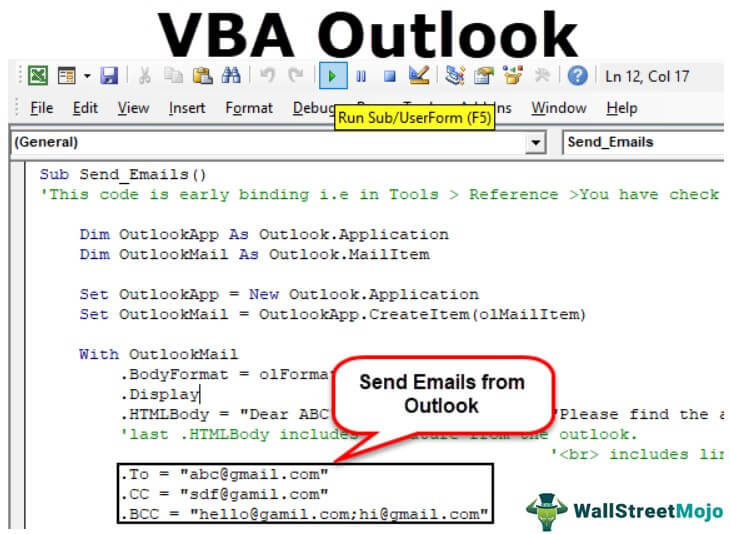
Sub Send_Emails()
'This code is early binding i.e in Tools >
Reference >You have check "MICROSOFT OUTLOOK 14.0 OBJECT LIBRARY"

  Dim OutlookApp As Outlook.Application
  Dim OutlookMail As Outlook.MailItem

  Set OutlookApp = New Outlook.Application
  Set OutlookMail = OutlookApp.CreateItem(olMailItem)

  With OutlookMail
    .BodyFormat = olFormatHTML
    .Display
    .HTMLBody = "Dear ABC" & "<br>" & "<br>" & "Please find the attached file" &
    .HTMLBody
    'last .HTMLBody includes signature from the outlook.
''<br> includes line breaksLine break in excel means inserting a new line in any cell value. To insert a line break, press ALT + Enter. As we insert a line break, the cell's height also increases as it represents the data.read more b/w two lines
    .To = "[email protected]"
    .CC = "[email protected]"
    .BCC = "[email protected];[email protected]"
    .Subject = "Test mail"
    .Attachments = ThisWorkbook
    .Send
  End With

End Sub
Recommended Articles
This article has been a guide to VBA Outlook. Here, we learn how to send emails from Outlook using VBA codes, examples, and a downloadable template. Below are some useful Excel articles related to VBA: –
- Excel VBA ThisWorkbook
- VBA ArrayList
- VBA For Next Loop
- List of String Functions in VBA
- VBA Write Text File
Return to VBA Code Examples
This tutorial will show you how to send emails from Excel through Outlook using VBA.
Sending the Active Workbook
Function SendActiveWorkbook(strTo As String, strSubject As String, Optional strCC As String, Optional strBody As String) As Boolean
   On Error Resume Next
   Dim appOutlook As Object
   Dim mItem As Object
'create a new instance of Outlook
   Set appOutlook = CreateObject("Outlook.Application")
   Set mItem = appOutlook .CreateItem(0)
   With mItem
     .To = strTo
     .CC = ""
     .Subject = strSubject
     .Body = strBody
     .Attachments.Add ActiveWorkbook.FullName
'use send to send immediately or display to show on the screen
    .Display 'or .Send
   End With
'clean up objects
  Set mItem = Nothing
  Set appOutlook = Nothing
End Function
The function above can be called using the procedure below
Sub SendMail()
   Dim strTo As String
   Dim strSubject As String
   Dim strBody As String
'populate variables
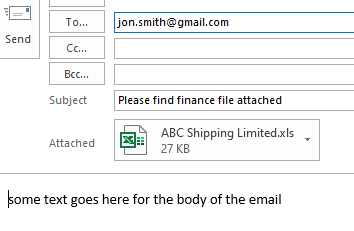
   strTo = "jon.smith@gmail.com"
   strSubject = "Please find finance file attached"
   strBody = "some text goes here for the body of the email"
'call the function to send the email
   If SendActiveWorkbook(strTo, strSubject, , strBody) = true then
      Msgbox "Email creation Success"
   Else
      Msgbox "Email creation failed!"
   End if
End Sub
Using Early Binding to refer to the Outlook Object Library
The code above uses Late Binding to refer to the Outlook Object. You can add a reference to Excel VBA, and declare the Outlook application and Outlook Mail Item using Early Binding if preferred. Early Binding makes the code run faster, but limits you as the user would need to have the same version of Microsoft Office on their PC.
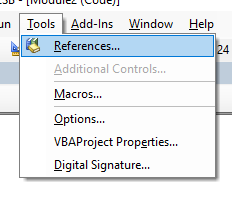
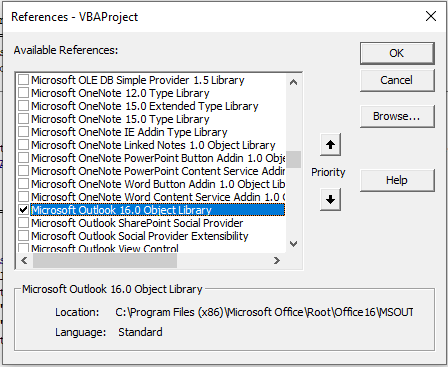
Click on the Tools menu and References to show the reference dialog box.
Add a reference to the Microsoft Outlook Object Library for the version of Office that you are using.
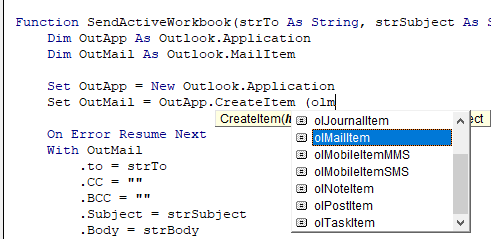
You can then amend your code to use these references directly.
A great advantage of early binding is the drop down lists that show you the objects that are available to use!
Sending a Single Sheet from the Active Workbook
To send a single sheet, you first need to create a new workbook from the existing workbook with just that sheet in it, and then send that sheet.
Function SendActiveWorksheet(strTo As String, strSubject As String, Optional strCC As String, Optional strBody As String) As Boolean
   On Error GoTo eh
'declare variables to hold the objects required
   Dim wbDestination As Workbook
   Dim strDestName As String
   Dim wbSource As Workbook
   Dim wsSource As Worksheet
   Dim OutApp As Object
   Dim OutMail As Object
   Dim strTempName As String
   Dim strTempPath As String
'first create destination workbook
   Set wbDestination = Workbooks.Add
   strDestName = wbDestination.Name
'set the source workbook and sheet
   Set wbSource = ActiveWorkbook
   Set wsSource = wbSource.ActiveSheet
'copy the activesheet to the new workbook
   wsSource.Copy After:=Workbooks(strDestName).Sheets(1)
'save with a temp name
   strTempPath = Environ$("temp") & ""
   strTempName = "List obtained from " & wbSource.Name & ".xlsx"
   With wbDestination
      .SaveAs strTempPath & strTempName
'now email the destination workbook
      Set OutApp = CreateObject("Outlook.Application")
      Set OutMail = OutApp.CreateItem(0)
      With OutMail
         .To = strTo
         .Subject = strSubject
         .Body = strBody
         .Attachments.Add wbDestination.FullName
'use send to send immediately or display to show on the screen
         .Display 'or .Display
      End With
      .Close False
  End With
'delete temp workbook that you have attached to your mail
   Kill strTempPath & strTempName
'clean up the objects to release the memory
   Set wbDestination = Nothing
   Set wbSource = Nothing
   Set wsSource = Nothing
   Set OutMail = Nothing
   Set OutApp = Nothing
Exit Function
eh:
   MsgBox Err.Description
End Function
and to run this function, we can create the following procedure
Sub SendSheetMail()
   Dim strTo As String
   Dim strSubject As String
   Dim strBody As String
   strTo = "jon.smith@gmail.com"
   strSubject = "Please find finance file attached"
   strBody = "some text goes here for the body of the email"
   If SendActiveWorksheet(strTo, strSubject, , strBody) = True Then
      MsgBox "Email creation Success"
   Else
      MsgBox "Email creation failed!"
   End If
End Sub
VBA Coding Made Easy
Stop searching for VBA code online. Learn more about AutoMacro — A VBA Code Builder that allows beginners to code procedures from scratch with minimal coding knowledge and with many time-saving features for all users!
Learn More!
Время на прочтение
6 мин
Количество просмотров 23K
В этой статье я бы хотел поделиться опытом автоматизации офисной, рутинной задачи по отправке сообщений группе клиентов.
Итак, собственно, в чем вопрос: необходимо отправить электронные письма с вложением нескольким десяткам клиентам. При этом в поле получателя должен быть только один адрес, т.е. клиенты друг о друге не должны знать. Кроме того, не допускается установка дополнительного программного обеспечения, типа MaxBulk Mailer и ему подобного. В нашем распоряжении есть только Microsoft Office, а в данном конкретном случае — Microsoft Office 2013.
Я описываю, на мой взгляд, самый вариант – без применения шаблонов, черновиков и форматирования. Для наших целей потребуется Outlook (переходим в редактор VBA и добавляем модуль, еще включаем «Microsoft Excel 15.0 Object Library» в Tools > References), текстовый файл со списком адресатов по принципу «одна строка-один адрес», текстовый файл с телом письма и файлы, которые будем отправлять в качестве вложения.
Общий алгоритм таков: указываем данные для полей и генерируем письма, перебирая в цикле получателей.
Сразу отмечу, что данный пример не является неким доведенным до совершенства кодом, работающим с максимальной эффективностью при минимальных размерах. Но он работает и справляется с заявленным функционалом. Собственно, мне было просто лень отправлять вручную несколько десятков писем и я написал эту программу, а потом решил ей поделиться. Если кому-то интересно, тот может улучшать код сколько душе угодно.
VBA, по умолчанию, не требует четкого объявления переменных и их типов. В принципе, можно вообще обойтись без этого. Поэтому некоторые переменные в «эпизодических ролях» не описаны в конструкции с Dim.
Итак, сначала запрашиваем тему письма с реализацией проверки на отмену действия.
TxtSubj = InputBox("Тема письма", "Рассылка")
If Len(Trim(TxtSubj)) = 0 Then
    Exit Sub
End If
Теперь очередь за файлами с адресами и текстом письма. Вот здесь возник нюанс. Как вызвать диалог выбора файла? О жестком прописывании пути я не хочу и думать. Так что приходится что-то придумывать. Многими используемый вариант с Application.GetOpenFilename не пройдет, так как в Outlook нет такого метода. Использовать API пробовал. Вариант с «Private Declare PtrSafe Function GetOpenFileName Lib „comdlg32.dll“…» не сработал (PtrSafe из-за того, что система Win7, х64). Ошибок не выдавал, но при вызове ничего не появлялось. Решения в Интернете не нашел. Если кто подскажет решение – буду благодарен. Таким образом, пришлось пойти в обход с применением объекта Excel.Application.
Dim xlApp As New Excel.Application
Set fd = xlApp.FileDialog(msoFileDialogFilePicker)
With fd
.AllowMultiSelect = False
.Title = "Файл с текстом письма"
.Filters.Add "Текстовый файл", "*.txt", 1
If .Show = -1 Then
For Each vrtSelectedItem In .SelectedItems
Path2Body = vrtSelectedItem
Next vrtSelectedItem
Else
    Exit Sub
End If
End With
Set fd = Nothing
И для другого файла
Set fd = xlApp.FileDialog(msoFileDialogFilePicker)
With fd
.AllowMultiSelect = False
.Title = "Файл со списком адресов"
.Filters.Add "Текстовый файл", "*.txt", 1
If .Show = -1 Then
For Each vrtSelectedItem In .SelectedItems
Path2To = vrtSelectedItem
Next vrtSelectedItem
Else
    Exit Sub
End If
End With
Set fd = Nothing
А теперь и вложения. Тут я использовал динамический массив и возможность множественного выбора диалога.
Код
Set fd = xlApp.FileDialog(msoFileDialogFilePicker)
With fd
.AllowMultiSelect = True
.Title = "Файлы, прилагаемые к письму"
.Filters.Add "Все файлы", "*.*", 1
If .Show = -1 Then
    i = 0
    ReDim Preserve Path2Att(i)
    For Each vrtSelectedItem In .SelectedItems
        Path2Att(i) = vrtSelectedItem
        i = i + 1
        ReDim Preserve Path2Att(i)
    Next vrtSelectedItem
Else
    Exit Sub
End If
End With
Set fd = Nothing
Каждый раз я создавал и удалял объект fd из-за того, что это сделать проще, чем заниматься его чисткой перед последующим вызовом.
Для получения данных из текстовых файлов пришлось использовать пару дополнительных функций. Вызываются они таким образом:
txtBody = ReadTXTfile(Path2Body)
Item2To = ReadTXTfile2Arr(Path2To)
А тут их исходный код
Function ReadTXTfile(ByVal filename As String) As String
    Set FSO = CreateObject("scripting.filesystemobject")
    Set ts = FSO.OpenTextFile(filename, 1, True): ReadTXTfile = ts.ReadAll: ts.Close
    Set ts = Nothing: Set FSO = Nothing
End Function
Function ReadTXTfile2Arr(ByVal filename As String) As Variant
Const OpenFileForReading = 1
Const OpenFileForWriting = 2
Const OpenFileForAppending = 8
Const vbSplitAll = -1

Dim S As Variant

Set FSO = CreateObject("Scripting.FileSystemObject")
Set FSOFile = FSO.GetFile(filename)
Set TextStream = FSOFile.OpenAsTextStream(OpenFileForReading)
Do While Not TextStream.AtEndOfStream
   S = S & TextStream.ReadLine & vbNewLine
Loop
TextStream.Close
ReadTXTfile2Arr = Split(S, vbNewLine, vbSplitAll, vbTextCompare)
Set TextStream = Nothing
Set FSOFile = Nothing
Set FSO = Nothing
End Function
С целью отладки я вставил такой код
‘Контроль за данными
'Debug.Print "Адреса получателя"
'Debug.Print "-----------------"
'For i = 0 To UBound(Item2To) - 1
'    Debug.Print Item2To(i)
'Next i
'Debug.Print "Прилагаемые файлы"
'Debug.Print "-----------------"
'For i = 0 To UBound(Path2Att) - 1
'    Debug.Print Path2Att(i)
'Next i
'Debug.Print "Тема письма"
'Debug.Print "-----------"
'Debug.Print TxtSubj
'Debug.Print "Тело письма"
'Debug.Print "-----------"
'Debug.Print txtBody
Как видно, он сейчас закомментирован, но позволяет понять где что лежит.
Теперь небольшая по размеру, но самая важная часть – генерация писем.
Dim olMailMessage As Outlook.MailItem
For i = 0 To UBound(Item2To) - 1
    Set olMailMessage = Application.CreateItem(olMailItem)
    With olMailMessage
        DoEvents
        .To = Item2To(i)
        .Subject = TxtSubj
        .Body = txtBody
        For k = 0 To UBound(Path2Att) - 1
            .Attachments.Add Path2Att(k), olByValue
            DoEvents
        Next k
        .Send
    End With
    Set olMailMessage = Nothing
Next i
При желании, метод .Send можно заменить на .Save. Тогда созданные письма окажутся в папке «Черновики».
Здесь полный код модуля «как есть».
Код
Attribute VB_Name = "Module"

Function ReadTXTfile(ByVal filename As String) As String
    Set FSO = CreateObject("scripting.filesystemobject")
    Set ts = FSO.OpenTextFile(filename, 1, True): ReadTXTfile = ts.ReadAll: ts.Close
    Set ts = Nothing: Set FSO = Nothing
End Function

Function ReadTXTfile2Arr(ByVal filename As String) As Variant
Const OpenFileForReading = 1
Const OpenFileForWriting = 2
Const OpenFileForAppending = 8
Const vbSplitAll = -1
Dim S As Variant
Set FSO = CreateObject("Scripting.FileSystemObject")
Set FSOFile = FSO.GetFile(filename)
Set TextStream = FSOFile.OpenAsTextStream(OpenFileForReading)
Do While Not TextStream.AtEndOfStream
   S = S & TextStream.ReadLine & vbNewLine
Loop
TextStream.Close
ReadTXTfile2Arr = Split(S, vbNewLine, vbSplitAll, vbTextCompare)
Set TextStream = Nothing
Set FSOFile = Nothing
Set FSO = Nothing
End Function

Public Sub Autosender()
'требуется текстовый файл с перечнем адресов (каждый с новой строки),
'текстовый файл с телом письма
'и попросит выбрать вложение (мультивыбор доступен)
Dim Path2Body As String
Dim Path2To As String
Dim Path2Att() As String
Dim Item2To() As String
Dim TxtSubj As String
Dim txtBody As Variant
Dim i
Dim k
Dim vrtSelectedItem As Variant
Dim fd As FileDialog
Dim olMailMessage As Outlook.MailItem
Dim xlApp As New Excel.Application
GenerateThis = False
TxtSubj = InputBox("Тема письма", "Рассылка")
If Len(Trim(TxtSubj)) = 0 Then
    Exit Sub
End If
Set fd = xlApp.FileDialog(msoFileDialogFilePicker)
With fd
.AllowMultiSelect = False
.Title = "Файл с текстом письма"
.Filters.Add "Текстовый файл", "*.txt", 1
If .Show = -1 Then
For Each vrtSelectedItem In .SelectedItems
Path2Body = vrtSelectedItem
Next vrtSelectedItem
Else
    Exit Sub
End If
End With
Set fd = Nothing
Set fd = xlApp.FileDialog(msoFileDialogFilePicker)
With fd
.AllowMultiSelect = False
.Title = "Файл со списком адресов"
.Filters.Add "Текстовый файл", "*.txt", 1
If .Show = -1 Then
For Each vrtSelectedItem In .SelectedItems
Path2To = vrtSelectedItem
Next vrtSelectedItem
Else
    Exit Sub
End If
End With
Set fd = Nothing
Set fd = xlApp.FileDialog(msoFileDialogFilePicker)
With fd
.AllowMultiSelect = True
.Title = "Файлы, прилагаемые к письму"
.Filters.Add "Все файлы", "*.*", 1
If .Show = -1 Then
    i = 0
    ReDim Preserve Path2Att(i)
    For Each vrtSelectedItem In .SelectedItems
        Path2Att(i) = vrtSelectedItem
        i = i + 1
        ReDim Preserve Path2Att(i)
    Next vrtSelectedItem
Else
    Exit Sub
End If
End With
Set fd = Nothing
Set xlApp = Nothing
txtBody = ReadTXTfile(Path2Body)
Item2To = ReadTXTfile2Arr(Path2To)
DoEvents
'Контроль за данными
'Debug.Print "Адреса получателя"
'Debug.Print "-----------------"
'For i = 0 To UBound(Item2To) - 1
'    Debug.Print Item2To(i)
'Next i
'Debug.Print "Прилагаемые файлы"
'Debug.Print "-----------------"
'For i = 0 To UBound(Path2Att) - 1
'    Debug.Print Path2Att(i)
'Next i
'Debug.Print "Тема письма"
'Debug.Print "-----------"
'Debug.Print TxtSubj
'Debug.Print "Тело письма"
'Debug.Print "-----------"
'Debug.Print txtBody
For i = 0 To UBound(Item2To) - 1
    Set olMailMessage = Application.CreateItem(olMailItem)
    With olMailMessage
        DoEvents
        .To = Item2To(i)
        .Subject = TxtSubj
        .Body = txtBody
        For k = 0 To UBound(Path2Att) - 1
            .Attachments.Add Path2Att(k), olByValue
            DoEvents
        Next k
        .Send
    End With
    Set olMailMessage = Nothing
Next i
MsgBox "Отправлено.", vbInformation + vbOKOnly, "Рассылка"
End Sub
В данном примере реализована возможность отправки простых писем. Если необходимо расширить возможности, например сделать текст форматированным, то двигаться следует в направлении Outlook.MailItem > GetInspector > WordEditor. Это, мягко говоря, усложняет код, но позволит использовать в качестве источника текста письма форматированный документ Word.
Можно также добавить обработку «преднамеренного» отсутствия каких-либо составляющих письма. Например, реализовать отправку без темы, текста или вложений. Сейчас отказ от одного из этих элементов приведет к прерыванию процедуры.
Этот код, теоретически, должен работать также и в более ранних версиях Microsoft Office. Поменяется только ссылка на библиотеку Excel.
- Интернет
- Рассылка почты
Пример макроса, отправляющего письма со вложениями из Excel через почтовый клиент Outlook:
Sub Отправить_Письмо_из_Outlook()

    'отправляем письмо без вложений
    res = SendEmailUsingOutlook("name@domain.ru", "Текст письма 1", "Тема письма 1")
    If res Then Debug.Print "Письмо 1 отправлено успешно" Else Debug.Print "Ошибка отправки"


    'отправляем письмо с 1 вложением
    attach$ = ThisWorkbook.FullName    ' прикрепляем текущий файл Excel
    res = SendEmailUsingOutlook("name@domain.ru", "Текст письма 2", "Тема письма 2", attach$)
    If res Then Debug.Print "Письмо 2 отправлено успешно" Else Debug.Print "Ошибка отправки"


    'отправляем письмо с несколькими вложениями
    Dim coll As New Collection    ' заносим в коллекцию список прикрепляемых файлов
    coll.Add "C:Documents and SettingsAdminРабочий столTyres.jpg"
    coll.Add "C:Documents and SettingsAdminРабочий столcalc.xls"
    coll.Add ThisWorkbook.FullName    ' прикрепляем текущий файл Excel

    res = SendEmailUsingOutlook("name@domain.ru", "Текст письма 3", "Тема письма 3", coll)
    If res Then Debug.Print "Письмо 3 отправлено успешно" Else Debug.Print "Ошибка отправки"
End Sub
Макрос использует функцию SendEmailUsingOutlook, которая:
- принимает в качестве параметров адрес получателя письма, тему и текст письма, список вложений
- запускает Outlook, формирует письмо, и отправляет его
- возвращает TRUE, если отправка прошла успешно, или FALSE, если с отправкой почты вызникли проблемы
Код функции SendEmailUsingOutlook:
Function SendEmailUsingOutlook(ByVal Email$, ByVal MailText$, Optional ByVal Subject$ = "", _
                               Optional ByVal AttachFilename As Variant) As Boolean
    ' функция производит отправку письма с заданной темой и текстом на адрес Email
    ' с почтового ящика, настроенного в Outlook для отправки писем "по-умолчанию"
    ' Если задан параметр AttachFilename, к отправляемому письму прикрепляется файл (файлы)

    On Error Resume Next: Err.Clear
    Dim OA As Object: Set OA = CreateObject("Outlook.Application")
    If OA Is Nothing Then MsgBox "Не удалось запустить OUTLOOK для отправки почты", vbCritical: Exit Function

    With OA.CreateItem(0)   'создаем новое сообщение
        .To = Email$: .Subject = Subject$: .Body = MailText$
        If VarType(AttachFilename) = vbString Then .Attachments.Add AttachFilename
        If VarType(AttachFilename) = vbObject Then    ' AttachFilename as Collection
            For Each file In AttachFilename: .Attachments.Add file: Next
        End If
        For i = 1 To 100000: DoEvents: Next    ' без паузы не отправляются письма без вложений
        Err.Clear: .Send
        SendEmailUsingOutlook = Err = 0
    End With
    Set OutApp = Nothing
End Function
Пример макроса, с получением параметров письма из ячеек листа Excel:
Sub Отправить_Письмо_из_Outlook()
    ' адрес получателя - в ячейке A1, текст письма - в ячейке A2
    res = SendEmailUsingOutlook(Cells(1, 1), Range("a2"), "Тема письма 1")
    If res Then Debug.Print "Письмо 1 отправлено успешно" Else Debug.Print "Ошибка отправки"
End Sub
- 176199 просмотров
Не получается применить макрос? Не удаётся изменить код под свои нужды?
Оформите заказ у нас на сайте, не забыв прикрепить примеры файлов, и описать, что и как должно работать.

