
Хитрости »
17 Июнь 2015 147419 просмотров
Диалоговое окно выбора файлов/папки
Часто при работе с файлами и написании кодов начинающие «кодить» в VBA сталкиваются с необходимостью предоставить пользователю возможность самостоятельного выбора файлов: либо всех в указанной папке, либо каких-то отдельных. Конечно, можно жестко в коде написать нечто вроде: «C:DocumentsFilesКнига1.xls», но это требует не только наличия именно диска С, но и полной структуры папок и имен файлов. Это очень неудобно в большинстве случаев и куда чаще необходимо дать пользователю возможность самому указать имя файла. Записывать в ячейку листа полный путь и имя весьма непрактично и часто для неискушенного пользователя вызывает только «отторжение» от программы. В статье Просмотреть все файлы в папке я приводил пример кода, который просматривает все файлы в указанной папке и папка при этом выбирается сами пользователем из привычного по работе с Windows диалога. Там используется диалог выбора папок. Именно на этом я и хочу сделать акцент в этой статье — рассказать про некоторые способы вызова подобных диалогов для выбора файлов или папки. Так же обращу внимание на некоторые вещи, которые следует учитывать при использовании того или иного типа диалогов.
- Диалог выбора файлов Applicaton.GetOpenFileName
- Диалог выбора файлов FileDialog(msoFileDialogFilePicker)
- Диалог выбора папки FileDialog(msoFileDialogFolderPicker)
- Диалог выбора папки через Shell
- Диалог сохранения файла SaveAs
Если рассматривать наиболее простые варианты, то их два. Выбрать файлы можно через Applicaton.GetOpenFileName или через Application.FileDialog. Отличия в них есть, но я заострю внимание на главном: GetOpenFileName будет работать в любой версии Excel, а класс FileDialog только начиная с Excel 2002, т.к. именно в этой версии впервые был использован класс FileDialog. Это стоит учитывать при разработке.
Диалог выбора файлов Applicaton.GetOpenFileName
Параметры:
Application.GetOpenFilename([FileFilter], [FilterIndex], [Title], [ButtonText], [MultiSelect])
По сути я часто использую именно его, т.к. это универсальный метод и в нем есть все, что лично мне необходимо: выбрать определенные типы файлов позволяет, возможность запрета выбора нескольких файлов сразу есть.
| FileFilter | Указываются типы файлов, которые будут отображаться в диалоговом окне выбора. Например, если указать «Excel files(*.xls*),*.xls*», то возможно будет выбрать только файлы Excel(с расширением, начинающимся на .xls — .xls, .xlsx, .xlsb, .xlsm и т.д.). Если указать «Text files(*.txt),*.txt», то можно будет выбрать только текстовые файлы с расширением .txt. Так же можно указать более одного типа расширений: «Excel files(*.xls*),*.xls*,Text files(*.txt),*.txt». По умолчанию тип файлов в диалоговом окне будет принадлежать первому указанному типу файлов(*.xls*). Но можно указать любой из перечисленных типов при помощи аргумента FilterIndex. Так же можно указать выбор любых типов файлов: «All files(*.*),*.*» |
| FilterIndex |
Если аргументом FileFilter указано более одного типа файлов(расширений), то этот аргумент указывает какой именно тип использовать. Например, следующая строка по умолчанию назначает выбор текстовых типов файлов:
avFiles = Application.GetOpenFilename _
    ("Excel files(*.xls*),*.xls*,Text files(*.txt),*.txt", 2, _
     "Выбрать текстовые или Excel файлы", , True)
|
| Title | Текст заголовка диалогового окна. Если указать «Выбрать текстовые или Excel файлы», то именно этот текст будет в заголовке. Если не указывать, то будет текст по умолчанию(нечто вроде «Открытие документа») |
| ButtonText | Данный аргумент доступен только для ПК под управлением Macintosh(MAC). Назначает текст для кнопки диалогового окна Открыть. Для владельцев Windows этот текст всегда будет «Открыть» |
| MultiSelect |
Указывает, может быть выбран только один файл или несколько:
По умолчанию принимает значение False avFiles = Application.GetOpenFilename _
("Excel files(*.xls*),*.xls*,Text files(*.txt),*.txt", 2, _
"Выбрать текстовые или Excel файлы", , False)
Выбор нескольких файлов: avFiles = Application.GetOpenFilename _
("Excel files(*.xls*),*.xls*,Text files(*.txt),*.txt", 2, _
"Выбрать текстовые или Excel файлы", , True)
|

Пример применения диалога Application.GetOpenFilename
Sub ShowGetOpenDialod()
    Dim avFiles
    'по умолчанию к выбору доступны файлы Excel(xls,xlsx,xlsm,xlsb)
    avFiles = Application.GetOpenFilename _
                ("Excel files(*.xls*),*.xls*", 1, "Выбрать Excel файлы", , False)
    If VarType(avFiles) = vbBoolean Then
        'была нажата кнопка отмены - выход из процедуры
        Exit Sub
    End If
    'avFiles - примет тип String
    MsgBox "Выбран файл: '" & avFiles & "'", vbInformation, "www.excel-vba.ru"
End Sub
В данном случае совершенно неважно указан ли выбор только одного файла или нескольких. Может поменяться только способ обработки полученного результата. Если параметр MultiSelect установлен в False, то переменная avFiles примет тип String, т.е. это будет одна строка. Предположим, что была выбрана книга Excel. Тогда открыть её можно будет как обычно это делается при использовании переменной:
Если же параметр MultiSelect установлен в True, то переменная avFiles примет тип Array — массив строк, в котором будут записаны все пути и имена выбранных файлов. Обрабатывать в таком случае следует циклом:
'avFiles - примет тип Array
    For Each x In avFiles
        Workbooks.Open x
    Next
В приложенном к статье файле приведены две процедуры с использованием этого типа диалога и обработкой файлов с параметром MultiSelect, установленным в True и False.
Диалог выбора файлов FileDialog(msoFileDialogFilePicker)
У этого диалога тоже есть параметры и они очень схожи с таковыми в Application.GetOpenFilename:
Ниже в статье примера кода с применением всех описанных параметров
| AllowMultiSelect |
Указывает, может быть выбран только один файл или несколько:
|
| Title | Текст заголовка диалогового окна. Если указать «Выбрать текстовые или Excel файлы», то именно этот текст будет в заголовке. Если не указывать, то будет текст по умолчанию(нечто вроде «Открытие документа») |
| Filters |
Перечисляются типы файлов, которые будут отображаться в диалоговом окне выбора. Для добавления типа файла(расширения) необходимо использовать метод Add: .Filters.Add([Description],[Extensions],[Position])
Тип файлов, который будет показан по умолчанию при вызове диалога определяется свойством FilterIndex диалога FileDialog. Каждый новый тип файлов добавляется новым Add: .Filters.Add "Excel files", "*.xls*;*.xla*", 1 'добавляем возможность выбора файлов Excel .Filters.Add "Text files", "*.txt", 2 'добавляем возможность выбора текстовых файлов |
| FilterIndex | Назначает тип файлов, который будет выбран по умолчанию из всех перечисленных в коллекции Filters при вызове диалога |
| InitialFileName | Этим параметром можно задать начальную папку, на которой будет открыт диалог:
.InitialFileName = "С:Temp"
Если при этом еще добавить имя файла, то в поле диалога Имя файла будет так же отображено это имя: .InitialFileName = "С:TempКнига1.xlsx"
Я лично не рекомендую указывать имя файла, т.к. после показа диалога этот файл автоматически будет выбран, что не всегда бывает правильным. Но все зависит от задач. Если пользователь не выберет самостоятельно ни одного файла, то ответом диалога будет именно файл с указанным именем(Книга1.xlsx). Если такого файла не окажется в папке, то диалог выдаст предупреждение, что такого файла нет. |
| InitialView | Данный параметр определяет внешний вид и структуру окна диалога. Доступно 9 вариантов:
При использовании данного параметра следует учитывать, что на разных операционных системах могут быть доступны не все варианты. Поэтому прежде чем использовать лучше убедиться, что на конечных ПК поддерживается указанный тип. В принципе ничего страшного не произойдет — будет просто показано окно с видом по умолчанию. Но куда правильнее в разработке придерживаться однотипного вида на всех ПК. |
| SelectedItems | Возвращает коллекцию выбранных файлов. В отличии от Application.GetOpenFilename всегда возвращается массив строк, поэтому можно всегда использовать цикл для открытия файлов, даже если параметр AllowMultiSelect установлен в False:
For Each x In .SelectedItems
    Workbooks.Open x
Next
Так же можно отбирать только отдельные файлы по индексам или организовать цикл иначе: For lf = 1 to .SelectedItems.Count x = .SelectedItems(lf) Workbooks.Open x Next Нумерация строк в SelectedItems всегда начинается с 1 |
| Show | Пожалуй, самый важный метод в диалоге — отвечает за показ диалога. При этом метод Show возвращает ответ в виде целого числа:
Это можно(точнее нужно!) использовать, чтобы не продолжать выполнение кода, если нажата кнопка Отмены: If .Show = 0 Then Exit Sub 'была нажата кнопка отмены |
Пример вызова диалога выбора файлов:
Sub ShowFileDialog()
    Dim oFD As FileDialog
    Dim x, lf As Long
    'назначаем переменной ссылку на экземпляр диалога
    Set oFD = Application.FileDialog(msoFileDialogFilePicker)
    With oFD 'используем короткое обращение к объекту
    'так же можно без oFD
    'With Application.FileDialog(msoFileDialogFilePicker)
        .AllowMultiSelect = False
        .Title = "Выбрать файлы отчетов" 'заголовок окна диалога
        .Filters.Clear 'очищаем установленные ранее типы файлов
        .Filters.Add "Excel files", "*.xls*;*.xla*", 1 'устанавливаем возможность выбора только файлов Excel
        .Filters.Add "Text files", "*.txt", 2 'добавляем возможность выбора текстовых файлов
        .FilterIndex = 2 'устанавливаем тип файлов по умолчанию - Text files(Текстовые файлы)
        .InitialFileName = "С:TempКнига1.xlsx" 'назначаем папку отображения и имя файла по умолчанию
        .InitialView = msoFileDialogViewDetails 'вид диалогового окна(доступно 9 вариантов)
        If .Show = 0 Then Exit Sub 'показывает диалог
        'цикл по коллекции выбранных в диалоге файлов
        For lf = 1 To .SelectedItems.Count
            x = .SelectedItems(lf) 'считываем полный путь к файлу
            Workbooks.Open x 'открытие книги
            'можно также без х
            'Workbooks.Open .SelectedItems(lf)
        Next
    End With
End Sub
Диалог выбора папки
Диалог выбора папки необходим в случаях, когда файлов в папке много и обработать нужно все эти файлы. Пример такой обработки я уже выкладывал в статье Просмотреть все файлы в папке. Здесь проще всего использовать появившийся в 2002 Excel диалог Application.FileDialog. Его параметры практически такие же, как у Application.FileDialog(msoFileDialogFilePicker) только их меньше доступно для применения:
| Title | Текст заголовка диалогового окна. Если указать «Выбрать папку с отчетами», то именно этот текст будет в заголовке. Если не указывать, то будет текст по умолчанию(нечто вроде «Открыть папку») |
| InitialFileName | Этим параметром можно задать начальную папку, на которой будет открыт диалог:
.InitialFileName = "С:Temp"
|
| InitialView | Данный параметр определяет внешний вид и структуру окна диалога. Доступно 9 вариантов:
При использовании данного параметра следует учитывать, что на разных операционных системах могут быть доступны не все варианты. Поэтому прежде чем использовать лучше убедиться, что на конечных ПК поддерживается указанный тип. В принципе ничего страшного не произойдет — будет просто показано окно с видом по умолчанию. Но куда правильнее в разработке придерживаться однотипного вида на всех ПК. |
| SelectedItems | Возвращает коллекцию с одним элементом, в котором содержится путь к выбранной папке. Нумерация строк в SelectedItems всегда начинается с 1, но т.к. выбор нескольких папок невозможен, то всегда указывается 1: x = .SelectedItems(1) |
| ButtonName | Назначает текст кнопки, которой подтверждается выбор папки. Может содержать не более 51 знака(чего как правило достаточно). |
| Show | Метод, который вызывает показ диалога с выбранными параметрами. Возвращает ответ в виде целого числа:
Это можно(точнее нужно!) использовать, чтобы не продолжать выполнение кода, если нажата кнопка Отмены: If .Show = 0 Then Exit Sub 'была нажата кнопка отмены |
Пример вызова диалога выбора папки:
Sub ShowFolderDialog()
    Dim oFD As FileDialog
    Dim x, lf As Long
    'назначаем переменной ссылку на экземпляр диалога
    Set oFD = Application.FileDialog(msoFileDialogFolderPicker)
    With oFD 'используем короткое обращение к объекту
    'так же можно без oFD
    'With Application.FileDialog(msoFileDialogFolderPicker)
        .Title = "Выбрать папку с отчетами" '"заголовок окна диалога
        .ButtonName = "Выбрать папку"
        .Filters.Clear 'очищаем установленные ранее типы файлов
        .InitialFileName = "C:Temp" '"назначаем первую папку отображения
        .InitialView = msoFileDialogViewLargeIcons 'вид диалогового окна(доступно 9 вариантов)
        If .Show = 0 Then Exit Sub 'показывает диалог
        'цикл по коллекции выбранных в диалоге файлов
        x = .SelectedItems(1) 'считываем путь к папке
        MsgBox "Выбрана папка: '" & x & "'", vbInformation, "www.excel-vba.ru"
    End With
End Sub
Диалог выбора папки через Shell
Диалог Application.FileDialog(msoFileDialogFolderPicker) всем хорош и удобен, кроме одного: как я уже упоминал, он стал доступен из VBA только начиная с 2002 Excel. Плюс, описанные выше диалоги не работают в Outlook — он просто лишен хоть какой-либо реализации выбора папок или файлов. Поэтому дополню статью еще одним вариантом показа диалога выбора папки — с помощью объекта Shell. Этот вариант выбора папки будет работать и в Outlook и в любом другом приложении.
Shell.BrowseForFolder([Hwnd], [sTitle], [iOptions], [vRootFolder])
| Hwnd | Дескриптор окна, к которому будет относится диалог. Как правило указывается 0 |
| sTitle | Поясняющий текст, который будет отображен в диалоге. Подобие заголовка окна. Может быть любым текстом, например «Выбрать папку с отчетами» |
| iOptions | Дополнительные параметры для диалога. Рекомендуется использовать 0. Но можно попробовать и пару других вариантов. Например, если указать 20, то в диалоговом окне появится дополнительное текстовое поле, в котором будет отображено имя выбранной папки. |
| vRootFolder | Аналогично InitialFileName в рассмотренных выше диалогах. Задает начальную папку, на которой диалог будет открыт после запуска. |

Пример вызова диалога выбора папки через Shell:
Sub GetFolderDialog_Shell()
    On Error Resume Next
    Dim objShellApp As Object, objFolder As Object, ulFlags
    Dim x As String
    Set objShellApp = CreateObject("Shell.Application")
    'ulFlags - числовой код, определяющий вид отображаемого окна и некоторые параметры
    '    ulFlags = 0     - наиболее часто применяемый. Лучше использовать всегда именно 0
    '    ulFlags = 1     - не отображать Корзину
    '    ulFlags = 2     - не включать сетевые папки
    '    ulFlags = 20    - добавляется тестовое поле с отображением имени выбранной папки
    '    ulFlags = 16    - отображать EditBox для ввода полного пути с клавиатуры
    '    ulFlags = 16384 - можно так же выбирать файлы.
    'Некоторые константы можно комбинировать. Например если указать 1 + 16384 - то можно будет выбирать файлы

    ulFlags = 0
    Set objFolder = objShellApp.BrowseForFolder(0, "Выбрать папку с отчетами", ulFlags, "C:Temp")'"
    x = objFolder.Self.Path 'записываем в переменную путь к папке
    If Err.Number <> 0 Then
        MsgBox "Папка не выбрана!", vbInformation, "www.excel-vba.ru"
    Else
        MsgBox "Выбрана папка: '" & x & "'", vbInformation, "www.excel-vba.ru"
    End If
End Sub
Конечно, диалог подобный выглядит довольно убого, особенно на современных операционных системах. Но он работает в любых версиях офиса и в любом приложении, в том числе в Outlook. Порой это бывает полезней красоты.
Скачать пример:
 Tips_Macro_GetOpenFileFolder.xls (100,0 KiB, 3 740 скачиваний)
Диалог сохранения файла SaveAs
Еще один вид диалогового окна — запрос имени и места сохранения файла.
Параметры:
Application.GetSaveAsFilename([InitialFileName], [FileFilter], [FilterIndex], [Title], [ButtonText])
Универсальный диалог, работающий во всех версиях Excel, начиная с 2000
| InitialFileName |
Можно указать путь и имя файла, которые будут использованы в качестве шаблона для сохранения. По умолчанию в диалоге отображается папка, которая была использована в последний раз в текущем сеансе Excel. Если диалог вызывается впервые, то будет показана для сохранения файлов по умолчанию(задается из самого Excel: Файл(File) —Параметры(Options) —Сохранение(Save) —Расположение локальных файлов по умолчанию(Default local file location)). Показываем диалог со стартовой папкой на той книге, в которой сам макрос, без указания имени сохраняемой книги: sToSavePath = Application.GetSaveAsFilename(InitialFileName:=ThisWorkbook.Path) Показываем диалог со стартовой папкой на той книге, в которой сам макрос и именем сохраняемой книги «SaveAs.xlsm»: sToSavePath = Application.GetSaveAsFilename(InitialFileName:="SaveAs.xlsm", FileFilter:="Excel files (*.xlsm), *.xlsm") Здесь следует обратить внимание на один важный момент: если необходимо помимо стартовой папки указать еще и имя файла, то в обязательном порядке надо указывать так же аргумент FileFilter. Если его не указывать, то InitialFileName просто откроет указанную папку, т.к. не поймет файлы какого типа надо отображать. Либо вместо «SaveAs.xlsm» надо будет указывать «SaveAs.*», что я лично настоятельно не рекомендую делать. |
| FileFilter | Указываются типы файлов, которые будут отображаться в диалоговом окне выбора. Должен совпадать с тем типом, с которым собираемся сохранять файл. Например, если указать «Excel files(*.xls*),*.xls*», то возможно будет выбрать только тип файлов Excel(с расширением, начинающимся на .xls — .xls, .xlsx, .xlsb, .xlsm и т.д.). Если указать «Text files(*.txt),*.txt», то только текстовые файлы с расширением .txt. Так же можно указать более одного типа расширений: «Excel files(*.xls*),*.xls*,Text files(*.txt),*.txt». По умолчанию тип файлов в диалоговом окне будет принадлежать первому указанному типу файлов(*.xls*). Но можно указать любой из перечисленных типов при помощи аргумента FilterIndex. Так же можно указать выбор любых типов файлов: «All files(*.*),*.*» |
| FilterIndex |
Если аргументом FileFilter указано более одного типа файлов(расширений), то этот аргумент указывает какой именно тип использовать. Например, следующая строка по умолчанию назначает выбор и сохранение файла в текстовый:
avFiles = Application.GetSaveAsFilename _
    (InitialFileName:=ThisWorkbook.Path, FileFilter:="Excel files(*.xls*),*.xls*,Text files(*.txt),*.txt", FilterIndex:=2)
|
| Title | Текст заголовка диалогового окна. Если указать «Выбрать текстовые или Excel файлы», то именно этот текст будет в заголовке. Если не указывать, то будет текст по умолчанию(нечто вроде «Сохранение документа») |
| ButtonText | Данный аргумент доступен только для ПК под управлением Macintosh(MAC). Назначает текст для кнопки диалогового окна Сохранить. Для владельцев Windows этот текст всегда будет «Сохранить» |

Что еще важно знать: сам по себе вызов диалога GetSaveAsFilename ничего не сохраняет — он только создает путь для сохраняемого файла. Сохранять придется принудительно после выбора места и имени.
Пример применения диалога Application.GetSaveAsFilename
Sub ShowGetSaveAsDialod()
    Dim sToSavePath
    sToSavePath = Application.GetSaveAsFilename( _
             InitialFileName:=ThisWorkbook.Path, _
             FileFilter:="Excel files(*.xls*),*.xls*,Text files(*.txt),*.txt", _
             FilterIndex:=2, _
             Title:="Сохранить файл")
    'если нажали Отмена - завершаем процедуру ничего не сохраняя
    If VarType(sToSavePath) = vbBoolean Then
        Exit Sub
    End If
    'непосредственно сохранение файла
    ThisWorkbook.SaveAs Filename:=sToSavePath, FileFormat:=ThisWorkbook.FileFormat
End Sub
Здесь тоже есть нюанс — метод SaveAs имеет два важных аргумента:
1. Filename — путь и имя сохраняемого файла. Здесь должно быть все понятно. Указываем то, что выбрали в диалоге.
2. FileFormat — формат сохраняемого файла. При этом не текстовое представление(как в диалоге «xls» или «txt»), а одна из предустановленных констант формата файла. Вот основные константы:
| Константа Excel | Числовая константа | Расшифровка |
|---|---|---|
| xlOpenXMLWorkbookMacroEnabled | 51 | xlsm — книга Excel |
| xlOpenXMLWorkbookMacroEnabled | 52 | xlsm — книга Excel с поддержкой макросов |
| xlExcel12 | 50 | xlsb — двоичная книга Excel (с поддержкой макросов) |
| xlOpenXMLAddIn | 55 | xlam — надстройка Excel |
| xlOpenXMLTemplate | 54 | xltx — шаблон Excel |
| xlOpenXMLTemplateMacroEnabled | 53 | xltm — шаблон Excel с поддержкой макросов |
| xlExcel8 | 56 | xls — книга Excel(97 — 2003) |
| xlAddIn | 18 | xla — надстройка Excel(97 — 2003) |
| xlTemplate | 17 | xlt — шаблон Excel(97 — 2003) |
| xlCurrentPlatformText | -4158 | txt — текстовый файл с разделителями табуляции |
| xlUnicodeText | 42 | txt — текстовый файл в кодировке Юникод |
| xlCSV | 6 | csv — CSV(разделитель запятая) |
| xlCSVMSDOS | 24 | csv — CSV(MS — DOS) |
| XlFileFormat | 62 | csv — CSV UTF-8(разделитель запятая) |
| xlTypePDF | 0 | pdf — файл в формате PDF |
Пример использования констант в диалогах Application.GetSaveAsFilename
Сохраняем файл с форматом xlsm — файл с поддержкой макросов. Для этого ищем в таблице выше расширение xlsm и берем либо константу Excel либо числовую константу:
Sub ShowGetSaveAsDialod()
    Dim sToSavePath
    sToSavePath = Application.GetSaveAsFilename( _
             InitialFileName:=ThisWorkbook.Path & "Report.xlsm", _
             FileFilter:="Excel files(*.xlsm),*.xlsm")
    'если нажали Отмена - завершаем процедуру ничего не сохраняя
    If VarType(sToSavePath) = vbBoolean Then
        Exit Sub
    End If
    'непосредственно сохранение файла
    'используем встроенную константу Excel
    ThisWorkbook.SaveAs Filename:=sToSavePath, FileFormat:=xlOpenXMLWorkbookMacroEnabled
    'используем числовую константу
    'ThisWorkbook.SaveAs Filename:=sToSavePath, FileFormat:=52
End Sub
Любой метод: либо числовая константа, либо встроенная работают одинаково. Вопрос лишь в том, что лично для Вас будет удобнее и нагляднее.
Так же см.:
Работа с диалогами
Как запретить сообщения?
Статья помогла? Поделись ссылкой с друзьями!
![]() Видеоуроки
Видеоуроки
Поиск по меткам
Access
apple watch
Multex
Power Query и Power BI
VBA управление кодами
Бесплатные надстройки
Дата и время
Записки
ИП
Надстройки
Печать
Политика Конфиденциальности
Почта
Программы
Работа с приложениями
Разработка приложений
Росстат
Тренинги и вебинары
Финансовые
Форматирование
Функции Excel
акции MulTEx
ссылки
статистика
Выбор файлов в VBA Excel. Стандартный диалог Application.GetOpenFilename. Стартовая папка диалога выбора файлов.
Открытие диалога выбора файлов
Открытие диалога для выбора любого файла и записи его полного имени в ячейку «A1»:
|
Private Sub CommandButton1_Click() Range(«A1») = Application.GetOpenFilename End Sub |
В процессе выполнения этого кода VBA Excel открывается диалог с заголовком по умолчанию «Открытие файла» и возможностью выбора любого файла. При нажатии на кнопку «Открытие» полное имя выбранного файла запишется в ячейку «A1». При нажатии на кнопку «Отмена» или кнопку закрытия формы в ячейку «A1» запишется строка «Ложь».
Открытие диалога с заголовком «Выбор файла»:
|
Private Sub CommandButton1_Click() Range(«A1») = Application.GetOpenFilename (, , «Выбор файла») End Sub |
Открытие диалога выбора файлов с указанием одного фильтра:
|
Private Sub CommandButton1_Click() Range(«A1») = Application.GetOpenFilename («Файлы Excel 97-2003,*.xls», , «Выбор файла») End Sub |
Фильтр в этом коде VBA Excel представляет из себя пару: наименование фильтра и строка из знака подстановки «*» с расширением отбираемых файлов, разделенных «,». В данном случае в открытом диалоге будут видны файлы с расширением «.xls». Таких пар может быть несколько, как в следующем примере.
Открытие диалога выбора файлов с указанием трех фильтров файлов:
|
Private Sub CommandButton1_Click() Range(«A1») = Application.GetOpenFilename _ («Файлы Excel 97-2003,*.xls,Текстовые файлы,*.txt,Рисунки,*.jpg», , «Выбор файла») End Sub |
Выбрать один из фильтров можно из раскрывающегося списка диалога выбора файлов «Тип файлов».
Для справки:
Application.GetOpenFilename («Фильтры», номер, «Заголовок диалога»)
Аргумент номер — это номер по порядку фильтра в списке, отображаемого по умолчанию. Если номер отсутствует или превышает количество фильтров, то по умолчанию отображается первый в списке.
Стартовая папка диалога выбора файлов
При открытии стандартного диалога выбора файлов «Application.GetOpenFilename» по умолчанию, как стартовая, выбирается папка «Мои документы» в Windows XP, «Документы» в Windows 8, но, при желании, можно задать, как стартовую, и любую другую папку.
Для этого можно воспользоваться операторами ChDrive (смена текущего диска) и ChDir (смена текущего каталога). По умолчанию текущим является диск «С» в Windows XP, поэтому, если ваша папка находится на этом диске, то ChDrive можно пропустить.
Пример 1
Проверяем, какая папка является стартовой по умолчанию. При вызове процедуры из первого примера диалог откроется именно на этой папке. Если выбрать файл, в ячейку «A1» запишется полный путь к нему, а при отмене выбора, запишется «Ложь».
|
Private Sub CommandButton1_Click() Range(«A1») = Application.GetOpenFilename End Sub |
Пример 2
В этом примере кода VBA стартовой назначается папка D:Новая папка. Если пропустить оператор ChDrive "D", то по умолчанию стартовой все-равно останется папка «Мои документы».
|
Private Sub CommandButton1_Click() ‘Смена текущего диска: ChDrive «D» ‘Смена текущего каталога: ChDir «D:Новая папка» Range(«A1») = Application.GetOpenFilename End Sub |
Пример 3
Здесь стартовой назначается папка, в которой расположен исходный файл Excel с кодом.
|
Private Sub CommandButton1_Click() ‘Смена текущего диска: ChDrive Left(ThisWorkbook.Path, 1) ‘Смена текущего каталога: ChDir ThisWorkbook.Path Range(«A1») = Application.GetOpenFilename End Sub |
Имя диска может быть любым, в зависимости от имеющегося на вашем компьютере.
Смотрите, как с помощью VBA Excel можно открыть папку в проводнике Windows для просмотра.
- Список файлов
- Работа с файлами
Функции GetFileName и GetFilePath по сути аналогичны, и предназначены для вывода диалогового окна выбора файла
(при этом можно указать стартовую папку для поиска файла, и тип/расширение выбираемого файла)
Функция GetFilenamesCollection позволяет выборать сразу несколько файлов в одной папке.
Функция GetFolderPath работает также, только служит для вывода диалогового окна выбора папки.
Function GetFolderPath(Optional ByVal Title As String = "Выберите папку", _
                       Optional ByVal InitialPath As String = "c:") As String
    ' функция выводит диалоговое окно выбора папки с заголовком Title,
    ' начиная обзор диска с папки InitialPath
    ' возвращает полный путь к выбранной папке, или пустую строку в случае отказа от выбора
    Dim PS As String: PS = Application.PathSeparator
    With Application.FileDialog(msoFileDialogFolderPicker)
        If Not Right$(InitialPath, 1) = PS Then InitialPath = InitialPath & PS
        .ButtonName = "Выбрать": .Title = Title: .InitialFileName = InitialPath
        If .Show <> -1 Then Exit Function
        GetFolderPath = .SelectedItems(1)
        If Not Right$(GetFolderPath, 1) = PS Then GetFolderPath = GetFolderPath & PS
    End With
End Function

Sub ПримерИспользования_GetFolderPath()
    ПутьКПапке = GetFolderPath("Заголовок окна", ThisWorkbook.Path)   ' запрашиваем имя папки
    If ПутьКПапке = "" Then Exit Sub    ' выход, если пользователь отказался от выбора папки
    MsgBox "Выбрана папка: " & ПутьКПапке, vbInformation
End Sub
Function GetFilePath(Optional ByVal Title As String = "Выберите файл для обработки", _
                     Optional ByVal InitialPath As String = "c:", _
                     Optional ByVal FilterDescription As String = "Книги Excel", _
                     Optional ByVal FilterExtention As String = "*.xls*") As String
    ' функция выводит диалоговое окно выбора файла с заголовком Title,
    ' начиная обзор диска с папки InitialPath
    ' возвращает полный путь к выбранному файлу, или пустую строку в случае отказа от выбора
    ' для фильтра можно указать описание и расширение выбираемых файлов
    On Error Resume Next
    With Application.FileDialog(msoFileDialogOpen)
        .ButtonName = "Выбрать": .Title = Title: .InitialFileName = InitialPath
        .Filters.Clear: .Filters.Add FilterDescription, FilterExtention
        If .Show <> -1 Then Exit Function
        GetFilePath = .SelectedItems(1): PS = Application.PathSeparator
    End With
End Function

Sub ПримерИспользования_GetFilePath()
    ИмяФайла = GetFilePath("Выберите файл Word", , "Документы Word", "*.doc") ' запрашиваем имя файла
    If ИмяФайла = "" Then Exit Sub    ' выход, если пользователь отказался от выбора файла
    MsgBox "Выбран файл: " & ИмяФайла, vbInformation
End Sub
Ниже представлены функции для вызова диалоговых окон выбора файлов и папок средствами VBA.
Функции GetFileName и GetFilePath по сути аналогичны, и предназначены для вывода диалогового окна выбора файла
(при этом можно указать стартовую папку для поиска файла, и типрасширение выбираемого файла)
Функция GetFilenamesCollection позволяет выборать сразу несколько файлов в одной папке.
Функция GetFolderPath работает аналогично, только служит для вывода диалогового окна выбора папки.
Function GetFileName(Optional ByVal Title As String = "Выберите файл для обработки", _
                     Optional ByVal InitialPath, _
                     Optional ByVal MyFilter As String = "Книги Excel (*.xls*),") As String
    ' функция выводит диалоговое окно выбора папки с заголовком Title,
    ' начиная обзор диска с папки InitialPath
    ' возвращает полный путь к выбранной папке, или пустую строку в случае отказа от выбора
    If Not IsMissing(InitialPath) Then
        On Error Resume Next: ChDrive Left(InitialPath, 1)
        ChDir InitialPath    ' выбираем стартовую папку
    End If
    res = Application.GetOpenFilename(MyFilter, , Title, "Открыть")  ' вывод диалогового окна
    GetFileName = IIf(VarType(res) = vbBoolean, "", res)    ' пустая строка при отказе от выбора
End Function

Sub ПримерИспользования_GetFileName()
    ИмяФайла = GetFileName("Заголовок окна", ThisWorkbook.Path)   ' запрашиваем имя файла
    ' ===================== другие варианты вызова функции =====================
    ' текстовые файлы, стартовая папка не указана
    '       ИмяФайла = GetFileName("Выберите текстовый файл", , "Текстовые файлы (*.txt),")
    ' файлы любого типа из папки "C:Windows"
    '       ИмяФайла = GetFileName(, "C:Windows", "")
    ' ==========================================================================

    If ИмяФайла = "" Then Exit Sub    ' выход, если пользователь отказался от выбора файла
    MsgBox "Выбран файл: " & ИмяФайла, vbInformation
End Sub
Function GetFolderPath(Optional ByVal Title As String = "Выберите папку", _
                       Optional ByVal InitialPath As String = "c:") As String
    ' функция выводит диалоговое окно выбора папки с заголовком Title,
    ' начиная обзор диска с папки InitialPath
    ' возвращает полный путь к выбранной папке, или пустую строку в случае отказа от выбора
    Dim PS As String: PS = Application.PathSeparator
    With Application.FileDialog(msoFileDialogFolderPicker)
        If Not Right$(InitialPath, 1) = PS Then InitialPath = InitialPath & PS
        .ButtonName = "Выбрать": .Title = Title: .InitialFileName = InitialPath
        If .Show <> -1 Then Exit Function
        GetFolderPath = .SelectedItems(1)
        If Not Right$(GetFolderPath, 1) = PS Then GetFolderPath = GetFolderPath & PS
    End With
End Function

Sub ПримерИспользования_GetFolderPath()
    ПутьКПапке = GetFolderPath("Заголовок окна", ThisWorkbook.Path)   ' запрашиваем имя папки
    ' ===================== другие варианты вызова функции =====================
    ' стартовая папка не указана, заголовок окна по умолчанию
    '       ПутьКПапке = GetFolderPath
    ' обзор папок начинается с папки "Рабочий стол"
    '       СтартоваяПапка = CreateObject("WScript.Shell").SpecialFolders("Desktop")
    '       ПутьКПапке = GetFolderPath("Выберите папку на рабочем столе", СтартоваяПапка)
    ' ==========================================================================

    If ПутьКПапке = "" Then Exit Sub    ' выход, если пользователь отказался от выбора папки
    MsgBox "Выбрана папка: " & ПутьКПапке, vbInformation
End Sub
Function GetFilePath(Optional ByVal Title As String = "Выберите файл для обработки", _
                     Optional ByVal InitialPath As String = "c:", _
                     Optional ByVal FilterDescription As String = "Книги Excel", _
                     Optional ByVal FilterExtention As String = "*.xls*") As String
    ' функция выводит диалоговое окно выбора файла с заголовком Title,
    ' начиная обзор диска с папки InitialPath
    ' возвращает полный путь к выбранному файлу, или пустую строку в случае отказа от выбора
    ' для фильтра можно указать описание и расширение выбираемых файлов
    On Error Resume Next
    With Application.FileDialog(msoFileDialogOpen)
        .ButtonName = "Выбрать": .Title = Title: .InitialFileName = InitialPath
        .Filters.Clear: .Filters.Add FilterDescription, FilterExtention
        If .Show <> -1 Then Exit Function
        GetFilePath = .SelectedItems(1): PS = Application.PathSeparator
    End With
End Function

Sub ПримерИспользования_GetFilePath()
     ИмяФайла = GetFilePath("Выберите файл Word", , "Документы Word", "*.doc") ' запрашиваем имя файла
    ' ===================== другие варианты вызова функции =====================
    ' текстовые файлы, стартовая папка не указана
    '       ИмяФайла = GetFilePath("Выберите текстовый файл", , "Текстовые файлы", "*.txt")
    ' файлы любого типа из папки "C:Windows"
    '       ИмяФайла = GetFilePath(, "C:Windows", , "*")
    ' ==========================================================================

    If ИмяФайла = "" Then Exit Sub    ' выход, если пользователь отказался от выбора файла
    MsgBox "Выбран файл: " & ИмяФайла, vbInformation
End Sub
Function GetFilenamesCollection(Optional ByVal Title As String = "Выберите файлы для обработки", _
                             Optional ByVal InitialPath As String = "c:") As FileDialogSelectedItems
    ' функция выводит диалоговое окно выбора нескольких файлов с заголовком Title,
    ' начиная обзор диска с папки InitialPath
    ' возвращает массив путей к выбранным файлам, или пустую строку в случае отказа от выбора
    With Application.FileDialog(3) ' msoFileDialogFilePicker
        .ButtonName = "Выбрать": .Title = Title: .InitialFileName = InitialPath
        If .Show <> -1 Then Exit Function
        Set GetFilenamesCollection = .SelectedItems
    End With
End Function

Sub ПримерИспользования_GetFilenamesCollection()
    Dim СписокФайлов As FileDialogSelectedItems
    Set СписокФайлов = GetFilenamesCollection("Заголовок окна", ThisWorkbook.Path)   ' выводим окно выбора
    ' ===================== другие варианты вызова функции =====================
    ' стартовая папка не указана, заголовок окна по умолчанию
           Set СписокФайлов = GetFilenamesCollection
    ' обзор файлов начинается с папки "Рабочий стол"
           СтартоваяПапка = CreateObject("WScript.Shell").SpecialFolders("Desktop")
           Set СписокФайлов = GetFilenamesCollection("Выберите файлы на рабочем столе", СтартоваяПапка)
    ' ==========================================================================

    If СписокФайлов Is Nothing Then Exit Sub  ' выход, если пользователь отказался от выбора файлов
    For Each File In СписокФайлов
        Debug.Print File
    Next
End Sub
Ещё один вариант кода (который я использую) для выбора файла
Его отличие — функция запоминает папку, из которой последний раз выбирался файл,
и при повторном запуске диалогового окна выбора файла,
обзор папок будет начат с той папки, откуда последний раз был взят файл.
Sub AttachFile_test()    ' пример использования
    Filename$ = GetFilePath()
    If Filename$ = "" Then Exit Sub
    MsgBox "Выбран файл: " & Filename$
End Sub

Function GetFilePath(Optional ByVal Title As String = "Выберите файл для обработки", _
                     Optional ByVal InitialPath As String = "c:", _
                     Optional ByVal FilterDescription As String = "Файлы счетов", _
                     Optional ByVal FilterExtention As String = "*.*") As String
    On Error Resume Next
    With Application.FileDialog(msoFileDialogOpen)
        .ButtonName = "Выбрать": .Title = Title:
        .InitialFileName = GetSetting(Application.Name, "GetFilePath", "folder", InitialPath)
        .Filters.Clear: .Filters.Add FilterDescription, FilterExtention
        If .Show <> -1 Then Exit Function
        GetFilePath = .SelectedItems(1)
        folder$ = Left(.SelectedItems(1), InStrRev(.SelectedItems(1), ""))
        SaveSetting Application.Name, "GetFilePath", "folder", folder$
    End With
End Function
- 214422 просмотра
Не получается применить макрос? Не удаётся изменить код под свои нужды?
Оформите заказ у нас на сайте, не забыв прикрепить примеры файлов, и описать, что и как должно работать.
Excel VBA allows you to open a workbook directly — all you need is the full path of the file, including the file name. However, locating and supplying the file path each time may can be tedious when working with multiple files. In this guide, we’re going to show you how to display File Open dialog in VBA.
Download Workbook
Opening a workbook in VBA
You can open workbooks in VBA using the Workbooks.Open method. This method accepts fifteen optional arguments, including the file name of the workbook you want to open.
Workbooks.Open (FileName, UpdateLinks, ReadOnly, Format, Password, WriteResPassword, IgnoreReadOnlyRecommended, Origin, Delimiter, Editable, Notify, Converter, AddToMru, Local, CorruptLoad)
Supply the file name with its full path to open the workbook.
Workbooks.Open «C:My DocumentsJuneIncome.xlsx»
Or
Workbooks.Open Filename:=»C:My DocumentsJuneIncome.xlsx»
Either line of code can open the workbook in the given path. The opened workbook becomes the active workbook.
Check out other optional arguments to determine how you want to open your workbook, such as in read-only mode, by updating external links, or with a password. Here is the documentation.
Displaying File Open dialog
File Open dialog can return the file name, which is needed for Workbooks.Open, along with its path. To display the File Open dialog, you need to call the Application.GetOpenFilename method.
Application.GetOpenFilename (FileFilter, FilterIndex, Title, ButtonText, MultiSelect)
The Application.GetOpenFilename method can take five optional arguments using which you can select the accepted file types, title of the dialog, or allow selecting multiple files.
To open the dialog in default state (without any filtering and ability to select single file) use it without any arguments. Assign the command to a string variable to set the variable with selected file’s full path.
Dim FullFileName as String
FullFileName = Application.GetOpenFilename
File Filter
On the other hand, applying a filter can be helpful in giving the end user only the files they need. You can use FileFilter to set filters on the Open File dialog box.

The FileFilter argument accepts a special string specifying file filtering criteria. You need to supply file types as friendly name — file type pairs. Each pair, name and type is separated by a comma (,) character.
friendly name 1, file type 1, friendly name 2, file type 2, …
If a friendly name covers multiple types, use semicolon characters to split file types:
friendly name 1, file type 1; file type 2; file type …, friendly name 2, file type 4; file type 5; file type …, …
Here is an example for displaying the dialog that accepts Excel Files only.
FullFileName = Application.GetOpenFilename(FileFilter:=»Excel Files,*.xl*»)
The following sample demonstrates the scenario at the above screenshot which displays two items as filters:
ExternalFileName = Application.GetOpenFilename(FileFilter:=»Excel Files,*.xl*;*.xm*,Text Files,*.txt;*.csv»)
Multiple Files
Another important feature of the Open File dialog is its ability to allow selecting multiple files. If the MultiSelect argument is set to True, the Open File dialog returns each selected file name in an array. Thus, you need to assign the dialog to a Variant type of variable instead of String.
Dim ExternalFileName As Variant
ExternalFileName = Application.GetOpenFilename(FileFilter:=»Excel Files,*.xl*,Text Files,*.txt;*.csv», MultiSelect:=True)

When you click the Open button, the assigned variable will have an array of filenames with paths. A common scenario is to use a loop to access each file name.
For i = LBound(ExternalFileName) To UBound(ExternalFileName)
    Workbooks.Open ExternalFileName(i)
Next i
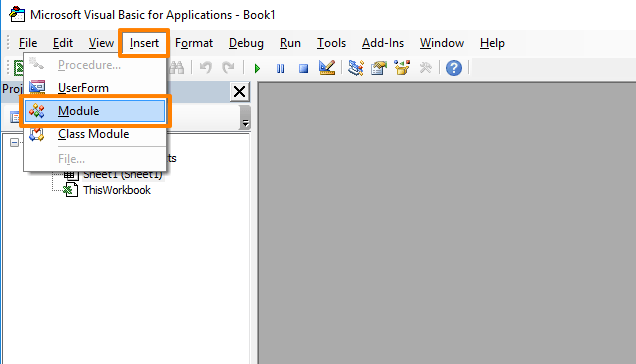
Before start, you need to open the VBA (Visual Basic for Applications) window and add a module. A module is where you can write code.
- Press Alt + F11 to open the VBA window
- In the VBA window, click Insert on the toolbar
- Click the Module option

Open a single workbook
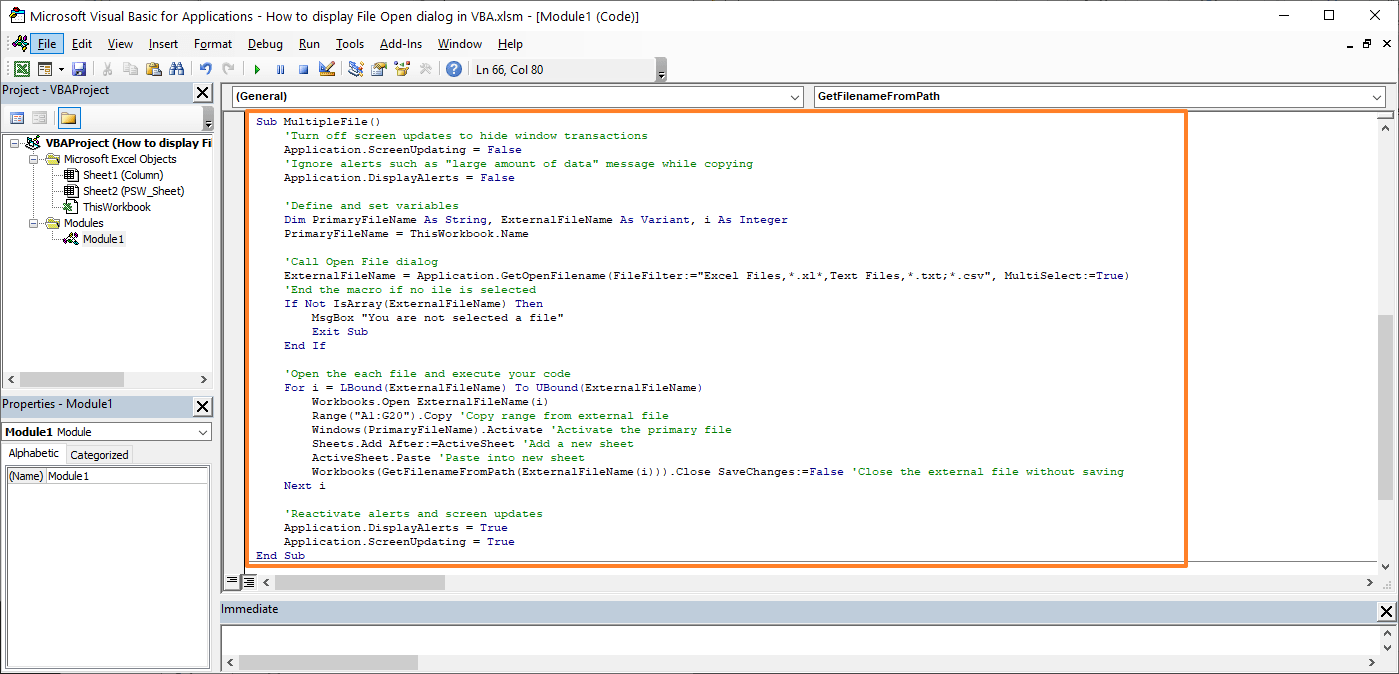
The following code displays the Open File dialog for Excel and some text files by allowing to select a single file only. After file name and path are set to the string variable, the code can copy content from the opened file to the existing file. You can simply copy this code and paste your VBA.

Note: GetFilenameFromPath is a custom function which parse the file name from the full path. You can find its code in the example file.
Open multiple workbooks
This time Application.GetOpenFilename method is updated for multiple file selection. You can see the MultiSelect:=True argument in the code below. This is an example where the code was modified to execute same action in a loop.
Sub SingleFile()
    'Turn off screen updates to hide window transactions
    Application.ScreenUpdating = False
    'Ignore alerts such as "large amount of data" message while copying
    Application.DisplayAlerts = False

    'Define and set variables
    Dim PrimaryFileName As String, ExternalFileName As String
    PrimaryFileName = ThisWorkbook.Name

    'Call Open File dialog
    ExternalFileName = Application.GetOpenFilename(FileFilter:="Excel Files,*.xl*,Text Files,*.txt;*.csv")
    'End the macro if no ile is selected
    If ExternalFileName = False Then
        MsgBox "You are not selected a file"
        Exit Sub
    End If

    'Open the specified file and execute your code
    Workbooks.Open ExternalFileName
    Range("A1:G20").Copy 'Copy range from external file
    Windows(PrimaryFileName).Activate 'Activate the primary file
    Sheets.Add After:=ActiveSheet 'Add a new sheet
    ActiveSheet.Paste 'Paste into new sheet
    Workbooks(GetFilenameFromPath(ExternalFileName)).Close SaveChanges:=False 'Close the external file without saving

    'Reactivate alerts and screen updates
    Application.DisplayAlerts = True
    Application.ScreenUpdating = True
End Sub
VBA allows you to choose a file to open using the Application.GetOpenFilename method. In this tutorial, you will learn how to open a file dialog and set parameters.
If you want to learn how to open and close a file, you can click on this link: VBA Open/Close File
Open a File Dialog in VBA
If you want to open a file in VBA, first you need to open a file dialog for choosing a file. Here is the code:
Dim strFile As String

strFile = Application.GetOpenFilename(FileFilter:="Excel files (*.xlsx*), *.xlsx*", Title:="Choose an Excel file to open", MultiSelect:=True)
As you can see, the method has several parameters. FileFilter allows you to filter file types which you need, in our case .xlsx files.
In the Title parameter, you can set a title of the dialog box. If you want to allow opening multiple files, you need to set MultipleSelect to True. If you don’t set this parameter, only one file can be selected.
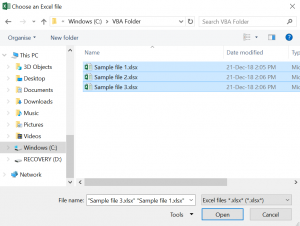
Image 1. Open a file dialog
As you can see in Image 1, the dialog box appears with the title Choose an Excel file. Only Excel files are filtered and we can select multiple files.
Open a File Dialog Box in a Specific Folder
If you want to open a dialog box in a specific folder, you have to use the method .FileDialog with the parameter msoFileDialogFilePicker. In the example, we will open a dialog box in the folder C:VBA Folder. Here is the code:
Dim fd As Office.FileDialog
Dim strFile As String

Set fd = Application.FileDialog(msoFileDialogFilePicker)

With fd

    .Filters.Clear
    .Filters.Add "Excel Files", "*.xlsx?", 1
    .Title = "Choose an Excel file"
    .AllowMultiSelect = False

    .InitialFileName = "C:VBA Folder"

    If .Show = True Then

        strFile = .SelectedItems(1)

    End If

End With
First you need to declare the variable fd type Office.FileDialog and the string variable for file taking:
Dim fd As Office.FileDialog
Dim strFile As String
After this, you need to set fd to Application.FileDialog(msoFileDialogFilePicker):
Set fd = Application.FileDialog(msoFileDialogFilePicker)Now, within With fd End With, we can set multiple parameters:
.Filters.Clear

.Filters.Add "Excel Files", "*.xlsx?", 1

.Title = "Choose an Excel file"

.AllowMultiSelect = False
Here we clear the file filters (.Filters.Clear) and set it to .xlsx (.Filters.Add “Excel Files”, “*.xlsx?”, 1).
Also, we can set the title of the dialog box: .Title = “Choose an Excel file”.
We can limit a user to select only one file by:
.AllowMultiSelect = FalseTo open a dialog box in the folder we want, we need to put this line of the code:
.InitialFileName = "C:VBA Folder"At the end we will just open the dialog box with all the parameters previously set:
If .Show = True Then

    strFile = .SelectedItems(1)

End If
When we execute this code, the dialog box for file opening appears in the folder C:VBA Folder:
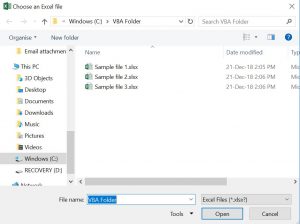
Image 2. Open a file dialog in a specific folder
VBA Coding Made Easy
Stop searching for VBA code online. Learn more about AutoMacro — A VBA Code Builder that allows beginners to code procedures from scratch with minimal coding knowledge and with many time-saving features for all users!

Learn More!
Macro Objective
Our objective is to write a simple macro that prompts the user for a file using a traditional “file open” dialog box. With this information, we will open the file in the background, copy a range of data, paste it into our active worksheet, then close the user-selected file.
Open the VBA Editor to Start Writing Code
Begin by opening the Visual Basic Editor by pressing ALT-F11 on the keyboard.
The process of presenting a dialog box to open files can be accomplished by accessing a built-in method of the Application object. The method is called GetOpenFilename.
To use the GetOpenFilename method in a macro, start a new procedure and enter the following code.
Sub Get_Data_From_File()
	Application.GetOpenFilename
End Sub

That’s it!
To test, run the macro to watch as Excel presents us with the Open dialog box.
Notice that the title of the dialog box is “Open” and the default file type filter is to display all file types.

These are customizable options.
If we cancel the macro or select a file and click Open, nothing happens.
This is because the purpose of the GetOpenFilename method is to capture the name of a selected file; nothing more. The act of opening the file would need to be performed by a separate piece of code.
To make this method useful, we will store the selected file in a variable then use the variable in an Open method to perform the file open operation.
Customizing the GetOpenFilename Method
The syntax for the GetOpenFilename method is:
GetOpenFilename( FileFilter, FilterIndex, Title, ButtonText, MultiSelect)There are several customizable options with the GetOpenFilename method.
- FileFilter –defines the pattern by which files are filtered. If you only wish to display text files (files with a .TXT or .CSV extension) you would define the filter as (“Text Files (*.TXT; *.CSV), *.txt; *.csv”).
- FilterIndex – specifies the default filter from the list supplied in the FileFilter If not defined, the first item in the list is selected as the default.
- Title – specifies the text to be displayed in the title bar of the dialog box.
- ButtonText – customizes the text for the buttons (Macintosh only).
- MultiSelect – Use TRUE to allow multiple files to be selected. Use FALSE to only allow a single file selection. FALSE is the default choice.
If you’d like to understand how to use MultiSelect correctly, check out the complete course.
Updating the Code
The following are modifications we will make to our existing code:
- We want to capture the user’s selection in a variable named “FileToOpen”. This will be declared as a string data type.
- We will use an SET assignment statement to place the user’s selection in the “FileToOpen” variable.
- We will customize the title of the dialog box to read “Browse for your File & Import Range”.
- Finally, we will only display Excel files in the dialog box; i.e. files ending in .XLS, .XLSX, .XLSM, or .XLSB.
Using the argument positions to define the options, the updated code will appear as follows:
Sub Get_Data_From_File()
Dim FileToOpen as String
	FileToOpen = Application.GetOpenFilename(“Excel Files (*.xls*), *xls*”, , “Browse for your File & Import Range”)
End Sub
(click image to zoom)
Using the option titles to define the options, the updated code can be made more readable:
Sub Get_Data_From_File()
Dim FileToOpen as String
	FileToOpen = Application.GetOpenFilename(Title:=“Browse for your File & Import Range”, FileFilter:= “Excel Files (*.xls*), *xls*”)
End Sub

(click image to zoom)
Testing the Code
When we run the code, we are presented with the following (note the custom title and filters):

Selecting a file and clicking Open returns us back to Excel with no action. We’re still not convinced anything happened.
To see the user’s file selection captured as a variable, perform the following:
- Add a breakpoint to the “End Sub” step of the code (click the light gray column to the left of the “End Sub” line of code)
- Highlight the “FileToOpen” variable
- Right-click the highlighted variable and select “Add Watch…”
- Click OK to add the watch (the Watch window will open automatically)


(click image to zoom)
Run the code.
After selecting a test file and clicking Open, the code will pause on the final line.
Examining the Watch window, we can see the selected file name has been captured and stored in the “FileToOpen” variable. (NOTE: You can also hover your mouse pointer over any reference to “FileToOpen” and observe a pop-up that displays the variable’s contents.)

(click image to zoom)
Cancelling Our Choice
Suppose the user cancels the Open dialog box. How will the code respond to this action?
If we launch the code and press the Cancel button without selecting a file, the GetOpenFilename method returns a “False” response and stores it in our “FileToOpen” variable.

(click image to zoom)
Because the “FileToOpen” variable was declared as a string data type, the word “False” will be interpreted as the filename to be opened.
Fixing the Code
Because we want to capture a text string when the user selects a file or capture a Boolean response when the user clicks the Cancel button, we need to change the data type of our “FileToOpen” variable to a Variant data type.
Dim FileToOpen as VariantDim FileToOpen as Variant
If we execute the code with this modification, we can see when we pause on the last line that the “FileToOpen” variable is holding a Boolean FALSE response, not a text response.

(click image to zoom)
We will test the “FileToOpen” variable for the presence of a Boolean FALSE. If the variable is NOT False, we will execute the remainder of the code. Otherwise, we will do nothing.
Sub Get_Data_From_File()
Dim FileToOpen As Variant
	FileToOpen = Application.GetOpenFilename(Title:="Browse for your File & Import Range", FileFilter:="Excel Files (*.xls*),*xls*")
	If FileToOpen <> False Then
		(Things happen here)
	End If
End Sub
(click image to zoom)
The below code contains instructions for what is to be performed when a valid filename is supplied.
We have added an additional variable named “OpenBook” to store the contents of the selected file. The “OpenBook” variable is declared as a Workbook data type.
The additional code will perform the following tasks:
- Open the selected file
- Store the contents of the file in the variable “OpenBook”
- Select the first sheet in the workbook
- Copy the contents of cells A1 through E20
- Paste the copied data as values into the file named “SelectFile” starting in cell A10
- Close the workbook selected by the user
Sub Get_Data_From_File()
Dim FileToOpen As Variant
Dim OpenBook as Workbook
	FileToOpen = Application.GetOpenFilename(Title:="Browse for your File & Import Range", FileFilter:="Excel Files (*.xls*),*xls*")
	If FileToOpen <> False Then
		Set OpenBook = Application.Workbooks.Open(FileToOpen)
		OpenBook.Sheets(1).Range("A1:E20").Copy
		ThisWorkbook.Worksheets("SelectFile").Range("A10").PasteSpecial xlPasteValues
		OpenBook.Close False
	End If
End Sub

(click image to zoom)
Optimizing the Code
To reduce screen flicker when opening background files, we will add the “Application.ScreenUpdating” toggle to our code.
We will place the toggle at the beginning with a FALSE setting and the same toggle at the end of the code with a TRUE setting.
Sub Get_Data_From_File()
Dim FileToOpen As Variant
Dim OpenBook as Workbook
Application.ScreenUpdating = False
	(Original OPEN and IF operations go here)
Application.ScreenUpdating = True
End Sub
BONUS: Defining Multiple Filters with Defaults
If you wish to filter for a variety of file type; such as Excel files, text files, or all files, you can define your FileFilter argument as follows:
Application.GetOpenFilename("Excel Files (*xls*), *xls*, Text Files (*.TXT), *.txt, All Files (*.*), *.*")Notice when run, the list has been filtered for Excel files, but you are provided a dropdown to select one of the other two categories of files.

If we add a value to the FilterIndex option, we can pre-select one of the defined filters to be a default choice. For our three filters, we would define the following values:
1 – for Excel files
2 – for Text files
3 – for All files
The updated code will appear as follows if we wish for Text files to be the default filter selection.
Application.GetOpenFilename("Excel Files (*xls*), *xls*, Text Files (*.TXT), *.txt, All Files (*.*), *.*", 2)
Practice Workbook
Feel free to Download the Workbook HERE.
![]()
Published on: September 26, 2019
Last modified: February 28, 2023


Leila Gharani
I’m a 5x Microsoft MVP with over 15 years of experience implementing and professionals on Management Information Systems of different sizes and nature.
My background is Masters in Economics, Economist, Consultant, Oracle HFM Accounting Systems Expert, SAP BW Project Manager. My passion is teaching, experimenting and sharing. I am also addicted to learning and enjoy taking online courses on a variety of topics.
| title | keywords | f1_keywords | ms.prod | api_name | ms.assetid | ms.date | ms.localizationpriority |
|---|---|---|---|---|---|---|---|
|
Application.GetOpenFilename method (Excel) |
vbaxl10.chm133142 |
vbaxl10.chm133142 |
excel |
Excel.Application.GetOpenFilename |
83931dc2-59b3-550b-6ce1-880413fd23d6 |
04/04/2019 |
high |
Application.GetOpenFilename method (Excel)
Displays the standard Open dialog box and gets a file name from the user without actually opening any files.
Syntax
expression.GetOpenFilename (FileFilter, FilterIndex, Title, ButtonText, MultiSelect)
expression A variable that represents an Application object.
Parameters
| Name | Required/Optional | Data type | Description |
|---|---|---|---|
| FileFilter | Optional | Variant | A string specifying file filtering criteria. |
| FilterIndex | Optional | Variant | Specifies the index numbers of the default file filtering criteria, from 1 to the number of filters specified in FileFilter. If this argument is omitted or greater than the number of filters present, the first file filter is used. |
| Title | Optional | Variant | Specifies the title of the dialog box. If this argument is omitted, the title is «Open.» |
| ButtonText | Optional | Variant | Macintosh only. |
| MultiSelect | Optional | Variant | True to allow multiple file names to be selected. False to allow only one file name to be selected. The default value is False. |
Return value
Variant
Remarks
This string passed in the FileFilter argument consists of pairs of file filter strings followed by the MS-DOS wildcard file filter specification, with each part and each pair separated by commas. Each separate pair is listed in the Files of type drop-down list box. For example, the following string specifies two file filters—text and addin:
"Text Files (*.txt), *.txt,Add-In Files (*.xla), *.xla"
To use multiple MS-DOS wildcard expressions for a single file filter type, separate the wildcard expressions with semicolons; for example: "Visual Basic Files (*.bas; *.txt), *.bas;*.txt".
If FileFilter is omitted, this argument defaults to "All Files (*.*), *.*".
This method returns the selected file name or the name entered by the user. The returned name may include a path specification. If MultiSelect is True, the return value is an array of the selected file names (even if only one file name is selected). Returns False if the user cancels the dialog box.
This method may change the current drive or folder.
Example
This example displays the Open dialog box, with the file filter set to text files. If the user chooses a file name, the code displays that file name in a message box.
fileToOpen = Application _
 .GetOpenFilename("Text Files (*.txt), *.txt")
If fileToOpen <> False Then
 MsgBox "Open " & fileToOpen
End If
[!includeSupport and feedback]
Often in VBA we need to ask the users to select files or directories before we execute the actual functionality of our macro. Welcome to the VBA Open file dialog post. Today we will learn how to use the Application.FileDialog, to understand the various msoFileDialogFilePicker file dialog picking options and how to properly manage these dialogs.
Here is a simple example of a VBA File Dialog:
Dim fDialog As FileDialog
Set fDialog = Application.FileDialog(msoFileDialogFilePicker)

'Show the dialog. -1 means success!
If fDialog.Show = -1 Then
   Debug.Print fDialog.SelectedItems(1) 'The full path to the file selected by the user
End If
Application FileDialog function
Before we start let’s understand the Application.FileDialog function.
The Application.FileDialog has the following syntax:
Application.FileDialog( fileDialogType as MsoFileDialogType )
Parameter
MsoFileDialogType
An enumeration defining the type of file dialog to open. It has the following values:
| Value | Description |
|---|---|
| msoFileDialogOpen | Open dialog box |
| msoFileDialogSaveAs | Save As dialog box |
| msoFileDialogFilePicker | File picker dialog box |
| msoFileDialogFolderPicker | Folder picker dialog box |
Properties and functions
FileDialog properties
| Property | Description |
|---|---|
| AllowMultiSelect | Allow to select more than one file or folder |
| ButtonName | Text displayed on the action button of a file dialog box |
| DialogType | Change the MsoFileDialogType (see above) |
| Filter | Set a file filter to filter file types user can select |
| InitialFileName | The initial path to be opened e.g. C: |
| InitialView | The initial file view. Can be one of the following:
|
| SelectedItems | Collection of type FileDialogSelectedItems with all selected items |
| Title | Title of the Open file dialog window |
Select files – msoFileDialogFilePicker
 The msoFileDialogFilePicker dialog type allows you to select one or more files.
Select single files
The most common select file scenario is asking the user to select a single file. The code below does just that:
Dim fDialog As FileDialog, result As Integer
Set fDialog = Application.FileDialog(msoFileDialogFilePicker)

'Optional: FileDialog properties
fDialog.AllowMultiSelect = False
fDialog.title = "Select a file"
fDialog.InitialFileName = "C:"
'Optional: Add filters
fDialog.Filters.Clear
fDialog.Filters.Add "Excel files", "*.xlsx"
fDialog.Filters.Add "All files", "*.*"

'Show the dialog. -1 means success!
If fDialog.Show = -1 Then
   Debug.Print fDialog.SelectedItems(1)
End If

'Result: C:somefile.xlsx
Select multiple files
Quite common is a scenario when you are asking the user to select one or more files. The code below does just that. Notice that you need to set AllowMultiSelect to True.
Dim fDialog As FileDialog, result As Integer
Set fDialog = Application.FileDialog(msoFileDialogFilePicker)

'IMPORTANT!
fDialog.AllowMultiSelect = True

'Optional FileDialog properties
fDialog.title = "Select a file"
fDialog.InitialFileName = "C:"
'Optional: Add filters
fDialog.Filters.Clear
fDialog.Filters.Add "Excel files", "*.xlsx"
fDialog.Filters.Add "All files", "*.*"

'Show the dialog. -1 means success!
If fDialog.Show = -1 Then
  For Each it In fDialog.SelectedItems
    Debug.Print it
  Next it
End If

'Results:
'C:somefile.xlsx
'C:somefile1.xlsx
'C:somefile2.xlsx
Select folder – msoFileDialogFilePicker
 Selecting a folder is more simple than selecting files. However only a single folder can be select within a single dialog window.
Select folder example
The dialog below will ask the user to select a folder:
Set fDialog = Application.FileDialog(msoFileDialogFolderPicker) 'Important we use msoFileDialogFolderPicker instead of (...)FilePicker

'Optional: Properties
fDialog.title = "Select a folder"
fDialog.InitialFileName = "C:"

If fDialog.Show = -1 Then
  Debug.Print fDialog.SelectedItems(1)
End If
The msoFileDialogFolderPicker dialog allows you to only select a SINGLE folder and obviously does not support file folders
Open file – msoFileDialogOpen
 Opening files is much more simple as it usually involves a single file. The only difference between the behavior between Selecting and Opening files are button labels.
Open file example
The dialog below will ask the user to select a file to open:
Dim fDialog As FileDialog, result As Integer, it As Variant
Set fDialog = Application.FileDialog(msoFileDialogOpen)

'Optional: FileDialog properties
fDialog.title = "Select a file"
fDialog.InitialFileName = "C:"

'Optional: Add filters
fDialog.Filters.Clear
fDialog.Filters.Add "All files", "*.*"
fDialog.Filters.Add "Excel files", "*.xlsx"

If fDialog.Show = -1 Then
  Debug.Print fDialog.SelectedItems(1)
End If
Save file – msoFileDialogSaveAs
 Saving a file is similarly easy, and also only the buttons are differently named.
The save file dialog will in fact not save any files! It will just allow the user to select a filename for the file. You need to open the files for reading / writing yourself. Check out my post on how to write files in VBA
Save file example
The dialog below will ask the user to select a path to which a files is to be saved:
Dim fDialog As FileDialog, result As Integer, it As Variant
Set fDialog = Application.FileDialog(msoFileDialogSaveAs)

'Optional: FileDialog properties
fDialog.title = "Save a file"
fDialog.InitialFileName = "C:"

If fDialog.Show = -1 Then
  Debug.Print fDialog.SelectedItems(1)
End If
The msoFileDialogSaveAs dialog does NOT support file filters
FileDialog Filters
One of the common problems with working with the Application.FileDialog is setting multiple file filters. Below some common examples of how to do this properly. To add a filter for multiple files use the semicolor ;:
Dim fDialog As FileDialog
Set fDialog = Application.FileDialog(msoFileDialogOpen)
'...
'Optional: Add filters
fDialog.Filters.Clear
fDialog.Filters.Add "All files", "*.*"
fDialog.Filters.Add "Excel files", "*.xlsx;*.xls;*.xlsm"
fDialog.Filters.Add "Text/CSV files", "*.txt;*.csv"
'...
Be sure to clear your list of filters each time. The FileDialog has its nuisances and often filters are not cleared automatically. Hence, when creating multiple dialogs you might see filters coming from previous executed dialogs if not cleared and re-initiated properly.
The open file dialog will in fact not open any files! It will just allow the user to select files to open. You need to open the files for reading / writing yourself. Check out my posts:
- Read file in VBA
- Write file in VBA