
| title | keywords | f1_keywords | ms.prod | api_name | ms.assetid | ms.date | ms.localizationpriority |
|---|---|---|---|---|---|---|---|
|
Validation object (Excel) |
vbaxl10.chm531072 |
vbaxl10.chm531072 |
excel |
Excel.Validation |
59d29d1e-92d3-373e-04d0-0d7fe97e1878 |
04/03/2019 |
medium |
Validation object (Excel)
Represents data validation for a worksheet range.
Example
Use the Validation property of the Range object to return the Validation object. The following example changes the data validation for cell E5.
Range("e5").Validation _
 .Modify xlValidateList, xlValidAlertStop, "=$A$1:$A$10"
Use the Add method to add data validation to a range and create a new Validation object. The following example adds data validation to cell E5.
With Range("e5").Validation
 .Add Type:=xlValidateWholeNumber, _
 AlertStyle:=xlValidAlertInformation, _
 Minimum:="5", Maximum:="10"
 .InputTitle = "Integers"
 .ErrorTitle = "Integers"
 .InputMessage = "Enter an integer from five to ten"
 .ErrorMessage = "You must enter a number from five to ten"
End With
Methods
- Add
- Delete
- Modify
Properties
- AlertStyle
- Application
- Creator
- ErrorMessage
- ErrorTitle
- Formula1
- Formula2
- IgnoreBlank
- IMEMode
- InCellDropdown
- InputMessage
- InputTitle
- Operator
- Parent
- ShowError
- ShowInput
- Type
- Value
See also
- Excel Object Model Reference
[!includeSupport and feedback]
Содержание
- Метод Validation.Add (Excel)
- Синтаксис
- Параметры
- Замечания
- Пример
- Поддержка и обратная связь
- Excel VBA – How to Apply Data Validation Drop Down List Using VBA Macro
- CLICK HERE TO GET 5 FREE EXCEL TEMPLATES
- Name already in use
- VBA-Docs / api / Excel.Validation.Add.md
- Class Validation (Excel VBA)
- Methods
- Properties
- Mastering cell validation lists in Excel
- A complete guide to using dynamic cell validation lists successfully and look like a pro while you’re at it
- Too many blanks
- Too many items
- Error unreadable content in workbook
- Hybrids to the rescue
- Note on Named Ranges
- Note on calling the code
Метод Validation.Add (Excel)
Добавляет проверку данных в указанный диапазон.
Синтаксис
expression. Добавить (Type, AlertStyle, Operator, Formula1, Formula2)
Выражение Переменная, представляющая объект Проверки .
Параметры
| Имя | Обязательный или необязательный | Тип данных | Описание |
|---|---|---|---|
| Тип | Обязательный | XlDVType | Тип проверки. |
| AlertStyle | Необязательный | Variant | Стиль оповещения проверки. Может быть одной из следующих констант XlDVAlertStyle : xlValidAlertInformation, xlValidAlertStop или xlValidAlertWarning. |
| Operator | Необязательный | Variant | Оператор проверки данных. Может быть одной из следующих констант XlFormatConditionOperator: xlBetween, xlEqual, xlGreaterEqual, xlLess, xlLess, xlLessEqual, xlNotBetween или xlNotEqual. |
| Formula1 | Необязательный | Variant | Первая часть уравнения проверки данных. Значение не должно превышать 255 символов. |
| Formula2 | Необязательный | Variant | Вторая часть уравнения проверки данных, если оператор имеет значение xlBetween или xlNotBetween (в противном случае этот аргумент игнорируется). |
Замечания
Метод Add требует различных аргументов в зависимости от типа проверки, как показано в следующей таблице.
| Тип проверки | Аргументы |
|---|---|
| xlValidateCustom | Формула 1 является обязательной, формула 2 игнорируется. Формула 1 должна содержать выражение, которое имеет значение True , если ввод данных является допустимым, и False , если ввод данных недопустим. |
| xlInputOnly | Используются AlertStyle, Formula1 или Formula2. |
| xlValidateList | Формула 1 является обязательной, формула 2 игнорируется. Формула 1 должна содержать список значений с разделителями-запятыми или ссылку на этот список на листе. |
| xlValidateWholeNumber, xlValidateDate, xlValidateDecimal, xlValidateTextLength или xlValidateTime | Необходимо указать одну из формул Formula1 или Formula2 , в противном случае можно указать оба варианта. |
Пример
В этом примере добавляется проверка данных в ячейку E5.
Поддержка и обратная связь
Есть вопросы или отзывы, касающиеся Office VBA или этой статьи? Руководство по другим способам получения поддержки и отправки отзывов см. в статье Поддержка Office VBA и обратная связь.
Источник
Excel VBA – How to Apply Data Validation Drop Down List Using VBA Macro
The full VBA code is shown below.
Use the Add method of the DataValidation property of the Range object.
CLICK HERE TO GET 5 FREE EXCEL TEMPLATES
Use the Type parameter to specify type of validation
| Name | Value |
|---|---|
| xlValidateCustom | 7 |
| xlValidateDate | 4 |
| xlValidateDecimal | 2 |
| xlValidateInputOnly | 0 |
| xlValidateList | 3 |
| xlValidateTextLength | 6 |
| xlValidateTime | 5 |
| xlValidateWholeNumber | 1 |
Use the AlertStyle parameter to specify the style of the alert warning dialog.
| Name | Value |
|---|---|
| xlValidAlertInformation | 3 |
| xlValidAlertStop | 1 |
| xlValidAlertWarning | 2 |
Use the Operator parameter together with the Formula parameters to specify a rule.
| Name | Value |
|---|---|
| xlBetween | 1 |
| xlEqual | 3 |
| xlGreater | 5 |
| xlGreaterEqual | 7 |
| xlLess | 6 |
| xlLessEqual | 8 |
| xlNotBetween | 2 |
| xlNotEqual | 4 |
Specify the error title and error message of the alert dialog in the DataValidation property itself (see code below).

This code below relates to the table shown above. Column A’s validation allow dates, but not in the past. Columns C and D have been given drop down lists. Each list has a named source – Properties and Issue_Type.
Источник
Name already in use
VBA-Docs / api / Excel.Validation.Add.md
- Go to file T
- Go to line L
- Copy path
- Copy permalink
Copy raw contents
Copy raw contents
Validation.Add method (Excel)
Adds data validation to the specified range.
expression.Add (Type, AlertStyle, Operator, Formula1, Formula2)
expression A variable that represents a Validation object.
| Name | Required/Optional | Data type | Description |
|---|---|---|---|
| Type | Required | XlDVType | The validation type. |
| AlertStyle | Optional | Variant | The validation alert style. Can be one of the following XlDVAlertStyle constants: xlValidAlertInformation, xlValidAlertStop, or xlValidAlertWarning. |
| Operator | Optional | Variant | The data validation operator. Can be one of the following XlFormatConditionOperator constants: xlBetween, xlEqual, xlGreater, xlGreaterEqual, xlLess, xlLessEqual, xlNotBetween, or xlNotEqual. |
| Formula1 | Optional | Variant | The first part of the data validation equation. Value must not exceed 255 characters. |
| Formula2 | Optional | Variant | The second part of the data validation equation when Operator is xlBetween or xlNotBetween (otherwise, this argument is ignored). |
The Add method requires different arguments, depending on the validation type, as shown in the following table.
| Validation type | Arguments |
|---|---|
| xlValidateCustom | Formula1 is required, Formula2 is ignored. Formula1 must contain an expression that evaluates to True when data entry is valid and False when data entry is invalid. |
| xlInputOnly | AlertStyle, Formula1, or Formula2 are used. |
| xlValidateList | Formula1 is required, Formula2 is ignored. Formula1 must contain either a comma-delimited list of values or a worksheet reference to this list. |
| xlValidateWholeNumber, xlValidateDate, xlValidateDecimal, xlValidateTextLength, or xlValidateTime | One of either Formula1 or Formula2 must be specified, or both may be specified. |
This example adds data validation to cell E5.
Источник
Class Validation (Excel VBA)
The class Validation represents data validation for a worksheet range.
Class Range gives access to class Validation.
To use a Validation class variable it first needs to be instantiated, for example
Validation class variables can be set using the Range.Validation procedure.
Methods
— Adds data validation to the specified range.
— Deletes the object.
— Modifies data validation for a range.
Properties
returns the validation alert style.
returns or sets the data validation error message.
returns or sets the title of the data-validation error dialog box.
returns the value or expression associated with the conditional format or data validation. Can be a constant value, a string value, a cell reference, or a formula.
returns the value or expression associated with the second part of a conditional format or data validation. Used only when the data validation conditional format Operator property is xlBetween or xlNotBetween (XlFormatConditionOperator). Can be a constant value, a string value, a cell reference, or a formula.
true if blank values are permitted by the range data validation.
returns or sets the description of the Japanese input rules. Can be one of the XlIMEMode constants listed in the following table.
true if data validation displays a drop-down list that contains acceptable values.
returns or sets the data validation input message.
returns or sets the title of the data-validation input dialog box. Read/write String. Limited to 32 characters.
returns a Long value that represents the operator for the data validation. See XlFormatConditionOperator.
true if the data validation error message will be displayed whenever the user enters invalid data.
true if the data validation input message will be displayed whenever the user selects a cell in the data validation range.
returns a Long value containing an XlDVType constant that represents the data type validation for a range.
returns a Boolean value that indicates if all the validation criteria are met (that is, if the range contains valid data).
Источник
Mastering cell validation lists in Excel
A complete guide to using dynamic cell validation lists successfully and look like a pro while you’re at it
«So here is the thing, we want to have a list of values that the user can choose from in the cells of our sheet»
-Your boss
Dropdown lists of the sort shown below are very common and can be hugely beneficial for users when filling out Excel sheets. They are quite easy to create and offer basic data validation so that the user can’t accidentally type in the wrong value.
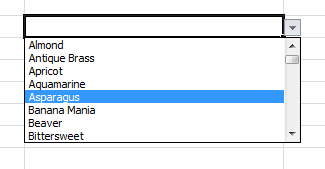
Lists with values can be very useful when creating data-entry sheets
TL;DR; If you just want to jump to the solution then feel free to download the demo sheet straight away 🙂
But yeah, back to the data validation lists.
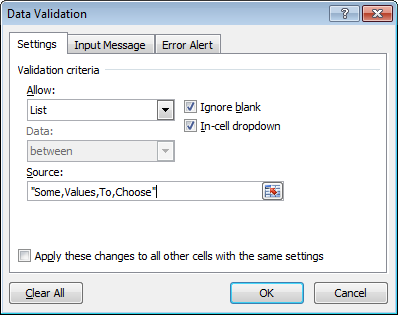
You can create one very easily via the ribbon through Data >> Data Validation
«So yeah, this is great. But we want the list of values to be editable by the user.»
-Your boss
Wait. That’s easy! I can use ranges in these cell lists. So I’ll just have one sheet that acts like a «Configuration» sheet and have some column in that sheet hold all the values to show in the list.
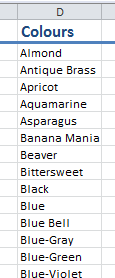
A list of colour names, so easy to add new ones at the end. so easy
Then I will just have the list pull data from a big chunk of the range so that the user can add items to the end of the list indefinately.

Oh my, still so easy.
Too many blanks
Unfortunately using an unbounded range for the list items causes a rather annoying bug. In the dropdown lists there will be a large section of completely empty items at the end. Even through you tick the Ignore blank option.
![]()
When using ranges a bunch of empty values appear at the end of the list. Annoying!
This is made even worse by the fact that the list always automatically scrolls down to the first blank item when entering values into an empty cell.
There are some solutions to this. Using the OFFSET function to limit the number of items in the list box is one of the fastest and simplest.
The OFFSET function can be used to help. But requires a lot of extra cells
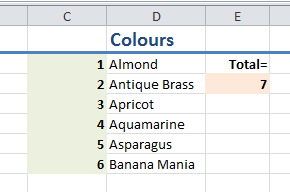
However to use the OFFSET function you need to know the total number of items to trim to, which requires you to use intermediate cells to count non-blank items. In the image above the green cells in column C count up when the cell in column D has a value. Then the cell orange cell in column E just takes the =MAX(C:C) range. This number you can use as the limit to the OFFSET function straight in the data validation box:

Data Validation using the OFFSET function
For some this is an acceptable solution. But for most this is just too brittle as the user might accidentally delete values in either column C or E and break the entire thing.
Too many items
Alright, no worries, you can fix this.
How about we use VBA to construct a simple string list of items and insert it directly into the cell validation list?
Something like this:
Then we can simply call this function when we deactivate the Configuration sheet and apply it to our entire range. Something like so:
Yes, this will work!
And it does, for a while.
Note: When specifying ranges like in the Worksheet_Deactivate function above. Always use the fully locked formula with $ signs for both columns and rows.
Error unreadable content in workbook
For a while the VBA solution works. But then suddenly your users start complaining about a strange error that keeps coming up when they open their sheet in the morning. They constantly have to have Excel «recover it» and when they do it seems that some content gets removed during repair.
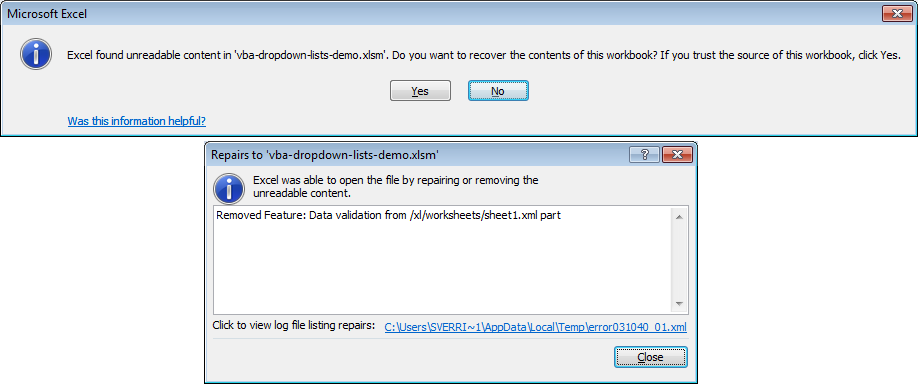
Super scary errors, what did you remove! Tell me. WHAT!!
You can’t find anything wrong with your code.
But the error is easily reproducible. There is something wrong. Everytime the sheet is closed and reopened the error appears.
You check, but the users really haven’t deleted anything critical or messed with the formulas. They’ve just been adding more colours to the list as they were instructed to do and was a major selling point for them to use your Workbook.
Then you find it. Bam! There is an undocumented max-limit for string lists! They cannot be longer than 256 characters!
So you cannot use your VBA solution after all. What to do?
Hybrids to the rescue
The real solution involves combining both of the approaches above in a way that circumvents the string limit of 256 characters while still keeping the sheet robust enough to handle users deleting rows willy-nilly without stuff breaking.
Tired? Want to jump to the solution. Go ahead 🙂
We modify our VBA code to produce an OFFSET function instead of a string. Then we make this function operate on the value range and places it in the data validation logic using VBA!
The way we call the function is still the same
That’s all there is too it. You circumvent the string limitation, keep the necessary elements for OFFSET out of the way of the user and have a list of values that the user can expand practically indefinitely.
Note on Named Ranges
I want to recommend the use of named ranges instead of the COL:ROW + $ pattern.
Named ranges are preferable as their extent can be modified without going behind the scenes to manipulate the raw VBA code. They also do not need any special $ handling to avoid a «shift» when generating the OFFSET functions and applying them to the cell ranges.
Managing the named ranges can then be done by non-programmers after the sheet is delivered to its users. In the example below I have replaced the hard-coded COL:ROW patterns with named ranges:
Note on calling the code
And where should I then call this code?
Ideally I think this code should be called directly on Worksheet_Deactivate when leaving the configuration sheet. That way the correct cells are always kept up to date after the user changes the list contents.
Now for the actual working demo, check it out!
Источник
In this article I will explain how you can create drop down lists using data validation.
Jump To:
- Creating Data Validation (Manually)
- Creating Data Validation (Using VBA)
- Selection Change
- Modifying, Adding, Inserting and Removing Items (Usin VBA)
You can download the file and code related to this article from the link below:
- Drop Down Lists Data Validation.xlsm
–
Creating Data Validation (Manually):
Step1 : In the first step you would need to print the data you are going to fill the drop down list with somewhere. Usually I open a new sheet, name it something no one would ever consider using (like “far43fq”) and print the data there.

Step 2: Select the cell you would like to add the drop down list to. Then click on the Data Validation button on the Data Ribbon:

Step 3: Select list:

Step 4: Input the range of the data. If the drop down list (data validation) and the data are in the same sheet you would reference them using a statement like “=A1:A6”. If they are in separate sheets you would use a statement like “=SheetName!A1:A6”, where “SheetName” is replaced with the name of the sheet.

Note: I this example the input data is in another sheet. The name of the sheet is Sheet1″.
After pressing Ok your drop down list is ready:

–
Creating Data Validation (Using VBA):
Using the code below a drop down list (data validation) will be created in the cell “J2” . The data for the drop down list will come from the range “=A1:A6” in the sheet “Sheet1”. Note you must change the highlighted parts based on the location of your source and the location for your drop down list:
Private  Sub  main()


'replace "J2" with the cell you want to insert the drop down list

With  Range("J2").Validation

 .Delete

 'replace "=A1:A6" with the range the data is in.

 .Add Type:=xlValidateList, AlertStyle:=xlValidAlertStop, _

 Operator:= xlBetween, Formula1:="=Sheet1!A1:A6"

 .IgnoreBlank = True

 .InCellDropdown = True

 .InputTitle = ""

 .ErrorTitle = ""

 .InputMessage = ""

 .ErrorMessage = ""

 .ShowInput = True

 .ShowError = True

End  With

End  Sub
–
Selection Change:
The data validation itself doesn’t have a built in function for determining when the user has selected a new value. Though you could use the worksheet_change event handler to determine when the user has selected a new value from the drop down list. The worksheet_change event triggers every time changes are made to a worksheet. You could use the worksheet_change event handler to catch this event and check if the changes made were to the value selected in the drop down list.
The code below is a worksheet_change event handler. It checks if the changes in the worksheet have occurred in the cell with the drop down list or not:
Private  Sub  Worksheet_Change(ByVal Target As  Range)

If  Target.Address = Range("J2").Address Then

 'your code

End  If

End  Sub
–
Modifying, Adding, Inserting and Removing Items (Usin VBA):
In order to modify, add, insert and remove items from a drop down list created using data validation, you would have to follow 2 steps.
Step 1: The first thing you would have to do is change the source data. For example lets say we want to modify the second item to “New Item 2”, we would need to change the data validation’s source to the values below:

Or for example lets say we want to add an item to the list of items. Again the first thing would be to modify the source data:

Or for example lets say we want to remove “item 4”. Again the first step would be to modify the source data:

Step 2: In the next step we need to update the drop down list to accommodate for the changes made in its source. This can be done using the code below. The code below must be copied to the sheet with the source data. The highlighted parts must be changed based on the location of your source data and the location you would like the drop down list to appear:
Option  Explicit

Dim  flagProgram As  Boolean


Private  Sub  Worksheet_Change(ByVal  Target As  Range)

Dim  intRowCount As  Integer

If  flagProgram = False Then

    flagProgram = True


    'get the total rows of data

    intRowCount = Get_Count

    'update the drop down list(data validation)

    Call  Update_DataValidation(intRowCount)


    flagProgram = False

End If


End  Sub
'This function will return the total count of rows in the

'drop down list(data validation) source

Private  Function  Get_Count() As  Integer

'counter

Dim  i As  Integer

'determines if the we have reached the end

Dim  flag As  Boolean


i = 1

flag = True

While  flag = True

    If  Cells(i, 1) <> "" Then

        'if there is still data go on

        i = i + 1

    Else

        'if there is no more data left stop the loop

        flag = False

    End If

Wend


'return the total row count

Get_Count = i - 1

End  Function
'the function below updates the source range for the data validation

'based on the number of rows provided by the input

Private  Sub  Update_DataValidation(ByVal  intRow As  Integer)

'the reference string to the source range

Dim  strSourceRange As  String


strSourceRange = "=Sheet1!A1:A" + Strings.Trim(Str(intRow))

With  Sheet2.Range("J2").Validation

    .Delete

    .Add Type:=xlValidateList, AlertStyle:=xlValidAlertStop, _

    Operator:= xlBetween, Formula1:=strSourceRange

    .IgnoreBlank = True

    .InCellDropdown = True

    .InputTitle = ""

    .ErrorTitle = ""

    .InputMessage = ""

    .ErrorMessage = ""

    .ShowInput = True

    .ShowError = True

End With

End  Sub
The code above has 3 different function. The main function is Worksheet_Change event handler. The event handler executes when the user makes changes to the sheet with the source data:
Private  Sub  Worksheet_Change(ByVal  Target As  Range)

...

End  Sub
flagProgram determines if the current changes made to the sheet have been done by the program or the user. This is to prevent an endless recursion of the Worksheet_Change event handler:
If  flagProgram = False Then

    flagProgram = True

    ...

    flagProgram = False

End If
The line below gets the number of rows in the source for the data validation. This value must be checked each time to account for added and removed items:
intRowCount = Get_Count
The function Update_DataValidation updates the data validation based on the input parameter intRow. The input parameter intRow determines how many rows of data the drop down list must use. The first line of this function creates a string which is a reference to the range with the source data:
strSourceRange = "=Sheet1!A1:A" + Strings.Trim(Str(intRow))
Note the highlighted section must changed if your source data is not in Sheet1 starting from cell A1. The resulting string will be something like this:
“=Sheet1!A1:A5”
or
“=Sheet1!A1:A7”
For more information about string processing and manipulation please see the link below:
- VBA Excel, String Processing and Manipulation
The rest of the lines in the function Update_DataValidation creates a drop down list in the cell “J2” in sheet2.
You can download the file and code related to this article from the link below:
- Drop Down Lists Data Validation.xlsm
See also:
- VBA Excel, String Processing and Manipulation
- Excel Drop Down Lists
- VBA UserForm Drop Down Lists
If you need assistance with your code, or you are looking to hire a VBA programmer feel free to contact me. Also please visit my website www.software-solutions-online.com
The full VBA code is shown below.
Use the Add method of the DataValidation property of the Range object.
| Name | Value |
|---|---|
| xlValidateCustom | 7 |
| xlValidateDate | 4 |
| xlValidateDecimal | 2 |
| xlValidateInputOnly | 0 |
| xlValidateList | 3 |
| xlValidateTextLength | 6 |
| xlValidateTime | 5 |
| xlValidateWholeNumber | 1 |
Use the AlertStyle parameter to specify the style of the alert warning dialog.
| Name | Value |
|---|---|
| xlValidAlertInformation | 3 |
| xlValidAlertStop | 1 |
| xlValidAlertWarning | 2 |
Use the Operator parameter together with the Formula parameters to specify a rule.
| Name | Value |
|---|---|
| xlBetween | 1 |
| xlEqual | 3 |
| xlGreater | 5 |
| xlGreaterEqual | 7 |
| xlLess | 6 |
| xlLessEqual | 8 |
| xlNotBetween | 2 |
| xlNotEqual | 4 |
Specify the error title and error message of the alert dialog in the DataValidation property itself (see code below).
This code below relates to the table shown above. Column A’s validation allow dates, but not in the past. Columns C and D have been given drop down lists. Each list has a named source – Properties and Issue_Type.
With Range("A2:A10").Validation
   .Add Type:=xlValidateDate, Operator:=xlGreaterEqual, Formula1:=Date, _
    AlertStyle:=xlValidAlertStop
   .ErrorTitle = "ReportingDate"
   .ErrorMessage = "You cannot enter a reporting date as a date in the past"
End With
With Range("C2:C10").Validation
   .Add Type:=xlValidateList, Operator:=xlBetween, Formula1:="=Properties", _
    AlertStyle:=xlValidAlertStop
   .ErrorTitle = "Property"
   .ErrorMessage = "Please select a property from the list"
End With
With Range("D2:D10").Validation
   .Add Type:=xlValidateList, Operator:=xlBetween, Formula1:="=Issue_Type", _
    AlertStyle:=xlValidAlertStop
   .ErrorTitle = "IssueType"
   .ErrorMessage = "Please select an Issue Type from the list"
End With