
When creating a VBA UserForm, we generally set it to a specific size. Most other forms and windows within the Excel and Windows environments do not have a fixed sized; they can be resized by the user. With a bit of coding magic, we can achieve a similar resizing effect for our VBA UserForms. This post will show you how.
There are two solutions presented below, a Windows API method and a VBA only method. Of the two, the Windows API solution has a smoother, more integrated feel for the user, but it will only work on Windows. If your code is expected to work on Windows and Mac, then using the VBA solution is the better option.
Windows API Solution
Windows API codes make use of special functions which are not part of Excel or VBA, but part of the main Windows application. The topic of Windows API codes is too big to discuss here, but by following the instructions below you can still get the code working, even if you don’t have a full understanding of why it works.
Remember, Windows API codes will only work on Windows.
How does it work?
A brief overview of how the process works will help with understanding what the code below does.
- Change the Windows setting to enable the UserForm to be resized.
- On the UserForm use the Resize event to capture when the form is resized.
- The objects’ size or position changes after each resize event.
Setting up the Windows API code
Copy the following code into a new standard module. It must be included at the top of the module before any functions or subprocedures, but below the Option Explicit statement (if there is one).
Public Const GWL_STYLE = -16
Public Const WS_CAPTION = &HC00000
Public Const WS_THICKFRAME = &H40000

#If VBA7 Then
    Public Declare PtrSafe Function GetWindowLong _
        Lib "user32" Alias "GetWindowLongA" ( _
        ByVal hWnd As Long, ByVal nIndex As Long) As Long
    Public Declare PtrSafe Function SetWindowLong _
        Lib "user32" Alias "SetWindowLongA" ( _
        ByVal hWnd As Long, ByVal nIndex As Long, _
        ByVal dwNewLong As Long) As Long
    Public Declare PtrSafe Function DrawMenuBar _
        Lib "user32" (ByVal hWnd As Long) As Long
    Public Declare PtrSafe Function FindWindowA _
        Lib "user32" (ByVal lpClassName As String, _
        ByVal lpWindowName As String) As Long
#Else
    Public Declare Function GetWindowLong _
        Lib "user32" Alias "GetWindowLongA" ( _
        ByVal hWnd As Long, ByVal nIndex As Long) As Long
    Public Declare Function SetWindowLong _
        Lib "user32" Alias "SetWindowLongA" ( _
        ByVal hWnd As Long, ByVal nIndex As Long, _
        ByVal dwNewLong As Long) As Long
    Public Declare Function DrawMenuBar _
        Lib "user32" (ByVal hWnd As Long) As Long
    Public Declare Function FindWindowA _
        Lib "user32" (ByVal lpClassName As String, _
        ByVal lpWindowName As String) As Long
#End If
This following code must be included within the same module as the code above but does not need to be directly below it.
Sub ResizeWindowSettings(frm As Object, show As Boolean)

Dim windowStyle As Long
Dim windowHandle As Long

'Get the references to window and style position within the Windows memory
windowHandle = FindWindowA(vbNullString, frm.Caption)
windowStyle = GetWindowLong(windowHandle, GWL_STYLE)

'Determine the style to apply based
If show = False Then
    windowStyle = windowStyle And (Not WS_THICKFRAME)
Else
    windowStyle = windowStyle + (WS_THICKFRAME)
End If

'Apply the new style
SetWindowLong windowHandle, GWL_STYLE, windowStyle

'Recreate the UserForm window with the new style
DrawMenuBar windowHandle

End Sub
The two code segments above create a reusable procedure which we can use to toggle the UserForm’s resize setting on or off. Anytime we want to turn on resizing for a UserForm, use the following:
Call ResizeWindowSettings(myUserForm, True)
To turn off resizing, use the following
Call ResizeWindowSettings(myUserForm, False)
Just replace myUserForm with the name of your form, or use Me if within the UserForm’s code module.
Setting up the UserForm
To illustrate the process, I’ve created a UserForm which looks like this:
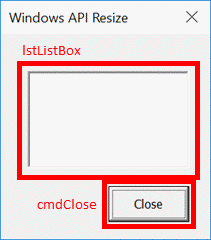
There are just two elements:
- A ListBox called lstListBox
- A Button called cmdClose
Both of these elements should change when then UserForm resizes. lstListBox should change in size, but not in position while the cmdClose will change in position but not in size. To enable this to happen we need to know the position of these objects from the bottom and right of the UserForm. Provided we keep the same distance from the bottom and right it will appear that these items are moving in sync with the UserForm.
The code below must be included within the UserForm’s code module to function correctly.
To capture the initial bottom and right positions of the ListBox and Button, we set up some Private variables to hold the values.
Private lstListBoxBottom As Double
Private lstListBoxRight As Double
Private cmdCloseBottom As Double
Private cmdCloseRight As Double
Now let’s set up what happens when the UserForm initializes.
Firstly, resizing is enabled by calling the code created in the Windows API section above. Secondly, we store the position of the objects in the private variables created above.
Private Sub UserForm_Initialize()

'Call the Window API to enable resizing
Call ResizeWindowSettings(Me, True)

'Get the bottom right anchor position of the objects to be resized
lstListBoxBottom = Me.Height - lstListBox.Top - lstListBox.Height
lstListBoxRight = Me.Width - lstListBox.Left - lstListBox.Width
cmdCloseBottom = Me.Height - cmdClose.Top - cmdClose.Height
cmdCloseRight = Me.Width - cmdClose.Left - cmdClose.Width

End Sub
Next, using the UserForm’s resize event, we change the size/position of ListBox and the Button:
- lstListBox changes height and width
- cmdCloses changes top and left position
Private Sub UserForm_Resize()

On Error Resume Next

'Set the new position of the objects
lstListBox.Height = Me.Height - lstListBoxBottom - lstListBox.Top
lstListBox.Width = Me.Width - lstListBoxRight - lstListBox.Left
cmdClose.Top = Me.Height - cmdCloseBottom - cmdClose.Height
cmdClose.Left = Me.Width - cmdCloseRight - cmdClose.Width

On Error GoTo 0

End Sub
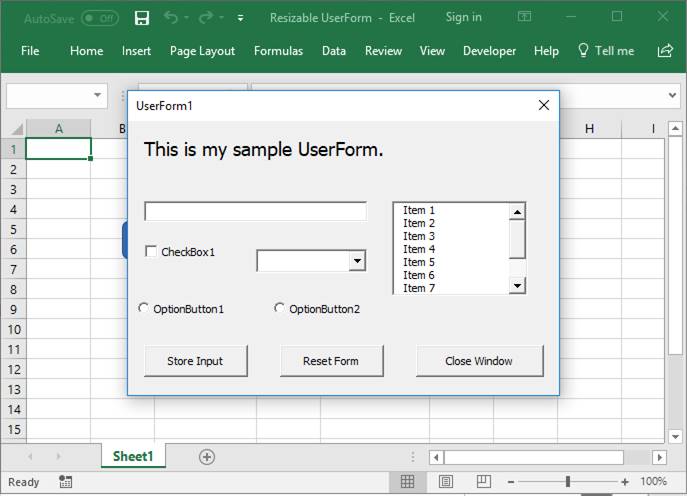
That is it. You’ve now got the code you need. So fire up the UserForm and start resizing.
![]()
When the mouse hovers over the edge of the UserForm, the icon changes, just click and drag. With this method, resizing can happen on any side of the UserForm.
VBA only solution
The VBA solution makes use of mouse events to trigger when to change the height and width of the UserForm. Personally, I think it’s not as smooth as the Window API solution, but it is much easier to understand and can be used on a Mac too.
How does it work?
The VBA solution uses a different method of application to the Window API solution.
- The UserForm contains an object which when clicked records the position of the mouse.
- As the mouse moves, the UserForm and it’s objects are repositioned or resized based on the new mouse position.
- When the mouse button is released, movement ceases to adjust the size.
Setting up the UserForm
To illustrate the process, I have created anotherUserForm; it looks like this:

There are just three elements:
- ListBox called lstListBox
- Button called cmdClose
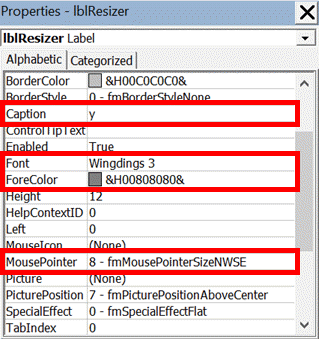
- Label called lblResizer
The lblResizer is a label which includes the “y” character from the Wingdings 3 font set. This displays as a small triangle in the bottom right corner to show the user where to click to resize the window. The Color and MousePointer properties are set as follows:
All of these elements, along with the UserForm itself will need to change when the mouse is clicked and moved whilst over the lblResizer object.
All the code must be contained within the UserForm’s code module.
We will set up some Private variables to hold the mouse position and click status, along with the minimum allowed window size.
Private resizeEnabled As Boolean
Private mouseX As Double
Private mouseY As Double
Private minWidth As Double
Private minHeight As Double
When initializing the UserForm, the code below will place the lblResizer into the bottom right corner, and set the minimum permitted window size.
Private Sub UserForm_Initialize()

'Position the resize icon
lblResizer.Left = Me.InsideWidth - lblResizer.Width
lblResizer.Top = Me.InsideHeight - lblResizer.Height
minHeight = 125
minWidth = 125

End Sub
The following code triggers when the mouse clicks on the lblResizer icon. The code records that the icon has been clicked and the position of the mouse at that moment.
Private Sub lblResizer_MouseDown(ByVal Button As Integer, ByVal Shift As Integer, _
    ByVal X As Single, ByVal Y As Single)

'The user clicked on the lblResizer
resizeEnabled = True

'Capture the mouse position on click
mouseX = X
mouseY = Y

End Sub
The following code triggers when the mouse moves while over the lblResizer.
Firstly, it will check that the window is larger than the minimum permitted size, and that mouse has been clicked. If both of these are True, the UserForm and the objects are re-positioned or resized based on the size of the mouse movement.
Private Sub lblResizer_MouseMove(ByVal Button As Integer, ByVal Shift As Integer, _
    ByVal X As Single, ByVal Y As Single)

'Check if the UserForm is not resized too small
Dim allowResize As Boolean

allowResize = True

If Me.Width + X - mouseX < minWidth Then allowResize = False
If Me.Height + Y - mouseY < minHeight Then allowResize = False

'Check if the mouse clicked on the lblResizer and above minimum size
If resizeEnabled = True And allowResize = True Then

    'Resize/move objects based on mouse movement since click

    'Resize the UserForm
    Me.Width = Me.Width + X - mouseX
    Me.Height = Me.Height + Y - mouseY

    'Resize the ListBox
    lstListBox.Width = lstListBox.Width + X - mouseX
    lstListBox.Height = lstListBox.Height + Y - mouseY

    'Move the Close Button
    cmdClose.Left = cmdClose.Left + X - mouseX
    cmdClose.Top = cmdClose.Top + Y - mouseY

    'Move the Resizer icon
    lblResizer.Left = Me.InsideWidth - lblResizer.Width
    lblResizer.Top = Me.InsideHeight - lblResizer.Height

End If

End Sub
The following code triggers when the mouse button is released; the mouse movement ceases to resize the UserForm.
Private Sub lblResizer_MouseUp(ByVal Button As Integer, ByVal Shift As Integer, _
    ByVal X As Single, ByVal Y As Single)

'The user un-clicked on the lblResizer
resizeEnabled = False

End Sub
That is it; we’re good to go. Open up the UserForm and start resizing.
![]()
In this example, the UserForm only resizes when the mouse clicks on the icon in the bottom right. We could add the ability to expand from the right, bottom, or left by using objects positioned just inside the edges of the UserForm.
Download the example file
Want to see these examples working? Then download the example file.

About the author
Hey, I’m Mark, and I run Excel Off The Grid.
My parents tell me that at the age of 7 I declared I was going to become a qualified accountant. I was either psychic or had no imagination, as that is exactly what happened. However, it wasn’t until I was 35 that my journey really began.
In 2015, I started a new job, for which I was regularly working after 10pm. As a result, I rarely saw my children during the week. So, I started searching for the secrets to automating Excel. I discovered that by building a small number of simple tools, I could combine them together in different ways to automate nearly all my regular tasks. This meant I could work less hours (and I got pay raises!). Today, I teach these techniques to other professionals in our training program so they too can spend less time at work (and more time with their children and doing the things they love).
Do you need help adapting this post to your needs?
I’m guessing the examples in this post don’t exactly match your situation. We all use Excel differently, so it’s impossible to write a post that will meet everybody’s needs. By taking the time to understand the techniques and principles in this post (and elsewhere on this site), you should be able to adapt it to your needs.
But, if you’re still struggling you should:
- Read other blogs, or watch YouTube videos on the same topic. You will benefit much more by discovering your own solutions.
- Ask the ‘Excel Ninja’ in your office. It’s amazing what things other people know.
- Ask a question in a forum like Mr Excel, or the Microsoft Answers Community. Remember, the people on these forums are generally giving their time for free. So take care to craft your question, make sure it’s clear and concise. List all the things you’ve tried, and provide screenshots, code segments and example workbooks.
- Use Excel Rescue, who are my consultancy partner. They help by providing solutions to smaller Excel problems.
What next?
Don’t go yet, there is plenty more to learn on Excel Off The Grid. Check out the latest posts:
Here is transcribed solution from
https://www.mrexcel.com/board/threads/resize-a-userform.485489/
I have tested it and it works
First add these declaration to your header
'Declaration for form resize
Private Declare Function GetActiveWindow Lib "user32.dll" () As Long
Private Declare Function SetLastError Lib "kernel32.dll" (ByVal dwErrCode As Long) As Long
Private Declare Function GetWindowLong Lib "user32.dll" Alias "GetWindowLongA" (ByVal hWnd As Long, ByVal nIndex As Long) As Long
Private Declare Function SetWindowLong Lib "user32.dll" Alias "SetWindowLongA" (ByVal hWnd As Long, ByVal nIndex As Long, ByVal dwNewLong As Long) As Long
Add this sub to your form
Private Sub MakeFormResizable()

'Written: August 02, 2010
'Author:  Leith Ross
'Summary: Makes the UserForm resizable by dragging one of the sides. Place a call
'         to the macro MakeFormResizable in the UserForm'
'from  https://www.mrexcel.com/board/threads/resize-a-userform.485489/

  Dim lStyle As Long
  Dim hWnd As Long
  Dim RetVal

  Const WS_THICKFRAME = &H40000
  Const GWL_STYLE As Long = (-16)

    hWnd = GetActiveWindow

    'Get the basic window style
     lStyle = GetWindowLong(hWnd, GWL_STYLE) Or WS_THICKFRAME

    'Set the basic window styles
     RetVal = SetWindowLong(hWnd, GWL_STYLE, lStyle)

    'Clear any previous API error codes
     SetLastError 0

    'Did the style change?
     If RetVal = 0 Then MsgBox "Unable to make UserForm Resizable."

End Sub
And finally call this sub from your Userform_Activate
Private Sub UserForm_Activate()
    MakeFormResizable
End Sub
Содержание
- Resize a UserForm with VBA or Windows API
- Windows API Solution
- How does it work?
- Setting up the Windows API code
- Setting up the UserForm
- VBA only solution
- How does it work?
- Setting up the UserForm
- Download the example file
- Vba excel форма на весь экран
- VBA Excel. Первая форма (для начинающих)
- Создание пользовательской формы
- Добавление элементов управления
- Отображение формы на экране
Resize a UserForm with VBA or Windows API
When creating a VBA UserForm, we generally set it to a specific size. Most other forms and windows within the Excel and Windows environments do not have a fixed sized; they can be resized by the user. With a bit of coding magic, we can achieve a similar resizing effect for our VBA UserForms. This post will show you how.
There are two solutions presented below, a Windows API method and a VBA only method. Of the two, the Windows API solution has a smoother, more integrated feel for the user, but it will only work on Windows. If your code is expected to work on Windows and Mac, then using the VBA solution is the better option.
Windows API Solution
Windows API codes make use of special functions which are not part of Excel or VBA, but part of the main Windows application. The topic of Windows API codes is too big to discuss here, but by following the instructions below you can still get the code working, even if you don’t have a full understanding of why it works.
Remember, Windows API codes will only work on Windows.
How does it work?
A brief overview of how the process works will help with understanding what the code below does.
- Change the Windows setting to enable the UserForm to be resized.
- On the UserForm use the Resize event to capture when the form is resized.
- The objects’ size or position changes after each resize event.
Setting up the Windows API code
Copy the following code into a new standard module. It must be included at the top of the module before any functions or subprocedures, but below the Option Explicit statement (if there is one).
This following code must be included within the same module as the code above but does not need to be directly below it.
The two code segments above create a reusable procedure which we can use to toggle the UserForm’s resize setting on or off. Anytime we want to turn on resizing for a UserForm, use the following:
To turn off resizing, use the following
Just replace myUserForm with the name of your form, or use Me if within the UserForm’s code module.
Setting up the UserForm
To illustrate the process, I’ve created a UserForm which looks like this:
There are just two elements:
- A ListBox called lstListBox
- A Button called cmdClose
Both of these elements should change when then UserForm resizes. lstListBox should change in size, but not in position while the cmdClose will change in position but not in size. To enable this to happen we need to know the position of these objects from the bottom and right of the UserForm. Provided we keep the same distance from the bottom and right it will appear that these items are moving in sync with the UserForm.
The code below must be included within the UserForm’s code module to function correctly.
To capture the initial bottom and right positions of the ListBox and Button, we set up some Private variables to hold the values.
Now let’s set up what happens when the UserForm initializes.
Firstly, resizing is enabled by calling the code created in the Windows API section above. Secondly, we store the position of the objects in the private variables created above.
Next, using the UserForm’s resize event, we change the size/position of ListBox and the Button:
- lstListBox changes height and width
- cmdCloses changes top and left position
That is it. You’ve now got the code you need. So fire up the UserForm and start resizing.
When the mouse hovers over the edge of the UserForm, the icon changes, just click and drag. With this method, resizing can happen on any side of the UserForm.
VBA only solution
The VBA solution makes use of mouse events to trigger when to change the height and width of the UserForm. Personally, I think it’s not as smooth as the Window API solution, but it is much easier to understand and can be used on a Mac too.
How does it work?
The VBA solution uses a different method of application to the Window API solution.
- The UserForm contains an object which when clicked records the position of the mouse.
- As the mouse moves, the UserForm and it’s objects are repositioned or resized based on the new mouse position.
- When the mouse button is released, movement ceases to adjust the size.
Setting up the UserForm
To illustrate the process, I have created anotherUserForm; it looks like this:
There are just three elements:
- ListBox called lstListBox
- Button called cmdClose
- Label called lblResizer
The lblResizer is a label which includes the “y” character from the Wingdings 3 font set. This displays as a small triangle in the bottom right corner to show the user where to click to resize the window. The Color and MousePointer properties are set as follows:
All of these elements, along with the UserForm itself will need to change when the mouse is clicked and moved whilst over the lblResizer object.
All the code must be contained within the UserForm’s code module.
We will set up some Private variables to hold the mouse position and click status, along with the minimum allowed window size.
When initializing the UserForm, the code below will place the lblResizer into the bottom right corner, and set the minimum permitted window size.
The following code triggers when the mouse clicks on the lblResizer icon. The code records that the icon has been clicked and the position of the mouse at that moment.
The following code triggers when the mouse moves while over the lblResizer.
Firstly, it will check that the window is larger than the minimum permitted size, and that mouse has been clicked. If both of these are True, the UserForm and the objects are re-positioned or resized based on the size of the mouse movement.
The following code triggers when the mouse button is released; the mouse movement ceases to resize the UserForm.
That is it; we’re good to go. Open up the UserForm and start resizing.
In this example, the UserForm only resizes when the mouse clicks on the icon in the bottom right. We could add the ability to expand from the right, bottom, or left by using objects positioned just inside the edges of the UserForm.
Download the example file
Want to see these examples working? Th e n download the example file.
About the author
Hey, I’m Mark, and I run Excel Off The Grid.
My parents tell me that at the age of 7 I declared I was going to become a qualified accountant. I was either psychic or had no imagination, as that is exactly what happened. However, it wasn’t until I was 35 that my journey really began.
In 2015, I started a new job, for which I was regularly working after 10pm. As a result, I rarely saw my children during the week. So, I started searching for the secrets to automating Excel. I discovered that by building a small number of simple tools, I could combine them together in different ways to automate nearly all my regular tasks. This meant I could work less hours (and I got pay raises!). Today, I teach these techniques to other professionals in our training program so they too can spend less time at work (and more time with their children and doing the things they love).
Do you need help adapting this post to your needs?
I’m guessing the examples in this post don’t exactly match your situation. We all use Excel differently, so it’s impossible to write a post that will meet everybody’s needs. By taking the time to understand the techniques and principles in this post (and elsewhere on this site), you should be able to adapt it to your needs.
But, if you’re still struggling you should:
- Read other blogs, or watch YouTube videos on the same topic. You will benefit much more by discovering your own solutions.
- Ask the ‘Excel Ninja’ in your office. It’s amazing what things other people know.
- Ask a question in a forum like Mr Excel, or the Microsoft Answers Community. Remember, the people on these forums are generally giving their time for free. So take care to craft your question, make sure it’s clear and concise. List all the things you’ve tried, and provide screenshots, code segments and example workbooks.
- Use Excel Rescue, who are my consultancy partner. They help by providing solutions to smaller Excel problems.
What next?
Don’t go yet, there is plenty more to learn on Excel Off The Grid. Check out the latest posts:
Источник
Vba excel форма на весь экран
200?’200px’:»+(this.scrollHeight+5)+’px’);»>
Option Explicit
Public FormIsOn As Boolean
Public Type RECT
Left As Long
Top As Long
Right As Long
Bottom As Long
End Type
Public Declare Function GetSystemMetrics Lib «user32.dll» (ByVal nIndex As Long) As Long
Public Declare Function GetDesktopWindow Lib «user32» () As Long
Public Declare Function GetWindowRect Lib «user32» (ByVal hWnd As Long, lpRect As RECT) As Long
Public Function ScreenWidth() As Single
Dim R As RECT
GetWindowRect GetDesktopWindow(), R
ScreenWidth = RRight ‘* Screen.TwipsPerPixelX
End Function
Public Function ScreenHeight() As Single
Dim R As RECT
GetWindowRect GetDesktopWindow(), R
ScreenHeight = R.Bottom * Screen.TwipsPerPixelY
End Function
Sub test()
Dim x As Integer, y As Integer
x = GetSystemMetrics(0)
y = GetSystemMetrics(1)
MsgBox «Ширина экрана:» & x & » : » & y
End Sub
Источник
VBA Excel. Первая форма (для начинающих)
Пример создания пользовательской формы в редакторе VBA Excel для начинающих программировать с нуля. Добавление на форму текстового поля и кнопки.
Начинаем программировать с нуля
Часть 4. Первая форма
[Часть 1] [Часть 2] [Часть 3] [Часть 4]
Создание пользовательской формы
Создайте или откройте файл Excel с расширением .xlsm (Книга Excel с поддержкой макросов) или с расширением .xls в старых версиях приложения.
Перейдите в редактор VBA, нажав сочетание клавиш «Левая_клавиша_Alt+F11».
В открывшемся окне редактора VBA выберите вкладку «Insert» главного меню и нажмите кнопку «UserForm». То же подменю откроется при нажатии на вторую кнопку (после значка Excel) на панели инструментов.

На экране редактора VBA появится новая пользовательская форма с именем «UserForm1»:

Добавление элементов управления
Обычно вместе с пользовательской формой открывается панель инструментов «Toolbox», как на изображении выше, с набором элементов управления формы. Если панель инструментов «Toolbox» не отобразилась, ее можно вызвать, нажав кнопку «Toolbox» во вкладке «View»:

При наведении курсора на элементы управления появляются подсказки.
Найдите на панели инструментов «Toolbox» элемент управления с подсказкой «TextBox», кликните по нему и, затем, кликните в любом месте рабочего поля формы. Элемент управления «TextBox» (текстовое поле) будет добавлен на форму.
Найдите на панели инструментов «Toolbox» элемент управления с подсказкой «CommandButton», кликните по нему и, затем, кликните в любом месте рабочего поля формы. Элемент управления «CommandButton» (кнопка) будет добавлен на форму.
Кликнув по элементу управления на форме, вы можете изменять его размер, перетягивая границы за белые квадратики, и перетаскивать по форме, ухватив за одну из границ. Кликнув по заголовку формы или по ее рабочему полю, вы можете также изменять ее размер, перетягивая границы за белые квадратики.

Нажатием клавиши «F4» вызывается окно свойств, с помощью которого можно вручную задавать значения свойств пользовательской формы и элементов управления. В окне свойств отображаются свойства выбранного элемента управления или формы, если выбрана она. Также окно свойств можно вызвать, нажав кнопку «Properties Window» во вкладке «View».
Отображение формы на экране
Чтобы запустить пользовательскую форму для просмотра из редактора VBA, необходимо выбрать ее, кликнув по заголовку или свободному от элементов управления полю, и совершить одно из трех действий:
- нажать клавишу «F5»;
- нажать на треугольник на панели инструментов (на изображении выше треугольник находится под вкладкой «Debug»);
- нажать кнопку «Run Sub/UserForm» во вкладке «Run».
Для запуска пользовательской формы с рабочего листа Excel, можно использовать кнопки, описанные в этой статье. Например, чтобы отобразить форму с помощью «кнопки – элемента ActiveX», используйте в модуле рабочего листа следующий код:
Источник
UserForm in Excel that can be resized by the user — they can click and drag the edges or corners of the form to change its size, just like with a regular window in the operating system.
Sections:
Make Form Resizable
Resize Event
Notes
Make Form Resizable
To do this, we need to place VBA code within a regular module and also within the Activate event for the UserForm.
Module Code
The below code goes into a regular module in the VBA window. (Alt + F11 to get to the VBA window and then Insert > Module.)
Private Declare Function GetForegroundWindow Lib "User32.dll" () As Long

Private Declare Function GetWindowLong _
  Lib "User32.dll" Alias "GetWindowLongA" _
    (ByVal hWnd As Long, _
     ByVal nIndex As Long) _
  As Long

Private Declare Function SetWindowLong _
  Lib "User32.dll" Alias "SetWindowLongA" _
    (ByVal hWnd As Long, _
     ByVal nIndex As Long, _
     ByVal dwNewLong As Long) _
  As Long

Private Const WS_THICKFRAME As Long = &H40000
Private Const GWL_STYLE As Long = -16
Note: this code must go at the very top of the module before any other code!
The next section of code can be placed anywhere within the module.
Public Sub FormResizable()

Dim lStyle As Long
Dim hWnd As Long
Dim RetVal

hWnd = GetForegroundWindow

lStyle = GetWindowLong(hWnd, GWL_STYLE) Or WS_THICKFRAME
RetVal = SetWindowLong(hWnd, GWL_STYLE, lStyle)

End Sub
UserForm Code
Code must also be placed within the UserForm itself in order to work.
All you need to do is call FormResizable from the Activate event for the UserForm.
FormResizableWhen you put the code into the Activate event for the UserForm, it will look like this:
Private Sub UserForm_Activate()

FormResizable

End Sub
If you already have code in the Activate event, just place FormResizable at the top of this section.
To learn more about events and how to use them, view our tutoral on UserForm Events.
Resize Event
Resizing a form without chaning anything within the form window is usually useless, as such, you can put code inside of the UserForm_Resize event that will adjust the properties of the controls in the form when the user resizes it, such as increasing the size of buttons or labels within the form when a user makes the form larger.
Notes
When a form is resized by the user, using the above code, once the form has been closed and opened again, it will default back to the original size.
Make sure to download the sample file to see this example in Excel.
Similar Content on TeachExcel
UserForm Events
Tutorial: Explanation of UserForm Events in Excel. This includes what they are, how to use them, and…
UserForm Controls
Tutorial: This tutorial gives you an overview of what a UserForm Control is and how to add them to y…
Scrollable UserForm
Tutorial: How to make a scrollable UserForm. This allows you to put scroll bars onto a form so that …
How to Resize Rows and Columns in Excel Quickly
Tutorial: Resizing rows and columns in Excel is an easy process. Simply left click in between the co…
Prevent Images and Shapes from Resizing or Moving in Excel
Tutorial:
How to stop Images and Shapes from resizing in Excel when you change the size of rows and…
Quickly Resize Multiple Columns or Rows at Once in Excel
Tutorial:
How to quickly resize multiple columns and rows at once in Excel. This avoids having to…
Subscribe for Weekly Tutorials
BONUS: subscribe now to download our Top Tutorials Ebook!
When designing a form, its size is set. You can also set that the form should be centered and that scroll bars should be added automatically for smaller screens (see for this Center VBA userform and set scroll bars). However, at runtime, the user cannot change the dimensions of the form. This is possible in some Windows forms. An example of this is the Excel form for customizing the Ribbon (File -> Options -> Customize Ribbon). With the mouse, that form can be enlarged or reduced by dragging the bottom right corner or the form border (right or bottom).
It would be nice to be able to add such an option to VBA userforms. This article will discuss a method, based entirely on VBA, where this option can be easily added to forms.

This method uses a class module. In this class module, which is attached to the form in the UserForm_Initialize event, the necessary controls are automatically added to the form to control the resizing. This uses Frames to ensure that resize controls are always placed OnTop of any other controls present close to the form edge. This is not possible with a Label, for example.
Changing the size of the form is further controlled entirely by the class module. Therefore add a class module called clUserFormResize and put the following code in it:
'--------------------------------------------------------------------------------------------------------------------------
' Author    : Manfred van den Noort
' Copyright : © 2020 worksheetsvba.com, all rights reserved
' Date      : 2020-12-11
' Version   : 1.0
' Purpose   : Create Resizable UserForm
'--------------------------------------------------------------------------------------------------------------------------

Private WithEvents frmResizableForm As MSForms.UserForm
Private oResizableForm As Object
Private WithEvents frResizerCorner As MSForms.Frame
Private WithEvents frResizerRight As MSForms.Frame
Private WithEvents frResizerBottom As MSForms.Frame
Private sngMinHeight As Single
Private sngMinWidth  As Single
Private sngMouseX As Single
Private sngMouseY As Single

Event Resizing(ByVal X As Single, ByVal Y As Single)

Friend Property Set ResizableForm(ByRef oFrm As Object)
    Set frmResizableForm = oFrm
    Set oResizableForm = oFrm
    'set default values for MinHeight and MinWidth if they are not already set or if the values are greater than the initial dimensions
    If sngMinHeight = 0 Or sngMinHeight > oResizableForm.Height Then
        sngMinHeight = oResizableForm.Height
    End If
    If sngMinWidth = 0 Or sngMinWidth > oResizableForm.Width Then
        sngMinWidth = oResizableForm.Width
    End If
    AddResizeControls
End Property

Friend Property Let MinHeight(sngValue As Single)
    If oResizableForm Is Nothing Then
        sngMinHeight = sngValue
    ElseIf sngValue = 0 Or sngValue > oResizableForm.Height Then
        sngMinHeight = oResizableForm.Height
    Else
        sngMinHeight = sngValue
    End If
End Property

Friend Property Let MinWidth(sngValue As Single)
    If oResizableForm Is Nothing Then
        sngMinWidth = sngValue
    ElseIf sngValue = 0 Or sngValue > oResizableForm.Width Then
        sngMinWidth = oResizableForm.Width
    Else
        sngMinWidth = sngValue
    End If
End Property

Private Sub AddResizeControls()
    'frames are used to asure the resize controls are always on top of other form controls
    Set frResizerCorner = oResizableForm.Controls.Add("Forms.Frame.1")
    With frResizerCorner
        .SpecialEffect = fmSpecialEffectFlat
        .MousePointer = fmMousePointerSizeNWSE
        .ZOrder 0
        .Width = 15
        .Height = 15
    End With
    With frResizerCorner.Add("Forms.label.1")
        With .Font
            .Name = "Marlett"
            .Charset = 2
            .Size = 14
            .Bold = True
        End With
        .Caption = "o"
        .ForeColor = 6579300
        .Width = 14
        .Height = 14
        .Top = 1
        .Left = 1
        .Enabled = False
    End With
    Set frResizerRight = oResizableForm.Controls.Add("Forms.Frame.1")
    With frResizerRight
        .SpecialEffect = fmSpecialEffectFlat
        .MousePointer = fmMousePointerSizeWE
        .ZOrder 0
        .Width = 2
        .Top = 0
    End With
    Set frResizerBottom = oResizableForm.Controls.Add("Forms.Frame.1")
    With frResizerBottom
        .SpecialEffect = fmSpecialEffectFlat
        .MousePointer = fmMousePointerSizeNS
        .ZOrder 0
        .Height = 2
        .Left = 0
    End With
End Sub

Private Sub frResizerCorner_MouseDown(ByVal Button As Integer, ByVal Shift As Integer, ByVal X As Single, ByVal Y As Single)
    If Button = 1 Then
        sngMouseX = X
        sngMouseY = Y
    End If
End Sub

Private Sub frResizerCorner_MouseMove(ByVal Button As Integer, ByVal Shift As Integer, ByVal X As Single, ByVal Y As Single)
    If Button = 1 Then
        With oResizableForm
            If .Width + X - sngMouseX > sngMinWidth Then
                .Width = .Width + X - sngMouseX
            Else
                X = 0
                sngMouseX = 0
            End If
            If .Height + Y - sngMouseY > sngMinHeight Then
                .Height = .Height + Y - sngMouseY
            Else
                Y = 0
                sngMouseY = 0
            End If
        End With
        If X <> 0 Or Y <> 0 Then
            RaiseEvent Resizing(X - sngMouseX, Y - sngMouseY)
        End If
    End If
End Sub

Private Sub frResizerRight_MouseMove(ByVal Button As Integer, ByVal Shift As Integer, ByVal X As Single, ByVal Y As Single)
    If Button = 1 Then
        With oResizableForm
            If .Width + X > sngMinWidth Then
                .Width = .Width + X
                RaiseEvent Resizing(X, 0)
            End If
        End With
    End If
End Sub

Private Sub frResizerBottom_MouseMove(ByVal Button As Integer, ByVal Shift As Integer, ByVal X As Single, ByVal Y As Single)
    If Button = 1 Then
        With oResizableForm
            If .Height + Y > sngMinHeight Then
                .Height = .Height + Y
                RaiseEvent Resizing(0, Y)
            End If
        End With
    End If
End Sub

Private Sub frmResizableForm_Layout()
    With frResizerCorner
        .Left = oResizableForm.InsideWidth - .Width
        .Top = oResizableForm.InsideHeight - .Height
    End With
    With frResizerRight
        .Left = oResizableForm.InsideWidth - .Width
        .Height = frResizerCorner.Top
    End With
    With frResizerBottom
        .Top = oResizableForm.InsideHeight - .Height
        .Width = frResizerCorner.Left
    End With
End Sub
This class module must work with the form to be resizable. Therefore, an instance of this class must be created when starting the form.To do this, a variable must be added to the top of the form and 2 lines of code must be added to the UserForm_Initialize event:
Private WithEvents oFormResize As clUserFormResizer

Private Sub UserForm_Initialize()
    Set oFormResize = New clUserFormResizer
    Set oFormResize.ResizableForm = Me
End Sub
But just changing the size of the form is of course not enough. The other controls on the form must then also change size and / or move with it. However, it is almost impossible to make a general algorithm for this, so that this can also be controlled by the class module. To give an example of this: depending on the purpose of the form, the position of the buttons and the purpose of the buttons, buttons sometimes have to stay in the same place, they sometimes have to move, but it may also be desirable that they also change size. In the latter case, it may also be desirable to change the font size in addition. That is why a Resizing Event has been added to the class module, so that it can be properly set per form how the other controls should react to a change in the size of the form.
For a very simple form with only a listbox and a close button, this code is very simple and could look like this for example:
Private Sub oFormResize_Resizing(ByVal X As Single, ByVal Y As Single)
    With btnClose
        .Left = .Left + X
        .Top = .Top + Y
    End With
    With ListBox1
        .Width = .Width + X
        .Height = .Height + Y
    End With
End Sub
Depending on the computer and graphics card, it may very occasionally happen that the form does not look completely good during resizing. For example, a very small part of a button will remain visible somewhere else on the form. If this happens, Me.Repaint can be added to the Resizing event.
Optionally, the minimum height and width can also be set when configuring the clUserFormResize. By default, the initial dimensions of the form are used. Smaller dimensions can be set for this, but check carefully that this does not cause errors when making the form smaller. This is because minimum values that are too small can lead to error messages, as invalid values for the dimensions of form controls can be set.
There is an example file available for download that includes the above code and also includes 2 sample forms. One form is very simple in design and the other form contains more controls. In this way it is clearly visible how to configure how the controls of the form should react to a change in the size of the form..
Download an example file:
![]() Create resizable userform 1.0
Create resizable userform 1.0
Questions / suggestions
Hopefully, this article helped you create resizable VBA Userforms. If you have any questions about this topic or suggestions for improvement, please post a comment below.