|
tod2020 Пользователь Сообщений: 261 |
VBA. «Как вписать во весь в экран» UserForm? |
|
vikttur Пользователь Сообщений: 47199 |
1. Задать Width и Height формы. |
|
Kuzmich Пользователь Сообщений: 7998 |
#3 06.07.2017 15:13:54
|
||
|
_Igor_61 Пользователь Сообщений: 3007 |
Здравствуйте! Как-то тоже задавался таким вопросом и кое-что нашел, вот только не помню где, вполне возможно что на этом сайте: |
|
tod2020 Пользователь Сообщений: 261 |
_Igor_61, это для 32-битной системы |
|
tod2020 Пользователь Сообщений: 261 |
#6 06.07.2017 20:03:11 Kuzmich, код
или
выдает такое: Прикрепленные файлы
Изменено: tod2020 — 06.07.2017 20:06:08 |
||||
|
Sanja Пользователь Сообщений: 14838 |
#7 06.07.2017 21:26:15
1. Форма на весь экран Согласие есть продукт при полном непротивлении сторон. |
||
|
tod2020 Пользователь Сообщений: 261 |
Sanja, енто всё для 32-битных ОС |
|
Sanja Пользователь Сообщений: 14838 |
#9 06.07.2017 21:43:04
Вы уверены? в моей х64 Windows 10 все работает Согласие есть продукт при полном непротивлении сторон. |
||
|
Sanja Пользователь Сообщений: 14838 |
Адаптация кода для 64 битных систем (x64) — VBA Согласие есть продукт при полном непротивлении сторон. |
|
tod2020 Пользователь Сообщений: 261 |
tod2020, проверил. строки где 32 прописано красным сразу засвечено у меня WIN81 Изменено: tod2020 — 06.07.2017 21:59:26 |
|
Sanja Пользователь Сообщений: 14838 |
А офис у Вас какой? Согласие есть продукт при полном непротивлении сторон. |
|
Мотя Пользователь Сообщений: 3218 |
|
|
Sanja Пользователь Сообщений: 14838 |
Попробуйте файл. Протестировано Win10 x64, Office 2010 x32 Согласие есть продукт при полном непротивлении сторон. |
|
tod2020 Пользователь Сообщений: 261 |
Sanja, оооооооооо, эта штука работает и уменя |
|
Ronin751 Пользователь Сообщений: 924 |
#16 07.07.2017 22:44:07 Я всегда делаю так:
При необходимости, убираю заголовок формы. |
||
|
Tidus1988 Пользователь Сообщений: 46 |
А как все это дело разместить по центру, а не в левом верхнем угле? Изменено: Tidus1988 — 29.07.2020 20:36:56 |
|
Андрей VG Пользователь Сообщений: 11878 Excel 2016, 365 |
#18 29.07.2020 20:47:58 Доброе время суток
Вы не находите, что
такая форма уже по центру экрана? Или вы о чём-то загадочном своём? |
||||
|
Tidus1988 Пользователь Сообщений: 46 |
#19 29.07.2020 20:52:25
наверное не совсем точно выразился, как элементы пользовательской формы (текст, элементы управления и тд) разместить по центру, после вписания пользовательской формы во весь экран. А не в верхнем левом углу, как в приложенном файле примера. |
||
|
Андрей VG Пользователь Сообщений: 11878 Excel 2016, 365 |
#20 29.07.2020 21:03:41
Добавьте такой обработчик события
Вы в нём получите новые значения ширины и высоты формы. По ним и высчитывайте положение элементов формы так, чтобы они в совокупности были по центру формы, используя Left, Top properties |
||||
|
vikttur Пользователь Сообщений: 47199 |
#21 29.07.2020 21:25:28 Резюмируя отвкет Андрея VG — не ищите себе проблем |
Содержание
- Resize a UserForm with VBA or Windows API
- Windows API Solution
- How does it work?
- Setting up the Windows API code
- Setting up the UserForm
- VBA only solution
- How does it work?
- Setting up the UserForm
- Download the example file
- Vba excel форма на весь экран
- VBA Excel. Первая форма (для начинающих)
- Создание пользовательской формы
- Добавление элементов управления
- Отображение формы на экране
Resize a UserForm with VBA or Windows API
When creating a VBA UserForm, we generally set it to a specific size. Most other forms and windows within the Excel and Windows environments do not have a fixed sized; they can be resized by the user. With a bit of coding magic, we can achieve a similar resizing effect for our VBA UserForms. This post will show you how.
There are two solutions presented below, a Windows API method and a VBA only method. Of the two, the Windows API solution has a smoother, more integrated feel for the user, but it will only work on Windows. If your code is expected to work on Windows and Mac, then using the VBA solution is the better option.
Windows API Solution
Windows API codes make use of special functions which are not part of Excel or VBA, but part of the main Windows application. The topic of Windows API codes is too big to discuss here, but by following the instructions below you can still get the code working, even if you don’t have a full understanding of why it works.
Remember, Windows API codes will only work on Windows.
How does it work?
A brief overview of how the process works will help with understanding what the code below does.
- Change the Windows setting to enable the UserForm to be resized.
- On the UserForm use the Resize event to capture when the form is resized.
- The objects’ size or position changes after each resize event.
Setting up the Windows API code
Copy the following code into a new standard module. It must be included at the top of the module before any functions or subprocedures, but below the Option Explicit statement (if there is one).
This following code must be included within the same module as the code above but does not need to be directly below it.
The two code segments above create a reusable procedure which we can use to toggle the UserForm’s resize setting on or off. Anytime we want to turn on resizing for a UserForm, use the following:
To turn off resizing, use the following
Just replace myUserForm with the name of your form, or use Me if within the UserForm’s code module.
Setting up the UserForm
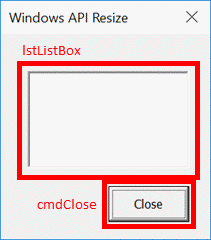
To illustrate the process, I’ve created a UserForm which looks like this:
There are just two elements:
- A ListBox called lstListBox
- A Button called cmdClose
Both of these elements should change when then UserForm resizes. lstListBox should change in size, but not in position while the cmdClose will change in position but not in size. To enable this to happen we need to know the position of these objects from the bottom and right of the UserForm. Provided we keep the same distance from the bottom and right it will appear that these items are moving in sync with the UserForm.
The code below must be included within the UserForm’s code module to function correctly.
To capture the initial bottom and right positions of the ListBox and Button, we set up some Private variables to hold the values.
Now let’s set up what happens when the UserForm initializes.
Firstly, resizing is enabled by calling the code created in the Windows API section above. Secondly, we store the position of the objects in the private variables created above.
Next, using the UserForm’s resize event, we change the size/position of ListBox and the Button:
- lstListBox changes height and width
- cmdCloses changes top and left position
That is it. You’ve now got the code you need. So fire up the UserForm and start resizing.
When the mouse hovers over the edge of the UserForm, the icon changes, just click and drag. With this method, resizing can happen on any side of the UserForm.
VBA only solution
The VBA solution makes use of mouse events to trigger when to change the height and width of the UserForm. Personally, I think it’s not as smooth as the Window API solution, but it is much easier to understand and can be used on a Mac too.
How does it work?
The VBA solution uses a different method of application to the Window API solution.
- The UserForm contains an object which when clicked records the position of the mouse.
- As the mouse moves, the UserForm and it’s objects are repositioned or resized based on the new mouse position.
- When the mouse button is released, movement ceases to adjust the size.
Setting up the UserForm
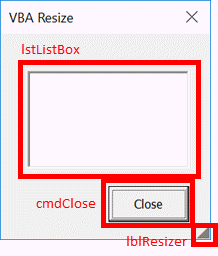
To illustrate the process, I have created anotherUserForm; it looks like this:
There are just three elements:
- ListBox called lstListBox
- Button called cmdClose
- Label called lblResizer
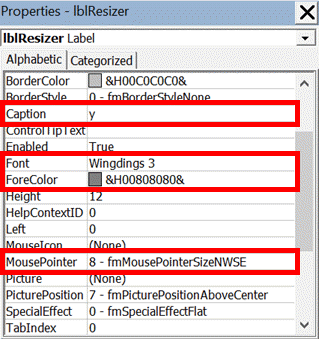
The lblResizer is a label which includes the “y” character from the Wingdings 3 font set. This displays as a small triangle in the bottom right corner to show the user where to click to resize the window. The Color and MousePointer properties are set as follows:
All of these elements, along with the UserForm itself will need to change when the mouse is clicked and moved whilst over the lblResizer object.
All the code must be contained within the UserForm’s code module.
We will set up some Private variables to hold the mouse position and click status, along with the minimum allowed window size.
When initializing the UserForm, the code below will place the lblResizer into the bottom right corner, and set the minimum permitted window size.
The following code triggers when the mouse clicks on the lblResizer icon. The code records that the icon has been clicked and the position of the mouse at that moment.
The following code triggers when the mouse moves while over the lblResizer.
Firstly, it will check that the window is larger than the minimum permitted size, and that mouse has been clicked. If both of these are True, the UserForm and the objects are re-positioned or resized based on the size of the mouse movement.
The following code triggers when the mouse button is released; the mouse movement ceases to resize the UserForm.
That is it; we’re good to go. Open up the UserForm and start resizing.
In this example, the UserForm only resizes when the mouse clicks on the icon in the bottom right. We could add the ability to expand from the right, bottom, or left by using objects positioned just inside the edges of the UserForm.
Download the example file
Want to see these examples working? Th e n download the example file.
About the author
Hey, I’m Mark, and I run Excel Off The Grid.
My parents tell me that at the age of 7 I declared I was going to become a qualified accountant. I was either psychic or had no imagination, as that is exactly what happened. However, it wasn’t until I was 35 that my journey really began.
In 2015, I started a new job, for which I was regularly working after 10pm. As a result, I rarely saw my children during the week. So, I started searching for the secrets to automating Excel. I discovered that by building a small number of simple tools, I could combine them together in different ways to automate nearly all my regular tasks. This meant I could work less hours (and I got pay raises!). Today, I teach these techniques to other professionals in our training program so they too can spend less time at work (and more time with their children and doing the things they love).
Do you need help adapting this post to your needs?
I’m guessing the examples in this post don’t exactly match your situation. We all use Excel differently, so it’s impossible to write a post that will meet everybody’s needs. By taking the time to understand the techniques and principles in this post (and elsewhere on this site), you should be able to adapt it to your needs.
But, if you’re still struggling you should:
- Read other blogs, or watch YouTube videos on the same topic. You will benefit much more by discovering your own solutions.
- Ask the ‘Excel Ninja’ in your office. It’s amazing what things other people know.
- Ask a question in a forum like Mr Excel, or the Microsoft Answers Community. Remember, the people on these forums are generally giving their time for free. So take care to craft your question, make sure it’s clear and concise. List all the things you’ve tried, and provide screenshots, code segments and example workbooks.
- Use Excel Rescue, who are my consultancy partner. They help by providing solutions to smaller Excel problems.
What next?
Don’t go yet, there is plenty more to learn on Excel Off The Grid. Check out the latest posts:
Источник
Vba excel форма на весь экран
200?’200px’:»+(this.scrollHeight+5)+’px’);»>
Option Explicit
Public FormIsOn As Boolean
Public Type RECT
Left As Long
Top As Long
Right As Long
Bottom As Long
End Type
Public Declare Function GetSystemMetrics Lib «user32.dll» (ByVal nIndex As Long) As Long
Public Declare Function GetDesktopWindow Lib «user32» () As Long
Public Declare Function GetWindowRect Lib «user32» (ByVal hWnd As Long, lpRect As RECT) As Long
Public Function ScreenWidth() As Single
Dim R As RECT
GetWindowRect GetDesktopWindow(), R
ScreenWidth = RRight ‘* Screen.TwipsPerPixelX
End Function
Public Function ScreenHeight() As Single
Dim R As RECT
GetWindowRect GetDesktopWindow(), R
ScreenHeight = R.Bottom * Screen.TwipsPerPixelY
End Function
Sub test()
Dim x As Integer, y As Integer
x = GetSystemMetrics(0)
y = GetSystemMetrics(1)
MsgBox «Ширина экрана:» & x & » : » & y
End Sub
Источник
VBA Excel. Первая форма (для начинающих)
Пример создания пользовательской формы в редакторе VBA Excel для начинающих программировать с нуля. Добавление на форму текстового поля и кнопки.
Начинаем программировать с нуля
Часть 4. Первая форма
[Часть 1] [Часть 2] [Часть 3] [Часть 4]
Создание пользовательской формы
Создайте или откройте файл Excel с расширением .xlsm (Книга Excel с поддержкой макросов) или с расширением .xls в старых версиях приложения.
Перейдите в редактор VBA, нажав сочетание клавиш «Левая_клавиша_Alt+F11».
В открывшемся окне редактора VBA выберите вкладку «Insert» главного меню и нажмите кнопку «UserForm». То же подменю откроется при нажатии на вторую кнопку (после значка Excel) на панели инструментов.
На экране редактора VBA появится новая пользовательская форма с именем «UserForm1»:
Добавление элементов управления
Обычно вместе с пользовательской формой открывается панель инструментов «Toolbox», как на изображении выше, с набором элементов управления формы. Если панель инструментов «Toolbox» не отобразилась, ее можно вызвать, нажав кнопку «Toolbox» во вкладке «View»:
При наведении курсора на элементы управления появляются подсказки.
Найдите на панели инструментов «Toolbox» элемент управления с подсказкой «TextBox», кликните по нему и, затем, кликните в любом месте рабочего поля формы. Элемент управления «TextBox» (текстовое поле) будет добавлен на форму.
Найдите на панели инструментов «Toolbox» элемент управления с подсказкой «CommandButton», кликните по нему и, затем, кликните в любом месте рабочего поля формы. Элемент управления «CommandButton» (кнопка) будет добавлен на форму.
Кликнув по элементу управления на форме, вы можете изменять его размер, перетягивая границы за белые квадратики, и перетаскивать по форме, ухватив за одну из границ. Кликнув по заголовку формы или по ее рабочему полю, вы можете также изменять ее размер, перетягивая границы за белые квадратики.
Нажатием клавиши «F4» вызывается окно свойств, с помощью которого можно вручную задавать значения свойств пользовательской формы и элементов управления. В окне свойств отображаются свойства выбранного элемента управления или формы, если выбрана она. Также окно свойств можно вызвать, нажав кнопку «Properties Window» во вкладке «View».
Отображение формы на экране
Чтобы запустить пользовательскую форму для просмотра из редактора VBA, необходимо выбрать ее, кликнув по заголовку или свободному от элементов управления полю, и совершить одно из трех действий:
- нажать клавишу «F5»;
- нажать на треугольник на панели инструментов (на изображении выше треугольник находится под вкладкой «Debug»);
- нажать кнопку «Run Sub/UserForm» во вкладке «Run».
Для запуска пользовательской формы с рабочего листа Excel, можно использовать кнопки, описанные в этой статье. Например, чтобы отобразить форму с помощью «кнопки – элемента ActiveX», используйте в модуле рабочего листа следующий код:
Источник
-
#1
Mr Excel,
I have created a userform in Visual Basic which automatically pops up when a workbook is opened. I would like it to appear in full screen mode ie self adjust to the users PC display settings / acceleration.
Is there a way to do this…if not I will have to design the form a little smaller to suit all needs (not the best solution but).
If you could help, I would be most appreciative.
Michael.
Remove leading & trailing spaces
Save as CSV to remove all leading and trailing spaces. It is faster than using TRIM().
-
#2
Hi Michael,
Please try this code.
If you want to keep the ratio, zoom property makes it possible.
<pre>
Private Sub UserForm_Initialize()
With Application
.WindowState = xlMaximized
Zoom = Int(.Width / Me.Width * 100)
Width = .Width
Height = .Height
End With
End Sub
</pre>
-
#3
Thanks Colo for answering Michael’s question! I needed to do this with my project too!
-
#4
Thank you Sir Colo for the solution. I need the same for my small project.
God bless you.
-
#5
Hello Colo
Handy code, thanks.
ColdGeorge
-
#6
for some reason i get the error runtime 380, could not set the zoom property please enter a value between 10 and 400?
-
#7
Your userform is too small compared to the size of your screen. Make it bigger if you want to use this method.
|
0 / 0 / 0 Регистрация: 17.03.2011 Сообщений: 9 |
|
|
1 |
|
Как сделать так, чтобы размер формы был максимальным т.е. форма была на весь экран?17.03.2011, 11:24. Показов 7807. Ответов 6
Привет. Помогите, пожалуйста, решить пару проблем. Есть Эксел файл, при открытии которого автоматически загружается пользовательская форма.
0 |
|
4131 / 2235 / 940 Регистрация: 01.12.2010 Сообщений: 4,624 |
|
|
17.03.2011, 13:33 |
2 |
|
Могу подсказать как сделать форму эквивалентной размеру приложения (не экрана)
0 |
|
0 / 0 / 0 Регистрация: 17.03.2011 Сообщений: 9 |
|
|
17.03.2011, 13:47 [ТС] |
3 |
|
Сделай одолжение. Спасибо. Brudda
0 |
|
pashulka 4131 / 2235 / 940 Регистрация: 01.12.2010 Сообщений: 4,624 |
||||
|
17.03.2011, 16:25 |
4 |
|||
|
Обратите внимание на то, что за размер определяется исходя из приложения (в данном случае MS Excel)
0 |
|
Димит 90 / 37 / 14 Регистрация: 03.11.2010 Сообщений: 429 |
||||
|
17.03.2011, 16:33 |
5 |
|||
|
Разрешите добавить.
Так сохранятся соотнашение сторон формы и пропорционально изменятся элементы на форме
1 |
|
0 / 0 / 0 Регистрация: 17.03.2011 Сообщений: 9 |
|
|
17.03.2011, 16:44 [ТС] |
6 |
|
Спасибо.
0 |
|
4131 / 2235 / 940 Регистрация: 01.12.2010 Сообщений: 4,624 |
|
|
17.03.2011, 18:15 |
7 |
|
Да… вопрос про Zoom я как-то и не заметил. Видать и вправду старею. Примечание : Однако вероятность подобного развития ситуации очень невелика.
0 |
|
IT_Exp Эксперт 87844 / 49110 / 22898 Регистрация: 17.06.2006 Сообщений: 92,604 |
17.03.2011, 18:15 |
|
7 |
- Brudda
- Обычный пользователь
- Сообщения: 79
- Зарегистрирован: 21.02.2005 (Пн) 14:47
- Откуда: Рига
Как сделать форму (UserForm) на весь экран?
Добрый день.
Мне кажется, что что-то похожее уже обсуждалось, но найти мне не удалось. Задача: необходимо сделать так, что бы сразу же после открытия файла на экране открывалась форма (UserForm) и ее размер был максимальным (на весь экран) для данной системы (т.е. монитор — разрешение и что там еще может быть). Может подскажете чего путного?
Заранее спасибо.
С почтением,
Brudda
- Brudda
- Обычный пользователь
- Сообщения: 79
- Зарегистрирован: 21.02.2005 (Пн) 14:47
- Откуда: Рига
Re: Как сделать форму (UserForm) на весь экран?
Brudda » 06.09.2008 (Сб) 13:53
Покапался я в инете и вот что нашел:
- Код: Выделить всё
Me.Height = Application.UsableHeight
Me.Width = Application.UsableWidth
Работает.
Читающим по-английски: похоже неплохой форум здесь http://www.mrexcel.com/forum/index.php
Brudda
- KL
- Microsoft MVP
- Сообщения: 483
- Зарегистрирован: 30.10.2005 (Вс) 0:31
- Откуда: Madrid
Re: Как сделать форму (UserForm) на весь экран?
KL » 06.09.2008 (Сб) 18:30
см. пример в приложении
- Вложения
-
Book1.xls
- (45 Кб) Скачиваний: 377
Последний раз редактировалось KL 07.09.2008 (Вс) 14:06, всего редактировалось 1 раз.
Привет,
KL
Вернуться в VBA
Кто сейчас на конференции
Сейчас этот форум просматривают: нет зарегистрированных пользователей и гости: 1


