
Элемент управления пользовательской формы TreeView, предназначенный для создания древовидной (иерархической) структуры. Примеры кода VBA Excel с TreeView.
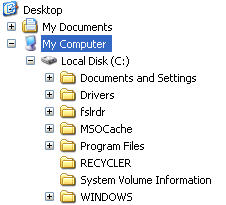
UserForm.TreeView – это элемент управления пользовательской формы, предназначенный для отображения информации в виде древовидной структуры, аналогичной древовидной иерархии папок в левой части проводника Windows. Каждый элемент древовидной структуры обычно называют узлом, ветвью или пунктом.

Каждый узел (пункт, ветвь) в древовидной структуре может содержать вложенные ветви, которые называются дочерними узлами. Узлы, содержащие дочерние пункты, называются родительскими. Их можно показывать как в развернутом, так и в свернутом виде.
Пункты элемента управления TreeView можно выбирать и привязывать к этому событию другие процедуры или строки кода VBA Excel. Рядом с ветвями иерархической структуры можно включить отображение флажков (CheckBox).
Добавление TreeView на Toolbox
Изначально на панели инструментов Toolbox нет ссылки на элемент управления TreeView, поэтому ее нужно добавить самостоятельно.
Чтобы добавить TreeView на панель инструментов Toolbox, кликните по ней правой кнопкой мыши и выберите из контекстного меню ссылку «Additional Controls…»:

В открывшемся окне «Additional Controls» из списка дополнительных элементов управления выберите строку «Microsoft TreeView Control»:

Нажмите кнопку «OK» и значок элемента управления TreeView появится на панели инструментов Toolbox:

Для работы кода VBA Excel с элементом управления TreeView необходимо добавить ссылку на библиотеку Microsoft Windows Common Controls 6.0 (SP6) (цифры у вас могут быть другие). Подключается ссылка в окне «References VBAproject», перейти в которое можно через главное меню редактора: Tools–>References…
Свойства древовидной структуры
| Свойство | Описание |
|---|---|
| Appearance | Внешний вид древовидной структуры (наличие 3D-рамки). По умолчанию cc3D (1) — рамка есть, ccFlat (0) — рамки нет. |
| BorderStyle | Отображение границ элемента управления TreeView. По умолчанию ccNone (0) — границ нет, ccFixedSingle (1) — границы есть. |
| CheckBoxes | Отображение флажков (CheckBox) рядом с узлами иерархической структуры. По умолчанию False — флажков нет, True — флажки есть. |
| ControlTipText | Текст всплывающей подсказки при наведении курсора на TreeView. |
| Enabled | Возможность раскрытия узлов и их выбора. True — перечисленные опции включены, False — выключены. |
| Font | Шрифт, начертание и размер текста узлов древовидной структуры. |
| FullRowSelect | Определяет область выбора и подсвечивания выбранной строки. По умолчанию False — область выбора ограничена текстом, True — область выбора распространяется на всю строку. |
| Height | Высота элемента управления TreeView. |
| HotTracking | Выделение узла подчеркиванием при наведении на него курсора. По умолчанию False — нет подчеркивания, True — есть подчеркивание. |
| Left | Расстояние от левого края внутренней границы пользовательской формы до левого края иерархической структуры. |
| LineStyle | Задает стиль веток. По умолчанию tvwTreeLines (0) — навигационные линии отображаются только у дочерних узлов, tvwRootLines (1) — навигационные линии отображаются у всех узлов. |
| Nodes | Возвращает коллекцию узлов. |
| SelectedItem | Возвращает выделенный пункт. |
| Sorted | Задает или отменяет автоматическую сортировку узлов элемента управления TreeView. По умолчанию False — сортировка отключена, True — сортировка включена. |
| Style | Задает стиль древовидной структуры. Она может состоять только из текста или из текста с дополнениями в разных комбинациях: навигационные линии, раскрывающие ветку плюсы, иконки — всего 8 задающих стиль констант. |
| TabIndex | Определяет позицию элемента управления в очереди на получение фокуса при табуляции, вызываемой свойством AutoTab или нажатием клавиш «Tab», «Enter». Отсчет начинается с 0. |
| Top | Расстояние от верхнего края внутренней границы пользовательской формы до верхнего края элемента управления. |
| Visible | Видимость элемента управления. True – TreeView отображается на пользовательской форме, False – TreeView скрыт. |
| Width | Ширина элемента управления. |
Программное создание узлов
Создание узлов элемента управления TreeView программным способом в VBA Excel.
Синтаксис
|
TreeView.Nodes.Add Relative, Relationship, Key, Text, Image, SelectedImage |
Свойство Nodes объекта TreeView возвращает коллекцию узлов, а метод Nodes.Add добавляет в коллекцию новый узел. Обязательным параметром является только Text.
Параметры
| Параметр | Описание |
|---|---|
| Relative | Уникальный ключ (Key) узла, относительно положения которого будет размещен новый пункт в соответствии с аргументом Relationship. |
| Relationship | Задает положение добавляемого узла относительно ветки, указанной аргументом Relative. |
| Key | Уникальный ключ (имя) создаваемого узла. |
| Text | Отображаемый текст узла (ветки, пункта). Обязательный параметр. |
| Image | Рисунок (иконка), который будет отображается перед узлом по умолчанию |
| SelectedImage | Рисунок (иконка), который заменит Image при выборе узла. |
Константы, которые применяются в качестве аргументов параметра Relationship:
| Константа | Значение | Описание |
|---|---|---|
| tvwFirst | 0 | Новый узел помещается перед всеми узлами того уровня, на котором находится узел, указанный аргументом Relative. |
| tvwLast | 1 | Новый узел помещается после всех узлов того уровня, на котором находится узел, указанный аргументом Relative. |
| tvwNext | 2 | Новый узел помещается после узла, указанного аргументом Relative (значение по умолчанию). |
| tvwPrevious | 3 | Новый узел помещается перед узлом, указанным аргументом Relative. |
| tvwChild | 4 | Новый узел создается как дочерний для узла, указанного аргументом Relative. |
Примеры кода VBA Excel с TreeView
Пример 1
Пример создание одного узла первого уровня. Для реализации примера необходима пользовательская форма с размещенным на ней элементом управления TreeView1.
|
Private Sub UserForm_Initialize() Me.Caption = «TreeView» TreeView1.Nodes.Add , , , «Текст узла первого уровня» End Sub |
Результат работы кода:

Пример 2
Генерация пяти узлов первого уровня с помощью кода VBA Excel. Для реализации примера необходима пользовательская форма с размещенным на ней элементом управления TreeView1.
|
Private Sub UserForm_Initialize() Me.Caption = «TreeView» Dim i As Byte With TreeView1.Nodes For i = 1 To 5 .Add , , , «Узел первого уровня №» & i Next End With End Sub |
Результат работы кода:

Пример 3
Создание узлов первого, второго и третьего уровней. Для реализации примера необходима пользовательская форма с размещенным на ней элементом управления TreeView1.
|
1 2 3 4 5 6 7 8 9 10 11 12 13 14 15 16 17 18 19 20 21 22 23 24 25 26 27 |
Private Sub UserForm_Initialize() Me.Caption = «TreeView» With TreeView1.Nodes ‘Создание узла «Node1» и трех его дочерних узлов .Add , , «Node1», «Text Node1» .Add «Node1», tvwChild, «Node1-Child1», «Text Node1-Child1» .Add «Node1», tvwChild, «Node1-Child2», «Text Node1-Child2» .Add «Node1», tvwChild, «Node1-Child3», «Text Node1-Child3» ‘Создание двух дочерних узлов ветки «Node1-Child1» .Add «Node1-Child1», tvwChild, «Node1-Child11», «Text Node1-Child11» .Add «Node1-Child1», tvwChild, «Node1-Child12», «Text Node1-Child12» ‘Создание узла «Node2» и трех его дочерних узлов .Add , , «Node2», «Text Node2» .Add «Node2», tvwChild, «Node2-Child1», «Text Node2-Child1» .Add «Node2», tvwChild, «Node2-Child2», «Text Node2-Child2» .Add «Node2», tvwChild, «Node2-Child3», «Text Node2-Child3» ‘Раскрываем свернутые по умолчанию узлы .Item(«Node1»).Expanded = True .Item(«Node2»).Expanded = True .Item(«Node1-Child1»).Expanded = True End With With TreeView1 ‘Отображаем навигационные линии и знаки плюс/минус .Style = tvwTreelinesPlusMinusText .LineStyle = tvwRootLines End With End Sub |
Результат работы кода:

Пример 4
Заполнение текстового поля в зависимости от выбранного пункта древовидной структуры с помощью кода VBA Excel. Для реализации примера необходима пользовательская форма с размещенными на ней элементами управления TreeView1 и TextBox1.
Данные для иерархической структуры и текстового поля содержатся в следующей таблице, размещенной на активном рабочем листе:

Код VBA Excel для создания узлов элемента управления TreeView1 с текстом из ячеек первого столбца таблицы:
|
1 2 3 4 5 6 7 8 9 10 11 12 13 14 15 16 17 18 19 20 21 22 23 24 25 26 27 28 29 |
Private Sub UserForm_Initialize() Me.Caption = «Каталог с описаниями» With TreeView1.Nodes ‘Добавляем ветки .Add , , «Node1», Cells(1, 1) .Add «Node1», tvwChild, «Node1-Child1», Cells(2, 1) .Add «Node1», tvwChild, «Node1-Child2», Cells(3, 1) .Add , , «Node2», Cells(4, 1) .Add «Node2», tvwChild, «Node2-Child1», Cells(5, 1) .Add «Node2», tvwChild, «Node2-Child2», Cells(6, 1) ‘Раскрываем свернутые по умолчанию узлы .Item(«Node1»).Expanded = True .Item(«Node2»).Expanded = True End With With TreeView1 ‘Отображаем навигационные линии и знаки плюс/минус .Style = tvwTreelinesPlusMinusText .LineStyle = tvwRootLines End With With TextBox1 .MultiLine = True .WordWrap = True .Text = «Выберите животное или растение» End With End Sub |
Код VBA Excel для заполнения текстового поля TextBox1 в зависимости от выбранного пункта древовидной структуры:
|
1 2 3 4 5 6 7 8 9 10 11 12 13 14 15 16 17 18 |
Private Sub TreeView1_NodeClick(ByVal Node As MSComctlLib.Node) With TreeView1 Select Case .SelectedItem Case Is = .Nodes(«Node1») TextBox1.Text = «Выберите животное или растение» Case Is = .Nodes(«Node1-Child1») TextBox1.Text = Cells(2, 2) Case Is = .Nodes(«Node1-Child2») TextBox1.Text = Cells(3, 2) Case Is = .Nodes(«Node2») TextBox1.Text = «Выберите животное или растение» Case Is = .Nodes(«Node2-Child1») TextBox1.Text = Cells(5, 2) Case Is = .Nodes(«Node2-Child2») TextBox1.Text = Cells(6, 2) End Select End With End Sub |
Результат работы кода:

Содержание
- 12.1 The VBA Treeview Control
- Adding the User Form
- An MSForms (all VBA) treeview
- Pages in this article
- How to use
- The container control
- Class modules
- Code behind your userform
- Variable declaration
- Initialisation
- Adding an instance of the treeview to your form
- Setting initial look
- Adding nodes
- Display the tree
- Termination
- Feedback
- Comments
- An MSForms (all VBA) treeview for Access, Excel And Word
- Content
- Introduction
- MAC Office and 64 bit Office Compatible!
- Acknowledgements
- Copyright and Licensing
- Disclaimer
- Donations
- Download
- ‘Pro’ Treeview and ListGrid VBA controls
- Content
- Other controls
- Comments
12.1 The VBA Treeview Control
In this section, you’re going to be learning about the Treeview control in Excel VBA. You’ll design a small VBA form like this one:

The Treeview on the left of the form has five headings. Each heading is called a parent node. Click the plus symbol next to a parent node and you’ll see other headings appear:
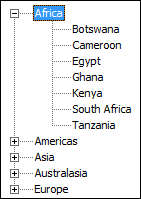
Because these headings are underneath a parent node they are called child nodes.
What we’ll do is to pull information from a spreadsheet when a child node is clicked. This information will appear in the labels and textboxes on the right of the form:

In the form above, Botswana, a child node of the parent node Africa, has been selected. The data for Botswana, therefore, appears on the form.
To follow along with the Treeview tutorial, we have a spreadsheet for you. Download the file below:
Once you have downloaded the spreadsheet, open it up. Now save it as a macro enabled workbook (XLSM file), so that you can do some coding with it.
The workbook consists of two sheets. The first sheet is the country data for the Treeview. (Many apologies if your country is not on the list — no slight is intended!) The second sheet contains the information we want to appear on the form whenever a child node is clicked.
With that in mind, let’s add a User Form to the project.
Adding the User Form
Click on the Developer ribbon at the top of Excel. Now click on Visual Basic in the Coding panel to open up the VBA Editor.
When your editor opens, click on Insert > User Form from the menu bar at the top.
In the properties panel for the new form, change the Name property to Nations. Locate the Caption property and change it to Nations.
In the VBA toolbox locate the Treeview control:

Draw a Treeview onto your form. Draw it on the left, and then use the resizing handles to make it a decent height. Make it wide enough for some text, but not too wide.
With your Treeview selected, change the following two properties:
You Treeview should look like this when you’re done:

Notice that the default parent and child nodes just say «Sample Node». We’ll change these defaults with code.
Add 5 labels to the right of your Treeview. Change the Caption properties to: Populations (in millions), Life expectancy, Currency, Capital, and Fun Facts. Add four more labels to the right of the first four labels. You can change the style of your labels. Experiment with the following properties of labels: BorderStyle, BorderColor, BackColor, Font.
Now add a textbox just below the Fun Facts label. Just below the textbox, add a Command Button. Change the Caption property to Exit.
Your form in design view should look something like ours below

The first thing we can do is to code for the Command Button. Double click your Exit button to open up its code stub. Now add the following line:
The Me keyword refers to the current form. When this line is executed, the form will close down.
In the next part below, you’ll learn about coding for the Nodes in the Treeview.
Источник
An MSForms (all VBA) treeview
Pages in this article
How to use
This page outlines the minimum steps needed to add this treeview control to your own Excel or Word VBA project. For Access the instructions are different, those can be found in the Access download.
The container control
Open the designer window of your userform and add a frame. This is where the treeview will be built. We recommend these properties (which are of course optional):
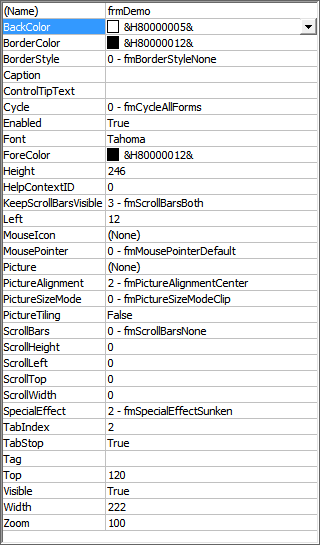
Recommended properties for the container frame
Your userform would look like this:
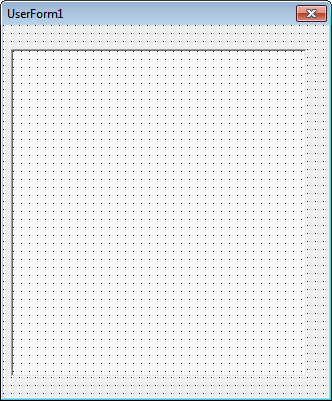
The container frame on your userform
If you want images in your treeview, you’ll have to add another frame (we called it frmImageBox) and then add Image controls within that frame. Set the Visible property of the frame to false to avoid it showing up on your userform. Like so:

The images frame on your userform
If you want to add images, make sure you name the new image controls properly, as it is the name of the imagecontrol you need to pass to the cNode class to get that image displayed. An easy way to get the images is to copy the entire frame with images from our userform to yours.
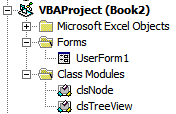
Class modules
Copy the class modules clsNode and clsTreeView to your project (you can simply drag them to your project). Your project (if you started with an empty workbook) would look like this:
The project with class modules in place
So far, things have been simple. The next parts are a bit more compex, but nothing too hard!
Code behind your userform
For the treeview to work, your userform needs some code, in particular these elements are necessary:
- Some variable declarations that will enable you to address the treeview and have your form handle events
- Initialisation code to:
- add nodes to the tree
- draw the treeview
Variable declaration
Add this code to the declaration section of your userform:
That’s it! No more variables needed!
Of course the name of the variable mcTree is totally up to you.
If you need another (independent) treeview on your form, simply add another frame to hold it and an additional variable in the forms declaration section (of course you name it differently than the other one) like the one shown here.
Initialisation
In the intialisation routine of your form, you need code that adds nodes to the tree and when you’re done adding nodes, you need to set some properties of the treeview. Then you’ll want the treeview to be displayed.
Adding an instance of the treeview to your form
Adding the instance is easy:
Now tell the tree class instance which frame is its container:
With mcTree
‘The VBA treeview needs a container Frame control on the userform.
‘Just draw a frame on your form where the treeview should appear
‘Make sure the frame has no border and no caption
‘Set it to show both scroll bars. (Keepscrollbarsvisible to both)
‘Set it to the special effect «Sunken»
‘Note that node label formats such as back/fore colors and font adopt
‘the frame container’s properties, so change if/as required.
‘(you can copy the frame named frmDemo from this userform )
‘Then pass this frame to the TreeControl of the treeview class
Set .TreeControl = Me.frmDemo
‘Title for message boxes:
.AppName = Me.AppName
Note that most of the code listed below is within the With mcTree . End With structure.
Setting initial look
You’ll want control over the look and feel of your treeview, here is some example code (this code comes immediately below the code sample show above):
If your treeview needs to show images, add a frame control with Image controls inside. Lets call it frmImageBox. This is how you tell the class where the images are:
That is just about all the plumbing you need to get started.
Adding nodes
First of all, a couple of variables are needed to add nodes:
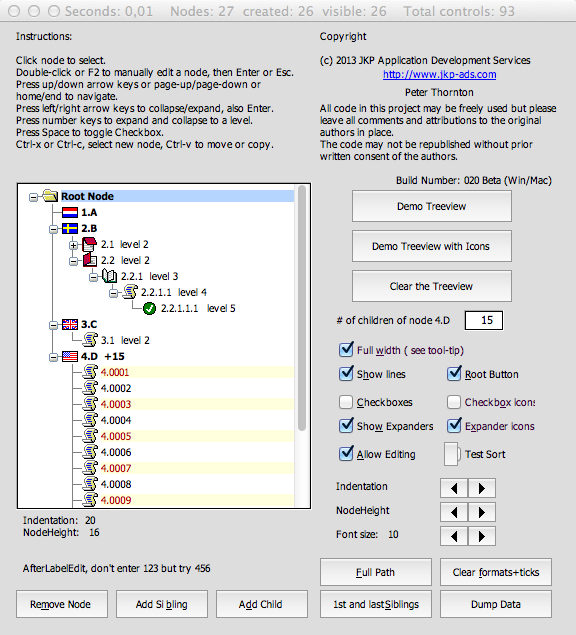
Next we’ll start by building the rootnode:
‘ add a Root node with main and expanded icons and make it bold
Set cRoot = .AddRoot(«Root», «Root Node», «FolderClosed», «FolderOpen»)
cRoot.Bold = True
Note that the tree can have more than one rootnode, there is a special RootNodes collection to which you automatically add new roots by calling the AddRoot method.
As you can see, we assume there are two icons in the image frame called FolderClosed and FolderOpen respectively.
Now we want to add children to the root. This is the code from our demo form:
‘Add branches with child nodes to the root:
‘Keys are optional but if using them they must be unique,
‘attempting to add a node with a duplicate key will cause a runtime error.
‘(below we will include unique keys with all the nodes)
Set cNode = cRoot.AddChild(«1», «1 A», «FLGNETH»)
cNode.Bold = True
‘Add a 2nd branch to the root:
Set cNode = cRoot.AddChild(«2», «2 B», «FLGSWED»)
cNode.Bold = True
‘If you want to add more child branches to a branch later on, use a variable to store the branch.
Set cExtraNode = cNode.AddChild(«2.1», «2.1 level 2», «NOTE03», «NOTE04») ‘ include an expanded icon
cExtraNode.Expanded = False ‘ this node will initially be collapsed,
‘ its child node controls will be created when expanded
‘To add a branches to a branch, make sure you set a variable to its ‘main’ or parent branch when created
‘Then use the Branch’s AddChild method, here to create multiple levels
Set cNode = cNode.AddChild(«2.2», «2.2 level 2», «NOTE03», «NOTE04») ‘ include an expanded icon
Set cNode = cNode.AddChild(«2.2.1», «2.2.1 level 3», «OpenBook»)
Set cNode = cNode.AddChild(«2.2.1.1», «2.2.1.1 level 4», «Scroll»)
Set cNode = cNode.AddChild(«2.2.1.1.1 «, «2.2.1.1.1 level 5», «GreenTick»)
‘Now add another branch to the branch we stored earlier
cExtraNode.AddChild «2.1.1», «2.1.1 level 3», «OpenBook»
‘Add a 3rd branch to the root, with a child node
Set cNode = cRoot.AddChild(«3», «3 C», «FLGUK»)
cNode.Bold = True
cNode.AddChild «3.1», «3.1 level 2», «Scroll»
‘ and add a 4th branch to the root
Set cNode = cRoot.AddChild(«4», «4 D», «FLGUSA02»)
cNode.Bold = True
cNode.Caption = «4 D +» & mlCntChildren
‘ add a bunch of child nodes to the 4th branch
For i = 1 To mlCntChildren ‘ 15
Set cExtraNode = cNode.AddChild(«4.» & i, » 4.1 » & Right$(«000» & i, 4), «Scroll»)
‘ add some alternate row colour formats
If i Mod 2 Then
cExtraNode.BackColor = RGB(255, 255, 220) ‘ pale yellow
cExtraNode.ForeColor = RGB(180, 0, 0) ‘ dark red font
End If
Next
Display the tree
Displaying the tree is as simple as calling one method:
Termination
When the form goes out of scope (i.e. out of memory) you need to remove the treeview from memory:
Feedback
We’ve worked hard to create a reliable and performant treeview. If you encounter bugs, please let us know so we can work on them. Better yet: if you have fixed a bug you found, send us your updated code so we can add the fixes you made.
In any case, comments (and compliments) are welcome!


Showing last 8 comments of 285 in total (Show All Comments):
Comment by: Gabriel (21-3-2022 16:16:00) deeplink to this comment
Hello again
In the previous question you solved the error about activating a node, thanks for the help!
Now, the node is selected but does NOT fire its click event.
How can I trigger the click on that node by code?
Something like «.ActiveNode.click» .
Comment by: Jan Karel Pieterse (21-3-2022 17:04:00) deeplink to this comment
The treeview does not trigger a click event when you use code to set the active node.
You could add that yourself, by adding this line to the end of the «Public Property Set ActiveNode» routine in the treeview class:
Comment by: Gabriel (21-3-2022 17:36:00) deeplink to this comment
EXCELENT.
thank you very very much.
Comment by: Essoo (27-4-2022 05:15:00) deeplink to this comment
Helloo
Thanks for the treeview controll works perfectly as explained
I want to know if this treeview has RightToLeft property and if not how to align it ftom right to left
Thanks in advance
Comment by: Peter Thornton (28-4-2022 09:22:00) deeplink to this comment
This Treeview does not have a RightToLeft property and I can’t suggest an easy way to adapt it as RTL. It would require significant changes!
Comment by: Gerson (30-6-2022 14:17:00) deeplink to this comment
Thank you so much for this CODE! Very interesting for MAC/PC.
I followed the steps but I’m getting this error:
«User-defined type not defined» in the line:
«Private moCheckboxImage (-1 to 1) As StdPicture»
Thank You
gerson
Comment by: Peter Thornton (4-7-2022 11:28:00) deeplink to this comment
«User-defined type not defined» with «As StdPicture» highlighted would suggest your project does not include the «OLE Automation» (stdole) reference.
That’s unusual as normally this reference is included by default, but see if it’s ticked in tools references.
Comment by: Gerson (4-7-2022 21:44:00) deeplink to this comment
Источник
An MSForms (all VBA) treeview for Access, Excel And Word
Content
Introduction
If you have ever used the Treeview control from the «Additional controls» section, then you know what a versatile control this is to show hierarchically organized data. There are a couple of problems with this Treeview control:
- Compile errors due to a difference in how the control libraries are registered in 32 bits Windows’ System32 and 64 bit Windows’ SysWOW64 folders. If you distribute a file that was saved in 64 bit Windows, containing one of the «Microsoft Windows Common Controls 6.0» (The Treeview control is one of them) and with the reference set to «mscomctl.ocx», people using 32 bit Windows will almost certainly have problems. At best it could entail removing both the control and the reference and replacing both, but at worst the user’s Excel can crash when trying to load the file and run the app.
- The standard Treeview control, like all non built-in ActiveX controls, cannot be used in 64 bit versions of Office.
Especially the second point convinced me to develop a custom-made Treeview «control», that only uses the native Office forms controls. A couple of weeks after I started building this I tricked Peter Thornton into helping me with it.
The screenshot below shows both our new Treeview (left) and the Windows one (right) side-by-side in their simplest display mode (read on, there are even prettier screenshots further down the page):
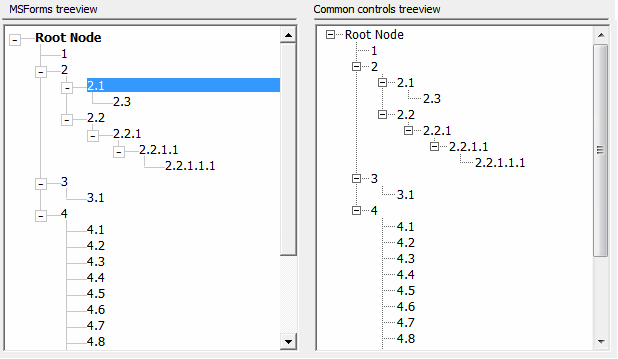
Two treeviews, left: VBA tree, right: Common controls tree
In the following pages I’ll show what our treeview can do and explain how to put it to use in your own VBA project.
MAC Office and 64 bit Office Compatible!

Treeview demo on Windows Excel
Screenshot of treeview on Mac Excel 2011
Acknowledgements
The basic plumbing and code structure of this treeview control was devised by me. However, without the help of my friend and fellow (former) Excel MVP Peter Thornton, lots of functionality would not have been available now. For that I sincerely thank Peter!
Furthermore, Access MVP Ben Clothier was kind enough to make the necessary adjustments to incorporate the treeview in an Access form
Also: Fellow Excel MVP Ron De Bruin ensured the treeview also works on MAC Office 2011, Thanks Ron!
Copyright and Licensing
All code in the treeview is (c) JKP Application Development Services and Peter Thornton (the Authors). It remains our sole intellectual property.
However, we’re offering this treeview to you at no cost. You get an unrestricted license for use in any VBA project you like. You’re free to modify any part of the code at will.
We do request that you:
- Keep our comments in place.
- Do not remove our names, url’s or email addresses from the code.
- Send us your praise and your comments.
- Send us any functional additions you do to the treeview.
And please mention the source of the treeview (including a link to this page) in your helpfile, manual and/or on your about screen.
We’re always interested to see how people have implemented the VBA Treeview. So please feel free to send a screenshot with a brief description or relevant details.
Disclaimer
You use this control at your own risk: The authors accept no liability whatsoever for any damages which may arise due to the use of our treeview.
Donations
Many, many hours were spent developing this treeview. Although we developed it for use in our own projects, we are giving it away for free!
Nevertheless, we would really be pleased if you actually express your appreciation in a more «tangible» form. So here is a paypal donation button at your disposal:
Download
The Excel workbook contains most of the documentation (on the tabs of the workbook), so I recommend you to at least download the Excel version. The Access version has instructions on its main form (click the «How do I. » button) on how to implement the treeview in your own projects.
Download the treeview sample Word document (build 026.5, 10 Jan 2023, downloaded 15.122 times)
Download the treeview sample Access database (build 026.5, 10 Jan 2023, downloaded 37.895 times)
‘Pro’ Treeview and ListGrid VBA controls
If your project needs more features and/or better performance than our free treeview, or if you need a listgrid control you’ve come to the right place as well.
The professional version of the treeview control has exceptional performance. Even with tens of thousands of nodes it will load quickly and remain highly responsive. It also has several new features including drag and drop. Timing experiments have shown that the pro version of our treeview outperforms the common controls treeview.
Our new ListGrid combines most of the functionality of the ActiveX Listview and Flexgrid controls with many extra useful features. It is the result of extensive beta testing by some of our treeview users, thanks guys!
The screenshot of the demo below gives an idea of just some of its capability.
The Pro Treeview and ListGrid are available for 32/64 bit Excel and Access. The Excel version will also work in Mac, one or two features are disabled for Mac but we’re working on it. Unlike our free treeview they are self contained in their own files and designed to work more like real controls.
For more details and if interested in a trial license to try either of these ‘controls’ please contact us:
Please note that the pro versions are paid versions. Pricing available upon request by using the links above (The download files above contain a Word document which also gives more details about the pro controls).
Content
Other controls
Another often used control is the calendar control. This control has the added problem that it has been deprecated with Office 2010 (where we’re supposed to use the date picker control). Frankens Team created an all-vba alternative using very similar techniques to what we’ve done here.
Showing last 8 comments of 864 in total (Show All Comments):
Comment by: Peter Thornton (16-12-2022 20:32:00) deeplink to this comment
It’s true our original free Treeview doesn’t handle non-standard DPI particularly well cosmetically, however I don’t think we’ve ever received any reports of what you describe.
If this occurs with the original/unmodified demo please describe the steps to reproduce. If it only occurs in your project, if you can email me a stripped down version with instructions I’ll have a look.
Comment by: Marcus (13-1-2023 15:57:00) deeplink to this comment
Excellent update to the Treeview control, Jan.
How would you suggest handling different screen resolutions to provide a more consistent display of icons.
For example, I have a high resolution laptop (3840 x 2400), but also need to use the Treeview on screens with a far lower resolution. On high resolution screens, the icons are tiny.
Would you suggest storing several icon sizes and swapping between them based on the screen’s resolution (and zoom level) or something else perhaps?
Comment by: Jan Karel Pieterse (13-1-2023 17:17:00) deeplink to this comment
I suggest to try adding one higher resolution icon to an image control with the image control set to zoom. Then create multiple copies of various sizes of that control, simply in design mode on a temporary userform. That way you can play with the picture related settings of the image controls to see what comes out best on various screen sizes. Your challenge is going to be to reliably get the resolution of the screen on which your firm is shown.
Comment by: Filipe Caetano (15-1-2023 11:46:00) deeplink to this comment
Please tell me what is new on build 26.5. I can’t find any information on excel file about this build.
Thank you very much.
Comment by: Jan Karel Pieterse (15-1-2023 12:09:00) deeplink to this comment
To find out what is new, look for «Narrator» and/or «reader». It is a temporary textbox which we added to make sure screen reader software understands the treeview and reads out the caption of the active node after you select it. This is an important accessibility feature for people with eye sight issues.
Comment by: Filipe Caetano (16-1-2023 10:38:00) deeplink to this comment
Thank you very much!
Great addition to the treeview control.
Keep the outstandin work.
Comment by: Mike Neely (19-2-2023 22:12:00) deeplink to this comment
Hi, Trying to use your control in Access 365 but I’m getting User Defined Type Not Defined. I added MS Forms 2.0 to my references but still not working. Would appreciate your help if possible, willing to donate more.
Comment by: Jan Karel Pieterse (20-2-2023 13:57:00) deeplink to this comment
Try this:
— Delete the userform from your project
— Copy modStartup from the demo access database into your project
— Run the routine called «CheckUF»
— Save your VB project
— Compact the database
Источник
This is a tutorial on the creation of a simple Treeview control on an Excel userform. For the purposes of this example, we’ll be populating the Treeview control with worksheet names and the addresses of cells with formulas in them.
The article is intended for intermediate level VBA coders, meaning that you should be comfortable with navigating the Visual Basic Editor (VBE), and preferably have created a least a few userforms in your experience. With the exception of Treeview specific items, I will not be covering terminology or explaining things in great detail, so if you’re a beginner, you may need some additional help to follow all the steps.
For ease of use, I have just used all the default object names that I’ve created for the article, but feel free to rename them in your own instance. Just remember to update the code examples to reflect the names of any controls that you do this for.
Creating the underlying structure:
To follow along with the example:
- Create a fresh new workbook
- Add a few formulas to worksheets 1 and 2. (It doesn’t matter what they are, just something that is a formula)
- Enter the VBE
- Add a new userform to your workbook (we’ll come back to this)
- Add a new blank code module, and place the following code in it (which will be used to launch the userform):
Sub ufLaunch()
     'Launch the userform
     UserForm1.Show
End Sub
Add the Treeview control to your controls toolbox:
Set up the userform:
- Right click the add the following controls:
- TreeView
- Label
- CommandButton
Your userform should now look approximately like this:


Add the code to make things work:
Each of the following routines will go in the userform module, and will be discussed at the end.
Private Sub UserForm_Initialize()
'Author : Ken Puls (https://www.excelguru.ca)
'Purpose: Load userform with desired defaults
     'Set control defaults
     With Me
          .CommandButton1.Caption = "Close"
          .Label1 = vbNullString
          .TreeView1.LineStyle = tvwRootLines
     End With
     'Populate the Treeview
     Call TreeView_Populate
End Sub

Private Sub TreeView_Populate()
'Author : Ken Puls (https://www.excelguru.ca)
'Purpose: Populate the treeview control
     Dim ws As Worksheet
     Dim rngFormula As Range
     Dim rngFormulas As Range

     With Me.TreeView1.Nodes
          'Clear TreeView control
          .Clear

          For Each ws In ActiveWorkbook.Worksheets
               'Add worksheet nodes
               .Add Key:=ws.Name, Text:=ws.Name

               'Check if any formulas in worksheet
               On Error Resume Next
               Set rngFormulas = ws.Cells.SpecialCells(xlCellTypeFormulas)
               On Error GoTo 0

               'Add formula cells
               If Not rngFormulas Is Nothing Then
                    For Each rngFormula In rngFormulas
                         .Add relative:=ws.Name, _
                              relationship:=tvwChild, _
                              Key:=ws.Name & "," & rngFormula.Address, _
                              Text:="Range " & rngFormula.Address
                    Next rngFormula
               End If

               'Release the range for next iteration
               Set rngFormulas = Nothing
          Next ws
     End With
End Sub

Private Sub Treeview1_NodeClick(ByVal Node As MSComctlLib.Node)
'Author : Ken Puls (https://www.excelguru.ca)
'Purpose: Write the selected node to a label for later use
     Me.Label1.Caption = Node.Key
End Sub

Private Sub CommandButton1_Click()
'Author : Ken Puls (https://www.excelguru.ca)
'Purpose: Unload the userform
     Unload Me
End Sub
The end result:
Save the project and go back to the Excel interface. Press Alt+F8 and run the «ufLaunch» macro to display the userform. As long as you put some formulas in your worksheets, those sheets should have a little + sign beside them, so click to expand them. Click on the Sheet names or the range names, and watch the label in the bottom left of the userform show what node you’ve selected. A screenshot of the finished form is shown below:
The code explained:
The userform makes use of four routines, which are broken down as follows:
Private Sub UserForm_Initialize()
The purpose of this routine is to set the desired defaults on the userform when it’s loaded. While I would normally set the default values of my controls in design view, I chose to go this route to allow an explanation with just the drag and drop of standard controls. This routine sets each controls defaults, then calls the Treeview_Populate routine to fill the treeview control.
While there isn’t much mystery in the above, there is one line in this routine worth nothing, and that is the one that sets the Treeview’s LineStyle property to ‘tvwRootLines’. This property is be default set to ‘tvwTreeLines’ when you drop the control on the userform. In that state, however, we do not get the +/- indicators, which means that you have to double click a node to get it to expand or collapse. Personally, I find the +/- view much more intuitive, as the user does not need to double click the node to know if there is anything in it. (They can still double click to expand or collapse the node if they want to though.)
Private Sub TreeView_Populate()
This routine actually populates all the nodes of the Treeview; in this case with the name of each worksheet in the workbook and the ranges that contain a formula.
The clearing of the control and looping through sheets and ranges should be self explanatory, so I won’t explore them in detail, but I do want to look at the method to add Treeview nodes.
When adding nodes to the Treeview, we need to create a parent/child relationship. In this scenario, each Sheet is a parent, and the ranges are the children that are spawned from the parents. (You could take this to a further level, by making the actual formula, value and fonts children of the ranges as well if you chose. In that case, the range would be the child of the sheet, but the parent of the other data under it.)
To add a top level parent node, we need to assign both a Key and some Text to the node. The key must be unique, and the text is what shows up in the Treeview on the userform. In the example above, the worksheets are added to the treeview using the following code:
.Add Key:=ws.Name, Text:=ws.Name
i.e. Me.TreeView1.Nodes.Add Key:=»Sheet1″, Text:=»Sheet1″
Every time you want to add a top level node to the userform (Sheet1, Sheet2 and Sheet3 in the example), you’d use the coding construct above.
To add child nodes, the procedure is slightly different. We still use the add method, and we still need a unique key, but we also have to provide the key of the parent node (relative) and the relationship (tvwChild). In the example, the code to add the children nodes (edited for line breaks) looks like this:
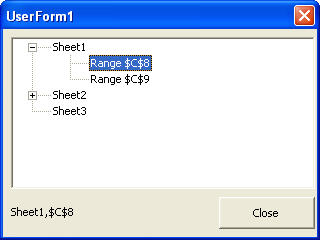
.Add relative:=ws.Name, relationship:=tvwChild, _
Key:=ws.Name & "," & rngFormula.Address, Text:="Range " & rngFormula.Address
i.e. Me.TreeView1.Nodes.Add relative:= «Sheet1″, relationship:=tvwChild Key:=»Sheet1,$C$8″, Text:=»Rage $C$8»
So to link the child node under the parent node, the ‘relative’ must be set equal to the parent node’s ‘key’, and the relationship must be set to ‘tvwchild’. To make the child node valid, it must also have it’s own key that is unique from any other in the treeview (not just the other children). What I did here was set up a compound key that is made up of the parent’s key and the current range, separated by a comma. Why? In a project I built with three parent/child layers (Sheet,Range,Data), I was easily able to split it up and see do what I wanted. For example, if I wanted to activate the selected range, I split the label’s contents into an array, use the individual components to activate the range i want. An example of this is shown in the Supplementary Information section at the end of the article.
Private Sub Treeview1_NodeClick(ByVal Node As MSComctlLib.Node)
The purpose of this routine is to capture the treeview node’s click event and write the key of the clicked node to our label for later use. I set the label1 control to ‘vbNullstring’ when the form was loaded, to ensure that the label is blank if no control is selected.
Private Sub CommandButton1_Click()
This command button simply unloads the userform.
Conclusion:
Once understood, the Treeview control is actually quite easy to set up and use. While this example has focussed on using the treeview control in an Excel userform, it could just as easily be applied in an Access, Word or Powerpoint solution, or any other application that supports the use of VBA. (In fact, this control can actually be accessed from other languages as well.)
Supplementary Information
Adding images to the Treeview:
The treeview control is used in a great many places in Microsoft Windows, and many times has images associated with it. Just one example of this is the capture below from the windows explorer:
Like the picture above, you can add images to your treeview control, and my friend Colo had a great page on doing that. While his site is no longer online, the page can still be access via the Google Wayback machine at this link.
Using the Treeview form to go to the selected range:
The following routine would add additional functionality to our example, by taking the user to the selected worksheet or range. It also goes in the userform module of our example, but you will need to add a new button to trigger it:
Private Sub CommandButton2_Click()
'Author : Ken Puls (https://www.excelguru.ca)
'Purpose: Go to the selected node
     Dim sNodes() As String

     'Check if a node has been selected
     If Me.lblNode.Caption = vbNullString Then
          MsgBox "You have not selected anything!" & vbNewLine & _
                 "Please select something and try again.", vbCritical + vbOKOnly, _
                 "Nothing selected"
          Exit Sub
     End If

     'Split label into portions
     sNodes = Split(Me.lblNode, ",")

     With Worksheets(sNodes(0))
          'Activate the worksheet
          .Activate

          'Activate the appropriate range
          If UBound(sNodes) + 1 > 1 Then
               'Activate selected range
               .Range(sNodes(1)).Activate
          Else
               'Worksheet selected, activate "A1"
               .Range("A1").Activate
          End If
     End With

     'Unload the userform
     Unload Me
End Sub
Syndication:
This article has also been published at Professional Office Developers Association (no longer online).
You’ve probably used a TreeView to view a hard drive directory structure before, you click on a folder and expand it to show the folders within that that folder. The top folder is the parent and the folder within it are the children. Each folder is a node. All nodes can have children (subfolders).
The following table shows how I would store a single parent node that has to child nodes.
| ParentGroup | ParentGroup |
|---|---|
| Parent 1 | |
| Child 1a | Parent 1 |
| Child 1a | Parent 1 |
This is an example of a a self-join table in a database, i.e. table that looks at itself. You could have an Excel table that looks like this, too.
I’ve created sample files for both a form in Microsoft Access and worksheet in Microsoft Excel. In the article I will be referring to a form in an Access database and populating data from a single table (the sample file also shows populating from multiple sources), but the method of adding nodes is the same; what differs is how you get the data used to populate the TreeView control.
Here’s the data I created in the sample database.

Download the sample file to follow along. I will only be post parts of the code and explaining them. It’s easier to step through it yourself then for me to try to explain it all.
Here’s the highlights of the Microsoft Access sample file
- Example ‘Groups’ TreeView populating using the table described above. Nodes are populated from a DAO recordset using a SQL string statement.
- Only the first level nodes are filled out when you open the form (as well as the first child, if any, so that there is a + for that node).
- Child nodes are only completely added when you expand a parent node.
- Also, includes a ‘Music’ data form that fills out nodes different levels from different data sources for each level (uses data from this article, Artists—>Albums—>Songs). Nodes are populated from stored queries; each query contains a nodeID and nodeText field that is used to set the .Key and .Text property when adding a node.
- Two versions of the ‘Music’ data example. One that fills out child nodes when you expand a parent node, and another that fills out all the node on the form’s open even (could be slow if you have a lot of nodes).


VBA code for working with a Treeview control
Dim nParent As Node, nChild As Node

'Basic formatting of TreeView
With Me.ctlTreeview
    .LineStyle = 1  'Root lines
    .Style = 7      'TreelinesPlusMinusPictureText
End With

'NODE PROPERTIES
'Node Key = unique identifier for each node, AND must be text (so numbers must be used as '1 and so on).
'- This is not the same as the .Index for a node. The index is a number based on position in tree hierachy.
'Node Text = Text you see in the tree view

'Basic code for adding node to TreeView control
'Set nAdd = GroupTree.Nodes.Add(parent node if any, relationship, node key, text to show with node)

'Add top level node (is not a child of any node)
Set nParent = GroupTree.Nodes.Add(, , "strNodeKey, "strNodeText"))

'Constants used to define relationship of node when adding
'CONSTANT / DESCRIPTION
'tvwFirst / Add as the first node at the level of the relative.
'tvwLast / Add as the last node at the level of the relative.
'tvwNext / Add after immediately following a specified node.
'tvwPrevious / Add after immediately preceding a specified node.
'tvwChild / Add as a child to the specified node.

'Add node that is a child
Set nChild = GroupTree.Nodes.Add(nParent, tvwChild, "strNodeKey, "strNodeText")

'Set a node to a specific node using the Key
Set nParent = GroupTree.Nodes("strNodeKey")

'Properties of Node
Debug.Print nParent.Index 'Not sure if you can refer to a node using the index number. I haven't found a way to yet.
Debug.Print nParent.Key
Debug.Print nParent.Text

'Expand a node to show it's children
nParent.Expanded = True

'Collapse a node to hide  it's children
nParent.Expanded = False

'Clear all nodes
Me.ctlTreeview.Nodes.Clear
Additionally, I also wrote a function to figure out which node level a node is at (i.e. to top-most level = level 1). I’ve seen people who count the number of «» in the .FullPath; The .PathSeparator «» is used to separate levels in the node’s path, e.g. «ParentChildGrandchild» (Grandchild is Level 3, 2*»» + 1). However, that method won’t work if the node text itself contains a «», e.g. «ThisWontWork». You can change what is used as the PathSeparator but the problem would still remain.
The approach I took is to count how many iterations it takes to get up to the top-most level using the .Root and .FirstSibling properties.
Public Function NodeLevel(ByVal nNode As Node) As Integer

    '*********************************************************************************************************
    'Function: Return the level of a node
    ' - I thought of using Len(Node.FullPath) - Len(Replace(Node.FullPath, "", "")),
    '   but that would give an incorrect answer if the a node's text included "" in it, e.g. 'ACDC'
    '
    'Written by Azli Hassan, http://AzliHassan.com/apps
    '*********************************************************************************************************

    'Set initial level to 1 (TreeView is base 0, but I'm using 1)
    NodeLevel = 1

    'Keep 'moving' up a level until we reach one level below the top-most level
    '.Root" Returns a reference to the root Node object of a TreeView control. (i.e. the FIRST node in top-most level)
    '.FirstSibling: Returns a reference to the first Node object in a hierarchy level. (i.e. the FIRST node in level)
    While nNode.Root <> nNode.FirstSibling 'Next 'up' level is the root (if they are the same then we're at level 1)
        NodeLevel = NodeLevel + 1
        Set nNode = nNode.Parent
    Wend

End Function
If I find out more than I know now, I’ll be sure to update this article. But this is all you need to add nodes to a TreeView ActiveX control.
[Note: Since this is an ActiveX control, it’s possible that it will stop working because of some update Microsoft did (it’s happened before). Try searching for ‘mscomctl.ocx’ in Google.]
Additional Links
- Treeview Sample File — Microsoft Access
- Treeview Sample File — Microsoft Excel
- Visual Basic Concepts: Using the TreeView Control — https://docs.microsoft.com/en-us/previous-versions/visualstudio/visual-basic-6/aa733703(v=vs.60)