|
Dollinsky Пользователь Сообщений: 24 |
Коллеги, прошу помощи: Спасибо! |
|
БМВ Модератор Сообщений: 21378 Excel 2013, 2016 |
#2 11.08.2021 17:03:47
По вопросам из тем форума, личку не читаю. |
||
|
Jack Famous Пользователь Сообщений: 10848 OS: Win 8.1 Корп. x64 | Excel 2016 x64: | Browser: Chrome |
Dollinsky, цикл по всем листам книги (For Each sh in ActiveWorkBook), в нём цикл по всем умным таблицам (For Each LO in sh.ListObjects) Во всех делах очень полезно периодически ставить знак вопроса к тому, что вы с давних пор считали не требующим доказательств (Бертран Рассел) ►Благодарности сюда◄ |
|
Dollinsky Пользователь Сообщений: 24 |
Спасибо! В Immediate попадает, а как на лист вывести? Скажем, Лист4 начиная со 2-й строки по столбцам B,C,D ? |
|
БМВ Модератор Сообщений: 21378 Excel 2013, 2016 |
#5 11.08.2021 17:38:52
та же фигня + еще и лень По вопросам из тем форума, личку не читаю. |
||
|
Dollinsky Пользователь Сообщений: 24 |
Спасибо! Изменено: Dollinsky — 11.08.2021 18:47:55 |
|
sokol92 Пользователь Сообщений: 4445 |
#7 11.08.2021 19:16:20
Не должно. Проверьте:
Владимир |
||||
|
Dollinsky Пользователь Сообщений: 24 |
|
|
Jack Famous Пользователь Сообщений: 10848 OS: Win 8.1 Корп. x64 | Excel 2016 x64: | Browser: Chrome |
#9 12.08.2021 09:51:08
Владимир, приветствую! Всё-таки я не сторонник подменять служебные имена своими, и потому переменную листа я бы назвал sh As WorkSheet или sh As Sheet Во всех делах очень полезно периодически ставить знак вопроса к тому, что вы с давних пор считали не требующим доказательств (Бертран Рассел) ►Благодарности сюда◄ |
||
|
БМВ Модератор Сообщений: 21378 Excel 2013, 2016 |
#10 12.08.2021 10:57:44
и потом в объектной модели появился объект SH и ты такой «ой блин все переписывать». да и
что-то не то во фразе. По вопросам из тем форума, личку не читаю. |
||||
|
Jack Famous Пользователь Сообщений: 10848 OS: Win 8.1 Корп. x64 | Excel 2016 x64: | Browser: Chrome |
#11 12.08.2021 11:25:07
VBE Replace
«своими» можно было не писать, но и так корректно Изменено: Jack Famous — 12.08.2021 11:26:47 Во всех делах очень полезно периодически ставить знак вопроса к тому, что вы с давних пор считали не требующим доказательств (Бертран Рассел) ►Благодарности сюда◄ |
||||
|
БМВ Модератор Сообщений: 21378 Excel 2013, 2016 |
#12 12.08.2021 12:18:32
в нем нет, а вот в объектной модели может. По вопросам из тем форума, личку не читаю. |
||
|
sokol92 Пользователь Сообщений: 4445 |
#13 12.08.2021 20:41:17
Я имена привел для #2. случае с функцией VBA Msgbox, которая совсем не дружит с юникодом. Изменено: sokol92 — 12.08.2021 20:41:34 Владимир |
||
|
Jack Famous Пользователь Сообщений: 10848 OS: Win 8.1 Корп. x64 | Excel 2016 x64: | Browser: Chrome |
#14 13.08.2021 09:29:36
это тип переменной
ну тут уже вкусовщина. Я, как разработчик, лучше вызову MyMsgBox с блэкджеком и прочим, чем буду вызывать MsgBox, с разным результатом в зависимости от того, есть подмена или нет Изменено: Jack Famous — 13.08.2021 09:31:01 Во всех делах очень полезно периодически ставить знак вопроса к тому, что вы с давних пор считали не требующим доказательств (Бертран Рассел) ►Благодарности сюда◄ |
||||||
|
БМВ Модератор Сообщений: 21378 Excel 2013, 2016 |
#15 13.08.2021 09:44:40 Off
да ладно , вангую будет PRDXMsgBox По вопросам из тем форума, личку не читаю. |
||
|
Jack Famous Пользователь Сообщений: 10848 OS: Win 8.1 Корп. x64 | Excel 2016 x64: | Browser: Chrome |
#16 13.08.2021 09:47:43
почти: PRDX_MsgBox Во всех делах очень полезно периодически ставить знак вопроса к тому, что вы с давних пор считали не требующим доказательств (Бертран Рассел) ►Благодарности сюда◄ |
||
|
Дмитрий(The_Prist) Щербаков Пользователь Сообщений: 14182 Профессиональная разработка приложений для MS Office |
#17 13.08.2021 12:55:01
в зависимости от ситуации может очень сильно подвести, выдав ошибку типов. Например, если в книгу будет вставлен лист типа Диаграмма, либо Лист макросов, Диалоговых окон…У этих листов нет таких объектов, как таблицы и в них они не могут быть вставлены.
а нет служебного Sheet. Поэтому можно и попользовать
нет такого типа. Есть коллекция Sheets, которая подразделяется на 5 других типов:
Есть Worksheets, которая содержит только рабочие листы. И есть Worksheet — это как раз тип. А типа Sheet нет и не было. И скорее всего не будет, т.к. не может быть просто типа Sheet, т.к. его нельзя будет отнести к конкретному типу листов, а MS любит конкретику в этом плане Изменено: Дмитрий(The_Prist) Щербаков — 13.08.2021 12:55:27 Даже самый простой вопрос можно превратить в огромную проблему. Достаточно не уметь формулировать вопросы… |
||||||||
|
Jack Famous Пользователь Сообщений: 10848 OS: Win 8.1 Корп. x64 | Excel 2016 x64: | Browser: Chrome |
#18 13.08.2021 13:04:25
проверил, действительно нет, спасибо тебе и Мише с Соколом Во всех делах очень полезно периодически ставить знак вопроса к тому, что вы с давних пор считали не требующим доказательств (Бертран Рассел) ►Благодарности сюда◄ |
||
|
БМВ Модератор Сообщений: 21378 Excel 2013, 2016 |
#19 13.08.2021 17:36:57
да, согласен. Редко такое бывает но ради универсальности лучше так. По вопросам из тем форума, личку не читаю. |
||
Как вывести список всех сводных таблиц из книги?
Предположим, у вас есть большая книга, содержащая несколько сводных таблиц, теперь вы хотите перечислить все сводные таблицы в этой книге, возможно ли это? Конечно, следующий код VBA в этой статье окажет вам услугу. Чтобы узнать больше, прочтите статью ниже.
Список всех сводных таблиц из книги с кодом VBA
 Список всех сводных таблиц из книги с кодом VBA
Следующий код VBA может помочь вам перечислить все имена сводных таблиц вместе с их атрибутами, такими как диапазон исходных данных, имя рабочего листа, дата обновления и так далее.
1. Откройте свою книгу, в которой вы хотите перечислить все сводные таблицы.
2. Удерживайте ALT + F11 ключи, и он открывает Окно Microsoft Visual Basic для приложений.
3. Нажмите Вставить > Модулии вставьте следующий код в Окно модуля.
Код VBA: список всех сводных таблиц из книги
Sub ListPivotsInfor()
'Update 20141112
    Dim St As Worksheet
    Dim NewSt As Worksheet
    Dim pt As PivotTable
    Dim I, K As Long
    Application.ScreenUpdating = False
    Set NewSt = Worksheets.Add
    I = 1: K = 2
    With NewSt
        .Cells(I, 1) = "Name"
        .Cells(I, 2) = "Source"
        .Cells(I, 3) = "Refreshed by"
        .Cells(I, 4) = "Refreshed"
        .Cells(I, 5) = "Sheet"
        .Cells(I, 6) = "Location"
        For Each St In ActiveWorkbook.Worksheets
            For Each pt In St.PivotTables
                I = I + 1
                .Cells(I, 1).Value = pt.Name
                .Cells(I, 2).Value = pt.SourceData
                .Cells(I, 3).Value = pt.RefreshName
                .Cells(I, 4).Value = pt.RefreshDate
                .Cells(I, 5).Value = St.Name
                .Cells(I, 6).Value = pt.TableRange1.Address
            Next
        Next
        .Activate
    End With
    Application.ScreenUpdating = True
End Sub
4, Затем нажмите F5 Ключ для запуска этого кода, все имена сводных таблиц, диапазон исходных данных, имя рабочего листа и другие атрибуты перечислены в новом рабочем листе, который помещается перед вашим активным листом, как показано на следующем снимке экрана:
Статьи по теме:
Как проверить, существует ли в книге сводная таблица?
Как добавить несколько полей в сводную таблицу?
Лучшие инструменты для работы в офисе
Kutools for Excel Решит большинство ваших проблем и повысит вашу производительность на 80%
- Снова использовать: Быстро вставить сложные формулы, диаграммы и все, что вы использовали раньше; Зашифровать ячейки с паролем; Создать список рассылки и отправлять электронные письма …
- Бар Супер Формулы (легко редактировать несколько строк текста и формул); Макет для чтения (легко читать и редактировать большое количество ячеек); Вставить в отфильтрованный диапазон…
- Объединить ячейки / строки / столбцы без потери данных; Разделить содержимое ячеек; Объединить повторяющиеся строки / столбцы… Предотвращение дублирования ячеек; Сравнить диапазоны…
- Выберите Дубликат или Уникальный Ряды; Выбрать пустые строки (все ячейки пустые); Супер находка и нечеткая находка во многих рабочих тетрадях; Случайный выбор …
- Точная копия Несколько ячеек без изменения ссылки на формулу; Автоматическое создание ссылок на несколько листов; Вставить пули, Флажки и многое другое …
- Извлечь текст, Добавить текст, Удалить по позиции, Удалить пробел; Создание и печать промежуточных итогов по страницам; Преобразование содержимого ячеек в комментарии…
- Суперфильтр (сохранять и применять схемы фильтров к другим листам); Расширенная сортировка по месяцам / неделям / дням, периодичности и др .; Специальный фильтр жирным, курсивом …
- Комбинируйте книги и рабочие листы; Объединить таблицы на основе ключевых столбцов; Разделить данные на несколько листов; Пакетное преобразование xls, xlsx и PDF…
- Более 300 мощных функций. Поддерживает Office/Excel 2007-2021 и 365. Поддерживает все языки. Простое развертывание на вашем предприятии или в организации. Полнофункциональная 30-дневная бесплатная пробная версия. 60-дневная гарантия возврата денег.
Вкладка Office: интерфейс с вкладками в Office и упрощение работы
- Включение редактирования и чтения с вкладками в Word, Excel, PowerPoint, Издатель, доступ, Visio и проект.
- Открывайте и создавайте несколько документов на новых вкладках одного окна, а не в новых окнах.
- Повышает вашу продуктивность на 50% и сокращает количество щелчков мышью на сотни каждый день!
Комментарии (20)
Оценок пока нет. Оцените первым!
Содержание
- Vba excel списка таблиц
- Как создать список всех сводных таблиц книги в Excel
- Как макрос работает
- Код макроса
- Как это код работает
- Как использовать
- Vba excel списка таблиц
Vba excel списка таблиц
(обращений: 95 с 04.10.2017)
Разделы: ЧаВо (FAQ)
Описание: Для чего? Ну, например, что бы написать свой собственный архивариус. Стандартный не совсем удобен.
Автор: Дмитрий Сонных (AKA Joss)
Добавил на сайт: 
Иногда бывает надо получить список присутствующих в базе элементов. Причины могут быть самые разные. Самое простое — пройтись циклом по соответствующим семействам. И так, приступим.
Dim obj As AccessObject, dbs As Object
Set dbs = Application.CurrentData
‘ Search for open AccessObject objects in AllTables collection.
For Each obj In dbs.AllTables
‘ Print name of obj.
Выводятся все таблицы вне зависимости от того локальные они или линкованные.
Можно исключить системные таблицы
Dim obj As AccessObject, dbs As Object
Set dbs = Application.CurrentData
‘ Search for open AccessObject objects in AllTables collection.
For Each obj In dbs.AllTables
If Left (obj.Name, 4) <> «MSys» Then
If Left (obj.Name, 1) <> «
‘ Print name of obj.
Можно вывести список открытых таблиц
Dim obj As AccessObject, dbs As Object
Set dbs = Application.CurrentData
‘ Search for open AccessObject objects in AllTables collection.
For Each obj In dbs.AllTables
If obj.IsLoaded = True Then
‘ Print name of obj.
Можно так же уточнить, в каком режиме открыта таблица — в обычном или режиме конструктора (иногда бывает нужно).
Dim obj As AccessObject, dbs As Object
Set dbs = Application.CurrentData
‘ Search for open AccessObject objects in AllTables collection.
For Each obj In dbs.AllTables
If obj.IsLoaded = True Then
‘ Print name of obj.
Debug.Print obj.Name, obj.CurrentView
‘ CurrentView = 0 as acCurViewDesign
‘ CurrentView = 2 as acCurViewDatasheet
Теперь перейдём к запросам.
Dim obj As AccessObject, dbs As Object
Set dbs = Application.CurrentData
‘ Search for open AccessObject objects in AllQueries collection.
For Each obj In dbs.AllQueries
‘ Print name of obj.
Можно так же определить, какие из запросов открыты в настоящее время и в каком режиме
Dim obj As AccessObject, dbs As Object
Set dbs = Application.CurrentData
‘ Search for open AccessObject objects in AllQueries collection.
For Each obj In dbs.AllQueries
If obj.IsLoaded = True Then
‘ Print name of obj.
Debug.Print obj.Name, obj.CurrentView
‘ CurrentView = 0 as acCurViewDesign
‘ CurrentView = 2 as acCurViewDatasheet
Dim obj As AccessObject, dbs As Object
Set dbs = Application.CurrentProject
‘ Search for open AccessObject objects in AllForms collection.
For Each obj In dbs.AllForms
‘ Print name of obj.
Можно так же определить, какие из форм открыты в настоящее время и в каком режиме
Dim obj As AccessObject, dbs As Object
Set dbs = Application.CurrentProject
‘ Search for open AccessObject objects in AllForms collection.
For Each obj In dbs.AllForms
If obj.IsLoaded = True Then
‘ Print name of obj.
Debug.Print obj.Name, obj.CurrentView
‘ CurrentView = 0 as acCurViewDesign
‘ CurrentView = 1 as acCurViewFormBrowse
‘ CurrentView = 2 as acCurViewDatasheet
‘ CurrentView = 3 as acCurViewPivotTable
Получить список отчётов
Dim obj As AccessObject, dbs As Object
Set dbs = Application.CurrentProject
‘ Search for open AccessObject objects in AllReports collection.
For Each obj In dbs.AllReports
‘ Print name of obj.
Можно так же определить, какие из отчётов открыты в настоящее время и в каком режиме
Dim obj As AccessObject, dbs As Object
Set dbs = Application.CurrentProject
‘ Search for open AccessObject objects in AllReports collection.
For Each obj In dbs.AllReports
If obj.IsLoaded = True Then
‘ Print name of obj.
Debug.Print obj.Name, obj.CurrentView
‘ CurrentView = 0 as acCurViewDesign
‘ CurrentView = 5 as acCurViewPreView
‘ CurrentView = 6 as acCurViewReportBrowse
‘ CurrentView = 7 as acCurViewLayout
Dim obj As AccessObject, dbs As Object
Set dbs = Application.CurrentProject
‘ Search for open AccessObject objects in AllMacros collection.
For Each obj In dbs.AllMacros
‘ Print name of obj.
Можно так же определить, какие из макросов открыты в настоящее время и в каком режиме (а режим пока один — режим конструктора)
Dim obj As AccessObject, dbs As Object
Set dbs = Application.CurrentProject
‘ Search for open AccessObject objects in AllMacros collection.
For Each obj In dbs.AllMacros
If obj.IsLoaded = True Then
‘ Print name of obj.
Debug.Print obj.Name, obj.CurrentView
‘ CurrentView = 0 as acCurViewDesign
Dim obj As AccessObject, dbs As Object
Set dbs = Application.CurrentProject
‘ Search for open AccessObject objects in AllTables collection.
For Each obj In dbs.AllModules
‘ Print name of obj.
Наличие модулей у форм и отчётов так определить нельзя. Они не выводятся. Для этого необходимо открыть отчёт или форму и проверить свойство HasModule
Можно так же определить, какие из модулей открыты в настоящее время и в каком режиме (а режим пока один — режим конструктора)
Dim obj As AccessObject, dbs As Object
Set dbs = Application.CurrentProject
‘ Search for open AccessObject objects in AllModules collection.
For Each obj In dbs.AllModules
If obj.IsLoaded = True Then
‘ Print name of obj.
Debug.Print obj.Name, obj.CurrentView
‘ CurrentView = 0 as acCurViewDesign
Чтобы определить тип модуля — Module или Class Module, необходимо открыть этот модуль и проверить свойство Type.
| Текущий рейтинг: 0 из 5 (проголосовало:0).  |
Здравствуйте! |
| Для тех, кто не хочет связываться с ADO
Dim dbs As Database, tdf As TableDef Set dbs = CurrentDb For Each tdf In dbs.TableDefs ‘ Print name of obj. Set tdf = Nothing Set dbs = Nothing |
| 02.10.2017 11:23 |
| Взято с SQL.RU Ссылка ********************************************************************** Здравствуйте уважаемые! В приложении — одна форма, которая формирует список всех объектов (форм, отчетов и модулей) и референсов той базы (или .adp проекта) из которой запускается. Если кому охота — можно доделать для страниц и макросов. Для референсов — проверяется корректность всех ссылок проекта. Может экспортировать списки в текстовый файл. Важно! — форма работает, если подключен файл MSCOMCTL.OCX (т.к. используется listview) Навеяно Гетцем, хотя сделал намного раньше, чем прочитал. Источник Как создать список всех сводных таблиц книги в ExcelЧто делает макрос: Когда рабочая книга содержит несколько сводных таблиц, часто нужно иметь список инвентаризации, в котором изложены основные сведения о сводных таблицах. При этом в списке, вы можете быстро просмотреть важную информацию, такую как местоположение каждой сводной таблицы, расположение исходных данных каждой сводной таблицы, индекс кэша и т.д. Как макрос работаетКогда вы создаете переменную объекта PivotTable, вы открываете все свойства сводной таблицы — такие как имя, местоположение, индекс кэша и т. д. В этом макросе цикл проходит по каждой сводной таблице, извлекает определенные свойства на новый лист. Код макросаКак это код работает
Как использоватьДля реализации этого макроса, вы можете скопировать и вставить его в стандартный модуль:
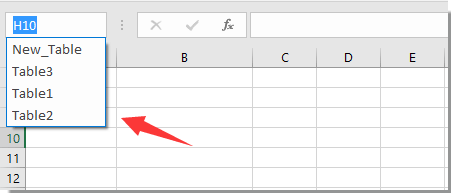
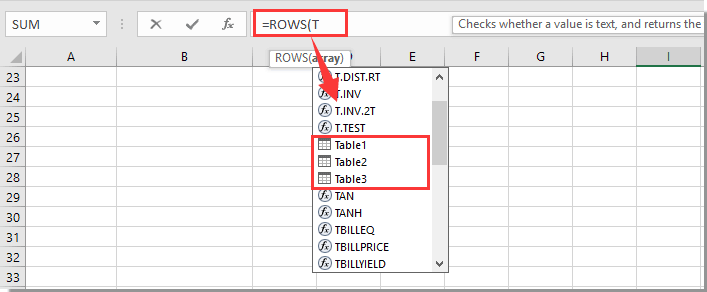
Источник Vba excel списка таблицЧтобы перечислить все имена таблиц в книге, методы, описанные в этой статье, могут помочь вам пройти через это. Удивительный! Использование эффективных вкладок в Excel, таких как Chrome, Firefox и Safari!Экономьте 50% своего времени и сокращайте тысячи щелчков мышью каждый день!Все имена таблиц по умолчанию перечислены в поле имени. Щелкните стрелку раскрывающегося списка в верхнем левом углу Имя Box для отображения всех имен таблиц. Смотрите скриншот: Внимание: Все ранжированные имена также перечислены в поле имени вместе со всеми именами таблиц. Если все таблицы были названы по исходному имени таблицы, например Table1, Table2…, вы можете попробовать перечислить все эти имена таблиц в строке формул. 1. Введите формулу =ROW(T в панель формул, тогда все имена таблиц перечислены в поле списка, как показано ниже. Внимание: Имена таблиц, которые были изменены, не будут отображаться с помощью этого метода. Если в вашей книге есть имя таблицы по умолчанию и измененное имя таблицы. Вы можете сразу перечислить их вместе с помощью следующего кода VBA. 1. нажмите другой + F11 , чтобы открыть Microsoft Visual Basic для приложений окно. 2. в Microsoft Visual Basic для приложений окна, нажмите Вставить > Модули. Затем скопируйте ниже код VBA в окно модуля. Код VBA: список всех имен таблиц в Excel. 3. нажмите F5 или нажмите кнопку «Выполнить», чтобы запустить код. Затем создается новый рабочий лист с именем «Имя таблицы» со всеми именами таблиц, перечисленными, как показано ниже: Источник Adblock |
Skip to content
На чтение 4 мин. Просмотров 2.3k.
Что делает макрос: Когда рабочая книга содержит несколько сводных таблиц, часто нужно иметь список инвентаризации, в котором изложены основные сведения о сводных таблицах. При этом в списке, вы можете быстро просмотреть важную информацию, такую как местоположение каждой сводной таблицы, расположение исходных данных каждой сводной таблицы, индекс кэша и т.д.
Следующий макрос выводит такой список.
Содержание
- Как макрос работает
- Код макроса
- Как это код работает
- Как использовать
Как макрос работает
Когда вы создаете переменную объекта PivotTable, вы открываете все свойства сводной таблицы — такие как имя, местоположение, индекс кэша и т. д. В этом макросе цикл проходит по каждой сводной таблице, извлекает определенные свойства на новый лист.
Код макроса
Sub SpisokSvodnihTablicKnigi()
'Шаг 1: Объявляем переменные
Dim ws As Worksheet
Dim pt As PivotTable
Dim MyCell As Range
'Шаг 2: Добавляем новый лист с заголовками столбцов
Worksheets.Add
Range("A1:F1") = Array("Pivot Name", "Worksheet", _
"Location", "Cache Index", _
"Source Data Location", _
"Row Count")
'Шаг 3: Устанавливаем якорь курсора в ячейке А2
Set MyCell = ActiveSheet.Range("A2")
'Шаг 4: Запускаем цикл по листам книги
For Each ws In Worksheets
'Шаг 5: Запускаем цикл по всем сводным таблицам
For Each pt In ws.PivotTables
MyCell.Offset(0, 0) = pt.Name
MyCell.Offset(0, 1) = pt.Parent.Name
MyRange.Offset(0, 2) = pt.TableRange2.Address
MyRange.Offset(0, 3) = pt.CacheIndex
MyRange.Offset(0, 4) = Application.ConvertFormula _
(pt.PivotCache.SourceData, xlR1C1, xlA1)
MyRange.Offset(0, 5) = pt.PivotCache.RecordCount
'Шаг 6: Переместить курсор строкой вниз и установить якорь
Set MyRange = MyRange.Offset(1, 0)
'Шаг 7: Работа через все сводные таблицы и листы
Next pt
Next ws
'Шаг 8: Соответствие размеров столбцов
ActiveSheet.Cells.EntireColumn.AutoFit
End Sub
Как это код работает
- Шаг 1 объявляет объект под названием WS. Это создает контейнер памяти для каждого рабочего листа. Затем мы объявляем объект под названием PT, который содержит
каждый цикл PivotTable . Наконец, мы создаем переменную диапазона под названием MyCell. Эта переменная действует как курсор, когда заполняет список инвентаризации. - Шаг 2 создает новый рабочий лист и добавляет заголовки столбцов, которые варьируются от А1 до F1. Обратите внимание, что мы можем добавить заголовки столбцов, используя простой массив, который содержит наши метки заголовка. Этот новый рабочий лист остается активным.
- Так же, как вы бы вручную помещали курсор в ячейку, если вы должны были начать вводить данные, шаг 3 помещает MyCell курсор в ячейку A2 активного листа. Это наша точка привязки, что позволяет нам перейти отсюда. На протяжении всего макроса, вы используете свойство offset. Свойство offset позволяет передвигать курсор Offset х количество строк и х количество столбцов от точки привязки. Например, Range (A2) .offset (0,1) будет перемещать курсор на один столбец. Если мы хотим, переместить курсор на одну строку вниз, мы вводим Range(A2). Offset(1, 0). В макросе, мы перемещаемся с помощью
Offset MyCell. Offset (0,4) будет перемещать курсор на четыре столбца справа от анкерной ячейки. После того, как курсор будет на месте, мы можем ввести данные. - Шаг 4 начинает зацикливание, говоря Excel, что мы хотим оценить все рабочие листы в этой книге.
- Шаг 5 перебирает все сводные таблицы в каждом листе. Для каждого PivotTable он находит, извлекает соответствующее свойство и заполняет таблицу на основании положения
курсора (шаг 3). Мы используем шесть свойств: Name, Parent.Range, TableRange2, CacheIndex, PivotCache.SourceData и PivotCache. RecordCount.
Свойство Name возвращает имя сводной таблице.Свойство Parent.Range дает нам лист, где постоянно находится PivotTable. Свойство TableRange2.Address возвращает диапазон, где находится PivotTable. Свойство CacheIndex возвращает порядковый номер кэша сводной для сводной таблицы.
Кэш-память поворота представляет собой контейнер памяти, которая хранит все данные для сводной таблицы. При создании новой сводной таблицы, Excel делает снимок исходных данных и
создает кэш возврата. Каждый раз при обновлении сводной таблицы, Excel приходит к исходным данным и делает еще один снимок, тем самым обновляя кэш возврата. Каждый кэш имеет свойство SourceData, который идентифицирует местоположение данных, используемых для создания кэш возврата. PivotCache. SourceData свойство сообщает нам, какой диапазон будет призван, когда мы обновить сводную таблицу. Вы также можете вытащить количество записей из исходных данных, используя PivotCache.Recordcount. - Каждый раз, когда макрос встречает новую сводную таблицу, он перемещает курсор вниз MyCell строку, начиная новую строку для каждого сводной таблицы.
- Шаг 7 говорит Excel повторить цикл для всех листов. После того, как все листы были оценены, макрос переходит к последнему шагу.
- Шаг 8 завершает с небольшим количеством форматирования размеров столбцов, чтобы соответствовало данным.
Как использовать
Для реализации этого макроса, вы можете скопировать и вставить его в стандартный модуль:
- Активируйте редактор Visual Basic, нажав ALT + F11.
- Щелкните правой кнопкой мыши имя проекта / рабочей книги в окне проекта.
- Выберите Insert➜Module.
- Введите или вставьте код.
Tables are one of the most powerful features of Excel. Controlling them using VBA provides a way to automate that power, which generates a double benefit 🙂
Excel likes to store data within tables. The basic structural rules, such as (a) headings must be unique (b) only one header row allowed, make tables compatible with more complex tools. For example, Power Query, Power Pivot, and SharePoint lists all use tables as either a source or an output. Therefore, it is clearly Microsoft’s intention that we use tables.
However, the biggest benefit to the everyday Excel user is much simpler; if we add new data to the bottom of a table, any formulas referencing the table will automatically expand to include the new data.
Whether you love tables as much as I do or not, this post will help you automate them with VBA.
Tables, as we know them today, first appeared in Excel 2007. This was a replacement for the Lists functionality found in Excel 2003. From a VBA perspective, the document object model (DOM) did not change with the upgraded functionality. So, while we use the term ‘tables’ in Excel, they are still referred to as ListObjects within VBA.
Download the example file
I recommend you download the example file for this post. Then you’ll be able to work along with examples and see the solution in action, plus the file will be useful for future reference.
Download the file: 0009 VBA tables and ListObjects.zip
Structure of a table
Before we get deep into any VBA code, it’s useful to understand how tables are structured.
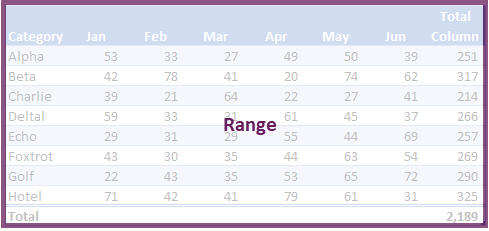
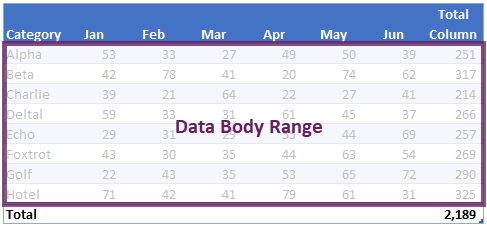
Range & Data Body Range
The range is the whole area of the table.
The data body range only includes the rows of data, it excludes the header and totals.
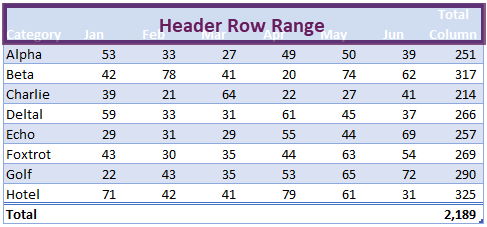
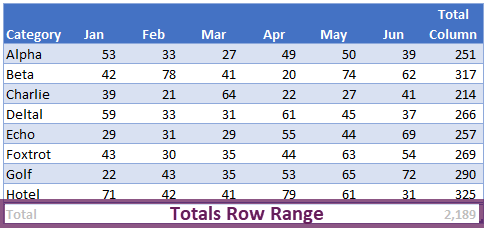
Header and total rows
The header row range is the top row of the table containing the column headers.
The totals row range, if displayed, includes calculations at the bottom of the table.
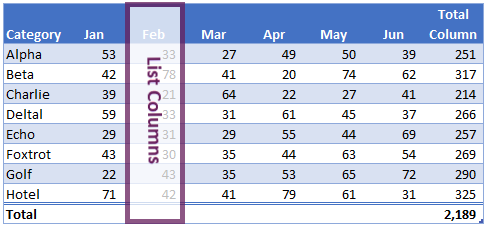
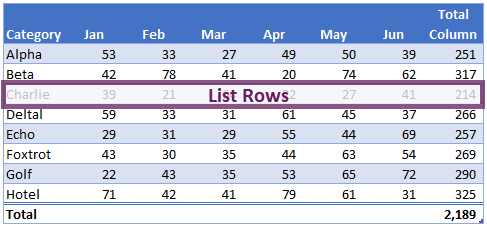
List columns and list rows
The individual columns are known as list columns.
Each row is known as a list row.
The VBA code in this post details how to manage all these table objects.
Referencing the parts of a table
While you may be tempted to skip this section, I recommend you read it in full and work through the examples. Understanding Excel’s document object model is the key to reading and writing VBA code. Master this, and your ability to write your own VBA code will be much higher.
Many of the examples in this first section use the select method, this is to illustrate how to reference parts of the table. In reality, you would rarely use the select method.
Select the entire table
The following macro will select the whole table, including the totals and header rows.
Sub SelectTable()

ActiveSheet.ListObjects("myTable").Range.Select

End Sub
Select the data within a table
The DataBodyRange excludes the header and totals sections of the table.
Sub SelectTableData()

ActiveSheet.ListObjects("myTable").DataBodyRange.Select

End Sub
Get a value from an individual cell within a table
The following macro retrieves the table value from row 2, column 4, and displays it in a message box.
Sub GetValueFromTable()

MsgBox ActiveSheet.ListObjects("myTable").DataBodyRange(2, 4).value

End Sub
Select an entire column
The macro below shows how to select a column by its position, or by its name.
Sub SelectAnEntireColumn()

'Select column based on position
ActiveSheet.ListObjects("myTable").ListColumns(2).Range.Select

'Select column based on name
ActiveSheet.ListObjects("myTable").ListColumns("Category").Range.Select

End Sub
Select a column (data only)
This is similar to the macro above, but it uses the DataBodyRange to only select the data; it excludes the headers and totals.
Sub SelectColumnData()

'Select column data based on position
ActiveSheet.ListObjects("myTable").ListColumns(4).DataBodyRange.Select

'Select column data based on name
ActiveSheet.ListObjects("myTable").ListColumns("Category").DataBodyRange.Select

End Sub
Select a specific column header
This macro shows how to select the column header cell of the 5th column.
Sub SelectCellInHeader()

ActiveSheet.ListObjects("myTable").HeaderRowRange(5).Select

End Sub
Select a specific column within the totals section
This example demonstrates how to select the cell in the totals row of the 3rd column.
Sub SelectCellInTotal()

ActiveSheet.ListObjects("myTable").TotalsRowRange(3).Select

End Sub
Select an entire row of data
The macro below selects the 3rd row of data from the table.
NOTE – The header row is not included as a ListRow. Therefore, ListRows(3) is the 3rd row within the DataBodyRange, and not the 3rd row from the top of the table.
Sub SelectRowOfData()

ActiveSheet.ListObjects("myTable").ListRows(3).Range.Select

End Sub
Select the header row
The following macro selects the header section of the table.
Sub SelectHeaderSection()

ActiveSheet.ListObjects("myTable").HeaderRowRange.Select

End Sub
Select the totals row
To select the totals row of the table, use the following code.
Sub SelectTotalsSection()

ActiveSheet.ListObjects("myTable").TotalsRowRange.Select

End Sub
OK, now we know how to reference the parts of a table, it’s time to get into some more interesting examples.
Creating and converting tables
This section of macros focuses on creating and resizing tables.
Convert selection to a table
The macro below creates a table based on the currently selected region and names it as myTable. The range is referenced as Selection.CurrentRegion, but this can be substituted for any range object.
If you’re working along with the example file, this macro will trigger an error, as a table called myTable already exists in the workbook. A new table will still be created with a default name, but the VBA code will error at the renaming step.
Sub ConvertRangeToTable()

tableName As String
Dim tableRange As Range

Set tableName = "myTable"
Set tableRange = Selection.CurrentRegion
ActiveSheet.ListObjects.Add(SourceType:=xlSrcRange, _
    Source:=tableRange, _
    xlListObjectHasHeaders:=xlYes _
    ).Name = tableName

End Sub
Convert a table back to a range
This macro will convert a table back to a standard range.
Sub ConvertTableToRange()

ActiveSheet.ListObjects("myTable").Unlist

End Sub
NOTE – Unfortunately, when converting a table to a standard range, the table formatting is not removed. Therefore, the cells may still look like a table, even when they are not – that’s frustrating!!!
Resize the range of the table
To following macro resizes a table to cell A1 – J100.
Sub ResizeTableRange()

ActiveSheet.ListObjects("myTable").Resize Range("$A$1:$J$100")

End Sub
Table styles
There are many table formatting options, the most common of which are shown below.
Change the table style
Change the style of a table to an existing pre-defined style.
Sub ChangeTableStyle()

ActiveSheet.ListObjects("myTable").TableStyle = "TableStyleLight15"

End Sub
To apply different table styles, the easiest method is to use the macro recorder. The recorded VBA code will include the name of any styles you select.
Get the table style name
Use the following macro to get the name of the style already applied to a table.
Sub GetTableStyleName()

MsgBox ActiveSheet.ListObjects("myTable").TableStyle

End Sub
Apply a style to the first or last column
The first and last columns of a table can be formatted differently using the following macros.
Sub ColumnStyles()

'Apply special style to first column
ActiveSheet.ListObjects("myTable").ShowTableStyleFirstColumn = True

'Apply special style to last column
ActiveSheet.ListObjects("myTable").ShowTableStyleLastColumn = True

End Sub
Adding or removing stripes
By default, tables have banded rows, but there are other options for this, such as removing row banding or adding column banding.
Sub ChangeStripes()

'Apply column stripes
ActiveSheet.ListObjects("myTable").ShowTableStyleColumnStripes = True

'Remove row stripes
ActiveSheet.ListObjects("myTable").ShowTableStyleRowStripes = False

End Sub
Set the default table style
The following macro sets the default table style.
Sub SetDefaultTableStyle()

'Set default table style
ActiveWorkbook.DefaultTableStyle = "TableStyleMedium2"

End Sub
Looping through tables
The macros in this section loop through all the tables on the worksheet or workbook.
Loop through all tables on a worksheet
If we want to run a macro on every table of a worksheet, we must loop through the ListObjects collection.
Sub LoopThroughAllTablesWorksheet()

'Create variables to hold the worksheet and the table
Dim ws As Worksheet
Dim tbl As ListObject

Set ws = ActiveSheet
'Loop through each table in worksheet
For Each tbl In ws.ListObjects

    'Do something to the Table....

Next tbl

End Sub
In the code above, we have set the table to a variable, so we must refer to the table in the right way. In the section labeled ‘Do something to the table…, insert the action to be undertaken on each table, using tbl to reference the table.
For example, the following will change the table style of every table.
tbl.TableStyle = "TableStyleLight15"
Loop through all tables in a workbook
Rather than looping through a single worksheet, as shown above, the macro below loops through every table on every worksheet.
Sub LoopThroughAllTablesWorkbook()

'Create variables to hold the worksheet and the table
Dim ws As Worksheet
Dim tbl As ListObject

'Loop through each worksheet
For Each ws In ActiveWorkbook.Worksheets

    'Loop through each table in worksheet
    For Each tbl In ws.ListObjects

        'Do something to the Table....

    Next tbl

Next ws

End Sub
As noted in the section above, we must refer to the table using its variable. For example, the following will display the totals row for every table.
tbl.ShowTotals = True
Adding & removing rows and columns
The following macros add and remove rows, headers, and totals from a table.
Add columns into a table
The following macro adds a column to a table.
Sub AddColumnToTable()

'Add column at the end
ActiveSheet.ListObjects("myTable").ListColumns.Add

'Add column at position 2
ActiveSheet.ListObjects("myTable").ListColumns.Add Position:=2
End Sub
Add rows to the bottom of a table
The next macro will add a row to the bottom of a table
Sub AddRowsToTable()

'Add row at bottom
ActiveSheet.ListObjects("myTable").ListRows.Add

'Add row at the first row
ActiveSheet.ListObjects("myTable").ListRows.Add Position:=1
End Sub
Delete columns from a table
To delete a column, it is necessary to use either the column index number or the column header.
Sub DeleteColumnsFromTable()

'Delete column 2
ActiveSheet.ListObjects("myTable").ListColumns(2).Delete

'Delete a column by name
ActiveSheet.ListObjects("myTable").ListColumns("Feb").Delete
End Sub
Delete rows from a table
In the table structure, rows do not have names, and therefore can only be deleted by referring to the row number.
Sub DeleteRowsFromTable()

'Delete row 2
ActiveSheet.ListObjects("myTable").ListRows(2).Delete

'Delete multiple rows
ActiveSheet.ListObjects("myTable").Range.Rows("4:6").Delete
End Sub
Add total row to a table
The total row at the bottom of a table can be used for calculations.
Sub AddTotalRowToTable()

'Display total row with value in last column
ActiveSheet.ListObjects("myTable").ShowTotals = True

'Change the total for the "Total Column" to an average
ActiveSheet.ListObjects("myTable").ListColumns("TotalColumn").TotalsCalculation = _
    xlTotalsCalculationAverage

'Totals can be added by position, rather than name
ActiveSheet.ListObjects("myTable").ListColumns(2).TotalsCalculation = _
    xlTotalsCalculationAverage
End Sub
Types of totals calculation
xlTotalsCalculationNone
xlTotalsCalculationAverage
xlTotalsCalculationCount
xlTotalsCalculationCountNums
xlTotalsCalculationMax
xlTotalsCalculationMin
xlTotalsCalculationSum
xlTotalsCalculationStdDev
xlTotalsCalculationVar
Table header visability
Table headers can be turned on or off. The following will hide the headers.
Sub ChangeTableHeader()

ActiveSheet.ListObjects("myTable").ShowHeaders = False

End Sub
Remove auto filter
The auto filter can be hidden. Please note, the table header must be visible for this code to work.
Sub RemoveAutoFilter()

ActiveSheet.ListObjects("myTable").ShowAutoFilterDropDown = False

End Sub
I have a separate post about controlling auto filter settings – check it out here. Most of that post applies to tables too.
Other range techniques
Other existing VBA techniques for managing ranges can also be applied to tables.
Using the union operator
To select multiple ranges, we can use VBA’s union operator. Here is an example, it will select rows 4, 1, and 3.
Sub SelectMultipleRangesUnionOperator()

Union(ActiveSheet.ListObjects("myTable").ListRows(4).Range, _
    ActiveSheet.ListObjects("myTable").ListRows(1).Range, _
    ActiveSheet.ListObjects("myTable").ListRows(3).Range).Select

End Sub
Assign values from a variant array to a table row
To assign values to an entire row from a variant array, use code similar to the following:
Sub AssignValueToTableFromArray()

'Assing values to array (for illustration)
Dim myArray As Variant
myArray = Range("A2:D2")

'Assign values in array to the table
ActiveSheet.ListObjects("myTable").ListRows(2).Range.Value = myArray

End Sub
Reference parts of a table using the range object
Within VBA, a table can be referenced as if it were a standard range object.
Sub SelectTablePartsAsRange()

ActiveSheet.Range("myTable[Category]").Select

End Sub
Counting rows and columns
Often, it is useful to count the number of rows or columns. This is a good method to reference rows or columns which have been added.
Counting rows
To count the number of rows within the table, use the following macro.
Sub CountNumberOfRows()

Msgbox ActiveSheet.ListObjects("myTable").ListRows.Count

End Sub
Counting columns
The following macro will count the number of columns within the table.
Sub CountNumberOfColumns()

Msgbox ActiveSheet.ListObjects("myTable").ListColumns.Count

End Sub
Useful table techniques
The following are some other useful VBA codes for controlling tables.
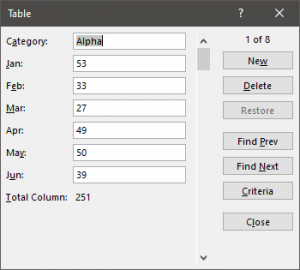
Show the table data entry form
If a table starts at cell A1, there is a simple data entry form that can be displayed.
Sub ShowDataEntryForm()

'Only works if Table starts at Cell A1
ActiveSheet.ShowDataForm

End Sub
The following screenshot shows the data form for the example table.
Check if a table exists
The following macro checks if a table already exists within a workbook. Change the tblName variable to adapt this to your requirements.
Sub CheckIfTableExists()

'Create variables to hold the worksheet and the table
Dim ws As Worksheet
Dim tbl As ListObject
Dim tblName As String
Dim tblExists As Boolean

tblName = "myTable"

'Loop through eac worksheet
For Each ws In ActiveWorkbook.Worksheets

    'Loop through each table in worksheet
    For Each tbl In ws.ListObjects

        If tbl.Name = tblName Then

            tblExists = True

        End If

    Next tbl

Next ws

If tblExists = True Then

    MsgBox "Table " & tblName & " exists."

Else

    MsgBox "Table " & tblName & " does not exists."

End If

End Sub
Find out if a table has been selected, if so which
The following macros find the name of the selected table.
Method 1
As you will see in the comments Jon Peltier had an easy approach to this, which has now become my preferred approach.
Sub SimulateActiveTable()

Dim ActiveTable As ListObject

On Error Resume Next
Set ActiveTable = ActiveCell.ListObject
On Error GoTo 0

'Confirm if a cell is in a Table
If ActiveTable Is Nothing Then
    MsgBox "Select table and try again"
Else
    MsgBox "The active cell is in a Table called: " & ActiveTable.Name
End If

End Sub
Method 2
This option, which was my original method, loops through each table on the worksheet and checks if they intersect with the active cell.
Sub SimulateActiveTable_Method2()

Dim ActiveTable As ListObject
Dim tbl As ListObject

'Loop through each table, check if table intersects with active cell
For Each tbl In ActiveSheet.ListObjects

    If Not Intersect(ActiveCell, tbl.Range) Is Nothing Then

        Set ActiveTable = tbl
        MsgBox "The active cell is in a Table called: " & ActiveTable.Name

    End If

Next tbl

'If no intersection then no tabl selected
If ActiveTable Is Nothing Then

    MsgBox "Select an Excel table and try again"

End If

End Sub
Conclusion
Wow! That was a lot of code examples.
There are over 30 VBA macros above, and even this does not cover everything, but hopefully covers 99% of your requirements. For your remaining requirements, you could try Microsoft’s VBA object reference library (https://docs.microsoft.com/en-us/office/vba/api/Excel.ListObject)
About the author
Hey, I’m Mark, and I run Excel Off The Grid.
My parents tell me that at the age of 7 I declared I was going to become a qualified accountant. I was either psychic or had no imagination, as that is exactly what happened. However, it wasn’t until I was 35 that my journey really began.
In 2015, I started a new job, for which I was regularly working after 10pm. As a result, I rarely saw my children during the week. So, I started searching for the secrets to automating Excel. I discovered that by building a small number of simple tools, I could combine them together in different ways to automate nearly all my regular tasks. This meant I could work less hours (and I got pay raises!). Today, I teach these techniques to other professionals in our training program so they too can spend less time at work (and more time with their children and doing the things they love).
Do you need help adapting this post to your needs?
I’m guessing the examples in this post don’t exactly match your situation. We all use Excel differently, so it’s impossible to write a post that will meet everybody’s needs. By taking the time to understand the techniques and principles in this post (and elsewhere on this site), you should be able to adapt it to your needs.
But, if you’re still struggling you should:
- Read other blogs, or watch YouTube videos on the same topic. You will benefit much more by discovering your own solutions.
- Ask the ‘Excel Ninja’ in your office. It’s amazing what things other people know.
- Ask a question in a forum like Mr Excel, or the Microsoft Answers Community. Remember, the people on these forums are generally giving their time for free. So take care to craft your question, make sure it’s clear and concise. List all the things you’ve tried, and provide screenshots, code segments and example workbooks.
- Use Excel Rescue, who are my consultancy partner. They help by providing solutions to smaller Excel problems.
What next?
Don’t go yet, there is plenty more to learn on Excel Off The Grid. Check out the latest posts:


