Элемент управления пользовательской формы SpinButton, применяемый в VBA Excel для создания счетчика, состоящего из двух кнопок. Свойства, пример кода.
UserForm.SpinButton – это элемент управления пользовательской формы, представляющий из себя счетчик, состоящий из двух кнопок, нажатие на которые увеличивает или уменьшает числовое значение этого элемента с указанным шагом.
Элемент управления SpinButton предназначен в VBA Excel для ввода пользователем числовых данных, которые ограничены минимальным и максимальным значениями. Увеличение или уменьшение числового значения счетчика при однократном нажатии кнопки происходит с указанным шагом.
Визуально, элемент управления SpinButton состоит из двух кнопок, расположенных вертикально или горизонтально в зависимости от настроек. При нажатии на верхнюю или правую кнопку элемента управления значение увеличивается, при нажатии на нижнюю или левую – уменьшается.
Обычно счетчик используется в паре с элементом управления TextBox или Label. Вспомогательный элемент необходим, чтобы отобразить значение счетчика на пользовательской форме.
Свойства элемента SpinButton
| Свойство | Описание |
|---|---|
| BackColor | Цвет кнопок. |
| Delay* | Время между последовательными событиями при удержании кнопки. |
| ControlTipText | Текст всплывающей подсказки при наведении курсора на счетчик. |
| Enabled | Возможность взаимодействия пользователя с элементом управления. True – взаимодействие включено, False – отключено (цвет стрелок становится серым). |
| Height | Высота элемента управления. |
| Left | Расстояние от левого края внутренней границы пользовательской формы до левого края элемента управления. |
| Max | Максимальное значение свойства Value. |
| Min | Минимальное значение свойства Value. |
| Orientation** | Задает горизонтальную или вертикальную ориентацию элемента управления SpinButton. |
| SmallChange | Шаг изменения значения свойства Value. |
| TabIndex | Определяет позицию элемента управления в очереди на получение фокуса при табуляции, вызываемой нажатием клавиш «Tab», «Enter». Отсчет начинается с 0. |
| Top | Расстояние от верхнего края внутренней границы пользовательской формы до верхнего края элемента управления. |
| Visible | Видимость элемента SpinButton. True – элемент отображается на пользовательской форме, False – скрыт. |
| Width | Ширина элемента управления. |
* По умолчанию свойство Delay равно 50 миллисекундам. Это означает, что первое событие (SpinUp, SpinDown, Change) происходит через 250 миллисекунд после нажатия кнопки, а каждое последующее событие – через каждые 50 миллисекунд (и так до отпускания кнопки).
** По умолчанию включена автоматическая ориентация, которая зависит от соотношения между шириной и высотой элемента управления. Если ширина больше высоты – ориентация горизонтальная, если высота больше ширины – ориентация вертикальная.
В таблице перечислены только основные, часто используемые свойства счетчика. Все доступные свойства отображены в окне Properties элемента управления SpinButton.
Пример кода VBA Excel со счетчиком
Условие
- На пользовательской форме UserForm1 расположены элементы управления SpinButton1 и Label1.
- Необходимо задать для счетчика SpinButton1 интервал значений от 100 до 500 единиц с шагом 50 и отображением набранного значения на элементе Label1.
Решение
Первоначальные настройки при открытии пользовательской формы:
|
Private Sub UserForm_Initialize() Me.Caption = «Пример» With SpinButton1 .Min = 100 .Max = 500 .SmallChange = 50 End With Label1.Caption = «100» End Sub |
Обработка события Change объекта SpinButton1:
|
Private Sub SpinButton1_Change() Label1.Caption = SpinButton1.Value End Sub |
Обе процедуры размещаются в модуле пользовательской формы.
A spin button can be used to increment a number in a cell. To create a spin button in Excel VBA, execute the following steps.
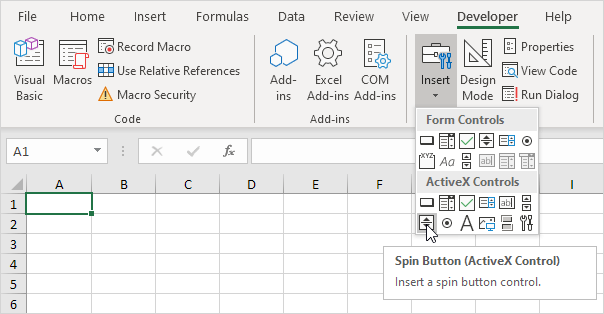
1. On the Developer tab, click Insert.
2. In the ActiveX Controls group, click Spin Button.
3. Drag a spin button on your worksheet.
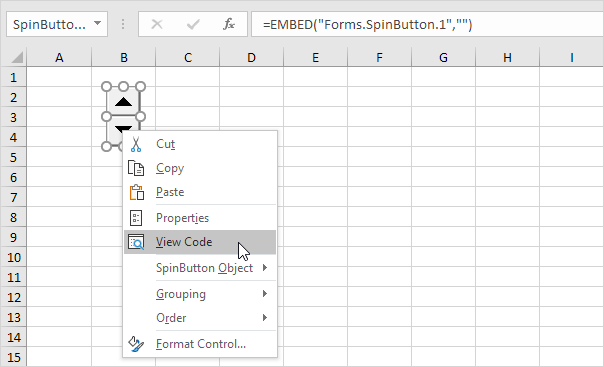
4. Right click the spin button (make sure Design Mode is selected).
5. Click View Code.
Note: you can change the name of a control by right clicking on the control (make sure Design Mode is selected) and then clicking on Properties. For now, we will leave SpinButton1 as the name of the spin button.
6. To link this spin button to a cell, add the following code line.
Range(«C3»).Value = SpinButton1.Value
7. You can set a maximum and minimum by adding the following code lines.
SpinButton1.Max = 100
SpinButton1.Min = 0
8. To change the incremental value, use the SmallChange property.
SpinButton1.SmallChange = 2
9. Click the arrows of the spin button (make sure Design Mode is deselected).
Result:
Note: instead of changing the properties of the spin button at runtime, you can also change the properties at design-time. To achieve this, right click on the spin button (make sure Design Mode is selected) and click on properties.
Return to VBA Code Examples
In VBA, you can create a Spin button which allows a user to increment a number in the cell in a defined range. Every time a user clicks on a button, the number will increase or decrease. In this tutorial, you will learn how to create a Spin button and use it in Excel and VBA.
If you want to learn how to use an Option button, click on this link: Option button Excel VBA
Create a Spin Button
In order to insert a Spin button in the Worksheet, you need to go to the Developer tab, click Insert and under ActiveX Controls choose Spin button:
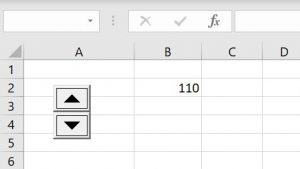
Image 1. Insert a Spin button in the Worksheet
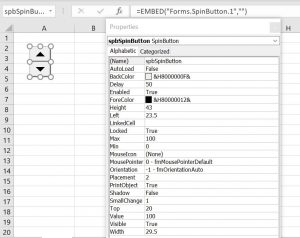
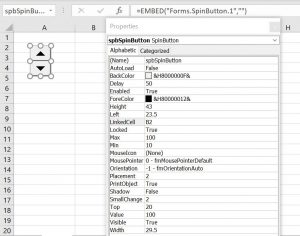
When you select the Spin button which you inserted, you can click on Properties under the Developer tab:
Image 2. Change Spin button Properties
Here you can set different properties of the Spin button. For the beginning, we changed the attribute Name to spbSpinButton. Now, we can use the Spin button with this name in VBA code. Other important attributes are Min and Max, which define a number range and SmallChange which defines a step of incrementation.
Set a Spin Button Using VBA
We will first see how to set properties of a Spin button in VBA and get a value in Worksheet. The code needs to be in event Change of the object spbSpinButton. You can enter this event by right-clicking on the Spin button and choosing View Code option. Here is the code:
Private Sub spbSpinButton_Change()

    Sheet1.spbSpinButton.Min = 100

    Sheet1.spbSpinButton.Max = 200

    Sheet1.spbSpinButton.SmallChange = 10

    Sheet1.Range("B2") = Sheet1.spbSpinButton.Value

End Sub
First, we set the lower limit for number range:
Sheet1.spbSpinButton.Min = 100After that, we set the upper limit for number range:
Sheet1.spbSpinButton.Max = 200We also need to set the step for number incrementation:
Sheet1.spbSpinButton.SmallChange = 10Finally, we are assigning the current value of the Spin button to the cell B2. This value is in the Value attribute of the object Sheet1.spbSpinButton:
Sheet1.Range("B2") = Sheet1.spbSpinButton.ValueNow, whenever we click on the Spin button, the value will increase or decrease by 10 in the range 100-200:
Image 3. Increase a number using the Spin button in VBA
Set a Spin Button in Excel
Another way to set a Spin button is using the Properties. Click on Properties under the Developer tab:
Image 4. Set a Spin button in Excel
Here we can set all the attributes we want: Min is 10, Max is 100 and SmallChange is 2. If you want to put the result of the Spin button in the cell B2, you have to put this cell in attribute LinkedCell.
VBA Coding Made Easy
Stop searching for VBA code online. Learn more about AutoMacro — A VBA Code Builder that allows beginners to code procedures from scratch with minimal coding knowledge and with many time-saving features for all users!
Learn More!
Содержание
- VBA Excel. Элемент управления SpinButton (счетчик)
- Элемент управления SpinButton
- Свойства элемента SpinButton
- Пример кода VBA Excel со счетчиком
- Условие
- Решение
- EXCEL VIDEO TUTORIALS / EXCEL DASHBOARD REPORTS
- TextBox and SpinButtons UserForm Controls
- | BACK TO EXCEL VBA LEVEL 2 TRAINING INDEX
- Excel Training VBA 2 Lesson 14
- TextBox and SpinButtons UserForm Controls
- Information Helpful? Why Not Donate | Free Excel Help >> Excel Training-Video Series >> Build Trading Models In Excel | BACK TO EXCEL VBA LEVEL 2 TRAINING INDEX
VBA Excel. Элемент управления SpinButton (счетчик)
Элемент управления пользовательской формы SpinButton, применяемый в VBA Excel для создания счетчика, состоящего из двух кнопок. Свойства, пример кода.
Элемент управления SpinButton
Элемент управления SpinButton предназначен в VBA Excel для ввода пользователем числовых данных, которые ограничены минимальным и максимальным значениями. Увеличение или уменьшение числового значения счетчика при однократном нажатии кнопки происходит с указанным шагом.
Визуально, элемент управления SpinButton состоит из двух кнопок, расположенных вертикально или горизонтально в зависимости от настроек. При нажатии на верхнюю или правую кнопку элемента управления значение увеличивается, при нажатии на нижнюю или левую – уменьшается.
Обычно счетчик используется в паре с элементом управления TextBox или Label. Вспомогательный элемент необходим, чтобы отобразить значение счетчика на пользовательской форме.
Свойства элемента SpinButton
| Свойство | Описание |
|---|---|
| BackColor | Цвет кнопок. |
| Delay* | Время между последовательными событиями при удержании кнопки. |
| ControlTipText | Текст всплывающей подсказки при наведении курсора на счетчик. |
| Enabled | Возможность взаимодействия пользователя с элементом управления. True – взаимодействие включено, False – отключено (цвет стрелок становится серым). |
| Height | Высота элемента управления. |
| Left | Расстояние от левого края внутренней границы пользовательской формы до левого края элемента управления. |
| Max | Максимальное значение свойства Value. |
| Min | Минимальное значение свойства Value. |
| Orientation** | Задает горизонтальную или вертикальную ориентацию элемента управления SpinButton. |
| SmallChange | Шаг изменения значения свойства Value. |
| TabIndex | Определяет позицию элемента управления в очереди на получение фокуса при табуляции, вызываемой нажатием клавиш «Tab», «Enter». Отсчет начинается с 0. |
| Top | Расстояние от верхнего края внутренней границы пользовательской формы до верхнего края элемента управления. |
| Visible | Видимость элемента SpinButton. True – элемент отображается на пользовательской форме, False – скрыт. |
| Width | Ширина элемента управления. |
* По умолчанию свойство Delay равно 50 миллисекундам. Это означает, что первое событие (SpinUp, SpinDown, Change) происходит через 250 миллисекунд после нажатия кнопки, а каждое последующее событие – через каждые 50 миллисекунд (и так до отпускания кнопки).
** По умолчанию включена автоматическая ориентация, которая зависит от соотношения между шириной и высотой элемента управления. Если ширина больше высоты – ориентация горизонтальная, если высота больше ширины – ориентация вертикальная.
В таблице перечислены только основные, часто используемые свойства счетчика. Все доступные свойства отображены в окне Properties элемента управления SpinButton.
Пример кода VBA Excel со счетчиком
Условие
- На пользовательской форме UserForm1 расположены элементы управления SpinButton1 и Label1.
- Необходимо задать для счетчика SpinButton1 интервал значений от 100 до 500 единиц с шагом 50 и отображением набранного значения на элементе Label1.
Решение
Первоначальные настройки при открытии пользовательской формы:
Источник
EXCEL VIDEO TUTORIALS / EXCEL DASHBOARD REPORTS
TextBox and SpinButtons UserForm Controls
| BACK TO EXCEL VBA LEVEL 2 TRAINING INDEX
Workbook Download
This is a zipped Excel Workbook to go with this lesson.
TextBox and SpinButtons
The Control Toolbox within the Visual Basic Editor by default will hold only the most commonly used controls. With just these Controls you will often find that they can be manipulated and programmed to do most if not all of what would be expected of most projects. Take for example the TextBox Control (possibly the most frequently used Control). Just because it is called a TextBox, by no means means that we are limited to only using text in this Control. While the default for this Control is to return text, it can also just as easily return numeric values.
Let’s now look at some examples of how we could use a TextBox.
Most often a TextBox Control would be used to collect typed information from a user. In previous lessons we looked at the fact that the user may mistype their information so we need to include as much validation checking as we possibly can. Obviously if the user will be typing their name there is no validation check that we can really do unless of course we have a list of all possible names that would be entered into it in which case we would end up using a ComboBox to store these names. Let’s assume for a moment that we are going to use our TextBox in this instance to collect a numeric value from the user. We could simply allow the user to type in a number and/or use the SpinButton Control to increment up to the desired number.
The SpinButton Control simply increments and decrements a number. The default Property for a SpinButton is the Value Property, while the default Event for a SpinButton is the Change Event.
Try this simple example to help better understand the SpinButton Control.
Insert a UserForm
On it place a TextBox
To the right of the Textbox place a SpinButton
Right click on the SpinButton and select Properties to display the Property Window for the SpinButton
Take a moment to look through these properties and you will notice that most of them are common to many other Controls.
Double click the SpinButton Control and within the default Change Event type TextBox1.Value=SpinButton1.Value
Now run your UserForm and user your SpinButton control to increment or decrement a number.
You will notice that by default the lowest value we can reach is 0, with the highest value being 100. If you have not guessed already, this can be easily changed in the Properties window for the SpinButton under the Max and Min Properties. So let’s go into this spot now and change this minimum and maximum to any two numbers. While you are there, also notice the Property called SmallChange. This simply tells our SpinButton what value to increment by. The default is 1, but we can change this to any value that fits within the scope of a Long, ie; -2, 147, 483, 648 to 2, 147, 483, 647. But having said this the recommended range of values ( (according to Excel’s help) is from -32,767 to 32,767. Let’s change the SmallChange Property of the SpinButton to 2. Now run your UserForm again and use the SpinButton to increment or decrement your number. This time you will be incrementing up by a step value of 2 until you reach the value set in your Max Property and down until you reach the Min Property set. This is the use of the SpinButton in possibly its simplest form. But don’t confuse this as being the same as the SpinButton being a very simple control and not having much scope of purpose. If you think about it, the whole basis of computers and Excel especially are simply built on numeric values. By this I mean that we could use the SpinButton Control to allow the user to do almost anything and you will be surprised at how many users find it more convenient to increment up/down to a number rather than type it. Not only does this help the User, but it can also aid us greatly in the fact that we can validate the TextBox storing the number to fit between a certain range and pattern without having to put in some lengthy code to validate the number chosen.
To ensure that the user cannot type into the TextBox a specific number, all we need to do is either change the Enabled Property of the TextBox to FALSE and/or the Locked Property. Once we have done this we can assume as safely as possible that the number chosen by the user using the SpinButton will meet any given criteria that we have determined.
Let us now assume we have a scenario where we have a TextBox always defaulting to today’s date and we want the user to be able to increment that date by one day up to any day one year ahead. To allow the user to simply add say 21 days to a date, is fraught with potential disasters. Let us use an example now with our TextBox to see how we can use the SpinButton to do this safely.
Double click the UserForm
Change the default Click Event to the Initialise Event
Within here place TextBox1.Value = Format(Date, «ddd d mmm yyyy»)
Above your TextBox add a Label Control and change its Caption Property to read today’s date.
Now within the SpinButton1_Change Event change our existing code to TextBox1.Value=Format(Date + SpinButton1.Value, «ddd d mmm yyyy») and below this type Label1.Caption=SpinButton1.Value & » day(s) from now»
Change the Min Property of the SpinButton to 0 and the Max Property of the SpinButton to 365
Increase the TextBox width so it will display the date in the format chosen
Run your UserForm
As soon as the UserForm shows our TextBox will display the current date including the name of the current day. Now use your SpinButton control to increment the date by 1 day at a time. You will notice that the date in the TextBox will increment by one day each time. Using this method you can ensure that the User will not type an invalid date that is not recognized by Excel or miscalculate the date from the number of days chosen. In fact, it would be impossible to do so.
One Control that Excel has which is not shown by default is the Calendar Control. This is a very handy Control to use when dates are required to be collected from the user. Not only does it make our life easier but also the user, as they can visually see a real calendar.
What I would like you to do using all available resources is create a small project that would allow a user to nominate certain dates and have them passed back to specific cells as shown in the attached Workbook. I am purposely NOT telling you how this Control works as it is very important at this level you are able to work out problems and overcome them.
Once you have had a go at this go here for some examples etc of this great Control:
Источник
Excel Training VBA 2 Lesson 14
TextBox and SpinButtons UserForm Controls
Information Helpful? Why Not Donate | Free Excel Help >> Excel Training-Video Series >> Build Trading Models In Excel
| BACK TO EXCEL VBA LEVEL 2 TRAINING INDEX
Workbook Download
This is a zipped Excel Workbook to go with this lesson.
TextBox and SpinButtons
The Control Toolbox within the Visual Basic Editor by default will hold only the most commonly used controls. With just these Controls you will often find that they can be manipulated and programmed to do most if not all of what would be expected of most projects. Take for example the TextBox Control (possibly the most frequently used Control). Just because it is called a TextBox, by no means means that we are limited to only using text in this Control. While the default for this Control is to return text, it can also just as easily return numeric values.
Let’s now look at some examples of how we could use a TextBox.
Most often a TextBox Control would be used to collect typed information from a user. In previous lessons we looked at the fact that the user may mistype their information so we need to include as much validation checking as we possibly can. Obviously if the user will be typing their name there is no validation check that we can really do unless of course we have a list of all possible names that would be entered into it in which case we would end up using a ComboBox to store these names. Let’s assume for a moment that we are going to use our TextBox in this instance to collect a numeric value from the user. We could simply allow the user to type in a number and/or use the SpinButton Control to increment up to the desired number.
The SpinButton Control simply increments and decrements a number. The default Property for a SpinButton is the Value Property, while the default Event for a SpinButton is the Change Event.
Try this simple example to help better understand the SpinButton Control.
Insert a UserForm
On it place a TextBox
To the right of the Textbox place a SpinButton
Right click on the SpinButton and select Properties to display the Property Window for the SpinButton
Take a moment to look through these properties and you will notice that most of them are common to many other Controls.
Double click the SpinButton Control and within the default Change Event type TextBox1.Value=SpinButton1.Value
Now run your UserForm and user your SpinButton control to increment or decrement a number.
You will notice that by default the lowest value we can reach is 0, with the highest value being 100. If you have not guessed already, this can be easily changed in the Properties window for the SpinButton under the Max and Min Properties. So let’s go into this spot now and change this minimum and maximum to any two numbers. While you are there, also notice the Property called SmallChange. This simply tells our SpinButton what value to increment by. The default is 1, but we can change this to any value that fits within the scope of a Long, ie; -2, 147, 483, 648 to 2, 147, 483, 647. But having said this the recommended range of values ( (according to Excel’s help) is from -32,767 to 32,767. Let’s change the SmallChange Property of the SpinButton to 2. Now run your UserForm again and use the SpinButton to increment or decrement your number. This time you will be incrementing up by a step value of 2 until you reach the value set in your Max Property and down until you reach the Min Property set. This is the use of the SpinButton in possibly its simplest form. But don’t confuse this as being the same as the SpinButton being a very simple control and not having much scope of purpose. If you think about it, the whole basis of computers and Excel especially are simply built on numeric values. By this I mean that we could use the SpinButton Control to allow the user to do almost anything and you will be surprised at how many users find it more convenient to increment up/down to a number rather than type it. Not only does this help the User, but it can also aid us greatly in the fact that we can validate the TextBox storing the number to fit between a certain range and pattern without having to put in some lengthy code to validate the number chosen.
To ensure that the user cannot type into the TextBox a specific number, all we need to do is either change the Enabled Property of the TextBox to FALSE and/or the Locked Property. Once we have done this we can assume as safely as possible that the number chosen by the user using the SpinButton will meet any given criteria that we have determined.
Let us now assume we have a scenario where we have a TextBox always defaulting to today’s date and we want the user to be able to increment that date by one day up to any day one year ahead. To allow the user to simply add say 21 days to a date, is fraught with potential disasters. Let us use an example now with our TextBox to see how we can use the SpinButton to do this safely.
Double click the UserForm
Change the default Click Event to the Initialise Event
Within here place TextBox1.Value = Format(Date, «ddd d mmm yyyy»)
Above your TextBox add a Label Control and change its Caption Property to read today’s date.
Now within the SpinButton1_Change Event change our existing code to TextBox1.Value=Format(Date + SpinButton1.Value, «ddd d mmm yyyy») and below this type Label1.Caption=SpinButton1.Value & » day(s) from now»
Change the Min Property of the SpinButton to 0 and the Max Property of the SpinButton to 365
Increase the TextBox width so it will display the date in the format chosen
Run your UserForm
As soon as the UserForm shows our TextBox will display the current date including the name of the current day. Now use your SpinButton control to increment the date by 1 day at a time. You will notice that the date in the TextBox will increment by one day each time. Using this method you can ensure that the User will not type an invalid date that is not recognized by Excel or miscalculate the date from the number of days chosen. In fact, it would be impossible to do so.
One Control that Excel has which is not shown by default is the Calendar Control. This is a very handy Control to use when dates are required to be collected from the user. Not only does it make our life easier but also the user, as they can visually see a real calendar.
What I would like you to do using all available resources is create a small project that would allow a user to nominate certain dates and have them passed back to specific cells as shown in the attached Workbook. I am purposely NOT telling you how this Control works as it is very important at this level you are able to work out problems and overcome them.
Once you have had a go at this go here for some examples etc of this great Control:
Источник
Элемент управления VBA SpinButton добавляет на поверхность формы счетчик, как и для ScrollBar тут можно задавать как минимальное так и максимальное значение. Объект SpinButton эффективно использовать при работе с небольшими значениями. Он представляет из себя ту же полосу прокрутки с двумя кнопками, но без полосы прокрутки.
Как и с ScrollBar, мы будет использовать компонент VBA SpinButton для вычисления суммы чисел. Хотя более эффективно он может использоваться для вывода определенных данных. Например, объект vba будет хранить пять значений, при нажатии по кнопкам компонента в текстовом поле будет выводиться заданное значение.
Как и для ScrollBar, для SpinButton VBA свойства практически те же.
Базовые свойства класса SpinButton VBA
Max и Min – тут мы задаем целые значения, максимально и минимальное. Значения могут находиться в диапазоне от −32 767 до +32 767. Задавать числовые значения можно как в прямом так и в обратном порядке, например, Min=1, а Max=100 или наоборот, Min=100, а Max=1. Хотя, так как тут лучше использовать небольшие диапазоны, то порядок перебора будет не сильно актуален.
SmallChange – определяет шаг при нажатии на управляющие кнопки, по умолчанию данное свойство содержит числовое значение 1, вы можете задать собственный шаг в диапазоне от −32 767 до +32 767. В принципе, увеличивать значение шага актуально при математических вычислениях, так как в иных случаях, нам просто надо выбрать значение из счетчика – vba SpinButton.
Orientation – свойство позволяет задать ориентацию объекта класса VBA SpinButton, то есть, горизонтальное или вертикальное положение. Тут можно задавать три варианта значений: 1 – стоит по умолчанию и определяет положение согласно параметров формы, -1 – задает горизонтальную ориентацию и 0 – вертикальное положение. Для формы мы будем использовать вертикальное размещение.
Visible – не только для текущего элемента управления, но и для других, свойство задает видимость. То есть, при значении false мы можем спрятать объект, но в памяти он будет хранится, что бы вновь его показать, значение свойства меняем на true.
Value – хранит выбранное в текущий момент значение, значения выбираются из диапазона, заданного свойствами Min и Max.
При изменении данных для счетчика возникает событие Change, оно является ключевым для SpinButton VBA компонента.
Теперь напишем пример и создадим форму.
Добавьте в окно проектов форму с именем SpinForm и модуль с именем SpinModule, за добавление отвечает меню Insert. Что бы быстро открыть редактор VisualBasic нажмите комбинацию Alt + F11.
Пропишите в редакторе кода для формы (просто выберите текущую форму в окне Проектов и нажмите кнопку View Code, расположенную вверху слева) следующий код:
Sub SpinModule()
    SpinForm.Show
End Sub
Данный код отвечает за вывод формы при запуске макроса, тут процедура SpinModule содержит вызов метода Show для объекта SpinForm класса UserForm.
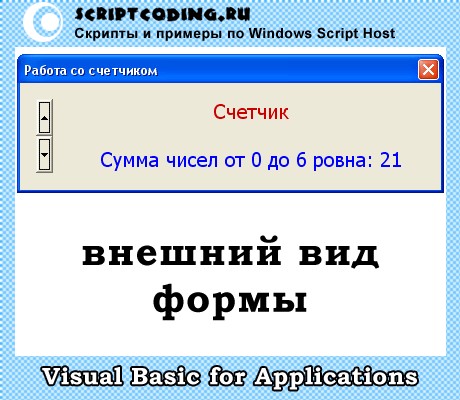
На поверхности формы расположите компоненты:
Label1 – будет содержать информативную надпись о том, что мы работаем с компонентом “Счетчик”
Label2 – будет содержать результат суммирования чисел от нуля до того значения, которое выбрано в компоненте VBA SpinButton
SpinButton1 – собственно, наш счетчик, который будет содержать диапазон от 0 до 10.
Помним, что все элементы управления находятся в окне ToolBox, вызвать его можно из меню View.
В редакторе кода для формы нам надо прописать следующие процедуры:
Private Sub ScrollBar1_Change()
Dim summ
    summ = 0
    ' вычесляем сумму чисел
    For i = 1 To ScrollBar1.Value
        summ = summ + i
    Next
    Label2.Caption = "Сумма чисел от 1 до " & ScrollBar1.Value & " ровна: " & summ
End Sub

Private Sub UserForm_Initialize()
Dim summ
    summ = 0
    ' вычесляем сумму чисел
    For i = 1 To ScrollBar1.Value
        summ = summ + i
    Next
    ' параметры первого текстового поля
    Label1.FontSize = 15
    Label1.ForeColor = &HCD
    Label1.TextAlign = fmTextAlignCenter
    ' параметры полосы прокрутки
    ScrollBar1.Min = 1
    ScrollBar1.Max = 100
    ' параметры второго текстового поля
    Label2.FontSize = 15
    Label2.ForeColor = &HFF0000
    Label2.TextAlign = fmTextAlignCenter
    Label2.Caption = "Сумма чисел от 1 до " & ScrollBar1.Value & " ровна: " & summ
End Sub
SpinButton1_Change – обработка ключевого события. При нажатии на управляющие кнопки будет происходить обработка цикла for, в котором будет происходить вычисление суммы чисел от 0 до выбранного значения в данный момент. За выбранное значение отвечает свойство Value, а точнее, SpinButton1.Value. После вычисления суммы в свойство Caption второй метки будет записана информирующая строка со значением полученной суммы.
UserForm_Initialize – собственно, тут происходит определение свойств компонентов на форме при инициализации формы UserForm.
Ну что же, пример довольно простой да и статья не тянет на что-то гениальное. Мы просто рассмотрели объект VBA класса SpinButton, который позволяет добавлять счетчик на поверхность формы.


