
Создание нового документа Word или открытие существующего из кода VBA Excel. Методы Documents.Add и Documents.Open. Сохранение и закрытие документа.
Работа с Word из кода VBA Excel
Часть 2. Создание и открытие документов Word
[Часть 1] [Часть 2] [Часть 3] [Часть 4] [Часть 5] [Часть 6]
Новый документ Word создается из кода VBA Excel с помощью метода Documents.Add:
|
Sub Test1() Dim myWord As New Word.Application Dim myDocument As Word.Document Set myDocument = myWord.Documents.Add myWord.Visible = True End Sub |
Переменную myDocument можно объявить с типом Object, но тогда не будет ранней привязки к типу Word.Document и подсказок при написании кода (Auto List Members).
Открытие существующего документа
Существующий документ Word открывается из кода VBA Excel с помощью метода Documents.Open:
|
Sub Test2() Dim myWord As New Word.Application Dim myDocument As Word.Document Set myDocument = _ myWord.Documents.Open(«C:Документ1.docx») myWord.Visible = True End Sub |
Замените в этой процедуре строку «C:Документ1.docx» на адрес своего файла.
Подключение к открытому документу
Присвоение переменной ссылки на существующий экземпляр Word.Application осуществляется в VBA Excel с помощью функции GetObject:
|
Sub Test3() Dim myWord As Object, myDoc As Word.Document On Error GoTo Instr Set myWord = GetObject(, «Word.Application») Set myDoc = myWord.Documents(«Документ1.docx») myDoc.Range.InsertAfter «Добавляем новый текст, подтверждающий подключение к открытому документу.» Exit Sub Instr: MsgBox «Произошла ошибка: « & Err.Description End Sub |
Если открытого приложения Word нет, выполнение функции GetObject приведет к ошибке. Также произойдет ошибка, если не будет найден указанный документ (в примере — «Документ1.docx»).
Сохранение и закрытие документа
Сохранение нового документа
Чтобы сохранить из кода VBA Excel новый документ Word, используйте метод SaveAs2 объекта Document:
|
myDocument.SaveAs2 («C:Документ2.docx») |
Замените «C:Документ2.docx» на путь к нужному каталогу с именем файла, под которым вы хотите сохранить новый документ.
Сохранение изменений в открытом документа
Сохраняйте изменения в существующем документе с помощью метода Document.Save или параметра SaveChanges метода Document.Close:
|
‘Сохранение изменений документа myDocument.Save ‘Сохранение изменений документа ‘при закрытии myDocument.Close ‘по умолчанию True myDocument.Close True myDocument.Close wdSaveChanges ‘Закрытие документа без ‘сохранения изменений myDocument.Close False myDocument.Close wdDoNotSaveChanges |
Закрытие любого сохраненного документа
Метод Document.Close закрывает документ, но не приложение. Если работа с приложением закончена, оно закрывается с помощью метода Application.Quit.
Using Excel VBA to create Microsoft Word documents
In these examples, we generate Microsoft Word Documents with various formatting features using
the Microsoft Excel VBA scripting language. These techniques can have many useful applications.
For instance if you have a list of data like a price or product list in Excel that you want to present
in a formatted Word Document, these techniques can prove useful.
In these examples, we assume the reader has at least basic knowledge of VBA, so we will not
go over basics of creating and running scripts. This code has been tested on Microsoft Word and Excel
2007. Some changes may be required for other versions of Word and Excel.
Writing to Word
Inserting a Table of Contents
Inserting Tabs
Inserting Tables
Inserting Bullet List
more on Inserting Tables
Multiple Features
Function that demonstrates VBA writing to a Microsoft Word document
The following code illustrates the use of VBA Word.Application object and related properties.
In this example, we create a new Word Document add some text.
'In Tools > References, add reference to "Microsoft Word XX.X Object Library" before running.
'Early Binding
Dim wdApp As Word.Application
Set wdApp = New Word.Application
'Alternatively, we can use Late Binding
'Dim wdApp As Object
'Set wdApp = CreateObject("word.Application")
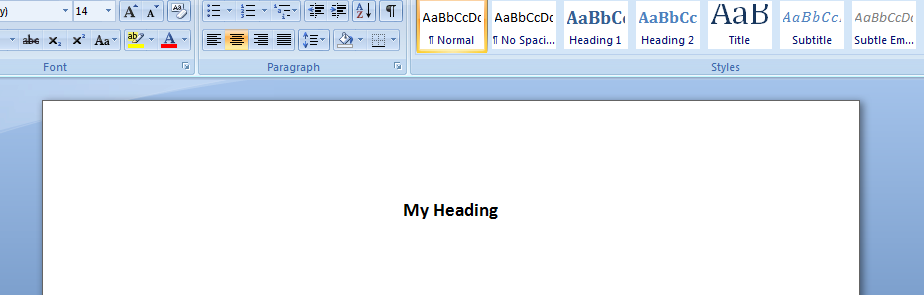
With wdApp
.Visible = True
.Activate
.Documents.Add
With .Selection
.ParagraphFormat.Alignment = wdAlignParagraphCenter
.Font.Bold = True
.Font.Name = "arial"
.Font.Size = 14
.TypeText ("My Heading")
.TypeParagraph
End With
End With
Some VBA Vocabulary
ParagraphFormat
Represents all the formatting for a paragraph.
output in MS Word:
Inserting a Table of Contents into Word Document using Excel VBA
In this example, we generate a Table of Contents into a Word Document using Excel VBA
Sub sAddTableOfContents()
Dim wdApp As Word.Application
Set wdApp = New Word.Application
'Alternatively, we can use Late Binding
'Dim wdApp As Object
'Set wdApp = CreateObject("word.Application")
Dim wdDoc As Word.Document
Set wdDoc = wdApp.Documents.Add
' Note we define a Word.range, as the default range wouled be an Excel range!
Dim myWordRange As Word.range
Dim Counter As Integer
wdApp.Visible = True
wdApp.Activate
'Insert Some Headers
With wdApp
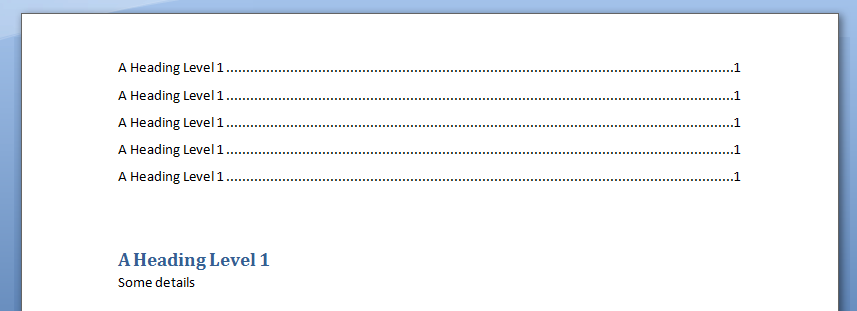
For Counter = 1 To 5
.Selection.TypeParagraph
.Selection.Style = "Heading 1"
.Selection.TypeText "A Heading Level 1"
.Selection.TypeParagraph
.Selection.TypeText "Some details"
Next
End With
' We want to put table of contents at the top of the page
Set myWordRange = wdApp.ActiveDocument.range(0, 0)
wdApp.ActiveDocument.TablesOfContents.Add _
range:=myWordRange, _
UseFields:=False, _
UseHeadingStyles:=True, _
LowerHeadingLevel:=3, _
UpperHeadingLevel:=1
End Sub
Some VBA Vocabulary
ActiveDocument.TablesOfContents.Add
The TablesOfContents property to return the TablesOfContents collection.
Use the Add method to add a table of contents to a document.
Some TablesOfContents Parameters
Range The range where you want the table of contents to appear. The table of contents replaces the range, if the range isn’t collapsed.
UseHeadingStyles True to use built-in heading styles to create the table of contents. The default value is True.
UpperHeadingLevel The starting heading level for the table of contents. Corresponds to the starting value used with the o switch for a Table of Contents (TOC) field. The default value is 1.
LowerHeadingLevel The ending heading level for the table of contents. Corresponds to the ending value used with the o switch for a Table of Contents (TOC) field. The default value is 9.
output Word Table in MS Word:
Write Microsoft Word Tabs
A function that writes tabbed content to a Microsoft Word Document. Note in each iteration, we change the
value of the leader character (characters that are inserted in the otherwise blank area created by the tab).
Public Sub sWriteMicrosoftTabs()
'In Tools > References, add reference to "Microsoft Word XX.X Object Library" before running.
'Early Binding
Dim wdApp As Word.Application
Set wdApp = New Word.Application
'Alternatively, we can use Late Binding
'Dim wdApp As Object
'Set wdApp = CreateObject("word.Application")
With wdApp
.Visible = True
.Activate
.Documents.Add
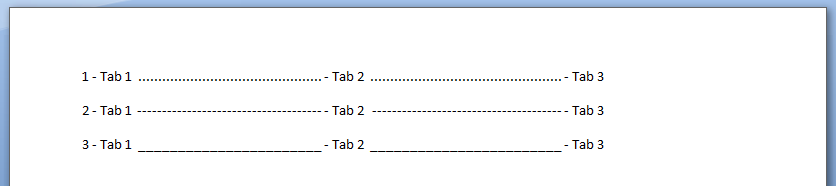
For Counter = 1 To 3
.Selection.TypeText Text:=Counter & " - Tab 1 "
' position to 2.5 inches
.Selection.Paragraphs.TabStops.Add Position:=Application.InchesToPoints(2.5), _
Leader:=Counter, Alignment:=wdAlignTabLeft
.Selection.TypeText Text:=vbTab & " - Tab 2 "
' position to 5 inches
.Selection.Paragraphs.TabStops.Add Position:=Application.InchesToPoints(5), _
Leader:=Counter, Alignment:=wdAlignTabLeft
.Selection.TypeText Text:=vbTab & " - Tab 3 "
.Selection.TypeParagraph
Next Counter
End With
End Sub
Some VBA Vocabulary
.TabStops.Add Use the TabStops property to return the TabStops collection. In the example above,
nprogram adds a tab stop positioned at 0, 2.5 and 5 inches.
output in MS Word:
Write Microsoft Word Tables
In this example, we generate a Microsoft Table using Excel VBA
Sub sWriteMSWordTable ()

    'In Tools > References, add reference to "Microsoft Word XX.X Object Library" before running.

    'Early Binding
    Dim wdApp As Word.Application
    Set wdApp = New Word.Application

    'Alternatively, we can use Late Binding
    'Dim wdApp As Object
    'Set wdApp = CreateObject("word.Application")

    With wdApp
        .Visible = True
        .Activate
        .Documents.Add

        With .Selection

            .Tables.Add _
                    Range:=wdApp.Selection.Range, _
                    NumRows:=1, NumColumns:=3, _
                    DefaultTableBehavior:=wdWord9TableBehavior, _
                    AutoFitBehavior:=wdAutoFitContent

            For counter = 1 To 12
                .TypeText Text:="Cell " & counter
                If counter <> 12 Then
                    .MoveRight Unit:=wdCell
                End If
            Next

        End With

    End With

End Sub
Some VBA vocabulary
Table.AddTable object that represents a new, blank table added to a document.
Table.Add properties
Range The range where you want the table to appear. The table replaces the range, if the range isn’t collapsed.
NumRows The number of rows you want to include in the table.
NumColumns The number of columns you want to include in the table.
DefaultTableBehavior Sets a value that specifies whether Microsoft Word automatically resizes cells in tables to fit the cells� contents (AutoFit). Can be either of the following constants: wdWord8TableBehavior (AutoFit disabled) or wdWord9TableBehavior (AutoFit enabled). The default constant is wdWord8TableBehavior.
AutoFitBehavior Sets the AutoFit rules for how Word sizes tables. Can be one of the WdAutoFitBehavior constants.
output in MS Word:

Write Microsoft Word bullet list
In this example, we write with bullet list and outline numbers with Excel VBA
'In Tools > References, add reference to "Microsoft Word XX.X Object Library" before running.
'Early Binding
Dim wdApp As Word.Application
Set wdApp = New Word.Application
'Alternatively, we can use Late Binding
'Dim wdApp As Object
'Set wdApp = CreateObject("word.Application")
With wdApp
.Visible = True
.Activate
.Documents.Add
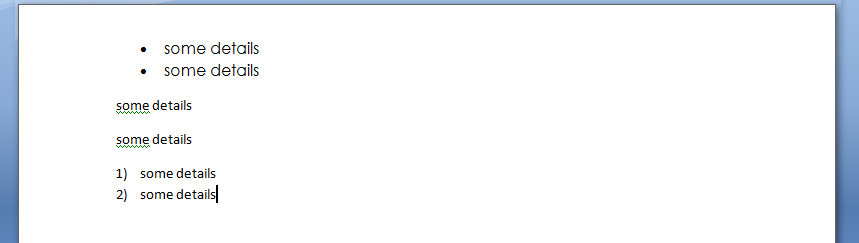
' turn on bullets
.ListGalleries(wdBulletGallery).ListTemplates(1).Name = ""
.Selection.Range.ListFormat.ApplyListTemplate ListTemplate:=.ListGalleries(wdBulletGallery).ListTemplates(1), _
continuepreviouslist:=False, applyto:=wdListApplyToWholeList, defaultlistbehavior:=wdWord9ListBehavior
With .Selection
.ParagraphFormat.Alignment = wdAlignParagraphLeft
.Font.Bold = False
.Font.Name = "Century Gothic"
.Font.Size = 12
.TypeText ("some details")
.TypeParagraph
.TypeText ("some details")
.TypeParagraph
End With
' turn off bullets
.Selection.Range.ListFormat.RemoveNumbers wdBulletGallery
With .Selection
.ParagraphFormat.Alignment = wdAlignParagraphLeft
.TypeText ("some details")
.TypeParagraph
.TypeText ("some details")
.TypeParagraph
End With
' turn on outline numbers
.ListGalleries(wdOutlineNumberGallery).ListTemplates(1).Name = ""
.Selection.Range.ListFormat.ApplyListTemplate ListTemplate:=.ListGalleries(wdOutlineNumberGallery).ListTemplates(1), _
continuepreviouslist:=False, applyto:=wdListApplyToWholeList, defaultlistbehavior:=wdWord9ListBehavior
With .Selection
.ParagraphFormat.Alignment = wdAlignParagraphLeft
.TypeText ("some details")
.TypeParagraph
.TypeText ("some details")
End With
End With
output in MS Word:
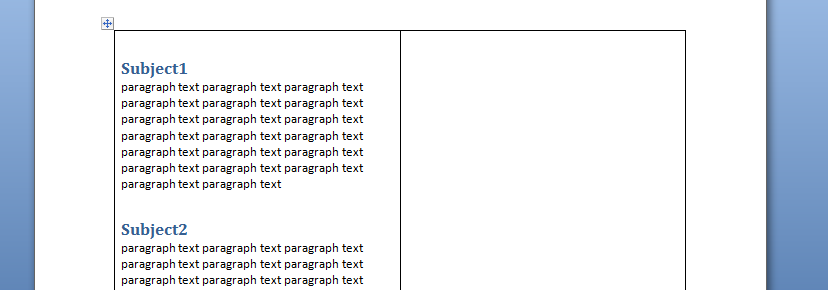
Another example of Writing Tables to Microsoft Word
In this example we will create a word document with 20 paragraphs. Each paragraph will have a header with a header style element
   'In Tools > References, add reference to "Microsoft Word XX.X Object Library" before running.
    Dim wdApp As Word.Application
    Dim wdDoc As Word.Document

    Set wdApp = New Word.Application
    wdApp.Visible = True


    Dim x As Integer
    Dim y As Integer

    wdApp.Visible = True
    wdApp.Activate
    wdApp.Documents.Add

    wdApp.ActiveDocument.Tables.Add Range:=wdApp.Selection.Range, NumRows:=2, NumColumns:= _
        2, DefaultTableBehavior:=wdWord9TableBehavior, AutoFitBehavior:= _
        wdAutoFitFixed

    With wdApp.Selection.Tables(1)
        If .Style <> "Table Grid" Then
            .Style = "Table Grid"
        End If
        .ApplyStyleHeadingRows = True
        .ApplyStyleLastRow = False
        .ApplyStyleFirstColumn = True
        .ApplyStyleLastColumn = False
        .ApplyStyleRowBands = True
        .ApplyStyleColumnBands = False
    End With

    With wdApp.Selection

        For x = 1 To 2
            ' set style name
            .Style = "Heading 1"
            .TypeText "Subject" & x
            .TypeParagraph
            .Style = "No Spacing"
            For y = 1 To 20
                .TypeText "paragraph text "
            Next y
            .TypeParagraph
        Next x

        ' new paragraph
        .TypeParagraph

        ' toggle bold on
        .Font.Bold = wdToggle
        .TypeText Text:="show some text in bold"
        .TypeParagraph

        'toggle bold off
        .Font.Bold = wdToggle
        .TypeText "show some text in regular front weight"
        .TypeParagraph


    End With
Some VBA vocabulary
TypeText
Inserts specified text at the beginning of the current selection. The selection is turned into an insertion point at the end of the inserted text.
If Options.ReplaceSelection = True then the original selection will be replaced. This behaves exactly the same as typing some text at the keyboard.
TypeParagraph
Insert a new blank paragraph. The selection is turned into an insertion point after the inserted paragraph mark. If Options.ReplaceSelection = True then the original selection will be replaced. This behaves exactly the same as pressing the Enter key.
output in MS Word:
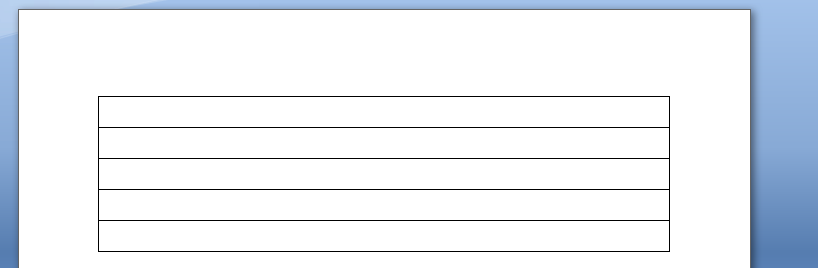
Generating a Word table with VBA
	'In Tools > References, add reference to "Microsoft Word XX.X Object Library" before running.

	Dim wdApp As Word.Application
	Dim wdDoc As Word.Document
	Dim r As Integer

	Set wdApp = CreateObject("Word.Application")
	wdApp.Visible = True

	Set wdDoc = wdApp.Documents.Add
	wdApp.Activate

	Dim wdTbl As Word.Table
	Set wdTbl = wdDoc.Tables.Add(Range:=wdDoc.Range, NumRows:=5, NumColumns:=1)

	With wdTbl

		.Borders(wdBorderTop).LineStyle = wdLineStyleSingle
		.Borders(wdBorderLeft).LineStyle = wdLineStyleSingle
		.Borders(wdBorderBottom).LineStyle = wdLineStyleSingle
		.Borders(wdBorderRight).LineStyle = wdLineStyleSingle
		.Borders(wdBorderHorizontal).LineStyle = wdLineStyleSingle
		.Borders(wdBorderVertical).LineStyle = wdLineStyleSingle

		For r = 1 To 5
			.Cell(r, 1).Range.Text = ActiveSheet.Cells(r, 1).Value
		Next r
	End With
output in MS Word:
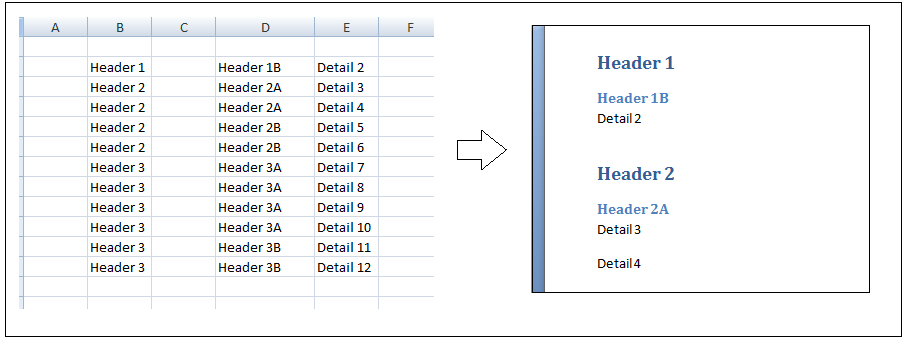
Option Explicit
Dim wdApp As Word.Application

Sub extractToWord()

   'In Tools > References, add reference to "Microsoft Word 12 Object Library" before running.

    Dim lastCell
    Dim rng As Range
    Dim row As Range
    Dim cell As Range
    Dim arrayOfColumns
    arrayOfColumns = Array("", "", "", "", "", "", "", "", "", "", "", "", "", "", "")
    Dim thisRow As Range
    Dim thisCell As Range
    Dim myStyle As String

    ' get last cell in column B
    lastCell = getLastCell()

    Set rng = Range("B2:H" & lastCell)

    'iterate through rows
    For Each thisRow In rng.Rows

        'iterate through cells in row row
        For Each thisCell In thisRow.Cells

            If thisCell.Value = arrayOfColumns(thisCell.Column) Or thisCell.Value = "" Then
            ' do nothing
                ''frWriteLine thisCell.Value, "Normal"
                ''frWriteLine arrayOfColumns(thisCell.Column), "Normal"
                  If thisCell.Value = arrayOfColumns(thisCell.Column) Or thisCell.Value = "" Then
                  End If

            Else
                myStyle = "Normal"
                Select Case thisCell.Column
                    Case 2
                        myStyle = "Heading 1"
                    Case 3
                        myStyle = "Heading 2"
                    Case 4
                        myStyle = "Heading 3"
                    Case Is > 5
                        myStyle = "Normal"

                End Select

                frWriteLine thisCell.Value, myStyle
            End If

        arrayOfColumns(thisCell.Column) = thisCell.Value

      Next thisCell
    Next thisRow

End Sub

Public Function getLastCell() As Integer

    Dim lastRowNumber As Long
    Dim lastRowString As String
    Dim lastRowAddress As String

    With ActiveSheet
        getLastCell = .Cells(.Rows.Count, 2).End(xlUp).row
    End With

End Function

Public Function frWriteLine(someData As Variant, myStyle As String)

    If wdApp Is Nothing Then

        Set wdApp = New Word.Application
        With wdApp
            .Visible = True
            .Activate
            .Documents.Add
        End With

    End If

    With wdApp

        With .Selection
            .ParagraphFormat.Alignment = wdAlignParagraphCenter
            .Style = myStyle
            .TypeText (someData)
            .TypeParagraph
        End With
    End With

End Function
output in MS Word:
- Документы Word
- Создание файлов
- Работа с файлами

Макрос предназначен для программного создания документов Word на основе шаблона
(без использования функции слияния в Word)
В прикреплённом к статье архиве находятся 2 файла:
- шаблон договора в формате Microsoft Word (расширение .dot)
- файл Excel с макросом
Настройки макроса задаются в коде:
Const ИмяФайлаШаблона = «шаблон.dot»
Const КоличествоОбрабатываемыхСтолбцов = 8
Const РасширениеСоздаваемыхФайлов = «.doc»
При нажатии кнопки запуска макрос на основе шаблона dot создаёт очередной файл, и в этом документе производит замену текста («кода поля») из первой строки файла Excel на значение поля (из очередной строки с данными файла Excel)
Папка для сформированных документов создаётся автоматически, и содержит в имени текущую дату и время
(например, созданная папка будет называться Договоры, сформированные 01-05-2011 в 15-03-24)
Имена создаваемых файлов формируются объединением полей фамилия, имя и отчество, с добавлением расширения doc
PS: Макрос был написан достаточно давно, когда я только начинал изучать VBA, — так что код недостаточно универсален.
Но, в качестве примера, пожалуй, подойдёт (если вам нужен более функциональный макрос, воспользуйтесь универсальной надстройкой (см. ниже))
Ознакомьтесь также с универсальной надстройкой формирования документов по шаблонам,
которая может делать всё тоже самое, что и эта программа,
только в качестве шаблонов могут выступать, помимо документов Word, ещё текстовые файлы, и книги Excel.
В надстройке — много возможностей, и полезных дополнений: склонение ФИО в родительный и дательный падежи, автоматический вывод на печать (с заданным количеством копий), размещение созданных файлов в разных папках, создание и рассылка писем со вложениями, и множество других полезных функций.
По вышеприведённой ссылке программа заполнения документов Word из Excel доступна для бесплатного скачивания.
Внимание: просьбы о доработке макроса, описанного в этой статье, не принимаются.
Есть новая (универсальная) версия, — в которой уже есть практически всё, что может понадобиться.
- 197043 просмотра
Не получается применить макрос? Не удаётся изменить код под свои нужды?
Оформите заказ у нас на сайте, не забыв прикрепить примеры файлов, и описать, что и как должно работать.
bizard, сначала делайте код в программе Word.
Когда ставите точку, то появляются члены, которые есть у объекта. Если среди членов нет нужного, значит у объекта нет этого члена. Есть случаи, что не все члены появляются после того, как поставишь точку, но такое редко бывает.
TypeParagraph — является членом объекта Selection. Если вы перейдёте в программу Word, октроете программу VBA, введёте ActiveDocument и поставите точку, то во всплывающей подсказке не будет TypeParagraph. Это означает, что у объекта ActiveDocument нет члена TypeParagraph (могут быть исключения — член не появляется, но есть, но это бывает редко).
Здесь:
| Visual Basic | ||
|
вы используете ActiveDocument, а должны использовать oDocument, т.к. вся работа у вас из Excel в программе Word ведётся через две переменные: oWord и oDocument. Других слов ваш код не понимает, в т.ч. не понимает слова ActiveDocument.
This post is the second in a series about controlling other applications from Excel using VBA. In the first part we looked at the basics of how to reference other applications using Early Binding or Late Binding. In this post, we will look at how we can automate Word from Excel even though we don’t know any VBA code for Word… yet. The process we will use for this is as follows:
- Enable the Word Developer menu
- Record a Word macro
- Add the code to Excel VBA and amend
- Record macros in Excel if necessary
- Repeat the previous steps until macro complete
I am not an Excel VBA expert (I’m more of an Excel VBA tinkerer), and I am certainly not a Word VBA expert. The process I am about to show you may not create the most efficient code, but I know this process works, because I have used it myself to automate lots tasks using Microsoft Word.
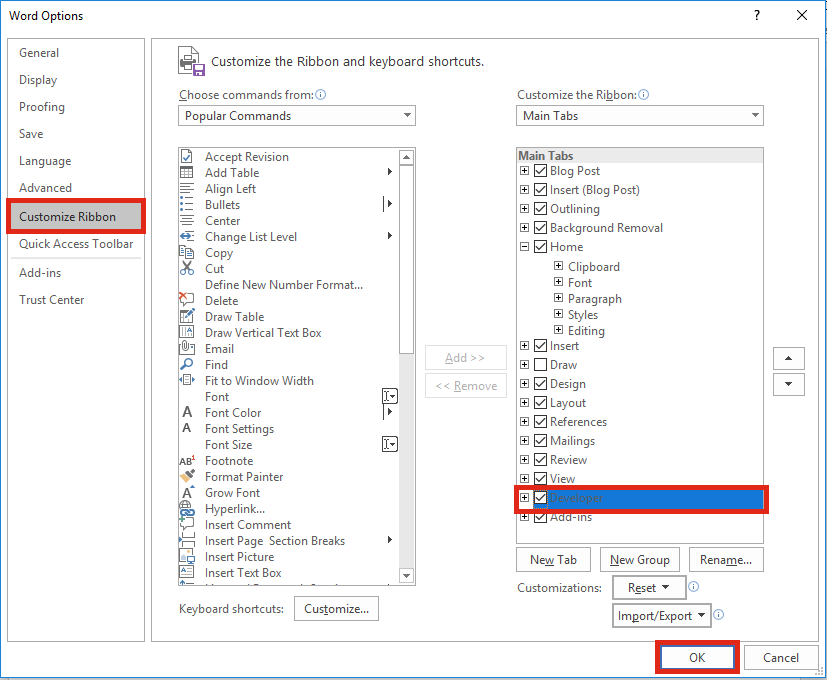
Enable the Word Developer menu
If you have enabled the Excel Developer menu it is the same process in Word.
In Word: File -> Options -> Customize Ribbon
Then tick the Developer Ribbon option, OK.
Record a Word Macro
The key to the success of this method is taking small sections of code and building up a complex macro bit by bit. Using the Word Macro Recorder is again, similar to the Excel Macro recorder.
Click on: Developer -> Record Macro

For the example in this post, we will create a macro which will open a new Word document, then copy a chart from Excel and paste it into that Word document. We will tackle this one stage at a time. Firstly, lets create the macro to open a new word document.
Click – Developer -> Record Macro. The Record Macro window will open.
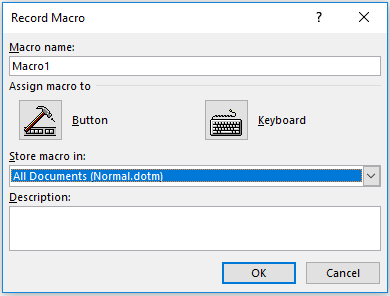
Make a note of the “Store macro in” option, as we will need to know where to find the recorded code later. Normal.dotm is fine for now. Click OK – the Macro Recorder is now running.
Open a new Word Document – File -> New -> Blank Document
Stop the Macro from recording – Developer -> Stop Recording

We can now view the code for opening a new Word Document in the Visual Basic Editor. Click: Developer -> Visual Basic.

Find the location of your recorded code in the Visual Basic Editor. In this example: Normal -> Modules -> NewMacros.
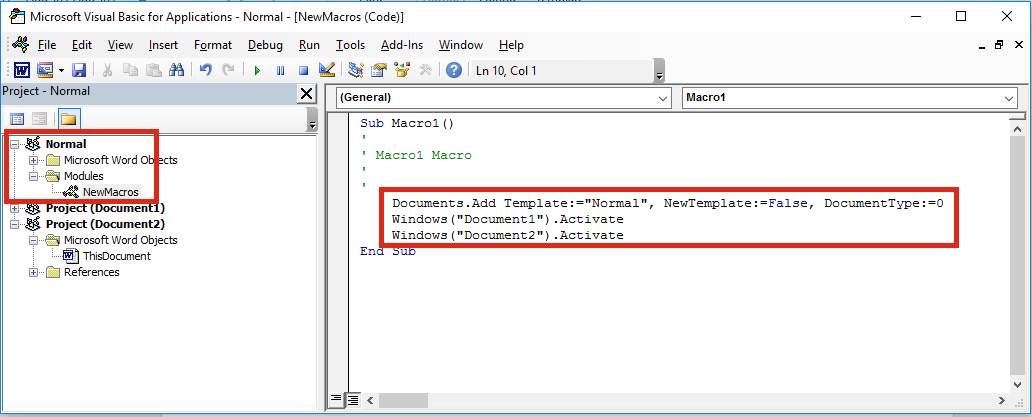
Your code should look like the following. It may be slightly different, but not significantly.
Sub Macro1()
'
' Macro1 Macro
'
'
    Documents.Add Template:="Normal", NewTemplate:=False, DocumentType:=0
    Windows("Document1").Activate
    Windows("Document2").Activate
End Sub
Add the code to Excel VBA and amend
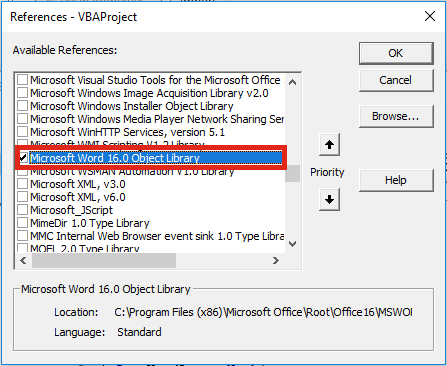
Let’s head back to the Excel VBA Editor and use the Early Binding method to control to Microsoft Word. In the Visual Basic Editor click Tools -> References select Microsoft Word x.xx Object Library. Then click OK.
As we are using Early Binding we need to declare the Application as a variable as follows:
Dim WordApp As Word.Application
Set WordApp = New Word.Application
Now copy and paste the code from the Word VBA Editor into the Excel VBA Editor.
The Word VBA code started with Documents.Add, all we have to do is add our application variable to the front of that line of code. Now becomes WordApp.Documents.Add . . .
Often, Selecting and Activating Objects is not required in VBA code, so I have not copied those statements into the code below.
Sub CreateWordDocument()

'Connect using Early Binding.
'Remember to set the reference to the Word Object Library
'In VBE Editor Tools -> References -> Microsoft Word x.xx Object Library
Dim WordApp As Word.Application
Set WordApp = New Word.Application

WordApp.Documents.Add Template:="Normal", NewTemplate:=False, DocumentType:=0
WordApp.Visible = True 'New Apps will be hidden by default, so make visible

Set WordApp = Nothing 'release the memory

End Sub
A point to note, when an application is opened with VBA, it is normally opened in the background. To make the Word document visible I have added the following code:
WordApp.Visible = True
Record macros in Excel (if necessary)
If we want to copy Excel content into a Word document, we will need to copy that content using Excel VBA. We can use the Macro Recorder in Excel to obtain the VBA code for copying, then we can use the Word Macro Recorder to obtain the VBA code for pasting.
Macro Recording from Excel – selecting a worksheet and copying chart
Sheets("Sheet1").Select
ActiveSheet.ChartObjects("Chart 1").Activate
ActiveChart.ChartArea.Copy
Macro Recording from Word – pasting a chart into a document
Selection.PasteSpecial Link:=False, DataType:=wdPasteEnhancedMetafile, _
        Placement:=wdInLine, DisplayAsIcon:=False
We can add both Macro recordings into our Excel macro. Remember to add WordApp. at the start of each statement of Word VBA code.
Sub CreateWordDocument()

'Connect using Early Binding.
'Remember to set the reference to the Word Object Library
'In VBE Editor Tools -> References -> Microsoft Word x.xx Object Library
Dim WordApp As Word.Application
Set WordApp = New Word.Application

WordApp.Documents.Add Template:="Normal", NewTemplate:=False, DocumentType:=0
WordApp.Visible = True 'New Apps will be hidden by default, so make visible

'code copied from Excel Macro recorder
Sheets("Sheet1").Select
Selection.ChartObjects("Chart 1").ChartArea.Copy

'code copied from Word Macro recorder with WordApp. added to the front.
WordApp.Selection.PasteSpecial Link:=False, DataType:=wdPasteEnhancedMetafile, _
        Placement:=wdInLine, DisplayAsIcon:=False

Set WordApp = Nothing 'release the memory

End Sub
This code is not particularly efficient; it contains a few unnecessary sections code. However… it works!
Repeat the previous steps until macro complete
By repeating the same steps above; recording short actions, then transferring the code into Excel, we can slowly build up much more complex Macros. The key is to keep the actions short, if you do too many actions with the Macro Recorder, code starts to look long and scary.
If you’ve you tried to use the Macro Recorder before you will know that this is not as easy as it seems. And this simple tutorial may make you think it is easy, when it’s not. Sometimes, it can be quite frustrating trying to find out where the issues and errors are. The key to success is recording very short actions, such as those below and copying them into the Visual Basic Editor.
'Pressing the Enter Key to move to a new line in Word
WordApp.Selection.TypeParagraph

'Turn on/off Bold Text
WordApp.Selection.Font.Bold = wdToggle

'Change Font Size
WordApp.Selection.Font.Size = 16

'Type some text
WordApp.Selection.TypeText Text:="Here is some text"
You will soon build up a standard library of code that you can use to control Word for most basic tasks.
In recorded VBA code from Word, the word “Selection” in the code often refers to the document itself. It is possible to make the code a little bit more efficient by declaring the document as a variable. If we were opening a specific document, we could include this at the start, just below the declaration of the application.
'Declare a specific document as a variable
Dim WordDocument As Object
Set WordDocument = WordApp.Documents.Open(sourceFileName)
Or, if we created a new document we could include the following below the declaration of the application variable.
'Delcare a new document as a variable
Dim WordDocument As Object
Set WordDocument = WordApp.Documents.Add Template:="Normal", _
NewTemplate:=False, DocumentType:=0
If we have created the document as a variable we can then reference the specific document. This code:
WordApp.Selection.TypeParagraph
Would become this code:
WordDocument.TypeParagraph
Or this code:
WordApp.Selection.TypeText Text:="Here is some text"
Would become this code:
WordDocument.TypeText Text:="Here is some text"
This method is much better, as it doesn’t rely on the Selection of the user being in the right place.
Conclusion
We have seen in this post that it is possible to create complex Macros to automate Word from Excel using VBA. By understanding how to declare variables for the application and documents we can create much more robust macros, even without knowing a lot of VBA code.
Related Posts:
- 5 quick ways to embed a Word document in Excel
- Controlling Powerpoint from Excel using VBA
- Edit links in Word using VBA
- How to link Excel to Word

About the author
Hey, I’m Mark, and I run Excel Off The Grid.
My parents tell me that at the age of 7 I declared I was going to become a qualified accountant. I was either psychic or had no imagination, as that is exactly what happened. However, it wasn’t until I was 35 that my journey really began.
In 2015, I started a new job, for which I was regularly working after 10pm. As a result, I rarely saw my children during the week. So, I started searching for the secrets to automating Excel. I discovered that by building a small number of simple tools, I could combine them together in different ways to automate nearly all my regular tasks. This meant I could work less hours (and I got pay raises!). Today, I teach these techniques to other professionals in our training program so they too can spend less time at work (and more time with their children and doing the things they love).
Do you need help adapting this post to your needs?
I’m guessing the examples in this post don’t exactly match your situation. We all use Excel differently, so it’s impossible to write a post that will meet everybody’s needs. By taking the time to understand the techniques and principles in this post (and elsewhere on this site), you should be able to adapt it to your needs.
But, if you’re still struggling you should:
- Read other blogs, or watch YouTube videos on the same topic. You will benefit much more by discovering your own solutions.
- Ask the ‘Excel Ninja’ in your office. It’s amazing what things other people know.
- Ask a question in a forum like Mr Excel, or the Microsoft Answers Community. Remember, the people on these forums are generally giving their time for free. So take care to craft your question, make sure it’s clear and concise. List all the things you’ve tried, and provide screenshots, code segments and example workbooks.
- Use Excel Rescue, who are my consultancy partner. They help by providing solutions to smaller Excel problems.
What next?
Don’t go yet, there is plenty more to learn on Excel Off The Grid. Check out the latest posts: