
Сортировка данных в таблице на рабочем листе Excel средствами VBA. Sort и SortField, объекты и методы. Примеры сортировки данных в диапазоне.
Синтаксис сортировки
Синтаксис полного кода VBA Excel, применяемого для сортировки данных в таблицах и диапазонах:
|
With Expression.Sort .SortFields.Clear .SortFields.Add Key, SortOn, Order, DataOption .SetRange [Range] .Header = [xlGuess, xlYes, xlNo] .MatchCase = [True, False] .Orientation = [xlTopToBottom, xlLeftToRight] .Apply End With |
Синтаксис сокращенного кода VBA Excel, применяемого для сортировки данных с параметрами по умолчанию:
|
With Expression.Sort .SortFields.Clear .SortFields.Add Key .SetRange [Range] .Apply End With |
Expression – выражение, возвращающее объект Worksheet, например:
|
ActiveSheet Worksheets («Лист1») ActiveWorkbook.Worksheets («Лист1») Workbooks(«Книга1.xlsm»).Worksheets («Лист1») |
Расшифровка кода
1. Expression.Sort – метод Sort объекта Worksheet возвращает объект Sort.
Объект Sort – это объект, представляющий сортировку диапазона данных.
2. .SortFields.Clear – метод SortFields объекта Sort возвращает коллекцию объектов SortFields. Метод Clear объекта SortFields удаляет все существующие объекты SortField.
Объект SortField содержит все сведения о параметрах сортировки для заданного рабочего листа.
3. .SortFields.Add Key, SortOn, Order, DataOption – метод Add объекта SortFields создает и возвращает новый экземпляр объекта SortField с заданными параметрами.
Параметры метода Add объекта SortFields:
Key – обязательный параметр, который задает значение ключа для сортировки. Тип данных – Range. Обычно указывается первая ячейка столбца при сортировке по строкам или первая ячейка строки при сортировке по столбцам. Сортировка диапазона будет осуществлена по данным столбца (строки), первая ячейка которого указана в качестве ключа.
SortOn – необязательный параметр, который задает критерий сортировки (по какому свойству ячеек производится сортировка).
Значения, которые может принимать SortOn:
| Константа | Значение | Описание |
|---|---|---|
| SortOnValues | 0 | сортировка по значению (значение по умолчанию) |
| SortOnCellColor | 1 | сортировка по цвету ячейки |
| SortOnFontColor | 2 | сортировка по цвету шрифта |
| SortOnIcon | 3 | сортировка по иконке* |
* Иконки (значки) могут быть заданы ячейкам при условном форматировании диапазона.
Order – необязательный параметр, задающий порядок сортировки (по возрастанию или по убыванию).
Значения, которые может принимать Order:
| Константа | Значение | Описание |
|---|---|---|
| xlAscending | 1 | сортировка по возрастанию (значение по умолчанию) |
| xlDescending | 2 | сортировка по убыванию |
DataOption – необязательный параметр, который задает способ сортировки текста.
Значения, которые может принимать DataOption:
| Константа | Значение | Описание |
|---|---|---|
| xlSortNormal | 0 | числовые и текстовые данные сортируются отдельно (значение по умолчанию) |
| xlSortTextAsNumbers | 1 | текстовые данные рассматриваются для сортировки как числовые |
4. .SetRange [Range] – метод SetRange объекта Sort задает диапазон (таблицу), в котором выполняется сортировка.
5. .Header = [xlGuess, xlYes, xlNo] – свойство Header объекта Sort указывает, является ли первая строка таблицы строкой заголовков (шапкой).
Значения, которые может принимать свойство Header:
| Константа | Значение | Описание |
|---|---|---|
| xlGuess | 0 | Excel сам определяет, есть ли строка заголовков |
| xlYes | 1 | строка заголовков есть, сортировка ее не затрагивает |
| xlNo | 2 | строки заголовков нет (значение по умолчанию) |
6. .MatchCase = [True, False] – свойство MatchCase объекта Sort указывает, как учитывать регистр при сортировке.
Значения, которые может принимать свойство MatchCase:
| Константа | Значение | Описание |
|---|---|---|
| False | 0 | регистр не учитывается (значение по умолчанию) |
| True | 1 | сортировка с учетом регистра |
7. .Orientation = [xlTopToBottom, xlLeftToRight] – свойство Orientation объекта Sort задает ориентацию для сортировки.
Значения, которые может принимать свойство Orientation:
| Константа | Значение | Описание |
|---|---|---|
| xlTopToBottom | 1 | сортировка по стокам (значение по умолчанию) |
| xlLeftToRight | 2 | сортировка по столбцам |
8. .Apply – метод Apply объекта Sort выполняет сортировку диапазона в соответствии с примененными параметрами.
Примеры сортировки
Таблица для примеров

Сортировка по одному столбцу
Краткая запись кода VBA Excel для сортировки диапазона по первому столбцу с параметрами по умолчанию:
|
Sub Primer1() With ActiveSheet.Sort .SortFields.Clear .SortFields.Add Key:=Range(«A2») .SetRange Range(«A2:C7») .Apply End With End Sub |
Полная запись, но тоже с параметрами по умолчанию:
|
Sub Primer2() With ActiveSheet.Sort .SortFields.Clear .SortFields.Add Key:=Range(«A2»), SortOn:=xlSortOnValues, Order:=xlAscending, DataOption:=xlSortNormal .SetRange Range(«A2:C7») .Header = xlNo .MatchCase = False .Orientation = xlTopToBottom .Apply End With End Sub |
Результат сортировки:

Сортировка по двум столбцам
Код VBA Excel для сортировки исходной таблицы по первому и второму столбцам с параметрами по умолчанию:
|
Sub Primer3() With ActiveSheet.Sort .SortFields.Clear .SortFields.Add Key:=Range(«A2») .SortFields.Add Key:=Range(«B2») .SetRange Range(«A2:C7») .Apply End With End Sub |
Результат сортировки:

Применение сортировки ко второму столбцу (добавление еще одного объекта SortField) не нарушает сортировку первого – в первом столбце меняются местами только ячейки с одинаковыми значениями.
In this Article
- Sort Data with Excel VBA
- Practical Use of the Sort Method in VBA
- Sample Data to Demonstrate Excel Sorting with VBA
- Recording a Macro for a VBA Sort
- VBA Code to do a Single Level Sort
- VBA Code to do a Multi-Level Sort
- Sorting by Cell Color
- Sorting by Font Color
- Using Other Parameters in VBA Sorting
- Extending the Sorting Function Using VBA
Sort Data with Excel VBA
Excel has an excellent means of sorting a range of tabular data using the ribbon on the Excel front end, and at some point, you will probably want to use this functionality within your VBA code. Fortunately, this is very easy to do.
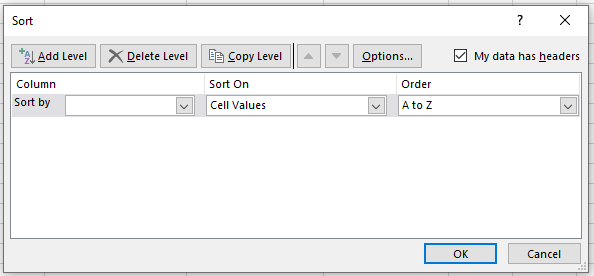
The front-end dialog box is found by clicking the ‘Sort’ icon in the ‘Sort & Filter’ group of the ‘Data’ tab on the Excel ribbon. You need to select a range of tabular data first.
You can also use Alt-A-S-S to show the dialog box for a custom sort.
The sort method has been greatly improved in later versions of Excel. The sort used to be restricted to three levels, but you can now enter as many levels as your need, and this also applies within VBA.
You can incorporate all the sort functions on offer in the Excel Sort dialog into your VBA code. The sort function in Excel is fast, and quicker than anything that you could write yourself in VBA, so take advantage of the functionality.
Note that when you do a sort in VBA, the sort parameters remain the same in the front-end sort dialog box. They also are saved when the workbook is saved.
If a user selects the same range of tabular data and clicks on the Sort icon, they will see all your parameters that have been entered by your VBA code. If they want to do a sort of their own design, then they will have to delete all your sort levels first, which will be very annoying for them.
Also, if you do not change the parameters within your code, and rely on default values, you may find that the user has made changes which will reflect through into your VBA sort, and may give unexpected results, which may be very difficult to debug.
Fortunately, there is a Clear method in VBA to re-set all the sort parameters so that the user will see a clean sort dialog box
Worksheets("Sheet1").Sort.SortFields.ClearIt is good practice to clear the sort parameters in VBA before and after the sort has been completed.
Practical Use of the Sort Method in VBA
When tabular data is imported into Excel, it is often in a very random order. It could be imported from a CSV (comma separated values) file or it could come from a link to a database or web page. You cannot rely on it being in a set order from one import to another.
If you are presenting this data to a user within your worksheet, the user may well find it difficult to look at and understand a huge amount of data which in terms of order is all over the place. They may want to group the data, or cut and paste certain sections of it into another application.
They may also want to see, for example, the highest paid employee, or the employee with the longest service.
Using the Sort method in VBA, you can offer options to allow easy sorting for the user.
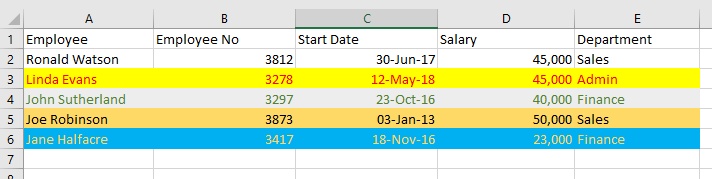
Sample Data to Demonstrate Excel Sorting with VBA
We first need some sample data to be entered into a worksheet, so that the code can demonstrate all the facilities available within VBA.
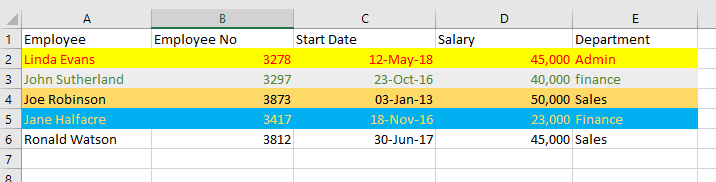
Copy this data into a worksheet (called ‘Sheet1’) exactly as shown.
Note that different cell background colors and font colors have been used, as these can also be used as sorting parameters. Sorting using cell and font colors will be demonstrated later in the article. Also note that on cell E3, the department name is all lower case.
You do not need the cell interior and font colors if you do not wish to use the examples of sorting by cell and font color.
Recording a Macro for a VBA Sort
VBA code for sorting can get quite complicated, and it can sometimes be a good idea to do the sort on the front end of Excel and record a macro to show you how the code works.
Unfortunately, the recording function can generate a huge amount of code because it sets virtually every parameter available, even though the default values for many parameters are acceptable to your sort operation.
However, it does give you a very good idea of what is involved in writing VBA sort code, and one advantage is that the recorded code will always work for you. Your own code may need testing and debugging to make it work properly.
Remember that for an operation done in VBA, there is no undo feature, so it is a good idea to make a copy of the tabular data onto another worksheet before you start writing your sorting code.
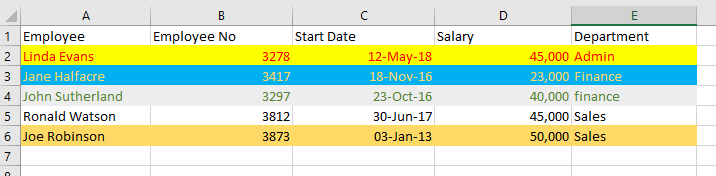
As an example, if you did a simple sort on the sample data above, sorting by Employee, the recording would generate the following code:
Sub Macro1()

Range("A1:E6").Select

ActiveWorkbook.Worksheets("Sheet1").Sort.SortFields.Clear
ActiveWorkbook.Worksheets("Sheet1").Sort.SortFields.Add2 Key:=Range("A2:A6"), _
    SortOn:=xlSortOnValues, Order:=xlAscending, DataOption:=xlSortNormal

With ActiveWorkbook.Worksheets("Sheet1").Sort
    .SetRange Range("A1:E6")
    .Header = xlYes
    .MatchCase = False
    .Orientation = xlTopToBottom
    .SortMethod = xlPinYin
    .Apply
End With

End Sub
This is quite a large chunk of code, and a lot of it is unnecessary because of default parameters being used. However, if you are under time pressure to complete a project and you need some code quickly that works, you can easily paste this into your own VBA code.
However, if you want to make your code understandable and more elegant, then there are other options available.
VBA Code to do a Single Level Sort
If you want to sort the sample code based on Employee only as before when recording a macro, the code is very simple:
Sub SingleLevelSort()

Worksheets("Sheet1").Sort.SortFields.Clear

Range("A1:E6").Sort Key1:=Range("A1"), Header:=xlYes

End Sub
This is far easier to understand than the recorded code because it accepts the defaults, e.g., sort ascending, so there is no need to set the parameters to default values. This assumes that you have used a ‘Clear’ statement beforehand.
The ‘Clear’ method is used initially to ensure that every sort parameter for that worksheet is set back to the default values. A user may have previously set the parameters to different values, or an earlier sort in VBA may have changed them. It is important to start from a default position when sorting, otherwise you could easily end up with incorrect results.
The Clear method does not reset the Header parameter, and it is advisable to include this in your code, otherwise Excel may try and guess whether a header row is present or not.
Run this code against the sample data and your worksheet will look like this:
VBA Code to do a Multi-Level Sort
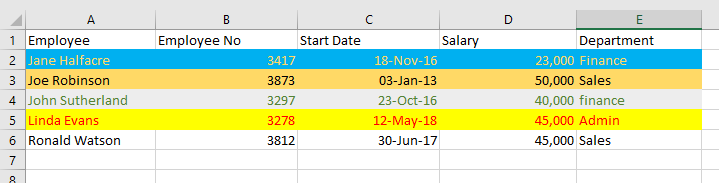
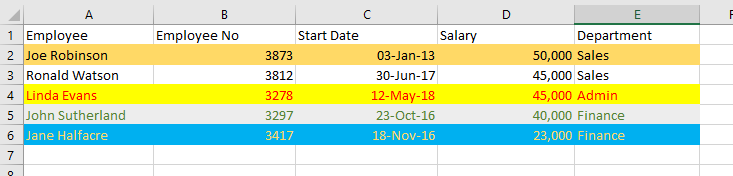
You can add in as many sorting levels as required within your code. Suppose that you wished to sort first by department and then by start date but in ascending order for the department and descending order for start date:
Sub MultiLevelSort()

Worksheets("Sheet1").Sort.SortFields.Clear

Range("A1:E6").Sort Key1:=Range("E1"), Key2:=Range("C1"), Header:=xlYes, _
    Order1:=xlAscending, Order2:=xlDescending

End Sub
Note that there are now two keys in the sort statement (Key1 and Key2). Key1 (Department column E) is sorted first of all and then Key2 (Start Date column C) is sorted based on the first sort.
There are also two order parameters. Order1 associates with Key1 (Department) and Order2 associates with Key2 (Start Date). It is important to ensure that keys and orders are kept in step with each other.
Run this code against the sample data and your worksheet will look like this:
The Department column (E) is in ascending order, and the Start Date column (C) is in descending order.
The effect of this sort is most noticeable when looking at Jane Halfacre (row 3) and John Sutherland (row 4). They are both in Finance but Jane Halfacre started before John Sutherland and the dates are shown in descending order.
If the range of tabular data could be of any length, you can use the UsedRange object to define the sort range. This will only work if there is only the tabular data on the worksheet as any values outside of the data will give incorrect results for the number of rows and columns.
Sub MultiLevelSort()

Worksheets("Sheet1").Sort.SortFields.Clear
Worksheets("Sheet1").UsedRange.Sort Key1:=Range("E1"), Key2:=Range("C1"), Header:=xlYes, _
    Order1:=xlAscending, Order2:=xlDescending

End Sub
This prevents the problem if you use the method ‘End(xlDown)’ to define the sort range. If there is a blank cell in the middle of the data, then anything after the blank cell will not be included, whereas UsedRange goes down to the last active cell in the worksheet.
VBA Coding Made Easy
Stop searching for VBA code online. Learn more about AutoMacro — A VBA Code Builder that allows beginners to code procedures from scratch with minimal coding knowledge and with many time-saving features for all users!

Learn More
Sorting by Cell Color
Since Excel 2007, sorting by the background color of a cell is now possible, which provides enormous flexibility when designing your sort code in VBA.
Sub SingleLevelSortByCellColor()

Worksheets("Sheet1").Sort.SortFields.Clear
ActiveWorkbook.Worksheets("Sheet1").Sort.SortFields.Add2 Key:=Range("A2:A6"), _
    SortOn:=xlSortOnCellColor, Order:=xlAscending, DataOption:=xlSortNormal

With ActiveWorkbook.Worksheets("Sheet1").Sort
    .SetRange Range("A2:E6")
    .Apply
End With

End Sub
This code will sort the sample data range (A2:A6) based on the cell background color. Note that there is now an additional parameter called ‘SortOn’ which has the value of ‘xlSortOnCellColor’.
Note that the ‘SortOn’ parameter can only be used by a worksheet object and not by a range object.
Because of this the code is more complicated than for a sort using cell values.
This code uses a key value for the sort which covers the whole range of data but you can specify individual columns as the key for the background color sort, and use multiple levels as shown earlier.
After running this code, your worksheet will now look like this:
Sorting by Font Color
The sort function in Excel VBA offers even more flexibility in that you can sort by font colors:
Sub SingleLevelSortByFontColor()

Worksheets("Sheet1").Sort.SortFields.Clear
ActiveWorkbook.Worksheets("Sheet1").Sort.SortFields.Add(Range("A2:A6"), _
    xlSortOnFontColor, xlAscending, xlSortNormal).SortOnValue.Color = RGB(0, 0, 0)

With ActiveWorkbook.Worksheets("Sheet1").Sort
    .SetRange Range("A1:E6")
    .Header = xlYes
    .Orientation = xlTopToBottom
    .Apply
End With

End Sub
The code for sorting by font color is far more complicated than for the cell background color. The ‘SortOn’ parameter now holds the value of ‘xlSortOnFontColor’.
Note that you must specify orientation as ‘xlTopToBottom’ and you must specify a color to sort on. This is specified in RGB terms (Red, Green, Black) with values going from 0 to 255.
After running this code against the sample data, your worksheet will now look like this:
Sorting using colors in VBA is far more complicated than a multi-level sort, but if your sort code will not work (which can happen if a parameter is missing or you have not entered the code correctly) then you can always fall back on recording a macro and integrating the recorded code into your VBA.
Using Other Parameters in VBA Sorting
There are a number of optional parameters that you can use in your VBA code to customize your sort.
SortOn
SortOn chooses whether the sort will use cell values, cell background colors, or cell font colors. The default setting is Cell Values.
SortOn = xlSortOnValuesOrder
Order chooses whether the sort will be done in ascending or descending order. The default is Ascending.
Order = xlAscendingDataOption
DataOption chooses how text and numbers are sorted. The parameter xlSortNormal sorts numeric and text data separately. The parameter xlSortTextAsNumbers treats text as numeric data for the sort. The default is xlSortNormal.
DataOption = xlSortNormalHeader
Header chooses whether the tabular data range has a header row or not. If there is a header row, you do not want this included in the sort.
Parameter values are xlYes, xlNo, and xlYesNoGuess. xlYesNoGuess leaves it to Excel to determine if there is a header row, which could easily lead to inconsistent results. Use of this value is not recommended.
The default value is XNo (no header row within the data). With imported data, there is usually a header row, so make sure that you set this parameter to xlYes.
Header = xlYesMatchCase
This parameter determines whether the sort is case-sensitive or not. Option values are True or False. If the value is False, then lower case values are considered the same as upper case values. If the value is True, then the sort will show the difference between upper and lower case values within the sort. The default value is False.
MatchCase = FalseOrientation
This parameter determines whether the sort will take place downwards through the rows, or across all the columns. The default value is xlTopToBottom (sort through rows). You can use xlLeftToRight if you wish to sort horizonally. Values such as xlRows and xlColumns do not work for this parameter.
Orientation = xlTopToBottomSortMethod
This parameter is only used for sorting Chinese languages. It has two values, xlPinYin and xlStroke. xlPinYin is the default value.
xlPinYin sorts using the phonetic Chinese sort order for characters. xlStroke sorts by the quantity of strokes in each character.
If you record a sort macro, this parameter will always be included in the code, and you may well have wondered what it meant. However, unless you are dealing with data in Chinese, it is of little use.
SortMethod = xlPinYinUsing a Double-Click Event to Sort Tabular Data
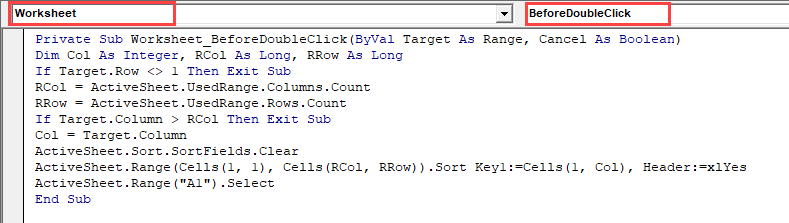
In all the functionality that Microsoft included in the sort methods for VBA, it did not include a simple means to double-click on a column header and sort the whole of the tabular data based on that particular column.
This is a really useful feature to have, and it is easy to write the code to do it.
Private Sub Worksheet_BeforeDoubleClick(ByVal Target As Range, Cancel As Boolean)
'Assumption is made that data begins at cell A1

'Create three variables to capture the target column selected and the maximum column and row of _
'   the tabular data
Dim Col As Integer, RCol As Long, RRow As Long

'Check that the user has double-clicked on the header row – row 1 otherwise exit sub
If Target.Row <> 1 Then Exit Sub

'Capture the maximum rows in the tabular data range using the ‘UsedRange’ object
RCol = ActiveSheet.UsedRange.Columns.Count

'Capture the maximum columns in the tabular data range using the 'UsedRange' object
RRow = ActiveSheet.UsedRange.Rows.Count

'Check that the user has not double-clicked on a column outside of the tabular data range
If Target.Column > RCol Then Exit Sub

'Capture the column that the user has double-clicked on
Col = Target.Column

'Clear away previous sort parameters
ActiveSheet.Sort.SortFields.Clear

'Sort the tabular range as defined by maximum rows and columns from the 'UsedRange' object
'Sort the tabular data using the column double-clicked by the user as the sort key
ActiveSheet.Range(Cells(1, 1), Cells(RRow, RCol)).Sort Key1:=Cells(1, Col), Header:=xlYes

'Select cell A1 – this is to ensure that the user is not left in edit mode after the sort is _
'   completed
ActiveSheet.Range("A1").Select

End Sub
This code needs to be placed on the double-click event on the sheet containing the tabular data. You do this by clicking on the worksheet name in the Project Explorer window (top-left hand corner of the VBE screen), and then selecting ‘Worksheet’ in the first drop down on the code window. Select ‘BeforeDoubleClick’ in the second drop down, and you can then enter your code.
Note that no names, ranges, or cell references are hardcoded into this code except for moving the cursor to cell A1 at the end of the code. The code is designed to get all the information required from the cell coordinates that the user has double-clicked on and the size of the tabular data range.
It does not matter how large the tabular data range is. The code will still pick up all the required information and it can be used on data held anywhere within your workbook without having to hardcode in values.
The only assumption made is that there is a header row in the tabular data, and that the data range starts at cell A1, but the starting position for the data range can be easily changed within the code.
Any user will be suitably impressed with this new sorting functionality!
VBA Programming | Code Generator does work for you!
Extending the Sorting Function Using VBA
Microsoft has allowed tremendous flexibility in sorting using a wide range of parameters. However, within VBA, you can take this further.
Suppose that you wanted to sort any values with a bold font to the top of your data. There is no way to do this in Excel, but you can write the VBA code to do it:
Sub SortByBold()

'Create variables to hold the number of rows and columns for the tabular data
Dim RRow As Long, RCol As Long, N As Long

'Turn off screen updating so that the user cannot see what is happening – they may see _
'   values being altered and wonder why
Application.ScreenUpdating = False

'Capture the number of columns in the tabular data range
RCol = ActiveSheet.UsedRange.Columns.Count

'Capture the number of rows within the tabular data range
RRow = ActiveSheet.UsedRange.Rows.Count

'Iterate through all the rows in the tabular data range ignoring the header row
For N = 2 To RRow
    'If a cell has a bold font then place a leading 0 value against the cell value
    If ActiveSheet.Cells(N, 1).Font.Bold = True Then
        ActiveSheet.Cells(N, 1).Value = "0" & ActiveSheet.Cells(N, 1).Value
    End If
Next N

'Clear any previous sort parameters
ActiveSheet.Sort.SortFields.Clear

'Sort the tabular data range. All the values with a leading 0 value will move to the top
ActiveSheet.Range(Cells(1, 1), Cells(RRow, RCol)).Sort Key1:=Cells(1, 1), Header:=xlYes

'Iterate through all the rows in the tabular data range ignoring the header row
For N = 2 To RRow
    'If a cell has a bold font then remove the leading 0 value from the cell value to _
    '   restore the original values
    If ActiveSheet.Cells(N, 1).Font.Bold = True Then
        ActiveSheet.Cells(N, 1).Value = Mid(ActiveSheet.Cells(N, 1).Value, 2)
    End If
Next N

'Turn screen updating back on
Application.ScreenUpdating = True

End Sub
The code works out the size of the tabular data range using the ‘UsedRange’ object and then iterates through all the rows within it. When a bold font is found, a leading zero is placed in front of the cell value.
A sort then takes place. As the sort is in ascending order, anything with a zero in front will go to the top of the list.
The code then iterates through all the rows and removes the leading zeroes, restoring the data to its original values.
This code sorts using bold fonts as a criterion, but you could easily use other cell characteristics in the same way, e.g., italic font, point size of text, underscore font, font name, etc.
- Excel VBA Сортировка
Excel VBA Сортировка
Существуют разные способы сортировки данных в Microsoft Excel. Под вкладкой Excel Data находится значок сортировки, откуда вы можете быстро отсортировать данные и получить результаты. Почему тогда нужно писать сложный код VBA?
Вы должны помнить это каждый раз, коды VBA существуют для автоматизации вещей. Предположим, у вас есть данные, которые время от времени обновляются. Может быть, каждый день, еженедельно, ежемесячно и т. Д., И вам нужны ваши данные определенным образом. В таких случаях можно использовать функцию VBA SORT, которая станет удобным инструментом для вашей справки.
VBA имеет метод Range.Sort для сортировки данных. Где Range указывает диапазон ячеек, которые мы хотим отсортировать в порядке возрастания или убывания.
Синтаксис для Range.Sort приведен ниже:

Где,
- Ключ — столбец / диапазон, который нужно отсортировать. Ex. Если вы хотите отсортировать ячейки A1: A10, вы должны упомянуть Range (A1: A10)
- Порядок — это параметр, который позволяет сортировать данные в порядке возрастания или убывания.
- Заголовок — это параметр, который указывает, имеет ли ваш столбец / диапазон заголовки или нет.
Этих трех параметров достаточно для нашей работы. Однако есть некоторые другие параметры, такие как MatchCase, SortMethod и т. Д., Которые вы всегда можете изучить и посмотреть, как они работают.
Как использовать функцию сортировки Excel VBA?
Мы узнаем, как сортировку VBA можно использовать для сортировки столбца без заголовков, столбца с заголовками и нескольких столбцов с примерами в Excel.
Вы можете скачать этот шаблон VBA Sort Excel здесь — Шаблон VBA Sort Excel
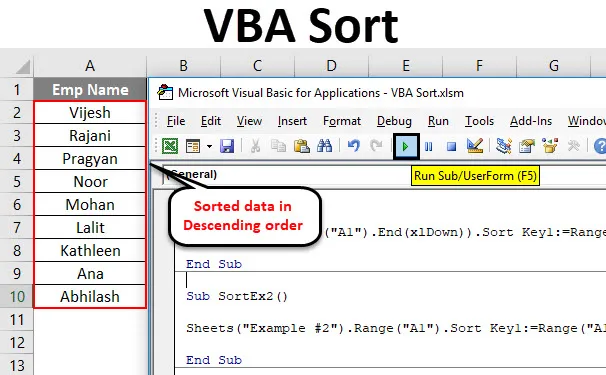
Функция сортировки VBA — пример № 1
Сортировка одного столбца без заголовка
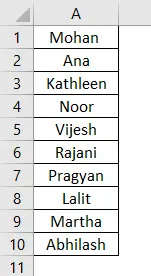
Предположим, у вас есть столбец с именами, как показано ниже, и все, что вам нужно, это отсортировать эти данные в алфавитном порядке в порядке возрастания или убывания.
Выполните следующие шаги, чтобы использовать функцию сортировки в VBA.
Шаг 1: Определите новую sup-процедуру в модуле и создайте макрос.
Код:
Sub SortEx1 () End Sub
Шаг 2: Используйте функцию Range.Sort для сортировки этого столбца в порядке возрастания.
Код:
Sub SortEx1 () Range ("A1", Range ("A1"). End (xlDown)). Sort End Sub
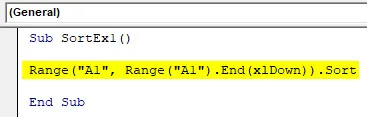
Здесь вы даете диапазон, начиная с ячейки A1 до последней использованной / непустой ячейки (см. Функцию .End (xlDown)) для функции Range.Sort.
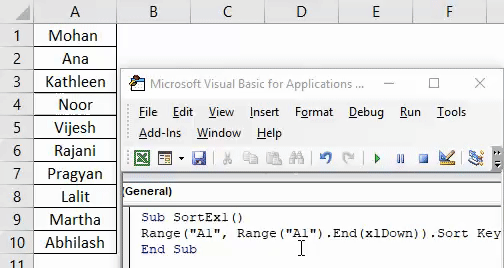
Шаг 3: Теперь введите значения аргумента.
Код:
Sub SortEx1 () Range ("A1", Range ("A1"). End (xlDown)). Sort Key1: = Range ("A1"), Order1: = xlAscending, заголовок: = xlNo End Sub

Как мы уже обсуждали ранее, Key, Order и Header являются важными и необходимыми аргументами, которые необходимо предоставить. В качестве начального диапазона столбца мы указали Range («A1»), который нам нужно отсортировать. Порядок предоставляется в порядке возрастания, а заголовок — как нет (что означает, что столбец не имеет заголовка).
Этот код проверяет все непустые ячейки, начиная с A1, а затем сортирует их в порядке возрастания, начиная с ячейки A1.
Шаг 4: Запустите этот код, нажав F5 или кнопку Run вручную и посмотрите результат.
Если вы можете сравнить это с изображением в начале этого примера, вы увидите, что имена отсортированы в порядке возрастания.
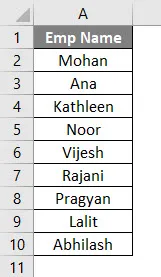
Функция сортировки VBA — пример № 2
Сортировка одной колонки с заголовком
Предположим, у вас есть столбец с заголовком, как показано ниже. И вы хотели отсортировать этот столбец в порядке возрастания или убывания.
Выполните следующие шаги, чтобы использовать функцию сортировки в VBA.
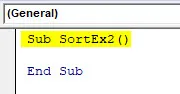
Шаг 1: Определите новую подпроцедуру в новой модели для хранения макроса.
Код:
Sub SortEx2 () End Sub
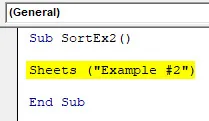
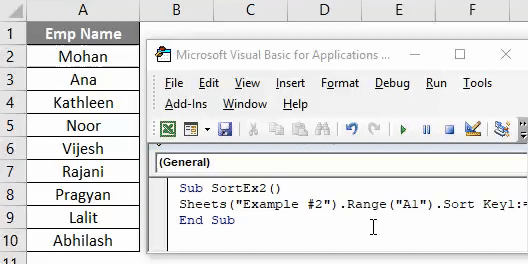
Шаг 2: Используйте Sheets («Пример # 2»), чтобы указать, к какому листу относятся ваши данные.
Код:
Sub SortEx2 () Sheets ("Пример # 2") End Sub
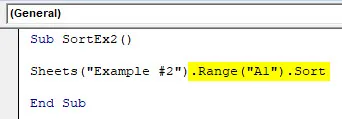
Шаг 3: Используйте Range («A1»). Сортируйте перед приведенной выше строкой кода, чтобы сделать ее функцией сортировки.
Код:
Sub SortEx2 () Sheets ("Пример # 2"). Диапазон ("A1"). Sort End Sub
Шаг 4: Введите Key1 как Range («A1») для сортировки данных из ячейки A1, Order1, чтобы отсортировать данные в порядке возрастания или убывания, и Header как « Да», чтобы система знала, что первая строка является заголовком в вашем данные.
Код:
Sub SortEx2 () Sheets ("Пример # 2"). Range ("A1"). Sort Key1: = Range ("A1"), Order1: = xlAscending, Header: = xlYes End Sub

Шаг 5: Запустите этот код, нажав F5 или кнопку Run вручную и посмотрите результат.
Здесь данные из примера № 2 данной рабочей книги Excel сортируются в порядке возрастания, учитывая, что они имеют заголовок. Это означает, что при сортировке этих данных первая строка (которая содержит имя Emp ) игнорируется, поскольку она рассматривается как заголовок для этих данных в столбце A.
Вы также можете отсортировать те же данные в порядке убывания алфавитов. Все, что вам нужно сделать, это изменить порядок с возрастания на убывание.
Шаг 6: Измените order1 на нисходящий, чтобы отсортировать данные в порядке убывания.
Код:
Sub SortEx2 () Sheets ("Пример # 2"). Range ("A1"). Sort Key1: = Range ("A1"), Order1: = xlDescending, Header: = xlYes End Sub

Шаг 7: Запустите код и посмотрите вывод, как показано ниже.
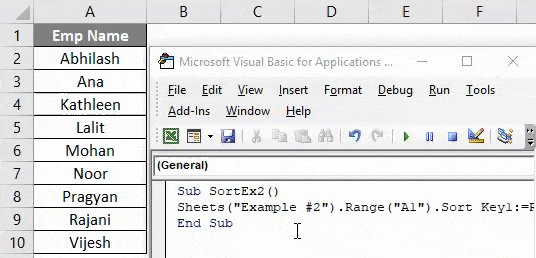
Вы можете видеть, что данные отсортированы в порядке убывания.
Функция сортировки VBA — пример № 3
Сортировка нескольких столбцов с заголовками
До сих пор мы рассмотрели, как сортировать данные одного столбца в порядке возрастания или убывания (без заголовка и с заголовком). Что если у вас есть данные, которые нужно отсортировать по нескольким столбцам? Можно ли написать код для того же?
Ответ: «Да, конечно, это можно сделать!»
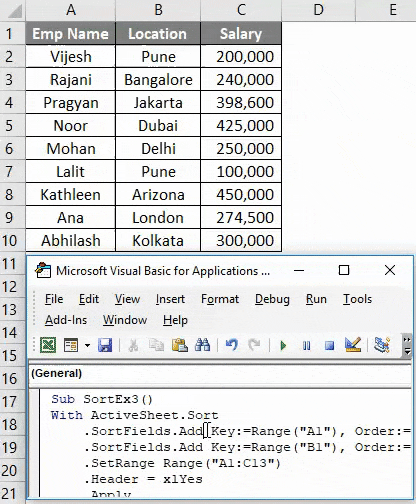
Предположим, у вас есть данные, указанные ниже:
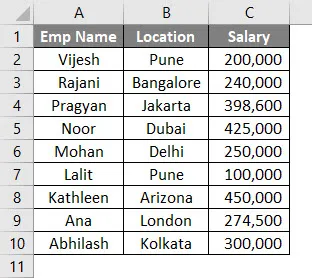
Вы хотели отсортировать эти данные сначала по Emp Name, а затем по Location. Выполните следующие шаги, чтобы увидеть, как мы можем кодировать его в VBA.
Шаг 1: Определите новую подпроцедуру для добавления макроса в новый модуль.
Код:
Sub SortEx3 () End Sub
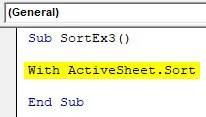
Шаг 2: Используйте оператор With… End With, чтобы добавить несколько условий сортировки в одном цикле.
Код:
Sub SortEx3 () с ActiveSheet.Sort End Sub
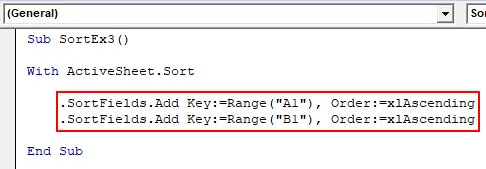
Шаг 3: Теперь используйте SortFields.Add, чтобы добавить несколько условий сортировки в одном листе.
Код:
Sub SortEx3 () с ActiveSheet.Sort .SortFields.Add Key: = Range ("A1"), Order: = xlAscending .SortFields.Add Key: = Range ("B1"), Order: = xlAscending End Sub
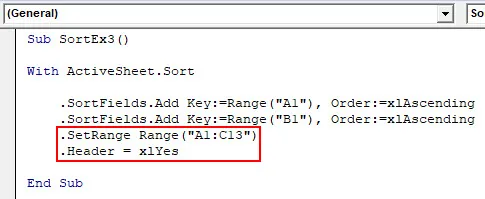
Шаг 4: Определите диапазон листов для сортировки и заголовок На следующем шаге.
Код:
Sub SortEx3 () с ActiveSheet.Sort .SortFields.Add Key: = Range ("A1"), Order: = xlAscending .SortFields.Add Key: = Range ("B1"), Order: = xlAscending .SetRange Range ("A1) : C13 ") .Header = xlYes End Sub
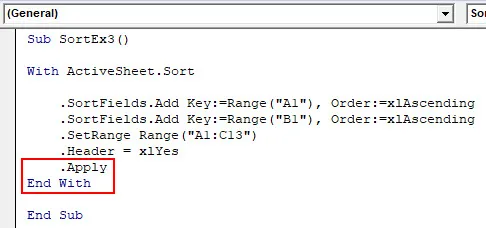
Шаг 5: Используйте .Apply, чтобы применить все это под оператором with и закрыть цикл, пишущий End With.
Код:
Sub SortEx3 () с ActiveSheet.Sort .SortFields.Add Key: = Range ("A1"), Order: = xlAscending .SortFields.Add Key: = Range ("B1"), Order: = xlAscending .SetRange Range ("A1) : C13 ") .Header = xlYes. Применить End End End Sub
Шаг 6: Запустите этот код, нажав F5 или кнопку Run вручную, и увидите результат.
В этом коде ActiveSheets.Sort помогает системе идентифицировать лист, по которому должны быть отсортированы данные. SortFields.Add позволяет добавлять два условия сортировки с их порядком (по возрастанию в обоих случаях). SetRange позволяет системе установить диапазон от A1 до C13. Вы также можете увеличить этот диапазон. Операторы Apply позволяют системе применять все изменения, сделанные в цикле With.
Наконец, вы получите данные, которые отсортированы по имени Emp сначала, а затем по местоположению.
То, что нужно запомнить
- Под сортировкой VBA вы можете создавать именованные диапазоны вместо ссылок на ячейки и использовать их. Ex. Если вы создали именованный диапазон для ячейки A1: A10 как «EmpRange», вы можете использовать его в Range.Sort, например Range («EmpRange»).
- Вы можете сортировать данные как по возрастанию, так и по убыванию, как в Excel.
- Если вы не уверены, есть ли у ваших данных заголовок или нет, вы можете использовать xlGuess в разделе заголовка, чтобы система могла угадать, является ли первая строка данных заголовком или нет.
Рекомендуемые статьи
Это было руководство по сортировке Excel VBA. Здесь мы обсудили VBA Sort и как использовать Excel VBA Sort Function вместе с практическими примерами и загружаемым шаблоном Excel. Вы также можете просмотреть наши другие предлагаемые статьи —
- Краткое руководство по Excel Сортировка по номеру
- Использование функции соответствия VBA
- Как отсортировать столбец в Excel?
- VBA Пока Loop | MS Excel
To sort a range of cells using VBA, you need to use the “SORT” method that allows you to set a single key (column) or multiple keys (for multiple columns) to sort. You can also define the order (ascending or descending) in which you want to sort, and you can specify if you have a header or not.
Sort a Range with VBA
- Use the range object to specify the range that you wish to sort.
- Type a dot and enter the sort method.
- Specify the key that you want to use to sort.
- Define the sorting order.
- Mention if you have a header or not.

Range("A1:A11").Sort Key1:=Range("A1"), _
                     Order1:=xlAscending, _
                     Header:=xlYes
In the above code, you have used the range A1:A11, and in the sort method, you have used the ascending order, mentioned that you have a header in the range.
Understanding the VBA’s Sort Method
Before you write a macro to sort a range it’s better to make deep dive into the sort method and understand its arguments.
Sort (Key1, Order1, Key2, Type, Order2, Key3, Order3, _
Header, OrderCustom, MatchCase, Orientation, SortMethod, _
DataOption1, DataOption2, DataOption3)
The following are the most important arguments that you will be using in the real life.
- Key: Here you need to define a cell whose column you want to use as a base to sort.
- Order: Order in which you want to sort the column (ascending/descending).
- Header: A constant to specify if you have a header or not or you want VBA to guess.
In the following code, I have used the “xlDescending” to sort amount column using descending order.

Range("A1:A13").Sort Key1:=Range("A1"), _
                     Order1:=xlDescending, _
                     Orientation:=xlSortColumns
Using Multiple Columns (Keys) to Sort
You can also use more than one column to sort a range. Let’s take an example of the below table where you have multiple entries with employee names and cities, and you need to sort using the name and city.

Here’s the code that you need to use:

Range("A1:C13").Sort Key1:=Range("A1"), _
                     Order1:=xlAscending, _
                     Key2:=Range("B1"), _
                     Order1:=xlAscending, _
                     Header:=xlYes
As you can see in the code, you have key1 and key2. In the key1, you have the column with the employee name, and in the key2, you have the city column. For both columns, the sorting order is ascending, and headers are there.
Note: You can use it as any column you want to use to take as a sort base using the keys and order.
Changing Sort Orientation
When you normally sort data in Excel, by default, you can sort using columns. But from the sort options, you can change the sort orientation to the left to right instead of top to bottom.

In the same way, you have an argument in the sort method to change the orientation (link).

Range("A1:C13").Sort Key1:=Range("A1"), _
                     Order1:=xlAscending, _
                     Orientation:=xlSortRows
More Tutorials
- Count Rows using VBA in Excel
- Excel VBA Font (Color, Size, Type, and Bold)
- Excel VBA Hide and Unhide a Column or a Row
- Excel VBA Range – Working with Range and Cells in VBA
- Apply Borders on a Cell using VBA in Excel
- Find Last Row, Column, and Cell using VBA in Excel
- Insert a Row using VBA in Excel
- Merge Cells in Excel using a VBA Code
- Select a Range/Cell using VBA in Excel
- SELECT ALL the Cells in a Worksheet using a VBA Code
- ActiveCell in VBA in Excel
- Special Cells Method in VBA in Excel
- UsedRange Property in VBA in Excel
- VBA AutoFit (Rows, Column, or the Entire Worksheet)
- VBA ClearContents (from a Cell, Range, or Entire Worksheet)
- VBA Copy Range to Another Sheet + Workbook
- VBA Enter Value in a Cell (Set, Get and Change)
- VBA Insert Column (Single and Multiple)
- VBA Named Range | (Static + from Selection + Dynamic)
- VBA Range Offset
- VBA Wrap Text (Cell, Range, and Entire Worksheet)
- VBA Check IF a Cell is Empty + Multiple Cells
⇠ Back to What is VBA in Excel
Helpful Links – Developer Tab – Visual Basic Editor – Run a Macro – Personal Macro Workbook – Excel Macro Recorder – VBA Interview Questions – VBA Codes
VBA Sort Columns in Table. We can sort columns in table using the SortFields object of Add method in Excel. Sort single column or multiple columns in table either in ascending or descending order. We can also sort data in columns by icon, date, number, string, cell color, date, etc. Let us see syntax, different examples using VBA. Also find and learn step by step instructions to run VBA example macro code.
Table of Contents:
- Objective
- VBA Syntax for the SortFields object of Add method in Excel
- VBA Sort Single Column in Table in Excel
- Sort Multiple Columns in Table in Excel VBA
- VBA Sort Table by Cell Color in Excel
- VBA Sort Table Range in Ascending order in Excel
- Sort Table Range in Descending order in Excel
- Instructions to Run VBA Macro Code
- Other Useful Resources
VBA Syntax for the SortFields object of Add method
Let us see the syntax for the SortFields object of Add method in Excel. We use this syntax to sort tables in Excel sheet.
SortFields.Add (Key, SortOn, Order, CustomOrder, DataOption)
Where
Key is a required parameter. It contains a range data type. It represents a key value to sort.
All the below parameters or arguments are optional and contains variant data type.
SortOn: It represents field to sort on.
Order: It represents the sort order.
CustomOrder: It represents custom sort order.
DataOption: It represents the data option.
VBA Sort Single Column in Table in Excel
Here is a simple example macro to sort single column in table in Excel using VBA. In this example we define sheet name, table name, and column name which needs to sort. Default it sorts in ascending order. The Sort object is used to apply sort to Table. And the Clear method is used to ensure that the previous sort is cleared.
'VBA Sort Single Column in Table in Excel
Sub VBAF1_Sort_Single_Column_in_Table()
    'Declare Variables
    Dim oSheetName As Worksheet
    Dim sTableName As String
    Dim loTable As ListObject
    Dim rRange As Range

    'Define Variable
    sTableName = "ExTable"

    'Define WorkSheet object
    Set oSheetName = Sheets("Table")

    'Define Table Range
    Set rRange = Range("ExTable[Salary]")

    'Define Table Object
    Set loTable = oSheetName.ListObjects(sTableName)

    'Sort Single Column Table
    With loTable.Sort
        'specify header is available or not
        .Header = xlYes

        'Clear if any existing sort
        .SortFields.Clear

        'Specify Column to sort
        .SortFields.Add Key:=rRange, SortOn:=xlSortOnValues

        'sort specific column in a table
        .Apply
    End With

End Sub
Output: Here is the example output screenshot of above macro procedure.

Sort Multiple Columns in Table in Excel VBA
Let us see another example to sort multiple columns in table in Excel VBA. Here we have to specify multiple column names to sort multiple columns data in table.
'Sort Multiple Columns in Table in Excel VBA
Sub VBAF1_Sort_Multiple_Columns_in_Table()
    'Declare Variables
    Dim oSheetName As Worksheet
    Dim sTableName As String
    Dim loTable As ListObject
    Dim rRange1 As Range
    Dim rRange2 As Range

    'Define Variable
    sTableName = "ExTable"

    'Define WorkSheet object
    Set oSheetName = Sheets("Table")

    'Define Table Range
    Set rRange1 = Range("ExTable[Name]")
    Set rRange2 = Range("ExTable[Salary]")

    'Define Table Object
    Set loTable = oSheetName.ListObjects(sTableName)

    'Sort Single Column Table
    With loTable.Sort
        'specify header is available or not
        .Header = xlYes

        'Clear if any existing sort
        .SortFields.Clear

        'Specify Column to sort
        .SortFields.Add Key:=rRange1, SortOn:=xlSortOnValues
        .SortFields.Add Key:=rRange2, SortOn:=xlSortOnValues

        'sort specified column in a table
        .Apply
    End With

End Sub
Output: Here is the example output screenshot of above VBA Code.

VBA Sort Table by Cell Color in Excel
Let us see another example to sort table by cell color in Excel using VBA. You can define your own cell colors. And change RGB color in the below procedure . In this example we have seen 3 different outputs.
'VBA Sort Table by Cell Color in Excel
Sub VBAF1_Sort_Table_ByCell_Color_in_Table()

    'Declare Variables
    Dim oSheetName As Worksheet
    Dim sTableName As String
    Dim loTable As ListObject
    Dim rRange1 As Range

    'Define Variable
    sTableName = "ExTable"

    'Define WorkSheet object
    Set oSheetName = Sheets("Table")

    'Define Table Range
    Set rRange = Range("ExTable[Salary]")

    'Define Table Object
    Set loTable = oSheetName.ListObjects(sTableName)

    'Sort Single Column Table
    With loTable.Sort
        'specify header is available or not
        .Header = xlYes

        'Clear if any existing sort
        .SortFields.Clear

        'Specify Column to sort
        .SortFields.Add(Key:=rRange, Order:=xlAscending, SortOn:=xlSortOnCellColor).SortOnValue.Color = RGB(255, 255, 0)

        'sort specified column in a table
        .Apply
    End With

End Sub
Output: Here is the example output screenshot of above VBA Code.

Note: Find the following link for more numbers of color index in Excel VBA.
ColorIndex in Excel VBA
VBA Sort Table Range in Ascending order in Excel
Here is one more example to sort table range in ascending order in table in Excel VBA. In this example we are sorting name column in ascending order.
'VBA Sort Table Range in Ascending order in Excel
Sub VBAF1_Sort_Table_Range_in_Ascending_Order_in_Table()

    'Declare Variables
    Dim oSheetName As Worksheet
    Dim sTableName As String
    Dim loTable As ListObject
    Dim rRange1 As Range

    'Define Variable
    sTableName = "ExTable"

    'Define WorkSheet object
    Set oSheetName = Sheets("Table")

    'Define Table Range
    Set rRange = Range("ExTable[Name]")

    'Define Table Object
    Set loTable = oSheetName.ListObjects(sTableName)

    'Sort Single Column Table
    With loTable.Sort
        'specify header is available or not
        .Header = xlYes

        'Clear if any existing sort
        .SortFields.Clear

        'Specify Name Column to sort in ascending order
        .SortFields.Add Key:=rRange, SortOn:=xlSortOnValues, Order:=xlAscending

        'sort specific column in a table
        .Apply
    End With

End Sub
Sort Table Range in Descending order in Excel
Here is one more example to sort table range in descending order in table in Excel VBA. In this example we are sorting salary column in descending order.
'VBA Sort Table Range in Descending order in Excel
Sub VBAF1_Sort_Table_Range_in_Descending_Order_in_Table()

    'Declare Variables
    Dim oSheetName As Worksheet
    Dim sTableName As String
    Dim loTable As ListObject
    Dim rRange1 As Range

    'Define Variable
    sTableName = "ExTable"

    'Define WorkSheet object
    Set oSheetName = Sheets("Table")

    'Define Table Range
    Set rRange = Range("ExTable[Salary]")

    'Define Table Object
    Set loTable = oSheetName.ListObjects(sTableName)

    'Sort Single Column Table
    With loTable.Sort
        'specify header is available or not
        .Header = xlYes

        'Clear if any existing sort
        .SortFields.Clear

        'Specify salary Column to sort in descending order
        .SortFields.Add Key:=rRange, SortOn:=xlSortOnValues, Order:=xlDescending

        'sort specific column in a table
        .Apply
    End With

End Sub
Instructions to Run VBA Macro Code or Procedure:
You can refer the following link for the step by step instructions.
Instructions to run VBA Macro Code
Other Useful Resources:
Click on the following links of the useful resources. These helps to learn and gain more knowledge.
VBA Tutorial VBA Functions List VBA Arrays in Excel VBA Tables and ListObjects
VBA Editor Keyboard Shortcut Keys List VBA Interview Questions & Answers Blog